Running Windows Server 2008 R2 - Installing and Creating the Lab Domain Controller (Part 2) __...
13
(http://www.windowsnetworking.com) Tweet 0 5 11 Home Articles & Tutorials Windows Server 2008 by Thomas Shinder [Published on 10 Nov. 2009 / Last Updated on 10 Nov. 2009 ] How to install and create the Lab Domain Controller on Windows Server 2008 R2. If you would like to be notified when Tom Shinder releases the next part of this article series please sign up to the WindowsNetworking.com Real time article update newsletter (http://www.windowsnetworking.com/pages/newsletter.asp). If you would like to read the first part in this article series please go to Running Windows Server 2008 R2 – Installing and Creating the Lab Domain Controller (Part 1) (http://www.windowsnetworking.com/articles_tutorials/Running-Windows-Server-2008-R2-Installing-Creating-Lab-Domain-Controller-Part1.html). OK, great! We got the domain controller going and the machine has rebooted. The next step is to install the key roles and services we need in order to get a basic enterprise level network going. What we will do here is use the Server Manager to install both the Certificate Services and DHCP server roles. Again, if you are used to the Windows 2003 way of doing things, you will find this to be a bit different. Maybe better? That is up to you to decide. I think there are some advantages to using Server Manager and maybe some disadvantages – but overall I think Microsoft did a good job with the Server Manager interface. To install the DHCP and Certificate Services roles, click the Roles node in the left pane of the console and then click Add Roles in the right pane. Figure 1 Click Next to skip the Before You Begin page. On the Select Server Roles page, put a check in the Active Directory Certificate Services and DHCP Server checkboxes. Click Next. Running Windows Server 2008 R2 - Installing and Creating the Lab Domain Controller (Part 2) 2 Like Introduction Home Articles & Tutorials KBase Tips Products Reviews Free Tools Blogs Forums White Papers Contact Us
-
Upload
jpmontes501 -
Category
Documents
-
view
22 -
download
3
Transcript of Running Windows Server 2008 R2 - Installing and Creating the Lab Domain Controller (Part 2) __...
(http://www.windowsnetworking.com)
Tweet 0 5 11
Home Articles & Tutorials Windows Server 2008
by Thomas Sh inder [Published on 10 Nov. 2009 / Last Updated on 10 Nov. 2009]
How to install and create the Lab Domain Controller on Windows Server 2008 R2.
If you would like to be notified when Tom Shinder releases the next part of this article series please sign up to the WindowsNetworking.com Real time article update newsletter(http://www.windowsnetworking.com/pages/newsletter.asp).
If you would like to read the first part in this article series please go to Running Windows Server 2008 R2 – Installing and Creating the Lab Domain Controller (Part 1)(http://www.windowsnetworking.com/articles_tutorials/Running-Windows-Server-2008-R2-Installing-Creating-Lab-Domain-Controller-Part1.html).
OK, great! We got the domain controller going and the machine has rebooted. The next step is to install the key roles and services we need in order to get a basic enterprise levelnetwork going.
What we will do here is use the Server Manager to install both the Certificate Services and DHCP server roles. Again, if you are used to the Windows 2003 way of doing things, youwill find this to be a bit different. Maybe better? That is up to you to decide. I think there are some advantages to using Server Manager and maybe some disadvantages – but overall Ithink Microsoft did a good job with the Server Manager interface.
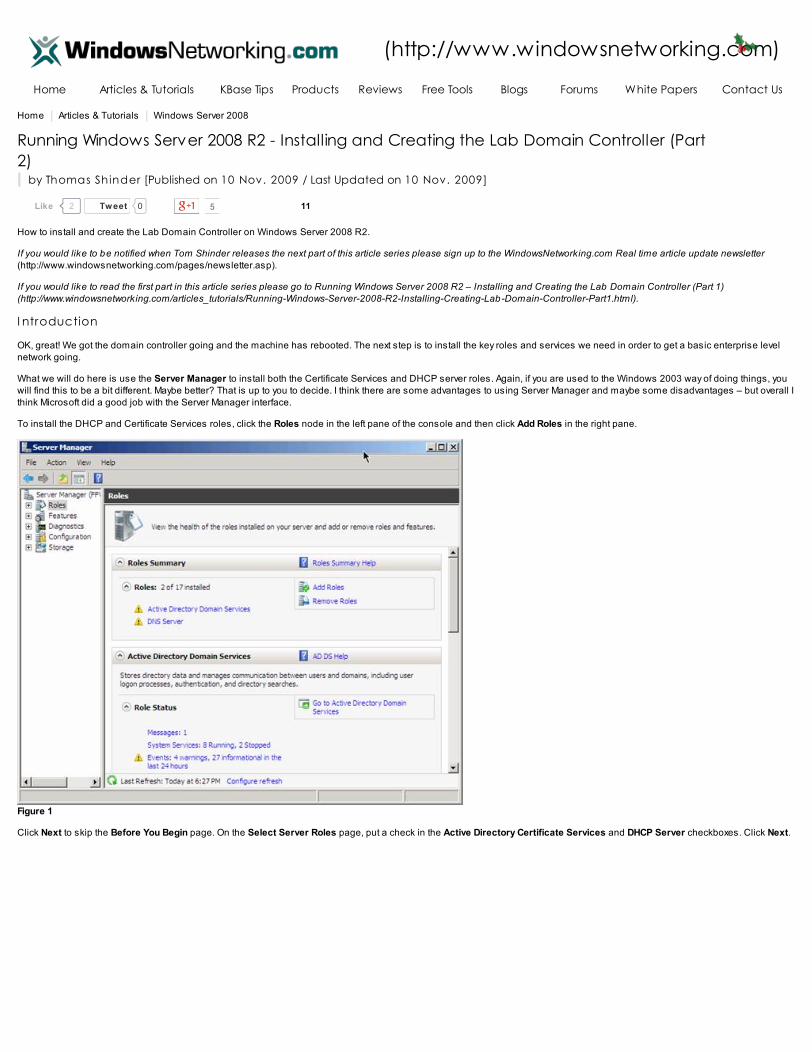
To install the DHCP and Certificate Services roles, click the Roles node in the left pane of the console and then click Add Roles in the right pane.
Figure 1
Click Next to skip the Before You Begin page. On the Select Server Roles page, put a check in the Active Directory Certificate Services and DHCP Server checkboxes. Click Next.
Running Windows Server 2008 R2 - Installing and Creating the Lab Domain Controller (Part
2)
2Like
I ntroduction
Home Articles & Tutorials KBase Tips Products Reviews Free Tools Blogs Forums White Papers Contact Us
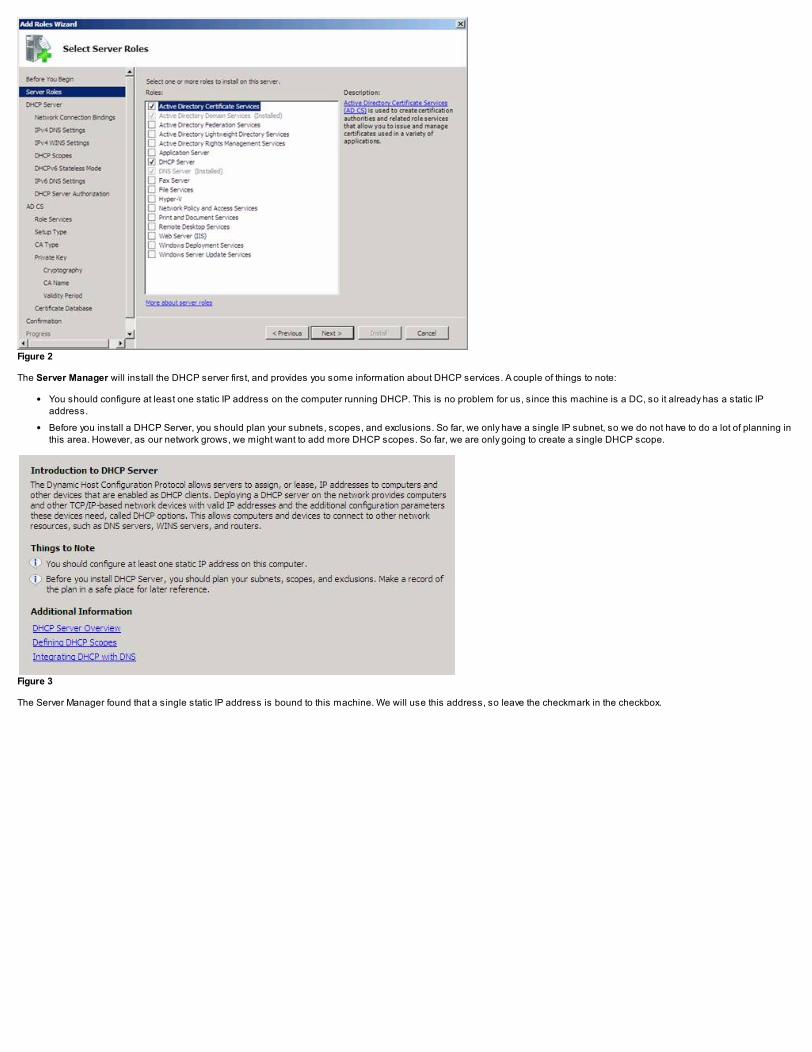
Figure 2
The Server Manager will install the DHCP server first, and provides you some information about DHCP services. A couple of things to note:
You should configure at least one static IP address on the computer running DHCP. This is no problem for us, since this machine is a DC, so it already has a static IPaddress.
Before you install a DHCP Server, you should plan your subnets, scopes, and exclusions. So far, we only have a single IP subnet, so we do not have to do a lot of planning inthis area. However, as our network grows, we might want to add more DHCP scopes. So far, we are only going to create a single DHCP scope.
Figure 3
The Server Manager found that a single static IP address is bound to this machine. We will use this address, so leave the checkmark in the checkbox.
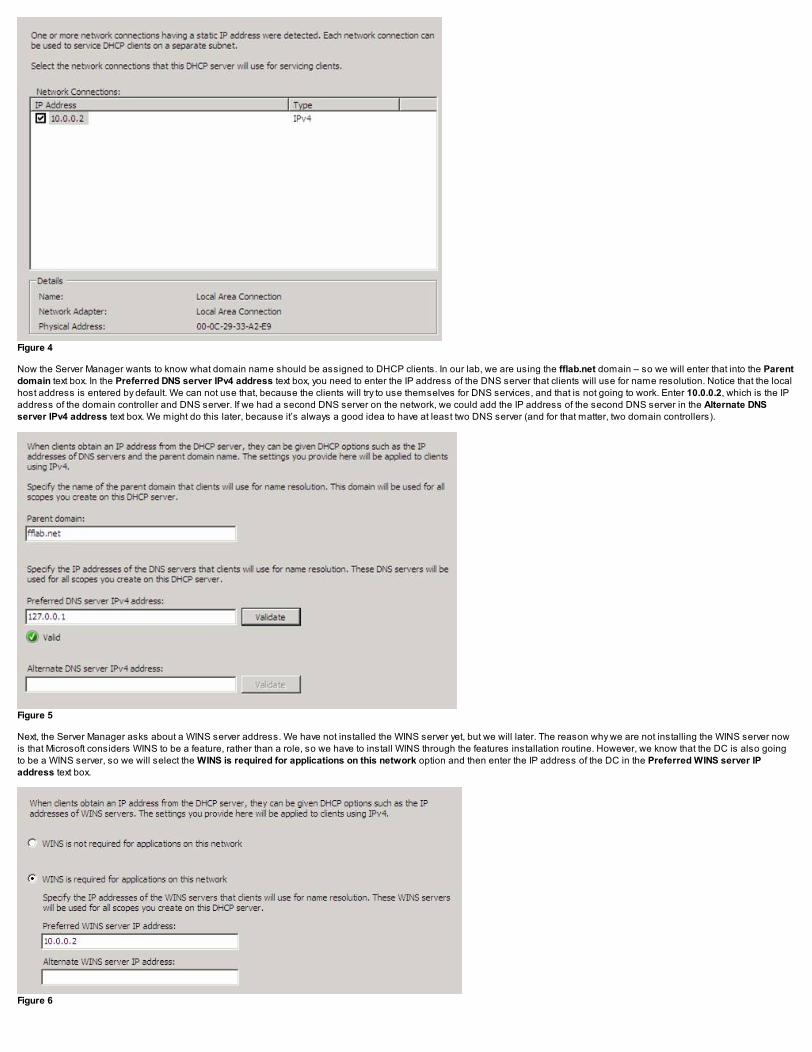
Figure 4
Now the Server Manager wants to know what domain name should be assigned to DHCP clients. In our lab, we are using the fflab.net domain – so we will enter that into the Parentdomain text box. In the Preferred DNS server IPv4 address text box, you need to enter the IP address of the DNS server that clients will use for name resolution. Notice that the localhost address is entered by default. We can not use that, because the clients will try to use themselves for DNS services, and that is not going to work. Enter 10.0.0.2, which is the IPaddress of the domain controller and DNS server. If we had a second DNS server on the network, we could add the IP address of the second DNS server in the Alternate DNSserver IPv4 address text box. We might do this later, because it’s always a good idea to have at least two DNS server (and for that matter, two domain controllers).
Figure 5
Next, the Server Manager asks about a WINS server address. We have not installed the WINS server yet, but we will later. The reason why we are not installing the WINS server nowis that Microsoft considers WINS to be a feature, rather than a role, so we have to install WINS through the features installation routine. However, we know that the DC is also goingto be a WINS server, so we will select the WINS is required for applications on this network option and then enter the IP address of the DC in the Preferred WINS server IPaddress text box.
Figure 6
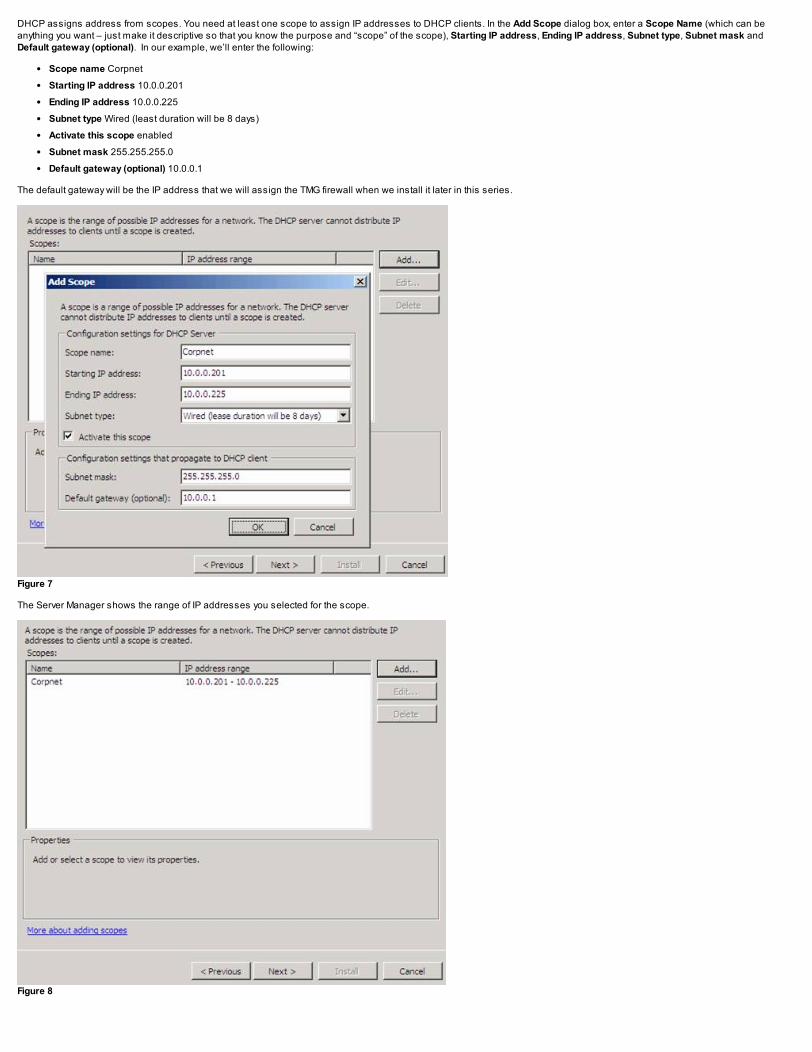
DHCP assigns address from scopes. You need at least one scope to assign IP addresses to DHCP clients. In the Add Scope dialog box, enter a Scope Name (which can beanything you want – just make it descriptive so that you know the purpose and “scope” of the scope), Starting IP address, Ending IP address, Subnet type, Subnet mask andDefault gateway (optional). In our example, we’ll enter the following:
Scope name Corpnet
Starting IP address 10.0.0.201
Ending IP address 10.0.0.225
Subnet type Wired (least duration will be 8 days)
Activate this scope enabled
Subnet mask 255.255.255.0
Default gateway (optional) 10.0.0.1
The default gateway will be the IP address that we will assign the TMG firewall when we install it later in this series.
Figure 7
The Server Manager shows the range of IP addresses you selected for the scope.
Figure 8
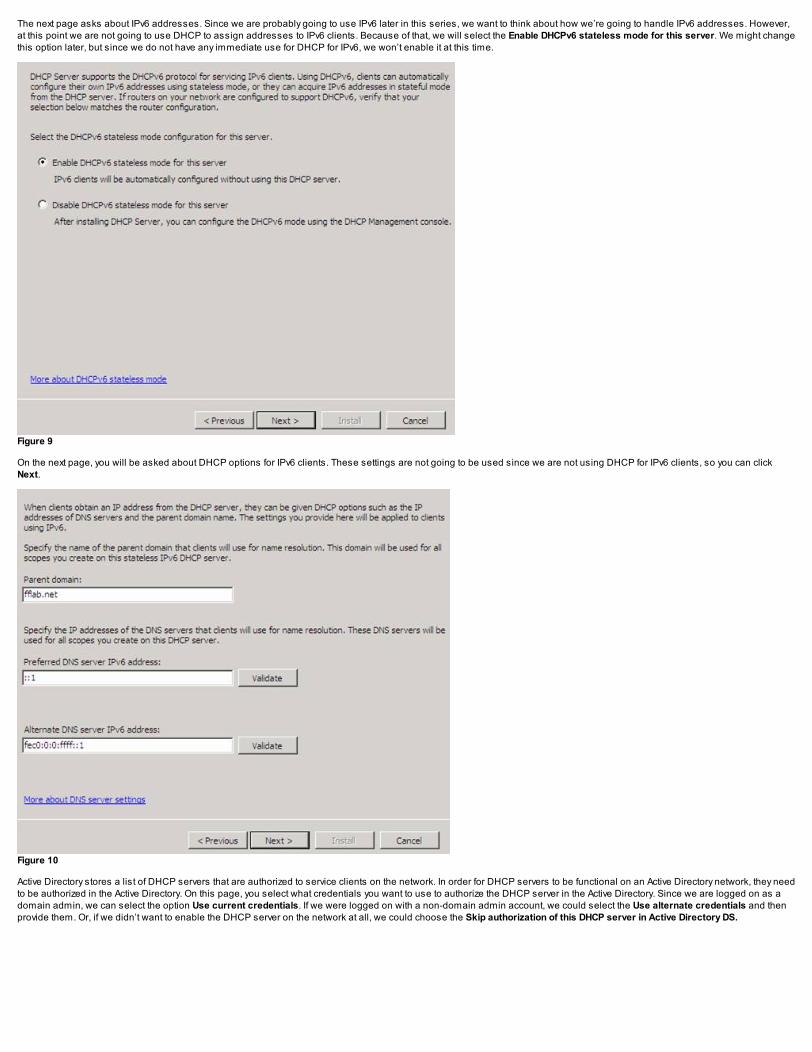
The next page asks about IPv6 addresses. Since we are probably going to use IPv6 later in this series, we want to think about how we’re going to handle IPv6 addresses. However,at this point we are not going to use DHCP to assign addresses to IPv6 clients. Because of that, we will select the Enable DHCPv6 stateless mode for this server. We might changethis option later, but since we do not have any immediate use for DHCP for IPv6, we won’t enable it at this time.
Figure 9
On the next page, you will be asked about DHCP options for IPv6 clients. These settings are not going to be used since we are not using DHCP for IPv6 clients, so you can clickNext.
Figure 10
Active Directory stores a list of DHCP servers that are authorized to service clients on the network. In order for DHCP servers to be functional on an Active Directory network, they needto be authorized in the Active Directory. On this page, you select what credentials you want to use to authorize the DHCP server in the Active Directory. Since we are logged on as adomain admin, we can select the option Use current credentials. If we were logged on with a non-domain admin account, we could select the Use alternate credentials and thenprovide them. Or, if we didn’t want to enable the DHCP server on the network at all, we could choose the Skip authorization of this DHCP server in Active Directory DS.
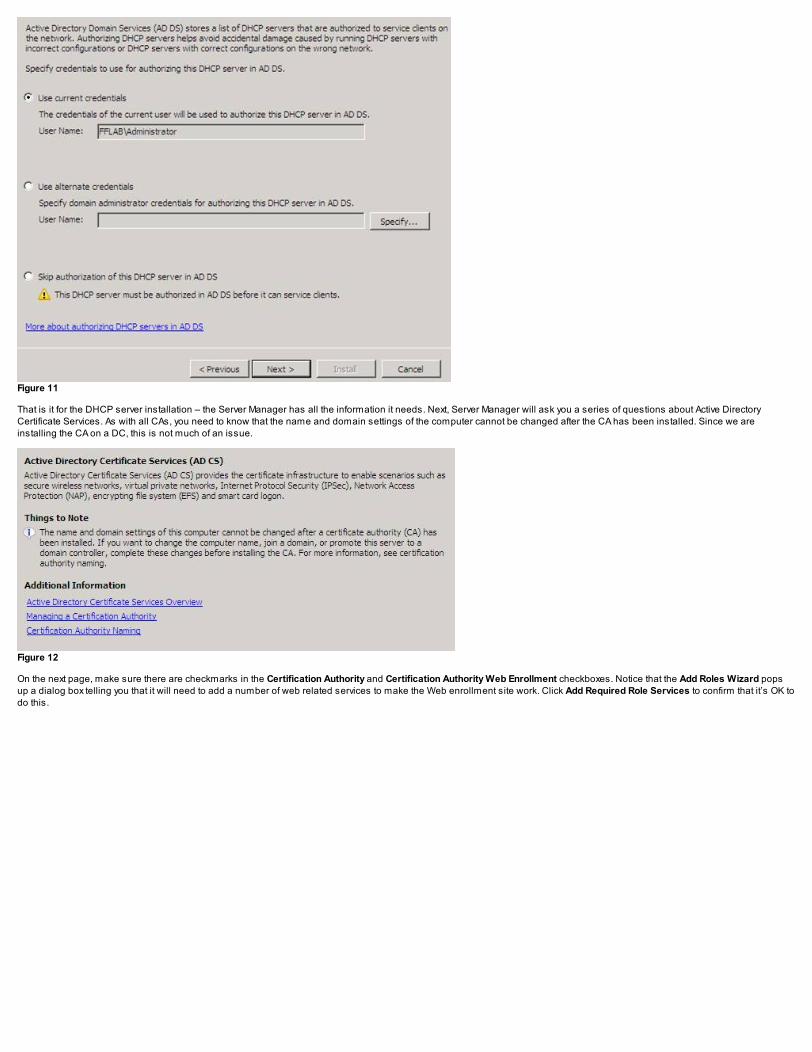
Figure 11
That is it for the DHCP server installation – the Server Manager has all the information it needs. Next, Server Manager will ask you a series of questions about Active DirectoryCertificate Services. As with all CAs, you need to know that the name and domain settings of the computer cannot be changed after the CA has been installed. Since we areinstalling the CA on a DC, this is not much of an issue.
Figure 12
On the next page, make sure there are checkmarks in the Certification Authority and Certification Authority Web Enrollment checkboxes. Notice that the Add Roles Wizard popsup a dialog box telling you that it will need to add a number of web related services to make the Web enrollment site work. Click Add Required Role Services to confirm that it’s OK todo this.

Figure 13
We now need to choose which type of CA to install: Enterprise or Standalone. Since we want to take advantage of autoenrollment for machine certificate and maybe user certificateslater in this series, we will install an Enterprise CA.
Figure 14
In a production environment, your PKI infrastructure will likely have several CAs – a root CA and subordinate CAs that get their CA certificates from the root CA. However, in ournetwork, we are only going to have a single CA, so that CA must be a root CA, which is the CA on the top of the hierarchy. Select the Root CA option.
Figure 15
Now we need to assign a private key to the CA that will be used to generate and issue certificates to clients. There are a couple of ways to do this – create a new private key, or use aexisting private key that has already been assigned to another CA. Since this is a new PKI for a new network, the best option here is to Create a new private key. Select that optionand move to the next page.
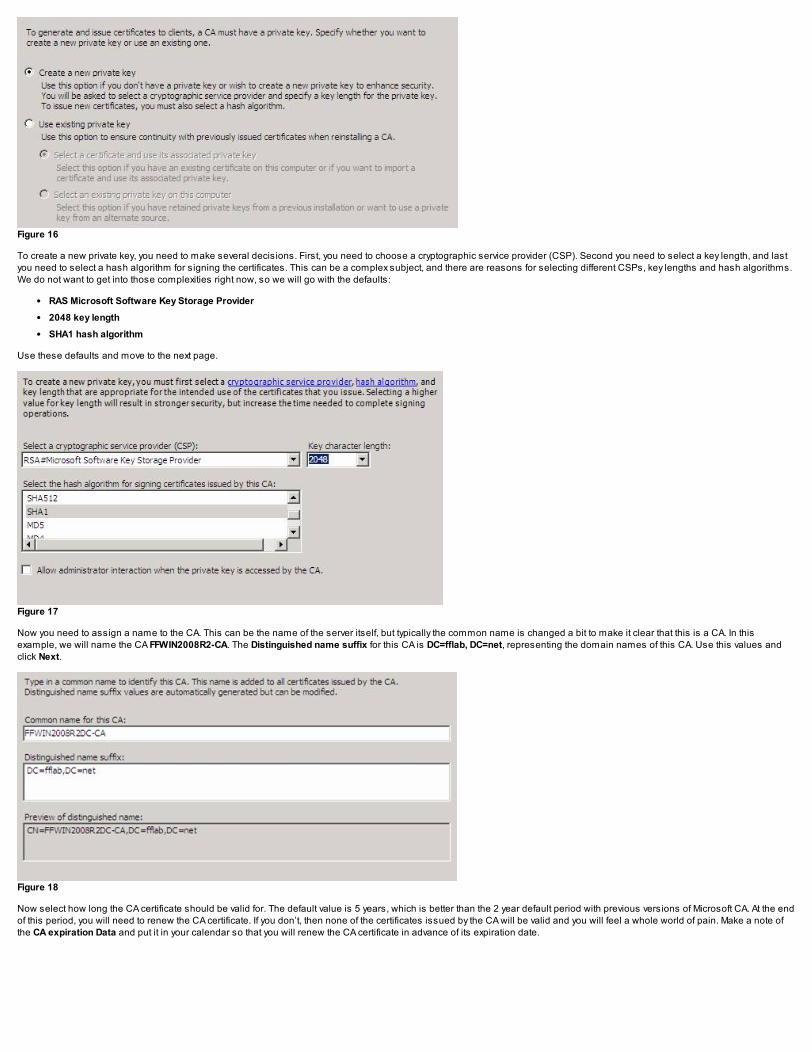
Figure 16
To create a new private key, you need to make several decisions. First, you need to choose a cryptographic service provider (CSP). Second you need to select a key length, and lastyou need to select a hash algorithm for signing the certificates. This can be a complex subject, and there are reasons for selecting different CSPs, key lengths and hash algorithms.We do not want to get into those complexities right now, so we will go with the defaults:
RAS Microsoft Software Key Storage Provider
2048 key length
SHA1 hash algorithm
Use these defaults and move to the next page.
Figure 17
Now you need to assign a name to the CA. This can be the name of the server itself, but typically the common name is changed a bit to make it clear that this is a CA. In thisexample, we will name the CA FFWIN2008R2-CA. The Distinguished name suffix for this CA is DC=fflab, DC=net, representing the domain names of this CA. Use this values andclick Next.
Figure 18
Now select how long the CA certificate should be valid for. The default value is 5 years, which is better than the 2 year default period with previous versions of Microsoft CA. At the endof this period, you will need to renew the CA certificate. If you don’t, then none of the certificates issued by the CA will be valid and you will feel a whole world of pain. Make a note ofthe CA expiration Data and put it in your calendar so that you will renew the CA certificate in advance of its expiration date.
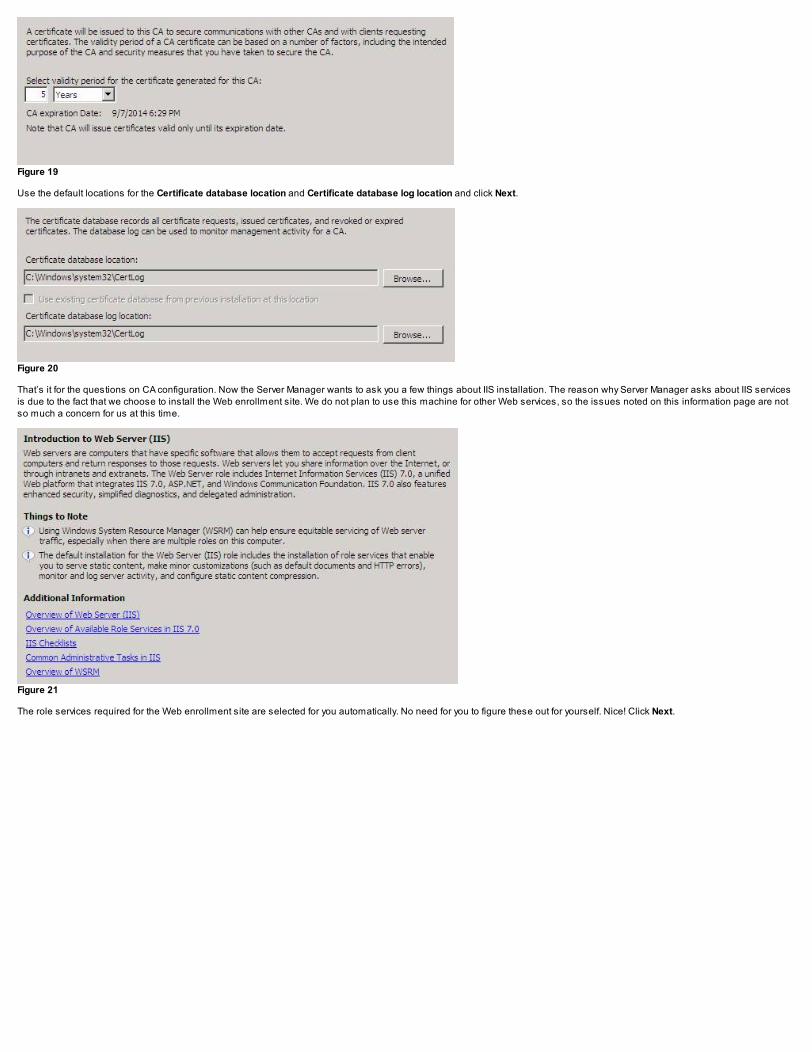
Figure 19
Use the default locations for the Certificate database location and Certificate database log location and click Next.
Figure 20
That’s it for the questions on CA configuration. Now the Server Manager wants to ask you a few things about IIS installation. The reason why Server Manager asks about IIS servicesis due to the fact that we choose to install the Web enrollment site. We do not plan to use this machine for other Web services, so the issues noted on this information page are notso much a concern for us at this time.
Figure 21
The role services required for the Web enrollment site are selected for you automatically. No need for you to figure these out for yourself. Nice! Click Next.
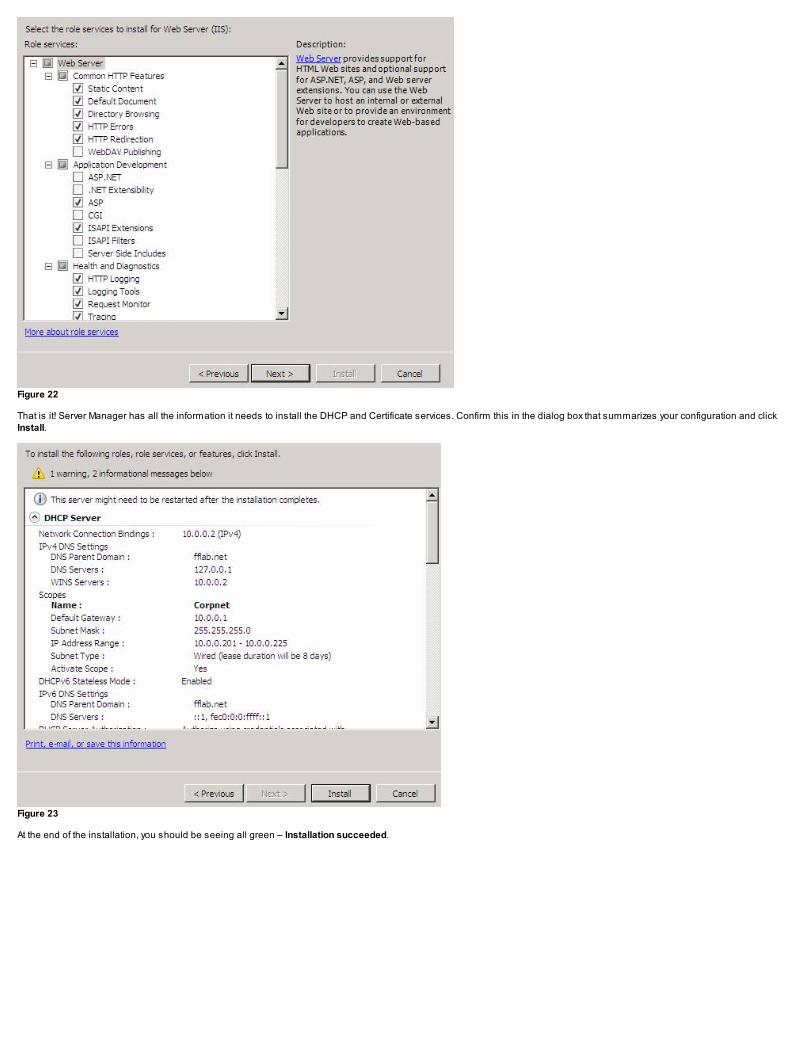
Figure 22
That is it! Server Manager has all the information it needs to install the DHCP and Certificate services. Confirm this in the dialog box that summarizes your configuration and clickInstall.
Figure 23
At the end of the installation, you should be seeing all green – Installation succeeded.
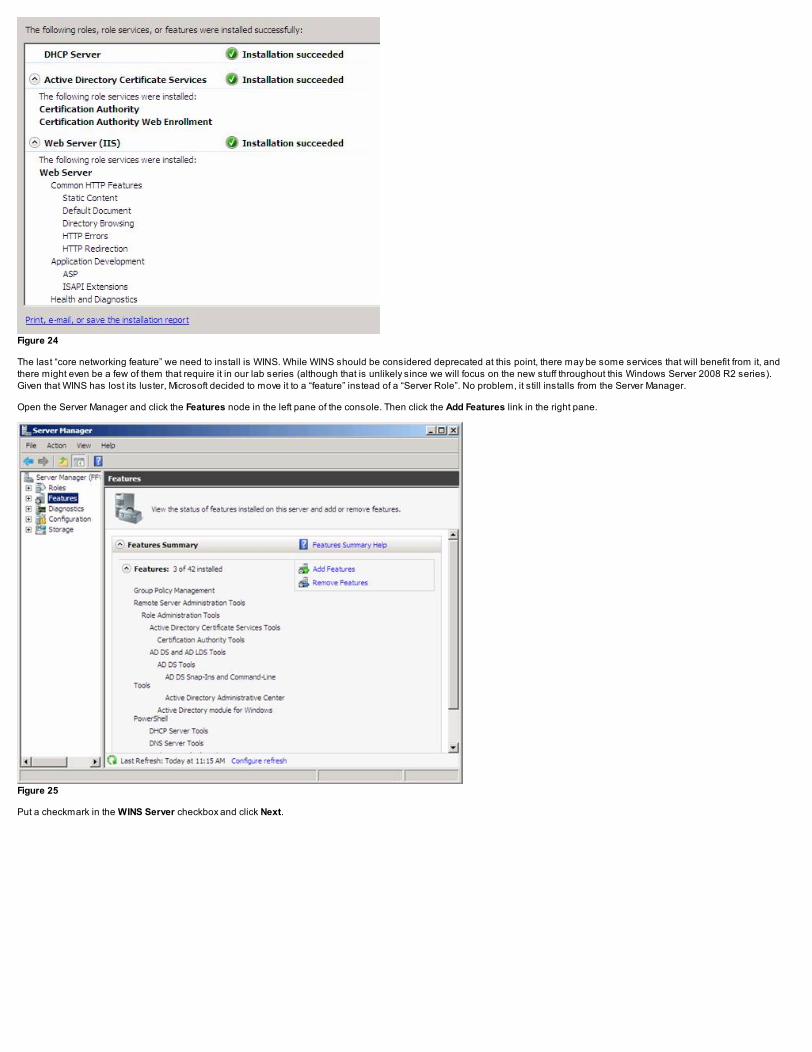
Figure 24
The last “core networking feature” we need to install is WINS. While WINS should be considered deprecated at this point, there may be some services that will benefit from it, andthere might even be a few of them that require it in our lab series (although that is unlikely since we will focus on the new stuff throughout this Windows Server 2008 R2 series).Given that WINS has lost its luster, Microsoft decided to move it to a “feature” instead of a “Server Role”. No problem, it still installs from the Server Manager.
Open the Server Manager and click the Features node in the left pane of the console. Then click the Add Features link in the right pane.
Figure 25
Put a checkmark in the WINS Server checkbox and click Next.

Figure 26
The information box informs you that WINS will be installed. Click Install.
Figure 27
Yay! It worked. The installation of the WINS server was successful.
Figure 28
Alright, our DC is now fully installed and ready to do the work of a DC, WINS, DHCP and certificate server. Now we can move to the next step of our infrastructure – installing thefirewall so that the DC and all the other services that we install on our network can connect to the Internet. What firewall should we install? Of course, the Forefront ThreatManagement Gateway Firewall! Why? Because as we'll see later, the TMG firewall integrates with the Forefront Protection Manager, which will allow us to create proactive firewallpolicy in response to threats detected on our network. It is really cool and I can not wait to show you how that works.

TechGenix Ltd is an online mediacompany which sets the standardfor providing free high qualitytechnical content to ITprofessionals.(http://www.techgenix.com)
Microsoft Exchange Server Resource Site:Articles & Tutorials(http://www.msexchange.org/)
Network Security Articles for WindowsServer 2003, 2008 & Vista(http://www.windowsecurity.com/)
The essential Virtualization resource sitefor administrators.(http://www.virtualizationadmin.com/)
Microsoft ISA Server Firewall ResourceSite: Articles & Tutorials(http://www.isaserver.org/)
CloudComputingAdmin.com | CloudComputing Resource Site for IT Pros(http://www.cloudcomputingadmin.com/)
Networking & Server software / hardwarefor Windows 2003, 2000, NT & Linux(http://www.wservernews.com/)
About Us Advertise With Us Contact Us
WindowsNetworking.com is in no way affiliated with Microsoft Corp. Copyright © 2014, TechGenix Ltd (http://www.techgenix.com/). All rights reserved. Please read our Privacy Policy (/pages/privacy.html) and Terms & Conditions (/pages/terms.html).
After we install the firewall, we will install a SharePoint Server and an Exchange Server. The SharePoint Server will be easy – just a single server. But I am not sure how to approachthe Exchange installation yet. We want to make the discussion useful but not too complex. I am thinking that we will install the Exchange Edge Server role on the TMG firewall, andthen create an Exchange Server that has all the other roles on it – however, it would be nice to create a separate Hub server, so that we can show how to install Forefront Protectionfor Exchange on Edge, Hub and Mailbox server roles. I will think about it and let you know when we get there.
See you next week! –Tom.
If you would like to be notified when Tom Shinder releases the next part of this article series please sign up to the WindowsNetworking.com Real time article update newsletter(http://www.windowsnetworking.com/pages/newsletter.asp).
If you would like to read the first part in this article series please go to Running Windows Server 2008 R2 – Installing and Creating the Lab Domain Controller (Part 1)(http://www.windowsnetworking.com/articles_tutorials/Running-Windows-Server-2008-R2-Installing-Creating-Lab-Domain-Controller-Part1.html).
See Also
Deploying Certificate Services in Windows Server 2012 (Part 2) (http://www.windowsnetworking.com/articles-tutorials/windows-server-2012/deploying-certificate-services-windows-server-2012-part2.html) on 15 Jan. 2013 (2013-01-15 17:05) by Deb Shinder
How to Import a Third-Party Certificate into the NTAuth Store (http://www.windowsnetworking.com/kbase/WindowsTips/Windows2000/AdminTips/Security/HowtoImportaThird-PartyCertificateintotheNTAuthStore.html) on 20 April 2004 (2004-04-20 02:00) by Wayne Maples
Directory Services Store (dsstore) (http://www.windowsnetworking.com/kbase/WindowsTips/Windows2000/AdminTips/Miscellaneous/DirectoryServicesStoredsstore.html)on 20 April 2004 (2004-04-20 02:00) by Wayne Maples
Setting up Wi-Fi Authentication in Windows Server 2008 (Part 1) (http://www.windowsnetworking.com/articles-tutorials/windows-server-2008/Setting-up-Wi-Fi-Authentication-Windows-Server-2008-Part1.html) on 28 Oct. 2010 (2010-10-28 16:36) by Eric Geier
Deploying Certificate Services in Windows Server 2012 (Part 1) (http://www.windowsnetworking.com/articles-tutorials/windows-server-2012/Deploying-Certificate-Services-Windows-Server-2012-Part1.html) on 17 Jan. 2013 (2013-01-17 20:58) by Deb Shinder
Introducing the Vista and Windows Server 2008 Advanced Certificate Request Wizard (http://www.windowsnetworking.com/articles-tutorials/windows-server-2008/Vista-Windows-Server-2008-Advanced-Certificate-Request-Wizard.html) on 22 May 2008 (2008-05-22 09:00) by Thomas Shinder
Request a certificate for an IIS web server (http://www.windowsnetworking.com/kbase/WindowsTips/Windows2000/AdminTips/IIS/RequestacertificateforanIISwebserver.html)on 20 April 2004 (2004-04-20 02:00) by Wayne Maples
Wireless Networking in Windows 2003 (http://www.windowsnetworking.com/articles-tutorials/wireless-networking/Wireless-Networking-Windows-2003.html)on 9 June 2005 (2005-06-09 11:06) by Andrew Z. Tabona
Securing Wireless Network Traffic (Part 6) (http://www.windowsnetworking.com/articles-tutorials/netgeneral/Securing-Wireless-Network-Traffic-Part6.html)on 15 July 2011 (2011-07-15 16:08) by Brien M. Posey
ADC Before or After the User Migration (http://www.windowsnetworking.com/kbase/WindowsTips/Windows2003/AdminTips/Exchange/ADCBeforeorAftertheUserMigration.html)on 28 July 2005 (2005-07-28 07:11) by Santhosh Sivarajan