Grade 4 - Cubism
18
Shape Grade 4 - Cubism
Transcript of Grade 4 - Cubism

Shape
Grade 4 - Cubism

What do you see?

Artistic Focus: Shape
SHAPE is a closed space made when a line connects to itself.
Today’s objective:1. To become familiar and
demonstrate their knowledge of Cubist abstract art.
2. To demonstrate proper care and use of watercolors and scissors.
WA State Visual Arts StandardWhen making works of art, utilize care for materials, tools, and equipment in a manner that prevents danger to oneself and others. (VA: Cr2.2.4)
Three Musicians, 1921, Picasso

Pablo Picasso
• Lived in Spain
• Born 1881 – 1973
• Cubism was a truly revolutionary style of modern art developed by Pablo Picasso and Georges Braque in the early 1900’s. They were bored with the conventional form of painting and wanted to do something fun and new.
• In Cubist artwork, objects are analyzed, broken up and reassembled in an abstracted form.
• A Cubist painting ignores the traditions of perspective drawing and shows you many views of a subject at one time.

Artwork
The Weeping Woman, 1937, Picasso

Artwork
Guitar on Pedestal, 1920, Picasso
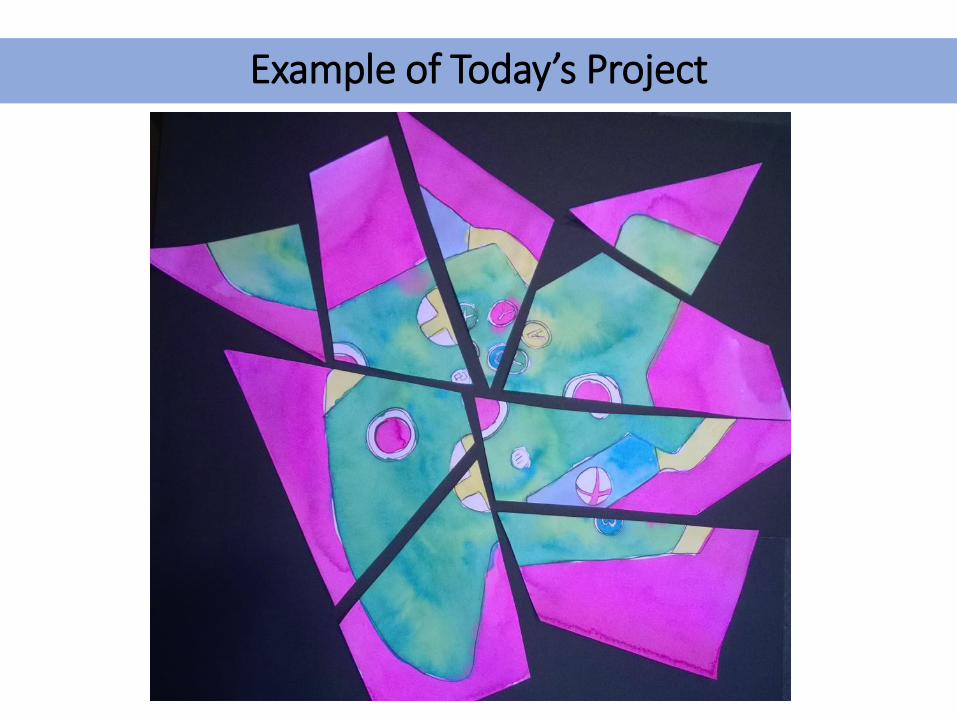
Example of Today’s Project

Materials
Paper towels Watercolor set Watercolor paper
Black Sharpie Pencil
Found objects

Before You Begin
1. Write your name in pencil on the back of the paper.
2. Flip over your paper.
3. Roll up your sleeves!

Day 1: Step 1
Use an object from home… or pick one from around the classroom

Step 2
• Sketch your object lightly with a pencil
• Go over your lines with a black Sharpie

Step 3
• Pick a color you’d like to use
• Drop 5 drops of water into the paint well
• Make about 15 circular motions to mix the paint with the water
• Paint the area you’ve chosen
• Repeat until your picture is complete

Artwork Needs to Dry
• Place your picture on a drying rack.
• This is the end of the first part of the lesson, since the painting will need to dry completely.
• During the second part of the lesson, we will cut up the painting to make a cubist piece of artwork.

Part 2: Materials
Scissors Glue
Large colored tag board
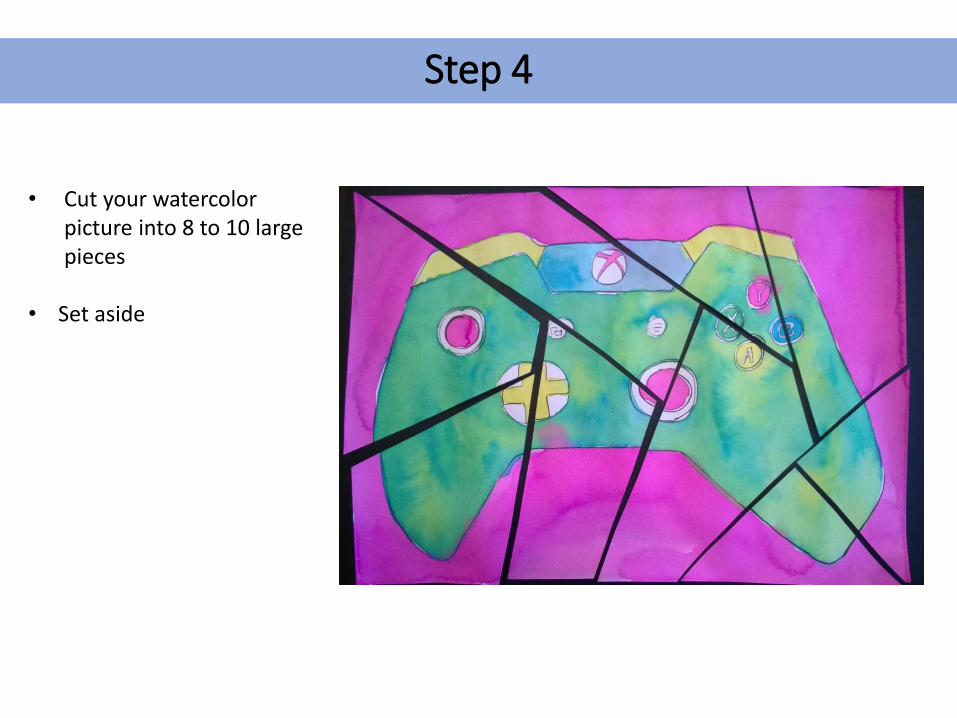
Step 4
• Cut your watercolor picture into 8 to 10 large pieces
• Set aside

Step 5
• Place the larger piece of paper on your desk
• Write your name on the back
• Rearrange the pieces
• Glue the pieces down

Reflection
• What did you think of using watercolors?
• What did you think about the second part of the lesson?
• What was your favorite part of our project today?
• Can anyone guess what his/her object is?
• Would anyone like to share their art?

Credits
1. Information and Photo https://en.wikipedia.org/wiki/Pablo_Picasso
2. Original LWSD sample, used with permission.
The development of this Lake Washington School District art docent lesson was made possible by a grant from the Lake Washington Schools Foundation.