Securing and Sharing a Presentation Lesson 10 © 2014, John Wiley & Sons, Inc.Microsoft Official...
65
Securing and Sharing a Presentation Lesson 10 © 2014, John Wiley & Sons, Inc. Microsoft Official Academic Course, Powerpoint 2013 1 Microsoft Powerpoint 2013
-
Upload
margery-dalton -
Category
Documents
-
view
217 -
download
0
Transcript of Securing and Sharing a Presentation Lesson 10 © 2014, John Wiley & Sons, Inc.Microsoft Official...

Securing and Sharing a Presentation
Lesson 10
© 2014, John Wiley & Sons, Inc.
Microsoft Official Academic Course, Powerpoint 2013
1
Microsoft Powerpoint 2013

Objectives
© 2014, John Wiley & Sons, Inc.
Microsoft Official Academic Course, Powerpoint 2013
2

Step by Step: View Comments• GET READY. Before you begin these steps, make sure that
your computer is on. Log on, if necessary.1. START PowerPoint,
if the program is not already running.
2. Locate and open the HR Review present-ation and save it as HR Review Final Version 1.
3. Note the small balloon icon in the upper-left corner of slide 1 (see the figure above).
© 2014, John Wiley & Sons, Inc.
Microsoft Official Academic Course, Powerpoint 2013
3

Step by Step: View Comments
4. Click the Review tab, click the down arrow below Show Comments, and then click Show Markup. The comment balloon is hidden.
5. Repeat step 4 to redisplay the comment balloon.6. Click the Show Comments button (the button
face, not the arrow below it). The Comments pane appears.
© 2014, John Wiley & Sons, Inc.
Microsoft Official Academic Course, Powerpoint 2013
4

Step by Step: View Comments
7. Read the comment in the Comments pane (see the figure at right).
8. On the Review tab, in the Comments group, click Next. The next comment appears, which is on slide 9. In this comment, Karen Jones suggests adjusting the diagram.
© 2014, John Wiley & Sons, Inc.
Microsoft Official Academic Course, Powerpoint 2013
5

Step by Step: View Comments
9. Click the SmartArt graphic, click the SmartArt Tools Design tab, click the More button in the SmartArt Styles group, and then click Metallic Scene. Click Change Colors, and click Gradient Loop –Accent 6. The diagram now has the “pop” Ms. Jones suggested (see the figure at right).
© 2014, John Wiley & Sons, Inc.
Microsoft Official Academic Course, Powerpoint 2013
6

Step by Step: View Comments
10. Reselect the comment in the Comments pane, and then click the Next button at the top of the Comments pane to go to the next comment.
11. Click the Previous button twice to return to the first comment on slide 1.
12. Close the Comments pane. To do so, either click the Close button on the Comments pane or click the Show Comments button on the Review tab.
13. SAVE the presentation.• PAUSE. LEAVE the presentation open to use in the
next exercise.
© 2014, John Wiley & Sons, Inc.
Microsoft Official Academic Course, Powerpoint 2013
7

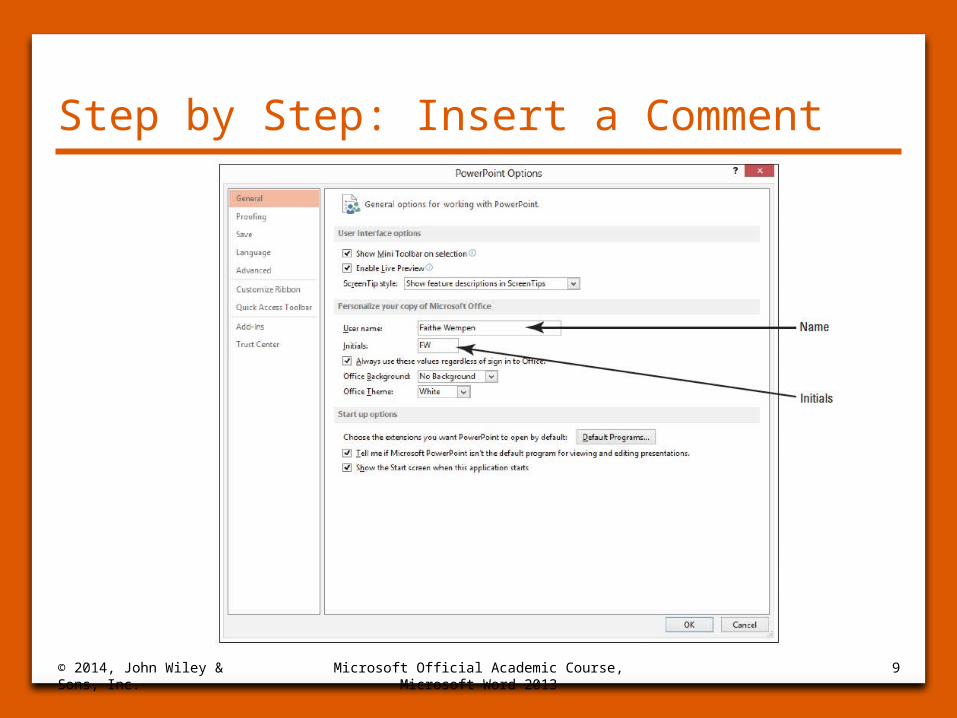
Step by Step: Insert a Comment• USE the HR Review Final Version 1 presentation
that is still open from the previous exercise. You are now ready to add your own comments to the presentation, which you are going to send to the Vice President for Operations.1. Click the File tab, and click Options. The
PowerPoint Options dialog box opens.2. Enter your own name and initials in the User
Name and Initials boxes (see the figure on the next slide). Then click OK to accept them.
© 2014, John Wiley & Sons, Inc.
Microsoft Official Academic Course, Powerpoint 2013
8
Step by Step: Insert a Comment
© 2014, John Wiley & Sons, Inc.
Microsoft Official Academic Course, Microsoft Word 2013
9

Step by Step: Insert a Comment
3. With slide 1 displayed, click the New Comment button on the Review tab. The Comments task pane appears and a new comment text box opens there (see the figure below).
© 2014, John Wiley & Sons, Inc.
Microsoft Official Academic Course, Powerpoint 2013
10

Step by Step: Insert a Comment
4. Key the following text in the comment box:Peter, I have already received feedback from Karen Jones. Please suggest any further changes you think necessary to make this a dynamite presentation.5. Click outside the comment box. Your comment
marker displays in the upper left corner of the slide, slightly overlapping the other comment marker.
6. Go to slide 10, and select the text 6 weeks in the third bullet.
© 2014, John Wiley & Sons, Inc.
Microsoft Official Academic Course, Powerpoint 2013
11

Step by Step: Insert a Comment
7. Click the New button on the Comments task pane.
8. Key the following text in the comment box:Peter, please see Karen’s comment on this slide. I don’t have access to the Design department schedule. Can you confirm the lag time is now only 4 to 5 weeks?9. Click outside the comment box to see the
entire comment.
© 2014, John Wiley & Sons, Inc.
Microsoft Official Academic Course, Powerpoint 2013
12

Step by Step: Insert a Comment
10. Drag the comment balloon to move it so it slightly overlaps the other comment balloon on this slide. Moving a comment marker allows you to associate the comment with a specific area of the slide, such as a picture or a bullet item, or to place it in a general location.
11. Close the Comments pane.12. SAVE the presentation.
• PAUSE. LEAVE the presentation open to use in the next exercise.
© 2014, John Wiley & Sons, Inc.
Microsoft Official Academic Course, Powerpoint 2013
13

Step by Step: Edit a Comment• USE the HR Review Final Version 1 presentation
that is still open from the previous exercise.1. Go to slide 1 and click one of the comment
balloons. The Comments pane reopens.2. Click in the comment you typed in the previous
exercise, select the text to make this a dynamite presentation at the end of the second sentence, and then press Delete. You have removed text from the comment. The figure on the next slide shows the edited comment.
© 2014, John Wiley & Sons, Inc.
Microsoft Official Academic Course, Powerpoint 2013
14

Step by Step: Edit a Comment
3. SAVE the presentation.
• PAUSE. LEAVE the presentation open to use in the next exercise.
© 2014, John Wiley & Sons, Inc.
Microsoft Official Academic Course, Powerpoint 2013
15

Step by Step: Delete a Comment• USE the HR Review Final Version 1 presentation
that is still open from the previous exercise. 1. With slide 1 displayed, click Karen Jones’s first
comment in the Comments pane, then click the Delete icon in the upper right corner of the comment. The comment is removed from the slide, leaving only your first comment.
2. Go to slide 9 and click the comment in the task pane.
© 2014, John Wiley & Sons, Inc.
Microsoft Official Academic Course, Powerpoint 2013
16

Step by Step: Delete a Comment
3. Click the Delete button on the Review tab. The comment is removed from the slide.
4. Close the Comments pane.5. SAVE the presentation.
• PAUSE. LEAVE the presentation open to use in the next exercise.
© 2014, John Wiley & Sons, Inc.
Microsoft Official Academic Course, Powerpoint 2013
17

Step by Step: Compare and Combine Presentations• USE the HR Review Final Version 1 presentation
that is still open from the previous exercise. Save the file as a new file named HR Review Final Version 2.1. On the Review tab, click Compare. The Choose
File to Merge with Current Presentation dialog box opens.
2. Navigate to the folder containing the data files for this lesson and select HR Summary (see the figure on the next slide).
3. Click Open. The presentation opens, and the Comments and the Revisions task panes open.
© 2014, John Wiley & Sons, Inc.
Microsoft Official Academic Course, Powerpoint 2013
18

Step by Step: Compare and Combine Presentations
© 2014, John Wiley & Sons, Inc.
Microsoft Official Academic Course, Microsoft Word 2013
19

Step by Step: Compare and Combine Presentations
4. Go to slide 3 and click the revision icon on the slide. A balloon appears showing the changes to that slide (see the figure at right).
© 2014, John Wiley & Sons, Inc.
Microsoft Official Academic Course, Powerpoint 2013
20

Step by Step: Compare and Combine Presentations
5. On the Review tab, click the Accept button. The changes on slide 3 are accepted. The revision icon changes to show a check mark.
6. Click the Next button in the Compare group. The next revision appears. It is a change from 12% to 10% on slide 6.
7. Click the Accept button, and then click Next. The next revision appears. The changes made to the SmartArt appear.
8. Click the Accept button, and then click Next. The next revision appears. It is a deletion of a bullet point. Click Accept, and then click Reject to change your mind.
© 2014, John Wiley & Sons, Inc.
Microsoft Official Academic Course, Powerpoint 2013
21

Step by Step: Compare and Combine Presentations
9. Click Next. A message appears that you have reached the end of the changes. Click Cancel.
10. On the Review tab, click End Review. A confirmation box appears; click Yes.
11. Browse through the presentation to confirm that the changes were made. The revisions you accepted were finalized, and the revision you rejected was discarded. The comments are still there; they were not affected by the review.
12. On the Review tab, click the down arrow under the Delete button and click Delete All Comments and Ink in This Presentation.
© 2014, John Wiley & Sons, Inc.
Microsoft Official Academic Course, Powerpoint 2013
22

Step by Step: Compare and Combine Presentations
13. Click Yes to confirm. All remaining comments are removed.
14. Close the Comments pane.15. SAVE the presentation.
• PAUSE. LEAVE the presentation open to use in the next exercise.
© 2014, John Wiley & Sons, Inc.
Microsoft Official Academic Course, Powerpoint 2013
23

Step by Step: Set a Password• USE the HR Review Final Version 2 presentation
that is still open from the previous exercise. Save the presentation as a new file named HR Review Final Version 3.1. Click the File tab, and click Protect
Presentation. A menu appears.2. Click Encrypt with Password. The Encrypt
Document dialog box opens.
© 2014, John Wiley & Sons, Inc.
Microsoft Official Academic Course, Powerpoint 2013
24

Step by Step: Set a Password
3. In the Password box, type ProtectMe. Black circles appearin place of the actual characters you type (see the figure at right).
© 2014, John Wiley & Sons, Inc.
Microsoft Official Academic Course, Microsoft Word 2013
25

Step by Step: Set a Password
4. Click OK. Another dialog box appears asking you to confirm the password; type ProtectMe again and click OK again.
5. Click the File tab if needed to reopen Backstage view, and click Close. When prompted to save your changes, click Save.
6. Click the File tab, click Open, and on the Recent Presentations list, click the HR Review Final Version 3.pptx document. A Password dialog box opens.
© 2014, John Wiley & Sons, Inc.
Microsoft Official Academic Course, Powerpoint 2013
26

Step by Step: Set a Password
7. In the Password box, type ProtectMe and click OK (see the figure below).
8. SAVE the presentation.• PAUSE. LEAVE the presentation open to use in the
next exercise.
© 2014, John Wiley & Sons, Inc.
Microsoft Official Academic Course, Powerpoint 2013
27

Step by Step: Change or Remove a Password• USE the HR Review Final Version 3 presentation that is
still open from the previous exercise.1. Click the File tab, and click Protect Presentation. A
menu appears.2. Click Encrypt with Password. The Encrypt Document
dialog box opens. The password previously assigned is already filled in.
3. Double-click the current password and press the Delete key on the keyboard to clear it.
4. Click OK. The password has been removed.5. Close the presentation and reopen it to confirm that
no password prompt appears.• PAUSE. LEAVE the presentation open to use in the next
exercise.© 2014, John Wiley & Sons, Inc.
Microsoft Official Academic Course, Powerpoint 2013
28

Step by Step: Mark a Presentation as Final• USE the HR Review Final Version 3 presentation
that is still open from the previous exercise.1. Click the File tab, click Protect Presentation,
and click Mark as Final. A confirmation box appears that it will be marked as final and then saved.
2. Click OK to continue. A confirmation box appears that it has been marked as final.
© 2014, John Wiley & Sons, Inc.
Microsoft Official Academic Course, Powerpoint 2013
29

Step by Step: Mark a Presentation as Final
3. Click OK to close the confirmation box. Notice that the Ribbon is hidden; an information bar appears with a message that the file is Marked as Final (see the figure below).
4. Click Edit Anyway. The editing commands on the Ribbon are displayed again.
© 2014, John Wiley & Sons, Inc.
Microsoft Official Academic Course, Powerpoint 2013
30

Step by Step: Mark a Presentation as Final
6. SAVE the presentation.• PAUSE. LEAVE the presentation open to use in the
next exercise.
© 2014, John Wiley & Sons, Inc.
Microsoft Official Academic Course, Powerpoint 2013
31

Step by Step: Check for Compatibility Issues and Optimize Media Compatibility• USE the HR Review Final Version 3 presentation
that is still open from the previous exercise. Save the file as a new file named HR Review Final Version 4.1. Go to slide 13 and click the Insert Video icon in
the placeholder on the left. 2. In the Insert Video dialog box, in the Bing Video
Search text box, key human resources and press Enter. Click any of the found video clips and click Insert to insert it.
3. Click the File tab. Notice that an Optimize Compatibility button appears, but is unavailable. That is because there is nothing that can be done to improve the compatibility of a linked video. Note the warning that 1 media file requires a network connection.
© 2014, John Wiley & Sons, Inc.
Microsoft Official Academic Course, Powerpoint 2013
32

Step by Step: Check for Compatibility Issues and Optimize Media Compatibility
4. Click Check for Issues. A menu appears.
5. Click Check Compatibility. The Microsoft PowerPoint Compatibility Checker window opens. It has found one potential issue (see the figure above).
© 2014, John Wiley & Sons, Inc.
Microsoft Official Academic Course, Powerpoint 2013
33

Step by Step: Check for Compatibility Issues and Optimize Media Compatibility
6. Click OK. The dialog box closes.7. Click the video on slide 13 and press the Delete
key to remove it.8. Save the presentation file. Leave it open to use
in the next exercise.9. Open the file Agility Media from the data files
provided for this lesson, and save it as Agility Media Final.
10. Click the File tab. Notice that the Optimize Compatibility button appears, and is available. That is because this presentation contains an actual embedded video clip, not just a link to an online clip.
© 2014, John Wiley & Sons, Inc.
Microsoft Official Academic Course, Powerpoint 2013
34

Step by Step: Check for Compatibility Issues and Optimize Media Compatibility
11. Click Optimize Compatibility. The Optimize Media Compatibility dialog box opens and immediately begins processing the video clip in the presentation to improve its compatibility. The figure at right shows this in progress.
12. When the optimization is complete, click Close.
© 2014, John Wiley & Sons, Inc.
Microsoft Official Academic Course, Powerpoint 2013
35

Step by Step: Check for Compatibility Issues and Optimize Media Compatibility
13. Click the File tab, click Check for Issues, and click Check Compatibility. The Microsoft PowerPoint Compatibility Checker window opens.
14. Note the compatibility issue that the checker found: that the media clips will be saved as pictures.
15. Click OK to close the dialog box.16. Save and close the Agility Final presentation.
Leave the HR Review Final Version 4 file open.• PAUSE. LEAVE PowerPoint open to use in the next
exercise.
© 2014, John Wiley & Sons, Inc.
Microsoft Official Academic Course, Powerpoint 2013
36

Step by Step: Check for Accessibility Issues• USE the HR Review Final Version 4 presentation that is
still open from the previous exercise. 1. Click the File
tab, click Check for Issues, andclick Check Accessibility. The AccessibilityChecker pane opens (see thefigure at right).
© 2014, John Wiley & Sons, Inc.
Microsoft Official Academic Course, Powerpoint 2013
37

Step by Step: Check for Accessibility Issues
2. In the Accessibility Checker task pane, click Picture 2 (Slide 4). Slide 4 appears and the picture is selected.
3. Do the following to add alt text to the picture:a. Right-click the picture and choose Format Picture.b. Click the Size & Properties icon at the top of the Format Picture task pane.c. If needed, click Alt Text to expand that heading’s options.d. In the Title box, key Smiling businessman.4. Repeat steps 2-3 for Picture 2 on slide 7. (You can skip
steps 3a through 3c because the Format Shape task pane is already open.) For its alt text, type Balance scale.
5. Repeat steps 2-3 for Picture 3 on slide 12. (You can skip steps 3a through 3c because the Format Shape task pane is already open.) For its alt text, type Woman writing.
© 2014, John Wiley & Sons, Inc.
Microsoft Official Academic Course, Powerpoint 2013
38

Step by Step: Check for Accessibility Issues
6. Do the following to add alt text to the SmartArt graphic on slide 9. In the Accessibility Checker task pane, click Content Placeholder 5 (Slide 9) to jump to slide 9.
e. In the Format Shape task pane, in the Alt Text section’s Title box, key SmartArt graphic of key positions to fill. f. On the SmartArt Tools Design tab, click Text Pane to display the text pane for the SmartArt.g. Select all the text in the text pane (Ctrl+A) and press Ctrl+C to copy it.h. Close the SmartArt text pane.i. Reselect the outer frame of the SmartArt graphic, and in the Format Shape task pane, click in the Description box under the Alt Text heading and press Ctrl+V to paste the copied text.
© 2014, John Wiley & Sons, Inc.
Microsoft Official Academic Course, Powerpoint 2013
39

Step by Step: Check for Accessibility Issues
7. Close the Format Shape task pane.8. In the Accessibility Checker task pane, click Slide
12 under the Check Reading Order heading.9. Follow the instructions in the Additional
Information section of the task pane to check the reading order. Note that the slide’s content is set to appear before its title.
10. On the Home tab, click the Select button, and on the menu that appears, click Selection Pane.
© 2014, John Wiley & Sons, Inc.
Microsoft Official Academic Course, Powerpoint 2013
40

Step by Step: Check for Accessibility Issues
11. In the Selection pane, click Title 8, and then click the Bring Forward button (the up arrow button) twice so that Title 8 appears at the top of the list of objects (see the figure at right).
12. Close the Selection task pane, and close the Accessibility Checker task pane.
13. Save the presentation.• PAUSE. LEAVE the
presentation open to use in the next exercise.
© 2014, John Wiley & Sons, Inc.
Microsoft Official Academic Course, Powerpoint 2013
41

Step by Step: Modify Properties and Remove Metadata• USE the HR Review Final Version 4 presentation
that is still open from the previous exercise. 1. Click the File tab, click the Properties heading
on the right, and click Show Document Panel. The Document Properties panel appears below the ribbon (see the figure below).
© 2014, John Wiley & Sons, Inc.
Microsoft Official Academic Course, Powerpoint 2013
42
Step by Step: Modify Properties and Remove Metadata
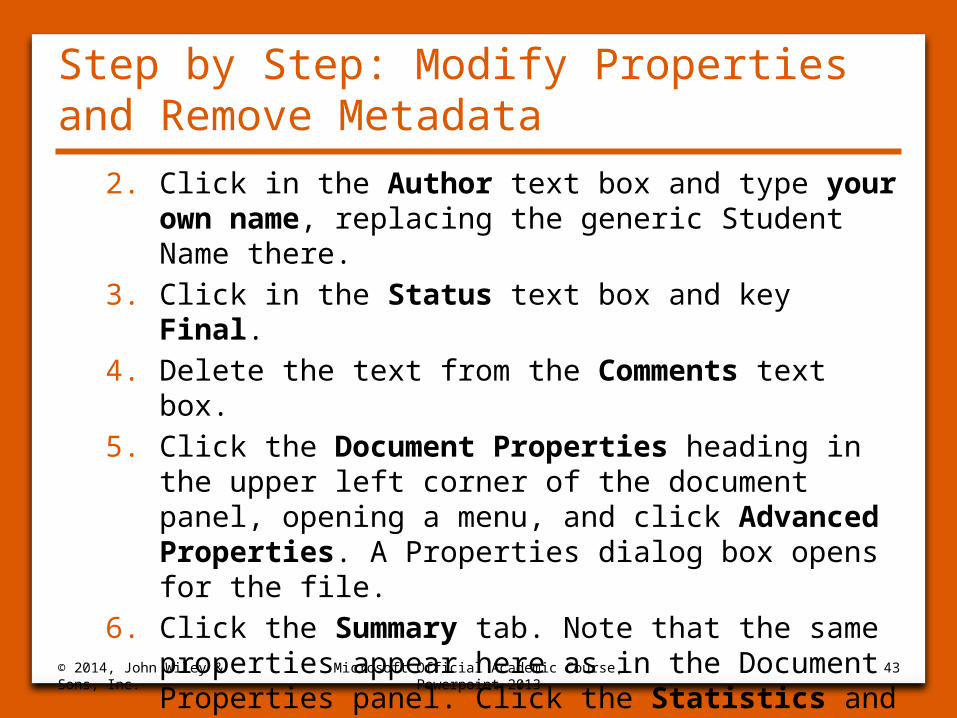
2. Click in the Author text box and type your own name, replacing the generic Student Name there.
3. Click in the Status text box and key Final.4. Delete the text from the Comments text box.5. Click the Document Properties heading in the
upper left corner of the document panel, opening a menu, and click Advanced Properties. A Properties dialog box opens for the file.
6. Click the Summary tab. Note that the same properties appear here as in the Document Properties panel. Click the Statistics and Contents tabs and note the information that appears on each of those tabs.
© 2014, John Wiley & Sons, Inc.
Microsoft Official Academic Course, Powerpoint 2013
43

Step by Step: Modify Properties and Remove Metadata
7. Click the Custom tab.8. In the list of properties
at the top, click Language. Then in the Value text box, type English, and click Add (see the figure at right).
© 2014, John Wiley & Sons, Inc.
Microsoft Official Academic Course, Powerpoint 2013
44

Step by Step: Modify Properties and Remove Metadata
9. Click OK to close the dialog box.
10. Click the File tab, click Check for Issues, and click Inspect Document. At the confirmation box, click Yes to save your changes. The Document Inspector dialog box opens.
11. Click Inspect. A report appears showing what the inspection found (see the figure at right).
© 2014, John Wiley & Sons, Inc.
Microsoft Official Academic Course, Powerpoint 2013
45

Step by Step: Modify Properties and Remove Metadata
12. Click the Remove All button next to Document Properties and Personal Information.
13. Click Close.
14. Examine the Document Properties panel. Note that most of the information has been removed from its text boxes.
15. Click the Close (X) button in the upper right corner of the Document Properties panel to close it.
16. Save the presentation.• PAUSE. LEAVE the presentation open to use in the
next exercise.
© 2014, John Wiley & Sons, Inc.
Microsoft Official Academic Course, Powerpoint 2013
46

Step by Step: Save in XML Format• USE the HR Review Final Version 4 presentation
that is still open from the previous exercise. 1. Click the File tab, and click Save As. 2. Click Browse and navigate to the location where
you are saving files for this lesson.3. Open the Save as type drop-down list and
click Strict Open XML Presentation. 4. In the File name box, type HR Review Open
XML.
5. Click Save.
6. Close the file. • PAUSE. LEAVE PowerPoint open to use in the next
exercise.© 2014, John Wiley & Sons, Inc.
Microsoft Official Academic Course, Powerpoint 2013
47

Step by Step: Save As a Picture Presentation
OPEN the HR Review Final Version presentation that you created earlier in the lesson. 1. Click the File tab, click Export, and click Change
File Type. 2. In the Change File Type list, type PowerPoint
Picture Presentation.
3. Scroll down to the bottom of the list and click the Save As button. The Save As dialog box opens.
4. In the File Name box, type HR Review Pictures, and then click Save. A message appears that a copy has been saved.
5. Click OK. Notice that the original file is still open; your newly saved version is not.
6. Open HR Review Pictures.pptx.© 2014, John Wiley & Sons, Inc.
Microsoft Official Academic Course, Powerpoint 2013
48

Step by Step: Save As a Picture Presentation
7. Click the background of slide 1. Notice that the entire slide appears with selection handles around it.
8. Drag one of the corner selection handles inward, decreasing the size of the image. Notice that all the slide’s con-tent is a graphic placed on a blank slide (see the figure at right).
© 2014, John Wiley & Sons, Inc.
Microsoft Official Academic Course, Powerpoint 2013
49

Step by Step: Save As a Picture Presentation
9. CLOSE HR Review Pictures.pptx without saving the changes to it.
• PAUSE. LEAVE HR Review Final Version 4.pptx open to use in the next exercise.
© 2014, John Wiley & Sons, Inc.
Microsoft Official Academic Course, Powerpoint 2013
50

Step by Step: Save a Presentation as an XPS File• USE the HR Review Final Version 4 presentation
that is still open from the previous exercise.1. Click the File tab, click Export, and click the
Create PDF/XPS on the right side. The Publish as PDF or XPS dialog box opens.
2. Navigate to the folder where you store files for this lesson.
3. In the File name box, type HRXPS.
© 2014, John Wiley & Sons, Inc.
Microsoft Official Academic Course, Powerpoint 2013
51

Step by Step: Save a Presentation as an XPS File
4. Open the Save as type drop-down list and click XPS Document (see the figure at right).
5. If the Open file after publishing check box is marked, click to clear it.
© 2014, John Wiley & Sons, Inc.
Microsoft Official Academic Course, Powerpoint 2013
52

Step by Step: Save a Presentation as an XPS File
6. Click Options. The Options dialog box opens (see the figure at right).
7. Mark the Frame slides check box to add an outline frame around each picture.
© 2014, John Wiley & Sons, Inc.
Microsoft Official Academic Course, Powerpoint 2013
53

Step by Step: Save a Presentation as an XPS File
8. Clear the Document properties check box so that the XPS file does not include the document properties.
9. Click OK. You return to the Publish as PDF or XPS dialog box.
10. Click Publish.
11. In Windows, navigate to the location containing the XPS file you just saved and double-click it to open it in the XPS Viewer utility in Windows.
12. Scroll through the presentation in the XPS Viewer, and then CLOSE the XPS Viewer window.
• PAUSE. LEAVE the HR Review Final Version 4 presentation file open to use in the next exercise.
© 2014, John Wiley & Sons, Inc.
Microsoft Official Academic Course, Powerpoint 2013
54

Step by Step: Save a Presentation as an Outline• USE the HR Review Final Version 4 presentation
that is still open from the previous exercise.1. Click the File tab, and click Save As.2. Click Browse, and then navigate to the location
where you want to save.3. Open the Save as type drop-down list and
click Outline/RTF.
4. In the File name box, type Outline.
5. Click Save. The file is saved.6. In Windows, navigate to the location where you
saved the Outline.rtf file, and double-click it to open it in the application set as the default for RTF files on your system.
© 2014, John Wiley & Sons, Inc.
Microsoft Official Academic Course, Powerpoint 2013
55

Step by Step: Save a Presentation as an Outline
7. Switch to Outline view in the application. (In Word, the command is View, Outline.) The figure at right shows the file opened in Word and displayed in Outline view with the Zoom set to 40%.
8. Scroll through the outline to review how it was exported. Then close the application.
• PAUSE. LEAVE the presentation file open to use in the next exercise.
© 2014, John Wiley & Sons, Inc.
Microsoft Official Academic Course, Powerpoint 2013
56

Step by Step: Save a Presentation in OpenDocument Format• USE the HR Review Final Version 4 presentation
that is still open from the previous exercise.1. Click the File tab, and click Save As.2. Click Browse, and then navigate to the location
where you want to save.3. Open the Save as type drop-down list and
click OpenDocument Presentation.4. In the File name box, type HR Open.
5. Click Save. A warning appears, stating that the file may contain features that are not compatible with this format.
6. Click Yes to confirm. The file is saved.• PAUSE. LEAVE the presentation file open to use
in the next exercise.© 2014, John Wiley & Sons, Inc.
Microsoft Official Academic Course, Powerpoint 2013
57

Step by Step: Save a Presentation as a PowerPoint Show• USE the HR Review Final Version 4 presentation
that is still open from the previous exercise.1. Click the File tab, and click Save As.2. Click Browse, and then navigate to the location
where you want to save.3. Open the Save as type drop-down list and
click PowerPoint Show.4. In the File name box, type HR Show.
5. Click Save. The file is saved in that format, and the new file is open in PowerPoint.
• PAUSE. LEAVE the presentation file open to use in the next exercise.
© 2014, John Wiley & Sons, Inc.
Microsoft Official Academic Course, Powerpoint 2013
58

Step by Step: Save a Slide or Object as a Picture• USE the HR Review Final Version 4 presentation
that is still open from the previous exercise.1. Go to slide 3.
2. Click the File tab, and click Save As.3. Click Browse, and then navigate to the location
where you want to save.4. Open the Save as type drop-down list and
click JPEG File Interchange Format.
5. In the File name box, type Goals Achieved.
© 2014, John Wiley & Sons, Inc.
Microsoft Official Academic Course, Powerpoint 2013
59

Step by Step: Save a Slide or Object as a Picture
6. Click Save. A dialog box prompts you to choose whether to save every slide or only the current slide (see the figure below).
7. Click Just This One. The current slide is saved as a graphic with the name you specified.
© 2014, John Wiley & Sons, Inc.
Microsoft Official Academic Course, Powerpoint 2013
60

Step by Step: Save a Slide or Object as a Picture
8. Go to slide 4.
9. Right-click the photo and click Save as Picture. The Save As Picture dialog box opens.
10. Navigate to the location where you want to save.11. In the File name box, type Businessman.
12. Click Save. That photo is saved as a separate graphic.
• PAUSE. LEAVE the presentation file open to use in the next exercise.
© 2014, John Wiley & Sons, Inc.
Microsoft Official Academic Course, Powerpoint 2013
61

Step by Step: Create a Video• USE the HR Review Final Version 4 presentation
that is still open from the previous exercise.1. Click the File tab, click Export, and click Create
a Video. The Create a Video controls appear in Backstage view (see the figure on the next slide).
2. Click the up increment arrow on the Seconds spent on each slide text box until the setting is 10:00.
© 2014, John Wiley & Sons, Inc.
Microsoft Official Academic Course, Powerpoint 2013
62

Step by Step: Create a Video
© 2014, John Wiley & Sons, Inc.
Microsoft Official Academic Course, Microsoft Word 2013
63

Step by Step: Create a Video
3. Click Create Video. The Save As dialog box opens.
4. In the File name box, type HR Video.
5. Navigate to the location where you are storing the files for this lesson.
6. Click Save. The video is created. A progress bar in the status bar shows the creation. Wait until the creation is complete before going on to the next step.
7. CLOSE PowerPoint, saving your changes to the presentation file.
8. In Windows, navigate to the folder containing the video and double-click the video clip to play it in your default application for video clips.© 2014, John Wiley & Sons,
Inc.Microsoft Official Academic Course, Powerpoint
201364

Skill Summary
© 2014, John Wiley & Sons, Inc.
Microsoft Official Academic Course, Powerpoint 2013
65