Designing a PresentationDesigning a Presentation Lesson 4 © 2014, John Wiley & Sons, Inc.Microsoft...
65
Designing a Presentation Lesson 4 © 2014, John Wiley & Sons, Inc. Microsoft Official Academic Course, Microsoft Word 2013 1 Microsoft Powerpoint 2013
-
Upload
neil-wilkerson -
Category
Documents
-
view
220 -
download
4
Transcript of Designing a PresentationDesigning a Presentation Lesson 4 © 2014, John Wiley & Sons, Inc.Microsoft...

Designing a PresentationLesson 4
© 2014, John Wiley & Sons, Inc.
Microsoft Official Academic Course, Microsoft Word 2013
1
Microsoft Powerpoint 2013

Objectives
© 2014, John Wiley & Sons, Inc.
Microsoft Official Academic Course, Microsoft Word 2013
2

Step by Step: Apply a Theme and Variant to a Presentation• GET READY. Before you begin these steps, make sure
that your computer is on. Log on, if necessary.1. START PowerPoint, if the program is not already
running.2. Locate and open the Special Events
presentation and save it as Special Events Final.
3. Make sure slide 1 is selected.4. On the Design tab, click the More button in the
Themes group. PowerPoint’s available themes display in the Themes gallery.
© 2014, John Wiley & Sons, Inc.
Microsoft Official Academic Course, Microsoft Word 2013
3

Step by Step: Apply a Theme and Variant to a Presentation
5. Point to any of the themes in the gallery. Notice that a ScreenTip displays the theme’s name (or in some cases file location), and the theme formats are instantly applied to the slide behind the gallery (right).
6. Right-click the Slice theme; a pop-up menu appears. In the menu, click Apply to Selected Slides. The Slice theme is applied only to slide 1.
© 2014, John Wiley & Sons, Inc.
Microsoft Official Academic Course, Microsoft Word 2013
4

Step by Step: Apply a Theme and Variant to a Presentation
7. Click the More button again in the Themes group to reopen the Themes gallery.
8. Right-click the Ion theme, and click Apply to All Slides to apply it to all slides.
9. Scroll through the slides to see how the theme has supplied new colors, fonts, bullet symbols, and layouts.
© 2014, John Wiley & Sons, Inc.
Microsoft Official Academic Course, Microsoft Word 2013
5

Step by Step: Apply a Theme and Variant to a Presentation
10. On the Design tab, click the purple thumbnail image in the Variants group. The colors change on all slides to reflect the chosen variant. Slide 1 should resemble the figure at right.
11. SAVE the presentation.
• PAUSE. LEAVE the presentation open to use in the next exercise.
© 2014, John Wiley & Sons, Inc.
Microsoft Official Academic Course, Microsoft Word 2013
6

Step by Step: Change Theme Colors• USE the Special Events Final presentation that is still
open from the previous exercise.1. Click the More
button in the Variants group, and then point to Colors. A menu appears containing the available color themes.
2. Move the pointer over some of the color themes to see the live preview of those colors on the current slide (above).
© 2014, John Wiley & Sons, Inc.
Microsoft Official Academic Course, Microsoft Word 2013
7

Step by Step: Change Theme Colors3. Click the Blue Warm color theme.
The new colors are applied to the presentation.
4. Click the More button again in the Variants group, point to Colors, and then click Customize Colors at the bottom of the gallery. The dialog box opens to allow you to replace colors in the current color palette.
5. Click the drop-down arrow next to the color designated for Hyperlink.
6. Click White, Text 1 on the Theme Colors palette to change the color for Hyperlinks to white (above).
© 2014, John Wiley & Sons, Inc.
Microsoft Official Academic Course, Microsoft Word 2013
8

Step by Step: Change Theme Colors
7. Select the text in the Name box and type Southridge in its place.
8. Click Save to save the new theme colors.9. SAVE the presentation.
• PAUSE. LEAVE the presentation open to use in the next exercise.
© 2014, John Wiley & Sons, Inc.
Microsoft Official Academic Course, Microsoft Word 2013
9

Step by Step: Change Theme Fonts• USE the Special Events Final presentation that is
still open from the previous exercise.1. Click the More button in the Variants group, and
then point to Fonts. A gallery displays showing font combinations for all available themes.
2. Move the pointer over some of the font combinations to see the live preview of those fonts on the current slide.
© 2014, John Wiley & Sons, Inc.
Microsoft Official Academic Course, Microsoft Word 2013
10

Step by Step: Change Theme Fonts3. Click the Candara
font theme (right). The new fonts are applied to the presentation.
4. SAVE the presentation.
• PAUSE. LEAVE the presentation open to use in the next exercise.
© 2014, John Wiley & Sons, Inc.
Microsoft Official Academic Course, Microsoft Word 2013
11

Step by Step: Applying a Different Slide Layout• USE the Special Events Final presentation that is
still open from the previous exercise.1. Click the Home tab on the Ribbon.2. Go to slide 5 and click New Slide in the Slides
group. (Click the graphical part of the button, not the button’s text.) PowerPoint adds a new slide with the same layout as slide 5, Title and Content.
3. Type the title Contact Information.
© 2014, John Wiley & Sons, Inc.
Microsoft Official Academic Course, Microsoft Word 2013
12

Step by Step: Applying a Different Slide Layout
4. Type the following information as the first bullet point in the text placeholder:457 Gray RoadNorth Hills, OH 45678
5. Type these additional bullet points:Phone: (513) 555-6543Fax: (513) 555-5432
6. Select the entire bulleted list, and then click the Bullets button on the Home tab to turn off the bullets. Then click away from the text box to deselect the selection. Your slide should look the one above.
© 2014, John Wiley & Sons, Inc.
Microsoft Official Academic Course, Microsoft Word 2013
13

Step by Step: Applying a Different Slide Layout
7. On the Home tab, click the Layout button in the Slides group to display the slide layout gallery shown at right.
8. Click Two Content to change the layout to two side-by-side content placeholders.
9. In the second place-holder, type:
Directions: From I-261 East, take exit 205 South (Crawfordsville Road) to Gray Road. Turn left on Gray Road, and look for us on your left after 2 miles.© 2014, John Wiley & Sons, Inc.
Microsoft Official Academic Course, Microsoft Word 2013
14

Step by Step: Applying a Different Slide Layout
10. Click anywhere in the text you just typed, and then click the Bullets button on the Home tab to turn off the bullet. Click away from the text box to deselect it. Your slide should look similar to the one above.
11. SAVE the presentation.• PAUSE. LEAVE the presentation open to use in the next
exercise.• The layouts that appear in the slide layout gallery depend
on the layouts stored in the Slide Master.© 2014, John Wiley & Sons, Inc.
Microsoft Official Academic Course, Microsoft Word 2013
15

Step by Step: Select a Theme Background• USE the Special Events Final presentation that is still
open from the previous exercise.1. Go to slide 6 if it
is not already selected.
2. On the Design tab, click the More button in the Variants group and then point to Background Styles. A gallery (above) displays some background styles created using the theme’s designated background colors.
© 2014, John Wiley & Sons, Inc.
Microsoft Official Academic Course, Microsoft Word 2013
16

Step by Step: Select a Theme Background
3. Right-click Style 8, then click Apply to Selected Slides. The background style is applied to slide 6 only.
4. SAVE the presentation.• PAUSE. LEAVE the presentation open to use in the
next exercise.
© 2014, John Wiley & Sons, Inc.
Microsoft Official Academic Course, Microsoft Word 2013
17

Step by Step: Customize the Background• USE the Special Events
Final presentation that is still open from the previous exercise.1. With slide 6 still active,
click the Format Background button on the Design tab. The Format Back-ground task pane opens. A gradient fill is selected beca use the style you selected in the previous exercise was a gradient.
2. Click the Type drop-down arrow, and then in the drop-down list, click the Linear preset (bove). The slide background changes to a different gradient type.
© 2014, John Wiley & Sons, Inc.
Microsoft Official Academic Course, Microsoft Word 2013
18

Step by Step: Customize the Background
3. Click the Solid Fill option button. The controls change to those for solid colors.
4. Click the Color drop-down arrow and in the gallery that appears, click Dark Purple, Background 2, Darker 50% (the third color in the bottom row of the Theme Colors section).
5. Drag the Transparency slider to 20% or type 20 in the Transparency text box. The fill lightens beca use it is now partly transparent (above).
© 2014, John Wiley & Sons, Inc.
Microsoft Official Academic Course, Microsoft Word 2013
19

Step by Step: Customize the Background
6. Click Picture or texture fill. The controls change to those for pictures and textures.
7. Click the Texture drop-down arrow, and then click the Green Marble texture.
8. Click Pattern Fill. The controls change to those for patterns.
9. Open the Foreground Color drop-down list and click Dark Purple, Backgound 2 (the third color in the top row of the Theme Colors section).
© 2014, John Wiley & Sons, Inc.
Microsoft Official Academic Course, Microsoft Word 2013
20

Step by Step: Customize the Background
10. Open the Background Color drop-down list and click Teal, Accent 5 (next-to-last color in the top row of the Theme Colors section).
11. Click the 90% pattern (the last pattern in the second row).
12. In the Format Background task pane, click Reset Background. The background returns to its original state specified by the theme and variant in use.
13. CLOSE the Format Background task pane.14. SAVE the presentation.
• PAUSE. LEAVE the presentation open to use in the next exercise.
© 2014, John Wiley & Sons, Inc.
Microsoft Official Academic Course, Microsoft Word 2013
21

Step by Step: Insert a Date, Footer, and Slide Numbers• USE the Special Events Final presentation that is
still open from the previous exercise.1. Click the Insert tab, and then click the Header &
Footer button. The Header and Footer dialog box opens.
2. Click the Date and time check box, and then click Update automatically if it is not already selected.
3. Click to select the Slide number check box.4. Click the Footer check box, and then type
Special Events in the text box below the check box.
© 2014, John Wiley & Sons, Inc.
Microsoft Official Academic Course, Microsoft Word 2013
22

Step by Step: Insert a Date, Footer, and Slide Numbers
5. Click the Don’t show on title slide check box. The dialog box should resemble the figurebelow. The date will be today’s date rather than the date shown.
© 2014, John Wiley & Sons, Inc.
Microsoft Official Academic Course, Microsoft Word 2013
23

Step by Step: Insert a Date, Footer, and Slide Numbers
6. Click the Apply to All button to apply the date, footer, and slide number to all slides except the title slide. Slide 6 should look similar to the figure below. In this theme, the footer and date appear vertically along the right side of the slide, and the slide number appears in the colored box in the upper right.
© 2014, John Wiley & Sons, Inc.
Microsoft Official Academic Course, Microsoft Word 2013
24

Step by Step: Insert a Date, Footer, and Slide Numbers
7. Click the Design tab, and move the mouse over several different themes in the Themes group. Notice that the placement of the slide number, footer, and date change with different themes. In many of the themes, these elements appear at the bottom of the slide.
8. SAVE the presentation.• PAUSE. LEAVE the presentation open to use in the
next exercise.
© 2014, John Wiley & Sons, Inc.
Microsoft Official Academic Course, Microsoft Word 2013
25

Step by Step: Add a Text Hyperlink• USE the Special Events Final presentation that is
still open from the previous exercise.1. Go to slide 6, position the insertion point at the
end of the fax number, and press Enter to start a new paragraph. Then type Visit our website.
2. Select the text you just typed, and then click the Hyperlink button on the Insert tab. The Insert Hyperlink dialog box opens.
© 2014, John Wiley & Sons, Inc.
Microsoft Official Academic Course, Microsoft Word 2013
26

Step by Step: Add a Text Hyperlink
3. Click in the Address box and type http://www.southridgevideo.com as the target of the link text (right).
4. Click OK. The website address is formatted with the theme’s hyperlink color and an underline.
5. Go to slide 1, and select Southridge Video.
© 2014, John Wiley & Sons, Inc.
Microsoft Official Academic Course, Microsoft Word 2013
27

Step by Step: Add a Text Hyperlink6. Click the Hyperlink button on the Insert tab. The
Insert Hyperlink dialog box opens.7. In the Link To list on the left side of the dialog box,
click Place in This Document. A list of slides from the current presentation appears.
8. Click 6. Contact Information (see Figure 4-16).
© 2014, John Wiley & Sons, Inc.
Microsoft Official Academic Course, Microsoft Word 2013
28

Step by Step: Add a Text Hyperlink9. Click OK; PowerPoint identifies slide 6 as the target for
this hyperlink.10. SAVE the presentation.
• PAUSE. LEAVE the presentation open to use in the next exercise.
© 2014, John Wiley & Sons, Inc.
Microsoft Official Academic Course, Microsoft Word 2013
29

Step by Step: Add a Graphical Hyperlink• USE the Special Events Final presentation that is still
open from the previous exercise.1. Go to slide 4, and click the photo to select it.2. Press Ctrl+K to open the Insert Hyperlink dialog box.
(Ctrl+K is a keyboard shortcut for the Insert Hyperlink command you used previously.)
3. Click Place in This Document. A list of slides from the current presentation appears.
4. Click 6. Contact Information.5. Click OK.6. SAVE the presentation.
• PAUSE. LEAVE the presentation open to use in the next exercise.
© 2014, John Wiley & Sons, Inc.
Microsoft Official Academic Course, Microsoft Word 2013
30

Step by Step: Add an Action to a Slide• USE the Special Events Final presentation that is still
open from the previous exercise.1. Go to slide 5.2. Click the Shapes
button on the Insert tab to display a gallery of drawing shapes.
3. Click the Action Button: Inform-ation shape (in the middle of the last row of shapes in the Action Buttons section, above).
© 2014, John Wiley & Sons, Inc.
Microsoft Official Academic Course, Microsoft Word 2013
31

Step by Step: Add an Action to a Slide4. The pointer changes to a crosshair. Click near the
bottom right corner of the slide to draw the button there at its default size. As soon as you release the mouse button, the Action Settings dialog box opens.
5. Click Hyperlink to, and then click the drop-down arrow of the text box below it.
6. Scroll to the bottom of the list of possible link targets and click Other File (right). The Hyperlink to Other File dialog box opens.
© 2014, John Wiley & Sons, Inc.
Microsoft Official Academic Course, Microsoft Word 2013
32

Step by Step: Add an Action to a Slide
7. Navigate to the data files for this lesson, click the Service Fees file, and then click OK to apply your selection and return to the Action Settings dialog box.
8. Click OK again to close the Action Settings dialog box.
9. SAVE the presentation.• PAUSE. LEAVE the presentation open to use in the
next exercise.
© 2014, John Wiley & Sons, Inc.
Microsoft Official Academic Course, Microsoft Word 2013
33

Step by Step: Test Links in a Slide Show• USE the Special Events Final presentation that is
still open from the previous exercise.1. SAVE the presentation and then press F5 to start
the slide show from slide 1.2. On slide 1, click the underlined Southridge
Video text. The show jumps to slide 6.3. Right-click, and on the menu that appears,
choose Last Viewed to return to slide 1.
© 2014, John Wiley & Sons, Inc.
Microsoft Official Academic Course, Microsoft Word 2013
34

Step by Step: Test Links in a Slide Show
4. Click the mouse button three times to advance to slide 4, and then click the photo. The show jumps to slide 6.
5. Right-click, and on the menu that appears, choose Last Viewed to return to slide 4.
6. Click the mouse button to advance to slide 5, and then click the Information button. If a security warning appears, click Yes to continue. A spreadsheet opens in Excel.
7. CLOSE Excel without making or saving any changes.
© 2014, John Wiley & Sons, Inc.
Microsoft Official Academic Course, Microsoft Word 2013
35

Step by Step: Test Links in a Slide Show
8. If the slide show is not active (full screen), switch back to it using the Windows taskbar.
9. Press Esc to end the slide show or click one more time.
10. CLOSE the presentation, saving your changes to it.
• PAUSE. LEAVE PowerPoint open to use in the next exercise.
© 2014, John Wiley & Sons, Inc.
Microsoft Official Academic Course, Microsoft Word 2013
36

Step by Step: Create Sections• USE the Blue Yonder Introduction presentation.
1. Locate and open the Blue Yonder Introduction presentation and save it as Blue Yonder Sections.
2. Go to slide 2. In the navigation pane on the left, right-click slide 2 and click Add Section from the menu that appears (right). A new section bar labeled Untitled Section appears in the Navigation pane above slide 2, indicating that the new section begins with that slide.
© 2014, John Wiley & Sons, Inc.
Microsoft Official Academic Course, Microsoft Word 2013
37

Step by Step: Create Sections
3. Go to slide 5. In the Navigation pane, right-click slide 5 and click Add Section. Another new section (also labeled Untitled Section) appears above slide 5 in the Navigation pane. Repeat these actions to create another new section above slide 7.
4. Click the Untitled Section bar above slide 2. Slides 2, 3, and 4 become selected.
5. Right-click the Untitled Section bar you just clicked and choose Rename Section from the menu that appears. The Rename Section dialog box opens.
© 2014, John Wiley & Sons, Inc.
Microsoft Official Academic Course, Microsoft Word 2013
38

Step by Step: Create Sections
6. Type Introduction in the Section Name box (right), and click Rename.
7. Rename the other two sections, Detail andConclusion, using the same actions you used in steps 4-6.
8. Right-click the Detail section heading in the navigation pane and click Move Section Up to move that section to appear before the Introduction section.
9. Right-click the Detail section heading again and click Move Section Down. The Detail section moves back to its original location.© 2014, John Wiley & Sons,
Inc.Microsoft Official Academic Course, Microsoft Word
201339
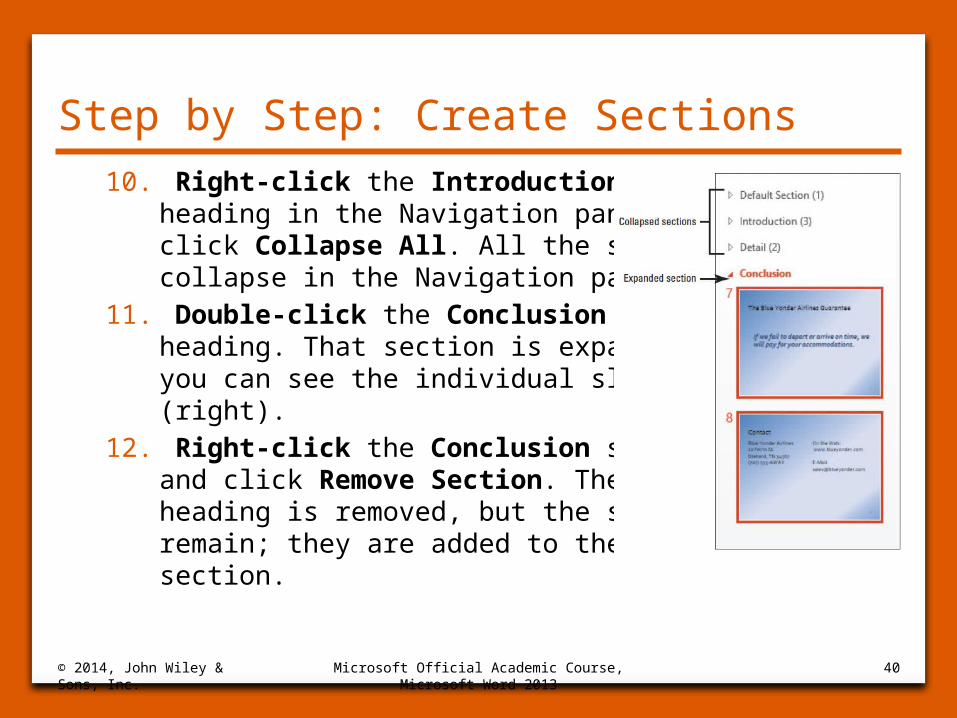
Step by Step: Create Sections10. Right-click the Introduction section
heading in the Navigation pane and click Collapse All. All the sections collapse in the Navigation pane.
11. Double-click the Conclusion section heading. That section is expanded so you can see the individual slides in it (right).
12. Right-click the Conclusion section and click Remove Section. The section heading is removed, but the slides remain; they are added to the Detail section.
© 2014, John Wiley & Sons, Inc.
Microsoft Official Academic Course, Microsoft Word 2013
40

Step by Step: Create Sections
13. Right-click either of the remaining section headings and choose Expand All.
14. Click the Introduction section heading to select it, and then on the Design tab, click the More button in the Variants group and point to Background Styles. On the background styles palette that appears, right-click Style 1 (the white background) and click Apply to Selected Slides. Only the slides in the selected section change their background color.
15. SAVE the presentation and CLOSE it.• PAUSE. LEAVE PowerPoint open to use in the next
exercise.© 2014, John Wiley & Sons, Inc.
Microsoft Official Academic Course, Microsoft Word 2013
41

Step by Step: Apply a Theme to a Slide Master• GET READY. To apply a theme to a slide master, perform
the following steps:1. Locate and
open the Rates presentation and save it as Rates Masters.
2. With slide 1 active, click the View tab.
3. Click the Slide Master button. Slide Master view opens with the Title Slide Layout selected in the left pane (above).
© 2014, John Wiley & Sons, Inc.
Microsoft Official Academic Course, Microsoft Word 2013
42

Step by Step: Apply a Theme to a Slide Master
4. Click the first slide in the left pane, which is the slide master for the current theme. (It is the top slide in the left pane—the one that is slightly larger than the others.)
5. Click the Themes button in the Slide Master tab to open the Themes gallery; click the Wisp theme in the gallery. The theme is applied to the slide master as well as all slide layouts in the left pane (above).© 2014, John Wiley & Sons,
Inc.Microsoft Official Academic Course, Microsoft Word
201343

Step by Step: Apply a Theme to a Slide Master
6. SAVE the presentation.• PAUSE. LEAVE the presentation open in Slide Master
view to use in the next exercise.
© 2014, John Wiley & Sons, Inc.
Microsoft Official Academic Course, Microsoft Word 2013
44

Step by Step: Move and Resize Placeholders on a Layout Master• USE the Rates Masters presentation that is still open
from the previous exercise.1. In Slide Master view, click to select the layout
master for the Title Slide Layout in the left pane (hover your cursor over the slide to see a balloon indicating the layout master’s name). The Title Slide Layout master appears in the right pane.
2. In the right pane, click the outer border of the subtitle placeholder (click to edit Master subtitle style) to select that text box.
© 2014, John Wiley & Sons, Inc.
Microsoft Official Academic Course, Microsoft Word 2013
45

Step by Step: Move and Resize Placeholders on a Layout Master
3. On the Drawing Tools Format tab, in the Size group, set the Height value to 1” (below).
© 2014, John Wiley & Sons, Inc.
Microsoft Official Academic Course, Microsoft Word 2013
46

Step by Step: Move and Resize Placeholders on a Layout Master
4. Position the mouse pointer over the border of the subtitle placeholder, but not over a selection handle. The mouse pointer becomes a four-headed arrow. Click and drag the box to the top of the slide (below).
© 2014, John Wiley & Sons, Inc.
Microsoft Official Academic Course, Microsoft Word 2013
47

Step by Step: Move and Resize Placeholders on a Layout Master
5. Using the same pro-cess as in step 4, move the title place-holder immediately below the subtitle (right).
6. SAVE the presentation.
• PAUSE. LEAVE the presentation open in Slide Master view to use in the next exercise.
© 2014, John Wiley & Sons, Inc.
Microsoft Official Academic Course, Microsoft Word 2013
48

Step by Step: Add a New Element to a Master• USE the Rates Masters presentation that is still open
in Slide Master view from the previous exercise.1. Click the Slide Master at the top of the left pane.2. On the Insert tab, click the Text Box button in
the Text group.3. In the bottom left corner of the slide master,
below the footer, click to place a new text box, and type Copyright 2015 Southridge Video.
© 2014, John Wiley & Sons, Inc.
Microsoft Official Academic Course, Microsoft Word 2013
49

Step by Step: Add a New Element to a Master
4. Select the text you just typed, and then click the Decrease Font Size button on the Home tab twice to change the font size to 14 point. Resize the text box as necessary so that the text fits on one line (above).
© 2014, John Wiley & Sons, Inc.
Microsoft Official Academic Course, Microsoft Word 2013
50

Step by Step: Add a New Element to a Master
5. With the text still selected, change the text fill color to Light Green, Background 2, Darker 75%.
6. Click the Slide Master tab, and then click the Close Master View button to return to Normal view.
7. View each slide to confirm that the copyright text appears on each one.
• PAUSE. LEAVE the presentation open to use in the next exercise.
© 2014, John Wiley & Sons, Inc.
Microsoft Official Academic Course, Microsoft Word 2013
51

Step by Step: Work with Background Images• USE the Rates Masters presentation that is still open from
the previous exercise.1. Go to slide 1.2. On the Design
tab, click Format Background to display the Format Background task pane.
3. Mark the Hide Background Graphics check box in the task pane (above). The background image disappears from slide 1. It remains on the other two slides.
© 2014, John Wiley & Sons, Inc.
Microsoft Official Academic Course, Microsoft Word 2013
52
Step by Step: Work with Background Images
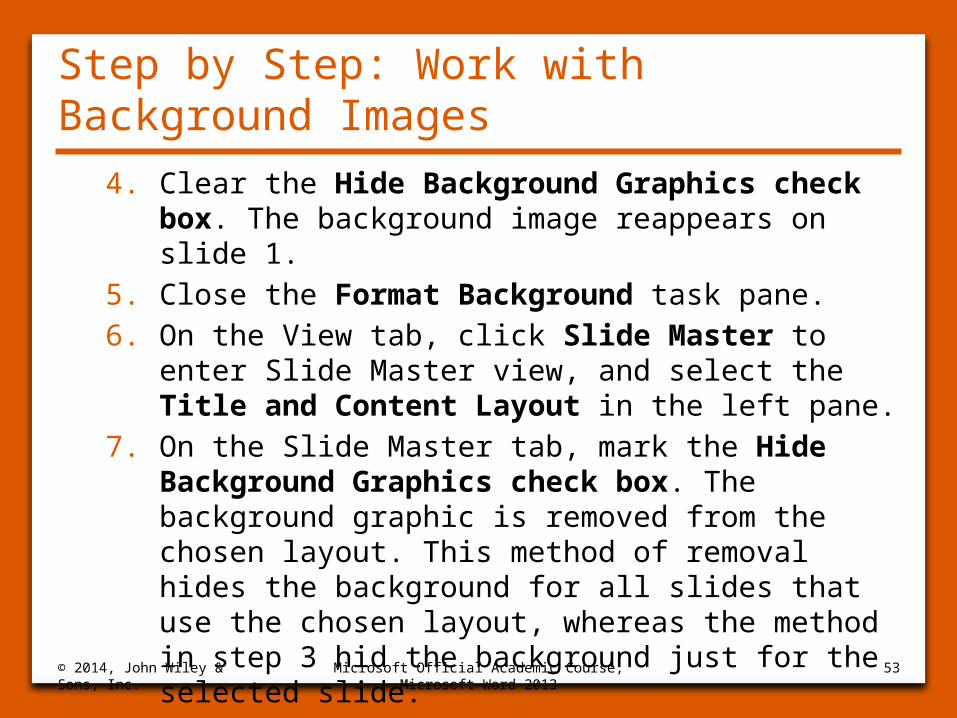
4. Clear the Hide Background Graphics check box. The background image reappears on slide 1.
5. Close the Format Background task pane.6. On the View tab, click Slide Master to enter Slide
Master view, and select the Title and Content Layout in the left pane.
7. On the Slide Master tab, mark the Hide Background Graphics check box. The background graphic is removed from the chosen layout. This method of removal hides the background for all slides that use the chosen layout, whereas the method in step 3 hid the background just for the selected slide.
© 2014, John Wiley & Sons, Inc.
Microsoft Official Academic Course, Microsoft Word 2013
53

Step by Step: Work with Background Images
8. Clear the Hide Background Graphics check box to restore the background graphic to the Title and Content Layout.
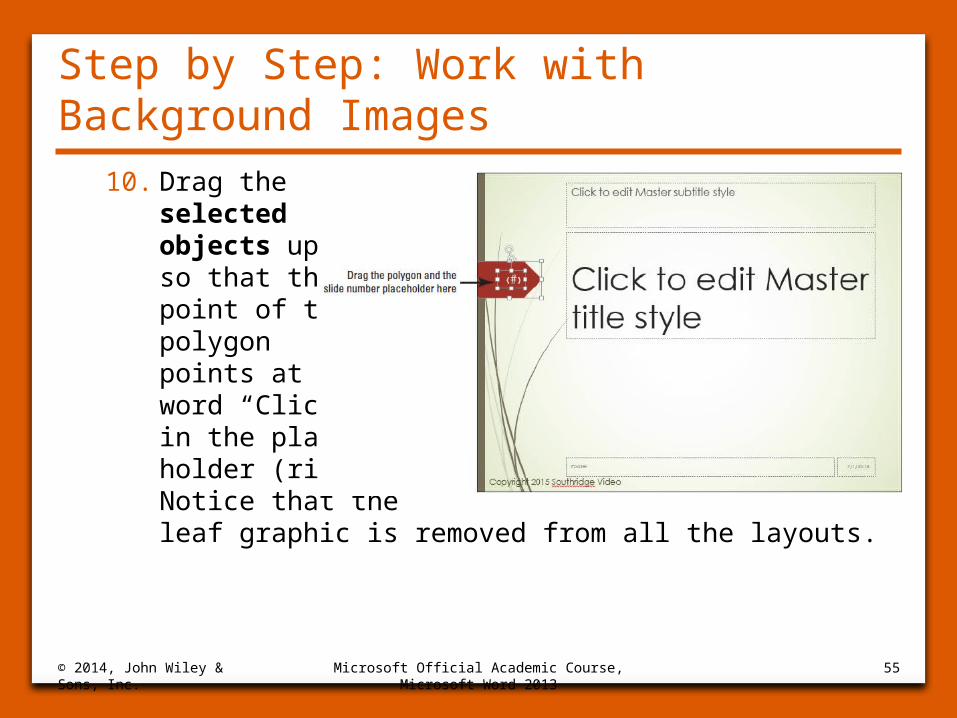
9. Select the Title Slide Layout in the left pane, and then in the right pane, select the brown polygon on the left side of the slide. Hold down the Shift key and click the page number code inside it, so that both objects are selected.
© 2014, John Wiley & Sons, Inc.
Microsoft Official Academic Course, Microsoft Word 2013
54
Step by Step: Work with Background Images
10. Drag the selected objects up so that the point of the polygon points at the word “Click” in the place-holder (right). Notice that the leaf graphic is removed from all the layouts.
© 2014, John Wiley & Sons, Inc.
Microsoft Official Academic Course, Microsoft Word 2013
55

Step by Step: Work with Background Images
11.On the Insert tab, click Pictures. Navigate to the location containing the files for this lesson, select Store.jpg, and click Insert. The image is inserted on the Slide Master where it covers almost all the content.
12. Drag the upper and lower selection handles on the image so that it covers the entire slide. The image will distort slightly; that is okay.
© 2014, John Wiley & Sons, Inc.
Microsoft Official Academic Course, Microsoft Word 2013
56

Step by Step: Work with Background Images
13. On the Picture Tools Format tab, click the Color button located in the Adjust group, and then click Washout (fourth thumb-nail in the first row in the Recolor section, right).
© 2014, John Wiley & Sons, Inc.
Microsoft Official Academic Course, Microsoft Word 2013
57

Step by Step: Work with Background Images14. In the Arrange group, click the Send Backward drop-
down arrow and click Send to Back. Now the background image is behind all other objects on the Slide Master as well as on each layout master (below).
© 2014, John Wiley & Sons, Inc.
Microsoft Official Academic Course, Microsoft Word 2013
58
Step by Step: Create a New Layout• USE the Rates Masters presentation that is still open in
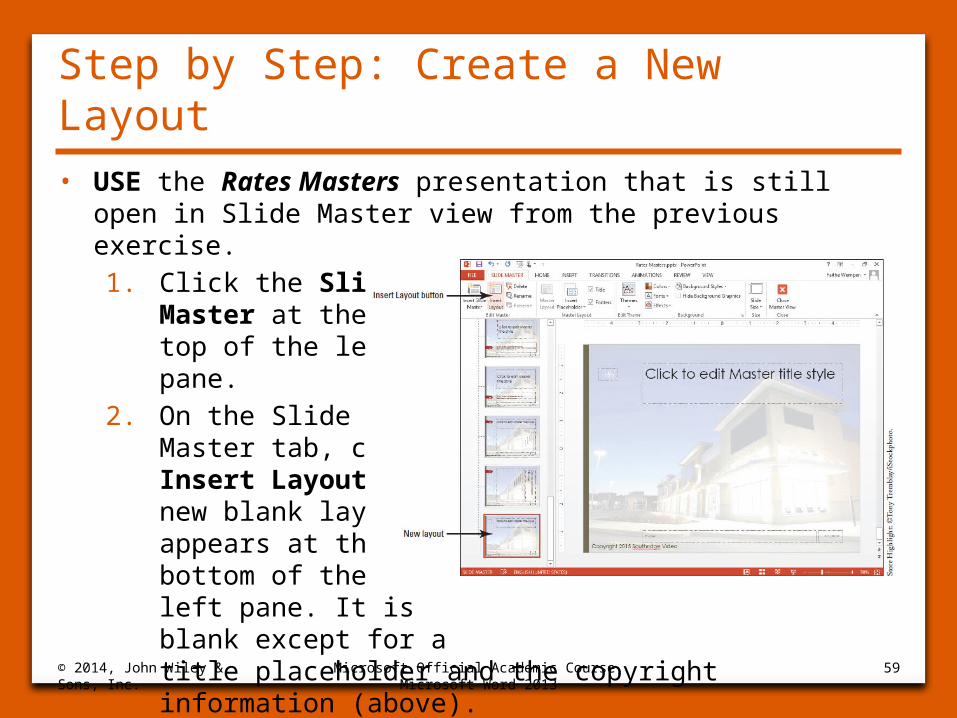
Slide Master view from the previous exercise.1. Click the Slide
Master at the top of the left pane.
2. On the Slide Master tab, click Insert Layout. A new blank layout appears at the bottom of the left pane. It is blank except for a title placeholder and the copyright information (above).© 2014, John Wiley & Sons,
Inc.Microsoft Official Academic Course, Microsoft Word
201359
Step by Step: Create a New Layout
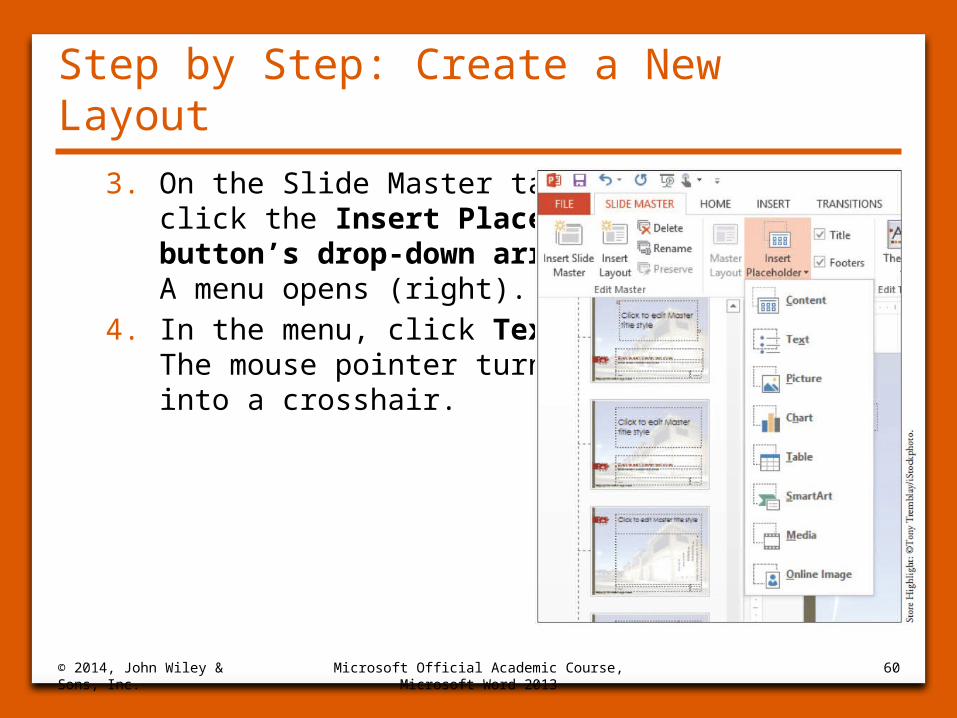
3. On the Slide Master tab, click the Insert Placeholder button’s drop-down arrow. A menu opens (right).
4. In the menu, click Text. The mouse pointer turns into a crosshair.
© 2014, John Wiley & Sons, Inc.
Microsoft Official Academic Course, Microsoft Word 2013
60

Step by Step: Create a New Layout
5. Draw a new text placeholder on the slide below the title placeholder that will cover most of the empty space on the slide vertically and about ¾ of the empty space on the slide hori-zontally (above).
© 2014, John Wiley & Sons, Inc.
Microsoft Official Academic Course, Microsoft Word 2013
61

Step by Step: Create a New Layout
6. Click the Insert Placeholder drop-down arrow again, and click Picture in the menu that appears. Draw a placeholder box to the right of the text placeholder (right).
7. Right-click the new layout master in the left pane and click Rename Layout in the menu that appears.
© 2014, John Wiley & Sons, Inc.
Microsoft Official Academic Course, Microsoft Word 2013
62

Step by Step: Create a New Layout8. In the Rename Lay-
out dialog box, re-place the current name with Text and Side Picture and click Rename.
9. On the Slide Master tab, click Close Master View.
10. Go to slide 1.11. On the Home
tab > Slides group, click the New Slide button’s drop-down arrow. On the gallery of layouts that appears, click your new layout, Text and Side Picture, to create a new slide using it (above).
© 2014, John Wiley & Sons, Inc.
Microsoft Official Academic Course, Microsoft Word 2013
63

Step by Step: Create a New Layout
12. SAVE the presentation.• PAUSE. EXIT PowerPoint.
© 2014, John Wiley & Sons, Inc.
Microsoft Official Academic Course, Microsoft Word 2013
64

Skill Summary
© 2014, John Wiley & Sons, Inc.
Microsoft Official Academic Course, Microsoft Word 2013
65