


Languages
Pages
Legal


Brushless GoPro Gimbal (Phantom) Manual v1.0
Designs, Images and Content Copyright © Aeroxcraft Ltd. 2013 Page 1
Brushless GoPro Gimbal for DJI Phantom
Basic Manual: Attaching and Connecting to the DJI Phantom
Brushless GoPro Gimbal (Phantom) Manual v1.0
Designs, Images and Content Copyright © Aeroxcraft Ltd. 2013 Page 2
Contents
1) Notes 2) Introduction 3) Tools required 4) Kit Contents 5) Installing the power cable 6) Fastening the Gimbal to the Phantom 7) Powering up the gimbal 8) Connecting the Tilt Control Cable
Page 3 4 5 6 7 11 15 16
Brushless GoPro Gimbal (Phantom) Manual v1.0
Designs, Images and Content Copyright © Aeroxcraft Ltd. 2013 Page 3
1) Notes
MAKE SURE THIS KIT IS ASSEMBLED CORRECTLY BEFORE FLIGHT. IF IN DOUBT CONTACT AEROXCRAFT FOR
ASSISTANCE.
This document is a work in progress. Information contained within this document may be incorrect and we
cannot be held responsible for any damage/injuries caused by following the information contained within this
document.
If you are unsure what you are doing get advice from someone who does.
Multirotor helicopters are dangerous. Operate them away from people and property. Be responsible. If in
doubt do not fly.
Always remove propellers from motors before carrying out work on your multirotor helicopter. Failure to do
so can cause serious injury.
It is the owner’s responsibility to ensure this model is assembled and fitted out correctly and safely. Ensure
that your model is capable of safely and reliably lifting the payload you are asking it to. This model is
dangerous if used in an incorrect manner. Ensure you seek assistance from an experienced flyer if you are
unsure. Do not fly near people, property or highways. Do not fly over people, property or highways. There
may be laws and regulations governing the use of this model in your area, seek advice from your authorities if
you are unsure.
Planning your build and installation is key to building a safe and reliable multi rotor. Make sure all wiring is of
the correct gauge, properly connected, neat and protected from wear/tear and radio/electrical interference.
Make sure all the components you use are suitable for the size and weight of your multi rotor.
Do not over tighten screws.
Use threadlock to ensure screws do not come loose when in use.
Check this product for damaged hardware, loose joints, missing parts or sharp edges before and after
assembly and frequently during use. Do not use unless all components are correctly fitted and adjusted. Do
not use if any parts are missing, damaged or broken.
Assembly is required. Take care when unpacking and assembling; contains small parts and sharp edges.
If you require any replacement parts they are all available from Aeroxcraft. Contact us for details.
Contact details
Website
www.aeroxcraft.com
Brushless GoPro Gimbal (Phantom) Manual v1.0
Designs, Images and Content Copyright © Aeroxcraft Ltd. 2013 Page 4
2) Introduction Plug and Play? (Almost!)
This gimbal is primarily designed for the DJI Phantom multirotor. It comes ready configured for use.
It also comes with all the hardware, cables and connectors you need to install it onto your Phantom.
The only extra part that we do not supply is a lever for the 7th channel on the Phantom transmitter.
We are looking into that, in the meantime however they are available elsewhere.
The DJI Phantom comes with a hidden power cable that is behind one of the white grommets on the
underside. The Aeroxcraft GoPro Gimbal comes with a power cable that needs to be joined to the
Phantoms power cable, by soldering or other means. We recommend soldering and covering the
joins with heat shrink tubing. Some heat shrink tubing is also included to make this easier for you.
There are other ways you could join the wires together, but this is up to you. Make sure any joins are
secure and well insulated. If the wires were to short or come apart it could cause your Phantom to 1)
crash, 2) go out of control, 3) start a fire or 4) a combination of items 1-3! All of which are potentially
very dangerous and best avoided.
Tilt Control
You can opt to use the tilt control or not. The tilt control allows you to move the camera up and
down, from looking straight ahead to looking straight down.
Connecting up the tilt control is more involved than simply fitting the gimbal and connecting up the
power. It involves taking apart your Phantom and also changing some of the settings in the Naza
flight controller. The choice is up to you and it can always be done at a later date if you so choose.
Read through this document first and you can make up your own mind.

Brushless GoPro Gimbal (Phantom) Manual v1.0
Designs, Images and Content Copyright © Aeroxcraft Ltd. 2013 Page 5
3) Tools Required
Fitting Gimbal
2.0mm Hex Driver / allen key
Thread lock (recommended)
Joining power cables
Soldering iron
Solder
Heat gun / Hair Dryer
Tilt Control
12mm Spanner (to remove props)
Small Philips screw driver
2.0mm Hex Driver / allen key
Brushless GoPro Gimbal (Phantom) Manual v1.0
Designs, Images and Content Copyright © Aeroxcraft Ltd. 2013 Page 6
4) Kit Contents
Tilt Control Cable
Power Cable
2x M3 x 30mm Screws
2x M3 x 6mm Screws
2x 20mm Spacers
12x Poly Buffers (Spares)
2x 1.6mm Heat Shrink Tubing

Brushless GoPro Gimbal (Phantom) Manual v1.0
Designs, Images and Content Copyright © Aeroxcraft Ltd. 2013 Page 7
5) Installing the Power Cable We recommend carrying out this stage before attaching the gimbal as it is much easier. Please ignore
the fact that the gimbal is in the following pictures.
Before you proceed ensure that there is no battery pack in the Phantom, no power is connected and
the Phantom is not connected to a computer.
The Phantoms Accessory Power Cable is behind one of the white grommets. On our Phantom it was
behind the one in the photo below. If you are careful, the cable will follow out of the hole with the
grommet. Make sure the wire does not pop back inside the Phantom!
Strip 3-5mm of insulation off each cable. Give the bare ends of wire a little twist with your
fingers to neaten them up. Note that red is positive and grey is negative, it is important you
know which is which as connecting the power to the gimbal board the wrong way round will
damage the gimbal board.
Brushless GoPro Gimbal (Phantom) Manual v1.0
Designs, Images and Content Copyright © Aeroxcraft Ltd. 2013 Page 8
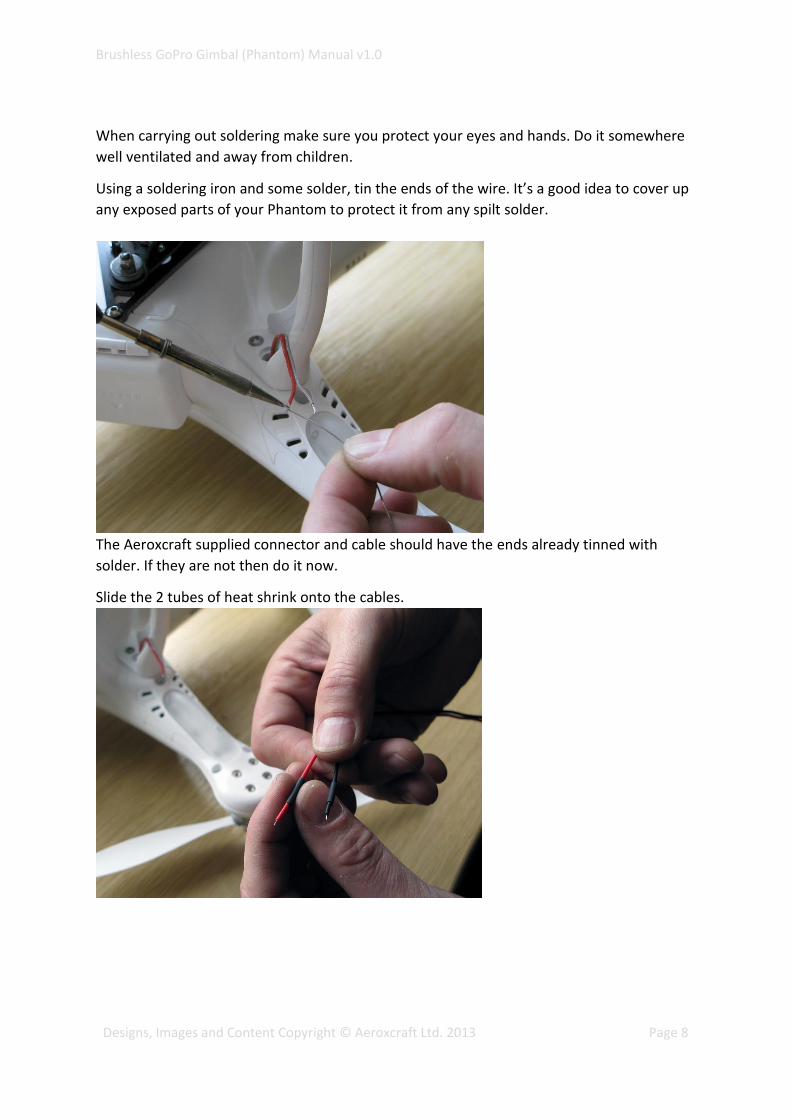
When carrying out soldering make sure you protect your eyes and hands. Do it somewhere
well ventilated and away from children.
Using a soldering iron and some solder, tin the ends of the wire. It’s a good idea to cover up
any exposed parts of your Phantom to protect it from any spilt solder.
The Aeroxcraft supplied connector and cable should have the ends already tinned with
solder. If they are not then do it now.
Slide the 2 tubes of heat shrink onto the cables.
Brushless GoPro Gimbal (Phantom) Manual v1.0
Designs, Images and Content Copyright © Aeroxcraft Ltd. 2013 Page 9
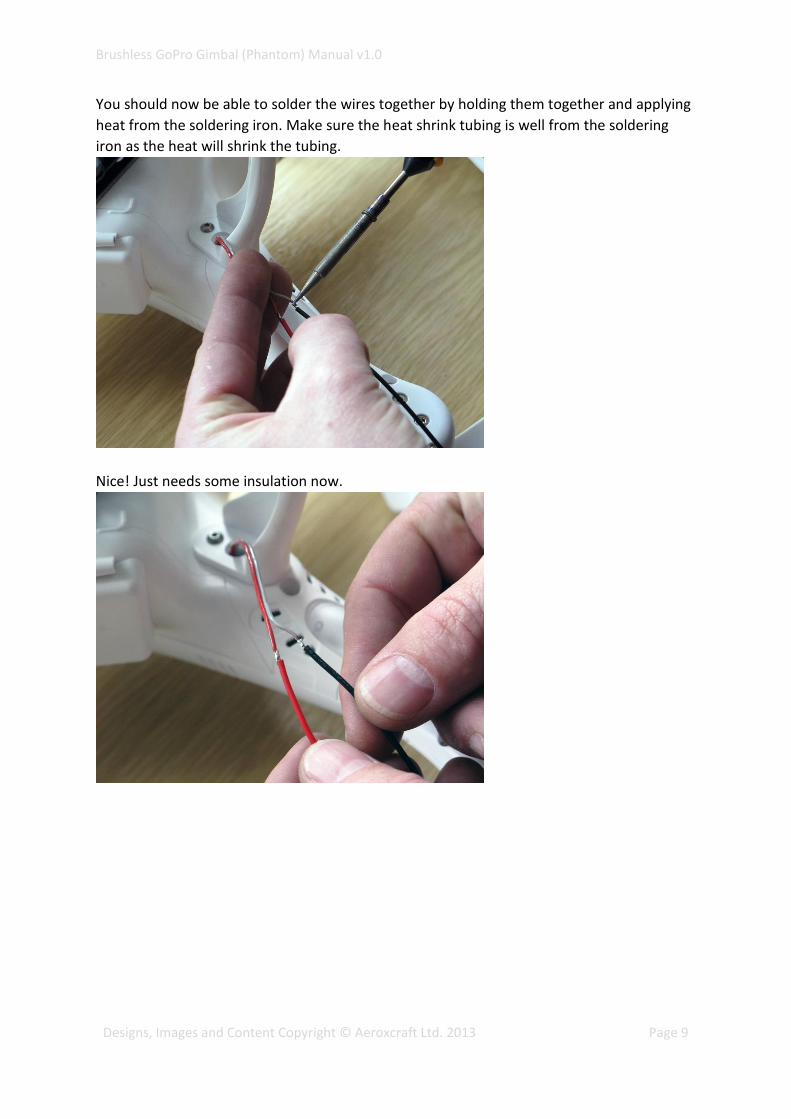
You should now be able to solder the wires together by holding them together and applying
heat from the soldering iron. Make sure the heat shrink tubing is well from the soldering
iron as the heat will shrink the tubing.
Nice! Just needs some insulation now.
Brushless GoPro Gimbal (Phantom) Manual v1.0
Designs, Images and Content Copyright © Aeroxcraft Ltd. 2013 Page 10
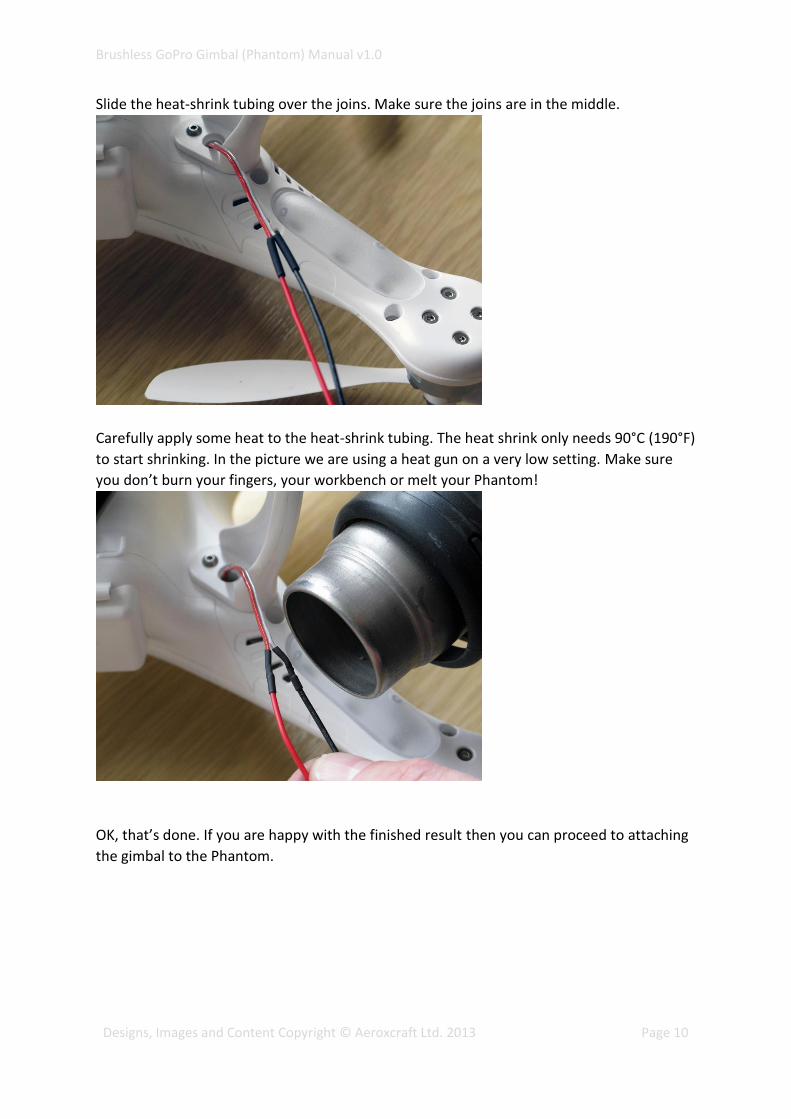
Slide the heat-shrink tubing over the joins. Make sure the joins are in the middle.
Carefully apply some heat to the heat-shrink tubing. The heat shrink only needs 90°C (190°F)
to start shrinking. In the picture we are using a heat gun on a very low setting. Make sure
you don’t burn your fingers, your workbench or melt your Phantom!
OK, that’s done. If you are happy with the finished result then you can proceed to attaching
the gimbal to the Phantom.
Brushless GoPro Gimbal (Phantom) Manual v1.0
Designs, Images and Content Copyright © Aeroxcraft Ltd. 2013 Page 11
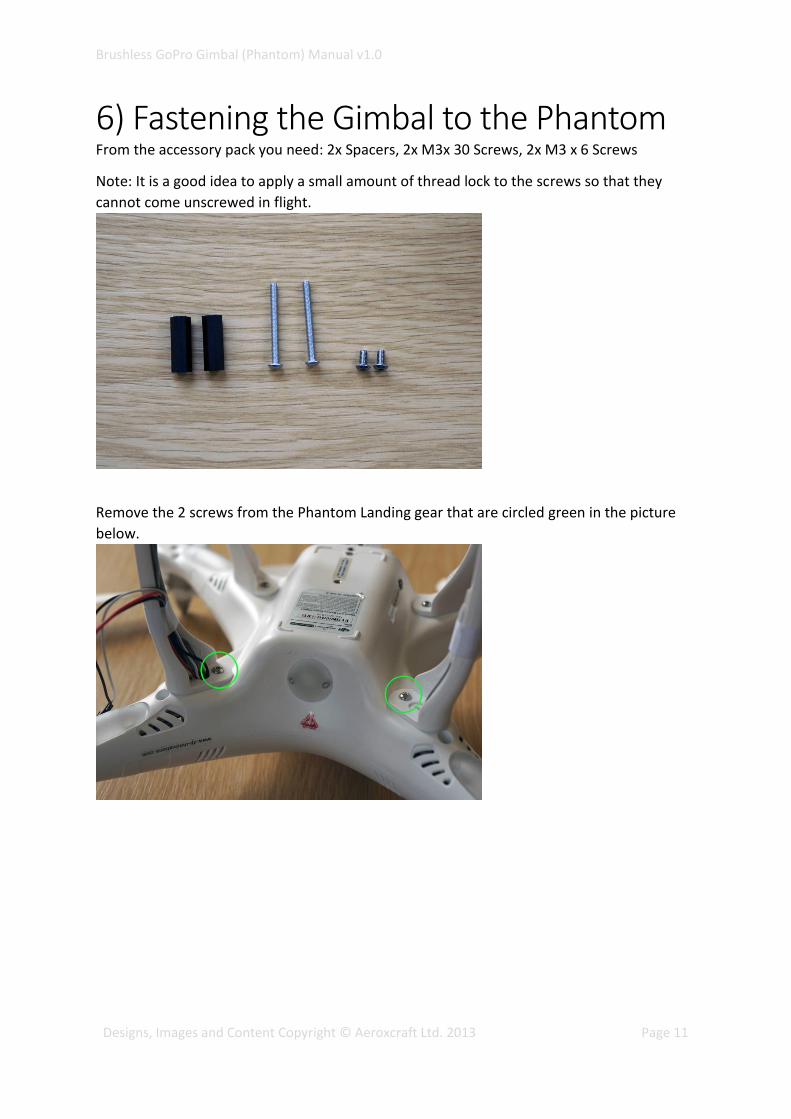
6) Fastening the Gimbal to the Phantom From the accessory pack you need: 2x Spacers, 2x M3x 30 Screws, 2x M3 x 6 Screws
Note: It is a good idea to apply a small amount of thread lock to the screws so that they
cannot come unscrewed in flight.
Remove the 2 screws from the Phantom Landing gear that are circled green in the picture
below.
Brushless GoPro Gimbal (Phantom) Manual v1.0
Designs, Images and Content Copyright © Aeroxcraft Ltd. 2013 Page 12
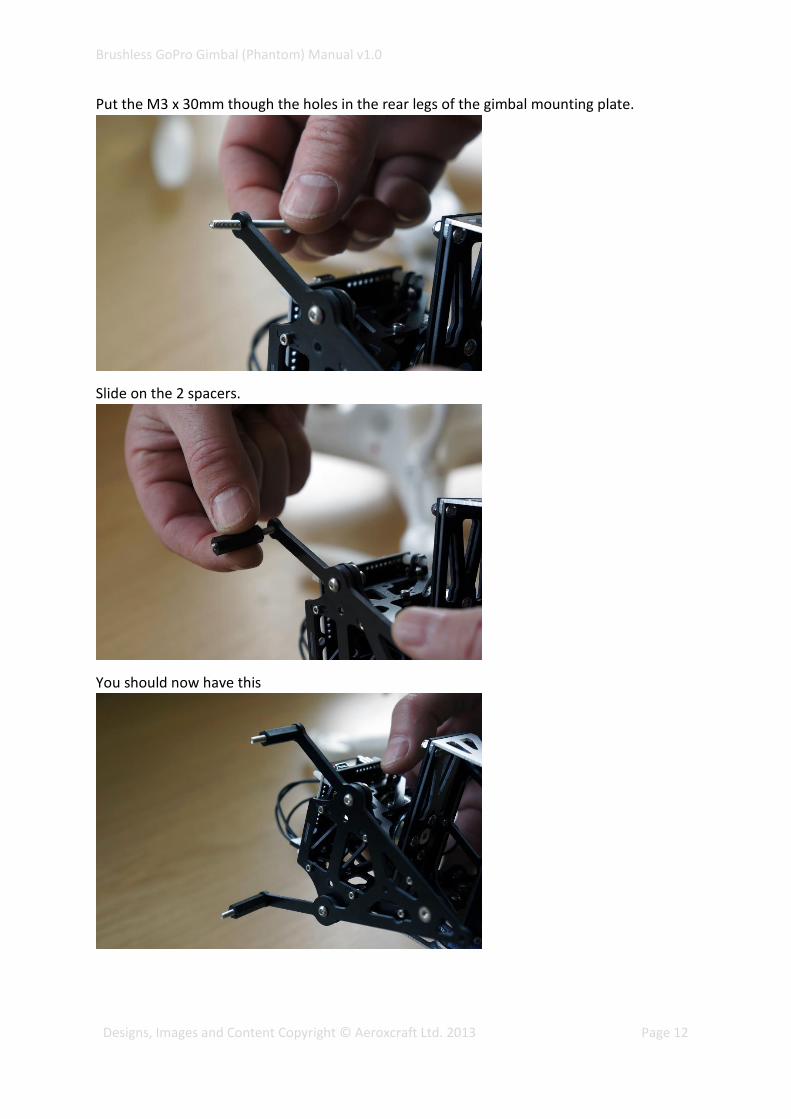
Put the M3 x 30mm though the holes in the rear legs of the gimbal mounting plate.
Slide on the 2 spacers.
You should now have this
Brushless GoPro Gimbal (Phantom) Manual v1.0
Designs, Images and Content Copyright © Aeroxcraft Ltd. 2013 Page 13
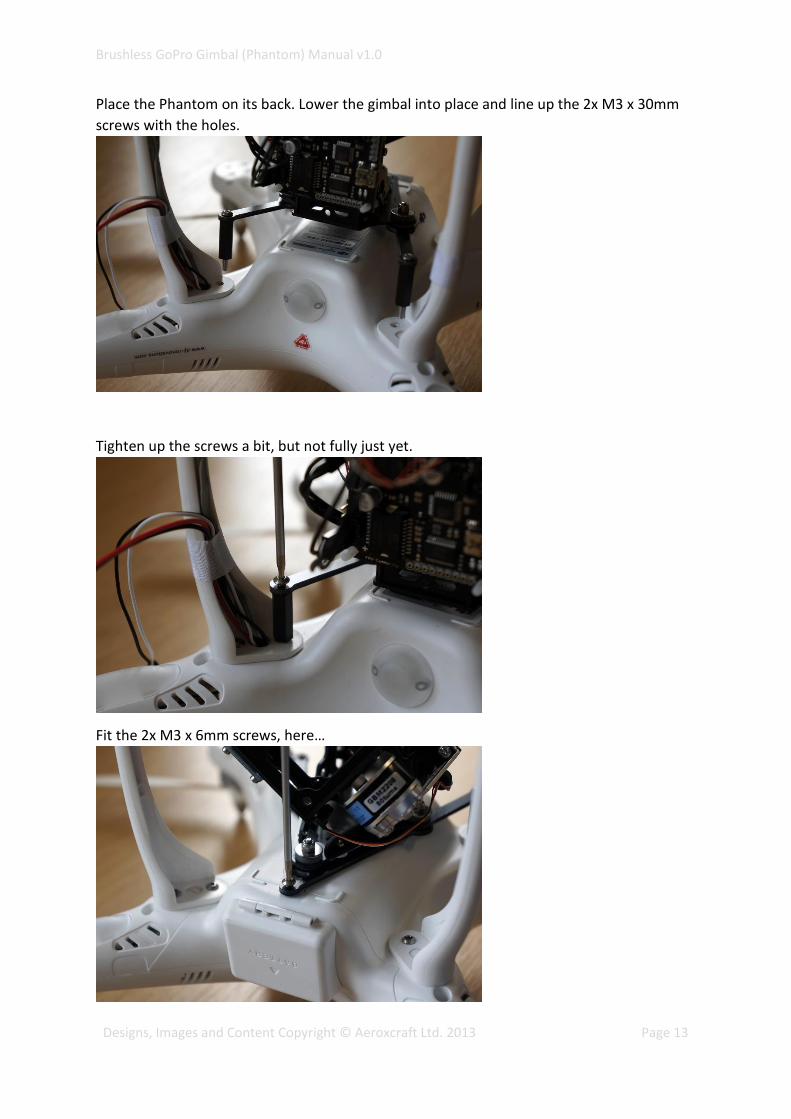
Place the Phantom on its back. Lower the gimbal into place and line up the 2x M3 x 30mm
screws with the holes.
Tighten up the screws a bit, but not fully just yet.
Fit the 2x M3 x 6mm screws, here…

Brushless GoPro Gimbal (Phantom) Manual v1.0
Designs, Images and Content Copyright © Aeroxcraft Ltd. 2013 Page 14
…and here.
When all 4 screws are in place, tighten them all up.
You can then attach the power connector to the gimbal board. Make sure you connect it the
right way round. Red is Positive (+) and Black is negative (-). Connecting the power the
wrong way round will blow a fuse on the board. It is possible to repair the board if you do
this, contact us for details if you have done this.
Brushless GoPro Gimbal (Phantom) Manual v1.0
Designs, Images and Content Copyright © Aeroxcraft Ltd. 2013 Page 15
7) Powering up the Gimbal.
Note: Put your GoPro camera in the gimbal before you connect up the power. The gimbal is
tuned to include the mass of the camera and will not work correctly without the camera
installed.
With the gimbal now connected to the Phantom, it is powered directly from the flight
battery. When you connect the flight battery make sure that the gimbal is kept very still. If
the gimbal senses any movement when it powers up it may not initialise properly.
Brushless GoPro Gimbal (Phantom) Manual v1.0
Designs, Images and Content Copyright © Aeroxcraft Ltd. 2013 Page 16
8) Connecting the Tilt Control Cable
You can connect the gimbal board to your Naza controller to allow control of the tilt(pitch)
of the camera gimbal.
To get at the Naza controller you need to open up the Phantom. Full details on how to do
this are available from the DJI website, we suggest you get them and read them before
proceeding.
The tasks required to do this are
1) Connect the gimbal board to the Naza. Supplied with the gimbal is a cable for doing
this. It basically connects pins A1 & GND on the gimbal board to the F2 port on the
Naza.
2) Use the Naza-M Assistant Software to configure the Naza flight controller. This is
available to download from DJI. You need to turn on gimbal control and set both the
gimbal tilt and roll gains to 0.
3) You will also need a tilt control lever for your transmitter. The Phantom transmitter
has a ‘hidden’ 7th channel that is used to control the gimbal tilt. To operate this
channel you need a lever that you can fit to the rear of your transmitter. These are
not available from Aeroxcraft as yet, but are widely available elsewhere.
Note: We have found the tilt control works best if you move the tilt lever slowly.
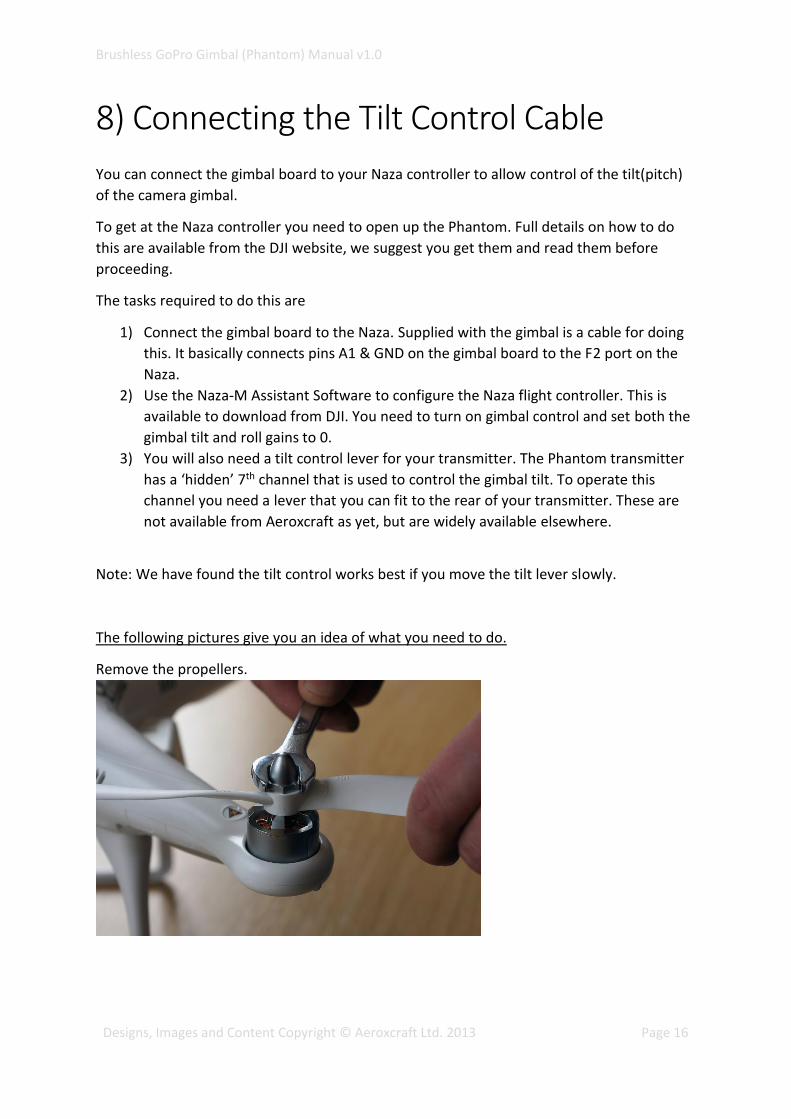
The following pictures give you an idea of what you need to do.
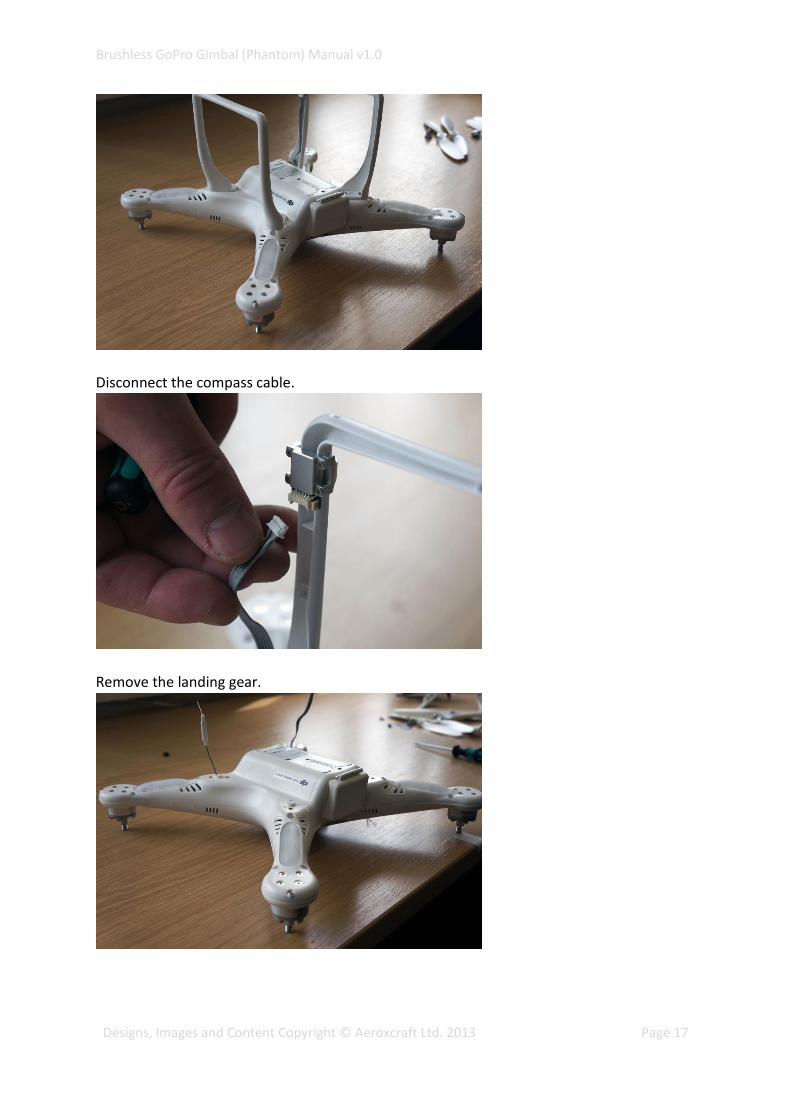
Remove the propellers.
Brushless GoPro Gimbal (Phantom) Manual v1.0
Designs, Images and Content Copyright © Aeroxcraft Ltd. 2013 Page 17
Disconnect the compass cable.
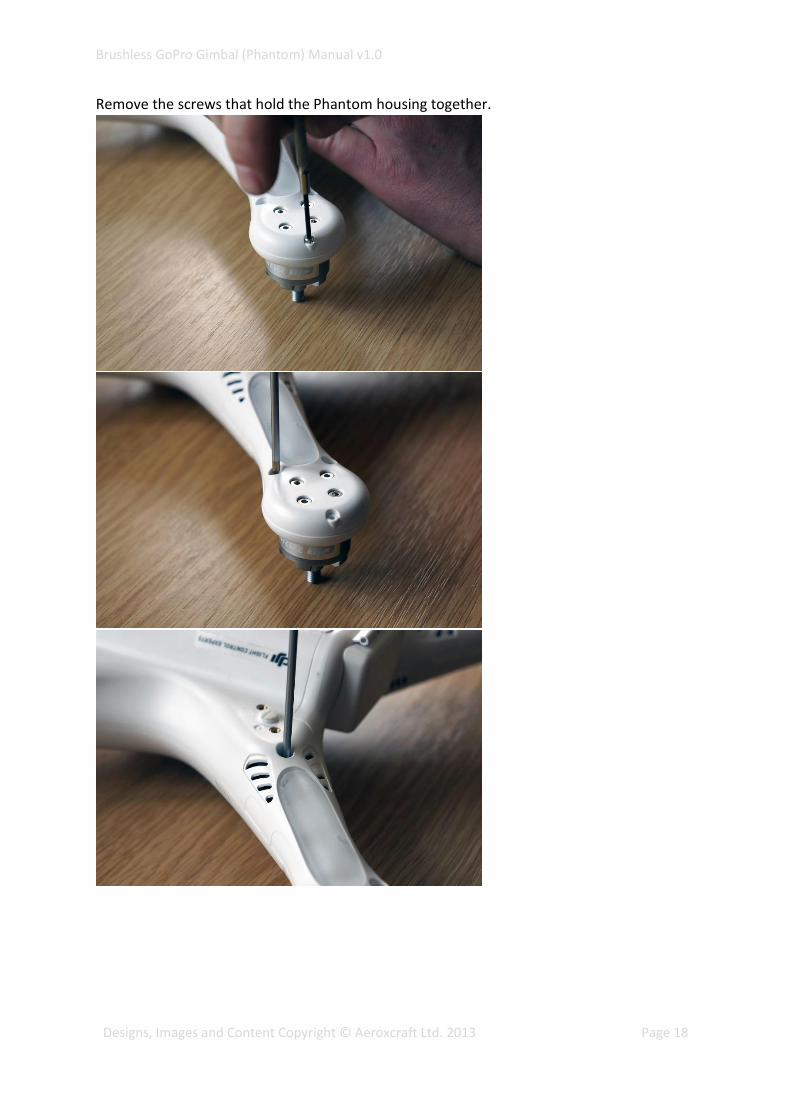
Remove the landing gear.
Brushless GoPro Gimbal (Phantom) Manual v1.0
Designs, Images and Content Copyright © Aeroxcraft Ltd. 2013 Page 18
Remove the screws that hold the Phantom housing together.
Brushless GoPro Gimbal (Phantom) Manual v1.0
Designs, Images and Content Copyright © Aeroxcraft Ltd. 2013 Page 19
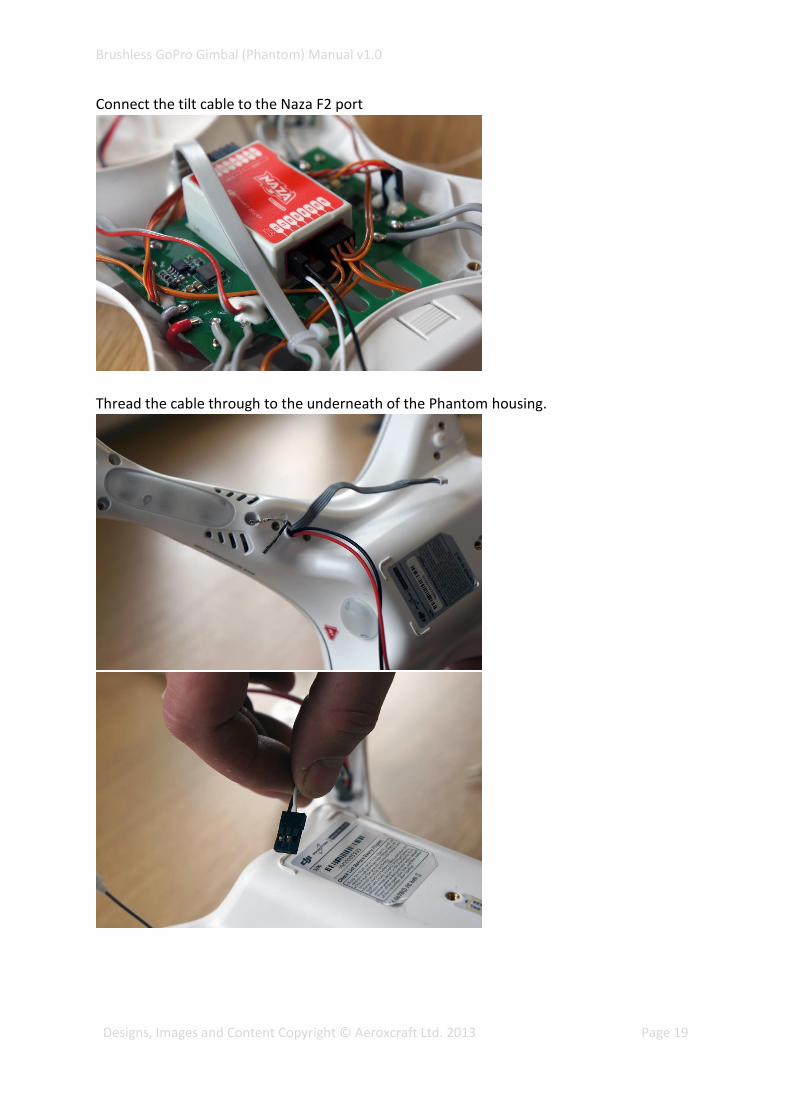
Connect the tilt cable to the Naza F2 port
Thread the cable through to the underneath of the Phantom housing.
Brushless GoPro Gimbal (Phantom) Manual v1.0
Designs, Images and Content Copyright © Aeroxcraft Ltd. 2013 Page 20
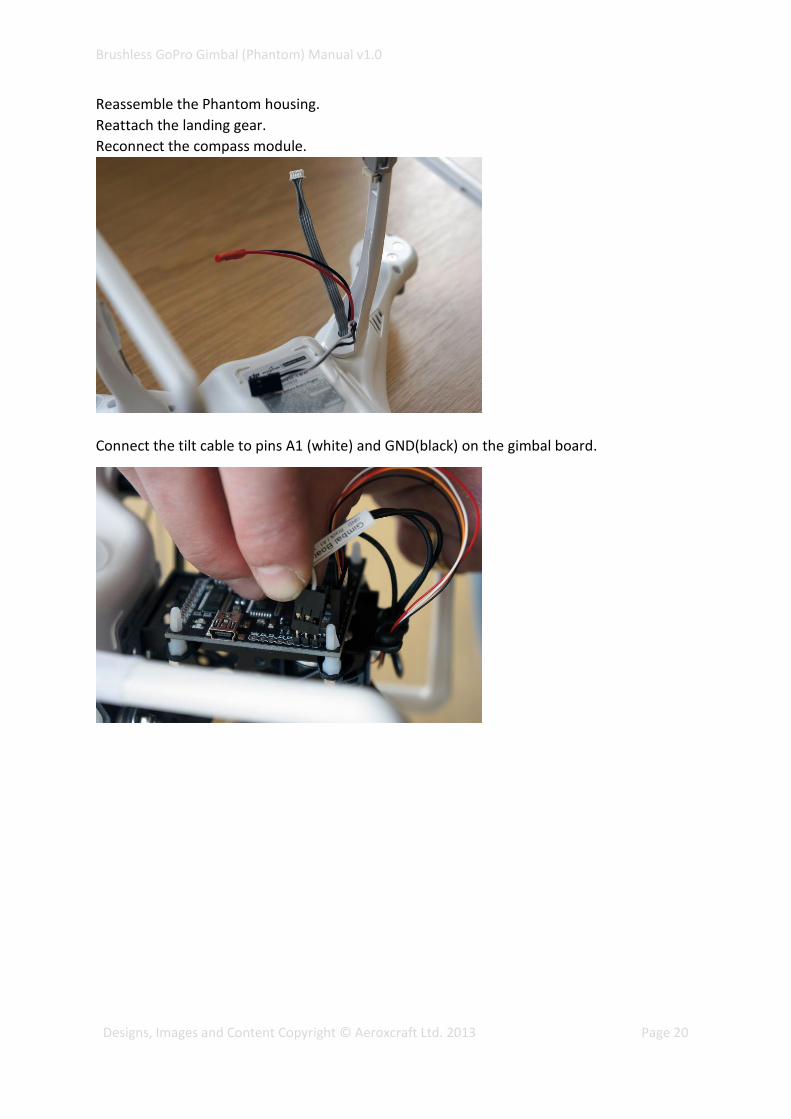
Reassemble the Phantom housing.
Reattach the landing gear.
Reconnect the compass module.
Connect the tilt cable to pins A1 (white) and GND(black) on the gimbal board.
Top Related