Ultra-low power high performance Smart Sensor Hub with ...€¦ · Bosch Sensortec |...
19
Bosch Sensortec | BHI260AB/BHA260AB – Evaluation Setup Guide 1 | 19 BHI260AB-BHA260AB Evaluation Setup Guide Document revision 2.10 Document release date May 15 th , 2020 Document number BST-BHI260-AN001-05 Technical reference code(s) 0 273 141 367 0 273 141 392 Notes Data and descriptions in this document are subject to change without notice. Product photos and pictures are for illustration purposes only and may differ from the real product appearance. BHI260AB BHA260AB Ultra-low power high performance Smart Sensor Hub with integrated sensors
Transcript of Ultra-low power high performance Smart Sensor Hub with ...€¦ · Bosch Sensortec |...

Bosch Sensortec | BHI260AB/BHA260AB – Evaluation Setup Guide 1 | 19
BHI260AB-BHA260AB Evaluation Setup Guide Document revision 2.10
Document release date May 15th, 2020
Document number BST-BHI260-AN001-05
Technical reference code(s) 0 273 141 367 0 273 141 392
Notes Data and descriptions in this document are subject to change without notice. Product photos and pictures are for illustration purposes only and may differ from the real product appearance.
BHI260AB BHA260AB Ultra-low power high performance Smart Sensor Hub with integrated sensors

Bosch Sensortec | BHI260AB/BHA260AB – Evaluation Setup Guide 1 | 19
Modifications reserved |Data subject to change without notice | Printed in Germany Document number: BST-BHI260AB-AN001-05 Revision_2.10
Table of contents 1 GENERAL DESCRIPTION ........................................................................................................................................ 3
2 SOFTWARE REQUIREMENTS ................................................................................................................................ 3
2.1 Windows ........................................................................................................................................................... 3
2.2 Linux ................................................................................................................................................................. 4
2.3 COINES ............................................................................................................................................................. 4
2.4 BHI260AB/ BHA260AB Sensor API ................................................................................................................ 4
2.5 Firmware on the Application Board ............................................................................................................... 5
3 HARDWARE REQUIREMENTS ............................................................................................................................... 6
4 BUILDING AND EXECUTING EXAMPLES .............................................................................................................. 8
5 COMMAND-LINE INTERFACE TOOL BHY2CLI ................................................................................................... 10
5.1 Overview ......................................................................................................................................................... 10
5.2 Getting started ............................................................................................................................................... 11
5.3 Examples and further descriptions ............................................................................................................. 13
6 LEGAL DISCLAIMER ............................................................................................................................................. 16
6.1 Product use .................................................................................................................................................... 16
6.2 Engineering Samples .................................................................................................................................... 16
6.3 Application examples and hints ................................................................................................................... 16
7 REFERENCES ........................................................................................................................................................ 16
8 DOCUMENT HISTORY AND MODIFICATIONS .................................................................................................... 17

Bosch Sensortec | BHI260AB/BHA260AB – Evaluation Setup Guide 2 | 19
Modifications reserved |Data subject to change without notice | Printed in Germany Document number: BST-BHI260AB-AN001-05 Revision_2.10
List of Figures Figure 1: Necessary components .................................................................................................................................. 6 Figure 2: Mounting the level shifter board .................................................................................................................... 6 Figure 3: Mounting the BHy2 shuttle board .................................................................................................................. 7 Figure 4: Checking the connection in device manager ............................................................................................... 7
List of tables Table 1: bhy2cli commands .......................................................................................................................................... 10

Bosch Sensortec | BHI260AB/BHA260AB – Evaluation Setup Guide 3 | 19
Modifications reserved |Data subject to change without notice | Printed in Germany Document number: BST-BHI260AB-AN001-05 Revision_2.10
1 General description This guide provides the tools and information needed to evaluate features of BHI260AB and BHA260AB (will be referred to as BHy2 in the following), on both Windows and Linux systems. Hardware and software requirements are described and simple examples can be used to get started with the BHy2 solution. The examples can then be used as a reference in order to build custom examples for various tasks. Additionally, the setup can be used to evaluate custom firmware images that are developed using the Software Development Kit (see Reference 2). Finally, the command line interface tool bhy2cli is introduced, which provides a simple and quick way of communicating to the BHy2 device via command line options, without needing any additional installations or hardware. The examples provided are based on COINES ("COmmunication with INertial and Environmental Sensors"), an evaluation software tool from Bosch Sensortec, which provides a low-level interface to Bosch Sensortec’s Application board 2.0, as well as the sensor shuttle boards connected to the Application board. Windows, Linux, and MacOS operating systems are supported by the tool. This document lists the Windows and Linux steps.
2 Software requirements 2.1 Windows It is recommended to use Windows 7 or newer in order to use the Software tools provided. To set up the required software environment, execute the following steps:
1. Install the GCC compiler for Windows as part of the TDM32 bundle (for 32-bit Windows installations) or TDM64 bundle (for 64-bit Windows installations), which can be found here:
a. Uncheck the circled checkbox and click Create. b. Read and accept the license agreement, then finish the installation with default options
2. Optionally, download and install the GNU ARM Embedded Toolchain to be able to program the
Application Board. Ensure that the toolchain is available on PATH.
Bosch Sensortec | BHI260AB/BHA260AB – Evaluation Setup Guide 4 | 19
Modifications reserved |Data subject to change without notice | Printed in Germany Document number: BST-BHI260AB-AN001-05 Revision_2.10
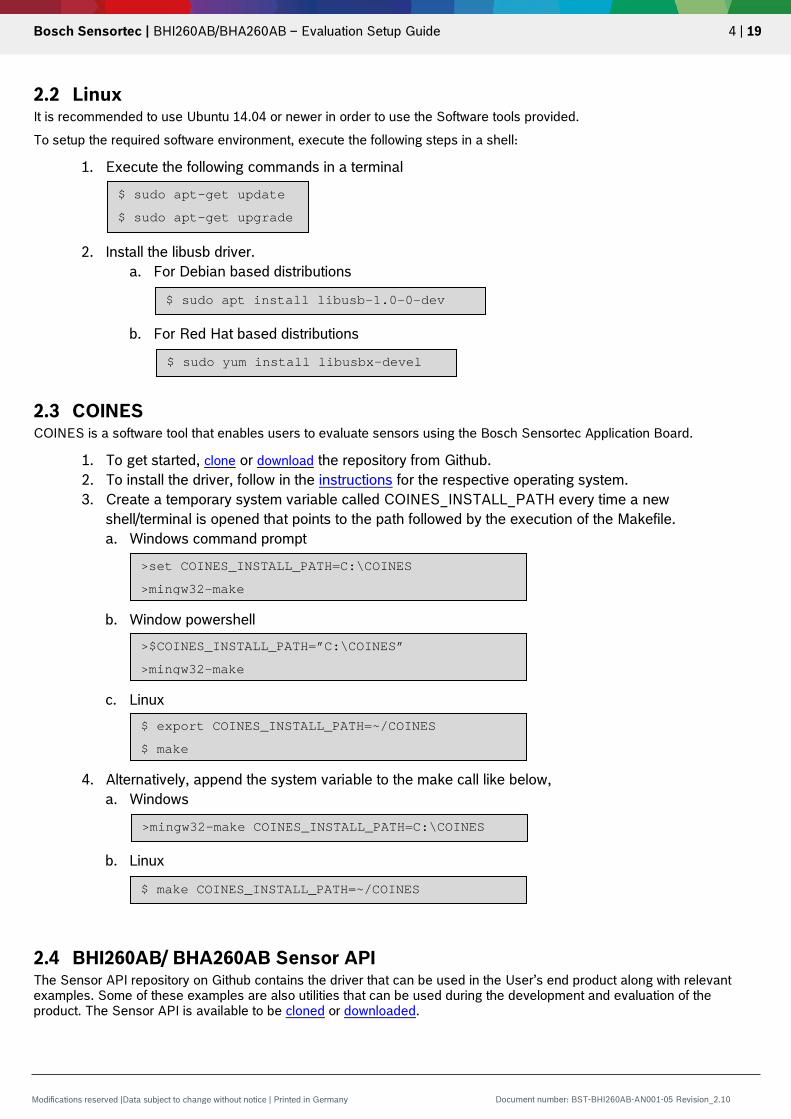
2.2 Linux It is recommended to use Ubuntu 14.04 or newer in order to use the Software tools provided. To setup the required software environment, execute the following steps in a shell:
1. Execute the following commands in a terminal
2. Install the libusb driver. a. For Debian based distributions
b. For Red Hat based distributions
2.3 COINES COINES is a software tool that enables users to evaluate sensors using the Bosch Sensortec Application Board.
1. To get started, clone or download the repository from Github. 2. To install the driver, follow in the instructions for the respective operating system. 3. Create a temporary system variable called COINES_INSTALL_PATH every time a new
shell/terminal is opened that points to the path followed by the execution of the Makefile. a. Windows command prompt
b. Window powershell
c. Linux
4. Alternatively, append the system variable to the make call like below, a. Windows
b. Linux
2.4 BHI260AB/ BHA260AB Sensor API The Sensor API repository on Github contains the driver that can be used in the User’s end product along with relevant examples. Some of these examples are also utilities that can be used during the development and evaluation of the product. The Sensor API is available to be cloned or downloaded.
$ sudo apt-get update $ sudo apt-get upgrade
$ sudo apt install libusb-1.0-0-dev
$ sudo yum install libusbx-devel
>mingw32-make COINES_INSTALL_PATH=C:\COINES
$ make COINES_INSTALL_PATH=~/COINES
>set COINES_INSTALL_PATH=C:\COINES
>mingw32-make
>$COINES_INSTALL_PATH=”C:\COINES”
>mingw32-make
$ export COINES_INSTALL_PATH=~/COINES
$ make

Bosch Sensortec | BHI260AB/BHA260AB – Evaluation Setup Guide 5 | 19
Modifications reserved |Data subject to change without notice | Printed in Germany Document number: BST-BHI260AB-AN001-05 Revision_2.10
2.5 Firmware on the Application Board The Application board ships with default firmware which may need an update depending on the time of update. In any case, it is recommended to update the board’s firmware, instructions for which are available in the README.
Bosch Sensortec | BHI260AB/BHA260AB – Evaluation Setup Guide 6 | 19
Modifications reserved |Data subject to change without notice | Printed in Germany Document number: BST-BHI260AB-AN001-05 Revision_2.10
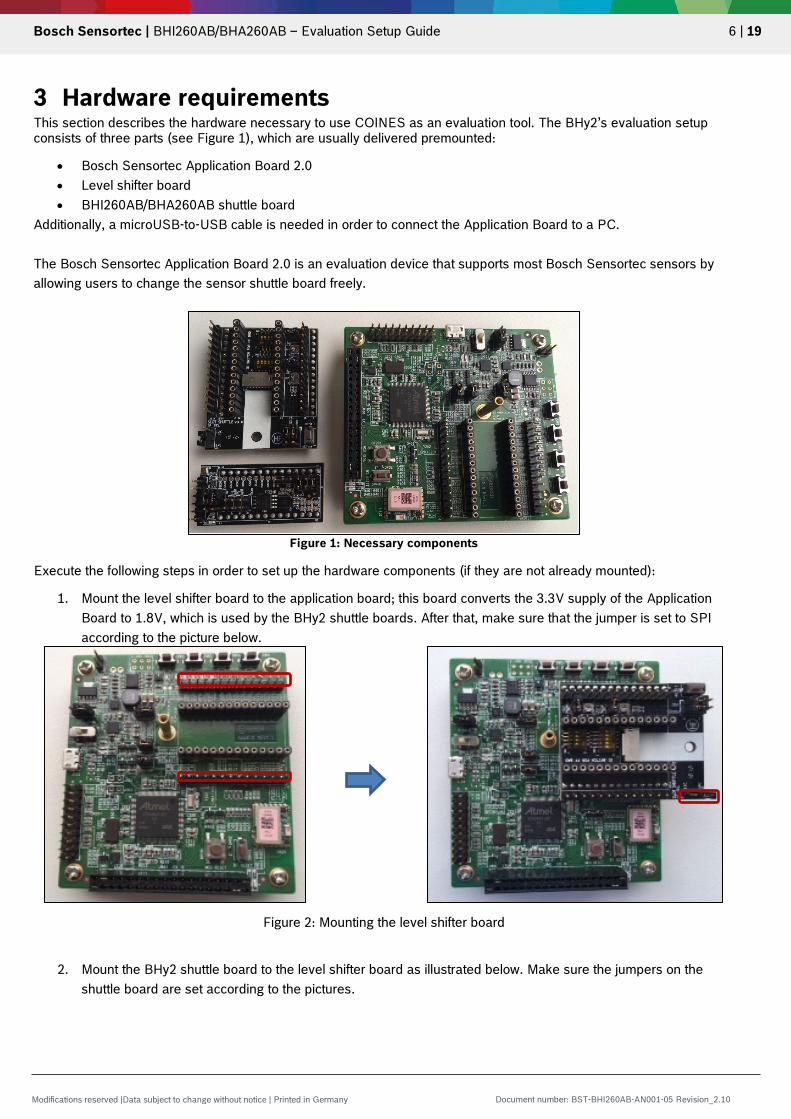
3 Hardware requirements This section describes the hardware necessary to use COINES as an evaluation tool. The BHy2’s evaluation setup consists of three parts (see Figure 1), which are usually delivered premounted:
• Bosch Sensortec Application Board 2.0 • Level shifter board • BHI260AB/BHA260AB shuttle board
Additionally, a microUSB-to-USB cable is needed in order to connect the Application Board to a PC. The Bosch Sensortec Application Board 2.0 is an evaluation device that supports most Bosch Sensortec sensors by allowing users to change the sensor shuttle board freely.
Figure 1: Necessary components
Execute the following steps in order to set up the hardware components (if they are not already mounted):
1. Mount the level shifter board to the application board; this board converts the 3.3V supply of the Application Board to 1.8V, which is used by the BHy2 shuttle boards. After that, make sure that the jumper is set to SPI according to the picture below.
Figure 2: Mounting the level shifter board
2. Mount the BHy2 shuttle board to the level shifter board as illustrated below. Make sure the jumpers on the
shuttle board are set according to the pictures.

Bosch Sensortec | BHI260AB/BHA260AB – Evaluation Setup Guide 7 | 19
Modifications reserved |Data subject to change without notice | Printed in Germany Document number: BST-BHI260AB-AN001-05 Revision_2.10
Figure 3: Mounting the BHy2 shuttle board
3. Attach a micro-USB-to-USB cable to the application board and connect it to your PC. 4. Turn on the device by setting the power switch (see Figure 3: Mounting the BHy2 shuttle board) on the
Application Board to the “on” position.
Under Windows, the correct connection of the application board as well as the installation of the necessary drivers can be confirmed by checking the device manager. The application board should now be visible under “BST Board” (see Figure 4).
Figure 4: Checking the connection in device manager

Bosch Sensortec | BHI260AB/BHA260AB – Evaluation Setup Guide 8 | 19
Modifications reserved |Data subject to change without notice | Printed in Germany Document number: BST-BHI260AB-AN001-05 Revision_2.10
4 Building and executing examples The Sensor API contains examples for COINES, which can be found under examples/coines. The following steps will guide you through the process of building and executing the example “bhy2cli”.
1. Open a command prompt terminal or powershell terminal and navigate to the directory of the bhy2cli example, for instance,
2. In order to build the application, execute the Makefile by involving make a. Windows
b. Linux
>cd C:\BHY2-Sensor-API\examples\coines\bhy2cli
>mingw32-make
Platform: Windows cc: "C:\TDM-GCC-64\bin\gcc.exe". [ MKDIR ] build/PC [ CC ] parse.c [ CC ] ../common/common.c [ CC ] ../../../bhy2.c [ CC ] ../../../bhy2_hif.c [ CC ] ../../../bhy2_parse.c [ CC ] bhy2cli.c [ MAKE ] coines_api [ CC ] pc/coines.c [ CC ] pc/comm_intf/comm_intf.c [ CC ] pc/comm_intf/comm_ringbuffer.c [ CC ] pc/comm_driver/usb.c [ CC ] pc/comm_driver/legacy_usb/legacy_usb_support.c [ AR ] libcoines-pc.a [ LD ] bhy2cli
Platform: Linux / macOS cc: "/usr/bin/gcc". [ MKDIR ] build/PC [ CC ] parse.c [ CC ] ../common/common.c [ CC ] ../../../bhy2.c [ CC ] ../../../bhy2_hif.c [ CC ] ../../../bhy2_parse.c [ CC ] bhy2cli.c [ MAKE ] coines_api [ CC ] pc/coines.c [ CC ] pc/comm_intf/comm_intf.c [ CC ] pc/comm_intf/comm_ringbuffer.c [ CC ] pc/comm_driver/usb.c [ AR ] libcoines-pc.a [ LD ] bhy2cli
$ make

Bosch Sensortec | BHI260AB/BHA260AB – Evaluation Setup Guide 9 | 19
Modifications reserved |Data subject to change without notice | Printed in Germany Document number: BST-BHI260AB-AN001-05 Revision_2.10
3. Run the bhy2cli executable a. Windows
b. Linux
This should result in the following screen,
>bhy2cli.exe -h
$ ./bhy2cli -h
Copyright (c) 2020 Bosch Sensortec GmbH Build date: May 15 2020 Usage: bhy2cli [<options>] Options: -h = Print this usage message -i = Show device information: Device ID, ROM version, RAM version, Power state, list of available sensors, content of Boot Status register, content of Error value register -v <verbose level> = Set the verbose level. 0 Error, 1 Warning, 2 Infos -b <firmware path> = Reset, upload specified firmware to RAM and boot from RAM [equivalent to using -n -u <firmware> -g r successively] -d <firmware path> = Reset, upload specified firmware to Flash and boot from Flash [equivalent to using -n -f <firmware> -g f successively] -n = Reset sensor hub -a <sensor id>:<sensor name>:<total output payload in bytes>: <output_format_0>:<output_format_1> = Register the expected payload of a new custom virtual sensor -Valid output_formats: u8: Unsigned 8 Bit, u16: Unsigned 16 Bit, u32: Unsigned 32 Bit, s8: Signed 8 Bit, 16: Signed 16 Bit, s32: Signed 32 Bit, f: Float, c: Char …

Bosch Sensortec | BHI260AB/BHA260AB – Evaluation Setup Guide 10 | 19
Modifications reserved |Data subject to change without notice | Printed in Germany Document number: BST-BHI260AB-AN001-05 Revision_2.10
5 Command-line interface tool bhy2cli The command-line interface tool bhy2cli is an application based on the COINES API. It is used to communicate to BHI260AB/BHA260AB by using predefined commands that it translates to corresponding host interface commands. The requirements for using the tool are described in chapters 2 and 3. Calls to the bhy2cli tool are structured as follows:
>bhy2cli <option1> <parameters1> <option2> <parameters2> …
There can be any number of options used subsequently and the same options can be used multiple times.
5.1 Overview The following table displays the implemented options with necessary parameters and short descriptions. Examples and further details can be found in the table below.
Table 1: bhy2cli commands
Option Parameters Description
-h none Display help, which prints information about available commands.
-i none Display general device information, virtual sensors present (sensor ids and name) in the loaded firmware, boot status register content and error register content.
-v <verbose level> Set the verbose level. 0 prints only the error messages, 1 prints warning messages and errors, 2 prints all messages. The default is 2.
-b <firmware path> Soft reset device, load firmware at provided file location into RAM and boot the device from RAM (equivalent to using: -n -u <firmware path> -g r).
-n none Soft reset device.
-u <firmware path> Load firmware at specified file location into RAM
-f <firmware path> Load firmware at specified file location into external FLASH.
-e none Erase external FLASH.
-g <medium> Medium = ‘r’ : boot device from RAM Medium = ‘f’ : boot device from external FLASH.
-c <sensor id>:<frequency>[:<latency>]
Activate sensor <sensor id> with the specified sample rate <frequency> [Hz] and stream output data. Optional: sensor output can be delayed by <latency> [ms]. Multiple sensors can be active at the same time.
-a <sensor id>:<sensor name>:<total output payload in bytes>: <output format 0>:<output format 1>…
Register the output payload of a custom virtual sensor, so that the data in the FIFO can be interpreted correctly. This enables streaming custom sensor data with -c option.
-r <adr>[:<len>]
Read <len> bytes from register address <adr>. If <len> is not specified, 1 byte will be read. Values for <adr> and <len> can be specified in either decimal or hexadecimal format.
-w <adr>=<val1>[,<val2>,…]
Write <val1> to <adr>. If more values are provided: write <val2> to <adr> + 1, <val3> to <adr> + 2 … Values for <adr> and <val> can be specified in either decimal or hexadecimal.

Bosch Sensortec | BHI260AB/BHA260AB – Evaluation Setup Guide 11 | 19
Modifications reserved |Data subject to change without notice | Printed in Germany Document number: BST-BHI260AB-AN001-05 Revision_2.10
Option Parameters Description
-s <param_id> Display read parameter response of parameter <param_id>.
-t <param_id>=<val1>[,<val2>…]
Write data to parameter <param_id>. Each specified <val> resembles one byte to be written. Values for <param_id> and <val> can be specified in either decimal or hexadecimal.
5.2 Getting started To start using bhy2cli, the following minimal example set of commands can be used to get started:
1. Establish the hardware connections described in chapter 3. 2. Build the tool as described in the chapter 4. 3. Use the “-b” option to reset, load a firmware to RAM and boot the device from RAM. In the example
below, the .fw file is located in a different directory as the bhy2cli executable. a. Windows
b. Linux
4. Display general device information including the existing virtual sensors in the firmware. a. Windows
b. Linux
5. Activate the virtual sensor “Game Rotation vector” at 25 Hz to see the data provided by the device. a. Windows
b. Linux
It should result is something like below,
> bhy2cli –b ..\..\..\firmware\bhi260\Bosch_SHUTTLE_BHI260.fw
$ ./bhy2cli –b ../../../firmware/bhi260/Bosch_SHUTTLE_BHI260.fw
> bhy2cli –i
$ ./bhy2cli –i
> bhy2cli –c 37:25
$ ./bhy2cli –c 37:25
[Info]Device found [Info]No firmware running [Info]Executing -b ..\..\..\firmware\bhi260\Bosch_SHUTTLE_BHI260.fw [Info]Reset successful [Info]Uploading 107804 bytes of firmware to RAM [Info]Completed 100.00% [Info]Firmware upload took 55.46 seconds [Info]Uploading firmware to RAM successful [Info]Waiting for firmware verification to complete [Info]Boot Status : 0x31: Flash detected. Host interface ready. Firmware verification done. [Info][META EVENT]; T: 0.039593750; Firmware initialized. Firmware version 5978 [Info]Booting from RAM successful
Bosch Sensortec | BHI260AB/BHA260AB – Evaluation Setup Guide 12 | 19
Modifications reserved |Data subject to change without notice | Printed in Germany Document number: BST-BHI260AB-AN001-05 Revision_2.10
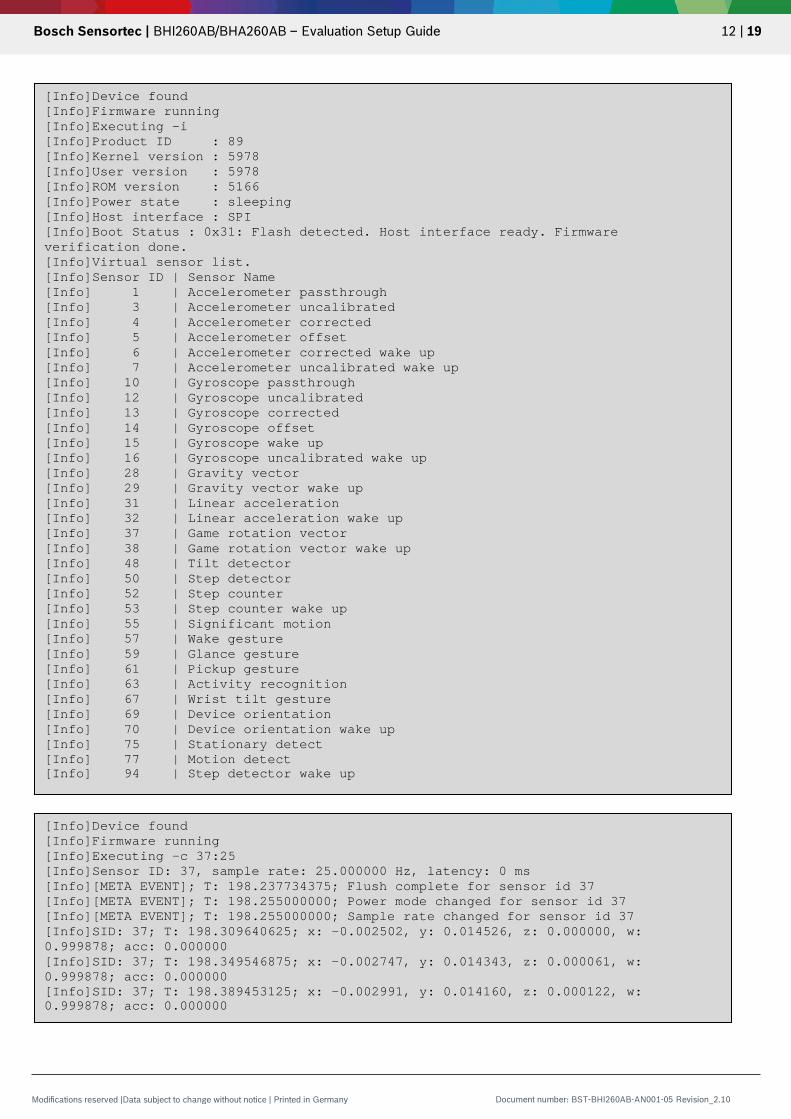
[Info]Device found [Info]Firmware running [Info]Executing -i [Info]Product ID : 89 [Info]Kernel version : 5978 [Info]User version : 5978 [Info]ROM version : 5166 [Info]Power state : sleeping [Info]Host interface : SPI [Info]Boot Status : 0x31: Flash detected. Host interface ready. Firmware verification done. [Info]Virtual sensor list. [Info]Sensor ID | Sensor Name [Info] 1 | Accelerometer passthrough [Info] 3 | Accelerometer uncalibrated [Info] 4 | Accelerometer corrected [Info] 5 | Accelerometer offset [Info] 6 | Accelerometer corrected wake up [Info] 7 | Accelerometer uncalibrated wake up [Info] 10 | Gyroscope passthrough [Info] 12 | Gyroscope uncalibrated [Info] 13 | Gyroscope corrected [Info] 14 | Gyroscope offset [Info] 15 | Gyroscope wake up [Info] 16 | Gyroscope uncalibrated wake up [Info] 28 | Gravity vector [Info] 29 | Gravity vector wake up [Info] 31 | Linear acceleration [Info] 32 | Linear acceleration wake up [Info] 37 | Game rotation vector [Info] 38 | Game rotation vector wake up [Info] 48 | Tilt detector [Info] 50 | Step detector [Info] 52 | Step counter [Info] 53 | Step counter wake up [Info] 55 | Significant motion [Info] 57 | Wake gesture [Info] 59 | Glance gesture [Info] 61 | Pickup gesture [Info] 63 | Activity recognition [Info] 67 | Wrist tilt gesture [Info] 69 | Device orientation [Info] 70 | Device orientation wake up [Info] 75 | Stationary detect [Info] 77 | Motion detect [Info] 94 | Step detector wake up
[Info]Device found [Info]Firmware running [Info]Executing -c 37:25 [Info]Sensor ID: 37, sample rate: 25.000000 Hz, latency: 0 ms [Info][META EVENT]; T: 198.237734375; Flush complete for sensor id 37 [Info][META EVENT]; T: 198.255000000; Power mode changed for sensor id 37 [Info][META EVENT]; T: 198.255000000; Sample rate changed for sensor id 37 [Info]SID: 37; T: 198.309640625; x: -0.002502, y: 0.014526, z: 0.000000, w: 0.999878; acc: 0.000000 [Info]SID: 37; T: 198.349546875; x: -0.002747, y: 0.014343, z: 0.000061, w: 0.999878; acc: 0.000000 [Info]SID: 37; T: 198.389453125; x: -0.002991, y: 0.014160, z: 0.000122, w: 0.999878; acc: 0.000000

Bosch Sensortec | BHI260AB/BHA260AB – Evaluation Setup Guide 13 | 19
Modifications reserved |Data subject to change without notice | Printed in Germany Document number: BST-BHI260AB-AN001-05 Revision_2.10
5.3 Examples and further descriptions
Display Help [-h] Available commands as well as connection status of the device will be displayed. Usage: >bhy2cli –h
Show information [-i] Display general device information, virtual sensors present in loaded firmware, boot status register content and error register content. Usage: >bhy2cli –i
Change verbose [-v] Set the verbose level. 0 prints only the error messages, 1 prints warning messages and errors, 2 prints all messages. The default is 2. Usage: >bhy2cli –v 1
Reset, load and boot [-b] This will soft reset the device, load the firmware specified by the file location into RAM and boot the device from RAM. Usage: >bhy2cli –b ..\..\..\firmware\bhi260\Bosch_SHUTTLE_BHI260.fw
Reset Device [-n] Perform a soft reset. Usage: >bhy2cli –n
Load firmware to RAM [-u] Load the firmware specified by the file location into RAM. Note that a soft reset or hard reset has to be performed before being able to upload a firmware image. Usage: >bhy2cli –u ..\..\..\firmware\bhi260\Bosch_SHUTTLE_BHI260.fw
Load firmware to external FLASH [-f] Load the firmware specified by the file location into external FLASH. Note that a soft reset or hard reset has to be performed before being able to upload a firmware image. Usage: >bhy2cli –f ..\..\..\firmware\bhi260\Bosch_SHUTTLE_BHI260-flash.fw
Erase Flash [-e] Erase content of external flash. Usage: >bhy2cli –e
Boot device [-g] Boot device from RAM. Usage: >bhy2cli –g r

Bosch Sensortec | BHI260AB/BHA260AB – Evaluation Setup Guide 14 | 19
Modifications reserved |Data subject to change without notice | Printed in Germany Document number: BST-BHI260AB-AN001-05 Revision_2.10
Boot device from external FLASH. Usage: >bhy2cli –g f
Activate Sensor [-c] Activate a virtual sensor by providing the Sensor ID, frequency [Hz] and a latency [ms] (optional, default is 0 ms). To stop streaming, press Ctrl + C. To activate multiple sensors at a time, the –c options can be chained. Note that the streaming of sensor data will start at the end of the bhy2cli function call – all other options will be
Example: Activate virtual sensor “Game Rotation vector” (Sensor ID 37) with a sample rate of 25 Hz: >bhy2cli –c 37:25
Register custom virtual sensor payload [-a] Register the output payload of a custom virtual sensor by providing the Sensor ID, an arbitrary name, the total output payload in bytes and each expected output format. Note that the registration of a custom sensor only applies for the current function call. In order to be able to stream sensor data, the –c option has to be used within the same call of the bhy2cli tool (see example below). Any registering of virtual sensor payloads using the -a option has to be done before the first -c option. Possible output formats (with corresponding output payload) are:
• c : Character (1 byte) • u8 : Unsigned 8 bit (1 byte) • u16 : Unsigned 16 bit (2 bytes) • u32 : Unsigned 32 bit (4 bytes) • s8 : Signed 8 bit (1 byte) • s16 : Signed 16 bit (2 bytes) • s32 : Signed 32 bit (4 bytes) • f : Single precision floating point (4 bytes)
Example: Register the payload of the custom virtual sensor “Lean Orientation” (Sensor ID 160). This virtual sensor outputs two characters as the device orientation, e.g. “Z +”. Since one character takes one byte, the total output payload of the sensor is two bytes. Since the registration of a custom sensor is temporary and only applies to the current function call, the “-c”-option has to be trailing in order to be able to stream data from this sensor. In the following example, the “Lean Orientation” sensor payload is registered and FIFO-data is streamed at 25 Hz (the provided name is only for display purposes and can be set to any string): >bhy2cli –a 160:”Lean Orientation”:2:c:c –c 160:25
Read register address [-r] This command will read a specified amount of data from subsequent addresses. Since the Host Channel registers 0x01 – 0x03 hold more than one byte, specifying one of these registers will result in reading subsequent bytes from the chosen register. Reading more than one byte from the register addresses 0x04 ongoing will result in reading from the specified register, as well as the following registers, since these registers hold one byte each (address auto increment for addresses >= 0x04). Detailed information about available registers can be found in Reference 1. Address and length can be specified as decimal or hexadecimal. Note: The maximum read length is restricted to 53 bytes for the current version of the tool.
Example: Read 3 bytes from Host Channel 2:

Bosch Sensortec | BHI260AB/BHA260AB – Evaluation Setup Guide 15 | 19
Modifications reserved |Data subject to change without notice | Printed in Germany Document number: BST-BHI260AB-AN001-05 Revision_2.10
>bhy2cli –r 0x02:3
Read the content of the general purpose registers WGP1_0 (0x08), WGP1_1 (0x09) and WGP1_2 (0x0A): >bhy2cli –r 0x08:3
Write register address [-w] This command will write specified values (one byte each) to subsequent addresses. Since more than one byte can be written to register 0x00, specifying it will result in writing to subsequent bytes of the chosen register. Writing more than one byte to the register addresses 0x04 ongoing will result in writing to the specified register, as well as the following registers, since these registers only hold one byte each (address auto increment for addresses >= 0x04). Detailed information about available registers can be found in Reference 1. Address and length can be specified as decimal or hexadecimal. Note: The maximum write length is restricted to 46 bytes for the current version of the tool.
Example: Write 0x0b to the first byte of Host Channel 0, 0x00 to the second byte of Host Channel 0, 0x04 to the third byte of Host Channel 0, 0x00 to the fourth byte of host channel 0, 0x01 to the fifth byte of Host Channel 0 and 0x00 to the last three bytes of Host Channel 0 (this executes the host command “Request Sensor Self-Test for the Sensor ID 1 (accelerometer). The command response can be found in the register Host channel 3 (register address 0x03). For more information regarding host commands please refer to Reference 1): >bhy2cli –w 0x00=0x0b,0x00,0x04,0x00,0x01,0x00,0x00,0x00
Write 42(dec) to register address 0x08, 0x2a(hex) to register address 0x09 and 5(dec) to register address 0x0a: >bhy2cli –w 0x08=42,0x2a,5
Read parameter [-s] Display the read parameter response of the specified parameter ID, without the parameter ID and the response length (first four bytes of the response). Detailed information about available parameters can be found in Reference 1. Parameter IDs can be provided as decimal or hexadecimal.
Example: Read the parameter “Firmware Version” with the id 0x0104: >bhy2cli –s 0x0104
Write parameter [-t] Write data to the specified parameter ID, without the parameter ID and the response length (first four bytes). Each additional value that is provided results in the following byte to be written. Detailed information about available parameters can be found in Reference 1. Parameter IDs can be provided as decimal or hexadecimal.
Example: Write 5(dec) to the first byte and 6(dec) to the second byte of the parameter “FIFO Control” with the parameter ID 0x0103. For validating the parameter write result, the “-s” option targeting the same parameter ID can be used. >bhy2cli –t 0x0103=5,6
Bosch Sensortec | BHI260AB/BHA260AB – Evaluation Setup Guide 16 | 19
Modifications reserved |Data subject to change without notice | Printed in Germany Document number: BST-BHI260AB-AN001-05 Revision_2.10
6 Legal disclaimer
6.1 Product use Bosch Sensortec products are developed for the consumer goods industry. They may only be used within the parameters of this product data sheet. They are not fit for use in life-sustaining or safety critical systems. Safety critical systems are those for which a malfunction is expected to lead to bodily harm, death, severe property damage or environmental damage. In addition, they are not fit for use in products which interact with motor vehicle systems. The resale and/or use of Bosch Sensortec products are at the purchaser’s own risk and his own responsibility. The examination of fitness for the intended use is the sole responsibility of the purchaser. The purchaser shall indemnify Bosch Sensortec from all third party claims arising from any product use not covered by the parameters of this product data sheet or not approved by Bosch Sensortec and reimburse Bosch Sensortec for all costs in connection with such claims. The purchaser must monitor the market for the purchased products, particularly with regard to product safety, and inform Bosch Sensortec without delay of all safety critical incidents.
6.2 Engineering Samples Engineering samples are marked with an asterisk (*) or (e) or (E). Engineering samples may vary from the valid technical specifications of the product series contained in this data sheet. Therefore, they are not intended or fit for resale to third parties or for use in end products. Their sole purpose is internal client testing. The testing of an engineering sample may in no way replace the testing of a product series. Bosch Sensortec assumes no liability for the use of engineering samples. The purchaser shall indemnify Bosch Sensortec from all claims arising from the use of engineering samples.
6.3 Application examples and hints With respect to any examples or hints given herein, any typical values stated herein and/or any information regarding the application of the device, Bosch Sensortec hereby disclaims any and all warranties and liabilities of any kind, including without limitation warranties of non-infringement of intellectual property rights or copyrights of any third party. The information given in this document shall in no event be regarded as a guarantee of conditions or characteristics. They are provided for illustrative purposes only and no evaluation regarding infringement of intellectual property rights or copyrights or regarding functionality, performance or error has been made.
7 References
Reference 1: BHI260AB and BHA260AB Datasheet Reference 2: BHI260AB-BHA260AB SDK Quick Start Guide

Bosch Sensortec | BHI260AB/BHA260AB – Evaluation Setup Guide 17 | 19
Modifications reserved |Data subject to change without notice | Printed in Germany Document number: BST-BHI260AB-AN001-05 Revision_2.10
8 Document history and modifications
Rev. No Chapter Description of modification/changes Date
2.8 All Main release. 2020-02-04
2.9 All Adaptations to COINES v2.0 2020-03-03
2.10 All Adaptations to COINES v2.3 2020-05-15

Bosch Sensortec | BHI260AB/BHA260AB – Evaluation Setup Guide 18 | 19
Modifications reserved |Data subject to change without notice | Printed in Germany Document number: BST-BHI260AB-AN001-05 Revision_2.10
Bosch Sensortec GmbH Gerhard-Kindler-Straße 9 72770 Reutlingen / Germany www.bosch-sensortec.com Modifications reserved | Printed in Germany Preliminary - specifications subject to change without notice Document number: BST-BHI260-AN001-05 Revision_2.10