Master thesis - POLITesi · PDF filemakes it easier to use when modelling ... Equivalent truss...
128
Politecnico di Milano School of civil, environmental and land management engineering Master thesis Experimental Tests on a Reinforced Concrete Frame with Polystyrene Infills Author: Marko ĐURANOVIĆ Supervisor: Prof. Ing. Liberato FERRARA December 2016
Transcript of Master thesis - POLITesi · PDF filemakes it easier to use when modelling ... Equivalent truss...

Politecnico di Milano School of civil, environmental and land management engineering
Master thesis
Experimental Tests on a Reinforced Concrete
Frame with Polystyrene Infills
Author:
Marko ĐURANOVIĆ
Supervisor:
Prof. Ing. Liberato FERRARA
December 2016

ii

iii
The aim of this thesis will be to investigate the behaviour of a reinforced concrete
frame infilled with polystyrene blocks instead of masonry. This was done by performing a
test on a full scale mock-up in a laboratory. After the test, analytical and FEA solutions were
presented and compared. Since this is fairly new way of using polystyrene, there are no
analytical solutions derived for it, so solutions for masonry infill adjusted for polystyrene
material were implemented. Forces coming from the experimental test were larger than the
predicted ones. This was due to a thick mortar layer which was applied on both sides of the
mock-up and was not taken into account in analytical and FEA solutions. Also all of the
material properties used for predicting the behaviour were characteristic values found in
literature and not obtained by testing material samples. Even so, behaviour of this frame was
very similar to the behaviour of a bare frame as it was expected from the beginning, and
makes it easier to use when modelling behaviour of a whole structure.
ABSTRACT

iv

v
First, I would like to thank my thesis supervisor Prof. Ing. Liberato Ferrara. He
consistently allowed this paper to be my own work, but steered me in the right the direction
whenever he thought I needed it.
I would also like to thank all other professors at Civil Engineering department for
preparing me for this moment by selflessly sharing their knowledge.
I thank my friend Cristian Sotela Sobrado with whom I wrote chapters 2,3 and 6.
I thank laboratory technicians who helped me in the experimental part of the thesis.
Finally, I must express my very profound gratitude to my family and friends for
providing me with unfailing support and continuous encouragement throughout my years of
study and through the process of researching and writing this thesis. This accomplishment
would not have been possible without them.
Marko Đuranović
Politecnico di Milano
December 2016
ACKNOWLEDGEMENTS

vi

vii
Abstract ................................................................................................................... iii
Acknowledgements .................................................................................................. v
Chapter 1 Introduction ......................................................................................... 1
1.1 Objective and scope ................................................................................... 1
1.2 Importance and significance of this study ................................................. 2
1.3 Possible connection between masonry and polystyrene infill ................... 2
Chapter 2 Review of literature ............................................................................ 3
2.1 Introduction ............................................................................................... 3
2.2 Bare frame behaviour ................................................................................ 4
2.2.1 Modelling .................................................................................................................... 5
2.2.2 Failure modes .............................................................................................................. 5
2.3 RC frame with unreinforced masonry infill .............................................. 5
2.3.1 Modelling .................................................................................................................... 5
2.3.2 Behaviour of infilled RC frames under monotonic loading ........................................ 8
2.3.3 Failure modes ............................................................................................................ 11
2.3.4 Analytical prediction of lateral resistance and stiffness ............................................ 17
2.3.5 Behaviour of infilled RC frames under cyclic loading .............................................. 25
2.4 RC frame with slightly reinforced masonry infill ................................... 27
2.4.1 Introduction ............................................................................................................... 27
2.4.2 Modelling and analysis .............................................................................................. 28
2.5 Comparison of the bare frame vs. masonry infilled frame behaviour under
monotonic loading ............................................................................................................... 30
Chapter 3 Prediction of ultimate load via analytical method ......................... 31
3.1 Description of the experimental specimen .............................................. 31
3.2 Failure mechanism 1 ................................................................................ 34
3.3 Failure mechanism 2 ................................................................................ 35
3.4 Failure mechanism 3 ................................................................................ 37
Contents

viii
3.5 Failure mechanism 4 ................................................................................ 38
3.6 Failure mechanism 5 ................................................................................ 39
3.7 Summary .................................................................................................. 40
3.8 Sensitivity Analysis ................................................................................. 40
3.8.1 Residual friction sensitivity analysis ......................................................................... 40
3.8.2 Elastic Modulus sensitivity analysis .......................................................................... 42
3.8.3 Concrete compressive strength sensitivity analysis ................................................... 43
3.8.4 Polystyrene compressive strength sensitivity analysis .............................................. 44
3.8.5 Compressive strut width ratio sensitivity analysis..................................................... 45
3.8.6 Summary and analysis of results ............................................................................... 46
Chapter 4 Description of the experiment .......................................................... 47
4.1 Mock-up and instruments ........................................................................ 47
4.2 Test protocol ............................................................................................ 53
Chapter 5 Experimental results ......................................................................... 55
5.1 Visual observations ................................................................................. 55
5.1.1 First cycle – target displacement 15 mm ................................................................... 55
5.1.2 Second cycle – target displacement 30 mm ............................................................... 56
5.1.3 Third cycle – target displacement 45 mm ................................................................. 57
5.1.4 Fourth cycle – target displacement 60 mm ................................................................ 58
5.1.5 Fifth cycle – target displacement 90 mm ................................................................... 58
5.1.6 Final (sixth) cycle – target displacement 120 mm ..................................................... 60
5.2 Pushover curve ........................................................................................ 61
5.3 Deformations in diagonal directions........................................................ 65
5.4 Moment – curvature diagrams ................................................................. 66
5.5 Strain in the strut ..................................................................................... 68
Chapter 6 Finite element analysis and modelling ............................................ 71
6.1 Starting assumptions ................................................................................ 71
6.2 RC frame ................................................................................................. 72
6.2.1 Modelling .................................................................................................................. 72
6.2.2 Pushover analysis ...................................................................................................... 74
6.3 Polystyrene infill ..................................................................................... 81
6.3.1 Modelling .................................................................................................................. 81
6.3.2 Pushover Analysis ..................................................................................................... 84
6.4 Elastic model with compression strut ...................................................... 89
6.4.1 Modelling .................................................................................................................. 89
6.4.2 Elastic analysis and results ........................................................................................ 95

ix
6.5 Summary and analysis of results ............................................................. 99
Chapter 7 Conclusions ...................................................................................... 103
Appendix A Testing frame verification - bolts ............................................... 105
Appendix B Linear analysis of the bare frame ............................................... 107
Reference .............................................................................................................. 109

x

xi
Figure 2-1. Bare frame behaviour under cyclic loading (Kakaletsis & Karayannis, 2008) ......................... 4
Figure 2-2. Macro models: Single strut (a) and multi strut (b), (c), (d) (Crisafulli, 1997) .......................... 6
Figure 2-3. Equivalent truss mechanism for infilled frame structure (Crisafulli, 1997) .............................. 7
Figure 2-4. Variation of the w/L ratio as a function of λh (Crisafulli, 1997) .............................................. 8
Figure 2-5. Stress distribution in masonry before separation (a) and after separation occurs (b) (Crisafulli,
1997) ............................................................................................................................................................ 8
Figure 2-6. Normal and shear stresses acting on a loaded corner of the frame (Crisafulli, 1997) ............... 9
Figure 2-7. Typical bending moment, shear and axial forces diagrams obtained from and infilled RC frame,
after separation occurs (Crisafulli, 1997) ................................................................................................... 10
Figure 2-8. Modes of failure observed in masonry infills (Crisafulli, 1997) ............................................. 11
Figure 2-9. Typical failure modes for shear cracking. Stepped cracking pattern (a) or horizontal sliding (b)
(Crisafulli, 1997) ........................................................................................................................................ 12
Figure 2-10. Cracking induced by diagonal tension. (Crisafulli, 1997) ..................................................... 12
Figure 2-11. Biaxial tension – compression stress state in the infill panel. (Crisafulli, 1997) ................... 13
Figure 2-12. Crushing of the loaded corners. (Crisafulli, 1997) ................................................................ 13
Figure 2-13. Modes of failure observed in RC boundary frames. (Crisafulli, 1997) ................................. 14
Figure 2-14. Flexural collapse mechanism with formation of plastic hinges at column ends (a) or along the
column length (b) (Crisafulli, 1997) .......................................................................................................... 15
Figure 2-15. Tension failure of the column (a) and bar anchorage failure (b). (Crisafulli, 1997) ............. 16
Figure 2-16. (a) Shear failure of the column. (Crisafulli, 1997); (b)Beam-Column joint failure. (Crisafulli,
1997) .......................................................................................................................................................... 17
LIST OF FIGURES

xii
Figure 2-17. Selected failure mechanisms (Mehrabi & Shing, Seismic Analysis of Masonry-Infilled
Reinforced Concrete Frames, 2003) .......................................................................................................... 18
Figure 2-18. Vertical load distribution model (Mehrabi & Shing, Seismic Analysis of Masonry-Infilled
Reinforced Concrete Frames, 2003) .......................................................................................................... 18
Figure 2-19. Failure mechanism 1 (Mehrabi & Shing, Seismic Analysis of Masonry-Infilled Reinforced
Concrete Frames, 2003) ............................................................................................................................. 21
Figure 2-20. Failure mechanism 2 (Mehrabi & Shing, Seismic Analysis of Masonry-Infilled Reinforced
Concrete Frames, 2003) ............................................................................................................................. 22
Figure 2-21. Failure mechanism 3 (Mehrabi & Shing, Seismic Analysis of Masonry-Infilled Reinforced
Concrete Frames, 2003) ............................................................................................................................. 22
Figure 2-22. Failure mechanism 4 (Mehrabi & Shing, Seismic Analysis of Masonry-Infilled Reinforced
Concrete Frames, 2003) ............................................................................................................................. 23
Figure 2-23. Failure mechanism 5 (Mehrabi & Shing, Seismic Analysis of Masonry-Infilled Reinforced
Concrete Frames, 2003) ............................................................................................................................. 24
Figure 2-24. Lateral load-displacement hysteresis curves and failure modes of a bare frame (a) (b) and a
masonry infilled RC frame (c) (d) (Kakaletsis & Karayannis, 2008) ........................................................ 26
Figure 2-25. Energy dissipated per cycle (Valiasis & Stylianidis, 1989) .................................................. 26
Figure 2-26. Details of reinforcing of the masonry panel (Calvi, Bolognini, & Penna, 2004) .................. 28
Figure 2-27. Hysteretic loops for different types of reinforcing (Calvi, Bolognini, & Penna, 2004) ........ 29
Figure 3-1. Possible failure mechanisms considered (Mehrabi & Shing, Seismic Analysis of Masonry-
Infilled Reinforced Concrete Frames, 2003) .............................................................................................. 31
Figure 3-2. Infilled frame geometry ........................................................................................................... 32
Figure 3-3. Beam and column cross sections ............................................................................................. 32
Figure 3-4. Interaction diagram for the columns ....................................................................................... 34
Figure 3-5. Failure mechanism 1 (Mehrabi & Shing, Seismic Analysis of Masonry-Infilled Reinforced
Concrete Frames, 2003) ............................................................................................................................. 34
Figure 3-6. Failure mechanism 2 (Mehrabi & Shing, Seismic Analysis of Masonry-Infilled Reinforced
Concrete Frames, 2003) ............................................................................................................................. 36
Figure 3-7. Failure mechanism 3 (Mehrabi & Shing, Seismic Analysis of Masonry-Infilled Reinforced
Concrete Frames, 2003) ............................................................................................................................. 37

xiii
Figure 3-8. Failure mechanism 4 (Mehrabi & Shing, Seismic Analysis of Masonry-Infilled Reinforced
Concrete Frames, 2003) ............................................................................................................................. 38
Figure 3-9. Failure mechanism 5 (Mehrabi & Shing, Seismic Analysis of Masonry-Infilled Reinforced
Concrete Frames, 2003) ............................................................................................................................. 39
Figure 3-10. Sensitivity analysis for residual friction coefficient .............................................................. 41
Figure 3-11. Sensitivity analysis for polystyrene elastic modulus ............................................................. 42
Figure 3-12. Sensitivity analysis for concrete compressive strength ......................................................... 43
Figure 3-13. Sensitivity analysis for polystyrene compressive strength .................................................... 44
Figure 3-14. Sensitivity analysis for compression strut width ratio on the crushing load ......................... 45
Figure 4-1. The wall................................................................................................................................... 48
Figure 4-2. Position of the piston ............................................................................................................... 49
Figure 4-3. Pulling rig ................................................................................................................................ 49
Figure 4-4. Position of the instruments ...................................................................................................... 50
Figure 4-5. One of the LVDT transducers used in the experiment (already installed) .............................. 50
Figure 4-6. Wire Drawn Transducer used in the experiment ..................................................................... 51
Figure 4-7. Transducers number 13 and 14 ............................................................................................... 52
Figure 4-8. WDT instruments with their L shaped mounting elements ..................................................... 52
Figure 4-9. Applied displacement .............................................................................................................. 53
Figure 5-1. First cracks in the mortar ......................................................................................................... 56
Figure 5-2. Growth of the old and creation of the new cracks ................................................................... 56
Figure 5-3. New cracks during the third cycle ........................................................................................... 57
Figure 5-4. Cracks at the leeward side ....................................................................................................... 57
Figure 5-5. Cracks during the fourth loading cycle ................................................................................... 58
Figure 5-6. Fifth cycle damages ................................................................................................................. 59
Figure 5-7. Out of plane damage during fifth cycle ................................................................................... 59
Figure 5-8. Back side of the mock-up ........................................................................................................ 59
Figure 5-9. Sixth loading cycle – uplift of the infill .................................................................................. 60
Figure 5-10. Infill separation from the frame............................................................................................. 60
Figure 5-11. Sixth load cycle – leeward side ............................................................................................. 61
Figure 5-12. Loading-unloading curve ...................................................................................................... 62

xiv
Figure 5-13. Stiffness degradation after each cycle ................................................................................... 63
Figure 5-14. Pushover curve from the experiment..................................................................................... 64
Figure 5-15. Pushover curve of the bare frame (experiment and SAP2000) ............................................. 64
Figure 5-16. Displacements in the strut ..................................................................................................... 65
Figure 5-17. Displacements in the tie ........................................................................................................ 66
Figure 5-18. Moment – curvature diagram of the bottom cross sections ................................................... 67
Figure 5-19. Moment – curvature diagram of the top cross sections ......................................................... 67
Figure 5-20. Strain in the strut ................................................................................................................... 68
Figure 5-21. Strain in function of top displacement .................................................................................. 69
Figure 6-1. Bare frame geometry and layout ............................................................................................. 72
Figure 6-2. Beam and column cross sections and reinforcement layout .................................................... 72
Figure 6-3. Assignment of concrete mechanical properties (a) and steel reinforcement (b) and (c) in MIDAS
GEN ........................................................................................................................................................... 73
Figure 6-4. Reinforced Concrete Frame model in MIDAS GEN............................................................... 73
Figure 6-5. Lumped plasticity in beam elements ....................................................................................... 74
Figure 6-6. Flexural plastic hinge definition for beam in Midas Gen ........................................................ 75
Figure 6-7. Flexural plastic hinge definition for column in Midas Gen ..................................................... 75
Figure 6-8. Shear plastic hinge definition for beam or column in Midas Gen ........................................... 76
Figure 6-9. Yielding moments at plastic hinges......................................................................................... 78
Figure 6-10. Pushover curve for RC Frame Structure ............................................................................... 78
Figure 6-11. Pushover analysis plastic hinge sequence for bare frame in elastic regime .......................... 79
Figure 6-12. Pushover analysis plastic hinge sequence for bare frame after first yielding ........................ 80
Figure 6-13 Pushover analysis plastic hinge sequence for bare frame after collapse of the columns ........ 80
Figure 6-14. Definition of polystyrene material in MIDAS GEN ............................................................. 82
Figure 6-15. Infilled frame model in MIDAS GEN ................................................................................... 82
Figure 6-16. Fictitious wall reinforcement layout...................................................................................... 83
Figure 6-17. Wall flexural plastic hinge definition in Midas Gen ............................................................. 84
Figure 6-18. Wall shear plastic hinge definition in Midas Gen ................................................................. 84
Figure 6-19. Pushover curve for infilled frame structure ........................................................................... 85
Figure 6-20. Pushover analysis plastic hinge sequence for infilled frame ................................................. 86

xv
Figure 6-21. Pushover analysis plastic hinge sequence for infilled frame ................................................. 87
Figure 6-22. Comparison between infilled frame and bare frame capacity curves .................................... 89
Figure 6-23. Elastic models of infilled frame with equivalent compression strut (a) and bare frame (b) in
SAP2000 .................................................................................................................................................... 90
Figure 6-24. Internal actions diagrams for frame under 52.69 kN lateral load .......................................... 90
Figure 6-25. Internal actions diagrams for auxiliary structure 1 ................................................................ 91
Figure 6-26. Internal actions diagrams for auxiliary structure 2 ................................................................ 91
Figure 6-27. Internal actions diagrams for auxiliary structure 3 ................................................................ 92
Figure 6-28. Internal actions diagrams for frame at maximum load (59.43 kN) applying super-position
principle ..................................................................................................................................................... 92
Figure 6-29. Internal actions diagrams for frame with strut under 54.85 kN lateral load .......................... 93
Figure 6-30. Internal actions diagrams for auxiliary structure 1 ................................................................ 93
Figure 6-31. Internal actions diagrams for auxiliary structure 2 ................................................................ 94
Figure 6-32. Internal actions diagrams for auxiliary structure 3 ................................................................ 94
Figure 6-33. Internal actions diagrams for auxiliary structure 4 ................................................................ 94
Figure 6-34. Internal actions diagrams for frame with strut at maximum load (79.24 kN) applying super-
position principle [kN, m] .......................................................................................................................... 95
Figure 6-35. Sections of RC frame studied in order to quantify contribution of compression strut .......... 96
Figure 6-36. Load-displacement relationship of bare frame: Elastic analysis vs. Pushover analysis ...... 100
Figure 6-37. Load-displacement relationship of infilled frame: Elastic analysis vs. Pushover analysis .. 101
Figure A-1. Layout of the frame .............................................................................................................. 105
Figure A-2. Resulting forces .................................................................................................................... 105
Figure B-1. Bending moment under 1 kN lateral load ............................................................................. 107

xvi
xvii
Table 3.1. Material mechanical properties of infilled frame components .................................................. 33
Table 3.2. Frame geometry and loads ........................................................................................................ 33
Table 3.3. Summary of lateral resistance for the 5 failure mechanisms .................................................... 40
Table 3.4. Extreme values of the crushing load, according to w/D ratio. .................................................. 45
Table 3.5. Sensitivity analysis ................................................................................................................... 46
Table 5.1. Max base shear achieved, its respective displacement and min shear for each loading cycle .. 63
Table 6.1. Bare frame capacity curve most relevant results ....................................................................... 81
Table 6.2. Polystyrene mechanical properties............................................................................................ 81
Table 6.3. Infilled frame capacity curve most relevant results .................................................................. 88
Table 6.4. Load-displacement points of frame structure just before activation of plastic hinges .............. 92
Table 6.5. Load-displacement points of infilled frame structure just before activation of plastic hinges and
at maximum load capacity ......................................................................................................................... 95
Table 6.6. Internal actions on the bare frame and frame with strut, under 100 kN horizontal loading ...... 97
Table 6.7. Difference between internal actions on bare frame and frame with strut .................................. 98
Table 6.8. Comparison of the load-displacement relation between elastic and pushover analysis .......... 100
LIST OF TABLES

xviii

1
In current structural engineering practice, one of the most used types of structural
systems is frame system with infill walls. Traditionally, masonry was present as an infill
material and was regarded as the best choice for it. Nowadays, since optimization of costs
and quality is a major concern, new materials are being invented and new ways of using
them are being patented constantly.
Trying to overcome some of the drawbacks of masonry (large weight when used in
big amounts, and influence on the stiffness of the whole structure) which are giving problems
to engineers when designing structures, especially for earthquake resistance, this research
will assess the use of polystyrene panels covered with a thin mortar layer interconnected
with glass fibers as the infill material. Polystyrene was selected knowing that it has low
weight, would not alter the stiffness in great amount and can act as an insulation by itself.
1.1 OBJECTIVE AND SCOPE
In this thesis an investigation will be performed on how reinforced concrete (RC)
frames behave when polystyrene panels are used as the infill. In order to achieve this, an
experimental test on a full scale mock-up was performed along with finite element modelling
of several different models.
This project intends to demonstrate what are the effects of polystyrene panels on post
elastic behaviour of an RC frame.
Chapter 1
Introduction

2
1.2 IMPORTANCE AND SIGNIFICANCE OF THIS STUDY
As mentioned before, masonry used as infill material has some drawbacks that affect
the whole structure. Polystyrene panels can avoid some of these inconveniences, but with
this new way of using polystyrene, a lot of uncertainties arise. These unknowns will be
explained in order to have a clear understanding of the response of a structure when using
polystyrene as infill in everyday constructions. Several possible failure modes may occur
and each one of them must be properly investigated, in order to determine what they are
dependent on.
1.3 POSSIBLE CONNECTION BETWEEN MASONRY AND POLYSTYRENE INFILL
Since not many (if any) studies like this have been performed, a familiar starting
point has to be determined. In this case, a logical starting point is to study masonry infills,
for which a lot of experiments have been done and countless papers have been written.
This analogy between polystyrene and masonry can be justified by the fact that both
of the materials can be considered to have brittle behaviour compared to a RC frame’s one.
For the masonry infill, several “common” failure modes have been determined, and those
modes will be adopted for polystyrene also. Although, it cannot be said that these modes are
the same for both cases, it is a reasonable starting point. Also, some analytical methods exist
which were used when more refined methods are unavailable. These solutions will have to
be calibrated to suit the case of using polystyrene instead of masonry.

3
In the following chapter some of the key aspects and results from previous studies
on masonry-infilled RC frames are presented. Particular attention is given to single story –
single bay frames. Different cases are considered regarding infill reinforcement, which
influences the behaviour, modelling and expected failure modes.
2.1 INTRODUCTION
Masonry infilled frames represent a common construction technique employed in
buildings all over the world. However, it is a common mistake to regard these infills as “non-
structural components”, and consider just the bare frame for the analysis of the structural
response. Although the masonry is not detailed accordingly to act as a shear wall, if it’s in
contact with the frame it will tend to prevent the RC frame to deform as it would normally
do if there was no infill present. For this reason, the infill will have a non-negligible stiffness
(and energy dissipation contribution) under the dynamic response of the structure, especially
under low intensity excitations. Maximum displacements and energy dissipation demands
for the frame elements are also expected to reduce. (Decanni, Mollaioli, Mura, & Saragoni,
2004)
If the structure is modelled as a bare frame, with “added mass” due to the “non-
structural infills”, the fundamental period of the structure will be overestimated (the structure
will be more flexible in the model), and thus, the seismic forces will be, in some cases,
underestimated, resulting in different seismic response than the one anticipated by the
designer. Needless to say, neglecting the infill rigidity is, in many cases, not a conservative
approach and should be avoided. In general, according to (Decanni, Mollaioli, Mura, &
Saragoni, 2004), the overall response of the structure can be significantly improved by the
Chapter 2
Review of literature

4
presence of the infills, even after accounting for the added mass for the inertial loads.
Different types of models have been developed to study the behaviour of these structures,
and the most typical failure modes have been outlined in several research papers.
Masonry is a much stiffer and stronger material than polystyrene, and therefore, it is
expected for the two systems to behave differently. However, in the absence of any previous
studies done specifically on polystyrene infilled frames, studying the behaviour of masonry
infilled frames gives a good starting point as to what to expect.
2.2 BARE FRAME BEHAVIOUR
Reinforced concrete frame structures are a well-known type of lateral load resisting
system, which has been studied thoroughly in the past. These types of structures are known
to have a very ductile behaviour, with large hysteresis loops under cyclic loading (Figure
2-1), which means they are able to dissipate a great amount of energy. Another big advantage
of frame structures is their great flexibility under seismic actions. Due to this feature, they
usually have longer fundamental periods, and hence, reduced inertial loads. Figure 2-1 shows
the expected plastic hinges that form on the structure (at top and bottom of columns and at
the faces of the beam) under cyclic loading. The experimental results are usually in very
good agreement with the numerical predictions for this type of structure, which can be
estimated, e.g., by means of a non-linear cyclic analysis.
Figure 2-1. Bare frame behaviour under cyclic loading (Kakaletsis & Karayannis, 2008)

5
2.2.1 Modelling
The bare frame model is fairly simple. Classical structural mechanics is sufficient to
model a frame structure, considering Euler-Bernoulli frame elements for both beams and
columns (neglecting shear deformation in the kinematic model).
Boundary conditions at the base of the columns should be suitably accounted for.
This is one of the modelling approximations, namely, since in a real structure, only in a very
few cases, an edge which is completely restrained (no rotation at all) can be achieved. The
use of fully fixed restraints at element ends in structural models is always questionable. It is
well known that for different rigidities of a connection, different distribution of internal
forces in the structure will be obtained. This issue can be overcome by careful examination
of the structure and proper calibration of the model.
Both steel and concrete material properties should be adequately accounted for. Steel
distribution in the RC elements needs to be defined, in order to plot a moment-curvature
diagram, due to the non-linear nature of the problem.
2.2.2 Failure modes
The single frame depicted in Figure 2-1 is a 3 times statically indeterminate structure.
Therefore, a total of 4 plastic hinges are needed in order to obtain the collapse mechanism.
Since frame structures are usually slender, their failure is governed by a flexural behaviour.
These plastic hinges are expected to form in the regions of the members where the highest
moment concentrations are located (top and bottom of columns and at beam ends), as seen
from the figure.
2.3 RC FRAME WITH UNREINFORCED MASONRY INFILL
Some masonry infill panels have absolutely no reinforcement, since they are
conceived as “non-structural elements” by the designer. The behaviour of panels that have
no reinforcement differs greatly from the one of slightly reinforced panels, as it will be
discussed later.
2.3.1 Modelling
Two types of models can be differentiated for simulating the in-plane behaviour of
infilled RC frames subjected to a lateral force:

6
Micro-models: Sophisticated analysis such as Finite Element Method are used to
model in detail the behaviour of masonry infilled RC frames. Several types of
elements need to be used (continuum elements, for the frame and infill, interphase
elements between frame and infill, and sometimes even additional elements for the
mortar joints). Usually, non-linear finite elements are needed to model the behaviour
appropriately. The data input, and also the computational time, are much more
complex than those required when a macro model is employed.
Macro-models: The simplest case is the so called “simplified model”, which uses a
single strut to model the masonry infill. This approach is suitable for global effects
of the structural behaviour (stiffness, period, drifts) but is not able to capture the
failure modes of the individual frames or the infills. Variations to this approach are
the so called “multi strut models”, which are a more refined version of the latter one.
Different layouts are illustrated in Figure 2-2. These models are used to describe the
local behaviour, and are able to predict the typical failure modes of the infilled RC
frame. Multi strut models are a popular way to proceed, and give acceptable results.
Figure 2-2. Macro models: Single strut (a) and multi strut (b), (c), (d) (Crisafulli, 1997)

7
Masonry is a material that works mainly under compression, and has a negligible
tensile strength. For this reason, the panel separates from the frame at the tension areas.
Figure 2-3 shows a mechanism that occurs after the separation. So, many authors agree that
a suitable model to approximate the effect of having a masonry infill is achieved by adding
a compression strut to the bare frame structure, having the same thickness as the wall. A
topic of interest is the width “w” of such strut which is the basic parameter for defining its
axial stiffness. Several values and formulas can be found in the literature, typically
depending on the compressive strength of masonry, and the relative stiffness between frame
and infill. Usual values for “w” are shown below.
𝐿
4≤ 𝑤 ≤
𝐿
3
( 2-1 )
Where:
L = length of compression strut
w = width of compression strut
Figure 2-4 shows the variation of “w/L” ratio as a function of the relative stiffness
between the frame and infill (λh), according to several researchers. Other characteristic
properties for strut are considered equivalent to the masonry infill. The stress distribution
along the masonry, before and after separation of the frame-infill has occurred, can be seen
in Figure 2-5, from a Finite Element Analysis.
Figure 2-3. Equivalent truss mechanism for infilled frame structure (Crisafulli, 1997)

8
Figure 2-4. Variation of the w/L ratio as a function of λh (Crisafulli, 1997)
Figure 2-5. Stress distribution in masonry before separation (a) and after separation occurs (b) (Crisafulli, 1997)
2.3.2 Behaviour of infilled RC frames under monotonic loading
Initially, under low stresses, the frame and masonry act together as a monolithic
element, and behave elastically, similar to a cantilever wall. From Figure 2-5 (a) it can be
observed that the stress concentrations occur at the corners, while the panel exhibits mainly
shear stresses.
As the load increases, due to increase of stress in masonry panel, and incompatibility
between the panel and the frame because of their different deformability properties, cracking
occurs at the frame/panel interface, and the panel separates from the frame, except at the
diagonally compressed corners. This results in a decrease of the structure stiffness (strength
9
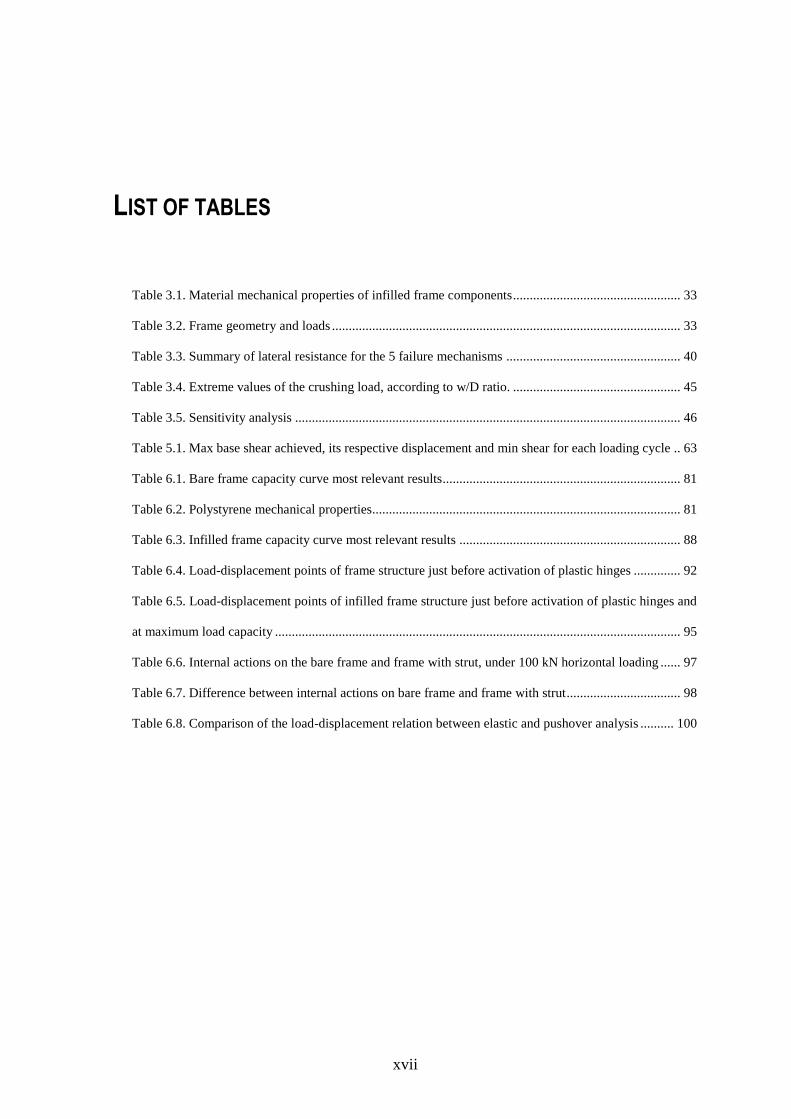
is not significantly affected), and an overload of compression stresses at the compressed
corners, which experience a biaxial compression state, as depicted in Figure 2-6. Since only
a limited portion of the frame is compressed at the corners, the idea of the equivalent
compression strut was proposed by Polyakov in 1958, and later improved by several authors.
Internal action diagrams (bending moment, shear and axial force) can be obtained for
the frame through a finite element analysis, or through a multi-strut model. Several multi-
strut models have been proposed in the literature, depending on the expected type of failure.
A simplified single strut model does not give realistic results for local analysis of the infilled
frame, as mentioned before.
Results show that for normal infilled frames, after separation occurs, the maximum
bending moments in the columns can be up to six times lower than in the case of the bare
frame (Crisafulli, 1997). However, the internal actions highly depend on the relative rigidity
between the frame and the infill, as depicted in Figure 2-7 (b). It is interesting to note how
for the case of a very rigid frame (compared to the infill), the behaviour tends to the one of
the bare frame. In any case, the final behaviour at large drifts (internal actions and global
stiffness) always tends towards the one of the bare frame, as the infill panel will be
completely cracked and its load carrying capacity will be quite low.
Figure 2-6. Normal and shear stresses acting on a loaded corner of the frame (Crisafulli, 1997)

10
Figure 2-7. Typical bending moment, shear and axial forces diagrams obtained from and infilled RC frame, after
separation occurs (Crisafulli, 1997)
For the case of non-integral infilled frames (when the infill is placed after casting the
frame) the behaviour is similar to the one described previously. However, some differences
could arise due to unwanted gaps between frame and masonry (if no expansive mortar is
used to prevent them). This results in a low initial stiffness, until the frame deforms enough
to close the gaps between itself and the masonry panel. Then there is a significant increase
of stiffness, as both members start to work together.
In general, four different stages can be distinguished during monotonic loading of
masonry infilled RC frame structures, according to Crisafulli (1997):
1. During the initial stage the structure behaves as a monolithic cantilever wall until
separation occurs.
2. Then the behaviour is characterized by the composite interaction between the panel
and the frame, although the materials remain mainly uncracked.
3. The induced state of stress into the panel produces different cracking patterns, with
significant damage until the maximum lateral resistance is achieved.
4. Finally, the lateral strength decreases and the response is mainly controlled by the
frame.

11
2.3.3 Failure modes
The failure type of infilled RC frames depends on several factors (relative rigidity
between frame and infill, dimensions of the structure, mechanical properties of components,
mortar joint thickness, frame reinforcing steel, vertical loads, amongst others). Several types
of failure are defined conventionally, however, the real failure will generally be a
combination of the failure modes described in this section. Failure can occur either in the
masonry panel, or in the RC frame, and for each of these two different modes have been
defined.
2.3.3.1 Failure in masonry panel
“The failure of the masonry panel can develop by debonding of the mortar joints,
cracking or crushing of the masonry units or a combination of these. The occurrence of the
different types of failure depends on the material properties and the stress state induced in
the panel”1. Figure 2-8 shows a diagram summarizing the different types of failure modes
observed for the masonry infills.
Figure 2-8. Modes of failure observed in masonry infills (Crisafulli, 1997)
1 (Crisafulli, 1997)

12
Shear Cracking
This is the most common type of failure according to experimental observations and
affected panels in existing buildings. It mainly depends on the bond strength and friction
coefficient of the mortar joints, tensile strength of masonry, and the relative values between
normal and shear stresses. Depending on the stress ratio, the failure can be along the mortar
joints, or cracks that cross the masonry units. The stress ratio can be directly related with the
aspect ratio (height/length) of the infill. Cracks along the mortar joints can occur along a
horizontal plane, or follow a stepped pattern, as observed in Figure 2-9. According to
(Mehrabi & Shing, Seismic Analysis of Masonry-Infilled Reinforced Concrete Frames,
2003), this is the most common type of failure for a relatively weak panel with respect to the
surrounding frame. Also, cracking due to diagonal tension (Figure 2-10) has been defined in
the literature, which occurs along the diagonal of the infill panel, due to a biaxial tension-
compression state, as seen in Figure 2-11. Generally, for high shear stresses (low aspect
ratios), cracking along mortar joints is more common. However, when mortar joints are very
strong, or the wall has medium to high aspect ratios, diagonal tension could be expected.
Diagonal tension is regarded as a very dangerous type of failure, since after the formation of
cracks along both diagonals, expulsion of the masonry units becomes imminent.
Figure 2-9. Typical failure modes for shear cracking. Stepped cracking pattern (a) or horizontal sliding (b) (Crisafulli,
1997)
Figure 2-10. Cracking induced by diagonal tension. (Crisafulli, 1997)

13
Figure 2-11. Biaxial tension – compression stress state in the infill panel. (Crisafulli, 1997)
Compression Failure
Two types of compression failure have been observed in the masonry panels. The
first one is the crushing of the loaded corners, where there is a biaxial compressive stress
state (Figure 2-12). This type of failure could be expected to occur when the frame is very
flexible, hence the contact length between frame and infill decreases, and stresses increase.
The second mechanism is due to the compressive failure of the diagonal strut. After
separation, as the lateral deformations increase, instability of the compressed strut is
eventually reached.
Figure 2-12. Crushing of the loaded corners. (Crisafulli, 1997)
Flexural Cracking
This type of failure can be observed where flexure effects are predominant (as in
multistorey, slender infilled frames). Cracks develop on the tension side of the infilled frame,
in the masonry infill. However, this type of failure is rarely seen, since separation of the

14
frame-infill usually occurs before flexural cracking, and the horizontal actions are resisted
through truss mechanism.
2.3.3.2 Failure in the RC frame
Different failure mechanisms have also been observed on the surrounding RC frame
during horizontal actions. “Damage in the frame members usually occurs from flexural
plastic hinges, shear failure, yielding under axial forces, compression failure or a
combination of these”2. Similar to the previous section, Figure 2-13 shows the different
failure modes for the RC frame, which are explained below.
Figure 2-13. Modes of failure observed in RC boundary frames. (Crisafulli, 1997)
2 (Crisafulli, 1997)

15
Flexural Collapse Mechanism
This mechanism usually develops after the masonry panel has failed. It is
characterized by the formation of plastic hinges at the column ends, where expected
maximum bending moments occur. However, when sliding shear in the panel occurs, plastic
hinges could form within the span of the column (Figure 2-14b), inducing an undesirable
increase of shear forces.
Failure Due to Axial Loads
Under lateral loading, columns work as a truss mechanism, under axial forces (tension and
compression). After concrete cracks, because of its intrinsic low tensile strength, if the load
is further increased, yielding in tension members can be reached. Two types of mechanisms
of this nature have been observed. The first one is known as the “flexural failure”, and can
be observed in slender frames (high aspect ratios), generally multi story frames. Horizontal
flexural cracks develop along the tension element because of the high plastic deformations
of the longitudinal reinforcement (Figure 2-15). Beams also tend to undergo some plastic
elongation, and hence, the interaction between the frame and infill can be significantly
degraded or completely lost during this process. The other mechanism is the bar anchorage
failure (Figure 2-15b), which can be avoided by providing proper development length for
the longitudinal bars.
Figure 2-14. Flexural collapse mechanism with formation of plastic hinges at column ends (a) or along the column length (b) (Crisafulli, 1997)

16
Figure 2-15. Tension failure of the column (a) and bar anchorage failure (b). (Crisafulli, 1997)
Shear Failure of the Columns
As seen in Figure 2-6, there is a concentration of shear stresses at the loaded corners
of the columns, along the contact length, due to the interaction with the infill at these regions.
Shear resistance in the columns basically depends on transversal reinforcement, concrete
strength and axial load. Although the compression column will have a higher shear
resistance, it will also usually have the highest shear action. Figure 2-16a shows a typical
shear failure taking place in column members.
Beam-Column Joint Failure
Concentration of normal and shear stresses develop close to the loaded corners
(Figure 2-6), hence inducing large shear and bending moments. Failure of the joint is a highly
unfavourable situation, since it decreases the contact length, and therefore decreases the
effective strut width, which results in an increase of the stresses on the masonry. It also
decreases the effectiveness of load transfer between the floor beam and the columns and
infill. During this failure, a diagonal crack appears at the beam column joint (Figure 2-16b).
17
Figure 2-16. (a) Shear failure of the column. (Crisafulli, 1997); (b)Beam-Column joint failure. (Crisafulli, 1997)
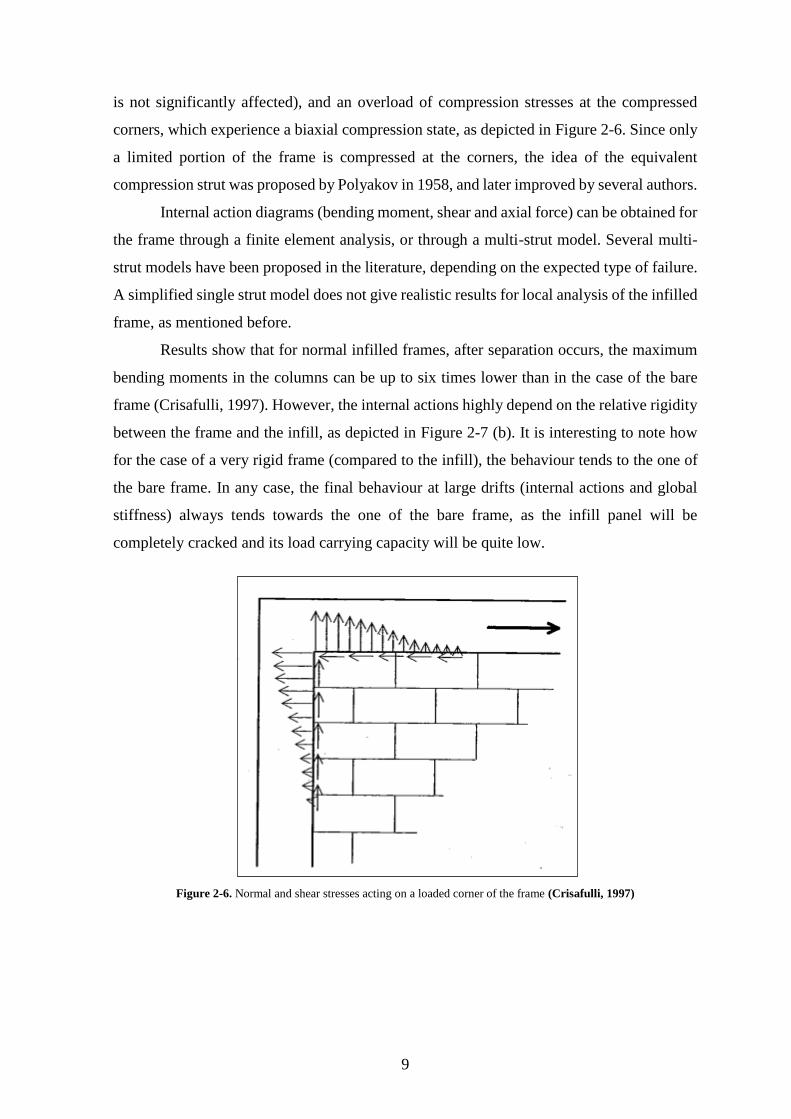
2.3.4 Analytical prediction of lateral resistance and stiffness
A simple analytical approach to quantify the lateral resistance of infilled frames
without openings, in the absence of more refined experimental data, was proposed by
(Mehrabi & Shing, Seismic Analysis of Masonry-Infilled Reinforced Concrete Frames,
2003). From all the failure mechanisms previously described, this method chooses 5 of them
as the most probable ones, as shown in Figure 2-17. For each failure mode, the lateral
resistance is obtained by analytical equations developed by (Mehrabi A. B., Shing, Schuller,
& Noland, 1994). Finally, the mechanism that results in the lowest lateral resistance value is
considered to be the predominant failure mechanism, and hence is considered the lateral load
resistance value. This method is briefly described below. It is interesting to point out that,
from the research carried out for several masonry infilled RC frames, the most common type
of failure mechanism observed in experimental tests for weak infills corresponds to
mechanism 5, where large slips along the bed joints and plastic hinges in the columns govern.
On the other hand, for strong infills, mechanism 2 is the most common one, which is
governed by the diagonal/sliding shear failure of the infill and the shear failure of the
windward column.

18
Figure 2-17. Selected failure mechanisms (Mehrabi & Shing, Seismic Analysis of Masonry-Infilled Reinforced
Concrete Frames, 2003)
Figure 2-18. Vertical load distribution model (Mehrabi & Shing, Seismic Analysis of Masonry-Infilled Reinforced
Concrete Frames, 2003)
2.3.4.1 Residual shear strength of cracked wall
The cracking load is evaluated through the model proposed by (Fiorato, Sozen, &
Gamble, 1970) shown in Figure 2-18. The beam is rigid and the wall is represented by a
diagonal and a vertical strut, which are connected by a hinge. P is the total vertical load, and
V the total lateral load. As observed in Figure 2-18, Pcl corresponds to the axial force in the
columns, due to P, Pwv is the axial load in the vertical strut due to P, and Pwl is the vertical
component of the axial force in the diagonal strut due to P. Hence, for equilibrium, it must
be:
𝑃 = 2𝑃𝑐𝑙 + 𝑃𝑤𝑣 + 𝑃𝑤𝑙 ( 2-2 )
The cracking load is estimated by means of the Mohr-Coulomb criterion:

19
𝑉𝑤𝑐𝑟 = 𝐶𝐴𝑤 + 𝜇0𝑃𝑤 ( 2-3 )
Where C is a cohesion factor, Aw the cross sectional area of the wall, 𝜇0 is the initial
friction coefficient of masonry mortar joints, and Pw is the total axial load due to P on the
wall.
𝑃𝑤 = 𝑃𝑤𝑣 + 𝑃𝑤𝑙 ( 2-4 )
It is assumed that the two columns and the infill panel act as two springs in parallel,
hence the total axial load is distributed according to their own axial stiffness.
𝑃𝑤𝑣 =𝑃𝐴𝑤
𝐴𝑤 + 2𝐴𝑐𝑒𝑞
( 2-5 )
𝑃𝑤𝑙 = 𝑉𝑤𝑐𝑟
ℎ
𝑙 ( 2-6 )
Where:
h = story height
L = frame span length
Aceq = equivalent area of RC columns, in masonry = 𝐴𝑐𝐸𝑐
𝐸𝑤
Ac = cross sectional area of RC column = ℎ𝑐𝑏𝑐 + 𝐴𝑠 (𝐸𝑠
𝐸𝑐− 1)
Ec, Ew, and Es = Elastic moduli of concrete, masonry and steel, respectively
hc, bc = Plan dimensions of RC columns
As = longitudinal rebar area in a column
By combining equations ( 2-3 ) - ( 2-6 ) the following expression can be derived for
the residual shear strength of a cracked wall, Vwr:
𝑉𝑤𝑟 = 𝐴𝑤
𝜇𝑟𝑃𝐴𝑤 + 2𝐴𝑐𝑒𝑞
1 − 𝜇𝑟ℎ𝐿
( 2-7 )
The residual shear strength (Vwr) is obtained from the cracking load (Vwcr), by means
of eliminating the cohesion factor (C), and replacing the initial friction coefficient (𝜇0) for
the residual friction coefficient (𝜇𝑟).
2.3.4.2 Crushing load
The crushing lateral load, which corresponds to the crushing of the diagonal
compression masonry strut, can be obtained by means of the concept proposed by (Stafford,
1962).

20
𝑉𝑐𝑟𝑢𝑠ℎ = 𝑤𝑡𝑓𝑚′ 𝑐𝑜𝑠𝜃
( 2-8 )
Where:
𝑓𝑚′ = the compressive strength of masonry
𝑡 = the wall thickness
𝑤 = the effective strut width, determined by means of Figure 2-4
𝜃 = the angle between the diagonal strut and a horizontal line
2.3.4.3 Failure Mechanism 1 (shear failure)
The lateral resistance considered in mechanism 1 is the sum of the shear forces in the
columns and the shear resistance of the wall, as seen in Figure 2-19. By force equilibrium in
the horizontal direction, the lateral load resistance for mechanism 1 is computed as follows:
𝑉𝑢1 = 𝑉𝑤𝑟 + 𝐹𝑐𝑐 + 𝐹𝑐𝑡 ( 2-9 )
Where:
Vu1 = lateral load resistance for mechanism 1
Vwr = residual shear strength of wall, obtained by equation ( 2-7 )
Fcc = shear force in leeward column
Fct = shear force in windward column
The expression for Fcc and Fct are derived by moment equilibrium of the free body
diagram in Figure 2-19, for each individual column segment, as follows:
𝐹𝑐𝑡 =
4𝑀𝑝𝑐𝑡
ℎ ( 2-10 )
𝐹𝑐𝑐 =
4𝑀𝑝𝑐
ℎ ( 2-11 )
Where:
Mpct = the plastic moment developed in the windward column, considering the
effect of the axial force
Mpc = the plastic moment developed in the leeward column, not considering the
effect of the axial force

21
Figure 2-19. Failure mechanism 1 (Mehrabi & Shing, Seismic Analysis of Masonry-Infilled Reinforced Concrete
Frames, 2003)
2.3.4.4 Failure Mechanism 2 (shear failure with inclined crack)
This mechanism is similar to the first one. However, the crack in the panel is
conceived as a diagonal (Figure 2-20), and therefore, the residual stress is slightly modified.
Also, the ultimate shear resistance is considered for the windward column (Vct) instead of
Fct. It follows:
𝑉𝑢2 = 𝑉′𝑤𝑟 + 𝐹𝑐𝑐 + 𝑉𝑐𝑡 ( 2-12 )
Where:
Vu2 = lateral load resistance for mechanism 2
V’wr = residual shear resistance provided by the horizontal crack, as expressed in
equation ( 2-13 )
Fcc = shear force in leeward column, as expressed in equation ( 2-11 )
Vct = ultimate shear resistance of windward column, as expressed in equation ( 2-14 )
𝑉′𝑤𝑟 = 𝐴𝑤
𝜇𝑟𝑃𝐴𝑤 + 2𝐴𝑐𝑒𝑞
1 − 0.5𝜇𝑟ℎ𝐿
( 2-13 )
𝑉𝑐𝑡 = 0.8𝑉𝑐𝑠 + 𝑉𝑐𝑐 ( 2-14 )
Where:
Vcs = shear resistance provided by stirrups
Vcc = shear resistance provided by concrete

22
Figure 2-20. Failure mechanism 2 (Mehrabi & Shing, Seismic Analysis of Masonry-Infilled Reinforced Concrete
Frames, 2003)
2.3.4.5 Failure Mechanism 3 (masonry crushing and plastic hinge formation)
In this mechanism, masonry is assumed to reach the crushing strength along the
contact length “y” with the frame, and plastic hinges are assumed to form in the columns
(near the beam-column joint, and in point b), as depicted in Figure 2-21. The stress is uniform
along “y”, so the whole segment AB is under plastic state of stress. Point “B” is the point of
maximum moment, and hence, zero shear force. This approach was proposed by (Liuaw &
Kwan, 1985).
Figure 2-21. Failure mechanism 3 (Mehrabi & Shing, Seismic Analysis of Masonry-Infilled Reinforced Concrete
Frames, 2003)
From moment equilibrium in segment AB:
𝑓𝑚′ 𝑡𝑦2
2= 2𝑀𝑝𝑐 ( 2-15 )

23
Where:
f’m = compressive strength of masonry
Mpc = plastic moment of the columns (neglecting axial force)
t = wall thickness
Therefore, from equation ( 2-15 ), the contact length can be derived as:
𝑦 = √4𝑀𝑝𝑐
𝑓𝑚′ 𝑡
( 2-16 )
Finally, considering force equilibrium in the horizontal direction for the free body
diagram of segment AB:
𝑉𝑢3 = 𝑦𝑓𝑚′ 𝑡
( 2-17 )
2.3.4.6 Failure Mechanism 4 (masonry crushing and plastic hinge formation)
Mechanism 4 is also based on plastic theory, and is proposed, similarly to the
previous mechanism, by (Liuaw & Kwan, 1985). The difference in this method is that the
plastic hinges are assumed to form at the ends of the columns (Figure 2-22), and the stress
on the compressed masonry corners is assumed parabolic along the contact length (𝛼ℎ)
because of the linear variation of strains, due to the rotation of the columns. Masonry is
assumed to crush at the corners, where the parabolic stress reaches its maximum value.
Figure 2-22. Failure mechanism 4 (Mehrabi & Shing, Seismic Analysis of Masonry-Infilled Reinforced Concrete
Frames, 2003)
Computing moment equilibrium about point A in column AB:
𝐹𝑐ℎ + 0.25𝑓𝑚′ 𝑡(𝛼ℎ)2 = 2𝑀𝑝𝑐
( 2-18 )
Where:

24
Fc = shear force in each column
Mpc = plastic moment of column AB, neglecting influence of axial force
Computing force equilibrium for column AB:
𝑉𝑢4 = 0.67𝑓𝑚′ 𝑡𝛼ℎ + 2𝐹𝑐 = (𝑚𝑐
2 + 0.67𝛼 − 0.5𝛼2)𝑓𝑚′ 𝑡ℎ
( 2-19 )
𝑚𝑐 = √4𝑀𝑝
𝑓𝑚′ 𝑡ℎ𝑐
2 ( 2-20 )
The contact length (𝛼ℎ) was proposed by Stafford Smith in 1966 as follows:
𝛼ℎ = 𝜋 √𝐸𝑐𝐼𝑐ℎ
4𝐸𝑤𝑡𝑠𝑖𝑛(2𝜃)
4
( 2-21 )
2.3.4.7 Failure Mechanism 5 (residual shear + flexure)
The last mechanism considers the frame and infill to act as two independent resistant
members (Figure 2-23), working in parallel, with a displacement compatibility at the
compressed corners. Therefore, the total lateral resistance is given by the sum of the residual
shear resistance of the fractured wall, and the flexural resistance of the frame.
𝑉𝑢5 = 𝑉𝑤𝑟 + 𝐹𝑓 ( 2-22 )
Where:
Vu5 = lateral resistance of mechanism 5
Vwr = residual shear resistance of fractured wall, obtained by equation ( 2-7 )
Ff = flexural resistance of the bare frame, with plastic hinges at column end sections,
obtained by means of equation ( 2-23 )
𝐹𝑓 =
4𝑀𝑝𝑐
ℎ ( 2-23 )
Figure 2-23. Failure mechanism 5 (Mehrabi & Shing, Seismic Analysis of Masonry-Infilled Reinforced Concrete
Frames, 2003)

25
2.3.5 Behaviour of infilled RC frames under cyclic loading
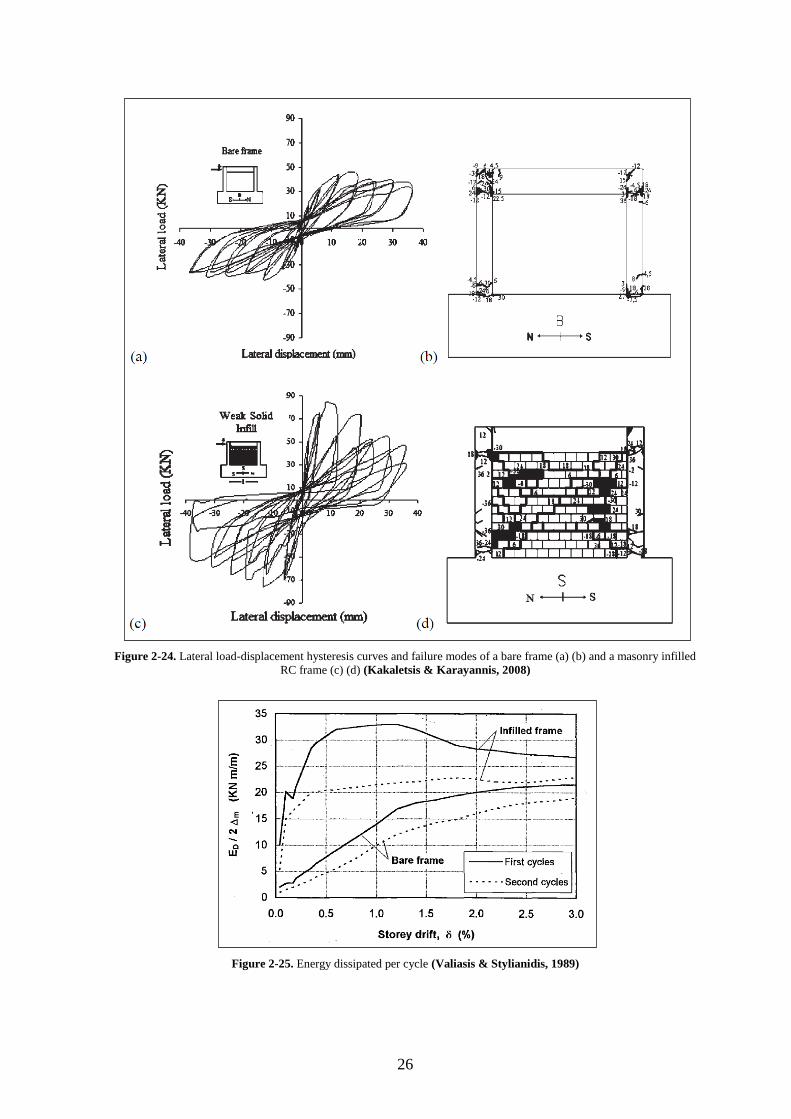
According to (Kakaletsis & Karayannis, 2008) it has been shown that the total energy
dissipation capacity of a masonry infilled RC frame is around 1.5 times larger than that of a
bare frame subjected to the same cyclic loading. This is depicted in Figure 2-24. Another
interesting fact is that the loss of strength is smaller than the corresponding loss of energy
dissipation. This is due to the noticeable pinching effect.
With reference to the initial stiffness, the one of the infilled frame is approximately
2.5 times larger than the initial stiffness of the bare frame. This can be seen by comparing
initial slopes in the diagrams depicted in Figure 2-24(a) and (c).
Various methods have been used to calculate the energy dissipation capacity based
on results acquired from cyclic tests. For this purpose, (Valiasis & Stylianidis, 1989)
introduced a parameter which is defined as “energy dissipated by cycle divided by
corresponding total displacement of the cycle”. Tests were conducted on bare frames and
masonry infilled ones. Results are shown in Figure 2-25. It can be seen that the energy per
unit of total displacement dissipated by the bare frame grows during the whole experiment,
while for the infilled frame, a sudden drop can be observed in the range of large
displacements (due to masonry degradation). In other words, in the range of large lateral
displacements, behaviour of an infilled frame tends to be similar to the behaviour of a bare
frame. Regardless of this, energy dissipation of an infilled frame is still considerably larger
than that of a bare frame.
26
Figure 2-24. Lateral load-displacement hysteresis curves and failure modes of a bare frame (a) (b) and a masonry infilled
RC frame (c) (d) (Kakaletsis & Karayannis, 2008)
Figure 2-25. Energy dissipated per cycle (Valiasis & Stylianidis, 1989)

27
2.4 RC FRAME WITH SLIGHTLY REINFORCED MASONRY INFILL
2.4.1 Introduction
As mentioned above, since masonry infills are often conceived as non-structural
elements, they are most of the times unreinforced. However, it has been shown that adding
light reinforcing to the panels can dramatically improve the performance of the infilled frame
(Calvi, Bolognini, & Penna, 2004).
Steel reinforcing could be placed either in the bed joints, or as a wire mesh between
the infill and the plaster, with no continuity between the steel in the infill and the surrounding
RC frame (Figure 2-26). The external mesh option uses roughly twice the amount of steel
than the bed joint reinforcing, but gives, according to research tests, the best results in terms
of ductility and post-peak behaviour.
Out of plane expulsion is a topic of interest for masonry infilled RC frames. Although
the wall can continue to carry load after expulsion, this is considered a dangerous situation
for human safety, and should therefore be considered as an Ultimate Limit State situation.
Slight reinforcing of the infill greatly improves the out-of-plane resistance, and therefore,
expulsion occurs at much higher values of loading.
Reinforcing of infill panels affects mostly the post-peak behaviour of infilled frames.
For this reason, there is not much difference in the behaviour for low damage situations in
comparison to the unreinforced infills. However, for significant damage limit states (at
significant drift values), the slight reinforcement gives a remarkably superior behaviour.

28
Figure 2-26. Details of reinforcing of the masonry panel (Calvi, Bolognini, & Penna, 2004)
2.4.2 Modelling and analysis
Modelling of slightly reinforced infilled frames has been carried out, according to
(Calvi, Bolognini, & Penna, 2004), with Takeda-type non-linear elements for beams and
columns (which account for concrete cracking and yielding of steel rebars), and using an
equivalent diagonal compression strut for the infill panel, with an effective width of 25% of
the length of the strut, and force-displacement curves which have been derived from
experimental data.
Non-linear analysis was carried out by means of a pushover analysis. Numerical
results are in good agreement with the experimental ones, and show how adding a slight
amount of reinforcement can have a positive impact on the overall structural response. Also,
different ways of reinforcing give different responses and are characterized by different
ductility level as represented in Figure 2-27.

29
Figure 2-27. Hysteretic loops for different types of reinforcing (Calvi, Bolognini, & Penna, 2004)

30
2.5 COMPARISON OF THE BARE FRAME VS. MASONRY INFILLED FRAME BEHAVIOUR UNDER
MONOTONIC LOADING
As from the surveyed literature studies, some common general conclusions can be
highlighted.
- The masonry infill has a non-negligible influence on the overall structural response
of the frame under lateral loading.
- Its influence is more relevant under low horizontal loading, when the masonry is not
fully cracked.
- It can be observed from experimental cyclic tests, that the initial stiffness is always
much greater for an infilled frame vs. the bare frame.
- Eventually, at large drifts, the response always tends to the one of the bare frame.
- Serious “pinching” of the hysteresis loops can occur in an infilled frame when it is
not reinforced
- Adding a slight amount of steel reinforcement improves the post-peak behaviour and
out of plane resistance.
- If adequately designed, the masonry infill is always beneficial in terms of stiffness
and energy dissipation vs. the bare frame.
31
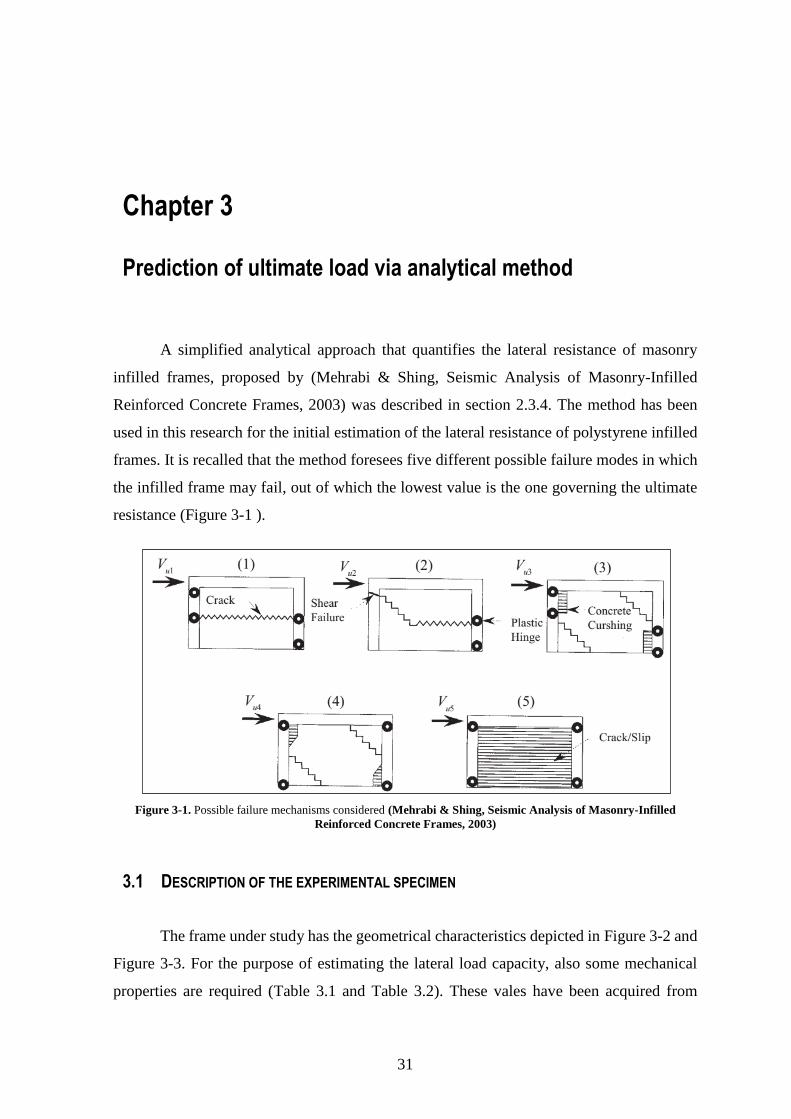
A simplified analytical approach that quantifies the lateral resistance of masonry
infilled frames, proposed by (Mehrabi & Shing, Seismic Analysis of Masonry-Infilled
Reinforced Concrete Frames, 2003) was described in section 2.3.4. The method has been
used in this research for the initial estimation of the lateral resistance of polystyrene infilled
frames. It is recalled that the method foresees five different possible failure modes in which
the infilled frame may fail, out of which the lowest value is the one governing the ultimate
resistance (Figure 3-1 ).
Figure 3-1. Possible failure mechanisms considered (Mehrabi & Shing, Seismic Analysis of Masonry-Infilled
Reinforced Concrete Frames, 2003)
3.1 DESCRIPTION OF THE EXPERIMENTAL SPECIMEN
The frame under study has the geometrical characteristics depicted in Figure 3-2 and
Figure 3-3. For the purpose of estimating the lateral load capacity, also some mechanical
properties are required (Table 3.1 and Table 3.2). These vales have been acquired from
Chapter 3
Prediction of ultimate load via analytical method

32
Eurocode 2 (for concrete) and through some internet research (for polystyrene). Value of
elastic modulus of concrete was calculated using equation ( 3-1 ) provided by EC2 with the
value of fcm = 28 MPa for concrete C20/25.
𝐸𝑐 = 22 ∙ [𝑓𝑐𝑚/10]0.3 = 29.96 GPa ( 3-1 )
It should be noted that this particular frame has no additional vertical axial load
acting on it, and therefore the axial load on columns (Pcl) is only due to the frame self-weight.
Similarly, the axial load acting on the infill is only due to its own self-weight (Pwv). An
iterative process was performed in order to determine the lateral load resistance, since some
of the failure modes require the total axial load on the columns, which depends on the
horizontal load (V), due to frame action.
Figure 3-2. Infilled frame geometry
Figure 3-3. Beam and column cross sections

33
Table 3.1. Material mechanical properties of infilled frame components
Material
Mechanical
Properties
Ec [GPa] 29.96 Concrete Elastic Modulus
Ep [MPa} 4.35 Polystyrene Elastic Modulus
Es [GPa} 210 Steel Elastic Modulus
fpk [MPa] 0.12 Polystyrene characteristic compressive strength
fck [MPa] 20 Concrete characteristic compressive strength
fyk [MPa] 450 Steel rebar characteristic tensile strength
μ0 0.5 Polystyrene initial friction Coefficient
μr 0.15 Polystyrene residual friction Coefficient
ρc [kN/m3] 25 Reinforced concrete density
ρp [kN/m3] 10.4 Polystyrene density
Table 3.2. Frame geometry and loads
Once convergence was reached, the axial load contribution on columns due to the
lateral load (V) was taken into account for the computation of the plastic moment capacity
of the columns, as well as their shear capacity. For this task an interaction diagram was
computed for the columns, which is shown in Figure 3-4, and was used with the respective
axial load for each column.
Geometry
and loads
h [m] 3.075 Height
L [m] 2.65 Length
θ [°] 52 Strut angle
D [m] 4.06 Diagonal length
w/D 0.25 Assumed compression strut width ratio
w [m] 1.01 Compression strut width
V [kN] 70 Total Expected Horizontal Load
P [kN] 27.20 Total Vertical Load
hc [m] 0.31 Column dimensions
bc [m] 0.2
d [m] 0.276 Concrete column inner lever arm
I [m4] 0.00050 Concrete column moment of inertia
tw [m] 0.2 Infill thickness
As [mm2] 1231.5 Longitudinal steel area in columns
Ast [mm2] 100.531 Transverse steel area in columns
s [mm] 175 Stirrup spacing close to mid-height of column
Aw [m2] 0.468 Infill Area in horizontal plane
Ac [m2] 0.069 Column Area
Aceq [m2] 1.04 Equivalent area of RC columns in polystyrene
Pwv [kN] 14.36 Axial load in vertical strut due to P (self-weight)
Pw [kN] 14.36 Total axial load due to P on the wall
Pcl [kN] 6.42 Total axial load due to P on each column
V*h/L [kN] 81.23 Total axial load due to V on the columns

34
Figure 3-4. Interaction diagram for the columns
3.2 FAILURE MECHANISM 1
Following the procedure explained in section 2.3.4.3, the lateral load resistance due
to failure mechanism 1 corresponds to the sum of the shear forces in the columns and the
shear resistance of the wall (Figure 3-5 ), and was computed as follows.
𝑉𝑢1 = 𝑉𝑤𝑟 + 𝐹𝑐𝑐 + 𝐹𝑐𝑡
Figure 3-5. Failure mechanism 1 (Mehrabi & Shing, Seismic Analysis of Masonry-Infilled Reinforced Concrete
Frames, 2003)
-1000
-500
0
500
1000
1500
2000
0 10 20 30 40 50 60 70 80 90
Axia
l F
orc
e [k
N]
Bending Moment [kN-m]

35
𝑉𝑤𝑐𝑟 = 𝐶𝐴𝑤 + 𝜇0𝑃𝑤
𝑉𝑤𝑟 = 𝜇r𝑃𝑤
𝑃𝑤 = 𝑃𝑤𝑣 + 𝑃𝑤𝑙
𝑃𝑤𝑣 = 14.36 𝑘𝑁
𝑃𝑤𝑙 = 𝑉𝑤𝑐𝑟
ℎ
𝑙
By combining the previous equations, substituting 𝜇0 for 𝜇r, and considering C=0,
the following expression is obtained for the residual shear strength.
𝑉𝑤𝑟 =𝜇𝑟𝑃𝑤𝑣
1 − 𝜇𝑟ℎ𝐿
=0.15 ∙ 14.36
1 − 0.15 ∙3.0752.65
= 2.61 𝑘𝑁
It now follows to compute the shear force in windward and leeward columns.
𝐹𝑐𝑡 =4𝑀𝑝𝑐𝑡
ℎ 𝐹𝑐𝑐 =
4𝑀𝑝𝑐
ℎ
The plastic moment on both columns was determined from the interaction diagram
in Figure 3-4, with the corresponding axial load on each column (neglecting axial load
contribution of “V” in leeward column, and considering the contribution of “V” in windward
column).
𝑀𝑝𝑐𝑡 = 45.77 𝑘𝑁 ∙ 𝑚 𝑀𝑝𝑐 = 52.34 𝑘𝑁 ∙ 𝑚
𝐹𝑐𝑡 =4 ∙ 45.77
3.075= 59.54 𝑘𝑁 𝐹𝑐𝑐 =
4 ∙ 52.34
3.075= 68.08 𝑘𝑁
The lateral load capacity is calculated as follows.
𝑽𝒖𝟏 = 𝑽𝒘𝒓 + 𝑭𝒄𝒄 + 𝑭𝒄𝒕 = 𝟐. 𝟔𝟏 + 𝟓𝟗. 𝟓𝟒 + 𝟔𝟖. 𝟎𝟖 = 𝟏𝟑𝟎. 𝟐𝟑 𝒌𝑵
3.3 FAILURE MECHANISM 2
Following the procedure explained in section 2.3.4.4, the lateral load resistance due
to failure mechanism 2 was computed. The failure mechanism corresponds to the sum of a
slightly modified residual shear stress of the wall (because of the diagonal crack), the
ultimate shear resistance in windward column, and the shear force in leeward column (Figure
3-6 ).
𝑉𝑢2 = 𝑉′𝑤𝑟 + 𝐹𝑐𝑐 + 𝑉𝑐𝑡

36
Figure 3-6. Failure mechanism 2 (Mehrabi & Shing, Seismic Analysis of Masonry-Infilled Reinforced Concrete
Frames, 2003)
𝑉′𝑤𝑟 =𝜇𝑟𝑃𝑤𝑣
1 − 0.5𝜇𝑟ℎ𝐿
=0.15 ∙ 14.36
1 − 0.5 ∙ 0.15 ∙3.0752.65
= 2.36 𝑘𝑁
𝑉𝑐𝑡 = 0.8𝑉𝑐𝑠 + 𝑉𝑐𝑐
The shear resistance of concrete column was calculated according to EN 1992-1-
1:2004, section 6.2.2. Calculations are presented below
𝑉𝑐𝑐 = [𝐶𝑅𝑑,𝑐𝑘(100𝜌1𝑓𝑐𝑘)1/3 + 𝑘1𝜎𝑐𝑝]𝑏𝑤𝑑
=[0.12 ∙ 1.85 ∙ (100 ∙ 0.002 ∙ 25)
13 − 0.15 ∙ 0.48] 200 ∙ 276
1000
= 37.96 𝑘𝑁
Where:
The minimum value for the shear resistance of concrete is calculated as:
𝑉𝑐𝑐,𝑚𝑖𝑛 = (𝑣𝑚𝑖𝑛 + 𝑘1𝜎𝑐𝑝)𝑏𝑤𝑑 =(0.39 − 0.15 ∙ 0.48)200 ∙ 276
1000= 17.55 𝑘𝑁
∴ 𝑉𝑐𝑐 = 37.96 𝑘𝑁
CRd,c = 0.12 - concrete shear calculation coefficient
K = 1 + √200
𝑑= 1.85 - concrete shear calculation coefficient
k1 = 0.15 - concrete shear calculation coefficient
ρ1 = 0.02 - longitudinal steel area ratio
σcp = -0.48 - axial stress due to design gravity loads (negative in tension)
vmin = 0.39 - concrete shear calculation coefficient

37
The shear resistance of stirrups was calculated according to EN 1992-1-1:2004,
section 6.2.3. Calculations are presented below. An angle for the compression strut θ = 45°
was assumed for this calculation.
𝑉𝑐𝑠 =𝐴𝑠𝑡
𝑠𝑧𝑓𝑦𝑑𝑐𝑜𝑡𝜃 =
100.531175
∙ (276) ∙ 391.3 ∙ 1
1000= 62 𝑘𝑁
The maximum shear force provided by stirrups is limited by the following
expression.
𝑉𝑅𝑑,𝑚𝑎𝑥 =𝛼𝑐𝑤𝑏𝑤𝑧𝑣1𝑓𝑐𝑑
𝑐𝑜𝑡𝜃 + 𝑡𝑎𝑛𝜃=
1 ∙ 200 ∙ 276 ∙ 0.6 ∙ 11.33
cot (45°) + tan (45°)∙
1
1000= 187.63 𝑘𝑁
Vcs is used since it is lesser than VRd,max.
∴ 𝑉𝑐𝑠 = 62 𝑘𝑁
It is now possible to compute the ultimate shear resistance of the windward column.
𝑉𝑐𝑡 = 0.8𝑉𝑐𝑠 + 𝑉𝑐𝑐 = 0.8 ∙ 62 + 37.96 = 87.60 𝑘𝑁
It now follows to sum all the contributions together in order to determine the capacity
of failure mechanism 2.
𝑽𝒖𝟐 = 𝑽′𝒘𝒓 + 𝑭𝒄𝒄 + 𝑽𝒄𝒕 = 𝟐. 𝟑𝟔 + 𝟔𝟖. 𝟎𝟖 + 𝟖𝟕. 𝟔𝟎 = 𝟏𝟓𝟖. 𝟎𝟒 𝒌𝑵
3.4 FAILURE MECHANISM 3
Following the procedure explained in section 2.3.4.5, the lateral load resistance due
to failure mechanism 3, which corresponds to crushing of the infill along the contact length,
and plastic hinges formation on columns, near to beam-column joint and point B (Figure
3-7), was computed as follows:
𝑉𝑢3 = 𝑦𝑓𝑝𝑘𝑡
Figure 3-7. Failure mechanism 3 (Mehrabi & Shing, Seismic Analysis of Masonry-Infilled Reinforced Concrete
Frames, 2003)
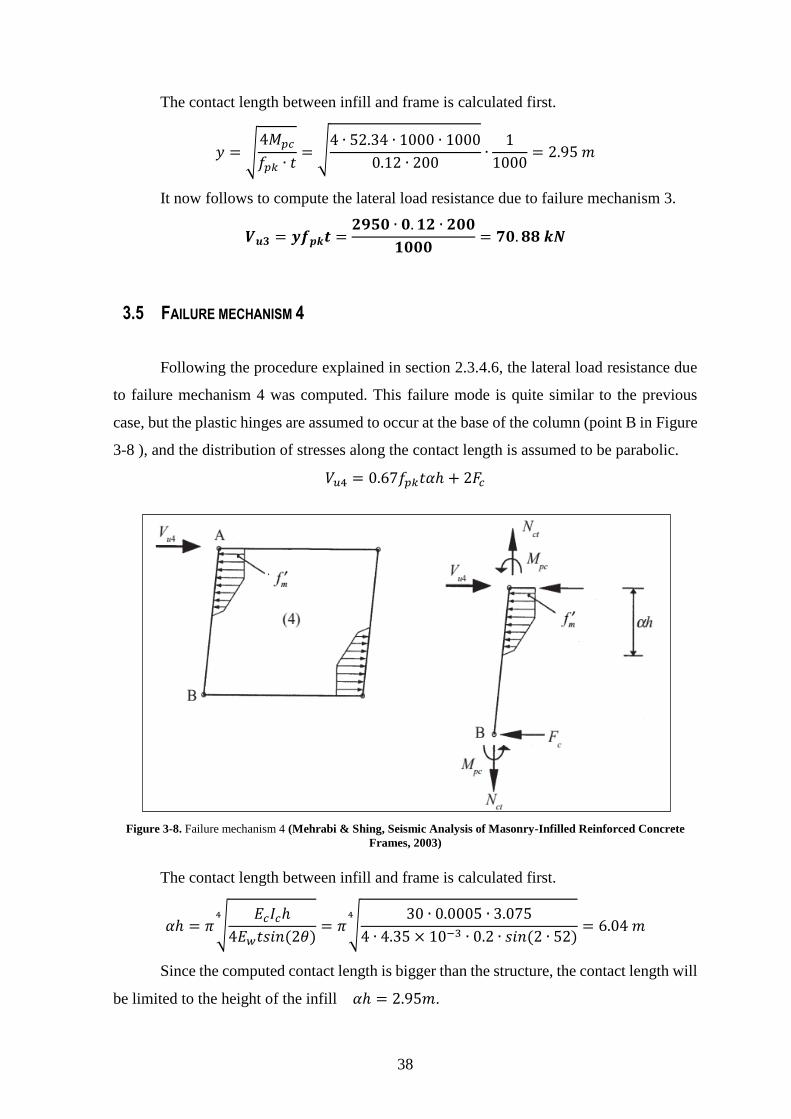
38
The contact length between infill and frame is calculated first.
𝑦 = √4𝑀𝑝𝑐
𝑓𝑝𝑘 ∙ 𝑡= √
4 ∙ 52.34 ∙ 1000 ∙ 1000
0.12 ∙ 200∙
1
1000= 2.95 𝑚
It now follows to compute the lateral load resistance due to failure mechanism 3.
𝑽𝒖𝟑 = 𝒚𝒇𝒑𝒌𝒕 =𝟐𝟗𝟓𝟎 ∙ 𝟎. 𝟏𝟐 ∙ 𝟐𝟎𝟎
𝟏𝟎𝟎𝟎= 𝟕𝟎. 𝟖𝟖 𝒌𝑵
3.5 FAILURE MECHANISM 4
Following the procedure explained in section 2.3.4.6, the lateral load resistance due
to failure mechanism 4 was computed. This failure mode is quite similar to the previous
case, but the plastic hinges are assumed to occur at the base of the column (point B in Figure
3-8 ), and the distribution of stresses along the contact length is assumed to be parabolic.
𝑉𝑢4 = 0.67𝑓𝑝𝑘𝑡𝛼ℎ + 2𝐹𝑐
Figure 3-8. Failure mechanism 4 (Mehrabi & Shing, Seismic Analysis of Masonry-Infilled Reinforced Concrete
Frames, 2003)
The contact length between infill and frame is calculated first.
𝛼ℎ = 𝜋 √𝐸𝑐𝐼𝑐ℎ
4𝐸𝑤𝑡𝑠𝑖𝑛(2𝜃)
4
= 𝜋 √30 ∙ 0.0005 ∙ 3.075
4 ∙ 4.35 × 10⁻³ ∙ 0.2 ∙ 𝑠𝑖𝑛(2 ∙ 52)
4
= 6.04 𝑚
Since the computed contact length is bigger than the structure, the contact length will
be limited to the height of the infill 𝛼ℎ = 2.95𝑚.

39
Next, the shear force in each column is computed.
𝐹𝑐ℎ + 0.25𝑓𝑝𝑘𝑡(𝛼ℎ)2 = 2𝑀𝑝𝑐 → 𝐹𝑐 =2𝑀𝑝𝑐 − 0.25𝑓𝑝𝑘𝑡(𝛼ℎ)2
ℎ
𝐹𝑐 =2 ∙ 52.34 − 0.25 ∙ 0.12 ∙ 1000 ∙ 0.2 ∙ 2.952
3.075= 17.06 𝑘𝑁
Now it is possible to determine the lateral resistance of the frame due to failure
mechanism 4.
𝑽𝒖𝟒 = 𝟎. 𝟔𝟕𝒇𝒑𝒌𝒕𝜶𝒉 + 𝟐𝑭𝒄 = 𝟎. 𝟔𝟕 ∙ 𝟎. 𝟏𝟐 ∙ 𝟏𝟎𝟎𝟎 ∙ 𝟎. 𝟐 ∙ 𝟐. 𝟗𝟓 + 𝟐 ∙ 𝟏𝟕. 𝟎𝟔 = 𝟖𝟏. 𝟓𝟔 𝒌𝑵
3.6 FAILURE MECHANISM 5
Following the procedure explained in section 2.3.4.7, the lateral load resistance due
to failure mechanism 5 was computed. The resistance is composed by the sum of the residual
shear resistance of the fractured wall and the flexural resistance of the frame (Figure 3-9 ).
This type of failure mechanism has been observed to occur more often in the case of weak
infills. Since polystyrene is much weaker than masonry, it is expected to govern.
𝑉𝑢5 = 𝑉𝑤𝑟 + 𝐹𝑓
Figure 3-9. Failure mechanism 5 (Mehrabi & Shing, Seismic Analysis of Masonry-Infilled Reinforced Concrete
Frames, 2003)
The flexural resistance of the bare frame, with plastic hinges at the column end
sections, is calculated first.
𝐹𝑓 =4𝑀𝑝𝑐
ℎ=
4 ∙ 52.34
3.075= 68.08 𝑘𝑁
The lateral load resistance due to failure mechanism 5 is now computed.
𝑽𝒖𝟓 = 𝑽𝒘𝒓 + 𝑭𝒇 = 𝟐. 𝟔𝟏 + 𝟔𝟖. 𝟎𝟖 = 𝟕𝟎. 𝟔𝟗 𝒌𝑵

40
3.7 SUMMARY
A summary of results is presented in Table 3.3.
Table 3.3. Summary of lateral resistance for the 5 failure mechanisms
It can be seen from Table 3.3 that, as expected, failure mechanism 5 is governing the
lateral resistance of the infilled frame.
3.8 SENSITIVITY ANALYSIS
While the geometrical properties of the infilled frame were measured with sufficient
accuracy, the mechanical properties could vary to some extent. This is due to the fact that no
laboratory tests were carried out in order to determine the mechanical properties of the
polystyrene infill, nor of concrete, depicted in Table 3.1. Typical values for concrete class
C20/25 were assumed. In the case of polystyrene, typical values found in the literature were
adopted in order to use the analytical equations in section 2.3.4.
A sensitivity analysis was carried out, in order to quantify the possible variation in
the failure loads due to variation of the mechanical properties, according to the analytical
method. From this analysis it is possible to quantify how each of these parameters will
influence the final result, by varying only one parameter at a time, and comparing it to the
“reference” case, which is the one depicted in Table 3.3. Several parameters, such as
compressive strength, elastic modulus, strut width ratio, and residual friction coefficient
were investigated.
3.8.1 Residual friction sensitivity analysis
The residual friction coefficient is a parameter which is used for the determination of
the residual shear strength of the cracked wall, as shown in section 2.3.4.1. The residual
shear strength is used in failure mechanisms 1, 2 and 5, and therefore will be the only ones
Summary of results
Vu1 [kN] 130.23 Lateral resistance for mechanism 1
Vu2 [kN] 158.04 Lateral resistance for mechanism 2
Vu3 [kN] 70.88 Lateral resistance for mechanism 3
Vu4 [kN] 81.56 Lateral resistance for mechanism 4
Vu5 [kN] 70.69 Lateral resistance for mechanism 5
Vu [kN] 70.69 Lateral resistance

41
affected by the variation of the residual friction coefficient. This parameter cannot be greater
than the initial friction coefficient, but must be greater than 0. For this reason, the range of
variation for the residual friction coefficient is determined as:
0 ≤ 𝜇𝑟 ≤ 𝜇0 𝜇0 = 0.5
From Figure 3-10 it can be observed that failure mechanism 3 and 4 are not affected
by the variation of the residual friction coefficient, as they don’t depend on it. Failure
mechanisms 1 and 2 are affected, but don’t govern the lateral load resistance, as failure
mechanism 5 is still governing. Failure mechanism 5 shows a considerable range of values
due to the variation of this parameter, as shown below.
68.1 𝑘𝑁 ≤ 𝑉𝑢5 ≤ 85.2 𝑘𝑁
Due to the fact that failure mechanism 5 does not govern the lateral load resistance
when 𝜇𝑟 = 0.5, the global capacity is governed by failure mechanism 3 when the residual
friction coefficient adopts very high values. The range of possible values for the lateral load
capacity, due to a variation of the residual friction coefficient, is shown below, which is
governed by failure mechanism 5 for low values of residual friction coefficient, and by
failure mechanism 3 for high values.
68.1 𝑘𝑁 ≤ 𝑉𝑢 ≤ 70.9 𝑘𝑁
Figure 3-10. Sensitivity analysis for residual friction coefficient
1 2 3 4 5
REFERENCE 130.2 158.0 70.9 81.6 70.7
μ0 = μr 144.7 165.8 70.9 81.6 85.2
μr = 0 127.6 155.7 70.9 81.6 68.1
0.0
20.0
40.0
60.0
80.0
100.0
120.0
140.0
160.0
180.0
Vu [
kN
]

42
3.8.2 Elastic Modulus sensitivity analysis
A similar analysis as the one performed in section 3.8.1 was carried out for the
polystyrene infill elastic modulus (Ep). The range of possible values studied was based on
the range of values found in the literature, and is shown below.
2.0 𝑀𝑃𝑎 ≤ 𝐸𝑝 ≤ 7.0 𝑀𝑃𝑎
Figure 3-11. Sensitivity analysis for polystyrene elastic modulus
The only failure mechanism affected by this variation is Vu4, due to the fact that the
contact length between frame and infill depends on the ratio between concrete and
polystyrene elastic modulus (𝐸𝑐
𝐸𝑝), as depicted in section 2.3.4.6. However, due to the great
flexibility of polystyrene material, the contact length calculated with any of the values in this
range exceeds the length of the infill, and therefore the infill length is used instead. For this
reason, in the range of interest, polystyrene elastic modulus has no influence in the lateral
load resistance of the structure. Having said this, Vu5 governs the lateral load capacity
regardless of the adopted value of Ep, as depicted in Figure 3-11.
1 2 3 4 5
REFERENCE 130.2 158.0 70.9 81.6 70.7
Ep = 2.0 MPa 130.2 158.0 70.9 81.6 70.7
Ep = 7.0 MPa 130.2 158.0 70.9 81.6 70.7
0.0
20.0
40.0
60.0
80.0
100.0
120.0
140.0
160.0
180.0
Vu [
kN
]

43
3.8.3 Concrete compressive strength sensitivity analysis
Variations in the concrete compressive strength are unavoidable, due to the intrinsic
nature of the heterogeneous material. The concrete class specification of the frame is C20/25,
and the investigated range of values is shown below.
15 𝑀𝑃𝑎 ≤ 𝑓𝑐𝑘 ≤ 40 𝑀𝑃𝑎
Figure 3-12. Sensitivity analysis for concrete compressive strength
From Figure 3-12 it can be noted that varying the concrete compressive strength
only affects Vu2, since this mechanism depends on the ultimate shear resistance, which is
affected by concrete strength. However, failure mechanism 2 is predominant for very stiff
infills (which is the opposite case from polystyrene infills), and as it can be seen from Figure
3-12, the resistance of mechanism 2 is much higher than the rest of the mechanisms, and
hence does not govern the global resistance in the range of values here studied. So similarly
to the previous case, variation of the concrete compressive strength, although has some
influence in Vu2, does not have any influence in the final resistance value, since Vu5 still
governs, and does not depend on fck.
1 2 3 4 5
REFERENCE 130.2 158.0 70.9 81.6 70.7
fck = 15 MPa 130.2 154.2 70.9 81.6 70.7
fck = 40 MPa 130.2 168.9 70.9 81.6 70.7
0.0
20.0
40.0
60.0
80.0
100.0
120.0
140.0
160.0
180.0
Vu [
kN
]

44
3.8.4 Polystyrene compressive strength sensitivity analysis
Similar to section 3.8.3, the possible variation of polystyrene compressive strength
is now studied. The range of values were selected based on the typical values found in the
literature, and are presented below.
0.1 𝑀𝑃𝑎 ≤ 𝑓𝑝𝑘 ≤ 0.2 𝑀𝑃𝑎
Figure 3-13. Sensitivity analysis for polystyrene compressive strength
From Figure 3-13, it’s worth pointing out how only failure mechanisms 3 and 4 are
influenced by the variation of polystyrene compressive strength. Both these failure
mechanisms are very similar, and account for the compressive strength of the infill explicitly,
as the infill is assumed to reach the crushing strength along the contact length (Figure 2-21
and Figure 2-22 ). It is very interesting to see how, for the lower bound values of fpk, failure
mechanism Vu3 starts to govern over Vu5. The range of possible values for Vu3, Vu4, and the
global lateral load capacity of the structure (Vu), due to a variation of polystyrene
compressive strength, are depicted below.
64.7 𝑘𝑁 ≤ 𝑉𝑢3 ≤ 91.5 𝑘𝑁
79.3 𝑘𝑁 ≤ 𝑉𝑢4 ≤ 90.5 𝑘𝑁
64.7 𝑘𝑁 ≤ 𝑉𝑢 ≤ 70.7 𝑘𝑁
1 2 3 4 5
REFERENCE 130.2 158.0 70.9 81.6 70.7
fpk = 0.1 MPa 130.2 158.0 64.7 79.3 70.7
fpk = 0.2 MPa 130.2 158.0 91.5 90.5 70.7
0.0
20.0
40.0
60.0
80.0
100.0
120.0
140.0
160.0
180.0
Vu [
kN
]

45
In the case of the frame considered in this thesis, we expect a combination of these
modes.
3.8.5 Compressive strut width ratio sensitivity analysis
A similar analysis was carried out in order to determine the influence of the assumed
compressive strut width ratio (w/D). From sections 3.2 - 3.6, it can be observed that the
compressive strut width is not an explicit input parameter for any of the failure mechanisms
(Vu, i), and therefore Vu does not depend on w/D. The crushing load, however, depends
explicitly on w, as depicted in section 2.3.4.2.
𝑉𝑐𝑟𝑢𝑠ℎ = 𝑤𝑡𝑓𝑝𝑘𝑐𝑜𝑠𝜃
From the above expression, it can be observed that the crushing load has a linear
dependence on w. This can also be observed from Figure 3-14. The possible range of values
investigated is based on previous investigations undergone for masonry infilled walls, as
shown in Figure 2-4. The extreme values are reported below.
Table 3.4. Extreme values of the crushing load, according to w/D ratio.
Figure 3-14. Sensitivity analysis for compression strut width ratio on the crushing load
0
5
10
15
20
25
30
0 0.1 0.2 0.3 0.4 0.5
Cru
shin
g L
oad
[kN
]
w/D
w/D 𝑉𝑐𝑟𝑢𝑠ℎ [kN]
0.05 3.03
0.45 27.3

46
3.8.6 Summary and analysis of results
A summary of the results investigated throughout the current section is proposed
below in Table 3.5.
Table 3.5. Sensitivity analysis
From Table 3.5 it can be clearly seen that, except for high values of the residual
friction coefficient, or very low values of polystyrene compressive strength, failure
mechanism 5 is always governing the global lateral resistance. As a general statement, the
only parameter investigated that affects Vu5 is the residual friction coefficient, and the only
parameter that affects Vu3 is polystyrene compressive strength. For this reason, these two
parameters (μr and fpk) are the only mechanical properties which could have some influence
on the lateral load resistance of the infilled frame, according to the simplified analytical
method proposed in this chapter.
Variation of the Elastic modulus of polystyrene affects only Vu4. However, in the
range of interest, it has no effect on the final value of this failure mechanism. Vu4 does not
govern the global lateral load resistance of the structure under any of the cases here studied,
and therefore, a variation of Ep in the range of interest is not expected to influence the lateral
load resistance, according to the simplified analytical method studied in this chapter.
Fai
lure
mec
han
ism
Ref
eren
ce
Residual
friction
Elastic
modulus
Ep [MPa]
Compressive
strength –
concrete
fck [MPa]
Compressive
strength –
polystyrene
fpk [MPa]
μ0 = μr μr = 0 1.9 4.35 15 40 0.1 0.2
Vu1 [kN] 130.2 144.7 127.6 130.2 130.2 130.2 130.2 130.2 130.2
Vu2 [kN] 158.0 165.8 155.7 158.0 158.0 154.2 168.9 158.0 158.0
Vu3 [kN] 70.9 70.9 70.9 70.9 70.9 70.9 70.9 64.7 91.5
Vu4 [kN] 81.6 81.6 81.6 81.6 81.6 81.6 81.6 79.3 90.5
Vu5 [kN] 70.7 85.2 68.1 70.7 70.7 70.7 70.7 70.7 70.7
Vu [kN] 70.7 70.9 68.1 70.7 70.7 70.7 70.7 64.7 70.7

47
This chapter will describe the mock-up and its components, the instruments which
are used for this experiment along with their positions and a brief explanation of their
mounting process. Last section will explain in which manner the load will be applied and
the scheduled testing protocol.
4.1 MOCK-UP AND INSTRUMENTS
The frame subjected to the experiment is built up of two columns 310 x 200 mm and
a beam 250 x 200 mm made of reinforced concrete C20/25. Infill blocks are made of
polystyrene. All material characteristics are presented in Chapter 3 in Table 3.1. A few tests
with a sclerometer were conducted on columns in order to have better picture of concrete
strength. An average value of 23.5 MPa was acquired.
Cover layer on one side consists of 40 mm thick mortar layer (with plastic mesh in
the middle) and on the other side there is mortar with thermo-insulating foam in total 90 mm
thick, which makes the infill 330 mm wide in total. On both sides, there is a GFRP mesh
embedded in the cover layer. This mesh is built up of bars with 10 mm in diameter with
spacing of 40 cm in both directions. Meshes are connected with transversal connectors.
The wall is resting on a steel plate which is embedded and welded to longitudinal
reinforcement of the columns. This plate is used to restrain end sections of the columns to
ground. Under each column there are six M24 bolts through which the mock-up is connected
to the testing frame. Detail verification of the bolted connection is presented in Annex A.
Chapter 4
Description of the experiment

48
Figure 4-1. The wall
Lateral force will be applied as a pulling force via steel jack which is connected to a
pulling rig. This is depicted in Figure 4-2 and Figure 4-3.

49
Figure 4-2. Position of the piston
Figure 4-3. Pulling rig
For this test, a total number of 15 measuring transducers will be used. Their locations
are shown in Figure 4-4. Twelve of them are Linear Variable Differential Transformers
(LVDT) and 3 of them are Wire Drawn Transducers (WDT).

50
Figure 4-4. Position of the instruments
Instruments numbered 1 and 2 are WDT (Figure 4-6) and they are supposed to
measure displacements in diagonal struts. Another WDT will measure horizontal
displacement of the beam. All other instruments are LVDTs (Figure 4-5). Results coming
from instruments numbered 3 – 6 will be used to obtain strain in diagonal direction which
will be later used to define the width of the diagonal strut used for analytical solutions. All
other instruments (7 – 14) are measuring displacements of edge segments at the columns in
order to obtain rotations and curvatures of cross sections at column ends.
Figure 4-5. One of the LVDT transducers used in the experiment (already installed)
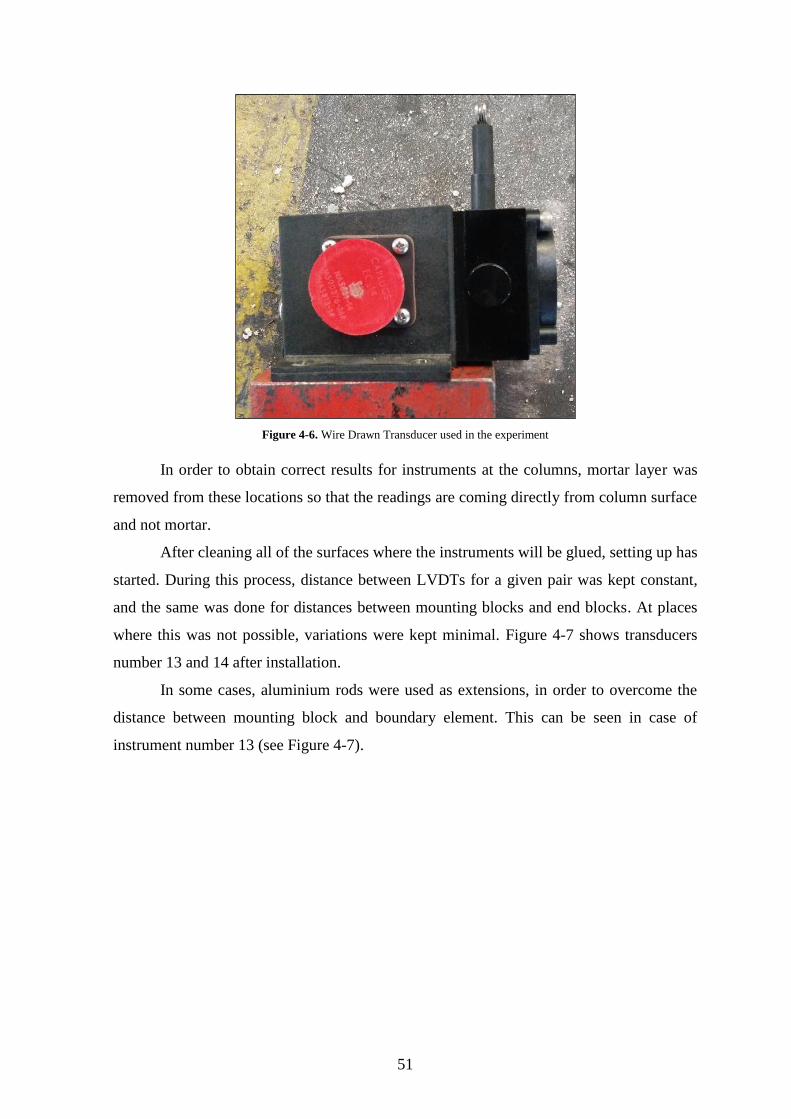
51
Figure 4-6. Wire Drawn Transducer used in the experiment
In order to obtain correct results for instruments at the columns, mortar layer was
removed from these locations so that the readings are coming directly from column surface
and not mortar.
After cleaning all of the surfaces where the instruments will be glued, setting up has
started. During this process, distance between LVDTs for a given pair was kept constant,
and the same was done for distances between mounting blocks and end blocks. At places
where this was not possible, variations were kept minimal. Figure 4-7 shows transducers
number 13 and 14 after installation.
In some cases, aluminium rods were used as extensions, in order to overcome the
distance between mounting block and boundary element. This can be seen in case of
instrument number 13 (see Figure 4-7).
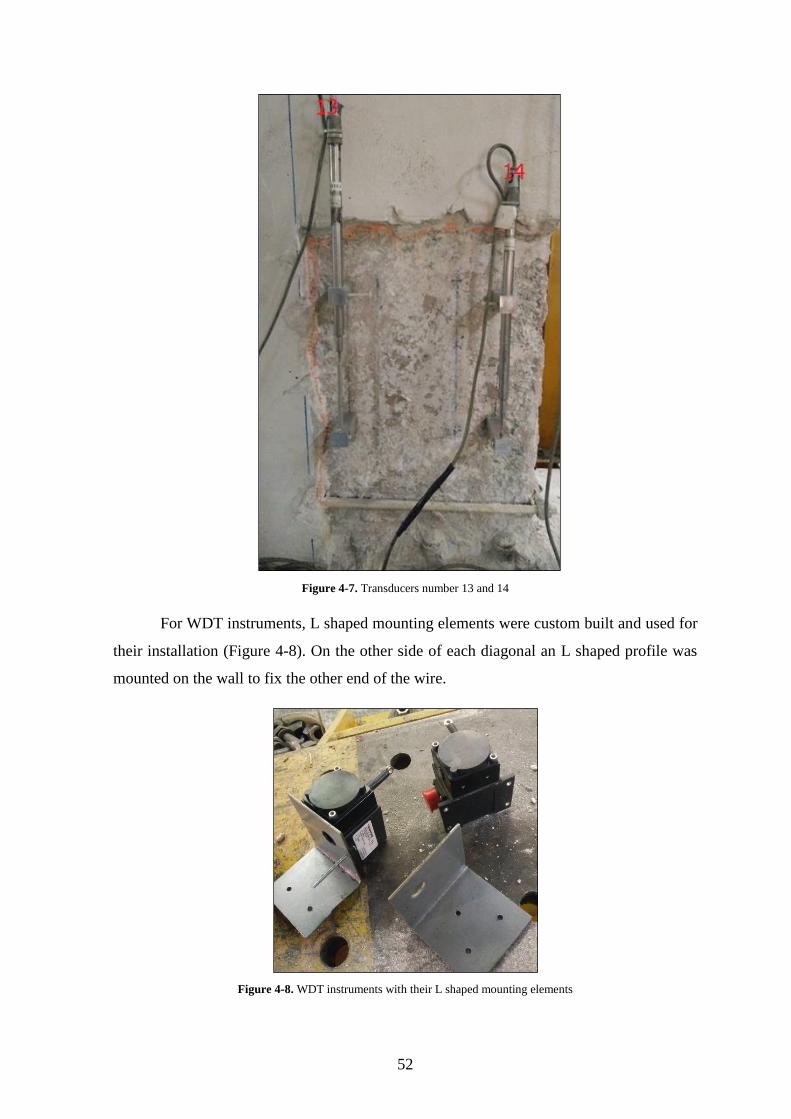
52
Figure 4-7. Transducers number 13 and 14
For WDT instruments, L shaped mounting elements were custom built and used for
their installation (Figure 4-8). On the other side of each diagonal an L shaped profile was
mounted on the wall to fix the other end of the wire.
Figure 4-8. WDT instruments with their L shaped mounting elements

53
An additional WDT was placed at the end of the frame to capture horizontal
displacement of the beam. That WDT was placed on the ground and using iron wire
connected to the piston.
4.2 TEST PROTOCOL
The experiment was displacement controlled, which means that the applied load was
the displacement while the force was measured. Different values of the displacements were
applied and after each value has been reached, the frame was unloaded and returned to initial
zero displacement state. Displacement values were 15 mm, 30 mm, 45 mm, 60 mm, 90 mm
and 120 mm. These are equivalent to 0.5%, 1%, 1.5%, 2%, 3% and 4% of drift (see Figure
4-9).
Displacement is applied with a velocity of 0.4 mm/s.
Figure 4-9. Applied displacement
15 (0.5%)
30 (1%)
45 (1.5%)
60 (2%)
90 (3%)
120 (4%)
0102030405060708090
100110120130
0 1 2 3 4 5 6 7 8 9 10 11 12
Dis
pla
cem
ent
[mm
] (d
rift
)
Step

54

55
The following chapter presents the results of the experimental test performed as
described in Chapter 4. First section is dedicated to some visual observations made during
the experiment and contains some conclusions drawn from those remarks. After that, data
acquired from the measuring instruments are presented and commented. First and most
important loading-unloading behaviour and the pushover curve after which the behaviour in
two diagonals is shown and noted. Then, moment – curvature diagrams of the cross sections
of the columns (bottom and top), and at the end, strain in the compressed diagonal.
5.1 VISUAL OBSERVATIONS
As previously said, this experiment was performed in six loading-unloading cycles.
Here we will discuss the behaviour of the infilled frame for each one by looking at some of
the photos made during the experiment.
5.1.1 First cycle – target displacement 15 mm
Even though the target displacement was not that severe, some cracks occurred in
mortar which is very stiff and does not allow any elastic deformation. These cracks occurred
on windward (left) side of the frame, which was expected since the load was applied from
left to right. Figure 5-1 shows the direction and the extension of these cracks. We can be
reminded of a shear behaviour mentioned in Chapter 3.
Only these cracks were observed at this point of the experiment.
Chapter 5
Experimental results

56
Figure 5-1. First cracks in the mortar
5.1.2 Second cycle – target displacement 30 mm
In this cycle, cracks that were already there started to grow and some new ones
occurred (Figure 5-2).
Figure 5-2. Growth of the old and creation of the new cracks
We can see that the plastic net which is embedded in the mortar layer keeps pieces
of mortar layer from falling down.

57
5.1.3 Third cycle – target displacement 45 mm
With this cycle, a more severe load is starting to act on the frame and infill. At
windward side of the mock-up new cracks occurred close to the bottom corner (Figure 5-3).
We can observe a crack which is parallel to the floor which means that the infill started to
diverge from the testing frame.
Figure 5-3. New cracks during the third cycle
From Figure 5-2 it can be seen that, at this point, cracks started to occur even on the
other side of the mock-up (leeward). Their direction is 45°, which is expected since that
diagonal is in tension.
Figure 5-4. Cracks at the leeward side

58
5.1.4 Fourth cycle – target displacement 60 mm
In this loading-unloading cycle, growth of already occurred cracks and falling off of
a few pieces of mortar layer was noticed. This is shown in Figure 5-5. We can see serious
detachment of the infill from the bottom.
Figure 5-5. Cracks during the fourth loading cycle
No new cracks occurred on the leeward (right) side of the mock-up.
5.1.5 Fifth cycle – target displacement 90 mm
This cycle was characterized by large damage occurring on mock-up, large enough
to detach some of the instruments. Horizontal crack separating infill from the bottom has
spread almost through the entire length of the mock-up (Figure 5-6).
We can notice another interesting thing if we look at Figure 5-7 where we see how
the mortar layer is kept in place by bars from GFRP mesh, while in between bars the mortar
layer tends to fall off.
On the back side of the mock-up (Figure 5-8), we observe that the damage is
concentrated at two places and it is not spread like in the front side. This is explained by the
fact that, on the back side of the mock-up, mortar is not directly placed on the frame and the
infill, but it is delaminated with a layer of thermo-insulating foam which absorbs small
deformations occurring in the infill and frame.

59
Figure 5-6. Fifth cycle damages
Figure 5-7. Out of plane damage during fifth cycle
Figure 5-8. Back side of the mock-up

60
5.1.6 Final (sixth) cycle – target displacement 120 mm
In the final stage of the experiment, target displacement was 120 mm or 4% drift. We
clearly see the uplift of the infill (Figure 5-9) during its whole length. For the first time, we
can see cracks occurring in the concrete column. If we look at Figure 5-10 we can see how
the infill got separated from the frame. On the leeward side of the frame, we can just note
that cracks which were already present just gained in their width and no new cracks occurred
(Figure 5-11).
Figure 5-9. Sixth loading cycle – uplift of the infill
Figure 5-10. Infill separation from the frame

61
Figure 5-11. Sixth load cycle – leeward side
5.2 PUSHOVER CURVE
Data coming from horizontal displacement of the beam and the values of base shear
give us loading-unloading curve shown in Figure 5-12. Six different loading-unloading
branches can be distinguished, one for each cycle. Values of target displacements at the end
of cycles are shown in Figure 4-9.
Figure 5-13 shows how stiffness of the whole structure is changing after each cycle.
It can be seen that during first loading step, until 52 kN of base shear, frame was
entirely stiff. That was until first cracks in mortar occurred after which its stiffness started
to deteriorate. Peak value of the base shear achieved in the first step was 149 kN at the
displacement of 10 mm. The unloading branch has the same slope as the loading one and it
can be seen that in order to reach initial state, base shear had to change its sign and reach a
minimum value of -45 kN. This was due to plastic deformation occurred in the frame that
had to be cancelled.
Second loading branch had a goal to reach target displacement of 30 mm or 1% drift.
It can be noted that the new loading branch, looks the same as loading branch for the previous
case (until 15 mm displacement) just shifted downwards since there is no rigid part at the
beginning due to already formed cracks. Until this point (15 mm) we can say that no major
stiffness degradation occurred since the branches have the same slope. After 15 mm mark,
structure experiences reduction of the stiffness. This leads to a maximum value of 127 kN

62
for base shear in the second loading step at the displacement of 25 mm. In order to return
the structure to its initial state, base shear had to achieve a value of -51 kN.
Figure 5-12. Loading-unloading curve
Third, fourth and fifth loading steps have similar behaviour with stiffness being
reduced after each cycle. An average peak base shear for these steps was 123 kN and average
force required to return the structure to the initial state was -50 kN.
Last loading step, with 120 mm target displacement, started as previous four ones but
at 102 mm displacement mark, a sudden drop of resistance occurred where base shear
dropped from its peak value for this step (114 kN) to a value of 105 kN. This drop was quite
expected in these conditions (almost 4% of drift) and occurred due to formation of cracks in
the frame itself, more specifically windward column as shown in Figure 5-9.
Table 5.1 summarises peak base shear forces for each loading cycle and their
respective displacements, also shows shear forces required to return the structure in its
previous state after loading is completed.
-50
-35
-20
-5
10
25
40
55
70
85
100
115
130
145
160
0 10 20 30 40 50 60 70 80 90 100 110 120
Bas
e sh
ear
[kN
]
Displacement [mm]

63
Table 5.1. Max base shear achieved, its respective displacement and min shear for each
loading cycle
An interesting observation can be made if we look at areas surrounded by loading-
unloading branches for each load cycle. It can be seen that area grows (gets wider) with each
step, and if we look at that area as dissipated energy, we can say that after each cycle structure
dissipates more energy than in the previous one. This can be regarded as favourable
behaviour during an earthquake.
Figure 5-13. Stiffness degradation after each cycle
If we take peak values for each load cycle and their respective displacements, we can
obtain a pushover curve (Figure 5-14).
We can see that after initial 150 kN, resistance of the frame gets stabilized around
120 kN mark. This can be justified by the fact that, initially, mortar, frame and infill worked
together making the whole structure more stiff and resistant, but after creation of the first
cracks in the mortar layer resistance value descends. Also, this stabilization tells us that the
structure has quite a ductile behaviour.
0
20
40
60
80
100
120
0 20 40 60 80 100 120
Bas
e sh
ear
[kN
]
Displacement [mm]
Loading cycle Max shear
[kN]
Displacement
[mm]
Min shear
[kN]
I 149.350 10.623 -45.289
II 127.414 25.832 -51.053
III 124.992 43.617 -54.475
IV 119.280 59.068 -48.448
V 122.479 83.774 -44.052
VI 113.979 99.949 -46.937

64
Figure 5-14. Pushover curve from the experiment
If we calculate the resisting bending moment of one of the columns from the frame,
as later is presented in detail in section 6.2, we obtain value of 60 kNm which should give
us 80 kN as the lateral resistance of the bare frame. Using SAP2000, a pushover for the bare
frame was obtained and shown in Figure 5-15 alongside pushover curve obtained from the
experiment. It should be noted that the yield limit of the reinforcing steel was set to 550
MPa, which is a more realistic value than the one provided by EC 2.
Figure 5-15. Pushover curve of the bare frame (experiment and SAP2000)
If we compare limit base shear coming from the experiment and the one coming
from this pushover analysis of the bare frame, we notice an improvement of 25% in
resistance of the infilled frame. We can also see that stiffness during elastic phase is almost
the same (because of the mortar layer, the experimental one is a bit stiffer).
0
15
30
45
60
75
90
105
120
135
150
165
0 10 20 30 40 50 60 70 80 90 100
Bas
e sh
ear
[kN
]
Displacement [mm]
0
20
40
60
80
100
120
140
160
0 10 20 30 40 50 60 70 80 90 100
Fo
rce
[kN
]
Displacement [mm]
Experiment Bare frame (SAP2000)

65
5.3 DEFORMATIONS IN DIAGONAL DIRECTIONS
. In this section results coming from two WDT instruments placed in compressed
diagonal (strut) and the diagonal in tension (tie) are presented and discussed. Even though
there is no actual reinforcement placed in tension diagonal, for the sake of simplicity, we
will call it a tie.
I should be noted that because of the safety of the instruments, they had to be removed
after fourth cycle (60 mm) so results are not showing behaviour for the last two loading-
unloading cycles.
Looking at Figure 5-16 we can notice that displacements are not that large, this was
expected if we know that no severe damage occurred in this direction. This, we can see in
section 5.1 where several photos are showing that major cracks occur in the direction
perpendicular to the diagonal in tension (tie). Biggest displacement in the strut occurred
during last monitored loading cycle (60 mm) and it was 4.7 mm. Another thing we can notice
is that the stiffness does not change dramatically over the cycles which again proves that
serious damage in this direction was avoided.
Figure 5-16. Displacements in the strut
Different situation can be seen if we look at the behaviour of the tie (Figure 5-17).
Here we notice much larger displacements, going up to 35 mm. This is quite reasonable since
we know that the main cracking happened perpendicularly to this diagonal. Also there is no
change of sign in displacement. This is because when the base shear changes its sign it is
-70
-20
30
80
130
180
-6 -5 -4 -3 -2 -1 0 1 2 3 4 5 6
Bas
e sh
ear
[kN
]
Displacement [mm]

66
actually closing the cracks that occurred before. A big drop of stiffness after each cycle was
also distinguished, again quite different with respect to the previous case.
Figure 5-17. Displacements in the tie
5.4 MOMENT – CURVATURE DIAGRAMS
Two different cross sections of columns will be analysed, bottom end and top end of
the column. It should be noted that for the purpose of these diagrams, values of bending
moments, at said cross sections, were calculated as for a bare frame. Analysis of the bare
frame subjected to 1 kN lateral load is presented in Appendix B.
As seen in Figure 5-18 first three loading-unloading cycles were monitored. We can
see a great reduction in stiffness after each cycle, also, when the frame reaches initial zero
displacement state, curvature changes its sign which tells us that both sides of the column
are experiencing tension even though it was a monotonic loading. As expected the biggest
curvature is at the end of the third cycle (45 mm) and has a value of 0.021 1/m. During first
loading-unloading cycle bigger bending moment than in other two cycles was achieved,
similar detail was noted before, in Figure 5-12, where at the beginning of the experiment,
the highest force was achieved, while during following cycles it got stabilized at lower level.
-100
-50
0
50
100
150
200
0 5 10 15 20 25 30 35 40
Bas
e sh
ear
[kN
]
Displacement [mm]

67
Figure 5-18. Moment – curvature diagram of the bottom cross sections
Before looking at the moment – curvature diagram of the top cross sections (Figure
5-19), it should be mentioned that because of the nature of the testing frame, rotations of the
beam cross sections were reduced, so it is alright to expect that the top cross sections of the
columns also rotate in smaller amount compared to the bottom ones. Still it is possible to
observe a behaviour similar to the one from the previous case, here maximum curvature was
0.011 1/m. One notable difference would be that the curvature has larger negative values
than the one of the bottom cross sections.
Figure 5-19. Moment – curvature diagram of the top cross sections
We can see that in both diagrams there is some stabilization in post cracking phase.
This tells us that the cross sections in columns are having ductile behaviour. Knowing that
when the masonry is used as an infill this is not quite a case, we can state that polystyrene
infill brought in a more desirable behaviour.
-100
-50
0
50
100
150
-0.005 0.000 0.005 0.010 0.015 0.020 0.025
Mo
men
t [k
Nm
]
Curtvature [1/m]
-100
-50
0
50
100
150
-0.005 0.000 0.005 0.010 0.015 0.020
Mo
men
t [k
Nm
]
Curtvature [1/m]

68
5.5 STRAIN IN THE STRUT
Strain was measured at two ends of the strut, using 4 LVDT transducers (two at each
end). Values shown in Figure 5-20 are mean values coming from those instruments. It should
be mentioned that these instruments are actually mounted on the mortar layer and not directly
on the infill.
Figure 5-20. Strain in the strut
Looking at Figure 5-20 we see how during the first loading-unloading cycle, at
around 142 kN of base shear, strain starts to grow under almost constant load and reaches its
maximum value of 0.18%. This happened due to formation of cracks in the diagonal in
tension or better said, cracks parallel to the strut. After first cycle, we cannot observe such a
phenomenon any longer, but strain always reaches values around 0.10% at the end of each
cycle. We can also see that, at the end of each unloading step, strain goes to negative, which
would mean that the strut experienced tension at that point (due to poison ratio), and if we
look at Figure 5-16 we see that this is indeed true.
Figure 5-21 shows strain in function of top displacement, where we observe an
interesting behaviour. Namely, for all loading-unloading cycles (except for the first one), no
matter how large the target displacement is, strain has a value around 0.10%. Also, after each
cycle negative strain gets bigger.
-100
-50
0
50
100
150
200
-0.10% -0.05% 0.00% 0.05% 0.10% 0.15% 0.20%Bas
e sh
ear
[kN
]
Strain [%]

69
Figure 5-21. Strain in function of top displacement
0
10
20
30
40
50
60
70
80
90
100
-0.10% -0.05% 0.00% 0.05% 0.10% 0.15% 0.20%
To
p d
isp
lace
men
t [m
m]
Strain [%]

70

71
Finite element analysis is a very powerful tool for the purpose of structural analysis,
broadly used by researchers and designers nowadays, in order to determine stress states,
displacements and strains in a very precise way. For this task, MIDAS GEN 2016 (v2.2) was
used in order to carry out the pushover analysis of the bare frame and infilled frame. The
results obtained from this analysis are meant to be compared with the ones obtained in
Chapter 3, and ultimately give a reasonable estimate of the failure load, maximum
displacement, and expected failure mode of the infilled frame during testing. Finally,
SAP2000 was used in order to perform a simple elastic analysis of the frame, and compare
these results to the ones obtained with the more refined pushover analysis.
6.1 STARTING ASSUMPTIONS
In order to obtain accurate results, the model must represent the real frame in a
precise way. Dimensions of the frame were precisely measured in the lab. Material
mechanical properties, as discussed previously, were not precisely measured by tests.
Concrete behaviour is built-in to the software, with all the mechanical properties that
correspond to the selected concrete class (C20/25). Reinforcement (longitudinal and
transversal) was adequately input to the model as well, in order to carry out the non-linear
analysis. Polystyrene, however, is not built-in to the software, and needed to be adequately
defined. Due to lack of refined experimental data describing the stress-strain relationship of
the material, an initial elastic behaviour was assumed, followed by a perfectly plastic
relationship.
Chapter 6
Finite element analysis and modelling

72
The supports at the bottom of the columns were modelled as perfectly fixed (zero
displacement and rotation at the base). Restraints during the test are such that will ensure
this condition not to deviate much from reality.
6.2 RC FRAME
6.2.1 Modelling
First, the reinforced concrete frame was modelled, without any infill, in order to
quantify the effect of adding the infill in a latter model. The frame characteristics are depicted
in Figure 6-1 and Figure 6-2. The concrete material mechanical properties were assigned in
the program, as shown in Figure 6-3 (a). Once the mechanical properties for the materials
have been suitably defined, and the proper dimensions and reinforcement layout are assigned
for beam and columns (Figure 6-3 (b) and (c)), the frame is then modelled (Figure 6-4).
Figure 6-1. Bare frame geometry and layout
Figure 6-2. Beam and column cross sections and reinforcement layout

73
Figure 6-3. Assignment of concrete mechanical properties (a) and steel reinforcement (b) and (c) in MIDAS GEN
Figure 6-4. Reinforced Concrete Frame model in MIDAS GEN

74
6.2.2 Pushover analysis
Once the frame is modelled, a non-linear static analysis (pushover analysis) is
performed on the frame structure. A pushover analysis consists basically in subjecting the
structure to a monotonically increasing invariant lateral displacement pattern, (displacement
of the top left corner of the frame in this case) until an incipient collapse situation is reached.
The main output from this analysis is the so called “pushover curve”, which describes the
load-displacement behaviour of the structure under lateral loads, accounting for geometrical
and material nonlinearities. Midas GEN includes a built-in option which performs this type
of analysis, and was used for this research in order to obtain the pushover curve.
Nonlinear behaviour is considered in Midas by the lumped plasticity method, which
considers two plastic hinges at each end of member (beam or column), where the nonlinear
behaviour is lumped (1 flexural hinge, and 1 shear hinge, at each end of the member). Due
to the nature of the lumped plasticity approach, possible plastic hinge locations must be
defined before the pushover analysis is carried out (for this case, possible plastic hinges are
defined at both ends of beam and columns), as depicted in Figure 6-5.
Figure 6-5. Lumped plasticity in beam elements
As mentioned before, each member end has 2 different types of plastic hinges (one
for flexure and one for shear). The flexural plastic hinge is described by a moment-rotation
behaviour, which is elastic up to yielding (A-B branch in Figure 6-6), then presents a
perfectly plastic behaviour (B-C branch in Figure 6-6) where it can continue to rotate without
taking additional load, until the ultimate rotation, where failure is achieved (point C in Figure
6-6). The shear plastic hinge, on the other hand, has a completely different behaviour to the
flexural hinge, as shear phenomena is brittle by nature, and can’t account for any post-elastic
resources. Shear hinges are defined by a force-displacement behaviour, which is elastic up
to failure (Figure 6-8 ). Plastic hinges in columns must account for the interaction between
axial force and yield moment (Figure 6-7 ), while axial force interaction is neglected in beam
plastic hinges.

75
Figure 6-6. Flexural plastic hinge definition for beam in Midas Gen
Figure 6-7. Flexural plastic hinge definition for column in Midas Gen
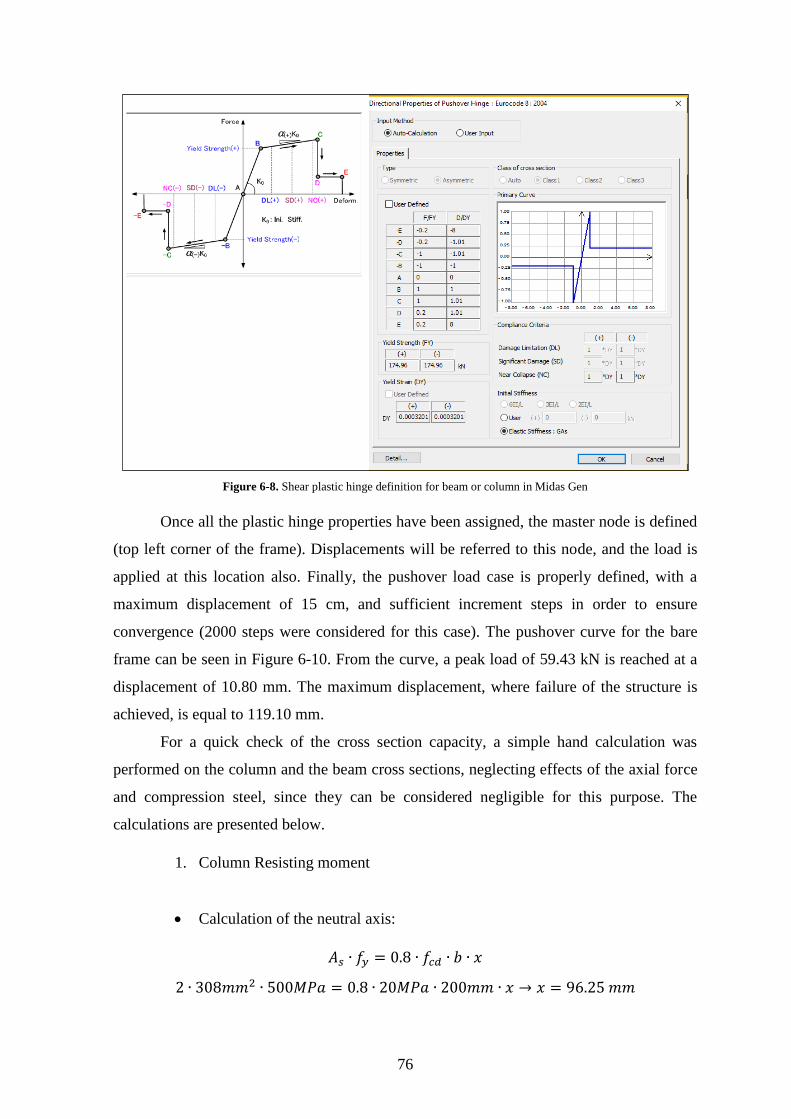
76
Figure 6-8. Shear plastic hinge definition for beam or column in Midas Gen
Once all the plastic hinge properties have been assigned, the master node is defined
(top left corner of the frame). Displacements will be referred to this node, and the load is
applied at this location also. Finally, the pushover load case is properly defined, with a
maximum displacement of 15 cm, and sufficient increment steps in order to ensure
convergence (2000 steps were considered for this case). The pushover curve for the bare
frame can be seen in Figure 6-10. From the curve, a peak load of 59.43 kN is reached at a
displacement of 10.80 mm. The maximum displacement, where failure of the structure is
achieved, is equal to 119.10 mm.
For a quick check of the cross section capacity, a simple hand calculation was
performed on the column and the beam cross sections, neglecting effects of the axial force
and compression steel, since they can be considered negligible for this purpose. The
calculations are presented below.
1. Column Resisting moment
Calculation of the neutral axis:
𝐴𝑠 ∙ 𝑓𝑦 = 0.8 ∙ 𝑓𝑐𝑑 ∙ 𝑏 ∙ 𝑥
2 ∙ 308𝑚𝑚2 ∙ 500𝑀𝑃𝑎 = 0.8 ∙ 20𝑀𝑃𝑎 ∙ 200𝑚𝑚 ∙ 𝑥 → 𝑥 = 96.25 𝑚𝑚

77
Strain at mid layer
Due to the fact that the second layer of the steel is in the middle of the cross section,
verification of yielding in steel is performed in this layer.
0.0035
96.25𝑚𝑚=
0.0035 + 𝑦
155𝑚𝑚→ 𝑦 = 0.00276
Where 155mm is the distance from the compressed edge to the mid layer of steel,
and “y” is the corresponding strain at that layer.
Since “y” is greater than εsy = 0.002, the steel at mid layer has yielded.
Resisting moment:
The resisting moment was calculated about the compressed edge of the cross section
as follows:
𝑀𝑅𝑑 = 308𝑚𝑚2 ∙ 500𝑀𝑃𝑎 ∙ (275𝑚𝑚 + 155𝑚𝑚) − 0.8 ∙ 20𝑀𝑃𝑎 ∙ 200𝑚𝑚
∙ 96.25 ∙ (0.8 ∙ 96.25
2) = 60 𝑘𝑁 ∙ 𝑚
2. Beam Resisting Moment
Calculation of the neutral axis:
𝐴𝑠 ∙ 𝑓𝑦 = 0.8 ∙ 𝑓𝑐𝑑 ∙ 𝑏 ∙ 𝑥
4 ∙ 113.1𝑚𝑚2 ∙ 500𝑀𝑃𝑎 = 0.8 ∙ 20𝑀𝑃𝑎 ∙ 200𝑚𝑚 ∙ 𝑥 → 𝑥 = 70.63 𝑚𝑚
Resisting moment:
The resisting moment was calculated about the compressed edge of the cross section
as follows:
𝑀𝑅𝑑 = 452.39𝑚𝑚2 ∙ 500𝑀𝑃𝑎 ∙ 216𝑚𝑚 − 0.8 ∙ 20𝑀𝑃𝑎 ∙ 200𝑚𝑚
∙ 70.63𝑚𝑚 ∙0.8 ∙ 70.63
2= 42.47 𝑘𝑁𝑚
Actual steel used for this frame has yield strength of 500 MPa which is a
characteristic value. Knowing that we can say that value of a limit later load for a bare frame
can be increased between 20% to 30% with the respect to the one obtained in FEA.
The flexural capacities obtained by the means of simple hand calculations are in very
good agreement with flexural plastic hinge resistance for beams and columns used during

78
pushover analysis, which can be seen in Figure 6-9. The column resistance is also in good
agreement with the interaction diagram from Figure 3-4, considering no axial load.
Figure 6-9. Yielding moments at plastic hinges
The pushover curve observed in Figure 6-10 presents a discontinuous nature. This
can be explained by analysing the failure mode sequence of the frame, which consists of a
series of plastic hinge activations, and plastic hinge failures, and are reflected in the curve
by the discontinuities in the load-displacement curve, due to the sudden loss of stiffness.
Figure 6-10. Pushover curve for RC Frame Structure

79
The aforementioned behaviour can be understood in a simple way by observing
Figure 6-11 and Figure 6-12. In Figure 6-11 (a) the frame is still within the elastic range (the
6 plastic hinges defined at the ends of beams and columns are blue, which means they are
still behaving elastically). The dot in the load-displacement curve below the frame shows
the structure’s current position, where it can be seen how the frame is still in the elastic
range. Then, in Figure 6-11 (b) the plastic hinge at the base of the windward column has
been activated. Similarly, Figure 6-11 (c) shows the moment when the plastic hinge is
activated at the base of the leeward column. Figure 6-12 (a) and (b) show the moment of
activation of plastic hinges on the beam ends. At this point, the frame has yielded and cannot
take any more load, but it can still continue to deform, because of the ductile nature of the
flexural plastic hinge.
After the long horizontal branch in the load-displacement curve, Figure 6-12 (c)
shows the moment when the first plastic hinge reaches failure (at the base of the windward
column). Finally, Figure 6-13 show the moment when the other three plastic hinges reach
failure, represented as discontinuities in the load-displacement curve.
Figure 6-11. Pushover analysis plastic hinge sequence for bare frame in elastic regime

80
Figure 6-12. Pushover analysis plastic hinge sequence for bare frame after first yielding
Figure 6-13 Pushover analysis plastic hinge sequence for bare frame after collapse of the columns
Failure of the structure is achieved when 4 plastic hinges are activated, as depicted
in Figure 6-13 (b). It’s worth mentioning that the top sections of the columns are still

81
behaving elastically at the point of failure, and never achieve yielding. The most relevant
results from the capacity curve in Figure 6-10 are presented in Table 6.1.
Table 6.1. Bare frame capacity curve most relevant results
6.3 POLYSTYRENE INFILL
6.3.1 Modelling
Polystyrene material was defined at this stage, in order to include the infill to the
previous model, with the properties reported in Table 6.2 which are the same values used in
Chapter 3. Figure 6-14 shows the assignment of polystyrene mechanical properties in
MIDAS GEN.
Table 6.2. Polystyrene mechanical properties
Bare
frame
1st yield load [kN] 52.69
Displacement at 1st yield [mm] 7.28
2nd yield load [kN] 55.95
Displacement at 2nd yield [mm] 8.03
3rd yield load [kN] 58.73
Displacement at 3rd yield [mm] 9.68
4th yield load [kN] 59.43
Displacement at 4th yield [mm] 10.80
1st hinge failure load [kN] 59.43
Displacement at 1st hinge failure
[mm] 86.70
2nd hinge failure load [kN] 46.27
Displacement at 2nd hinge failure
[mm] 87.9
3rd hinge failure load [kN] 32.37
Displacement at 3rd hinge failure
[mm] 112.88
4th hinge failure load [kN] 22.13
Displacement at 4th hinge failure
[mm] 119.1
Maximum Load [kN] 59.43
Maximum Displacement [mm] 119.10
Ductility (𝛿𝑦
𝛿𝑢) 16.36
Uniaxial yield strength 0.1 MPa
Initial elastic modulus 4.35 MPa
Poisson’s ratio 0.01
Weight density 10.4 MPa

82
Figure 6-14. Definition of polystyrene material in MIDAS GEN
Figure 6-15. Infilled frame model in MIDAS GEN
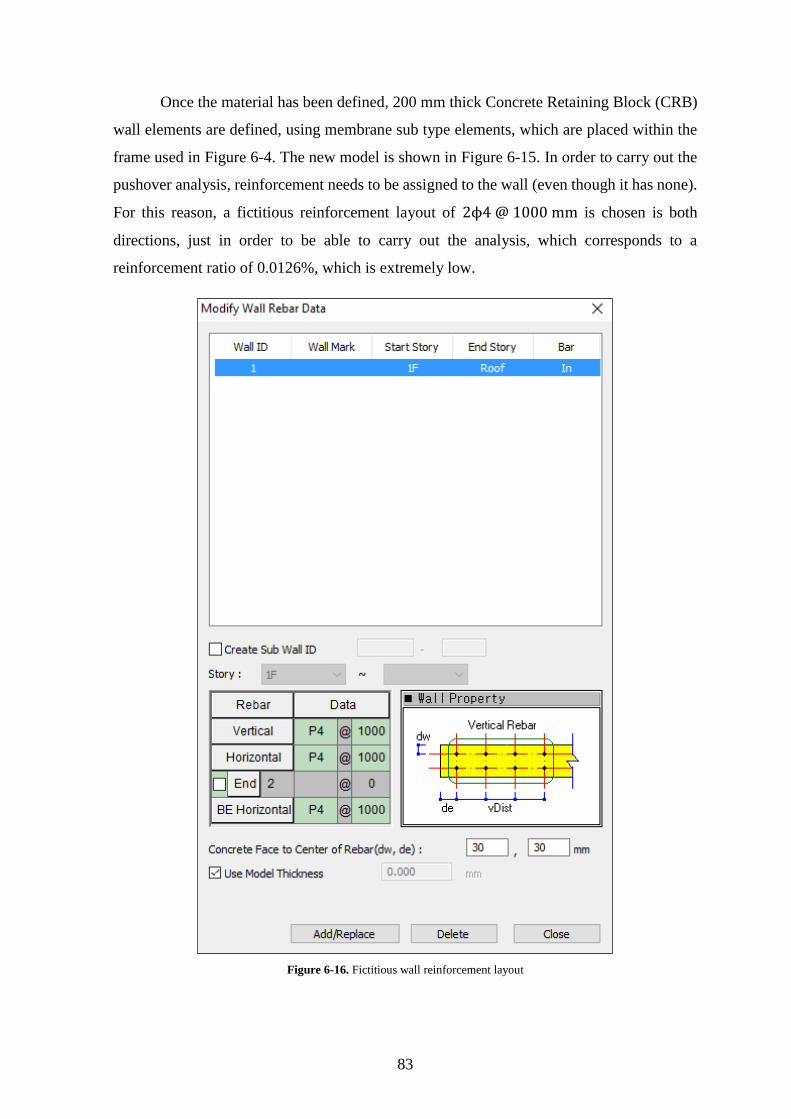
83
Once the material has been defined, 200 mm thick Concrete Retaining Block (CRB)
wall elements are defined, using membrane sub type elements, which are placed within the
frame used in Figure 6-4. The new model is shown in Figure 6-15. In order to carry out the
pushover analysis, reinforcement needs to be assigned to the wall (even though it has none).
For this reason, a fictitious reinforcement layout of 2ϕ4 @ 1000 mm is chosen is both
directions, just in order to be able to carry out the analysis, which corresponds to a
reinforcement ratio of 0.0126%, which is extremely low.
Figure 6-16. Fictitious wall reinforcement layout

84
6.3.2 Pushover Analysis
A similar analysis to the one performed in section 6.2.2 was carried out for this
model, with the only difference that, in this case, the infill is present in the model, instead of
performing the pushover analysis on the bare frame. One additional plastic hinge needed to
be defined and then assigned to the top and bottom of the infill, as depicted in Figure 6-17
and Figure 6-18. The pushover curve for the infilled frame is shown in Figure 6-19.
Figure 6-17. Wall flexural plastic hinge definition in Midas Gen
Figure 6-18. Wall shear plastic hinge definition in Midas Gen

85
Figure 6-19. Pushover curve for infilled frame structure
From Figure 6-19 it is worth noticing how the initial behaviour of the infilled frame
is quite similar to the one in Figure 6-10, of the bare frame, with a very similar yield strength,
displacement and stiffness. The structure has an initial elastic behaviour (Figure 6-20 (a)).
After the first plastic hinge yielding (Figure 6-20 (b)), the structure continues to take load,
with a reduced stiffness. Figure 6-20 (c), (d) and (e) show the activation of the next 3 plastic
hinges. At this point, the frame structure has achieved yielding and cannot continue to take
additional load. Therefore, the only component which is still able to take more load is the
infill, which is still behaving elastically up to this point.
After activation of the 4 plastic hinges on the frame, the structure continues to take
additional load, with a significantly reduced stiffness, up until the first plastic hinge failure
on the windward column (Figure 6-20 (f)), where the maximum load is achieved (79.24 kN).
After the sudden drop, the structure continues to take additional load, with a constant
stiffness, up until the failure of the second plastic hinge (Figure 6-21 (a)), where there is a
second sudden drop in the load-displacement curve. Similarly, the structure continues to take
additional load, with constant stiffness, and sudden drops where plastic hinges achieve
failure (Figure 6-21 (b) and (c)). After the fourth plastic hinge has failed, the infill still
behaves elastically. The structure is able to reload until reaching failure of the top plastic
hinge of the infill, in shear, as depicted in Figure 6-21 (d). Due to the fact that the failure of
the last plastic hinge is in shear, there is no ductile behaviour at the end, and the failure

86
occurs in a brittle way. At this point, the structure has achieved failure, at a maximum
displacement of 119.18 mm. The most relevant results of the capacity curve from Figure
6-19 are presented in Table 6.3. A comparison of both capacity curves is proposed in Figure
6-22.
Figure 6-20. Pushover analysis plastic hinge sequence for infilled frame

87
Figure 6-21. Pushover analysis plastic hinge sequence for infilled frame

88
Table 6.3. Infilled frame capacity curve most relevant results
Infilled
frame
1st yield load [kN] 54.85
Displacement at 1st yield [mm] 7.35
2nd yield load [kN] 58.75
Displacement at 2nd yield [mm] 8.18
3rd yield load [kN] 61.53
Displacement at 3rd yield [mm] 9.6
4th yield load [kN] 62.4
Displacement at 4th yield [mm] 10.65
1st hinge failure load [kN] 79.24
Displacement at 1st hinge failure [mm] 85.95
Load increase [kN] 16.84
2nd hinge failure load [kN] 66.10
Displacement at 2nd hinge failure [mm] 87.23
Load increase [kN] 0.46
3rd hinge failure load [kN] 57.62
Displacement at 3rd hinge failure [mm] 112.88
Load increase [kN] 6.71
4th hinge failure load [kN] 48.78
Displacement at 4th hinge failure [mm] 119.18
Load increase [kN] 1.18
5th hinge failure load [kN] 39.60
Displacement at 5th hinge failure [mm] 124.28
Load increase [kN] 1.04
Total load absorbed by infill [kN] 26.23
Maximum Load [kN] 79.24
Maximum Displacement [mm] 119.18
Ductility (𝛿𝑦
𝛿𝑢) 16.21

89
Figure 6-22. Comparison between infilled frame and bare frame capacity curves
6.4 ELASTIC MODEL WITH COMPRESSION STRUT
Another topic of interest for this investigation is the applicability of simplified
methods for analysis (macro-models), instead of refined and more advanced approaches such
as finite element analysis (micro-models). The use of an equivalent compression strut model
for the analysis of masonry infilled RC frames under lateral load has been widely
investigated and used in past years. The width of the equivalent strut, however, has been a
topic of discussion and has several different approaches, as seen before in Figure 2-4. This
section is dedicated to the development of a similar approach for polystyrene infilled RC
frames under lateral load, using similar width-to-length ratios for the compressive strut, and
comparing these results to the ones obtained by finite element analysis.
6.4.1 Modelling
Due to the fact that the purpose of this investigation is focused on simplified tools
for analysis, a simple elastic approach is proposed, using 3 frame (Bernoulli beam) elements
for the beam and columns, and a truss element for the equivalent compression strut,
considering the elastic properties for each material accordingly (Table 6.2 for polystyrene
properties, and the built in properties for C20/25 concrete in the software). Two elastic
0
10
20
30
40
50
60
70
80
90
0.00 20.00 40.00 60.00 80.00 100.00 120.00 140.00
Bas
e sh
ear
[kN
]
Displacement [mm]
Infilled frame Bare frame

90
models were carried out, in parallel, using the SAP2000 software: one for the frame with
equivalent compression strut, and another one for the bare frame, as shown in Figure 6-23
(a) and Figure 6-23 (b) respectively. The reason for the latter model, is to use it as reference,
in order to quantify the effect of adding the compression strut. It is also useful to compare it
to the results obtained in section 6.2 for the bare frame.
Figure 6-23. Elastic models of infilled frame with equivalent compression strut (a) and bare frame (b) in SAP2000
6.4.1.1 Bare Frame
From Table 6.1, it can be observed that the first yielding, corresponding to the base
of the columns, occurs at a load equal to 52.69 kN. The internal actions on the frame, under
a horizontal load of 52.69 kN, are depicted in Figure 6-24.
Figure 6-24. Internal actions diagrams for frame under 52.69 kN lateral load
After this first plastic hinge activation, the internal actions are “frozen”, and an
auxiliary structure is analysed. This auxiliary structure can be idealized as the same frame

91
having a hinge at the bottom section of the windward column, where the plastic hinge has
been activated, and it can keep taking an additional 3.26 kN lateral load under the new
structural scheme. Now, a third auxiliary structure is analysed, with 2 plastic hinges, one at
the base of each column, and with a horizontal load equal to 2.78 kN. Finally, a third
auxiliary structure is analysed, with one additional plastic hinge on the right hand side of the
beam, and a horizontal load equal to 0.7 kN. At this point, the structure’s internal actions are
computed for the first model, and the three auxiliary models, and the actions are summed in
order to obtain the final internal action diagrams.
Figure 6-25. Internal actions diagrams for auxiliary structure 1
Figure 6-26. Internal actions diagrams for auxiliary structure 2

92
Figure 6-27. Internal actions diagrams for auxiliary structure 3
Finally, by means of the superposition principle, the internal action diagrams from
Figure 6-24, Figure 6-25, Figure 6-26 and Figure 6-27 can be simply added to obtain the
final diagram on the frame, under a total load of 59.43 kN, as depicted in Figure 6-28
Figure 6-28. Internal actions diagrams for frame at maximum load (59.43 kN) applying super-position principle
Finally, the corresponding horizontal displacements of the structure were computed,
immediately before the formation of plastic hinges on columns and beams. The values are
depicted in Table 6.4.
Table 6.4. Load-displacement points of frame structure just before activation of plastic
hinges
Load
[kN]
Displacement
[mm]
52.69 7.29
55.95 8.04
58.73 9.73
59.43 10.94

93
6.4.1.2 Infilled frame
Similarly, an elastic analysis was carried out on the same frame structure, with the
addition of a compression strut, as depicted in Figure 6-23 (a). Initially, a compression strut
width/length ratio of w/D = 0.25 was considered, as a first approximation, which was later
checked and adjusted. This results in using a strut with dimensions 200 x 1127 mm. From
Table 6.3, the relevant points of interest to be analysed can be determined. Similar to the
previous analysis, an incremental elastic analysis was performed. First, a 54.85 kN load was
applied on the frame structure with compression strut, fixed at the bottom. Then, incremental
loads were applied on the auxiliary models accordingly, in order to follow the plastic hinge
activation sequence observed in Figure 6-20, similar to the analysis performed in section
6.4.1.1. Results can be seen in Figure 6-29 - Figure 6-34.
Figure 6-29. Internal actions diagrams for frame with strut under 54.85 kN lateral load
Figure 6-30. Internal actions diagrams for auxiliary structure 1

94
Figure 6-31. Internal actions diagrams for auxiliary structure 2
Figure 6-32. Internal actions diagrams for auxiliary structure 3
Figure 6-33. Internal actions diagrams for auxiliary structure 4
At this point, plastic hinges are activated at both, the base of the columns, and at the
ends of the beams. From this point forward, the only component which is still able to carry
additional load is the compression strut, through axial force. The strut carries an additional
16.84 kN before the failure of the first plastic hinge, reaching the maximum load of the
capacity curve in Figure 6-19. After the sudden drop due to the failure of plastic hinges at

95
the base of the columns, the strut continues to take even more load. As shown in Table 6.3,
the infill is able to carry an additional 26.23 kN in total, after the frame structure has
completely yielded. The resulting internal actions at this point are depicted in Figure 6-34.
Figure 6-34. Internal actions diagrams for frame with strut at maximum load (79.24 kN) applying super-position principle [kN, m]
Finally, the corresponding horizontal displacements of the structure were computed,
immediately before the formation of plastic hinges on columns and beams, and at the
moment the structure reaches its maximum load capacity. The values are depicted in Table
6.5.
Table 6.5. Load-displacement points of infilled frame structure just before activation of
plastic hinges and at maximum load capacity
Load
[kN]
Displacement
[mm]
54.85 7.48
58.75 8.36
61.53 9.95
62.4 11.23
79.24 174.86
6.4.2 Elastic analysis and results
Two elastic models were carried out, in parallel, in order to quantify the influence of
adding the compression strut, and to compare the results of a simple elastic approach to the
pushover analysis from section 6.3. In order to model the post-elastic behaviour of the frame
(after activation of the first plastic hinge and before collapse), auxiliary models were used
with idealized hinges at the sections where plastic hinges have been activated. The internal
actions from these auxiliary models were then super imposed to the ones where the structure
is still behaving elastically, to obtain the final internal actions (Figure 6-28 and Figure 6-34).
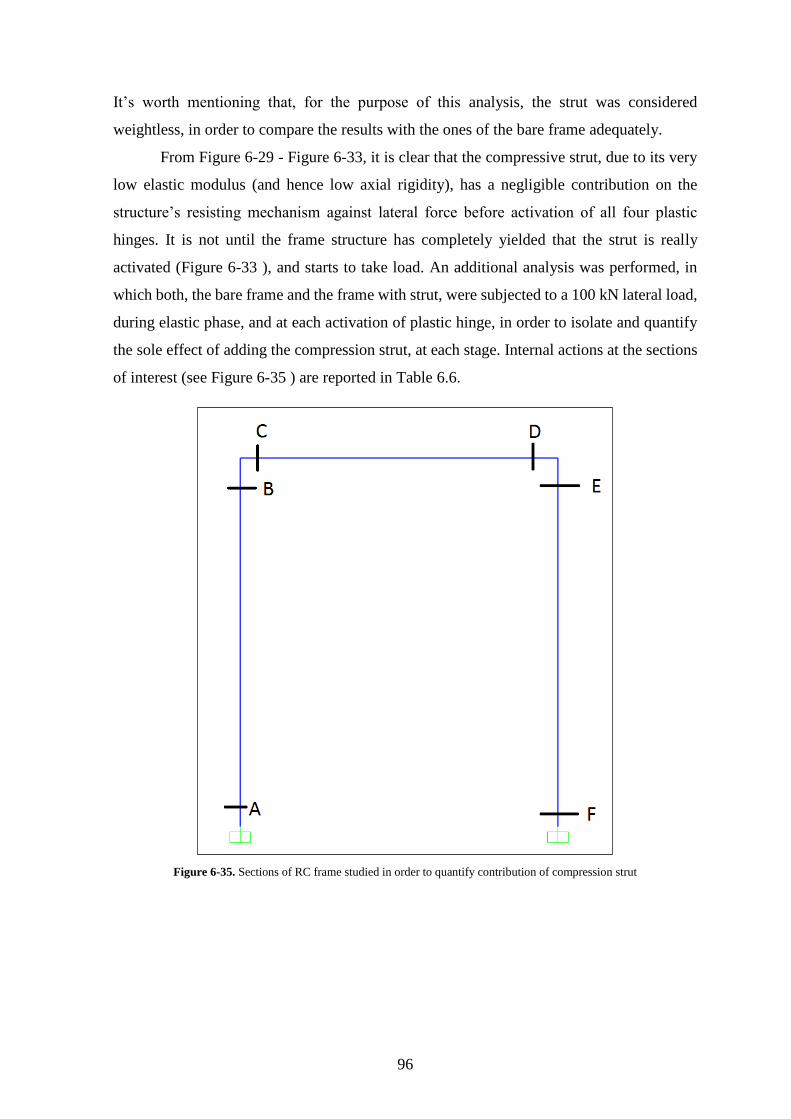
96
It’s worth mentioning that, for the purpose of this analysis, the strut was considered
weightless, in order to compare the results with the ones of the bare frame adequately.
From Figure 6-29 - Figure 6-33, it is clear that the compressive strut, due to its very
low elastic modulus (and hence low axial rigidity), has a negligible contribution on the
structure’s resisting mechanism against lateral force before activation of all four plastic
hinges. It is not until the frame structure has completely yielded that the strut is really
activated (Figure 6-33 ), and starts to take load. An additional analysis was performed, in
which both, the bare frame and the frame with strut, were subjected to a 100 kN lateral load,
during elastic phase, and at each activation of plastic hinge, in order to isolate and quantify
the sole effect of adding the compression strut, at each stage. Internal actions at the sections
of interest (see Figure 6-35 ) are reported in Table 6.6.
Figure 6-35. Sections of RC frame studied in order to quantify contribution of compression strut

97
Table 6.6. Internal actions on the bare frame and frame with strut, under 100 kN horizontal
loading
Sec
tion
Sta
ge
Bare frame Frame with strut
M(x)
[kN-m]
V(x)
[kN]
N(x)
[kN]
Top
disp.
[mm]
M(x)
[kN-m]
V(x)
[kN]
N(x)
[kN]
Top
disp.
[mm]
A
No p
last
ic h
inges
94.2 50.11 45.14
13.83
92.89 49.41 46.12
13.64
B 59.9 50.11 45.14 59.06 49.41 46.12
C 59.9 45.14 -49.89 59.06 44.5 -49.19
D 59.71 45.14 -49.89 58.87 44.5 -49.19
E 59.71 49.89 -45.14 58.87 49.19 -44.5
F 93.69 49.89 -45.14 92.39 49.19 -44.5
strut - - - - - -2.14
A
Wit
h f
irst
pla
stic
hin
ge
- 21.99 59.06
23.06
- 21.49 60.37
22.53
B 67.63 21.99 59.06 66.07 21.49 60.37
C 67.63 59.06 -78.01 66.07 57.69 -76.21
D 88.87 59.06 -78.01 86.82 57.69 -76.21
E 88.87 78.01 -59.06 86.82 76.21 -57.69
F 150.99 78.01 -59.06 147.52 76.21 -57.69
strut - - - - - -3.53
A
Wit
h f
irst
tw
o p
last
ic
hin
ges
- 50.02 116.04
60.67
- 47.09 116.04
57.13
B 153.81 50.02 116.04 144.8 47.09 116.04
C 153.81 116.04 -49.98 144.8 109.24 -47.05
D 153.69 116.04 -49.98 144.69 109.24 -47.05
E 153.69 49.98 -116.04 144.69 47.05 -
109.24
F - 49.98 -116.04 - 47.05 -
109.24
strut - - - - - -8.97
A
Wit
h t
hre
e pla
stic
hin
ges
- 100 116.04
173.58
- 84.86 116.04
147.33
B 307.5 100 116.04 260.93 84.86 116.04
C 307.5 116.04 - 260.93 98.47 -
D - 116.04 - - 98.47 -
E - - -116.04 - - -98.47
F - - -116.04 - - -98.47
strut - - - - - -23.2
Table 6.7 shows the error made by computing the internal actions and displacements
on the bare frame, instead of the frame with the strut, assuming the values of the frame with
the strut are the correct ones. As it can be observed, the error is quite negligible at the first
three stages (6% difference). Finally, after the formation of the third plastic hinge, results
are significantly different (more than 17%). In general, the internal actions on the bare frame
are always slightly higher than the ones on the frame with strut. The results confirm once

98
again that, due to the great difference in rigidities to lateral loading between the frame and
the strut, the contribution of the strut is negligible before the RC frame has reached at least
3 plastic hinge activations. Due to the fact that the third and fourth plastic hinge yield at
practically the same load, for practical purposes, the latter stage has no significant
contribution on the response either.
Table 6.7. Difference between internal actions on bare frame and frame with strut
Section Load M(x) V(x) N(x) Top
displacement
A
No p
last
ic h
inges
1.41% 1.42% -2.12%
1.39%
B 1.42% 1.42% -2.12%
C 1.42% 1.44% 1.42%
D 1.43% 1.44% 1.42%
E 1.43% 1.42% 1.44%
F 1.41% 1.42% 1.44%
strut - - -
A
Wit
h f
irst
pla
stic
hin
ge
- 2.33% -2.17%
2.35%
B 2.36% 2.33% -2.17%
C 2.36% 2.37% 2.36%
D 2.36% 2.37% 2.36%
E 2.36% 2.36% 2.37%
F 2.35% 2.36% 2.37%
strut - - -
A
Wit
h f
irst
tw
o p
last
ic
hin
ges
- 6.22% 0.00%
6.20%
B 6.22% 6.22% 0.00%
C 6.22% 6.22% 6.23%
D 6.22% 6.22% 6.23%
E 6.22% 6.23% 6.22%
F - 6.23% 6.22%
strut - - -
A
Wit
h t
hre
e pla
stic
hin
ges
- 17.84% 0.00%
17.82%
B 17.85% 17.84% 0.00%
C 17.85% 17.84% -
D - 17.84% -
E - - 17.84%
F - - 17.84%
strut - - -

99
6.5 SUMMARY AND ANALYSIS OF RESULTS
Two pushover analysis were carried out, one for the bare frame, and the other for the
infilled frame, in sections 6.2 and 6.3 respectively. Section 6.4 focuses on an elastic analysis
for two models separately, one of a bare frame, and one of a frame with a compression strut,
which represents the infill contribution to the lateral load response. The purpose of the elastic
analysis was to compare the results to the pushover analysis, in order to predict if simplified
tools are appropriate for the task of modelling polystyrene infilled frames.
By comparing the two pushover curves in Figure 6-22 it can be observed how the
initial stiffness is practically identical in both cases. This behaviour suggests that the infill is
not contributing to the lateral response of the structure in the initial (elastic) branch, since
the infilled frame presents the same response as the one of the bare frame, except for a very
slight gain of strength (4.76%). After the frame yielding (at about 10.6mm in the load-
displacement curve), the bare frame pushover curve presents a horizontal branch, since the
frame cannot take any more load, while the infilled frame curve continues to take additional
load. This means that the moment when the frame yields completely (4 plastic hinges have
been activated), the infill begins to get loaded.
The fact that the infill presents a negligible contribution to the lateral load resistance
before the frame achieves yielding is also confirmed by the elastic analysis performed in
section 6.4.1.2, where the strut is practically unloaded before this point. Additionally, the
influence of adding the strut was quantified for each stage of plastic hinge formation, and
reported in Table 6.7. It can be noted that, similar to what was observed during the pushover
analysis, before the activation of the four plastic hinges, the strut has a negligible
contribution on the response to lateral loading.
Next, the load-displacement relationship was investigated and compared between the
elastic approach and the pushover analysis. At every activation point of plastic hinges,
displacements were computed for each respective load. An additional point was included
before failure of the first plastic hinge in the case of the infilled frame. For this purpose, the
displacement on the elastic model was constructed by the super position of several auxiliary
models, in order to account for the plastic hinge formation at the base of columns and beam
ends, as seen in section 6.4. The difference between both approaches was computed
assuming the pushover analysis to be the correct one.

100
Table 6.8. Comparison of the load-displacement relation between elastic and pushover
analysis
Table 6.8 shows, in general, good agreement between the results of the pushover
analysis and elastic approach of the bare frame, even after the activation of three plastic
hinges. In the case on the infilled frame, there is also good agreement up until the formation
of the third plastic hinge. After this point, and before reaching failure of the first plastic
hinge, the results diverge greatly (more than 100%), which makes the elastic approach
clearly unreliable after this point. Results can also be seen graphically in Figure 6-36 and
Figure 6-37. In general, the elastic analysis leads to greater displacements. The great
difference between either analyses at the last stage is partly due to assumptions made during
the pushover analysis, such as the plastic hinge length (due to the lumped plasticity
approach). Also, the strut width plays an important role at this point, as the axial stiffness of
the strut depends on it.
Figure 6-36. Load-displacement relationship of bare frame: Elastic analysis vs. Pushover analysis
0
10
20
30
40
50
60
70
0 2 4 6 8 10 12
Bas
e S
hea
r [k
N]
Displacement [mm]
Elastic Analysis Pushover Analysis
Structure Load
[kN]
Displacement [mm] Difference
Elastic analysis Pushover analysis [%]
Bare
frame
52.69 7.29 7.28 0.14
55.95 8.04 8.03 0.12
58.73 9.73 9.68 0.52
59.43 10.94 10.8 1.30
Infilled
frame
54.85 7.48 7.35 1.77
58.75 8.36 8.18 2.20
61.53 9.95 9.6 3.65
62.4 11.23 10.65 5.45
79.24 174.86 85.95 103.44

101
Figure 6-37. Load-displacement relationship of infilled frame: Elastic analysis vs. Pushover analysis
By analysing the capacity curve in Figure 6-19, it can be observed that the plot
follows a constant linear stiffness after the frame structure has yielded (after approximately
a 10.65 mm displacement). If the hinge failures on the concrete frame were disregarded
(plastic hinges with infinite deformation capacity for the RC frame) the curve would follow
a straight line from the point where the concrete frame has yielded, up until failure of the
plastic hinge of the infill. This is, actually, in line with the fact that the infill is the only
component which is still able to carry load after this point, and is behaving elastically, as
discussed previously.
By computing the slope of the load-displacement curve in Figure 6-19, the elastic
stiffness was obtained, as shown in ( 6-1 ), which is constant throughout all the “growing”
or “loading” segments of the plot after frame has yielded.
𝐾 =
Δ𝑉
Δ𝑥= 224 𝑁/𝑚𝑚 ( 6-1 )
Let us now consider the structure in Figure 6-23 (a). As mentioned before, after the
frame structure has yielded, the only element still able to carry load is the compression strut.
As it is behaving elastically, the strut, whose load carrying mechanism consists of axial
loading only, has the well know elastic stiffness for an element under axial loading:
𝐾 =
EA
L ( 6-2 )
Where:
0
10
20
30
40
50
60
70
80
90
0 20 40 60 80 100 120 140 160 180 200
Bas
e S
hea
r [k
N]
Displacement [mm]
Elastic Analysis Pushover Analysis

102
E = Elastic Modulus of Polystyrene: 4.35 MPa
A = Cross section area of the strut [mm2]
L = Length of the strut: 4059 mm
The only unknown quantity is the cross section area of the strut. By fixing the out of
plane thickness equal to 200 mm (equal to the thickness of the infill), the only unknown
remains the strut width (w). The problem has one equation and one unknown. By equating
expressions ( 6-2 ) and ( 6-1 ), the value for the strut width is determined.
𝐾 =EA
L=
(4.35 𝑀𝑃𝑎) ∙ (200 𝑚𝑚) ∙ 𝑤
4059 𝑚𝑚= 224
𝑁
𝑚𝑚 ( 6-3 )
𝑤 = 1045 𝑚𝑚 ( 6-4 )
𝑤𝐷⁄ = 1045
4059⁄ = 0.257 ( 6-5 )
According to the previous expressions, in order to analyse the structure with an
equivalent compression strut, a 200 x 1045 mm strut should be used. The strut width ratio,
in this case, corresponds to w/D = 0.26 (practically identical to the w/D = 0.25 used during
the elastic analysis in section 6.4), which is inside the common value range used for masonry
infilled frames, as discussed in Chapter 2.

103
After an experimental test and a few numerical analyses were performed, we can sum
up some highlights which will be presented in this chapter. Giving emphases to the
experimental part of this thesis, we can conclude:
Experimental results
- The mortar layer gave an initial strong contribution to the lateral resistance of
the frame after which an almost constant contribution of the infill was present;
- Values of the curvature obtained for column cross sections were very
reasonable and similar to the ones for bare frame. Critical sections were able
to dissipate energy which is not the case when masonry infill is used;
- Polystyrene infill does not prevent cracks from occurring;
- Formed cracks were concentrated in areas which are in tension, while
compressed parts stayed almost intact;
- Sliding failure mode was noticed (in Chapter 3 named as failure mode 5);
- In the final stages of the experiment, infill got detached from the bottom of the
testing frame along its whole length, crack was around 6 mm wide;
- Cracks in windward column occurred but without crushing of the concrete;
- Overall behaviour of the mock-up can be regarded as ductile.
Modelling results
- When FEA and analytical solutions are being used, with characteristic values
for material strength, values of about 30% lower compared to the experimental
ones are obtained, which is good from the designing point of view;
Chapter 7
Conclusions

104
- When modelling a frame infilled with polystyrene panels, an increase of 25%
in resistance is occurring compared with models of a bare frame;
- Elastic analysis with compressed strut can be used during elastic phase.
Comparison of the experimental results with numerical solutions
- Both experimental and numerical solutions show us that when using
polystyrene infill an increase of 25% in strength is occurring;
- Even when characteristic values are used during modelling, failure occurs at
similar displacement (for this case was at 120 mm);
- Pushover curve obtained from the experiment has the same stiffness (during
elastic phase) as the one for the bare frame obtained by means of numerical
analysis (Figure 5-15).
Finally, numerical modelling can be successfully used to predict the limit strength of
a frame infilled with the polystyrene panels (laboratory tests are recommended to be carried
out, in order to determine the mechanical properties of the materials used for future
investigations (concrete, polystyrene, reinforcing steel, etc.); if characteristic values are
used, obtained results should be increased by 25-30%).

105
Verification will be done for 80 kN force since that is the highest expected force to
occur. This value was obtained in Chapter 6. Layout of the frame is depicted in Figure A-1.
Resulting forces are shown in Figure A-2.
Figure A-1. Layout of the frame
Figure A-2. Resulting forces
Appendix A
Testing frame verification - bolts

106
Both columns have 6 x M24 8.8 bolts.
Forces acting on one bolt:
𝑉 =40𝑘𝑁
6= 6.67𝑘𝑁 𝐹 =
93𝑘𝑁
6= 15.5𝑘𝑁
In the worst case only two bolts are taking shear force so it is 40 kN per bolt in shear.
Properties of M24 8.8 bolt:
𝑓𝑦𝑏 = 640𝑀𝑃𝑎 𝑓𝑢𝑏 = 800𝑀𝑃𝑎 𝐴𝑠 = 353𝑚𝑚2
Tension verification:
𝐹𝑡,𝑅𝑑 = 𝑘2𝑓𝑢𝑏
𝐴𝑠
𝛾𝑀2= 0.9 ∙ 800𝑀𝑃𝑎 ∙
353𝑚𝑚2
1.25= 203𝑘𝑁 > 15.5𝑘𝑁
Shear verification:
𝐹𝑣,𝑅𝑑 = 𝛼𝑣𝑓𝑢𝑏
𝐴𝑠
𝛾𝑀2= 0.6 ∙ 800𝑀𝑃𝑎 ∙
353𝑚𝑚2
1.25= 135𝑘𝑁 > 40𝑘𝑁
Combination:
15.5
203+
40
135= 0.37
Everything is satisfied.

107
Results of a linear elastic analysis of the bare frame subjected to a lateral force of 1
kN, are presented here. Their purpose is to easily obtain values of moments for moment-
curvature diagrams presented in section 5.4.
The analysis was performed in SAP2000 and the resulting diagram is shown in Figure
B-1.
Figure B-1. Bending moment under 1 kN lateral load
Appendix B
Linear analysis of the bare frame

108

109
Calvi, M., Bolognini, D., & Penna, A. (2004). Seismic Performance of Masonry-Infilled RC
Frames - Benefits of slight reinforcements. Guimarães: SÍSMICA 2004 - 6º
Congresso Nacional de Sismologia e Engenharia Sísmica.
Crisafulli. (1997). Seismic Behaviour of Reinforced Concrete Structures with Masonry
Infills. Christchurch: University of Cantebury.
Decanni, L., Mollaioli, F., Mura, A., & Saragoni, R. (2004). SEISMIC PERFORMANCE OF
MASONRY INFILLED R/C FRAMES. Vancouver: 13th World Conference on
Earthquake Engineering.
Fiorato, A. E., Sozen, M. A., & Gamble, W. L. (1970). An Investigation of the Interaction
of Reinforced Concrete Frames with Masonry Filler Walls. Champaign: University
of Illinois.
Holmes, M. (1961). Steel frames with brickwork and concrete infilling. In Proceedings of
the Institution of Civil Engineers (pp. 473-478). UK: Thomas Telford.
Kakaletsis, & Karayannis. (2008). Influence of Masonry Strength and Openings on Infilled
RC Frames Under Cycling Loading. Journal of Earthquake Engineering, 12(2), 197-
218.
Liuaw, T. C., & Kwan, K. H. (1985). Unified Plastic Analysis for Infilled Frames. Journal
of Structural Engineering, 111(7), 1427-1448.
Mehrabi, A. B., & Shing, P. B. (2003). Seismic Analysis of Masonry-Infilled Reinforced
Concrete Frames. TMS Journal, 21, 81-94.
Mehrabi, A. B., Shing, B. P., Schuller, M. P., & Noland, J. L. (1994). Performance of
Masonry-Infilled R/C Frames Under In-Plane Lateral Loads. Dept. of Civil,
Environmental, and Architectural Engineering. Boulder: University Colorado.
Moretti, M. L., Papatheocharis, T., & Perdikaris, P. C. (2014, September). Design of
Reinforced Concrete Infilled Frames. Journal of Structural Engineering, 140(9), 10.
REFERENCE

110
Radovanović, Ž., Siđić Grebović, R., Dimovska, S., & Serdar, N. (2015). The Mechanical
Properties of Masonry Walls - Analysis of the Test Results. International Scientific
Conference Urban Civil Engineering and Municipal Facilities. Elsevier Ltd.
Stafford, S. B. (1962). Lateral Stiffness of Infilled Frames. Journal of Structural Division,
88(ST6), 183-199.
Valiasis, T., & Stylianidis, K. (1989). Masonry Infilled R/C Frames under Horizontal
Loading - Experimental Results. European Earthquake Engineering, 3(3), 10-20.