How to set up a remote connection to University … for the VPN connection to work, also make sure...
15
How to set up a remote connection to University Services There are two ways to connect and login to the University network: the Southampton Virtual Environment (SVE) and the Virtual Private Network (VPN). It is helpful to be able to remotely connect to University services through either the Southampton Virtual Environment or the Virtual Private Network in order to be able to: - Gain secure access to library E-Resources - Access to your University Personal filestore (My Documents) In addition, the Southampton Virtual Environment enables you to access a standard University of Southampton desktop environment. This means you can use software such as the Microsoft Office programmes and Endnote, just as you would if you were on campus. Therefore it is recommended that you use the Southampton Virtual Environment in preference to VPN. We recommend VPN only if you are unable to access all services through the SVE. This guide explains how to connect to both services, but we anticipate you will only need to follow the guide for SVE. How to connect to the Southampton Virtual Environment (SVE) • Launch a supported Web browser of your choice: • Go to the iSolutions webpage (the University of Southampton’s IT support department) on the Southampton Virtual Environment (SVE): http://www.southampton.ac.uk/isolutions/students/southampton-virtual- environment.page
Transcript of How to set up a remote connection to University … for the VPN connection to work, also make sure...

How to set up a remote connection to University Services
There are two ways to connect and login to the University network: the Southampton Virtual Environment (SVE) and the Virtual Private Network (VPN). It is helpful to be able to remotely connect to University services through either the Southampton Virtual Environment or the Virtual Private Network in order to be able to:
- Gain secure access to library E-Resources - Access to your University Personal filestore (My Documents)
In addition, the Southampton Virtual Environment enables you to access a standard University of Southampton desktop environment. This means you can use software such as the Microsoft Office programmes and Endnote, just as you would if you were on campus. Therefore it is recommended that you use the Southampton Virtual Environment in preference to VPN. We recommend VPN only if you are unable to access all services through the SVE. This guide explains how to connect to both services, but we anticipate you will only need to follow the guide for SVE.
How to connect to the Southampton Virtual Environment (SVE)
• Launch a supported Web browser of your choice:
• Go to the iSolutions webpage (the University of Southampton’s IT support department) on the Southampton Virtual Environment (SVE): http://www.southampton.ac.uk/isolutions/students/southampton-virtual-environment.page

iSolutions recommend that you download the software VMware Horizon Client onto your computer (or other electronic device) to use SVE. Scroll to the bottom of the screen and under the title Supported clients, click on the link titled VMware Horizon Clients:
(Please note that this How to…? Guide helps you to download VMware Horizon Clients software for a Windows PC or laptop only. If you do want help in accessing University of Southampton systems remotely using another type of device, such as a Mac or Android device, then you can go to the iSolutions Help guides which can be found on the same webpage as seen on the screenshot below).
• The VMware Horizon Clients link takes you to a list of options, as you can see in the screenshot below. If you have a Windows PC or laptop, will need to select VMware Horizon Client for Windows from the list:

• You will need to know whether your computer is running a 32-bit or a 64-bit version of Windows. You can check this as follows:
o If you have Windows 7 or Vista, do the following: Open System by clicking the Start button, right-clicking Computer, Click Properties. Under System, you can view the System type.
o If you have Windows 8, do the following:
Swipe in from the right edge of the screen, and then tap Search. Or, if you are using a mouse, point to the lower-right corner of the screen,
and then click Search. Type system in the search box, and then tap or click Settings. Tap or click System. If you are running a 64-bit version of Windows 8, 64-bit
Operating System is displayed in the System type field under the System heading. If you are running a 32-bit version of Windows 8, 32-bit Operating System is displayed in the System type field under the System heading.
• Once you have found out whether your computer is either running a 32-bit or a 64-bit version
of Windows, then click on Go to Downloads for the appropriate bit version in the far right-hand column, as you can see in the screenshot below. (This guide shows you how to select VMware Horizon Client for 64-bit Windows)

• The next screen tells you how to download the VMware Horizon Client for 64-bit Windows. Click on the blue ‘Download’ button at the bottom right of the screen to start the downloading process, as shown in the screenshot below.
• Once the file has been downloaded, you will need to click on the ‘Save File’ option in the grey box, as shown in the screenshot below:

• You have now saved the file into your Downloads folder at the top right hand side of your
screen. You will need to run or execute the VMware Horizon Client file so that the VMware Horizon Client software can be installed onto your computer (you may need to access the VMware Horizon Client file from your Downloads folder on your computer). Click on the file and then follow the steps that your computer asks you to take.
• Your computer will start to install the software onto your computer, as seen in the screenshot below:

• Once the software has been installed, you will need to click on Finish, as shown in the
screenshot below:
• You will then be prompted to Shut Down your computer/laptop as you will not be able to
make use of the VMware software until your computer has Restarted:

• Once you have Shut Down and Restarted your computer, you should see the VMware Horizon Client icon on your computer/laptop desktop:
• Click on the VMware Horizon Client icon and enter your username and password when prompted. As in the screenshot below, in the ‘Search’ box, type in the connection server address, which is:
vdi.soton.ac.uk
• Then click on the virtual desktop Win 8.1 Student to be able to access your University of
Southampton desktop on your own computer:
• You will then be taken to your University of Southampton virtual desktop:

• This provides you with access to all of the programmes on the University of Southampton desktop. You must remember to save your work separately onto a memory stick or Cloud (and regularly) as you will not be able to save documents onto your virtual desktop.
• When you have finished using the desktop, remember to save your work separately. You can click
on the Logoff button on the desktop or right click the Windows menu and select Shutdown and sign out and then Sign Out:

NB: If you do not sign out and close the browser, your session will remain open for 15 minutes. After this time you will be automatically logged out. The information in this guide has been taken from the iSolutions guides to the Southampton Virtual Environment. Please note that the information in this How to…? guide was correct at the time of printing. From time to time, updated versions of software are installed by the University which could mean that some of the screens may appear differently to those shown here. If this is the case, then please access the iSolutions Southampton Virtual Environment website: http://www.southampton.ac.uk/isolutions/students/southampton-virtual-environment.page There is also a helpful ‘question and answer’ page containing the solutions to common queries about the Southampton Virtual Environment in the link below: http://www.southampton.ac.uk/isolutions/students/students-using-my-own-computer.page If you do experience any problems connecting to the Southampton Virtual Environment (SVE) service, please contact iSolutions/Serviceline (the University IT Support service) on: Email: [email protected] or Tel: +44 (0) 2380 595656.

How to set up a Virtual Private Network
Please note: We anticipate that the SVE will meet all your needs in accessing the University’s network, e-journals, library resources, and other University resources. However, if you encounter problems with SVE then VPN is an alternative. There is no need to install VPN if SVE is working well for you.
The Virtual Private Network (VPN) enables you to connect to and log into the University network remotely. It is particularly useful to access e-Journals and other library resources. The iSolutions Setup Guide for Windows 7 (and Vista) is reproduced in this How To…? guide, with permission from iSolutions. To set up VPN on a different system, (for example, Windows 8.1, Windows XP, Linux, Mac, smartphones and tablets, iPad or iPhone) please access the University’s guides which can be found by accessing the following link:
https://sotonproduction.service-now.com/soton/kb_find.do?sysparm_current_site=f6828df56f3121007f4813054b3ee49d&sysparm_topic=IT&sysparm_operator=IR_AND_OR_QUERY&sysparm_search=vpn&x=0&y=0
Once you have entered your username and password, you will be directed to the userguides for other devices and systems which have been produced by iSolutions (the University of Southampton’s IT department):

How to set up VPN using Microsoft Windows 7 (and Vista) The following userguide has been reproduced with the permission of iSolutions and tells you how to set up VPN using Windows 7 (it is also the same for Vista).
1. The Control Panel Window Click on Start, then ‘Control Panel’. The ‘Control Panel’ window will open and you should select the ‘Classic View’ on the left hand frame. Then double click on the ‘Network and Sharing Centre’ icon.

2. The Network and Sharing Centre window The ‘Network and Sharing Centre’ window should tell you the status of your network or Internet connections. Press F5 to refresh if needed. Click on the Internet globe picture or click on ‘View Status’ to ensure that you are connected and can access the Internet. If so, then from the left hand frame labelled ‘Tasks’ click on the ‘Set up a connection or network’.
3. The Set up a connection or network window Select 'Connect to a workplace' then click Next. Note. If this option page is not identical, perhaps due to it being a different version of Microsoft Windows 7 (or Vista) then look for the most similar option that mentions Workplaces or VPN connections (Virtual Private Network).
4. The How do you want to connect window Click on 'Use my Internet connection (VPN)'.

5. How do you connect to the Internet? (optional) If at this point you are not already connected to the Internet (for example, if you have not dialled in, plugged in or connected to wireless) then you will be presented with a window stating that you will require an Internet connection to connect to the VPN. If you are already connected to the Internet then you will not see this window. However it is possible in this window to specify how you will want to connect to the Internet once you have setup and started the VPN connection. So you can select your preferred Internet Service Provider (ISP) or connection method, follow the connection process, and then continue with the VPN setup below.
6. The Connect to a workplace window Type in the ‘Internet address’ of the University of Southampton’s VPN server: vpn.soton.ac.uk (Click inside the box or start typing and the box will clear for you). Important: The ‘Internet address’ must be correct for the VPN connection to work, also make sure there are NO SPACES in the text. Enter a suitable ‘Destination name’ for the connection — for example, 'University VPN connection' as shown. This name is only for descriptive purposes and does not dictate how the connection works. Then click Next.
7. Enter user name and password to connect The basic settings are now complete, and you can try out the connection. Please remember, before you can connect to our VPN server you need to be connected to the internet first via your normal network, broadband or dialup service. Enter your university username and password in the appropriate boxes. It is best not to tick the ‘Remember this password’ box, as there is a risk that unauthorised access to your computer may result in someone retrieving your password or logging in without your consent. Then click Connect.
Note. SOTON can be specified as the ‘Domain’ if you wish, but this is not required.
8. Connecting to vpn.soton.ac.uk These VPN connection settings will be created and saved to the ‘Network and sharing Centre’. Then the computer will begin “Connecting to vpn.soton.ac.uk”. Then, if successful, it will try “Verifying the
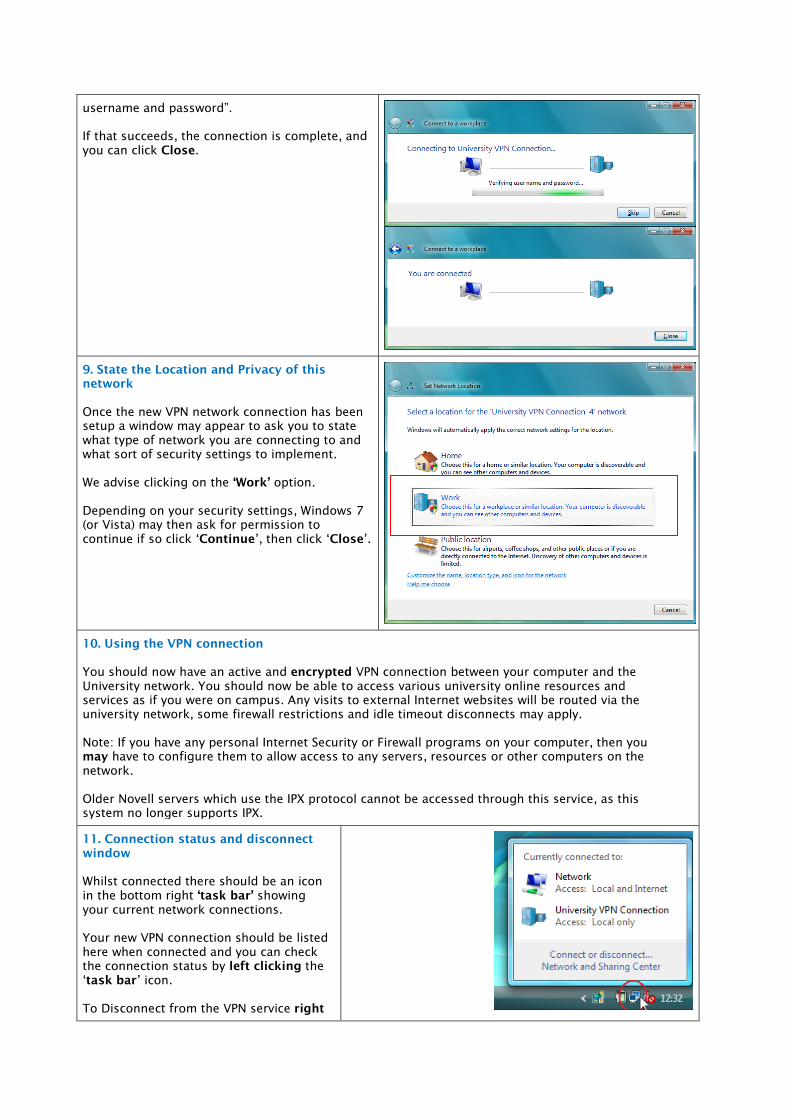
username and password”. If that succeeds, the connection is complete, and you can click Close.
9. State the Location and Privacy of this network Once the new VPN network connection has been setup a window may appear to ask you to state what type of network you are connecting to and what sort of security settings to implement. We advise clicking on the ‘Work’ option. Depending on your security settings, Windows 7 (or Vista) may then ask for permission to continue if so click ‘Continue’, then click ‘Close’.
10. Using the VPN connection You should now have an active and encrypted VPN connection between your computer and the University network. You should now be able to access various university online resources and services as if you were on campus. Any visits to external Internet websites will be routed via the university network, some firewall restrictions and idle timeout disconnects may apply. Note: If you have any personal Internet Security or Firewall programs on your computer, then you may have to configure them to allow access to any servers, resources or other computers on the network. Older Novell servers which use the IPX protocol cannot be accessed through this service, as this system no longer supports IPX.
11. Connection status and disconnect window Whilst connected there should be an icon in the bottom right ‘task bar’ showing your current network connections. Your new VPN connection should be listed here when connected and you can check the connection status by left clicking the ‘task bar’ icon. To Disconnect from the VPN service right

click the ‘network connections’ icon, highlight the ‘Disconnect from’ option and select the VPN connections name. (You can also disconnect from the VPN network via the ‘Network and Sharing Centre’ window).
12. To start the VPN connection again The VPN connection settings have been saved to the ‘Network and Sharing Centre’ and can be accessed by following Step 1 again and then clicking on ‘Manage network connections’ in the ‘tasks’ bar. This ‘Network Connections’ window will show you a list of all your network connections including your new “University VPN connection” icon (depending on what you named it). Double click on this VPN icon to login and start the connection again (remember to be connected to the internet first). Alternatively, you can click ‘Start’, then ‘Connect To’, select your new VPN connection from the list, and click ‘Connect’.
© University of Southampton
Please note that the information in this How to…? guide was correct at the time of printing. From time to time, updated versions of software are installed by the University which could mean that some of the screens may appear differently to those shown here. If you experience any problems connecting to the VPN service please contact Serviceline (the University IT Support service) via: Email: [email protected] or Tel: +44 (0) 2380 595656. Alternatively, there is an online guide to help you “How to troubleshoot VPN connections” which is available at https://sotonproduction.service-now.com/soton/kb_view.do?sysparm_article=KB0011703