CPS Freemium MixedMedia v1
20
using mixed-media supplies free guide to alcohol ink, gel medium and other supplies for mixed-media art 1 the workshop: sticking together JENN MASON 2 a look at: pastes and gel mediums CPS EDITORS 3 re-think alcohol ink CATHY TAYLOR 4 alcohol inks and oil pastels: an irresistible mix MANDY RUSSELL 5 a look at: water-soluble art supplies CPS EDITORS presented by cloth paper scissors ® 2 5 3 4 1
Transcript of CPS Freemium MixedMedia v1

using mixed-media suppliesfree guide to alcohol ink, gel medium and other supplies for mixed-media art
1 the workshop: sticking together Jenn Mason
2 a look at: pastes and gel mediums CPs editors
3 re-think alcohol ink Cathy taylor
4 alcohol inks and oil pastels: an irresistible mix Mandy russell
5 a look at: water-soluble art supplies CPs editors
presented by cloth paper scissors®
2
53
4
1

to a mixed-media artist, any kind of art/craft supply is fair game. But there are some
mixed-media supplies that are especially attractive because of their juicy color, their versatility, or both. In our latest eBook, Using Mixed-Media Supplies: Free Guide to Alcohol Ink, Gel Medium and Other Supplies for Mixed-Media Art, expert artists show you how to get great results with some of the most popular materials.
The many different forms of gel medium are the mixed-media supplies that hold the art world together. Two articles, “The Workshop: Sticking Together” and “A Look At: Pastes and Gel Mediums” answer the question “What is gel medium?” in all its forms and explain how to use gel medium and pastes to get the best results.
For a burst of color, you can’t beat alcohol inks. Two artists, Cathy Taylor and Mandy Russell, show you how to use alcohol inks in different
Using Mixed-Media Supplies:
Free Guide to Alcohol Ink, Gel Medium and Other
Supplies for Mixed-Media Artpresented by
Cloth Paper Scissors®
online editor Cate Prato
creative services division art director Larissa Davis
PhotograPher Larry Stein
Projects and information are for inspiration and personal use only. interweave Press is not responsible for any liability arising from errors, omissions, or mistakes contained in this eBook, and readers should proceed cautiously, especially with respect to technical information.
© F+W Media, inc. all rights reserved. F+W Media grants permission for any or all pages in this eBook to be copied for personal use.
ways. In “Re-Think Alcohol Ink” and “Alcohol Inks and Oil Pastels: An Irresistible Mix,” you’ll learn different alcohol ink techniques that you can use in future projects.
The range and type of water-soluble art supplies has exploded recently and they are perfect for art journaling and other mixed-media pursuits. Our editors reviewed some of the best sketching pencils, watercolor pencils, and other art journaling supplies in “A Look At: Water-Soluble Art Supplies.” First, they explore how to use sketching pencils and Liquid Pencil, then review the options for using watercolor pencils, and conclude with other fun water-soluble mixed-media art supplies like blocks, crayons, and shimmering watercolors.
When looking to create collages, art journals, paintings and more, you will love having Using Mixed-Media Supplies: Free Guide to Alcohol Ink, Gel Medium and Other Supplies for Mixed-Media Art as a resource.
Warmly,
Cate Prato Online Editor, Cloth Paper Scissors Today
clothpaperscissors.com
Where mixed media artists come to play
-
Using Mixed-Media Supplies: Alcohol Ink, Gel Medium and Other Supplies2
clothpaperscissors.com©F+W Media, Inc.

I know I have not been on this attachment journey alone. I’ve seen amazing art with really great stuff stuck to it—all over the place. And so I ask, I experiment, and I find ways to make one thing stick to another. This article is the current culmination of my endeavors and discoveries. I say current because I’m always finding new ways to make things stick and new things to be stuck. You may already know a few of these sticky solutions, but hopefully you’ll learn a thing or two from the “attachments” I’ve made. That’s the great thing about experimentation, you learn something whether your hypothesis works or fails—and then you go forward from there.
the ultimate sticker: soft gel medium
I started using soft gel medium (gloss finish) from Golden® when I wanted to seal some or all of my collages; then,
quite by accident, I discovered that I could use it to glue bigger, bulkier items. Once, while waiting for a collage to dry, I was working out the next layer, which included an old watch face. I set the watch face on the collage while the gel was still wet, and when I came back to it I found that the watch face was already stuck. Now I use gel to glue anything that I can. I will even tint it with my acrylics or fluid acrylics if I want it to show.
I then ventured on to see how well it would stick paper to canvas, board, or other paper. I actually like a little irregularity in my paper when I adhere it, but I think having more than one or two wrinkles looks more like sloppy work than purposeful placement. Then I discovered a few tricks for dealing with wrinkles. The first was to add gel to both surfaces that were going to be stuck together. The second was that whatever paper I was adding needed time to “slack.” This means I quickly brush the gel onto the back of the paper and then I pick it up and feel for the paper to “give in” to the wetness of the gel. This is easier to see in a larger piece of paper, like a book page or a sheet of music. If you hold it in the middle from underneath, the two sides will go limp—this is the moment to attach. Once you’ve laid your limp paper in place, immediately add gel to the top of the paper from the center to the outside edges. The brush will help to push the paper down, and by “wetting” the top
with the gel you help the paper become equally saturated with gel medium on both sides. This technique will help to get rid of most of the wrinkles you might see. When all else fails, I use my hands. I run them over the paper from the center to the outside edge, working the wrinkles out as I go.
the other sticker: quick-dry tacky glueWhen I can’t use soft gel medium or when I need something to dry fast, I usually use a quality, quick-dry tacky glue. A little goes a long way and it also dries clear—two of my requirements for glue, along with being acid-free.
all wired up: wire
Wire comes in handy when you have an oddly shaped item or you want to introduce movement into your piece. If you create art in boxes or shadowbox frames and you want to hang something, wire will get you where you want to go.
Making a spiral at the end of the wire will help to secure the wire when you need to stick it through a hole. If you’re
sticking togetherAttAchment options for mixed-mediA Art
adapted from Cloth PaPer SCiSSorS® september/october 2008
being a mixed-media artist quite often
requires that I stick one thing to
another. If it was just paper collage I would
pick my favorite glue and that would be
that. But no, I usually have more interesting
problems like adding wheels, found metal
pieces, doll parts, watch faces, leather belts,
and other unusual items I’ve collected that
help to tell my story.
by jenn mason
Using Mixed-Media Supplies: Alcohol Ink, Gel Medium and Other Supplies3
clothpaperscissors.com©F+W Media, Inc.

using a really fine-gauge wire, try adding a bead at the end to keep it from going through the hole. This will work nicely even through a canvas, so long as your object isn’t too heavy (or you can reinforce the canvas first).
tip: interested in adding a rock or irregularly shaped object? Wrap wire around the object in all directions and then twist the two ends together. Use pliers to bend a couple of the wire wraps, creating a kink to tighten the wire around the object if needed. Add the object to your art, using the wire ends.
tacky additions: nails and tacks
I am captivated by carpet tacks. They are easy to push in and they have a little bit of a head that can help hold things in place (unlike a finish nail). I use them as much for decoration as I do for attaching. Of course, if you are using them on a canvas you will only be able to use them around the perimeter where there is an underlying wood frame to secure them.
add a twist: screws
In my opinion, screws are a no-fail option. If I can hold something together with a screw, I know it isn’t going anywhere. I’m always on the lookout for old screws that have been covered in paint and used for another purpose. I will also occasionally use a screw as an elevated surface on which I can attach another object with gel or glue.
Keep your eyes peeled; you never know when you, too, will have to get something to stick to something else.
“A L
ittle
Tin
y Bi
rd”
• 16
" ×
16"
Using Mixed-Media Supplies: Alcohol Ink, Gel Medium and Other Supplies4
clothpaperscissors.com©F+W Media, Inc.
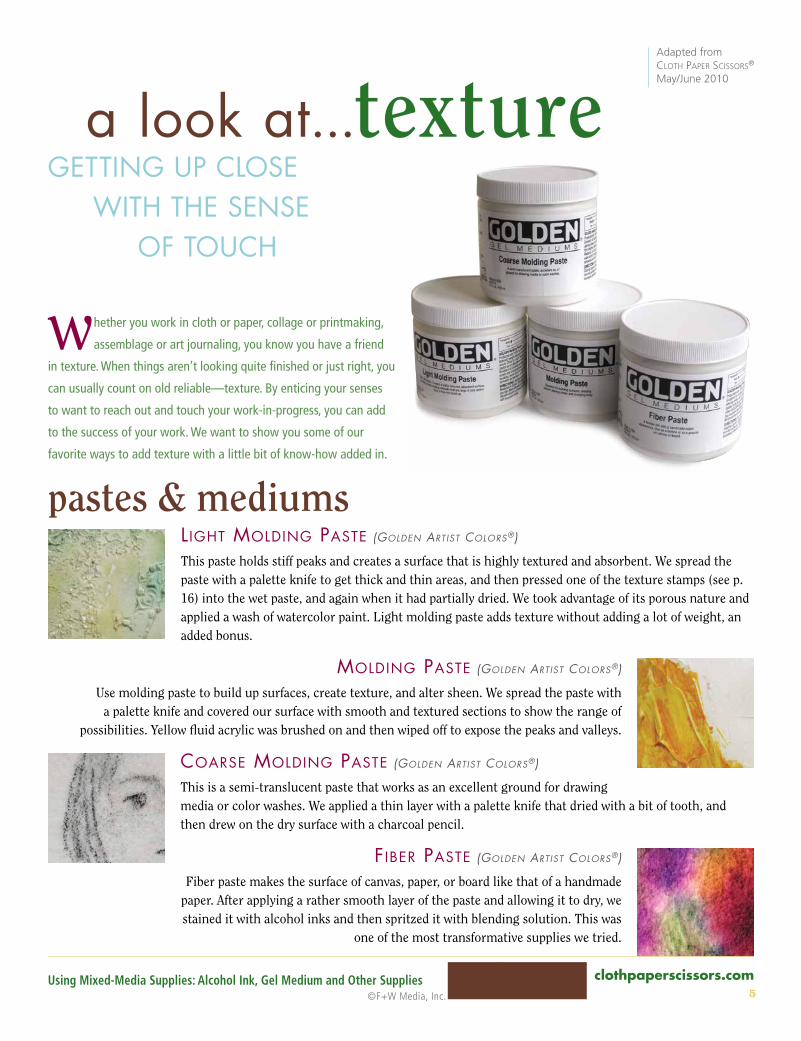
pastes & mediumsLight MoLding Paste (Golden Artist Colors®)
This paste holds stiff peaks and creates a surface that is highly textured and absorbent. We spread the paste with a palette knife to get thick and thin areas, and then pressed one of the texture stamps (see p. 16) into the wet paste, and again when it had partially dried. We took advantage of its porous nature and applied a wash of watercolor paint. Light molding paste adds texture without adding a lot of weight, an added bonus.
MoLding Paste (Golden Artist Colors®)
Use molding paste to build up surfaces, create texture, and alter sheen. We spread the paste with a palette knife and covered our surface with smooth and textured sections to show the range of
possibilities. Yellow fluid acrylic was brushed on and then wiped off to expose the peaks and valleys.
Coarse MoLding Paste (Golden Artist Colors®)
This is a semi-translucent paste that works as an excellent ground for drawing media or color washes. We applied a thin layer with a palette knife that dried with a bit of tooth, and then drew on the dry surface with a charcoal pencil.
Fiber Paste (Golden Artist Colors®)
Fiber paste makes the surface of canvas, paper, or board like that of a handmade paper. After applying a rather smooth layer of the paste and allowing it to dry, we stained it with alcohol inks and then spritzed it with blending solution. This was
one of the most transformative supplies we tried.
whether you work in cloth or paper, collage or printmaking,
assemblage or art journaling, you know you have a friend
in texture. When things aren’t looking quite finished or just right, you
can usually count on old reliable—texture. By enticing your senses
to want to reach out and touch your work-in-progress, you can add
to the success of your work. We want to show you some of our
favorite ways to add texture with a little bit of know-how added in.
a look at...texture getting Up close With the sense of toUch
adapted from Cloth PaPer SCiSSorS® May/June 2010
Using Mixed-Media Supplies: Alcohol Ink, Gel Medium and Other Supplies5
clothpaperscissors.com©F+W Media, Inc.
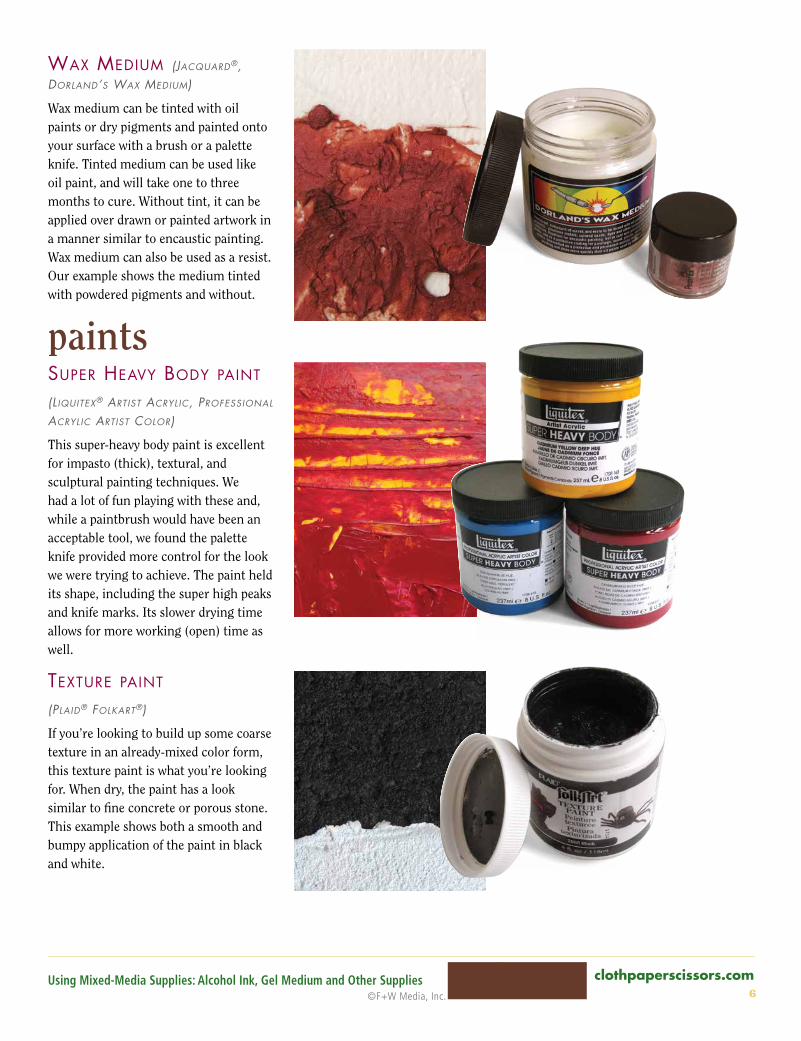
Wax MediuM (JACquArd®, dorlAnd’s WAx MediuM)
Wax medium can be tinted with oil paints or dry pigments and painted onto your surface with a brush or a palette knife. Tinted medium can be used like oil paint, and will take one to three months to cure. Without tint, it can be applied over drawn or painted artwork in a manner similar to encaustic painting. Wax medium can also be used as a resist. Our example shows the medium tinted with powdered pigments and without.
paintssuPer heavy body Paint (liquitex® Artist ACryliC, ProfessionAl ACryliC Artist Color)
This super-heavy body paint is excellent for impasto (thick), textural, and sculptural painting techniques. We had a lot of fun playing with these and, while a paintbrush would have been an acceptable tool, we found the palette knife provided more control for the look we were trying to achieve. The paint held its shape, including the super high peaks and knife marks. Its slower drying time allows for more working (open) time as well.
texture Paint (PlAid® folkArt®)
If you’re looking to build up some coarse texture in an already-mixed color form, this texture paint is what you’re looking for. When dry, the paint has a look similar to fine concrete or porous stone. This example shows both a smooth and bumpy application of the paint in black and white.
Using Mixed-Media Supplies: Alcohol Ink, Gel Medium and Other Supplies6
clothpaperscissors.com©F+W Media, Inc.

toolsFaux bois tooL (PlAid, Wood GrAiner)
By dragging and rocking this tool through wet paint, fluid acrylics, or glazes you can achieve the texture of wood grain in your painting. Here we used fluid acrylics.
TexTure STamP
(JHB, lisA PAvelkA siGnAture series)
These texture stamps were made to be used with polymer clay, but are easily adaptable to other texture applications. Stamp them into wet or dry pastes and mediums, or use them with paints and glazes. They are easy to wash and store, making them a great tool to have on hand.
PaLette kniFe (Liquitex free•styLe™)
A palette knife is a great way to add thicker paints, grounds, and mediums. Just like different brush shapes and sizes, palette knives come in a number of different options. Look for a comfortable handle and an offset blade.
Using Mixed-Media Supplies: Alcohol Ink, Gel Medium and Other Supplies7
clothpaperscissors.com©F+W Media, Inc.

the Workshop
rethink alcohol
ink
Above: “sunflower serenade”
right: “ellie’s garden”
adapted from Cloth PaPer SCiSSorS® July/august 2012
by cathy taylor
Using Mixed-Media Supplies: Alcohol Ink, Gel Medium and Other Supplies8
clothpaperscissors.com©F+W Media, Inc.

I had tried using Yupo paper when it first appeared on the art scene, and while many watercolor artists were intrigued by the way pigment moved on its slippery surface, I found it aggravating. So Yupo was retired to “the bin.” That is, until I learned about alcohol inks.
I love to peruse the aisles of the local craft stores to see what cool new things I might be able to incorporate into my artwork. Alcohol inks were being used in a variety of stamping techniques and I wondered if I could paint with alcohol ink? Alcohol ink was designed to be used on non-porous surfaces such as tiles, metal, and plastic, so would it work on Yupo paper?
The answer, after some trial and error, is yes!
creating backgroundsLaying a singLe-CoLor Wash
1. Place a sheet of Yupo on the covered work surface.
2. Take a small piece of paper towel and dampen it with Citrasolv.
3. Drop a couple of drops of an alcohol ink onto the paper towel.
4. Gently wipe the color onto the Yupo paper, side to side, starting at the top and working down to the bottom of the page, overlapping the strokes. Add more drops of color as needed. (Figure 1)
materials•Yupo® paper, white or transparent
•plastic drop cloth, to protect the work surface
•Apron
•citrasolv® concentrate
•paper towels
•Alcohol inks, several colors (i prefer Adirondack® inks by ranger.)
•drinking straw
•paintbrushes, small round, a variety of sizes
•rubbing alcohol
•tar gel, medium
•Water container
optional
•masking fluid
•rubber gloves
•cotton swabs Figure 1
inever stop asking “what if?”, and
many of my experiments fail, but I learn
something every time, and in many cases
this knowledge leads me to the next great
discovery.
Using Mixed-Media Supplies: Alcohol Ink, Gel Medium and Other Supplies9
clothpaperscissors.com©F+W Media, Inc.

Laying a variegated Wash
1. Dampen a small piece of paper towel with Citrasolv.
2. Squeeze a couple of drops of 2–3 different colors of alcohol ink onto the paper towel.
3. Gently wipe the colors onto the paper, starting at the top and working down the paper. (Figure 2)
note: You may work back into the applied colors to create different combinations of color.
ink techniqueskeePing things White (not sHoWn)1. Reserve white areas by applying
masking fluid or frisket to chosen areas of the paper. Allow to dry.
2. Apply inks with a paintbrush, continuing to add the inks in layers until you achieve the desired result. Allow to dry.
3. Paint up a storm.
4. Following the manufacturer’s directions, rub the Frisket off to reveal the white spaces.
reMoving ink to Create soFt eFFeCts
1. Using a small paintbrush, apply a variety of ink colors in layers. Allow to dry. (Figure 3)
2. Using a small paintbrush or a cotton swab dipped in Citrasolv, gently remove areas of ink to produce soft, transparent passages. (Figure 4)
note: if desired, citrasolv will remove all or most all of the ink if an area is not working the way you’d planned.
figure 2
figure 3
figure 4
Using Mixed-Media Supplies: Alcohol Ink, Gel Medium and Other Supplies10
clothpaperscissors.com©F+W Media, Inc.

single-color wash
Variegated wash
Creating a Painting
Painting with alcohol inks is esmerizing. You can continue to dab on colors over other colors for interesting effects. You’ll find that certain colors will “chase” other colors, some colors will stay put better than others, and some colors will separate.
1. Create a background wash for the painting, if desired.
2. Use the tip of a paintbrush to dab and stroke different colors onto the painting.
tip: Use ink directly from the bottle to conserve it. ink placed in a palette quickly evaporates.
3. Continue to add layers of ink and use Citrasolv to soften or blend colors as needed. In these examples, landscapes were painted on both a single-color and a variegated wash.
Using Mixed-Media Supplies: Alcohol Ink, Gel Medium and Other Supplies11
clothpaperscissors.com©F+W Media, Inc.

other painting techniquesCreating a stained-gLass eFFeCt With tar geL
note: the tar gel was tinted for easier viewing, but tar gel comes clear.
1. Dip the handle end of your paintbrush into the tar gel.
2. Hold the paintbrush over the Yupo paper and allow the tar gel to drizzle onto the paper. (Figure 5) Move the brush around to create shapes or even spell words. The tar gel will drizzle in a consistent way. Allow the tar gel to dry.
3. Add inks with the small paintbrush. (Figures 6 + 7) The tar gel will block the color(s) and cause beautiful blending effects.
note: if you use transparent Yupo, hold it up to light and it will look like stained glass.
Creating FLoraL shaPes
1. Wipe a sheet of Yupo paper with a small piece of paper towel dampened with Citrasolv.
2. Gently squeeze drops of various colors of alcohol ink onto the paper. (Figure 8)
3. Quickly use a drinking straw to blow the wet ink outward to form floral shapes. (Figure 9)
4. Apply ink to the paintbrush by squeezing a drop of the desired ink color directly onto the brush. Apply other colors to the shapes with the paintbrush. The colors will react to each other creating wonderful back runs and textures. (Figure 10)
5. Add more color and detail to complete the image. (Figure 11)
6. Rinse the paintbrush in rubbing alcohol to clean.
ctaylorart.comFigure 6
figure 5
figure 9
Figure 10
figure 7
figure 8
Figure 11
Using Mixed-Media Supplies: Alcohol Ink, Gel Medium and Other Supplies12
clothpaperscissors.com©F+W Media, Inc.

One creative evening, I found myself in need of a dramatic nighttime background and I knew the inks were the place to turn. However, I wanted a bit more control over their fluidity and decided to incorporate my trusty and favorite medium: oil pastel.
With just a few simple ingredients, I discovered how to make these two polar opposites, alcohol inks and oil pastels, work together to create amazing resist (and reverse-resist) images. This technique is perfect for deep, dramatic backgrounds.
alcohol inks & oil pastels
an irresistible pair
adapted from Cloth PaPer SCiSSorS® november/december 2012
by mandy russell
i’m always looking for an excuse to play
around with my alcohol inks. I’m allured
by their deep vibrancy and the seemingly
mysterious results when the inks are
layered.
Using Mixed-Media Supplies: Alcohol Ink, Gel Medium and Other Supplies13
clothpaperscissors.com©F+W Media, Inc.

prepare the surfacetip: Birch plywood can be found inexpensively at most hardware stores. some big box stores will even cut it to your desired measurements for you.
1. Sand the surface of the gesso-primed board to remove any plywood “hairs.” Apply a second layer of gesso and let dry. Once dry, lightly sand the surface again to ensure that it’s smooth.
2. (Optional) To add another dimension, adhere a piece of decorative paper to the primed surface with Mod Podge. Lay a piece of wax paper over the paper-covered board and, using the brayer, roll all over the board, starting from the center and working outward. Make sure the paper is adhered well. Remove the wax paper
and wipe off any excess Mod Podge. Let dry.
3. Using a foam brush, generously coat the surface and sides of the board with Mod Podge. Make sure to seal all surface areas completely. Let dry.
the resistThe following steps show how to create two resist images, one somewhat on top of the other. I prefer making at least two this way, but you could chose to do more, or just complete one.
1. Apply a dozen or more drops of a light-tone ink to the surface of the board and then spray the surface several times with the alcohol. With a fabric scrap, spread the ink/alcohol mixture over the entire surface of the
materials•plywood, gesso-primed (i used birch
plywood, measuring approximately 8" × 7".)
•sandpaper
•gesso
•foam brush(es)
•mod podge®, matte finish
•Alcohol inks: light, medium, and dark tones (i use Adirondack® inks by ranger.)
•Spray bottle filled with 91% isopropyl alcohol (not diluted)
•Fabric scraps: 12 or more small, lint-free cotton scraps
•oil pastels
•hardware cloth
•heat gun
•Baby oil
•stencils: paper letter stencils, brass stencils, etc.
•Alcohol Blending solution (i use Adirondack® brand by ranger.)
optional
•decorative paper: non-textured/ patterned, cut to fit board
•Brayer
•Wax paper
Using Mixed-Media Supplies: Alcohol Ink, Gel Medium and Other Supplies14
clothpaperscissors.com©F+W Media, Inc.

board. Allow the ink to dry until it is no longer tacky to the touch.
tip: prepare a separate board just for testing to see how the different inks will look when combined.
2. Rub oil pastel all over a small piece of the hardware cloth. Set the pastel-covered hardware cloth on the board and heat it with the heat gun, just melting the pastel so that it drops onto the surface of the board. (Figure 1) Remove the hardware cloth and let the pastel cool.
caution: heat guns are extremely hot! place the gun in a heat-safe spot, such as a heat-proof bowl, when not in use.
3. Apply a dozen or more drops of a medium-toned alcohol ink to the surface of the board. Spray it several times with the alcohol and then wipe
the entire surface with another fabric scrap. Make sure you get plenty of color in and around the oil pastel. Add more ink and spray again, if needed. Let dry completely. (Figure 2)
4. Drop a generous amount of baby oil onto the surface of the board and, using another fabric scrap, rub vigorously all over the pastel. The pastel will slowly begin to lift off the surface. Keep rubbing, adding more baby oil if needed, until all of the pastel is removed, and then wipe off as much oil as you can with a new fabric scrap.
5. Wet a clean fabric scrap with alcohol and wipe the entire surface of the board. This will dissolve some more oil. Repeat wetting and wiping until most of the oil is removed from the surface so that the oil pastel will stick
in the next step.
note: Step 6 should only be completed if the surface of the board is not tacky. if it is at all tacky to the touch, the pressure from applying the oil pastel could gouge the surface. however, do not confuse tacky with oily. having a slightly oily surface is almost unavoidable with this technique.
6. Lay out your first stencil arrangement overlapping the hardware-cloth resist image. Keep in mind that stencils with larger openings yield clearer images. Rub back and forth over the stencil with an oil pastel, completely filling the opening with color. (Figure 3)
7. Remove the stencil and, using the heat gun, heat the pastel until it is just melted. The pastel will turn from crumbly and chalky to smooth
Figure 1
figure 2
figure 3
Using Mixed-Media Supplies: Alcohol Ink, Gel Medium and Other Supplies15
clothpaperscissors.com©F+W Media, Inc.

and oily, and will really stick to the surface. (Figure 4)
8. Apply a dozen or more drops of dark-toned ink to the surface and spray several times with the alcohol. Dab the entire surface with a fabric scrap to distribute the color. Be sure to dab rather than wipe as wiping could remove some of the oil-pastel image. To mottle the color a bit more, apply a different medium- or dark-toned ink. (At this point, I prefer caramel or ginger.)
tip: don’t worry if the surface gets a bit of lint stuck to it. simply rub the lint-afflicted area(s) with baby oil to remove the lint.
9. Remove the oil pastel per the directions in Step 4, using a fabric scrap and lots of baby oil, and then wipe the surface with a clean fabric scrap sprayed with alcohol to dissolve any excess oil from the surface of the board. (Figure 5) Seal the board with Mod Podge and let dry—unless you plan on continuing with the reverse-resist.
the reverse resistThe reverse resist is the darker image surrounded by lighter color. It turns out much more mysterious and has fuzzier edges, sometimes making it necessary to squint in order to really see the image.
1. Build up a dark surface. If you are continuing to work on a surface after having completed the above resist process, then simply chose an area where you want to place a reverse-resist image. Darken that area by applying more dark-toned ink, spray it with alcohol, and then wipe and dab to spread the color out evenly. Let dry.
note: if you are starting on a new primed and sealed board, apply a dozen or more drops of light-colored ink, spray it a few times with alcohol, and spread the color all over the surface with a fabric scrap. let dry. repeat this process two more times, first with a medium-toned ink and then with a dark-toned ink. let dry completely.
figure 4
figure 5
Figure 6
Using Mixed-Media Supplies: Alcohol Ink, Gel Medium and Other Supplies16
clothpaperscissors.com©F+W Media, Inc.

2. Position the stencil on the darkened surface and fill the stencil opening with oil pastel. Remove the stencil and heat the pastel with the heat gun to melt it. Let cool. (Figure 6)
3. Apply a generous amount of alcohol blending solution around the stencil. Gently dab all over and around the stenciled image with a fabric scrap. You will see the color lift away. Again, it’s important to dab, not wipe, during this step as it could wipe away the oil pastel. Make sure you remove enough color so that the reverse-resist image will stand out. Let dry completely. (Figure 7) Apply baby oil to the stenciled image and rub the image away with a cotton scrap. Remove excess baby oil with
an alcohol-dampened fabric scrap. Seal the surface with Mod Podge. (Figure 8)
note: this technique can be reworked over and over again on the same surface if the surface hasn’t been sealed. to start new, wipe off as much ink as possible with the alcohol blending solution.
The resist image possibilities and color combinations are virtually endless. You could even scribble, doodle, or hand write a message with the oil pastel. Have fun, play around, and watch while the oil and alcohol do the rest.
mandyrussell.com
figure 7 figure 8
my alcohol inks sorted into light, medium, and dark tones
note: there is much room here for overlap between the light and medium inks, and a few mediums could act as darks. it is helpful to see them sorted.
• lights: latte, watermelon, sunshine yellow, butterscotch, citrus, sunset orange
• mediums: caramel, sail boat blue, slate, purple twilight, wild plum, meadow
• darks: currant, stream, ginger, eggplant
Using Mixed-Media Supplies: Alcohol Ink, Gel Medium and Other Supplies17
clothpaperscissors.com©F+W Media, Inc.

water-soluble graphiteLiquid PenCiL (derivAn®)
This innovative product lets you create authentic graphite pencil effects and pencil-like sketches with a brush and some water. Liquid Pencil comes in permanent and rewettable formulas that can be used like watercolor, and even erased when dry.
when you think
of watercolors,
you may conjure up
images of flip-top
plastic palettes filled
with circles of colors.
In this issue, we want
to take you beyond the
basics and into some
interesting methods of
adding water-soluble
color to your artwork,
from the shades of
gray available with
liquid graphite to the
intense colors available
in block and pencil
form, to the shimmery
color just waiting to be
activated in little pots.
This article touches
on just a few of the
supplies available to
get you started on a
journey into the wet
and wonderful world
of water-soluble art
supplies. Grab some
H2O and let’s get
started!
a look at...water-soluble
art supplies
adapted from Cloth PaPer SCiSSorS® deptember/october 2011
graPhitint (derWent)
Used dry, Graphitint pencils offer just a hint of color, but add water and you’ll transform the tint into rich vibrant shades. The 24 available colors range from soft grays and greens to glowing russets and plums.
sketChing PenCiLs (derWent)
These water-soluble sketching pencils come in three washes: HB (light wash), 4B (medium wash), and 8B (dark wash). They can be used as the start of a watercolor drawing where they will gently dissolve into the painting to create a charming softness, or they can be used alone to create dramatic black-and-white drawings.
Using Mixed-Media Supplies: Alcohol Ink, Gel Medium and Other Supplies18
clothpaperscissors.com©F+W Media, Inc.

watercolor pencils, sticks, blocks, and crayonsart griP® aquareLLe WaterCoLor PenCiLs (fABer-CAstell)
Art GRIP pencils come in four different color-coordinated packs, each with nine pencils and a brush. Their triangular shape keeps the pencils from rolling off of your worktable, and the fully glued barrel adds long-lasting break resistance—great for artists who are hard on their supplies. Simply run a wet brush over your drawing and the water-soluble lead turns into rich watercolor pigments.
aquatone (derWent)
Aquatones are solid sticks of pure water-soluble color. They can be used like a conventional watercolor pencil (wet or dry), or the label can be peeled off and the side of the pencil can be used to apply broad strokes of color.
MetaLLiC PenCiLs (derWent)
These highly reflective, water-soluble pencils work best on black or other dark papers. The colors blend together beautifully to create vivid and striking effects.
inktense PenCiLs (derWent)
The Inktense Pencils combine intense color with a translucent watercolor effect. The 71 colors are permanent once completely dissolved, allowing you to work over them with other pencils, if desired. They can be used on a variety of projects from traditional watercolor to silk painting.
Using Mixed-Media Supplies: Alcohol Ink, Gel Medium and Other Supplies19
clothpaperscissors.com©F+W Media, Inc.
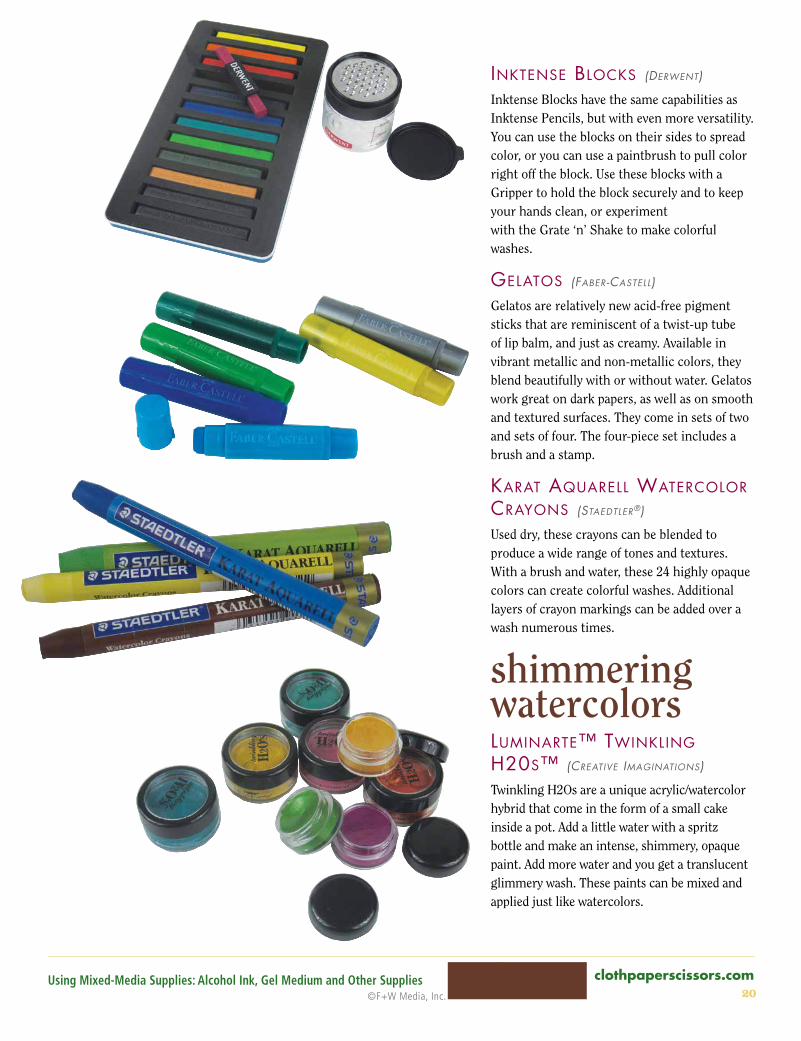
inktense bLoCks (derWent)
Inktense Blocks have the same capabilities as Inktense Pencils, but with even more versatility. You can use the blocks on their sides to spread color, or you can use a paintbrush to pull color right off the block. Use these blocks with a Gripper to hold the block securely and to keep your hands clean, or experiment with the Grate ‘n’ Shake to make colorful washes.
geLatos (fABer-CAstell)
Gelatos are relatively new acid-free pigment sticks that are reminiscent of a twist-up tube of lip balm, and just as creamy. Available in vibrant metallic and non-metallic colors, they blend beautifully with or without water. Gelatos work great on dark papers, as well as on smooth and textured surfaces. They come in sets of two and sets of four. The four-piece set includes a brush and a stamp.
karat aquareLL WaterCoLor Crayons (stAedtler®)
Used dry, these crayons can be blended to produce a wide range of tones and textures. With a brush and water, these 24 highly opaque colors can create colorful washes. Additional layers of crayon markings can be added over a wash numerous times.
shimmering watercolorsLuMinarte™ tWinkLing h20s™ (CreAtive iMAGinAtions)
Twinkling H2Os are a unique acrylic/watercolor hybrid that come in the form of a small cake inside a pot. Add a little water with a spritz bottle and make an intense, shimmery, opaque paint. Add more water and you get a translucent glimmery wash. These paints can be mixed and applied just like watercolors.
Using Mixed-Media Supplies: Alcohol Ink, Gel Medium and Other Supplies20
clothpaperscissors.com©F+W Media, Inc.