CompactRIO PROFIBUS DP DP Slave - Getting Started · CompactRIO PROFIBUS DP-Getting Started-...
17
CompactRIO PROFIBUS DP-Getting Started- V2.3/20.09.2017 CompactRIO PROFIBUS DP DP Slave - Getting Started V2.3/20.09.2017
Transcript of CompactRIO PROFIBUS DP DP Slave - Getting Started · CompactRIO PROFIBUS DP-Getting Started-...
CompactRIO PROFIBUS DP-Getting Started- V2.3/20.09.2017
CompactRIO PROFIBUS DP
DP Slave - Getting Started
V2.3/20.09.2017
d:\project\5362_crio-dp_master\anwenderdoku\slave\version_2.3_vipm\gettingstarted_crio_pb_dp-slave_e.doc
Revision History
Version Date Description Resp.
V2.3 20.09.2017 KUNBUS rebranding, location of GSD JKU, AME
V2.2 01.09.2015 cross-reference amendment in chapter 4 SKR
V2.1 25.06.2015 Prerequisites changed regarding NI RIO Version SKR
V 2.0 26.09.2013 Change from MDK 1.0 to MDK 2.0 MF,JK
V1.4 03.03.2010 Minor Fixes SF
V1.3 17.02.2010 National Instruments specific changes SF, JK
V1.2 16.06.2009 Minor fixes BS, MF
V1.1 28.04.2009 Minor fixes SF, BS
V1.0 28.02.2008 Initial Version
GmbH Robert-Bosch-Straße 12A
76275 Ettlingen Phone +49 7243 51449 - 00
Copyright 2017 by GmbH
Business Confidential/KUNBUS Proprietary This document includes data that shall not be duplicated, used, or disclosed - in whole or in part - for any purpose other than
to evaluate this document. If, however, a contract with a customer is in force, the customer shall have the right to duplicate, use, or disclose the data to the extent provided in this contract. This restriction does not limit the customer’s right to us e the data in this document if it can also be obtained from another source without restriction. The data subject to this restriction are
confidential in all pages of this document.

DP Slave - Getting Started Contents
CompactRIO PROFIBUS DP-Getting Started-V2.3/20.09.2017 i Business Confidential/ Proprietary
Contents
1 Introduction ................................................................................................................... 1
1.1 Worldwide Support and Services ......................................................................... 1
1.2 Prerequisites: ....................................................................................................... 1
2 Installation .................................................................................................................... 2
3 Configuring the PLC with the cRIO PB Slave Module ................................................... 3
4 cRIO PB Module API .................................................................................................... 4
4.1 DP-Slave API ....................................................................................................... 4 4.1.1 DP-AutoSlave Address Property ............................................................ 5 4.1.2 Read/Write Slave Data Method .............................................................. 5
4.1.2.1 Slave Status ............................................................................. 6 4.1.3 Get Slave Output Data Method .............................................................. 6 4.1.4 Set Slave Input Data Method ................................................................. 7
5 RT DP Slave VIs ........................................................................................................... 8
5.1 DP-Slave menu ................................................................................................... 8 5.1.1 Slave I/O-Data ....................................................................................... 8
6 RT Slave Example ...................................................................................................... 10
7 Error codes ................................................................................................................. 12
Contents DP Slave - Getting Started
ii CompactRIO PROFIBUS DP-Getting Started-V2.3/20.09.2017 Business Confidential/ Proprietary
List of Figures
Figure 1: Measurement and Automation Explorer .................................................................. 2
Figure 2: cRIO PB Module API ............................................................................................... 4
Figure 3: DP-AutoSlave Address Method Node ..................................................................... 5
Figure 4: Read/Write Slave Data Method Node ..................................................................... 5
Figure 5: Get Slave Output Data Method Node ...................................................................... 7
Figure 6: Set Slave Input Data Method Node ......................................................................... 7
Figure 7: DP-Slave menu ....................................................................................................... 8
Figure 8: Slave I/O-Data VI .................................................................................................... 8

DP Slave - Getting Started Introduction
CompactRIO PROFIBUS DP-Getting Started-V2.3/20.09.2017 1 Business Confidential/ Proprietary
1 Introduction
This document describes the set into operation procedure of the CompactRIO PROFIBUS
DP module (cRIO PB) as DP-Slave.
1.1 Worldwide Support and Services The National Instruments website is your complete resource for technical support. At ni.com/support, you have access to everything from troubleshooting and application
development self-help resources to email and phone assistance from NI Application Engineers.
1.2 Prerequisites:
A cRIO PB Slave or Master/Slave module.
Download the cRIO PB Slave or Master/Slave Driver Software from the LabVIEW
Tools Network
National Instruments CompactRIO system with real time controller and chassis.
The National Instruments LabVIEW Real time and FPGA Development System from
Version 2012 installed on a Windows PC.
NI-RIO Version 14.5 or higher needs to be installed.
A PROFIBUS DP Master System connected to the cRIO PB Slave module.
Note: The CompactRIO PROFIBUS DP modules require 2.5 W of power, so you must use it
in Slot 1 while leaving Slot 2 empty.
Note: The CompactRIO PROFIBUS DP modules is supported only in CompactRIO
reconfigurable chassis, such as an NI cRIO-911x, and NI Single-Board RIO devices.
Installation DP Slave - Getting Started
2 CompactRIO PROFIBUS DP-Getting Started-V2.3/20.09.2017 Business Confidential/ Proprietary
2 Installation
Install the cRIO PB module in the CompactRIO chassis in slot 1
Switch on the CompactRIO system
Install the KUNBUS cRIO PB Slave or Master/Slave Driver Software downloaded from
Tools Network.
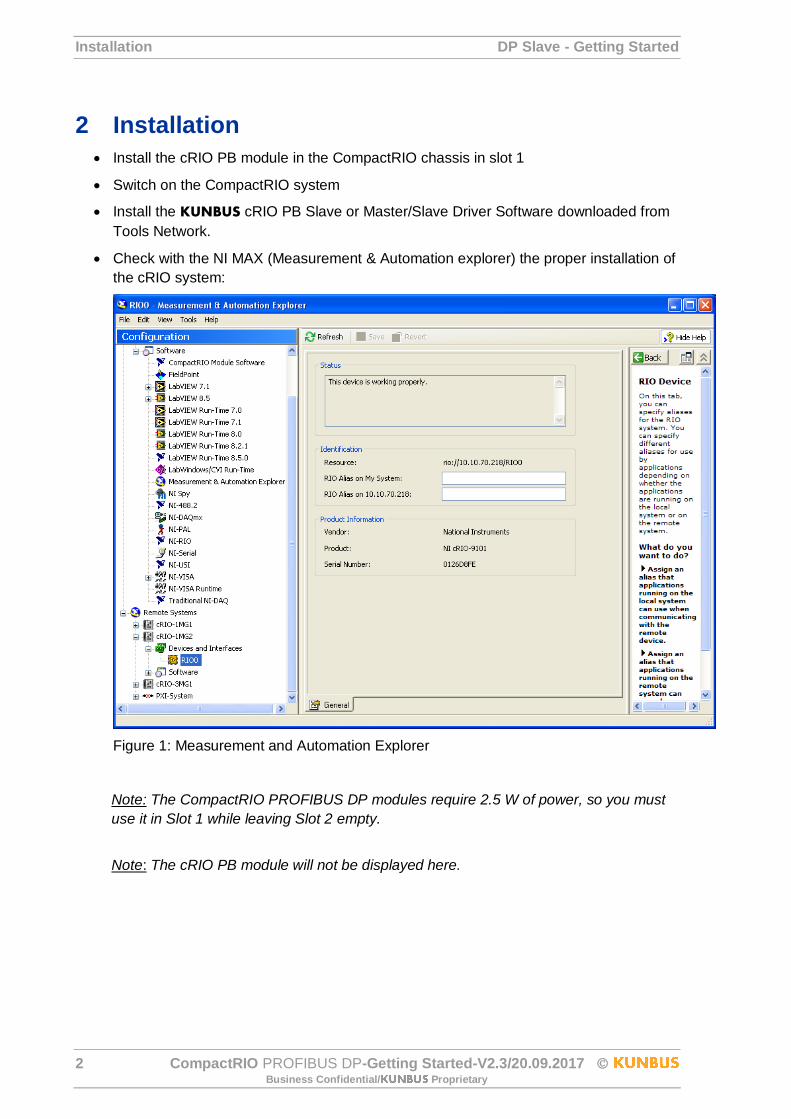
Check with the NI MAX (Measurement & Automation explorer) the proper installation of
the cRIO system:
Figure 1: Measurement and Automation Explorer
Note: The CompactRIO PROFIBUS DP modules require 2.5 W of power, so you must
use it in Slot 1 while leaving Slot 2 empty.
Note: The cRIO PB module will not be displayed here.
DP Slave - Getting Started Configuring the PLC with the cRIO PB Slave Module
CompactRIO PROFIBUS DP-Getting Started-V2.3/20.09.2017 3 Business Confidential/ Proprietary
3 Configuring the PLC with the cRIO PB Slave Module
To get the cRIO PB Slave module into operation it has to be configured on the used DP
Master system. The cRIO PB Slave module ships with a GSD file that can be imported in the
related configuration tool of the PLC.
The cRIO PB GSD file KUNB0B57.GSD can be found in the folder
“…\Public\Documents\Kunbus GmbH\GSD”. Additionally the GSD file is included in the auto
populating folder “GSD” inside the PROFIBUS DP Slave Example project.
cRIO PB Module API DP Slave - Getting Started
4 CompactRIO PROFIBUS DP-Getting Started-V2.3/20.09.2017 Business Confidential/ Proprietary
4 cRIO PB Module API
The lower level cRIO PB Module API consists of FPGA I/O Method and Property Nodes to
be integrated into a FPGA based application. Additionally an easy to use high level RT API is
available (see chapter 6).
Add your FPGA target to a LabVIEW project. LabVIEW will discover your module
automatically if it is connected.
Complete the following steps to add the cRIO PB module to a LabVIEW project if the module
is not connected:
1. Right-click your FPGA Target in the Project Explorer window and select New »
C Series Modules from the shortcut menu to display the Add Targets and Devices
dialog box.
2. Click the New target or device radio button, select C Series Module, and click OK
button to display the New C Series Module dialog box.
3. Select the CS_cRIO-PBAS module from the Module Type pull-down menu and click
the OK button.
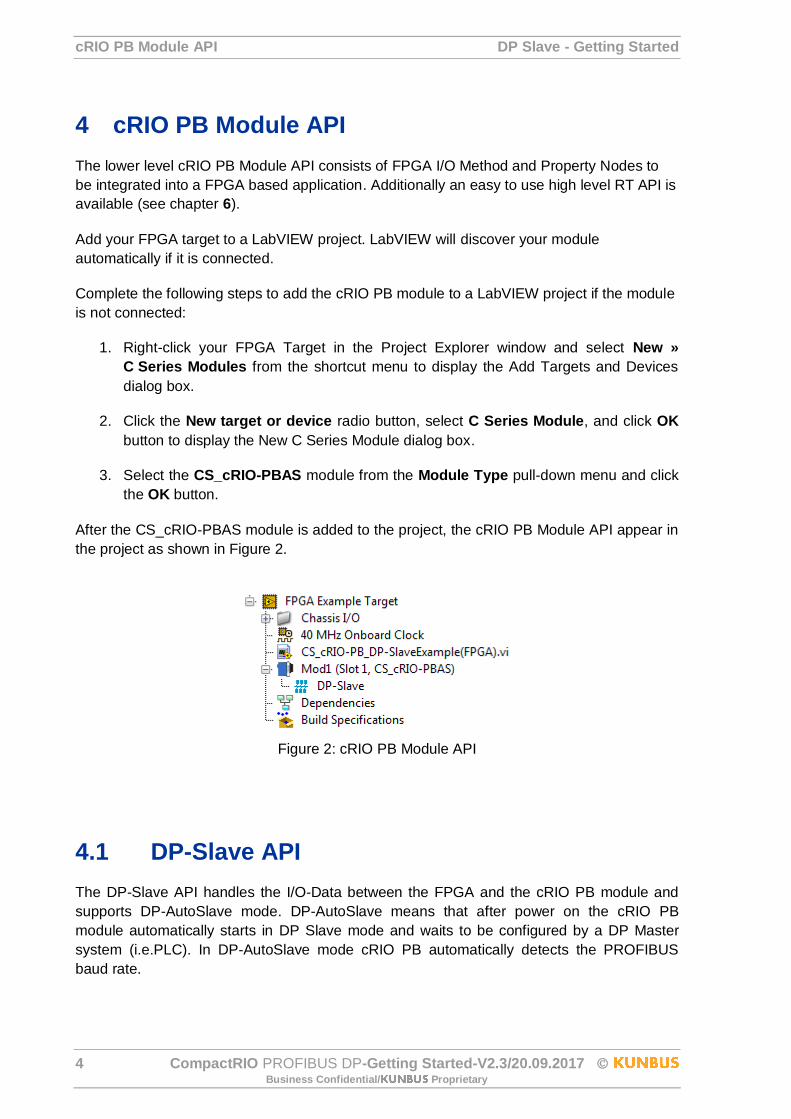
After the CS_cRIO-PBAS module is added to the project, the cRIO PB Module API appear in
the project as shown in Figure 2.
Figure 2: cRIO PB Module API
4.1 DP-Slave API
The DP-Slave API handles the I/O-Data between the FPGA and the cRIO PB module and
supports DP-AutoSlave mode. DP-AutoSlave means that after power on the cRIO PB
module automatically starts in DP Slave mode and waits to be configured by a DP Master
system (i.e.PLC). In DP-AutoSlave mode cRIO PB automatically detects the PROFIBUS
baud rate.
DP Slave - Getting Started cRIO PB Module API
CompactRIO PROFIBUS DP-Getting Started-V2.3/20.09.2017 5 Business Confidential/ Proprietary
Note: DP-AutoSlave mode is supported from firmware version 3.4.15.
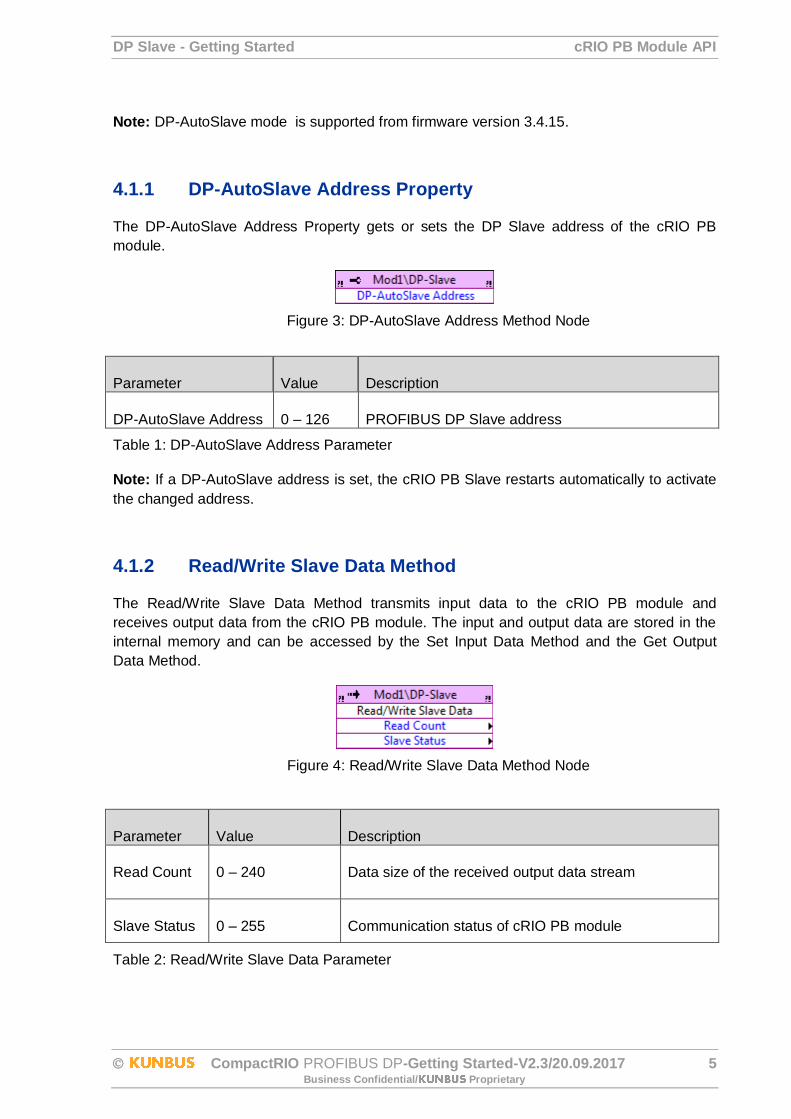
4.1.1 DP-AutoSlave Address Property
The DP-AutoSlave Address Property gets or sets the DP Slave address of the cRIO PB
module.
Figure 3: DP-AutoSlave Address Method Node
Parameter Value Description
DP-AutoSlave Address 0 – 126 PROFIBUS DP Slave address
Table 1: DP-AutoSlave Address Parameter
Note: If a DP-AutoSlave address is set, the cRIO PB Slave restarts automatically to activate
the changed address.
4.1.2 Read/Write Slave Data Method
The Read/Write Slave Data Method transmits input data to the cRIO PB module and
receives output data from the cRIO PB module. The input and output data are stored in the
internal memory and can be accessed by the Set Input Data Method and the Get Output
Data Method.
Figure 4: Read/Write Slave Data Method Node
Parameter Value Description
Read Count 0 – 240 Data size of the received output data stream
Slave Status 0 – 255 Communication status of cRIO PB module
Table 2: Read/Write Slave Data Parameter
cRIO PB Module API DP Slave - Getting Started
6 CompactRIO PROFIBUS DP-Getting Started-V2.3/20.09.2017 Business Confidential/ Proprietary
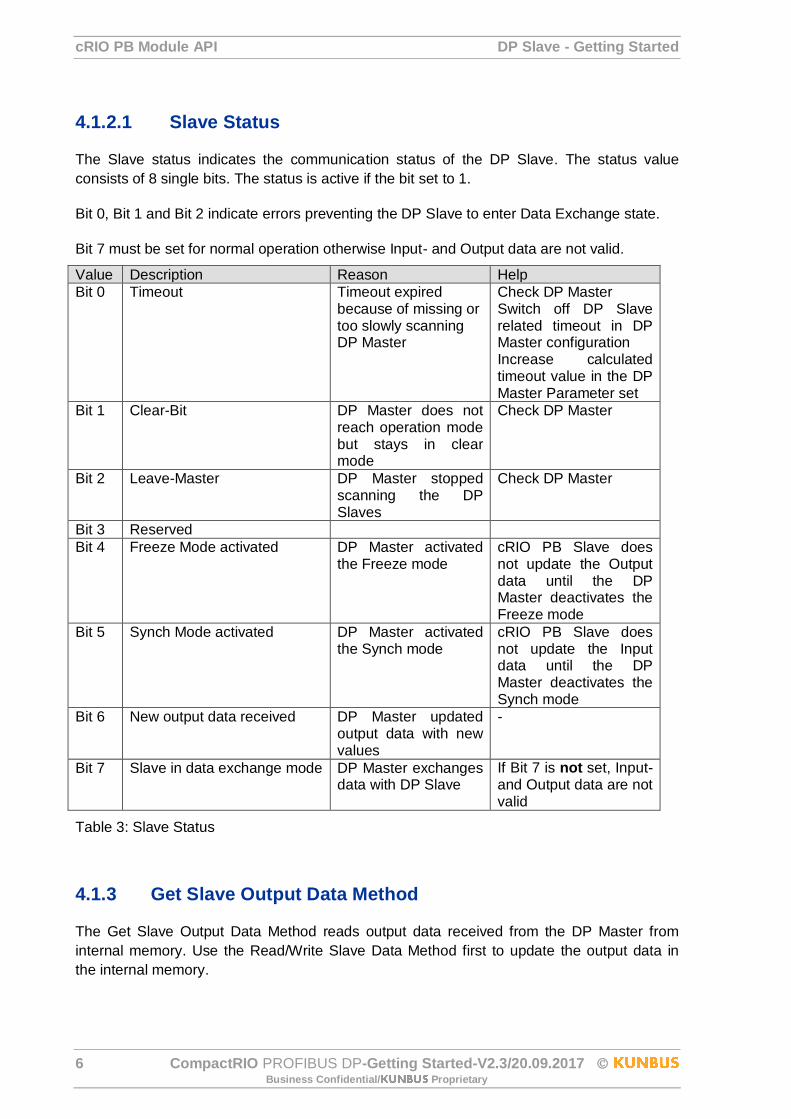
4.1.2.1 Slave Status
The Slave status indicates the communication status of the DP Slave. The status value
consists of 8 single bits. The status is active if the bit set to 1.
Bit 0, Bit 1 and Bit 2 indicate errors preventing the DP Slave to enter Data Exchange state.
Bit 7 must be set for normal operation otherwise Input- and Output data are not valid.
Value Description Reason Help
Bit 0 Timeout Timeout expired because of missing or too slowly scanning DP Master
Check DP Master Switch off DP Slave related timeout in DP Master configuration Increase calculated timeout value in the DP Master Parameter set
Bit 1 Clear-Bit DP Master does not reach operation mode but stays in clear mode
Check DP Master
Bit 2 Leave-Master DP Master stopped scanning the DP Slaves
Check DP Master
Bit 3 Reserved
Bit 4 Freeze Mode activated DP Master activated the Freeze mode
cRIO PB Slave does not update the Output data until the DP Master deactivates the Freeze mode
Bit 5 Synch Mode activated DP Master activated the Synch mode
cRIO PB Slave does not update the Input data until the DP Master deactivates the Synch mode
Bit 6 New output data received DP Master updated output data with new values
-
Bit 7 Slave in data exchange mode DP Master exchanges data with DP Slave
If Bit 7 is not set, Input- and Output data are not valid
Table 3: Slave Status
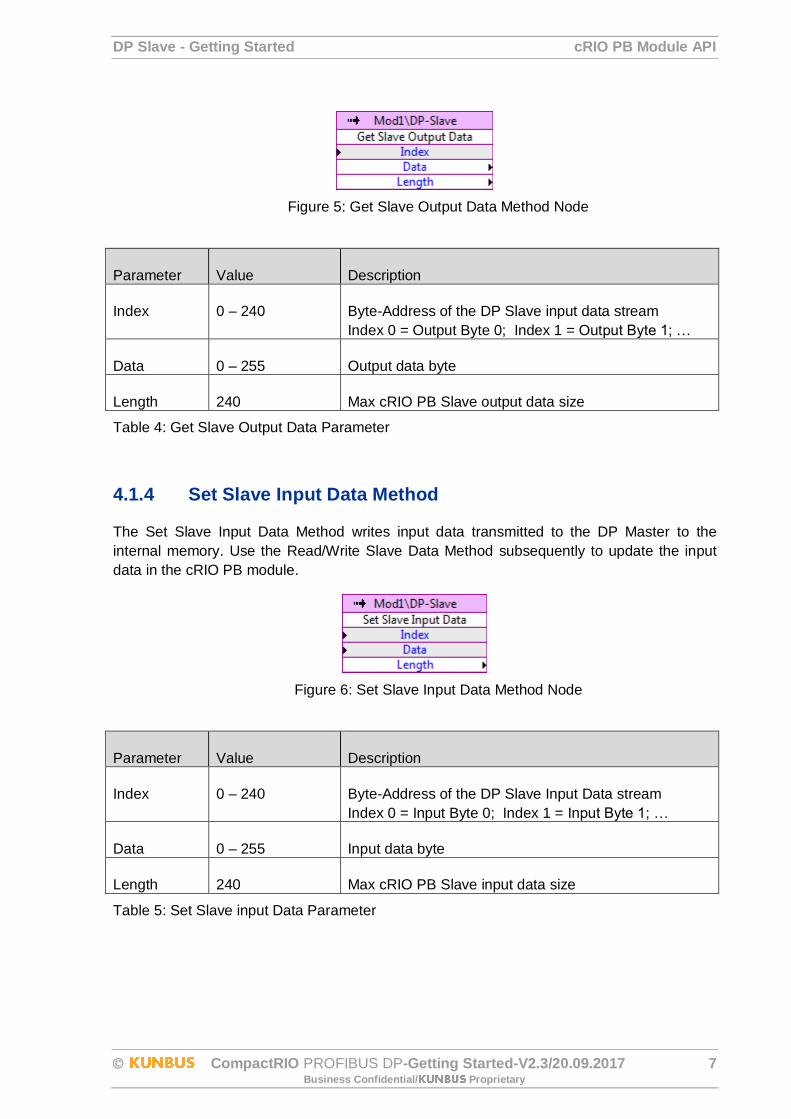
4.1.3 Get Slave Output Data Method
The Get Slave Output Data Method reads output data received from the DP Master from
internal memory. Use the Read/Write Slave Data Method first to update the output data in
the internal memory.
DP Slave - Getting Started cRIO PB Module API
CompactRIO PROFIBUS DP-Getting Started-V2.3/20.09.2017 7 Business Confidential/ Proprietary
Figure 5: Get Slave Output Data Method Node
Parameter Value Description
Index 0 – 240 Byte-Address of the DP Slave input data stream
Index 0 = Output Byte 0; Index 1 = Output Byte 1; …
Data 0 – 255 Output data byte
Length 240 Max cRIO PB Slave output data size
Table 4: Get Slave Output Data Parameter
4.1.4 Set Slave Input Data Method
The Set Slave Input Data Method writes input data transmitted to the DP Master to the
internal memory. Use the Read/Write Slave Data Method subsequently to update the input
data in the cRIO PB module.
Figure 6: Set Slave Input Data Method Node
Parameter Value Description
Index 0 – 240 Byte-Address of the DP Slave Input Data stream
Index 0 = Input Byte 0; Index 1 = Input Byte 1; …
Data 0 – 255 Input data byte
Length 240 Max cRIO PB Slave input data size
Table 5: Set Slave input Data Parameter
RT DP Slave VIs DP Slave - Getting Started
8 CompactRIO PROFIBUS DP-Getting Started-V2.3/20.09.2017 Business Confidential/ Proprietary
5 RT DP Slave VIs
The RT DP Slave VIs provide access to the cRIO PB module on RT-Level via the already
described low level FPGA VIs. Refer to chapter 6 RT Slave Example for a fully working
implementation example. The VI specific context help menu describes in detail all VI specific
parameters.
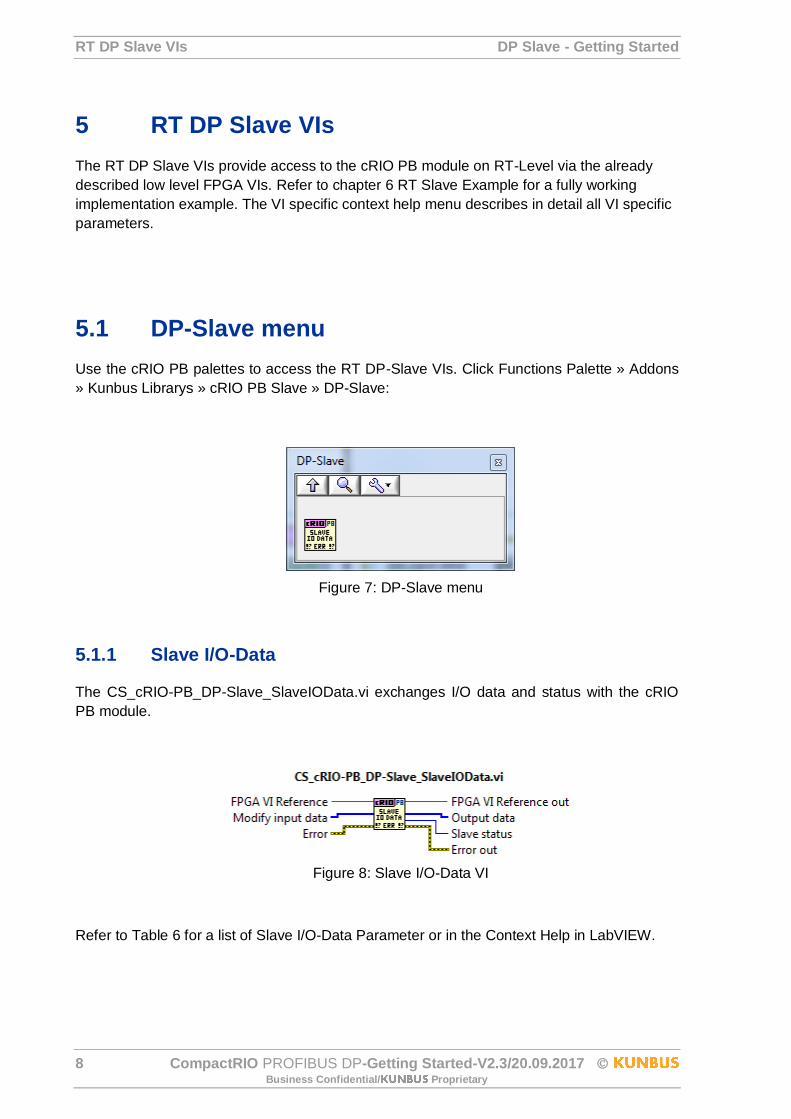
5.1 DP-Slave menu
Use the cRIO PB palettes to access the RT DP-Slave VIs. Click Functions Palette » Addons
» Kunbus Librarys » cRIO PB Slave » DP-Slave:
Figure 7: DP-Slave menu
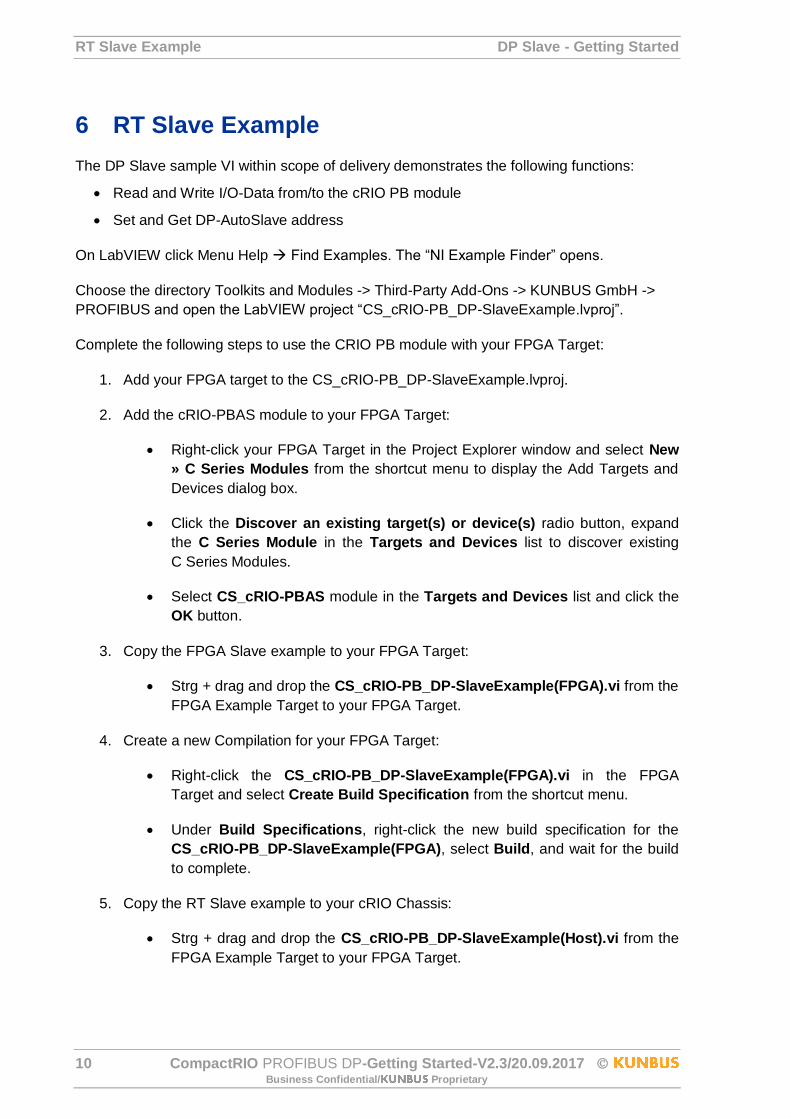
5.1.1 Slave I/O-Data
The CS_cRIO-PB_DP-Slave_SlaveIOData.vi exchanges I/O data and status with the cRIO
PB module.
Figure 8: Slave I/O-Data VI
Refer to Table 6 for a list of Slave I/O-Data Parameter or in the Context Help in LabVIEW.

DP Slave - Getting Started RT DP Slave VIs
CompactRIO PROFIBUS DP-Getting Started-V2.3/20.09.2017 9 Business Confidential/ Proprietary
Parameter Value Description
Modify input data [0 – 255] DP Slave input data
Output data [0 – 255] DP Slave output data
Slave Status 0 – 255 Communication status of cRIO PB Slave
Refer to 0 Table 2: Read/Write Slave Data Parameter
Slave Status for detailed information
Table 6: Slave I/O-Data Parameter
RT Slave Example DP Slave - Getting Started
10 CompactRIO PROFIBUS DP-Getting Started-V2.3/20.09.2017 Business Confidential/ Proprietary
6 RT Slave Example
The DP Slave sample VI within scope of delivery demonstrates the following functions:
Read and Write I/O-Data from/to the cRIO PB module
Set and Get DP-AutoSlave address
On LabVIEW click Menu Help Find Examples. The “NI Example Finder” opens.
Choose the directory Toolkits and Modules -> Third-Party Add-Ons -> KUNBUS GmbH ->
PROFIBUS and open the LabVIEW project “CS_cRIO-PB_DP-SlaveExample.lvproj”.
Complete the following steps to use the CRIO PB module with your FPGA Target:
1. Add your FPGA target to the CS_cRIO-PB_DP-SlaveExample.lvproj.
2. Add the cRIO-PBAS module to your FPGA Target:
Right-click your FPGA Target in the Project Explorer window and select New
» C Series Modules from the shortcut menu to display the Add Targets and
Devices dialog box.
Click the Discover an existing target(s) or device(s) radio button, expand
the C Series Module in the Targets and Devices list to discover existing
C Series Modules.
Select CS_cRIO-PBAS module in the Targets and Devices list and click the
OK button.
3. Copy the FPGA Slave example to your FPGA Target:
Strg + drag and drop the CS_cRIO-PB_DP-SlaveExample(FPGA).vi from the
FPGA Example Target to your FPGA Target.
4. Create a new Compilation for your FPGA Target:
Right-click the CS_cRIO-PB_DP-SlaveExample(FPGA).vi in the FPGA
Target and select Create Build Specification from the shortcut menu.
Under Build Specifications, right-click the new build specification for the
CS_cRIO-PB_DP-SlaveExample(FPGA), select Build, and wait for the build
to complete.
5. Copy the RT Slave example to your cRIO Chassis:
Strg + drag and drop the CS_cRIO-PB_DP-SlaveExample(Host).vi from the
FPGA Example Target to your FPGA Target.
DP Slave - Getting Started RT Slave Example
CompactRIO PROFIBUS DP-Getting Started-V2.3/20.09.2017 11 Business Confidential/ Proprietary
6. Configure Open FPGA VI Reference to communicate between the Host VI and
FPGA VI.
Double-click the RT Slave example CS_cRIO-PB_DP-
SlaveExample(Host).vi and select Window»Show Block Diagram.
Right-click the Open FPGA VI Reference function and select Configure Open
FPGA VI Reference from the shortcut menu to display the Configure Open
FPGA VI Reference dialog box.
Click the VI radio button, select CS_cRIO-PB_DP-SlaveExample(FPGA).vi in
the Select VI dialog box and click the OK button.
Run the CS_cRIO-PB_DP-SlaveExample(Host).vi and following the Instructions in the DP-
Slave section.
Error codes DP Slave - Getting Started
12 CompactRIO PROFIBUS DP-Getting Started-V2.3/20.09.2017 Business Confidential/ Proprietary
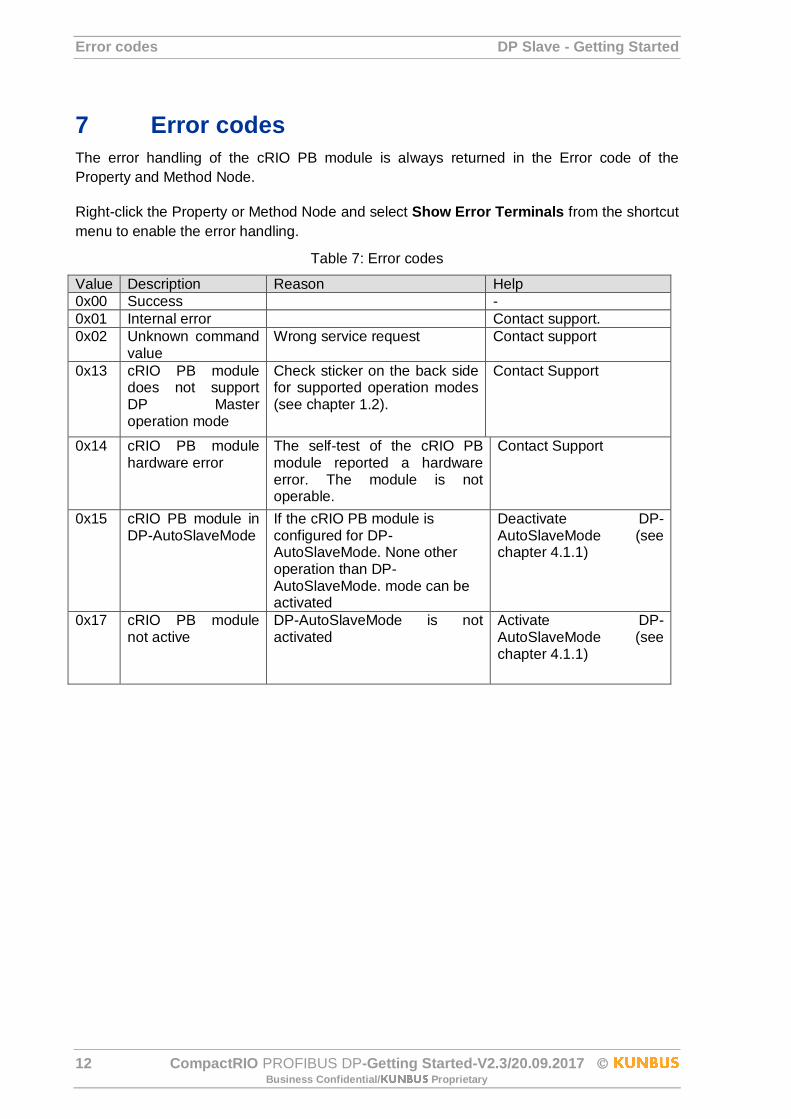
7 Error codes
The error handling of the cRIO PB module is always returned in the Error code of the
Property and Method Node.
Right-click the Property or Method Node and select Show Error Terminals from the shortcut
menu to enable the error handling.
Table 7: Error codes
Value Description Reason Help
0x00 Success -
0x01 Internal error Contact support.
0x02 Unknown command value
Wrong service request Contact support
0x13 cRIO PB module does not support DP Master operation mode
Check sticker on the back side for supported operation modes (see chapter 1.2).
Contact Support
0x14 cRIO PB module hardware error
The self-test of the cRIO PB module reported a hardware error. The module is not operable.
Contact Support
0x15 cRIO PB module in DP-AutoSlaveMode
If the cRIO PB module is configured for DP-AutoSlaveMode. None other operation than DP-AutoSlaveMode. mode can be activated
Deactivate DP-AutoSlaveMode (see chapter 4.1.1)
0x17 cRIO PB module not active
DP-AutoSlaveMode is not activated
Activate DP-AutoSlaveMode (see chapter 4.1.1)

© 2018 National Instruments. All rights reserved.
377817A-01 Sep18
Information is subject to change without notice. Refer to the NI Trademarks and Logo Guidelines at ni.com/trademarks for more information on NI trademarks. Other product and company names mentioned herein are trademarks or trade names of their respective companies. For patents covering NI products/technology, refer to the appropriate location: Help»Patents in your software, the patents.txt file on your media, or the National Instruments Patents Notice at ni.com/patents. You can find information about end-user license agreements (EULAs) and third-party legal notices in the readme file for your NI product. Refer to the Export Compliance Information at ni.com/legal/export-compliance for the NI global trade compliance policy and how to obtain relevant HTS codes, ECCNs, and other import/export data. NI MAKES NO EXPRESS OR IMPLIED WARRANTIES AS TO THE ACCURACY OF THE INFORMATION CONTAINED HEREIN AND SHALL NOT BE LIABLE FOR ANY ERRORS. U.S. Government Customers: The data contained in this manual was developed at private expense and is subject to the applicable limited rights and restricted data rights as set forth in FAR 52.227-14, DFAR 252.227-7014, and DFAR 252.227-7015.


![PROFIBUS DP bus interface, PROFIBUS DP [BU 2700]...Sicherheit/PROFIBUS DP [BU 2700]/Bestimmungsgemäße Ver wendung PROFIBUS DP @ 8\mod_1461835577600_388.docx @ 2249429 @ 2 @ 1 2.1](https://static.fdocuments.in/doc/165x107/60b54c574bd00c04b50e633d/profibus-dp-bus-interface-profibus-dp-bu-2700-sicherheitprofibus-dp-bu.jpg)