CDOT Calculating Quantities With InRoads and …...CDOT Calculating Quantities With InRoads and...
42
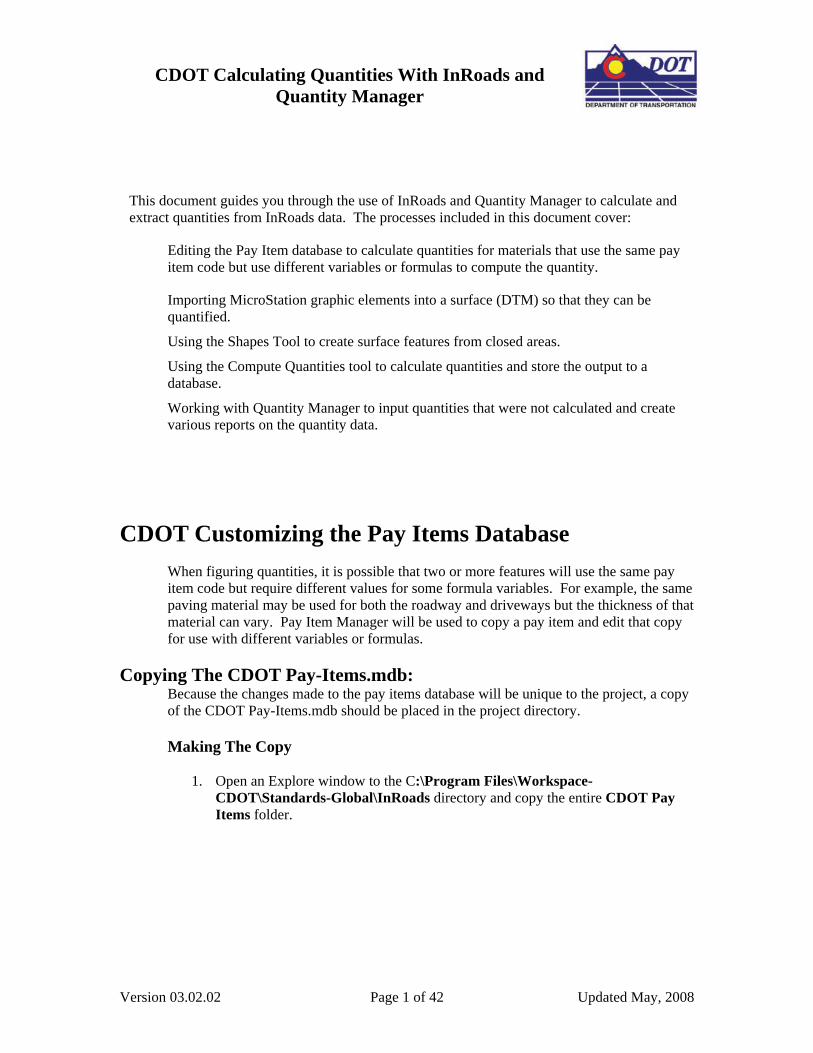
CDOT Calculating Quantities With InRoads and Quantity Manager Version 03.02.02 Page 1 of 42 Updated May, 2008 This document guides you through the use of InRoads and Quantity Manager to calculate and extract quantities from InRoads data. The processes included in this document cover: Editing the Pay Item database to calculate quantities for materials that use the same pay item code but use different variables or formulas to compute the quantity. Importing MicroStation graphic elements into a surface (DTM) so that they can be quantified. Using the Shapes Tool to create surface features from closed areas. Using the Compute Quantities tool to calculate quantities and store the output to a database. Working with Quantity Manager to input quantities that were not calculated and create various reports on the quantity data. CDOT Customizing the Pay Items Database When figuring quantities, it is possible that two or more features will use the same pay item code but require different values for some formula variables. For example, the same paving material may be used for both the roadway and driveways but the thickness of that material can vary. Pay Item Manager will be used to copy a pay item and edit that copy for use with different variables or formulas. Copying The CDOT Pay-Items.mdb: Because the changes made to the pay items database will be unique to the project, a copy of the CDOT Pay-Items.mdb should be placed in the project directory. Making The Copy 1. Open an Explore window to the C:\Program Files\Workspace- CDOT\Standards-Global\InRoads directory and copy the entire CDOT Pay Items folder.
Transcript of CDOT Calculating Quantities With InRoads and …...CDOT Calculating Quantities With InRoads and...
CDOT Calculating Quantities With InRoads and Quantity Manager
Version 03.02.02 Page 1 of 42 Updated May, 2008
This document guides you through the use of InRoads and Quantity Manager to calculate and extract quantities from InRoads data. The processes included in this document cover:
Editing the Pay Item database to calculate quantities for materials that use the same pay item code but use different variables or formulas to compute the quantity.
Importing MicroStation graphic elements into a surface (DTM) so that they can be quantified.
Using the Shapes Tool to create surface features from closed areas.
Using the Compute Quantities tool to calculate quantities and store the output to a database.
Working with Quantity Manager to input quantities that were not calculated and create various reports on the quantity data.
CDOT Customizing the Pay Items Database When figuring quantities, it is possible that two or more features will use the same pay item code but require different values for some formula variables. For example, the same paving material may be used for both the roadway and driveways but the thickness of that material can vary. Pay Item Manager will be used to copy a pay item and edit that copy for use with different variables or formulas.
Copying The CDOT Pay-Items.mdb: Because the changes made to the pay items database will be unique to the project, a copy of the CDOT Pay-Items.mdb should be placed in the project directory. Making The Copy
1. Open an Explore window to the C:\Program Files\Workspace-CDOT\Standards-Global\InRoads directory and copy the entire CDOT Pay Items folder.

CDOT Calculating Quantities With InRoads and Quantity Manager.pdf
2. Change the directory to C:\Projects\JPC#\Design\InRoads and paste.
Copying A Pay Item
Now that a copy of the master database has been made, customizing the copy for the particular project can be accomplished.
3. Start InRoads (and MicroStation), opening the; C:\Projects\JPC#\Design\Working\XXXJPC#QuantityModel##.dgn file.
4. From the InRoads menu, select Quantities > Pay Item Manager. This displays
the Pay Item Manager dialog box.
Version 03.02.02 Page 2 of 42 Updated May, 2008

CDOT Calculating Quantities With InRoads and Quantity Manager.pdf
5. From the Pay Item Manager dialog box, select File > Open. 6. In the Open dialog box, Set the directory path to:
C:\Projects\JPC#\Design\InRoads\CDOT Pay Items\. 7. Select CDOT Pay-Items.mdb and Open.
Locate The Pay Item To Be Copied
8. Select Edit > Find from the Pay Item Manager dialog box. This displays the Find dialog box.
9. In the Find What field of the Find dialog box, key in the desired Pay Item Code.
And select Find Next. The desired pay item will be displayed, highlighted in the right pane of the Pay Item Manager dialog box.
10. Select Close from the Find dialog box.
Version 03.02.02 Page 3 of 42 Updated May, 2008

CDOT Calculating Quantities With InRoads and Quantity Manager.pdf
Making The Copy
10. In the right pane of the Pay Item Manager window, <R> on the desired Pay Item
Name. Note: be sure that the cursor is in the Name column. Select Copy from the menu that is displayed.
Move the cursor to the Description column, <R> and select Paste. A copy of the pay item (with (2) appended to the name is placed under the original.
Editing The Pay Item:.
13. In the right pane of the Pay Item Manager window, <D> on the copied Pay Item Name. Note: be sure that the cursor is in the Name column. This will highlight the copied Pay Item.
14. <R> on the Pay Item Name and select Edit. This displays the Edit Pay Item
dialog box.
Version 03.02.02 Page 4 of 42 Updated May, 2008

CDOT Calculating Quantities With InRoads and Quantity Manager.pdf
15. <D> just to the left of the ‘(2) in the Pay Item Name field. Key in a brief, descriptive addition to the name. Delete the ‘(2)’.
For Example, if pay item 403-32621 is to be laid down 6” thick, the name could read, “403-32621 – 6” Thick”.
16. Do not change the Pay Item Code, Description, or Unit Name. Doing so will result in errors in the pay quantity calculations.
17. A different formula may be selected from the Formula pull-down in the Quantity
Calculation area. For example, there are two formulas for computing tons; ‘Ton’ and ‘Ton – L’.
‘Ton’ uses the area of a feature and the variables Thickness and WeightCFT. ‘Ton – L’ uses the length of the feature and the variables Width, Thickness, and WeightCFT.
Version 03.02.02 Page 5 of 42 Updated May, 2008

CDOT Calculating Quantities With InRoads and Quantity Manager.pdf
Editing Formula Variables
18. <D> on the desired variable from the Variables list in the Quantity Calculation area.
19. Highlight the data in the Value field directly below the Variables list and key in
the desired value. Press the Tab key to accept the value.
Deduction From Pay Items This option is used when two features occupy the same location (are coincident) and one of those features can reduce the quantity of the other. For example, suppose a curb feature is stored as a continuous Breakline and inlet features are stored as random points on the curb Breakline. For each occurrence of an inlet on the curb, the quantity of the curb can be reduced by a defined value.
20. To add a pay item for deduction <D> on the Pay Item Browser button. This
displays the Pay Item browser dialog box. 21. <D> on the desired pay item and select Add. The Pay Item is add to the Deduct
From Pay Items list. <D> on the Close button to dismiss the Pay Item browser dialog box.
Version 03.02.02 Page 6 of 42 Updated May, 2008

CDOT Calculating Quantities With InRoads and Quantity Manager.pdf
2. <D> on the desired pay item from the list in the Deduct From Pay Items area.
3. Highlight the data in the Value field directly below the Pay Items list and key in
2 2
the desired value. Press the Tab key to accept the value.
The Measurment Area
he options in this area are used to determine how areas and lines are measured. It is
here are two mode of measurement; Planarized and Slope. Planrized projects the shape
24. <D> on the desired radio button to select the measurement Mode.
Talso used to specify quantity factors and rounding. Tto a flat (2D) plane for measurement. Slope measures the actual (3D) shape.
Version 03.02.02 Page 7 of 42 Updated May, 2008

CDOT Calculating Quantities With InRoads and Quantity Manager.pdf
A Quantity Factor is a multiplier applied to the calculated quantity.
25. If a Quantity Factor is to be used, <D> the check box to the left of Apply
6. Highlight the data in the field to the right of Apply Quantity Factor and key in
Quantity Factor. 2
the desired value. Press the Tab key to exit the field.
A Rounding Factor is used to modify the computed value to the nearest specified
27. If a Rounding Factor is to be used, <D> the check box to the left of Apply
8. Highlight the data in the field to the right of Apply Rounding Factor and key in
9. Select the desired rounding option from the two radio buttons below Apply
increment. There is also the option to round up or down.
Rounding Factor. 2
the desired value. Press the Tab key to exit the field. 2
Rounding Factor.
30. <D> the Apply button to accept all of the changes made to the pay item.
1. <D> the Close button to dismiss the Edit Pay Item dialog box.
3
Version 03.02.02 Page 8 of 42 Updated May, 2008

CDOT Calculating Quantities With InRoads and Quantity Manager.pdf
32. This completes the edit.
This command takes the X, Y, and Z coordinate information from a MicroStation element and stores it in a DTM file. This command will be primarily used for creating pay quantity data. Because of the high level of data control required, the Load From Fence option is inappropriate and will not be described. Creating Or Opening The Surface Data imported from graphics can be either loaded into a new or existing surface. Creating A Surface
1. the InRoads menu, <D> on the bottom Surfaces tab. <R> on the word
New from the menu.
Importing Graphics To surface
In‘Surfaces’ at the top of the left pane then select
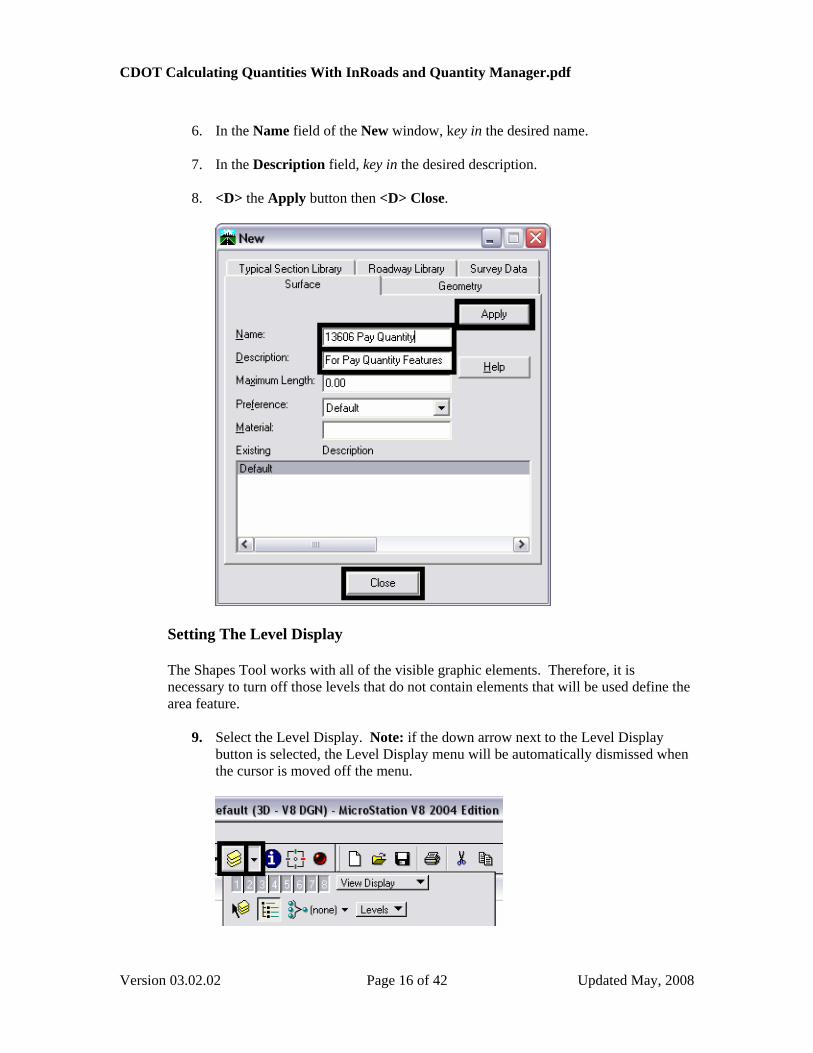
2. In the Name fie
ld of the New window, key in the desired name.
3. the Description field, key in the desired description.
In
Version 03.02.02 Page 9 of 42 Updated May, 2008

CDOT Calculating Quantities With InRoads and Quantity Manager.pdf
4. <D> the Apply button then <D> Close.
Opening An Existing Surface
5. In the InRoads menu, <D> on the bottom Surfaces tab. <R> on the word
‘Surfaces’ at the top of the left pane then select Open from the menu.
6. In the Open dialog box, use the Look In pull down menu to select the desired directory path.
e.
7. <D> on the desired file nam
Version 03.02.02 Page 10 of 42 Updated May, 2008

CDOT Calculating Quantities With InRoads and Quantity Manager.pdf
8. <D> on the Open button, then <D> on the Cancel button to dismiss the Open
dialog box.
Importing Graphic Data
ill be displayed.
9. In the InRoads menu, select File > Import > Surface. The Import Surface dialog box w
10. sing the Surface pulU l down menu, select the desired surface.
a. If all of the elements on a particular level are to be imported, select Level. b. If some elements on a level are to be imported and others are not, then select
Single Element. 12. If Load From is set to Level, then with the Level Pull down menu select the
desired level. If Load From is set to Single Element this field is inactive. 13. In the Seed Name field, key in the desired name. This will be used to name the
features imported from the graphic elements. Note: this field may be populated if an existing surface is being used.
11. With the Load From pull down menu, select the desired method.
Version 03.02.02 Page 11 of 42 Updated May, 2008
CDOT Calculating Quantities With InRoads and Quantity Manager.pdf
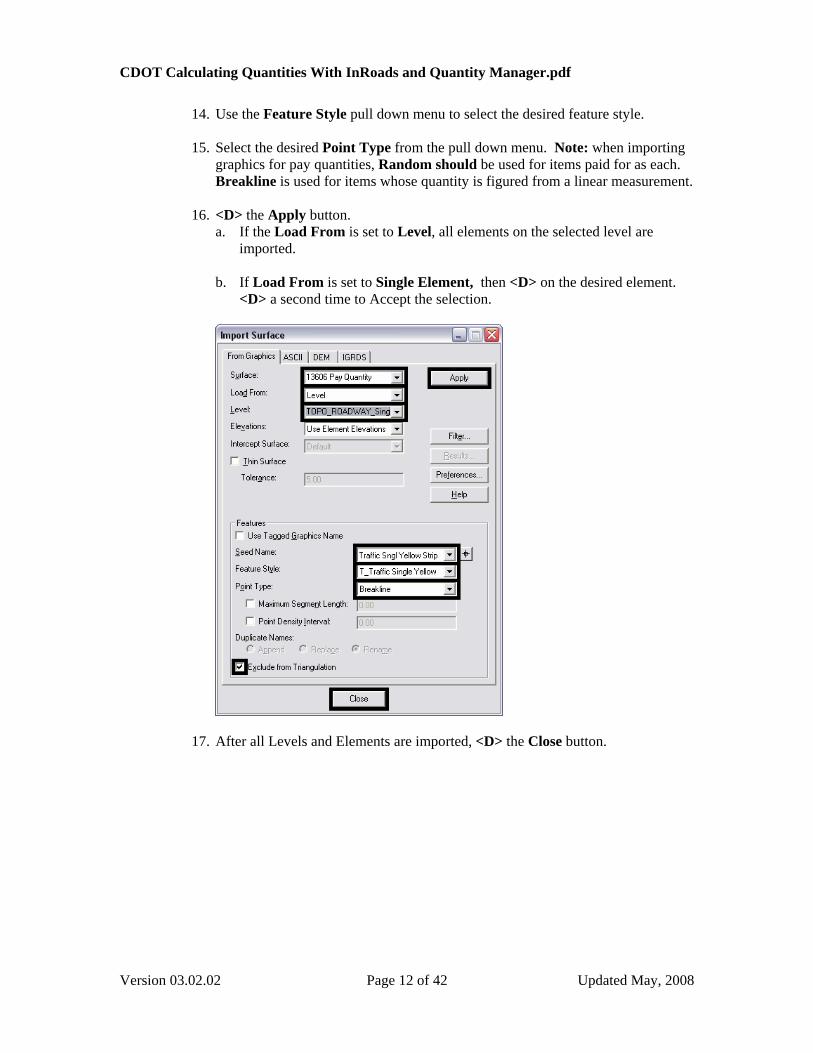
14. Use the Feature Style pull down menu to select the desired feature style. 15. Select the desired Point Type from the pull down menu. Note: when importing
graphics for pay quantities, Random should be used for items paid for as each. Breakline is used for items whose quantity is figured from a linear measurement.
16. <D> the Apply button.
a. If the Load From is set to Level, all elements on the selected level are imported.
b. If Load From is set to Single Element, then <D> on the desired element.
<D> a second time to Accept the selection.
ft
ments are imported, <D> the Close button.
17. A er all Levels and Ele
Version 03.02.02 Page 12 of 42 Updated May, 2008

CDOT Calculating Quantities With InRoads and Quantity Manager.pdf
Saving The Surface
18. In the InRoads menu, <R> on the surface name in the left pane then select Save
from the menu. If the file existed prior to importing data then the data is saved to that file and no further action is required.
the file was new then the Save As dialog box will appear. Select the directory path using the Save In pull down menu.
20. In the File Name field, key in the desired name. 21. <D> on the Save button, then <D> on the Close button.
19. If
Version 03.02.02 Page 13 of 42 Updated May, 2008

CDOT Calculating Quantities With InRoads and Quantity Manager.pdf
Using The Shapes Tool The Shapes Tool is used to create dtm features that define an area. The advantage of this tool is that it does not affect the graphic elements used to create the features. So, some of the same elements used to define an area feature can also be used to define linear features as well.
Creating A Working DGN file:
Because the Shapes Tool may require additional graphic elements to be added to the model file, or existing elements to be modified, a copy of this file should be used. Creating A Copy of the DGN File
1. Start InRoads (and MicroStation). Set the directory path and highlight the
desired file. Select OK.
2. Select File > Save As from the MicroStation Menu.
3. In the Save As dialog box, set the directory to the Working directory.
Version 03.02.02 Page 14 of 42 Updated May, 2008

CDOT Calculating Quantities With InRoads and Quantity Manager.pdf
4. Key in the new name for the copied file and select OK. The copied file is now
open in MicroStation.
Preparations For Using The Shapes Tool:
Creating A surface For Quantity Data
The design DTM will contain a large number of features that will not be used for quantity calculation. Using this surface could produce unwanted or erroneous quantity data. To avoid this problem a surface will be created to contain only pay quantity data.
5. In the InRoads menu, <D> on the bottom Surfaces tab. <R> on the word
’ at the top of the left pane then select New from the menu. ‘Surfaces
Version 03.02.02 Page 15 of 42 Updated May, 2008
CDOT Calculating Quantities With InRoads and Quantity Manager.pdf
6. In the Name field of the New window, key in the desired name. 7. In the Description field, key in the desired description. 8. <D> the Apply button then <D> Close.
Setting The Level Display
The Shapes Tool works with all of the visible graphic elements. Therefore, it is necessary to turn off those levels that do not contain elements that will be used define the area feature.
9. Select the Level Display. Note: if the down arrow next to the Level Display
button is selected, the Level Display menu will be automatically dismissed when the cursor is moved off the menu.
Version 03.02.02 Page 16 of 42 Updated May, 2008

CDOT Calculating Quantities With InRoads and Quantity Manager.pdf
menu.
from the menu. This will leave only the desired elements displayed.
10. <R> on the desired level and select Set Active from the 11. <R> on the Level Display and select All Off
Closing The Area
12. Use the Match Element Attributes command. Turn on all of the check boxes.
<D> on the desired element to match its attributes.
13. Select the Place Smartline (or Place Line) command. <T> to the end of one of the elements that will form the area then <D>.
Version 03.02.02 Page 17 of 42 Updated May, 2008

CDOT Calculating Quantities With InRoads and Quantity Manager.pdf
14. <T> to the end of the next element that will form the area then <D>.
15. Repeat this process until all of the gaps in the area are filled. Below is an closed area.
example of a
Version 03.02.02 Page 18 of 42 Updated May, 2008

CDOT Calculating Quantities With InRoads and Quantity Manager.pdf
Creating The Area Feature
16. From the InRoads menu, select Quantities > Shapes Tool. The Shapes Tool
dialog box will be displayed.
17. On the Shapes Tool dialog box, select Fill for the Shape entry. 18. Using the Surface pull down menu, select the surface created above. 19. In the Feature Name field, key in the desired feature name. 20. In the Description field, key in the desired text. 21. Using the Feature Style pull down menu, select the desired feature style. 22. Select Rename for the Duplicate Names setting. 23. Toggle on Use Dynamics and Exclude From Triangulation.
Version 03.02.02 Page 19 of 42 Updated May, 2008

CDOT Calculating Quantities With InRoads and Quantity Manager.pdf
e fields. Note: If station limits are used, temporary lines extending perpendicular to the active alignment 1,000 feet in either direction will be placed at the Start and Stop stations. These will be used to define areas both inside and outside the station limits.
24. In the Limits area, toggle Station on if desired. If used, key in the Start and Stop stations in their respectiv
25. Select the Apply button. 26. Move the cursor inside the desired area. Closed areas will highlight as the cursor
7 <D> a second time to accept. If settings, these can be selected
e. fter.
is moved through them.
. <D> inside the area to create the feature. additional features are to be created using the same
2
at this time. The first additional feature will have a ‘1’ appended to its namThis will be incremented by 1 for each additional feature therea
28. After the desired areas have been selected, <R> to redisplay the Shapes Tool dialog box and then select Close.
Version 03.02.02 Page 20 of 42 Updated May, 2008

CDOT Calculating Quantities With InRoads and Quantity Manager.pdf
29. In the InRoads menu, <R> on the surface name in the left pane then select Save from the menu. If the file existed prior to importing data then the data is saved to that file and no further action is required.
Saving The Surface
ctory
32. <D> on the Save button, then <D> on the Close button.
30. If the file was new then the Save As dialog box will appear. Select the direpath using the Save In pull down menu.
31. In the File Name field, key in the desired name.
Version 03.02.02 Page 21 of 42 Updated May, 2008

CDOT Calculating Quantities With InRoads and Quantity Manager.pdf
Inty data from a DTM and stores it in
a database to be used with Quantity Manager. This command requires a surface with pay items assigned to the features and a geometry project with a horizontal alignment.
1. From the InRoads menu, select Quantities > Compute Quantities. This will
display the Compute Quantities dialog box.
Roads Compute Quantities The compute Quantities command collects pay quanti
2. Select the desired alignment using the Alignment pull down menu. Quantities
will only be calculated for features within the station range of the specified
ce. The All mode uses all features within the alignment, the Fence mode uses only those features that are within a defined fence.
alignment. 3. Using the Mode pull down menu, select either All or Fen
Version 03.02.02 Page 22 of 42 Updated May, 2008

CDOT Calculating Quantities With InRoads and Quantity Manager.pdf
4. In the Include area, <D> either the All or Selected radio button for Pay Items. 5. <D> either the All or Selected radio button for Features.
Note: If the Selected radio button is chosen, then the items to be processed must be identified on their respective tab. If the All radio button is selected all data of that type is processed and its tab is not used.
6. In the Output area, <D> on the browser button next to the Database field. This will display the Browse window.
Version 03.02.02 Page 23 of 42 Updated May, 2008

CDOT Calculating Quantities With InRoads and Quantity Manager.pdf
n menu.
8. In the File Name field, key in the desired filename or select an available one
from those listed. 9. <D> on the Save button. This will dismiss the Browse window and fill in the
Database field.
7. Select the desired directory path from the Save In pull dow
10. le.
Select a Mode. Choose Create to make new file or to overwrite an existing fiChoose Append if adding additional data to an existing file.
Version 03.02.02 Page 24 of 42 Updated May, 2008
CDOT Calculating Quantities With InRoads and Quantity Manager.pdf
by
the combo box. Phases are used to group quantities.
n to the right.
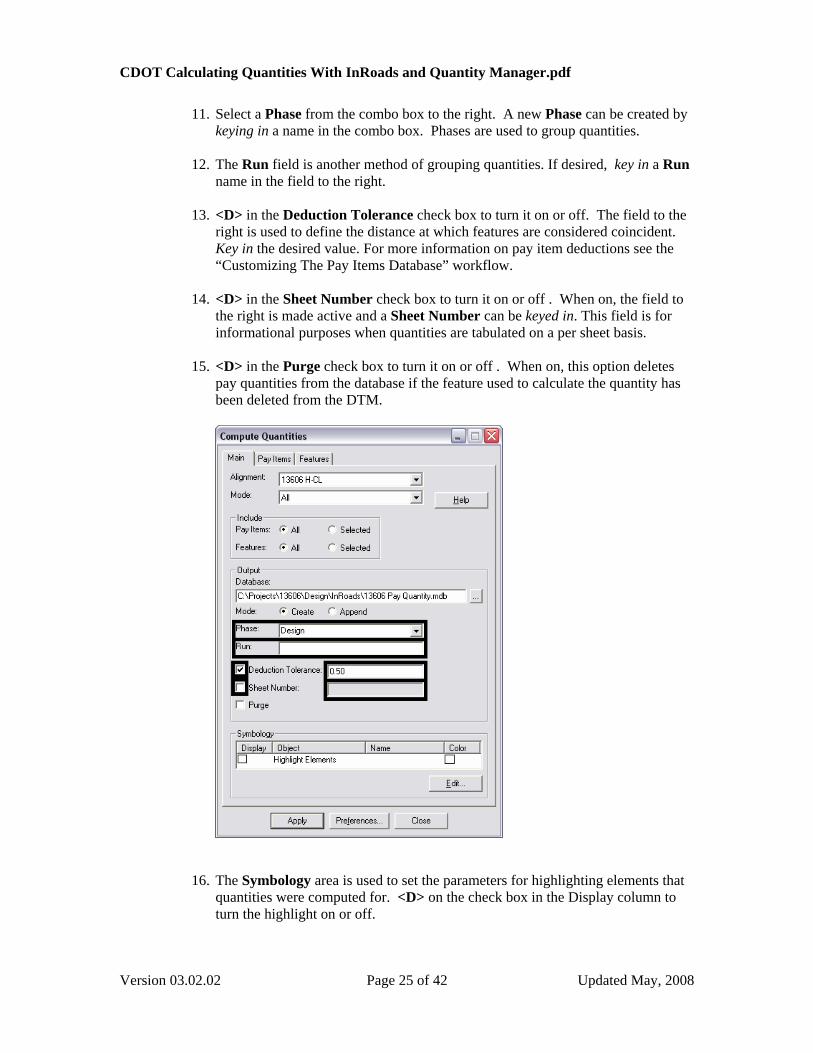
13. <D> in the Deduction Tolerance check box to turn it on or off. The field to the right is used to define the distance at which features are considered coincident. Key in the desired value. For more information on pay item deductions see the “Customizing The Pay Items Database” workflow.
14. <D> in the Sheet Number check box to turn it on or off . When on, the field to
the right is made active and a Sheet Number can be keyed in. This field is for informational purposes when quantities are tabulated on a per sheet basis.
15. <D> in the Purge check box to turn it on or off . When on, this option deletes
pay quantities from the database if the feature used to calculate the quantity has been deleted from the DTM.
11. Select a Phase from the combo box to the right. A new Phase can be createdkeying in a name in
12. The Run field is another method of grouping quantities. If desired, key in a Ru
name in the field
16. The Symbology area is used to set the parameters for highlighting elements that uantities were computed for. <D> on the check box in the Display column to rn the highlight on or off.
qtu
Version 03.02.02 Page 25 of 42 Updated May, 2008

CDOT Calculating Quantities With InRoads and Quantity Manager.pdf
The Pay Items Tab
7. <D> on the Pay Items tab to bring it to the front.
This tab is used if Pay Items in the Include area is set to Selected.
1 18. Select the Pay Items to be computed by clicking in the check box to its left.
Note: All of the pay items in the list can be selected by selecting the ‘Root’ directory at the top of the list. If a Category is selected (‘300 Bases’ in the example above) then all of the items in that category and its sub-categories are selected. If a Sub-Category is selected (‘603 Culverts and Sewers ‘ above) then all of the items in that sub-category are selected. Finally, individual pay items can be selected (‘606-00350 Guardrail Type 3 above).
The Features Tab This tab is used if Features in the Include area is set to Selected.
19. D> on the Features tab to bring it to the front.
or Ctrl key and then clicking on the desired surfaces.
<
20. In The Surface area, <D> on the desired surface. Multiple surfaces can be
selected by holding the Shift
Version 03.02.02 Page 26 of 42 Updated May, 2008

CDOT Calculating Quantities With InRoads and Quantity Manager.pdf
tive range of
atures can be selected by holding the Shift key then clicking on the first and eatures can be selected by
holding the Ctrl key then clicking on the desired features.
The Locator button can be used to identify features from the graphic elements displayed. The Ctrl key can be used with this option, however, the Shift key can not. To use it, <D> on the Locator button then <D> on the desired graphic element.
21. In the Features area, <D> on the desired Feature. A consecufelast feature in the range. A number of individual f
Version 03.02.02 Page 27 of 42 Updated May, 2008

CDOT Calculating Quantities With InRoads and Quantity Manager.pdf
22. <D> the Apply button to calculate the quantities.
23. When processing is completed, a message stating that the *.mdb file has been
created will appear in the lower left corner of the InRoads interface.
Version 03.02.02 Page 28 of 42 Updated May, 2008

CDOT Calculating Quantities With InRoads and Quantity Manager.pdf
24. <D> the Close button to dismiss the Compute Quantities dialog box..
Version 03.02.02 Page 29 of 42 Updated May, 2008

CDOT Calculating Quantities With InRoads and Quantity Manager.pdf
Working With Quantity Manager
Quantity Manager is a “Stand Alone” interface with the pay quantity database created by the InRoads Compute Quantities command. It is used to update the database with quantities not computed by InRoads and to create reports on the quantity data.
Opening Quantity Manager 1. Quantity Manager can be started from the InRoads menu by selecting Quantities >
Quantity Manager. It can also be started from the Start menu by selecting Start > All Programs > Bentley Civil Engineering > Quantity Manager. MicroStation and InRoads do not have to be running for Quantity Manager to work.
2. Select Project > Open. This option is used to load the database created by the InRoads Compute Quantities command. The ‘Connect to Database’ window will appear.
3. Set the Database pull down to: MS Access 2000. This is the format used by the
Compute Quantities command (SQL Server 2000 and Oracle formats can also be used by Quantity Manager)
Version 03.02.02 Page 30 of 42 Updated May, 2008

CDOT Calculating Quantities With InRoads and Quantity Manager.pdf
ired
4. In the ‘File’ box, type in the directory path and file name of the desired file. The ‘Browse’ button to the right of the field can be used to locate and select the desfile.
5. <D> the Connect button. (unless otherwise noted, the ‘User Name’ and ‘Password’
fields are left blank.) The database is now loaded into Quantity Manager and editingcan begin.
Properties And Preferences Information about the project that is used by Trns*port is stored in the Project Properties. A data file that facilitates the manual entry of quantities is attached to through the Project Preferences. This information should be filled in after the project is opened the first time. Properties Data 6. Select Project > Properties from the menu bar.
7. In the Project Properties dialog box, fill in the desired information for: Project Number (JPC Code), Description (optional), Unit System, and Spec. Year. This information is used when creating a data file to be used with Trns*port. After the data is entered, <D> the OK button.
Version 03.02.02 Page 31 of 42 Updated May, 2008

CDOT Calculating Quantities With InRoads and Quantity Manager.pdf
reference Data
P8. Select Project > Preferences from the menu bar.
9. From the Project Preferences dialog box, <D> the Browse icon for the Payitem field. Navigate to the C:\Projects\JPC#\Design\InRoads\CDOT Pay Items\
rectory and select the CDOOT_Payitem_Reference_v33.xml file. <D> the Open dibutton.
This file contains a searchable pay item code list that will allow users to select pay item data from the file instead of manually keying in the information.
10. <D> the OK button from the Project Preferences dialog box. This will dismiss
the Project Preferences dialog box.
Version 03.02.02 Page 32 of 42 Updated May, 2008

CDOT Calculating Quantities With InRoads and Quantity Manager.pdf
The data stored in the pay quantity database is now displayed in the Quantity Manager window. The window is divided into three parts; the Pay Items Table, the Quantities Table, and the Elements Table. The Pay Items table is used to add, edit, and delete Pay Items and Categories within the database. It is also used to add additional quantities. The Quantities Table is used to add, edit, and delete specific quantities within the database. The Elements Table is for informational purposes only.
The Pay Item Table The majority of the work done in Quantity Manager will be accomplished through the Pay Item Table. It is used to add or delete categories and pay items and can also be used to add quantity data to new or existing pay items within the pay quantity database. The s and Pay Items. Categories (and Sub-Categories) are used to divide the pay item data up into
digits of the pay item code. Sub-Categories are used to further divide pay items. The pay item contains data on each element that had a quantity calculated for it using its pay item code. It also contains quantity data that was added manually to the database.
Pay Item Table is broken down into two basic types of data; Categorie
manageable pieces. They work much like the folders in the project directory structure, with the pay items organized by the first three
Version 03.02.02 Page 33 of 42 Updated May, 2008

CDOT Calculating Quantities With InRoads and Quantity Manager.pdf
The Item
illustration below identifies categories, sub-categories, and pay items within the Pay Table’s tree view.
Information can be displayed within the Pay Item Table in two ways; the Payitem Tree and the Payitem Table. The Payitem Tree (illustrated above) shows only the Categoryand Pay Item names. The Payitem Table displays data specific to each pay item code used in the database. Below is an illustration of a sample Payitem Table:
Because the Payitem Tree is generally easier to work with, it will be used throughout this
orkflow.
e
isplaying Pay Item Information
w Displaying Information In The Quantity And Element Tables Information is displayed in the quantity and element tables based on items selected in thpay items table. D11. Expand the Pay Item Tree to show the desired pay item. <D> on the desired pay
item. The data for that pay item is displayed in the quantity table
o
Version 03.02.02 Page 34 of 42 Updated May, 2008

CDOT Calculating Quantities With InRoads and Quantity Manager.pdf
12. To show all of the items within a category or sub-category, <D> on the category in the pay item tree. All items within the category are displayed. In the example below, by selecting category 600, the pay items in subcategories 603,606,607,and 627 are displayed.
3. Items from multiple categories can be displayed by holding the Shift or Ctrl k y and
1 eselecting the desired categories or items.
ies for earthwork and many lump sum items will not be included in the dtm and, therefore, not incorporated into the database by the Compute Quantities
ies, and pay items may
4. To add a new category <D> on the category next in sequence to the one to be added. tegory Above… or Insert Category Below… This
Adding Data To The Database Quantit
command. To include these additional categories, sub-categorneed to be added to the database.
115. Right Click and select Insert Ca
displays the New Category Properties dialog box.
Version 03.02.02 Page 35 of 42 Updated May, 2008

CDOT Calculating Quantities With InRoads and Quantity Manager.pdf
Category Properties dialog box, key in the desired category name. Select OK to create the new category.
16. In the New
17. To add a new sub-category <D> on the category that will contain the new sub-category.
18. Right Click and select Insert Subcategory… This displays the New Category Properties dialog box.
Note: A new category can not be placed above or below the Root category they must be placed as sub-categories.
19. In the New Category Properties dialog box, Select OK to create the new category.
key in the desired category name.
Version 03.02.02 Page 36 of 42 Updated May, 2008

CDOT Calculating Quantities With InRoads and Quantity Manager.pdf
20. To add a new pay item <D> on the pay item next in sequence to the one to be
added (or <D> on the category the pay item is to be added to). 21. Right Click and select Insert Payitem Above… or Insert Payitem Below…
r Insert Payitem… if a category was selected above). The New Payitem
22. elect the Search
(oProperties dialog box appears.
S icon next to the Payitem Name field. This displays the dialog box. Select Payitem
23. Key in the desired value in the Payitem Filter. This will greatly reduce the number of items that will have to be scrolled through.
24. <D> on the pay item to be used, then select the Import icon.
25. The Select Payitem dialog box is dismissed and the New Payitems Properties dialog is populated with the selected data. Select the OK icon and the pay item is added to the Pay Item Tree,
Version 03.02.02 Page 37 of 42 Updated May, 2008

CDOT Calculating Quantities With InRoads and Quantity Manager.pdf
elect Insert Quantity… The New Quantity 26. To add a Quantity to a pay item <D> on the pay item then Right Click. 27. From the Right Click menu s
Properties dialog box is displayed.
Note: only the Measurement Basis, Computed Quantity, and Phase are required fields. The others may be filled in as desired so that the data included with the manually entered quantity will match those of the ones imported from InRoads.
28. Select the desired Measurement Basis. This is how the feature would have
been measured if there was one. There are three options; Area, Linear, and Each. Items measured by volume (Tons, Gallons, Cubic Yards, etc.) or area (Square Feet or Square Yards) should be set to ‘Area’. Those measured in Linear Feet or Linear Yards should be set to ‘Linear’. Items listed as Each or
ump Sum should use ‘Each’. Use the pull down menu to select the desired
nd the number of points in a random feature. For a Lump Sum payitem this should be 1. This number is not used for any calculation. It is here to make this payitem record consistent with those imported from the DTM. Key in the desired value.
30. Key in the desired Computed Quantity. If a formula was utilized, this field is the result of the computation. Using a pavement quantity example, a formula computing tons from square feet could be utilized. In this case, the tonnage is the Computed Quantity. Entering da to this field auto-fills the Rounded Quantity with the same value. Key in he desired value.
31. ey in the desired Rounded Quantity. Some payitems use a Rounding Factor hich is applied to the Computed Quantity. If the quantity being entered uses
Lentry.
29. Select the desired Measurement Value. This equates to the area of a shape feature, the length of a line feature, a
ta in t
Kw
Version 03.02.02 Page 38 of 42 Updated May, 2008

CDOT Calculating Quantities With InRoads and Quantity Manager.pdf
ted
83 84 feet. Key in the desired value.
32. Select the desired Deduction Quantity. The quantity of some payitems may be reduced by the presence of another payitem. While the payitem causing the reduction is not listed here, the amount of the reduction is. Key in the desired value.
33. Key in the desired Sheet Number. This is the name of the sheet upon which the quantities are located. This can be useful when computations are tabulated for individual sheets.
34. Key in the desired Run Name. This is a user-defined name. The run name is a grouping mechanism to permit segregation of quantities under the same payitem. It could be used to represent quantities of different stages or different alternatives.
35. Select the desired Phase. To assign the quantity to a particular phase. Note: if this data is to be exported to Trns*port the Phase must be set to Design.
36. Key in the desired Remarks. Key-in field for remarks. Limited to 256 characters.
37. ey in the desired Description. Key-in field for the Description. Limited to
38. d
a rounding factor, change the number in this field to the rounded compuquantity. For example, concrete pipe is rounded to 2 foot increments. Anfoot long pipe would be rounded to
K256 characters. Key in the desired Extended Description. Key-in field for the ExtendeDescription. Limited to 256 characters.
Note: it is not required to enter location data. However, this information maybe used when generating some reports.
Select the Location Tab. This tab is used to identify the l
39. ocation of the quantity in relation to an alignment.
Version 03.02.02 Page 39 of 42 Updated May, 2008
CDOT Calculating Quantities With InRoads and Quantity Manager.pdf
und the
.
left and right of the alignment that the quantity occurs.
imum Offset. Left of the alignment is negative, right
ered.
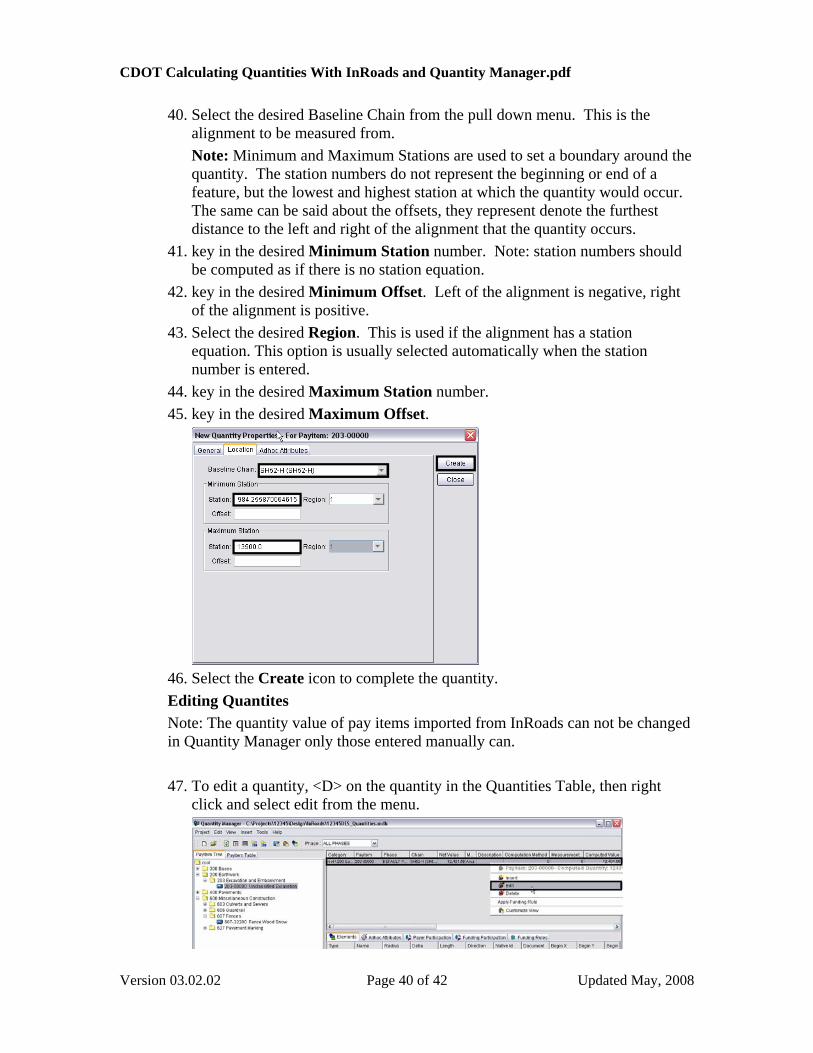
40. Select the desired Baseline Chain from the pull down menu. This is the alignment to be measured from. Note: Minimum and Maximum Stations are used to set a boundary aroquantity. The station numbers do not represent the beginning or end of a feature, but the lowest and highest station at which the quantity would occurThe same can be said about the offsets, they represent denote the furthest distance to the
41. key in the desired Minimum Station number. Note: station numbers should be computed as if there is no station equation.
42. key in the desired Minof the alignment is positive.
43. Select the desired Region. This is used if the alignment has a station equation. This option is usually selected automatically when the station number is ent
44. key in the desired Maximum Station number. 45. key in the desired Maximum Offset.
46. Select the Create icon to complete the quantity. Editing Quantites Note: The quantity value of pay items imported from InRoads can not be changed in Quantity Manager only those entered manually can. 47. To edit a quantity, <D> on the quantity in the Quantities Table, then right
click and select edit from the menu.
Version 03.02.02 Page 40 of 42 Updated May, 2008

CDOT Calculating Quantities With InRoads and Quantity Manager.pdf
the
ties dialog box. The illustration on the left
s
48. This displays the Edit Quantity Properties dialog box. This dialog box issame as the New Quantity Propershows the fields that can be edited for a quantity imported from InRoads. The illustration on the right shows fields that can be edited for a quantity that imanually entered.
Creating A Report Reports are used to display the quantity data in a meaningful way.
49. Display the Quantities to be reported on in the Quantities Table. This can be done by Selecting Pay items from the Pay Item Table (hold the Shift or Ctrl to select multiple pay items) or Select Edit > Select All.
50. Highlight the desired quantities in the Quantities Table.
in the report. 53. Key in the directory path and filename for the Report File Name. The ‘search’
button can be used to select the directory path and filename if desired. 54. Some report styles use the Starting Page Number to automatically number the
pages of the report. If this field is active, the desired page number can be keyed in.
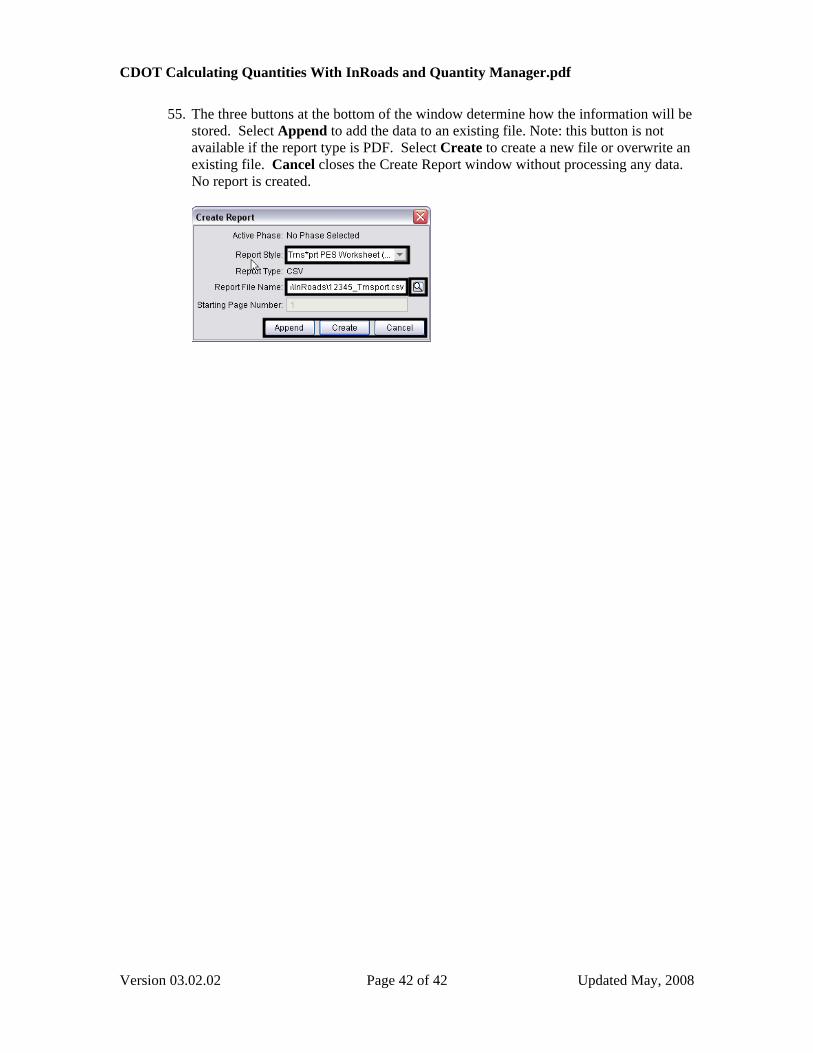
51. Select Tools > Reports > Create to open the ‘Create Report’ window. 52. Select the desired Report Style from the pull down menu. The Style name describes
the type of information to be contained
Version 03.02.02 Page 41 of 42 Updated May, 2008
CDOT Calculating Quantities With InRoads and Quantity Manager.pdf
Version 03.02.02 Page 42 of 42 Updated May, 2008
55. The three buttons at the bottom of the window determine how the information will bestored. Select Append to add the data to an existing file. Note: this button is not available if the report type is PDF. Select Create to create a new file or overwrite an existing file. Cancel closes the Create Report window without processing any data. No report is created.