
Banner Navigation Quick Review July 2016
16
Banner Navigation Quick Review July 2016
Transcript of Banner Navigation Quick Review July 2016

Banner Navigation Quick Review
July 2016

Page- 2 -
Introduction
This document describes common navigation procedures in Banner INB, which are covered in Banner Basics (Navigation) and Banner Tips and Tricks training.
This information will refresh your memory of how to navigate in Banner, but attending or repeating navigation training classes is strongly recommended.
View the current Banner training schedule at http://www.kent.edu/hr/register
Contents Introduction .......................................................................................................................................... - 2 -
Access Banner INB ................................................................................................................................ - 3 -
Open a Banner Form ............................................................................................................................. - 3 -
Open a Record When You Know the ID or Correct Name .................................................................... - 4 -
Next Block and Rollback ....................................................................................................................... - 4 -
Open a Second Form with Direct Access .............................................................................................. - 4 -
Find a Record when Multiple Names Are Returned ............................................................................. - 5 -
Search for a Record Using SOAIDEN and Query ................................................................................... - 6 -
Search for a Record Using Detail form SOAIDNS .................................................................................. - 7 -
Personalize Display Colors in Banner INB ............................................................................................. - 8 -
Display Form Names in the General Menu......................................................................................... - 10 -
Bookmark Forms in the My Banner Folder......................................................................................... - 11 -
Query Almost Any Banner Form ......................................................................................................... - 12 -
Create a QuickFlow (Banner Macro) .................................................................................................. - 14 -
Run a QuickFlow ................................................................................................................................. - 16 -
Quick Guide to Searching Names in INB:
To summarize, the methods available in INB are:
1. Search on almost any form using name or KSU ID (p. 5) when you have this information.
2. Use Extended Name Search (p. 6) to reduce the list of multiple similar/identical names. Query by address, gender, birth date.
3. Use SOAIDEN (p. 7) to see IDs and birthdates of similar/identical names.
4. Use SOAIDNS (p. 8) to view address, phone, and curriculum information for similar/identical names. You may also search for more information about similar/identical names in SPAIDEN or any personal information forms that are available to you.

Page- 3 -
Access Banner INB
STEP ACTION
1. Log in to FlashLine at ww.kent.edu or your campus homepage.
2. Open the Employee Dashboard.
3. Locate the Top Employee Resources panel.
4. Click the link Banner INB.
Note If Banner does not accept your ID and password, contact your supervisor.
Open a Banner Form
STEP ACTION
1. Type any form acronym in the Go To. field (for example, SPAIDEN) and press Enter.
2. Or you can ‘fish’ in the folders to find the form you want, and double-click on the yellow folder next to the folder name.
Note If you bookmark frequently-used forms (see p. 11), the form names will appear in your My Banner folder for quick access.

Page- 4 -
Open a Record When You Know the ID or Correct Name
STEP ACTION
1. Type the ID or name, press Tab or Enter.
2. If a match is found, both the ID and name field will fill in.
3. Click Next Block to populate the rest of the form with data
Next Block and Rollback
STEP ACTION
1. Remember to always click Next Block to populate the form with data.(or Ctrl-PageDown.
2. To return to the Key Block to search for another record, click the Rollback button. The ID will be highlighted. Type a new ID, or press delete and Tab to search again.
)
Open a Second Form with Direct Access
STEP ACTION
1. Open a second form to check detail, and then close it, returning to your original form. Do not open multiple forms and leave them open, as this can generate display errors.
2. Click the File menu, select Direct Access to display the Go To. field. (Or click F5)
3. Type the name of another form in the Go To. field and press Tab or Enter.
4. When the form opens, Next Block to view the data.
5. Exit the second form when you are done, returning to the first form.

Page- 5 -
Find a Record when Multiple Names Are Returned
# records
names
STEP ACTION
1. The ID and Name Extended Search form will pop up when there is more than one person in the Banner database under the name you typed.
2. Click the Results menu button to view other records retrieved. The Person/Non-Person Count Field shows how many records were matched.
3. If you can tell which record matches the person you are looking up, double-click on the name in the Results list to open the record.
4. If there are too many names, you must reduce the search results. Specify a City, State, Zip code, Birth Date, or Gender. You may use a combination of these search criteria.
5. Click the Reduce Search icon to re-run the search with the limitations that have been specified.
retrieved

Page- 6 -
Search for a Record Using SOAIDEN and Query
STEP ACTION
1. Click the ID field Search button to open the search Option List. Non-Person: department, vendor, or other entity. Alternate ID: search by SSN.
2. Click Person Search. The SOAIDEN form will open and present a query grid.
STEP ACTION
1. Type whatever accurate information you have into the fields. If you are not sure of the spelling of an item, leave the field blank.
2. Press the F8 key to execute the query. Review the results. You may have to use the scroll bar at the right side of the page to scroll through all of the names listed.
3. Press F7 to clear a query and type a new query.
4. Press F7 to clear a query and type a new query.
5. The query screen will close, opening the record in the form where you started. Go to the Next Block to see record details.

Page- 7 -
Search for a Record Using Detail form SOAIDNS
STEP ACTION
Note: If your search retrieved several similar names, and you cannot determine the correct match, you can quickly view more information about each person, in order to pinpoint the correct record.
1. From the SOAIDEN query results screen highlight a single record, then from the Options menu select Search and Display more Detail.
2. SOAIDNS will open with the name you highlighted in the first block. Click F8 to populate the form, retrieving the address and curriculum information. Scroll in the first block to view information for similar/identical names.
3. To view detail of another record, press F7 in SOAIDNS and retype your query in the first block. Press F8 to execute. You may now scroll the list of names viewing details.
Page- 8 -
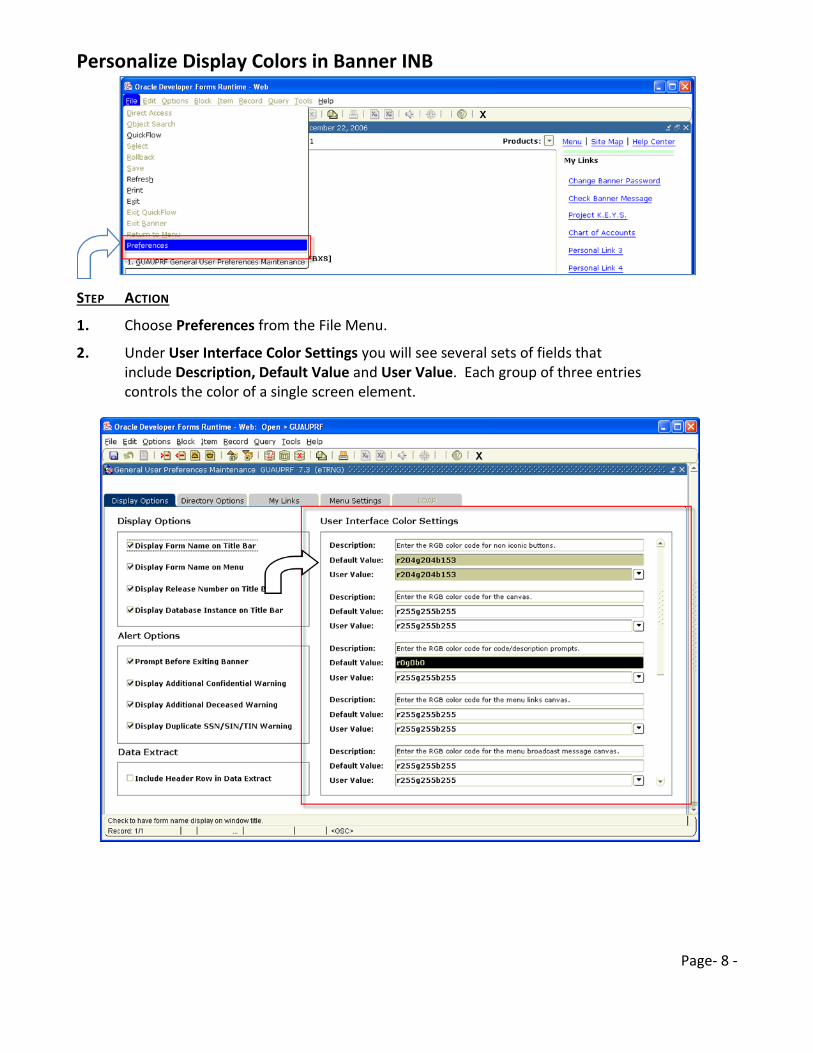
Personalize Display Colors in Banner INB
STEP ACTION
1. Choose Preferences from the File Menu.
2. Under User Interface Color Settings you will see several sets of fields that include Description, Default Value and User Value. Each group of three entries controls the color of a single screen element.

Page- 9 -
Personalize Display Colors (continued)
STEP ACTION
3. To change a color, look for the User Value field in one group. Click the arrow icon next to the field to display the color selector.
4. Click a color swatch to select it, and click OK.
5. Continue with colors of other screen elements. Experiment with colors to improve contrast for reading, or ease eyestrain by adding a pale green background.
6. Save the changes by clicking the Save icon then Exit the form by clicking in the icon bar.
7. These changes take effect immediately.

Page- 10 -
Display Form Names in the General Menu
STEP ACTION
1. Choose Preferences from the File menu.
2. Under Display Options, make sure the check box is checked for Display Form Name on Menu.
3. Save by clicking the Save icon , and Exit the Preferences form by clicking the in the icon bar.
4. You must Exit and restart Banner for this change to take effect. See below for what the general menu now looks like when you browse:

Page- 11 -
Bookmark Forms in the My Banner Folder
When you are in a form that you would like to add to the My Banner folder, simply right-click the mouse and a pop-up box will appear. Choose Add to Personal Menu. The next time you sign into Banner, the form will be in your My Banner folder.

Page- 12 -
Query Almost Any Banner Form
Not all forms are useful to query. You’ll generally want to query forms that have few fields, but report many rows (‘window blind forms’) or instances of data, for example:
1. Viewing students enrolled in a single class section (SFASLST)
2. Seeing student account transaction entries (TSAAREV)
3. Looking up all courses in a single subject (SCASRCH)
4. Viewing all buildings on all campuses. (SLABQRY)
General Instructions for performing a Query
1. Almost every form in Banner allows query.
2. Not every field in a form can be queried.
3. The F7 key hides form data.
4. Type query data to be matched into a blank field or fields.
5. The F8 key executes the query, retrieving all records that match what you typed.
6. You can query on more than one field simultaneously. (But remember that some fields do not permit query.)
7. Looking doesn’t hurt in Banner – if the query is unproductive, try again.
8. To clear a query and return to the original view, press F8 twice.
Describe what you wish to see more of – Banner will retrieve all records that match the exact information you type.
Page- 13 -
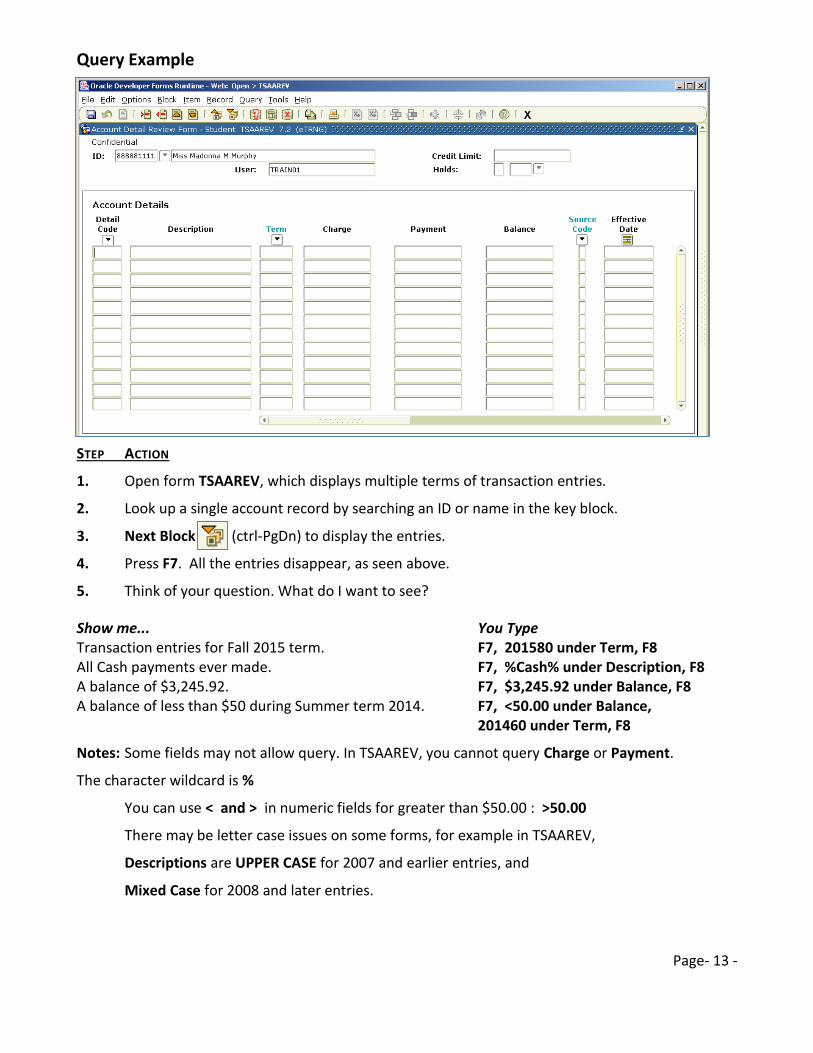
Query Example
STEP ACTION
1. Open form TSAAREV, which displays multiple terms of transaction entries.
2. Look up a single account record by searching an ID or name in the key block.
3. Next Block (ctrl-PgDn) to display the entries.
4. Press F7. All the entries disappear, as seen above.
5. Think of your question. What do I want to see?
Show me... You Type Transaction entries for Fall 2015 term. F7, 201580 under Term, F8 All Cash payments ever made. F7, %Cash% under Description, F8 A balance of $3,245.92. F7, $3,245.92 under Balance, F8 A balance of less than $50 during Summer term 2014. F7, <50.00 under Balance, 201460 under Term, F8
Notes: Some fields may not allow query. In TSAAREV, you cannot query Charge or Payment.
The character wildcard is %
You can use < and > in numeric fields for greater than $50.00 : >50.00
There may be letter case issues on some forms, for example in TSAAREV,
Descriptions are UPPER CASE for 2007 and earlier entries, and
Mixed Case for 2008 and later entries.
Page- 14 -
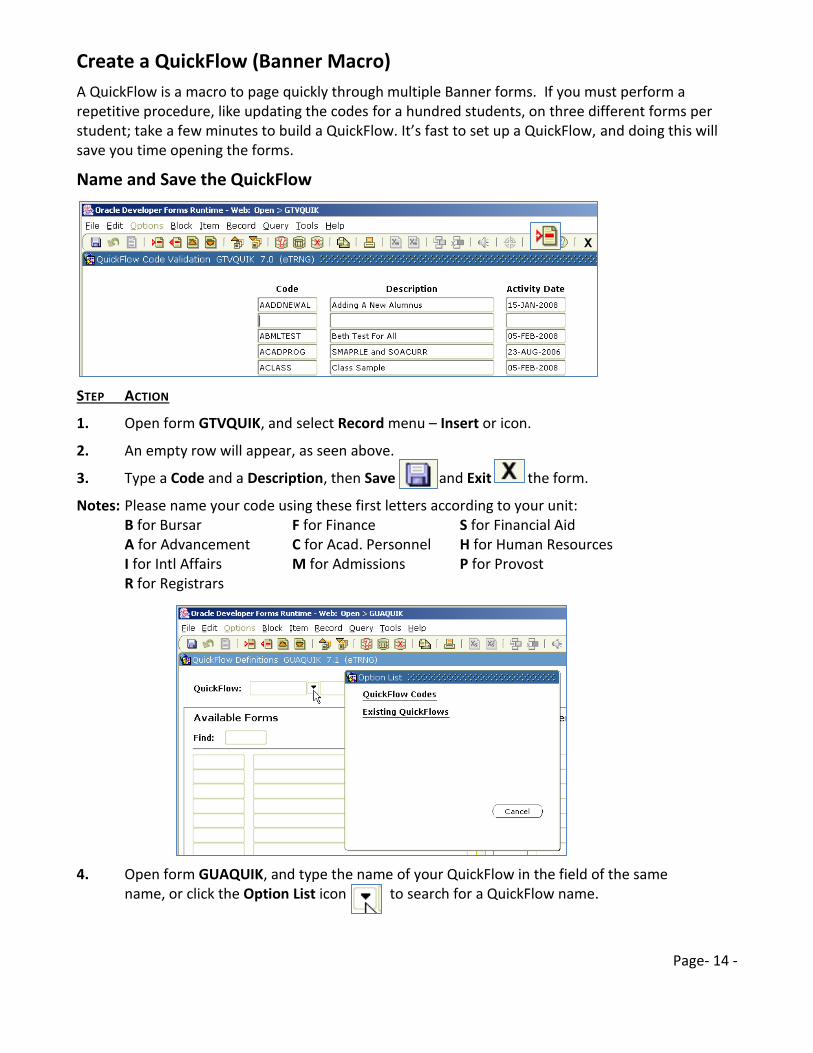
Create a QuickFlow (Banner Macro)
A QuickFlow is a macro to page quickly through multiple Banner forms. If you must perform a repetitive procedure, like updating the codes for a hundred students, on three different forms per student; take a few minutes to build a QuickFlow. It’s fast to set up a QuickFlow, and doing this will save you time opening the forms.
Name and Save the QuickFlow
STEP ACTION
1. Open form GTVQUIK, and select Record menu – Insert or icon.
2. An empty row will appear, as seen above.
3. Type a Code and a Description, then Save and Exit the form.
Notes: Please name your code using these first letters according to your unit: B for Bursar F for Finance S for Financial Aid A for Advancement C for Acad. Personnel H for Human Resources I for Intl Affairs M for Admissions P for Provost R for Registrars
4. Open form GUAQUIK, and type the name of your QuickFlow in the field of the same name, or click the Option List icon to search for a QuickFlow name.
Page- 15 -
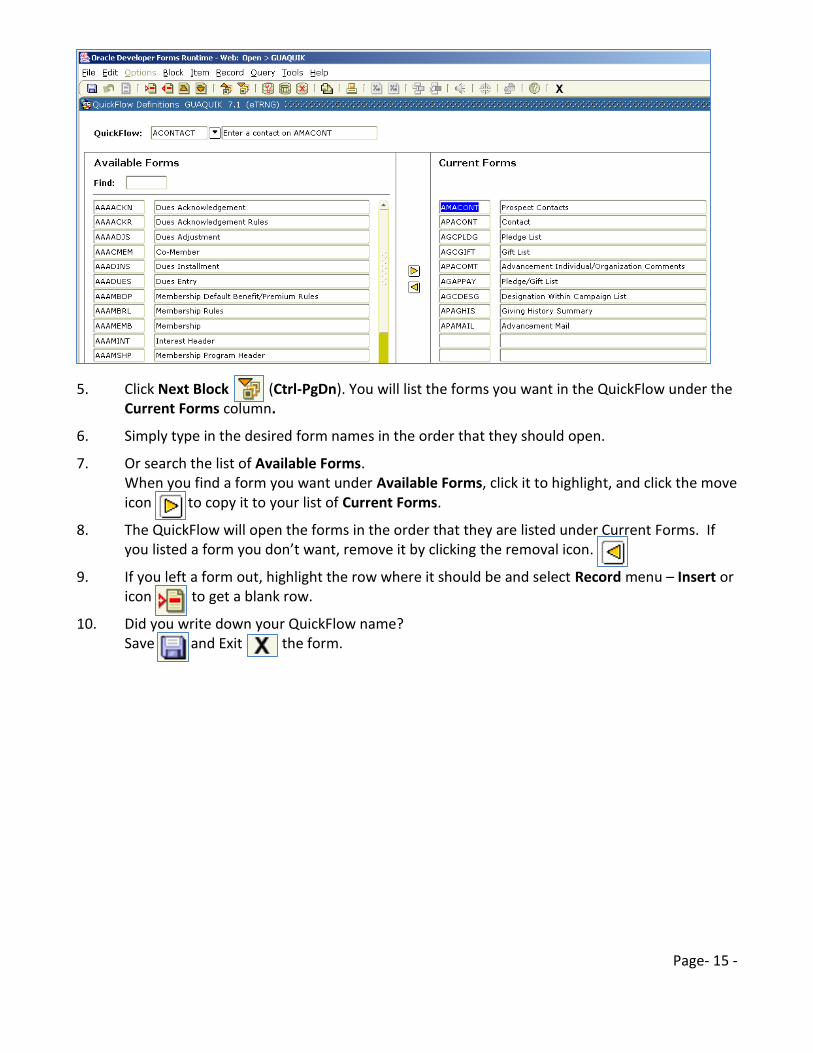
5. Click Next Block (Ctrl-PgDn). You will list the forms you want in the QuickFlow under the Current Forms column.
6. Simply type in the desired form names in the order that they should open.
7. Or search the list of Available Forms. When you find a form you want under Available Forms, click it to highlight, and click the move icon to copy it to your list of Current Forms.
8. The QuickFlow will open the forms in the order that they are listed under Current Forms. If you listed a form you don’t want, remove it by clicking the removal icon.
9. If you left a form out, highlight the row where it should be and select Record menu – Insert or icon to get a blank row.
10. Did you write down your QuickFlow name? Save and Exit the form.

Page- 16 -
Run a QuickFlow
1. To run a QuickFlow, select File menu – QuickFlow
2. The QuickFlow run form GUAQFLW will open. Type your QuickFlow name, or click to search for your QuickFlow
3. When you’re ready to begin, click . The first form from your list will open, ready for searching or data entry.
4. If you are entering data, be sure to Save before you Exit. When you Exit, the next form in the list will open.
5. When you exit the last form in the list, you’ll see the Quick Flow run box. You can another round of forms, or r to stop.