Banner 9 Basic Navigation Guide...Banner 9 Basic Navigation Guide Banner 9 – Basic Navigation 7...
24
Banner 9 – Basic Navigation User’s Guide September 2018
Transcript of Banner 9 Basic Navigation Guide...Banner 9 Basic Navigation Guide Banner 9 – Basic Navigation 7...

Banner 9 – Basic
Navigation
User’s Guide
September 2018

CONTENTS
Welcome to Banner Basic Navigation ........................................................................................................................... 3 What is Banner? ....................................................................................................................................................... 3 Features & Benefits .................................................................................................................................................. 3
Obtaining Banner Access ............................................................................................................................................... 3 Logging into Banner ....................................................................................................................................................... 4 Banner Landing Page/Dashboard .................................................................................................................................. 5 Navigating Banner – Main Menu ................................................................................................................................... 6
Banner Short Cuts .................................................................................................................................................... 7 Banner Pages ................................................................................................................................................................. 7
Page Features ........................................................................................................................................................... 8 Page Header........................................................................................................................................................... 8 Key Block ................................................................................................................................................................ 9 Sections ................................................................................................................................................................ 10 Bottom Section Navigation .................................................................................................................................. 10
Tools ............................................................................................................................................................................ 11 Related ......................................................................................................................................................................... 11 Resort or Move Columns ............................................................................................................................................. 12
Sort Order............................................................................................................................................................... 12 Move Columns ....................................................................................................................................................... 12
Notification Center Messages...................................................................................................................................... 12 Export to Excel ............................................................................................................................................................. 13 Data Display Options ................................................................................................................................................... 13
Required Fields ....................................................................................................................................................... 13 Dates ...................................................................................................................................................................... 14 Page Display options .............................................................................................................................................. 14 Lookup .................................................................................................................................................................... 14 Filtering Data .......................................................................................................................................................... 14
Wildcards in Banner..................................................................................................................................................... 15 Using the % Wildcard ............................................................................................................................................. 15 Using the _Wildcard ............................................................................................................................................... 16
Banner Online Help...................................................................................................................................................... 16 Page Names in Banner ................................................................................................................................................. 17 Banner Custom Menu .................................................................................................................................................. 18
Bookmarking Pages in My Banner .......................................................................................................................... 18 Appendix A................................................................................................................................................................... 23
PC Keyboard Shortcuts ........................................................................................................................................... 23 Mac Keyboard Shortcuts ........................................................................................................................................ 24 Banner 9 Support ................................................................................................................................................... 24

Banner 9 Basic Navigation Guide
Banner 9 – Basic Navigation 3 September 2018
WELCOME TO BANNER BASIC NAVIGATION
Welcome to the Banner 9-Basic Navigation User’s Guide. This guide is designed to provide you with the information needed to successfully access and navigate in Banner and includes the following topics:
Accessing Banner
Navigating in Banner
Display Options
Bookmarking Using My Banner
Keyboard Shortcuts
WHAT IS BANNER?
Banner is an administrative suite of integrated applications used to run the information systems used by the University. Banner allows the integration of data between Student, Finance, Human Resources, and Advancement systems. Banner is a web-based application, accessible using internet browsers. The previous version of Banner was Banner INB. The current version of Banner is Banner AppNav (Application Navigator) or Banner 9. Note: To access Banner off campus, a VPN (virtual private network) connection with the EWU network or remote desktop must be established. Contact the Help Desk at 359-2247 or visit https://sites.ewu.edu/it/services/access-passwords-storage/vpn/ to set up a VPN connection. EWU uses the following Banner modules:
Banner Student
Financial Aid
Banner Finance
Banner Human Resources/Payroll
FEATURES & BENEFITS
The Banner 9 Welcome screen offers a modern web page interface for navigating throughout Banner pages, offering multiple ways to search. for navigating throughout Banner Admin pages, offering multiple ways to search.
Reorganization of the Banner Administrative menu.
Banner Admin pages are transformed into web page-like versions of INB forms.
Mobile device compatible.
Internet based and with full browser support.
OBTAINING BANNER ACCESS
The University currently has three user access levels: Student, Finance, and Financial Aid. The ability to view, access, and edit data vary with each access level.
Banner 9 Basic Navigation Guide
Banner 9 – Basic Navigation 4 September 2018
For Student and Financial Aid access:
Enroll and complete the Banner 100-Basic Navigation course. Sign up for the course from the Training Scheduler at https://web.ewu.edu/trainsched/. Complete and return the Banner 100-Basic Navigation exam.
Submit the Banner Student Access form found on the Banner Help website at https://sites.ewu.edu/it/services/training-development/banner-help/.
For Finance access:
Enroll and complete the Banner 100-Basic Navigation course. Sign up for the course from the on-line Training Scheduler at https://web.ewu.edu/trainsched/ Complete and return the Banner 100-Basic Navigation exam.
Enroll and complete the Banner Finance 201-Introduction to Finance course. Sign up for the course from the online Training Scheduler found at https://web.ewu.edu/trainsched/.
Submit the Banner Finance Access security form found at https://sites.ewu.edu/hr/files/2017/10/Banner-Finance-Access-
Request-Form.pdf
LOGGING INTO BANNER
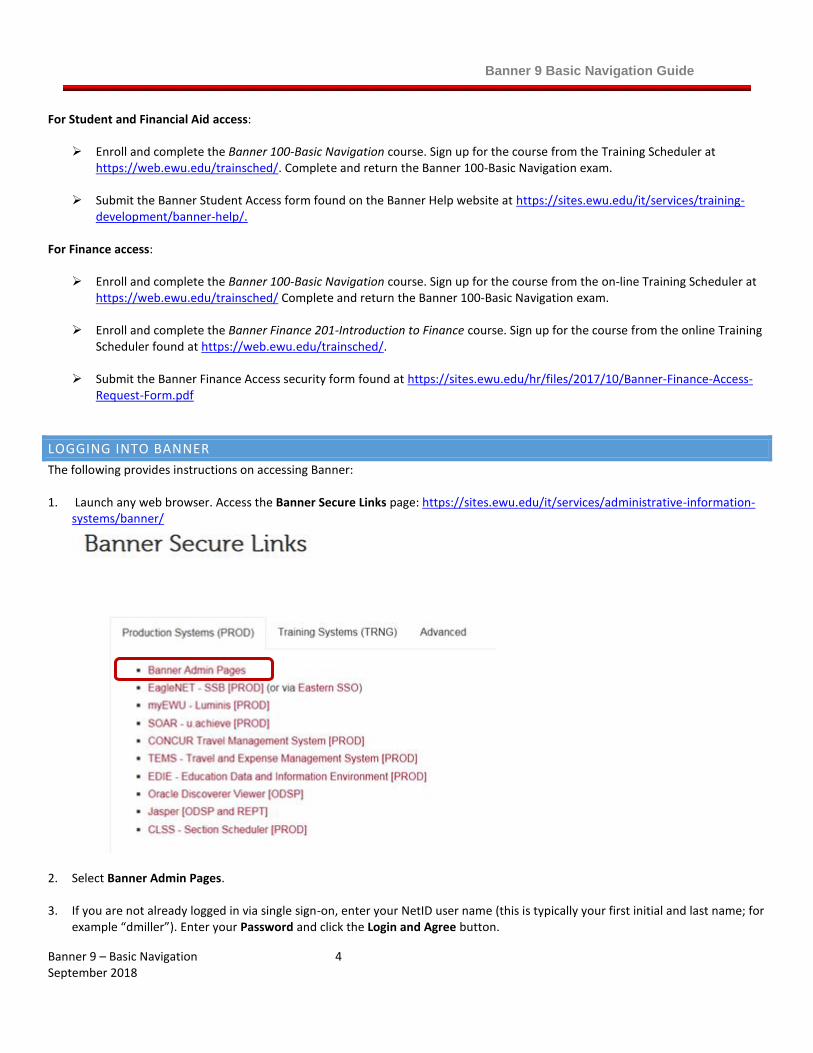
The following provides instructions on accessing Banner: 1. Launch any web browser. Access the Banner Secure Links page: https://sites.ewu.edu/it/services/administrative-information-
systems/banner/
2. Select Banner Admin Pages.
3. If you are not already logged in via single sign-on, enter your NetID user name (this is typically your first initial and last name; for example “dmiller”). Enter your Password and click the Login and Agree button.

Banner 9 Basic Navigation Guide
Banner 9 – Basic Navigation 5 September 2018
If you do not know your password click the Need your NetID or password on the Eastern Single Sign-on page, or contact the Help Desk at 359-2247.
BANNER LANDING PAGE/DASHBOARD
After logging in, the Banner landing page displays. Menus, pages, and modules are selected from this screen using the search feature or icons in the left-hand column.
1. The landing page provides the following icons that are used to navigate Banner. The icons display continuously regardless of the page displayed.
Banner 9 Basic Navigation Guide
Banner 9 – Basic Navigation 6 September 2018
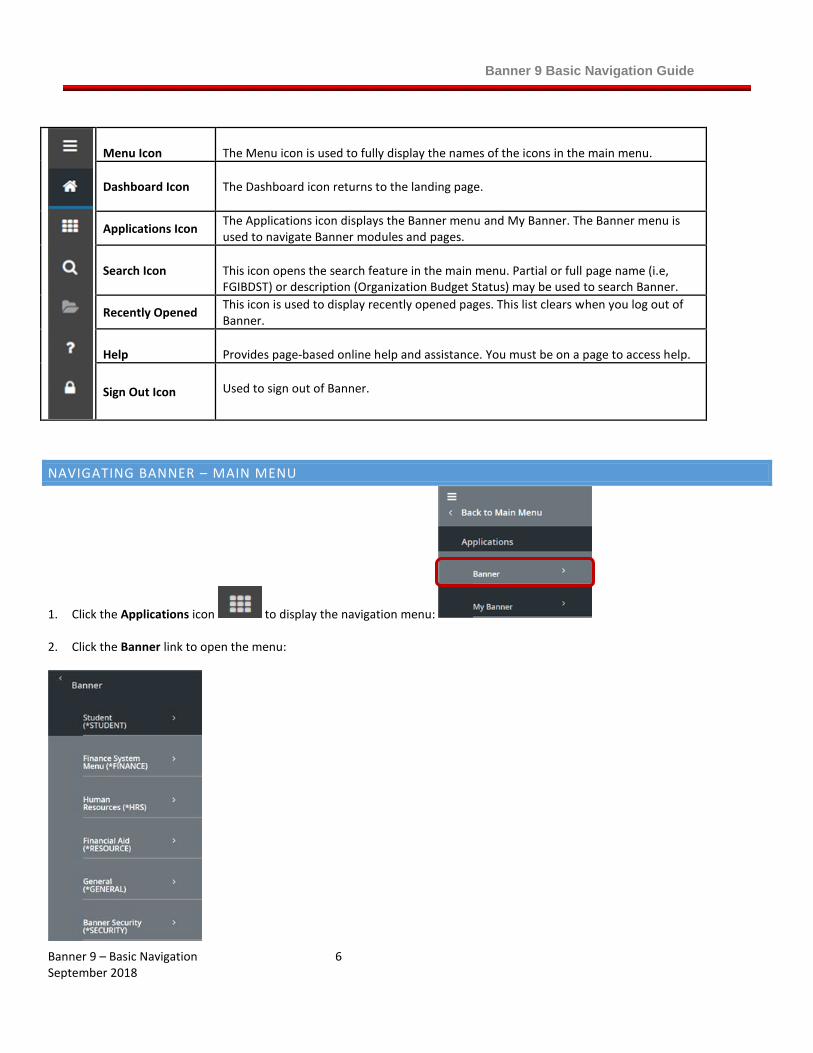
Menu Icon
The Menu icon is used to fully display the names of the icons in the main menu.
Dashboard Icon
The Dashboard icon returns to the landing page.
Applications Icon The Applications icon displays the Banner menu and My Banner. The Banner menu is used to navigate Banner modules and pages.
Search Icon
This icon opens the search feature in the main menu. Partial or full page name (i.e, FGIBDST) or description (Organization Budget Status) may be used to search Banner.
Recently Opened This icon is used to display recently opened pages. This list clears when you log out of Banner.
Help
Provides page-based online help and assistance. You must be on a page to access help.
Sign Out Icon
Used to sign out of Banner.
NAVIGATING BANNER – MAIN MENU
1. Click the Applications icon to display the navigation menu: 2. Click the Banner link to open the menu:

Banner 9 Basic Navigation Guide
Banner 9 – Basic Navigation 7 September 2018
The Banner menu contains subfolders, the modules, and the available pages based on the module selected (Student,
Finance System, etc.).
Click the desired module to open the menu and drill down to the desired page. DIRECT NAVIGATION If you know the page name or page description, use the Search field on the landing page or the Search icon.
Search Icon
This icon opens the search feature in the main menu. Partial or full page name (i.e, FGIBDST) or description (Organization Budget Status) may be used to search Banner.
BANNER SHORT CUTS
Banner 9 has a set of keyboard shortcuts on the landing page, which you can review by clicking on Keyboard Shortcuts in the bottom
right corner of the page: . Please see Appendix A for a full list of keyboard shortcuts. To control the screen size use the following keyboard short cuts: screen zoom: CTRL = (increase), CTRL – (decrease), CTRL 0 (reset to 100%).
BANNER PAGES
A Banner page is used to view, access, and edit information in the database. The pages available for each user depends on the user access level. The access level determines the ability to view, edit and update pages. The following provides steps to navigate a Student page.
1. Click the Applications icon: .
2. Select Banner and the desired system (for example; Student (*STUDENT) or Finance System Menu (*FINANCE) etc.).
3. Drill down in the desired menu to locate the applicable page.

Banner 9 Basic Navigation Guide
Banner 9 – Basic Navigation 8 September 2018
The Student menu displays:
4. Select the General Person sub-menu. Select General Person Identification (SPAIDEN).
The General Person Identification (SPAIDEN) page displays.
PAGE FEATURES
When a page is accessed, there are several features, icons, and keys available for navigating in the page. The following features are used to navigate page.
PAGE HEADER
The page header is part of the basic navigation and contains the following items from left to right:
Page close icon “X” – Always use this icon to close the page.
Banner 9 Basic Navigation Guide
Banner 9 – Basic Navigation 9 September 2018
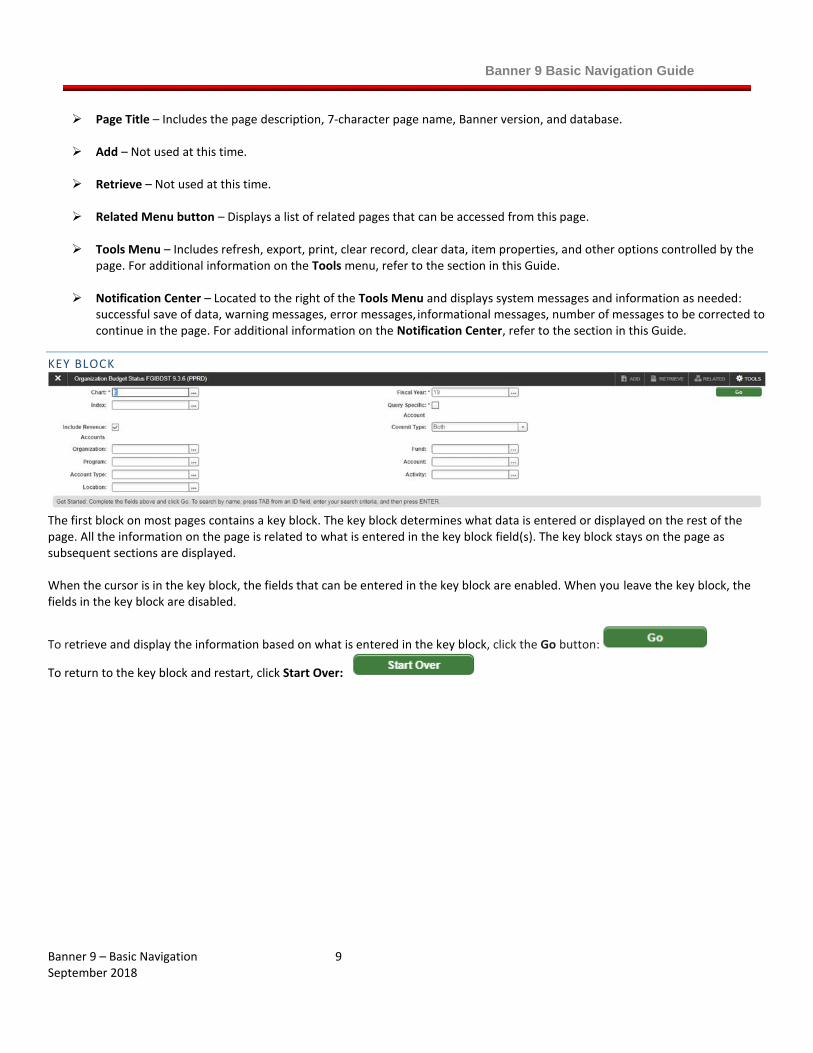
Page Title – Includes the page description, 7-character page name, Banner version, and database.
Add – Not used at this time.
Retrieve – Not used at this time.
Related Menu button – Displays a list of related pages that can be accessed from this page.
Tools Menu – Includes refresh, export, print, clear record, clear data, item properties, and other options controlled by the page. For additional information on the Tools menu, refer to the section in this Guide.
Notification Center – Located to the right of the Tools Menu and displays system messages and information as needed: successful save of data, warning messages, error messages, informational messages, number of messages to be corrected to continue in the page. For additional information on the Notification Center, refer to the section in this Guide.
KEY BLOCK
The first block on most pages contains a key block. The key block determines what data is entered or displayed on the rest of the page. All the information on the page is related to what is entered in the key block field(s). The key block stays on the page as subsequent sections are displayed. When the cursor is in the key block, the fields that can be entered in the key block are enabled. When you leave the key block, the fields in the key block are disabled.
To retrieve and display the information based on what is entered in the key block, click the Go button:
To return to the key block and restart, click Start Over:

Banner 9 Basic Navigation Guide
Banner 9 – Basic Navigation 10 September 2018
SECTIONS
Pages are divided into sections that contain additional details for the key information. A section can represent one record or multiple records depending on the type of information. Each section contains related information. Sections of data are accessed by scrolling up and down the page. They can be opened or collapsed by clicking on the arrow on the far left side of the section header. Some sections are accessed by using tabs that group information in a meaningful way.
If available, the sections may have a header that includes icons for the following actions: Insert – Use this to insert records in the section. Delete – Use this to delete records in the section. Copy – Use this to copy records in the section. More Information – This icon displays if supplemental data can be entered for the record. The icon is displayed with a check mark
if supplemental data already exists for the record. Filter – Use this to filter records in the section.
BOTTOM SECTION NAVIGATION
The bottom of the section of the page contains icons to be used for navigation, perform functions, and display additional information.
Previous Section – Moves backwards in the sections (Alt+ Page Up). Next Section – Moves to the next section of the page (Alt+ Page Down). Activity Date – Current system time. This displays the time stamped for the record if created or modified. Activity User – Name of account user creating or modifying the record. Save – Saves any data added or modified.

Banner 9 Basic Navigation Guide
Banner 9 – Basic Navigation 11 September 2018
TOOLS
Tools allow additional actions, options, or page layout selections. To view Tools, click Tools in the top right-hand corner. Please note: Banner Document Management is not used at this time.
RELATED
The Related option is used to display additional related pages, based on the page displayed. To view related pages, click on Related in the top right hand side.

Banner 9 Basic Navigation Guide
Banner 9 – Basic Navigation 12 September 2018
RESORT OR MOVE COLUMNS
SORT ORDER
In a grid layout, values for a field can be sorted. An up or down arrow next to the field name indicates the current sort order for the field. Click the field label to reverse the sort order.
MOVE COLUMNS
Some pages allow columns to be moved. Click the desired column and drag and drop to the desired location: Note: Some columns are locked and cannot be moved.
NOTIFICATION CENTER MESSAGES
Various message notification types may display when working in Banner 9. The Notification Center is located on the top right hand
side next to Tools only if a notification is displayed . To clear the notification click on the number to toggle off.
Error Notification – Displays a “!” in a circle when message is displayed.
Info Notification – Displays an “i” in a circle when a message is displayed. May display an OK button that you must select to continue.

Banner 9 Basic Navigation Guide
Banner 9 – Basic Navigation 13 September 2018
Success Notification – Displays a checkmark in a circle when a message is displayed.
Warning Notification – Displays a “!” in a yield sign when a message is displayed.
EXPORT TO EXCEL
Data may be exported to Excel. From the desired page, click Tools in the top right-hand corner. Select Export from the list:
Depending on the browser used a download option displays at the bottom on the page: . Click or select to open. Click the Excel icon in the system tray to open the file if Excel does not automatically open:
DATA DISPLAY OPTIONS
REQUIRED FIELDS
An asterisk (*) displayed next to a field name indicates that the field requires a value. If you leave a section or a page without entering information in a required field, an error message displays in the Notification Center.

Banner 9 Basic Navigation Guide
Banner 9 – Basic Navigation 14 September 2018
DATES
Dates can be entered directly or use the calendar icon. The date format is mmddyyyy. To enter the current date, type any letter and [TAB].
PAGE DISPLAY OPTIONS
The default view is typically compact. To change the view, click Tools in the top right-hand corner. In the Page Layout section, select either Compact or Expand:
LOOKUP
The Lookup feature is used to quickly find a value for a field. The Lookup button (…) next to a field indicates that the field has the
lookup feature: Click the Lookup button (…), enter a value, and press Enter to display results that match the filter criteria (if applicable). Select a value and click OK, or double-click a value to return the value to the calling page.
FILTERING DATA
There are multiple ways to filter data depending on the page and field available. Data may be filtered if the Filter icon is displayed in
the header or section: Use the following steps to filter data in a section.
1. Click the Filter (or F7) icon for the section:

Banner 9 Basic Navigation Guide
Banner 9 – Basic Navigation 15 September 2018
2. Choose the desired field or select another field (if applicable) from the Add Another Field drop down list.
3. Enter a value for the field you selected.
Optional: Some pages automatically offer additional filter options. Choose a desired field or select an additional field from the Add Another Field dropdown, select the desired field, and enter a value for the field:
When all filter criteria are entered, click Go or (F8) to display the filter results. The number of records retrieved is displayed at the bottom of the section. The results for a field can be sorted in ascending or descending order by clicking on the field label in the column header. You can reverse the sort order by clicking the field label.
WILDCARDS IN BANNER
Two wildcard characters are used in Banner: the percent sign “%” and an underscore “_”. Wildcards are used to fill in unknown characters in a page name or a search criterion. The search results returned depends on the number of items that satisfy the search criteria.
WILDCARD FUNCTION
% The percent sign wildcard is used when one or more consecutive characters are unknown. For example, when searching for a page, FGI% will result in a list of all pages that begin with the letters FGI such as FGIBAVL, FGIENCD, FGITRND, etc.
_ The underscore wildcard is used when a single character is unknown. For example, a search using FGI_AVL returns FGIBAVL (this is the only page that satisfies the search).
USING THE % WILDCARD
When utilizing the lookup option you may perform either exact match lookups or partial match lookups when some of the information is unknown. To perform a partial match lookup, use a “%” to replace the unknown information.
1. Select the lookup icon (…):
2. Enter a partial value followed by % in the desired field:

Banner 9 Basic Navigation Guide
Banner 9 – Basic Navigation 16 September 2018
1. Click Go or press F8. The results of the query using the wildcard (%) yield any names that match the partial information entered.
USING THE _WILDCARD
The underscore is used to replace a single unknown character.
1. From the Search field, enter the known values and an underscore (_) for the unknown character.
BANNER ONLINE HELP
Online help is available from any page. Access the desired page and click the Help icon in the left-hand column: . A new browser window opens with help information specific to the page. If desired, the page can be printed. Click the Printer icon in the top right-hand side to print.
You may also use the scroll bar in the left-hand column of page names to view help for additional pages.

Banner 9 Basic Navigation Guide
Banner 9 – Basic Navigation 17 September 2018
PAGE NAMES IN BANNER
Every Banner page has an abbreviated seven character page name. Pages can be referred to based on their page description or from the seven character page name. In the example below, the page is referred to as the “SPAIDEN” page or the General Person Identification page. The seven characters are located in positions one through seven.
Position 1
S
Position 2 P
Position 3 A
Position 4 I
Position 5 D
Position 6 E
Position 7
N POSITION 1- Identifies the Banner product owning the page, report, process, or table. The boldface text in the table below represents the Banner products used at EWU.
Position 1 for Banner Products
F Finance R Financial Aid
G General S Student
S Banner Security H Human Resources
POSITION 2 - Identifies the application module owning the page, report, process or table. Unique to the product identified in position 1.
Position 2 for Banner Student
A Admissions
C Catalog
E Support Services
F Registration/Fee Assessment
G General Student
H Grades/Academic History
I Faculty Load
K Reserved for SCT International
L Location Management
M CAPP
O Overall
P Person
R Recruiting
S Schedule
T Validation page/table
U Utility
Position 2 for Banner Financial Aid
A Applicant Processing
B Budgeting
C Record Creation
E Electronic Data Exchange
F Funds Management
H History and Transcripts
J Student Employment
L Logging
N Need Analysis
O Common Functions
P Packaging and Disbursements
R Requirements Tracking
S Student System Shared Data
T Validation page/table
U Utility
Student Person Application Identification

Banner 9 Basic Navigation Guide
Banner 9 – Basic Navigation 18 September 2018
Position 2 for Banner General Position 2 for Banner Finance
E Event Management A Accounts Payable
J Job Submission B Budget and Position Control
L Letter Generation F Fixed Assets
O Overall G General Ledger
P Purge O Finance Operations
S Security P Purchasing / Procurement
T Validation page/table R Research / Grant & Contract Accounting
U Utility T Validation page/table
X Cross Product
POSITION 3 - Identifies the type of page, report, process or table.
Types of pages (also called objects)
• Inquiry • Application • Query • Maintenance
POSITION 4 through 7 - Identifies a unique four-character code for the page, report, process or table, typically an abbreviation of the page description. Below is a list of commonly used codes.
* * *IDEN Identification
* * *PINC Position Incumbent
* * *STDN Student Relation
* * *PERS Person
* * *BAVL Budget Availability Status
* * *STAT Status
* * *PSWD Password
* * *TRND Transaction Detail
* * *BDST Organization Budget Status
* * *TBAL Trial Balance
* * *GLAC General Ledger Activity
BANNER CUSTOM MENU
The My Banner feature is used to “bookmark” frequently used Banner pages. Adding pages to My Banner eliminates the need to navigate through menu paths to access frequently used pages. It also eliminates the need to memorize page names or keep a separate written list of frequently accessed pages.
BOOKMARKING PAGES IN MY BANNER
The following provides instructions on adding Banner pages to My Banner.
1. From the landing page, type “my banner” in the search field. Select My Banner Maintenance (GUAPMNU).

Banner 9 Basic Navigation Guide
Banner 9 – Basic Navigation 19 September 2018
2. The My Banner Maintenance page displays. Confirm the Type field displays Oracle Forms module:
If Oracle Forms module does not display, select it from the drop-down list:
3. There are two ways to select pages/queries/menus; search for an object in the list, or query for the desired page.
Search the List: Click any item in the Object list or Description list (in the left column) to activate the pagination controls at the bottom of the list:
Scroll through the list to find the desired page or object. Double click the desired oject or description to select:

Banner 9 Basic Navigation Guide
Banner 9 – Basic Navigation 20 September 2018
Click the Insert Selection button to add the object to the Object Selection list (the right column). Continue to scroll through the Object list or Description list
to select additional objects. Once completed, click the Save button in the lower right-hand side of the page: Note: To change the sort order of the Object list or Description list, click the column header. A sort icon appears:
. Click the arrow to change the sort order.
Query: To query an object name (or partial object name) or object desciption (or partial object description), click any item in the Object list or Description list (in the left column) to activate the Filter icon:
Click the Filter icon: . A query section opens at the top of the page:
Enter the 7-character page name (for example FOIDOCH) in the Object field, or the page description (for example Document History) in Description field and click Go:
Important Note: The Description field is case-sensitive.
If the full 7-character page name or the page description is not known, use the wild card (%) to search.
Based on the filter criteria, the page(s) displays in the Object list. Double click the object or description to select.
Click the Insert Selection button to add the object to the Object Selection list (the right column).

Banner 9 Basic Navigation Guide
Banner 9 – Basic Navigation 21 September 2018
Repeat all the steps in this section to continue adding pages. Once completed, click the Save button in the lower
right-hand side of the page:
Note: If desired, an additional description may be added to items in the Object Selection list. Click the applicable object description and type additional text:
4. To view the My Banner list, log out of Banner and log back in. Click the Applications icon in the left-hand column.
Select My Banner
5. To remove items from My Banner, from the landing page, type “my banner” in the search field. Select My Banner Maintenance (GUAPMNU).

Banner 9 Basic Navigation Guide
Banner 9 – Basic Navigation 22 September 2018
6. The My Banner Maintenance page displays. Double click to select the applicable item in the Object Selection column. Click Remove Selection:
7. Once completed, click the Save button in the lower right-hand side of the page:
8. To view the changes in the My Banner list, log out of Banner and log back in.

Banner 9 Basic Navigation Guide
Banner 9 – Basic Navigation 23 September 2018
APPENDIX A
PC KEYBOARD SHORTCUTS
Action
Banner 9 Key Stroke
Cancel Page, Close Current Page, or Cancel Search/Query (in Query mode)
CTRL+Q
Choose/Submit ENTER
Clear All in Section SHIFT+F5
Clear One Record SHIFT+F4
Clear Page or Start Over F5
Count Query SHIFT+F2
Delete Record SHIFT+F6
Down/Next Record Down Arrow
Duplicate Item F3
Duplicate Selected Record F4
Edit CTRL+E
Execute Filter Query F8
Exit CTRL+Q
Expand/Collapse Drop-down Field ALT+Down Arrow
Export SHIFT+F1
First Page CTRL+Home
Insert/Create Record F6
Last Page CTRL+End
List of Values F9
More Information CTRL+SHIFT+U
Next Field of Item TAB
Next Page Down Page Down
Next Section ALT+Page Down
Open Menu Directly CTRL+M
Open Related Menu ALT+SHIFT+R
Open Tools Menu ALT+SHIFT+T
Page Tab 1, Page Tab 2, and so on CTRL+SHITF+1 CTRL+SHITF+2, etc.
Previous Field or Item SHIFT+TAB
Previous Page Up Page Up
Previous Section ALT+Page Up
Print CTRL+P

Banner 9 Basic Navigation Guide
Banner 9 – Basic Navigation 24 September 2018
MAC KEYBOARD SHORTCUTS
Action
Banner 9 Key Stroke
Display Open Items CTRL + Y
Search CRTL + Shift + Y
Help CTRL + Shift + L
Sign Out CTRL + Shift + F
Open the Main Menu CTRL + M
Close Main Menu Ctrl + Alt + M
Open Related Menu Alt + Shift + R
Open Tools Menu Alt + Shift + T
GO Button /Choose / Submit/Action Return/Enter
Next Section ALT + Page Down
Previous Section ALT + Page Up
Cancel page, Exit, Close Current Page, Cancel Search or Query Ctrl + Q
Cancel Action Esc
Next Field/Item Tab
Page Tab 1, Page Tab 2, Page Tab 3, … CTRL + Shift + 1, CTRL + Shift + 2, CTRL + Shift + 3,
Previous Field/Item Shift + Tab
BANNER 9 SUPPORT
For additional information and resources, visit the Banner 9 Training and Documentation page: https://sites.ewu.edu/it/services/administrative-information-systems/banner/banner-9-upgrade/training-documentation/ For technical assistance, contact the Help Desk: https://support.ewu.edu/support/home