n OpenStack 4 - VMware Integrated OpenStack Administrator Guide Modified on 14 Nov 2017 VMware...
160
VMware Integrated OpenStack Administrator Guide Modified on 14 Nov 2017 VMware Integrated OpenStack 4.0
Transcript of n OpenStack 4 - VMware Integrated OpenStack Administrator Guide Modified on 14 Nov 2017 VMware...

VMware IntegratedOpenStack AdministratorGuideModified on 14 Nov 2017VMware Integrated OpenStack 4.0

VMware Integrated OpenStack Administrator Guide
VMware, Inc. 2
You can find the most up-to-date technical documentation on the VMware website at:
https://docs.vmware.com/
If you have comments about this documentation, submit your feedback to
Copyright © 2015–2017 VMware, Inc. All rights reserved. Copyright and trademark information.
VMware, Inc.3401 Hillview Ave.Palo Alto, CA 94304www.vmware.com

Contents
About This Book 6
Updated Information 7
1 About VMware Integrated OpenStack 8
Internationalization 8
OpenStack Foundation Compliance 8
VMware Integrated OpenStack System Requirements 9
OpenStack Instances in vSphere Web Client 12
Monitor OpenStack Instances in the vSphere Web Client 15
Customer Experience Improvement Program 16
2 Managing Your VMware Integrated OpenStack Deployment 17
Managing Your Deployment Configuration 17
Managing Your Network Configuration 27
Adding Capacity in the vSphere Web Client 36
Configure the Backup Service for Block Storage 39
Back Up the VMware Integrated OpenStack Deployment 41
Restore VMware Integrated OpenStack from a Backup 42
Failure Recovery 44
VMware Integrated OpenStack Log File Locations 46
Upgrade to VMware Integrated OpenStack 4.0 48
Updating Your VMware Integrated OpenStack Deployment 54
Customize the Dashboard Logos and Background 58
Use Profiling to Trace OpenStack Deployments 62
Configure NUMA for Use With VMware Integrated OpenStack 64
3 Managing OpenStack Projects and Users 66
Create an OpenStack Project 66
Modify a Project 67
Working with Security Groups 68
Create a Cloud User Account in OpenStack 75
Modify a User Account 76
4 Working with Instances in OpenStack 77
Import vSphere VMs into VMware Integrated OpenStack 77
Create a Snapshot from an Instance 82
Control the State of an Instance 82
VMware, Inc. 3
Track Instance Use 82
Use DRS to Control OpenStack Instance Placement 83
Using Affinity and Anti-Affinity to Place OpenStack Instances 87
Apply QoS Resource Allocation to Existing Instances 89
Define Default Nova Storage for OpenStack Instances 90
5 Working with Volumes and Volume Types in OpenStack 92
Modify the Default Cinder Volume Adapter Type 92
Create a Volume Type 93
Delete a Volume Type 94
Migrating Volumes Between Datastores 95
6 Managing Images for the Image Service 99
Import Images to the Image Service 99
Modify Image Settings 105
Modify Image Resource Metadata 105
Configuring Images for Windows Guest Customization 106
Configure QoS Resource Allocation for Instances Using Image Metadata 108
Delete an Existing Image 110
Migrating Images 111
Add a VM Template as an Image 113
Configure Images to Enable Live Resize of VMs Deployed From That Image 114
Modify the Default Behavior for Nova Snapshots 115
Modify the Default Cinder Upload-to-Image Behavior 116
7 Working with Flavors 118
Default Flavor Configurations 118
Create a Flavor 118
Delete a Flavor 119
Modify Flavor Metadata 120
Configure QoS Resource Allocation for Instances Using Flavor Metadata 121
8 Working with VMware Integrated OpenStack Carrier Edition 124
Use Tenant Virtual Data Center for Secure Multi-Tenancy and Resource Allocation 124
Configure Passthrough Devices for Instances 127
9 VMware Integrated OpenStack CLI Command Reference 133
viocli backup Command 133
viocli dbverify Command 134
viocli deployment Command 134
viocli ds-migrate-prep Command 136
viocli epops Command 136
VMware Integrated OpenStack Administrator Guide
VMware, Inc. 4
viocli inventory-admin Command 137
viocli recover Command 138
viocli restore Command 140
viocli rollback Command 140
viocli services Command 141
viocli show Command 141
viocli upgrade Command 142
viocli volume-migrate Command 142
10 vRealize Automation Integration 144
Integrate VMware Integrated OpenStack with vRealize Automation 145
Designing and Publishing Blueprints 147
VMware Integrated OpenStack Administrator Guide
VMware, Inc. 5
About This Book
The VMware Integrated OpenStack Administrator Guide shows you how to performVMware Integrated OpenStack cloud administrative tasks in the VMware Integrated OpenStack, includinghow to create and manage projects, users accounts, flavors, images, and networks.
Intended AudienceThis guide is for cloud administrators who want to create and manage resources with an OpenStackdeployment that is fully integrated with VMware® vSphere®. To do so successfully, you should be familiarwith the OpenStack components and functions.
VMware Technical Publications GlossaryVMware Technical Publications provides a glossary of terms that might be unfamiliar to you. Fordefinitions of terms as they are used in VMware technical documentation, go to http://www.vmware.com/support/pubs.
VMware, Inc. 6
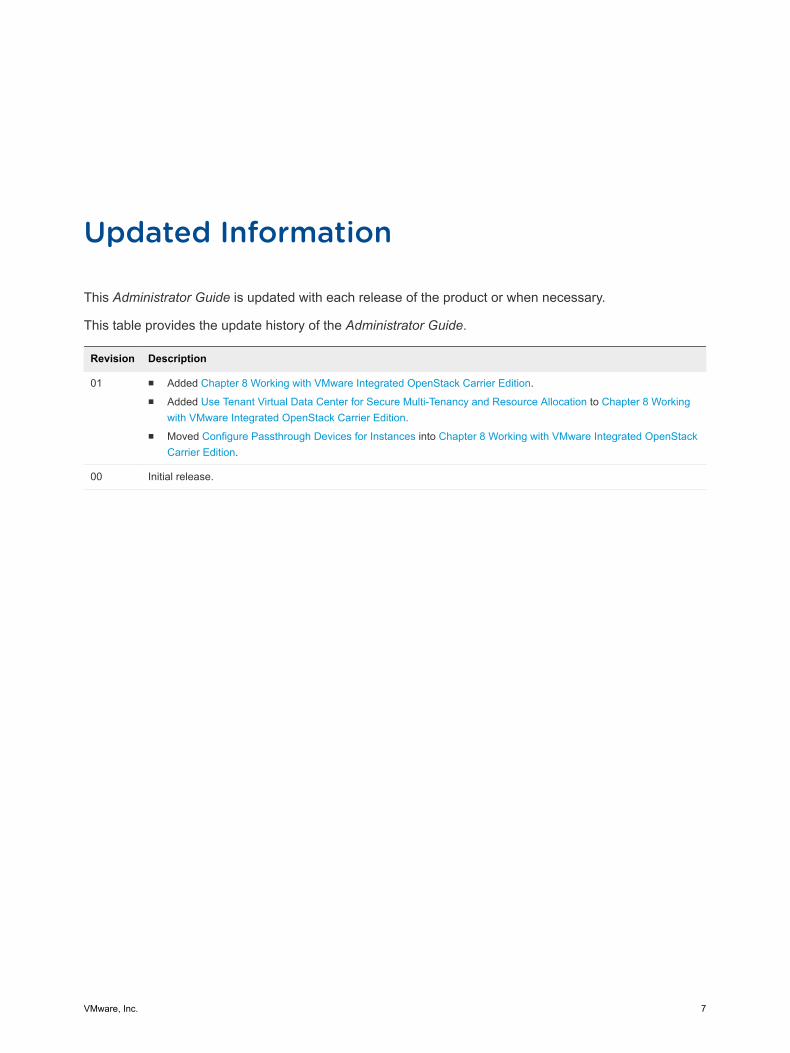
Updated Information
This Administrator Guide is updated with each release of the product or when necessary.
This table provides the update history of the Administrator Guide.
Revision Description
01 n Added Chapter 8 Working with VMware Integrated OpenStack Carrier Edition.n Added Use Tenant Virtual Data Center for Secure Multi-Tenancy and Resource Allocation to Chapter 8 Working
with VMware Integrated OpenStack Carrier Edition.n Moved Configure Passthrough Devices for Instances into Chapter 8 Working with VMware Integrated OpenStack
Carrier Edition.
00 Initial release.
VMware, Inc. 7

AboutVMware Integrated OpenStack 1With VMware Integrated OpenStack, you can implement OpenStack services on your existing VMwarevSphere implementation.
You deploy VMware Integrated OpenStack through the Integrated OpenStack Manager vApp in vCenter.
The Integrated OpenStack Manager provides a workflow that guides you through and completes theVMware Integrated OpenStack deployment process. With Integrated OpenStack Manager, you canspecify your management and compute clusters, configure networking, and add resources. Post-deployment, you can use Integrated OpenStack Manager to add components or otherwise modify theconfiguration of your VMware Integrated OpenStack cloud infrastructure.
VMware Integrated OpenStack 4.x is based on the Ocata release of OpenStack.
This chapter includes the following topics:
n Internationalization
n OpenStack Foundation Compliance
n VMware Integrated OpenStack System Requirements
n OpenStack Instances in vSphere Web Client
n Monitor OpenStack Instances in the vSphere Web Client
n Customer Experience Improvement Program
InternationalizationVMware Integrated OpenStack 2.0 and greater is available in English and seven additional languages:Simplified Chinese, Traditional Chinese, Japanese, Korean, French, German, and Spanish.
ASCII characters must be used for all input and naming conventions of OpenStack resources (such asproject names, usernames, image names, and so on) and for the underlying infrastructure components(such as ESXi hostnames, vSwitch port group names, data center names, datastore names, and so on).
OpenStack Foundation ComplianceEvery new version of VMware Integrated OpenStack complies with the latest Guidelines created by theOpenStack Foundation DefCore Committee.
VMware, Inc. 8
VMware Integrated OpenStack is designated as an OpenStack Powered Platform™ product andtherefore provides proven interoperability with all other OpenStack Powered™ products.
For detailed information about the compatibility of VMware Integrated OpenStack with the OpenStackPowered Platform™, go to http://www.openstack.org/marketplace/distros/distribution/vmware/vmware-integrated-openstack.
VMware Integrated OpenStack System RequirementsBefore you begin the VMware Integrated OpenStack deployment tasks, your system must comply with allhardware, software, networking, and storage requirements.
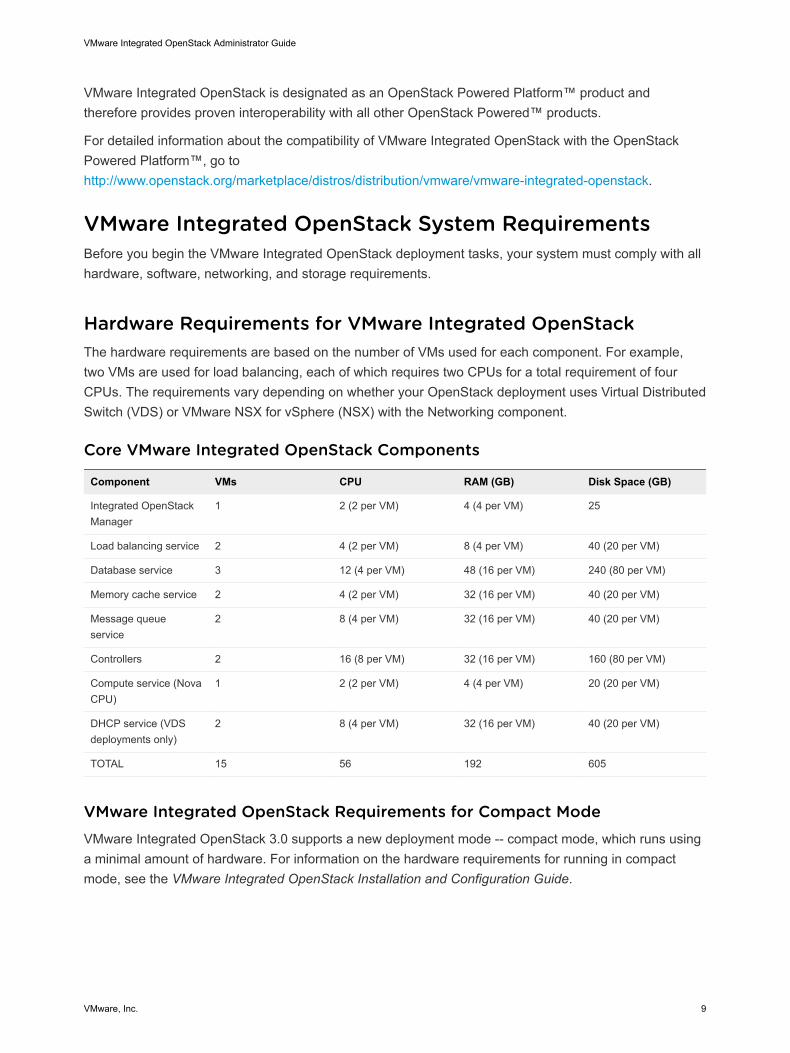
Hardware Requirements for VMware Integrated OpenStackThe hardware requirements are based on the number of VMs used for each component. For example,two VMs are used for load balancing, each of which requires two CPUs for a total requirement of fourCPUs. The requirements vary depending on whether your OpenStack deployment uses Virtual DistributedSwitch (VDS) or VMware NSX for vSphere (NSX) with the Networking component.
Core VMware Integrated OpenStack Components
Component VMs CPU RAM (GB) Disk Space (GB)
Integrated OpenStackManager
1 2 (2 per VM) 4 (4 per VM) 25
Load balancing service 2 4 (2 per VM) 8 (4 per VM) 40 (20 per VM)
Database service 3 12 (4 per VM) 48 (16 per VM) 240 (80 per VM)
Memory cache service 2 4 (2 per VM) 32 (16 per VM) 40 (20 per VM)
Message queueservice
2 8 (4 per VM) 32 (16 per VM) 40 (20 per VM)
Controllers 2 16 (8 per VM) 32 (16 per VM) 160 (80 per VM)
Compute service (NovaCPU)
1 2 (2 per VM) 4 (4 per VM) 20 (20 per VM)
DHCP service (VDSdeployments only)
2 8 (4 per VM) 32 (16 per VM) 40 (20 per VM)
TOTAL 15 56 192 605
VMware Integrated OpenStack Requirements for Compact ModeVMware Integrated OpenStack 3.0 supports a new deployment mode -- compact mode, which runs usinga minimal amount of hardware. For information on the hardware requirements for running in compactmode, see the VMware Integrated OpenStack Installation and Configuration Guide.
VMware Integrated OpenStack Administrator Guide
VMware, Inc. 9
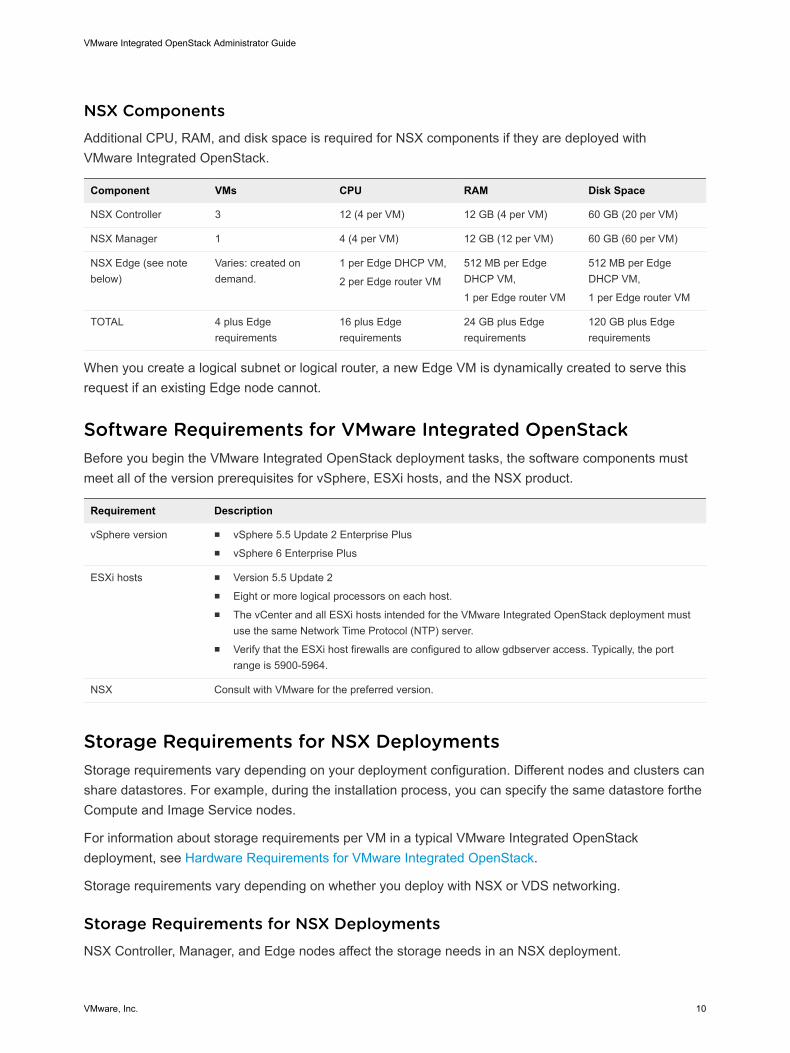
NSX ComponentsAdditional CPU, RAM, and disk space is required for NSX components if they are deployed withVMware Integrated OpenStack.
Component VMs CPU RAM Disk Space
NSX Controller 3 12 (4 per VM) 12 GB (4 per VM) 60 GB (20 per VM)
NSX Manager 1 4 (4 per VM) 12 GB (12 per VM) 60 GB (60 per VM)
NSX Edge (see notebelow)
Varies: created ondemand.
1 per Edge DHCP VM,
2 per Edge router VM
512 MB per EdgeDHCP VM,
1 per Edge router VM
512 MB per EdgeDHCP VM,
1 per Edge router VM
TOTAL 4 plus Edgerequirements
16 plus Edgerequirements
24 GB plus Edgerequirements
120 GB plus Edgerequirements
When you create a logical subnet or logical router, a new Edge VM is dynamically created to serve thisrequest if an existing Edge node cannot.
Software Requirements for VMware Integrated OpenStackBefore you begin the VMware Integrated OpenStack deployment tasks, the software components mustmeet all of the version prerequisites for vSphere, ESXi hosts, and the NSX product.
Requirement Description
vSphere version n vSphere 5.5 Update 2 Enterprise Plusn vSphere 6 Enterprise Plus
ESXi hosts n Version 5.5 Update 2n Eight or more logical processors on each host.n The vCenter and all ESXi hosts intended for the VMware Integrated OpenStack deployment must
use the same Network Time Protocol (NTP) server.n Verify that the ESXi host firewalls are configured to allow gdbserver access. Typically, the port
range is 5900-5964.
NSX Consult with VMware for the preferred version.
Storage Requirements for NSX DeploymentsStorage requirements vary depending on your deployment configuration. Different nodes and clusters canshare datastores. For example, during the installation process, you can specify the same datastore fortheCompute and Image Service nodes.
For information about storage requirements per VM in a typical VMware Integrated OpenStackdeployment, see Hardware Requirements for VMware Integrated OpenStack.
Storage requirements vary depending on whether you deploy with NSX or VDS networking.
Storage Requirements for NSX DeploymentsNSX Controller, Manager, and Edge nodes affect the storage needs in an NSX deployment.
VMware Integrated OpenStack Administrator Guide
VMware, Inc. 10
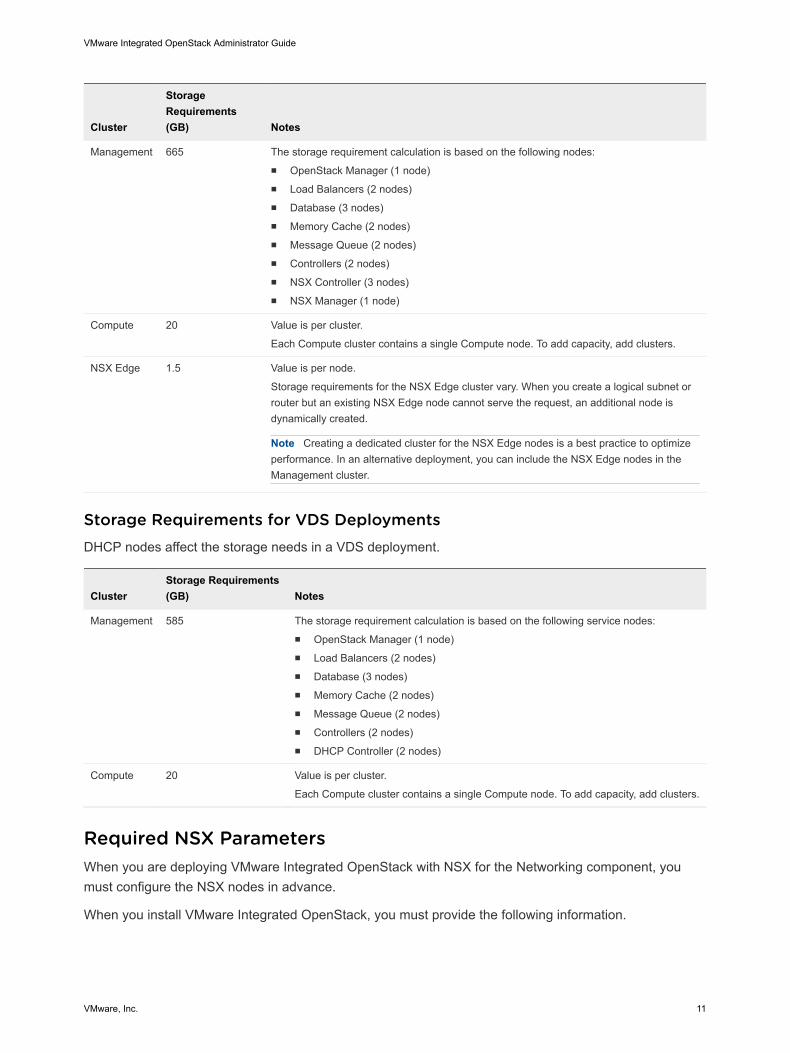
Cluster
StorageRequirements(GB) Notes
Management 665 The storage requirement calculation is based on the following nodes:n OpenStack Manager (1 node)n Load Balancers (2 nodes)n Database (3 nodes)n Memory Cache (2 nodes)n Message Queue (2 nodes)n Controllers (2 nodes)n NSX Controller (3 nodes)n NSX Manager (1 node)
Compute 20 Value is per cluster.
Each Compute cluster contains a single Compute node. To add capacity, add clusters.
NSX Edge 1.5 Value is per node.
Storage requirements for the NSX Edge cluster vary. When you create a logical subnet orrouter but an existing NSX Edge node cannot serve the request, an additional node isdynamically created.
Note Creating a dedicated cluster for the NSX Edge nodes is a best practice to optimizeperformance. In an alternative deployment, you can include the NSX Edge nodes in theManagement cluster.
Storage Requirements for VDS DeploymentsDHCP nodes affect the storage needs in a VDS deployment.
ClusterStorage Requirements(GB) Notes
Management 585 The storage requirement calculation is based on the following service nodes:n OpenStack Manager (1 node)n Load Balancers (2 nodes)n Database (3 nodes)n Memory Cache (2 nodes)n Message Queue (2 nodes)n Controllers (2 nodes)n DHCP Controller (2 nodes)
Compute 20 Value is per cluster.
Each Compute cluster contains a single Compute node. To add capacity, add clusters.
Required NSX ParametersWhen you are deploying VMware Integrated OpenStack with NSX for the Networking component, youmust configure the NSX nodes in advance.
When you install VMware Integrated OpenStack, you must provide the following information.
VMware Integrated OpenStack Administrator Guide
VMware, Inc. 11
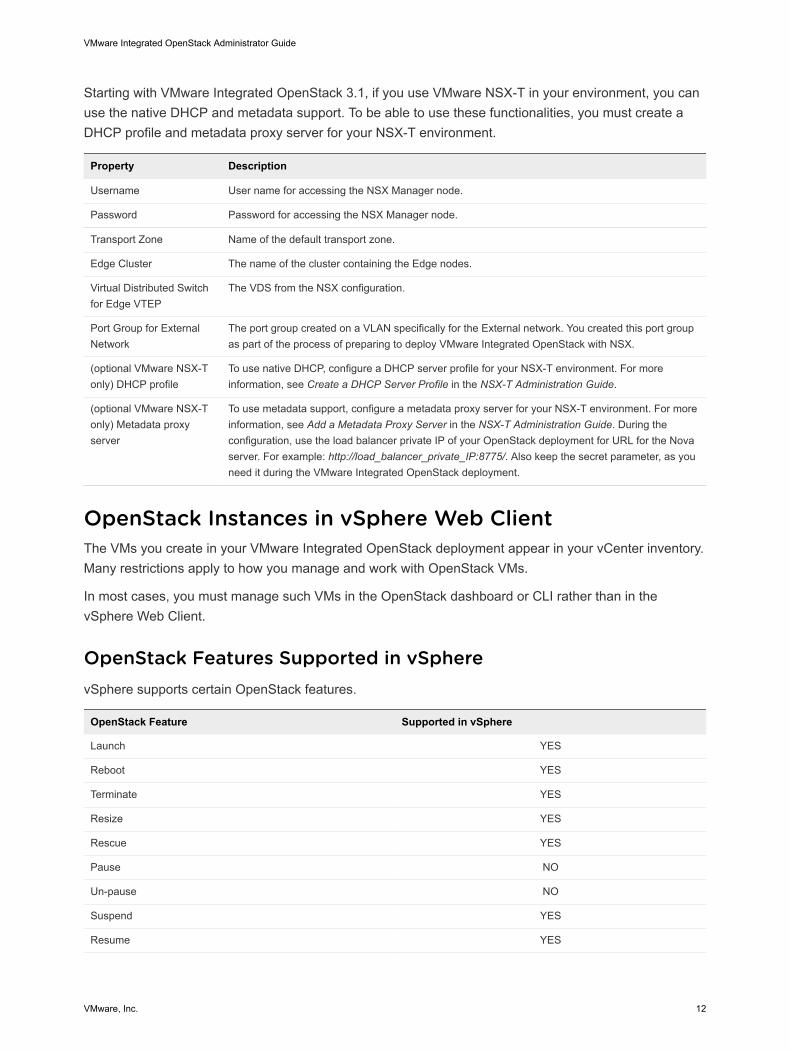
Starting with VMware Integrated OpenStack 3.1, if you use VMware NSX-T in your environment, you canuse the native DHCP and metadata support. To be able to use these functionalities, you must create aDHCP profile and metadata proxy server for your NSX-T environment.
Property Description
Username User name for accessing the NSX Manager node.
Password Password for accessing the NSX Manager node.
Transport Zone Name of the default transport zone.
Edge Cluster The name of the cluster containing the Edge nodes.
Virtual Distributed Switchfor Edge VTEP
The VDS from the NSX configuration.
Port Group for ExternalNetwork
The port group created on a VLAN specifically for the External network. You created this port groupas part of the process of preparing to deploy VMware Integrated OpenStack with NSX.
(optional VMware NSX-Tonly) DHCP profile
To use native DHCP, configure a DHCP server profile for your NSX-T environment. For moreinformation, see Create a DHCP Server Profile in the NSX-T Administration Guide.
(optional VMware NSX-Tonly) Metadata proxyserver
To use metadata support, configure a metadata proxy server for your NSX-T environment. For moreinformation, see Add a Metadata Proxy Server in the NSX-T Administration Guide. During theconfiguration, use the load balancer private IP of your OpenStack deployment for URL for the Novaserver. For example: http://load_balancer_private_IP:8775/. Also keep the secret parameter, as youneed it during the VMware Integrated OpenStack deployment.
OpenStack Instances in vSphere Web ClientThe VMs you create in your VMware Integrated OpenStack deployment appear in your vCenter inventory.Many restrictions apply to how you manage and work with OpenStack VMs.
In most cases, you must manage such VMs in the OpenStack dashboard or CLI rather than in thevSphere Web Client.
OpenStack Features Supported in vSpherevSphere supports certain OpenStack features.
OpenStack Feature Supported in vSphere
Launch YES
Reboot YES
Terminate YES
Resize YES
Rescue YES
Pause NO
Un-pause NO
Suspend YES
Resume YES
VMware Integrated OpenStack Administrator Guide
VMware, Inc. 12
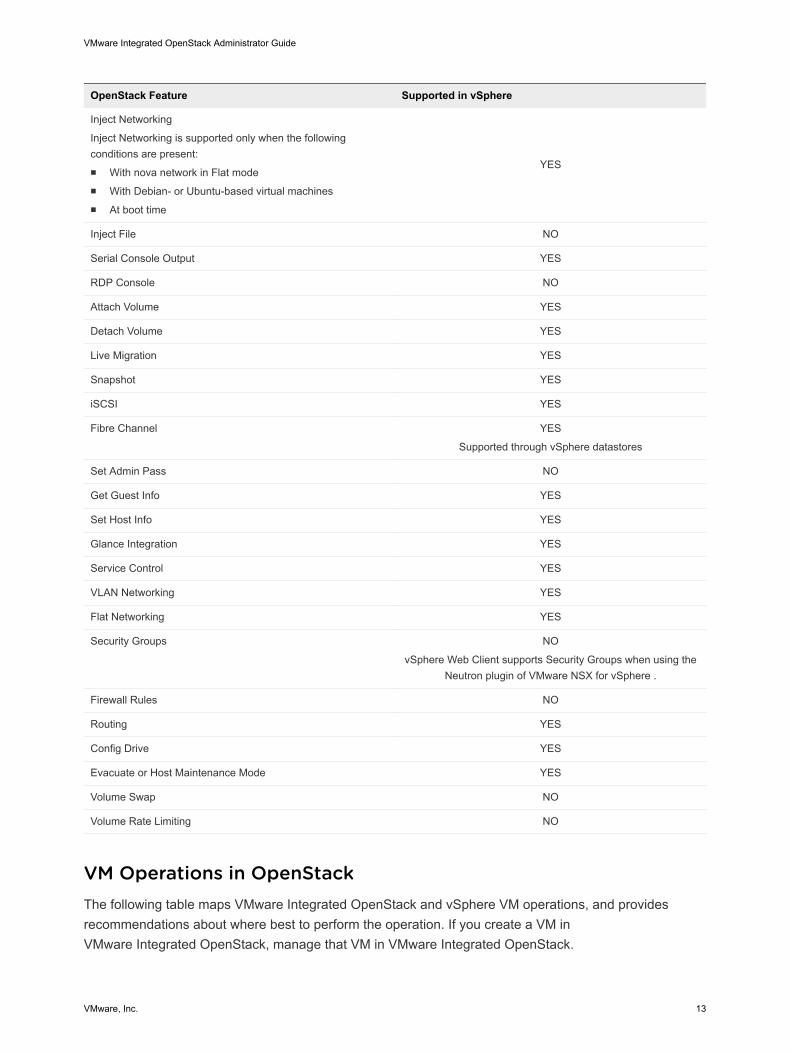
OpenStack Feature Supported in vSphere
Inject Networking
Inject Networking is supported only when the followingconditions are present:n With nova network in Flat moden With Debian- or Ubuntu-based virtual machinesn At boot time
YES
Inject File NO
Serial Console Output YES
RDP Console NO
Attach Volume YES
Detach Volume YES
Live Migration YES
Snapshot YES
iSCSI YES
Fibre Channel YES
Supported through vSphere datastores
Set Admin Pass NO
Get Guest Info YES
Set Host Info YES
Glance Integration YES
Service Control YES
VLAN Networking YES
Flat Networking YES
Security Groups NO
vSphere Web Client supports Security Groups when using theNeutron plugin of VMware NSX for vSphere .
Firewall Rules NO
Routing YES
Config Drive YES
Evacuate or Host Maintenance Mode YES
Volume Swap NO
Volume Rate Limiting NO
VM Operations in OpenStackThe following table maps VMware Integrated OpenStack and vSphere VM operations, and providesrecommendations about where best to perform the operation. If you create a VM inVMware Integrated OpenStack, manage that VM in VMware Integrated OpenStack.
VMware Integrated OpenStack Administrator Guide
VMware, Inc. 13
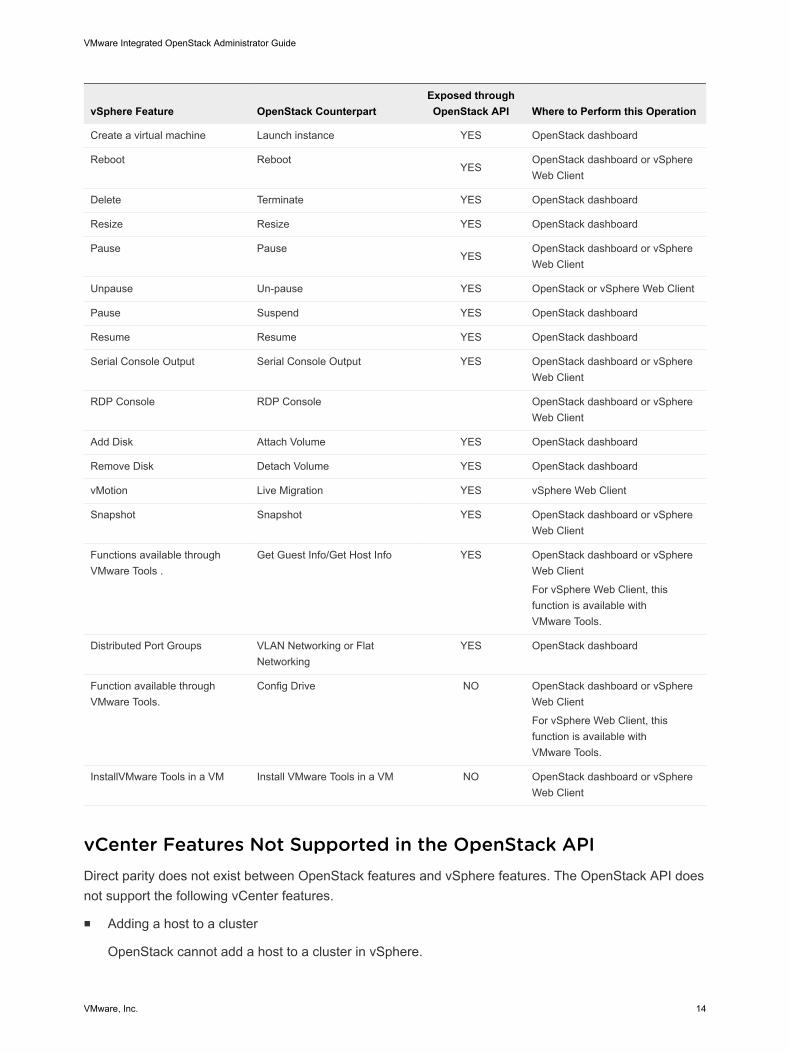
vSphere Feature OpenStack CounterpartExposed throughOpenStack API Where to Perform this Operation
Create a virtual machine Launch instance YES OpenStack dashboard
Reboot RebootYES
OpenStack dashboard or vSphereWeb Client
Delete Terminate YES OpenStack dashboard
Resize Resize YES OpenStack dashboard
Pause PauseYES
OpenStack dashboard or vSphereWeb Client
Unpause Un-pause YES OpenStack or vSphere Web Client
Pause Suspend YES OpenStack dashboard
Resume Resume YES OpenStack dashboard
Serial Console Output Serial Console Output YES OpenStack dashboard or vSphereWeb Client
RDP Console RDP Console OpenStack dashboard or vSphereWeb Client
Add Disk Attach Volume YES OpenStack dashboard
Remove Disk Detach Volume YES OpenStack dashboard
vMotion Live Migration YES vSphere Web Client
Snapshot Snapshot YES OpenStack dashboard or vSphereWeb Client
Functions available throughVMware Tools .
Get Guest Info/Get Host Info YES OpenStack dashboard or vSphereWeb Client
For vSphere Web Client, thisfunction is available withVMware Tools.
Distributed Port Groups VLAN Networking or FlatNetworking
YES OpenStack dashboard
Function available throughVMware Tools.
Config Drive NO OpenStack dashboard or vSphereWeb Client
For vSphere Web Client, thisfunction is available withVMware Tools.
InstallVMware Tools in a VM Install VMware Tools in a VM NO OpenStack dashboard or vSphereWeb Client
vCenter Features Not Supported in the OpenStack APIDirect parity does not exist between OpenStack features and vSphere features. The OpenStack API doesnot support the following vCenter features.
n Adding a host to a cluster
OpenStack cannot add a host to a cluster in vSphere.
VMware Integrated OpenStack Administrator Guide
VMware, Inc. 14
n Putting a host into maintenance mode
You place a host in maintenance mode to service it, for example, to install more memory. A hostenters or leaves maintenance mode only as the result of a user request. No such function exists inOpenStack. See the vSphere documentation for instructions about entering and exiting maintenancemode.
n Resource Pools
A resource pool in vSphere is a logical abstraction for flexible management of resources, such asCPU and memory. OpenStack has no equivalent to a resource pool.
n vSphere snapshots
vCenter supports OpenStack snapshots, but vSphere snapshots are distinct and are not supported inthe OpenStack API.
Monitor OpenStack Instances in the vSphere Web ClientYou can view and monitor instance activity and metadata in the vSphere Web Client.
Prerequisites
Verify that VMware Integrated OpenStack is deployed and operational.
Verify that you or another user has started instances in VMware Integrated OpenStack.
Procedure
1 In the vSphere Web Client, select Home > Inventories, and click the VMware Integrated OpenStackicon.
2 Expand the Inventory view until you expose the instance VMs in the compute cluster.
The instance VMs are identified by their UUIDs.
3 Select an instance VM and click the Summary tab.
The Summary tab displays the portlets common to VMs in thevSphere Web Client. The OpenStackVM and Tags portlets contain details about instances created in OpenStack.
4 (Optional) Locate and review the OpenStack VM and Tags VM portlets.
These portlets display information about the selected instance, including instance properties such asthe name, tenant, the user that created the instance, the originating flavor, and so on.
5 (Optional) Use the vSphere Web Client to search for and filter OpenStack instances.
a In the vSphere Web Client Search field, enter one of the tag values from the Tags portlet.
For example, to find all instances created using the default m1.tiny flavor, enter m1.tiny.
The Related Objects tab appears with a list of all the OpenStack instances that match the searchcriteria.
b Click the name of any instance to open the Summary tab for that instance.
VMware Integrated OpenStack Administrator Guide
VMware, Inc. 15
Customer Experience Improvement ProgramYou can configure this product to collect data that can be used by the VMware Customer ExperienceImprovement Program.
This product participates in VMware's Customer Experience Improvement Program ("CEIP"). Detailsregarding the data collected through CEIP and the purposes for which it is used by VMware are set forthat the Trust & Assurance Center at http://www.vmware.com/trustvmware/ceip.html
To join or leave the CEIP for this product, please go to the Customer Experience Improvement Programpage in the User Interface to change your participation in CEIP:
n During product deployment using the Integrated OpenStack Manager, participation in the CEIP isenabled by default, unless you choose not to participate.
After initial deployment, go to the Customer Experience Improvement Program page to modify yourparticipation, if required.
n To join the CEIP, go to Home > Inventories, and click the VMware Integrated OpenStack icon. Thenclick the Manage tab and click the Settings tab. Finally click Enable to join.
n To leave the CEIP, go to Home > Inventories, and click the VMware Integrated OpenStack icon.Then click the Manage tab and click the Settings tab. Finally click Disable to leave the program.
VMware Integrated OpenStack Administrator Guide
VMware, Inc. 16
Managing YourVMware Integrated OpenStackDeployment 2Managing your VMware Integrated OpenStack deployment includes modifying configuration settings,backup, recovery, and restoration of your OpenStack configuration and data; using patches for minorupdates, and upgrading to new versions.
This chapter includes the following topics:
n Managing Your Deployment Configuration
n Managing Your Network Configuration
n Adding Capacity in the vSphere Web Client
n Configure the Backup Service for Block Storage
n Back Up the VMware Integrated OpenStack Deployment
n Restore VMware Integrated OpenStack from a Backup
n Failure Recovery
n VMware Integrated OpenStack Log File Locations
n Upgrade to VMware Integrated OpenStack 4.0
n Updating Your VMware Integrated OpenStack Deployment
n Customize the Dashboard Logos and Background
n Use Profiling to Trace OpenStack Deployments
n Configure NUMA for Use With VMware Integrated OpenStack
Managing Your Deployment ConfigurationDuring the VMware Integrated OpenStack installation and deployment process, you configure theOpenStack components, specify the syslog server, provide passwords for LDAP, NSX, andvCenter Server, among other deployment tasks. After deployment, you can modify these settings.
Monitor Your VMware Integrated OpenStack DeploymentAfter you finish installing VMware Integrated OpenStack, you can monitor your deployment configuration,including datastore sizes, network settings, and metadata service, among other details.
VMware, Inc. 17
Procedure
1 In vCenter, select Home > VMware Integrated OpenStack.
2 Click the Monitor tab.
Modify the Syslog Server AddressThe Syslog server address is configured during installation but you can modify the configurationafterward.
Prerequisites
Verify that the new Syslog server address is valid.
Procedure
1 In vCenter, select Home > VMware Integrated OpenStack > Manage.
2 Click the Settings tab.
3 Click Syslog Server.
The Syslog Server panel displays the current configuration.
4 Click Edit to change the Syslog server address.
5 Click OK to apply the change.
The vSphere Web Client might take a few minutes to update the OpenStack configuration.
Update Deployment PasswordsPart of your VMware Integrated OpenStack deployment configuration includes passwords that allowOpenStack to access and connect with your LDAP server, NSX, and vCenter Server. If the credentialschange, you can modify the password settings directly in the VMware Integrated OpenStack manager toensure continued access.
Only the text boxes with updated passwords on the Change Password page change. To leave apassword unmodified, leave the text box blank.
Prerequisites
Verify that the passwords you supply in the Change Passwords panel match the passwords configured forthe LDAP server, NSX, or vCenter Server, as appropriate.
Procedure
1 In vCenter, select Home > VMware Integrated OpenStack > Manage.
2 Click the Settings tab.
3 Click Change Password.
The Change Passwords panel contains text boxes for updating the current LDAP server, NSX, andvCenter Server password configurations.
VMware Integrated OpenStack Administrator Guide
VMware, Inc. 18
4 Enter the new password.
5 Click Submit.
The password settings in the VMware Integrated OpenStack are updated with the new values.
Manage the OpenStack SSL Certificate ConfigurationYou can add OpenStack SSL certificates in the VMware Integrated OpenStack manager.
You can only import existing CA signed certificates, created from CSRs generated byVMware Integrated OpenStack. You can also create new CSRs to create new CA signed certificates.Using wildcard certificates is not supported.
Procedure
1 In the vSphere Web Client, select Home > Inventories, and click the VMware Integrated OpenStackicon.
2 Click the Manage tab and click the Settings tab.
3 Click OpenStack SSL Certificate.
4 Generate a new certificate signing request to create new CA signed certificate.
a Provide the Organizational Unit, Organizational Name, Locality Name, State Name, and CountryCode information as appropriate to your organization.
b Click Generate.
c Use the generated certificate signing request to create a certificate that is signed by your CA.
5 Import the CA signed certificate.
a Click Import.
b Browse to and select the CA signed certificate file.
c Click OK.
The imported certificate is applied.
Configure the Ceilometer ComponentCeilometer is the telemetric component of OpenStack that collects and persists data regarding the use ofthe physical and virtual resources in your OpenStack deployment.
You can enable Ceilometer after completing the VMware Integrated OpenStack deployment.
Procedure
1 In vCenter, select Home > VMware Integrated OpenStack > Manage.
2 Select the Settings tab.
VMware Integrated OpenStack Administrator Guide
VMware, Inc. 19

3 Click Ceilometer.
The Ceilometer panel displays the current status and configuration.
4 Click Edit to modify the settings.
5 Select the Configure Ceilometer option.
6 Click OK to configure Ceilometer.
The vSphere Web Client might take a few minutes to update the OpenStack configuration.
Ceilometer is automatically enabled the first time you configure it. Afterwards, the Ceilometer settingsshow only Enable and Disable options.
Modify Your Enrollment in the Customer Experience ImprovementProgramDuring the installation process, you can enroll in the VMware Customer Experience ImprovementProgram (CEIP). After installation, you can modify this configuration in the VMware Integrated OpenStackmanager.
This product participates in VMware's Customer Experience Improvement Program ("CEIP"). Detailsregarding the data collected through CEIP and the purposes for which it is used by VMware are set forthat the Trust & Assurance Center at http://www.vmware.com/trustvmware/ceip.html
Procedure
1 To join the CEIP, go to Home > Inventories, and click the VMware Integrated OpenStack icon. Thenclick the Manage tab and click the Settings tab. Finally, click Enable to join.
2 To leave the CEIP, go to Home > Inventories, and click the VMware Integrated OpenStack icon.Then click the Manage tab and click the Settings tab. Finally, click Disable to leave.
3 Click Customer Experience Improvement Program.
The Customer Experience Improvement Program page displays the current status of yourparticipation in the CEIP. If enabled, you are opted in. If disabled, you are opted out.
Manage Your Authentication SettingsPart of your VMware Integrated OpenStack deployment configuration includes setting up authentication.You can also modify this configuration post-installation.
Prerequisites
Verify that the new LDAP settings are valid.
Procedure
1 In vCenter, select Home > VMware Integrated OpenStack > Manage.
2 Click the Settings tab.
VMware Integrated OpenStack Administrator Guide
VMware, Inc. 20
3 Click Configure Identity Source.
The panel displays the current configuration.
4 Set the VMware Integrated OpenStack identity source.
Option Description
OpenStack admin user Define the OpenStack administrative user name. This is the default administrativeuser name for logging in to the VMware Integrated OpenStack dashboard.
OpenStack admin password Define the OpenStack administrative user password. This is the defaultadministrative user password for logging in to the VMware Integrated OpenStackdashboard.
Confirm password Reenter the password for confirmation.
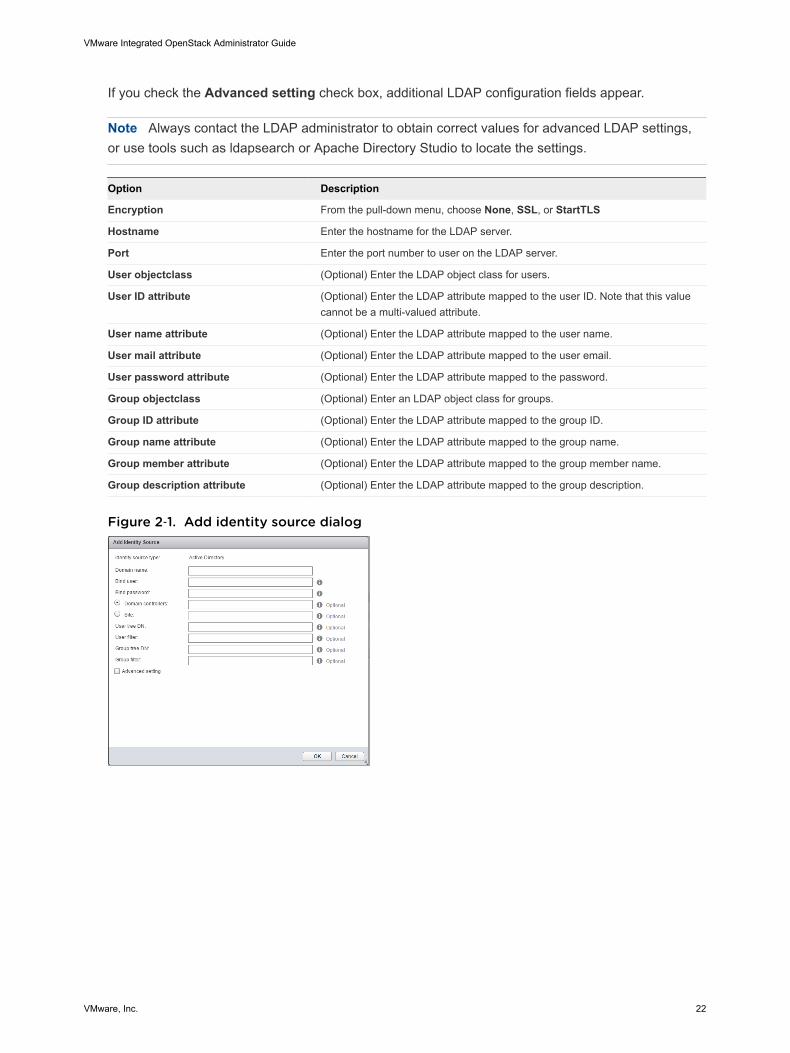
5 If you are using LDAP with your VMware Integrated OpenStack deployment, click the plus sign (+) toconfigure the LDAP source.
The Add Identity Source dialog appears.
Option Description
Domain Name Specify the full Active Directory domain name; for example, vmware.com.
Bind user Provide the user name to bind to Active Directory for LDAP requests.
Bind password Provide the password to allow the LDAP client access to the LDAP server.
Domain controllers (Optional) VMware Integrated OpenStack automatically chooses the existingActive Directory domain controllers. However, you can specify a list of specificdomain controllers to use. To do this, select the Domain controllers radio buttonand then enter the IP address of one or more domain controllers, separated bycommas.
Site (Optional) Optionally, you can limit LDAP searching to a specific deployment sitewithin your organization; for example, sales.vmware.com. Select the Site radiobutton and enter the domain name of the site to search.
User Tree DN (Optional) Enter the search base for users; for example, DC=vmware, DC=com.Defaults to the top of the user tree in most Active Directory deployments.
User Filter (Optional) Enter an LDAP search filter for users.
Important If you use VMware Integrated OpenStack 3.0 or older and yourdirectory contains more than 1,000 objects (users and groups), you must apply afilter to ensure that fewer than 1,000 objects are returned. For examples of filters,see https://msdn.microsoft.com/en-us/library/aa746475(v=vs.85).aspx.
Advanced setting If you want to specify advanced LDAP settings, check the Advanced settingcheck box.
VMware Integrated OpenStack Administrator Guide
VMware, Inc. 21
If you check the Advanced setting check box, additional LDAP configuration fields appear.
Note Always contact the LDAP administrator to obtain correct values for advanced LDAP settings,or use tools such as ldapsearch or Apache Directory Studio to locate the settings.
Option Description
Encryption From the pull-down menu, choose None, SSL, or StartTLS
Hostname Enter the hostname for the LDAP server.
Port Enter the port number to user on the LDAP server.
User objectclass (Optional) Enter the LDAP object class for users.
User ID attribute (Optional) Enter the LDAP attribute mapped to the user ID. Note that this valuecannot be a multi-valued attribute.
User name attribute (Optional) Enter the LDAP attribute mapped to the user name.
User mail attribute (Optional) Enter the LDAP attribute mapped to the user email.
User password attribute (Optional) Enter the LDAP attribute mapped to the password.
Group objectclass (Optional) Enter an LDAP object class for groups.
Group ID attribute (Optional) Enter the LDAP attribute mapped to the group ID.
Group name attribute (Optional) Enter the LDAP attribute mapped to the group name.
Group member attribute (Optional) Enter the LDAP attribute mapped to the group member name.
Group description attribute (Optional) Enter the LDAP attribute mapped to the group description. Figure 2‑1. Add identity source dialog
VMware Integrated OpenStack Administrator Guide
VMware, Inc. 22
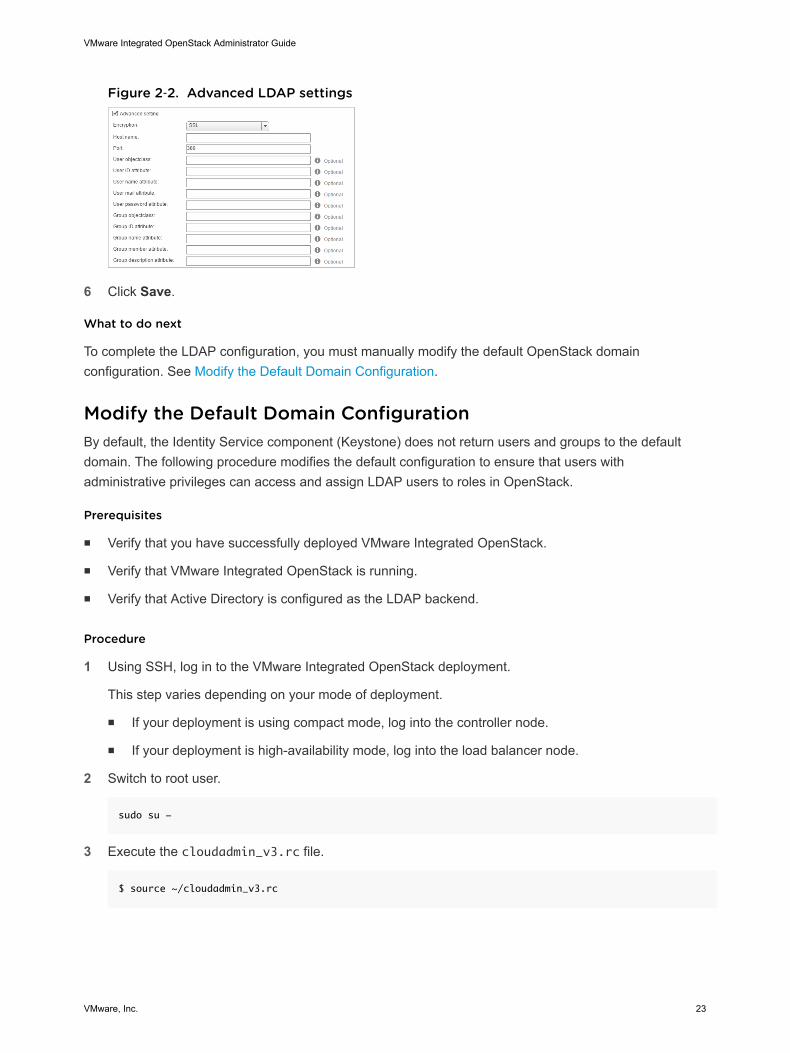
Figure 2‑2. Advanced LDAP settings
6 Click Save.
What to do next
To complete the LDAP configuration, you must manually modify the default OpenStack domainconfiguration. See Modify the Default Domain Configuration.
Modify the Default Domain ConfigurationBy default, the Identity Service component (Keystone) does not return users and groups to the defaultdomain. The following procedure modifies the default configuration to ensure that users withadministrative privileges can access and assign LDAP users to roles in OpenStack.
Prerequisites
n Verify that you have successfully deployed VMware Integrated OpenStack.
n Verify that VMware Integrated OpenStack is running.
n Verify that Active Directory is configured as the LDAP backend.
Procedure
1 Using SSH, log in to the VMware Integrated OpenStack deployment.
This step varies depending on your mode of deployment.
n If your deployment is using compact mode, log into the controller node.
n If your deployment is high-availability mode, log into the load balancer node.
2 Switch to root user.
sudo su -
3 Execute the cloudadmin_v3.rc file.
$ source ~/cloudadmin_v3.rc
VMware Integrated OpenStack Administrator Guide
VMware, Inc. 23
4 Create the initial project in the default domain in OpenStack.
$ openstack --os-identity-api-version 3 --os-username admin \
--os-user-domain-name local --os-project-name admin --os-password admin \
--os-region-name nova project create --domain default --description "Demo Project" --or-
show demo
Parameter Description
--os-identity-api-version 3 Specifies the API version, in this case, version 3.
--os-username admin Provides the administrative username for login, in this caseadmin.
--os-user-domain-name local Specifies the domain, in this case local for the specifieduser.
--os-project-name admin Specifies the admin OpenStack project.
--os-password admin Provides the administrative password for login, in this caseadmin.
--os-region-name nova project create Runs the nova project create command.
--domain default This command specifies the domain where the new projectis created, in this case the default domain.
--description "Demo Project" This parameter names the new project, in this caseDemo Project.
--or-show demo Creates an alias for the new project.
5 Add an administrative user to the new project in the default domain.
$ openstack --os-identity-api-version 3 --os-username admin \
--os-user-domain-name local --os-project-name admin --os-password admin \
--os-region-name nova role add --project demo --project-domain default \
--user [email protected] --user-domain default admin
Parameter Description
--os-identity-api-version 3 Specifies the API version, in this case, version 3.
--os-username admin Provides the administrative username for login, in this caseadmin.
--os-user-domain-name local Specifies the domain, in this case local for the specifieduser.
--os-project-name admin Specifies the admin OpenStack project.
--os-password admin Provides the administrative password for login, in this caseadmin.
--os-region-name nova role add Runs the nova role add command.
--project demo Specifies the project to which the new administrative user isadded.
--project-domain default Specifies the project domain.
VMware Integrated OpenStack Administrator Guide
VMware, Inc. 24
Parameter Description
--user [email protected] Specifies the new administrative user.
--user-domain default admin Assigns the new user to the default admin domain.
Note If special characters are used for the user ID, you must modify the Keystone settings in theVMware Integrated OpenStack manager.
6 (Optional) If special characters are used for the administrative user ID, you must modify the Keystonesettings in the VMware Integrated OpenStack manager.
a In the VMware Integrated OpenStack manager in vCenter, go to Manage > Settings > ConfigureIdentity Source.
b Click Edit.
c Under Advanced Settings, modify the User ID value from cn to userPrincipalName.
You can now log in to the default domain in the VMware Integrated OpenStack dashboard using theadministrative user name and password.
Configure VMware Identity Manager as a Single Sign-On Solutionfor OpenStackStarting with VMware Integrated OpenStack 3.1, you can integrate your VMware Integrated OpenStackdeployments with VMware Identity Manager.
By integrating VMware Integrated OpenStack with VMware Identity Manager you achieve a way tosecurely use existing credentials to access cloud resources such as servers, volumes, and databases,across multiple endpoints provided in multiple authorized clouds. You have a single set of credentials,without having to provision additional identities or log in multiple times. The credential is maintained bythe user's Identity Provider.
Prerequisites
n Verify that the version of VMware Identity Manager is 2.8.0 or later.
n Verify that you can authenticate as administrator to the VMware Identity Manager instance.
Procedure
1 Implement the custom.yml file.
sudo mkdir -p /opt/vmware/vio/custom
sudo cp /var/lib/vio/ansible/custom/custom.yml.sample /opt/vmware/vio/custom/custom.yml
VMware Integrated OpenStack Administrator Guide
VMware, Inc. 25
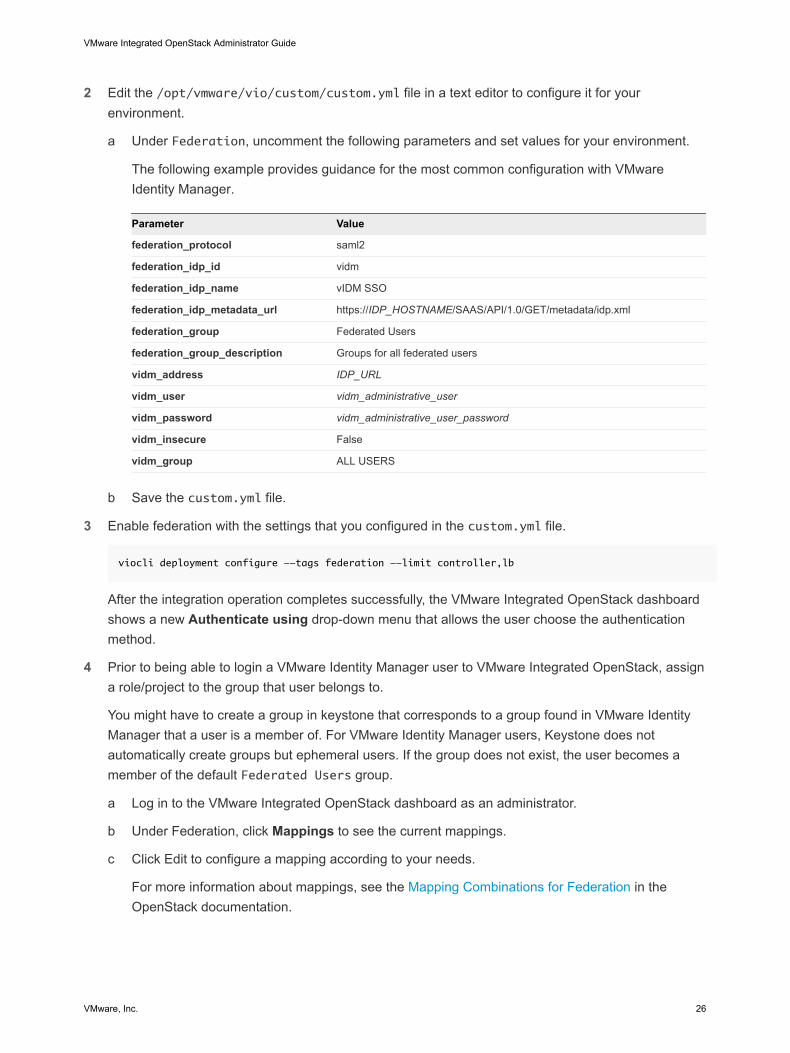
2 Edit the /opt/vmware/vio/custom/custom.yml file in a text editor to configure it for yourenvironment.
a Under Federation, uncomment the following parameters and set values for your environment.
The following example provides guidance for the most common configuration with VMwareIdentity Manager.
Parameter Value
federation_protocol saml2
federation_idp_id vidm
federation_idp_name vIDM SSO
federation_idp_metadata_url https://IDP_HOSTNAME/SAAS/API/1.0/GET/metadata/idp.xml
federation_group Federated Users
federation_group_description Groups for all federated users
vidm_address IDP_URL
vidm_user vidm_administrative_user
vidm_password vidm_administrative_user_password
vidm_insecure False
vidm_group ALL USERS
b Save the custom.yml file.
3 Enable federation with the settings that you configured in the custom.yml file.
viocli deployment configure --tags federation --limit controller,lb
After the integration operation completes successfully, the VMware Integrated OpenStack dashboardshows a new Authenticate using drop-down menu that allows the user choose the authenticationmethod.
4 Prior to being able to login a VMware Identity Manager user to VMware Integrated OpenStack, assigna role/project to the group that user belongs to.
You might have to create a group in keystone that corresponds to a group found in VMware IdentityManager that a user is a member of. For VMware Identity Manager users, Keystone does notautomatically create groups but ephemeral users. If the group does not exist, the user becomes amember of the default Federated Users group.
a Log in to the VMware Integrated OpenStack dashboard as an administrator.
b Under Federation, click Mappings to see the current mappings.
c Click Edit to configure a mapping according to your needs.
For more information about mappings, see the Mapping Combinations for Federation in theOpenStack documentation.
VMware Integrated OpenStack Administrator Guide
VMware, Inc. 26
Managing Your Network ConfigurationDuring installation, you configure the Neutron networking component by specifying port groups. Afterinstallation, you can extend the IP range, create an L2 bridge, or change the DNS of the dedicatednetworks.
Add IP Address Ranges to a NetworkYou can add IP address ranges to the management or API access network.
You typically add IP ranges as part of the upgrade process.
Procedure
1 In the vSphere Web Client, select Home > Inventories, and click the VMware Integrated OpenStackicon.
2 Click the Manage tab and click the Networks tab.
The Networks tab lists the Management and API network configurations, including their IP addressranges.
3 Expand the IP addresses available for the Management network.
a Right-click the name of the Management network in the list and select Add IP Range.
b In the Add IP Range dialog box, specify the new IP range.
Note If you are adding addresses as part of the upgrade process, the new IP range must matchthe same number of IP addresses configured for the existing Management network. For example,in a typical VMware Integrated OpenStack deployment, the Management network requires aminimum range of 11 IP addresses.
c Click OK.
4 Expand the IP addresses available for the external network.
a Right-click the name of the API network in the list and select Add IP Range.
b In the Add IP Range dialog box, specify the new IP range.
Note If you are adding addresses as part of the upgrade process, the new IP range must matchthe same number of IP addresses configured for the existing API network. For example, in atypical VMware Integrated OpenStack deployment, the API network requires a minimum range of2 IP addresses for versions 3.0 and older and a minimum range of 3 IP addresses for versions3.1 and later.
c Click OK.
VMware Integrated OpenStack Administrator Guide
VMware, Inc. 27
Modify the Default Router SettingYou can modify the default router setting that NSX uses in the custom.yml file.
The Neutron configuration file includes a parameter that sets the default router types. For example,tenant_router_types = shared, distributed, exclusive. You can modify the custom.yml file tooverride this configuration with a custom setting.
Procedure
1 Implement the custom.yml file.
sudo mkdir -p /opt/vmware/vio/custom
sudo cp /var/lib/vio/ansible/custom/custom.yml.sample /opt/vmware/vio/custom/custom.yml
2 Open the /opt/vmware/vio/custom/custom.yml file in a text editor.
3 Uncomment the nsxv_tenant_router_types parameter and specify the router types for NSXtenants.
nsxv_tenant_router_types: exclusive, shared, distributed
4 Using SSH, log in to the VMware Integrated OpenStack manager.
5 Switch to root user.
sudo su -
6 Push the new configuration to your VMware Integrated OpenStack deployment.
viocli deployment configure --limit controller
Modify Network DNS SettingAfter installation, you can modify the DNS settings for the networks configured for OpenStackmanagement and API access.
Important Modifying the network DNS setting results in a brief interruption in the network connection.
Procedure
1 In the vSphere Web Client, select Home > Inventories, and click the VMware Integrated OpenStackicon.
2 Click the Manage tab and click the Networks tab.
The Networks tab lists the Management and API network configurations, including their DNSaddresses.
VMware Integrated OpenStack Administrator Guide
VMware, Inc. 28
3 Right-click the network name whose DNS setting you want to modify and choose Change DNS.
Note You can also select the network in the list, click All Actions and choose Change DNS.
4 Modify the DNS and Secondary DNS IP addresses.
5 Click OK.
Create a VXLAN/VLAN L2 BridgeIn a leaf-spine data center architecture, the OpenStack Compute cluster cannot access VMs on a VLAN.You can overcome this technical limitation by creating a VXLAN network and L2 VXLAN and VLANbridge.
Prerequisites
Verify that a VDS port group is available for the VXLAN network configuration.
Procedure
1 Using SSH, log in as administrator to the VMware Integrated OpenStack manager.
2 Using SSH, log in to the controller01 node.
3 Create the logical L2 gateway on Neutron.
u If your version is VMware Integrated OpenStack 3.0 or older, use the neutron-l2gw l2-gateway-create command.
neutron-l2gw l2-gateway-create <gateway-name> \
--device name=<device-name1>,interface_names="<interface-name1>[|<seg-id1>]"
u If your version is VMware Integrated OpenStack 3.1 or later, use the l2-gateway-createcommand.
l2-gateway-create <gateway-name> \
--device name=<device-name1>,interface_names="<interface-name1>[|<seg-id1>]"
Option Description
<gateway-name> Specifies the name of the new gateway.
<device-name1> Specifies the device name. This is a dummy name. The NSX plug-in creates adedicated DLR.
<interface-name1> Specifies the distributed port group MOB ID as the interface name.
<seg-id1> Specifies the distributed port group segmentation ID. From the backup edge pool, NSX creates a dedicated DLR called L2 bridging-{gateway-id}.
VMware Integrated OpenStack Administrator Guide
VMware, Inc. 29
4 Create the logical L2 gateway connection on Neutron.
u If your version is VMware Integrated OpenStack 3.0 or older, use the neutron-l2gw l2-gateway-connection-create command.
neutron-l2gw l2-gateway-connection-create <gateway-name/uuid> <network-name/uuid> \
[--default-segmentation-id=<seg-id>]
u If your version is VMware Integrated OpenStack 3.1 or later, use the l2-gateway-connection-create command.
l2-gateway-connection-create <gateway-name/uuid> <network-name/uuid> \
[--default-segmentation-id=<seg-id>]
Option Description
<gateway-name/uuid> Specifies the name of the existing gateway.
<network-name/uuid> Specifies the network name. This is a dummy name. The NSX plug-in creates adedicated DLR.
<default-segmentation-id=seg-id1> Specifies the default distributed port group segmentation ID. This operation connects the OpenStack network with the Provider VLAN network.
Managing NSX Edge Node High AvailabilityYou can configure VMware Integrated OpenStack to ensure that every NSX Edge node is enable for highavailability.
You can configure the custom.yml file before installing and deploying VMware Integrated OpenStack. Ifyou have already installed and deployed VMware Integrated OpenStack, you have the additional step ofmanually enabling each running NSX Edge node.
Enable NSX Edge Node High Availability Before DeploymentBefore you install VMware Integrated OpenStack, you can enable high availability for NSX Edge nodes bymodifying the custom.yml file.
Prerequisites
Verify that your Edge cluster has at least two hosts. If not, you might receive an anti-affinity error.
Procedure
1 Implement the custom.yml file.
sudo mkdir -p /opt/vmware/vio/custom
sudo cp /var/lib/vio/ansible/custom/custom.yml.sample /opt/vmware/vio/custom/custom.yml
VMware Integrated OpenStack Administrator Guide
VMware, Inc. 30
2 Edit the /opt/vmware/vio/custom/custom.yml file.
a Uncomment the nsxv_edge_ha parameter.
b Set the nsxv_edge_ha parameter to True.
nsxv_edge_ha: True
3 Save the custom.yml file.
When you install and deploy VMware Integrated OpenStack, high availability is enabled by default for allNSX Edge nodes.
Enable NSX Edge Node High Availability After DeploymentIf you have already installed VMware Integrated OpenStack, you can enable high availability for NSXEdge nodes by modifying the custom.yml file and manually modifying each running Edge node.
Prerequisites
Verify that your Edge cluster has at least two hosts. If not, you might receive an anti-affinity error.
Procedure
1 Implement the custom.yml file.
sudo mkdir -p /opt/vmware/vio/custom
sudo cp /var/lib/vio/ansible/custom/custom.yml.sample /opt/vmware/vio/custom/custom.yml
2 Edit the /opt/vmware/vio/custom/custom.yml file.
a Uncomment the nsxv_edge_ha parameter.
b Set the nsxv_edge_ha parameter to True.
nsxv_edge_ha: True
3 Save the custom.yml file.
After modifying and saving the custom.yml file, high availability is enabled for newly deployed NSXEdge nodes subsequently generated by VMware Integrated OpenStack.
VMware Integrated OpenStack Administrator Guide
VMware, Inc. 31
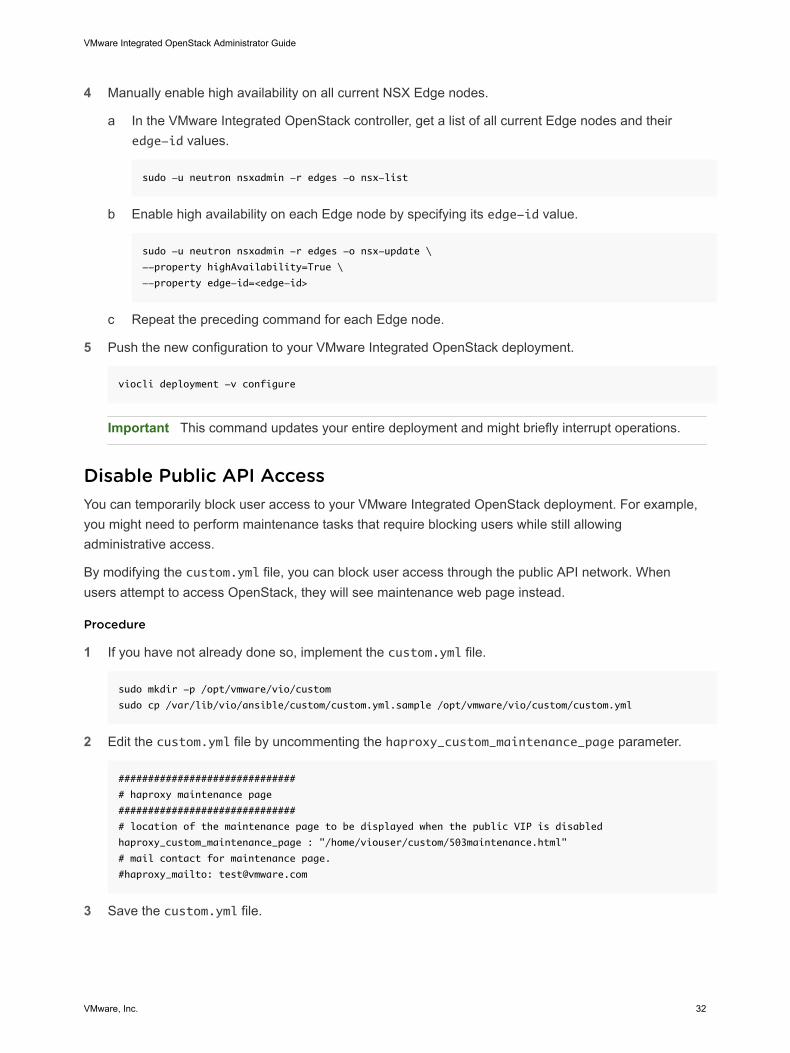
4 Manually enable high availability on all current NSX Edge nodes.
a In the VMware Integrated OpenStack controller, get a list of all current Edge nodes and theiredge-id values.
sudo -u neutron nsxadmin -r edges -o nsx-list
b Enable high availability on each Edge node by specifying its edge-id value.
sudo -u neutron nsxadmin -r edges -o nsx-update \
--property highAvailability=True \
--property edge-id=<edge-id>
c Repeat the preceding command for each Edge node.
5 Push the new configuration to your VMware Integrated OpenStack deployment.
viocli deployment -v configure
Important This command updates your entire deployment and might briefly interrupt operations.
Disable Public API AccessYou can temporarily block user access to your VMware Integrated OpenStack deployment. For example,you might need to perform maintenance tasks that require blocking users while still allowingadministrative access.
By modifying the custom.yml file, you can block user access through the public API network. Whenusers attempt to access OpenStack, they will see maintenance web page instead.
Procedure
1 If you have not already done so, implement the custom.yml file.
sudo mkdir -p /opt/vmware/vio/custom
sudo cp /var/lib/vio/ansible/custom/custom.yml.sample /opt/vmware/vio/custom/custom.yml
2 Edit the custom.yml file by uncommenting the haproxy_custom_maintenance_page parameter.
##############################
# haproxy maintenance page
##############################
# location of the maintenance page to be displayed when the public VIP is disabled
haproxy_custom_maintenance_page : "/home/viouser/custom/503maintenance.html"
# mail contact for maintenance page.
#haproxy_mailto: [email protected]
3 Save the custom.yml file.
VMware Integrated OpenStack Administrator Guide
VMware, Inc. 32
4 Push the modified configuration to your VMware Integrated OpenStack deployment.
viocli deployment -v configure --limit lb
5 To remove the block, repeat the procedure and re-comment out thehaproxy_custom_maintenance_page parameter.
Configure BGP Dynamic Routing for YourVMware Integrated OpenStack DeploymentStarting with VMware Integrated OpenStack 4.0, you can configure dynamic routing for your provider andtenants.
You must first create a VXLAN external network that you later use as internal interface for your gatewayedges.
Prerequisites
n You must use VMware NSX for vSphere as your virtual network provider.
Procedure
1 Create IPv4 address scope for future tenant subnets and the external VXLAN network subnet.
neutron address-scope-create scope_name 4
2 Create a provider subnet pool.
Replace scope_name with the name of the address scope that you created earlier.
neutron subnetpool-create --pool-prefix 10.10.10.0/24 --default-prefixlen 24 provider_pool_name --
address-scope scope_name
3 Create a self-service subnet pool for tenant networks.
Replace scope_name with the name of the address scope that you created earlier.
neutron subnetpool-create --pool-prefix 1.1.1.0/24 --default-prefixlen 26 selfservice --
address-scope scope_name --shared
4 Create the external VXLAN network.
The following command creates a new logical switch in VMware NSX for vSphere .
neutron net-create --provider:network_type vxlan --router:external external_VXLAN_network_name
VMware Integrated OpenStack Administrator Guide
VMware, Inc. 33
5 Create the external VXLAN subnet.
Replace provider_pool_name with the name of the provider pool that you created earlier. Replaceexternal_VXLAN_network_name with the name of the network that you created earlier.
neutron subnet-create --no-gateway --name ext_vxlan_subnet_name --disable-dhcp --allocation-pool
start=start_IP,end=end_IP --subnetpool provider_pool_name external_VXLAN_network_name NETWORK[CIDR]
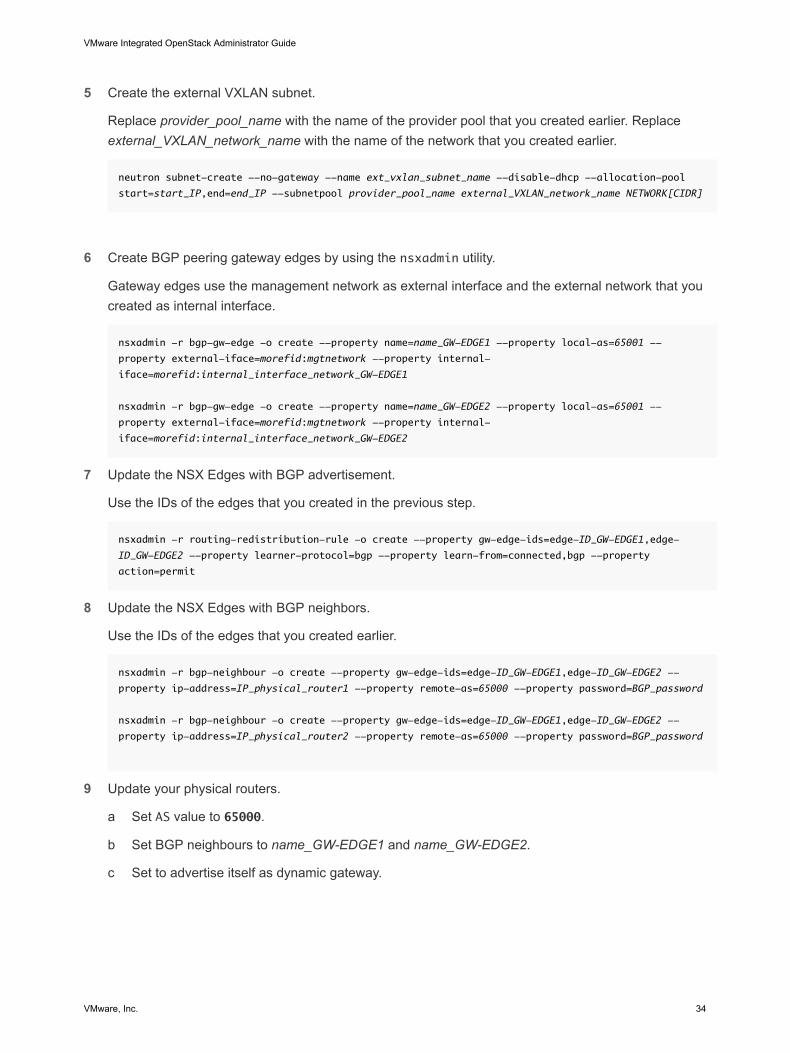
6 Create BGP peering gateway edges by using the nsxadmin utility.
Gateway edges use the management network as external interface and the external network that youcreated as internal interface.
nsxadmin -r bgp-gw-edge -o create --property name=name_GW-EDGE1 --property local-as=65001 --
property external-iface=morefid:mgtnetwork --property internal-
iface=morefid:internal_interface_network_GW-EDGE1
nsxadmin -r bgp-gw-edge -o create --property name=name_GW-EDGE2 --property local-as=65001 --
property external-iface=morefid:mgtnetwork --property internal-
iface=morefid:internal_interface_network_GW-EDGE2
7 Update the NSX Edges with BGP advertisement.
Use the IDs of the edges that you created in the previous step.
nsxadmin -r routing-redistribution-rule -o create --property gw-edge-ids=edge-ID_GW-EDGE1,edge-
ID_GW-EDGE2 --property learner-protocol=bgp --property learn-from=connected,bgp --property
action=permit
8 Update the NSX Edges with BGP neighbors.
Use the IDs of the edges that you created earlier.
nsxadmin -r bgp-neighbour -o create --property gw-edge-ids=edge-ID_GW-EDGE1,edge-ID_GW-EDGE2 --
property ip-address=IP_physical_router1 --property remote-as=65000 --property password=BGP_password
nsxadmin -r bgp-neighbour -o create --property gw-edge-ids=edge-ID_GW-EDGE1,edge-ID_GW-EDGE2 --
property ip-address=IP_physical_router2 --property remote-as=65000 --property password=BGP_password
9 Update your physical routers.
a Set AS value to 65000.
b Set BGP neighbours to name_GW-EDGE1 and name_GW-EDGE2.
c Set to advertise itself as dynamic gateway.
VMware Integrated OpenStack Administrator Guide
VMware, Inc. 34
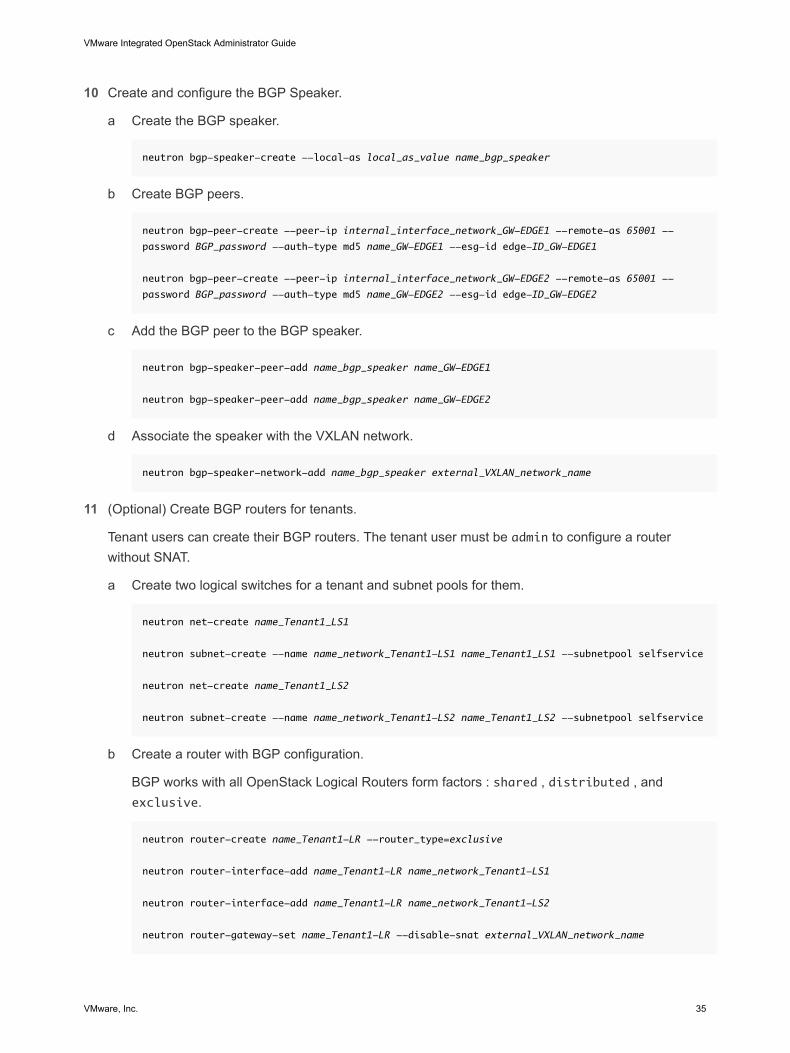
10 Create and configure the BGP Speaker.
a Create the BGP speaker.
neutron bgp-speaker-create --local-as local_as_value name_bgp_speaker
b Create BGP peers.
neutron bgp-peer-create --peer-ip internal_interface_network_GW-EDGE1 --remote-as 65001 --
password BGP_password --auth-type md5 name_GW-EDGE1 --esg-id edge-ID_GW-EDGE1
neutron bgp-peer-create --peer-ip internal_interface_network_GW-EDGE2 --remote-as 65001 --
password BGP_password --auth-type md5 name_GW-EDGE2 --esg-id edge-ID_GW-EDGE2
c Add the BGP peer to the BGP speaker.
neutron bgp-speaker-peer-add name_bgp_speaker name_GW-EDGE1
neutron bgp-speaker-peer-add name_bgp_speaker name_GW-EDGE2
d Associate the speaker with the VXLAN network.
neutron bgp-speaker-network-add name_bgp_speaker external_VXLAN_network_name
11 (Optional) Create BGP routers for tenants.
Tenant users can create their BGP routers. The tenant user must be admin to configure a routerwithout SNAT.
a Create two logical switches for a tenant and subnet pools for them.
neutron net-create name_Tenant1_LS1
neutron subnet-create --name name_network_Tenant1-LS1 name_Tenant1_LS1 --subnetpool selfservice
neutron net-create name_Tenant1_LS2
neutron subnet-create --name name_network_Tenant1-LS2 name_Tenant1_LS2 --subnetpool selfservice
b Create a router with BGP configuration.
BGP works with all OpenStack Logical Routers form factors : shared , distributed , andexclusive.
neutron router-create name_Tenant1-LR --router_type=exclusive
neutron router-interface-add name_Tenant1-LR name_network_Tenant1-LS1
neutron router-interface-add name_Tenant1-LR name_network_Tenant1-LS2
neutron router-gateway-set name_Tenant1-LR --disable-snat external_VXLAN_network_name
VMware Integrated OpenStack Administrator Guide
VMware, Inc. 35

BGP dynamic routing is now configured on the provider side and tenants can also use it.
Adding Capacity in the vSphere Web ClientYou can add compute clusters and datastores to an existing VMware Integrated OpenStack deployment.
Adding Compute Resources from Multiple vCenter ServerInstancesYou can add multiple vCenter Server instances to your VMware Integrated OpenStack deployment, if youuse VMware NSX-T as virtual network provider. By adding more instances, you improve scalability andresiliency for your OpenStack infrastructure.
Requirements for Adding Compute Resources from MultiplevCenter Server InstancesYou can add multiple vCenter Server instances, if the following requirements are met:
n High Availability deployments only, not available for compact mode deployments.
n Virtual network must be provided by VMware NSX-T, not available for deployments that use vSphereDistributed Switch or VMware NSX for vSphere .
n You can have only one availability zone per vCenter Server instance.
Add New Compute Clusters for an OpenStack Deployment fromMultiple vCenter Server InstancesYou can increase the number of compute clusters in your VMware Integrated OpenStack deployment toincrease CPU capacity. You can select compute clusters from all Compute vCenter Server instances inyour data center.
Prerequisites
Prepare a cluster with at least one host.
Procedure
1 In vCenter Server, select Home > VMware Integrated OpenStack > Manage.
2 (Optional) Add additional vCenter Server instances for use in VMware Integrated OpenStack.
a Select the Compute vCenter Server tab.
b Click the green plus-sign icon (+) at the top of the panel to add a new instance.
c In the Add Compute vCenter Server dialog box, enter the FQDN of the instance, credentials withadministrative privileges, and click OK.
3 Select the Nova Compute tab.
This tab displays the current Nova Compute clusters and their status.
VMware Integrated OpenStack Administrator Guide
VMware, Inc. 36

4 Click the green plus-sign icon (+) at the top of the panel.
5 On the Select a Compute vCenter Server page, select the instance and the availability zone for thecompute cluster that you need and click Next.
6 On the Add Nova cluster page, select the cluster that you prepared as a prerequisite, and click Next.
The cluster you select must contain at least one host.
7 On the Add Nova datastores page, select the datastores for the tenants in the new cluster, and clickNext.
8 On the Review proposed configuration page, select the existing management VM, and click Next.
9 Review the proposed configuration, and click Finish.
10 Confirm that the new cluster is added to the OpenStack deployment.
The newly added cluster appears in the Nova Compute tab.
OpenStack capacity increases based on the resources available in the additional cluster.
Add Storage to the Compute NodeYou can increase the number of datastores available to the Compute node in yourVMware Integrated OpenStack deployment.
Adding a datastore to the Compute node causes the Nova service to restart, which might cause atemporary disruption to the OpenStack services in general.
Prerequisites
Verify that you have datastores available. See the vSphere Web Client documentation.
Procedure
1 In vCenter, select Home > VMware Integrated OpenStack > Manage.
2 Click the Nova Storage tab.
This tab displays the datastores that are currently available, their status, and other details.
3 Click the green plus-sign icon (+) at the top of the panel.
4 On the Select a Nova node page of the Add Nova Datastores dialog box, select the cluster to whichyou want to add a datastore, and click Next.
5 On the Add Nova datastore page, select one or more datastores to add to the cluster, and click Next.
6 Review the proposed configuration, and click Finish.
The storage capacity for the selected Compute node increases accordingly with the size of the additionaldatastore.
VMware Integrated OpenStack Administrator Guide
VMware, Inc. 37

Add Storage to the Image ServiceYou can increase the number of datastores available to the Image Service node in yourVMware Integrated OpenStack deployment.
Adding a datastore to the Image Service node causes the Glance service to restart, which might cause atemporary disruption to the OpenStack services in general.
Prerequisites
Verify that you have datastores available. See the vSphere Web Client documentation.
Procedure
1 In vCenter, select Home > VMware Integrated OpenStack > Manage.
2 Click the Glance Storage tab.
This tab displays the datastores that are currently available, their status, and other details.
3 Click the green plus-sign icon (+) at the top of the panel.
4 On the Add Glance datastore page, select one or more datastores to add to the cluster, and clickNext.
5 Review the proposed configuration, and click Finish.
The storage capacity for the Image Service node increases accordingly with the size of the additionaldatastore.
Fix Out of Sync Availability ZonesWhen you work with multiple vCenter Server instances, you might see that availability zones are notsynced between the OpenStack management server and the VMware Integrated OpenStack Horizondashboard.
Due to a known OpenStack issue, if you use CLI commands to rename availability zones, you might seedifferent names in the vSphere Web Client and the Horizon dashboard. In the vSphere Web Client, on theNova Compute tab, under Availability Zones, out of sync availability ones appear in red. Resynchronizethe availability zones to fix the issue.
Procedure
1 Using SSH, log in to the VMware Integrated OpenStack manager.
2 List the availability zones for your OpenStack deployment.
You need the OpenStack admin password.
viocli inventory-admin show-availability-zones
VMware Integrated OpenStack Administrator Guide
VMware, Inc. 38
3 Synchronize availability zones.
viocli inventory-admin sync-availability-zones
All availability zones are now synchronized.
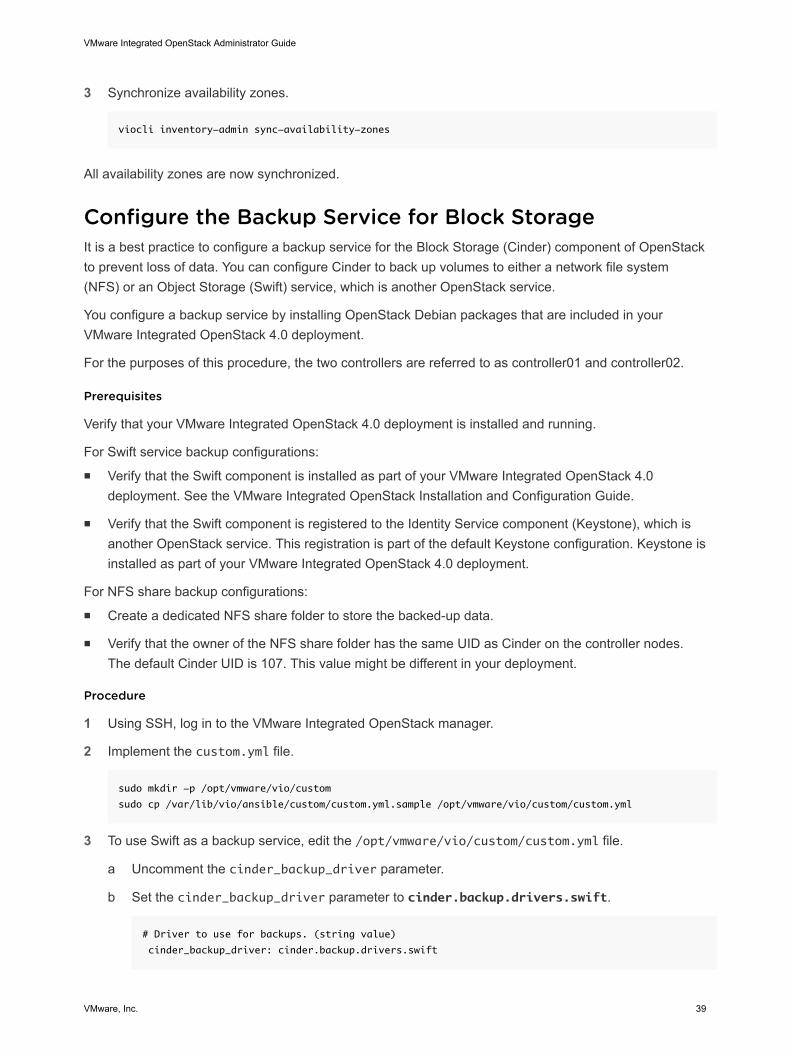
Configure the Backup Service for Block StorageIt is a best practice to configure a backup service for the Block Storage (Cinder) component of OpenStackto prevent loss of data. You can configure Cinder to back up volumes to either a network file system(NFS) or an Object Storage (Swift) service, which is another OpenStack service.
You configure a backup service by installing OpenStack Debian packages that are included in yourVMware Integrated OpenStack 4.0 deployment.
For the purposes of this procedure, the two controllers are referred to as controller01 and controller02.
Prerequisites
Verify that your VMware Integrated OpenStack 4.0 deployment is installed and running.
For Swift service backup configurations:
n Verify that the Swift component is installed as part of your VMware Integrated OpenStack 4.0deployment. See the VMware Integrated OpenStack Installation and Configuration Guide.
n Verify that the Swift component is registered to the Identity Service component (Keystone), which isanother OpenStack service. This registration is part of the default Keystone configuration. Keystone isinstalled as part of your VMware Integrated OpenStack 4.0 deployment.
For NFS share backup configurations:
n Create a dedicated NFS share folder to store the backed-up data.
n Verify that the owner of the NFS share folder has the same UID as Cinder on the controller nodes.The default Cinder UID is 107. This value might be different in your deployment.
Procedure
1 Using SSH, log in to the VMware Integrated OpenStack manager.
2 Implement the custom.yml file.
sudo mkdir -p /opt/vmware/vio/custom
sudo cp /var/lib/vio/ansible/custom/custom.yml.sample /opt/vmware/vio/custom/custom.yml
3 To use Swift as a backup service, edit the /opt/vmware/vio/custom/custom.yml file.
a Uncomment the cinder_backup_driver parameter.
b Set the cinder_backup_driver parameter to cinder.backup.drivers.swift.
# Driver to use for backups. (string value)
cinder_backup_driver: cinder.backup.drivers.swift
VMware Integrated OpenStack Administrator Guide
VMware, Inc. 39
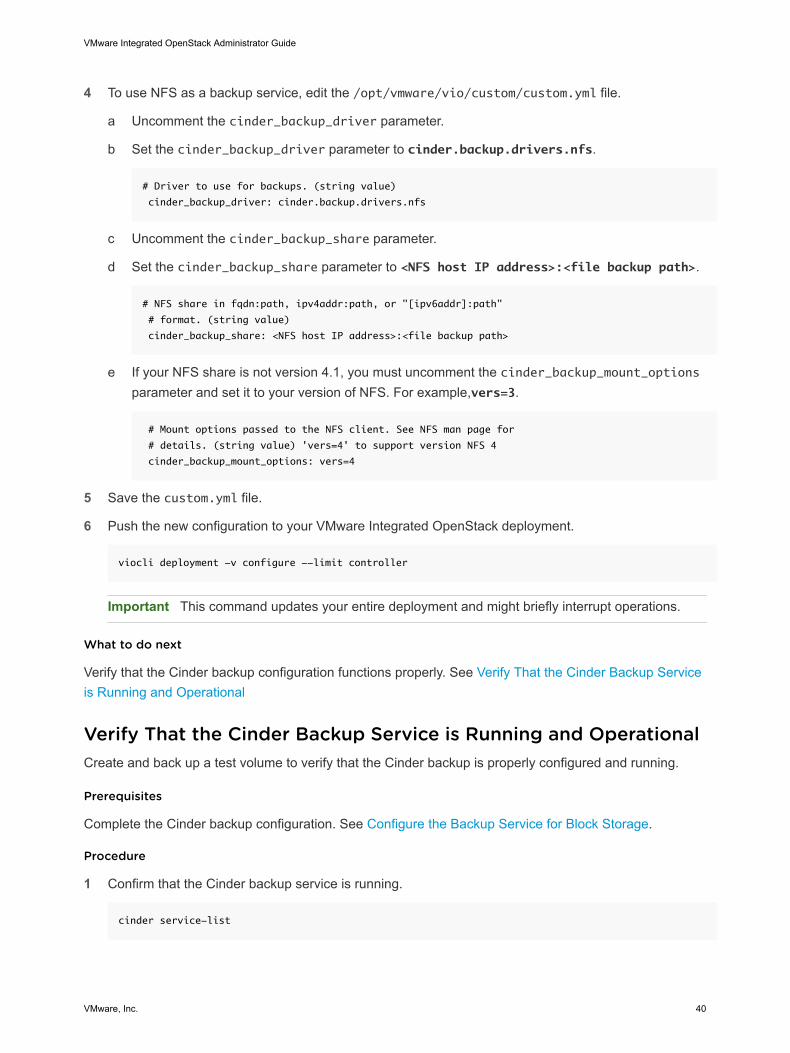
4 To use NFS as a backup service, edit the /opt/vmware/vio/custom/custom.yml file.
a Uncomment the cinder_backup_driver parameter.
b Set the cinder_backup_driver parameter to cinder.backup.drivers.nfs.
# Driver to use for backups. (string value)
cinder_backup_driver: cinder.backup.drivers.nfs
c Uncomment the cinder_backup_share parameter.
d Set the cinder_backup_share parameter to <NFS host IP address>:<file backup path>.
# NFS share in fqdn:path, ipv4addr:path, or "[ipv6addr]:path"
# format. (string value)
cinder_backup_share: <NFS host IP address>:<file backup path>
e If your NFS share is not version 4.1, you must uncomment the cinder_backup_mount_optionsparameter and set it to your version of NFS. For example,vers=3.
# Mount options passed to the NFS client. See NFS man page for
# details. (string value) 'vers=4' to support version NFS 4
cinder_backup_mount_options: vers=4
5 Save the custom.yml file.
6 Push the new configuration to your VMware Integrated OpenStack deployment.
viocli deployment -v configure --limit controller
Important This command updates your entire deployment and might briefly interrupt operations.
What to do next
Verify that the Cinder backup configuration functions properly. See Verify That the Cinder Backup Serviceis Running and Operational
Verify That the Cinder Backup Service is Running and OperationalCreate and back up a test volume to verify that the Cinder backup is properly configured and running.
Prerequisites
Complete the Cinder backup configuration. See Configure the Backup Service for Block Storage.
Procedure
1 Confirm that the Cinder backup service is running.
cinder service-list
VMware Integrated OpenStack Administrator Guide
VMware, Inc. 40
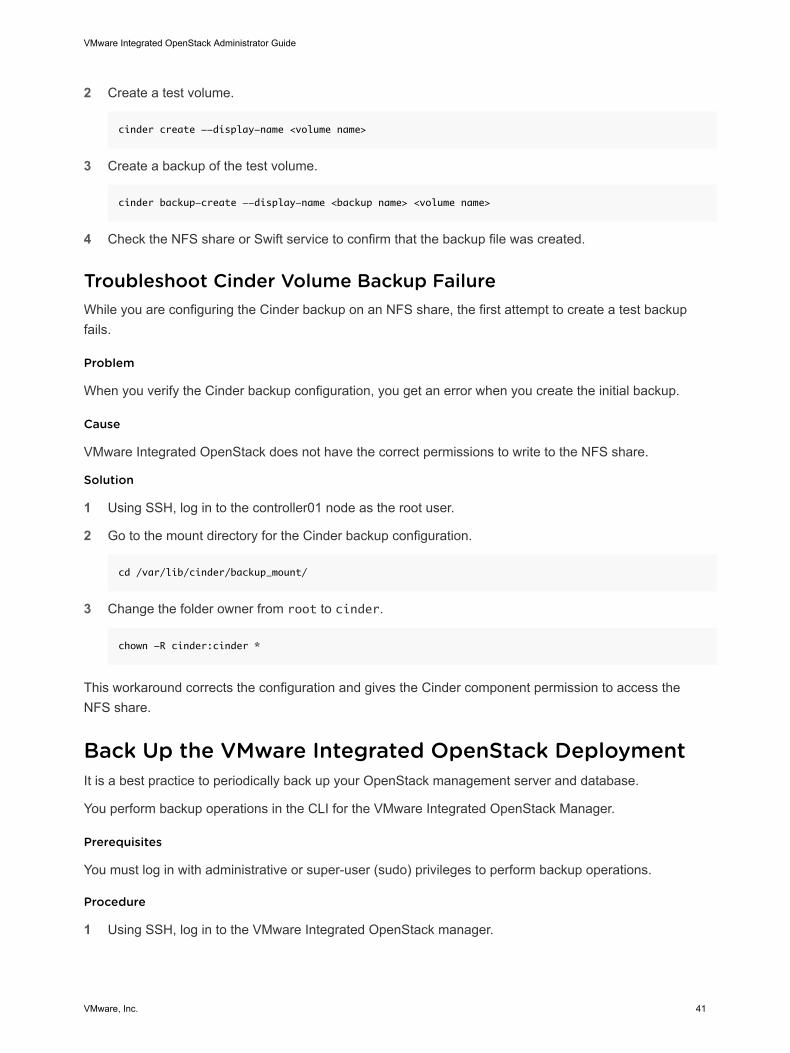
2 Create a test volume.
cinder create --display-name <volume name>
3 Create a backup of the test volume.
cinder backup-create --display-name <backup name> <volume name>
4 Check the NFS share or Swift service to confirm that the backup file was created.
Troubleshoot Cinder Volume Backup FailureWhile you are configuring the Cinder backup on an NFS share, the first attempt to create a test backupfails.
Problem
When you verify the Cinder backup configuration, you get an error when you create the initial backup.
Cause
VMware Integrated OpenStack does not have the correct permissions to write to the NFS share.
Solution
1 Using SSH, log in to the controller01 node as the root user.
2 Go to the mount directory for the Cinder backup configuration.
cd /var/lib/cinder/backup_mount/
3 Change the folder owner from root to cinder.
chown -R cinder:cinder *
This workaround corrects the configuration and gives the Cinder component permission to access theNFS share.
Back Up the VMware Integrated OpenStack DeploymentIt is a best practice to periodically back up your OpenStack management server and database.
You perform backup operations in the CLI for the VMware Integrated OpenStack Manager.
Prerequisites
You must log in with administrative or super-user (sudo) privileges to perform backup operations.
Procedure
1 Using SSH, log in to the VMware Integrated OpenStack manager.
VMware Integrated OpenStack Administrator Guide
VMware, Inc. 41
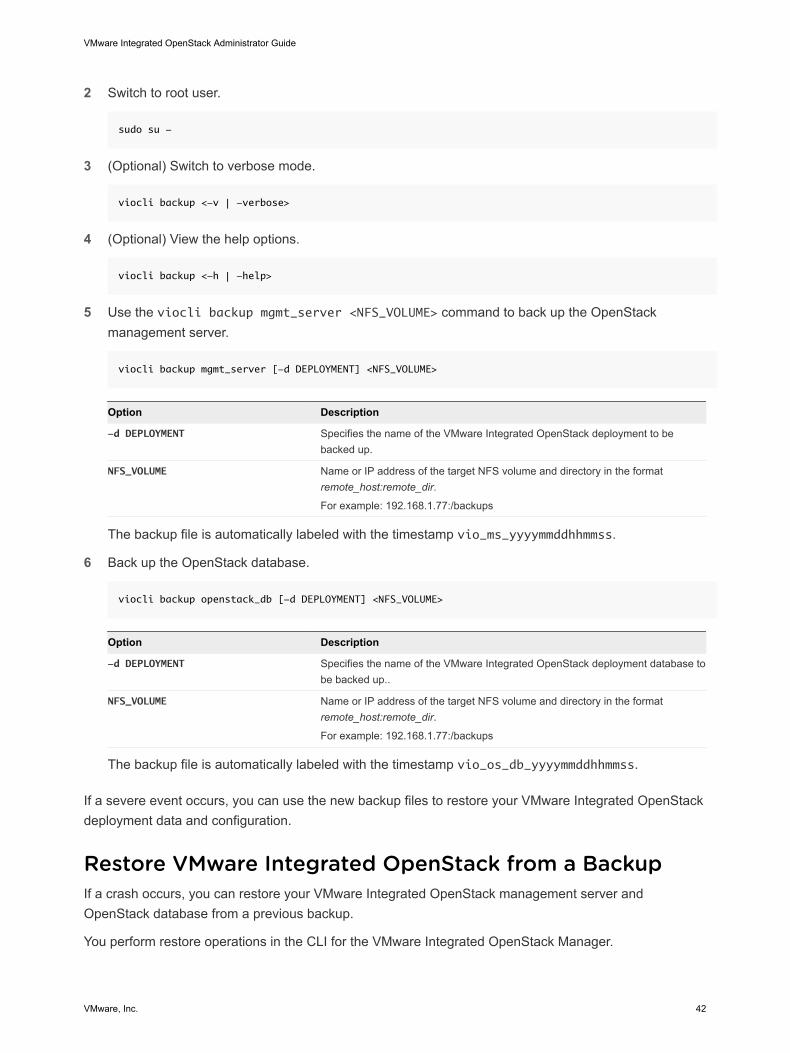
2 Switch to root user.
sudo su -
3 (Optional) Switch to verbose mode.
viocli backup <-v | -verbose>
4 (Optional) View the help options.
viocli backup <-h | -help>
5 Use the viocli backup mgmt_server <NFS_VOLUME> command to back up the OpenStackmanagement server.
viocli backup mgmt_server [-d DEPLOYMENT] <NFS_VOLUME>
Option Description
-d DEPLOYMENT Specifies the name of the VMware Integrated OpenStack deployment to bebacked up.
NFS_VOLUME Name or IP address of the target NFS volume and directory in the formatremote_host:remote_dir.
For example: 192.168.1.77:/backups The backup file is automatically labeled with the timestamp vio_ms_yyyymmddhhmmss.
6 Back up the OpenStack database.
viocli backup openstack_db [-d DEPLOYMENT] <NFS_VOLUME>
Option Description
-d DEPLOYMENT Specifies the name of the VMware Integrated OpenStack deployment database tobe backed up..
NFS_VOLUME Name or IP address of the target NFS volume and directory in the formatremote_host:remote_dir.
For example: 192.168.1.77:/backups The backup file is automatically labeled with the timestamp vio_os_db_yyyymmddhhmmss.
If a severe event occurs, you can use the new backup files to restore your VMware Integrated OpenStackdeployment data and configuration.
Restore VMware Integrated OpenStack from a BackupIf a crash occurs, you can restore your VMware Integrated OpenStack management server andOpenStack database from a previous backup.
You perform restore operations in the CLI for the VMware Integrated OpenStack Manager.
VMware Integrated OpenStack Administrator Guide
VMware, Inc. 42
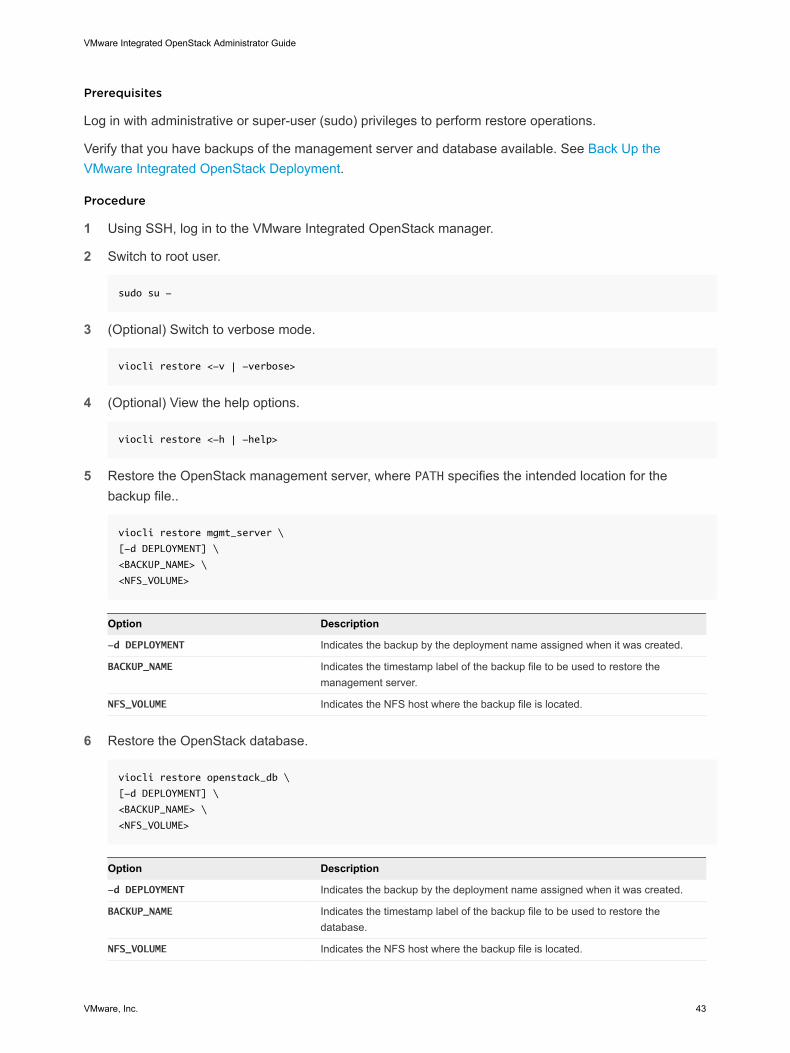
Prerequisites
Log in with administrative or super-user (sudo) privileges to perform restore operations.
Verify that you have backups of the management server and database available. See Back Up theVMware Integrated OpenStack Deployment.
Procedure
1 Using SSH, log in to the VMware Integrated OpenStack manager.
2 Switch to root user.
sudo su -
3 (Optional) Switch to verbose mode.
viocli restore <-v | -verbose>
4 (Optional) View the help options.
viocli restore <-h | -help>
5 Restore the OpenStack management server, where PATH specifies the intended location for thebackup file..
viocli restore mgmt_server \
[-d DEPLOYMENT] \
<BACKUP_NAME> \
<NFS_VOLUME>
Option Description
-d DEPLOYMENT Indicates the backup by the deployment name assigned when it was created.
BACKUP_NAME Indicates the timestamp label of the backup file to be used to restore themanagement server.
NFS_VOLUME Indicates the NFS host where the backup file is located.
6 Restore the OpenStack database.
viocli restore openstack_db \
[-d DEPLOYMENT] \
<BACKUP_NAME> \
<NFS_VOLUME>
Option Description
-d DEPLOYMENT Indicates the backup by the deployment name assigned when it was created.
BACKUP_NAME Indicates the timestamp label of the backup file to be used to restore thedatabase.
NFS_VOLUME Indicates the NFS host where the backup file is located.
VMware Integrated OpenStack Administrator Guide
VMware, Inc. 43
You restore your VMware Integrated OpenStack management server and OpenStack database to thestate of the backups.
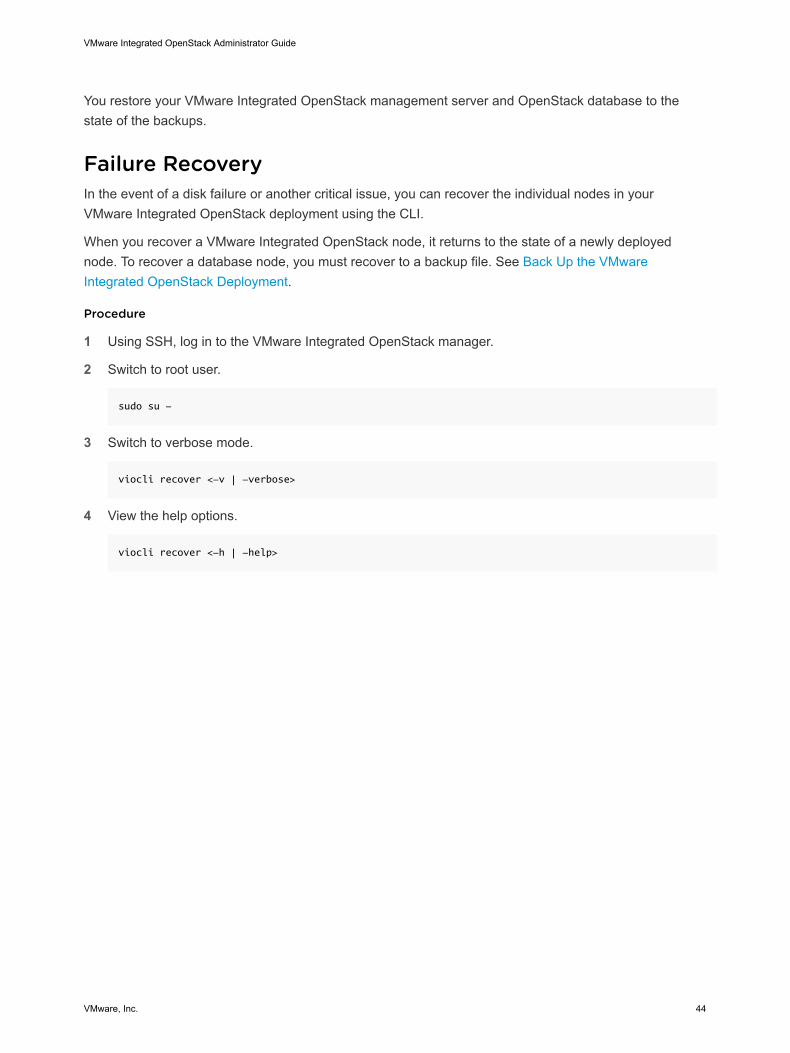
Failure RecoveryIn the event of a disk failure or another critical issue, you can recover the individual nodes in yourVMware Integrated OpenStack deployment using the CLI.
When you recover a VMware Integrated OpenStack node, it returns to the state of a newly deployednode. To recover a database node, you must recover to a backup file. See Back Up the VMwareIntegrated OpenStack Deployment.
Procedure
1 Using SSH, log in to the VMware Integrated OpenStack manager.
2 Switch to root user.
sudo su -
3 Switch to verbose mode.
viocli recover <-v | -verbose>
4 View the help options.
viocli recover <-h | -help>
VMware Integrated OpenStack Administrator Guide
VMware, Inc. 44
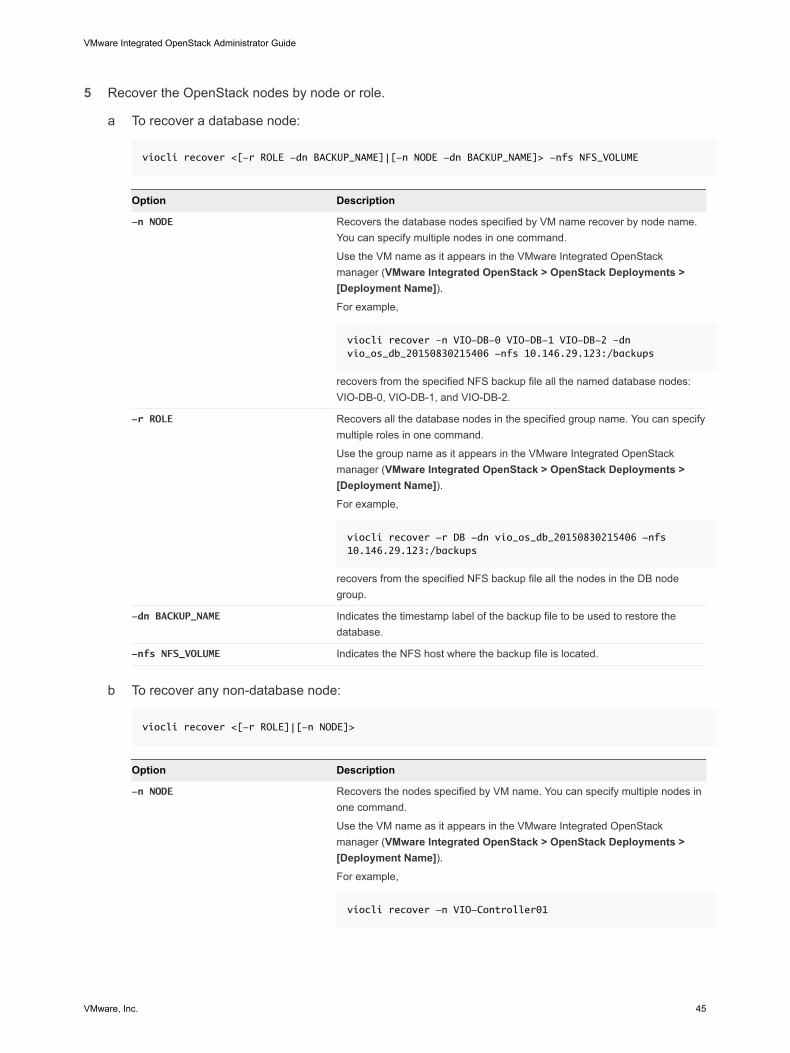
5 Recover the OpenStack nodes by node or role.
a To recover a database node:
viocli recover <[-r ROLE -dn BACKUP_NAME]|[-n NODE -dn BACKUP_NAME]> -nfs NFS_VOLUME
Option Description
-n NODE Recovers the database nodes specified by VM name recover by node name.You can specify multiple nodes in one command.
Use the VM name as it appears in the VMware Integrated OpenStackmanager (VMware Integrated OpenStack > OpenStack Deployments >[Deployment Name]).For example,
viocli recover –n VIO-DB-0 VIO-DB-1 VIO-DB-2 –dn vio_os_db_20150830215406 -nfs 10.146.29.123:/backups
recovers from the specified NFS backup file all the named database nodes:VIO-DB-0, VIO-DB-1, and VIO-DB-2.
-r ROLE Recovers all the database nodes in the specified group name. You can specifymultiple roles in one command.
Use the group name as it appears in the VMware Integrated OpenStackmanager (VMware Integrated OpenStack > OpenStack Deployments >[Deployment Name]).For example,
viocli recover -r DB -dn vio_os_db_20150830215406 -nfs 10.146.29.123:/backups
recovers from the specified NFS backup file all the nodes in the DB nodegroup.
-dn BACKUP_NAME Indicates the timestamp label of the backup file to be used to restore thedatabase.
-nfs NFS_VOLUME Indicates the NFS host where the backup file is located.
b To recover any non-database node:
viocli recover <[-r ROLE]|[-n NODE]>
Option Description
-n NODE Recovers the nodes specified by VM name. You can specify multiple nodes inone command.
Use the VM name as it appears in the VMware Integrated OpenStackmanager (VMware Integrated OpenStack > OpenStack Deployments >[Deployment Name]).For example,
viocli recover -n VIO-Controller01
VMware Integrated OpenStack Administrator Guide
VMware, Inc. 45
Option Description
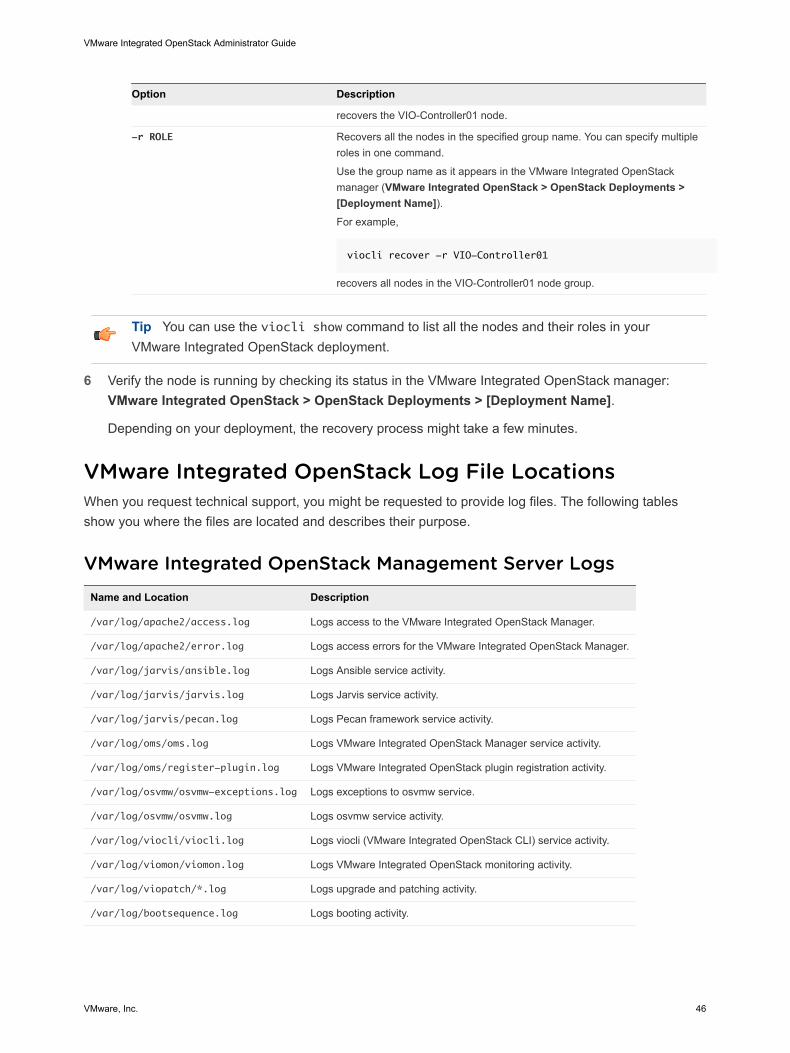
recovers the VIO-Controller01 node.
-r ROLE Recovers all the nodes in the specified group name. You can specify multipleroles in one command.
Use the group name as it appears in the VMware Integrated OpenStackmanager (VMware Integrated OpenStack > OpenStack Deployments >[Deployment Name]).For example,
viocli recover -r VIO-Controller01
recovers all nodes in the VIO-Controller01 node group.
Tip You can use the viocli show command to list all the nodes and their roles in yourVMware Integrated OpenStack deployment.
6 Verify the node is running by checking its status in the VMware Integrated OpenStack manager:VMware Integrated OpenStack > OpenStack Deployments > [Deployment Name].
Depending on your deployment, the recovery process might take a few minutes.
VMware Integrated OpenStack Log File LocationsWhen you request technical support, you might be requested to provide log files. The following tablesshow you where the files are located and describes their purpose.
VMware Integrated OpenStack Management Server Logs
Name and Location Description
/var/log/apache2/access.log Logs access to the VMware Integrated OpenStack Manager.
/var/log/apache2/error.log Logs access errors for the VMware Integrated OpenStack Manager.
/var/log/jarvis/ansible.log Logs Ansible service activity.
/var/log/jarvis/jarvis.log Logs Jarvis service activity.
/var/log/jarvis/pecan.log Logs Pecan framework service activity.
/var/log/oms/oms.log Logs VMware Integrated OpenStack Manager service activity.
/var/log/oms/register-plugin.log Logs VMware Integrated OpenStack plugin registration activity.
/var/log/osvmw/osvmw-exceptions.log Logs exceptions to osvmw service.
/var/log/osvmw/osvmw.log Logs osvmw service activity.
/var/log/viocli/viocli.log Logs viocli (VMware Integrated OpenStack CLI) service activity.
/var/log/viomon/viomon.log Logs VMware Integrated OpenStack monitoring activity.
/var/log/viopatch/*.log Logs upgrade and patching activity.
/var/log/bootsequence.log Logs booting activity.
VMware Integrated OpenStack Administrator Guide
VMware, Inc. 46
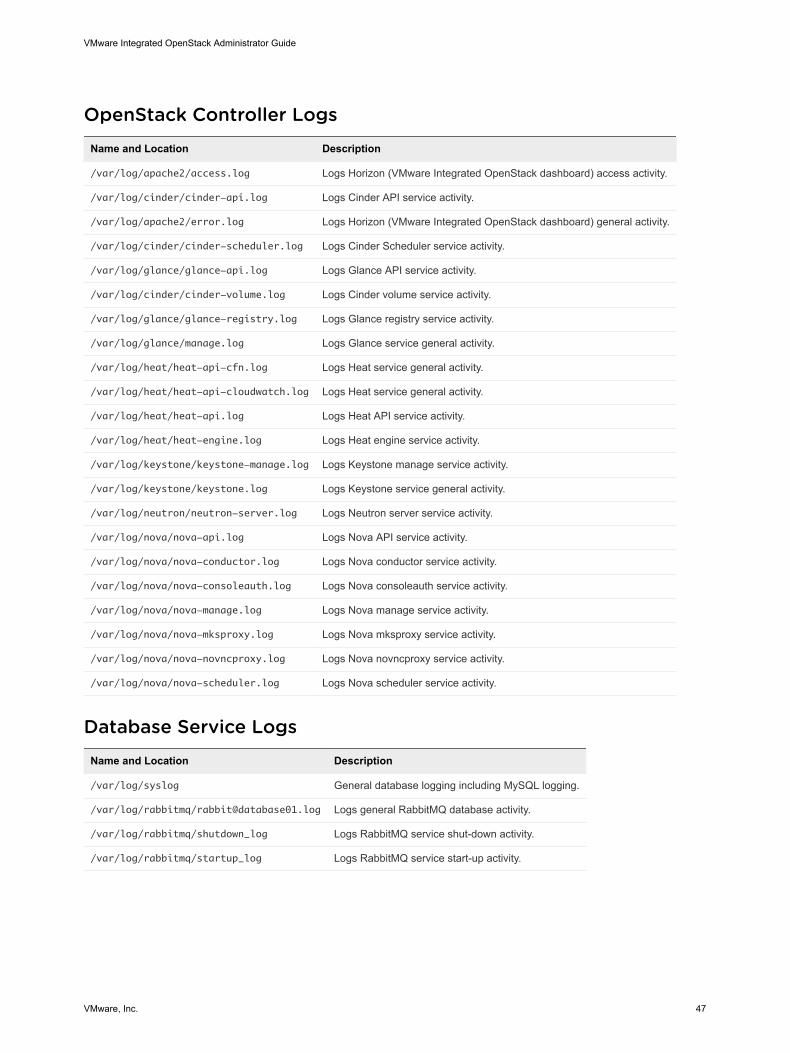
OpenStack Controller Logs
Name and Location Description
/var/log/apache2/access.log Logs Horizon (VMware Integrated OpenStack dashboard) access activity.
/var/log/cinder/cinder-api.log Logs Cinder API service activity.
/var/log/apache2/error.log Logs Horizon (VMware Integrated OpenStack dashboard) general activity.
/var/log/cinder/cinder-scheduler.log Logs Cinder Scheduler service activity.
/var/log/glance/glance-api.log Logs Glance API service activity.
/var/log/cinder/cinder-volume.log Logs Cinder volume service activity.
/var/log/glance/glance-registry.log Logs Glance registry service activity.
/var/log/glance/manage.log Logs Glance service general activity.
/var/log/heat/heat-api-cfn.log Logs Heat service general activity.
/var/log/heat/heat-api-cloudwatch.log Logs Heat service general activity.
/var/log/heat/heat-api.log Logs Heat API service activity.
/var/log/heat/heat-engine.log Logs Heat engine service activity.
/var/log/keystone/keystone-manage.log Logs Keystone manage service activity.
/var/log/keystone/keystone.log Logs Keystone service general activity.
/var/log/neutron/neutron-server.log Logs Neutron server service activity.
/var/log/nova/nova-api.log Logs Nova API service activity.
/var/log/nova/nova-conductor.log Logs Nova conductor service activity.
/var/log/nova/nova-consoleauth.log Logs Nova consoleauth service activity.
/var/log/nova/nova-manage.log Logs Nova manage service activity.
/var/log/nova/nova-mksproxy.log Logs Nova mksproxy service activity.
/var/log/nova/nova-novncproxy.log Logs Nova novncproxy service activity.
/var/log/nova/nova-scheduler.log Logs Nova scheduler service activity.
Database Service Logs
Name and Location Description
/var/log/syslog General database logging including MySQL logging.
/var/log/rabbitmq/[email protected] Logs general RabbitMQ database activity.
/var/log/rabbitmq/shutdown_log Logs RabbitMQ service shut-down activity.
/var/log/rabbitmq/startup_log Logs RabbitMQ service start-up activity.
VMware Integrated OpenStack Administrator Guide
VMware, Inc. 47
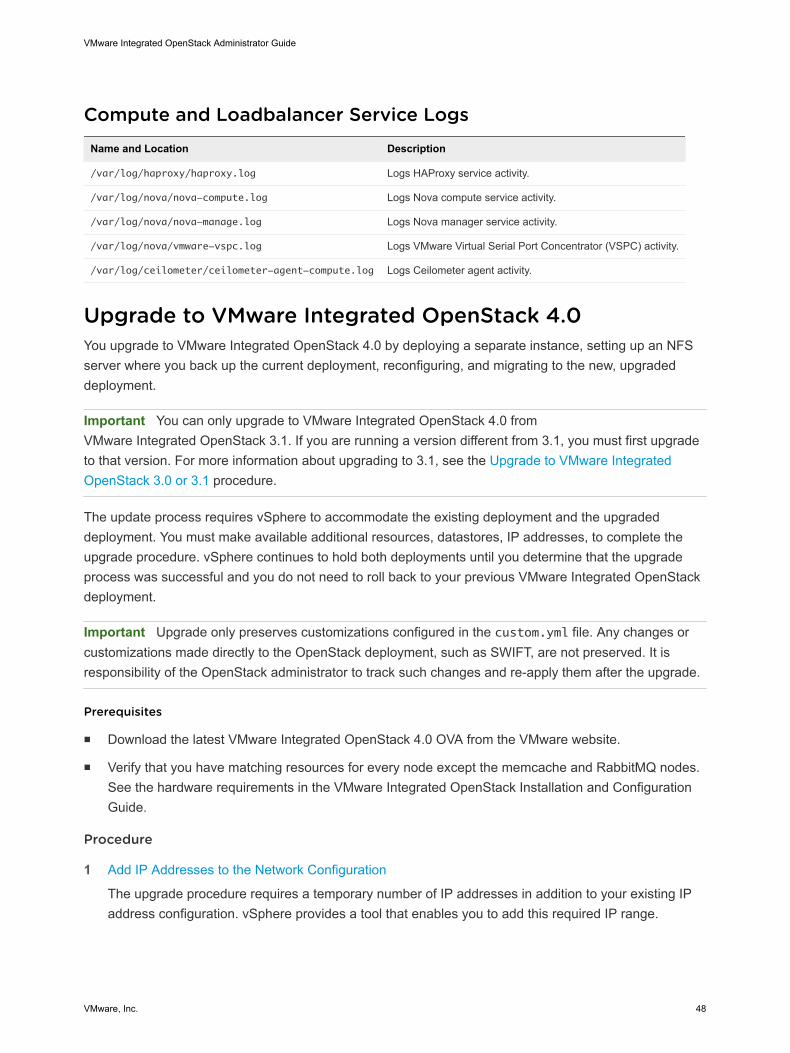
Compute and Loadbalancer Service Logs
Name and Location Description
/var/log/haproxy/haproxy.log Logs HAProxy service activity.
/var/log/nova/nova-compute.log Logs Nova compute service activity.
/var/log/nova/nova-manage.log Logs Nova manager service activity.
/var/log/nova/vmware-vspc.log Logs VMware Virtual Serial Port Concentrator (VSPC) activity.
/var/log/ceilometer/ceilometer-agent-compute.log Logs Ceilometer agent activity.
Upgrade to VMware Integrated OpenStack 4.0You upgrade to VMware Integrated OpenStack 4.0 by deploying a separate instance, setting up an NFSserver where you back up the current deployment, reconfiguring, and migrating to the new, upgradeddeployment.
Important You can only upgrade to VMware Integrated OpenStack 4.0 fromVMware Integrated OpenStack 3.1. If you are running a version different from 3.1, you must first upgradeto that version. For more information about upgrading to 3.1, see the Upgrade to VMware IntegratedOpenStack 3.0 or 3.1 procedure.
The update process requires vSphere to accommodate the existing deployment and the upgradeddeployment. You must make available additional resources, datastores, IP addresses, to complete theupgrade procedure. vSphere continues to hold both deployments until you determine that the upgradeprocess was successful and you do not need to roll back to your previous VMware Integrated OpenStackdeployment.
Important Upgrade only preserves customizations configured in the custom.yml file. Any changes orcustomizations made directly to the OpenStack deployment, such as SWIFT, are not preserved. It isresponsibility of the OpenStack administrator to track such changes and re-apply them after the upgrade.
Prerequisites
n Download the latest VMware Integrated OpenStack 4.0 OVA from the VMware website.
n Verify that you have matching resources for every node except the memcache and RabbitMQ nodes.See the hardware requirements in the VMware Integrated OpenStack Installation and ConfigurationGuide.
Procedure
1 Add IP Addresses to the Network Configuration
The upgrade procedure requires a temporary number of IP addresses in addition to your existing IPaddress configuration. vSphere provides a tool that enables you to add this required IP range.
VMware Integrated OpenStack Administrator Guide
VMware, Inc. 48
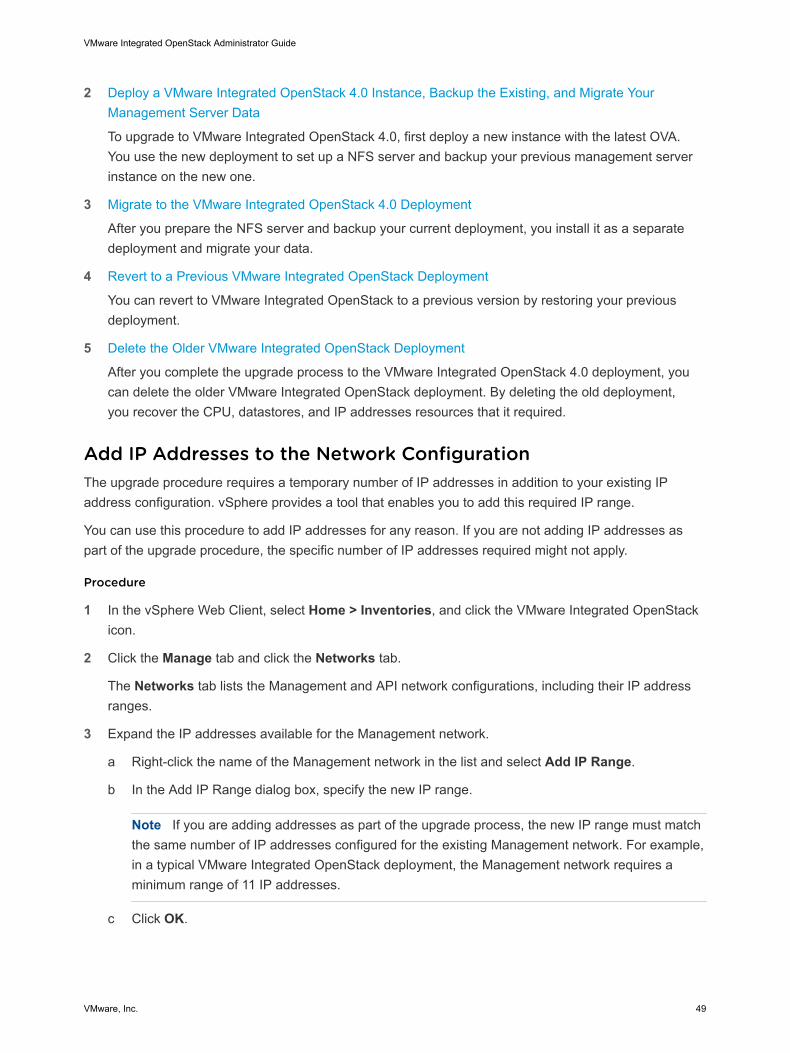
2 Deploy a VMware Integrated OpenStack 4.0 Instance, Backup the Existing, and Migrate YourManagement Server Data
To upgrade to VMware Integrated OpenStack 4.0, first deploy a new instance with the latest OVA.You use the new deployment to set up a NFS server and backup your previous management serverinstance on the new one.
3 Migrate to the VMware Integrated OpenStack 4.0 Deployment
After you prepare the NFS server and backup your current deployment, you install it as a separatedeployment and migrate your data.
4 Revert to a Previous VMware Integrated OpenStack Deployment
You can revert to VMware Integrated OpenStack to a previous version by restoring your previousdeployment.
5 Delete the Older VMware Integrated OpenStack Deployment
After you complete the upgrade process to the VMware Integrated OpenStack 4.0 deployment, youcan delete the older VMware Integrated OpenStack deployment. By deleting the old deployment,you recover the CPU, datastores, and IP addresses resources that it required.
Add IP Addresses to the Network ConfigurationThe upgrade procedure requires a temporary number of IP addresses in addition to your existing IPaddress configuration. vSphere provides a tool that enables you to add this required IP range.
You can use this procedure to add IP addresses for any reason. If you are not adding IP addresses aspart of the upgrade procedure, the specific number of IP addresses required might not apply.
Procedure
1 In the vSphere Web Client, select Home > Inventories, and click the VMware Integrated OpenStackicon.
2 Click the Manage tab and click the Networks tab.
The Networks tab lists the Management and API network configurations, including their IP addressranges.
3 Expand the IP addresses available for the Management network.
a Right-click the name of the Management network in the list and select Add IP Range.
b In the Add IP Range dialog box, specify the new IP range.
Note If you are adding addresses as part of the upgrade process, the new IP range must matchthe same number of IP addresses configured for the existing Management network. For example,in a typical VMware Integrated OpenStack deployment, the Management network requires aminimum range of 11 IP addresses.
c Click OK.
VMware Integrated OpenStack Administrator Guide
VMware, Inc. 49
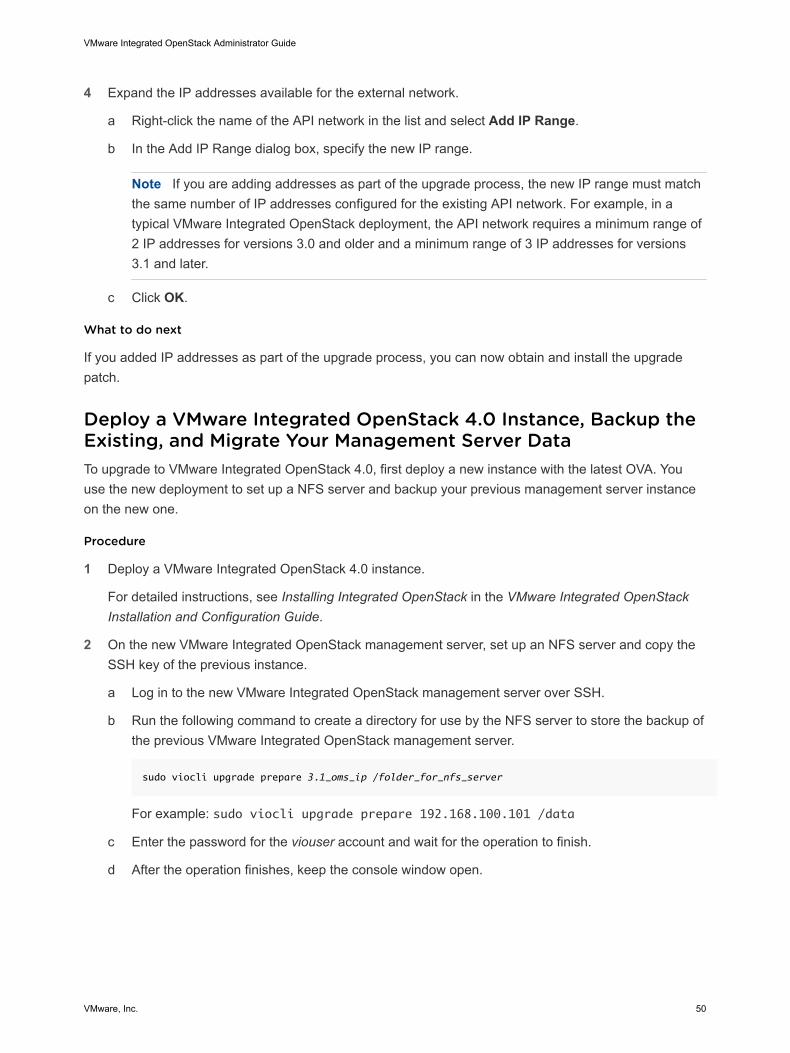
4 Expand the IP addresses available for the external network.
a Right-click the name of the API network in the list and select Add IP Range.
b In the Add IP Range dialog box, specify the new IP range.
Note If you are adding addresses as part of the upgrade process, the new IP range must matchthe same number of IP addresses configured for the existing API network. For example, in atypical VMware Integrated OpenStack deployment, the API network requires a minimum range of2 IP addresses for versions 3.0 and older and a minimum range of 3 IP addresses for versions3.1 and later.
c Click OK.
What to do next
If you added IP addresses as part of the upgrade process, you can now obtain and install the upgradepatch.
Deploy a VMware Integrated OpenStack 4.0 Instance, Backup theExisting, and Migrate Your Management Server DataTo upgrade to VMware Integrated OpenStack 4.0, first deploy a new instance with the latest OVA. Youuse the new deployment to set up a NFS server and backup your previous management server instanceon the new one.
Procedure
1 Deploy a VMware Integrated OpenStack 4.0 instance.
For detailed instructions, see Installing Integrated OpenStack in the VMware Integrated OpenStackInstallation and Configuration Guide.
2 On the new VMware Integrated OpenStack management server, set up an NFS server and copy theSSH key of the previous instance.
a Log in to the new VMware Integrated OpenStack management server over SSH.
b Run the following command to create a directory for use by the NFS server to store the backup ofthe previous VMware Integrated OpenStack management server.
sudo viocli upgrade prepare 3.1_oms_ip /folder_for_nfs_server
For example: sudo viocli upgrade prepare 192.168.100.101 /data
c Enter the password for the viouser account and wait for the operation to finish.
d After the operation finishes, keep the console window open.
VMware Integrated OpenStack Administrator Guide
VMware, Inc. 50

3 Backup the data from your VMware Integrated OpenStack management server by using theconfigured NFS server on the new instance.
a Open another session to log in to the previous VMware Integrated OpenStack 3.1 managementserver over SSH.
b Backup the data of the previous VMware Integrated OpenStack management server on the newone.
You can also use the optional verbose parameter.
sudo viocli backup mgmt_server 4.0_oms_ip:/folder_for_nfs_server
For example: sudo viocli backup mgmt_server 192.168.100.102:/data –-verbose
4 Migrate the backed up data from your previous VMware Integrated OpenStack management server tothe new one.
a Return to the console connected to the new VMware Integrated OpenStack management server.
b List the contents of the folder created for use by the NFS server.
For example:
cd /data
ll
c Copy the name of the directory that begins with vio_ms_.
d Reconfigure the new instance by using the folder name from the previous step, the IP address ofthe new server, and the NSF server folder.
You can also use the optional verbose parameter.
sudo viocli upgrade mgmt_server folder_containing_backup 4.0_oms_ip:/folder_for_nfs_server
For example: sudo viocli upgrade mgmt_server vio_ms_20170918093000192.168.100.102:/data --verbose
The VMware Integrated OpenStack management server is now upgraded.
What to do next
You can now install and provision the new VMware Integrated OpenStack vApp.
Migrate to the VMware Integrated OpenStack 4.0 DeploymentAfter you prepare the NFS server and backup your current deployment, you install it as a separatedeployment and migrate your data.
The upgrade process also allows you to switch from a compact mode deployment to HA deployment.
VMware Integrated OpenStack Administrator Guide
VMware, Inc. 51
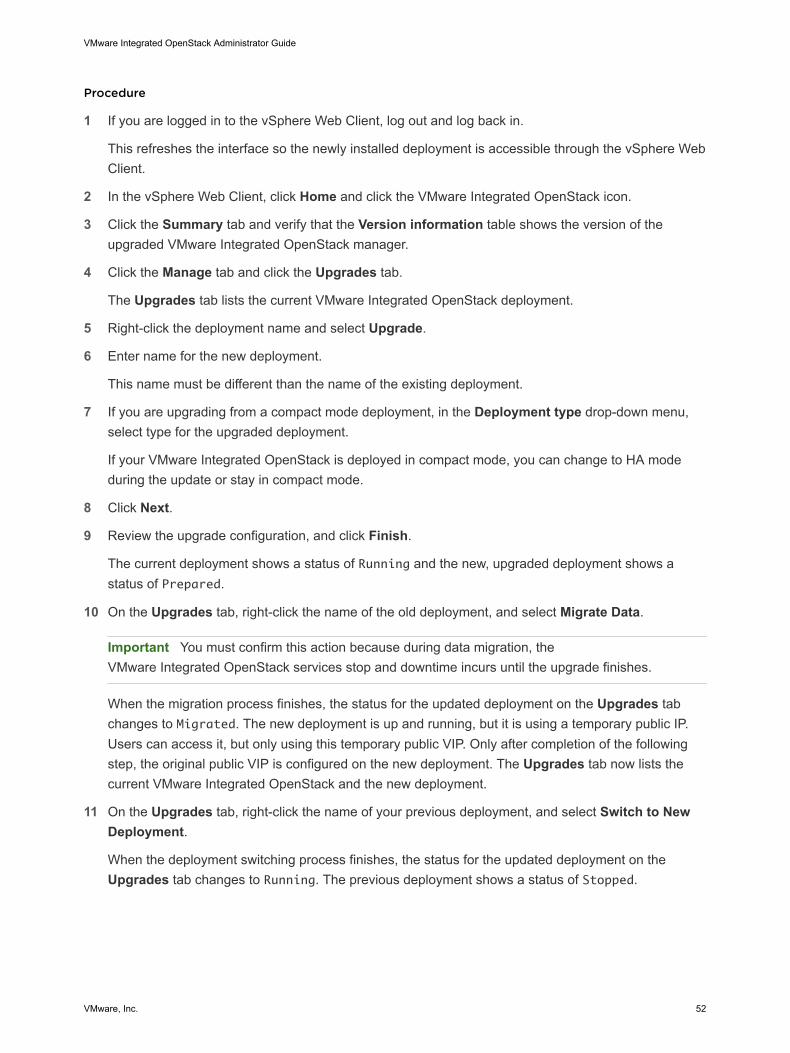
Procedure
1 If you are logged in to the vSphere Web Client, log out and log back in.
This refreshes the interface so the newly installed deployment is accessible through the vSphere WebClient.
2 In the vSphere Web Client, click Home and click the VMware Integrated OpenStack icon.
3 Click the Summary tab and verify that the Version information table shows the version of theupgraded VMware Integrated OpenStack manager.
4 Click the Manage tab and click the Upgrades tab.
The Upgrades tab lists the current VMware Integrated OpenStack deployment.
5 Right-click the deployment name and select Upgrade.
6 Enter name for the new deployment.
This name must be different than the name of the existing deployment.
7 If you are upgrading from a compact mode deployment, in the Deployment type drop-down menu,select type for the upgraded deployment.
If your VMware Integrated OpenStack is deployed in compact mode, you can change to HA modeduring the update or stay in compact mode.
8 Click Next.
9 Review the upgrade configuration, and click Finish.
The current deployment shows a status of Running and the new, upgraded deployment shows astatus of Prepared.
10 On the Upgrades tab, right-click the name of the old deployment, and select Migrate Data.
Important You must confirm this action because during data migration, theVMware Integrated OpenStack services stop and downtime incurs until the upgrade finishes.
When the migration process finishes, the status for the updated deployment on the Upgrades tabchanges to Migrated. The new deployment is up and running, but it is using a temporary public IP.Users can access it, but only using this temporary public VIP. Only after completion of the followingstep, the original public VIP is configured on the new deployment. The Upgrades tab now lists thecurrent VMware Integrated OpenStack and the new deployment.
11 On the Upgrades tab, right-click the name of your previous deployment, and select Switch to NewDeployment.
When the deployment switching process finishes, the status for the updated deployment on theUpgrades tab changes to Running. The previous deployment shows a status of Stopped.
VMware Integrated OpenStack Administrator Guide
VMware, Inc. 52

What to do next
If the deployment process is unsuccessful, you can revert to your previous VMware Integrated OpenStackdeployment. See Revert to a Previous VMware Integrated OpenStack Deployment.
If the deployment process is successful, you can delete the previous VMware Integrated OpenStackdeployment.
Revert to a Previous VMware Integrated OpenStack DeploymentYou can revert to VMware Integrated OpenStack to a previous version by restoring your previousdeployment.
Prerequisites
n Verify that you retained the previous VMware Integrated OpenStack deployment in your OpenStackmanager.
n Verify that you are prepared to stop the services running on the previousVMware Integrated OpenStack deployment.
Procedure
1 In the vSphere Web Client, select Home > Inventories, and click the VMware Integrated OpenStackicon.
2 In the Inventory Lists panel, click OpenStack Deployments.
The current VMware Integrated OpenStack deployment appears in the center pane.
3 Right-click the name of the current deployment on the OpenStack Deployments tab and select StopOpenStack Deployment.
4 Return to the main VMware Integrated OpenStack panel (Home > Inventories > VMware IntegratedOpenStack).
5 Click the Manage tab and click the Upgrades tab.
The Upgrades tab lists the VMware Integrated OpenStack 4.0 and older deployments.
6 Right-click the previous VMware Integrated OpenStack deployment name and select Restore fromthe pop-up menu.
When the process of reverting your VMware Integrated OpenStack deployment is finished, theOpenStack services restart.
Delete the Older VMware Integrated OpenStack DeploymentAfter you complete the upgrade process to the VMware Integrated OpenStack 4.0 deployment, you candelete the older VMware Integrated OpenStack deployment. By deleting the old deployment, you recoverthe CPU, datastores, and IP addresses resources that it required.
VMware Integrated OpenStack Administrator Guide
VMware, Inc. 53
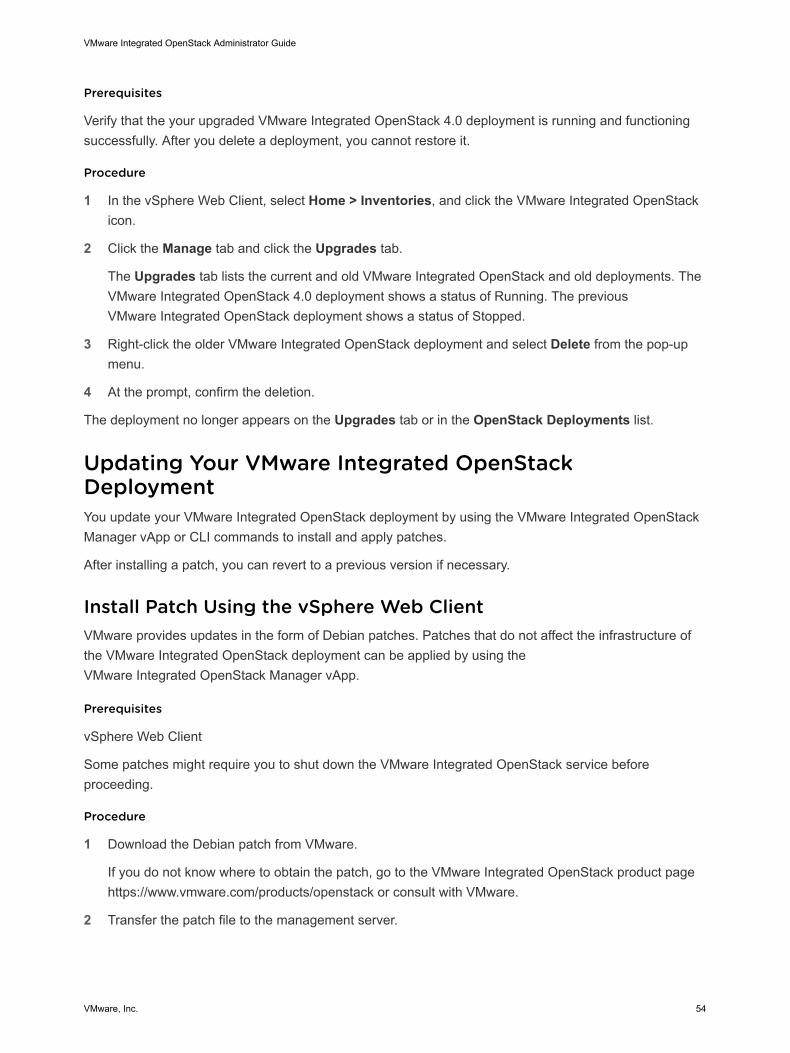
Prerequisites
Verify that the your upgraded VMware Integrated OpenStack 4.0 deployment is running and functioningsuccessfully. After you delete a deployment, you cannot restore it.
Procedure
1 In the vSphere Web Client, select Home > Inventories, and click the VMware Integrated OpenStackicon.
2 Click the Manage tab and click the Upgrades tab.
The Upgrades tab lists the current and old VMware Integrated OpenStack and old deployments. TheVMware Integrated OpenStack 4.0 deployment shows a status of Running. The previousVMware Integrated OpenStack deployment shows a status of Stopped.
3 Right-click the older VMware Integrated OpenStack deployment and select Delete from the pop-upmenu.
4 At the prompt, confirm the deletion.
The deployment no longer appears on the Upgrades tab or in the OpenStack Deployments list.
Updating Your VMware Integrated OpenStackDeploymentYou update your VMware Integrated OpenStack deployment by using the VMware Integrated OpenStackManager vApp or CLI commands to install and apply patches.
After installing a patch, you can revert to a previous version if necessary.
Install Patch Using the vSphere Web ClientVMware provides updates in the form of Debian patches. Patches that do not affect the infrastructure ofthe VMware Integrated OpenStack deployment can be applied by using theVMware Integrated OpenStack Manager vApp.
Prerequisites
vSphere Web Client
Some patches might require you to shut down the VMware Integrated OpenStack service beforeproceeding.
Procedure
1 Download the Debian patch from VMware.
If you do not know where to obtain the patch, go to the VMware Integrated OpenStack product pagehttps://www.vmware.com/products/openstack or consult with VMware.
2 Transfer the patch file to the management server.
VMware Integrated OpenStack Administrator Guide
VMware, Inc. 54

3 Log in to the management server and enter the following command to load the patch file into themanagement server repository:
sudo viopatch add -l path/filename.deb
where filename.deb is the filename of the Debian patch file.
4 In the vSphere Web Client, select Home > Inventories, and click the VMware Integrated OpenStackicon.
5 Click the Manage tab and click the Updates tab.
The Updates tab lists added patches and indicates if they are installed.
6 Select the patch and click Choose.
The patch appears in the list on the Updates tab.
7 Install the patch.
If you can install the patch by using the VMware Integrated OpenStack Manager vApp, the Applyoption appears in the Patch Action column on the Updates tab.
If the Apply option does not appear in the Patch Action column, click More details in the PatchDescription column to access instructions for installing patches by using the CLI.
After you install a patch, the value in the Patch Status column on the Updates tab changes toInstalled.
8 To complete the update, log out of thevSphere Web Client and back in.
You can ignore any error messages you encounter when logging back in.
9 Restart all VMware Integrated OpenStack services.
Install Patch Using CLI CommandsVMware provides updates in the form of Debian patches. Patches that affect the infrastructure of theVMware Integrated OpenStack deployment must be applied through the command console for theVMware Integrated OpenStack Manager vApp.
Procedure
1 Download the Debian patch from VMware.
If you do not know where to obtain the patch, go to the VMware Integrated OpenStack product pagehttps://www.vmware.com/products/openstack or consult with VMware.
VMware Integrated OpenStack Administrator Guide
VMware, Inc. 55

2 Add the patch to your VMware Integrated OpenStack installation.
a Log into the console for theVMware Integrated OpenStack management server.
b Add the patch.
viopatch add -l [path to the debian file]
c Confirm that the patch was successfully added.
viopatch list
This returns a list of available patches, their version numbers, their type, and current status. Thelist should indicate the patch by its build number.
3 Install the patch.
a Ensure that VMware Integrated OpenStack service is either running or not yet deployed.
If the VMware Integrated OpenStack service is in any other state, the upgrade will fail.
b Log into the VMware Integrated OpenStack management server and run the following command:
viopatch install -p <upgrade patch name> -v <upgrade patch version>
The patch installation takes 5 to 10 minutes to complete.
4 To complete the update, log out of thevSphere Web Client and back in.
You can ignore any error messages you encounter when logging back in.
5 Restart all VMware Integrated OpenStack services.
If necessary, you can revert to the previous version. For details, see Reverting a Patch UpdateInstallation.
For troubleshooting the patch installation, see Troubleshooting Update Patch Installation Problems
Reverting a Patch Update InstallationYou can revert a patch update installation.
Prerequisites
You can only revert to an earlier version of the same point release. For example, you cannot revert a 2.0implementation to a 1.0.x version.
Procedure
1 Log into the console for theVMware Integrated OpenStack management server.
VMware Integrated OpenStack Administrator Guide
VMware, Inc. 56
2 Run the uninistall command.
viopatch uninstall --patch vio-patch-[version number] --version [build number]
The reversion process takes 5 to 10 minutes to complete.
3 After uninstalling the patch, restart the vSphere Web Client service on the vCenter Server todowngrade the VMware Integrated OpenStack plugin.
Troubleshooting Update Patch Installation ProblemsThis section describe some common errors you might encounter while installing the update patch.
Troubleshoot Update Patch Installation FailureThe patch installation fails.
Problem
After adding and applying the update patch, the installation fails.
Cause
The VMware Integrated OpenStack deployment must be running or not yet deployed.
Solution
1 Ensure that the VMware Integrated OpenStack service is either running or not yet deployed.
2 If the service is running, ensure that all the OpenStack management VMs (database, load balancer,and so on) are also running.
Troubleshoot Update Patch Installation ErrorsYou get an error when using the vSphere Web Client to add patch.
Problem
Patch installation fails with a fatal error message in vSphere Web Client.
Cause
The type of update requires using the CLI to add and install the patch
Solution
u Add and install the patch using the CLI method described in Install Patch Using CLI Commands.
VMware Integrated OpenStack Administrator Guide
VMware, Inc. 57
Customize the Dashboard Logos and BackgroundBy default, the VMware Integrated OpenStack dashboard log-in page displays the VMware corporate logoand a blank background. All pages in the VMware Integrated OpenStack dashboard display the VMwarecorporate logo in the upper left hand corner. You can customize your deployment configuration to displayyour company's logos or other branding instead of these default graphics.
n The default dimension for the logo graphic is 216 pixels long by 35 pixels wide. You can use a graphicwith different dimensions, but the display might be impacted.
n The background graphic appears in the center of the log-in page.
Procedure
1 Customize the Log-in Page Background
You can specify a custom graphic to appear as the background to theVMware Integrated OpenStack dashboard log-in page.
2 Customize the Log-in Page Logo
You can specify the custom logo that appears on the VMware Integrated OpenStack dashboard log-in page.
3 Customize the Dashboard Page Logo
You can specify the custom logo that appears in the top left corner of each page in theVMware Integrated OpenStack dashboard.
Customize the Log-in Page BackgroundYou can specify a custom graphic to appear as the background to the VMware Integrated OpenStackdashboard log-in page.
Procedure
1 Load your custom graphic file in the /home/viouser/custom/horizon/ directory in yourVMware Integrated OpenStack deployment.
This directory is the default directory for graphic files in the VMware Integrated OpenStackdashboard.
VMware Integrated OpenStack Administrator Guide
VMware, Inc. 58
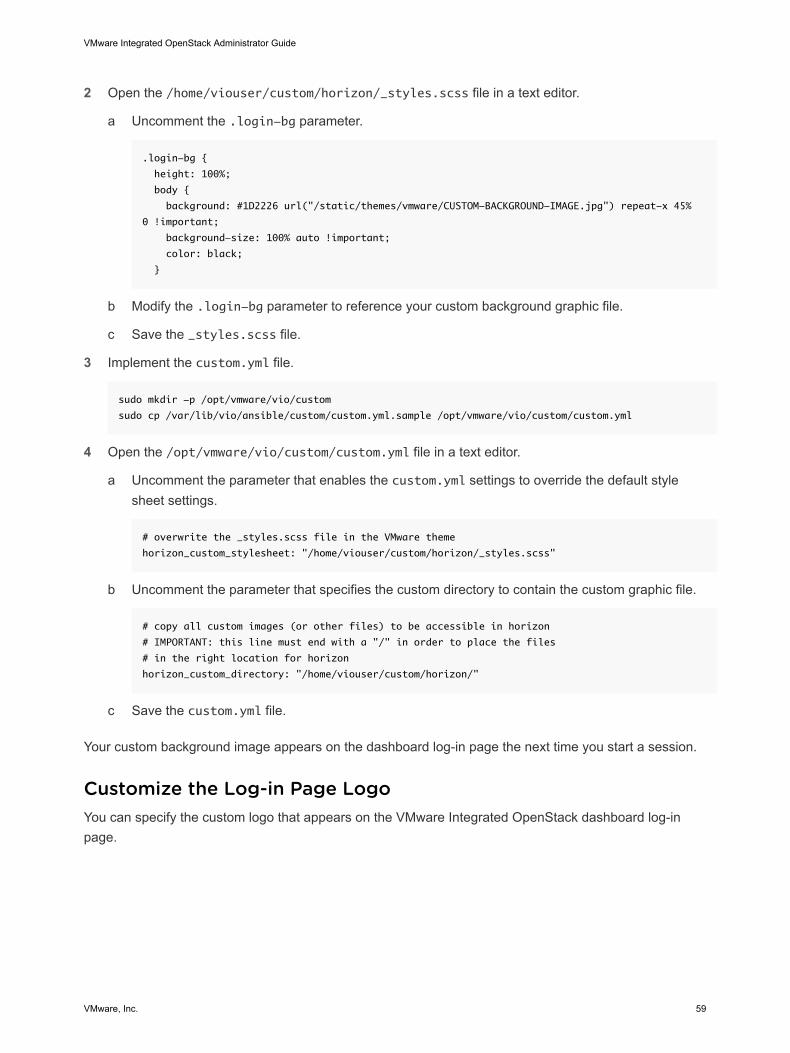
2 Open the /home/viouser/custom/horizon/_styles.scss file in a text editor.
a Uncomment the .login-bg parameter.
.login-bg {
height: 100%;
body {
background: #1D2226 url("/static/themes/vmware/CUSTOM-BACKGROUND-IMAGE.jpg") repeat-x 45%
0 !important;
background-size: 100% auto !important;
color: black;
}
b Modify the .login-bg parameter to reference your custom background graphic file.
c Save the _styles.scss file.
3 Implement the custom.yml file.
sudo mkdir -p /opt/vmware/vio/custom
sudo cp /var/lib/vio/ansible/custom/custom.yml.sample /opt/vmware/vio/custom/custom.yml
4 Open the /opt/vmware/vio/custom/custom.yml file in a text editor.
a Uncomment the parameter that enables the custom.yml settings to override the default stylesheet settings.
# overwrite the _styles.scss file in the VMware theme
horizon_custom_stylesheet: "/home/viouser/custom/horizon/_styles.scss"
b Uncomment the parameter that specifies the custom directory to contain the custom graphic file.
# copy all custom images (or other files) to be accessible in horizon
# IMPORTANT: this line must end with a "/" in order to place the files
# in the right location for horizon
horizon_custom_directory: "/home/viouser/custom/horizon/"
c Save the custom.yml file.
Your custom background image appears on the dashboard log-in page the next time you start a session.
Customize the Log-in Page LogoYou can specify the custom logo that appears on the VMware Integrated OpenStack dashboard log-inpage.
VMware Integrated OpenStack Administrator Guide
VMware, Inc. 59
Procedure
1 Load your custom graphic file to the /home/viouser/custom/horizon/ directory in yourVMware Integrated OpenStack deployment.
This directory is the default directory for graphic files in the VMware Integrated OpenStackdashboard.
2 Modify the /home/viouser/custom/horizon/_styles.scss file in a text editor.
a Uncomment the .login parameter.
.login {
background-image: url(/static/themes/vmware/CUSTOM_LOGIN_PAGE_LOGO.png);
color: white;
background-color: black;
}
b Modify the .login parameter to reference your custom graphic file.
c Save the _styles.scss file.
3 Implement the custom.yml file.
sudo mkdir -p /opt/vmware/vio/custom
sudo cp /var/lib/vio/ansible/custom/custom.yml.sample /opt/vmware/vio/custom/custom.yml
4 Open the /opt/vmware/vio/custom/custom.yml file in a text editor.
a Uncomment the parameter that enables the custom.yml settings to override the default stylesheet settings.
# overwrite the _styles.scss file in the VMware theme
horizon_custom_stylesheet: "/home/viouser/custom/horizon/_styles.scss"
b Uncomment the parameter that specifies the custom directory to contain the custom graphic file.
# copy all custom images (or other files) to be accessible in horizon
# IMPORTANT: this line must end with a "/" in order to place the files
# in the right location for horizon
horizon_custom_directory: "/home/viouser/custom/horizon/"
c Save the custom.yml file.
Your custom logo appears on the dashboard log-in page the next time you start a session.
Customize the Dashboard Page LogoYou can specify the custom logo that appears in the top left corner of each page in theVMware Integrated OpenStack dashboard.
VMware Integrated OpenStack Administrator Guide
VMware, Inc. 60

Procedure
1 Load your custom graphic file to the /home/viouser/custom/horizon/ directory in yourVMware Integrated OpenStack deployment.
This directory is the default directory for graphic files in the VMware Integrated OpenStackdashboard.
2 Modify the /home/viouser/custom/horizon/_styles.scss file in a text editor.
a Uncomment the .topbar parameter.
.topbar {
h1.brand a {
background-image: url(/static/themes/vmware/CUSTOM_PAGE_LOGO.png);
}
}
b Modify the .topbar parameter to reference your custom graphic file.
c Save the _styles.scss file.
3 Implement the custom.yml file.
sudo mkdir -p /opt/vmware/vio/custom
sudo cp /var/lib/vio/ansible/custom/custom.yml.sample /opt/vmware/vio/custom/custom.yml
4 Open the /opt/vmware/vio/custom/custom.yml file in a text editor.
a Uncomment the parameter that enables the custom.yml settings to override the default stylesheet settings.
# overwrite the _styles.scss file in the VMware theme
horizon_custom_stylesheet: "/home/viouser/custom/horizon/_styles.scss"
b Uncomment the parameter that specifies the custom directory to contain the custom graphic file.
# copy all custom images (or other files) to be accessible in horizon
# IMPORTANT: this line must end with a "/" in order to place the files
# in the right location for horizon
horizon_custom_directory: "/home/viouser/custom/horizon/"
c Save the custom.yml file.
Your custom logo appears in the top left corner of each dashboard page the next time you start a session.
VMware Integrated OpenStack Administrator Guide
VMware, Inc. 61
Use Profiling to Trace OpenStack DeploymentsBy using the VMware Integrated OpenStack profiling feature, you can enable tracing for the coreOpenStack services. When enabled, tracing captures the response time of all API, RPC, driver, anddatabase calls that are part of an OpenStack operation. You can enable or disable tracing without havingto restart OpenStack services.
VMware Integrated OpenStack provides two options for configuring profiler. You can use it either with theCeilometer OpenStack service or with vRealize Log Insight to store profiler trace data.
Procedure
1 Configure Tracing of OpenStack Services
Configure the VMware Integrated OpenStack profiling feature by modifying the custom.yml file.
2 Use Tracing of OpenStack Services
Use the VMware Integrated OpenStack profiling to capture the response time of all API, RPC, driver,and database calls that are part of an OpenStack operation.
Configure Tracing of OpenStack ServicesConfigure the VMware Integrated OpenStack profiling feature by modifying the custom.yml file.
VMware Integrated OpenStack provides two options for configuring profiler. You can use it either with theCeilometer OpenStack service or with vRealize Log Insight to store profiler trace data.
Prerequisites
n To use vRealize Log Insight to store profiler trace data, verify that your instance is fully operational,version 3.3 or later, and that you can authenticate with a user with the USER role assigned.
n To use Ceilometer OpenStack service to store profiler trace data, verify that the service is running.
VMware Integrated OpenStack Administrator Guide
VMware, Inc. 62
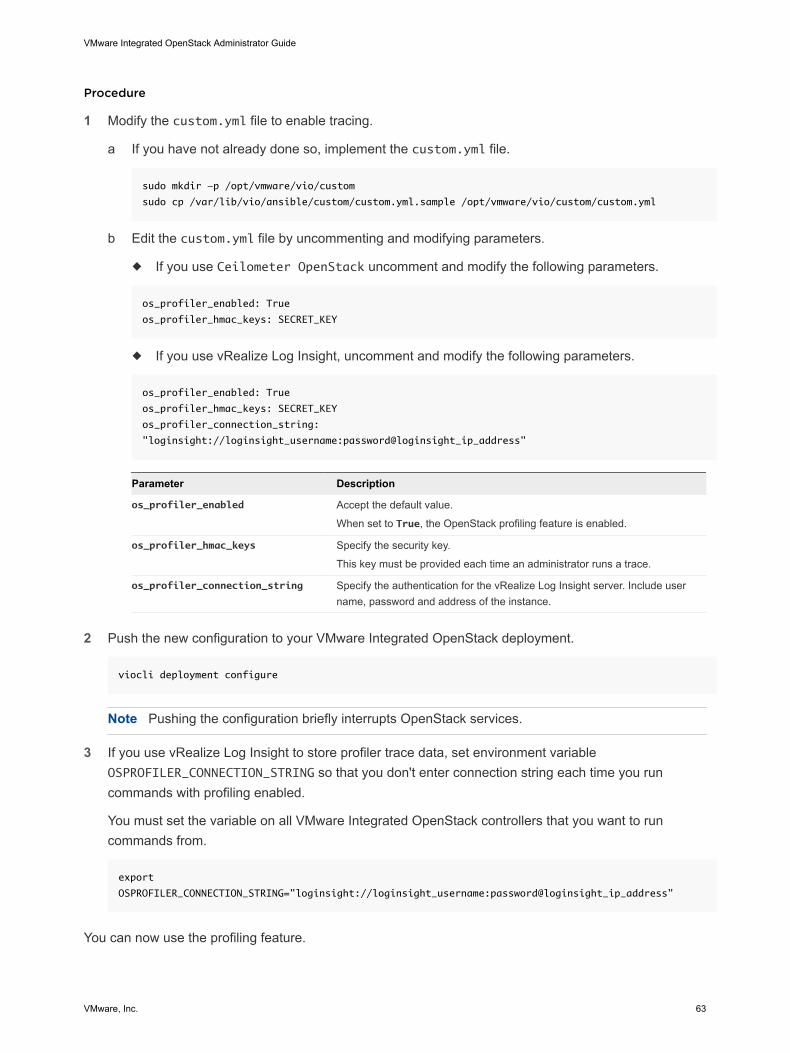
Procedure
1 Modify the custom.yml file to enable tracing.
a If you have not already done so, implement the custom.yml file.
sudo mkdir -p /opt/vmware/vio/custom
sudo cp /var/lib/vio/ansible/custom/custom.yml.sample /opt/vmware/vio/custom/custom.yml
b Edit the custom.yml file by uncommenting and modifying parameters.
u If you use Ceilometer OpenStack uncomment and modify the following parameters.
os_profiler_enabled: True
os_profiler_hmac_keys: SECRET_KEY
u If you use vRealize Log Insight, uncomment and modify the following parameters.
os_profiler_enabled: True
os_profiler_hmac_keys: SECRET_KEY
os_profiler_connection_string:
"loginsight://loginsight_username:password@loginsight_ip_address"
Parameter Description
os_profiler_enabled Accept the default value.
When set to True, the OpenStack profiling feature is enabled.
os_profiler_hmac_keys Specify the security key.
This key must be provided each time an administrator runs a trace.
os_profiler_connection_string Specify the authentication for the vRealize Log Insight server. Include username, password and address of the instance.
2 Push the new configuration to your VMware Integrated OpenStack deployment.
viocli deployment configure
Note Pushing the configuration briefly interrupts OpenStack services.
3 If you use vRealize Log Insight to store profiler trace data, set environment variableOSPROFILER_CONNECTION_STRING so that you don't enter connection string each time you runcommands with profiling enabled.
You must set the variable on all VMware Integrated OpenStack controllers that you want to runcommands from.
export
OSPROFILER_CONNECTION_STRING="loginsight://loginsight_username:password@loginsight_ip_address"
You can now use the profiling feature.
VMware Integrated OpenStack Administrator Guide
VMware, Inc. 63
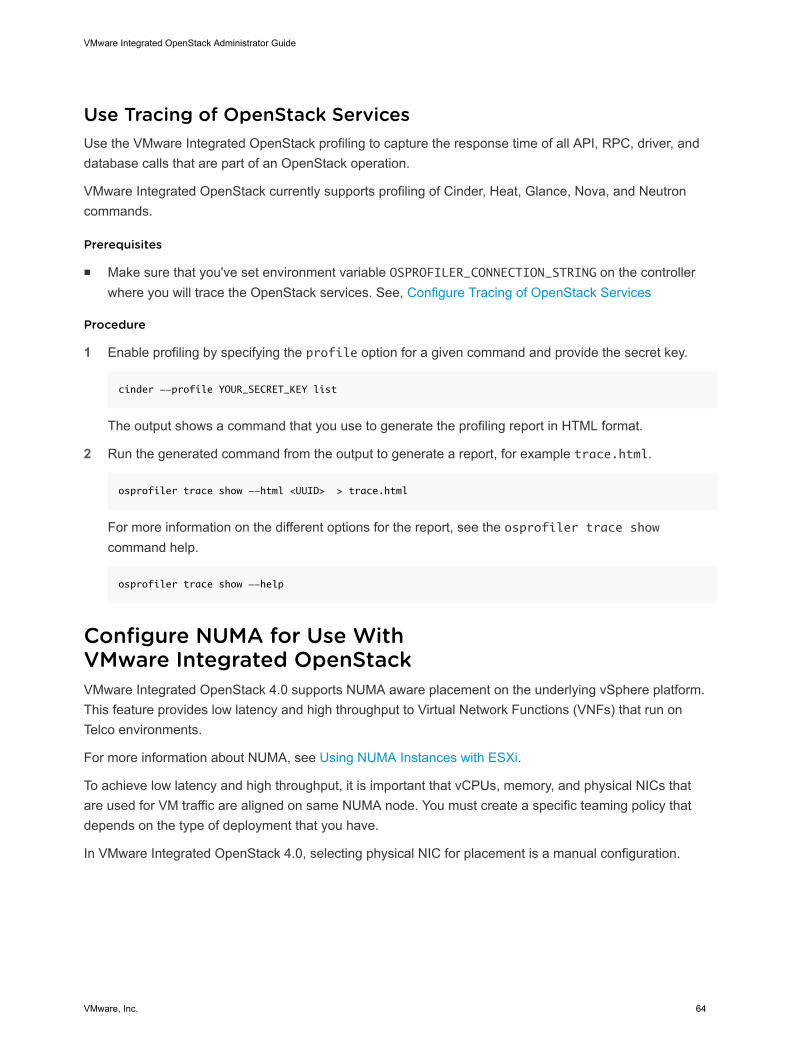
Use Tracing of OpenStack ServicesUse the VMware Integrated OpenStack profiling to capture the response time of all API, RPC, driver, anddatabase calls that are part of an OpenStack operation.
VMware Integrated OpenStack currently supports profiling of Cinder, Heat, Glance, Nova, and Neutroncommands.
Prerequisites
n Make sure that you've set environment variable OSPROFILER_CONNECTION_STRING on the controllerwhere you will trace the OpenStack services. See, Configure Tracing of OpenStack Services
Procedure
1 Enable profiling by specifying the profile option for a given command and provide the secret key.
cinder --profile YOUR_SECRET_KEY list
The output shows a command that you use to generate the profiling report in HTML format.
2 Run the generated command from the output to generate a report, for example trace.html.
osprofiler trace show --html <UUID> > trace.html
For more information on the different options for the report, see the osprofiler trace showcommand help.
osprofiler trace show --help
Configure NUMA for Use WithVMware Integrated OpenStackVMware Integrated OpenStack 4.0 supports NUMA aware placement on the underlying vSphere platform.This feature provides low latency and high throughput to Virtual Network Functions (VNFs) that run onTelco environments.
For more information about NUMA, see Using NUMA Instances with ESXi.
To achieve low latency and high throughput, it is important that vCPUs, memory, and physical NICs thatare used for VM traffic are aligned on same NUMA node. You must create a specific teaming policy thatdepends on the type of deployment that you have.
In VMware Integrated OpenStack 4.0, selecting physical NIC for placement is a manual configuration.
VMware Integrated OpenStack Administrator Guide
VMware, Inc. 64
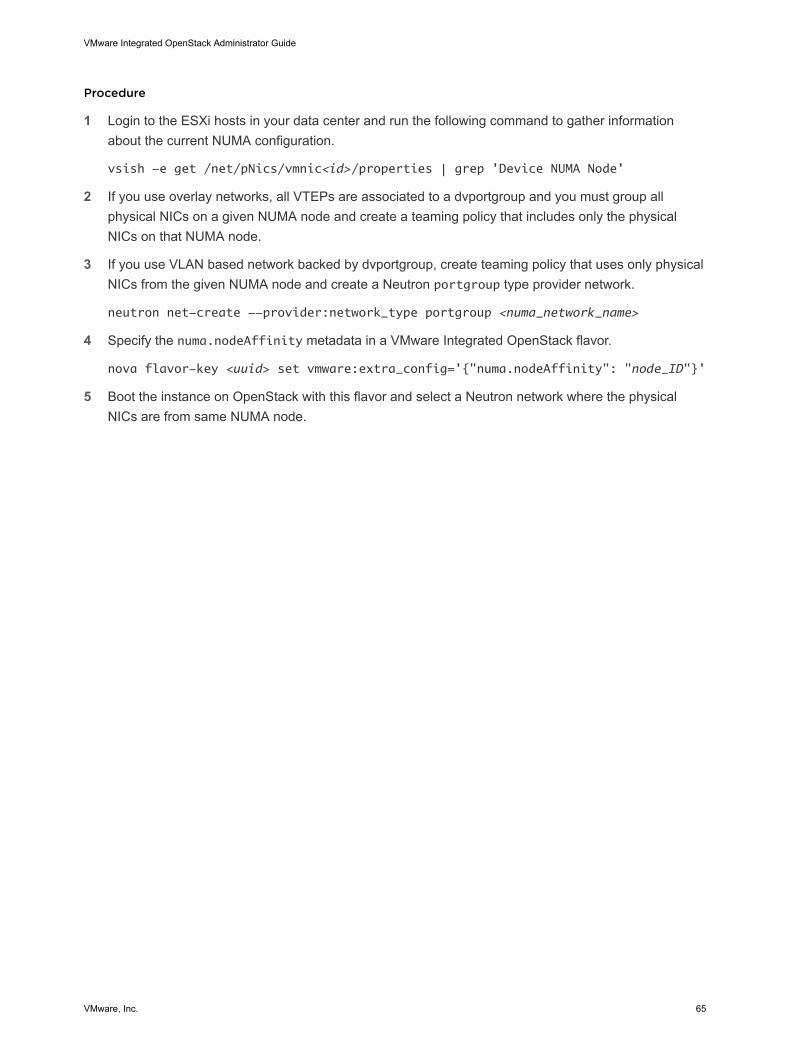
Procedure
1 Login to the ESXi hosts in your data center and run the following command to gather informationabout the current NUMA configuration.
vsish -e get /net/pNics/vmnic<id>/properties | grep 'Device NUMA Node'
2 If you use overlay networks, all VTEPs are associated to a dvportgroup and you must group allphysical NICs on a given NUMA node and create a teaming policy that includes only the physicalNICs on that NUMA node.
3 If you use VLAN based network backed by dvportgroup, create teaming policy that uses only physicalNICs from the given NUMA node and create a Neutron portgroup type provider network.
neutron net-create --provider:network_type portgroup <numa_network_name>
4 Specify the numa.nodeAffinity metadata in a VMware Integrated OpenStack flavor.
nova flavor-key <uuid> set vmware:extra_config='{"numa.nodeAffinity": "node_ID"}'
5 Boot the instance on OpenStack with this flavor and select a Neutron network where the physicalNICs are from same NUMA node.
VMware Integrated OpenStack Administrator Guide
VMware, Inc. 65
Managing OpenStack Projectsand Users 3In VMware Integrated OpenStack, cloud administrators manage permissions through user, group, andproject definitions. Projects in OpenStack equate to tenants in vCloud Suite. You can assign users anduser groups to more than one project.
Before you can create a user, you must create at least one project to which you can assign the user.
This chapter includes the following topics:n Create an OpenStack Project
n Modify a Project
n Working with Security Groups
n Create a Cloud User Account in OpenStack
n Modify a User Account
Create an OpenStack ProjectProjects are the equivalent of tenants or accounts. They function as organizational units in the cloud towhich you can assign users.
Prerequisites
Verify that you are logged in to the VMware Integrated OpenStack dashboard as a cloud administrator.
Procedure
1 Select the admin project from the drop-down menu in the title bar.
2 Select Admin > Identity > Projects.
3 Click Create Project.
VMware, Inc. 66

4 Click the Project Info tab and configure the project settings.
Setting Description
Name Project name.
Description Optional description of the new project.
Enabled New projects are enabled by default. Disabling a project prevents cloud users from accessing the project,prevents users from managing launching instances for the project, and can prevent users from logging inif they are assigned only to that project.
5 (Optional) Add members to the project by selecting existing cloud users on the Project Members tab.
6 (Optional) Add groups of members to the project by selecting existing groups of cloud users on theProject Groups tab.
7 On the Quota tab, accept or modify the quota settings.
Quotas are operational limits that you can configure to manage how much system resources areavailable to a specific project. For example, you can optimize the cloud resources by controlling thenumber of gigabytes allowed for each tenant. Quotas can be enforced at both the project and userlevel.
8 Click Create Project at the bottom of the panel.
The VMware Integrated OpenStack dashboard assigns an ID to the new project, and the project is listedon the Projects page.
Modify a ProjectYou can update a project to change its name or description, and enable or temporarily disable it.
Important Disabling a project can have negative consequences. For example, if a user is assigned toonly that project, they cannot log in to the VMware Integrated OpenStack dashboard. Similarly, the projectis not accessible by its members. Project instances continue running, so you must suspend or stop themmanually. Project data is retained in case the project is enabled again.
Prerequisites
Verify that you are logged in to the VMware Integrated OpenStack dashboard as a cloud administrator.
Procedure
1 On the VMware Integrated OpenStack dashboard, select the admin project from the drop-down menuin the title bar.
2 Select Admin > Identity > Projects.
3 Select the project to edit.
VMware Integrated OpenStack Administrator Guide
VMware, Inc. 67
4 In the Actions column, select Edit Project from the drop-down menu.
In the Edit Project dialog box, you can change the project's name and description, and enable anddisable it.
5 Modify the project settings, and click Save.
6 (Optional) To change user assignments for a project, on the Projects page, click Manage Membersfor the project to modify.
Option Action
Assign a user to the current project Click the plus sign (+) for the user.
Remove a user from the currentproject,
Click the minus sign (-) for the user.
7 Click Save.
8 To delete one or more projects, return to the Projects page and select the projects to delete.
Note You cannot restore a deleted project.
a Click Delete Projects.
b At the prompt, confirm the deletion.
Working with Security GroupsA security group is a set of IP filter rules that define networking access and that you can apply to allinstances in a project. Group rules are project-specific. Project members can edit the default rules for theirgroup and add new rule sets.
You can use security groups to apply IP rules by creating a new security group with the desired rules orby modifying the rules set in the default security group.
Note A security group can apply either rules or a security policy, but not both.
About the Default Security GroupEach project in VMware Integrated OpenStack has a default security group that is applied to an instanceunless another security group is defined and specified. Unless it is modified, the default security groupdenies all incoming traffic to your instance and permits only outgoing traffic. A common example is to editthe default security group to permit SSH access and ICMP access, so that users can log in to and pinginstances.
Create a Security GroupSecurity groups are sets of IP filter rules that define networking access and are applied to all instanceswithin a project. You can either modify the rules in the default security group or create a security groupwith custom rules.
VMware Integrated OpenStack Administrator Guide
VMware, Inc. 68

To modify an existing rule for a security group, see Modify the Rules for an Existing Security Group
Procedure
1 Log in to the VMware Integrated OpenStack dashboard as a cloud administrator.
2 Select the project from the drop-down menu in the title bar.
3 Select Project > Compute > Access & Security.
4 Click the Security Groups tab.
5 Click Create Security Group.
6 Enter a name and description for the new group, and click Create Security Group.
The new group appears in the list on the Security Group tab.
7 Configure the rules for the new group.
a Select the new security group and click Manage Rules.
b Click Add Rule.
c From the Rule drop-down menu, select the rule to add.
The subsequent fields might change depending on the rule you select.
d If applicable, specify Ingress or Egress from the Direction drop-down menu.
e After you complete the rule definition, click Add.
8 Configure additional rules if necessary.
9 Click the Access & Security tab to return to the main page.
Modify the Rules for an Existing Security GroupYou can modify a security group by adding and removing rules assigned to that group. Rules define whichtraffic is allowed to instances that are assigned to the security group.
Procedure
1 Log in to the VMware Integrated OpenStack dashboard as a cloud administrator.
2 Select the project from the drop-down menu in the title bar.
3 Select Project > Compute > Access & Security.
4 Click the Security Groups tab.
5 Select the security group to modify and click Manage Rules.
6 To remove a rule, select the rule and click Delete Rule.
VMware Integrated OpenStack Administrator Guide
VMware, Inc. 69

7 To add a rule, click Add Rule and select the custom rule to add from the Rule drop-down menu.
Option Description
Custom TCP Rule Used to exchange data between systems and for end-user communication.
Custom UDP Rule Used to exchange data between systems, for example, at the application level.
Custom ICMP Rule Used by network devices, such as routers, to send error or monitoring messages.
Other Protocol You can manually configure a rule if the rule protocol is not included in the list. a From the Remote drop-down list, select CIDR or Security Group.
b If applicable, select Ingress or Egress from the Direction drop-down menu.
For TCP and UDP rules, you can open either a single port or a range of ports. Depending on yourselection, different fields appear below the Open Port list.
c Select the kind of access to allow.
Option Description
CIDR (Classless Inter-DomainRouting)
Limits access only to IP addresses within the specified block.
Security Group Allows any instance in the specified security group to access any other groupinstance.
You can choose between IPv4 or IPv6 in the Ether Type list.
8 Click Add.
The new rule appears on the Manage Security Group Rules page for the security group.
Enabling SSH and ICMP AccessYou can modify the default security group to enable SSH and ICMP access to instances. The rules in thedefault security group apply to all instances in the currently selected project.
Procedure
1 Log in to the VMware Integrated OpenStack dashboard as a cloud administrator.
2 Select the project from the drop-down menu in the title bar.
3 Select Project > Compute > Access & Security.
4 Click the Security Groups tab, select the default security group, and click Manage Rules.
5 Click Add Rule and configure the rules to allow SSH access.
Control Value
Rule SSH
Remote CIDR
CIDR 0.0.0.0/0
VMware Integrated OpenStack Administrator Guide
VMware, Inc. 70

To accept requests from a particular range of IP addresses, specify the IP address block in the CIDRtext box.
Instances will now have SSH port 22 open for requests from any IP address.
6 Click Add.
7 From the Manage Security Group Rules page, click Add Rule and configure the rules to allow ICMPaccess.
Control Value
Rule All ICMP
Direction Ingress
Remote CIDR
CIDR 0.0.0.0/0
8 Click Add.
Instances will now accept all incoming ICMP packets.
Use VMware NSX for vSphere Security Policies Through SecurityGroupsThis feature enables the consumption of VMware NSX for vSphere policy from the OpenStack CloudManagement Platform through OpenStack security groups. NSX administrator can define security policiesthat the OpenStack cloud administrator shares with cloud users. Cloud user can also define their ownsecurity groups with rules if the cloud administrator enables regular security groups. This feature can alsobe used by cloud administrators to insert third-party network services.
Starting with VMware Integrated OpenStack 3.1, Neutron security groups enable administrators to usetwo new functionalities.
Provider securitygroups
Also known as administrator rules, when configured those security groupsare mandatory and apply to all VMs of a given tenant. A provider securitygroup can either be associated with a policy or exist without a policy.
NSX Service Composer- Security Policysecurity groups
For more information, see the Service Composer chapter in the VMwareNSX for vSphere Administration Guide.
Each VMware NSX for vSphere policy can be defined by the OpenStack Cloud Administrator as a defaultpolicy by setting the nsxv_default_policy_id option in the custom.yml file. All new tenants have thispolicy as their default. More policies can be defined and assigned as mandatory or optional for a giventenant by being associated with either the provider or optional security groups respectively. Tenant userscan also create security groups with rules but they cannot override security groups set by the cloudadministrator.
VMware Integrated OpenStack Administrator Guide
VMware, Inc. 71
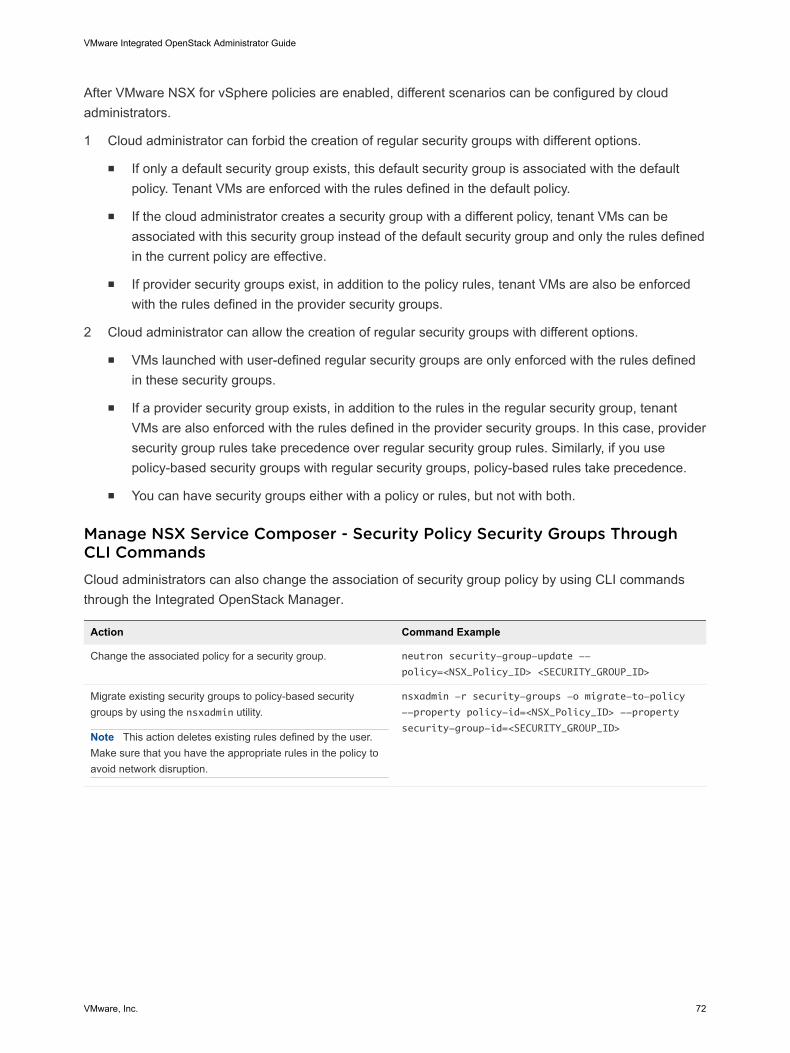
After VMware NSX for vSphere policies are enabled, different scenarios can be configured by cloudadministrators.
1 Cloud administrator can forbid the creation of regular security groups with different options.
n If only a default security group exists, this default security group is associated with the defaultpolicy. Tenant VMs are enforced with the rules defined in the default policy.
n If the cloud administrator creates a security group with a different policy, tenant VMs can beassociated with this security group instead of the default security group and only the rules definedin the current policy are effective.
n If provider security groups exist, in addition to the policy rules, tenant VMs are also be enforcedwith the rules defined in the provider security groups.
2 Cloud administrator can allow the creation of regular security groups with different options.
n VMs launched with user-defined regular security groups are only enforced with the rules definedin these security groups.
n If a provider security group exists, in addition to the rules in the regular security group, tenantVMs are also enforced with the rules defined in the provider security groups. In this case, providersecurity group rules take precedence over regular security group rules. Similarly, if you usepolicy-based security groups with regular security groups, policy-based rules take precedence.
n You can have security groups either with a policy or rules, but not with both.
Manage NSX Service Composer - Security Policy Security Groups ThroughCLI CommandsCloud administrators can also change the association of security group policy by using CLI commandsthrough the Integrated OpenStack Manager.
Action Command Example
Change the associated policy for a security group. neutron security-group-update --
policy=<NSX_Policy_ID> <SECURITY_GROUP_ID>
Migrate existing security groups to policy-based securitygroups by using the nsxadmin utility.
Note This action deletes existing rules defined by the user.Make sure that you have the appropriate rules in the policy toavoid network disruption.
nsxadmin -r security-groups -o migrate-to-policy
--property policy-id=<NSX_Policy_ID> --property
security-group-id=<SECURITY_GROUP_ID>
VMware Integrated OpenStack Administrator Guide
VMware, Inc. 72
Action Command Example
Enforce provider security groups on existing VM ports neutron port-update <PORT_ID> --provider-security-
groups list=true <SECURITY_GROUP_ID1>
<SECURITY_GROUP_ID2>
Ensure that a new policy, created on the NSX side is placedbefore all the OpenStack security groups section by using thensxadmin utility.
Note When more than one policy-based security groups areenforced on a VM/port, the order in which the policy rules areenforced is controlled by the NSX admin through the firewallsection.
sudo -u neutron nsxadmin --config-
file /etc/neutron/neutron.conf --config-
file /etc/neutron/plugins/vmware/nsxv.ini -r
firewall-sections -o nsx-reorder
n Enable VMware NSX for vSphere Security Policies in Neutron
You enable VMware NSX for vSphere security policies in Neutron by modifying the custom.yml file.
n Modify Security Policy in a Security Groups
You can change the security policy that is associated with a security group.
Enable VMware NSX for vSphere Security Policies in NeutronYou enable VMware NSX for vSphere security policies in Neutron by modifying the custom.yml file.
Additionally you must set the default security policy for the default security group for a new tenant andoptionally, allow or forbid tenants to create own policies.
Procedure
1 Log in to the OpenStack Management Server.
2 Create custom.yml file, if it does not exist.
sudo mkdir -p /opt/vmware/vio/custom
sudo cp /var/lib/vio/ansible/custom/custom.yml.sample
/opt/vmware/vio/custom/custom.yml
3 Open the /opt/vmware/vio/custom/custom.yml file in a text editor.
VMware Integrated OpenStack Administrator Guide
VMware, Inc. 73
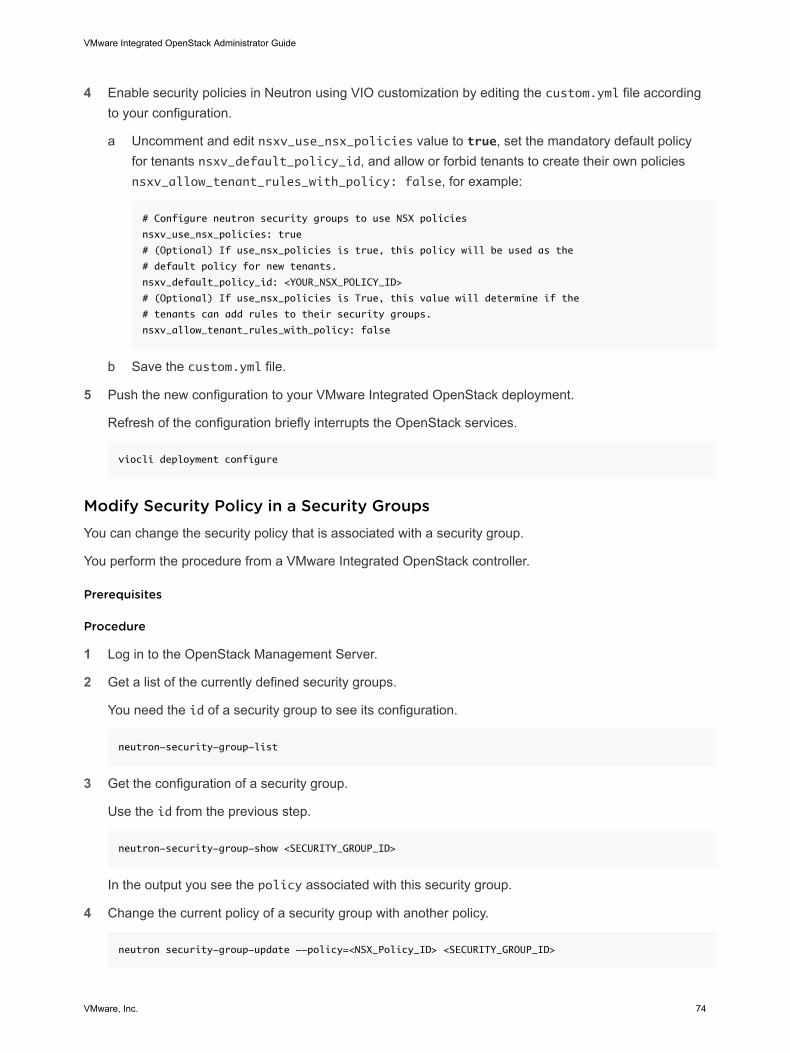
4 Enable security policies in Neutron using VIO customization by editing the custom.yml file accordingto your configuration.
a Uncomment and edit nsxv_use_nsx_policies value to true, set the mandatory default policyfor tenants nsxv_default_policy_id, and allow or forbid tenants to create their own policiesnsxv_allow_tenant_rules_with_policy: false, for example:
# Configure neutron security groups to use NSX policies
nsxv_use_nsx_policies: true
# (Optional) If use_nsx_policies is true, this policy will be used as the
# default policy for new tenants.
nsxv_default_policy_id: <YOUR_NSX_POLICY_ID>
# (Optional) If use_nsx_policies is True, this value will determine if the
# tenants can add rules to their security groups.
nsxv_allow_tenant_rules_with_policy: false
b Save the custom.yml file.
5 Push the new configuration to your VMware Integrated OpenStack deployment.
Refresh of the configuration briefly interrupts the OpenStack services.
viocli deployment configure
Modify Security Policy in a Security GroupsYou can change the security policy that is associated with a security group.
You perform the procedure from a VMware Integrated OpenStack controller.
Prerequisites
Procedure
1 Log in to the OpenStack Management Server.
2 Get a list of the currently defined security groups.
You need the id of a security group to see its configuration.
neutron-security-group-list
3 Get the configuration of a security group.
Use the id from the previous step.
neutron-security-group-show <SECURITY_GROUP_ID>
In the output you see the policy associated with this security group.
4 Change the current policy of a security group with another policy.
neutron security-group-update --policy=<NSX_Policy_ID> <SECURITY_GROUP_ID>
VMware Integrated OpenStack Administrator Guide
VMware, Inc. 74
You have changed the associated security policy to a given security group.
Create a Cloud User Account in OpenStackCloud users have a limited set of rights and privileges relative to cloud administrators. Cloud users arelimited to the tenants to which they are assigned. Tenants are called projects in OpenStack. Cloud userscan create and manage instances, create and manage volumes, create networks, and create newimages, among other tasks.
Prerequisites
n Verify that you are logged in to the VMware Integrated OpenStack dashboard as a cloudadministrator.
n Verify that a configured OpenStack project is available. See Create an OpenStack Project.
VMware Integrated OpenStack now supports Keystone multi-domain back-end:
n A separate back-end can be on each domain.
n The local domain now contains the service users, vioservice user, and admin user. This domain isbacked by SQL. The Default domain contains either your standard users if using SQL or LDAP usersif AD was configured. For convenience, the admin user is also available on the Default domain.
n Along with the domain context in Horizon, in the CLI you will also need to specify a domain if notusing the Default. OpenStack command lines will always default to the default domain.
n When logging in to the dashboard, users are now prompted for a domain name. To log insuccessfully, they must enter "default" for the domain name
Procedure
1 On the VMware Integrated OpenStack dashboard, select the admin project from the drop-down menuin the title bar.
2 Select Admin > Identity Panel > Users.
3 Click Create User.
The Create User dialog appears.
4 Ensure that the Domain ID field is set to default and the Domain name is Default.
Users must enter the correct domain name to successfully log into the VMware Integrated OpenStackdashboard.
5 Configure the user settings.
Option Description
User Name Cloud user name.
Email Valid email address for the new user.
Password/Confirm Password Preliminary password for the new user.
VMware Integrated OpenStack Administrator Guide
VMware, Inc. 75
Option Description
Primary Project Project to which the user is assigned. You cannot create a user account withoutassigning it to at least one project.
Role Role to which the user is assigned. A role is a set of rights and privileges. A userassigned that role inherits those rights and privileges.
Enable To enable the user, check the Enable check box. To enable the user at a latertime, leave the Enable check box unchecked.
6 Click Create User at the bottom of the panel.
The VMware Integrated OpenStack dashboard assigns an ID to the user, and the user now appears onthe Users page.
Modify a User AccountAs a cloud administrator, you can enable, disable, and delete user accounts, and change passwords foraccounts.
Prerequisites
Verify that you are logged in to the VMware Integrated OpenStack dashboard as a cloud administrator.
Procedure
1 In the VMware Integrated OpenStack dashboard, select the admin project from the drop-down menuin the title bar.
2 Select Identity > Users.
Option Action
Enable or disable a user account. a Select the user account to edit.
b In the Actions column, click Edit and select Enable User or Disable Userfrom the drop-down list.
Delete one or more user accounts. a Select the user accounts to delete.
b Click Delete Users.
c At the prompt, confirm the deletion.
Change a password a Select the user account to edit.
b In the Actions column, clickEdit and then select Change Password.
c Change the password as required.
VMware Integrated OpenStack Administrator Guide
VMware, Inc. 76

Working with Instances inOpenStack 4Instances are virtual machines that run in the cloud.
As a cloud administrative user, you can manage instances for users in various projects. You can view,terminate, edit, perform a soft or hard reboot, create a snapshot from, and migrate instances. You canalso view the logs for instances or start a VNC console for an instance.
For information about how to use the dashboard to start instances as an end user, see the VMwareIntegrated OpenStack User's Guide.
This chapter includes the following topics:
n Import vSphere VMs into VMware Integrated OpenStack
n Create a Snapshot from an Instance
n Control the State of an Instance
n Track Instance Use
n Use DRS to Control OpenStack Instance Placement
n Using Affinity and Anti-Affinity to Place OpenStack Instances
n Apply QoS Resource Allocation to Existing Instances
n Define Default Nova Storage for OpenStack Instances
Import vSphere VMs into VMware Integrated OpenStackYou can import VMs from vSphere into your VMware Integrated OpenStack deployment and managethem like OpenStack instances.
You import VMs using the Datacenter Command Line Interface (DCLI), which is packaged with theVMware Integrated OpenStack management server, and is powered by theVMware Integrated OpenStack vAPI provider.
Though imported VMs become OpenStack instances, they remain distinct in several ways:
n If the imported VM has multiple disks:
n Nova snapshot creation is not supported.
n The Nova resizing operation is not supported.
VMware, Inc. 77

n Existing networks are imported as provider network type port group, with subnets created with DHCPdisabled. This prevents conflict between the DHCP node in OpenStack and the external DHCPserver.
Note If the DHCP server cannot maintain the same IP address during lease renewal, the instanceinformation in OpenStack will show the incorrect IP address. For this reason, it is recommended thatyou use static DHCP bindings on existing DHCP servers. Also, it is not recommended to launch newOpenStack instances on the imported networks since the DHCP address from the external server, ifany, might conflict with OpenStack.
n The flavor for the imported VM shows the correct CPU and memory but the root disk incorrectlydisplays as having 0 GB.
Prerequisites
n Verify that you are running VMware Integrated OpenStack version 4.0.
n Verify that VMware Integrated OpenStack is deployed and running.
n Verify that the VMs to be imported are in the same vCenter.
n Importing VMs is supported with NSX and the VDS plugin for Neutron.
Note If you are running VMware Integrated OpenStack 3.0, you cannot import VMs that are backedby a NSX logical switch. The network backing must be a regular distributed port group. This feature issupported in VMware Integrated OpenStack 3.1 and later.
Procedure
1 Add the clusters containing the VMs to be imported to the VMware Integrated OpenStackdeployment.
a In the vSphere Web Client, identify the cluster containing the VMs to be imported.
b Add the cluster to the VMware Integrated OpenStack deployment as a Nova compute cluster.
c Repeat for multiple clusters, if necessary.
After the cluster is added as a Nova compute cluster, you can import the VMs.
2 Using SSH, log in to the VMware Integrated OpenStack manager.
3 Connect to the VMware Integrated OpenStack vAPI endpoint.
The endpoint runs locally.
dcli +server http://localhost:9449/api +i
This command opens an interactive shell (dcli).
VMware Integrated OpenStack Administrator Guide
VMware, Inc. 78
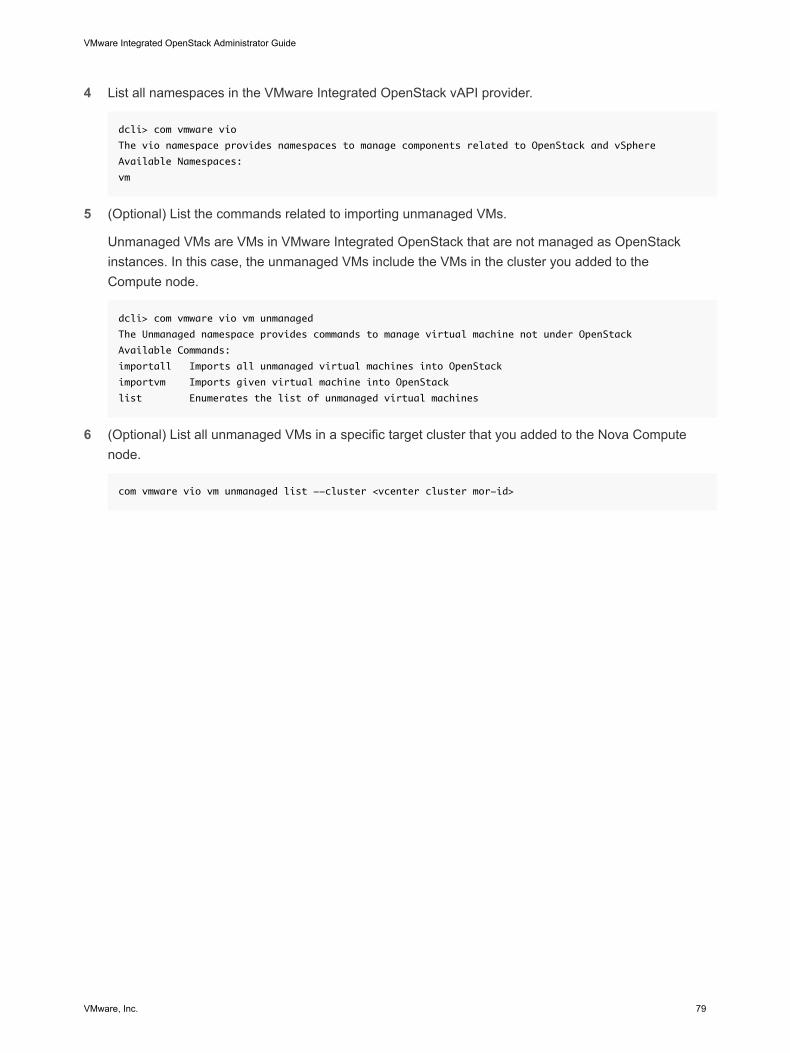
4 List all namespaces in the VMware Integrated OpenStack vAPI provider.
dcli> com vmware vio
The vio namespace provides namespaces to manage components related to OpenStack and vSphere
Available Namespaces:
vm
5 (Optional) List the commands related to importing unmanaged VMs.
Unmanaged VMs are VMs in VMware Integrated OpenStack that are not managed as OpenStackinstances. In this case, the unmanaged VMs include the VMs in the cluster you added to theCompute node.
dcli> com vmware vio vm unmanaged
The Unmanaged namespace provides commands to manage virtual machine not under OpenStack
Available Commands:
importall Imports all unmanaged virtual machines into OpenStack
importvm Imports given virtual machine into OpenStack
list Enumerates the list of unmanaged virtual machines
6 (Optional) List all unmanaged VMs in a specific target cluster that you added to the Nova Computenode.
com vmware vio vm unmanaged list --cluster <vcenter cluster mor-id>
VMware Integrated OpenStack Administrator Guide
VMware, Inc. 79
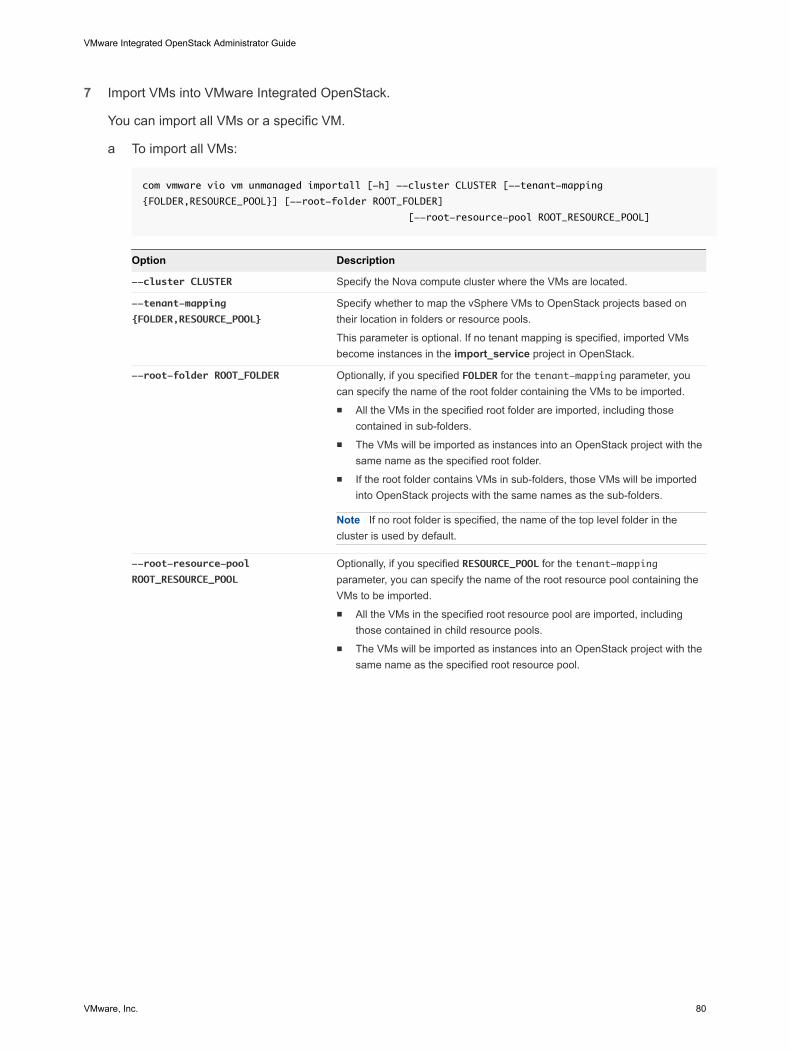
7 Import VMs into VMware Integrated OpenStack.
You can import all VMs or a specific VM.
a To import all VMs:
com vmware vio vm unmanaged importall [-h] --cluster CLUSTER [--tenant-mapping
{FOLDER,RESOURCE_POOL}] [--root-folder ROOT_FOLDER]
[--root-resource-pool ROOT_RESOURCE_POOL]
Option Description
--cluster CLUSTER Specify the Nova compute cluster where the VMs are located.
--tenant-mapping
{FOLDER,RESOURCE_POOL}
Specify whether to map the vSphere VMs to OpenStack projects based ontheir location in folders or resource pools.
This parameter is optional. If no tenant mapping is specified, imported VMsbecome instances in the import_service project in OpenStack.
--root-folder ROOT_FOLDER Optionally, if you specified FOLDER for the tenant-mapping parameter, youcan specify the name of the root folder containing the VMs to be imported.n All the VMs in the specified root folder are imported, including those
contained in sub-folders.n The VMs will be imported as instances into an OpenStack project with the
same name as the specified root folder.n If the root folder contains VMs in sub-folders, those VMs will be imported
into OpenStack projects with the same names as the sub-folders.
Note If no root folder is specified, the name of the top level folder in thecluster is used by default.
--root-resource-pool
ROOT_RESOURCE_POOL
Optionally, if you specified RESOURCE_POOL for the tenant-mappingparameter, you can specify the name of the root resource pool containing theVMs to be imported.n All the VMs in the specified root resource pool are imported, including
those contained in child resource pools.n The VMs will be imported as instances into an OpenStack project with the
same name as the specified root resource pool.
VMware Integrated OpenStack Administrator Guide
VMware, Inc. 80
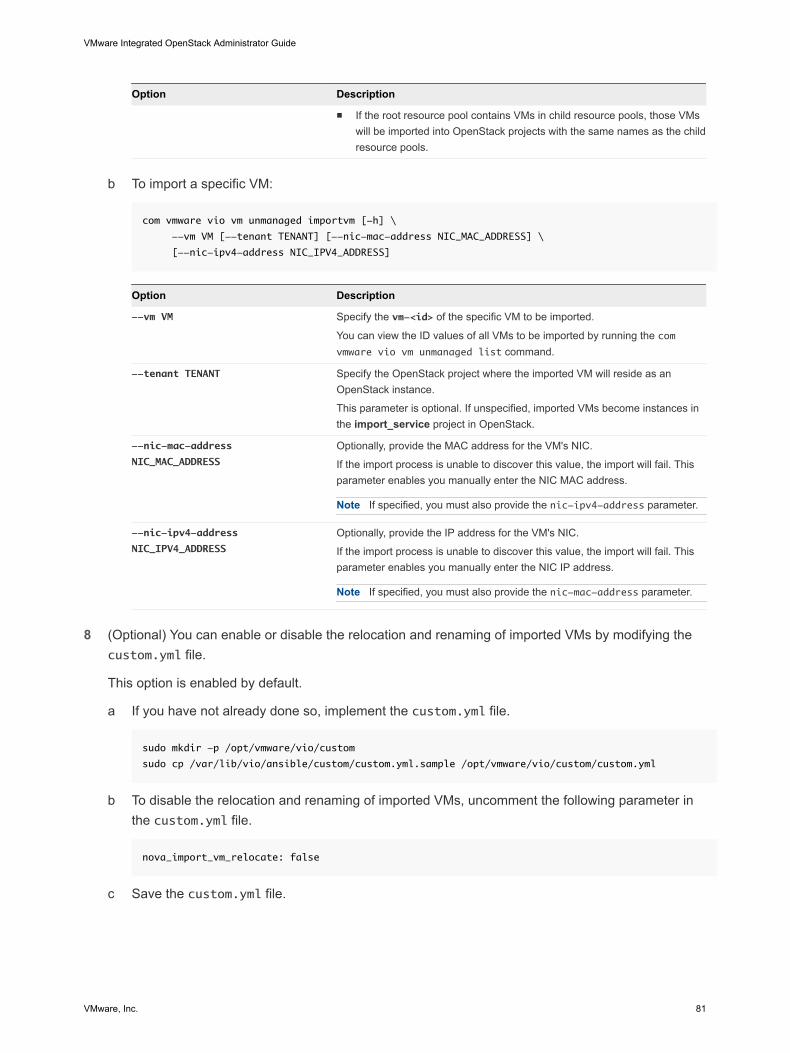
Option Description
n If the root resource pool contains VMs in child resource pools, those VMswill be imported into OpenStack projects with the same names as the childresource pools.
b To import a specific VM:
com vmware vio vm unmanaged importvm [-h] \
--vm VM [--tenant TENANT] [--nic-mac-address NIC_MAC_ADDRESS] \
[--nic-ipv4-address NIC_IPV4_ADDRESS]
Option Description
--vm VM Specify the vm-<id> of the specific VM to be imported.
You can view the ID values of all VMs to be imported by running the comvmware vio vm unmanaged list command.
--tenant TENANT Specify the OpenStack project where the imported VM will reside as anOpenStack instance.
This parameter is optional. If unspecified, imported VMs become instances inthe import_service project in OpenStack.
--nic-mac-address
NIC_MAC_ADDRESS
Optionally, provide the MAC address for the VM's NIC.
If the import process is unable to discover this value, the import will fail. Thisparameter enables you manually enter the NIC MAC address.
Note If specified, you must also provide the nic-ipv4-address parameter.
--nic-ipv4-address
NIC_IPV4_ADDRESS
Optionally, provide the IP address for the VM's NIC.
If the import process is unable to discover this value, the import will fail. Thisparameter enables you manually enter the NIC IP address.
Note If specified, you must also provide the nic-mac-address parameter.
8 (Optional) You can enable or disable the relocation and renaming of imported VMs by modifying the
custom.yml file.
This option is enabled by default.
a If you have not already done so, implement the custom.yml file.
sudo mkdir -p /opt/vmware/vio/custom
sudo cp /var/lib/vio/ansible/custom/custom.yml.sample /opt/vmware/vio/custom/custom.yml
b To disable the relocation and renaming of imported VMs, uncomment the following parameter inthe custom.yml file.
nova_import_vm_relocate: false
c Save the custom.yml file.
VMware Integrated OpenStack Administrator Guide
VMware, Inc. 81
Create a Snapshot from an InstanceWith snapshots, you can create new images from running instances.
You can create a snapshot of an instance directly from the Instances page.
Procedure
1 Log in to the VMware Integrated OpenStack dashboard as a cloud administrator.
2 Select the admin project from the drop-down menu in the title bar.
3 Select Admin > System Panel > Instances.
4 In the Actions column, click Create Snapshot.
The snapshot appears on the Images & Snapshots page.
Control the State of an InstanceAs a cloud administrative user, you can pause, unpause, suspend, resume, soft or hard reboot, orterminate an instance.
Procedure
1 Log in to the VMware Integrated OpenStack dashboard as a cloud administrator.
2 Select the admin project from the drop-down menu in the title bar.
3 Select Admin > System Panel > Instances.
4 Select the instance whose state you want to manage.
5 In the Actions column, click More and select the state from the drop-down menu.
Items that appear in red text are disabled.
Track Instance UseYou can track the use of instances for each project. You can track costs per month by showing metricslike the number of VCPUs, disks, RAM, and uptime of all of your instances.
Procedure
1 Log in to the VMware Integrated OpenStack dashboard as a cloud administrator.
2 Select the admin project from the drop-down menu in the title bar.
3 Select Admin > System Panel > Overview.
The Overview page shows the usage summary and project-specific usage information. You canspecify a period of time for the usage information. Optionally, you can download a CSV summary.
4 (Optional) Specify a period of time for reporting and click Submit.
5 (Optional) Click Download CSV Summary to download a report of the usage.
VMware Integrated OpenStack Administrator Guide
VMware, Inc. 82
Use DRS to Control OpenStack Instance PlacementAs a cloud administrator, you can use vSphere DRS settings to control how specific OpenStack instancesare placed on hosts in the Compute cluster . In addition to the DRS configuration, you also modify themetadata of source images in OpenStack to ensure that instances generated from those images arecorrectly identified for placement.
Prerequisites
n Verify that you are running VMware Integrated OpenStack version 2.0.x or later.
n Verify that VMware Integrated OpenStack is running in vSphere. Go to Home > VMware IntegratedOpenStack > OpenStack Deployments > [Deployment Name].
n At least one dummy VM in the Compute cluster to use as a template to create a DRS VM group.
Procedure
1 Define VM and Host Groups for Placing OpenStack Instances
In the vSphere Web Client, create VM and host groups to contain and manage specific OpenStackinstances.
2 Create a DRS Rule for OpenStack Instance Placement
In the vSphere Web Client, create a DRS rule to manage the distribution of OpenStack instances ina VM group to a specific host group.
3 Apply VM Group Settings to Image Metadata
You can modify the metadata of a source image to automatically place instances into VM groups.VM groups are configured in the vSphere Web Client and can be further used to apply DRS rules.
Define VM and Host Groups for Placing OpenStack InstancesIn the vSphere Web Client, create VM and host groups to contain and manage specific OpenStackinstances.
Procedure
1 Log in to the vSphere Web Client.
2 Go to the vCenter Hosts and Clusters view.
3 Select the Compute cluster configured for the VMware Integrated OpenStack deployment.
4 Click the Manage tab.
5 Click Settings and click vSphere DRS.
VMware Integrated OpenStack Administrator Guide
VMware, Inc. 83
6 Verify the following settings configuration:
n DRS is enabled.
n DRS Automation is set to Fully Automated or Partially Automated .
n Power Management is set to Off.
7 Click VM/Host Groups.
8 Create a VM group.
a Click Add.
b Enter a name for the new VM group.
c From the Type drop-down menu, select VM Group.
d Click Add.
e On the Filter tab, select the dummy VM to create an empty VM group.
You created the dummy VM in an earlier task in this sequence.
f Click OK.
9 Create a Host group.
a Click Add.
b Enter a name for the new host group.
c From the Type drop-down menu, select Host Group.
d Click Add.
e On the Filter tab, add members to the group by selecting one or more hosts.
f Click OK.
Both groups now appear in the VM/Host Groups list on the VM/Host page.
What to do next
You can now create a rule that determines how OpenStack instances assigned to the VM group aredistributed on the hosts in the host group. See Create a DRS Rule for OpenStack Instance Placement.
Create a DRS Rule for OpenStack Instance PlacementIn the vSphere Web Client, create a DRS rule to manage the distribution of OpenStack instances in a VMgroup to a specific host group.
If you are continuing from Define VM and Host Groups for Placing OpenStack Instances, skip ahead to Step 5 .
Prerequisites
n Define at least one VM group .
VMware Integrated OpenStack Administrator Guide
VMware, Inc. 84
n Define at least one host group.
See Define VM and Host Groups for Placing OpenStack Instances.
Procedure
1 Log in to the vSphere Web Client.
2 Go to the vCenter Hosts and Clusters view and select the Compute cluster configured for theVMware Integrated OpenStack deployment.
3 Click the Manage tab, and go to Settings > vSphere DRS.
4 Verify the following settings configuration:
n DRS is enabled .
n DRS Automation is set to Fully Automated or Partially Automated .
n Power Management is set to Off.
5 Click VM/Host Rules.
6 Click Add.
7 Enter a name for the new rule and select or deselect the Enable rule option to enable or disable therule.
8 From the Type drop-down menu, select Virtual Machines to Hosts.
9 From the VM Group drop-down menu, select the VM group that identifies the OpenStack instancesyou want to place .
10 Select the Must run on hosts in group specification. .
11 Select a specification for the rule.
Setting Description
Must run on hosts in group OpenStack instances in the specified VM group must run on hosts in the specifiedhost group.
Should run on hosts in group OpenStack instances in the specified VM group should, but are not required, to runon hosts in the specified host group.
Must not run on hosts in group OpenStack instances in the specified VM group must never run on host in thespecified host group.
Should not run on hosts in group OpenStack instances in the specified VM group should not, but may, run on hosts inthe specified host group.
12 From the Host Group drop-down menu, select the host group that contains the hosts on which theOpenStack instances will be placed .
13 Click OK.
The rule now determines that OpenStack instances in the specified VM group must run on hosts in thespecified host group.
VMware Integrated OpenStack Administrator Guide
VMware, Inc. 85

What to do next
In the VMware Integrated OpenStack dashboard, you can now modify the metadata for a specific imageto ensure that all instances generated from that image are automatically included in the VM group, andtherefore subject to the DRS rule.
Apply VM Group Settings to Image MetadataYou can modify the metadata of a source image to automatically place instances into VM groups. VMgroups are configured in the vSphere Web Client and can be further used to apply DRS rules.
Prerequisites
n Verify that a VM group is configured in the vSphere Web Client for the Compute cluster.
n Verify that the DRS VM group name is defined in the vSphere Web Client. See Use DRS to ControlOpenStack Instance Placement.
Procedure
1 Log in to the VMware Integrated OpenStack dashboard as a cloud administrator.
2 Select the admin project from the drop-down menu in the title bar.
3 Select Admin > System > Images.
4 Click the image to modify.
5 In the Actions column of the image listing, click the down arrow and select Update Metadata.
6 Add the DRS VM group metadata property to the image metadata.
The Update Metadata dialog box displays two columns. The column on the right displays metadatatags already applied to the image, and the one on the left displays available metadata tags, which aregrouped by categories, such as Guest Customization, Instance Config Data, and so on.
a In the Available Metadata column, select the VMware Driver Options > DRS VM group property.
b Click the plus sign (+) to add the property to the image metadata.
The vmware_vm_group metadata property is highlighted in the Existing Metadata column.
c For the metadata value, enter DRS VM group name as defined in the vSphere Web Client.
d To remove a metadata tag from the image definition, click the minus sign (-).
7 Click Save.
All instances generated from this source image are automatically assigned to the specified VM group inthe VMware Integrated OpenStack deployment in vCenter.
VMware Integrated OpenStack Administrator Guide
VMware, Inc. 86
Using Affinity and Anti-Affinity to Place OpenStackInstancesThe Nova scheduler provides filters that you can use to ensure that OpenStack instances areautomatically placed on the same host (affinity) or separate hosts (anti-affinity).
You apply the affinity or anti-affinity filter as a policy to a server group. All instances that are members ofthe same group are subject to the same filters. When you create an OpenStack instance, you can specifythe server group to which the instance will belong and therefore what filter will be applied.
You can perform this configuration using either the OpenStack CLI or ServerGroup API. You cannotperform this configuration in the VMware Integrated OpenStack Horizon dashboard.
This approach to placing OpenStack instances is tenant-based. Affinity and anti-affinity determine therelationship among instances in the same server group, but they cannot determine the hosts on which theinstances are placed in vCenter. For an administrator-based approach that provides greater control, see Use DRS to Control OpenStack Instance Placement.
Create Instances with an Affinity or Anti-Affinity Policy by Usingthe CLIYou can place instances using affinity or anti-affinity by creating a server group in OpenStack andapplying desired filter as a group policy. All instances that are members of the server group will be subjectto the affinity or anti-affinity policy. You can perform this configuration using the CLI.
Prerequisites
n Verify that the intended filter configuration does not conflict with any existing administrativeconfiguration, such as DRS rules that manage instance placement on hosts.
n Verify that you are running VMware Integrated OpenStack version 2.0.x or later.
n Verify that VMware Integrated OpenStack is running.
n Verify that you are using a Python nova-client version 2.17.0.6 or later as required for theServerGroup API. Go to http://docs.openstack.org/user-guide/common/cli_install_openstack_command_line_clients.html.
Procedure
1 Using SSH, log in to the nova-client.
2 (Optional) Obtain the ID of the image you will use to create the instance.
You can use the nova image-list command to view the list of available images and their ID values.
3 (Optional) Obtain the ID of the flavor you will use to define the instance .
You can use the nova flavor-list command to view the list of flavor definitions and their IDvalues.
VMware Integrated OpenStack Administrator Guide
VMware, Inc. 87
4 Create a new server group with the intended policy.
a Create a server group with the affinity policy:
nova server-group-create GROUP_NAME affinity
b Create a server group with the anti-affinity policy:
nova server-group-create GROUP_NAME anti-affinity
In both case, the CLI returns the auto-generated server group UUID, name, and policy.
5 Launch a new instance, using the --image, --flavor, and --hint flags to apply the server groupaffinity policy .
nova boot --image IMAGE_ID --flavor FLAVOR_ID --hint group=SERVER_GROUP_UUID INSTANCE_NAME
6 (Optional) Confirm that the new rule and the server group instances appear and are running correctlyin the VMware Integrated OpenStack deployment in vCenter Server.
The details appear in the Manage > Settings > VM/Host Rules page for the Compute cluster.
Create Instances with an Affinity or Anti-Affinity Policy Using theAPIYou can place instances using affinity or anti-affinity by creating a server group in OpenStack andapplying desired filter as a group policy. All instances that are members of the server group will be subjectto the affinity or anti-affinity policy. You can perform this configuration using the ServerGroup API from thePython nova-client.
Prerequisites
n Verify that the intended anti-affinity filter configuration does not conflict with any existingadministrative configuration, such as DRS rules that manage instance placement on hosts.
n Verify that you are running VMware Integrated OpenStack version 2.0.x or later.
n Verify that VMware Integrated OpenStack is running.
n Verify that you are using a Python nova-client version 2.17.0.6 or later, as required for theServerGroup API. Go to http://docs.openstack.org/user-guide/common/cli_install_openstack_command_line_clients.html.
VMware Integrated OpenStack Administrator Guide
VMware, Inc. 88
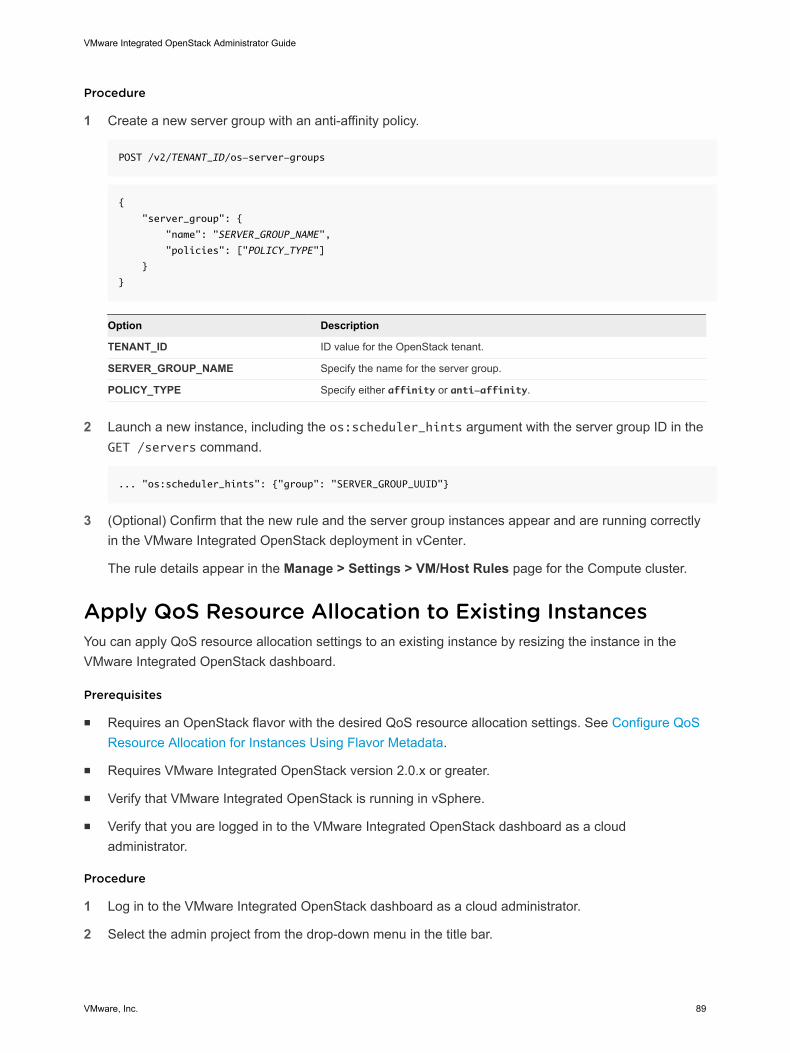
Procedure
1 Create a new server group with an anti-affinity policy.
POST /v2/TENANT_ID/os-server-groups
{
"server_group": {
"name": "SERVER_GROUP_NAME",
"policies": ["POLICY_TYPE"]
}
}
Option Description
TENANT_ID ID value for the OpenStack tenant.
SERVER_GROUP_NAME Specify the name for the server group.
POLICY_TYPE Specify either affinity or anti-affinity.
2 Launch a new instance, including the os:scheduler_hints argument with the server group ID in theGET /servers command.
... "os:scheduler_hints": {"group": "SERVER_GROUP_UUID"}
3 (Optional) Confirm that the new rule and the server group instances appear and are running correctlyin the VMware Integrated OpenStack deployment in vCenter.
The rule details appear in the Manage > Settings > VM/Host Rules page for the Compute cluster.
Apply QoS Resource Allocation to Existing InstancesYou can apply QoS resource allocation settings to an existing instance by resizing the instance in theVMware Integrated OpenStack dashboard.
Prerequisites
n Requires an OpenStack flavor with the desired QoS resource allocation settings. See Configure QoSResource Allocation for Instances Using Flavor Metadata.
n Requires VMware Integrated OpenStack version 2.0.x or greater.
n Verify that VMware Integrated OpenStack is running in vSphere.
n Verify that you are logged in to the VMware Integrated OpenStack dashboard as a cloudadministrator.
Procedure
1 Log in to the VMware Integrated OpenStack dashboard as a cloud administrator.
2 Select the admin project from the drop-down menu in the title bar.
VMware Integrated OpenStack Administrator Guide
VMware, Inc. 89
3 Select Admin > System > Instances.
4 Click the hyperlinked name of the instance to access the Instance Details page.
5 Click the down arrow (next to the Create Snapshot button) and choose Resize Instance.
6 In the Flavor Choice tab, open the New Flavor drop-down list and select the flavor with the desiredQoS resource allocations
7 Click Resize.
The resizing process may take a few minutes.
The instance is now subject to the QoS settings as defined in the flavor metadata.
Define Default Nova Storage for OpenStack InstancesTo ensure that OpenStack instances booted from a volume use the correct volume type, you can createand apply policy-based management settings, which are called PBM policies.
After you enable the storage policy in the custom.yml file, you apply the policy by modifying themetadata of an OpenStack flavor. All instances created by using that flavor inherit the storage policyconfiguration.
Procedure
1 Implement the custom.yml file.
sudo mkdir -p /opt/vmware/vio/custom
sudo cp /var/lib/vio/ansible/custom/custom.yml.sample /opt/vmware/vio/custom/custom.yml
2 Edit the /opt/vmware/vio/custom/custom.yml file by uncommenting the PBM options.
##############################
# PBM options
##############################
# (string) The PBM default policy to use when no policy is associated with a flavor (Mandatory) if
nova_pbm_enabled is set to True.
nova_pbm_default_policy: nova
# (boolean) The PBM status. Set this to True to enable storage policies for nova flavors.
nova_pbm_enabled: False
3 Set the nova_pbm_enabled parameter to True.
nova_pbm_enabled: True
4 Save the custom.yml file.
VMware Integrated OpenStack Administrator Guide
VMware, Inc. 90
5 Apply the policy to an OpenStack flavor as metadata.
a Log in to the VMware Integrated OpenStack dashboard as a cloud administrator.
b Select the admin project from the drop-down menu in the title bar.
c Select Admin > System > Flavors.
d (Optional) Create a flavor specific to the intended use of this metadata property.
Create a custom flavor to contain the specific configuration. This action leaves the original flavorconfiguration intact and available for other instance creation.
e Select the flavor to modify.
f In the Actions column of the image listing, click the down arrow and select Update Metadata.
g Enter vmware:storage_policy in the Custom field.
h Click the plus sign (+) next to the Custom field.
In the column under Existing Metadata, the newly added metadata property appears.
i Enter nova as the metadata property value.
6 Click Save.
The default Nova storage policy is applied to all future OpenStack instances that are created from thisflavor.
VMware Integrated OpenStack Administrator Guide
VMware, Inc. 91

Working with Volumes andVolume Types in OpenStack 5Volumes are block storage devices that you attach to instances to enable persistent storage.
As a cloud administrative user, you can manage volumes and volume types for users in various projects.You can create and delete volume types, and you can view and delete volumes.
Cloud users can attach a volume to a running instance or detach a volume and attach it to anotherinstance at any time. For information about how to use the dashboard to create and manage volumes asan end user, see the VMware Integrated OpenStack User Guide.
This chapter includes the following topics:
n Modify the Default Cinder Volume Adapter Type
n Create a Volume Type
n Delete a Volume Type
n Migrating Volumes Between Datastores
Modify the Default Cinder Volume Adapter TypeStarting with VMware Integrated OpenStack 3.1, you can change the default adapter type for newlycreated volumes by changing vmware_adapter_type parameter using a custom.yml file.
By default, empty volumes are always created and attached to a lsiLogic controller. When a volume iscreated from image, Cinder respects the vmware_adaptertype property of the image and creates thecorresponding controller. For newly created volumes you set the adapter type by using thecinder_volume_default_adapter_type parameter in the custom.yml file with one of the followingvalues.
Value Description
lsiLogic Sets the default adapter type to LSI Logic
busLogic Sets the default adapter type to Bus Logic
lsiLogicsas Sets the default adapter type to LSI Logic SAS
paraVirtual Sets the default adapter type to VMware Paravirtual SCSI
ide Sets the default adapter type to IDE
VMware, Inc. 92
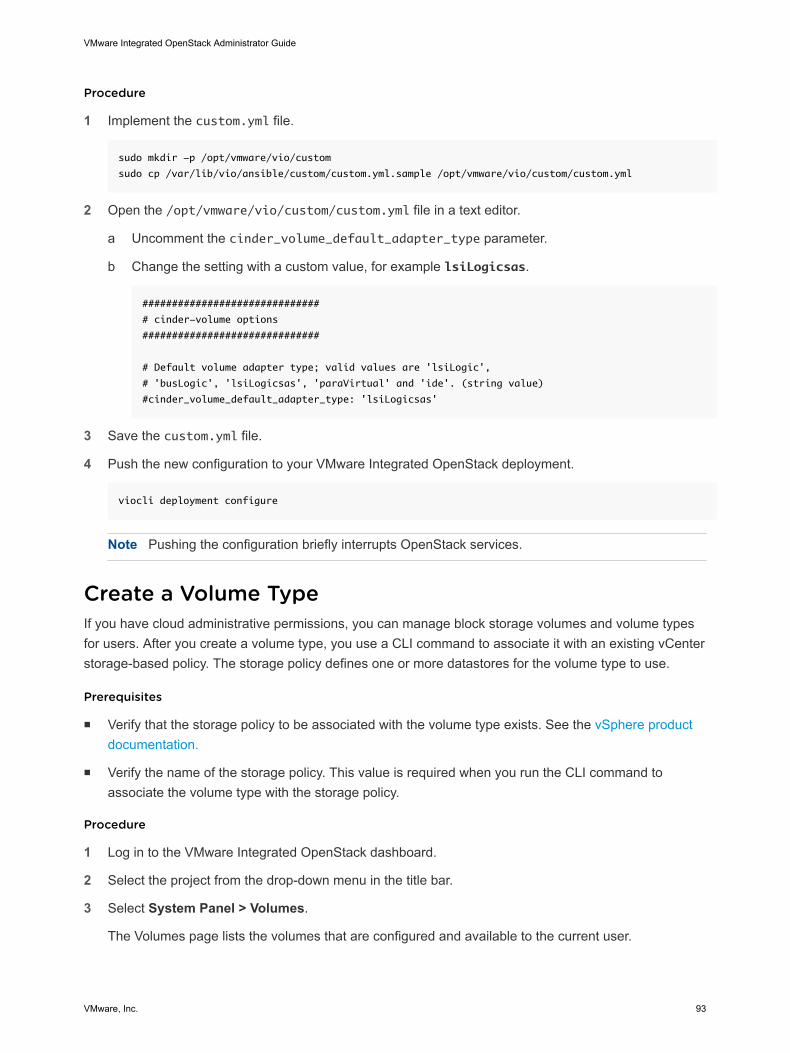
Procedure
1 Implement the custom.yml file.
sudo mkdir -p /opt/vmware/vio/custom
sudo cp /var/lib/vio/ansible/custom/custom.yml.sample /opt/vmware/vio/custom/custom.yml
2 Open the /opt/vmware/vio/custom/custom.yml file in a text editor.
a Uncomment the cinder_volume_default_adapter_type parameter.
b Change the setting with a custom value, for example lsiLogicsas.
##############################
# cinder-volume options
##############################
# Default volume adapter type; valid values are 'lsiLogic',
# 'busLogic', 'lsiLogicsas', 'paraVirtual' and 'ide'. (string value)
#cinder_volume_default_adapter_type: 'lsiLogicsas'
3 Save the custom.yml file.
4 Push the new configuration to your VMware Integrated OpenStack deployment.
viocli deployment configure
Note Pushing the configuration briefly interrupts OpenStack services.
Create a Volume TypeIf you have cloud administrative permissions, you can manage block storage volumes and volume typesfor users. After you create a volume type, you use a CLI command to associate it with an existing vCenterstorage-based policy. The storage policy defines one or more datastores for the volume type to use.
Prerequisites
n Verify that the storage policy to be associated with the volume type exists. See the vSphere productdocumentation.
n Verify the name of the storage policy. This value is required when you run the CLI command toassociate the volume type with the storage policy.
Procedure
1 Log in to the VMware Integrated OpenStack dashboard.
2 Select the project from the drop-down menu in the title bar.
3 Select System Panel > Volumes.
The Volumes page lists the volumes that are configured and available to the current user.
VMware Integrated OpenStack Administrator Guide
VMware, Inc. 93
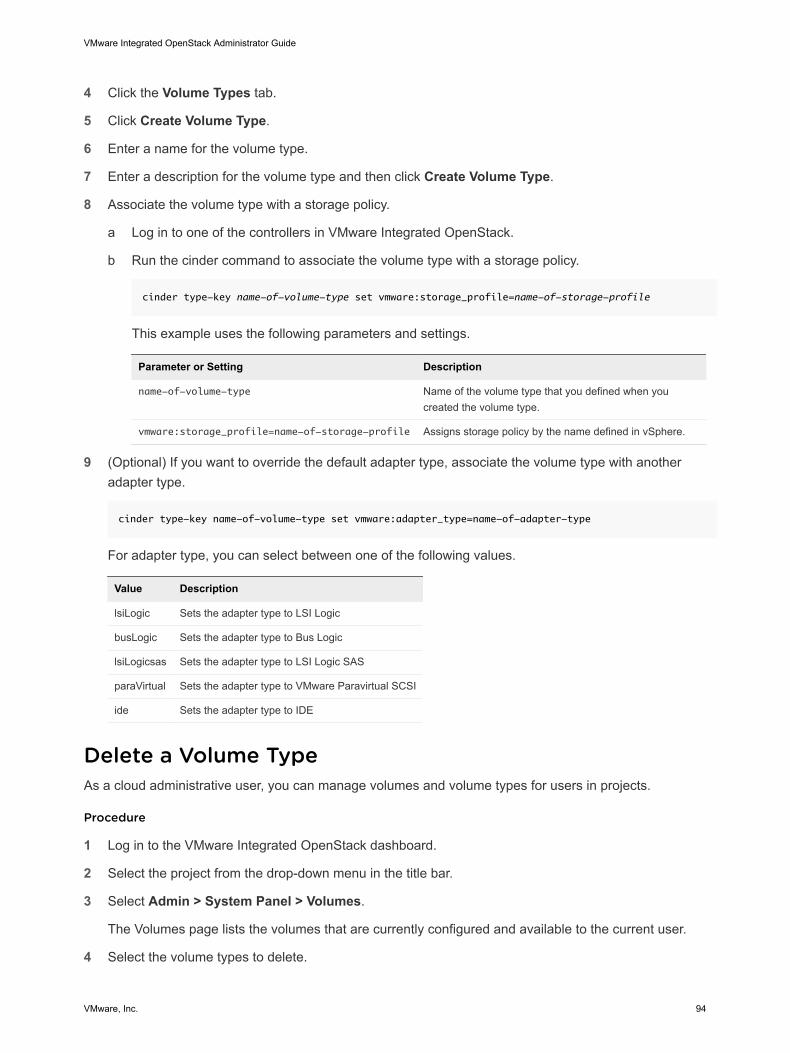
4 Click the Volume Types tab.
5 Click Create Volume Type.
6 Enter a name for the volume type.
7 Enter a description for the volume type and then click Create Volume Type.
8 Associate the volume type with a storage policy.
a Log in to one of the controllers in VMware Integrated OpenStack.
b Run the cinder command to associate the volume type with a storage policy.
cinder type-key name-of-volume-type set vmware:storage_profile=name-of-storage-profile
This example uses the following parameters and settings.
Parameter or Setting Description
name-of-volume-type Name of the volume type that you defined when youcreated the volume type.
vmware:storage_profile=name-of-storage-profile Assigns storage policy by the name defined in vSphere.
9 (Optional) If you want to override the default adapter type, associate the volume type with anotheradapter type.
cinder type-key name-of-volume-type set vmware:adapter_type=name-of-adapter-type
For adapter type, you can select between one of the following values.
Value Description
lsiLogic Sets the adapter type to LSI Logic
busLogic Sets the adapter type to Bus Logic
lsiLogicsas Sets the adapter type to LSI Logic SAS
paraVirtual Sets the adapter type to VMware Paravirtual SCSI
ide Sets the adapter type to IDE
Delete a Volume TypeAs a cloud administrative user, you can manage volumes and volume types for users in projects.
Procedure
1 Log in to the VMware Integrated OpenStack dashboard.
2 Select the project from the drop-down menu in the title bar.
3 Select Admin > System Panel > Volumes.
The Volumes page lists the volumes that are currently configured and available to the current user.
4 Select the volume types to delete.
VMware Integrated OpenStack Administrator Guide
VMware, Inc. 94
5 Click Delete Volume Types.
6 At the prompt, confirm the deletion.
Migrating Volumes Between DatastoresYou can safely migrate Cinder volumes between datastores. This enables you to replace datastores,increase resources and capacity, and preserve volumes without taking them offline. The process formigrating volumes depends on several factors. For example, the process is very straightforward if thevolume is not attached to an instance. If a volume is attached to an instance, you must migrate theinstance.
Note You cannot migrate any volume that has snapshots attached. You must first detach the snapshots.
Migrate All Volumes from a Specified DatastoreYou can quickly evacuate all volumes from a specified datastore, automatically migrating them to otherdatastores in the same datastore cluster.
Prerequisites
n Verify that the specified datastore is part of a datastore cluster.
n Verify that Storage DRS is enabled in Not Automation (Manual Mode) for the datastore cluster.
n Verify that the volume does not have any snapshots attached. If so, you must detach them first.
Procedure
1 Using SSH, log in to the VMware Integrated OpenStack manager.
2 Switch to root user.
sudo su -
3 Prepare the volume for migration.
This step prepares all volumes on the specified datastore for migration.
viocli ds-migrate-prep [-d DEPLOYMENT] DC_NAME DS_NAME
Option Description
-d DEPLOYMENT Indicates the name of the VMware Integrated OpenStack deployment.
DC_NAME Indicates the data center name.
DS_NAME Indicates the datastore name.
4 Place the datastore in maintenance mode.
See the vSphere product documentation.
VMware Integrated OpenStack Administrator Guide
VMware, Inc. 95
When you place the datastore in maintenance mode, the datastore is evacuated and the volumesautomatically migrate to other datastores in the same datastore cluster.
Migrate Unattached Cinder VolumesYou can migrate Cinder volumes that are unattached to instances to specified target datastores.
Prerequisites
Verify that the volume does not have any snapshots attached. If so, you must detach them first.
Procedure
1 Using SSH, log in to the VMware Integrated OpenStack manager.
2 Switch to root user.
sudo su -
3 Migrate the volume.
viocli volume-migrate [-d [NAME]] \
[--source-dc [SRC_DC_NAME]] [--source-ds [SRC_DS_NAME]] \
[--volume-ids [VOLUME_UUIDS]] [--ignore-storage-policy] \
DEST_DC_NAME DEST_DS_NAME [-h] [-v]
ParameterMandatory orOptional Description
-d, --deployment
NAMEAutomatic Name of the deployment in which the volumes to be migrated.
Applied automatically. The default value is the name of the currentdeployment.
--source-dc
SRC_DC_NAMEMandatory unlessVOLUME_UUIDS isspecified.
Identifies the source data center.
Used with the --source-ds parameter uniquely to identify thedatastore.
--source-ds
SRC_DS_NAMEMandatory unlessVOLUME_UUIDS isspecified.
Used with the --source-dc parameter uniquely to identify thedatastore.
For example, the following command migrates all the volumes fromdatastore DS-01 in data center DC-01 to datastore DS-02 in datacenter DC-02.
viocli volume-migrate --source-dc DC-01 --source-ds
DS-01 DC-02 DS-02
--volume-ids
VOLUME_UUIDSMandatory unlessSRC_DC_NAME andSRC_DS_NAME arespecified.
Migrates one or more individual volumes specified by UUID value.To specify more than one volume, separate the UUIDs by commas.
For example, the following command migrates two volumesspecified by their UUID values to datastore DS-01 in data centerDC-01.
viocli volume-migrate --volume-ids
25e121d9-1153-4d15-92f8-c92c10b4987f,
4f1120e1-9ed4-421a-b65b-908ab1c6bc50 DC-01 DS-01
VMware Integrated OpenStack Administrator Guide
VMware, Inc. 96

ParameterMandatory orOptional Description
--ignore-storage-
policy
Optional Ignores storage policy compliance check.
Include this parameter to prevent migration failure if the migratedvolume includes a storage policy with which the destinationdatastore does not comply.
DEST_DC_NAME Mandatory Specifies the destination data center.
DEST_DS_NAME Mandatory Specifies the destination datastore.
-h, --help Optional Show the use and arguments for this command.
-v, --verbose Optional Enter verbose mode.
Migrate Attached Cinder VolumesTo migrate an attached cinder volume to a different datastore, you must migrate the virtual machine thatcorresponds to the instance to which it is attached.
Prerequisites
Verify that the volume does not have any snapshots attached. If so, you must detach them first.
Procedure
1 Using SSH, log in to the VMware Integrated OpenStack manager.
2 Switch to root user.
sudo su -
3 Prepare the volume for migration.
This step prepares all volumes on the specified datastore for migration.
viocli ds-migrate-prep [-d DEPLOYMENT] DC_NAME DS_NAME
Option Description
-d DEPLOYMENT Indicates the name of the VMware Integrated OpenStack deployment.
DC_NAME Indicates the data center name.
DS_NAME Indicates the datastore name.
4 Log in to the vSphere Web Client.
5 Locate the virtual machine that corresponds to the Nova instance to which the volume is attached.
VMware Integrated OpenStack Administrator Guide
VMware, Inc. 97
6 Use the Storage vMotion feature in the vSphere Web Client to migrate the virtual machine to adifferent datastore.
The volume migrates to the new datastore, but only the disk of the shadow VM moves to the newdatastore. The shadow VM remains on the old datastore with no disk.
See the vSphere product documentation about using Storage vMotion.
7 (Optional) To fix the disk of the shadow VM, run a volume detach procedure.
The detach operation disconnects the volume from the instance. Failures to read or write from thevolume might occur.
VMware Integrated OpenStack Administrator Guide
VMware, Inc. 98
Managing Images for the ImageService 6In the OpenStack context, an image is a file that contains a virtual disk from which you can install anoperating system on a VM. You create an instance in your OpenStack cloud by using one of the imagesavailable. The VMware Integrated OpenStack Image Service component natively supports images thatare packaged in the ISO, OVA, and VMDK formats.
If you have existing images in vSphere that you want to use in OpenStack, you can export them in one ofthe supported formats and upload them to the Image Service. If you obtain an image that is in anunsupported format, you can convert it as part of the import process. Unsupported formats are RAW,QCOW2, VDI, and VHD.
This chapter includes the following topics:
n Import Images to the Image Service
n Modify Image Settings
n Modify Image Resource Metadata
n Configuring Images for Windows Guest Customization
n Configure QoS Resource Allocation for Instances Using Image Metadata
n Delete an Existing Image
n Migrating Images
n Add a VM Template as an Image
n Configure Images to Enable Live Resize of VMs Deployed From That Image
n Modify the Default Behavior for Nova Snapshots
n Modify the Default Cinder Upload-to-Image Behavior
Import Images to the Image ServiceYou can use CLI commands or the VMware Integrated OpenStack dashboard to import images.
Prerequisites
To be successfully imported, verify that the image is in one of the natively supported image formats (ISO,OVA, VMDK) or in a format that can be converted during the import process (RAW, QCOW2, VDI, VHD).
VMware, Inc. 99
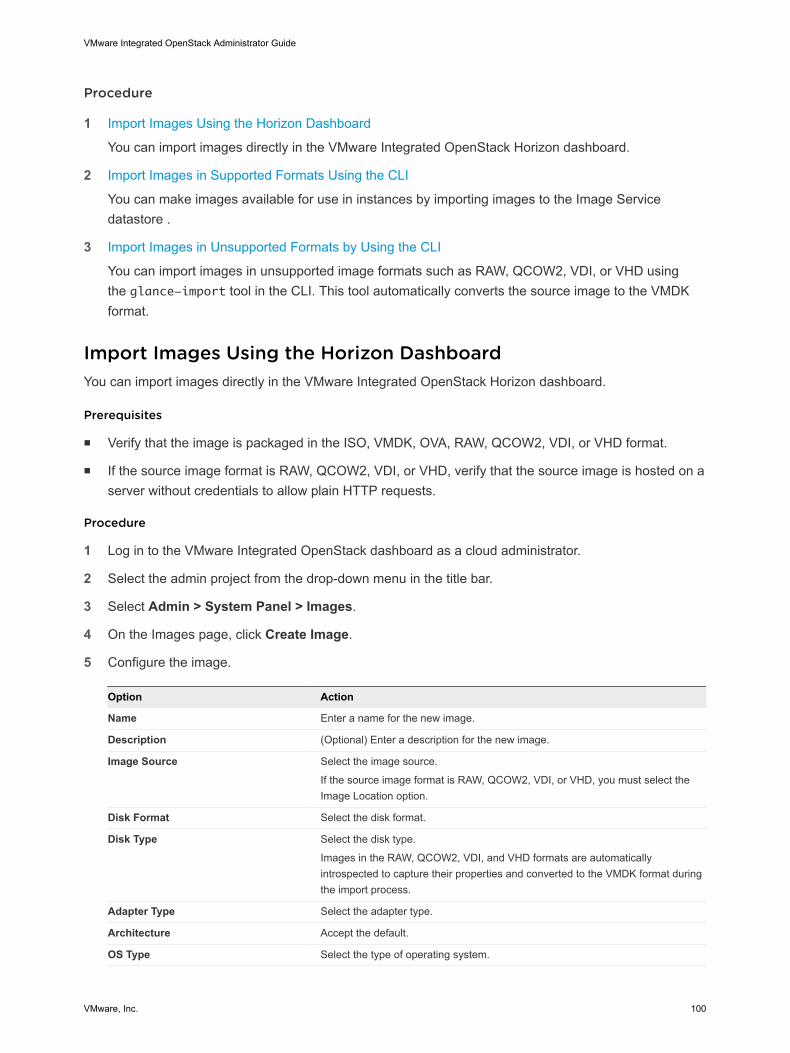
Procedure
1 Import Images Using the Horizon Dashboard
You can import images directly in the VMware Integrated OpenStack Horizon dashboard.
2 Import Images in Supported Formats Using the CLI
You can make images available for use in instances by importing images to the Image Servicedatastore .
3 Import Images in Unsupported Formats by Using the CLI
You can import images in unsupported image formats such as RAW, QCOW2, VDI, or VHD usingthe glance-import tool in the CLI. This tool automatically converts the source image to the VMDKformat.
Import Images Using the Horizon DashboardYou can import images directly in the VMware Integrated OpenStack Horizon dashboard.
Prerequisites
n Verify that the image is packaged in the ISO, VMDK, OVA, RAW, QCOW2, VDI, or VHD format.
n If the source image format is RAW, QCOW2, VDI, or VHD, verify that the source image is hosted on aserver without credentials to allow plain HTTP requests.
Procedure
1 Log in to the VMware Integrated OpenStack dashboard as a cloud administrator.
2 Select the admin project from the drop-down menu in the title bar.
3 Select Admin > System Panel > Images.
4 On the Images page, click Create Image.
5 Configure the image.
Option Action
Name Enter a name for the new image.
Description (Optional) Enter a description for the new image.
Image Source Select the image source.
If the source image format is RAW, QCOW2, VDI, or VHD, you must select theImage Location option.
Disk Format Select the disk format.
Disk Type Select the disk type.
Images in the RAW, QCOW2, VDI, and VHD formats are automaticallyintrospected to capture their properties and converted to the VMDK format duringthe import process.
Adapter Type Select the adapter type.
Architecture Accept the default.
OS Type Select the type of operating system.
VMware Integrated OpenStack Administrator Guide
VMware, Inc. 100
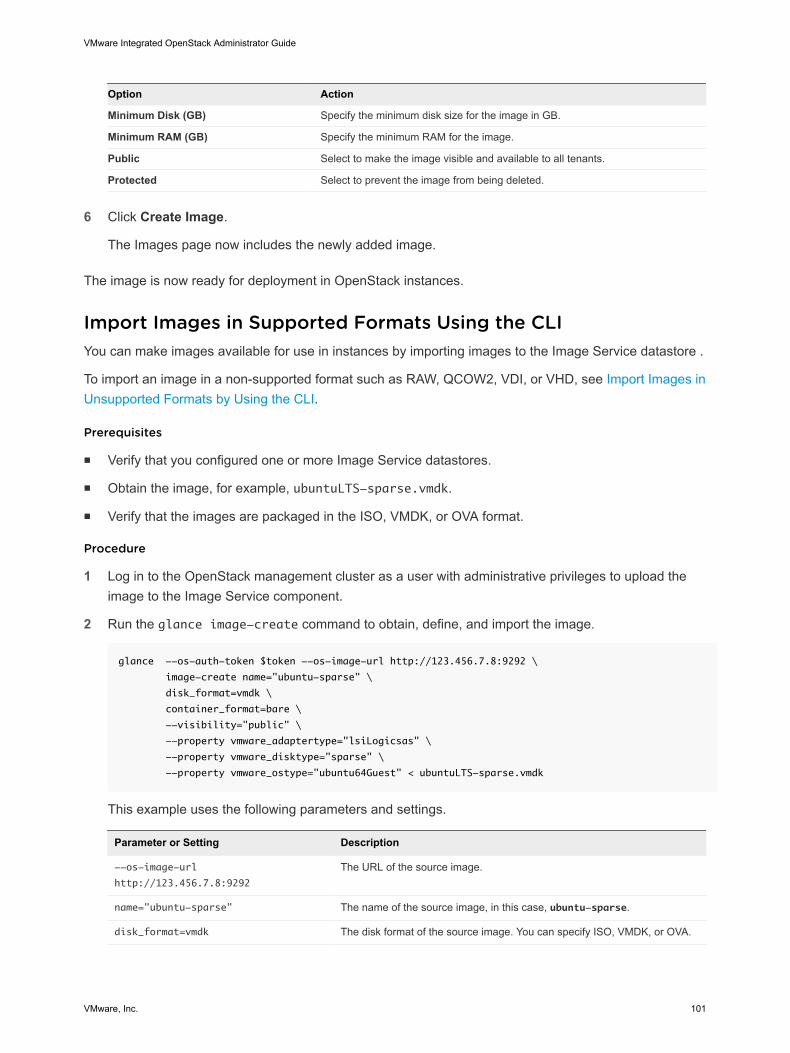
Option Action
Minimum Disk (GB) Specify the minimum disk size for the image in GB.
Minimum RAM (GB) Specify the minimum RAM for the image.
Public Select to make the image visible and available to all tenants.
Protected Select to prevent the image from being deleted.
6 Click Create Image.
The Images page now includes the newly added image.
The image is now ready for deployment in OpenStack instances.
Import Images in Supported Formats Using the CLIYou can make images available for use in instances by importing images to the Image Service datastore .
To import an image in a non-supported format such as RAW, QCOW2, VDI, or VHD, see Import Images inUnsupported Formats by Using the CLI.
Prerequisites
n Verify that you configured one or more Image Service datastores.
n Obtain the image, for example, ubuntuLTS-sparse.vmdk.
n Verify that the images are packaged in the ISO, VMDK, or OVA format.
Procedure
1 Log in to the OpenStack management cluster as a user with administrative privileges to upload theimage to the Image Service component.
2 Run the glance image-create command to obtain, define, and import the image.
glance --os-auth-token $token --os-image-url http://123.456.7.8:9292 \
image-create name="ubuntu-sparse" \
disk_format=vmdk \
container_format=bare \
--visibility="public" \
--property vmware_adaptertype="lsiLogicsas" \
--property vmware_disktype="sparse" \
--property vmware_ostype="ubuntu64Guest" < ubuntuLTS-sparse.vmdk
This example uses the following parameters and settings.
Parameter or Setting Description
--os-image-url
http://123.456.7.8:9292
The URL of the source image.
name="ubuntu-sparse" The name of the source image, in this case, ubuntu-sparse.
disk_format=vmdk The disk format of the source image. You can specify ISO, VMDK, or OVA.
VMware Integrated OpenStack Administrator Guide
VMware, Inc. 101
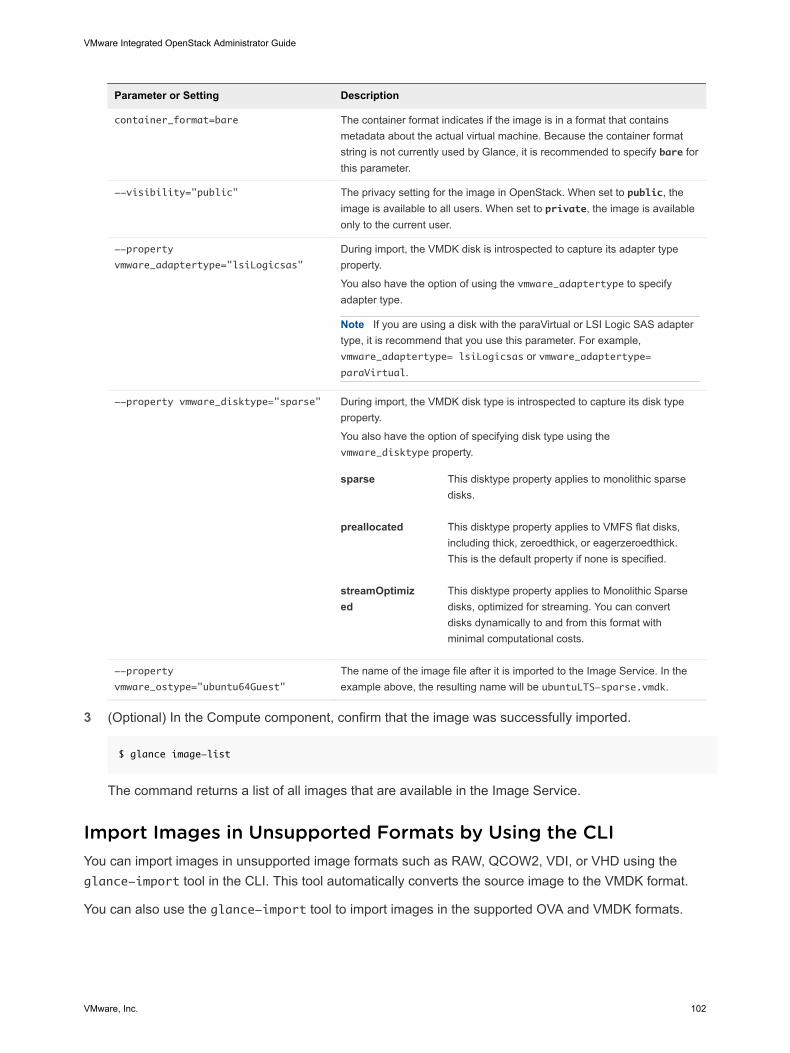
Parameter or Setting Description
container_format=bare The container format indicates if the image is in a format that containsmetadata about the actual virtual machine. Because the container formatstring is not currently used by Glance, it is recommended to specify bare forthis parameter.
--visibility="public" The privacy setting for the image in OpenStack. When set to public, theimage is available to all users. When set to private, the image is availableonly to the current user.
--property
vmware_adaptertype="lsiLogicsas"
During import, the VMDK disk is introspected to capture its adapter typeproperty.
You also have the option of using the vmware_adaptertype to specifyadapter type.
Note If you are using a disk with the paraVirtual or LSI Logic SAS adaptertype, it is recommend that you use this parameter. For example,vmware_adaptertype= lsiLogicsas or vmware_adaptertype=paraVirtual.
--property vmware_disktype="sparse" During import, the VMDK disk type is introspected to capture its disk typeproperty.
You also have the option of specifying disk type using thevmware_disktype property.
sparse This disktype property applies to monolithic sparsedisks.
preallocated This disktype property applies to VMFS flat disks,including thick, zeroedthick, or eagerzeroedthick.This is the default property if none is specified.
streamOptimized
This disktype property applies to Monolithic Sparsedisks, optimized for streaming. You can convertdisks dynamically to and from this format withminimal computational costs.
--property
vmware_ostype="ubuntu64Guest"
The name of the image file after it is imported to the Image Service. In theexample above, the resulting name will be ubuntuLTS-sparse.vmdk.
3 (Optional) In the Compute component, confirm that the image was successfully imported.
$ glance image-list
The command returns a list of all images that are available in the Image Service.
Import Images in Unsupported Formats by Using the CLIYou can import images in unsupported image formats such as RAW, QCOW2, VDI, or VHD using theglance-import tool in the CLI. This tool automatically converts the source image to the VMDK format.
You can also use the glance-import tool to import images in the supported OVA and VMDK formats.
VMware Integrated OpenStack Administrator Guide
VMware, Inc. 102

Prerequisites
n Verify that the image is packaged in the RAW, QCOW2, VDI, or VHD format.
n To allow plain HTTP requests, verify that the image is hosted on a server without credentials.
n Verify that the VMware Integrated OpenStack controller can access the hosted server where theimage is stored.
Procedure
1 Using SSH, log in to the VMware Integrated OpenStack manager.
2 From the VMware Integrated OpenStack manager, use SSH to log in to the controller01 node.
3 Switch to root user.
sudo su -
4 Execute the cloudadmin.rc file.
source cloudadmin.rc
5 Configure the controller01 node to use the internal VIP.
export OS_AUTH_URL=http://INTERNAL_VIP:35357/v2.0
6 To import the image, run the glance-import command.
glance-import import --name image_name --url image_http_url --image-format supported_image_format
Parameter Description
image-name Specify the name for the image as it will appear in the Image Service.
image_format Specify the format of the source image file. Non-VMDK images are convertedautomatically to the VMDK format.
The following formats are supported:n VMDKn OVAn RAWn QCOW2n VDIn VHD
image_http-url Provide the HTTP location of the source image file. For example:
glance-import cirros-img qcow2 https://launchpad.net/cirros/trunk/0.3.0/+download/cirros-0.3.0-
x86_64-disk.img
VMware Integrated OpenStack Administrator Guide
VMware, Inc. 103
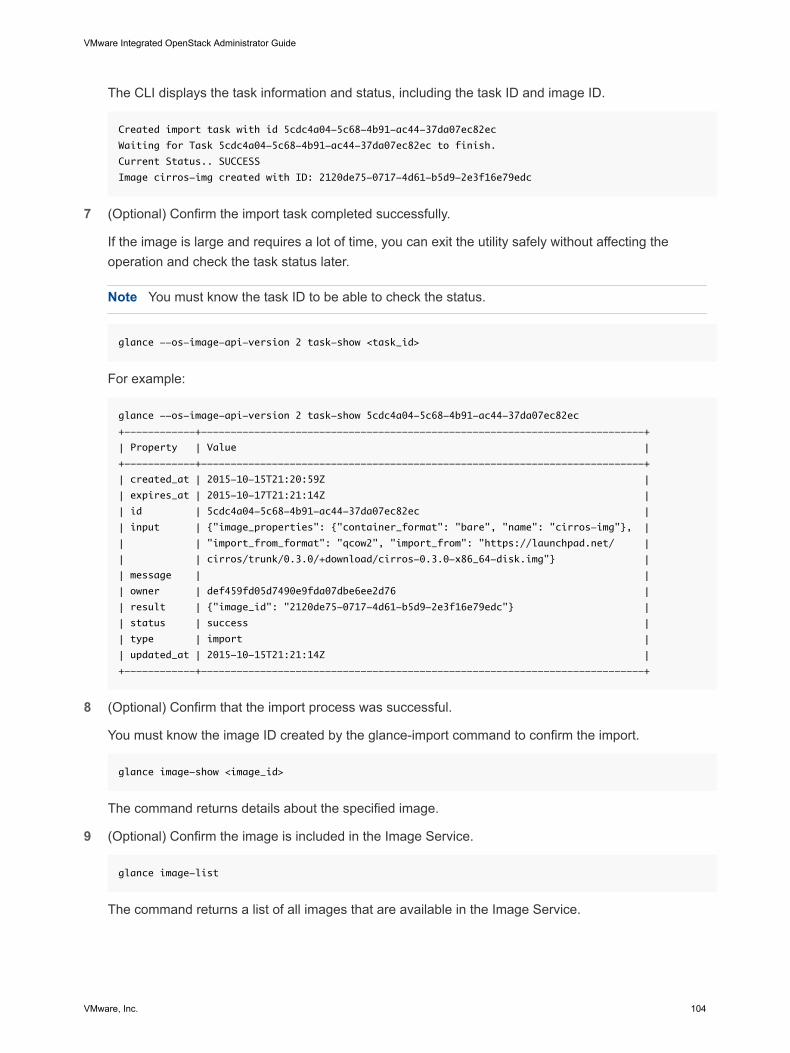
The CLI displays the task information and status, including the task ID and image ID.
Created import task with id 5cdc4a04-5c68-4b91-ac44-37da07ec82ec
Waiting for Task 5cdc4a04-5c68-4b91-ac44-37da07ec82ec to finish.
Current Status.. SUCCESS
Image cirros-img created with ID: 2120de75-0717-4d61-b5d9-2e3f16e79edc
7 (Optional) Confirm the import task completed successfully.
If the image is large and requires a lot of time, you can exit the utility safely without affecting theoperation and check the task status later.
Note You must know the task ID to be able to check the status.
glance --os-image-api-version 2 task-show <task_id>
For example:
glance --os-image-api-version 2 task-show 5cdc4a04-5c68-4b91-ac44-37da07ec82ec
+------------+---------------------------------------------------------------------------+
| Property | Value |
+------------+---------------------------------------------------------------------------+
| created_at | 2015-10-15T21:20:59Z |
| expires_at | 2015-10-17T21:21:14Z |
| id | 5cdc4a04-5c68-4b91-ac44-37da07ec82ec |
| input | {"image_properties": {"container_format": "bare", "name": "cirros-img"}, |
| | "import_from_format": "qcow2", "import_from": "https://launchpad.net/ |
| | cirros/trunk/0.3.0/+download/cirros-0.3.0-x86_64-disk.img"} |
| message | |
| owner | def459fd05d7490e9fda07dbe6ee2d76 |
| result | {"image_id": "2120de75-0717-4d61-b5d9-2e3f16e79edc"} |
| status | success |
| type | import |
| updated_at | 2015-10-15T21:21:14Z |
+------------+---------------------------------------------------------------------------+
8 (Optional) Confirm that the import process was successful.
You must know the image ID created by the glance-import command to confirm the import.
glance image-show <image_id>
The command returns details about the specified image.
9 (Optional) Confirm the image is included in the Image Service.
glance image-list
The command returns a list of all images that are available in the Image Service.
VMware Integrated OpenStack Administrator Guide
VMware, Inc. 104
Modify Image SettingsAfter an image is loaded, you can modify the image settings, such as image name, description, and thepublic and protected settings.
Procedure
1 Log in to the VMware Integrated OpenStack dashboard as a cloud administrator.
2 Select the admin project from the drop-down menu in the title bar.
3 Select Admin > System Panel > Images.
4 Select the image to edit.
5 In the Actions column, click Edit Images.
6 Modify the settings as necessary.
7 Click Update Image.
The Images page redisplays with the changed information.
Modify Image Resource MetadataAfter an image is loaded, you can modify the image resource metadata settings by adding or removingmetadata tags for the image definition. Image resource metadata can help end users determine thenature of an image, and is used by associated OpenStack components and drivers that interface with theImage Service.
You can manage metadata definitions on the Metadata Definitions page located atAdmin > System >Metadata Definitions.
Procedure
1 Log in to the VMware Integrated OpenStack dashboard as a cloud administrator.
2 Select the admin project from the drop-down menu in the title bar.
3 Select Admin > System > Images.
4 Click the image to modify.
5 In the Actions column of the image listing, click the down arrow and select Update Metadata.
VMware Integrated OpenStack Administrator Guide
VMware, Inc. 105
6 Modify the settings as necessary.
The Update Metadata dialog has two columns. The right shows metadata tags already applied to theimage, and the left column shows available metadata tags, which are grouped by category, such asGuest Customization, Instance Config Data, and so on.
a To add a metadata tag to the image definition, click the plus sign (+).
The item moves to the Existing Metadata column and is highlighted.
b Enter the metadata value in the provided field, if applicable.
c To remove a metadata tag from the image definition, click the minus sign (-).
7 Click Save.
Configuring Images for Windows Guest CustomizationYou can configure images for Windows guest customization directly in the VMware Integrated OpenStackdashboard by applying the guest customization metadata to the Glance image used to create aninstance.
The Windows guest customization feature provides an alternative to the cloudbase-init approach toenabling guest customization. If an image currently uses cloudbase-init, do not use theVMware Integrated OpenStack Windows guest customization feature.
Prerequisites
n Verify that you are logged in to the VMware Integrated OpenStack dashboard as a cloudadministrator.
n Verify that you have an appropriate Windows OS image available in the Glance Image Service.
n Verify that the correct versions of the Microsoft System Preparation tools (sysprep) for each guestoperating system you want to customize are installed in vSphere. See Installing the MicrosoftSysprep Tool in the vSphere product documentation.
n Verify that VMware Tools is installed on the source image.
n Verify that the image disk type property correctly reflects the image disk type prior to import.
This applies only to images imported into Glance in VMware Integrated OpenStack versions earlierthan 2.0. In version 2.0.x and later, image properties (such as disk type) are automaticallyintrospected during the Glance import process.
Procedure
1 Log in to the VMware Integrated OpenStack dashboard as a cloud administrator.
2 Select the admin project from the drop-down menu in the title bar.
VMware Integrated OpenStack Administrator Guide
VMware, Inc. 106
3 (Optional) Preview the Guest Customization Options metadata definition.
a Select Admin > System > Metadata Definitions.
b Click Guest Customization Options.
c Click the Contents tab.
You can only view the metadata definitions in the VMware Integrated OpenStack dashboard. Youcannot modify the metadata.
4 Select Admin > System > Images.
5 Locate the Windows image to modify.
6 In the Actions column of the image listing, click the down arrow and select Update Metadata.
7 In the column under Available Metadata, expand the Guest Customization Options tab.
Note If the Guest Customization Options tab is not present, the related metadata properties mightalready be configured.
8 Click the plus sign (+) next to the guest customization option you want to add.
Tip You can add all the options simultaneously by the clicking the plus sign (+) on the top GuestCustomization Options tab.
In the column under Existing Metadata, the newly added metadata properties appear.
Note You may need to scroll to the bottom of this column to see the newly added metadataproperties.
9 Configure the metadata properties.
Metadata Property Description
Auto logon count Applies the windows_logon_count metadata property.
Enter the number of times the machine can automatically logged in to asAdministrator . Typically, this value is set to 1, but you can increase the value ifyour configuration requires multiple reboots. This value might be determined bythe list of commands executed by the GuiRunOnce command.
Automatic logon Applies the windows_auto_logon metadata property.
If selected, the VM is automatically logged in to as Administrator.
Maximum number of connections Applies the windows_max_connect metadata property.
Enter the number of client licenses purchased for the Windows server beinginstalled.
Note This property is applied only if the windows_license_mode metadataproperty, described below, is set to PerServer.
VMware Integrated OpenStack Administrator Guide
VMware, Inc. 107
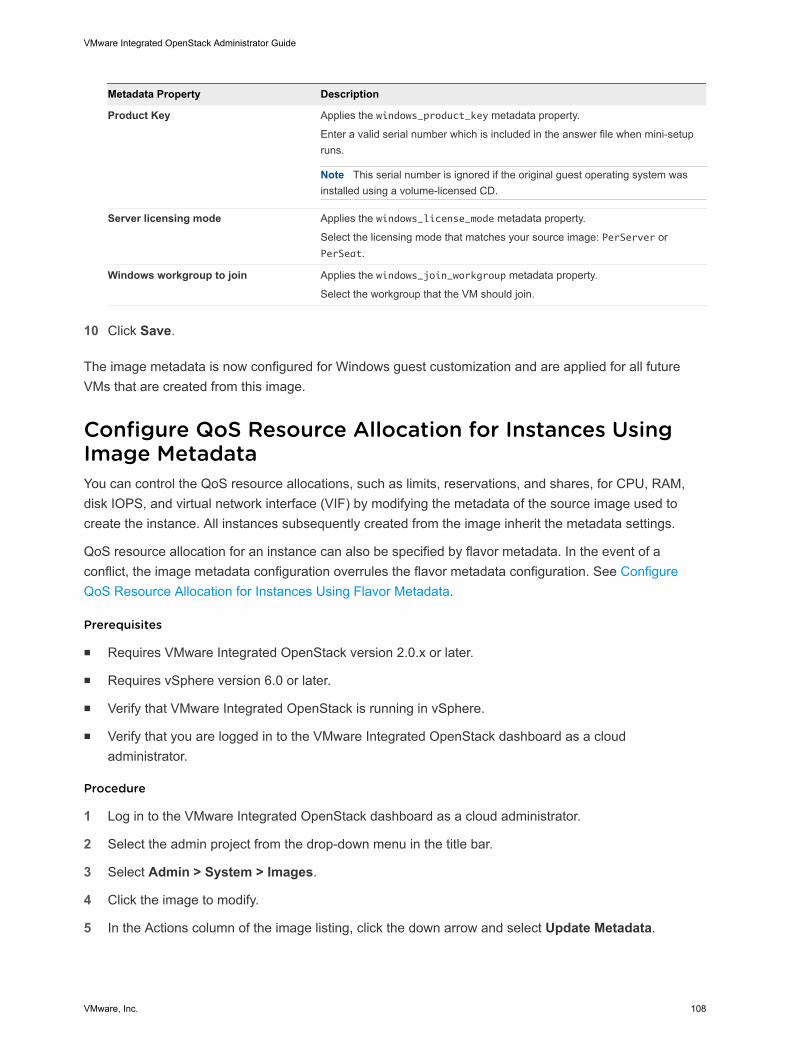
Metadata Property Description
Product Key Applies the windows_product_key metadata property.
Enter a valid serial number which is included in the answer file when mini-setupruns.
Note This serial number is ignored if the original guest operating system wasinstalled using a volume-licensed CD.
Server licensing mode Applies the windows_license_mode metadata property.
Select the licensing mode that matches your source image: PerServer orPerSeat.
Windows workgroup to join Applies the windows_join_workgroup metadata property.
Select the workgroup that the VM should join.
10 Click Save.
The image metadata is now configured for Windows guest customization and are applied for all futureVMs that are created from this image.
Configure QoS Resource Allocation for Instances UsingImage MetadataYou can control the QoS resource allocations, such as limits, reservations, and shares, for CPU, RAM,disk IOPS, and virtual network interface (VIF) by modifying the metadata of the source image used tocreate the instance. All instances subsequently created from the image inherit the metadata settings.
QoS resource allocation for an instance can also be specified by flavor metadata. In the event of aconflict, the image metadata configuration overrules the flavor metadata configuration. See ConfigureQoS Resource Allocation for Instances Using Flavor Metadata.
Prerequisites
n Requires VMware Integrated OpenStack version 2.0.x or later.
n Requires vSphere version 6.0 or later.
n Verify that VMware Integrated OpenStack is running in vSphere.
n Verify that you are logged in to the VMware Integrated OpenStack dashboard as a cloudadministrator.
Procedure
1 Log in to the VMware Integrated OpenStack dashboard as a cloud administrator.
2 Select the admin project from the drop-down menu in the title bar.
3 Select Admin > System > Images.
4 Click the image to modify.
5 In the Actions column of the image listing, click the down arrow and select Update Metadata.
VMware Integrated OpenStack Administrator Guide
VMware, Inc. 108
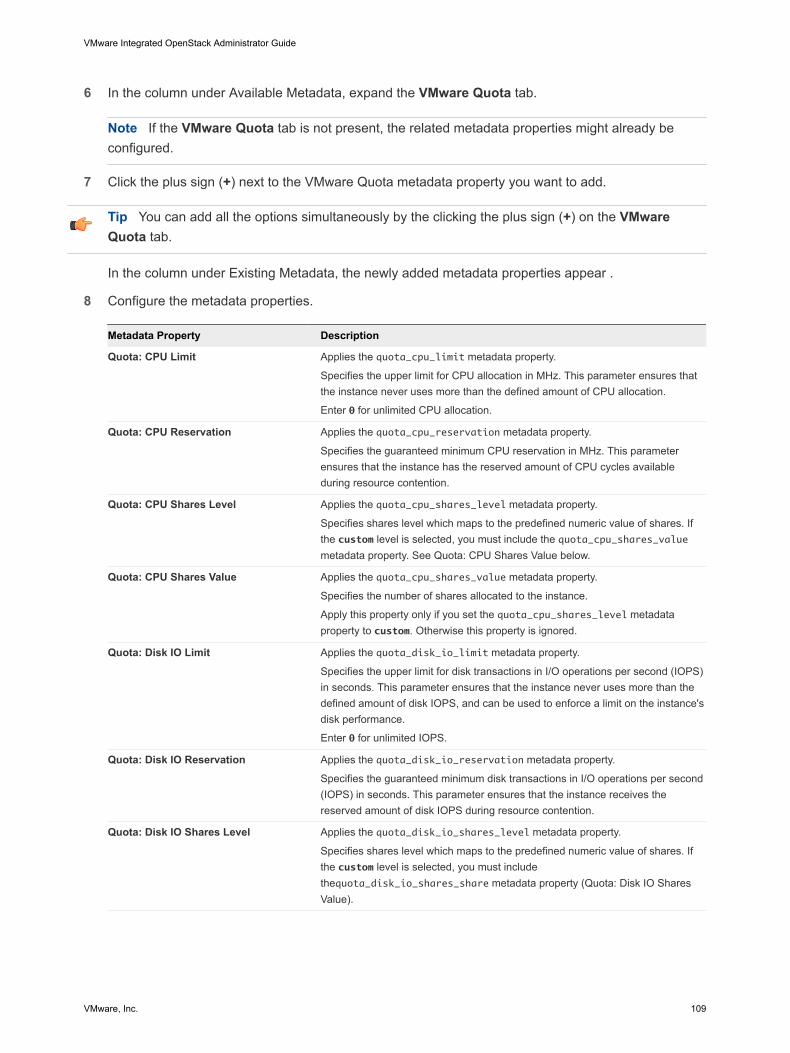
6 In the column under Available Metadata, expand the VMware Quota tab.
Note If the VMware Quota tab is not present, the related metadata properties might already beconfigured.
7 Click the plus sign (+) next to the VMware Quota metadata property you want to add.
Tip You can add all the options simultaneously by the clicking the plus sign (+) on the VMwareQuota tab.
In the column under Existing Metadata, the newly added metadata properties appear .
8 Configure the metadata properties.
Metadata Property Description
Quota: CPU Limit Applies the quota_cpu_limit metadata property.
Specifies the upper limit for CPU allocation in MHz. This parameter ensures thatthe instance never uses more than the defined amount of CPU allocation.
Enter 0 for unlimited CPU allocation.
Quota: CPU Reservation Applies the quota_cpu_reservation metadata property.
Specifies the guaranteed minimum CPU reservation in MHz. This parameterensures that the instance has the reserved amount of CPU cycles availableduring resource contention.
Quota: CPU Shares Level Applies the quota_cpu_shares_level metadata property.
Specifies shares level which maps to the predefined numeric value of shares. Ifthe custom level is selected, you must include the quota_cpu_shares_valuemetadata property. See Quota: CPU Shares Value below.
Quota: CPU Shares Value Applies the quota_cpu_shares_value metadata property.
Specifies the number of shares allocated to the instance.
Apply this property only if you set the quota_cpu_shares_level metadataproperty to custom. Otherwise this property is ignored.
Quota: Disk IO Limit Applies the quota_disk_io_limit metadata property.
Specifies the upper limit for disk transactions in I/O operations per second (IOPS)in seconds. This parameter ensures that the instance never uses more than thedefined amount of disk IOPS, and can be used to enforce a limit on the instance'sdisk performance.
Enter 0 for unlimited IOPS.
Quota: Disk IO Reservation Applies the quota_disk_io_reservation metadata property.
Specifies the guaranteed minimum disk transactions in I/O operations per second(IOPS) in seconds. This parameter ensures that the instance receives thereserved amount of disk IOPS during resource contention.
Quota: Disk IO Shares Level Applies the quota_disk_io_shares_level metadata property.
Specifies shares level which maps to the predefined numeric value of shares. Ifthe custom level is selected, you must includethequota_disk_io_shares_share metadata property (Quota: Disk IO SharesValue).
VMware Integrated OpenStack Administrator Guide
VMware, Inc. 109
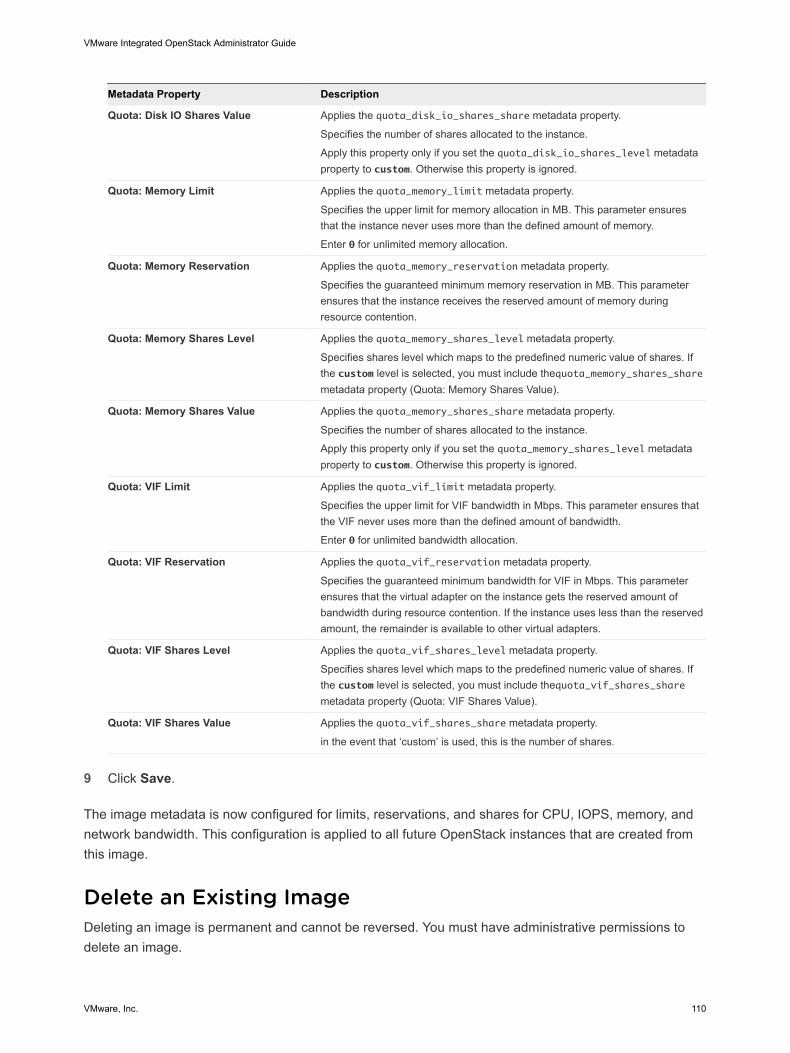
Metadata Property Description
Quota: Disk IO Shares Value Applies the quota_disk_io_shares_share metadata property.
Specifies the number of shares allocated to the instance.
Apply this property only if you set the quota_disk_io_shares_level metadataproperty to custom. Otherwise this property is ignored.
Quota: Memory Limit Applies the quota_memory_limit metadata property.
Specifies the upper limit for memory allocation in MB. This parameter ensuresthat the instance never uses more than the defined amount of memory.
Enter 0 for unlimited memory allocation.
Quota: Memory Reservation Applies the quota_memory_reservation metadata property.
Specifies the guaranteed minimum memory reservation in MB. This parameterensures that the instance receives the reserved amount of memory duringresource contention.
Quota: Memory Shares Level Applies the quota_memory_shares_level metadata property.
Specifies shares level which maps to the predefined numeric value of shares. Ifthe custom level is selected, you must include thequota_memory_shares_sharemetadata property (Quota: Memory Shares Value).
Quota: Memory Shares Value Applies the quota_memory_shares_share metadata property.
Specifies the number of shares allocated to the instance.
Apply this property only if you set the quota_memory_shares_level metadataproperty to custom. Otherwise this property is ignored.
Quota: VIF Limit Applies the quota_vif_limit metadata property.
Specifies the upper limit for VIF bandwidth in Mbps. This parameter ensures thatthe VIF never uses more than the defined amount of bandwidth.
Enter 0 for unlimited bandwidth allocation.
Quota: VIF Reservation Applies the quota_vif_reservation metadata property.
Specifies the guaranteed minimum bandwidth for VIF in Mbps. This parameterensures that the virtual adapter on the instance gets the reserved amount ofbandwidth during resource contention. If the instance uses less than the reservedamount, the remainder is available to other virtual adapters.
Quota: VIF Shares Level Applies the quota_vif_shares_level metadata property.
Specifies shares level which maps to the predefined numeric value of shares. Ifthe custom level is selected, you must include thequota_vif_shares_sharemetadata property (Quota: VIF Shares Value).
Quota: VIF Shares Value Applies the quota_vif_shares_share metadata property.
in the event that ‘custom’ is used, this is the number of shares.
9 Click Save.
The image metadata is now configured for limits, reservations, and shares for CPU, IOPS, memory, andnetwork bandwidth. This configuration is applied to all future OpenStack instances that are created fromthis image.
Delete an Existing ImageDeleting an image is permanent and cannot be reversed. You must have administrative permissions todelete an image.
VMware Integrated OpenStack Administrator Guide
VMware, Inc. 110
Procedure
1 Log in to the VMware Integrated OpenStack dashboard as a cloud administrator.
2 Select the admin project from the drop-down menu in the title bar.
3 Select Admin > System Panel > Images.
4 Select one or more images to delete.
5 Click Delete Images.
6 Confirm the deletion at the prompt.
Migrating ImagesYou can migrate images between datastores in a way that preserves their UUID and metadata.
This process requires you to copy the images folder from the current datastore to an offline datastore andmodify the Image Service image location configuration.
Procedure
1 Copy the Images Folder to the New Datastore
Copy the images folder, including folder name and relative path, to the new datastore.
2 Update the Migrated Images Location Data
After you copy the images folder to a new datastore, you must update the locations setting on eachimage to reflect the new datastore.
Copy the Images Folder to the New DatastoreCopy the images folder, including folder name and relative path, to the new datastore.
Prerequisites
Verify that both the current and destination datastores are available.
Procedure
1 Using SSH, log in to the ESXi host on which the current Image Service datastore is mounted.
2 Switch to root user.
sudo su -
3 Locate the images folder.
The images folder is typically called images and resides on the top level.
4 Using the cp or scp Linux command, copy the images folder to the new datastore.
Important When copying the folder to the new datastore, retain both the images folder name andrelative path.
VMware Integrated OpenStack Administrator Guide
VMware, Inc. 111
What to do next
You must now modify the images data to reflect the new location. For details, see Update the MigratedImages Location Data.
Update the Migrated Images Location DataAfter you copy the images folder to a new datastore, you must update the locations setting on each imageto reflect the new datastore.
Prerequisites
n Verify that the images folder has been copied to the new datastore.
n Verify that the image folder name and relative path on the new datastore are the same as as on theprevious datastore.
n Verify that you know the image ID values of the images you want to update.
Procedure
1 Repeat this procedure for all images that you want to migrate.
2 Using SSH, log in as administrator to the VMware Integrated OpenStack manager.
3 Using SSH, log in to the controller01 node.
4 Switch to root user.
sudo su -
5 Execute the cloudadmin.rc file.
source cloudadmin.rc
6 (Optional) View a list of images.
glance image-list
7 (Optional) Get the location of a specific image.
Note You must know the image ID to specify the image.
glance --os-image-api-version 2 image-show <image_id>
The image location is the URL indicated by the locations parameter.
vsphere://<vcenter_ip>/folder/<image_folder_name>/<image_id>dcPath=<path_to_datac
enter>&dsName=<old_datastore_name>
VMware Integrated OpenStack Administrator Guide
VMware, Inc. 112
For example:
vsphere://10.20.123.456/folder/images/6c4a7e0d-65e7-4f3c-9dde-0de75f729a0c
?dcPath=Datacenter1&dsName=old_ds
8 Update the image's location URL to reflect the destination datastore to complete the migration of asingle image.
a Add the new location to the image configuration.
glance --os-image-api-version 2 location-add <image_id> --url <new_url>
Option Description
image_id Specifies the image to be modified.
new_url The new URL is the same as the previous URL except the dsName argumentspecifies the name of the new datastore.
vsphere://<vcenter_ip>/folder/<image_folder_name>/<image_id>dc
Path=<path_to_datacenter>&dsName=<new_datastore_name>
If the command returns a 400 Bad Request: Invalid Location message, verify that file pathof the image on the destination datastore is correct.
b Remove the old location from the image configuration.
glance --os-image-api-version 2 location-delete <image_id> --url <old_url>
c View the image information again to verify that the locations parameter correctly reflects thenew datastore.
glance --os-image-api-version 2 image-show <image_id>
The image is successfully migrated.
Add a VM Template as an ImageYou can add existing VM templates to your VMware Integrated OpenStack deployment as Glanceimages. This enables users to boot instances, create bootable block storage volumes, and other functionsavailable to Glance images.
Prerequisites
n Verify that the existing VMs template resides in the same vCenter as yourVMware Integrated OpenStack deployment.
n Verify that the following conditions do apply.
n The VM template does not have multiple disks.
n The VM template does not have a CD-ROM drive.
VMware Integrated OpenStack Administrator Guide
VMware, Inc. 113

n The VM template does not have a floppy disk drive.
Procedure
1 Prepare the VM template.
Configure the metadata settings as necessary.
n The vmware_ostype is required for Windows images, but optional for Linux images.
n The hw_vif_model is recommended for specifying NIC type. Before defining this setting, confirmthe correct NIC type for this image template. For example, if this setting is undefined, the instanceis provisioned with the E1000 NIC by default. To ensure another NIC is provisioned, define thissetting appropriately.
For example, to provision the VMXNET3 NIC, the metadata definition ishw_vif_model=VirtualVmxnet3.
n The following metadata settings are not required.
n vmware_adaptertype
n vmware_disktype
2 Log in to the OpenStack management cluster.
3 Run the glance command to obtain, define, and import the image.
glance image-create --name <NAME> \
--disk-format vmdk --container-format bare
--property vmware_ostype=ubuntu64Guest
--property hw_vif_model=VirtualVmxnet3
glance location-add <glance_image_UUID> --url "vi://<vcenter-host>/<datacenter-path>/vm/<sub-
folders>/<template_name> IMAGE_ID"
The location-add command points to the inventory path for the VM template and can refer to eitherVM or host. For example:
"vi://<datacenter-path>/vm/<template_name>”
or
"vi://<datacenter-path>/host/<host_name>/<template_name>"
The vm and host keywords in the inventory path represent the VM and Templates View and Hostand Cluster View hierarchy in your vSphere Web Client.
Configure Images to Enable Live Resize of VMs DeployedFrom That ImageStarting with VMware Integrated OpenStack 4.0, you can deploy VMs from images that can later beresized with no need to power them off. You can change memory, vCPU, and root disk sizes.
VMware Integrated OpenStack Administrator Guide
VMware, Inc. 114

The live-resize functionality uses the os_live_resize property for images that is not available inprevious versions of VMware Integrated OpenStack, so that you must add it to your existing images to beable to resize new VMs without powering them off. The value of os_live_resize can be memory, disk,and vcpu, or any combination separated by commas. For exampleos_live_resize=disk,memory,vcpu.
Prerequisites
To be able to deploy VMs that are capable of live-resizing, the following requirements for the image mustbe met.
n Create the VM image in VMware Integrated OpenStack 4.0 or later, so that the os_live_resizeproperty is available.
n To be able to resize disks, deploy the VMs as full clones not linked clones and use SCSI virtual diskadapter types. IDE adapter type is not supported.
Procedure
1 Log in to the OpenStack management cluster.
2 Create new image that uses a Virtual Machine Disk.
openstack image create --container-format bare --disk-format vmdk \
3 Configure a SCSI virtual disk for the vmware_adaptertype property.
--property vmware_adaptertype="lsiLogicsas" --property vmware_disktype="sparse" \
4 Configure the VMs to deploy from the image to be full clones and not linked ones.
--property vmware_ostype="otherGuest64" --property img_linked_clone=False \
5 Configure the VM settings to be available for live-resize through the os_live_resize property.
--property os_live_resize=vcpu,memory,disk --file cirros-0.3.5-x86_64-disk.vmdk
--public cirros
You created a new image for VMs that can be resized with no need to power them off.
Modify the Default Behavior for Nova SnapshotsBy default, Nova snapshots are Glance images that are stored and organized as VM templates in thevCenter configured for VMware Integrated OpenStack. You can modify this behavior so that snapshotsare stored as streamOptimized VMDK disks instead.
Before VMware Integrated OpenStack 2.5, the default behavior was to store Nova snapshots asstreamOptimized VMDK disks. This procedure enables you to restore the pre-2.5 default.
VMware Integrated OpenStack Administrator Guide
VMware, Inc. 115

Procedure
1 Implement the custom.yml file.
sudo mkdir -p /opt/vmware/vio/custom
sudo cp /var/lib/vio/ansible/custom/custom.yml.sample /opt/vmware/vio/custom/custom.yml
2 Open the /opt/vmware/vio/custom/custom.yml file in a text editor.
a Uncomment the nova_snapshot_format parameter.
b Change the setting to streamOptimized.
##############################
# Glance Template Store
# options that affect the use of glance template store
##############################
#glance_default_store: vi
nova_snapshot_format: streamOptimized
#cinder_image_format: template
3 Save the custom.yml file.
4 Push the new configuration to your VMware Integrated OpenStack deployment.
viocli deployment configure
Note Pushing the configuration briefly interrupts OpenStack services.
Modify the Default Cinder Upload-to-Image BehaviorBy default, the Block Storage upload-to-image feature creates a Glance image from a Cinder volume thatis stored and organized as a VM template. You can modify this behavior so that the images are stored asstreamOptimized VMDK disks instead.
Before VMware Integrated OpenStack 4.0, the default behavior was to store the Glance images asstreamOptimized VMDK disks. This procedure enables you to restore the pre-4.0 default.
Procedure
1 Implement the custom.yml file.
sudo mkdir -p /opt/vmware/vio/custom
sudo cp /var/lib/vio/ansible/custom/custom.yml.sample
/opt/vmware/vio/custom/custom.yml
VMware Integrated OpenStack Administrator Guide
VMware, Inc. 116
2 Open the /opt/vmware/vio/custom/custom.yml file in a text editor.
a Uncomment the cinder_image_format parameter.
b Change the setting to streamOptimized.
##############################
# Glance Template Store
# options that affect the use of glance template store
##############################
#glance_default_store: vi
#nova_snapshot_format: template
cinder_image_format: streamOptimized
3 Save the custom.yml file.
4 Push the new configuration to your VMware Integrated OpenStack deployment.
viocli deployment configure
Note Pushing the configuration briefly interrupts OpenStack services.
VMware Integrated OpenStack Administrator Guide
VMware, Inc. 117
Working with Flavors 7In OpenStack, a flavor is a preset configuration that defines the compute, memory, and storage capacityof an instance. When you create an instance, you configure the server by selecting a flavor.Administrative users can create, edit, and delete flavors.
Do not delete any of the default flavors.
This chapter includes the following topics:
n Default Flavor Configurations
n Create a Flavor
n Delete a Flavor
n Modify Flavor Metadata
n Configure QoS Resource Allocation for Instances Using Flavor Metadata
Default Flavor ConfigurationsThe default OpenStack deployment provides five default flavors ranging from tiny to extra large.
Name vCPUs RAM (MB) Disk (GB)
m1.tiny 1 512 1
m1.small 1 2048 20
m1.medium 2 4096 40
m1.large 4 8192 80
m1.xlarge 8 16384 160
Create a FlavorAdministrative users can create custom flavors.
Prerequisites
Verify that you are logged in to the VMware Integrated OpenStack dashboard as a cloud administrator.
VMware, Inc. 118
Procedure
1 On the VMware Integrated OpenStack dashboard, select the admin project from the drop-down menuin the title bar.
2 Select Admin > System Panel > Flavors.
3 Click Create Flavor.
4 In the Create Flavor dialog box, configure the new flavor.
Parameter Description
Name Name for the flavor.
ID Integer or a UUID4 value that identifies the flavor.
If this parameter is left blank or has a value of auto, OpenStack automatically generates a UUID.
VCPUs Number of virtual CPUs that an instance made from this flavor will use.
RAM MB Megabytes of RAM for virtual machines made from this flavor.
Root Disk GB Gigabytes of disk used for the root (/) partition in instances made from this flavor.
Ephemeral DiskGB
Gigabytes of disk space to use for the ephemeral partition. If unspecified, the value is 0 by default.
Ephemeral disks offer machine local disk storage linked to the life cycle of a VM instance. When a VMis terminated, all data on the ephemeral disk is lost. Ephemeral disks are not included in snapshots.
Swap Disk MB Megabytes of swap space to use. If unspecified, the default is 0.
5 Click Create Flavor at the bottom of the dialog box to complete the process.
6 (Optional) Specify which projects can access instances created from specific flavors.
a On the Flavors page, click Edit Flavor in the Actions column of the instance.
b In the Edit Flavor dialog box, click the Flavor Access tab.
c Use the toggle controls to select the projects that can access the instance.
d Click Save.
7 (Optional) Modify the settings of a specific flavor.
a On the Flavors page, click Edit Flavor in the Actions column of the instance.
b In the Edit Flavor dialog box, modify the settings in either the Flavor Info or Flavor Access tab.
c Click Save.
Delete a FlavorYou can manage the number and variety of flavors by deleting those that no longer meet users' needs,duplicate other flavors, or for other reasons.
Note You cannot undo the deletion of a flavor. Do not delete default flavors.
VMware Integrated OpenStack Administrator Guide
VMware, Inc. 119
Prerequisites
You must be logged in to the VMware Integrated OpenStack dashboard as a cloud administrator toperform this task.
Procedure
1 In the VMware Integrated OpenStack dashboard, select the admin project from the drop-down menuin the title bar.
2 Select Admin > System Panel > Flavors.
3 Select the flavors to delete.
4 Click Delete Flavors.
5 At the prompt, confirm the deletion.
Modify Flavor MetadataYou can modify the metadata of a flavor to dynamically add properties to all the instances that aresubsequently created that use that flavor.
You can also use image metadata to specify many flavor metadata settings. If a conflict occurs, the imagemetadata configuration overrules the flavor metadata configuration.
Prerequisites
n Requires VMware Integrated OpenStack version 2.0.x or greater.
n Requires vSphere version 6.0 or greater.
n Verify that VMware Integrated OpenStack is running in vSphere.
n Verify that you are logged in to the VMware Integrated OpenStack dashboard as a cloudadministrator.
Procedure
1 Log in to the VMware Integrated OpenStack dashboard as a cloud administrator.
2 Select the admin project from the drop-down menu in the title bar.
3 Select Admin > System > Flavors.
4 (Optional) Create a flavor specific to the intended use of the metadata application.
Create a custom flavor to contain the specific configuration. The custom flavor leaves the originalflavor configuration intact and available for other instance creation.
5 Select the flavor to modify.
6 In the Actions column of the image listing, click the down arrow and select Update Metadata.
7 Click the plus sign (+) next to the metadata properties to add.
In the column under Existing Metadata, the newly added metadata properties appear.
VMware Integrated OpenStack Administrator Guide
VMware, Inc. 120
8 Configure the metadata properties.
For example, you might have to select an option from a drop-down list or enter a string value.
9 Click Save.
The newly added flavor metadata properties are now configured. This configuration is applied to all futureOpenStack instances that are created from this flavor.
Configure QoS Resource Allocation for Instances UsingFlavor MetadataYou can control the QoS resource allocations, such as limits, reservations, and shares, for CPU, RAM,disk IOPS, and virtual network interface (VIF) by modifying the metadata of the flavor used to create theinstance. All instances subsequently created using the flavor inherit the metadata settings.
QoS resource allocation can also be specified by image metadata. In the event of a conflict, the imagemetadata configuration overrules the flavor metadata configuration. See Configure QoS ResourceAllocation for Instances Using Image Metadata.
Prerequisites
n Requires VMware Integrated OpenStack version 2.0.x or greater.
n Requires vSphere version 6.0 or greater.
n Verify that VMware Integrated OpenStack is running in vSphere.
n Verify that you are logged in to the VMware Integrated OpenStack dashboard as a cloudadministrator.
Procedure
1 Log in to the VMware Integrated OpenStack dashboard as a cloud administrator.
2 Select the admin project from the drop-down menu in the title bar.
3 Select Admin > System > Flavors.
4 (Optional) Create a flavor specific to the set of QoS resource allocations.
You must create a custom flavor to contain the specific configuration. This leaves the original flavorconfiguration intact and available for other uses.
5 Select the flavor to modify.
6 In the Actions column of the image listing, click the down arrow and select Update Metadata.
7 In the column under Available Metadata, expand the VMware Quota tab.
Note If the VMware Quota tab is not present, the related metadata properties might already beconfigured.
VMware Integrated OpenStack Administrator Guide
VMware, Inc. 121
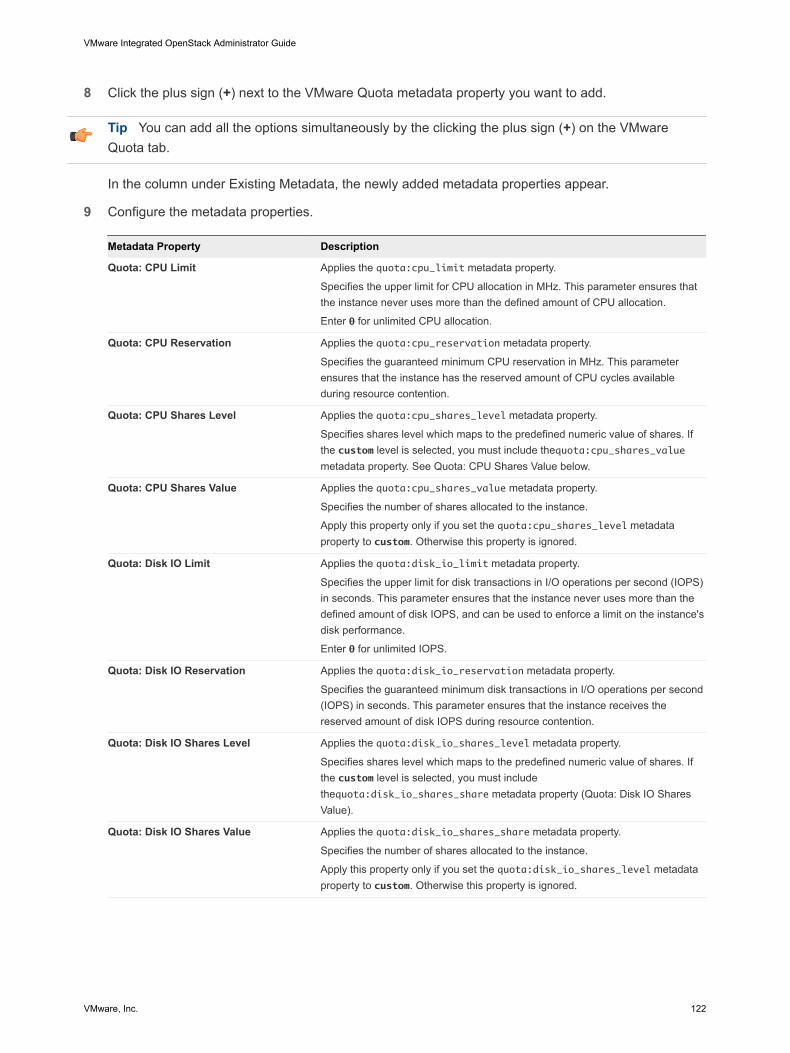
8 Click the plus sign (+) next to the VMware Quota metadata property you want to add.
Tip You can add all the options simultaneously by the clicking the plus sign (+) on the VMwareQuota tab.
In the column under Existing Metadata, the newly added metadata properties appear.
9 Configure the metadata properties.
Metadata Property Description
Quota: CPU Limit Applies the quota:cpu_limit metadata property.
Specifies the upper limit for CPU allocation in MHz. This parameter ensures thatthe instance never uses more than the defined amount of CPU allocation.
Enter 0 for unlimited CPU allocation.
Quota: CPU Reservation Applies the quota:cpu_reservation metadata property.
Specifies the guaranteed minimum CPU reservation in MHz. This parameterensures that the instance has the reserved amount of CPU cycles availableduring resource contention.
Quota: CPU Shares Level Applies the quota:cpu_shares_level metadata property.
Specifies shares level which maps to the predefined numeric value of shares. Ifthe custom level is selected, you must include thequota:cpu_shares_valuemetadata property. See Quota: CPU Shares Value below.
Quota: CPU Shares Value Applies the quota:cpu_shares_value metadata property.
Specifies the number of shares allocated to the instance.
Apply this property only if you set the quota:cpu_shares_level metadataproperty to custom. Otherwise this property is ignored.
Quota: Disk IO Limit Applies the quota:disk_io_limit metadata property.
Specifies the upper limit for disk transactions in I/O operations per second (IOPS)in seconds. This parameter ensures that the instance never uses more than thedefined amount of disk IOPS, and can be used to enforce a limit on the instance'sdisk performance.
Enter 0 for unlimited IOPS.
Quota: Disk IO Reservation Applies the quota:disk_io_reservation metadata property.
Specifies the guaranteed minimum disk transactions in I/O operations per second(IOPS) in seconds. This parameter ensures that the instance receives thereserved amount of disk IOPS during resource contention.
Quota: Disk IO Shares Level Applies the quota:disk_io_shares_level metadata property.
Specifies shares level which maps to the predefined numeric value of shares. Ifthe custom level is selected, you must includethequota:disk_io_shares_share metadata property (Quota: Disk IO SharesValue).
Quota: Disk IO Shares Value Applies the quota:disk_io_shares_share metadata property.
Specifies the number of shares allocated to the instance.
Apply this property only if you set the quota:disk_io_shares_level metadataproperty to custom. Otherwise this property is ignored.
VMware Integrated OpenStack Administrator Guide
VMware, Inc. 122
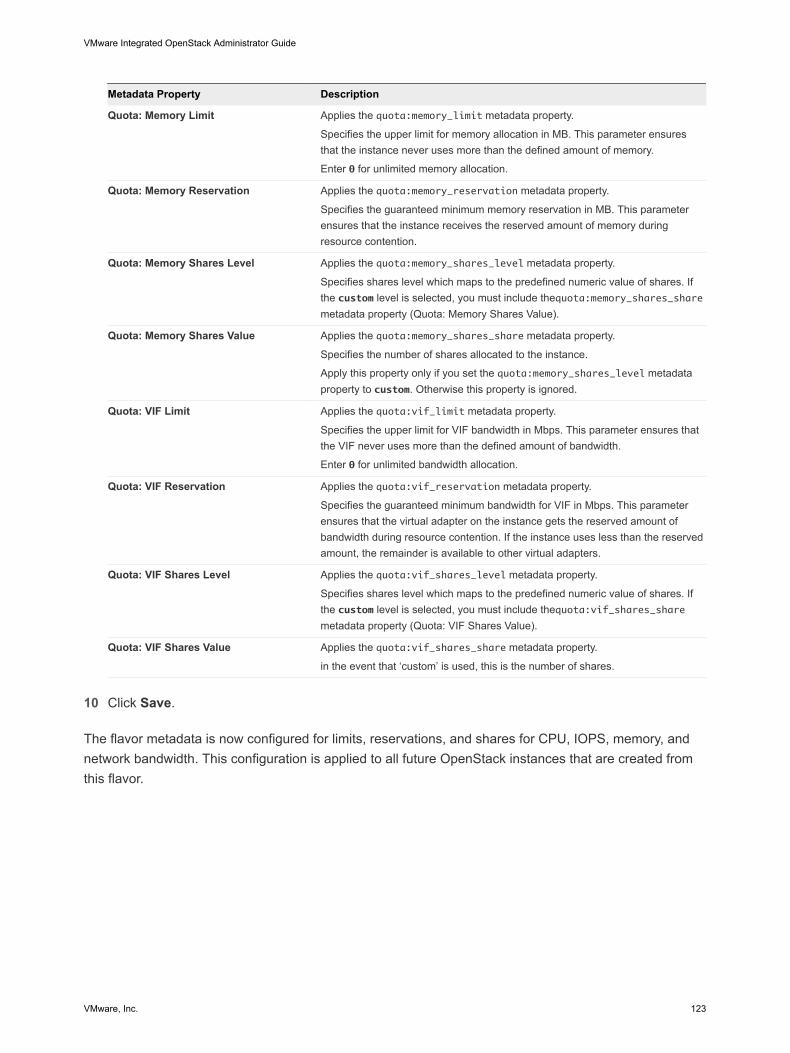
Metadata Property Description
Quota: Memory Limit Applies the quota:memory_limit metadata property.
Specifies the upper limit for memory allocation in MB. This parameter ensuresthat the instance never uses more than the defined amount of memory.
Enter 0 for unlimited memory allocation.
Quota: Memory Reservation Applies the quota:memory_reservation metadata property.
Specifies the guaranteed minimum memory reservation in MB. This parameterensures that the instance receives the reserved amount of memory duringresource contention.
Quota: Memory Shares Level Applies the quota:memory_shares_level metadata property.
Specifies shares level which maps to the predefined numeric value of shares. Ifthe custom level is selected, you must include thequota:memory_shares_sharemetadata property (Quota: Memory Shares Value).
Quota: Memory Shares Value Applies the quota:memory_shares_share metadata property.
Specifies the number of shares allocated to the instance.
Apply this property only if you set the quota:memory_shares_level metadataproperty to custom. Otherwise this property is ignored.
Quota: VIF Limit Applies the quota:vif_limit metadata property.
Specifies the upper limit for VIF bandwidth in Mbps. This parameter ensures thatthe VIF never uses more than the defined amount of bandwidth.
Enter 0 for unlimited bandwidth allocation.
Quota: VIF Reservation Applies the quota:vif_reservation metadata property.
Specifies the guaranteed minimum bandwidth for VIF in Mbps. This parameterensures that the virtual adapter on the instance gets the reserved amount ofbandwidth during resource contention. If the instance uses less than the reservedamount, the remainder is available to other virtual adapters.
Quota: VIF Shares Level Applies the quota:vif_shares_level metadata property.
Specifies shares level which maps to the predefined numeric value of shares. Ifthe custom level is selected, you must include thequota:vif_shares_sharemetadata property (Quota: VIF Shares Value).
Quota: VIF Shares Value Applies the quota:vif_shares_share metadata property.
in the event that ‘custom’ is used, this is the number of shares.
10 Click Save.
The flavor metadata is now configured for limits, reservations, and shares for CPU, IOPS, memory, andnetwork bandwidth. This configuration is applied to all future OpenStack instances that are created fromthis flavor.
VMware Integrated OpenStack Administrator Guide
VMware, Inc. 123
Working withVMware Integrated OpenStackCarrier Edition 8VMware Integrated OpenStack Carrier Edition is an OpenStack distribution that accelerates thedeployment of production Network File Virtualization (NFV) services on OpenStack.
As a communication service provider (CSP), you can use VMware Integrated OpenStack Carrier Editionto run Carrier Grade OpenStack solutions on the vCloud NFV platform.
This chapter includes the following topics:
n Use Tenant Virtual Data Center for Secure Multi-Tenancy and Resource Allocation
n Configure Passthrough Devices for Instances
Use Tenant Virtual Data Center for Secure Multi-Tenancyand Resource AllocationUsing the Tenant Virtual Data Center available with the VMware Integrated OpenStack Carrier Edition,you can create virtual datacenters for tenants under different compute nodes that offer specific servicelevel agreements for each telecommunication workload.
While quotas on projects set limits on the OpenStack resources across multiple compute nodes oravailability zones, they do not guarantee resource reservation. By using the Tenant Virtual Data Center toallocate CPU and memory for an OpenStack project or tenant on a compute node, you provide aresource guarantee for tenants and avoid noisy neighbor scenarios in a multi-tenant environment.
To manage the Tenant Virtual Data Center, you use the VMware Integrated OpenStack command lineutility. The viocli inventory-admin command includes parameters to create, list, and delete a tenantvirtual data center.
Yo use the Tenant Virtual Data Center to allocate resources at the compute node level. To allocateresources for Virtual Network Functions (VNF), see Configure QoS Resource Allocation for InstancesUsing Flavor Metadata.
Prerequisites
Verify that VMware Integrated OpenStack version 4.0 or later is deployed and running.
Procedure
1 Using SSH, log in to the VMware Integrated OpenStack manager.
VMware, Inc. 124
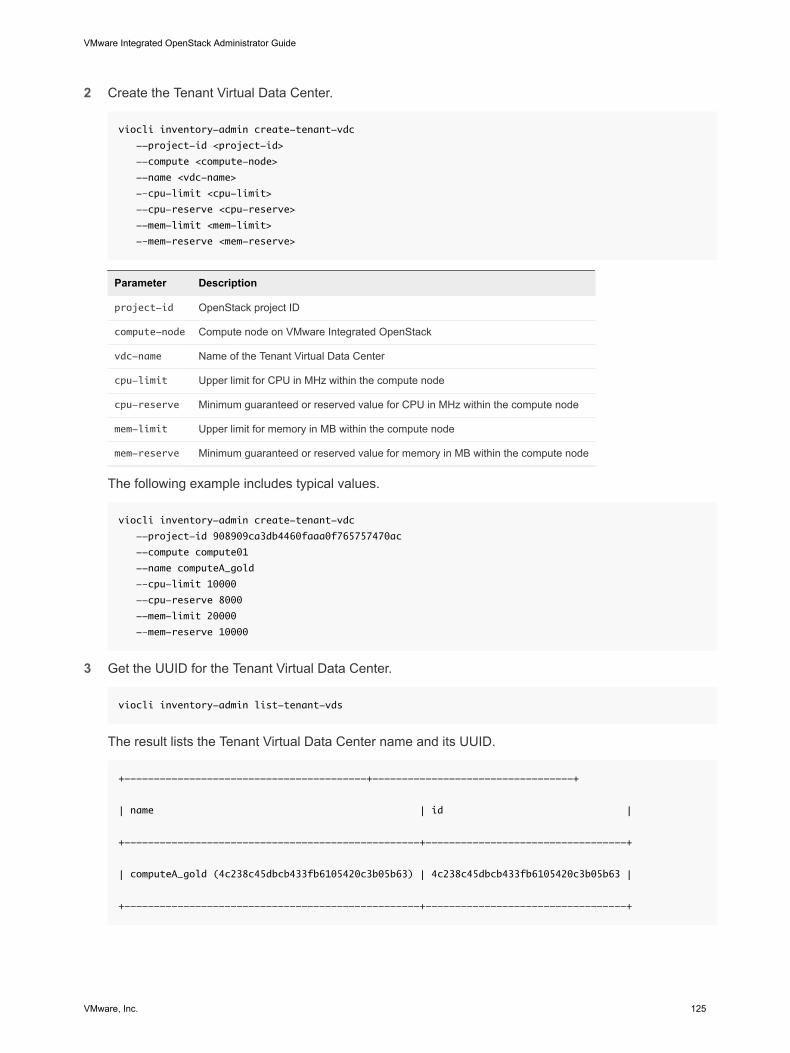
2 Create the Tenant Virtual Data Center.
viocli inventory-admin create-tenant-vdc
--project-id <project-id>
--compute <compute-node>
--name <vdc-name>
-–cpu-limit <cpu-limit>
--cpu-reserve <cpu-reserve>
--mem-limit <mem-limit>
-–mem-reserve <mem-reserve>
Parameter Description
project-id OpenStack project ID
compute-node Compute node on VMware Integrated OpenStack
vdc-name Name of the Tenant Virtual Data Center
cpu-limit Upper limit for CPU in MHz within the compute node
cpu-reserve Minimum guaranteed or reserved value for CPU in MHz within the compute node
mem-limit Upper limit for memory in MB within the compute node
mem-reserve Minimum guaranteed or reserved value for memory in MB within the compute node
The following example includes typical values.
viocli inventory-admin create-tenant-vdc
--project-id 908909ca3db4460faaa0f765757470ac
--compute compute01
--name computeA_gold
-–cpu-limit 10000
--cpu-reserve 8000
--mem-limit 20000
-–mem-reserve 10000
3 Get the UUID for the Tenant Virtual Data Center.
viocli inventory-admin list-tenant-vds
The result lists the Tenant Virtual Data Center name and its UUID.
+-----------------------------------------+----------------------------------+
| name | id |
+--------------------------------------------------+----------------------------------+
| computeA_gold (4c238c45dbcb433fb6105420c3b05b63) | 4c238c45dbcb433fb6105420c3b05b63 |
+--------------------------------------------------+----------------------------------+
VMware Integrated OpenStack Administrator Guide
VMware, Inc. 125
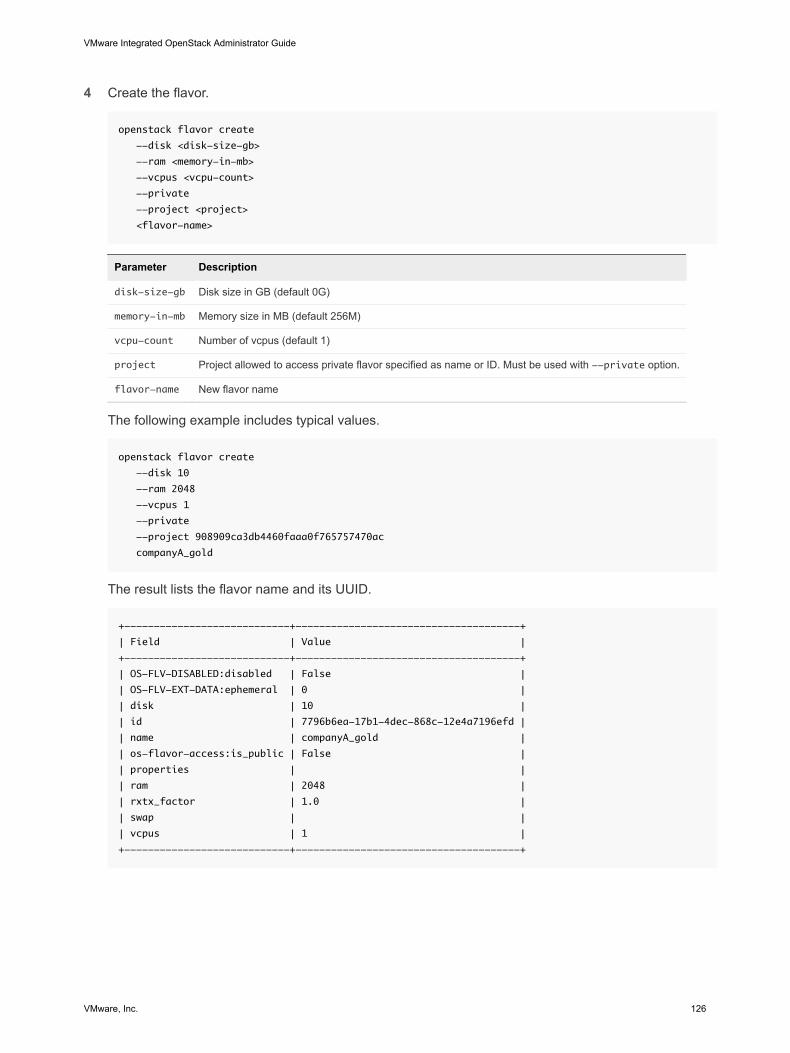
4 Create the flavor.
openstack flavor create
--disk <disk-size-gb>
--ram <memory-in-mb>
--vcpus <vcpu-count>
--private
--project <project>
<flavor-name>
Parameter Description
disk-size-gb Disk size in GB (default 0G)
memory-in-mb Memory size in MB (default 256M)
vcpu-count Number of vcpus (default 1)
project Project allowed to access private flavor specified as name or ID. Must be used with --private option.
flavor-name New flavor name
The following example includes typical values.
openstack flavor create
--disk 10
--ram 2048
--vcpus 1
--private
--project 908909ca3db4460faaa0f765757470ac
companyA_gold
The result lists the flavor name and its UUID.
+----------------------------+--------------------------------------+
| Field | Value |
+----------------------------+--------------------------------------+
| OS-FLV-DISABLED:disabled | False |
| OS-FLV-EXT-DATA:ephemeral | 0 |
| disk | 10 |
| id | 7796b6ea-17b1-4dec-868c-12e4a7196efd |
| name | companyA_gold |
| os-flavor-access:is_public | False |
| properties | |
| ram | 2048 |
| rxtx_factor | 1.0 |
| swap | |
| vcpus | 1 |
+----------------------------+--------------------------------------+
VMware Integrated OpenStack Administrator Guide
VMware, Inc. 126
5 Use the OpenStack flavor extra specs to expose the Tenant Virtual Data Center.
openstack flavor set
--property vmware:tenant_vdc=<UUID-TvDC> <UUID-flavor>
The following example includes values for the Tenant Virtual Data Center and flavor UUIDs.
openstack flavor set
--property vmware:tenant_vdc=4c238c45dbcb433fb6105420c3b05b63
7796b6ea-17b1-4dec-868c-12e4a7196efd
6 (optional) You can use the following command to expose the VNF level resource allocation with theTenant Virtual Data Center.
openstack flavor set
--property vmware:tenant_vdc=<UUID-TvDC>
--property quota:memory_reservation_percent <memory-percent>
--property quota:cpu_reservation_percent <cpu-percent> <UUID-flavor>
The following example includes typical values.
openstack flavor set
--property vmware:tenant_vdc=4c238c45dbcb433fb6105420c3b05b63
--property quota:memory_reservation_percent 100
--property quota:cpu_reservation_percent 100 7796b6ea-17b1-4dec-868c-12e4a7196efd
What to do next
When the Tenant Virtual Data Center is no longer needed, delete it.
viocli inventory-admin delete-tenant-vdc --id <UUID-TvDC>
Configure Passthrough Devices for InstancesYou can create instances that use the Single Root I/O Virtualization (SR-IOV) specification by modifyingthe metadata parameters of the flavor and image used to create the instance. SR-IOV is a specificationthat allows a single Peripheral Component Interconnect Express (PCIe) physical device under a singleroot port to appear as multiple separate physical devices.
For more information about SR-IOV requirements and supported features, see the vSphere Web Clientdocumentation.
The following table describes the key components of SR-IOV and their role.
VMware Integrated OpenStack Administrator Guide
VMware, Inc. 127
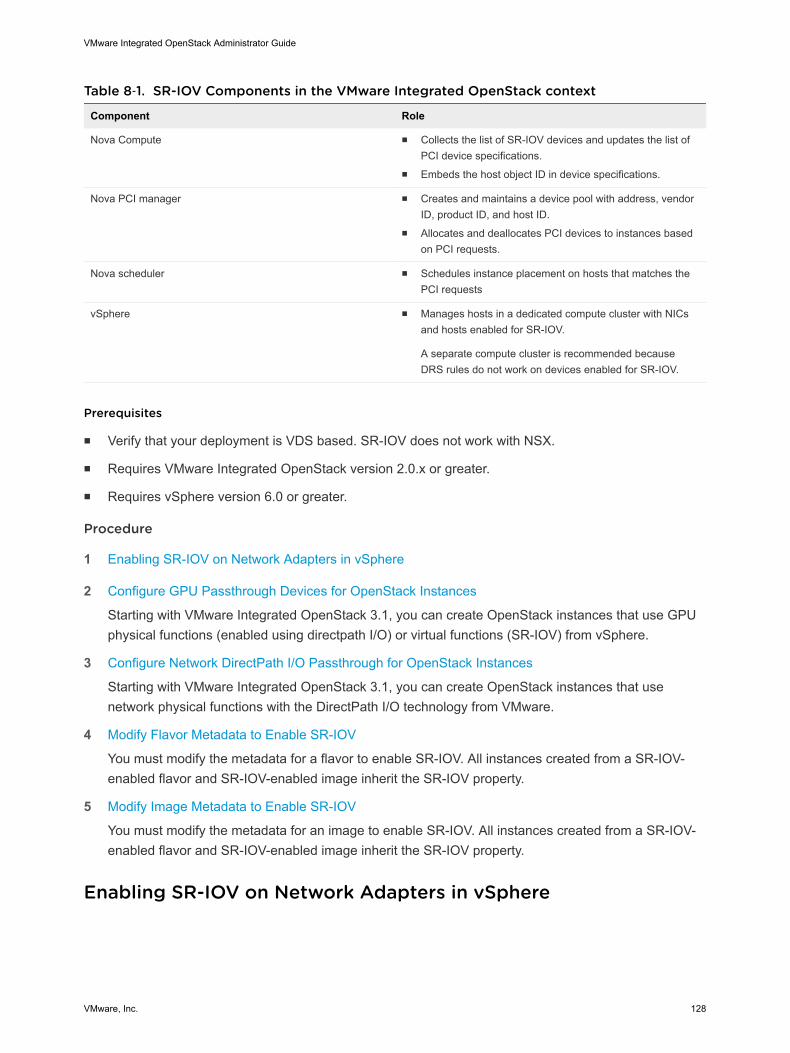
Table 8‑1. SR-IOV Components in the VMware Integrated OpenStack context
Component Role
Nova Compute n Collects the list of SR-IOV devices and updates the list ofPCI device specifications.
n Embeds the host object ID in device specifications.
Nova PCI manager n Creates and maintains a device pool with address, vendorID, product ID, and host ID.
n Allocates and deallocates PCI devices to instances basedon PCI requests.
Nova scheduler n Schedules instance placement on hosts that matches thePCI requests
vSphere n Manages hosts in a dedicated compute cluster with NICsand hosts enabled for SR-IOV.
A separate compute cluster is recommended becauseDRS rules do not work on devices enabled for SR-IOV.
Prerequisites
n Verify that your deployment is VDS based. SR-IOV does not work with NSX.
n Requires VMware Integrated OpenStack version 2.0.x or greater.
n Requires vSphere version 6.0 or greater.
Procedure
1 Enabling SR-IOV on Network Adapters in vSphere
2 Configure GPU Passthrough Devices for OpenStack Instances
Starting with VMware Integrated OpenStack 3.1, you can create OpenStack instances that use GPUphysical functions (enabled using directpath I/O) or virtual functions (SR-IOV) from vSphere.
3 Configure Network DirectPath I/O Passthrough for OpenStack Instances
Starting with VMware Integrated OpenStack 3.1, you can create OpenStack instances that usenetwork physical functions with the DirectPath I/O technology from VMware.
4 Modify Flavor Metadata to Enable SR-IOV
You must modify the metadata for a flavor to enable SR-IOV. All instances created from a SR-IOV-enabled flavor and SR-IOV-enabled image inherit the SR-IOV property.
5 Modify Image Metadata to Enable SR-IOV
You must modify the metadata for an image to enable SR-IOV. All instances created from a SR-IOV-enabled flavor and SR-IOV-enabled image inherit the SR-IOV property.
Enabling SR-IOV on Network Adapters in vSphere
VMware Integrated OpenStack Administrator Guide
VMware, Inc. 128

Procedure
1 In the vSphere Web Client, navigate to the host.
2 On the Configure tab, expand Networking and select Physical adapters.
You can look at the SR-IOV property to see whether a physical adapter supports SR-IOV.
3 Select the physical adapter and click Edit adapter settings.
4 Under SR-IOV, select Enabled from the Status drop-down menu.
5 In the Number of virtual functions text box, type the number of virtual functions that you want toconfigure for the adapter.
6 Click OK.
7 Restart the host.
Because DRS rules do not work on SR-IOV-enabled devices, create a dedicated compute cluster for SR-IOV-enabled hosts and adapters, called vmnics.
The virtual functions become active on the NIC port represented by the physical adapter entry. Theyappear in the PCI Devices list in the Settings tab for the host.
You can use the esxcli network sriovnic vCLI commands to examine the configuration of virtualfunctions on the host.
What to do next
You can now configure the flavor and image metadata in the VMware Integrated OpenStack dashboard.
Configure GPU Passthrough Devices for OpenStack InstancesStarting with VMware Integrated OpenStack 3.1, you can create OpenStack instances that use GPUphysical functions (enabled using directpath I/O) or virtual functions (SR-IOV) from vSphere.
Consumption of GPU and passthrough features is achieved by using the appropriate flavor. Modify themetadata parameters of the flavor to create the instance.
Prerequisites
Make sure that you perform the following settings in your environment before you can configure GPUpassthrough devices:
n Enable DirectPath I/O in vSphere. See the DirectPath I/O chapter in the VMware vSphere 6.5Documentation.
n Enable SR-IOV on GPU devices on your ESXi hosts. See Configuring AMD Multiuser GPU UsingvDGA in the VMware Horizon documentation.
Procedure
1 Log in to the OpenStack Management Server.
VMware Integrated OpenStack Administrator Guide
VMware, Inc. 129
2 Create custom.yml file if it does not exist.
sudo mkdir -p /opt/vmware/vio/custom
sudo cp /var/lib/vio/ansible/custom/custom.yml.sample
/opt/vmware/vio/custom/custom.yml
3 Open the /opt/vmware/vio/custom/custom.yml file in a text editor.
4 Create PCI alias using VIO customization by editing the custom.yml file according to yourconfiguration.
a Edit nova_pci_alias value to create PCI alias based on device_type, vendor_id, andproduct_id and name the alias, for example:
nova_pci_alias: ["product_id": "692f", "vendor_id": "1002", “device_type:” “type-VF”, "name":
"gpu-vf"}]
b Save the custom.yml file.
5 Push the new configuration to your VMware Integrated OpenStack deployment.
Refresh of the configuration briefly interrupts the OpenStack services.
viocli deployment configure --tags nova_api_config
What to do next
Modify Flavor Metadata to Enable SR-IOV.
Configure Network DirectPath I/O Passthrough for OpenStackInstancesStarting with VMware Integrated OpenStack 3.1, you can create OpenStack instances that use networkphysical functions with the DirectPath I/O technology from VMware.
Consumption of DirectPath I/O passthrough features is achieved by using the appropriate flavor. Modifythe metadata parameters of the flavor to create the instance.
Prerequisites
Make sure that you perform the following settings in your environment before you can configureDirectPath I/O passthrough devices:
n Enable DirectPath I/O in vSphere. See the DirectPath I/O chapter in the VMware vSphere 6.5Documentation.
Procedure
1 Log in to the OpenStack Management Server.
VMware Integrated OpenStack Administrator Guide
VMware, Inc. 130
2 Create custom.yml file if it does not exist.
sudo mkdir -p /opt/vmware/vio/custom
sudo cp /var/lib/vio/ansible/custom/custom.yml.sample
/opt/vmware/vio/custom/custom.yml
3 Open the /opt/vmware/vio/custom/custom.yml file in a text editor.
4 Create PCI alias using VIO customization by editing the custom.yml file according to yourconfiguration.
a Edit nova_pci_alias value to create PCI alias based on device_type, vendor_id, andproduct_id and name the alias, for example:
nova_pci_alias: [{"device_type": "type-VF", "name": "sriov"}, {"vendor_id":"15b3",
"product_id":"1013", "device_type": "type-PF", "name":"fpt"}]
b Save the custom.yml file.
5 Push the new configuration to your VMware Integrated OpenStack deployment.
Refresh of the configuration briefly interrupts the OpenStack services.
viocli deployment configure --tags nova_api_config
What to do next
Modify Flavor Metadata to Enable SR-IOV.
Modify Flavor Metadata to Enable SR-IOVYou must modify the metadata for a flavor to enable SR-IOV. All instances created from a SR-IOV-enabled flavor and SR-IOV-enabled image inherit the SR-IOV property.
Procedure
1 Log in to the VMware Integrated OpenStack dashboard as a cloud administrator.
2 Select the admin project from the drop-down menu in the title bar.
3 Select Admin > System > Flavors.
4 (Optional) Create a flavor dedicated to the SR-IOV specification.
The original flavor configuration remains intact and available for other uses.
5 Select the flavor to modify.
6 In the Actions column of the image listing, click the down arrow and select Update Metadata.
7 In the column under Available Metadata, expand the VMware Driver Options for Flavors tab.
Note If the VMware Driver Options for Flavors tab is not present, the related metadata propertymight already be configured.
VMware Integrated OpenStack Administrator Guide
VMware, Inc. 131

8 Click the plus sign (+) next to the PCI Passthrough alias metadata property.
In the column under Existing Metadata, the newly added metadata property and the default valueappear. The numerical portion represents the number of virtual functions that you can request.
The PCI Passthrough alias refers to a PCI request specification that contains vendor_id,product_id, and device_type. In VMware Integrated OpenStack, the alias is already created andrefers to a PCI request specification that you can use to allocate any device regardless of thevendor_id, product_id, and device_type.
9 Increase the numerical value as needed.
The maximum number of virtual functions allowed is 10.
10 Click Save.
You can now modify image metadata to enable SR-IOV.
Modify Image Metadata to Enable SR-IOVYou must modify the metadata for an image to enable SR-IOV. All instances created from a SR-IOV-enabled flavor and SR-IOV-enabled image inherit the SR-IOV property.
Procedure
1 Log in to the VMware Integrated OpenStack dashboard as a cloud administrator.
2 Select the admin project from the drop-down menu in the title bar.
3 Select Admin > System > Images.
4 (Optional) Create an image definition dedicated to the SR-IOV specification.
The original image configuration remains intact and available for other uses.
5 Select the image to modify.
6 In the Actions column of the image listing, click the down arrow and select Update Metadata.
7 In the column under Available Metadata, expand the VMware Driver Options tab.
Note If the VMware Driver Options tab is not present, the related metadata property might alreadybe configured.
8 Click the plus sign (+) next to the Virtual Network Interface metadata property.
In the column under Existing Metadata, the newly added metadata property appears ashw_vif_model.
9 From the drop-down list, select VirtualSriovEthernetCard.
10 Click Save.
VMware Integrated OpenStack Administrator Guide
VMware, Inc. 132
VMware Integrated OpenStackCLI Command Reference 9The VMware Integrated OpenStack CLI command has specific syntax requirements.
This chapter includes the following topics:n viocli backup Command
n viocli dbverify Command
n viocli deployment Command
n viocli ds-migrate-prep Command
n viocli epops Command
n viocli inventory-admin Command
n viocli recover Command
n viocli restore Command
n viocli rollback Command
n viocli services Command
n viocli show Command
n viocli upgrade Command
n viocli volume-migrate Command
viocli backup CommandUse the viocli backup command to create a backup of either manager server data or the OpenStackdatabase. This command requires an NFS server to be available for the VMware Integrated OpenStackCL to mount.
The viocli backup command uses the following syntax.
viocli backup mgmt_server [-d NAME] NFS_VOLUME [-h] [-v]
viocli backup openstack_db [-d NAME] NFS_VOLUME [-h] [-v]
VMware, Inc. 133
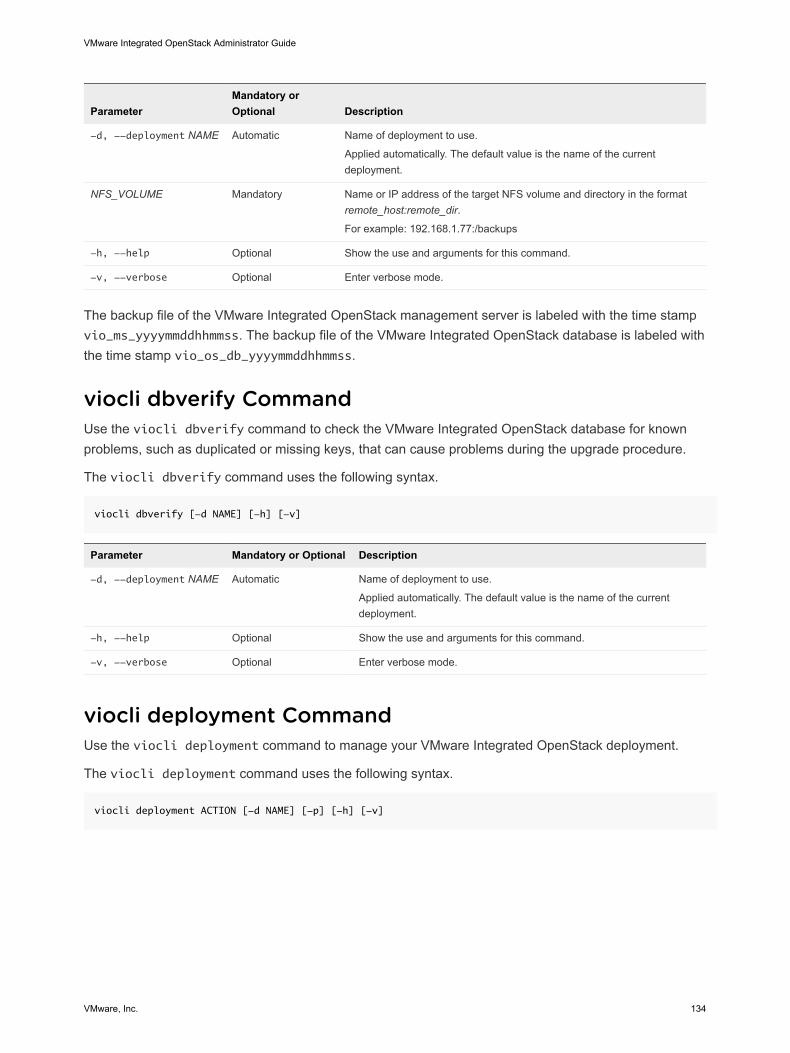
ParameterMandatory orOptional Description
-d, --deployment NAME Automatic Name of deployment to use.
Applied automatically. The default value is the name of the currentdeployment.
NFS_VOLUME Mandatory Name or IP address of the target NFS volume and directory in the formatremote_host:remote_dir.
For example: 192.168.1.77:/backups
-h, --help Optional Show the use and arguments for this command.
-v, --verbose Optional Enter verbose mode.
The backup file of the VMware Integrated OpenStack management server is labeled with the time stampvio_ms_yyyymmddhhmmss. The backup file of the VMware Integrated OpenStack database is labeled withthe time stamp vio_os_db_yyyymmddhhmmss.
viocli dbverify CommandUse the viocli dbverify command to check the VMware Integrated OpenStack database for knownproblems, such as duplicated or missing keys, that can cause problems during the upgrade procedure.
The viocli dbverify command uses the following syntax.
viocli dbverify [-d NAME] [-h] [-v]
Parameter Mandatory or Optional Description
-d, --deployment NAME Automatic Name of deployment to use.
Applied automatically. The default value is the name of the currentdeployment.
-h, --help Optional Show the use and arguments for this command.
-v, --verbose Optional Enter verbose mode.
viocli deployment CommandUse the viocli deployment command to manage your VMware Integrated OpenStack deployment.
The viocli deployment command uses the following syntax.
viocli deployment ACTION [-d NAME] [-p] [-h] [-v]
VMware Integrated OpenStack Administrator Guide
VMware, Inc. 134

ParameterMandatory orOptional Description
ACTION
Use one of the followingpositional arguments:n start
n stop
n pause
n resume
n configure
n cert-req-create
n cert-update
n getlogs
n status
Mandatorystart Start the deployment.
stop Stop the deployment.
pause Pause the deployment.
resume Resume the paused deployment.
configure Reconfigure the entire deployment.
cert-req-
create
Create a certificate signing request for a certificateauthority.
cert-update Update VMware Integrated OpenStack with theprovided certificate.
getlogs Generate log files for the current deployment,including the ansible executed commands andoutput. Log files are writtento /var/log/viocli/viocli.log and rotatedafter they reach 100 MB, with a maximum of sevenrotations.
status Generate reports on the following potential issues:n Synchronization issues between the
management server and OpenStack nodes,including time of occurrence, the affected node,and reason for failed status.
n Connections to OpenStack processes andaverage connection count.
n Broken network connections, including time ofoccurrence, the hostnames and ports thatfailed to connect, or single host, if applicable.
n OpenStack database issues, including time ofoccurrence, FAILED or SUCCESS status,reason for failure if applicable, and the currentsize of the database cluster.
n Missing processes, including time ofoccurrence, node where issue occurred,status, and reason for failure, if applicable.
-d, --deployment NAME Automatic Name of deployment to use.
Applied automatically. The default value is the name of the currentdeployment.
-p, --progress Optional Show progress of the current upgrade operation.
-h, --help Optional Show the use and arguments for this command.
-v, --verbose Optional Enter verbose mode.
VMware Integrated OpenStack Administrator Guide
VMware, Inc. 135
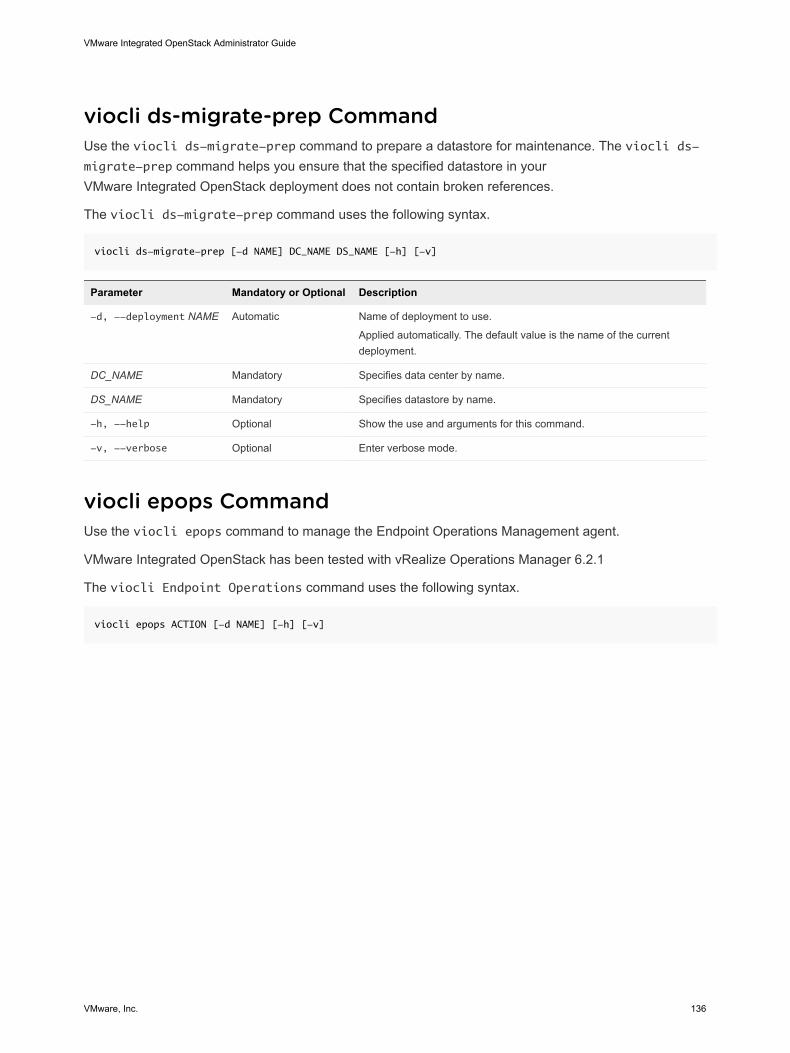
viocli ds-migrate-prep CommandUse the viocli ds-migrate-prep command to prepare a datastore for maintenance. The viocli ds-migrate-prep command helps you ensure that the specified datastore in yourVMware Integrated OpenStack deployment does not contain broken references.
The viocli ds-migrate-prep command uses the following syntax.
viocli ds-migrate-prep [-d NAME] DC_NAME DS_NAME [-h] [-v]
Parameter Mandatory or Optional Description
-d, --deployment NAME Automatic Name of deployment to use.
Applied automatically. The default value is the name of the currentdeployment.
DC_NAME Mandatory Specifies data center by name.
DS_NAME Mandatory Specifies datastore by name.
-h, --help Optional Show the use and arguments for this command.
-v, --verbose Optional Enter verbose mode.
viocli epops CommandUse the viocli epops command to manage the Endpoint Operations Management agent.
VMware Integrated OpenStack has been tested with vRealize Operations Manager 6.2.1
The viocli Endpoint Operations command uses the following syntax.
viocli epops ACTION [-d NAME] [-h] [-v]
VMware Integrated OpenStack Administrator Guide
VMware, Inc. 136
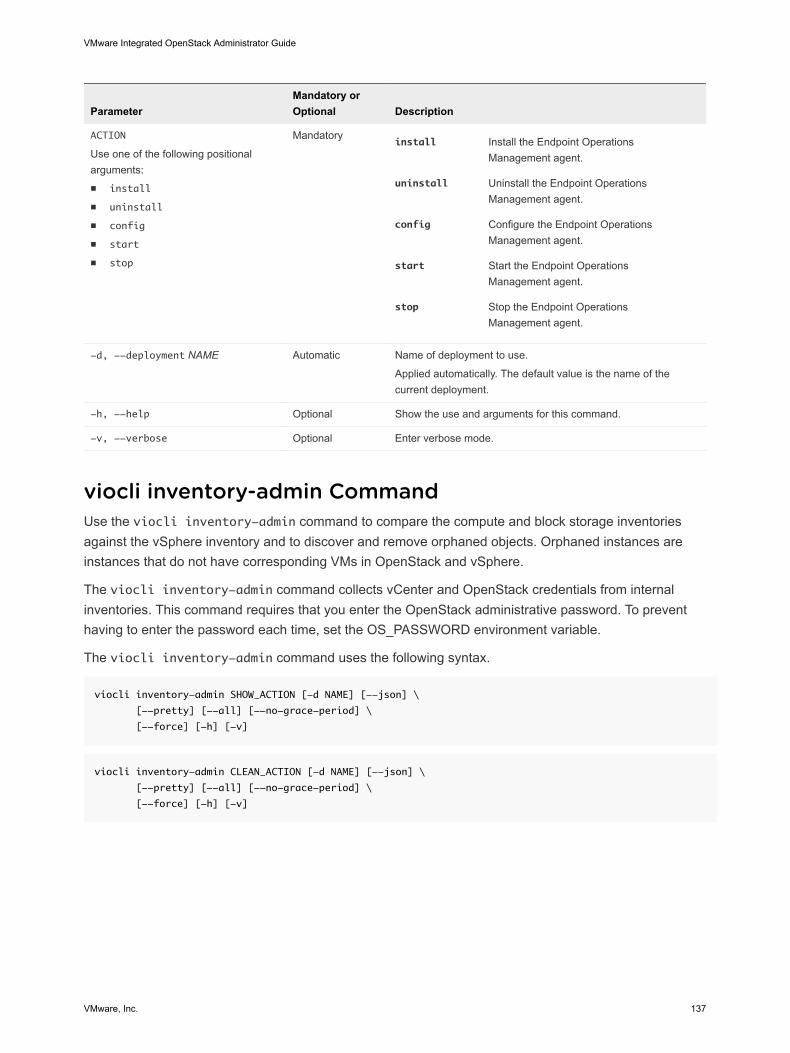
ParameterMandatory orOptional Description
ACTION
Use one of the following positionalarguments:n install
n uninstall
n config
n start
n stop
Mandatoryinstall Install the Endpoint Operations
Management agent.
uninstall Uninstall the Endpoint OperationsManagement agent.
config Configure the Endpoint OperationsManagement agent.
start Start the Endpoint OperationsManagement agent.
stop Stop the Endpoint OperationsManagement agent.
-d, --deployment NAME Automatic Name of deployment to use.
Applied automatically. The default value is the name of thecurrent deployment.
-h, --help Optional Show the use and arguments for this command.
-v, --verbose Optional Enter verbose mode.
viocli inventory-admin CommandUse the viocli inventory-admin command to compare the compute and block storage inventoriesagainst the vSphere inventory and to discover and remove orphaned objects. Orphaned instances areinstances that do not have corresponding VMs in OpenStack and vSphere.
The viocli inventory-admin command collects vCenter and OpenStack credentials from internalinventories. This command requires that you enter the OpenStack administrative password. To preventhaving to enter the password each time, set the OS_PASSWORD environment variable.
The viocli inventory-admin command uses the following syntax.
viocli inventory-admin SHOW_ACTION [-d NAME] [--json] \
[--pretty] [--all] [--no-grace-period] \
[--force] [-h] [-v]
viocli inventory-admin CLEAN_ACTION [-d NAME] [--json] \
[--pretty] [--all] [--no-grace-period] \
[--force] [-h] [-v]
VMware Integrated OpenStack Administrator Guide
VMware, Inc. 137
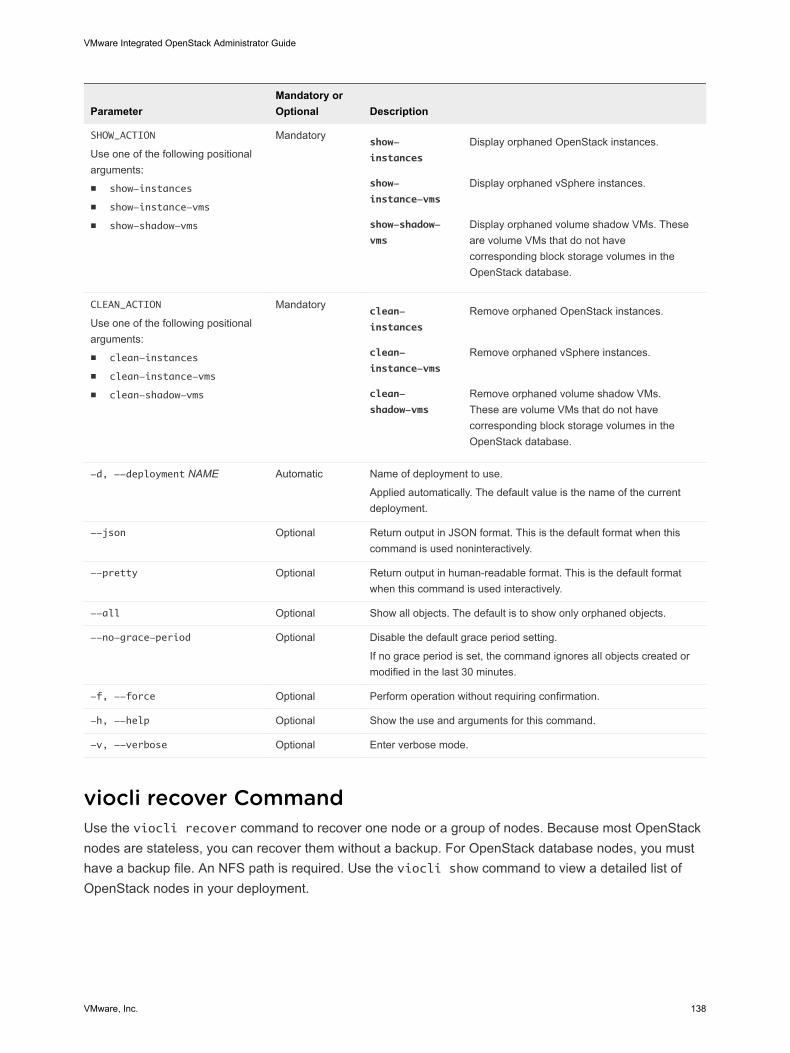
ParameterMandatory orOptional Description
SHOW_ACTION
Use one of the following positionalarguments:n show-instances
n show-instance-vms
n show-shadow-vms
Mandatoryshow-
instances
Display orphaned OpenStack instances.
show-
instance-vms
Display orphaned vSphere instances.
show-shadow-
vms
Display orphaned volume shadow VMs. Theseare volume VMs that do not havecorresponding block storage volumes in theOpenStack database.
CLEAN_ACTION
Use one of the following positionalarguments:n clean-instances
n clean-instance-vms
n clean-shadow-vms
Mandatoryclean-
instances
Remove orphaned OpenStack instances.
clean-
instance-vms
Remove orphaned vSphere instances.
clean-
shadow-vms
Remove orphaned volume shadow VMs.These are volume VMs that do not havecorresponding block storage volumes in theOpenStack database.
-d, --deployment NAME Automatic Name of deployment to use.
Applied automatically. The default value is the name of the currentdeployment.
--json Optional Return output in JSON format. This is the default format when thiscommand is used noninteractively.
--pretty Optional Return output in human-readable format. This is the default formatwhen this command is used interactively.
--all Optional Show all objects. The default is to show only orphaned objects.
--no-grace-period Optional Disable the default grace period setting.
If no grace period is set, the command ignores all objects created ormodified in the last 30 minutes.
-f, --force Optional Perform operation without requiring confirmation.
-h, --help Optional Show the use and arguments for this command.
-v, --verbose Optional Enter verbose mode.
viocli recover CommandUse the viocli recover command to recover one node or a group of nodes. Because most OpenStacknodes are stateless, you can recover them without a backup. For OpenStack database nodes, you musthave a backup file. An NFS path is required. Use the viocli show command to view a detailed list ofOpenStack nodes in your deployment.
VMware Integrated OpenStack Administrator Guide
VMware, Inc. 138
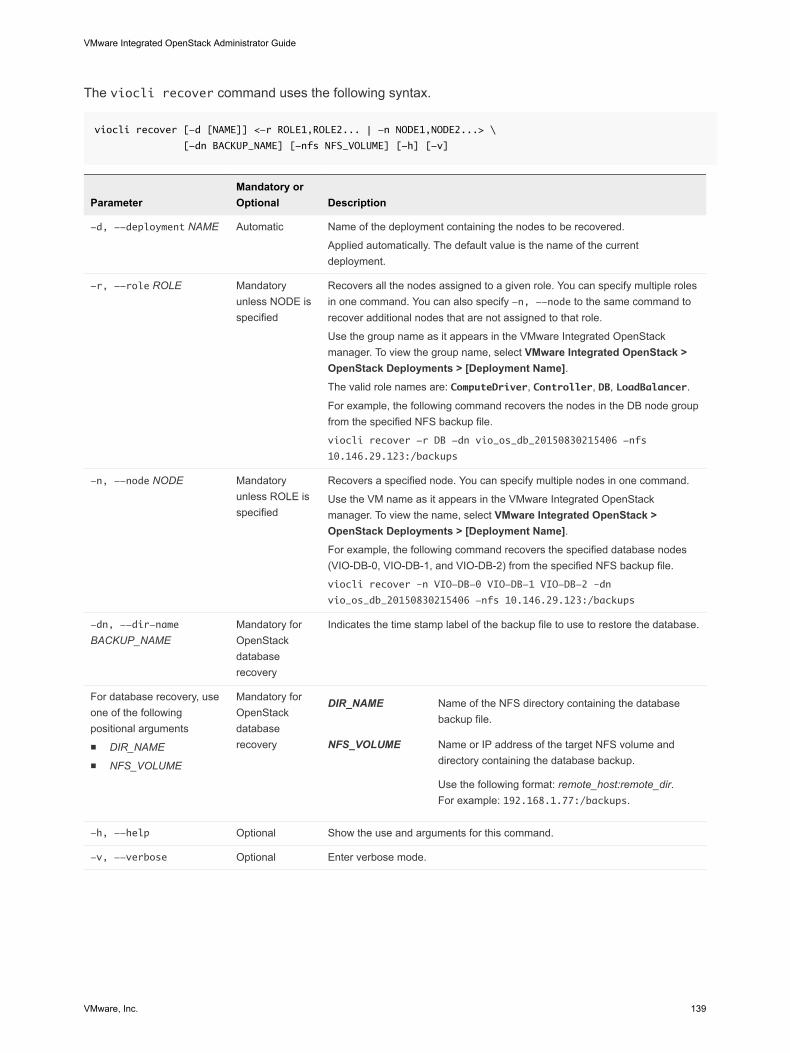
The viocli recover command uses the following syntax.
viocli recover [-d [NAME]] <-r ROLE1,ROLE2... | -n NODE1,NODE2...> \
[-dn BACKUP_NAME] [-nfs NFS_VOLUME] [-h] [-v]
ParameterMandatory orOptional Description
-d, --deployment NAME Automatic Name of the deployment containing the nodes to be recovered.
Applied automatically. The default value is the name of the currentdeployment.
-r, --role ROLE Mandatoryunless NODE isspecified
Recovers all the nodes assigned to a given role. You can specify multiple rolesin one command. You can also specify -n, --node to the same command torecover additional nodes that are not assigned to that role.
Use the group name as it appears in the VMware Integrated OpenStackmanager. To view the group name, select VMware Integrated OpenStack >OpenStack Deployments > [Deployment Name].The valid role names are: ComputeDriver, Controller, DB, LoadBalancer.
For example, the following command recovers the nodes in the DB node groupfrom the specified NFS backup file.
viocli recover -r DB -dn vio_os_db_20150830215406 -nfs
10.146.29.123:/backups
-n, --node NODE Mandatoryunless ROLE isspecified
Recovers a specified node. You can specify multiple nodes in one command.
Use the VM name as it appears in the VMware Integrated OpenStackmanager. To view the name, select VMware Integrated OpenStack >OpenStack Deployments > [Deployment Name].For example, the following command recovers the specified database nodes(VIO-DB-0, VIO-DB-1, and VIO-DB-2) from the specified NFS backup file.
viocli recover –n VIO-DB-0 VIO-DB-1 VIO-DB-2 –dn
vio_os_db_20150830215406 -nfs 10.146.29.123:/backups
-dn, --dir-name
BACKUP_NAMEMandatory forOpenStackdatabaserecovery
Indicates the time stamp label of the backup file to use to restore the database.
For database recovery, useone of the followingpositional argumentsn DIR_NAME
n NFS_VOLUME
Mandatory forOpenStackdatabaserecovery
DIR_NAME Name of the NFS directory containing the databasebackup file.
NFS_VOLUME Name or IP address of the target NFS volume anddirectory containing the database backup.
Use the following format: remote_host:remote_dir.For example: 192.168.1.77:/backups.
-h, --help Optional Show the use and arguments for this command.
-v, --verbose Optional Enter verbose mode.
VMware Integrated OpenStack Administrator Guide
VMware, Inc. 139

viocli restore CommandUse the viocli restore command to restore a deployment from a backup file previously created byusing the viocli backup command. You can restore a backup of either management server data or ofthe OpenStack database.
The viocli restore command uses the following syntax.
viocli restore mgmt_server [-d [NAME]] <DIR_NAME | NFS_VOLUME> [-h] [-v]
viocli restore openstack_db [-d [NAME]] <DIR_NAME | NFS_VOLUME> [-h] [-v]
ParameterMandatory orOptional Description
-d, --deployment NAME Automatic Name of deployment to use.
Applied automatically. The default value is the name of thecurrent deployment.
Use one of the following positionalargumentsn DIR_NAME
n NFS_VOLUME
Mandatory DIR_NAME Name of the NFS directory containingthe backup file.
NFS_VOLUME
Name or IP address of the target NFSvolume and directory in the formatremote_host:remote_dir. For example:192.168.1.77:/backups.
-h, --help Optional Show the use and arguments for this command.
-v, --verbose Optional Enter verbose mode.
The backup file of the VMware Integrated OpenStack management server is labeled with the time stampvio_ms_yyyymmddhhmmss. The backup file of the VMware Integrated OpenStack database is labeled withthe time stamp vio_os_db_yyyymmddhhmmss.
viocli rollback CommandUse the viocli rollback command to roll back a recent upgrade of VMware Integrated OpenStack.Use the VMware Integrated OpenStack manager in the vSphere Web Client to perform the rollback.
The viocli rollback command uses the following syntax.
viocli rollback [-d NAME] [-p] [-h] [-v] [-f]
Parameter Mandatory or Optional Description
-d, --deployment NAME Automatic Name of deployment to use.
Applied automatically. The default value is the name of the currentdeployment.
-p, --progress Optional Show progress of the current upgrade operation.
-h, --help Optional Show the use and arguments for this command.
VMware Integrated OpenStack Administrator Guide
VMware, Inc. 140
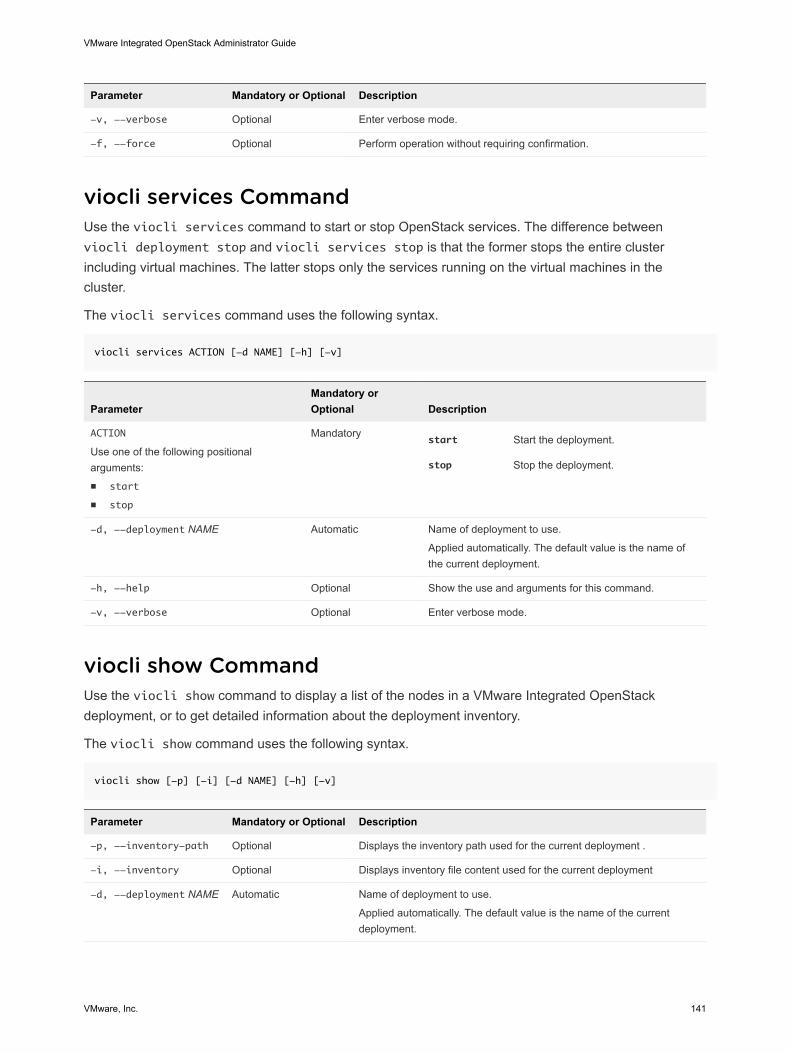
Parameter Mandatory or Optional Description
-v, --verbose Optional Enter verbose mode.
-f, --force Optional Perform operation without requiring confirmation.
viocli services CommandUse the viocli services command to start or stop OpenStack services. The difference betweenviocli deployment stop and viocli services stop is that the former stops the entire clusterincluding virtual machines. The latter stops only the services running on the virtual machines in thecluster.
The viocli services command uses the following syntax.
viocli services ACTION [-d NAME] [-h] [-v]
ParameterMandatory orOptional Description
ACTION
Use one of the following positionalarguments:n start
n stop
Mandatorystart Start the deployment.
stop Stop the deployment.
-d, --deployment NAME Automatic Name of deployment to use.
Applied automatically. The default value is the name ofthe current deployment.
-h, --help Optional Show the use and arguments for this command.
-v, --verbose Optional Enter verbose mode.
viocli show CommandUse the viocli show command to display a list of the nodes in a VMware Integrated OpenStackdeployment, or to get detailed information about the deployment inventory.
The viocli show command uses the following syntax.
viocli show [-p] [-i] [-d NAME] [-h] [-v]
Parameter Mandatory or Optional Description
-p, --inventory-path Optional Displays the inventory path used for the current deployment .
-i, --inventory Optional Displays inventory file content used for the current deployment
-d, --deployment NAME Automatic Name of deployment to use.
Applied automatically. The default value is the name of the currentdeployment.
VMware Integrated OpenStack Administrator Guide
VMware, Inc. 141
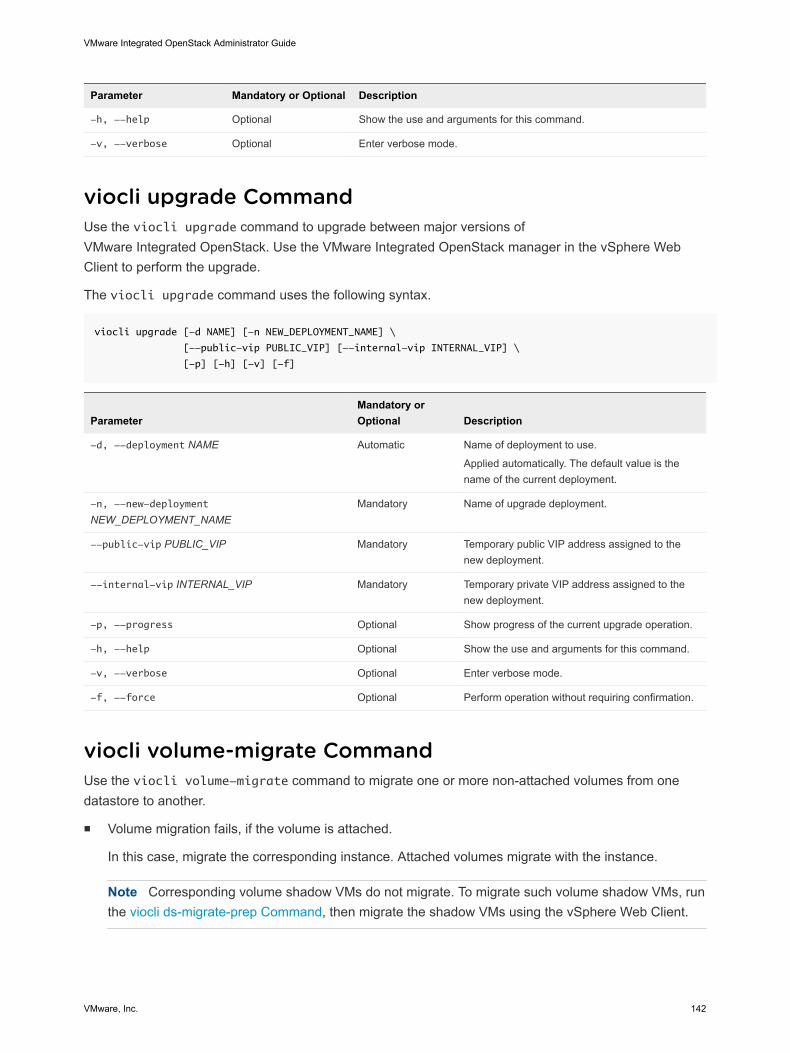
Parameter Mandatory or Optional Description
-h, --help Optional Show the use and arguments for this command.
-v, --verbose Optional Enter verbose mode.
viocli upgrade CommandUse the viocli upgrade command to upgrade between major versions ofVMware Integrated OpenStack. Use the VMware Integrated OpenStack manager in the vSphere WebClient to perform the upgrade.
The viocli upgrade command uses the following syntax.
viocli upgrade [-d NAME] [-n NEW_DEPLOYMENT_NAME] \
[--public-vip PUBLIC_VIP] [--internal-vip INTERNAL_VIP] \
[-p] [-h] [-v] [-f]
ParameterMandatory orOptional Description
-d, --deployment NAME Automatic Name of deployment to use.
Applied automatically. The default value is thename of the current deployment.
-n, --new-deployment
NEW_DEPLOYMENT_NAMEMandatory Name of upgrade deployment.
--public-vip PUBLIC_VIP Mandatory Temporary public VIP address assigned to thenew deployment.
--internal-vip INTERNAL_VIP Mandatory Temporary private VIP address assigned to thenew deployment.
-p, --progress Optional Show progress of the current upgrade operation.
-h, --help Optional Show the use and arguments for this command.
-v, --verbose Optional Enter verbose mode.
-f, --force Optional Perform operation without requiring confirmation.
viocli volume-migrate CommandUse the viocli volume-migrate command to migrate one or more non-attached volumes from onedatastore to another.
n Volume migration fails, if the volume is attached.
In this case, migrate the corresponding instance. Attached volumes migrate with the instance.
Note Corresponding volume shadow VMs do not migrate. To migrate such volume shadow VMs, runthe viocli ds-migrate-prep Command, then migrate the shadow VMs using the vSphere Web Client.
VMware Integrated OpenStack Administrator Guide
VMware, Inc. 142
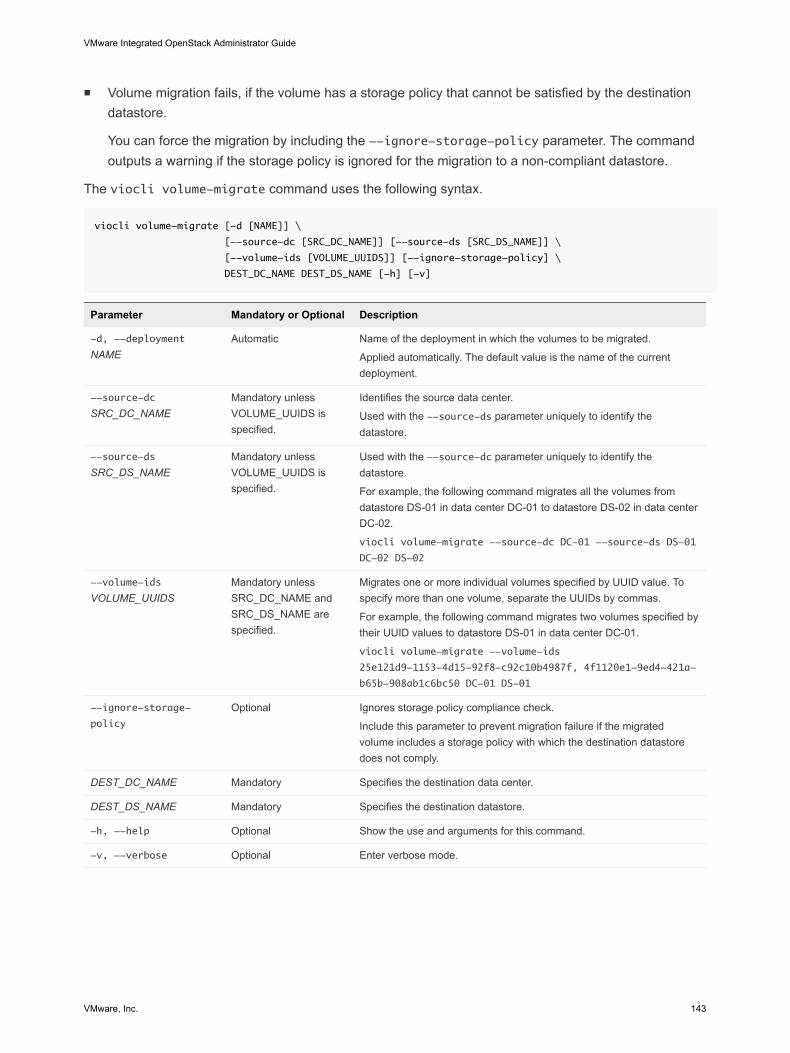
n Volume migration fails, if the volume has a storage policy that cannot be satisfied by the destinationdatastore.
You can force the migration by including the --ignore-storage-policy parameter. The commandoutputs a warning if the storage policy is ignored for the migration to a non-compliant datastore.
The viocli volume-migrate command uses the following syntax.
viocli volume-migrate [-d [NAME]] \
[--source-dc [SRC_DC_NAME]] [--source-ds [SRC_DS_NAME]] \
[--volume-ids [VOLUME_UUIDS]] [--ignore-storage-policy] \
DEST_DC_NAME DEST_DS_NAME [-h] [-v]
Parameter Mandatory or Optional Description
-d, --deployment
NAMEAutomatic Name of the deployment in which the volumes to be migrated.
Applied automatically. The default value is the name of the currentdeployment.
--source-dc
SRC_DC_NAMEMandatory unlessVOLUME_UUIDS isspecified.
Identifies the source data center.
Used with the --source-ds parameter uniquely to identify thedatastore.
--source-ds
SRC_DS_NAMEMandatory unlessVOLUME_UUIDS isspecified.
Used with the --source-dc parameter uniquely to identify thedatastore.
For example, the following command migrates all the volumes fromdatastore DS-01 in data center DC-01 to datastore DS-02 in data centerDC-02.
viocli volume-migrate --source-dc DC-01 --source-ds DS-01
DC-02 DS-02
--volume-ids
VOLUME_UUIDSMandatory unlessSRC_DC_NAME andSRC_DS_NAME arespecified.
Migrates one or more individual volumes specified by UUID value. Tospecify more than one volume, separate the UUIDs by commas.
For example, the following command migrates two volumes specified bytheir UUID values to datastore DS-01 in data center DC-01.
viocli volume-migrate --volume-ids
25e121d9-1153-4d15-92f8-c92c10b4987f, 4f1120e1-9ed4-421a-
b65b-908ab1c6bc50 DC-01 DS-01
--ignore-storage-
policy
Optional Ignores storage policy compliance check.
Include this parameter to prevent migration failure if the migratedvolume includes a storage policy with which the destination datastoredoes not comply.
DEST_DC_NAME Mandatory Specifies the destination data center.
DEST_DS_NAME Mandatory Specifies the destination datastore.
-h, --help Optional Show the use and arguments for this command.
-v, --verbose Optional Enter verbose mode.
VMware Integrated OpenStack Administrator Guide
VMware, Inc. 143
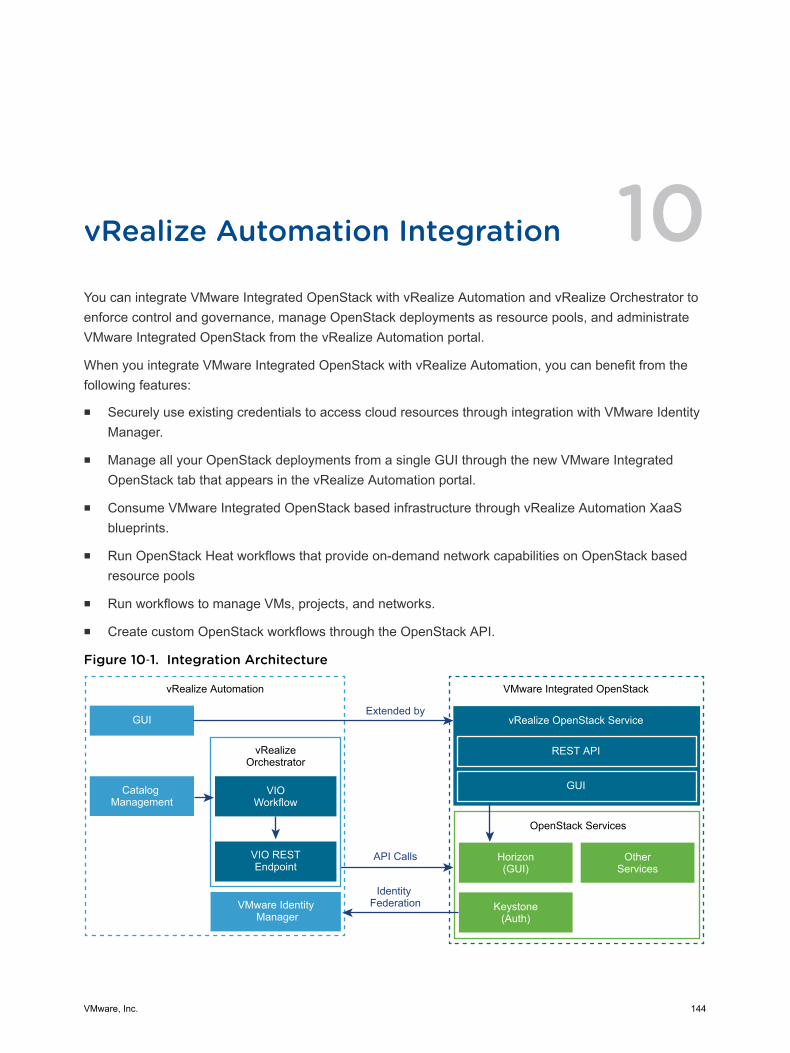
vRealize Automation Integration 10You can integrate VMware Integrated OpenStack with vRealize Automation and vRealize Orchestrator toenforce control and governance, manage OpenStack deployments as resource pools, and administrateVMware Integrated OpenStack from the vRealize Automation portal.
When you integrate VMware Integrated OpenStack with vRealize Automation, you can benefit from thefollowing features:
n Securely use existing credentials to access cloud resources through integration with VMware IdentityManager.
n Manage all your OpenStack deployments from a single GUI through the new VMware IntegratedOpenStack tab that appears in the vRealize Automation portal.
n Consume VMware Integrated OpenStack based infrastructure through vRealize Automation XaaSblueprints.
n Run OpenStack Heat workflows that provide on-demand network capabilities on OpenStack basedresource pools
n Run workflows to manage VMs, projects, and networks.
n Create custom OpenStack workflows through the OpenStack API.
Figure 10‑1. Integration Architecture
vRealize Automation
GUI
Catalog Management
vRealizeOrchestrator
VIOWorkflow
VIO RESTEndpoint
VMware Identity Manager
VMware Integrated OpenStack
vRealize OpenStack Service
REST API
GUI
OpenStack Services
Horizon(GUI)
OtherServices
Keystone(Auth)
Extended by
Identity Federation
API Calls
VMware, Inc. 144

VMware Identity Manager IntegrationBy integrating VMware Integrated OpenStack with VMware Identity Manager you achieve a way tosecurely use existing credentials to access cloud resources such as servers, volumes, and databases,across multiple endpoints provided in multiple authorized clouds. You have a single set of credentials,without having to provision additional identities or log in multiple times. The credential is maintained bythe user's Identity Provider.
Managing OpenStack Deployments Through the vRealizeAutomation PortalIf you have enabled the VMware Identity Manager integration, you can use the new VMware IntegratedOpenStack tab that appears in the vRealize Automation portal. This tab embeds the VMware IntegratedOpenStack dashboard in the vRealize Automation portal to allow for cloud administrators to manageOpenStack deployments from a single GUI. vRealize Automation administrator must enable the new taband configure mappings to associate users to their respective projects. When a user who is associated toa project logs in to the vRealize Automation portal, they see the VIO tab.
vRealize Automation XaaS Blueprints DesignTo consume vRealize Automation blueprints, you must install the vRealize Orchestrator Plug-in forOpenStack. vRealize Automation administrators can design and publish OpenStack blueprints. Anapproval chain and entitlement can also be configured. vRealize Automation users can requestOpenStack catalog items that can be either approved or denied by users with assigned approval role.
vRealize Orchestrator WorkflowsAfter you design vRealize Automation XaaS Blueprints, you consume them through the vRealizeOrchestrator workflows that allow cloud administrators to automate user on-boarding and applicationdeployment to OpenStack.
This chapter includes the following topics:
n Integrate VMware Integrated OpenStack with vRealize Automation
n Designing and Publishing Blueprints
Integrate VMware Integrated OpenStack with vRealizeAutomationYou integrate the two solutions by configuring the vRealize Automation tenant FQDN through theOpenStack management server and installing the vRealize Orchestrator OpenStack plug-in.
VMware Integrated OpenStack Administrator Guide
VMware, Inc. 145
Procedure
1 Enable the service that integrates VMware Integrated OpenStack with vRealize Automation.
a Log in to the OpenStack management server.
b Run the command to configure the VMware Integrated OpenStack tab for yourv RealizeAutomation tenant.
The vra_tenant value must be uppercase only.
viocli vros enable -d your_VIO_deployment_name --vra_tenant YOUR_VRA_TENANT --vra_host IP/FQDN
--vra_admin vRA_administrator_username --vros_host OMS_server_IP --verbose
2 Prior to being able to login a VMware Identity Manager user to VMware Integrated OpenStack, assigna role or project to the group that user belongs to.
a Create JSON file and configure mappings between the vIDM domain, the Openstack project, andthe OpenStack group.
{
"domain": {
"name": "Default", //domain where VMware Identity Manager users will consume
resource from.
"project": {
"name": "fed-project1", // new OpenStack project for this group of users.
"group": {
"name": "fed-group1", // new OpenStack group for these vRealize Automation users
"users": [ // list of vIDM users will be added to the group.
{
"name": "user1"
},
{
"name": ”user2"
}
]
}
}
}
}
b Apply the mappings configured in the JSON file.
vros_cli.sh add-mapping mappings_file.json
3 Deploy the vRealize Orchestrator OpenStack Plug-In.
a Download the o11n-openstack-plugin.2.0.0-XXX.vmoapp file on your local file system fromhttp://Your_OMS_server_IP/o11n-openstack-plugin/.
You can log in to either the vRealize Orchestrator embedded in your vRealize Automation serveror the external vRealize Orchestrator connected to the vRealize Automation server.
b Log in to the vRealize Orchestrator Control Center as root.
VMware Integrated OpenStack Administrator Guide
VMware, Inc. 146
c On the Control Center page, click Manage Plug-Ins.
d In the Install Plug-In section, click Browse.
e Select the o11n-openstack-plugin.2.0.0-XXX.vmoapp file from the local file system.
The vRealize Orchestrator server installs the plug-in. After the plug-in is installed, the ManagePlug-Ins page refreshes and indicates that the installation was successful. The page also displaysa message prompting you to restart the vRealize Orchestrator server.
f Click Install.
g Click Startup Options to access controls and restart the vRealize Orchestrator server.
You can now administrate VMware Integrated OpenStack through the vRealize Automation portal, design,and consume blueprints.
Designing and Publishing BlueprintsYou can design blueprints to run any of the available workflows. For example, you can design blueprintsto create or delete OpenStack projects, and to deploy or delete Heat stacks.
Service Accounts for vRealize Orchestrator WorkflowsYou can use service accounts for authentication when you design blueprints. These accounts are used bydefault for authentication of the OpenStack REST API and users do not have to enter credentials everytime they request services. When you use service accounts, set the credentials related parameters as notvisible to the users. You create these accounts as standard OpenStack users.
Design an XaaS Blueprint for Creating or Deleting OpenStackProjectsYou can design blueprints that create OpenStack projects when consumed.
Prerequisites
n Verify that you have service architect user privileges to access the plug-in.
n Verify that the OpenStack Keystone service is connected to an Active Directory server for automaticsynchronization. This configuration automatically synchronizes user accounts in Keystone
Procedure
1 Log in to the vRealize Automation tenant as a service architect.
2 Select Design > XaaS > XaaS Blueprints.
3 Click New.
4 Select the workflow Orchestrator > Library > VMware Integrated OpenStack > Deploy anOpenStack project or Delete an OpenStack project, and click Next.
The blueprint form appears.
VMware Integrated OpenStack Administrator Guide
VMware, Inc. 147
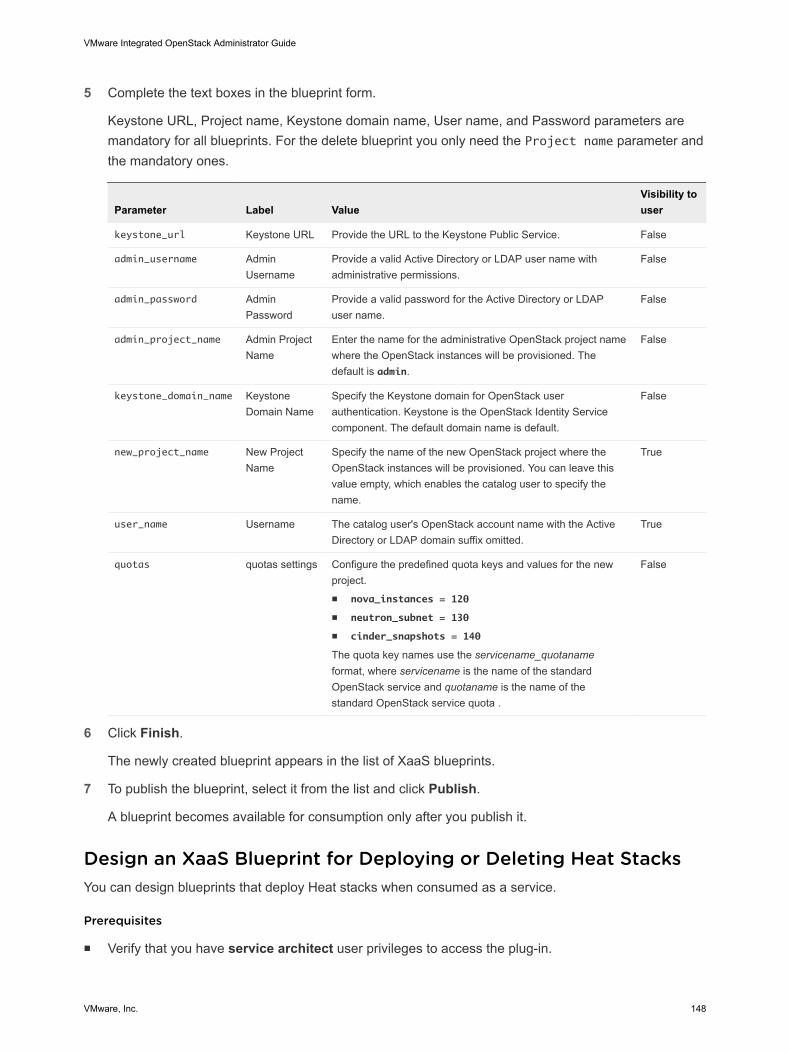
5 Complete the text boxes in the blueprint form.
Keystone URL, Project name, Keystone domain name, User name, and Password parameters aremandatory for all blueprints. For the delete blueprint you only need the Project name parameter andthe mandatory ones.
Parameter Label ValueVisibility touser
keystone_url Keystone URL Provide the URL to the Keystone Public Service. False
admin_username AdminUsername
Provide a valid Active Directory or LDAP user name withadministrative permissions.
False
admin_password AdminPassword
Provide a valid password for the Active Directory or LDAPuser name.
False
admin_project_name Admin ProjectName
Enter the name for the administrative OpenStack project namewhere the OpenStack instances will be provisioned. Thedefault is admin.
False
keystone_domain_name KeystoneDomain Name
Specify the Keystone domain for OpenStack userauthentication. Keystone is the OpenStack Identity Servicecomponent. The default domain name is default.
False
new_project_name New ProjectName
Specify the name of the new OpenStack project where theOpenStack instances will be provisioned. You can leave thisvalue empty, which enables the catalog user to specify thename.
True
user_name Username The catalog user's OpenStack account name with the ActiveDirectory or LDAP domain suffix omitted.
True
quotas quotas settings Configure the predefined quota keys and values for the newproject.n nova_instances = 120
n neutron_subnet = 130
n cinder_snapshots = 140
The quota key names use the servicename_quotanameformat, where servicename is the name of the standardOpenStack service and quotaname is the name of thestandard OpenStack service quota .
False
6 Click Finish.
The newly created blueprint appears in the list of XaaS blueprints.
7 To publish the blueprint, select it from the list and click Publish.
A blueprint becomes available for consumption only after you publish it.
Design an XaaS Blueprint for Deploying or Deleting Heat StacksYou can design blueprints that deploy Heat stacks when consumed as a service.
Prerequisites
n Verify that you have service architect user privileges to access the plug-in.
VMware Integrated OpenStack Administrator Guide
VMware, Inc. 148
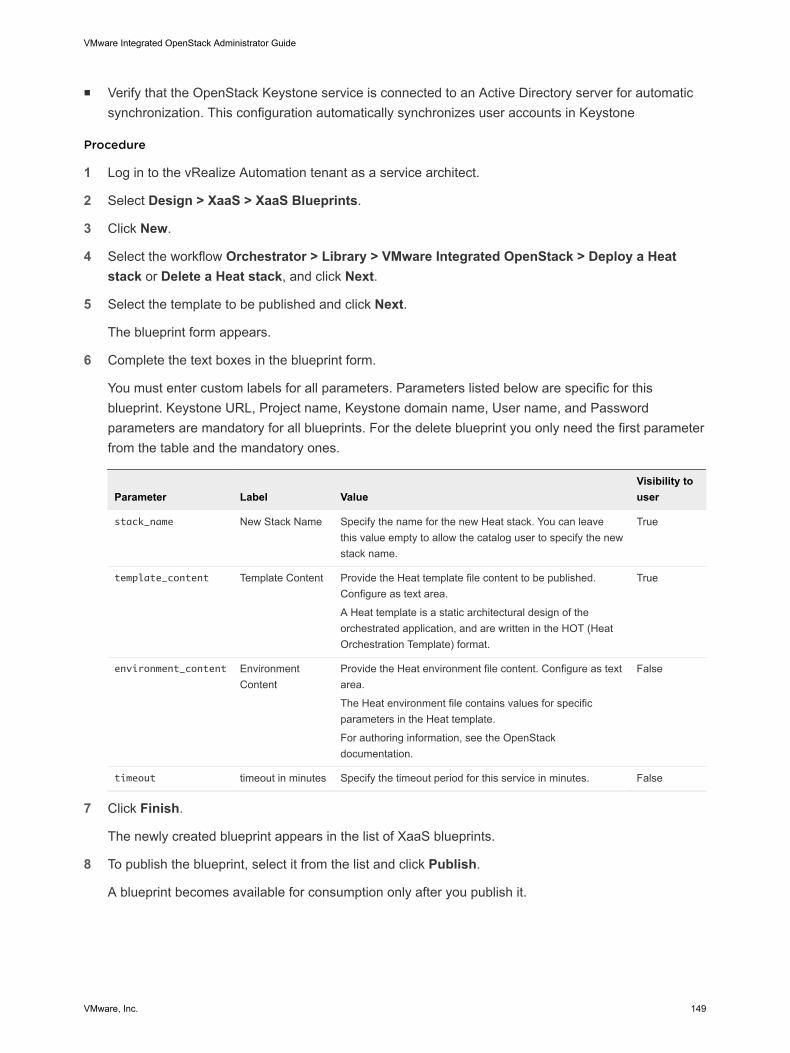
n Verify that the OpenStack Keystone service is connected to an Active Directory server for automaticsynchronization. This configuration automatically synchronizes user accounts in Keystone
Procedure
1 Log in to the vRealize Automation tenant as a service architect.
2 Select Design > XaaS > XaaS Blueprints.
3 Click New.
4 Select the workflow Orchestrator > Library > VMware Integrated OpenStack > Deploy a Heatstack or Delete a Heat stack, and click Next.
5 Select the template to be published and click Next.
The blueprint form appears.
6 Complete the text boxes in the blueprint form.
You must enter custom labels for all parameters. Parameters listed below are specific for thisblueprint. Keystone URL, Project name, Keystone domain name, User name, and Passwordparameters are mandatory for all blueprints. For the delete blueprint you only need the first parameterfrom the table and the mandatory ones.
Parameter Label ValueVisibility touser
stack_name New Stack Name Specify the name for the new Heat stack. You can leavethis value empty to allow the catalog user to specify the newstack name.
True
template_content Template Content Provide the Heat template file content to be published.Configure as text area.
A Heat template is a static architectural design of theorchestrated application, and are written in the HOT (HeatOrchestration Template) format.
True
environment_content EnvironmentContent
Provide the Heat environment file content. Configure as textarea.
The Heat environment file contains values for specificparameters in the Heat template.
For authoring information, see the OpenStackdocumentation.
False
timeout timeout in minutes Specify the timeout period for this service in minutes. False
7 Click Finish.
The newly created blueprint appears in the list of XaaS blueprints.
8 To publish the blueprint, select it from the list and click Publish.
A blueprint becomes available for consumption only after you publish it.
VMware Integrated OpenStack Administrator Guide
VMware, Inc. 149

Design an XaaS Blueprint for Creating or Deleting VM InstancesYou can design blueprints that create or delete VM instances.
Prerequisites
n Verify that you have service architect user privileges to access the plug-in.
n Verify that the OpenStack Keystone service is connected to an Active Directory server for automaticsynchronization. This configuration automatically synchronizes user accounts in Keystone
Procedure
1 Log in to the vRealize Automation tenant as a service architect.
2 Select Design > XaaS > XaaS Blueprints.
3 Click New.
4 Select the workflow Orchestrator > Library > VMware Integrated OpenStack > create an instanceor delete an instance, and click Next.
The blueprint form appears.
5 Complete the text boxes in the blueprint form.
You must enter custom labels for all parameters. Parameters listed below are specific for thisblueprint. Keystone URL, Project name, Keystone domain name, User name, and Passwordparameters are mandatory for all blueprints. For the delete blueprint you only need the first parameterfrom the table and the mandatory ones.
Parameter DescriptionVisibility touser
Instance name Enter name for the VM. True
Image name Name of the VM image to clone from.
Instance source is the template used to create an instance. You can use asnapshot of an existing instance, an image, or a volume, if enabled. You can alsoselect to use persistent storage by creating a new volume.
True
Flavor name Name of the flavor.
Flavors manage the sizing for the compute, memory and storage capacity of theinstance.
True
Network name Enter name of an existing network.
Networks provide the communication channels for instances in the cloud.
True
Keypair name Select an existing key pair, import a key pair, or generate a new key pair.
A key pair allows you to connect over SSH to your newly created instance.
True
Availability zone Optional.
Defines the placement for allocation of virtual machines.
True
Timeout Timeout for the workflow to wait for creation complete. True
VMware Integrated OpenStack Administrator Guide
VMware, Inc. 150
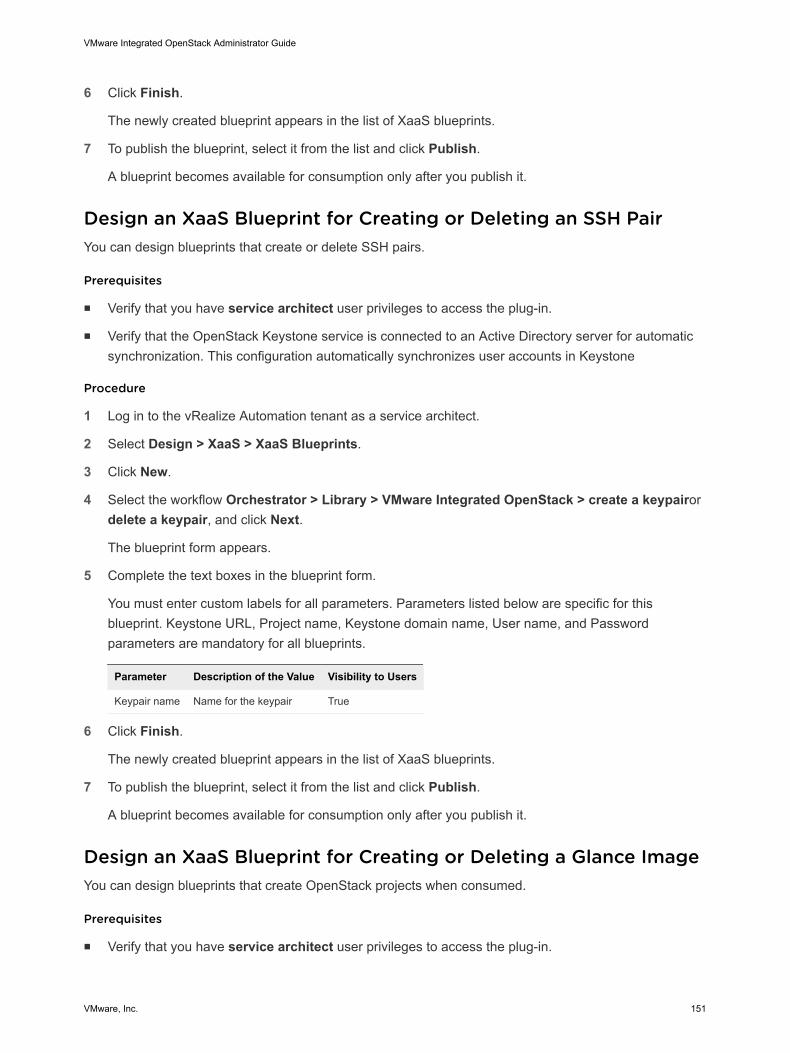
6 Click Finish.
The newly created blueprint appears in the list of XaaS blueprints.
7 To publish the blueprint, select it from the list and click Publish.
A blueprint becomes available for consumption only after you publish it.
Design an XaaS Blueprint for Creating or Deleting an SSH PairYou can design blueprints that create or delete SSH pairs.
Prerequisites
n Verify that you have service architect user privileges to access the plug-in.
n Verify that the OpenStack Keystone service is connected to an Active Directory server for automaticsynchronization. This configuration automatically synchronizes user accounts in Keystone
Procedure
1 Log in to the vRealize Automation tenant as a service architect.
2 Select Design > XaaS > XaaS Blueprints.
3 Click New.
4 Select the workflow Orchestrator > Library > VMware Integrated OpenStack > create a keypairordelete a keypair, and click Next.
The blueprint form appears.
5 Complete the text boxes in the blueprint form.
You must enter custom labels for all parameters. Parameters listed below are specific for thisblueprint. Keystone URL, Project name, Keystone domain name, User name, and Passwordparameters are mandatory for all blueprints.
Parameter Description of the Value Visibility to Users
Keypair name Name for the keypair True
6 Click Finish.
The newly created blueprint appears in the list of XaaS blueprints.
7 To publish the blueprint, select it from the list and click Publish.
A blueprint becomes available for consumption only after you publish it.
Design an XaaS Blueprint for Creating or Deleting a Glance ImageYou can design blueprints that create OpenStack projects when consumed.
Prerequisites
n Verify that you have service architect user privileges to access the plug-in.
VMware Integrated OpenStack Administrator Guide
VMware, Inc. 151
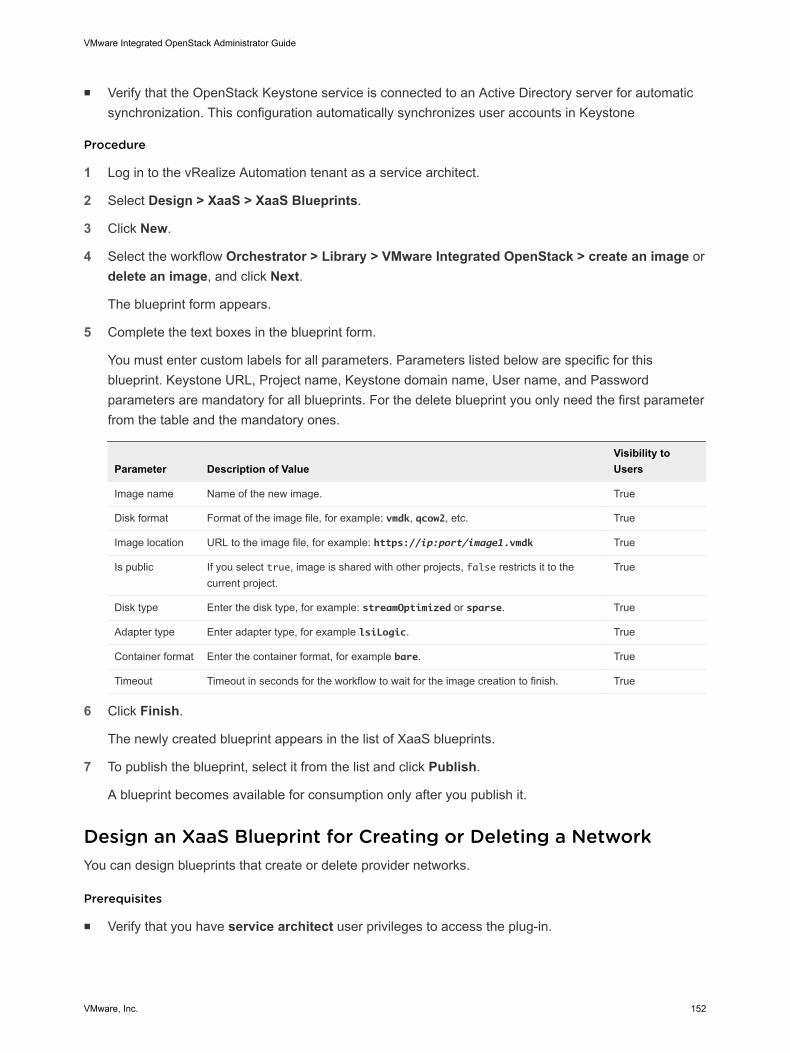
n Verify that the OpenStack Keystone service is connected to an Active Directory server for automaticsynchronization. This configuration automatically synchronizes user accounts in Keystone
Procedure
1 Log in to the vRealize Automation tenant as a service architect.
2 Select Design > XaaS > XaaS Blueprints.
3 Click New.
4 Select the workflow Orchestrator > Library > VMware Integrated OpenStack > create an image ordelete an image, and click Next.
The blueprint form appears.
5 Complete the text boxes in the blueprint form.
You must enter custom labels for all parameters. Parameters listed below are specific for thisblueprint. Keystone URL, Project name, Keystone domain name, User name, and Passwordparameters are mandatory for all blueprints. For the delete blueprint you only need the first parameterfrom the table and the mandatory ones.
Parameter Description of ValueVisibility toUsers
Image name Name of the new image. True
Disk format Format of the image file, for example: vmdk, qcow2, etc. True
Image location URL to the image file, for example: https://ip:port/image1.vmdk True
Is public If you select true, image is shared with other projects, false restricts it to thecurrent project.
True
Disk type Enter the disk type, for example: streamOptimized or sparse. True
Adapter type Enter adapter type, for example lsiLogic. True
Container format Enter the container format, for example bare. True
Timeout Timeout in seconds for the workflow to wait for the image creation to finish. True
6 Click Finish.
The newly created blueprint appears in the list of XaaS blueprints.
7 To publish the blueprint, select it from the list and click Publish.
A blueprint becomes available for consumption only after you publish it.
Design an XaaS Blueprint for Creating or Deleting a NetworkYou can design blueprints that create or delete provider networks.
Prerequisites
n Verify that you have service architect user privileges to access the plug-in.
VMware Integrated OpenStack Administrator Guide
VMware, Inc. 152
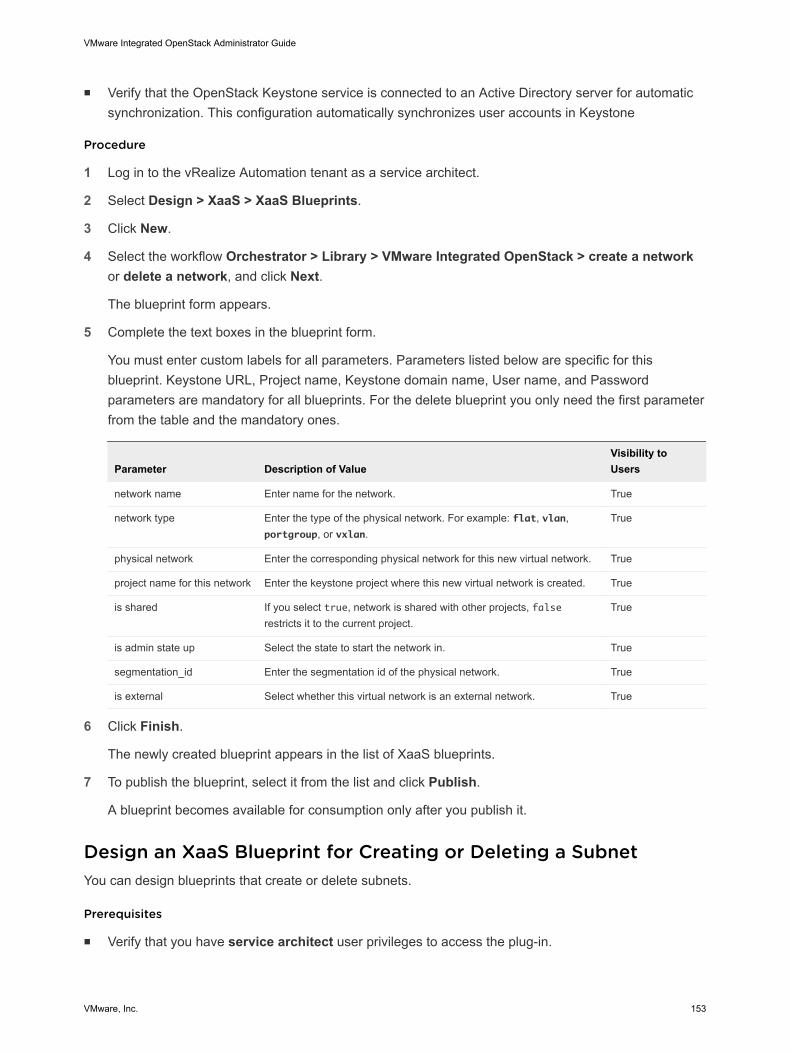
n Verify that the OpenStack Keystone service is connected to an Active Directory server for automaticsynchronization. This configuration automatically synchronizes user accounts in Keystone
Procedure
1 Log in to the vRealize Automation tenant as a service architect.
2 Select Design > XaaS > XaaS Blueprints.
3 Click New.
4 Select the workflow Orchestrator > Library > VMware Integrated OpenStack > create a networkor delete a network, and click Next.
The blueprint form appears.
5 Complete the text boxes in the blueprint form.
You must enter custom labels for all parameters. Parameters listed below are specific for thisblueprint. Keystone URL, Project name, Keystone domain name, User name, and Passwordparameters are mandatory for all blueprints. For the delete blueprint you only need the first parameterfrom the table and the mandatory ones.
Parameter Description of ValueVisibility toUsers
network name Enter name for the network. True
network type Enter the type of the physical network. For example: flat, vlan,portgroup, or vxlan.
True
physical network Enter the corresponding physical network for this new virtual network. True
project name for this network Enter the keystone project where this new virtual network is created. True
is shared If you select true, network is shared with other projects, falserestricts it to the current project.
True
is admin state up Select the state to start the network in. True
segmentation_id Enter the segmentation id of the physical network. True
is external Select whether this virtual network is an external network. True
6 Click Finish.
The newly created blueprint appears in the list of XaaS blueprints.
7 To publish the blueprint, select it from the list and click Publish.
A blueprint becomes available for consumption only after you publish it.
Design an XaaS Blueprint for Creating or Deleting a SubnetYou can design blueprints that create or delete subnets.
Prerequisites
n Verify that you have service architect user privileges to access the plug-in.
VMware Integrated OpenStack Administrator Guide
VMware, Inc. 153

n Verify that the OpenStack Keystone service is connected to an Active Directory server for automaticsynchronization. This configuration automatically synchronizes user accounts in Keystone
Procedure
1 Log in to the vRealize Automation tenant as a service architect.
2 Select Design > XaaS > XaaS Blueprints.
3 Click New.
4 Select the workflow Orchestrator > Library > VMware Integrated OpenStack > create a subnet ordelete a subnet, and click Next.
The blueprint form appears.
5 Complete the text boxes in the blueprint form.
You must enter custom labels for all parameters. Parameters listed below are specific for thisblueprint. Keystone URL, Project name, Keystone domain name, User name, and Passwordparameters are mandatory for all blueprints. For the delete blueprint you only need the first parameterfrom the table and the mandatory ones.
Parameter Description of Value Visibility to Users
Subnet name Name for the subnet True
Network name Name of the network that the subnet is created under. True
CIDR IP address range in CIDR format. True
DHCP True or false according to your needs. True
IP start IP address starting allocation. True
IP end IP address ending allocation. True
Gateway IP IP address of the gateway. True
6 Click Finish.
The newly created blueprint appears in the list of XaaS blueprints.
7 To publish the blueprint, select it from the list and click Publish.
A blueprint becomes available for consumption only after you publish it.
Design an XaaS Blueprint for Creating or Deleting a Floating IPYou can design blueprints that create or delete a floating IP address.
Prerequisites
n Verify that you have service architect user privileges to access the plug-in.
n Verify that the OpenStack Keystone service is connected to an Active Directory server for automaticsynchronization. This configuration automatically synchronizes user accounts in Keystone
VMware Integrated OpenStack Administrator Guide
VMware, Inc. 154
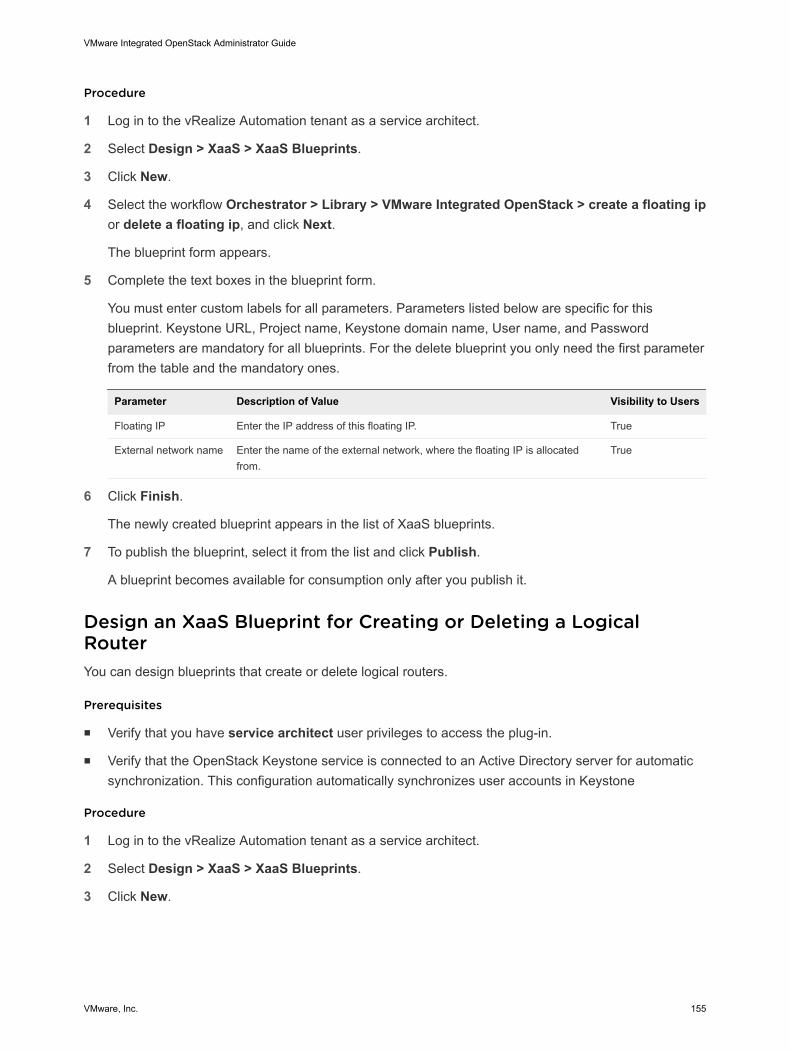
Procedure
1 Log in to the vRealize Automation tenant as a service architect.
2 Select Design > XaaS > XaaS Blueprints.
3 Click New.
4 Select the workflow Orchestrator > Library > VMware Integrated OpenStack > create a floating ipor delete a floating ip, and click Next.
The blueprint form appears.
5 Complete the text boxes in the blueprint form.
You must enter custom labels for all parameters. Parameters listed below are specific for thisblueprint. Keystone URL, Project name, Keystone domain name, User name, and Passwordparameters are mandatory for all blueprints. For the delete blueprint you only need the first parameterfrom the table and the mandatory ones.
Parameter Description of Value Visibility to Users
Floating IP Enter the IP address of this floating IP. True
External network name Enter the name of the external network, where the floating IP is allocatedfrom.
True
6 Click Finish.
The newly created blueprint appears in the list of XaaS blueprints.
7 To publish the blueprint, select it from the list and click Publish.
A blueprint becomes available for consumption only after you publish it.
Design an XaaS Blueprint for Creating or Deleting a LogicalRouterYou can design blueprints that create or delete logical routers.
Prerequisites
n Verify that you have service architect user privileges to access the plug-in.
n Verify that the OpenStack Keystone service is connected to an Active Directory server for automaticsynchronization. This configuration automatically synchronizes user accounts in Keystone
Procedure
1 Log in to the vRealize Automation tenant as a service architect.
2 Select Design > XaaS > XaaS Blueprints.
3 Click New.
VMware Integrated OpenStack Administrator Guide
VMware, Inc. 155

4 Select the workflow Orchestrator > Library > VMware Integrated OpenStack > create a router ordelete a router, and click Next.
The blueprint form appears.
5 Complete the text boxes in the blueprint form.
You must enter custom labels for all parameters. Parameters listed below are specific for thisblueprint. Keystone URL, Project name, Keystone domain name, User name, and Passwordparameters are mandatory for all blueprints. For the delete blueprint you only need the first parameterfrom the table and the mandatory ones.
Parameter Description of Value Visibility to Users
Router name Enter name of the router. True
External network Enter name of the network where the router is uplinked. True
Is admin state up Select the state to start the router in. True
Is distributed Select whether the router is distributed or not. True
Router type Select between exclusive or shared. True
Router size Select between compact, large, or extra large. True
6 Click Finish.
The newly created blueprint appears in the list of XaaS blueprints.
7 To publish the blueprint, select it from the list and click Publish.
A blueprint becomes available for consumption only after you publish it.
Design an XaaS Blueprint for Creating or Deleting a SecurityGroupYou can design blueprints that create or delete a security group.
Prerequisites
n Verify that you have service architect user privileges to access the plug-in.
n Verify that the OpenStack Keystone service is connected to an Active Directory server for automaticsynchronization. This configuration automatically synchronizes user accounts in Keystone
Procedure
1 Log in to the vRealize Automation tenant as a service architect.
2 Select Design > XaaS > XaaS Blueprints.
3 Click New.
4 Select the workflow Orchestrator > Library > VMware Integrated OpenStack > create a securitygroup or delete a security group, and click Next.
The blueprint form appears.
VMware Integrated OpenStack Administrator Guide
VMware, Inc. 156
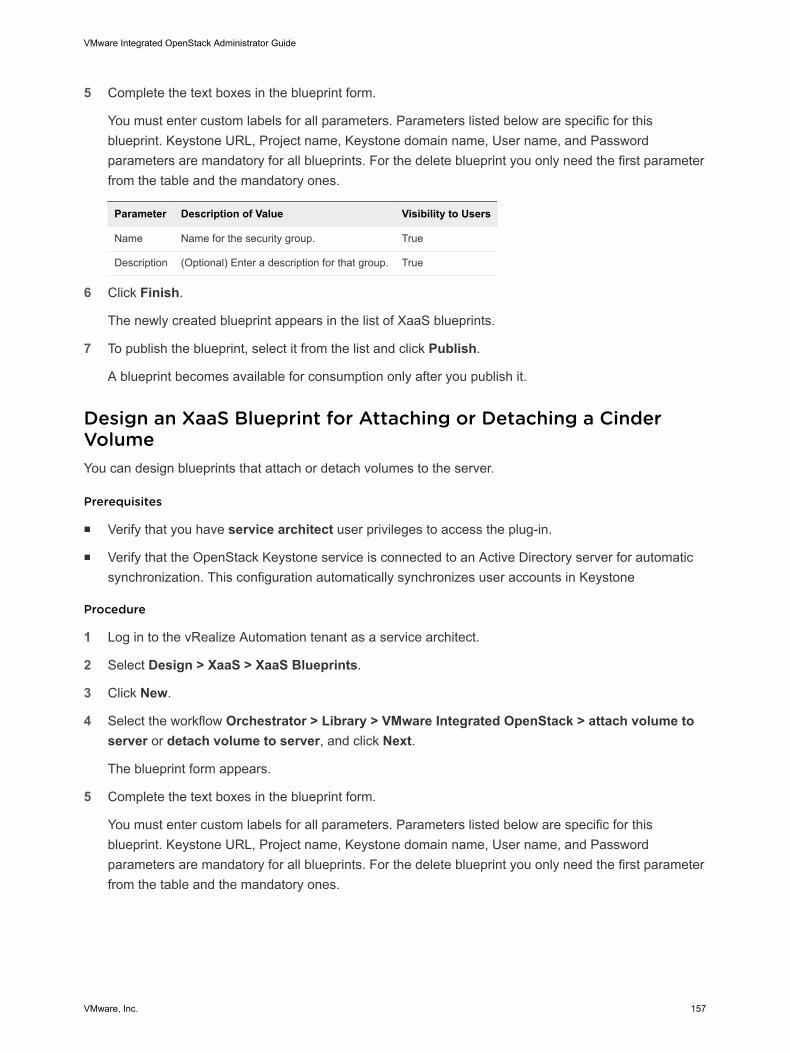
5 Complete the text boxes in the blueprint form.
You must enter custom labels for all parameters. Parameters listed below are specific for thisblueprint. Keystone URL, Project name, Keystone domain name, User name, and Passwordparameters are mandatory for all blueprints. For the delete blueprint you only need the first parameterfrom the table and the mandatory ones.
Parameter Description of Value Visibility to Users
Name Name for the security group. True
Description (Optional) Enter a description for that group. True
6 Click Finish.
The newly created blueprint appears in the list of XaaS blueprints.
7 To publish the blueprint, select it from the list and click Publish.
A blueprint becomes available for consumption only after you publish it.
Design an XaaS Blueprint for Attaching or Detaching a CinderVolumeYou can design blueprints that attach or detach volumes to the server.
Prerequisites
n Verify that you have service architect user privileges to access the plug-in.
n Verify that the OpenStack Keystone service is connected to an Active Directory server for automaticsynchronization. This configuration automatically synchronizes user accounts in Keystone
Procedure
1 Log in to the vRealize Automation tenant as a service architect.
2 Select Design > XaaS > XaaS Blueprints.
3 Click New.
4 Select the workflow Orchestrator > Library > VMware Integrated OpenStack > attach volume toserver or detach volume to server, and click Next.
The blueprint form appears.
5 Complete the text boxes in the blueprint form.
You must enter custom labels for all parameters. Parameters listed below are specific for thisblueprint. Keystone URL, Project name, Keystone domain name, User name, and Passwordparameters are mandatory for all blueprints. For the delete blueprint you only need the first parameterfrom the table and the mandatory ones.
VMware Integrated OpenStack Administrator Guide
VMware, Inc. 157

Parameter Description of Value Visibility to Users
Instance name Enter the name of the VM to attach to. True
Volume name Enter the name of the volume to be attached. True
6 Click Finish.
The newly created blueprint appears in the list of XaaS blueprints.
7 To publish the blueprint, select it from the list and click Publish.
A blueprint becomes available for consumption only after you publish it.
Design an XaaS Blueprint for Attaching or Detaching a CinderVolumeYou can design blueprints that attach or detach volumes to the server.
Prerequisites
n Verify that you have service architect user privileges to access the plug-in.
n Verify that the OpenStack Keystone service is connected to an Active Directory server for automaticsynchronization. This configuration automatically synchronizes user accounts in Keystone
Procedure
1 Log in to the vRealize Automation tenant as a service architect.
2 Select Design > XaaS > XaaS Blueprints.
3 Click New.
4 Select the workflow Orchestrator > Library > VMware Integrated OpenStack > attach volume toserver or detach volume to server, and click Next.
The blueprint form appears.
5 Complete the text boxes in the blueprint form.
You must enter custom labels for all parameters. Parameters listed below are specific for thisblueprint. Keystone URL, Project name, Keystone domain name, User name, and Passwordparameters are mandatory for all blueprints. For the delete blueprint you only need the first parameterfrom the table and the mandatory ones.
Parameter Description of Value Visibility to Users
Instance name Enter the name of the VM to attach to. True
Volume name Enter the name of the volume to be attached. True
6 Click Finish.
The newly created blueprint appears in the list of XaaS blueprints.
VMware Integrated OpenStack Administrator Guide
VMware, Inc. 158
7 To publish the blueprint, select it from the list and click Publish.
A blueprint becomes available for consumption only after you publish it.
Publish XaaS Blueprints as Catalog ItemsAfter an XaaS blueprint is designed, you must publish it to the catalog to make it available to servicecatalog users. All catalog items must be associated with a service so that you can entitle users andgroups to access the services. .
Prerequisites
Verify that you have tenant administrator user privileges to access the plug-in.
Procedure
1 Log in to the vRealize Automation tenant as a tenant administrator.
2 Select Administration > Catalog Management > Services.
3 Click the New icon.
4 Enter a name and description.
These values appear in the service catalog for the catalog users. For example, if it does not existalready, you can create the OpenStack Services category.
5 (Optional) To associate the OpenStack icon with the new service, click Browse and select theOpenStack icon.
6 Click Finish.
7 Select OpenStack Services and click Manage Catalog Items from the drop-down menu.
8 Click the Add icon and select the desired blueprints.
9 Add the selected blueprints to the current service and click OK.
10 Select OpenStack Services and click Activate from the drop-down menu.
11 (Optional) Select Administration > Catalog Management > Catalog Items and to update the addedservices with the OpenStack icon.
What to do next
You can now configure entitlements for users and groups to use the new OpenStack services. See the vRealize Automation product documentation.
Request an OpenStack ServiceCatalog users with the required entitlement can request the running of a configured service through theservices catalog in vRealize Automation.
For more information about using entitlements and how they determine which users and groups canrequest specific catalog items or perform specific actions, see the vRealize Automation productdocumentation.
VMware Integrated OpenStack Administrator Guide
VMware, Inc. 159
Prerequisites
n Verify that you have the user privileges to access the plug-in as a catalog user.
n Verify that your user account possesses the required entitlement to access and request OpenStackServices.
Procedure
1 Log in to the vRealize Automation tenant as a catalog user.
2 Select Catalog > OpenStack Services.
3 Click Request for the service that you need.
The actual name of this service is determined by the person who creates the source blueprint.
The New Request page displays the parameters you need to supply.
4 On the Request Information tab, enter a brief description.
5 Click the Step tab and provide the required configurations.
6 Click Submit.
The request is submitted. After the request is approved, depending on the approval policy associatedwith the catalog service, the OpenStack service request runs.
7 To confirm if the request was successful, you can log in to OpenStack to verify that the OpenStackservice request completed successfully.
You must log in to OpenStack as the same user who requested the new service.
VMware Integrated OpenStack Administrator Guide
VMware, Inc. 160