Adobe InDesign CS5 – Illustrated Unit D: Working with Graphics.
Working with Graphics:How to use images, graphics and charts in OOo Writer
Title: Working with Graphics: How to use images, graphics and charts inOOo Writer
Version: 1.0First edition: January 2005First Englishedition:
January 2005

Contents
Overview..........................................................................................................................................ii
Copyright and trademark information.........................................................................................ii
Feedback..................................................................................................................................... ii
Acknowledgments.......................................................................................................................ii
Modifications and updates.......................................................................................................... ii
Graphics in Writer documents......................................................................................................... 1
How to add a graphic from a file..................................................................................................... 1
Inserting a graphic from a file..................................................................................................... 1
Resizing a graphic....................................................................................................................... 3
Inserting a graphic from other sources........................................................................................ 4
Adding an image to the Gallery....................................................................................................... 6
Modifying an image......................................................................................................................... 7
Positioning graphics within the text.................................................................................................8
Arranging and aligning graphics................................................................................................. 8
Wrapping text around graphics................................................................................................... 9
Anchoring graphics and drawing objects.......................................................................................12
Adding captions to graphics...........................................................................................................13
Adding captions automatically..................................................................................................13
Using the Caption dialog...........................................................................................................13
Adding captions manually.........................................................................................................14
Using Writer’s drawing tools.........................................................................................................15
Creating drawing objects...........................................................................................................15
Setting or changing properties for drawing objects...................................................................16
Grouping drawing objects......................................................................................................... 17
Appendix A: Graphic file types supported.................................................................................... 18
Working with Graphics i
Overview
Overview
This describes how to insert images and graphics into documents written withOpenOffice.org Writer; modify, resize, position, and anchor graphics; add captions; and useWriter’s drawing tools.
Copyright and trademark informationThe contents of this Documentation are subject to the Public Documentation License,Version 1.0 (the “License”); you may only use this Documentation if you comply with theterms of this License. A copy of the License is available at:http ://www.openoffice.org/licenses/PDL.rtf .
The Initial Writer of the Original Documentation is Vincenzo Ponzi. All Rights Reserved.(Initial Writer contact:[email protected].) Contact the Initial Writer only to report errors inthe documentation. For questions regarding how to use the software, subscribe to the UsersMail List and post your question there: http://support.openoffice.org/index.html.)
Contributors: Jean Hollis Weber contributed the sections on automatic and manual captions,anchoring graphics, and Writer’s drawing tools. Portions created by Jean Hollis Weber areCopyright © 2004. All Rights Reserved. (Contributor contact [email protected].)
All trademarks within this guide belong to legitimate owners.
FeedbackPlease direct any comments or suggestions about this document to:[email protected].
AcknowledgmentsMany thanks and congratulations to the developers who provided us with a great product!Thanks to the the community of authors, reviewers and support people for getting the projectup and running. This is a great contribution for open software freedom.
Modifications and updates
Version Date Description of Change
1.0 3 January 2005 First published edition.
Working with Graphics ii
Graphics in Writer documents
Graphics in Writer documents
When you write a text document using OpenOffice.org Writer, you may may need to includesome graphic illustrations.
Graphics in Writer are of three basic types:
• Graphic and image files, including photos, drawings, scanned images, and others
• Diagrams created using Writer’s drawing tools
• Charts created using OOo’s Chart facility (see the chapter titled “Working withCharts” in the Common Features Guide)
This chapter covers the first two types of graphic illustrations. Most parts of this chapter alsoapply to the other components of OOo.
How to add a graphic from a file
OpenOffice.org can import various vector (line drawing) and raster (bitmap) file formats. Themost common are .gif, .jpg, .png, and .bmp. See Appendix A on page 18 for a full list ofsupported graphic file types.
Graphics may be downloaded from the Internet, scanned, created with a graphics program, orthey may be photos taken with a digital camera. Some questions come to mind:
• How is a graphic inserted?
• Should the graphic be included in the document, or should it be linked to the file?
• How can the size of the graphic be adjusted?
• How can the relative position between the graphic and the text be changed?
These questions will be discussed in order.
Inserting a graphic from a fileTo insert a graphic image from a file, the file must be stored in a directory (folder) on thecomputer.
Proceed as follows:
1) On the main menu. select Insert > Image > from File. This displays the windowshown in Figure 1.
2) Navigate to the file to be inserted.
3) Select the file to insert and click Open.
Working with Graphics 1

How to add a graphic from a file
Figure 1. Insert Graphics dialog
Note: At the bottom of the Insert Graphics dialog (Figure 1) are two checkboxes. If the Previewcheckbox is checked, the selected graphic file is previewed in the window, as shown in Figure 1,so you can verify that you have the correct file. The Link checkbox is discussed below.
Linking a graphic file
If the Link checkbox in the Insert Graphic dialog is checked, OOo will create a link to thefile containing the graphic, instead of saving a copy of the graphic in the document. Theresult is that the figure will be displayed in the document, but when the document is saved, itwill contain only a reference to the graphic file, but not the graphic itself. The document andthe image remain two separate files, and they are merged together only when you open thedocument again.
Linking an image has two advantages and one disadvantage:
• Advantage – Linking can reduce the size of the document when it is saved, because theimage file itself is not included.
• Advantage – You can modify the image file separately, without changing thedocument, because the link to the file remains valid and the modified image willappear when you next open the document.
• Disadvantage – If you send the document to someone else, you must also send theimage file, or the receiver will not be able to see the linked image.
Resizing a graphicIt is possible, and quite likely, that the inserted image will not fit perfectly into the documentbecause it is too big or too small. Therefore you will probably need to resize the image.
The position of the image is not relevant for now. Changing the position of an image relativeto the text is discussed in “Positioning graphics within the text“ on page 8.
Working with Graphics 2
How to add a graphic from a file
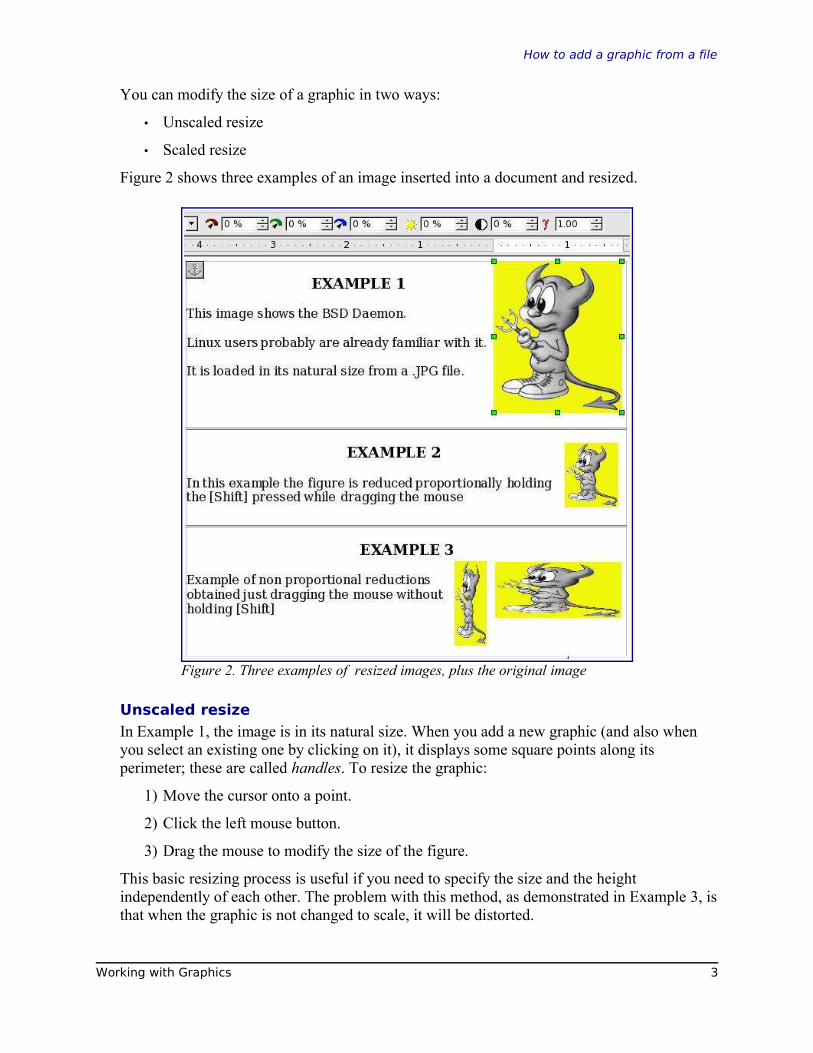
You can modify the size of a graphic in two ways:
• Unscaled resize
• Scaled resize
Figure 2 shows three examples of an image inserted into a document and resized.
Figure 2. Three examples of resized images, plus the original image
Unscaled resize
In Example 1, the image is in its natural size. When you add a new graphic (and also whenyou select an existing one by clicking on it), it displays some square points along itsperimeter; these are called handles. To resize the graphic:
1) Move the cursor onto a point.
2) Click the left mouse button.
3) Drag the mouse to modify the size of the figure.
This basic resizing process is useful if you need to specify the size and the heightindependently of each other. The problem with this method, as demonstrated in Example 3, isthat when the graphic is not changed to scale, it will be distorted.
Working with Graphics 3
How to add a graphic from a file
You need to either carefully measure and calculate how much the image needs to be adjustedin the horizontal and vertical directions in order to maintain the correct proportions, or usethe “scaled resize” method described below.
Scaled resize
A scaled resize is usually the best option, because it automatically maintains the proportionsof the graphic. To perform a scaled resize:
1) Press and hold the Shift key.
2) Click and drag a corner handle of the graphic.
It will resize proportionally, as shown in Example 2.
3) Release the mouse button to complete the resize.
Inserting images from other sourcesYou can insert images from sources other than a file on a computer. The possible sources forimages are:
• Graphics program
• Scanner
• OOo Gallery
From a graphics program
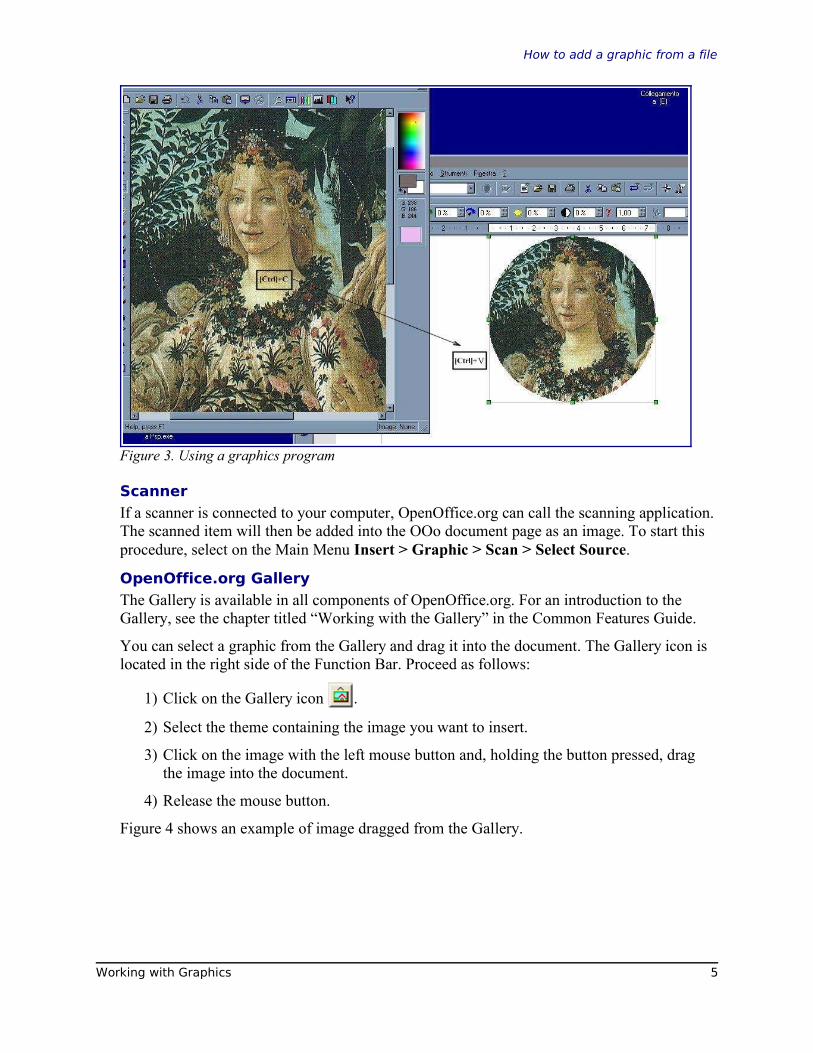
You can use many different graphics programs to edit a graphic file. In these programs youcan select, copy, and paste an image, or part of a graphic into an OpenOffice.org document.Figure 3 shows an example of this procedure, which can be recreated with these steps:
1) In the imaging program window, select an area of the image to be copied. (Theprogram used in the example is Paint Shop.)
2) Move the cursor over the selected area and press Control+C to copy.
3) Switch to the OpenOffice.org Writer window.
4) Click to insert the cursor where the graphic is to be inserted.
5) Press Control+V to paste.
Working with Graphics 4
How to add a graphic from a file
Figure 3. Using a graphics program
Scanner
If a scanner is connected to your computer, OpenOffice.org can call the scanning application.The scanned item will then be added into the OOo document page as an image. To start thisprocedure, select on the Main Menu Insert > Graphic > Scan > Select Source.
OpenOffice.org Gallery
The Gallery is available in all components of OpenOffice.org. For an introduction to theGallery, see the chapter titled “Working with the Gallery” in the Common Features Guide.
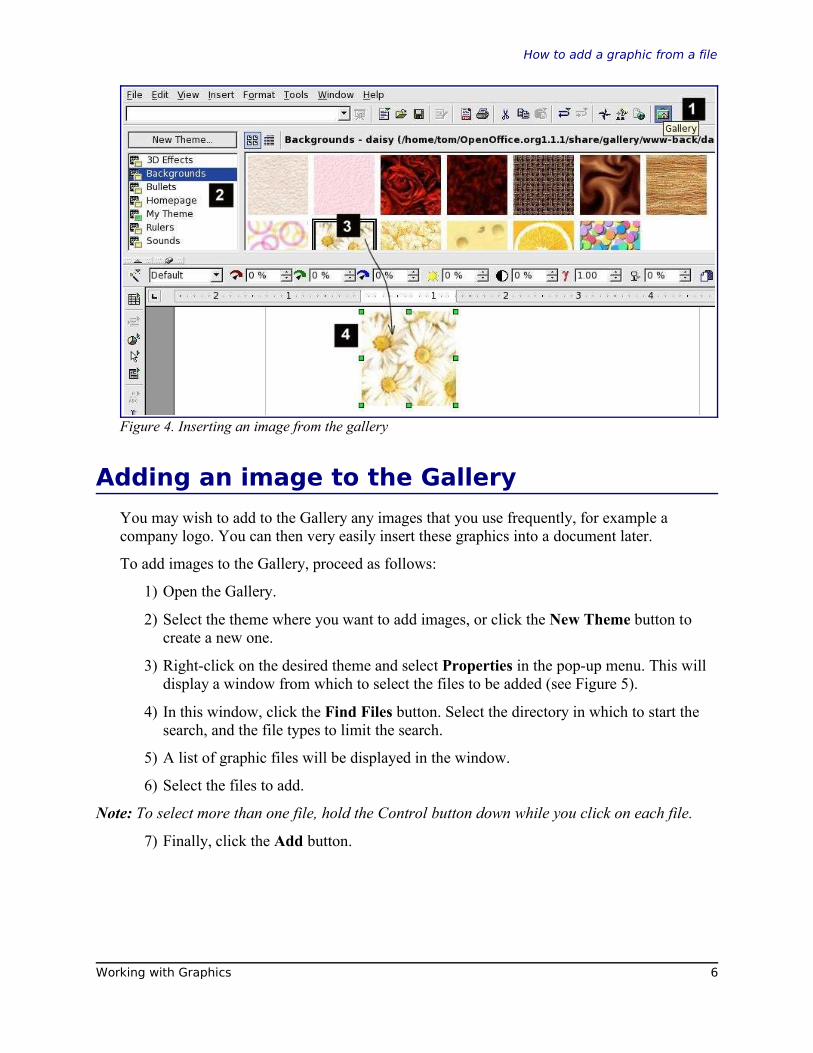
You can select a graphic from the Gallery and drag it into the document. The Gallery icon islocated in the right side of the Function Bar. Proceed as follows:
1) Click on the Gallery icon .
2) Select the theme containing the image you want to insert.
3) Click on the image with the left mouse button and, holding the button pressed, dragthe image into the document.
4) Release the mouse button.
Figure 4 shows an example of image dragged from the Gallery.
Working with Graphics 5
How to add a graphic from a file
Figure 4. Inserting an image from the gallery
Adding an image to the Gallery
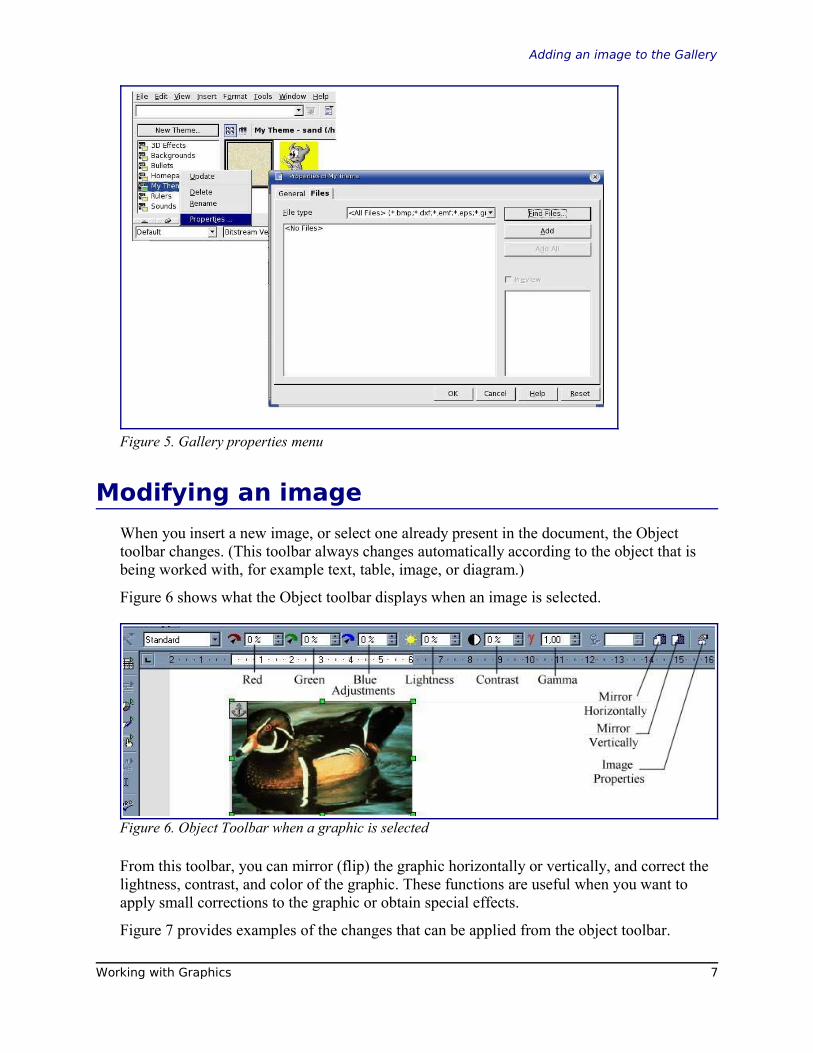
You may wish to add to the Gallery any images that you use frequently, for example acompany logo. You can then very easily insert these graphics into a document later.
To add images to the Gallery, proceed as follows:
1) Open the Gallery.
2) Select the theme where you want to add images, or click the New Theme button tocreate a new one.
3) Right-click on the desired theme and select Properties in the pop-up menu. This willdisplay a window from which to select the files to be added (see Figure 5).
4) In this window, click the Find Files button. Select the directory in which to start thesearch, and the file types to limit the search.
5) A list of graphic files will be displayed in the window.
6) Select the files to add.
Note: To select more than one file, hold the Control button down while you click on each file.
7) Finally, click the Add button.
Working with Graphics 6
Adding an image to the Gallery
Figure 5. Gallery properties menu
Modifying an image
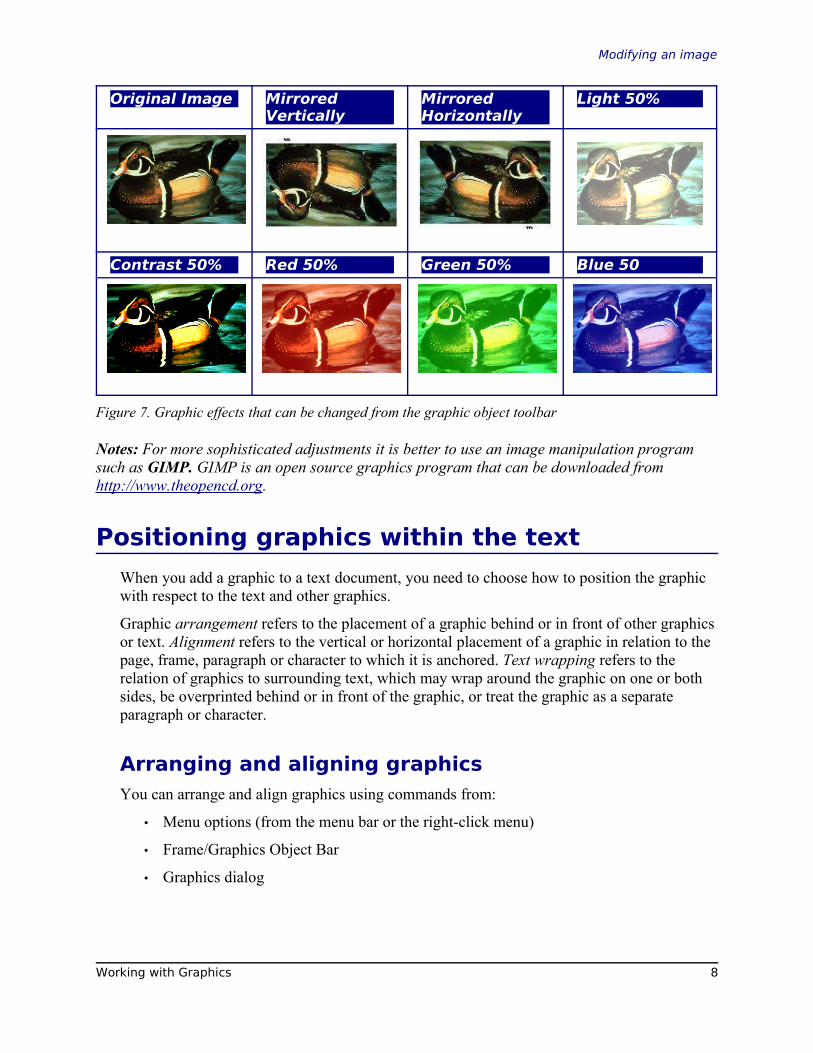
When you insert a new image, or select one already present in the document, the Objecttoolbar changes. (This toolbar always changes automatically according to the object that isbeing worked with, for example text, table, image, or diagram.)
Figure 6 shows what the Object toolbar displays when an image is selected.
Figure 6. Object Toolbar when a graphic is selected
From this toolbar, you can mirror (flip) the graphic horizontally or vertically, and correct thelightness, contrast, and color of the graphic. These functions are useful when you want toapply small corrections to the graphic or obtain special effects.
Figure 7 provides examples of the changes that can be applied from the object toolbar.
Working with Graphics 7
Modifying an image
Original Image MirroredVertically
MirroredHorizontally
Light 50%
Contrast 50% Red 50% Green 50% Blue 50
Figure 7. Graphic effects that can be changed from the graphic object toolbar
Notes: For more sophisticated adjustments it is better to use an image manipulation programsuch as GIMP. GIMP is an open source graphics program that can be downloaded fromhttp://www.theopencd.org.
Positioning graphics within the text
When you add a graphic to a text document, you need to choose how to position the graphicwith respect to the text and other graphics.
Graphic arrangement refers to the placement of a graphic behind or in front of other graphicsor text. Alignment refers to the vertical or horizontal placement of a graphic in relation to thepage, frame, paragraph or character to which it is anchored. Text wrapping refers to therelation of graphics to surrounding text, which may wrap around the graphic on one or bothsides, be overprinted behind or in front of the graphic, or treat the graphic as a separateparagraph or character.
Arranging and aligning graphicsYou can arrange and align graphics using commands from:
• Menu options (from the menu bar or the right-click menu)
• Frame/Graphics Object Bar
• Graphics dialog
Working with Graphics 8

Positioning graphics within the text
Frame/Graphics Object Bar
There are two toolbars related to manipulating graphics: the Graphics Object Bar and theFrame Object Bar. You can switch between these two toolbars as needed.
When you select a graphic, the Graphics Object Bar (shown in Figure 6) may be displayed.Click on the left-facing arrow at the right end of the toolbar to display the Frame Object Bar(Figure 8).
Here you can click icons to apply many arrangement, alignment, wrapping, anchoring,formatting, and other choices. You can toggle this object bar by clicking on the left-facingarrow at the right-hand end to redisplay the Graphics Object Bar.
Figure 8. Frame object bar
Graphics dialog
Click Format > Graphics, or right-click and then click Graphics on the pop-up menu, orclick the Frame Properties icon on the object bar to display the Graphics dialog. Here youcan specify the characteristics of the graphic and its placement in detail.
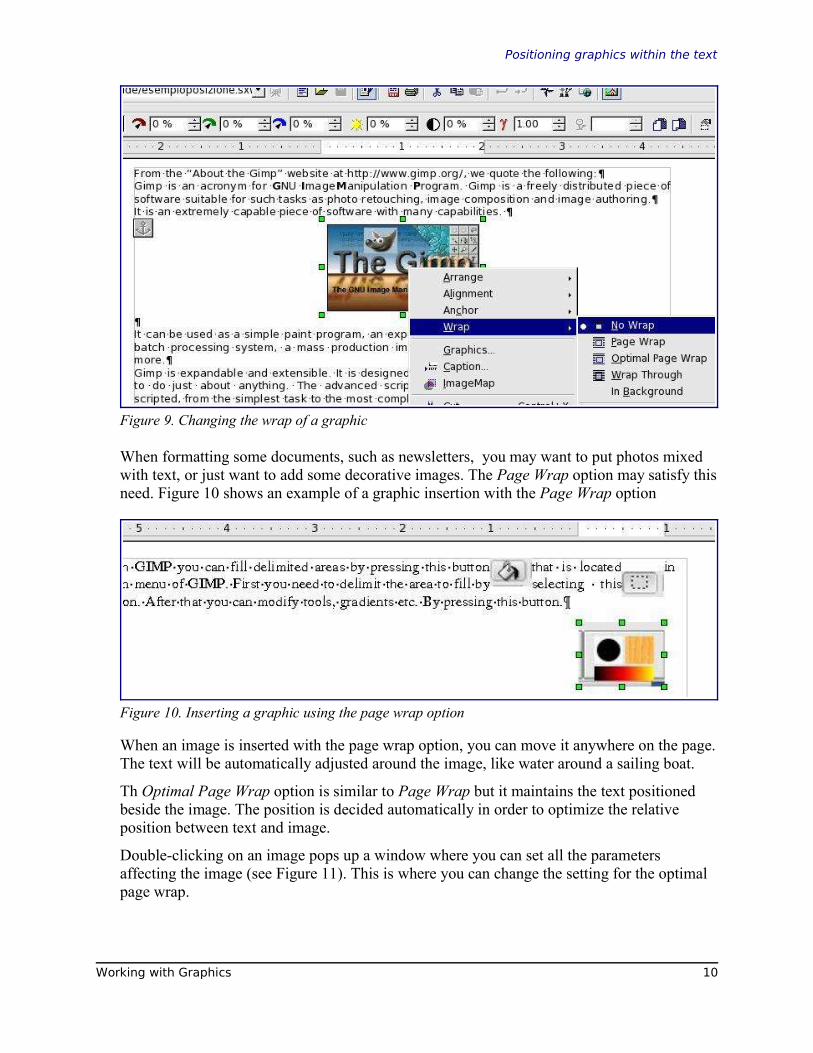
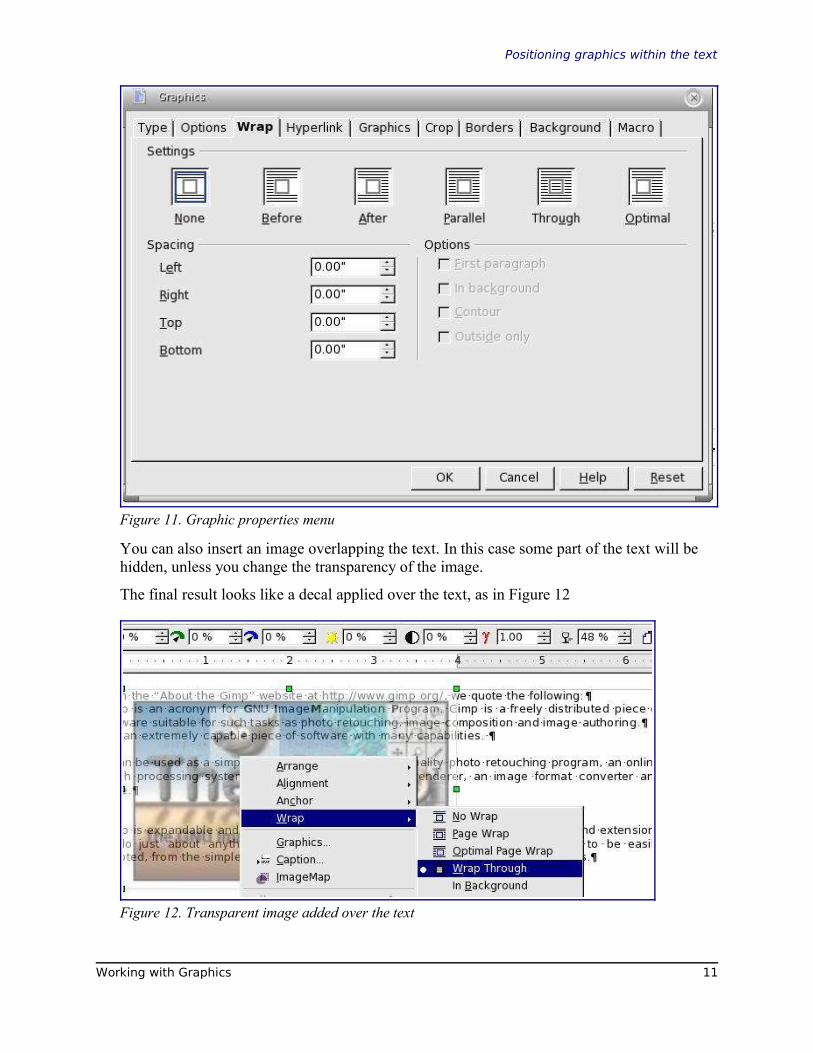
Wrapping text around graphicsThe Wrap menu options provide several possibilities:
• Alternate paragraphs and graphics, maintaining a separation between them (No Wrap).
• Wrap text around the graphics (Page Wrap or Optimal Page Wrap).
• Put a semi-transparent graphic over the text (Wrap Through).
• Add a graphic in the background (In Background).
Often you need to insert graphics with no text around them, as in this chapter. To set theposition of an image to no wrap, follow the following steps:
1) Select a graphic by clicking on it.
2) Right-click to display the context menu and move the cursor to Wrap to display thevarious wrap modes.
3) Select No Wrap.
Figure 9 shows an example of this operation.
Working with Graphics 9
Wrap off
Wrap on
Wrap through
Align left
Align center horizontal
Align right
Align bottom
Align top
Align vertical center
Line style/color (border)
BordersBackground
colorBring to
frontSend to
backLink
frames
Unlink frames
Change anchor
Frame prop.
Positioning graphics within the text
Figure 9. Changing the wrap of a graphic
When formatting some documents, such as newsletters, you may want to put photos mixedwith text, or just want to add some decorative images. The Page Wrap option may satisfy thisneed. Figure 10 shows an example of a graphic insertion with the Page Wrap option
Figure 10. Inserting a graphic using the page wrap option
When an image is inserted with the page wrap option, you can move it anywhere on the page.The text will be automatically adjusted around the image, like water around a sailing boat.
Th Optimal Page Wrap option is similar to Page Wrap but it maintains the text positionedbeside the image. The position is decided automatically in order to optimize the relativeposition between text and image.
Double-clicking on an image pops up a window where you can set all the parametersaffecting the image (see Figure 11). This is where you can change the setting for the optimalpage wrap.
Working with Graphics 10
Positioning graphics within the text
Figure 11. Graphic properties menu
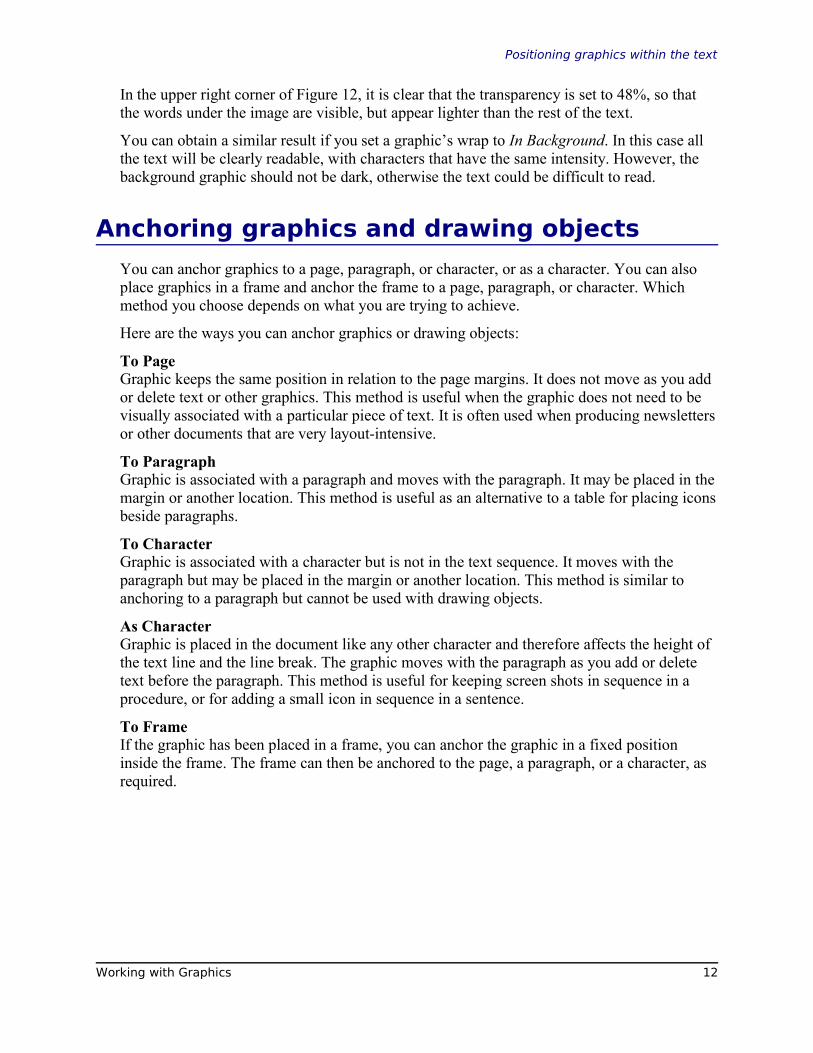
You can also insert an image overlapping the text. In this case some part of the text will behidden, unless you change the transparency of the image.
The final result looks like a decal applied over the text, as in Figure 12
Figure 12. Transparent image added over the text
Working with Graphics 11
Positioning graphics within the text
In the upper right corner of Figure 12, it is clear that the transparency is set to 48%, so thatthe words under the image are visible, but appear lighter than the rest of the text.
You can obtain a similar result if you set a graphic’s wrap to In Background. In this case allthe text will be clearly readable, with characters that have the same intensity. However, thebackground graphic should not be dark, otherwise the text could be difficult to read.
Anchoring graphics and drawing objects
You can anchor graphics to a page, paragraph, or character, or as a character. You can alsoplace graphics in a frame and anchor the frame to a page, paragraph, or character. Whichmethod you choose depends on what you are trying to achieve.
Here are the ways you can anchor graphics or drawing objects:
To PageGraphic keeps the same position in relation to the page margins. It does not move as you addor delete text or other graphics. This method is useful when the graphic does not need to bevisually associated with a particular piece of text. It is often used when producing newslettersor other documents that are very layout-intensive.
To ParagraphGraphic is associated with a paragraph and moves with the paragraph. It may be placed in themargin or another location. This method is useful as an alternative to a table for placing iconsbeside paragraphs.
To CharacterGraphic is associated with a character but is not in the text sequence. It moves with theparagraph but may be placed in the margin or another location. This method is similar toanchoring to a paragraph but cannot be used with drawing objects.
As CharacterGraphic is placed in the document like any other character and therefore affects the height ofthe text line and the line break. The graphic moves with the paragraph as you add or deletetext before the paragraph. This method is useful for keeping screen shots in sequence in aprocedure, or for adding a small icon in sequence in a sentence.
To FrameIf the graphic has been placed in a frame, you can anchor the graphic in a fixed positioninside the frame. The frame can then be anchored to the page, a paragraph, or a character, asrequired.
Working with Graphics 12
Adding captions to graphics
Adding captions to graphics
You can add captions to graphics in three ways: automatically, by using the Caption dialog,and manually.
Adding captions automaticallyYou can set up OOo to add captions automatically whenever you insert a graphic, a table, orother objects into a document. You can choose which objects are captioned automatically,what the sequence name is for each caption (for example, “Table” or “Figure”), and theposition of the caption.
To set up automatic captions:
1) Click Options > Text Document > General.
2) Select Caption – Automatic, then click the Object Selection button.
3) On the Caption dialog, choose which objects will be automatically captioned andspecify the characteristics of the captions.
For more information, see “General options for text documents” in the chapter titled “Settingup Writer.”
Now when you insert a graphic, it will be placed in a frame with a caption containing thedefault sequence name for graphics (for example, “Figure”). Position the cursor in the captionarea and type the text for the caption.
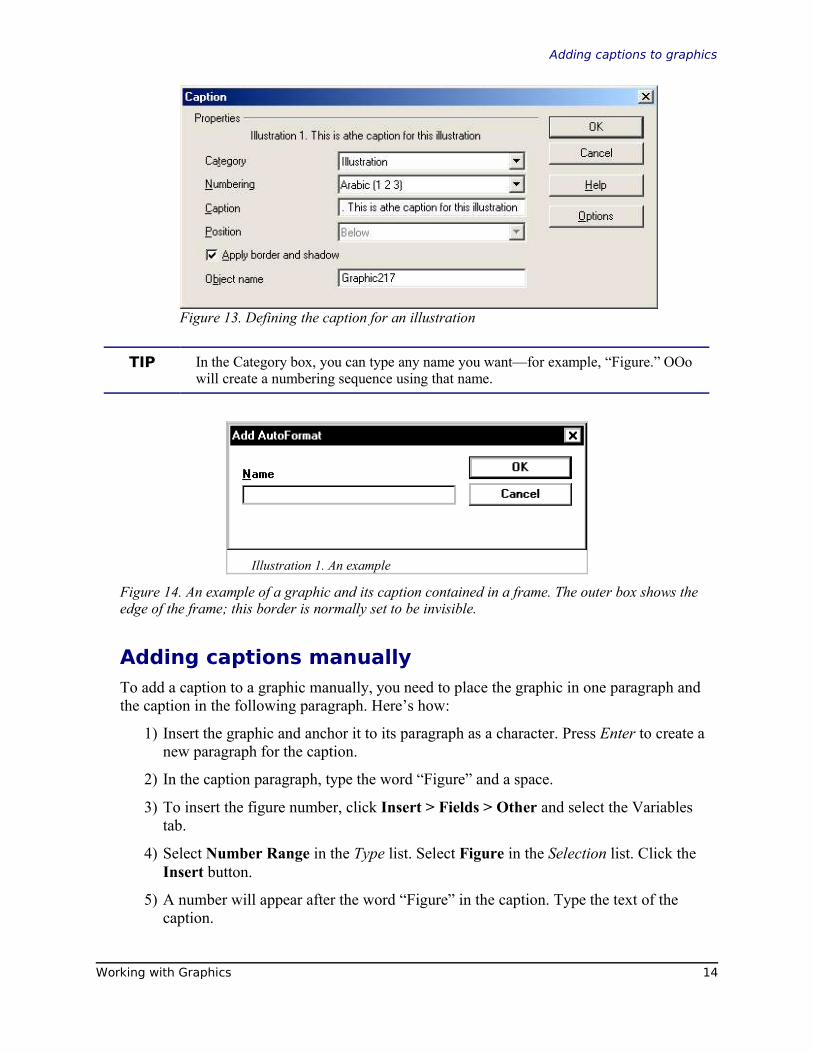
Using the Caption dialogTo add captions using the Caption dialog:
1) Insert the graphic, then select it and click Insert > Caption.
2) On the Caption dialog (Figure 13), select the caption category (“Illustration” in thisexample) and Arabic (1 2 3) as the numbering, and type your caption text.
3) Click OK. The graphic and its caption are placed in a frame, as shown in Figure 15.
Working with Graphics 13
Adding captions to graphics
Figure 13. Defining the caption for an illustration
TIP In the Category box, you can type any name you want—for example, “Figure.” OOowill create a numbering sequence using that name.
Illustration 1. An example
Figure 14. An example of a graphic and its caption contained in a frame. The outer box shows theedge of the frame; this border is normally set to be invisible.
Adding captions manuallyTo add a caption to a graphic manually, you need to place the graphic in one paragraph andthe caption in the following paragraph. Here’s how:
1) Insert the graphic and anchor it to its paragraph as a character. Press Enter to create anew paragraph for the caption.
2) In the caption paragraph, type the word “Figure” and a space.
3) To insert the figure number, click Insert > Fields > Other and select the Variablestab.
4) Select Number Range in the Type list. Select Figure in the Selection list. Click theInsert button.
5) A number will appear after the word “Figure” in the caption. Type the text of thecaption.
Working with Graphics 14

Adding captions to graphics
TIP Using the Fields dialog can get a bit cumbersome if you are manually addingcaptions to a lot of figures, so you might want to make an AutoText entry containingthe word Figure, the figure-number field, and the space after the number.
Using Writer’s drawing tools
You can use Writer’s drawing tools to create graphics such as simple diagrams usingrectangles, circles, lines, text, and other objects. Group the drawing objects to make sure theystay together the way you intended.
You can use the drawing tools to place drawing objects directly on a page in your document,or you can insert the drawing objects into a frame.
You can also use the drawing tools to annotate photographs, screen captures, or otherillustrations produced by other programs, but this is not recommended for these reasons:
• You cannot include graphics in a group with drawing objects, so they may get out ofalignment in your document.
• If you convert a Writer document to another format, such as HTML, the drawingobjects and the graphics will not remain associated; they will be saved separately.
Instead, use OOo Draw or another graphics program to annotate illustrations.
Creating drawing objectsTo begin using the drawing tools, display the Draw Functions toolbar (Figure 15),
Long-click on the Show Draw Functions icon on the main toolbar (normally found onthe left-hand side of the Writer window).
If you are planning to use the drawing tools repeatedly, you can tear off this toolbar and moveit to a convenient place on the window.
Figure 15. Displaying the Draw Functions toolbar
To use a drawing tool:
1) Click in the document where you want the drawing to be anchored. You can changethe anchor later, if necessary.
2) Select the tool from the Draw Functions toolbar (Figure 15). The mouse pointer
Working with Graphics 15
Show draw functions
Arc
Rectangle
Line Ellipse Curve
Selection
Ellipse pie Text Callouts
Polygon Freeform line
Circle segment
Text animation
Using Writer’s drawing tools
changes to a drawing-functions pointer, a cross-hair with a symbol for the selectedtool.
3) Move the cross-hair pointer to the place in the document where you want the graphicto appear, and then click and drag to create the drawing object. Release the mousebutton. The selected drawing function remains active, so you can draw another objectof the same type.
4) To cancel the selected drawing function, press the Esc key or click on the selectionicon (the arrow) on the Draw Functions toolbar.
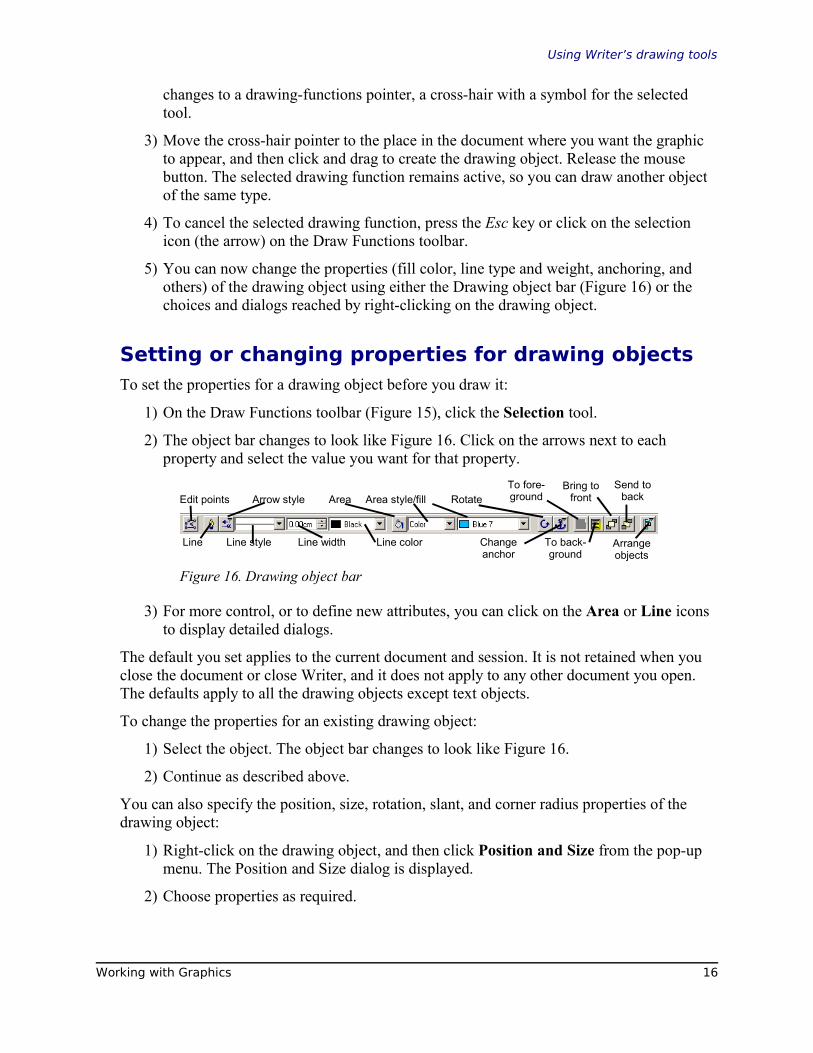
5) You can now change the properties (fill color, line type and weight, anchoring, andothers) of the drawing object using either the Drawing object bar (Figure 16) or thechoices and dialogs reached by right-clicking on the drawing object.
Setting or changing properties for drawing objectsTo set the properties for a drawing object before you draw it:
1) On the Draw Functions toolbar (Figure 15), click the Selection tool.
2) The object bar changes to look like Figure 16. Click on the arrows next to eachproperty and select the value you want for that property.
Figure 16. Drawing object bar
3) For more control, or to define new attributes, you can click on the Area or Line iconsto display detailed dialogs.
The default you set applies to the current document and session. It is not retained when youclose the document or close Writer, and it does not apply to any other document you open.The defaults apply to all the drawing objects except text objects.
To change the properties for an existing drawing object:
1) Select the object. The object bar changes to look like Figure 16.
2) Continue as described above.
You can also specify the position, size, rotation, slant, and corner radius properties of thedrawing object:
1) Right-click on the drawing object, and then click Position and Size from the pop-upmenu. The Position and Size dialog is displayed.
2) Choose properties as required.
Working with Graphics 16
Edit points Arrow style
Line width Line color
Area Area style/fill Rotate
Line Line style Change anchor
Bring to front
Send to back
To fore- ground
To back-ground
Arrange objects
Using Writer’s drawing tools
Grouping drawing objects1) Select one object, then hold down the Shift key and select the others you want to
include in the group. The bounding box expands to include all the selected objects.
2) With the objects selected, click Format > Group > Group, or right-click and thenclick Group > Group on the popup menu.
You cannot include an embedded or linked graphic in a group with drawing objects.
Working with Graphics 17

Appendix A: Graphic file types supported
Appendix A: Graphic file types supported
OpenOffice.org Writer can open the file types listed in Table 1.
Table 1. Graphic file types supported by OpenOffice.org Writer
File extension File type
BMP Windows Bitmap
DXF AutoCAD Interchange Format
EMF Enhanced Metafile
EPS Encapsulated PostScript
GIF Graphics Interchange Format
JPG, JPEG Joint Photographic Experts Group
MET OS/2 Metafile
PBM Portable Bitmap
PCD Kodak Photo CD
PCT Mac Pict
PCX Zsoft Paintbrush
PGM Portable Graymap
PNG Portable Network Graphic
PPM Portable Pixelmap
PSD Adobe Photoshop
RAS Sun Raster Image
SGF StarWriter Graphics Format
SGV StarDraw 2.0
SVM StarView Metafile
TGA Truevision Targa
TIF, TIFF Tagged Image File Format
WMF Windows Metafile
XBM X Bitmap
SPM X PixMap
Working with Graphics 18