Using Rubicon Atlas - Warren Hills Regional School District
30
Using Rubicon Atlas Warren Hills Regional School District Version 2.0 March 2018 Reviewed and Developed by: Mrs. Dawn A. Moore, Assistant Superintendent of Curriculum and Instruction Warren Hills Regional School District Office of Curriculum and Instruction
Transcript of Using Rubicon Atlas - Warren Hills Regional School District
Using Rubicon Atlas
Warren Hills Regional School District
Version 2.0 March 2018
Reviewed and Developed by:
Mrs. Dawn A. Moore, Assistant Superintendent
of Curriculum and Instruction
Warren Hills Regional School District
Office of Curriculum and Instruction
2
Table of Contents Introduction
What is Rubicon Atlas? ............................................................................................................................3
How Should I be Using Rubicon Atlas in my Practice? ................................................................3
What Kind of Maps Are in Rubicon Atlas? ........................................................................................3
How Do I Access Rubicon Atlas? ..........................................................................................................3
Part I: Setting up and Navigating Rubicon Atlas
Logging into Rubicon Atlas.....................................................................................................................5
Using My Atlas to Navigate around Rubicon Atlas ........................................................................6
Personalizing My Atlas .............................................................................................................................7
Updating Your Personal Settings with My Settings ......................................................................8
Part II: Course Map and Unit Map Basics
Editing Course and Unit Maps ...............................................................................................................10
Adding Standards to a Unit Map ...........................................................................................................11
Adding Essential Questions, Content, and Skills ............................................................................12
Part III: Adding Assessments, Activities, and Resources as Files into Unit Maps
Adding Assessments .................................................................................................................................14
Adding Files to Suggested Activities and Resources ....................................................................17
Adding a Course Description .................................................................................................................19
Part IV: Running Standards Analysis & Scope and Sequence Reports
Running a Standards Analysis Report................................................................................................21
Saving and Sharing Standards Analysis Reports ...........................................................................25
Running a Scope and Sequence Report .............................................................................................25
Saving and Sharing Scope and Sequence Reports .........................................................................30
3
What is Rubicon Atlas? Rubicon Atlas is a curriculum mapping software program that Warren Hills Regional School District uses to house its curriculum and assessments online. Each teacher in our district has write-access to the curriculum maps for the courses that he or she teaches. In each course map teachers will find:
all of the units of study for the course; standards targeted and assessed; essential questions; content and skills taught in the unit; assessments; classroom activities; and, resources for teaching the unit.
How Should I be Using Rubicon Atlas in My Practice? Faculty use the course and unit maps in Rubicon Atlas to design their daily lessons and class activities, to house their teaching materials, to store and access unit assessments, course benchmarks, and course final exams, and to collaborate with one another on best practices for each course. Rubicon Atlas has the ability to be updated as frequently as the faculty using it desire, and it should consistently be refreshed and updated with those activities, resources, and assessments which reflect the faculty’s best practices. Rubicon Atlas is designed for flexibility. Faculty are encouraged to put their best practices (whether it is a project that was a labor of love, an assessment that is valid and reliable, or an activity that students connect with and enjoy) into their course maps so that all of the faculty teaching the same course can benefit. What Kind of Maps Are in Rubicon Atlas? Warren Hills maintains two different maps: collaborative maps and district maps. Collaborative maps are the live, teacher created and edited course maps which are available to the faculty teaching a particular course. Each year faculty will have access to the collaborative maps that match their teaching load. District maps are the static outlines of the collaborative maps which are viewable on Warren Hills’ Rubicon Atlas Public Portal. A district map will have the unit breakdown of the course, the standards addressed and targeted, essential questions, content, and skills. No other resources are ever available to the public. District maps are there to inform the community about the content, scope, and sequence of our curriculum. How do I access Rubicon Atlas? To get to Rubicon Atlas a user needs three things:
1. the URL – http://warrenhills.rubiconatlas.org; 2. an Internet connection; 3. and, any computing device with an Internet browser.
As a faculty member you have access to Rubicon Atlas anytime you have an Internet connection. Therefore there is great benefit to placing your course materials in your unit maps in Rubicon Atlas. Since our networked drives are not available off campus, and you may wish to access your course files and assessments while you are off campus, Rubicon Atlas’ unit maps provide that access to you.
4
Part I Setting up and Navigating Rubicon Atlas
In this section you will be introduced to Rubicon Atlas’s features and basic layout. You will
learn how to customize your initial page, understand its basic features, and explore its menus. Finally, you will learn how to adjust your settings and security for your Rubicon Atlas account.
5
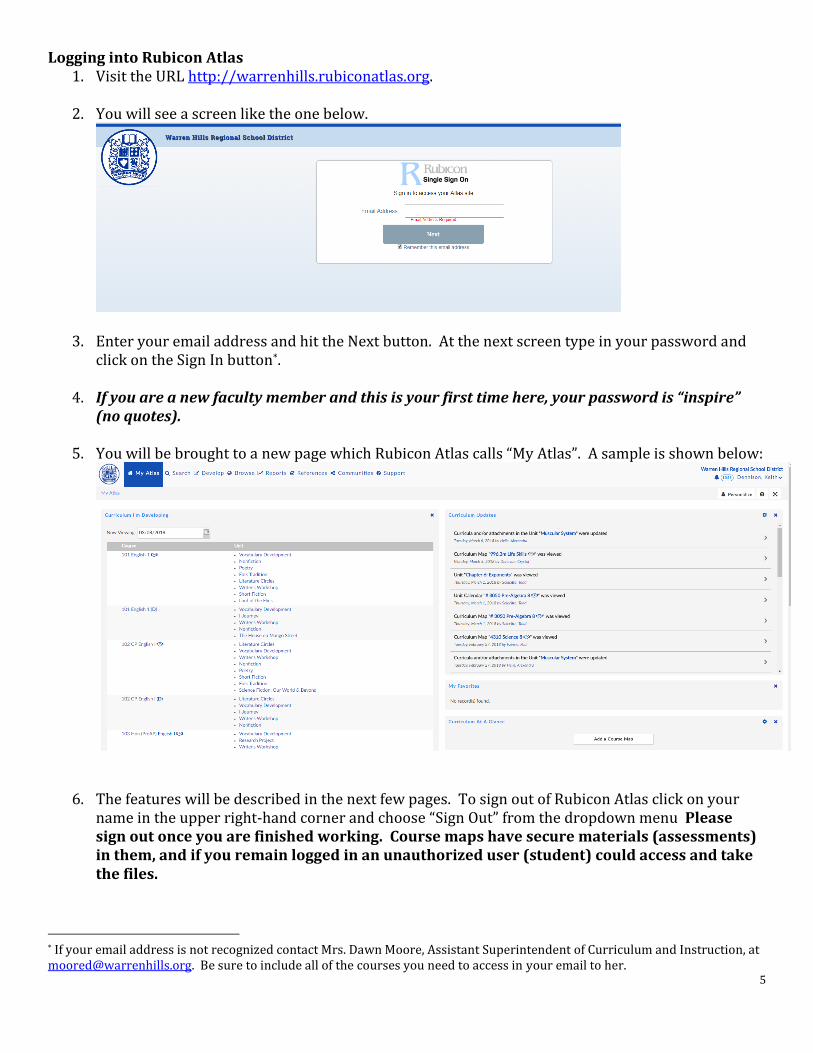
Logging into Rubicon Atlas 1. Visit the URL http://warrenhills.rubiconatlas.org.
2. You will see a screen like the one below.
3. Enter your email address and hit the Next button. At the next screen type in your password and click on the Sign In button*.
4. If you are a new faculty member and this is your first time here, your password is “inspire” (no quotes).
5. You will be brought to a new page which Rubicon Atlas calls “My Atlas”. A sample is shown below:
6. The features will be described in the next few pages. To sign out of Rubicon Atlas click on your name in the upper right-hand corner and choose “Sign Out” from the dropdown menu Please sign out once you are finished working. Course maps have secure materials (assessments) in them, and if you remain logged in an unauthorized user (student) could access and take the files.
* If your email address is not recognized contact Mrs. Dawn Moore, Assistant Superintendent of Curriculum and Instruction, at [email protected]. Be sure to include all of the courses you need to access in your email to her.
6
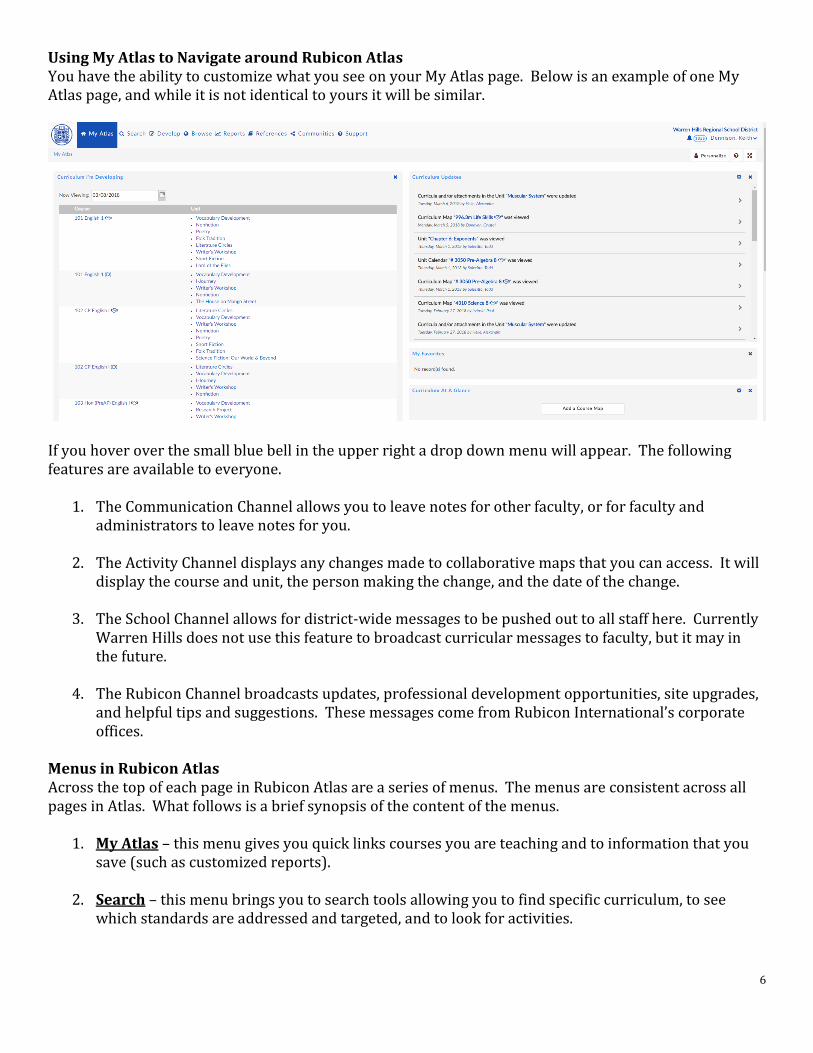
Using My Atlas to Navigate around Rubicon Atlas You have the ability to customize what you see on your My Atlas page. Below is an example of one My Atlas page, and while it is not identical to yours it will be similar.
If you hover over the small blue bell in the upper right a drop down menu will appear. The following features are available to everyone.
1. The Communication Channel allows you to leave notes for other faculty, or for faculty and administrators to leave notes for you.
2. The Activity Channel displays any changes made to collaborative maps that you can access. It will display the course and unit, the person making the change, and the date of the change.
3. The School Channel allows for district-wide messages to be pushed out to all staff here. Currently Warren Hills does not use this feature to broadcast curricular messages to faculty, but it may in the future.
4. The Rubicon Channel broadcasts updates, professional development opportunities, site upgrades, and helpful tips and suggestions. These messages come from Rubicon International’s corporate offices.
Menus in Rubicon Atlas Across the top of each page in Rubicon Atlas are a series of menus. The menus are consistent across all pages in Atlas. What follows is a brief synopsis of the content of the menus.
1. My Atlas – this menu gives you quick links courses you are teaching and to information that you save (such as customized reports).
2. Search – this menu brings you to search tools allowing you to find specific curriculum, to see which standards are addressed and targeted, and to look for activities.
7
3. Develop – this menu brings you right to the course maps for your courses.
4. Browse – this menu brings you to browsing tools which allow you to look for many different curricula or elements of curriculum across Warren Hills’ entire Program of Studies.
5. Reports – this menu brings you to tools which allow you to run different analysis reports on your curriculum. This guide expands on some of them in Part IV.
6. References – this menu brings you to different links and professional development resources related to Rubicon Atlas, curriculum design, and pedagogy.
7. Community – some schools share their Rubicon Atlas maps, techniques, resources, and strategies with the public in great detail. Browse through these links to take advantage of what your teaching colleagues throughout the nation are sharing with you.
8. Support – use this menu to get detailed instructions on how to use Rubicon Atlas. This guide is intended as an introduction and a quick reference. The Support Menu will give you detailed instructions on how to use all of Rubicon’s features.
Personalizing My Atlas Faculty can add different features to their own My Atlas pages. This is a personal preference only, so do not feel pressured to customize your page if it is fine the way it is.
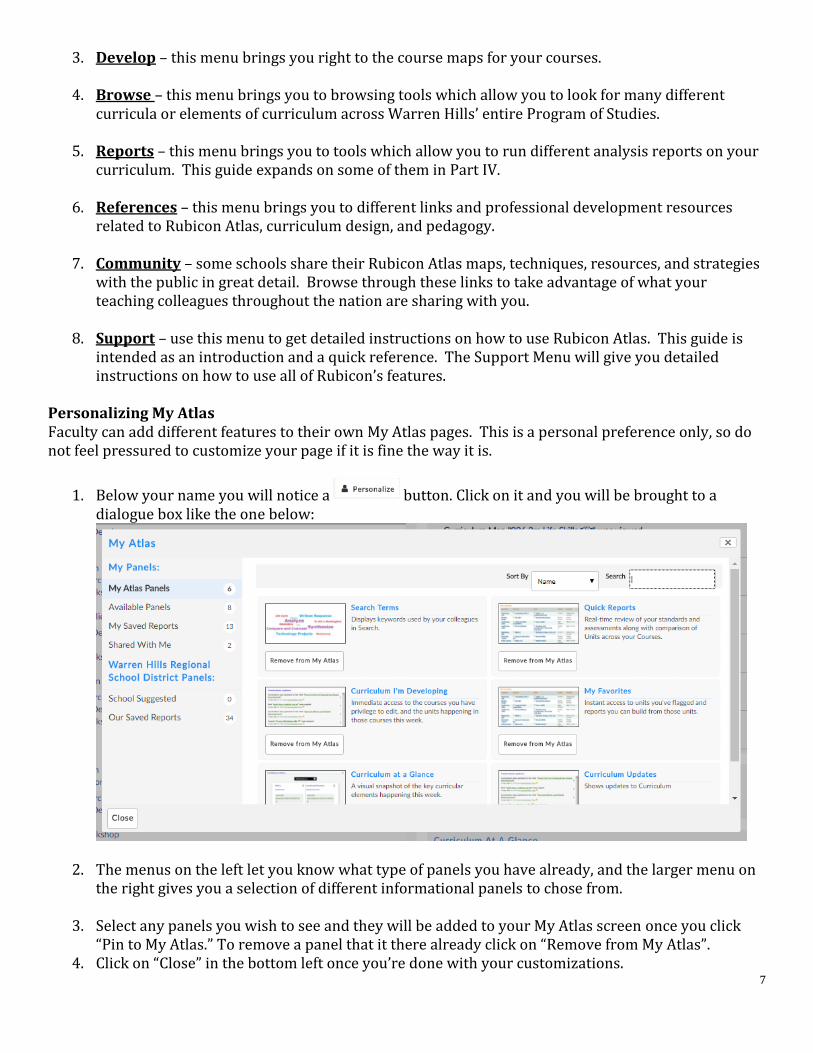
1. Below your name you will notice a button. Click on it and you will be brought to a dialogue box like the one below:
2. The menus on the left let you know what type of panels you have already, and the larger menu on the right gives you a selection of different informational panels to chose from.
3. Select any panels you wish to see and they will be added to your My Atlas screen once you click “Pin to My Atlas.” To remove a panel that it there already click on “Remove from My Atlas”.
4. Click on “Close” in the bottom left once you’re done with your customizations.
8
5. To move the panels around on My Atlas, hover your mouse pointer over the bar at the top of the
tile until it turns into a 4-pointed cursor. Drag and drop your tile where you want it. Updating Your Personal Settings with My Settings Occasionally you may wish to change your password and refresh some of your personal settings for Rubicon Atlas. To do so you will use My Settings.
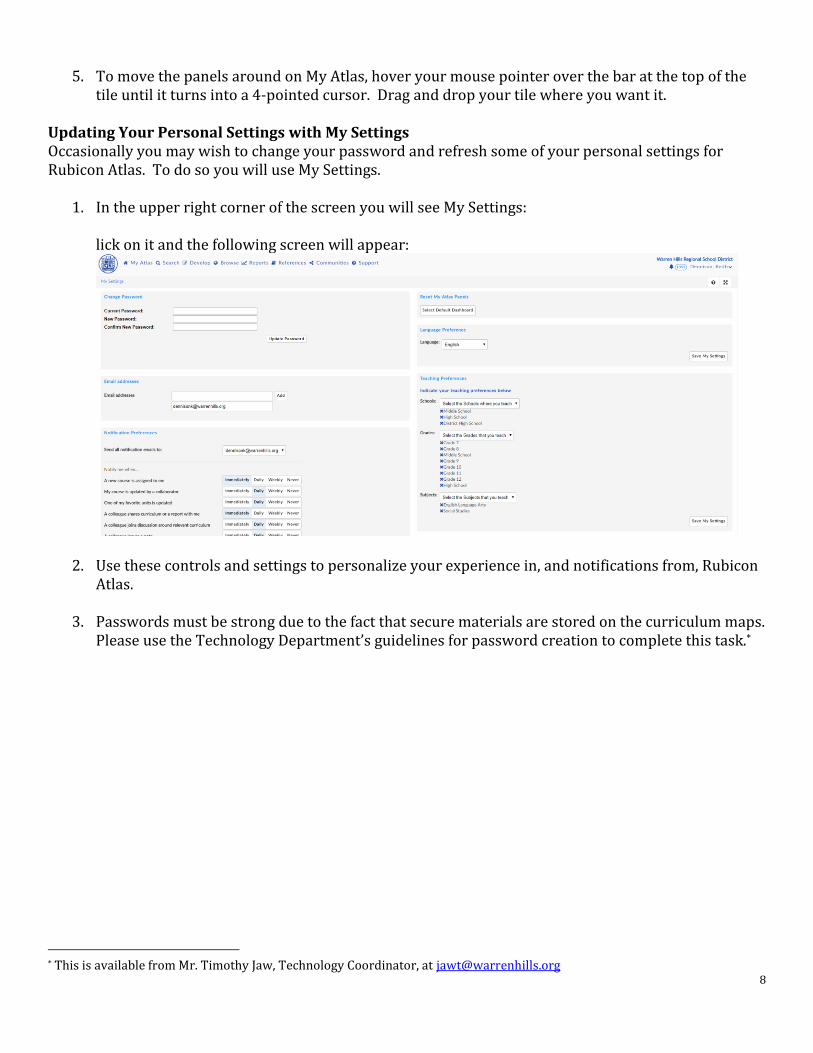
1. In the upper right corner of the screen you will see My Settings: lick on it and the following screen will appear:
2. Use these controls and settings to personalize your experience in, and notifications from, Rubicon Atlas.
3. Passwords must be strong due to the fact that secure materials are stored on the curriculum maps. Please use the Technology Department’s guidelines for password creation to complete this task.*
* This is available from Mr. Timothy Jaw, Technology Coordinator, at [email protected]
9
Part II Course Map and Unit Map Basics
In this section you will be introduced to the course map and the unit map. You will learn how
to add a unit to a course, how to select standards to be targeted and assessed in your unit, and enter Essential Questions, Content, and Skills into a unit map.
10
Editing Course and Unit Maps Most of the work you will be doing in Rubicon Atlas will be on your course and unit maps. Rubicon Atlas is very intuitive to use, and very user friendly. Below are the basics to get you started. If you need further instructions please see the Support Menu.
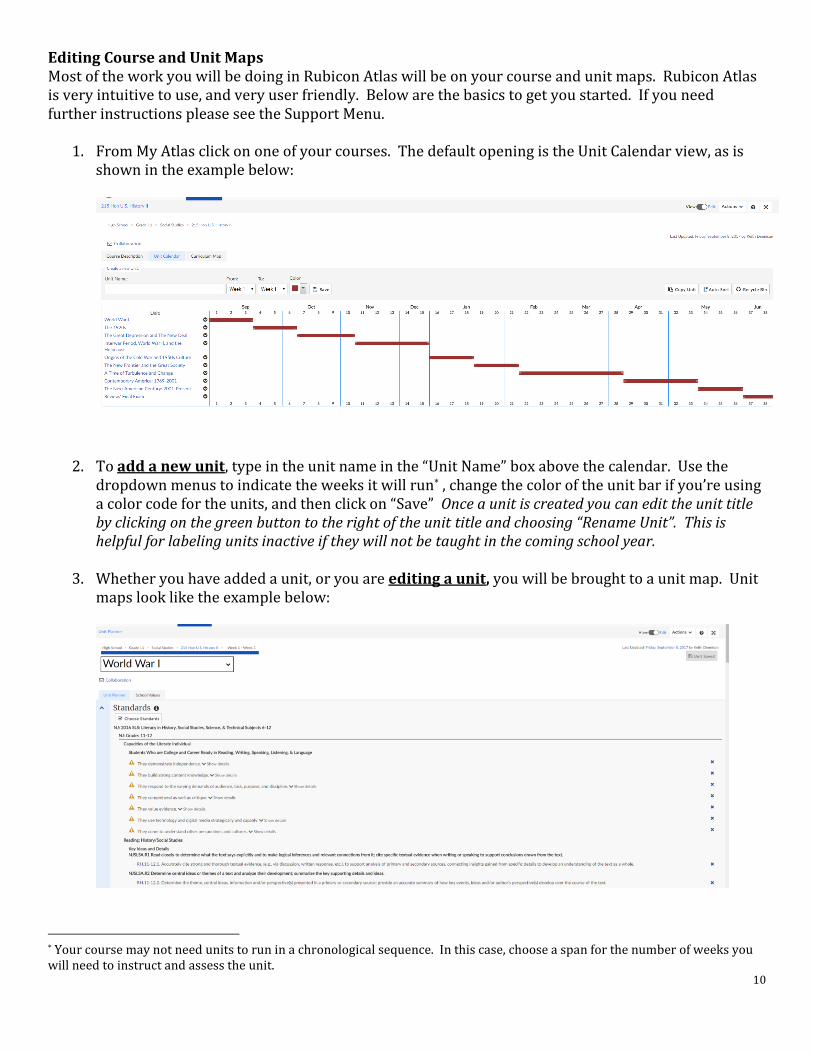
1. From My Atlas click on one of your courses. The default opening is the Unit Calendar view, as is shown in the example below:
2. To add a new unit, type in the unit name in the “Unit Name” box above the calendar. Use the dropdown menus to indicate the weeks it will run* , change the color of the unit bar if you’re using a color code for the units, and then click on “Save” Once a unit is created you can edit the unit title by clicking on the green button to the right of the unit title and choosing “Rename Unit”. This is helpful for labeling units inactive if they will not be taught in the coming school year.
3. Whether you have added a unit, or you are editing a unit, you will be brought to a unit map. Unit maps look like the example below:
* Your course may not need units to run in a chronological sequence. In this case, choose a span for the number of weeks you will need to instruct and assess the unit.

11
4. To switch between units in a course use the dropdown menu at the top of the page (where World War I is displayed in this example).
5. Each unit map has the following elements, in this order, as you scroll down the page: a. Standards b. Essential Questions c. Content d. Skills e. Suggested Assessments f. Suggested Activities g. Resources
Adding Standards to a Unit Map All standards that we use at Warren Hills as required by the New Jersey Department of Education are loaded into Rubicon Atlas. There are additional suggested standards developed by professional organizations such as National Council for the Social Studies that can be included in unit maps as appropriate. Please note the yellow triangle icons on the screen shot from the previous page. This indicates that this standard has been retired by the Department of Education and must be updated. This icon alerts faculty to the need to make that change as soon as is possible.
1. Click on the button and you will get a dialogue box similar to the one displayed here:
12
2. Under “Browse Standards” you will see a dropdown menu box. Click on it and filter the menus down until you arrive at the standards you need to target and assess in this unit.
3. Place checkmarks next to the standards that you are going to target and assess in this unit, and then hit “Save” at the bottom.
4. To remove a standard, click on blue X next to it. Hit “Save Unit” at the top or bottom of the unit map to keep that change.
Adding Essential Questions, Content, and Skills
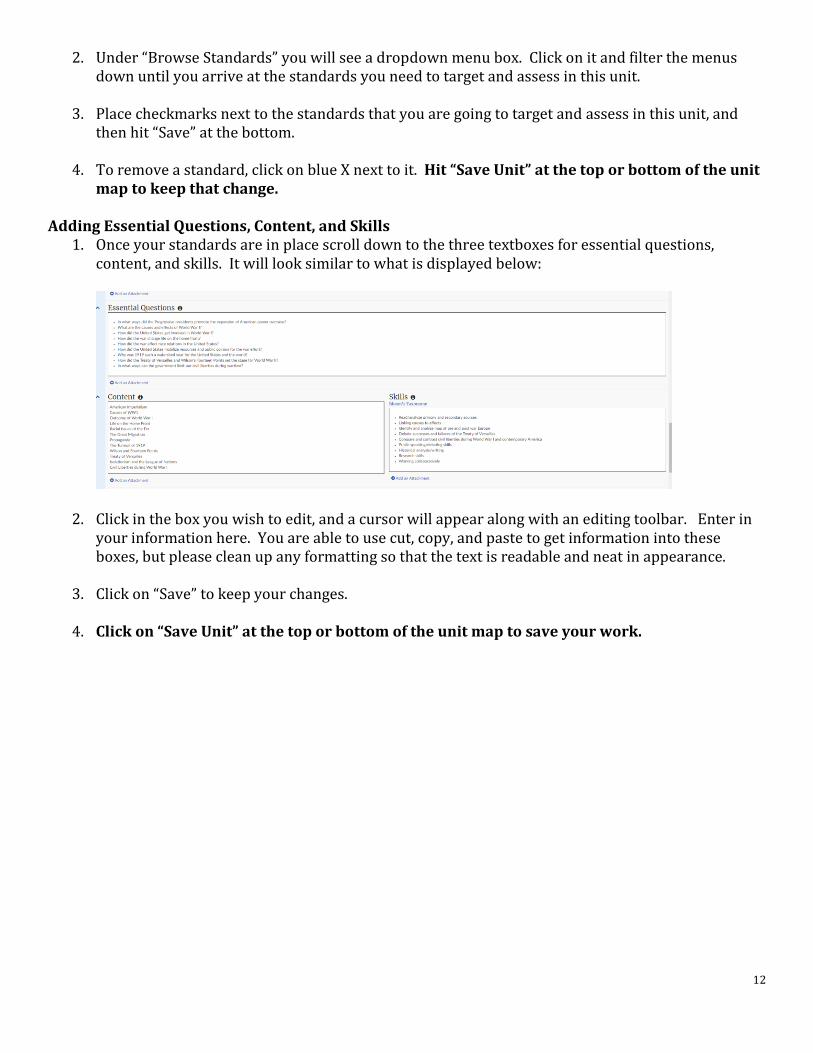
1. Once your standards are in place scroll down to the three textboxes for essential questions, content, and skills. It will look similar to what is displayed below:
2. Click in the box you wish to edit, and a cursor will appear along with an editing toolbar. Enter in your information here. You are able to use cut, copy, and paste to get information into these boxes, but please clean up any formatting so that the text is readable and neat in appearance.
3. Click on “Save” to keep your changes.
4. Click on “Save Unit” at the top or bottom of the unit map to save your work.
13
Part III Adding Assessments, Activities, and
Resources as Files into Unit Maps
In this section you will learn how to add files (any type of file) to a unit map or a course map.
Faculty should be uploading (adding) all course and unit assessments to their maps. Additionally faculty should be adding class activities and resources to their unit maps which reflect best practices. Faculty should also consider uploading activities and resources that students respond well to in their classes, in addition to those things that have a high impact on student learning and achievement.
14
Adding Assessments There is great benefit to adding your assessments to the unit maps in Rubicon Atlas for the courses that you teach:
1. They’re available to anyone currently teaching the course, as well as colleagues who will be teaching the course in the future.
2. They’re available to you whenever you want them, whenever you have Internet access. As you know faculty networked folders are only available on campus, but that may not fit the way you as an individual work.
3. Whenever you’re ready to use or revise the assessment you do not have to remember who had the file last.
Note: Assessments, class activities, and resources are never published to the district maps which are available to the public. Placing the assessments in Rubicon Atlas never compromises their security. Process
1. Select the Collaborative Map from My Atlas for the course you wish to edit. It’s indicated by an icon a handshake:
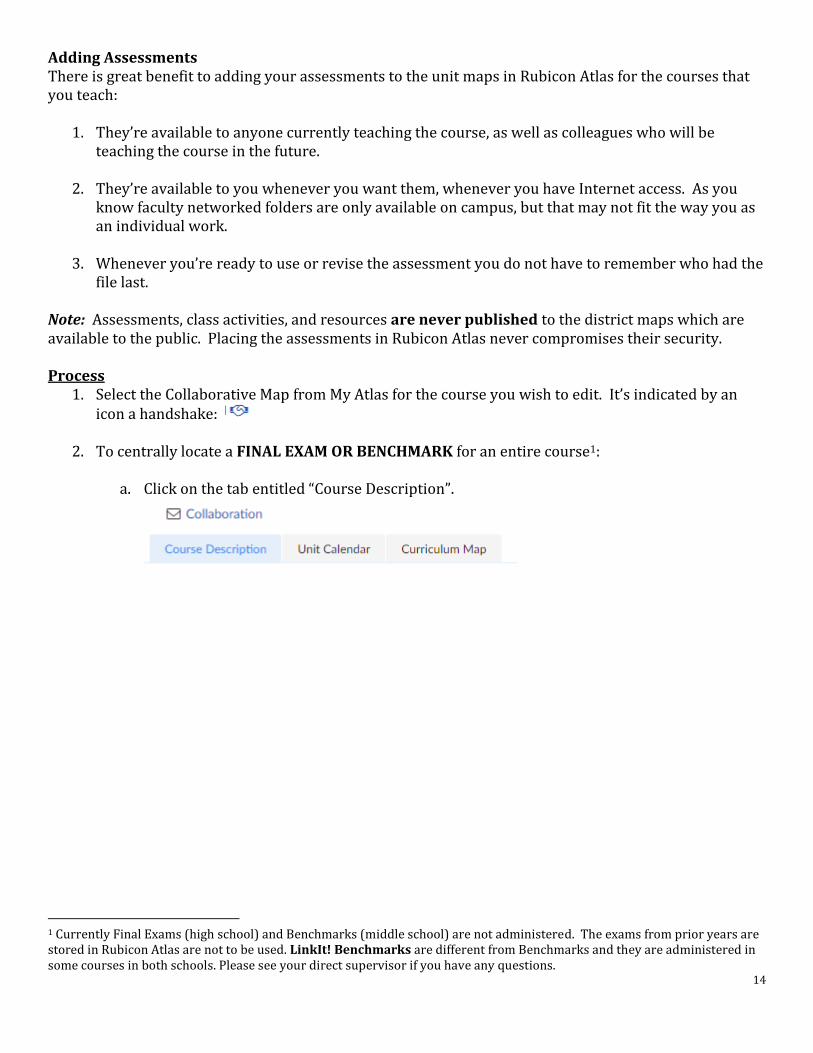
2. To centrally locate a FINAL EXAM OR BENCHMARK for an entire course1:
a. Click on the tab entitled “Course Description”.
1 Currently Final Exams (high school) and Benchmarks (middle school) are not administered. The exams from prior years are stored in Rubicon Atlas are not to be used. LinkIt! Benchmarks are different from Benchmarks and they are administered in some courses in both schools. Please see your direct supervisor if you have any questions.
15
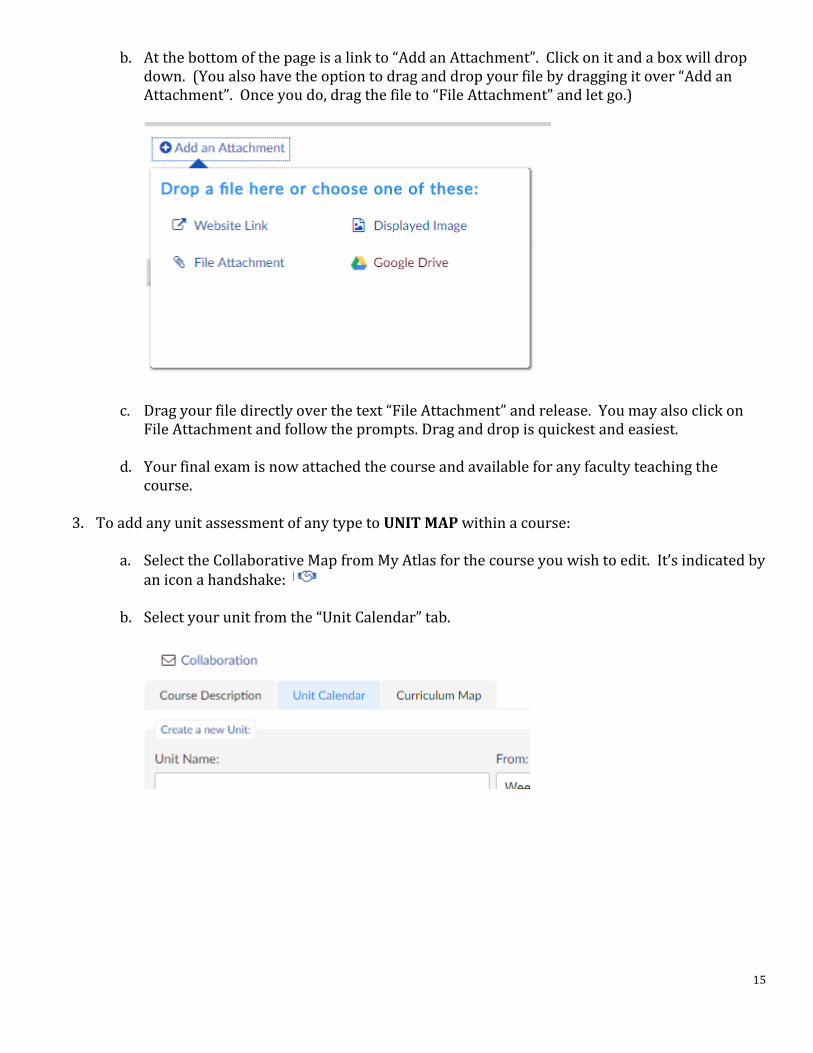
b. At the bottom of the page is a link to “Add an Attachment”. Click on it and a box will drop down. (You also have the option to drag and drop your file by dragging it over “Add an Attachment”. Once you do, drag the file to “File Attachment” and let go.)
c. Drag your file directly over the text “File Attachment” and release. You may also click on File Attachment and follow the prompts. Drag and drop is quickest and easiest.
d. Your final exam is now attached the course and available for any faculty teaching the course.
3. To add any unit assessment of any type to UNIT MAP within a course:
a. Select the Collaborative Map from My Atlas for the course you wish to edit. It’s indicated by an icon a handshake:
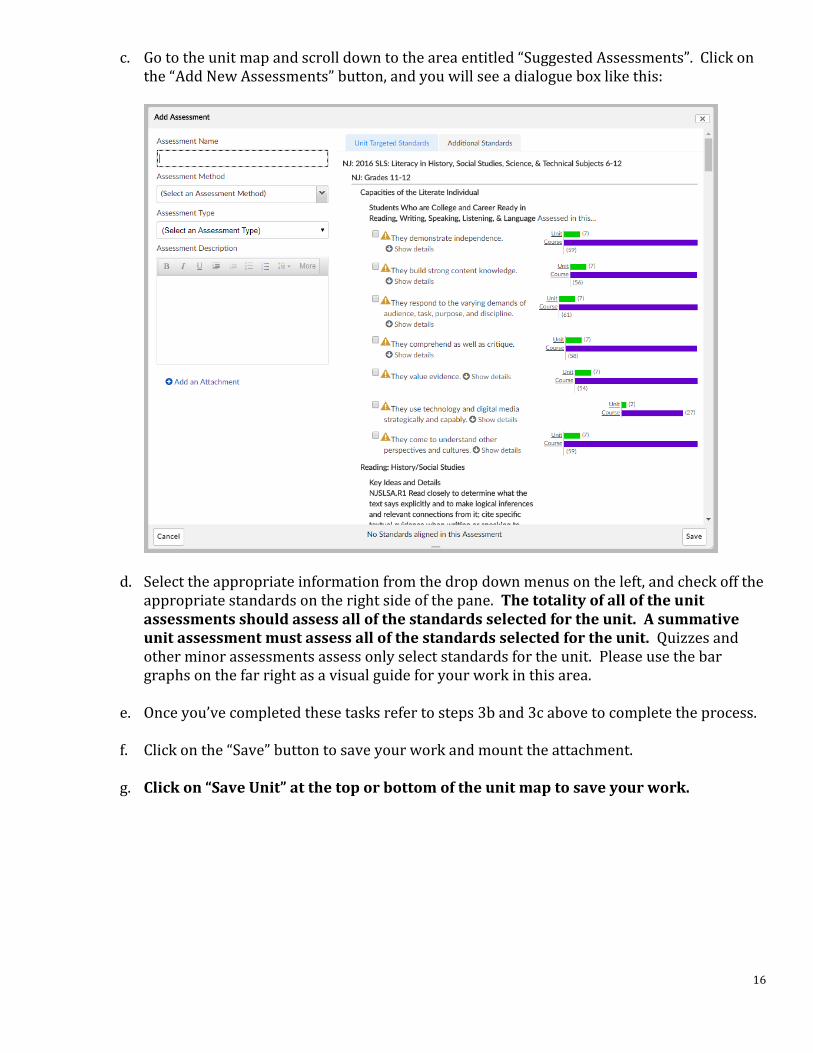
b. Select your unit from the “Unit Calendar” tab.
16
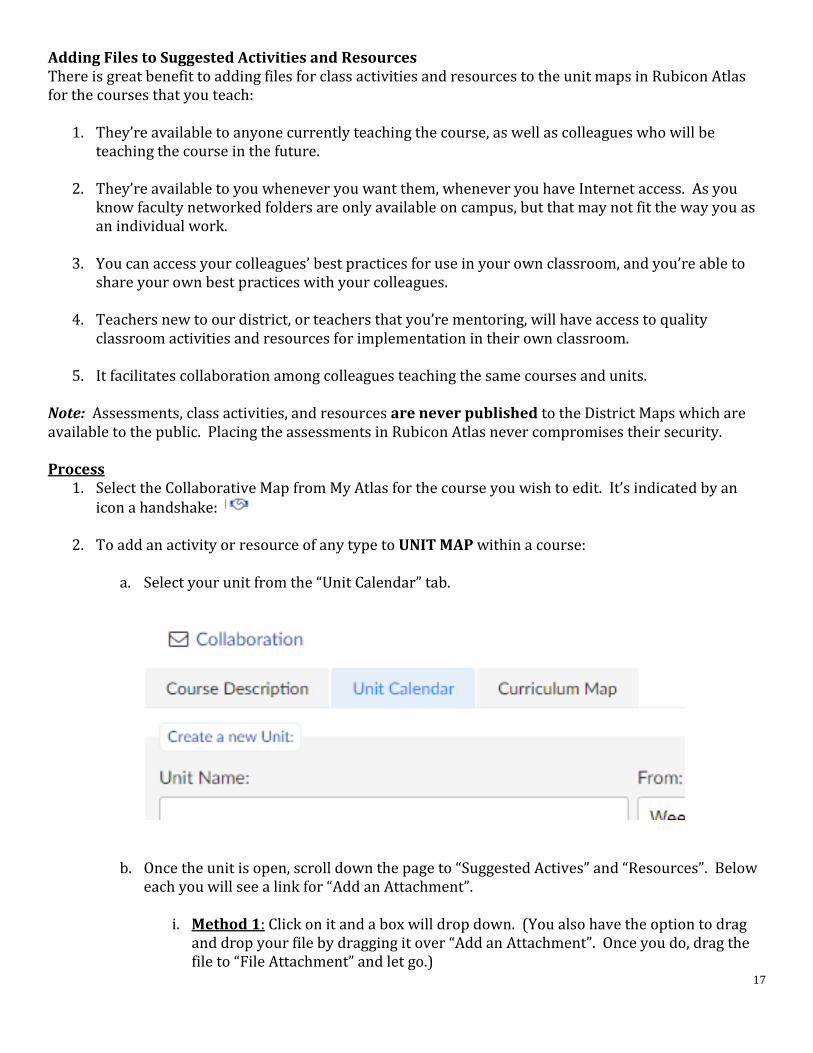
c. Go to the unit map and scroll down to the area entitled “Suggested Assessments”. Click on the “Add New Assessments” button, and you will see a dialogue box like this:
d. Select the appropriate information from the drop down menus on the left, and check off the appropriate standards on the right side of the pane. The totality of all of the unit assessments should assess all of the standards selected for the unit. A summative unit assessment must assess all of the standards selected for the unit. Quizzes and other minor assessments assess only select standards for the unit. Please use the bar graphs on the far right as a visual guide for your work in this area.
e. Once you’ve completed these tasks refer to steps 3b and 3c above to complete the process.
f. Click on the “Save” button to save your work and mount the attachment.
g. Click on “Save Unit” at the top or bottom of the unit map to save your work.
17
Adding Files to Suggested Activities and Resources There is great benefit to adding files for class activities and resources to the unit maps in Rubicon Atlas for the courses that you teach:
1. They’re available to anyone currently teaching the course, as well as colleagues who will be teaching the course in the future.
2. They’re available to you whenever you want them, whenever you have Internet access. As you know faculty networked folders are only available on campus, but that may not fit the way you as an individual work.
3. You can access your colleagues’ best practices for use in your own classroom, and you’re able to share your own best practices with your colleagues.
4. Teachers new to our district, or teachers that you’re mentoring, will have access to quality classroom activities and resources for implementation in their own classroom.
5. It facilitates collaboration among colleagues teaching the same courses and units. Note: Assessments, class activities, and resources are never published to the District Maps which are available to the public. Placing the assessments in Rubicon Atlas never compromises their security. Process
1. Select the Collaborative Map from My Atlas for the course you wish to edit. It’s indicated by an icon a handshake:
2. To add an activity or resource of any type to UNIT MAP within a course:
a. Select your unit from the “Unit Calendar” tab.
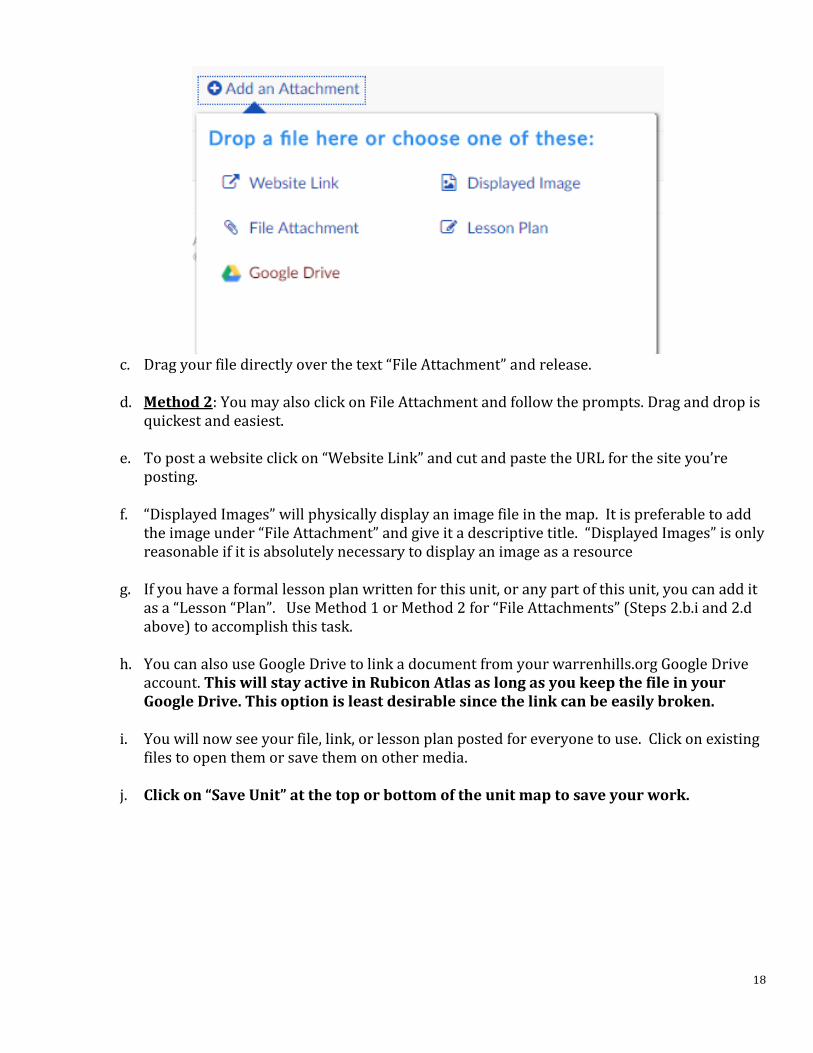
b. Once the unit is open, scroll down the page to “Suggested Actives” and “Resources”. Below each you will see a link for “Add an Attachment”.
i. Method 1: Click on it and a box will drop down. (You also have the option to drag and drop your file by dragging it over “Add an Attachment”. Once you do, drag the file to “File Attachment” and let go.)
18
c. Drag your file directly over the text “File Attachment” and release.
d. Method 2: You may also click on File Attachment and follow the prompts. Drag and drop is
quickest and easiest.
e. To post a website click on “Website Link” and cut and paste the URL for the site you’re posting.
f. “Displayed Images” will physically display an image file in the map. It is preferable to add the image under “File Attachment” and give it a descriptive title. “Displayed Images” is only reasonable if it is absolutely necessary to display an image as a resource
g. If you have a formal lesson plan written for this unit, or any part of this unit, you can add it as a “Lesson “Plan”. Use Method 1 or Method 2 for “File Attachments” (Steps 2.b.i and 2.d above) to accomplish this task.
h. You can also use Google Drive to link a document from your warrenhills.org Google Drive account. This will stay active in Rubicon Atlas as long as you keep the file in your Google Drive. This option is least desirable since the link can be easily broken.
i. You will now see your file, link, or lesson plan posted for everyone to use. Click on existing
files to open them or save them on other media.
j. Click on “Save Unit” at the top or bottom of the unit map to save your work.
19
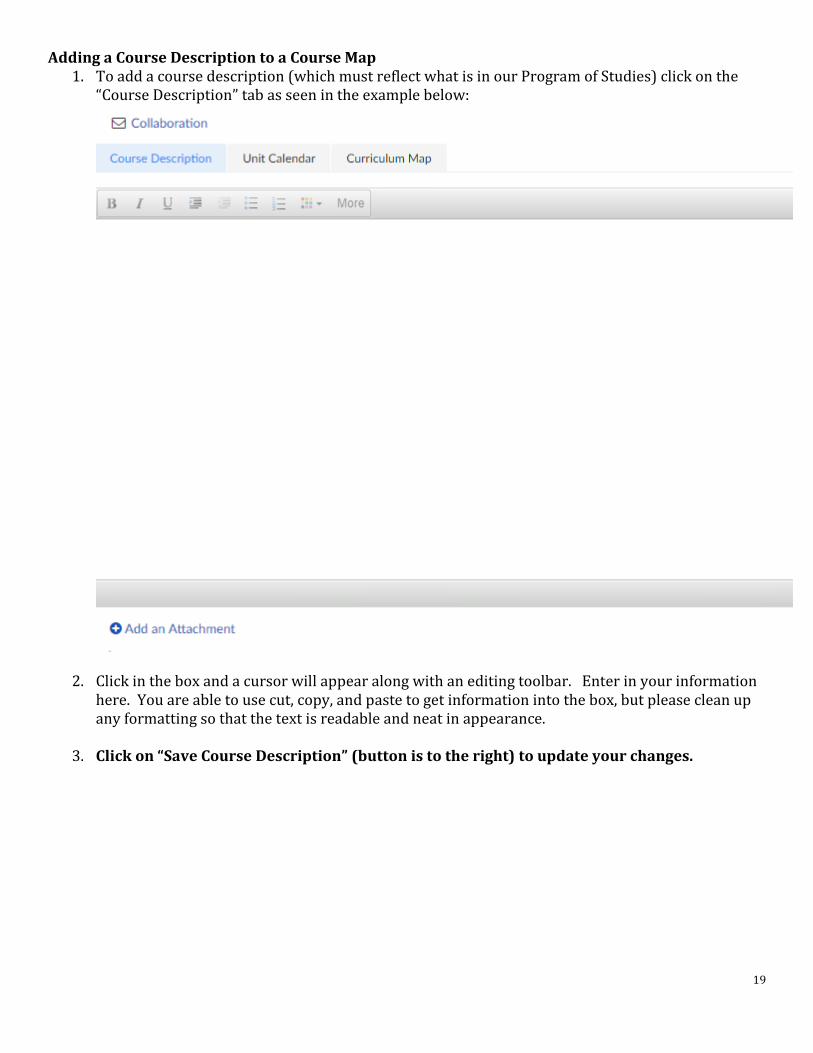
Adding a Course Description to a Course Map 1. To add a course description (which must reflect what is in our Program of Studies) click on the
“Course Description” tab as seen in the example below:
2. Click in the box and a cursor will appear along with an editing toolbar. Enter in your information here. You are able to use cut, copy, and paste to get information into the box, but please clean up any formatting so that the text is readable and neat in appearance.
3. Click on “Save Course Description” (button is to the right) to update your changes.

20
Part IV Running Standards Analysis
& Scope and Sequence Reports
In this section you will learn how to run, save, and share two different reports. Standards
Analysis reports lets the faculty know how well aligned a course is to the required standards, and how many of the targeted standards are being assessed across all of the assessments for a course or unit. Scope and Sequence reports allow faculty to run horizontal and vertical comparisons of courses in the program of study to ensure proper rigor and pacing.
21
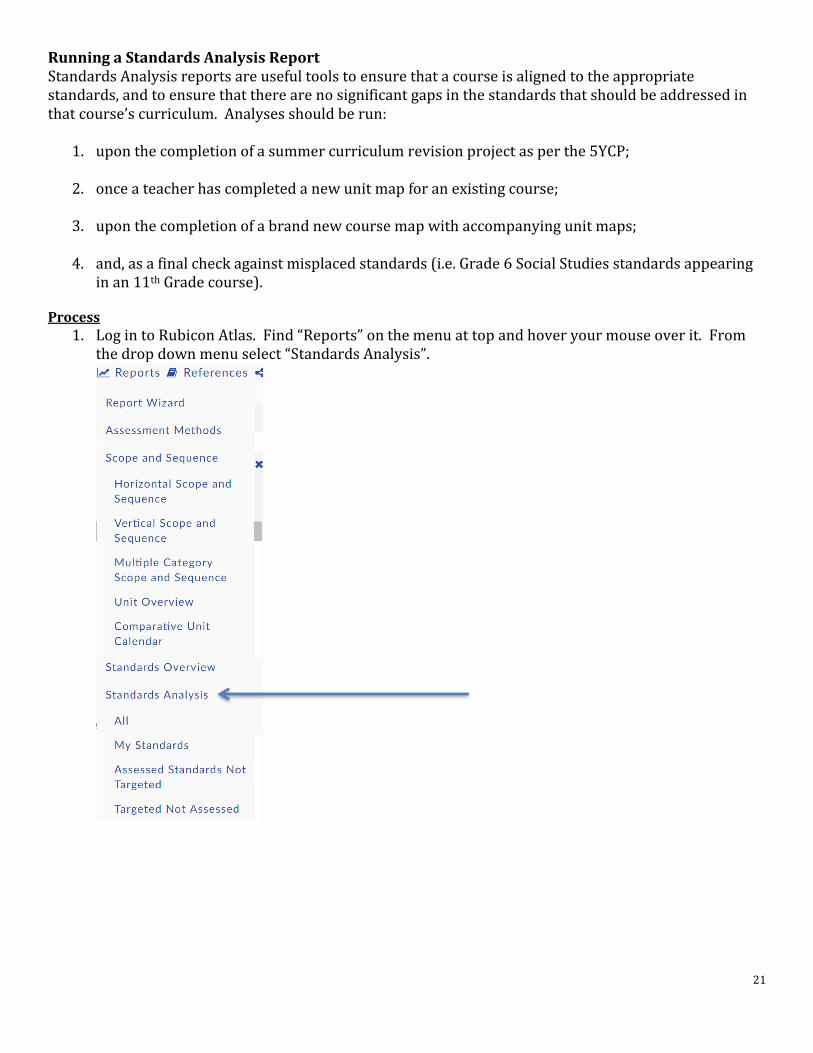
Running a Standards Analysis Report Standards Analysis reports are useful tools to ensure that a course is aligned to the appropriate standards, and to ensure that there are no significant gaps in the standards that should be addressed in that course’s curriculum. Analyses should be run:
1. upon the completion of a summer curriculum revision project as per the 5YCP;
2. once a teacher has completed a new unit map for an existing course;
3. upon the completion of a brand new course map with accompanying unit maps;
4. and, as a final check against misplaced standards (i.e. Grade 6 Social Studies standards appearing in an 11th Grade course).
Process
1. Log in to Rubicon Atlas. Find “Reports” on the menu at top and hover your mouse over it. From the drop down menu select “Standards Analysis”.
22
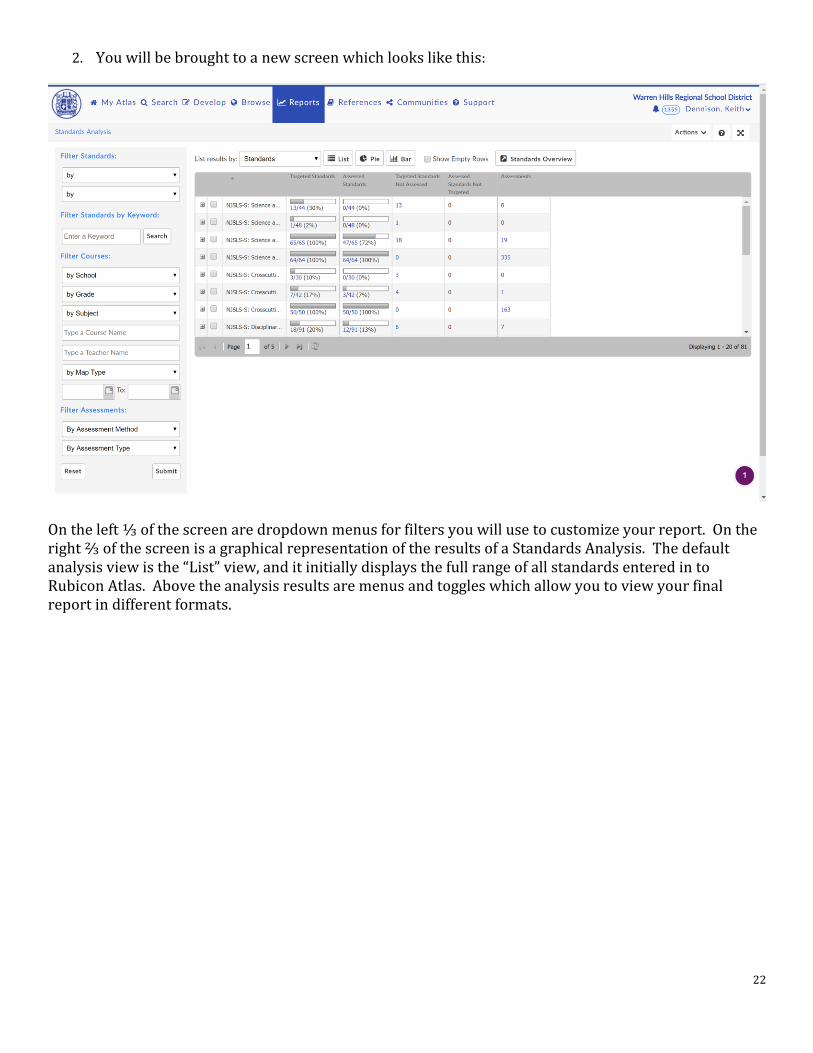
2. You will be brought to a new screen which looks like this:
On the left ⅓ of the screen are dropdown menus for filters you will use to customize your report. On the right ⅔ of the screen is a graphical representation of the results of a Standards Analysis. The default analysis view is the “List” view, and it initially displays the full range of all standards entered in to Rubicon Atlas. Above the analysis results are menus and toggles which allow you to view your final report in different formats.
23
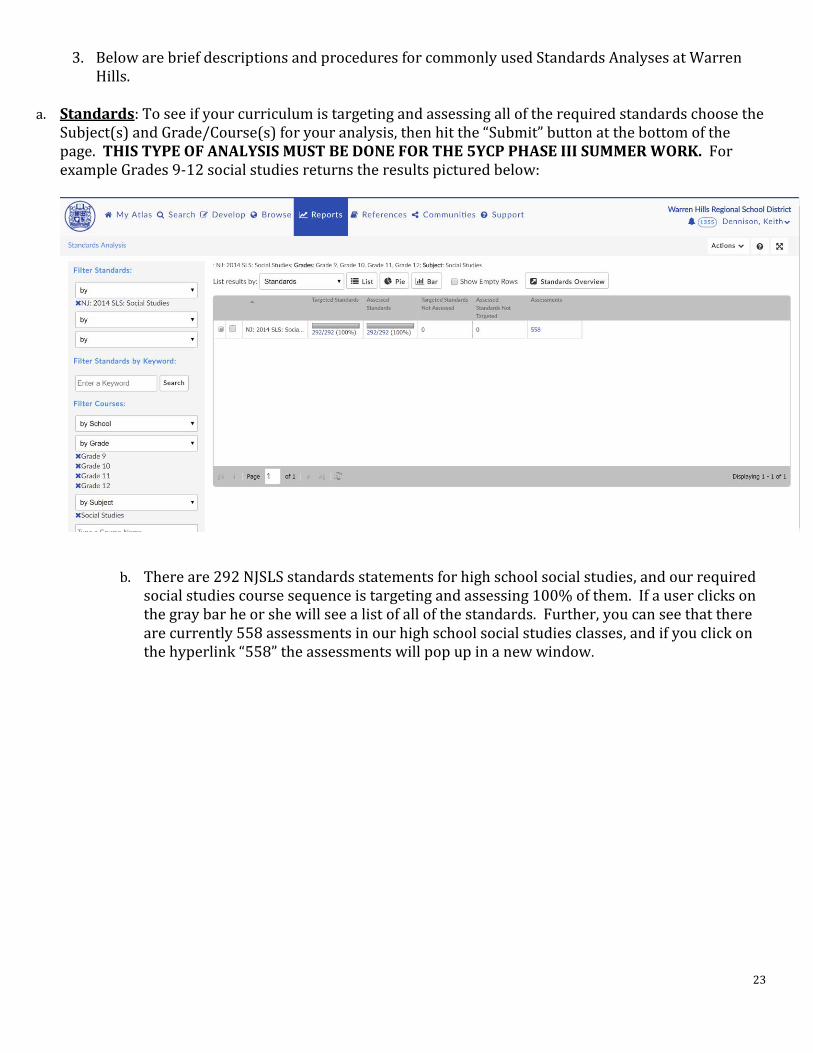
3. Below are brief descriptions and procedures for commonly used Standards Analyses at Warren Hills.
a. Standards: To see if your curriculum is targeting and assessing all of the required standards choose the Subject(s) and Grade/Course(s) for your analysis, then hit the “Submit” button at the bottom of the page. THIS TYPE OF ANALYSIS MUST BE DONE FOR THE 5YCP PHASE III SUMMER WORK. For example Grades 9-12 social studies returns the results pictured below:
b. There are 292 NJSLS standards statements for high school social studies, and our required social studies course sequence is targeting and assessing 100% of them. If a user clicks on the gray bar he or she will see a list of all of the standards. Further, you can see that there are currently 558 assessments in our high school social studies classes, and if you click on the hyperlink “558” the assessments will pop up in a new window.
24
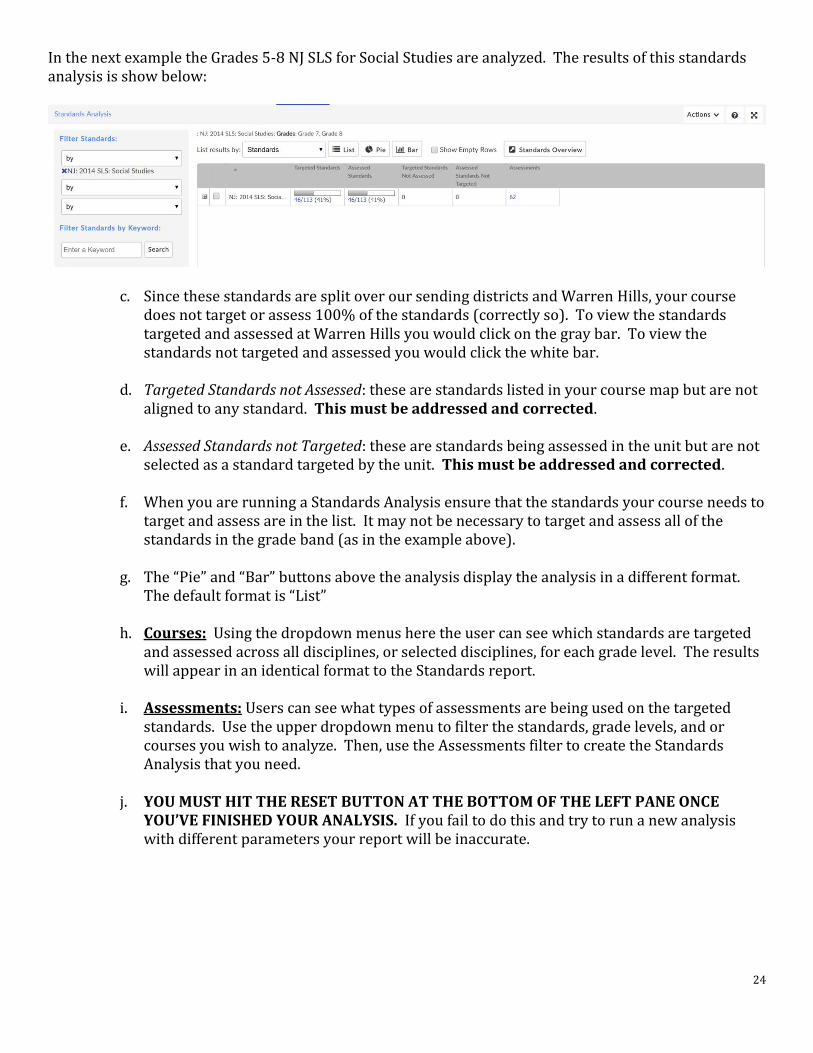
In the next example the Grades 5-8 NJ SLS for Social Studies are analyzed. The results of this standards analysis is show below:
c. Since these standards are split over our sending districts and Warren Hills, your course does not target or assess 100% of the standards (correctly so). To view the standards targeted and assessed at Warren Hills you would click on the gray bar. To view the standards not targeted and assessed you would click the white bar.
d. Targeted Standards not Assessed: these are standards listed in your course map but are not aligned to any standard. This must be addressed and corrected.
e. Assessed Standards not Targeted: these are standards being assessed in the unit but are not selected as a standard targeted by the unit. This must be addressed and corrected.
f. When you are running a Standards Analysis ensure that the standards your course needs to target and assess are in the list. It may not be necessary to target and assess all of the standards in the grade band (as in the example above).
g. The “Pie” and “Bar” buttons above the analysis display the analysis in a different format. The default format is “List”
h. Courses: Using the dropdown menus here the user can see which standards are targeted and assessed across all disciplines, or selected disciplines, for each grade level. The results will appear in an identical format to the Standards report.
i. Assessments: Users can see what types of assessments are being used on the targeted standards. Use the upper dropdown menu to filter the standards, grade levels, and or courses you wish to analyze. Then, use the Assessments filter to create the Standards Analysis that you need.
j. YOU MUST HIT THE RESET BUTTON AT THE BOTTOM OF THE LEFT PANE ONCE YOU’VE FINISHED YOUR ANALYSIS. If you fail to do this and try to run a new analysis with different parameters your report will be inaccurate.

25
Saving and Sharing Standards Analysis Reports Users can save their reports, or share them with other faculty and colleagues. Once you have your report generated, look for the “Actions” button at the top right of the report. Click on it and you will see a menu like the one below:
You have a few options available to you for saving and sharing reports:
1. Save: this saves the report to your Atlas account. You access it by visiting the same menu and clicking on “Open Saved Report”, or by using the My Atlas menu.
2. Personalize My Atlas – This brings you to the Personalization screen (see Section 1) and shows you where the report has been saved to the “My Saved Reports” section of the personalization pane. You can select it from there and it will be pinned to My Atlas. This allows you the flexibility of going back to My Saved Reports to get it again in the future.
3. Pin to My Atlas: this places the report as a tile on your default welcome screen. Whenever you log into Atlas it will be displayed in My Atlas.
4. Share Report: this allows you to share the report with colleagues and faculty through Rubicon Atlas’ messenger system. Follow the prompts given after you click on “Share Report” to complete this task.
5. Print: prints out a hard copy of the report.
6. Export to Word and Export to Excel: this allows you to export your report into Microsoft Word or Microsoft Excel. From here you can save it to storage media of your choice.
26
Running a Scope and Sequence Report Rubicon Atlas allows users to run horizontal and vertical scope and sequence analyses for our courses. These analyses are useful in many ways:
1. horizontal scope and sequence allows faculty to ensure proper rigor and coverage by comparing different levels of the same course;
2. vertical scope and sequence allows faculty to ensure that there are no gaps in the progression of the field of study;
3. vertical scope and sequence also allows faculty to ensure minimal duplication of the skills and content taught between two or more courses in a sequence;
4. and, finally both types of analyses allow faculty to understand a particular course’s role, scope, breadth, and coverage within an entire field of study.
Process
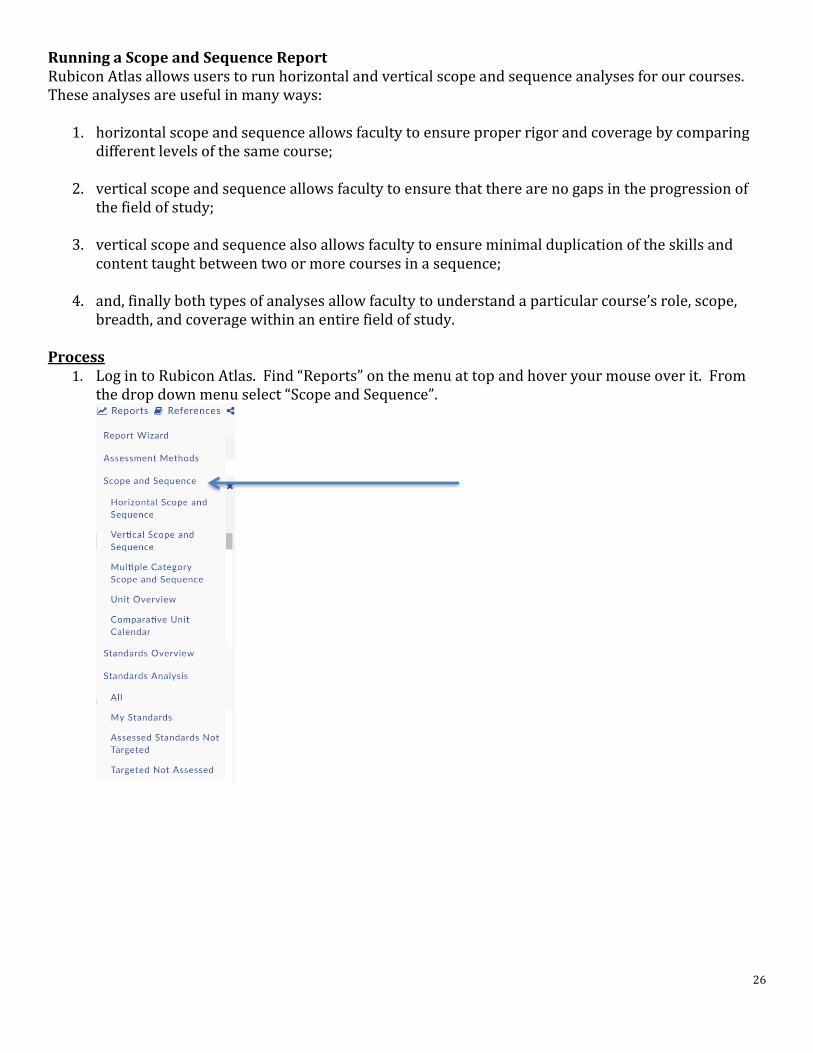
1. Log in to Rubicon Atlas. Find “Reports” on the menu at top and hover your mouse over it. From the drop down menu select “Scope and Sequence”.
27
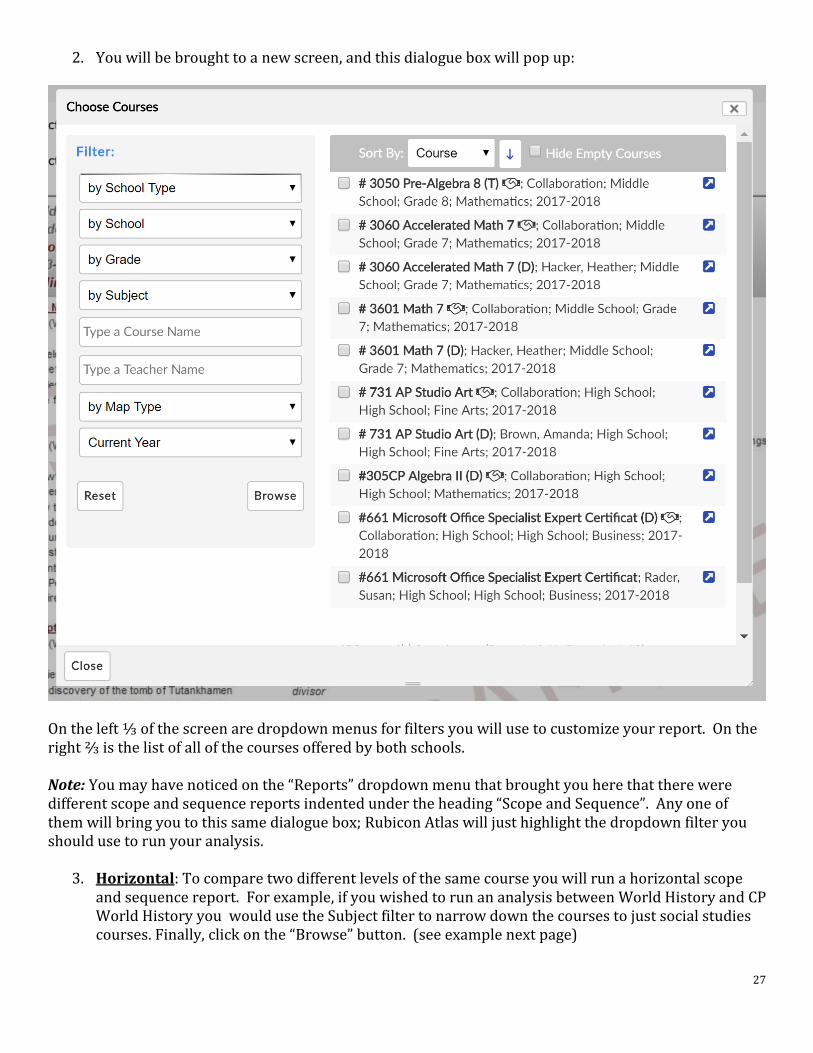
2. You will be brought to a new screen, and this dialogue box will pop up:
On the left ⅓ of the screen are dropdown menus for filters you will use to customize your report. On the right ⅔ is the list of all of the courses offered by both schools. Note: You may have noticed on the “Reports” dropdown menu that brought you here that there were different scope and sequence reports indented under the heading “Scope and Sequence”. Any one of them will bring you to this same dialogue box; Rubicon Atlas will just highlight the dropdown filter you should use to run your analysis.
3. Horizontal: To compare two different levels of the same course you will run a horizontal scope and sequence report. For example, if you wished to run an analysis between World History and CP World History you would use the Subject filter to narrow down the courses to just social studies courses. Finally, click on the “Browse” button. (see example next page)
28
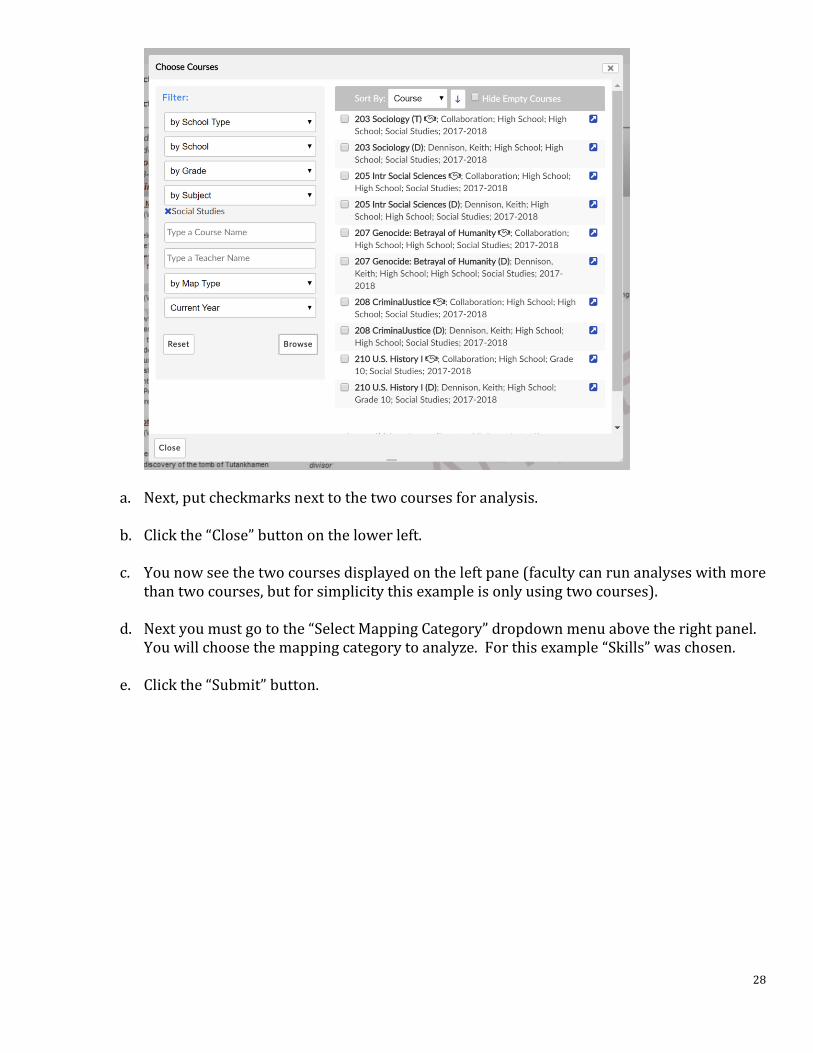
a. Next, put checkmarks next to the two courses for analysis.
b. Click the “Close” button on the lower left.
c. You now see the two courses displayed on the left pane (faculty can run analyses with more than two courses, but for simplicity this example is only using two courses).
d. Next you must go to the “Select Mapping Category” dropdown menu above the right panel. You will choose the mapping category to analyze. For this example “Skills” was chosen.
e. Click the “Submit” button.
29
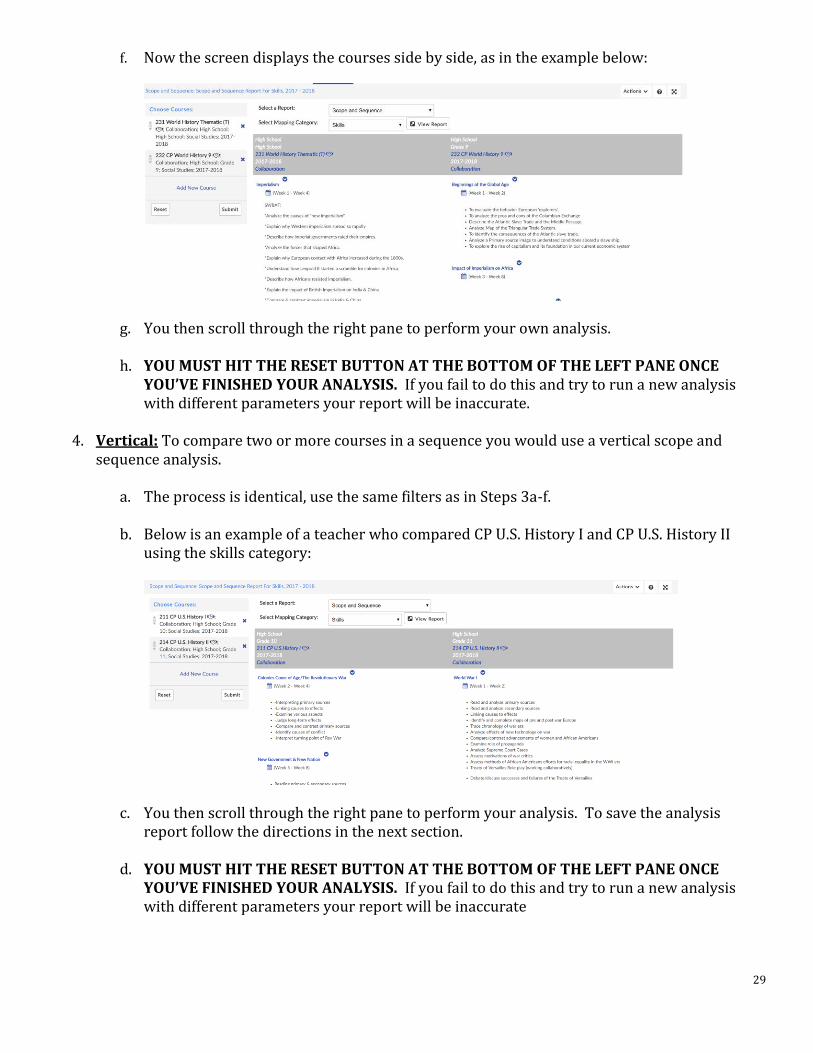
f. Now the screen displays the courses side by side, as in the example below:
g. You then scroll through the right pane to perform your own analysis.
h. YOU MUST HIT THE RESET BUTTON AT THE BOTTOM OF THE LEFT PANE ONCE YOU’VE FINISHED YOUR ANALYSIS. If you fail to do this and try to run a new analysis with different parameters your report will be inaccurate.
4. Vertical: To compare two or more courses in a sequence you would use a vertical scope and sequence analysis.
a. The process is identical, use the same filters as in Steps 3a-f.
b. Below is an example of a teacher who compared CP U.S. History I and CP U.S. History II using the skills category:
c. You then scroll through the right pane to perform your analysis. To save the analysis report follow the directions in the next section.
d. YOU MUST HIT THE RESET BUTTON AT THE BOTTOM OF THE LEFT PANE ONCE YOU’VE FINISHED YOUR ANALYSIS. If you fail to do this and try to run a new analysis with different parameters your report will be inaccurate
30
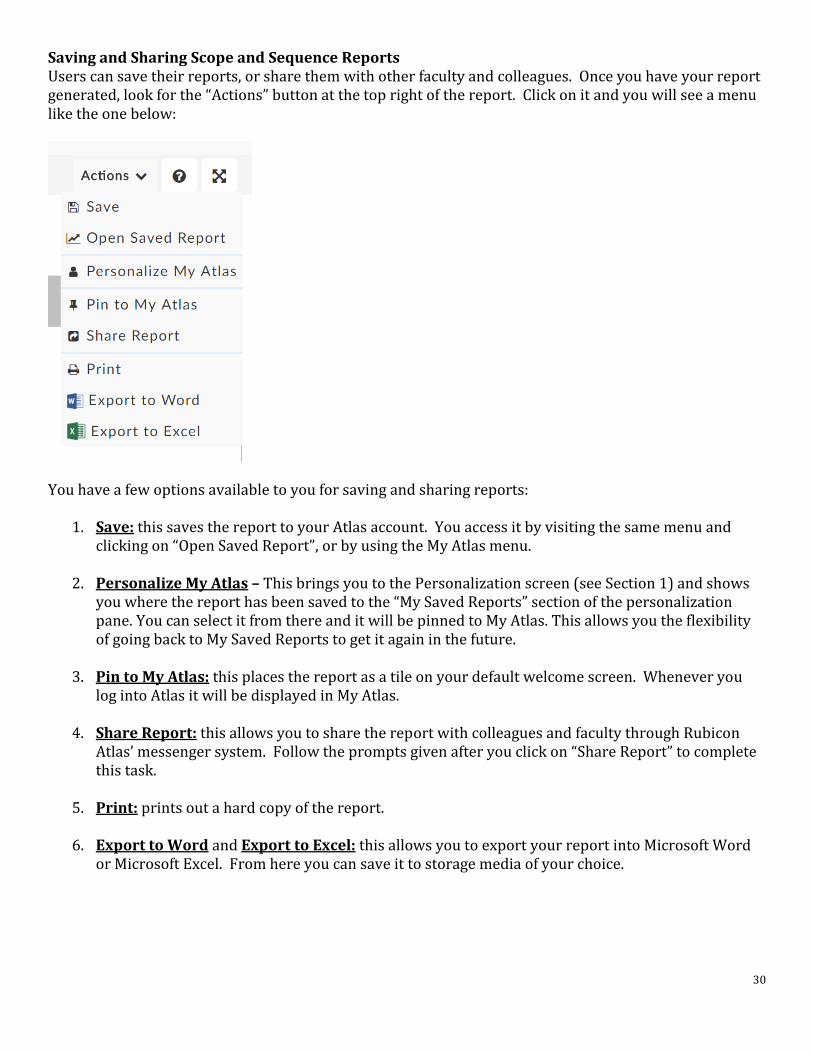
Saving and Sharing Scope and Sequence Reports Users can save their reports, or share them with other faculty and colleagues. Once you have your report generated, look for the “Actions” button at the top right of the report. Click on it and you will see a menu like the one below:
You have a few options available to you for saving and sharing reports:
1. Save: this saves the report to your Atlas account. You access it by visiting the same menu and clicking on “Open Saved Report”, or by using the My Atlas menu.
2. Personalize My Atlas – This brings you to the Personalization screen (see Section 1) and shows you where the report has been saved to the “My Saved Reports” section of the personalization pane. You can select it from there and it will be pinned to My Atlas. This allows you the flexibility of going back to My Saved Reports to get it again in the future.
3. Pin to My Atlas: this places the report as a tile on your default welcome screen. Whenever you log into Atlas it will be displayed in My Atlas.
4. Share Report: this allows you to share the report with colleagues and faculty through Rubicon Atlas’ messenger system. Follow the prompts given after you click on “Share Report” to complete this task.
5. Print: prints out a hard copy of the report.
6. Export to Word and Export to Excel: this allows you to export your report into Microsoft Word or Microsoft Excel. From here you can save it to storage media of your choice.