THE GHOST HOUSE ASSEMBLY INSTRUCTIONS page1.ravensblight.com/0826GhostHouseINST.pdf · Starting to...
10
THE GHOST HOUSE – ASSEMBLY INSTRUCTIONS page1. (CONTINUED ON NEXT PAGE)
-
Upload
nguyenxuyen -
Category
Documents
-
view
217 -
download
2
Transcript of THE GHOST HOUSE ASSEMBLY INSTRUCTIONS page1.ravensblight.com/0826GhostHouseINST.pdf · Starting to...
THE GHOST HOUSE – ASSEMBLY INSTRUCTIONS page1.
(CONTINUED ON NEXT PAGE)
THE GHOST HOUSE – ASSEMBLY INSTRUCTIONS page2.
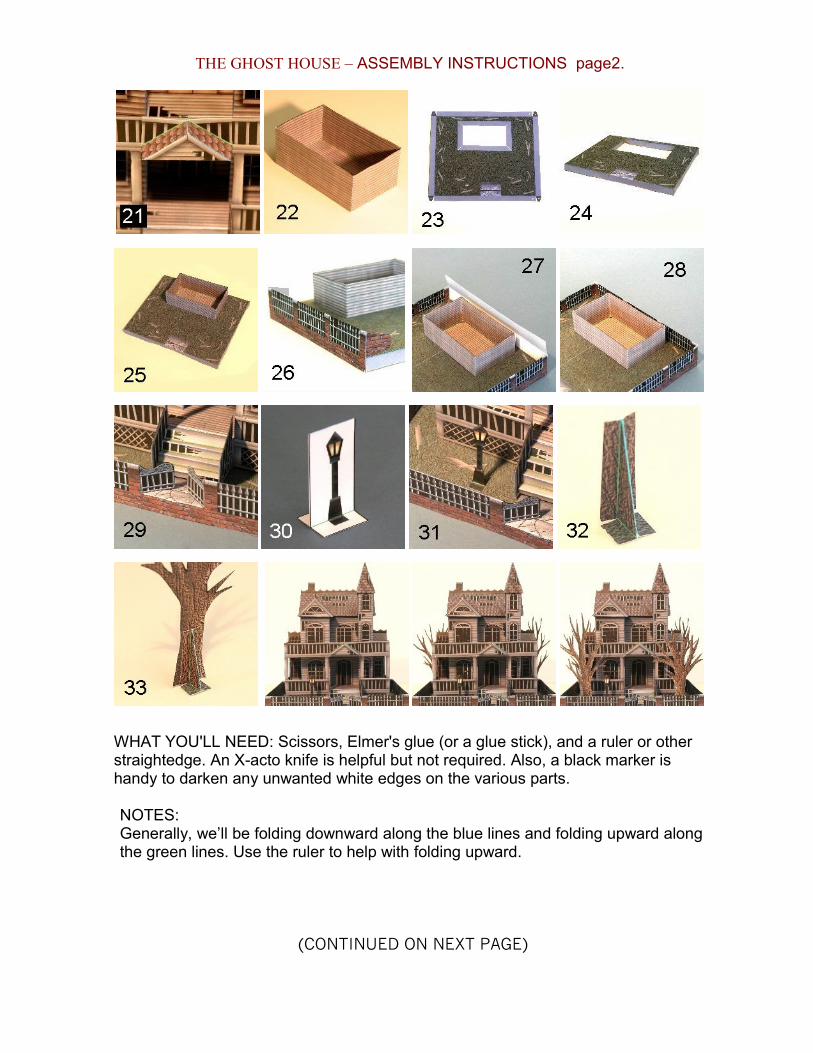
WHAT YOU'LL NEED: Scissors, Elmer's glue (or a glue stick), and a ruler or other straightedge. An X-acto knife is helpful but not required. Also, a black marker is handy to darken any unwanted white edges on the various parts.
NOTES: Generally, we’ll be folding downward along the blue lines and folding upward along the green lines. Use the ruler to help with folding upward.
(CONTINUED ON NEXT PAGE)
THE GHOST HOUSE – ASSEMBLY INSTRUCTIONS page3.
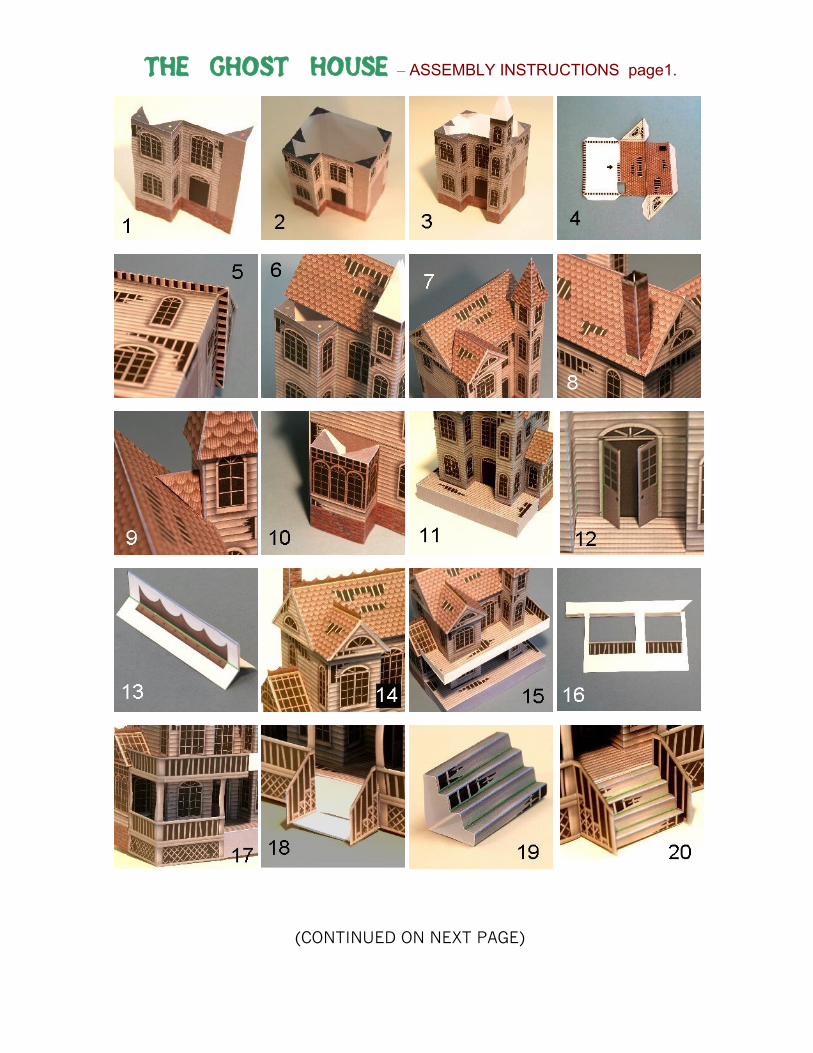
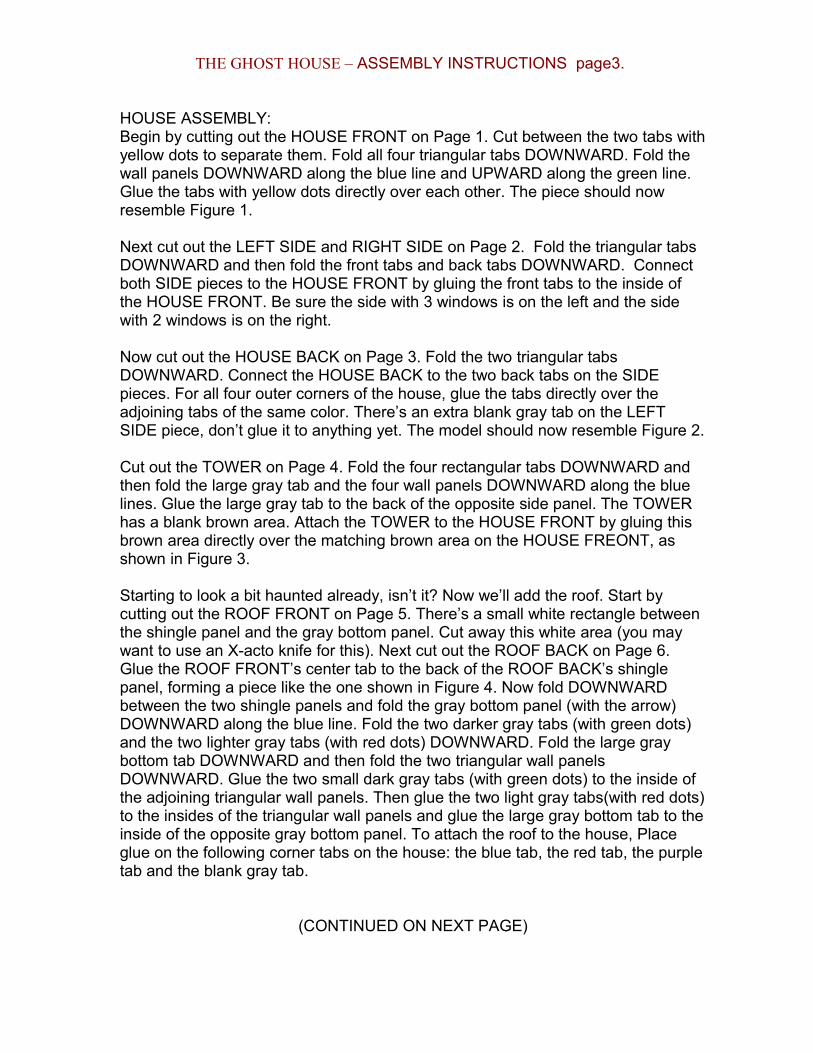
HOUSE ASSEMBLY:Begin by cutting out the HOUSE FRONT on Page 1. Cut between the two tabs with yellow dots to separate them. Fold all four triangular tabs DOWNWARD. Fold the wall panels DOWNWARD along the blue line and UPWARD along the green line. Glue the tabs with yellow dots directly over each other. The piece should now resemble Figure 1.
Next cut out the LEFT SIDE and RIGHT SIDE on Page 2. Fold the triangular tabs DOWNWARD and then fold the front tabs and back tabs DOWNWARD. Connect both SIDE pieces to the HOUSE FRONT by gluing the front tabs to the inside of the HOUSE FRONT. Be sure the side with 3 windows is on the left and the side with 2 windows is on the right.
Now cut out the HOUSE BACK on Page 3. Fold the two triangular tabs DOWNWARD. Connect the HOUSE BACK to the two back tabs on the SIDE pieces. For all four outer corners of the house, glue the tabs directly over the adjoining tabs of the same color. There’s an extra blank gray tab on the LEFT SIDE piece, don’t glue it to anything yet. The model should now resemble Figure 2.
Cut out the TOWER on Page 4. Fold the four rectangular tabs DOWNWARD and then fold the large gray tab and the four wall panels DOWNWARD along the blue lines. Glue the large gray tab to the back of the opposite side panel. The TOWER has a blank brown area. Attach the TOWER to the HOUSE FRONT by gluing this brown area directly over the matching brown area on the HOUSE FREONT, as shown in Figure 3.
Starting to look a bit haunted already, isn’t it? Now we’ll add the roof. Start by cutting out the ROOF FRONT on Page 5. There’s a small white rectangle between the shingle panel and the gray bottom panel. Cut away this white area (you may want to use an X-acto knife for this). Next cut out the ROOF BACK on Page 6. Glue the ROOF FRONT’s center tab to the back of the ROOF BACK’s shingle panel, forming a piece like the one shown in Figure 4. Now fold DOWNWARD between the two shingle panels and fold the gray bottom panel (with the arrow) DOWNWARD along the blue line. Fold the two darker gray tabs (with green dots) and the two lighter gray tabs (with red dots) DOWNWARD. Fold the large gray bottom tab DOWNWARD and then fold the two triangular wall panels DOWNWARD. Glue the two small dark gray tabs (with green dots) to the inside of the adjoining triangular wall panels. Then glue the two light gray tabs(with red dots) to the insides of the triangular wall panels and glue the large gray bottom tab to the inside of the opposite gray bottom panel. To attach the roof to the house, Place glue on the following corner tabs on the house: the blue tab, the red tab, the purple tab and the blank gray tab.
(CONTINUED ON NEXT PAGE)

THE GHOST HOUSE – ASSEMBLY INSTRUCTIONS page 4.
Place the roof in position (with the arrow on the bottom pointing towards the front of the house) and glue in place. This can be a little tricky, but it helps to use a large drop of glue on each corner, let it dry till it’s tacky, place the roof in position and then give it a while to dry. The rafters on the roof’s bottom panel should overhang the walls of the house as shown in Figure 5. It’s OK if there’s a small gap between the roof and the tower, we’ll be adding more there later. Note: The corner tabs with green and yellow dots should still be exposed, as shown in Figure 6.
After the roof is in place and the glue’s dry, cut out the UPSTAIRS ROOF on page 8. Fold all five tabs DOWNWARD and then fold DOWNWARD along the blue lines between the two shingle panels and between the shingle and bottom panels. Then fold the triangular wall panel DOWNWARD along the blue line. Glue the tab with the green dot to the inside of the adjoining shingle panel. Glue the tab with the red dot to the inside of the adjoining triangular wall panel. Now glue the blank gray tab to the inside of the adjoining shingle panel and glue the two tabs with blue dots directly over each other. Place glue on the house’s two remaining tabs (with the green and yellow dots) and on the UPSTAIRS ROOF’s tab (with the blue dot). Position the UPSTAIRS ROOF in the same manner as the main roof and glue in place.
Next cut out the TOWER ROOF on Page 3. Fold DOWNWARD along the blue lines between all five panels. Glue the blank brown panel to the inside of the opposite shingle panel. Glue the TOWER ROOF over the blank tabs on the TOWER. The model should now resemble Figure 7.
Now cut out the CHIMNEY on Page 6. Fold the gray tab DOWNWARD and then fold each brick panel DOWNWARD along the blue lines. Fold the four black tabs DOWNWARD and glue them to the back of the opposite panels. Fold the two small shingle panels UPWARD along the green lines. Then glue the gray tab to the inside of the opposite brick panel. Connect the CHIMNEY to the ROOF BACK by placing the chimney over the black rectangle and gluing the shingle panels directly above and below the black rectangle, as shown in Figure 8.
Next cut out the HALL ROOF on Page 6. Fold DOWNWARD between the two shingle panels (along the blue line) and then fold both gray panels DOWNWARD. Glue the two gray panels directly over each other. Place the HALL ROOF between the TOWER and the ROOF FRONT as shown in Figure 9, with the gray panel resting against the tower. Glue the gray panel to the tower.
(CONTINUED ON NEXT PAGE)

THE GHOST HOUSE – ASSEMBLY INSTRUCTIONS page 5.
The Ghost House has a solarium on the left side and a library on the right. They will both be constructed in the same way. We’ll start with the Solarium. Cut out the SOLARIUM on Page 7. Cut along the two white lines to separate the two sets of dark gray tabs from each other. Fold the two light gray tabs DOWNWARD and then fold the wall panels DOWNWARD along the two blue lines. Now fold the four dark gray tabs downward. Glue the two tabs with green dots directly over each other and then do the same for the two tabs with red dots. Place the SOLARIUM over the blank brown area on the left side of the house. Glue the two gray tabs to the brown area, as shown in figure 10.
After finishing the solarium, cut out the LIBRARY on Page 7 and assemble it in the same way as the solarium. Connect the LIBRARY to the blank brown area on the right side of the house.
Next cut out the SOLARIUM ROOF on Page 8. Fold the three gray tabs DOWNWARD. Fold the bottom and top panels DOWNWARD along the blue lines and then fold the triangular panel DOWNWARD. Glue the tab with the green dot to the inside of the adjoining top panel. Then glue the tab with the red dot to the inside of the triangular panel. Glue the blank gray tab to the inside of the adjoining top panel. Attach the SOLARIUM ROOF to the SOLARIUM by placing glue on the two SOLARIUM corners (with the green and red dots) and then attaching the SOLARIUM ROOF in the same manner as we did the main roof.
After attaching the solarium roof, cut out the LIBRARY ROOF on Page 8 and assemble it in the same way as the solarium roof. Connect the LIBRARY ROOF to the LIBRARY.
After the roof pieces have had time to dry securely, cut out the PORCH on Page 9. Cut along the white lines between the two sets of tabs with yellow dots. Fold the four tabs with yellow dots DOWNWARD. Then fold the tab with the green dot DOWNWARD and fold the two tabs with blue dots DOWNWARD. Fold the large gray front panel and the two gray side panels DOWNWARD. Glue the two tabs with blue dots to the inside of the large gray front panel. For each pair of tabs with yellow dots, glue one directly over the other. To attach the PORCH to the HOUSE FRONT, place glue on the tab with the green dot and the two corner tabs with yellow dots. Slide the PORCH into position as shown in Figure 11 and glue in place. The porch floor should set level with the top edge of the foundation bricks on the house.
(CONTINUED ON NEXT PAGE)

THE GHOST HOUSE – ASSEMBLY INSTRUCTIONS page 6.
Now’s a good time to add the front doors. Cut out the DOOR LEFT and DOOR RIGHT on Page 3. For each door, fold the wall panel UPWARD along the green line and then fold the outer door panel DOWNWARD along the blue line. Glue the outer door panel to the back of the inner door panel to make a two sided door. Place the DOOR LEFT and DOOR RIGHT in position, as shown in Figure 12, and glue the wall panels to the HOUSE FRONT. The doors are meant to be open at a slight angle so you can see a little darkness beyond them.
Next we’ll add the roof rails. There are five ROOF RAIL pieces on Page 9. For each piece: cut along the outside black lines to remove the piece from the page. Fold DOWNWARD along the blue center lines and fold UPWARD along the green lines. To assemble each piece: glue the inner panels (with the pointy metal) to the backs of each other but DO NOT glue the outer panels (with the rectangular metal strips) to each other. The pieces should now resemble Figure 13. Flatten the piece, cut away the white area, and then spread the rectangular metal strips back outward. Trim as needed. (You may want to darken the white edges of the roof rails with a black marker.) To connect the pieces to the roofs, place glue on the rectangular strips, place the rail over the top edge of the roof piece (with a rectangular strip on either side of the fold) and glue in place, as shown in Figure 14. The longest roof rail goes on the main roof. The roof rail with five points goes on the upstairs roof. The roof rail with two points goes on the hall roof (behind the tower). The roof rails with three points go on the solarium roof and the library roof.
Now cut out the DECK TOP on Page 10. Fold the tabs with yellow dots and the tabs with red dots UPWARD. Then fold the three panels with rails UPWARD. Fold the shingle panel and the solarium roof panel UPWARD. Fold the gray panel with the green dot and the outer wall panel both DOWNWARD. Glue the outer wall panel to the unprinted side of the gray panel with the green dot. Glue the tabs with red dots to the unprinted sides of the shingle and solarium roof panels. Glue the tabs with yellow dots to the unprinted side of the long front rail panel. Cut out the DECK BOTTOM on Page 10 and glue it to the unprinted underside of the DECK TOP. To connect the deck to the house, place glue on the tab with the green dot, on the back of the solarium roof panel and on the back of the shingle panel. Locate the black line located about half way up the front of the house. Position the deck so it’s level with this black line (as shown in Figure 15) and glue the deck in place.
(CONTINUED ON NEXT PAGE)

THE GHOST HOUSE – ASSEMBLY INSTRUCTIONS page 7.
Next cut out the LEFT PORCH RAILS on Page 11. Remove the two white areas (you may want to use an X-acto knife for this). At the top of the white areas are two ledge panels. Cut along the white lines on either side of them, and then cut along the white line beside the far right ledge panel. Below the two white areas are two inner rails. Cut along the white lines on either side of them. Fold the three ledge panels DOWNWARD along the blue lines and then fold the two inner rail panels DOWNWARD along the blue lines. Fold the ledge panels and inner rail panels over and glue them to the unprinted side of the piece, as shown in Figure 16 (shown from the back). Now cut out the INNER POSTS on Page 11 and glue them between the ledge and rail panels. This is so the inside of the porch will have texture like the outside, instead of being blank. Turn the piece face up and fold the corner post DOWNWARD along the blue line. Now put glue on the unprinted areas on the back of the piece and position it over the porch and deck as shown in Figure 17. The bottom edge of the LEFT PORCH RAIL should line up with the bottom edge of the PORCH. Glue the LEFT PORCH RAIL in place, connecting the piece to the porch first and then to the deck. Trim the top edge of the deck rail if necessary and darken with a marker if desired.
Cut out the RIGHT PORCH RAILS and INNER POSTS on Page 12. Assemble in the same manner as the LEFT PORCH RAILS and attach to the porch and deck.
Now cut out the STEP RAILS on Page 12. Fold the two panels with red dots DOWNWARD. Fold the outer rail panels DOWNWARD along the blue lines and then fold the inner rail panels DOWNWARD along the blue lines. Glue the outer rail panels to the unprinted sides of the inner rail panels and then glue the panels with red dots directly over each other. To connect the STEP RAILS to the PORCH, position the panel with the green dot directly over the exposed part of the gray front panel on the PORCH (as shown in Figure 18) and glue in place.
Next cut out the STEPS on Page 11. Fold the panel with the yellow dot DOWNWARD. Fold the panel with the red dot DOWNWARD. For each step: fold DOWNWARD on the blue lines and fold UPWARD on the green lines. The folded piece should resemble Figure 19. To connect the STEPS to the STEP RAILS, glue the tab with the yellow dot to the back of the STEP RAIL piece and then glue the tab with the red dot to the bottom of the STEP RAIL piece. The steps should now resemble Figure 20.
CONTINUED ON NEXT PAGE)

THE GHOST HOUSE – ASSEMBLY INSTRUCTIONS page 8.
Now cut out the AWNING on page 11. Fold the two rail panels UPWARD along the green lines. Fold DOWNWARD along the blue line between the two shingle panels. Fold DOWNWARD between the shingle panel and the triangular wall panel (along the blue line). Fold the tab with the yellow dot and the two blank gray tabs DOWNWARD. Fold DOWNWARD between the triangular wall panel and the rectangular wall panel. Glue the tab with the yellow dot to the inside of the adjoining shingle panel. Glue the two blank gray tabs to the inside of the adjoining shingle panels. To connect the AWNING to the front of the DECK, put glue on the back of the two rail panels, position the awning over the steps (as shown in Figure 21) and glue in place.
STORAGE COMPARTMENT ASSEMBLY:Congratulations! The house is now complete. But of course... all haunted houses have a few secret places. So we’ll be adding a hidden storage compartment. Cut out the BOX on Page 13. Fold the four blank brown tabs DOWNWARD and then fold all four side panels DOWNWARD. Glue the brown tabs to the inside of the adjoining side panels to form a box. Cut out the BOX LINER on Page 14. Fold the four side panels UPWARD and then glue the BOX liner to the inside of the BOX, as shown in Figure 22. Trim the top edge as necessary and darken with a black marker if desired. The box should now slide into the bottom of the house. If the box is too snug, you can pinch the box corners to collapse the sides of the box inward slightly. You now have a hidden storage compartment.
LANDSCAPE ASSEMBLY:If you wish you can call your model complete at this point, but it’s much more impressive when it sits on its own ‘property’. To build the landscaping, begin by cutting out the LEFT LAWN on Page 15 and the RIGHT LAWN on Page 16. Cut along the two white lines on each piece to separate the tabs with green dots. The RIGHT LAWN has four tabs with red dots. Glue these to the underside of the LAWN LEFT piece so that the lawn panels meet and one large piece is formed, as shown in Figure 23. Fold the inner tabs with green dots DOWNWARD. Fold the four tabs with yellow dots DOWNWARD and then fold the four side panels DOWNWARD. Glue the four tabs with yellow dots to the inside of the adjoining side panels to form a pedestal like the one shown in Figure 24.Remove the BOX from the house model and place it in the hole in the LAWN piece. Turn the piece upside down and line up the lower edges of the tabs (with green dots) and the bottom of the BOX. Glue the tabs to the BOX. The lawn should now sit level on your tabletop with the bottom of the BOX also resting on the tabletop, as shown in Figure 25. You’ll now be able to slide the house over the storage box and the box will hold the house in position on the lawn.
(CONTINUED ON NEXT PAGE)

THE GHOST HOUSE – ASSEMBLY INSTRUCTIONS page 9.
Next we’ll add the fence. Cut out the LEFT FENCE on Page 17. Fold the two end tabs DOWNWARD and then fold DOWNWARD along the blue line between the two fence panels. Glue the two fence panels together. The outside panel is the one with brick along the bottom and the inside panel is the one without brick along the bottom. Place glue on the unprinted rectangle under the inside fence panel. Position the FENCE piece against the gray panel on the left side of the lawn (as shown in Figure 26) and glue in place.
Cut out the RIGHT FENCE on Page 17 and assemble it in the same way as we did the LEFT FENCE. Glue the RIGHT FENCE to the gray panel on the right side of the lawn.
Now cut out the BACK FENCE on Page 18. Fold DOWNWARD along the blue line between the two fence panels (but don’t glue them together yet). Once again, the outside panel is the one with brick along the bottom and the inside panel is the one without brick at the bottom. Fold the two sides together and put glue on the unprinted rectangle below the inside panel. Then UNFOLD the piece and glue the outside panel to the back of the lawn as shown in Figure 27. The brick tabs on the LEFT FENCE and RIGHT FENCE should be glued to the unprinted side of the outside panel. Fold the inside panel down over the tabs and glue the inside panel to the outside panel, as shown in Figure 28.
To complete the fence, cut out the FRONT FENCE on Page 18 and fold DOWNWARD along the blue lines between the fence panels (but don’t glue the fence panels together yet). Cut along the red line to separate the two gates and then cut along the red line at the bottom of the gates to separate them from the brick. Fold the gates DOWNWARD. Cut out the two INSIDE GATE PANELS on Page 18 and glue them to the unprinted sides of the gates. Trim if needed.Now fold the fence panels together and place glue on the unprinted area below the inside fence panels. UNFOLD the piece and glue it to the gray area on the front of the lawn. Fold the inside fence panels down over the tabs and glue the fence panels together. The front fence should now resemble Figure 29, with the gates swung inward slightly.
You may now add the house to the lawn by placing it over the storage box. Again, if the box is too snug just collapse the sides a little.
(CONTINUED ON NEXT PAGE)
THE GHOST HOUSE – ASSEMBLY INSTRUCTIONS page 10.
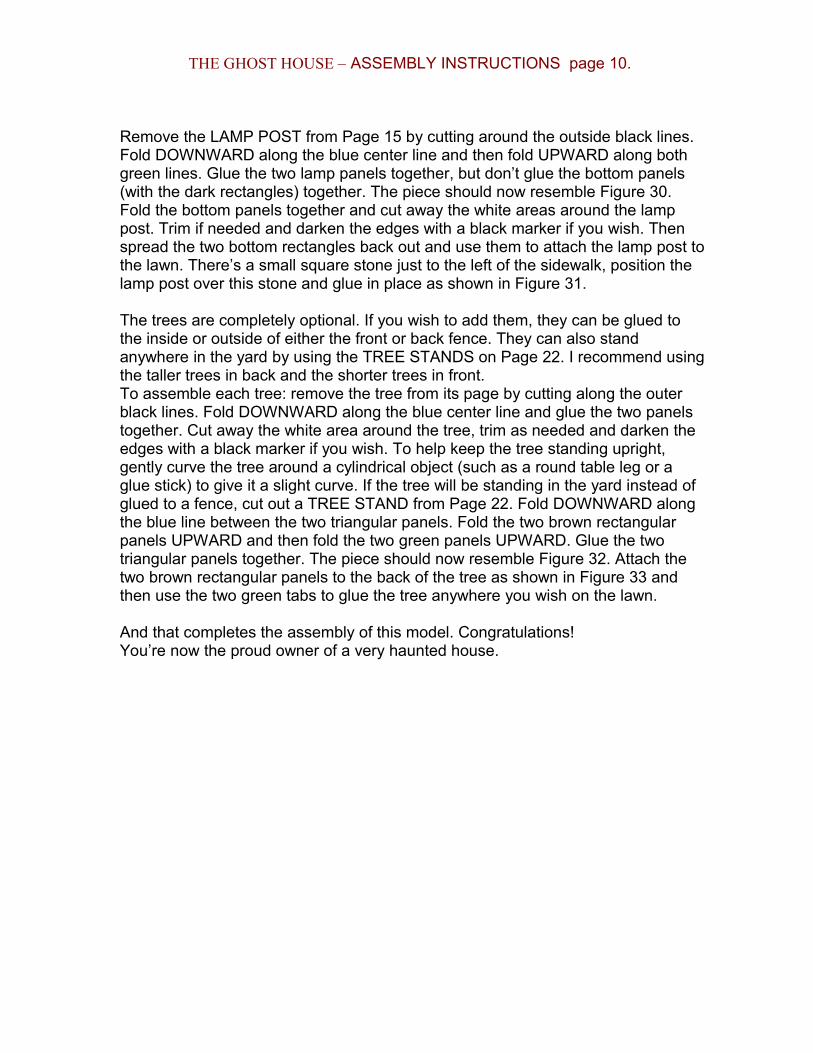
Remove the LAMP POST from Page 15 by cutting around the outside black lines. Fold DOWNWARD along the blue center line and then fold UPWARD along both green lines. Glue the two lamp panels together, but don’t glue the bottom panels (with the dark rectangles) together. The piece should now resemble Figure 30. Fold the bottom panels together and cut away the white areas around the lamp post. Trim if needed and darken the edges with a black marker if you wish. Then spread the two bottom rectangles back out and use them to attach the lamp post to the lawn. There’s a small square stone just to the left of the sidewalk, position the lamp post over this stone and glue in place as shown in Figure 31.
The trees are completely optional. If you wish to add them, they can be glued to the inside or outside of either the front or back fence. They can also stand anywhere in the yard by using the TREE STANDS on Page 22. I recommend using the taller trees in back and the shorter trees in front. To assemble each tree: remove the tree from its page by cutting along the outer black lines. Fold DOWNWARD along the blue center line and glue the two panels together. Cut away the white area around the tree, trim as needed and darken the edges with a black marker if you wish. To help keep the tree standing upright, gently curve the tree around a cylindrical object (such as a round table leg or a glue stick) to give it a slight curve. If the tree will be standing in the yard instead of glued to a fence, cut out a TREE STAND from Page 22. Fold DOWNWARD along the blue line between the two triangular panels. Fold the two brown rectangular panels UPWARD and then fold the two green panels UPWARD. Glue the two triangular panels together. The piece should now resemble Figure 32. Attach the two brown rectangular panels to the back of the tree as shown in Figure 33 and then use the two green tabs to glue the tree anywhere you wish on the lawn.
And that completes the assembly of this model. Congratulations! You’re now the proud owner of a very haunted house.