
STANDARD OPERATING PROCEDURE: Q-EXACTIVE - Shared … · Turn on the “LC” Accela 1250 pump...
17
Updated by 02/2016 Q-exactive mass spec – WVU SRF 1 STANDARD OPERATING PROCEDURE: Q-EXACTIVE Purpose of this Instrument: Essential tool for molecular weight identification for small molecules, peptides, proteins, ect. Location: WVU – Chemistry Research Laboratory Building – Room: 381 Primary Staff Contact: Dr. Huiyuan Li (304) 293-0747 The Shared Research Facilities are operated for the benefit of all researchers. If you encounter any problems with this piece of equipment, please contact the staff member listed above immediately. There is never a penalty for asking questions. If the equipment is not behaving exactly the way it should, contact a staff member. 1) INITIAL CHECK This text is a guide to operating the Q-exactive mass spectroscopy. A more detailed and thorough account of these procedures can be found in the Q-exactive Operating Manual. 1. Log in your “Mass Spec Q-exactive” session on the CORES.
Transcript of STANDARD OPERATING PROCEDURE: Q-EXACTIVE - Shared … · Turn on the “LC” Accela 1250 pump...
Updated by 02/2016
Q-exactive mass spec – WVU SRF 1
STANDARD OPERATING PROCEDURE:
Q-EXACTIVE
Purpose of this Instrument: Essential tool for molecular weight identification for small molecules, peptides, proteins, ect.
Location: WVU – Chemistry Research Laboratory Building – Room: 381
Primary Staff Contact: Dr. Huiyuan Li (304) 293-0747
The Shared Research Facilities are operated for the benefit of all researchers. If you encounter any problems with this piece of
equipment, please contact the staff member listed above immediately. There is never a penalty for asking questions. If the
equipment is not behaving exactly the way it should, contact a staff member.
1) INITIAL CHECK
This text is a guide to operating the Q-exactive mass spectroscopy. A more detailed and thorough account of these procedures
can be found in the Q-exactive Operating Manual.
1. Log in your “Mass Spec Q-exactive” session on the CORES.
Updated by 02/2016
Q-exactive mass spec – WVU SRF 2
2. Check log sheet to see the notes of previous users. This will inform you about anything unusual that occurred before, and
solvents were used before.
3. Write down your name, date, start/end time, sample type, and ion source information on the log sheet.
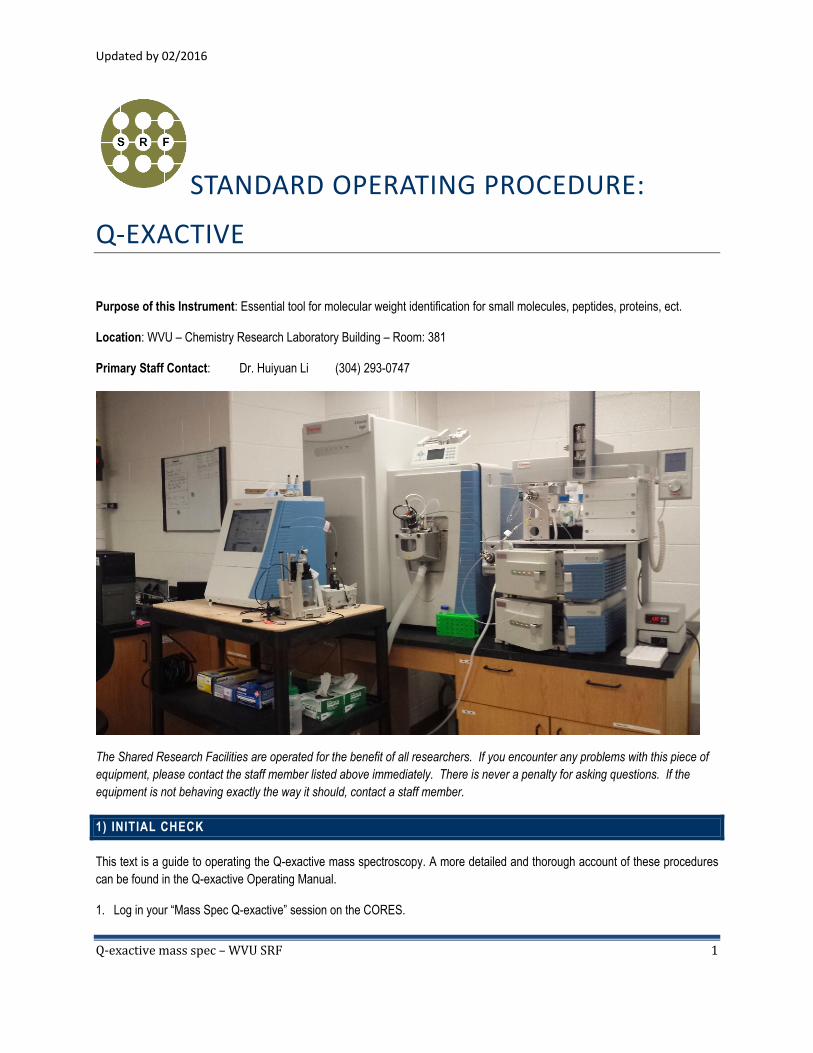
4. Check the nitrogen generator reading (It is located on the left of the computer bench). It should be around 100 psi (see
generator figure below). If the service light is on, and the reading is lower or higher, do not continue and contact SRF
personnel immediately. Do not turn off the nitrogen generator. Keep it on all the time.
Figure 1. Nitrogen generator. Keep it on all the time.
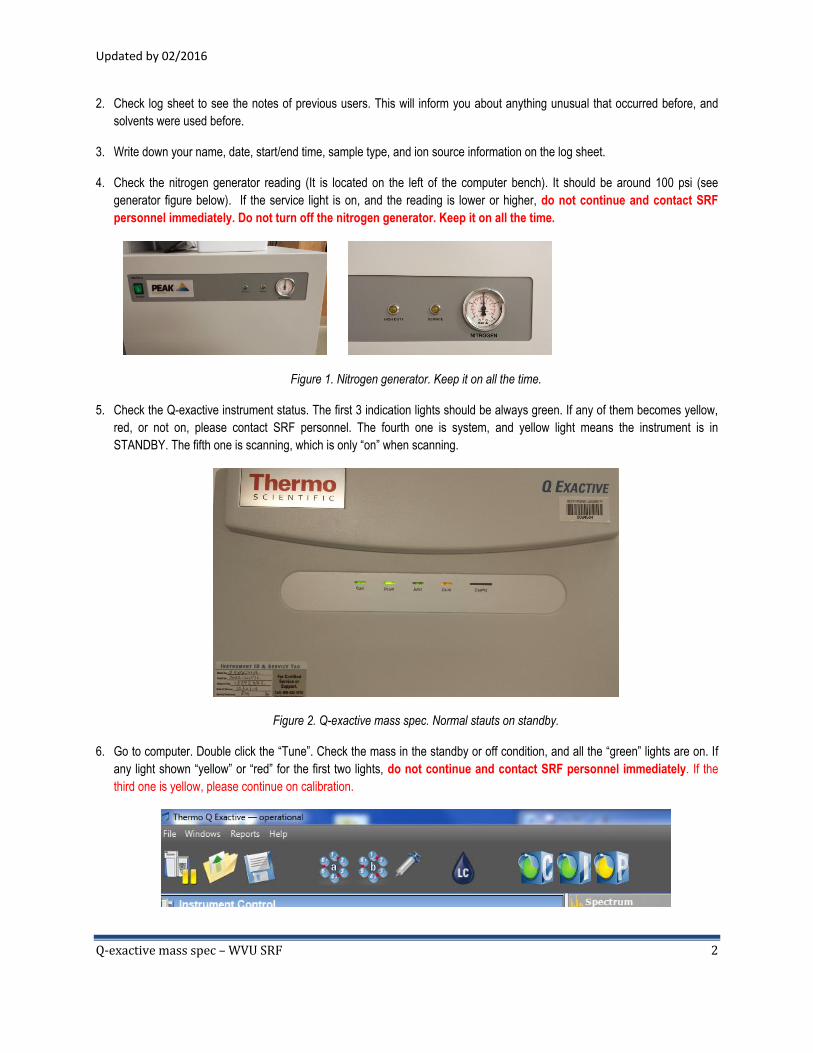
5. Check the Q-exactive instrument status. The first 3 indication lights should be always green. If any of them becomes yellow,
red, or not on, please contact SRF personnel. The fourth one is system, and yellow light means the instrument is in
STANDBY. The fifth one is scanning, which is only “on” when scanning.
Figure 2. Q-exactive mass spec. Normal stauts on standby.
6. Go to computer. Double click the “Tune”. Check the mass in the standby or off condition, and all the “green” lights are on. If
any light shown “yellow” or “red” for the first two lights, do not continue and contact SRF personnel immediately. If the
third one is yellow, please continue on calibration.
Updated by 02/2016
Q-exactive mass spec – WVU SRF 3
Figure 3. Tune software interface. Normal stauts on standby. The third yellow lights is on suggesting performance issue
(calibration is needed usually)
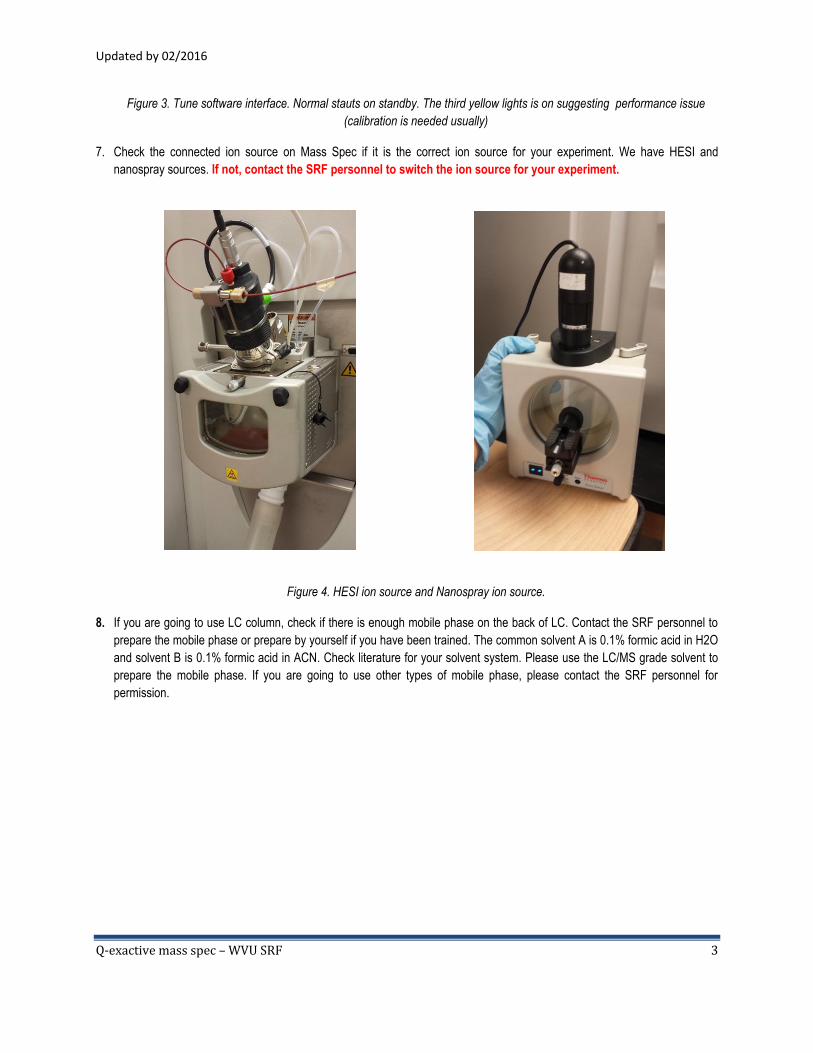
7. Check the connected ion source on Mass Spec if it is the correct ion source for your experiment. We have HESI and
nanospray sources. If not, contact the SRF personnel to switch the ion source for your experiment.
Figure 4. HESI ion source and Nanospray ion source.
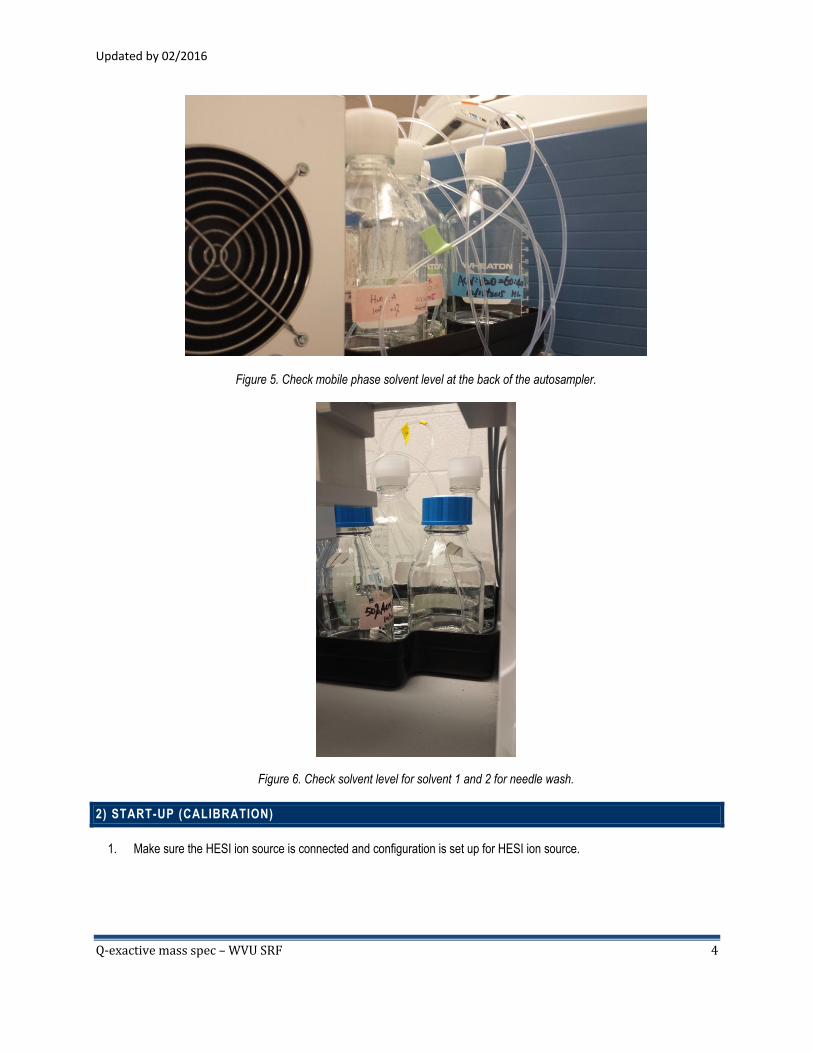
8. If you are going to use LC column, check if there is enough mobile phase on the back of LC. Contact the SRF personnel to
prepare the mobile phase or prepare by yourself if you have been trained. The common solvent A is 0.1% formic acid in H2O
and solvent B is 0.1% formic acid in ACN. Check literature for your solvent system. Please use the LC/MS grade solvent to
prepare the mobile phase. If you are going to use other types of mobile phase, please contact the SRF personnel for
permission.
Updated by 02/2016
Q-exactive mass spec – WVU SRF 4
Figure 5. Check mobile phase solvent level at the back of the autosampler.
Figure 6. Check solvent level for solvent 1 and 2 for needle wash.
2) START-UP (CALIBRATION)
1. Make sure the HESI ion source is connected and configuration is set up for HESI ion source.
Updated by 02/2016
Q-exactive mass spec – WVU SRF 5
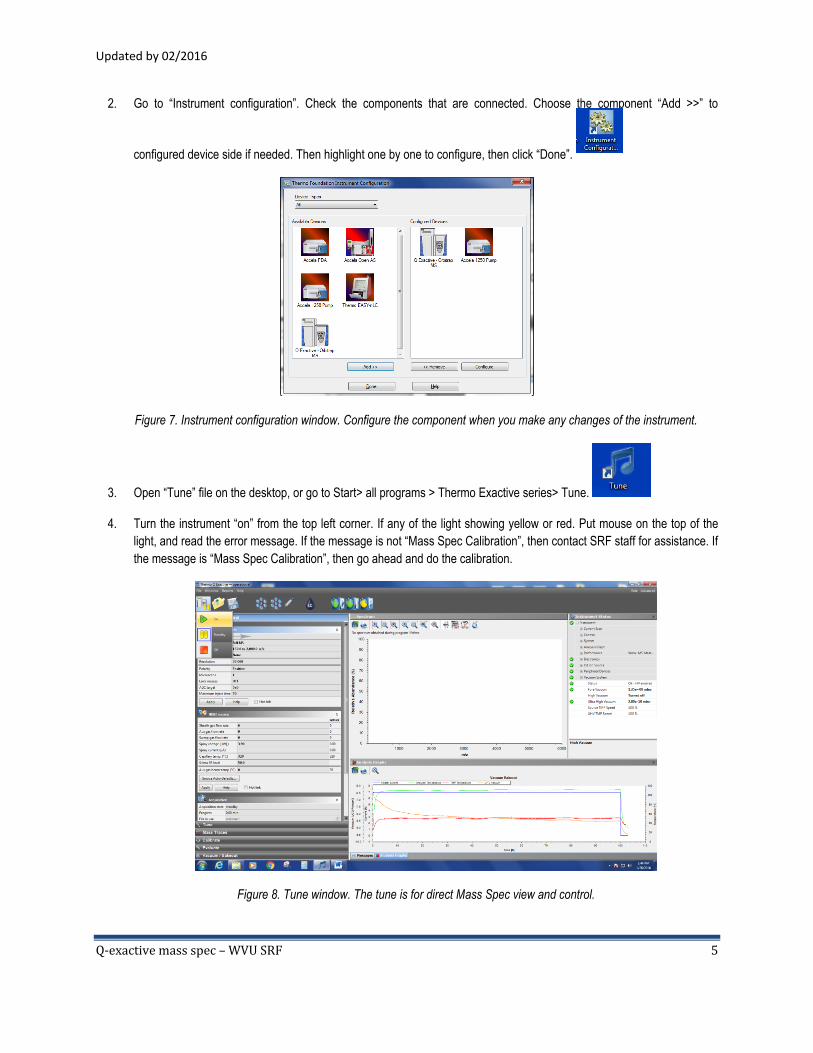
2. Go to “Instrument configuration”. Check the components that are connected. Choose the component “Add >>” to
configured device side if needed. Then highlight one by one to configure, then click “Done”.
Figure 7. Instrument configuration window. Configure the component when you make any changes of the instrument.
3. Open “Tune” file on the desktop, or go to Start> all programs > Thermo Exactive series> Tune.
4. Turn the instrument “on” from the top left corner. If any of the light showing yellow or red. Put mouse on the top of the
light, and read the error message. If the message is not “Mass Spec Calibration”, then contact SRF staff for assistance. If
the message is “Mass Spec Calibration”, then go ahead and do the calibration.
Figure 8. Tune window. The tune is for direct Mass Spec view and control.

Updated by 02/2016
Q-exactive mass spec – WVU SRF 6
5. Turn on the “LC” Accela 1250 pump direct control.
6. Check the “take pump under control”. Input flow rate 100 uL/min, inlet C (usually MeOH). Flow solvent C for about 10
min.
Figure 9. LC direct control window.
7. Prepare for the calibration:
(1) Find the calibration solution in the Chemical storage area cabinet.
Figure 10. Calibration solution. Find both positive and negative calibration solutions at the same cabinet.
(2) Find the direct injection tubing and syringe
Updated by 02/2016
Q-exactive mass spec – WVU SRF 7
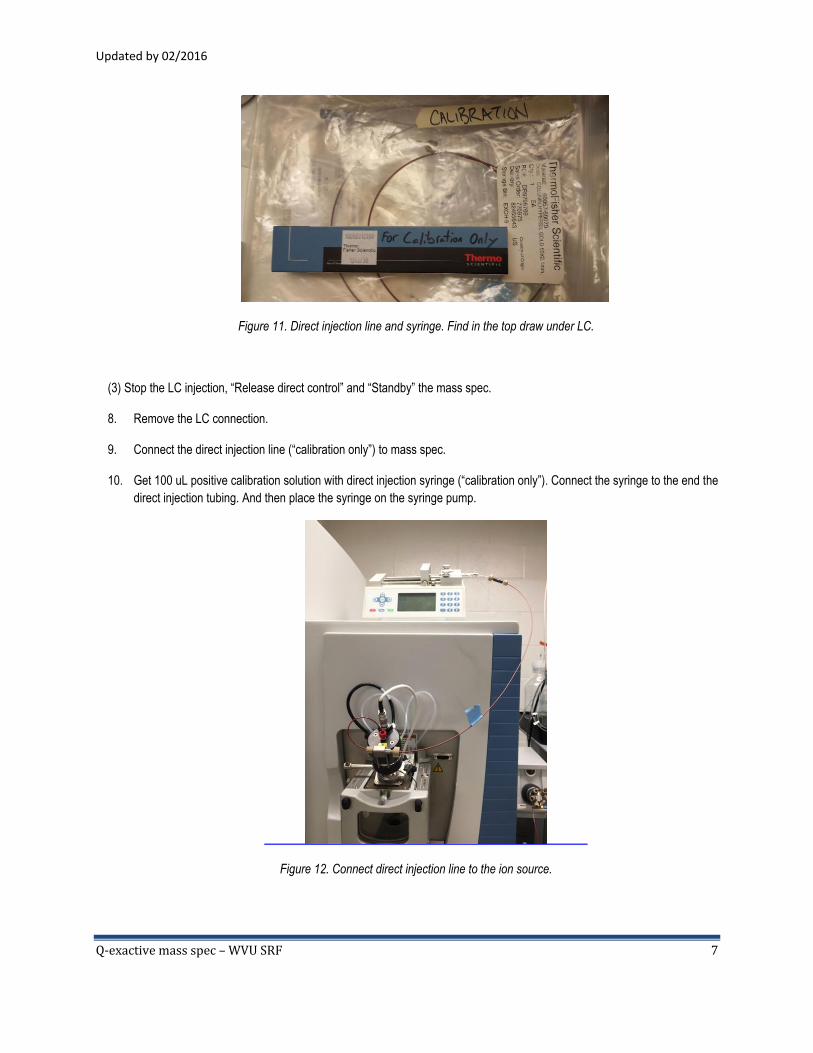
Figure 11. Direct injection line and syringe. Find in the top draw under LC.
(3) Stop the LC injection, “Release direct control” and “Standby” the mass spec.
8. Remove the LC connection.
9. Connect the direct injection line (“calibration only”) to mass spec.
10. Get 100 uL positive calibration solution with direct injection syringe (“calibration only”). Connect the syringe to the end the
direct injection tubing. And then place the syringe on the syringe pump.
Figure 12. Connect direct injection line to the ion source.
Updated by 02/2016
Q-exactive mass spec – WVU SRF 8
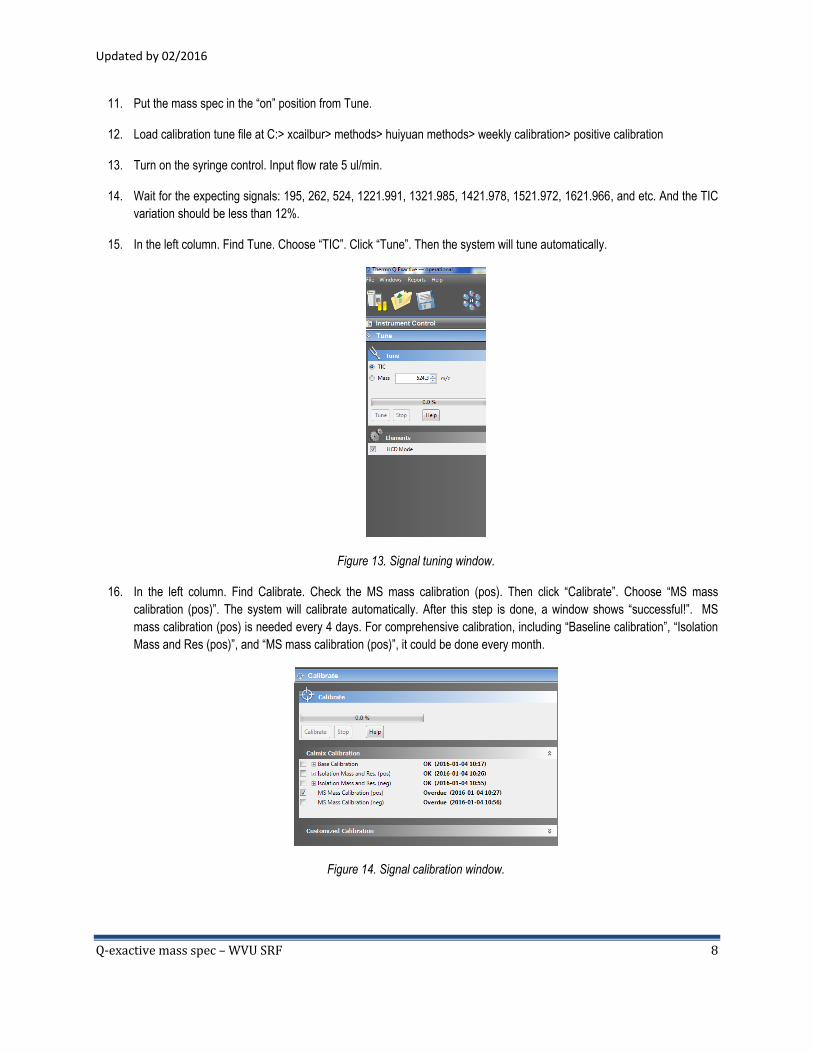
11. Put the mass spec in the “on” position from Tune.
12. Load calibration tune file at C:> xcailbur> methods> huiyuan methods> weekly calibration> positive calibration
13. Turn on the syringe control. Input flow rate 5 ul/min.
14. Wait for the expecting signals: 195, 262, 524, 1221.991, 1321.985, 1421.978, 1521.972, 1621.966, and etc. And the TIC
variation should be less than 12%.
15. In the left column. Find Tune. Choose “TIC”. Click “Tune”. Then the system will tune automatically.
Figure 13. Signal tuning window.
16. In the left column. Find Calibrate. Check the MS mass calibration (pos). Then click “Calibrate”. Choose “MS mass
calibration (pos)”. The system will calibrate automatically. After this step is done, a window shows “successful!”. MS
mass calibration (pos) is needed every 4 days. For comprehensive calibration, including “Baseline calibration”, “Isolation
Mass and Res (pos)”, and “MS mass calibration (pos)”, it could be done every month.
Figure 14. Signal calibration window.

Updated by 02/2016
Q-exactive mass spec – WVU SRF 9
17. Stop the direct injection. Standby the instrument.
18. Wash the syringe and direct injection line with MeOH. Make sure it is clean.
19. Inject 400 uL MeOH to system to wash the signal out of the system.
20. Stop the injection. Standby the instrument.
21. Do the negative calibration with the same procedure with Negative calibration solution and Tune file.
22. Disconnect the injection line. Put the syringe into the box and direct injection line into the corresponding bag.
IMPORTANT: “Standby” the instrument when you change the inlet or direct injection line.
IMPORTANT: Dispose any HPLC chemical waste solvent into the jar located in the chemical
fume hood with label “HPLC chemical waste”. Do not overfill the bottle. If the bottle is near full,
please contact BNRF staff to dispose the bottle and get a new one for your chemical waste.
3) SET UP METHOD FOR YOUR EXPERIMENT
1. Use a regular LC/MS/MS experiment as an example. Configure all necessary parts, including orbitrap mass, pump,
autosampler, and PDA.
Figure 15. Configuration window.
Updated by 02/2016
Q-exactive mass spec – WVU SRF 10
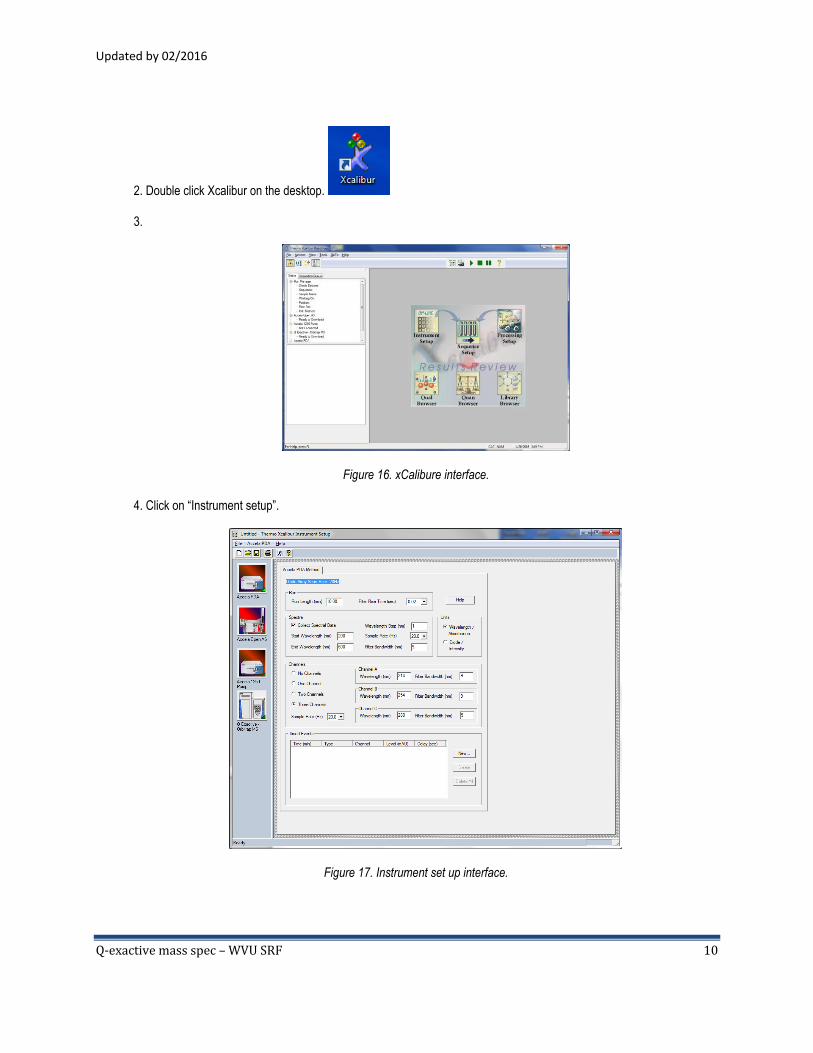
2. Double click Xcalibur on the desktop.
3.
Figure 16. xCalibure interface.
4. Click on “Instrument setup”.
Figure 17. Instrument set up interface.

Updated by 02/2016
Q-exactive mass spec – WVU SRF 11
5. Set up all parameter as needed.
For example:
PDA (3 channels could be monitored at the same time. Choose the UV absorption wavelength that are best for your
sample)
Accela open AS (could choose from the Template dropdown window: standard injection accela open)
Accela pump (set up a gradient run. See figure 18 as an example. You need adjust the starting solvent condition, and
gradient run time/final B% of the gradient based on the polarity and complexity of your sample.)
Orbitrap MS
(a. Global lists: Use when you need specify the signal that to be tested.
b. Tune file. This is mass parameter file when you initially tune your sample.
c. Scan groups. Full-ms-SIM, when you want to see the entire components in the sample. Only MS will be detected, not
MS/MS.
AIF: All ion fragmentation
Full MS/AIF: Detect in two modes, full mass and all ion fragmentation.
Full MS/dd-MS2 (TopN): Detect in two modes, full mass and data dependent MS2.
Targeted-SIM: Use it when you have certain targets, list accurate masses of these targets in “Global list” in inclusion list.
Only the targeted/selected ions will be detected. )
Figure 18. An example of HPLC gradient set up
Updated by 02/2016
Q-exactive mass spec – WVU SRF 12
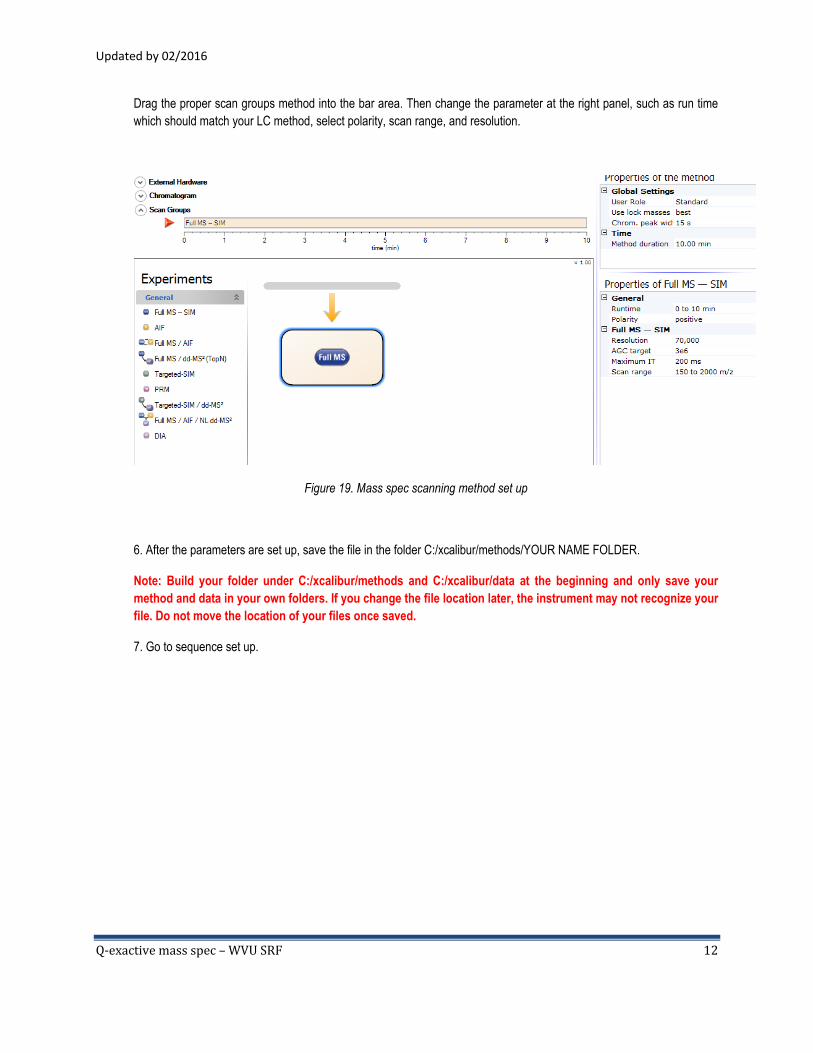
Drag the proper scan groups method into the bar area. Then change the parameter at the right panel, such as run time
which should match your LC method, select polarity, scan range, and resolution.
Figure 19. Mass spec scanning method set up
6. After the parameters are set up, save the file in the folder C:/xcalibur/methods/YOUR NAME FOLDER.
Note: Build your folder under C:/xcalibur/methods and C:/xcalibur/data at the beginning and only save your
method and data in your own folders. If you change the file location later, the instrument may not recognize your
file. Do not move the location of your files once saved.
7. Go to sequence set up.
Updated by 02/2016
Q-exactive mass spec – WVU SRF 13
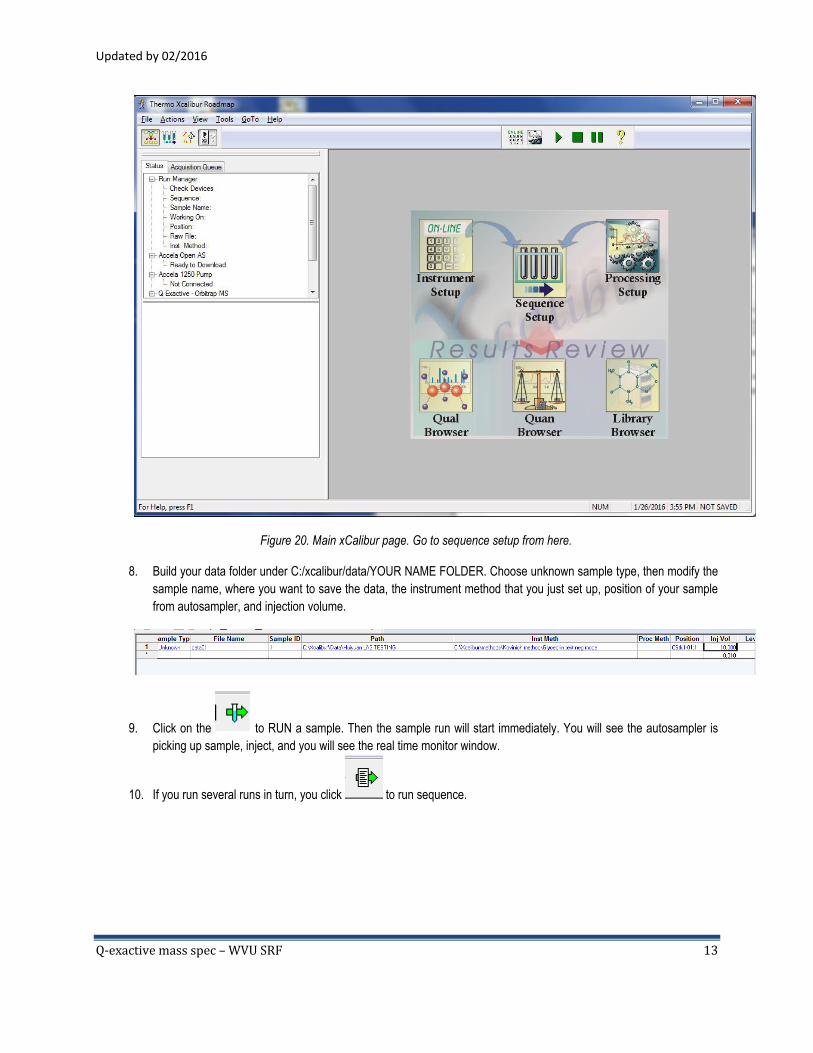
Figure 20. Main xCalibur page. Go to sequence setup from here.
8. Build your data folder under C:/xcalibur/data/YOUR NAME FOLDER. Choose unknown sample type, then modify the
sample name, where you want to save the data, the instrument method that you just set up, position of your sample
from autosampler, and injection volume.
9. Click on the to RUN a sample. Then the sample run will start immediately. You will see the autosampler is
picking up sample, inject, and you will see the real time monitor window.
10. If you run several runs in turn, you click to run sequence.
Updated by 02/2016
Q-exactive mass spec – WVU SRF 14
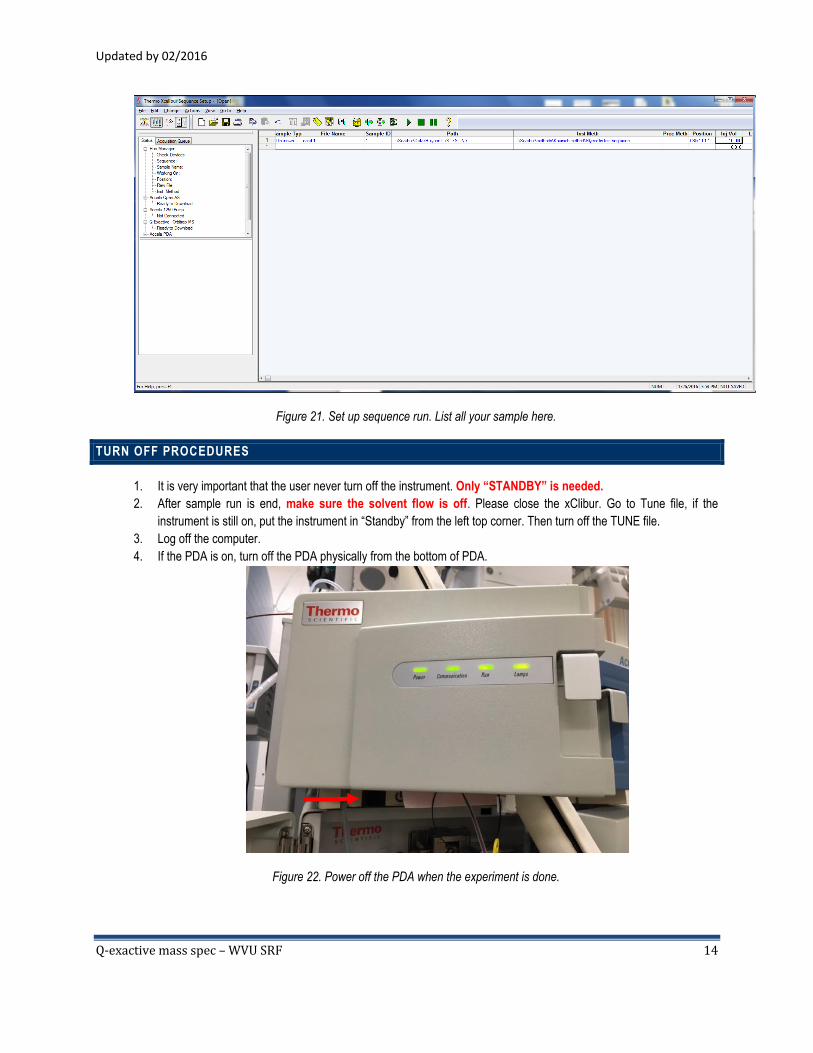
Figure 21. Set up sequence run. List all your sample here.
TURN OFF PROCEDURES
1. It is very important that the user never turn off the instrument. Only “STANDBY” is needed.
2. After sample run is end, make sure the solvent flow is off. Please close the xClibur. Go to Tune file, if the
instrument is still on, put the instrument in “Standby” from the left top corner. Then turn off the TUNE file.
3. Log off the computer.
4. If the PDA is on, turn off the PDA physically from the bottom of PDA.
Figure 22. Power off the PDA when the experiment is done.
Updated by 02/2016
Q-exactive mass spec – WVU SRF 15
EMERGENCY OPERATING PROCEDURES
If you have any questions, even if you are just slightly unsure, ASK someone who knows and can help.
There are no penalties for asking for help but there may be for not reporting damage to the equipment that
may delay or prevent others from working.
If, at any time, you need to contact someone for help, call or locate the following staff of the Shared
Research Facility (SRF):
Huiyuan Li Office: CRL 381 Phone: (304) 293-0747
Emergency situation:
1) Instrument failure. Such as POWER light is not on.
Wait until data acquisition, if any, is complete.
Turn off the flow of sample solution from the LC or direct injection.
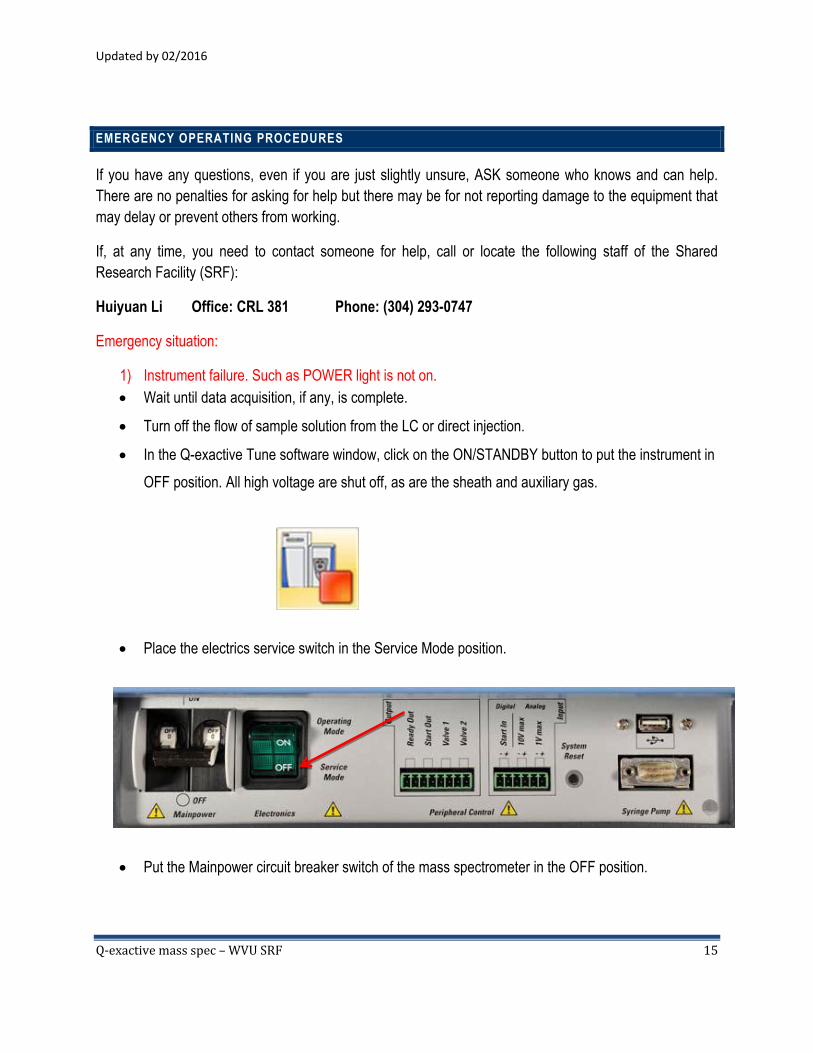
In the Q-exactive Tune software window, click on the ON/STANDBY button to put the instrument in
OFF position. All high voltage are shut off, as are the sheath and auxiliary gas.
Place the electrics service switch in the Service Mode position.
Put the Mainpower circuit breaker switch of the mass spectrometer in the OFF position.
Updated by 02/2016
Q-exactive mass spec – WVU SRF 16
2) Power outage
During your experiment, there is a power outage. No worries. The instrument was protected by
uninterrupted power supply (UPS). The short time power break will not affect your sample run. The
computer itself is not connected to UPS. You could restart computer after the power outage. If the power
outage is longer than the UPS support, then you need turn off the instrument by following steps:
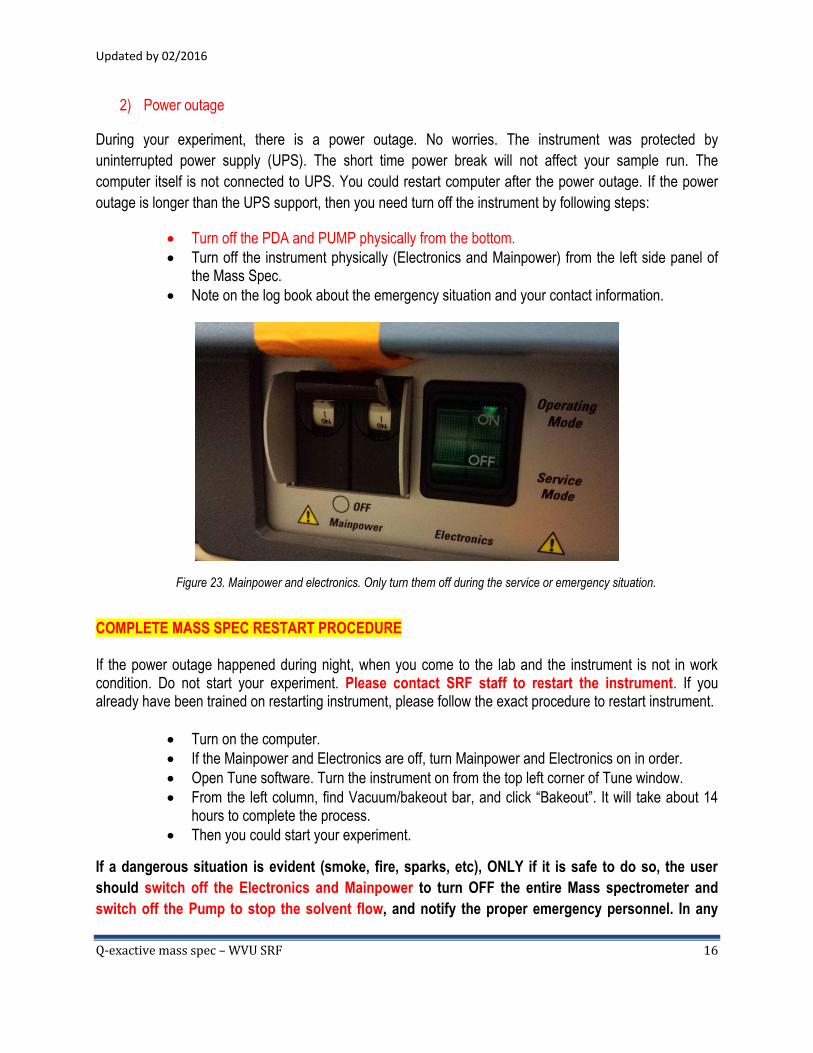
Turn off the PDA and PUMP physically from the bottom.
Turn off the instrument physically (Electronics and Mainpower) from the left side panel of the Mass Spec.
Note on the log book about the emergency situation and your contact information.
Figure 23. Mainpower and electronics. Only turn them off during the service or emergency situation.
COMPLETE MASS SPEC RESTART PROCEDURE If the power outage happened during night, when you come to the lab and the instrument is not in work condition. Do not start your experiment. Please contact SRF staff to restart the instrument. If you already have been trained on restarting instrument, please follow the exact procedure to restart instrument.
Turn on the computer.
If the Mainpower and Electronics are off, turn Mainpower and Electronics on in order.
Open Tune software. Turn the instrument on from the top left corner of Tune window.
From the left column, find Vacuum/bakeout bar, and click “Bakeout”. It will take about 14 hours to complete the process.
Then you could start your experiment.
If a dangerous situation is evident (smoke, fire, sparks, etc), ONLY if it is safe to do so, the user
should switch off the Electronics and Mainpower to turn OFF the entire Mass spectrometer and
switch off the Pump to stop the solvent flow, and notify the proper emergency personnel. In any
Updated by 02/2016
Q-exactive mass spec – WVU SRF 17
case, the user should leave the facility and contact emergency personnel as soon as possible from
a safe place.
Huiyuan Li Office: CRL 381 Phone: (304) 293-0747