Snapshot with Oracle -...
44
White Paper Using SVA SnapShot With Oracle® June, 2001 TL-ENG-PRD-0477-A1 TL-ENG-PRD-0477-A01
Transcript of Snapshot with Oracle -...

White Paper
Using SVA SnapShot With Oracle® June, 2001
TL-ENG-PRD-0477-A1
TL-ENG-PRD-0477-A01


Table of Contents
1 Abstract............................................................................................................................... 5
2 Understanding SnapShot................................................................................................... 6 2.1 How Does SnapShot Work? ..................................................................................................................6
3 Architecture Example........................................................................................................ 7
4 Configuration Step............................................................................................................. 8 4.1 SVA Configuration................................................................................................................................8 4.2 Oracle Configuration .............................................................................................................................8
4.2.1 Product Installation .....................................................................................................................8 4.2.2 Oracle Glossary...........................................................................................................................9 4.2.3 Database Files ...........................................................................................................................10 4.2.4 User Data ..................................................................................................................................11 4.2.5 Database Objects.......................................................................................................................12
5 Back Up an Oracle Database Using SVA SnapShot ..................................................... 13 5.1 Cold Backup Using a Single Host .......................................................................................................13
5.1.1 Scenario ....................................................................................................................................13 5.1.2 Critical Analysis........................................................................................................................14
5.2 Hot Backup Using a Single Host .........................................................................................................15 5.2.1 Scenario ....................................................................................................................................15 5.2.2 Critical Analysis........................................................................................................................17
5.3 Hot Backup Using a Second Host........................................................................................................18 5.3.1 Functional Architecture.............................................................................................................18
5.3.1.1 Dismount the Target SVA Disk (on the Primary Host) ..............................................19 5.3.1.2 Disable Access to the Target SVA Disk by the Primary Host (on the Primary Host) 19 5.3.1.3 Enable Access to the Target SVA Disks by the Secondary Host................................20 5.3.1.4 Mount the Disk on the Secondary Host ......................................................................20 5.3.1.5 Perform Oracle Operations .........................................................................................20 5.3.1.6 Back Up the Database to Tape....................................................................................21 5.3.1.7 Restore Data From Tape .............................................................................................22
5.4 Performance.........................................................................................................................................22 5.4.1 Metrics ......................................................................................................................................22
6 Restoring an Oracle Database Using SVA SnapShot ................................................... 25 6.1 File System Mismatch .........................................................................................................................25 6.2 Decision Support System (DSS)..........................................................................................................25 6.3 Hot Standby Database .........................................................................................................................26 6.4 Processing a Snapped Database on the Source Server.........................................................................26
TL-ENG-PRD-0477-A01 Page 3 of 44
Toulouse Research and Development Center
6.4.1 Backup ......................................................................................................................................27 6.4.2 Mount the Target Disks.............................................................................................................27 6.4.3 Oracle Operations on the Primary Database .............................................................................27 6.4.4 Operating System Operations for the Secondary Database.......................................................28
7 Appendix........................................................................................................................... 32 7.1 “Hot backup” Script.............................................................................................................................32 7.2 Database files.......................................................................................................................................38 7.3 SVA Extents Repartition .....................................................................................................................39 7.4 Files on SVA .......................................................................................................................................41 7.5 Logical Oracle File System .................................................................................................................43
TL-ENG-PRD-0477-A01 Page 4 of 44

Toulouse Research and Development Center
1 Abstract The StorageTek Shared Virtual Array� (SVA) has a powerful feature called SnapShot. It allows users to make instantaneous copies of any single virtual disk defined within the disk subsystem. In order to be able to take advantage of all the benefits of this feature, it is necessary to integrate the SnapShot operational steps with relational database management software (RDMS) used on many host systems. Today the open systems market is leading the disk storage market, and most of the integration effort remains to be done in this arena. This paper presents the integration of SnapShot with the most popular database management software in the open systems world: Oracle®.
This paper includes descriptions of how to perform cold backups, hot backups, and recovery on some Oracle/SVA configurations. It is assumed that the reader has a good knowledge of UNIX disk administration, Oracle administration, SVA principles, and SVA administration.
All scripts, prerequisites, and constraints are detailed in each section.
TL-ENG-PRD-0477-A01 Page 5 of 44

Toulouse Research and Development Center
2 Understanding SnapShot SnapShot is a powerful data duplication product that harnesses the unique virtual disk architecture of the StorageTek SVA. SnapShot duplicates entire open systems logical units (LUNs) in seconds, using no additional physical capacity.
SnapShot’s virtually instantaneous copying speed is accomplished by manipulating pointers to data within the virtual disk subsystem, instead of physically moving the data. With no physical data movement involved, SnapShot duplicates a LUN in approximately two to five seconds, no matter how much data is involved. SnapShot also has the unique ability to create any number of copies that the user needs or desires.
Traditional data duplication products require physical data movement, which is costly in terms of resources such as CPU cycles, channel utilization, I/O operations used, and, more importantly, in terms of time. By eliminating the use of these resources and time, SnapShot creates a new paradigm in data duplication.
2.1 How Does SnapShot Work? SnapShot simply updates pointers within the virtual disk subsystem mapping tables for the data views being duplicated at electronic memory speeds. The updated pointers reference the same disk array locations as the original source data—one physical copy of the data with multiple host “views” (illustrated in Figure 1).
Shared Virtual Array (SVA)9500
Backend DataPointers
Host TracksPointers
Solaris, HP, AIX, NT or W2K
Source
Target 1
Target 2
Figure 1
SnapShot copies use no disk storage initially, since only one physical copy of the data exists at the point in time when the SnapShot is performed. All copies (targets) and the original copy (source) are totally independent; they can be updated, changed, or read without affecting one other. Only changes to either the source data or copies use additional physical storage, and any parts of the data that remain common are shared.
The result of a SnapShot operation is the same as that of a traditional copy, the main difference is that the time required to create the copy with SnapShot is measured in mere seconds versus traditional physical duplication products measured in minutes or hours.
TL-ENG-PRD-0477-A01 Page 6 of 44

Toulouse Research and Development Center
3 Architecture Example This section presents the test environment for the SVA using an Oracle database. Figure 2 illustrates the architecture used as an example during this study.
This architecture reproduces a typical schema with an Oracle production server. The production server (Sun Ultra 10 in Figure 2) uses three LUNs of the SVA to store the Oracle database files. These LUNs were defined by the SVA Administrator (SVAA) software, also installed on the production server.
A fiber connection is used between the Sun servers and the SVA 9500. The production server sees disks defined in domain 8, and the tape library is connected via a SCSI bus on controller 2.
The following sections describe how to back up and recover the Oracle database using SVA SnapShot.
c1
Emulex LP800
Ultra 10Solaris 2.7Oracle 8SVAA 3.1
Oracle 8Oracle 8/space/space
/dsk1/dsk1
/dsk2/dsk2
/dsk3/dsk3
Oracle Database Production
FCFC
c2
8
c1t8d1s2
c1t8d2s2
c1t8d3s2SVA Domain
Host Mount point
Virtual Host View
Figure 2
TL-ENG-PRD-0477-A01 Page 7 of 44
Toulouse Research and Development Center
4 Configuration Step
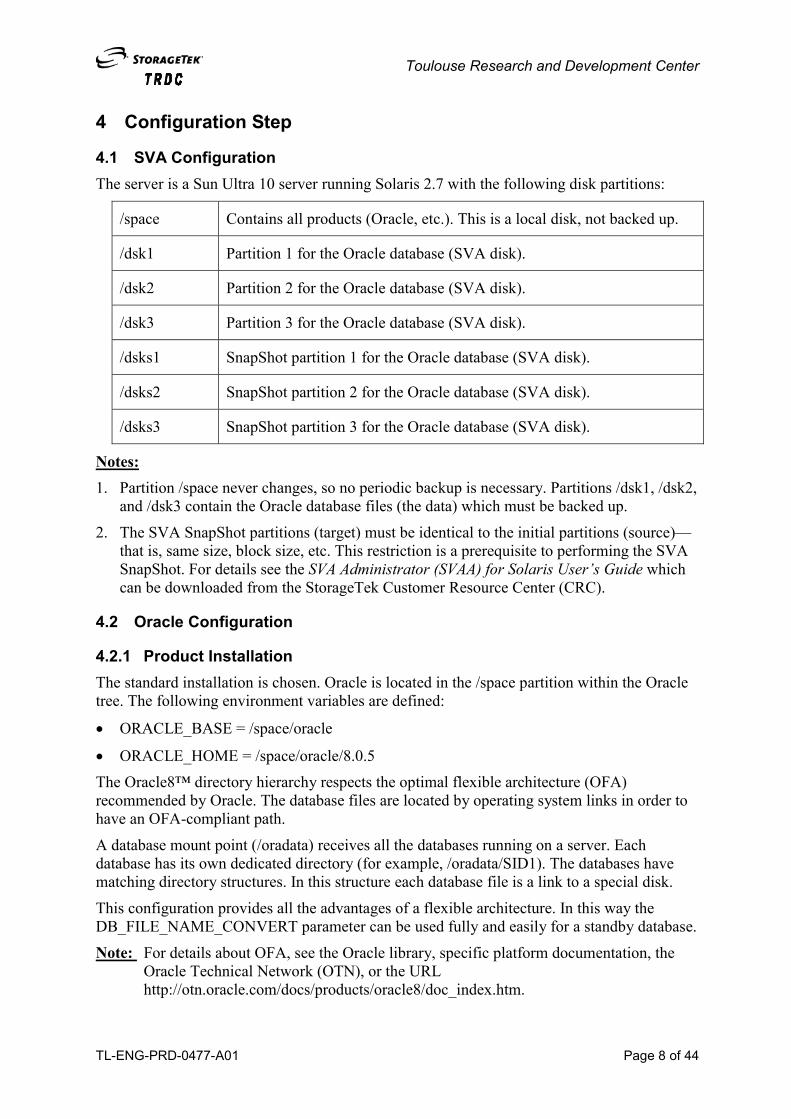
4.1 SVA Configuration The server is a Sun Ultra 10 server running Solaris 2.7 with the following disk partitions:
/space Contains all products (Oracle, etc.). This is a local disk, not backed up.
/dsk1 Partition 1 for the Oracle database (SVA disk).
/dsk2 Partition 2 for the Oracle database (SVA disk).
/dsk3 Partition 3 for the Oracle database (SVA disk).
/dsks1 SnapShot partition 1 for the Oracle database (SVA disk).
/dsks2 SnapShot partition 2 for the Oracle database (SVA disk).
/dsks3 SnapShot partition 3 for the Oracle database (SVA disk).
Notes: 1. Partition /space never changes, so no periodic backup is necessary. Partitions /dsk1, /dsk2,
and /dsk3 contain the Oracle database files (the data) which must be backed up.
2. The SVA SnapShot partitions (target) must be identical to the initial partitions (source)—that is, same size, block size, etc. This restriction is a prerequisite to performing the SVA SnapShot. For details see the SVA Administrator (SVAA) for Solaris User’s Guide which can be downloaded from the StorageTek Customer Resource Center (CRC).
4.2 Oracle Configuration
4.2.1 Product Installation The standard installation is chosen. Oracle is located in the /space partition within the Oracle tree. The following environment variables are defined:
ORACLE_BASE = /space/oracle ��
�� ORACLE_HOME = /space/oracle/8.0.5
The Oracle8™ directory hierarchy respects the optimal flexible architecture (OFA) recommended by Oracle. The database files are located by operating system links in order to have an OFA-compliant path.
A database mount point (/oradata) receives all the databases running on a server. Each database has its own dedicated directory (for example, /oradata/SID1). The databases have matching directory structures. In this structure each database file is a link to a special disk.
This configuration provides all the advantages of a flexible architecture. In this way the DB_FILE_NAME_CONVERT parameter can be used fully and easily for a standby database.
Note: For details about OFA, see the Oracle library, specific platform documentation, the Oracle Technical Network (OTN), or the URL http://otn.oracle.com/docs/products/oracle8/doc_index.htm.
TL-ENG-PRD-0477-A01 Page 8 of 44

Toulouse Research and Development Center
4.2.2 Oracle Glossary Following are some Oracle database terms and their acronyms:
Tablespace (TS) Logical space for object storage.
Database file (DBF) A file of the database containing data. One or several DBFs compose one TS.
Rollback segment (RBS)
Oracle object managing the transaction. They are located in a TS.
Segment Group of extents for the same stored object. A stored object can be a table, index, IOT, or Oracle SnapShot.
Extent Contiguous suite of database blocks.
Database block The smallest unit of storage. A database block is a power 2 disk block. Generally, the database block sizes are 2KB, 4KB, 8KB, 16KB, etc., depending on the server and the database.
Control files Files containing the database description. They can be considered pointers to all DBFs and contain information such as database timestamp, database name, names and locations of DBFs, SCN, log sequence number, redo log information, etc.
There are at least two control files, multiplexed, so these identical files are distributed on several disks in order to avoid problems due to disk crash. These files are continuously updated by Oracle, so they cannot be backed up online. In order to ensure consistency of the control file backup, Oracle provides a specific Oracle command for backing up online control files.
Redo logs These files contain redo entries. A redo entry corresponds to a database modification (a database block update). They are in binary format. No SQL is visible inside.
There are at least two redo logs. For added security, these files can be also multiplexed, in which case the notion of group and group member is used. A redo group contains multiplexed redo logs files. Redo log files are continuously updated by Oracle, so they cannot be backed up online because the consistency of the backups cannot be guaranteed.
When the logs are filled, depending on the database mode, the logs are either overwritten (NOARCHIVELOG mode) or archived (ARCHIVELOG mode). In the latter case, when a redo is archived it becomes an archive log.
TL-ENG-PRD-0477-A01 Page 9 of 44

Toulouse Research and Development Center
4.2.3 Database Files The test database, called “SVA,” is a standard database in archive mode created with the following file repartition:
/dsk1/SVA/tssystem Contains the SYSTEM tablespace.
/dsk1/SVA/tstemp Contains the TEMP tablespace (temporary).
/dsk1/SVA/tsrbs Contains the RBS tablespace (for rollback segments).
/dsk1/SVA/arch Contains archive log.
/dsk1/SVA/redo Contains all the redo logs.
/dsk1/SVA/control Contains control file #1.
/dsk2/SVA/control Contains control file #2.
/dsk2/SVA/tsdata Contains database files for the TSDATA tablespace (tablespace for data).
/dsk2/SVA/tsindex Contains database files for the TSINDEX tablespace (tablespace for index).
/dsk3/SVA/tsdata Contains database files for the TSDATA tablespace (tablespace for data).
/dsk3/SVA/tsindex Contains database files for the TSINDEX tablespace (tablespace for index).
Database file names are formatted as:
<tablespace_name>_<n>.dbf
where <tablespace_name> is the name of the tablespace to which the file belongs, and <n> is a sequential number: 1 for the first database file, 2 for the second, and so on.
Note: This repartition corresponds to complex data repartition. This repartition can be changed without modifying the backup results.
TL-ENG-PRD-0477-A01 Page 10 of 44

Toulouse Research and Development Center
The configuration is described in the following table:
SVA Disk/ Tablespace DSK1 DSK2 DSK3
Control files X X
Redo logs X
System X
RBS X
TEMP X
TSDATA X X
TSINDEX X X
4.2.4 User Data A schema is created for the user SVA. SVA sets its tables in the TSDATA tablespace and its index in the TSINDEX tablespace. Tables and index do not correspond to a real schema.
The files are sized so that the data is distributed throughout the volume group. For example, a table has two extents on two separate database files. The table distribution on the TSDATA tablespace is as follows:
Tables T1 T2 T3 T4 T5
Extents E1 E2 E3 E1 E2 E1 E2 E1 E2 E1 E2
Database Files
1 1 2 1 3 2 3 1 2 3 3
SVA Disk DSK2
DSK2
DSK2
DSK2
DSK3
DSK2
DSK3
DSK2
DSK2
DSK3
DSK3
Notes: 1. The previous data repartition is the more complex one, as it covers the maximum number
of cases.
2. Each volume group has three database files: two for one tablespace and one for the other. As a result, dsk2 has 2 x 100 MB for TSDATA and dsk3 has 1 x 100 MB for TSDATA. (TSINDEX has the same repartition, but dsk2 and dsk3 are reversed.)
3. The “Database Files” row contains the number of database files composing the tablespace TSDATA. So, the real name is “tsdata_1.dbf”.
TL-ENG-PRD-0477-A01 Page 11 of 44

Toulouse Research and Development Center
4.2.5 Database Objects All the database files are described in the Appendix on page 32.
The tablespace containing user data is as follows:
TSDATA = (100 MB + 100 MB) DSK2 + (100 MB) DSK3 ��
�� TSINDEX = (100 MB) DSK2 + (100 MB + 100 MB) DSK3
Table creation (order and size):
Database Files / Tables
DBF 1
DBF 2
DBF 3
T1 20 + 30 60
T2 40 40
T3 30 30
T4 10 10
T5 9 + 9
TL-ENG-PRD-0477-A01 Page 12 of 44

Toulouse Research and Development Center
5 Back Up an Oracle Database Using SVA SnapShot This section describes the following database backup scenarios:
�� Cold backup using a single host
�� Hot backup using a single host
�� Hot backup using a second host
All steps are detailed. The associated commands can be grouped in a single shell script and run in one operating system command.
All the scenarios have the following prerequisites:
�� All Oracle database files must be on SVA disks.
�� During the SVA SnapShot, the target area must not be mounted.
�� Targets must be created on SVA before performing the backup (the configuration step, for example).
5.1 Cold Backup Using a Single Host
5.1.1 Scenario Prerequisites: Administrators must know all volume groups containing the database files.
Scenario: The scenario is illustrated in Figure 3.
c1
Emulex LP800
Ultra 10Solaris 2.7Oracle 8SVAA 3.1
Oracle 8Oracle 8/space/space
SourceSource/dsk1/dsk1/dsk2/dsk2/dsk3/dsk3
TargetTarget/dsks1/dsks1/dsks2/dsks2/dsks3/dsks3
Oracle Database Production
Oracle Database Backup
FCFC
c2
1
2
3
4
Figure 3
TL-ENG-PRD-0477-A01 Page 13 of 44

Toulouse Research and Development Center
1. Stop the instance. Run the following Oracle commands as an Oracle user: Svrmgrl
Connect internal;
Shutdown;
Exit;
2. Make an SVA SnapShot of all volume groups containing database files. 3. Restart the instance. Run the following command as an Oracle user:
svrmgrl
Connect internal;
Startup pfile=<full path of initSID.ora file>/initSID.ora;
Exit;
Note: If the initSID.ora file is located in the $ORACLE_HOME/dbs directory, you need only enter “startup”.
4. Back up the SVA SnapShot (target) to tape.
5. Restore data from tape. Results: The database is running.
5.1.2 Critical Analysis Advantages Disadvantages
Quick–—Backup time is not dependent on the database size.
The database must be halted.
Simple—There is only one SVA command per file system.
The database can be backed up to tape using another server on which the SVA SnapShot will be mounted.
The backup database can be run on the same server if the database is renamed. (An instance on the same database cannot be run on the same server. For this, the control must be rebuilt).
A logical backup (export) can be performed on the renamed database. Therefore the data can be moved to another system (for example, from UNIX to NT).
The target SVA area does not need to be mounted on the server.
All the other advantages of a cold backup apply.
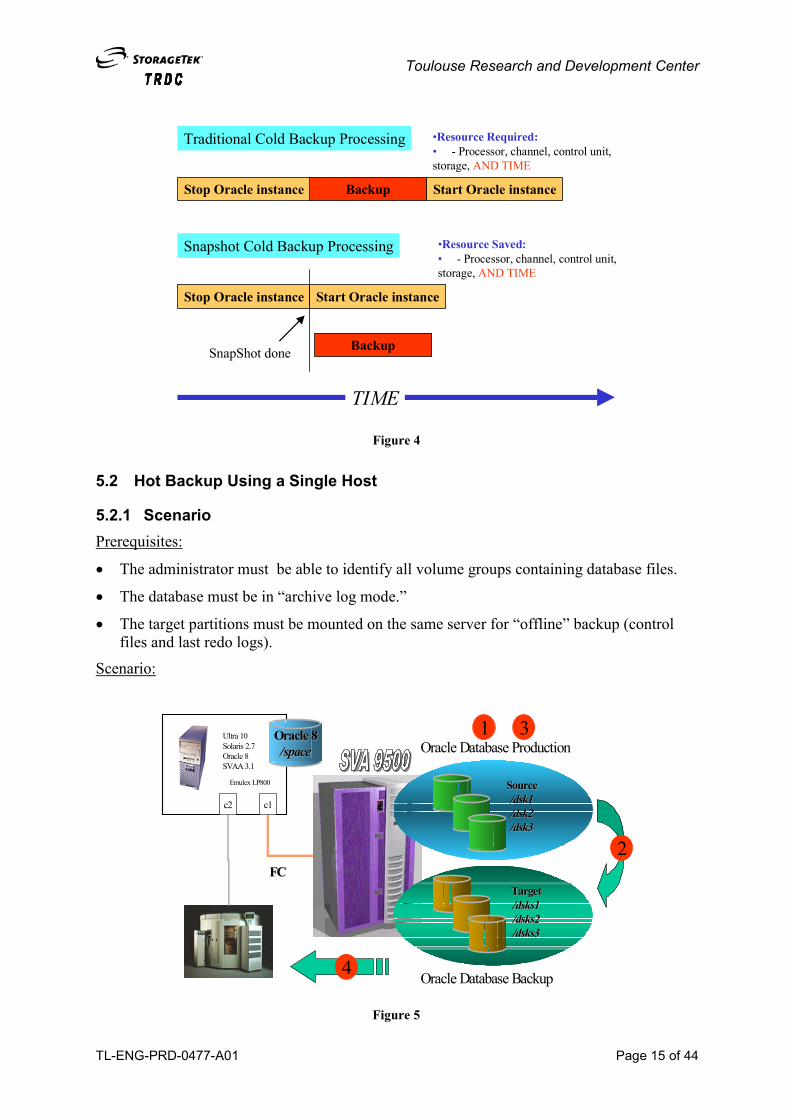
SnapShot works by creating different “views” of data rather than copying the data itself. By eliminating the need to physically move data for duplication, SnapShot duplicates data almost instantly. With SnapShot’s ultra-fast duplication capability, backup operations are no longer on the critical path and can run in parallel with other processes.
TL-ENG-PRD-0477-A01 Page 14 of 44
Toulouse Research and Development Center
Traditional Cold Backup Processing
Snapshot Cold Backup Processing
Stop Oracle instance Backup Start Oracle instance
Stop Oracle instance
Backup
Start Oracle instance
SnapShot done
TIME
•Resource Required:• - Processor, channel, control unit,storage,
•Resource Saved:• - Processor, channel, control unit,storage,
AND TIME
AND TIME
Figure 4
5.2 Hot Backup Using a Single Host
5.2.1 Scenario Prerequisites:
The administrator must be able to identify all volume groups containing database files. ��
��
��
The database must be in “archive log mode.”
The target partitions must be mounted on the same server for “offline” backup (control files and last redo logs).
Scenario:
c1
Emulex LP800
Ultra 10Solaris 2.7Oracle 8SVAA 3.1
Oracle 8Oracle 8/space/space
SourceSource/dsk1/dsk1/dsk2/dsk2/dsk3/dsk3
TargetTarget/dsks1/dsks1/dsks2/dsks2/dsks3/dsks3
Oracle Database Production
Oracle Database Backup
FCFC
c2
1
2
3
4
Figure 5
TL-ENG-PRD-0477-A01 Page 15 of 44

Toulouse Research and Development Center
1. Switch the database to backup mode:
�� Connect to the database with DBA privileges: sqlplus system/manager
�� For all tablespaces, set all tablespaces to “begin backup:” ALTER TABLESPACE my_tablespace BEGIN BACKUP;
2. Perform the SnapShot:
�� Synchronize the disks with the UNIX sync command.
�� Snap all volume groups containing database files.
3. Switch the database to normal mode:
�� Connect to the database with DBA privileges: sqlplus system/manager
�� For all tablespaces, set all tablespaces to “end backup:” ALTER TABLESPACE my_tablespace END BACKUP;
�� Perform a file system check on the target disk with the UNIX fsck command. This is necessary because the snap is performed while the disks are mounted and SnapShot will try to mount already mounted disks. This situation also occurs after a power supply failure on a UNIX server.
�� Mount the snapped (target) database volume groups on the server.
�� Connect to the database with DBA privileges.
�� Archive last logs: force log switching and archiving with one of the following Oracle commands (under SQL*Plus®): ALTER SYSTEM SWITCH LOGFILE;
ALTER SYSTEM ARCHIVE LOG ALL;
�� Back up the control file with consistent mode: ALTER SYSTEM BACKUP CONTROL FILE TO ‘<full path of the backed up control file>’ REUSE;
�� Copy the last ARCHIVE LOG from the source to the SVA target; this covers all “archive logs” generated during the SnapShot operation.
4. Back up data from the SVA target to tapes.
5. Restore data from tape. Result: The restored database runs.
Note: In backup mode, the database generally needs a recovery session. The following commands must be issued under svrgmrl:
�� Shut down the instance if it is running: shutdown;
�� Mount the instance:
startup mount pfile=<full path of initSID.ora file>/initSID.ora
TL-ENG-PRD-0477-A01 Page 16 of 44

Toulouse Research and Development Center
�� Recover the database. (The recovery mode is chosen by the DBA, depending on the needs of the database. The last updates are present depending on the recovery method.): RECOVER DATABASE)
�� Open the instance: ALTER DATABASE OPEN;
5.2.2 Critical Analysis Note: The target SVA area must be mounted temporarily in order to back up the control file
and the last redo logs. This is a prerequisite and is transparent to the users, so it is neither an advantage nor a disadvantage.
Advantages Disadvantages
Quick—Backup time is not dependent on the database size.
Since the length of time for the backup is very short, there is no need to perform it on a tablespace-by-tablespace basis, simplifying the operation significantly. Backup time is dependent only on the number of SVA disks used in the configuration (about ten seconds per disk).
Simple—There is only one SVA command per file system required to back up all database files.
The database is still running, and contention for redo and archive logs is reduced to a minimum.
The transfer to tape can be managed by another server.
Traditional Hot Backup Processing
Snapshot Hot Backup Processing
Begin Backup Mode
Backup
End Backup Mode
Begin Backup Mode
Backup
End Backup Mode
SnapShot done
TIME
Archive Transaction
Archive Transaction
Figure 6
TL-ENG-PRD-0477-A01 Page 17 of 44

Toulouse Research and Development Center
5.3 Hot Backup Using a Second Host Sections 5.1 and 5.2 described how to use SnapShot to back up an Oracle database then transfer the SnapShot target to tape using the same host. With the virtual architecture of the SVA, you can dynamically move the device to be backed up to another host. As a result, the production server is not affected by the backup to tape operation (CPU, storage unit control, and I/Os).
This section describes how to snap the database then back up the target to tape using a separate host.
5.3.1 Functional Architecture
SAN
Ultra 10Solaris 2.7Oracle 8SVAA 3.1SVAPATH
Oracle Database Production
Oracle Database Backup
SUN E250Solaris 2.6Oracle 8SVAPath
Domain 7Domain 7
Production path Backup path
Figure 7
Before you start the backup to tape, you must back up the database using SnapShot; this can be done as either a cold backup (described in Section 5.1) or a hot backup (described in Section 5.2). Also, the disks must be mounted or mounted by the primary host.
You must perform the following steps in order to transfer the target SVA disk to another host. (These steps are detailed Sections 5.3.1.1 through 5.3.1.6.)
1. If necessary, dismount the target SVA disk.
2. Disable access to the target SVA disk by the primary host.
3. Enable access to the target SVA disk by the secondary host. 4. Mount the disk on the secondary host.
5. If necessary, issue Oracle commands to define the same path for DBFs in the file system as are in the control files. In the case of a hot backup, recover the database (this is a standard operation).
6. Back up the database to tape.
TL-ENG-PRD-0477-A01 Page 18 of 44

Toulouse Research and Development Center
Note: All examples are given for the configuration illustrated in Figure 7.
5.3.1.1 Dismount the Target SVA Disk (on the Primary Host) If the target disk is currently mounted, it must be dismounted before you can proceed. For all disks, issue the umount <mount point> command.
Following is an example (run as root): umount /dsk1
umount /dsk2
umount /dsk3
5.3.1.2 Disable Access to the Target SVA Disk by the Primary Host (on the Primary Host)
This section disables access to the target SVA disk by the primary host. All steps are performed on the primary host.
Note: The examples in this section use SVA Path’s LUN masking feature which can show or hide a disk to a dedicated host; however, you can use any LUN masking product to achieve the same results. In addition, you can insert the commands into a backup script which can be run automatically.
1. Disable all the target SVA disks using the SVA Path command on the primary host.
2. To display all available disks, run the set setsp command.
The following is an example (run as root): setsp =============================================================================== spd Path/disk Status Primary Exclude Buf Balance RtrCnt RtrDly FailBack =============================================================================== 0 c2t1d0/sd16 Good X 32 1 20 3000 1 spd0 = c4t1d0 ID = "STK 9200 0000000000300001" =============================================================================== 1 c2t1d1/sd151 Good X 32 1 20 3000 1 spd1 = c4t1d1 ID = "STK 9200 0000000000300002" =============================================================================== 2 c2t2d0/sd17 Good X X 32 1 20 3000 1 spd2 = c4t2d0 ID = "STK 9200 000000000030020A" =============================================================================== 3 c2t8d1/sd201 Good X 32 1 20 3000 1 spd3 = c4t8d1 ID = "STK 9200 0000000000300053" =============================================================================== 4 c2t8d2/sd202 Good X 32 1 20 3000 1 spd4 = c4t8d2 ID = "STK 9200 0000000000300058" =============================================================================== 5 c2t8d3/sd203 Good X 32 1 20 3000 1 spd5 = c4t8d3 ID = "STK 9200 0000000000300059" ===============================================================================
…
3. Identify the disk numbers of the target SVA disks.
4. Disable the target disks. Following is an example (assuming the target SVA disks are disks 10, 11, and 12):
setsp -e1 -l10 setsp -e1 -l11
setsp -e1 -l12
Note: The –e option is for exclusion, and -l is for the specified device. (Type setsp-? For details.)
Result: The secondary host should now “see” the target SVA disks.
TL-ENG-PRD-0477-A01 Page 19 of 44

Toulouse Research and Development Center
5.3.1.3 Enable Access to the Target SVA Disks by the Secondary Host This section enables to the SVA target disks by the secondary host. These steps are performed on the secondary host.
1. Perform the steps described in section 5.3.1.2 to identify the appropriate disks.
2. Assuming that the target disks are 1, 2, and 3, run the following commands: setsp -e0 -l1
setsp -e0 -l2
setsp -e0 -l3
5.3.1.4 Mount the Disk on the Secondary Host Mount the target SVA disks on the secondary host. This is a classic mount operation:
Following is an example (run as root): mount /dev/dsk/c2t0d5s2 /dsk1
mount /dev/dsk/c2t0d6s2 /dsk2
mount /dev/dsk/c2t0d7s2 /dsk3
5.3.1.5 Perform Oracle Operations At this point, all the files comprising the database are on the secondary host. The file systems on the primary and secondary hosts may be different, so something must be done to define identical paths for all database files in both the file system and the Oracle control files.
There are two possible solutions:
1. Operating system-based solution: When using OFA, make the appropriate symbolic links from the logical path to the physical path. (This solution is recommended because it is easier and more secure, and because the backup can be used by several hosts.)
For all database files, issue the following UNIX commands: ln -s <physical path>/<database file name> <logical path>/<database file name>
2. Oracle solution: Rebuild the control file in order to update it with the new path. This solution is not recommended because the original control files are altered, and backups are modified. It does work, however, and the commands are as follows:
On the primary database, connected as a DBA (system) user, type: ALTER DATABASE BACKUP CONTROLFILE TO TRACE;
Oracle generates a file in order to rebuild the control files. This file is located in the directory to which the Oracle user_dump_dest parameter points. Following is an example of the file:
Dump file /oradata/SVA/admin/trace/sva_ora_10354.trc Oracle8 Enterprise Edition Release 8.0.5.0.0 - Production With the Partitioning and Objects options PL/SQL Release 8.0.5.0.0 - Production ORACLE_HOME = /space/oracle/8.0.5 System name: SunOS
Node name: olinda Release: 5.7 Version: Generic_106541-12 Machine: sun4u Instance name: SVA Redo thread mounted by this instance: 1 Oracle process number: 9 Unix process pid: 10354, image: oracleSVA *** SESSION ID:(8.3) 1999.04.27.11.22.33.000
TL-ENG-PRD-0477-A01 Page 20 of 44

Toulouse Research and Development Center
*** 1999.04.27.11.22.33.000 # The following commands will create a new control file and use it # to open the database. # Data used by the recovery manager will be lost. Additional logs may # be required for media recovery of offline data files. Use this # only if the current version of all online logs are available. STARTUP NOMOUNT CREATE CONTROLFILE REUSE DATABASE "SVA" NORESETLOGS ARCHIVELOG MAXLOGFILES 255 MAXLOGMEMBERS 3 MAXDATAFILES 100 MAXINSTANCES 8 MAXLOGHISTORY 904 LOGFILE GROUP 1 '/oradata/SVA/redo/log1_SVA.rdo' SIZE 5M, GROUP 2 '/oradata/SVA/redo/log2_SVA.rdo' SIZE 5M, GROUP 3 '/oradata/SVA/redo/log3_SVA.rdo' SIZE 5M DATAFILE '/oradata/SVA/tssystem/tssystem_SVA.dbf', '/oradata/SVA/tsrbs/tsrbs_SVA.dbf', '/oradata/SVA/tstemp/temp_SVA.dbf', '/oradata/SVA/tsdata/tsdata_1.dbf', '/oradata/SVA/tsdata/tsdata_2.dbf', '/oradata/SVA/tsdata/tsdata_3.dbf', '/oradata/SVA/tsindex/tsindex_1.dbf', '/oradata/SVA/tsindex/tsindex_2.dbf', '/oradata/SVA/tsindex/tsindex_3.dbf', '/oradata/SVA/tsdata/tsdata_4.dbf', '/oradata/SVA/tsindex/tsindex_4.dbf', '/oradata/SVA/tsdata/tsdata_5.dbf', '/oradata/SVA/tsindex/tsindex_5.dbf', '/oradata/SVA/tsdata/tsdata_6.dbf', '/oradata/SVA/tsindex/tsindex_6.dbf' ; # Recovery is required if any of the datafiles are restored backups, # or if the last shutdown was not normal or immediate. RECOVER DATABASE # All logs need archiving and a log switch is needed. ALTER SYSTEM ARCHIVE LOG ALL; # Database can now be opened normally. ALTER DATABASE OPEN;
Transfer this file onto the second host, then edit the file in order to modify all paths of the database files. After making the modifications, delete the original SnapShot control file and run this script under svrmgrl.
Note: As we did, you may modify the STARTUP MOUNT command in order to specify the full path of the initSID.ora, so the command appears as follows:
STARTUP MOUNT pfile=<full path of initSID.ora file>/initSID.ora
Remark:
If you performed a SnapShot with the database in hot backup mode and you want to open the database on the secondary host, you must recover the database with the following commands under svrmgrl (with the Oracle user):
svrmgrl
connect internal;
startup mount pfile=<full path of initSID.ora file>/initSID.ora
RECOVER DATABASE;
ALTER DATABASE OPEN;
5.3.1.6 Back Up the Database to Tape You can now back up the database to tape.
TL-ENG-PRD-0477-A01 Page 21 of 44
Toulouse Research and Development Center
5.3.1.7 Restore Data From Tape After restoring data from tape, the database is operational. Use the appropriate standard command to start the Oracle instance. For example:
svrmgrl
connect internal;
startup pfile=<full path of initSID.ora file>/initSID.ora
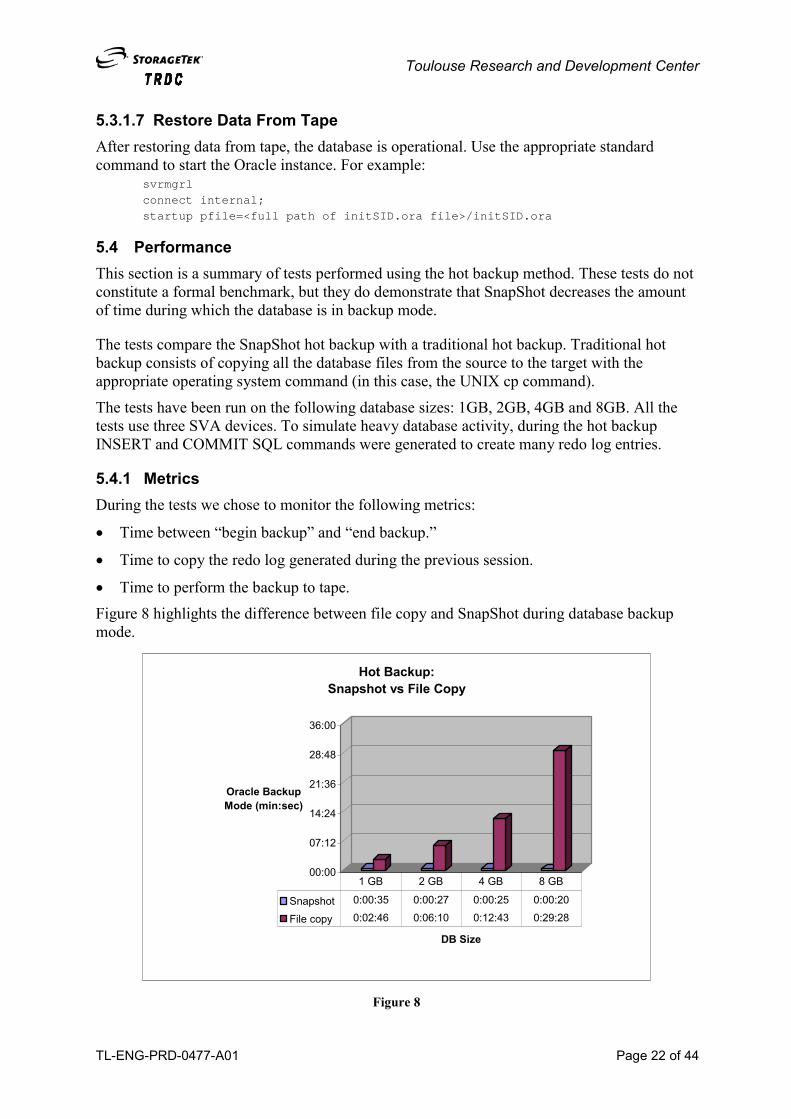
5.4 Performance This section is a summary of tests performed using the hot backup method. These tests do not constitute a formal benchmark, but they do demonstrate that SnapShot decreases the amount of time during which the database is in backup mode.
The tests compare the SnapShot hot backup with a traditional hot backup. Traditional hot backup consists of copying all the database files from the source to the target with the appropriate operating system command (in this case, the UNIX cp command).
The tests have been run on the following database sizes: 1GB, 2GB, 4GB and 8GB. All the tests use three SVA devices. To simulate heavy database activity, during the hot backup INSERT and COMMIT SQL commands were generated to create many redo log entries.
5.4.1 Metrics During the tests we chose to monitor the following metrics:
�� Time between “begin backup” and “end backup.”
�� Time to copy the redo log generated during the previous session.
�� Time to perform the backup to tape.
Figure 8 highlights the difference between file copy and SnapShot during database backup mode.
00:00
07:12
14:24
21:36
28:48
36:00
Oracle Backup Mode (min:sec)
DB Size
Hot Backup:Snapshot vs File Copy
Snapshot 0:00:35 0:00:27 0:00:25 0:00:20
File copy 0:02:46 0:06:10 0:12:43 0:29:28
1 GB 2 GB 4 GB 8 GB
Figure 8
TL-ENG-PRD-0477-A01 Page 22 of 44

Toulouse Research and Development Center
Figure 9 shows the improvement between SnapShot hot backup and traditional hot backup.
1Go2 Go
4 Go8 Go
Heavy Activity
Light Activity0%
2000%
4000%
6000%
8000%
10000%
Bac
kup
Mod
e Im
prov
emen
t
Hot Backup imrovementSnapshot vs File Copy
Figure 9
Figure 10 shows all the processes involved in backing up a 8GB database.
0:00:00 0:28:48 0:57:36 1:26:24 1:55:12 2:24:00
Time
Snapshot
Traditional
Hot Backup SampleHeavy Activity in 8 GB DB Size
Backup To Tape 1:37:27 1:35:53Copy Redo Log 0:02:14 0:00:44Database Backup Mode 0:01:01 0:30:30
Snapshot Traditional
Figure 10
TL-ENG-PRD-0477-A01 Page 23 of 44

Toulouse Research and Development Center
Note: In the case of SnapShot, the “Copy Redo Log” section includes file system check (fsck) time. This time is proportional to the size of the disk and represents 90 percent of this time. This explains the difference between 2:14 and 0:44.
The most important point is that SnapShot decreases the full backup time and the period when the database is in backup mode. Since the backup takes very little time, it does not need to be done on a tablespace-by-tablespace basis, making the process very simple.
Using SnapShot, backup time is dependent only on the number of SVA disks used. The time per SVA disk is about ten seconds (on the test platform). The critical time corresponding to the backup is very short, so there is no impact on the production database.
Using traditional hot backups, the instance must support a heavy load, requiring large SHARED_POOL_SIZE and DB_BLOCK_BUFFER values which consume a lot of memory and CPU activity. This requires taking backup into account in production planning.
TL-ENG-PRD-0477-A01 Page 24 of 44

Toulouse Research and Development Center
6 Restoring an Oracle Database Using SVA SnapShot This section documents some additional features of using SVA SnapShot.
Assumptions:
The backup is already on SVA disks (data has been copied from tape to SVA disks). ��
��
��
The use of the OFA norm is a plus for database architecture.
It is recommended to keep the same data repartition.
6.1 File System Mismatch Assume that you mistakenly erase some database files (except SYSTEM tablespace data files). Your mission is to restore the deleted files as quickly as possible.
The following steps explain how to restore the files very quickly (in about one minute):
1. Mount the target disks on the host, each one on a different mount point.
Note: At this point, all SVA disks containing the database (source and target) are mounted on the production host.
2. Create symbolic links from the backed up files to the deleted files.
3. Connect to the database as DBA (user system, for example). Recover the tablespace with the following commands
ALTER TABLESPACE my_tablespace OFFLINE FOR RECOVER;
ALTER DATABASE RECOVER TABLESPACE my_tablespace;
ALTER TABLESPACE my_tablespace ONLINE;
Result: The database is now recovered.
Note: In case of several tablespaces, repeat these steps.
Once you have restored the files, it is recommended that you reconfigure the database as previously. Perform the following steps:
1. Set the tablespace(s) containing the deleted files in BEGIN BACKUP mode: ALTER TABLESPACE my_tablespace BEGIN BACKUP;
2. Copy the deleted database files from the backup location to the original location with a different name.
3. Remove the symbolic links, and rename the copied files (it is recommended to use a shell script for security reasons).
4. Repeat the last two steps for all affected database files.
5. Set the tablespace(s) containing the deleted files in END BACKUP mode: ALTER TABLESPACE my_tablespace END BACKUP;
6. When the database has recovered its normal configuration, perform a backup. 6.2 Decision Support System (DSS)
When the production database is large with several working users, it is very difficult to plan long and complex “decision support” queries (such as for data warehouse applications).
One classic solution is to replicate the database by making an Oracle Read Only snap shot. During the replication process there is an increased load on the primary database (bigger
TL-ENG-PRD-0477-A01 Page 25 of 44

Toulouse Research and Development Center
transactions, connection activities, etc.), increased use of network bandwidth, and supervision of the replication process.
A better solution is to use SVA SnapShot. Perform a hot backup periodically—for example, every four hours. Mount the target disks on the second host and open the database. You now have a full copy of the production database which can be used for long queries. Note that the copy does not require additional storage capacity until updates are performed on the primary database. This solution eliminates the need for Oracle replication, with all its associated drawbacks.
6.3 Hot Standby Database The hot standby database is a database that is permanently in recovery mode. It is useful for applications such as call centers, back office, reservation centers, etc. In case of a system crash, the time to switch to the hot standby is about one minute, regardless of the size of the database.
This solution has its drawbacks, however:
�� Physical changes performed on the primary database require a hot standby re-initialization. The time required to perform the re-initialization is proportional to the size of the database.
�� The transfer of archive logs from the primary to the secondary host must be monitored.
Using SVA SnapShot makes running the hot standby re-initialization easier and quicker! (SnapShot time depends only on the number of SVA disks.) If a physical change occurs on the primary database, only a few minutes are necessary to run the hot standby re-initialization.
A second approach with SVA is to transfer the archive log using the SnapShot feature. You can set up a dedicated disk to store all the archive log files (log_archive_dest database parameter). Periodically make a SnapShot of this disk and mount it on a second host, then replay the log on the standby database.
6.4 Processing a Snapped Database on the Source Server This section provides an example of mounting a SnapShot of a database on the source server.
Notes: 1. The commands, devices, and code are specific to the configuration used (database and
server). They could be customized easily for your own situation, however.
2. You may see in one of the generated files the word “ARCHIVELOG.” This word will not appear if the primary database is not in archive log mode.
Reminder: Hot backup is required to set the database in archive log mode; otherwise only cold backup is feasible.
There is no particular prerequisite for this example, except that the operating system kernel must be able to receive several Oracle instances at the same time. This affects the shared memory segment, semaphores, message queues, etc. See your system administrator.
The major difference between restoring a SnapShot on the same server and restoring it on a different one is in the paths of the database files. The problem is that within a given file system, a physical or logical path is unique. Oracle stores its control files within the database
TL-ENG-PRD-0477-A01 Page 26 of 44

Toulouse Research and Development Center
file paths. If you want to create another database by using an SVA SnapShot, the control file will still point to the source database file paths.
When restoring the database files on the same server—that is, the same file system—you must change the paths of the restored files and tell Oracle that the paths have changed. Therefore control files must be rebuilt.
6.4.1 Backup The backup (cold or hot) is performed as described in Sections 5.1 and 5.2. A cold backup is necessary if the database is not in archive log mode.
6.4.2 Mount the Target Disks After performing the SnapShot, you must mount the target SVA disks on the server. The source points are /dsk
i; the target mount points are the same as the source mount points,
suffixed with “s” for SnapShot. mount /dev/dsk/c2t8d4s2 /dsk1s
mount /dev/dsk/c2t8d5s2 /dsk2s
mount /dev/dsk/c2t8d6s2 /dsk3s
6.4.3 Oracle Operations on the Primary Database You must now perform some Oracle and operating system operations. Under SQL*Plus, connect as a DBA (system/manager, for example) and run the following command:
ALTER DATABASE BACKUP CONTROLFILE TO TRACE;
Oracle generates a file in order to rebuild the control files. This file is located in the directory to which the user_dump_dest Oracle parameter points. (Search the last file of this directory). Following is an example of the file:
Dump file /oradata/SVA/admin/trace/sva_ora_10354.trc
Oracle8 Enterprise Edition Release 8.0.5.0.0 - Production
With the Partitioning and Objects options
PL/SQL Release 8.0.5.0.0 - Production
ORACLE_HOME = /space/oracle/8.0.5
System name: SunOS
Node name: olinda
Release: 5.7
Version: Generic_106541-12
Machine: sun4u
Instance name: SVA
Redo thread mounted by this instance: 1
Oracle process number: 9
Unix process pid: 10354, image: oracleSVA
*** SESSION ID:(8.3) 1999.04.27.11.22.33.000
*** 1999.04.27.11.22.33.000
# The following commands will create a new control file and use it
# to open the database.
# Data used by the recovery manager will be lost. Additional logs may # be required for media recovery of offline data files. Use this
# only if the current version of all online logs are available.
STARTUP NOMOUNT
CREATE CONTROLFILE REUSE DATABASE "SVA" NORESETLOGS ARCHIVELOG
MAXLOGFILES 255
MAXLOGMEMBERS 3
MAXDATAFILES 100
TL-ENG-PRD-0477-A01 Page 27 of 44
Toulouse Research and Development Center
MAXINSTANCES 8
MAXLOGHISTORY 904
LOGFILE
GROUP 1 '/oradata/SVA/redo/log1_SVA.rdo' SIZE 5M,
GROUP 2 '/oradata/SVA/redo/log2_SVA.rdo' SIZE 5M,
GROUP 3 '/oradata/SVA/redo/log3_SVA.rdo' SIZE 5M
DATAFILE
'/oradata/SVA/tssystem/tssystem_SVA.dbf',
'/oradata/SVA/tsrbs/tsrbs_SVA.dbf',
'/oradata/SVA/tstemp/temp_SVA.dbf',
'/oradata/SVA/tsdata/tsdata_1.dbf',
'/oradata/SVA/tsdata/tsdata_2.dbf',
'/oradata/SVA/tsdata/tsdata_3.dbf',
'/oradata/SVA/tsindex/tsindex_1.dbf',
'/oradata/SVA/tsindex/tsindex_2.dbf',
'/oradata/SVA/tsindex/tsindex_3.dbf',
'/oradata/SVA/tsdata/tsdata_4.dbf',
'/oradata/SVA/tsindex/tsindex_4.dbf',
'/oradata/SVA/tsdata/tsdata_5.dbf',
'/oradata/SVA/tsindex/tsindex_5.dbf',
'/oradata/SVA/tsdata/tsdata_6.dbf',
'/oradata/SVA/tsindex/tsindex_6.dbf'
;
# Recovery is required if any of the datafiles are restored backups,
# or if the last shutdown was not normal or immediate.
RECOVER DATABASE
# All logs need archiving and a log switch is needed.
ALTER SYSTEM ARCHIVE LOG ALL;
# Database can now be opened normally.
ALTER DATABASE OPEN;
Note: For the following steps, this file is copied and renamed as “rebuild_control_file.sql”. Move this file into the target area.
This file contains the descriptions and paths of all database files in the source database. The use of the OFA norm is very interesting in this case, as you will see. All the paths mentioned in this file have the following format:
/<Oracle database mount point>/<Database name>/<directory>/<database file name>
Here <Oracle database mount point> is “oradata”, and <Database name> is “SVA”.
Note: Oracle and most DBAs recommend using OFA architecture. If you do not, the operations are possible but more complex.
6.4.4 Operating System Operations for the Secondary Database 1. Make Links
If you are using OFA architecture, make the appropriate links on the file system so you have the equivalent path for the new database (here called “SVA2”). Depending on your integration level, make links to the directories (easier) or to the database files (more difficult):
ln -s /dsk1s/SVA/tssystem_SVA.dbf /oradata/SVA2/tssystem/tssystem_SVA.dbf
ln -s /dsk2s/qwerty/tsrbs_SVA.dbf /oradata/SVA2/tsrbs/tsrbs_SVA.dbf
ln -s /dsk3s/mydata /oradata/SVA2/tsdata
TL-ENG-PRD-0477-A01 Page 28 of 44
Toulouse Research and Development Center
The first line makes a link from one file to another within the same directory hierarchy. The second line makes a link from one file to another within a different directory hierarchy. The third line makes a link from one directory to another.
Here all the database files have a different logical path, except the initSID.ora file.
Note: If you are not using OFA architecture, now may be the time to implement it!
2. Modify Paths in Generated Files Before performing this step, you must identify all the paths for the new database. Open the “rebuild_control_file.sql” file and modify the database file paths according to your links or paths.
�� If you are using the OFA norm, replace the string “/SVA” by the string “/SVA2” in the “rebuild_control_file.sql” file.
�� If you are not using the OFA norm, replace the source mount point by the corresponding target mount point. This is the easiest method. This is a critical step.
3. Change the Database Name A server cannot start the same database twice. Oracle locks the database and deleting the lock is not recommended ($ORACLE_HOME/dbs/lkSID file). Therefore, you must change the name of the database. This change is implemented by changing the following line in the “rebuild_control_file.sql” file:
Original: CREATE CONTROLFILE REUSE DATABASE "SVA" NORESETLOGS ARCHIVELOG
Updated: CREATE CONTROLFILE REUSE SET DATABASE "SVA2" NORESETLOGS ARCHIVELOG
If you are not using OFA, the “rebuild_control_file.sql” file may appear as follows: STARTUP NOMOUNT
CREATE CONTROLFILE REUSE SET DATABASE "SVA2" NORESETLOGS ARCHIVELOG
MAXLOGFILES 255
MAXLOGMEMBERS 3
MAXDATAFILES 100
MAXINSTANCES 8
MAXLOGHISTORY 904
LOGFILE
GROUP 1 '/dsk1s/SVA/redo/log1_SVA.rdo' SIZE 5M,
GROUP 2 '/dsk2s/SVA/redo/log2_SVA.rdo' SIZE 5M,
GROUP 3 '/dsk3s/SVA/redo/log3_SVA.rdo' SIZE 5M
DATAFILE
'/dsk1s/SVA/tssystem/tssystem_SVA.dbf',
'/dsk1s/SVA/tsrbs/tsrbs_SVA.dbf',
'/dsk3s/SVA/tstemp/temp_SVA.dbf',
'/dsk2s/SVA/tsdata/tsdata_1.dbf',
'/dsk2s/SVA/tsdata/tsdata_2.dbf',
'/dsk3s/SVA/tsdata/tsdata_3.dbf',
'/dsk2s/SVA/tsindex/tsindex_1.dbf',
'/dsk2s/SVA/tsindex/tsindex_2.dbf',
'/dsk3s/SVA/tsindex/tsindex_3.dbf',
'/dsk1s/SVA/tsdata/tsdata_4.dbf',
'/dsk2s/SVA/tsindex/tsindex_4.dbf',
'/dsk3s/SVA/tsdata/tsdata_5.dbf',
'/dsk1s/SVA/tsindex/tsindex_5.dbf',
'/dsk1s/SVA/tsdata/tsdata_6.dbf',
'/dsk3s/tsindex/tsindex_6.dbf'
TL-ENG-PRD-0477-A01 Page 29 of 44
Toulouse Research and Development Center
;
# Recovery is required if any of the datafiles are restored backups,
# or if the last shutdown was not normal or immediate.
RECOVER DATABASE
# All logs need archiving and a log switch is needed.
ALTER SYSTEM ARCHIVE LOG ALL;
# Database can now be opened normally.
ALTER DATABASE OPEN;
If you are using OFA, the “rebuild_control_file.sql” file may appear as follows: STARTUP NOMOUNT
CREATE CONTROLFILE REUSE SET DATABASE "SVA2" NORESETLOGS ARCHIVELOG
MAXLOGFILES 255
MAXLOGMEMBERS 3
MAXDATAFILES 100
MAXINSTANCES 8
MAXLOGHISTORY 904
LOGFILE
GROUP 1 '/oradata/SVA2/redo/log1_SVA.rdo' SIZE 5M,
GROUP 2 '/oradata/SVA2/redo/log2_SVA.rdo' SIZE 5M,
GROUP 3 '/oradata/SVA2/redo/log3_SVA.rdo' SIZE 5M
DATAFILE
'/oradata/SVA2/tssystem/tssystem_SVA.dbf',
'/oradata/SVA2/tsrbs/tsrbs_SVA.dbf',
'/oradata/SVA2/tstemp/temp_SVA.dbf',
'/oradata/SVA2/tsdata/tsdata_1.dbf',
'/oradata/SVA2/tsdata/tsdata_2.dbf',
'/oradata/SVA2/tsdata/tsdata_3.dbf',
'/oradata/SVA2/tsindex/tsindex_1.dbf',
'/oradata/SVA2/tsindex/tsindex_2.dbf',
'/oradata/SVA2/tsindex/tsindex_3.dbf',
'/oradata/SVA2/tsdata/tsdata_4.dbf',
'/oradata/SVA2/tsindex/tsindex_4.dbf',
'/oradata/SVA2/tsdata/tsdata_5.dbf',
'/oradata/SVA2/tsindex/tsindex_5.dbf',
'/oradata/SVA2/tsdata/tsdata_6.dbf',
'/oradata/SVA2/tsindex/tsindex_6.dbf'
;
# Recovery is required if any of the datafiles are restored backups,
# or if the last shutdown was not normal or immediate.
RECOVER DATABASE
# All logs need archiving and a log switch is needed.
ALTER SYSTEM ARCHIVE LOG ALL;
# Database can now be opened normally.
ALTER DATABASE OPEN;
4. Rename the initSID.ora File This operation consists of updating the initSID.ora file. You must rename the backup initSVA.ora file from initSVA.ora to initSVA2.ora. Also, you must change the control_files parameter to specify the correct new path for the control file to rebuild.
Note: It is very important to change this parameter because if you omit this step you can destroy the control files of the primary database.
5. Start the Database
TL-ENG-PRD-0477-A01 Page 30 of 44

Toulouse Research and Development Center
You are now ready to start the database located on the target. Set the ORACLE_SID environment variable to SVA2, the name of the new instance:
sh, ksh: export ORACLE_SID=SVA2
csh: setenv ORACLE_SID SVA2
Make a link from $ORACLE_HOME/dbs/initSVA2.ora to initSVA2.ora path, or update the following line in the “rebuild_control_file.sql”:
Original: STARTUP NOMOUNT
Updated: STARTUP NOMOUNT pfile=<path for init file>/initSVA2.ora
Under svrmgrl, type the following commands: oracle@olinda$ svrmgrl
Oracle Server Manager Release 3.0.5.0.0 - Production
(c) Copyright 1997, Oracle Corporation. All Rights Reserved.
Oracle8 Enterprise Edition Release 8.0.5.0.0 - Production
With the Partitioning and Objects options
PL/SQL Release 8.0.5.0.0 - Production
SVRMGR> connect internal;
Connected.
SVRMGR>@rebuild_control_file.sql
ORACLE instance started.
Total System Global Area 27762192 bytes
Fixed Size 48656 bytes
Variable Size 21078016 bytes
Database Buffers 6553600 bytes
Redo Buffers 81920 bytes
Statement processed.
Statement processed.
Statement processed.
Statement processed.
SVRMGR>
The database re-creates the control files, recovering itself if necessary (always when using a hot backup), then archives all the archive logs and opens the instance.
Oracle will display any errors that may have occurred during this process. The most common problem is that a path is not correct, causing a database file to be missing. Correct the error and try again.
The operations are now complete, and both databases are running on the same server. If you want to have several copies, repeat this operation starting from either the primary or the secondary database.
TL-ENG-PRD-0477-A01 Page 31 of 44
Toulouse Research and Development Center
7 Appendix
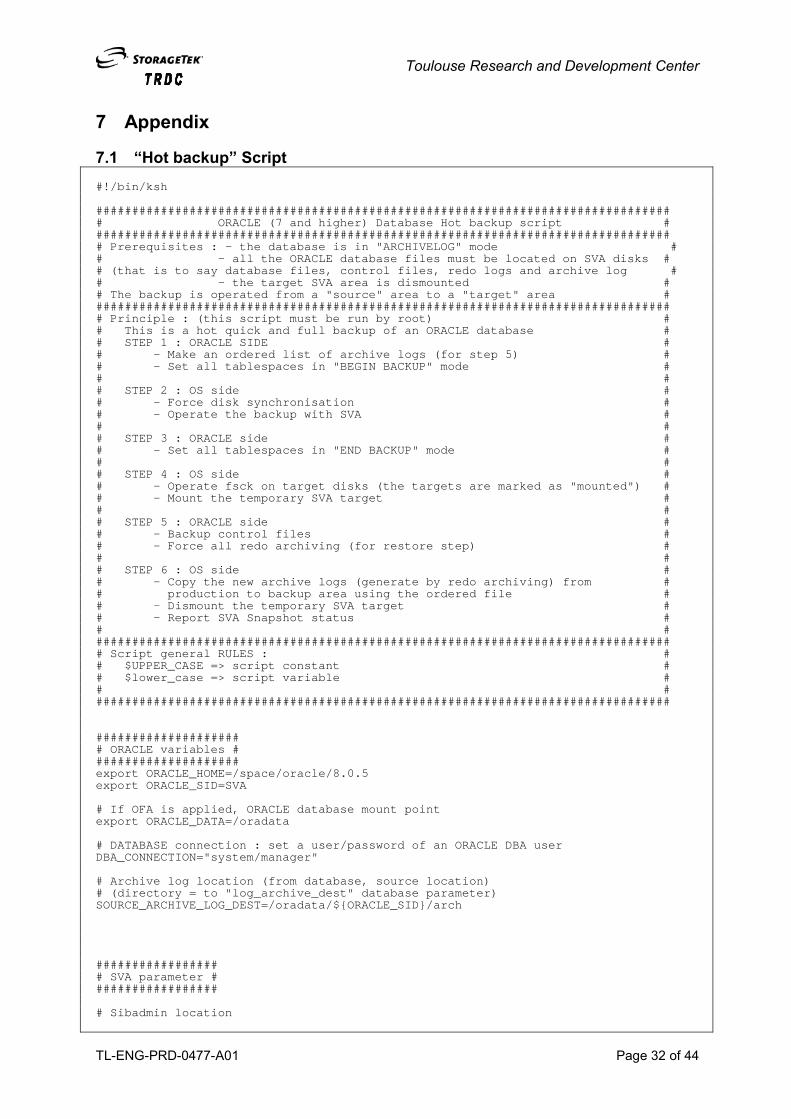
7.1 “Hot backup” Script #!/bin/ksh ################################################################################ # ORACLE (7 and higher) Database Hot backup script # ################################################################################ # Prerequisites : - the database is in "ARCHIVELOG" mode # # - all the ORACLE database files must be located on SVA disks # # (that is to say database files, control files, redo logs and archive log # # - the target SVA area is dismounted # # The backup is operated from a "source" area to a "target" area # ################################################################################ # Principle : (this script must be run by root) # # This is a hot quick and full backup of an ORACLE database # # STEP 1 : ORACLE SIDE # # - Make an ordered list of archive logs (for step 5) # # - Set all tablespaces in "BEGIN BACKUP" mode # # # # STEP 2 : OS side # # - Force disk synchronisation # # - Operate the backup with SVA # # # # STEP 3 : ORACLE side # # - Set all tablespaces in "END BACKUP" mode # # # # STEP 4 : OS side # # - Operate fsck on target disks (the targets are marked as "mounted") # # - Mount the temporary SVA target # # # # STEP 5 : ORACLE side # # - Backup control files # # - Force all redo archiving (for restore step) # # # # STEP 6 : OS side # # - Copy the new archive logs (generate by redo archiving) from # # production to backup area using the ordered file # # - Dismount the temporary SVA target # # - Report SVA Snapshot status # # # ################################################################################ # Script general RULES : # # $UPPER_CASE => script constant # # $lower_case => script variable # # # ################################################################################ #################### # ORACLE variables # #################### export ORACLE_HOME=/space/oracle/8.0.5 export ORACLE_SID=SVA # If OFA is applied, ORACLE database mount point export ORACLE_DATA=/oradata # DATABASE connection : set a user/password of an ORACLE DBA user DBA_CONNECTION="system/manager" # Archive log location (from database, source location) # (directory = to "log_archive_dest" database parameter)
SOURCE_ARCHIVE_LOG_DEST=/oradata/${ORACLE_SID}/arch ################# # SVA parameter # ################# # Sibadmin location
TL-ENG-PRD-0477-A01 Page 32 of 44
Toulouse Research and Development Center
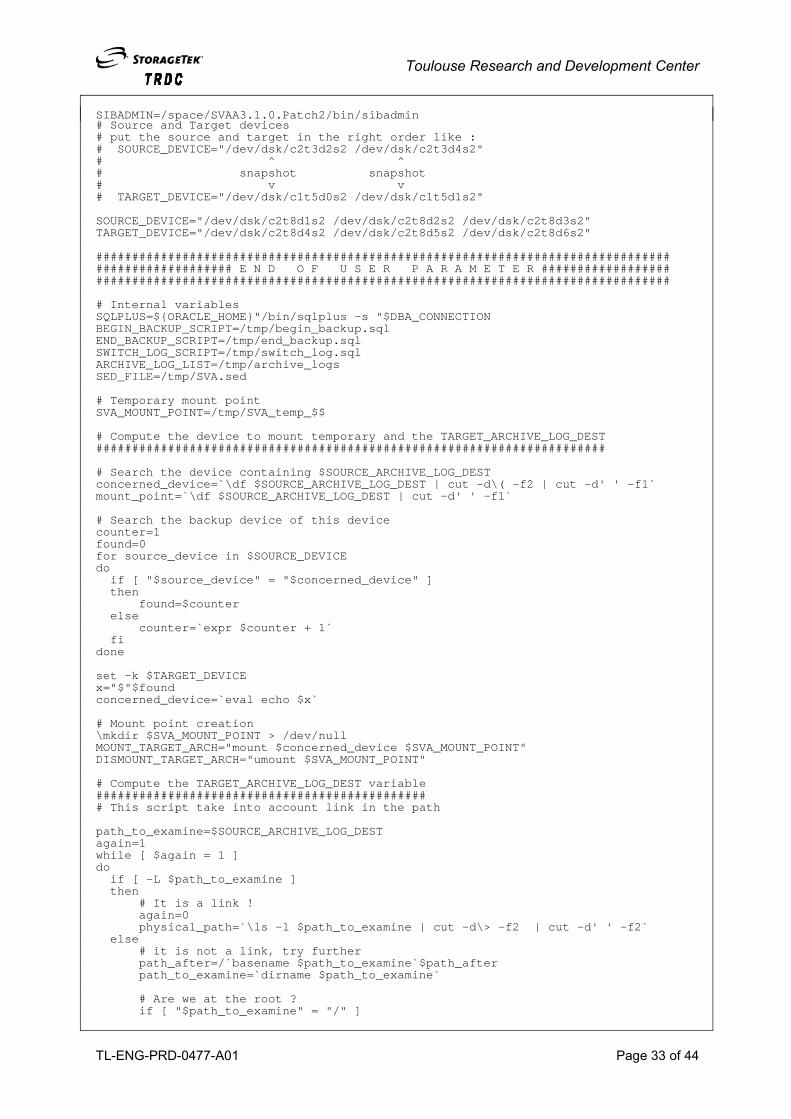
SIBADMIN=/space/SVAA3.1.0.Patch2/bin/sibadmin # Source and Target devices # put the source and target in the right order like : # SOURCE_DEVICE="/dev/dsk/c2t3d2s2 /dev/dsk/c2t3d4s2" # ^ ^ # snapshot snapshot # v v # TARGET_DEVICE="/dev/dsk/c1t5d0s2 /dev/dsk/c1t5d1s2" SOURCE_DEVICE="/dev/dsk/c2t8d1s2 /dev/dsk/c2t8d2s2 /dev/dsk/c2t8d3s2" TARGET_DEVICE="/dev/dsk/c2t8d4s2 /dev/dsk/c2t8d5s2 /dev/dsk/c2t8d6s2" ################################################################################ ################### E N D O F U S E R P A R A M E T E R ################## ################################################################################ # Internal variables SQLPLUS=${ORACLE_HOME}"/bin/sqlplus -s "$DBA_CONNECTION BEGIN_BACKUP_SCRIPT=/tmp/begin_backup.sql END_BACKUP_SCRIPT=/tmp/end_backup.sql SWITCH_LOG_SCRIPT=/tmp/switch_log.sql ARCHIVE_LOG_LIST=/tmp/archive_logs SED_FILE=/tmp/SVA.sed # Temporary mount point SVA_MOUNT_POINT=/tmp/SVA_temp_$$ # Compute the device to mount temporary and the TARGET_ARCHIVE_LOG_DEST ####################################################################### # Search the device containing $SOURCE_ARCHIVE_LOG_DEST concerned_device=`\df $SOURCE_ARCHIVE_LOG_DEST | cut -d\( -f2 | cut -d' ' -f1` mount_point=`\df $SOURCE_ARCHIVE_LOG_DEST | cut -d' ' -f1` # Search the backup device of this device counter=1 found=0 for source_device in $SOURCE_DEVICE do if [ "$source_device" = "$concerned_device" ] then found=$counter else counter=`expr $counter + 1` fi done set -k $TARGET_DEVICE x="$"$found concerned_device=`eval echo $x` # Mount point creation \mkdir $SVA_MOUNT_POINT > /dev/null MOUNT_TARGET_ARCH="mount $concerned_device $SVA_MOUNT_POINT" DISMOUNT_TARGET_ARCH="umount $SVA_MOUNT_POINT" # Compute the TARGET_ARCHIVE_LOG_DEST variable ############################################## # This script take into account link in the path path_to_examine=$SOURCE_ARCHIVE_LOG_DEST again=1 while [ $again = 1 ] do if [ -L $path_to_examine ] then
# It is a link ! again=0 physical_path=`\ls -l $path_to_examine | cut -d\> -f2 | cut -d' ' -f2` else # it is not a link, try further path_after=/`basename $path_to_examine`$path_after path_to_examine=`dirname $path_to_examine` # Are we at the root ? if [ "$path_to_examine" = "/" ]
TL-ENG-PRD-0477-A01 Page 33 of 44

Toulouse Research and Development Center
then again=0 fi fi done # We know the physical path for $SOURCE_ARCHIVE_LOG_DEST physical_path=$physical_path$path_after # Prepare to replace the physical mount point by the temporary mount point echo "s/"`./trans.sh $mount_point`"/"`./trans.sh $SVA_MOUNT_POINT`"/" > $SED_FILE # Archive log location of the target area TARGET_ARCHIVE_LOG_DEST=`echo $physical_path | sed -f $SED_FILE` # Full path and name of secure backup control file with the archive logs # (worst recovery case, should be in target path) SECURE_CONTROL_FILE=${TARGET_ARCHIVE_LOG_DEST}/control_${ORACLE_SID}.ctl ################################################################################ ############ S C R I P T F U N C T I O N S ############ ################################################################################ ################### archive_log_list () { echo echo "===> List of ordered archive logs" ls -t $SOURCE_ARCHIVE_LOG_DEST > $ARCHIVE_LOG_LIST } #################### begin_backup_mode () { echo echo " ============================================================" echo " BEGIN BACKUP at "`date` echo " ============================================================" echo echo "===> Set ORACLE tablespaces in BEGIN BACKUP mode" $SQLPLUS <<! set pages 0 set lines 1000 set trimspool on set heading off PROMPT - Set all tablespaces in "BEGIN BACKUP" mode spool $BEGIN_BACKUP_SCRIPT SELECT 'ALTER TABLESPACE ' || tablespace_name || ' BEGIN BACKUP;' FROM dba_tablespaces / spool off @$BEGIN_BACKUP_SCRIPT exit ! } ################### synchronize_disk () { echo echo "===> Synchronize disks" sync sync sync }
############### SVA_snapshot () { echo echo "===> SVA snapshot" source_id=1 liste_CR=""
TL-ENG-PRD-0477-A01 Page 34 of 44

Toulouse Research and Development Center
snap_CR="OK" for source in $SOURCE_DEVICE do target_id=1 for target in $TARGET_DEVICE do if [ "$source_id" == "$target_id" ] then echo " ... Snapshoting "$source" to "$target" ..." $SIBADMIN snap -source $source -target $target CR=$? if [ $CR != 0 ] then snap_CR="KO" fi liste_CR=$liste_CR" "$CR fi target_id=`expr $target_id + 1` done source_id=`expr $source_id + 1` done } ################## end_backup_mode () { echo echo "===> ORACLE operations" $SQLPLUS <<! set pages 0 set lines 1000 set heading off set trimspool on PROMPT - Set all tablespaces in "END BACKUP" mode spool $END_BACKUP_SCRIPT SELECT 'ALTER TABLESPACE ' || tablespace_name || ' END BACKUP;' FROM dba_tablespaces / spool off @$END_BACKUP_SCRIPT exit ! echo echo " ============================================================" echo " END BACKUP at "`date` echo " ============================================================" echo } ################# fsck_on_target () { echo echo "===> Operate fsck on target disks" for device in $TARGET_DEVICE do echo " ... Running fsck -y $device ..." echo " start at `date`" fsck -y $device > /dev/null if [ $? != 0 ] then echo " ===> WARNING : fsck on $device failed ! <==="
fi echo " ended at `date`" done # Mount the target area in order to save last archive logs and control file echo echo "===> Mount the target area" $MOUNT_TARGET_ARCH }
TL-ENG-PRD-0477-A01 Page 35 of 44

Toulouse Research and Development Center
############################ control_file_and_redo_log () { echo echo "===> ORACLE operations" #echo "===> Backup control file and archive logs ..." $SQLPLUS <<! set pages 0 set lines 1000 set heading off set trimspool on PROMPT PROMPT - Force all redo log archiving spool $SWITCH_LOG_SCRIPT SELECT 'ALTER SYSTEM SWITCH LOGFILE;' FROM v\$logfile / spool off @$SWITCH_LOG_SCRIPT PROMPT PROMPT - Backup control file in case of worst scenario ALTER DATABASE BACKUP CONTROLFILE TO '$SECURE_CONTROL_FILE' REUSE / exit ! } ######################## copy_new_archive_logs () { echo echo "===> Copying new archive logs" # Get the oldest before (full path) first_old_archive=`head -1 $ARCHIVE_LOG_LIST` # Archive log list may be empty if [ "$first_old_archive" = "" ] then first_old_archive=$ARCHIVE_LOG_LIST fi # Set the full path of the first old archive first_old_archive=$SOURCE_ARCHIVE_LOG_DEST/$first_old_archive # Check all archive logs for archive in `ls -t $SOURCE_ARCHIVE_LOG_DEST` do # if new archive log is newer than the last oldest if [ "$SOURCE_ARCHIVE_LOG_DEST/$archive" -nt "$first_old_archive" ] then echo " ... Copying $archive ..." \cp -p $SOURCE_ARCHIVE_LOG_DEST/$archive $TARGET_ARCHIVE_LOG_DEST/$archive fi done # Unmount the temporary target area echo echo "===> Unmount the target area" $DISMOUNT_TARGET_ARCH # Remove the temporary mount point
\rmdir $SVA_MOUNT_POINT > /dev/null } ###################### SVA_snapshot_status () { # Checking snapshot status if [ "$snap_CR" = "KO" ]
TL-ENG-PRD-0477-A01 Page 36 of 44

Toulouse Research and Development Center
then echo echo echo "=============================================" echo " WARNING : Problem during SNAPSHOT ! " echo " status list : " $liste_CR echo " see SVA documentation for details " echo "=============================================" echo fi } ################################################################################ # Beginning of the script # ################################################################################ echo echo " =============================================" echo " H O T B A C K U P " echo " =============================================" echo " start at "`date` echo " =============================================" echo # STEP 1 ######## archive_log_list begin_backup_mode # STEP 2 ######## synchronize_disk SVA_snapshot # STEP 3 ######## end_backup_mode # STEP 4 ######## fsck_on_target # STEP 5 ######## control_file_and_redo_log # STEP 6 ######## copy_new_archive_logs # SVA status ############ SVA_snapshot_status ################################################################################ # End of the script # ################################################################################ echo echo " =============================================" echo " H O T B A C K U P COMPLETED "
echo " =============================================" echo " end at " `date` echo " =============================================" echo
TL-ENG-PRD-0477-A01 Page 37 of 44
Toulouse Research and Development Center
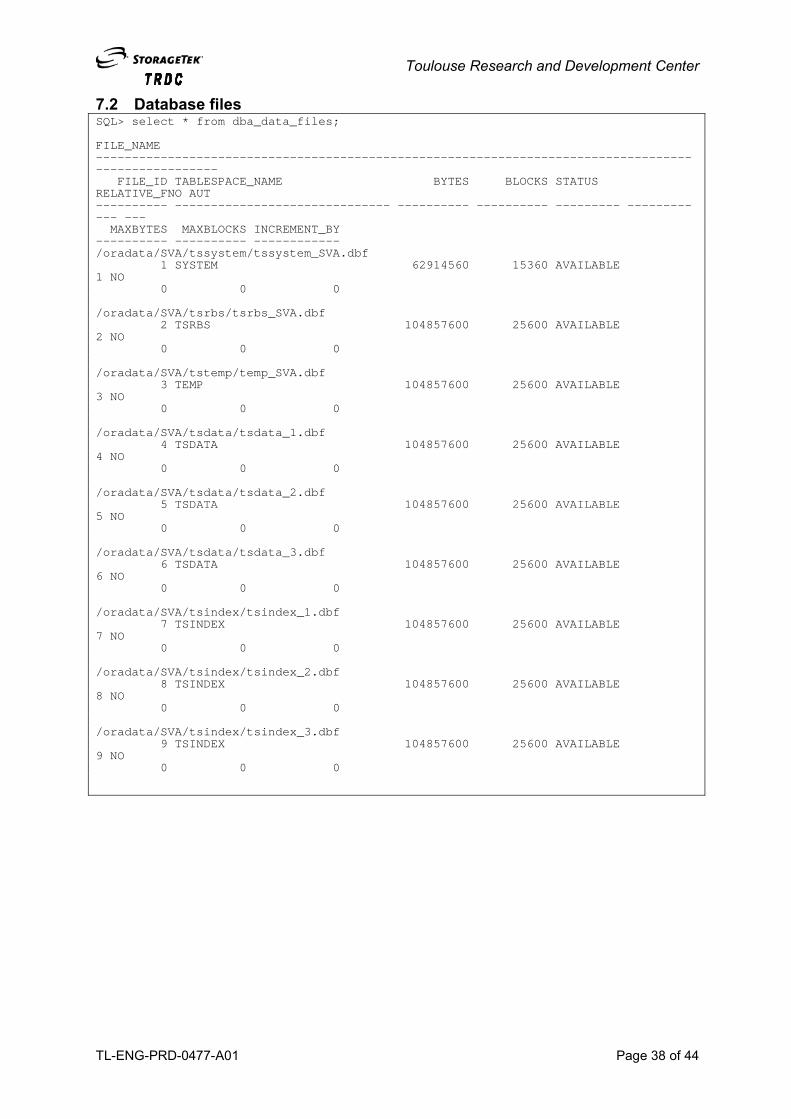
7.2 Database files SQL> select * from dba_data_files; FILE_NAME ---------------------------------------------------------------------------------------------------- FILE_ID TABLESPACE_NAME BYTES BLOCKS STATUS RELATIVE_FNO AUT ---------- ------------------------------ ---------- ---------- --------- ------------ --- MAXBYTES MAXBLOCKS INCREMENT_BY ---------- ---------- ------------ /oradata/SVA/tssystem/tssystem_SVA.dbf 1 SYSTEM 62914560 15360 AVAILABLE 1 NO 0 0 0 /oradata/SVA/tsrbs/tsrbs_SVA.dbf 2 TSRBS 104857600 25600 AVAILABLE 2 NO 0 0 0 /oradata/SVA/tstemp/temp_SVA.dbf 3 TEMP 104857600 25600 AVAILABLE 3 NO 0 0 0 /oradata/SVA/tsdata/tsdata_1.dbf 4 TSDATA 104857600 25600 AVAILABLE 4 NO 0 0 0 /oradata/SVA/tsdata/tsdata_2.dbf 5 TSDATA 104857600 25600 AVAILABLE 5 NO 0 0 0 /oradata/SVA/tsdata/tsdata_3.dbf 6 TSDATA 104857600 25600 AVAILABLE 6 NO 0 0 0 /oradata/SVA/tsindex/tsindex_1.dbf 7 TSINDEX 104857600 25600 AVAILABLE 7 NO 0 0 0 /oradata/SVA/tsindex/tsindex_2.dbf 8 TSINDEX 104857600 25600 AVAILABLE 8 NO 0 0 0 /oradata/SVA/tsindex/tsindex_3.dbf 9 TSINDEX 104857600 25600 AVAILABLE 9 NO 0 0 0
TL-ENG-PRD-0477-A01 Page 38 of 44
Toulouse Research and Development Center
7.3 SVA Extents Repartition
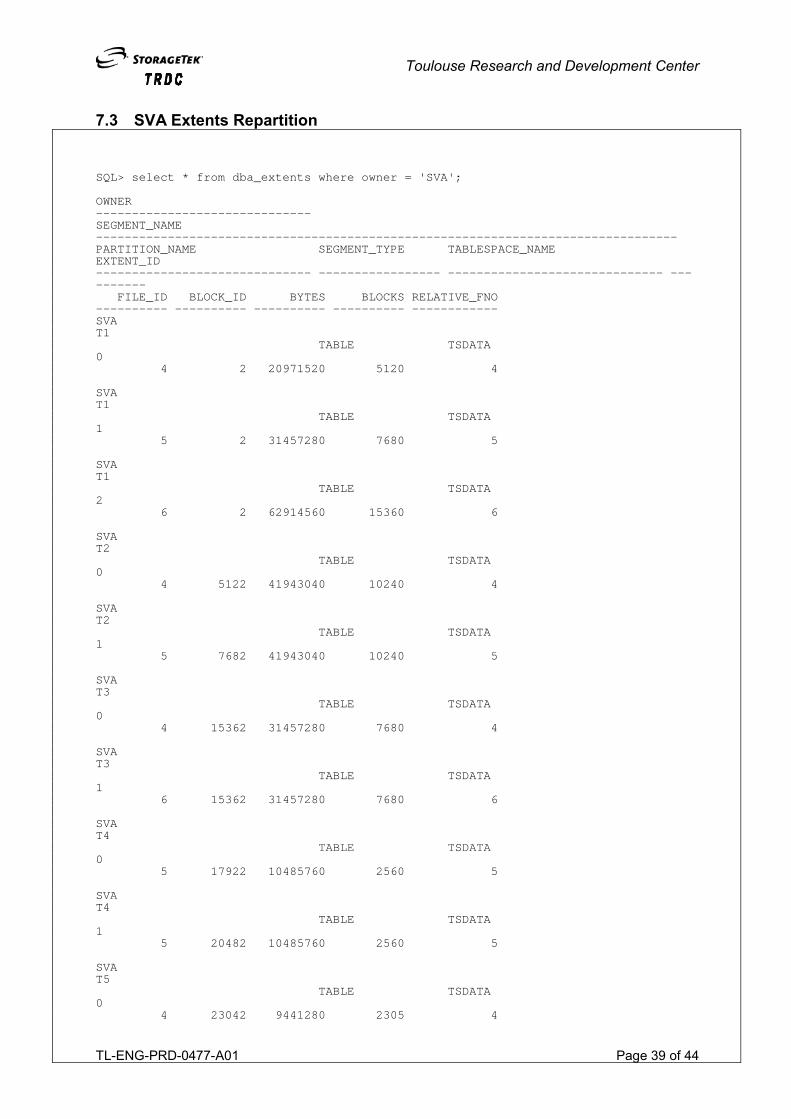
SQL> select * from dba_extents where owner = 'SVA'; OWNER ------------------------------ SEGMENT_NAME --------------------------------------------------------------------------------- PARTITION_NAME SEGMENT_TYPE TABLESPACE_NAME EXTENT_ID ------------------------------ ----------------- ------------------------------ ---------- FILE_ID BLOCK_ID BYTES BLOCKS RELATIVE_FNO ---------- ---------- ---------- ---------- ------------ SVA T1 TABLE TSDATA 0 4 2 20971520 5120 4 SVA T1 TABLE TSDATA 1 5 2 31457280 7680 5 SVA T1 TABLE TSDATA 2 6 2 62914560 15360 6 SVA T2 TABLE TSDATA 0 4 5122 41943040 10240 4 SVA T2 TABLE TSDATA 1 5 7682 41943040 10240 5 SVA T3 TABLE TSDATA 0 4 15362 31457280 7680 4 SVA T3 TABLE TSDATA 1 6 15362 31457280 7680 6 SVA T4 TABLE TSDATA 0 5 17922 10485760 2560 5
T4 SVA
TABLE TSDATA 1 5 20482 10485760 2560 5 SVA T5 TABLE TSDATA 0
TL-ENG-PRD-0477-A01 Page 39 of 44
4 23042 9441280 2305 4

Toulouse Research and Development Center
TABLE TSDATA
SVA T5
1 5 23042 9441280 2305 5
TL-ENG-PRD-0477-A01 Page 40 of 44

Toulouse Research and Development Center
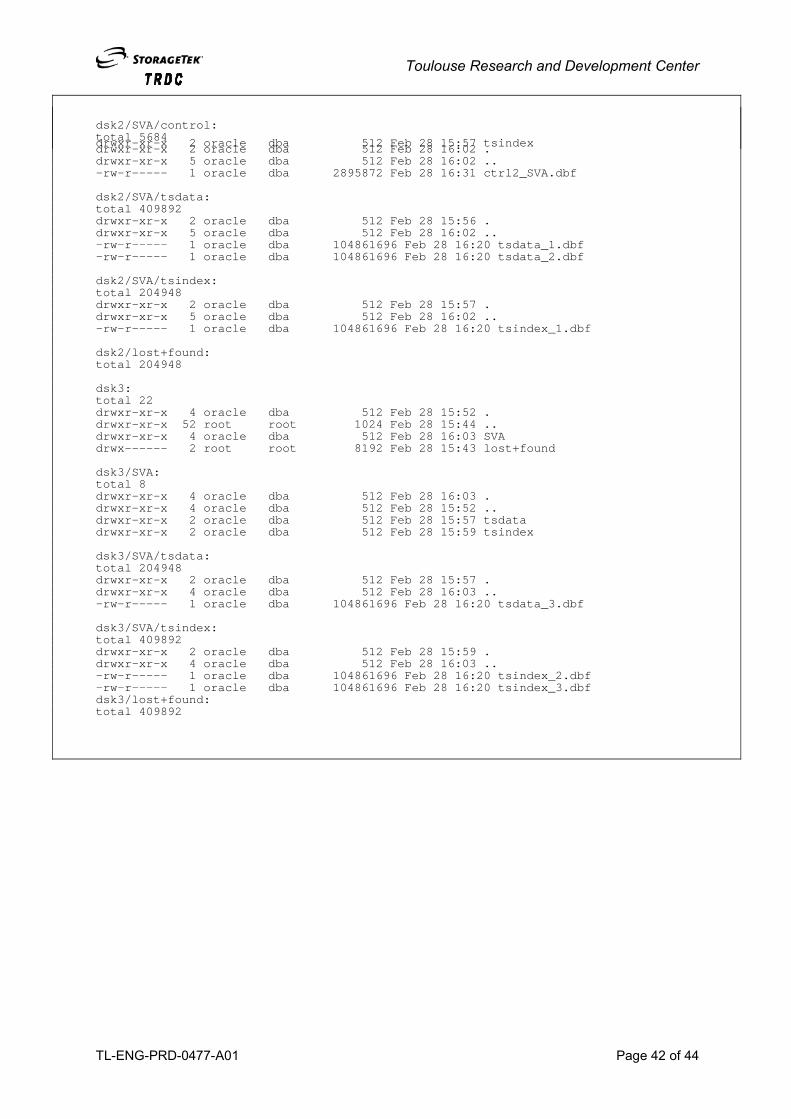
7.4 Files on SVA
dsk1: total 22 drwxr-xr-x 4 oracle dba 512 Feb 28 15:52 . drwxr-xr-x 52 root root 1024 Feb 28 15:44 .. drwxr-xr-x 8 oracle dba 512 Feb 28 16:03 SVA drwx------ 2 root root 8192 Feb 28 15:40 lost+found dsk1/SVA: total 16 drwxr-xr-x 8 oracle dba 512 Feb 28 16:03 . drwxr-xr-x 4 oracle dba 512 Feb 28 15:52 .. drwxr-xr-x 2 oracle dba 512 Feb 28 16:20 arch drwxr-xr-x 2 oracle dba 512 Feb 28 16:02 control drwxr-xr-x 2 oracle dba 512 Feb 28 16:00 redo drwxr-xr-x 2 oracle dba 512 Feb 28 15:55 tsrbs drwxr-xr-x 2 oracle dba 512 Feb 28 15:54 tssystem drwxr-xr-x 2 oracle dba 512 Feb 28 15:54 tstemp dsk1/SVA/arch: total 4 drwxr-xr-x 2 oracle dba 512 Feb 28 16:20 . drwxr-xr-x 8 oracle dba 512 Feb 28 16:03 .. dsk1/SVA/control: total 5684 drwxr-xr-x 2 oracle dba 512 Feb 28 16:02 . drwxr-xr-x 8 oracle dba 512 Feb 28 16:03 .. -rw-r----- 1 oracle dba 2895872 Feb 28 16:31 ctrl1_SVA.dbf dsk1/SVA/redo: total 30820 drwxr-xr-x 2 oracle dba 512 Feb 28 16:00 . drwxr-xr-x 8 oracle dba 512 Feb 28 16:03 .. -rw-r----- 1 oracle dba 5243392 Feb 28 16:23 log1_SVA.rdo -rw-r----- 1 oracle dba 5243392 Feb 28 16:20 log2_SVA.rdo -rw-r----- 1 oracle dba 5243392 Feb 28 16:20 log3_SVA.rdo dsk1/SVA/tsrbs: total 204948 drwxr-xr-x 2 oracle dba 512 Feb 28 15:55 . drwxr-xr-x 8 oracle dba 512 Feb 28 16:03 .. -rw-r----- 1 oracle dba 104861696 Feb 28 16:22 tsrbs_SVA.dbf dsk1/SVA/tssystem: total 122980 drwxr-xr-x 2 oracle dba 512 Feb 28 15:54 . drwxr-xr-x 8 oracle dba 512 Feb 28 16:03 .. -rw-r----- 1 oracle dba 62918656 Feb 28 16:23 tssystem_SVA.dbf dsk1/SVA/tstemp: total 204948 drwxr-xr-x 2 oracle dba 512 Feb 28 15:54 . drwxr-xr-x 8 oracle dba 512 Feb 28 16:03 .. -rw-r----- 1 oracle dba 104861696 Feb 28 16:20 temp_SVA.dbf dsk1/lost+found: total 204948 dsk2: total 22 drwxr-xr-x 4 oracle dba 512 Feb 28 15:52 . drwxr-xr-x 52 root root 1024 Feb 28 15:44 .. drwxr-xr-x 5 oracle dba 512 Feb 28 16:02 SVA drwx------ 2 root root 8192 Feb 28 15:42 lost+found dsk2/SVA: total 10 drwxr-xr-x 5 oracle dba 512 Feb 28 16:02 . drwxr-xr-x 4 oracle dba 512 Feb 28 15:52 .. drwxr-xr-x 2 oracle dba 512 Feb 28 16:02 control
TL-ENG-PRD-0477-A01 Page 41 of 44
drwxr-xr-x 2 oracle dba 512 Feb 28 15:56 tsdata
Toulouse Research and Development Center
drwxr-xr-x 2 oracle dba 512 Feb 28 15:57 tsindex total 5684 rwxr-xr-x 2 oracle dba 512 Feb 28 16:02 .
dsk2/SVA/control:
ddrwxr-xr-x 5 orac
1 oracle dba 512 Feb 28 16:02 ..
-rw-r----- le dba 2895872 Feb 28 16:31 ctrl2_SVA.dbf dsk2/SVA/tsdata: total 409892 rwxr-xr-x 2 oracle dba 512 Feb 28 15:56 . ddrwxr-xr-x 5 ora
1 oracle dba 512 Feb 28 16:02 ..
-rw-r----- cle dba 104861696 Feb 28 16:20 tsdata_1.dbf -rw-r----- 1 oracle dba 104861696 Feb 28 16:20 tsdata_2.dbf dsk2/SVA/tsindex: total 204948 rwxr-xr-x 2 oracle dba 512 Feb 28 15:57 . ddrwxr-xr-x 5 orac
1 oracle dba 512 Feb 28 16:02 ..
-rw-r----- le dba 104861696 Feb 28 16:20 tsindex_1.dbf dsk2/lost+found: total 204948 dsk3: total 22 rwxr-xr-x 4d oracle dba 512 Feb 28 15:52 . drwxr-xr-x 52 root root 1024 Feb 28 15:44 .. drwxr-xr-x 4 oracle dba 512 Feb 28 16:03 SVA drwx------ 2 root root 8192 Feb 28 15:43 lost+found dsk3/SVA: total 8 rwxr-xr-x 4 oracle dba 512 Feb 28 16:03 . ddrwxr-xr-x
-x 4 oracle dba 512 Feb 28 15:52 ..
drwxr-xr 2 oracle dba 512 Feb 28 15:57 tsdata drwxr-xr-x 2 oracle dba 512 Feb 28 15:59 tsindex dsk3/SVA/tsdata: total 204948 rwxr-xr-x 2 oracle dba 512 Feb 28 15:57 . ddrwxr-xr-x 4 ora
1 oracle dba 512 Feb 28 16:03 ..
-rw-r----- cle dba 104861696 Feb 28 16:20 tsdata_3.dbf dsk3/SVA/tsindex: total 409892 rwxr-xr-x 2 oracle dba 512 Feb 28 15:59 . ddrwxr-xr-x 4 orac
1 oracle dba 512 Feb 28 16:03 ..
-rw-r----- le dba 104861696 Feb 28 16:20 tsindex_2.dbf -rw-r----- 1 oracle dba 104861696 Feb 28 16:20 tsindex_3.dbf dsk3/lost+found: total 409892
TL-ENG-PRD-0477-A01 Page 42 of 44

Toulouse Research and Development Center
7.5 Logical Oracle File System /oradata/SVA .: total 22 drwxr-xr-x 10 oracle dba 512 Feb 28 16:11 . drwxr-xr-x 6 oracle dba 512 Feb 28 14:58 .. drwxr-xr-x 9 oracle dba 512 Feb 28 14:58 admin lrwxrwxrwx 1 oracle dba 13 Feb 28 16:11 arch -> /dsk1/SVA/arch drwxr-xr-x 2 oracle dba 512 Feb 28 16:12 control drwxr-xr-x 2 oracle dba 512 Feb 28 16:10 redo drwxr-xr-x 2 oracle dba 512 Feb 28 16:09 tsdata drwxr-xr-x 2 oracle dba 512 Feb 28 16:08 tsindex drwxr-xr-x 2 oracle dba 512 Feb 28 16:07 tsrbs drwxr-xr-x 2 oracle dba 512 Feb 28 16:04 tssystem drwxr-xr-x 2 oracle dba 512 Feb 28 16:06 tstemp ./admin: total 22 drwxr-xr-x 9 oracle dba 512 Feb 28 14:58 . drwxr-xr-x 10 oracle dba 512 Feb 28 16:11 .. -rwxr--r-- 1 oracle dba 314 Feb 28 11:59 START -rwxr--r-- 1 oracle dba 285 Feb 28 11:59 STOP drwxr-xr-x 2 oracle dba 512 Feb 28 12:01 core drwxr-xr-x 2 oracle dba 512 Feb 28 14:58 create drwxr-xr-x 2 oracle dba 512 Feb 28 14:41 dump drwxr-xr-x 2 oracle dba 512 Feb 28 12:01 exp drwxr-xr-x 2 oracle dba 512 Feb 28 12:10 pfile drwxr-xr-x 2 oracle dba 512 Feb 28 12:01 sql drwxr-xr-x 2 oracle dba 512 Feb 28 12:01 trace ./admin/core: total 4 drwxr-xr-x 2 oracle dba 512 Feb 28 12:01 . drwxr-xr-x 9 oracle dba 512 Feb 28 14:58 .. ./admin/create: total 10640 drwxr-xr-x 2 oracle dba 512 Feb 28 14:58 . drwxr-xr-x 9 oracle dba 512 Feb 28 14:58 .. -rw-r--r-- 1 oracle dba 3825 Feb 28 15:03 CRDB_SVA.sql -rw-r--r-- 1 oracle dba 5426198 Feb 28 14:53 create_SVA.log -rw-r--r-- 1 oracle dba 1393 Feb 28 12:02 init.ora ./admin/dump: total 46 drwxr-xr-x 2 oracle dba 512 Feb 28 14:41 . drwxr-xr-x 9 oracle dba 512 Feb 28 14:58 .. -rw-r--r-- 1 oracle dba 21483 Feb 28 16:20 alert_SVA.log ./admin/exp: total 4 drwxr-xr-x 2 oracle dba 512 Feb 28 12:01 . drwxr-xr-x 9 oracle dba 512 Feb 28 14:58 .. ./admin/pfile: total 8 drwxr-xr-x 2 oracle dba 512 Feb 28 12:10 . drwxr-xr-x 9 oracle dba 512 Feb 28 14:58 .. -rw-r--r-- 1 oracle dba 1499 Feb 28 12:10 initSVA.ora ./admin/sql: total 4 drwxr-xr-x 2 oracle dba 512 Feb 28 12:01 . drwxr-xr-x 9 oracle dba 512 Feb 28 14:58 ..
./admin/trace: total 4 drwxr-xr-x 2 oracle dba 512 Feb 28 12:01 . drwxr-xr-x 9 oracle dba 512 Feb 28 14:58 .. ./control: total 8 drwxr-xr-x 2 oracle dba 512 Feb 28 16:12 . drwxr-xr-x 10 oracle dba 512 Feb 28 16:11 ..
TL-ENG-PRD-0477-A01 Page 43 of 44

Toulouse Research and Development Center
lrwxrwxrwx 1 oracle dba 30 Feb 28 16:11 ctrl1_SVA.dbf -> /dsk1/SVA/control/ctrl1_SVA.dbf lrwxrwxrwx 1 oracle dba 30 Feb 28 16:12 ctrl2_SVA.dbf -> /dsk2/SVA/control/ctrl2_SVA.dbf ./redo: total 10 drwxr-xr-x 2 oracle dba 512 Feb 28 16:10 . drwxr-xr-x 10 oracle dba 512 Feb 28 16:11 .. lrwxrwxrwx 1 oracle dba 26 Feb 28 16:10 log1_SVA.rdo -> /dsk1/SVA/redo/log1_SVA.rdo lrwxrwxrwx 1 oracle dba 26 Feb 28 16:10 log2_SVA.rdo -> /dsk1/SVA/redo/log2_SVA.rdo lrwxrwxrwx 1 oracle dba 26 Feb 28 16:10 log3_SVA.rdo -> /dsk1/SVA/redo/log3_SVA.rdo ./tsdata: total 10 drwxr-xr-x 2 oracle dba 512 Feb 28 16:09 . drwxr-xr-x 10 oracle dba 512 Feb 28 16:11 .. lrwxrwxrwx 1 oracle dba 28 Feb 28 16:08 tsdata_1.dbf -> /dsk2/SVA/tsdata/tsdata_1.dbf lrwxrwxrwx 1 oracle dba 28 Feb 28 16:09 tsdata_2.dbf -> /dsk2/SVA/tsdata/tsdata_2.dbf lrwxrwxrwx 1 oracle dba 28 Feb 28 16:09 tsdata_3.dbf -> /dsk3/SVA/tsdata/tsdata_3.dbf ./tsindex: total 10 drwxr-xr-x 2 oracle dba 512 Feb 28 16:08 . drwxr-xr-x 10 oracle dba 512 Feb 28 16:11 .. lrwxrwxrwx 1 oracle dba 30 Feb 28 16:07 tsindex_1.dbf -> /dsk2/SVA/tsindex/tsindex_1.dbf lrwxrwxrwx 1 oracle dba 30 Feb 28 16:08 tsindex_2.dbf -> /dsk3/SVA/tsindex/tsindex_2.dbf lrwxrwxrwx 1 oracle dba 30 Feb 28 16:08 tsindex_3.dbf -> /dsk3/SVA/tsindex/tsindex_3.dbf ./tsrbs: total 6 drwxr-xr-x 2 oracle dba 512 Feb 28 16:07 . drwxr-xr-x 10 oracle dba 512 Feb 28 16:11 .. lrwxrwxrwx 1 oracle dba 28 Feb 28 16:07 tsrbs_SVA.dbf -> /dsk1/SVA/tsrbs/tsrbs_SVA.dbf ./tssystem: total 6 drwxr-xr-x 2 oracle dba 512 Feb 28 16:04 . drwxr-xr-x 10 oracle dba 512 Feb 28 16:11 .. lrwxrwxrwx 1 oracle dba 34 Feb 28 16:04 tssystem_SVA.dbf -> /dsk1/SVA/tssystem/tssystem_SVA.dbf ./tstemp: total 6 drwxr-xr-x 2 oracle dba 512 Feb 28 16:06 . drwxr-xr-x 10 oracle dba 512 Feb 28 16:11 .. lrwxrwxrwx 1 oracle dba 28 Feb 28 16:06 temp_SVA.dbf -> /dsk1/SVA/tstemp/temp_SVA.dbf
TL-ENG-PRD-0477-A01 Page 44 of 44