
SeqStudio Genetic Analyzer Instrument and Software v1 the samples 35 Sample preparation guidelines...
220
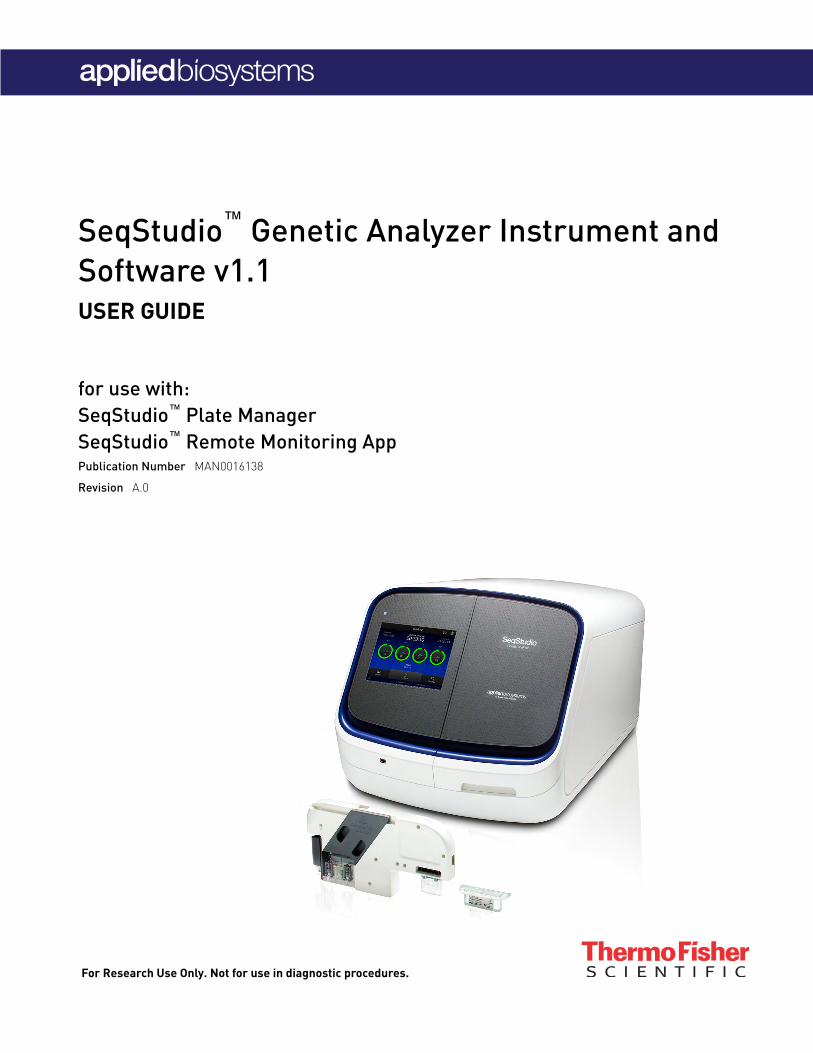
For Research Use Only. Not for use in diagnostic procedures. SeqStudio ™ Genetic Analyzer Instrument and Software v1.1 USER GUIDE for use with: SeqStudio ™ Plate Manager SeqStudio ™ Remote Monitoring App Publication Number MAN0016138 Revision A.0
Transcript of SeqStudio Genetic Analyzer Instrument and Software v1 the samples 35 Sample preparation guidelines...
For Research Use Only. Not for use in diagnostic procedures.
SeqStudio™ Genetic Analyzer Instrument andSoftware v1.1USER GUIDE
for use with:SeqStudio™ Plate ManagerSeqStudio™ Remote Monitoring AppPublication Number MAN0016138
Revision A.0

Manufacturer: Multiple Life Technologies Corporation manufacturing sites are responsible for manufacturing the products associated withthe workflow covered in this guide.
Corporate entity: Life Technologies Corporation | Carlsbad, CA 92008 USA | Toll Free in USA 1 800 955 6288
The information in this guide is subject to change without notice.
DISCLAIMER: TO THE EXTENT ALLOWED BY LAW, LIFE TECHNOLOGIES AND/OR ITS AFFILIATE(S) WILL NOT BE LIABLE FOR SPECIAL, INCIDENTAL,INDIRECT, PUNITIVE, MULTIPLE, OR CONSEQUENTIAL DAMAGES IN CONNECTION WITH OR ARISING FROM THIS DOCUMENT, INCLUDING YOURUSE OF IT.
Revision history: Pub. No. MAN0016138
Revision Date DescriptionA.0 19 October 2017 New document for v1.1 software. Quick references only (MAN0016144 and
MAN0017087) were provided for v1.0 software.
Important Licensing Information: These products may be covered by one or more Limited Use Label Licenses. By use of these products, you acceptthe terms and conditions of all applicable Limited Use Label Licenses.TRADEMARKS: All trademarks are the property of Thermo Fisher Scientific and its subsidiaries unless otherwise specified.
©2017 Thermo Fisher Scientific Inc. All rights reserved.

Contents
■ CHAPTER 1 Product information . . . . . . . . . . . . . . . . . . . . . . . . . . . . . . . . . . . . . . 11
Instrument overview . . . . . . . . . . . . . . . . . . . . . . . . . . . . . . . . . . . . . . . . . . . . . . . . . . . . . . . . . . . 12
Parts of the instrument . . . . . . . . . . . . . . . . . . . . . . . . . . . . . . . . . . . . . . . . . . . . . . . . . . . . . . . . . 13Instrument status indicator . . . . . . . . . . . . . . . . . . . . . . . . . . . . . . . . . . . . . . . . . . . . . . . . . 14
SeqStudio™ Genetic Analyzer consumables . . . . . . . . . . . . . . . . . . . . . . . . . . . . . . . . . . . . . . . . 14SeqStudio™ Genetic Analyzer Cartridge . . . . . . . . . . . . . . . . . . . . . . . . . . . . . . . . . . . . . . . 15SeqStudio™ Genetic Analyzer Cathode Buffer Container . . . . . . . . . . . . . . . . . . . . . . . . 18Radio frequency identification . . . . . . . . . . . . . . . . . . . . . . . . . . . . . . . . . . . . . . . . . . . . . . . 19Important notice regarding use of consumables that exceed supported limits . . . . . 19
Software features . . . . . . . . . . . . . . . . . . . . . . . . . . . . . . . . . . . . . . . . . . . . . . . . . . . . . . . . . . . . . . 20
SeqStudio™ Plate Manager overview . . . . . . . . . . . . . . . . . . . . . . . . . . . . . . . . . . . . . . . . . . . . . . 23Computer and operating system options . . . . . . . . . . . . . . . . . . . . . . . . . . . . . . . . . . . . . . 23Recommended browsers . . . . . . . . . . . . . . . . . . . . . . . . . . . . . . . . . . . . . . . . . . . . . . . . . . . 24
SeqStudio™ Remote Monitoring App overview . . . . . . . . . . . . . . . . . . . . . . . . . . . . . . . . . . . . . . 25
Network connection options . . . . . . . . . . . . . . . . . . . . . . . . . . . . . . . . . . . . . . . . . . . . . . . . . . . . . 26
Experiment types . . . . . . . . . . . . . . . . . . . . . . . . . . . . . . . . . . . . . . . . . . . . . . . . . . . . . . . . . . . . . . 26
Data output . . . . . . . . . . . . . . . . . . . . . . . . . . . . . . . . . . . . . . . . . . . . . . . . . . . . . . . . . . . . . . . . . . . . 27
Secondary analysis software . . . . . . . . . . . . . . . . . . . . . . . . . . . . . . . . . . . . . . . . . . . . . . . . . . . . 28
Workflow: Cloud or desktop . . . . . . . . . . . . . . . . . . . . . . . . . . . . . . . . . . . . . . . . . . . . . . . . . . . . . 30
Workflow: instrument . . . . . . . . . . . . . . . . . . . . . . . . . . . . . . . . . . . . . . . . . . . . . . . . . . . . . . . . . . 31
■ CHAPTER 2 Prepare the samples and the instrument . . . . . . . . . . . . . . 32
Precautions for use . . . . . . . . . . . . . . . . . . . . . . . . . . . . . . . . . . . . . . . . . . . . . . . . . . . . . . . . . . . . 32
Power on the instrument . . . . . . . . . . . . . . . . . . . . . . . . . . . . . . . . . . . . . . . . . . . . . . . . . . . . . . . 33
Sign in . . . . . . . . . . . . . . . . . . . . . . . . . . . . . . . . . . . . . . . . . . . . . . . . . . . . . . . . . . . . . . . . . . . . . . . . 33
Sign in with the Guest instrument profile . . . . . . . . . . . . . . . . . . . . . . . . . . . . . . . . . . . . . . . . . . 33
Sign out . . . . . . . . . . . . . . . . . . . . . . . . . . . . . . . . . . . . . . . . . . . . . . . . . . . . . . . . . . . . . . . . . . . . . . . 34
Parts of the home screen . . . . . . . . . . . . . . . . . . . . . . . . . . . . . . . . . . . . . . . . . . . . . . . . . . . . . . . 34
SeqStudio™ Genetic Analyzer Instrument and Software User Guide 3

Prepare the samples . . . . . . . . . . . . . . . . . . . . . . . . . . . . . . . . . . . . . . . . . . . . . . . . . . . . . . . . . . . 35Sample preparation guidelines . . . . . . . . . . . . . . . . . . . . . . . . . . . . . . . . . . . . . . . . . . . . . . 35Plate layout and loading guidelines . . . . . . . . . . . . . . . . . . . . . . . . . . . . . . . . . . . . . . . . . . 37Prepare the plate . . . . . . . . . . . . . . . . . . . . . . . . . . . . . . . . . . . . . . . . . . . . . . . . . . . . . . . . . . 37Prepare the tubes . . . . . . . . . . . . . . . . . . . . . . . . . . . . . . . . . . . . . . . . . . . . . . . . . . . . . . . . . . 38
Prepare the instrument . . . . . . . . . . . . . . . . . . . . . . . . . . . . . . . . . . . . . . . . . . . . . . . . . . . . . . . . . 39Check the consumables status . . . . . . . . . . . . . . . . . . . . . . . . . . . . . . . . . . . . . . . . . . . . . . 39Load the CBC, the sample plate, and the cartridge . . . . . . . . . . . . . . . . . . . . . . . . . . . . . 40
■ CHAPTER 3 Use the instrument with the Thermo Fisher Cloud . . . . 42
Understanding instrument and Cloud interaction . . . . . . . . . . . . . . . . . . . . . . . . . . . . . . . . . . . 42"Connect" versus "link" . . . . . . . . . . . . . . . . . . . . . . . . . . . . . . . . . . . . . . . . . . . . . . . . . . . . 42First user who links is assigned administrator role . . . . . . . . . . . . . . . . . . . . . . . . . . . . 42Local versus Cloud instrument profiles . . . . . . . . . . . . . . . . . . . . . . . . . . . . . . . . . . . . . . . 43If you link when you are signed in to the instrument . . . . . . . . . . . . . . . . . . . . . . . . . . . . 43If you link when you are not signed in to the instrument . . . . . . . . . . . . . . . . . . . . . . . . . 44Cloud instrument profile roles and functions . . . . . . . . . . . . . . . . . . . . . . . . . . . . . . . . . . 46For more information on using the Thermo Fisher Cloud . . . . . . . . . . . . . . . . . . . . . . . . 46
Cloud administrators for an instrument . . . . . . . . . . . . . . . . . . . . . . . . . . . . . . . . . . . . . . . . . . . 47Cloud administrator functions . . . . . . . . . . . . . . . . . . . . . . . . . . . . . . . . . . . . . . . . . . . . . . . 47Assign instrument administrator role to other users . . . . . . . . . . . . . . . . . . . . . . . . . . . 47Manage the users and administrators of your instrument . . . . . . . . . . . . . . . . . . . . . . . 48Disconnect individual users from an instrument . . . . . . . . . . . . . . . . . . . . . . . . . . . . . . . 49
Register and obtain a Cloud account . . . . . . . . . . . . . . . . . . . . . . . . . . . . . . . . . . . . . . . . . . . . . . 49
Link the instrument to your Thermo Fisher Cloud account . . . . . . . . . . . . . . . . . . . . . . . . . . . 50
Change your own Cloud instrument profile PIN . . . . . . . . . . . . . . . . . . . . . . . . . . . . . . . . . . . . 51
Set up email notifications from the instrument . . . . . . . . . . . . . . . . . . . . . . . . . . . . . . . . . . . . . 52
■ CHAPTER 4 Create or modify a plate setup from thePlate Manager . . . . . . . . . . . . . . . . . . . . . . . . . . . . . . . . . . . . . . . . . . . . . . . . . . . . . . . . . . . . 53
Overview of plate setup settings . . . . . . . . . . . . . . . . . . . . . . . . . . . . . . . . . . . . . . . . . . . . . . . . . 53
Set up a plate using default settings (Plate Manager) . . . . . . . . . . . . . . . . . . . . . . . . . . . . . . . 55Access the Plate Manager on the Cloud . . . . . . . . . . . . . . . . . . . . . . . . . . . . . . . . . . . . . . . 55Access the Plate Manager on the desktop . . . . . . . . . . . . . . . . . . . . . . . . . . . . . . . . . . . . . 55Create or open a plate setup PSM file . . . . . . . . . . . . . . . . . . . . . . . . . . . . . . . . . . . . . . . . 55Enter plate properties . . . . . . . . . . . . . . . . . . . . . . . . . . . . . . . . . . . . . . . . . . . . . . . . . . . . . . 56
Contents
4 SeqStudio™ Genetic Analyzer Instrument and Software User Guide

Assign wells: Sample and run information . . . . . . . . . . . . . . . . . . . . . . . . . . . . . . . . . . . . 57Save a plate setup in the Plate Manager . . . . . . . . . . . . . . . . . . . . . . . . . . . . . . . . . . . . . . 58
Additional plate settings (Plate Manager) . . . . . . . . . . . . . . . . . . . . . . . . . . . . . . . . . . . . . . . . . 59Specify replicate injections . . . . . . . . . . . . . . . . . . . . . . . . . . . . . . . . . . . . . . . . . . . . . . . . . 59Edit analysis settings . . . . . . . . . . . . . . . . . . . . . . . . . . . . . . . . . . . . . . . . . . . . . . . . . . . . . . . 59Modify the default file name convention . . . . . . . . . . . . . . . . . . . . . . . . . . . . . . . . . . . . . . 60Hide or share a plate (Plate setup security) . . . . . . . . . . . . . . . . . . . . . . . . . . . . . . . . . . . 60Define custom fields . . . . . . . . . . . . . . . . . . . . . . . . . . . . . . . . . . . . . . . . . . . . . . . . . . . . . . . 61
■ CHAPTER 5 Create or modify a plate setup from the instrument . . 62
PSM and CSV plate setup files for import into the instrument . . . . . . . . . . . . . . . . . . . . . . . . 63
Shared (public), hidden (my plates), and guest plate setup files . . . . . . . . . . . . . . . . . . . . . . 64
Overview of plate setup settings . . . . . . . . . . . . . . . . . . . . . . . . . . . . . . . . . . . . . . . . . . . . . . . . . 65
(Optional) Set up for auto export of sample data files (AB1 and FSA) . . . . . . . . . . . . . . . . . . 66
Set up a plate using default settings (instrument) . . . . . . . . . . . . . . . . . . . . . . . . . . . . . . . . . . 66Create or import a plate setup . . . . . . . . . . . . . . . . . . . . . . . . . . . . . . . . . . . . . . . . . . . . . . . 66Enter plate properties . . . . . . . . . . . . . . . . . . . . . . . . . . . . . . . . . . . . . . . . . . . . . . . . . . . . . . 67Assign wells: run module, size standard, and dye set . . . . . . . . . . . . . . . . . . . . . . . . . . . 69Assign wells: sample name, sample type, and custom fields . . . . . . . . . . . . . . . . . . . . 70
Set optional plate settings (instrument) . . . . . . . . . . . . . . . . . . . . . . . . . . . . . . . . . . . . . . . . . . . 71Specify replicate injections . . . . . . . . . . . . . . . . . . . . . . . . . . . . . . . . . . . . . . . . . . . . . . . . . . 71Modify analysis settings . . . . . . . . . . . . . . . . . . . . . . . . . . . . . . . . . . . . . . . . . . . . . . . . . . . . 72Modify the default file name convention . . . . . . . . . . . . . . . . . . . . . . . . . . . . . . . . . . . . . . 72Hide or share a plate (Plate setup security) . . . . . . . . . . . . . . . . . . . . . . . . . . . . . . . . . . . 73Define custom fields . . . . . . . . . . . . . . . . . . . . . . . . . . . . . . . . . . . . . . . . . . . . . . . . . . . . . . . 73(Optional) View the injection list, change injection settings or order, orspecify replicates and re-injections . . . . . . . . . . . . . . . . . . . . . . . . . . . . . . . . . . . . . . . . . . 75
■ CHAPTER 6 Start and monitor a run . . . . . . . . . . . . . . . . . . . . . . . . . . . . . . . . . . 76
Load the plate or the tube assembly . . . . . . . . . . . . . . . . . . . . . . . . . . . . . . . . . . . . . . . . . . . . . . 76
Select a plate setup and start a run . . . . . . . . . . . . . . . . . . . . . . . . . . . . . . . . . . . . . . . . . . . . . . . 77Automatic file cleanup . . . . . . . . . . . . . . . . . . . . . . . . . . . . . . . . . . . . . . . . . . . . . . . . . . . . . . 78
Lock the touchscreen . . . . . . . . . . . . . . . . . . . . . . . . . . . . . . . . . . . . . . . . . . . . . . . . . . . . . . . . . . . 79
Monitor a run from the Thermo Fisher Cloud . . . . . . . . . . . . . . . . . . . . . . . . . . . . . . . . . . . . . . 79Open the Remote Monitoring App from Instrument Connect App . . . . . . . . . . . . . . . . 79Open the Remote Monitoring App from the Plate Manager . . . . . . . . . . . . . . . . . . . . . . 81View notifications from the instrument on the Cloud . . . . . . . . . . . . . . . . . . . . . . . . . . . . 83View results in the Remote Monitoring App on the Cloud . . . . . . . . . . . . . . . . . . . . . . . . 83
Monitor a run from a mobile device . . . . . . . . . . . . . . . . . . . . . . . . . . . . . . . . . . . . . . . . . . . . . . . 87
Contents
SeqStudio™ Genetic Analyzer Instrument and Software User Guide 5
Monitor a run from the instrument . . . . . . . . . . . . . . . . . . . . . . . . . . . . . . . . . . . . . . . . . . . . . . . 89(Optional) View the injection list, change injection settings or order, orspecify replicates and re-injections . . . . . . . . . . . . . . . . . . . . . . . . . . . . . . . . . . . . . . . . . . 89View the run status . . . . . . . . . . . . . . . . . . . . . . . . . . . . . . . . . . . . . . . . . . . . . . . . . . . . . . . . 89View real-time results . . . . . . . . . . . . . . . . . . . . . . . . . . . . . . . . . . . . . . . . . . . . . . . . . . . . . . 90Pause a plate or cancel or stop injections . . . . . . . . . . . . . . . . . . . . . . . . . . . . . . . . . . . . . 90View results for the current plate . . . . . . . . . . . . . . . . . . . . . . . . . . . . . . . . . . . . . . . . . . . . 91
Unload the plate or the tube assembly . . . . . . . . . . . . . . . . . . . . . . . . . . . . . . . . . . . . . . . . . . . . 95
■ CHAPTER 7 View and analyze results . . . . . . . . . . . . . . . . . . . . . . . . . . . . . . . . . 97
View results in the Remote Monitoring App on the Cloud . . . . . . . . . . . . . . . . . . . . . . . . . . . . 97
View results on the instrument . . . . . . . . . . . . . . . . . . . . . . . . . . . . . . . . . . . . . . . . . . . . . . . . . . 98View results for the current plate . . . . . . . . . . . . . . . . . . . . . . . . . . . . . . . . . . . . . . . . . . . . 98View results for a previously run plate (run history) . . . . . . . . . . . . . . . . . . . . . . . . . . . 104Edit injection parameters and re-inject samples . . . . . . . . . . . . . . . . . . . . . . . . . . . . . . 104Export a report (QC report) . . . . . . . . . . . . . . . . . . . . . . . . . . . . . . . . . . . . . . . . . . . . . . . . . 105
Export results from the instrument (sample data files and QC reports) . . . . . . . . . . . . . . . 105
Analyze data . . . . . . . . . . . . . . . . . . . . . . . . . . . . . . . . . . . . . . . . . . . . . . . . . . . . . . . . . . . . . . . . . . 106
■ CHAPTER 8 Manage the software (Plate Manager) . . . . . . . . . . . . . . . . 107
Add a custom dye calibration to the Plate Manager . . . . . . . . . . . . . . . . . . . . . . . . . . . . . . . 107
Download a plate setup template as a CSV file . . . . . . . . . . . . . . . . . . . . . . . . . . . . . . . . . . . . 107
Save a plate setup as a PDF . . . . . . . . . . . . . . . . . . . . . . . . . . . . . . . . . . . . . . . . . . . . . . . . . . . . 108
Save a plate setup as a CSV file . . . . . . . . . . . . . . . . . . . . . . . . . . . . . . . . . . . . . . . . . . . . . . . . . 108
Create a plate setup template . . . . . . . . . . . . . . . . . . . . . . . . . . . . . . . . . . . . . . . . . . . . . . . . . . 108
Delete plate setups . . . . . . . . . . . . . . . . . . . . . . . . . . . . . . . . . . . . . . . . . . . . . . . . . . . . . . . . . . . . 109
Manage email notifications in the Thermo Fisher Cloud . . . . . . . . . . . . . . . . . . . . . . . . . . . . 110
Manage run modules . . . . . . . . . . . . . . . . . . . . . . . . . . . . . . . . . . . . . . . . . . . . . . . . . . . . . . . . . . 110Run module settings . . . . . . . . . . . . . . . . . . . . . . . . . . . . . . . . . . . . . . . . . . . . . . . . . . . . . . 111Run modules, read lengths, size ranges, and run times . . . . . . . . . . . . . . . . . . . . . . . . 111
Manage size standards . . . . . . . . . . . . . . . . . . . . . . . . . . . . . . . . . . . . . . . . . . . . . . . . . . . . . . . . 112
Manage analysis settings . . . . . . . . . . . . . . . . . . . . . . . . . . . . . . . . . . . . . . . . . . . . . . . . . . . . . . 113Fragment analysis settings (size calling) . . . . . . . . . . . . . . . . . . . . . . . . . . . . . . . . . . . . . 113Sequencing settings (base calling) . . . . . . . . . . . . . . . . . . . . . . . . . . . . . . . . . . . . . . . . . . 115
■ CHAPTER 9 Manage the software (instrument) . . . . . . . . . . . . . . . . . . . . 117
Connect the instrument to a network drive . . . . . . . . . . . . . . . . . . . . . . . . . . . . . . . . . . . . . . . 117Determine IP address for a computer on a network . . . . . . . . . . . . . . . . . . . . . . . . . . . 117Create folders and enable network folder sharing . . . . . . . . . . . . . . . . . . . . . . . . . . . . 118Connect to a network drive . . . . . . . . . . . . . . . . . . . . . . . . . . . . . . . . . . . . . . . . . . . . . . . . . 119Set up a default Cloud location for opening plate setups . . . . . . . . . . . . . . . . . . . . . . . 119Set up a default Cloud location for saving results (auto export) . . . . . . . . . . . . . . . . . 120
Contents
6 SeqStudio™ Genetic Analyzer Instrument and Software User Guide

Set up a default network location for opening plate setups . . . . . . . . . . . . . . . . . . . . . 120Set up a default network location for saving results (auto export) . . . . . . . . . . . . . . . 121
Link the instrument to your Thermo Fisher Cloud account . . . . . . . . . . . . . . . . . . . . . . . . . . 123
Lock the touchscreen . . . . . . . . . . . . . . . . . . . . . . . . . . . . . . . . . . . . . . . . . . . . . . . . . . . . . . . . . . 124
Manage plate setups . . . . . . . . . . . . . . . . . . . . . . . . . . . . . . . . . . . . . . . . . . . . . . . . . . . . . . . . . . 125Export or delete a plate setup (PSM file) . . . . . . . . . . . . . . . . . . . . . . . . . . . . . . . . . . . . . 125Import a plate setup from a CSV or PSM file . . . . . . . . . . . . . . . . . . . . . . . . . . . . . . . . . . 126
Manage run settings (instrument) . . . . . . . . . . . . . . . . . . . . . . . . . . . . . . . . . . . . . . . . . . . . . . . 126Manage run modules . . . . . . . . . . . . . . . . . . . . . . . . . . . . . . . . . . . . . . . . . . . . . . . . . . . . . . 126Manage size standard definitions . . . . . . . . . . . . . . . . . . . . . . . . . . . . . . . . . . . . . . . . . . . 128Manage analysis settings . . . . . . . . . . . . . . . . . . . . . . . . . . . . . . . . . . . . . . . . . . . . . . . . . . 129Modify the default file name convention . . . . . . . . . . . . . . . . . . . . . . . . . . . . . . . . . . . . . 134
Manage instrument settings . . . . . . . . . . . . . . . . . . . . . . . . . . . . . . . . . . . . . . . . . . . . . . . . . . . . 135Display instrument hardware and software information . . . . . . . . . . . . . . . . . . . . . . . 135Change the instrument name . . . . . . . . . . . . . . . . . . . . . . . . . . . . . . . . . . . . . . . . . . . . . . 135Enable Demo mode . . . . . . . . . . . . . . . . . . . . . . . . . . . . . . . . . . . . . . . . . . . . . . . . . . . . . . . 135Manage date and time settings . . . . . . . . . . . . . . . . . . . . . . . . . . . . . . . . . . . . . . . . . . . . . 135Manage the network configuration . . . . . . . . . . . . . . . . . . . . . . . . . . . . . . . . . . . . . . . . . . 136Check for software updates (administrator only) . . . . . . . . . . . . . . . . . . . . . . . . . . . . . . 137
Manage instrument profiles on the instrument . . . . . . . . . . . . . . . . . . . . . . . . . . . . . . . . . . . 138Local instrument profile roles and functions . . . . . . . . . . . . . . . . . . . . . . . . . . . . . . . . . 138Create a local instrument profile for another user (administrator only) . . . . . . . . . . 138Change the role of a local instrument profile (administrator only) . . . . . . . . . . . . . . . 139Delete an instrument profile from an instrument (administrator only) . . . . . . . . . . . 139Delete the PIN for a local instrument profile (administrator only) . . . . . . . . . . . . . . . 139Create your own local instrument profile . . . . . . . . . . . . . . . . . . . . . . . . . . . . . . . . . . . . 140Change your own local instrument profile PIN . . . . . . . . . . . . . . . . . . . . . . . . . . . . . . . . 140
Manage storage space . . . . . . . . . . . . . . . . . . . . . . . . . . . . . . . . . . . . . . . . . . . . . . . . . . . . . . . . . 140Automatic file cleanup . . . . . . . . . . . . . . . . . . . . . . . . . . . . . . . . . . . . . . . . . . . . . . . . . . . . . 140Export or delete a plate setup (PSM file) . . . . . . . . . . . . . . . . . . . . . . . . . . . . . . . . . . . . . 141Export results from the instrument (sample data files and QC reports) . . . . . . . . . . 141Delete a run history . . . . . . . . . . . . . . . . . . . . . . . . . . . . . . . . . . . . . . . . . . . . . . . . . . . . . . . 142Back up user data (plates and results) (administrator only) . . . . . . . . . . . . . . . . . . . . 142
■ CHAPTER 10 Maintain the instrument . . . . . . . . . . . . . . . . . . . . . . . . . . . . . . 143
Regular maintenance tasks . . . . . . . . . . . . . . . . . . . . . . . . . . . . . . . . . . . . . . . . . . . . . . . . . . . . 143Check the cathode buffer fill level . . . . . . . . . . . . . . . . . . . . . . . . . . . . . . . . . . . . . . . . . . 143Clean the instrument exterior and touchscreen . . . . . . . . . . . . . . . . . . . . . . . . . . . . . . . 144Clean the autosampler . . . . . . . . . . . . . . . . . . . . . . . . . . . . . . . . . . . . . . . . . . . . . . . . . . . . 144
Manage the cartridge . . . . . . . . . . . . . . . . . . . . . . . . . . . . . . . . . . . . . . . . . . . . . . . . . . . . . . . . . . 145SeqStudio™ Genetic Analyzer Cartridge storage . . . . . . . . . . . . . . . . . . . . . . . . . . . . . . 145Set cartridge storage mode (administrator only) . . . . . . . . . . . . . . . . . . . . . . . . . . . . . . 145Check or export the Instrument-cartridge history . . . . . . . . . . . . . . . . . . . . . . . . . . . . 146Check or export the cartridge history . . . . . . . . . . . . . . . . . . . . . . . . . . . . . . . . . . . . . . . 146
Contents
SeqStudio™ Genetic Analyzer Instrument and Software User Guide 7
Fill the capillary array and refresh the polymer delivery system . . . . . . . . . . . . . . . . 147Remove the SeqStudio™ Genetic Analyzer Cartridge . . . . . . . . . . . . . . . . . . . . . . . . . . . 147Insert the cartridge . . . . . . . . . . . . . . . . . . . . . . . . . . . . . . . . . . . . . . . . . . . . . . . . . . . . . . . 147Store the cartridge . . . . . . . . . . . . . . . . . . . . . . . . . . . . . . . . . . . . . . . . . . . . . . . . . . . . . . . . 149SeqStudio™ Integrated Capillary Protector . . . . . . . . . . . . . . . . . . . . . . . . . . . . . . . . . . . 150Long-term on-instrument cartridge storage . . . . . . . . . . . . . . . . . . . . . . . . . . . . . . . . . 151
Install cathode buffer . . . . . . . . . . . . . . . . . . . . . . . . . . . . . . . . . . . . . . . . . . . . . . . . . . . . . . . . . . 151SeqStudio™ Genetic Analyzer Cathode Buffer Container storage . . . . . . . . . . . . . . . . 151Remove the SeqStudio™ Genetic Analyzer Cathode Buffer Container . . . . . . . . . . . . 151Assemble the SeqStudio™ Genetic Analyzer Cathode Buffer Container (CBC) . . . . . 152Insert the Cathode Buffer Container . . . . . . . . . . . . . . . . . . . . . . . . . . . . . . . . . . . . . . . . 153
■ APPENDIX A Troubleshooting . . . . . . . . . . . . . . . . . . . . . . . . . . . . . . . . . . . . . . . . 154
Troubleshooting resources . . . . . . . . . . . . . . . . . . . . . . . . . . . . . . . . . . . . . . . . . . . . . . . . . . . . . 154
Troubleshooting workflow . . . . . . . . . . . . . . . . . . . . . . . . . . . . . . . . . . . . . . . . . . . . . . . . . . . . . 155
Export log files for plates, install runs, injections, and instrument . . . . . . . . . . . . . . . . . . 155
View the raw data and the EPT plot . . . . . . . . . . . . . . . . . . . . . . . . . . . . . . . . . . . . . . . . . . . . . . 156
Data quality alerts . . . . . . . . . . . . . . . . . . . . . . . . . . . . . . . . . . . . . . . . . . . . . . . . . . . . . . . . . . . . 156
Sizecalling and basecalling quality alerts . . . . . . . . . . . . . . . . . . . . . . . . . . . . . . . . . . . . . . . . 156
Check size standard quality . . . . . . . . . . . . . . . . . . . . . . . . . . . . . . . . . . . . . . . . . . . . . . . . . . . . 157
Instrument troubleshooting . . . . . . . . . . . . . . . . . . . . . . . . . . . . . . . . . . . . . . . . . . . . . . . . . . . . 158
Cartridge troubleshooting . . . . . . . . . . . . . . . . . . . . . . . . . . . . . . . . . . . . . . . . . . . . . . . . . . . . . . 159
Sample and data troubleshooting . . . . . . . . . . . . . . . . . . . . . . . . . . . . . . . . . . . . . . . . . . . . . . . 160
EPT data . . . . . . . . . . . . . . . . . . . . . . . . . . . . . . . . . . . . . . . . . . . . . . . . . . . . . . . . . . . . . . . . . . . . 164
Software troubleshooting . . . . . . . . . . . . . . . . . . . . . . . . . . . . . . . . . . . . . . . . . . . . . . . . . . . . . . 165
Service tools . . . . . . . . . . . . . . . . . . . . . . . . . . . . . . . . . . . . . . . . . . . . . . . . . . . . . . . . . . . . . . . . . 167
■ APPENDIX B Link the instrument to your Cloud account—detailed instructions . . . . . . . . . . . . . . . . . . . . . . . . . . . . . . . . . . . . . . . . . . . . . . . . . . . . 168
Workflow: Set up the instrument for Thermo Fisher Cloud access . . . . . . . . . . . . . . . . . . . 168
Network requirements . . . . . . . . . . . . . . . . . . . . . . . . . . . . . . . . . . . . . . . . . . . . . . . . . . . . . . . . 169
Link the instrument from a mobile device . . . . . . . . . . . . . . . . . . . . . . . . . . . . . . . . . . . . . . . . 169Create a Cloud PIN and generate the QR code on the instrument . . . . . . . . . . . . . . . 169Register the instrument with the Instrument Connect App . . . . . . . . . . . . . . . . . . . . . 170
Link the instrument using a link code . . . . . . . . . . . . . . . . . . . . . . . . . . . . . . . . . . . . . . . . . . . . 170
Link the instrument using your Cloud account . . . . . . . . . . . . . . . . . . . . . . . . . . . . . . . . . . . . 174
Set up email notifications from the instrument . . . . . . . . . . . . . . . . . . . . . . . . . . . . . . . . . . . . 176
Contents
8 SeqStudio™ Genetic Analyzer Instrument and Software User Guide
■ APPENDIX C Dye calibration and install standard checks . . . . . . . . . 177
Calibrate dyes . . . . . . . . . . . . . . . . . . . . . . . . . . . . . . . . . . . . . . . . . . . . . . . . . . . . . . . . . . . . . . . . 177Overview of system dye set and custom dye set calibration . . . . . . . . . . . . . . . . . . . . 177System versus custom dyes . . . . . . . . . . . . . . . . . . . . . . . . . . . . . . . . . . . . . . . . . . . . . . . . 177Factory, auto, and manual calibration . . . . . . . . . . . . . . . . . . . . . . . . . . . . . . . . . . . . . . . 178Determine if manual calibration is required . . . . . . . . . . . . . . . . . . . . . . . . . . . . . . . . . . 178Perform a system dye calibration . . . . . . . . . . . . . . . . . . . . . . . . . . . . . . . . . . . . . . . . . . 180Perform a custom dye calibration . . . . . . . . . . . . . . . . . . . . . . . . . . . . . . . . . . . . . . . . . . . 182View the dye calibration history . . . . . . . . . . . . . . . . . . . . . . . . . . . . . . . . . . . . . . . . . . . . 186Import or export a custom dye set . . . . . . . . . . . . . . . . . . . . . . . . . . . . . . . . . . . . . . . . . . 187
Perform an install run . . . . . . . . . . . . . . . . . . . . . . . . . . . . . . . . . . . . . . . . . . . . . . . . . . . . . . . . . 188Overview of install checks . . . . . . . . . . . . . . . . . . . . . . . . . . . . . . . . . . . . . . . . . . . . . . . . . 188Perform an install run . . . . . . . . . . . . . . . . . . . . . . . . . . . . . . . . . . . . . . . . . . . . . . . . . . . . . 189View install run results . . . . . . . . . . . . . . . . . . . . . . . . . . . . . . . . . . . . . . . . . . . . . . . . . . . . 190Export the install run report . . . . . . . . . . . . . . . . . . . . . . . . . . . . . . . . . . . . . . . . . . . . . . . 193View the install run history . . . . . . . . . . . . . . . . . . . . . . . . . . . . . . . . . . . . . . . . . . . . . . . . . 195
■ APPENDIX D Run modules . . . . . . . . . . . . . . . . . . . . . . . . . . . . . . . . . . . . . . . . . . . 197
Run modules, read lengths, size ranges, and run times . . . . . . . . . . . . . . . . . . . . . . . . . . . . 197
■ APPENDIX E Parts and materials . . . . . . . . . . . . . . . . . . . . . . . . . . . . . . . . . . . . 198
Required materials not supplied . . . . . . . . . . . . . . . . . . . . . . . . . . . . . . . . . . . . . . . . . . . . . . . . 198
■ APPENDIX F Instrument specifications and layout . . . . . . . . . . . . . . . . 200
Instrument dimensions . . . . . . . . . . . . . . . . . . . . . . . . . . . . . . . . . . . . . . . . . . . . . . . . . . . . . . . . 200
Instrument clearances . . . . . . . . . . . . . . . . . . . . . . . . . . . . . . . . . . . . . . . . . . . . . . . . . . . . . . . . . 200
Environmental requirements . . . . . . . . . . . . . . . . . . . . . . . . . . . . . . . . . . . . . . . . . . . . . . . . . . . 201
Electrical requirements . . . . . . . . . . . . . . . . . . . . . . . . . . . . . . . . . . . . . . . . . . . . . . . . . . . . . . . . 202
Electrical protective devices . . . . . . . . . . . . . . . . . . . . . . . . . . . . . . . . . . . . . . . . . . . . . . . . . . . . 202
Network requirements . . . . . . . . . . . . . . . . . . . . . . . . . . . . . . . . . . . . . . . . . . . . . . . . . . . . . . . . 203
Safety requirements . . . . . . . . . . . . . . . . . . . . . . . . . . . . . . . . . . . . . . . . . . . . . . . . . . . . . . . . . . . 203Safety practices . . . . . . . . . . . . . . . . . . . . . . . . . . . . . . . . . . . . . . . . . . . . . . . . . . . . . . . . . . 203Required safety equipment . . . . . . . . . . . . . . . . . . . . . . . . . . . . . . . . . . . . . . . . . . . . . . . . 204
Contents
SeqStudio™ Genetic Analyzer Instrument and Software User Guide 9

■ APPENDIX G Safety . . . . . . . . . . . . . . . . . . . . . . . . . . . . . . . . . . . . . . . . . . . . . . . . . . . 205
Symbols on this instrument . . . . . . . . . . . . . . . . . . . . . . . . . . . . . . . . . . . . . . . . . . . . . . . . . . . . 205Conformity symbols . . . . . . . . . . . . . . . . . . . . . . . . . . . . . . . . . . . . . . . . . . . . . . . . . . . . . . . 206
Safety alerts on this instrument . . . . . . . . . . . . . . . . . . . . . . . . . . . . . . . . . . . . . . . . . . . . . . . . . 207
Safety information for instruments not manufactured by Thermo Fisher Scientific . . . . 208
Instrument safety . . . . . . . . . . . . . . . . . . . . . . . . . . . . . . . . . . . . . . . . . . . . . . . . . . . . . . . . . . . . . 208General . . . . . . . . . . . . . . . . . . . . . . . . . . . . . . . . . . . . . . . . . . . . . . . . . . . . . . . . . . . . . . . . . 208Physical injury . . . . . . . . . . . . . . . . . . . . . . . . . . . . . . . . . . . . . . . . . . . . . . . . . . . . . . . . . . . 208Electrical . . . . . . . . . . . . . . . . . . . . . . . . . . . . . . . . . . . . . . . . . . . . . . . . . . . . . . . . . . . . . . . . 208Cleaning and decontamination . . . . . . . . . . . . . . . . . . . . . . . . . . . . . . . . . . . . . . . . . . . . . 209Instrument component and accessory disposal . . . . . . . . . . . . . . . . . . . . . . . . . . . . . . . 209Laser . . . . . . . . . . . . . . . . . . . . . . . . . . . . . . . . . . . . . . . . . . . . . . . . . . . . . . . . . . . . . . . . . . . 209
Safety and electromagnetic compatibility (EMC) standards . . . . . . . . . . . . . . . . . . . . . . . . . 209Safety compliance . . . . . . . . . . . . . . . . . . . . . . . . . . . . . . . . . . . . . . . . . . . . . . . . . . . . . . . . 210EMC . . . . . . . . . . . . . . . . . . . . . . . . . . . . . . . . . . . . . . . . . . . . . . . . . . . . . . . . . . . . . . . . . . . . 210Environmental design . . . . . . . . . . . . . . . . . . . . . . . . . . . . . . . . . . . . . . . . . . . . . . . . . . . . . 211Radio compliance . . . . . . . . . . . . . . . . . . . . . . . . . . . . . . . . . . . . . . . . . . . . . . . . . . . . . . . . . 211
Chemical safety . . . . . . . . . . . . . . . . . . . . . . . . . . . . . . . . . . . . . . . . . . . . . . . . . . . . . . . . . . . . . . . 212
Biological hazard safety . . . . . . . . . . . . . . . . . . . . . . . . . . . . . . . . . . . . . . . . . . . . . . . . . . . . . . . . 213
■ Documentation and support . . . . . . . . . . . . . . . . . . . . . . . . . . . . . . . . . . . . . . . . . . . 214
Related documentation . . . . . . . . . . . . . . . . . . . . . . . . . . . . . . . . . . . . . . . . . . . . . . . . . . . . . . . . 214
Customer and technical support . . . . . . . . . . . . . . . . . . . . . . . . . . . . . . . . . . . . . . . . . . . . . . . . 214
Limited product warranty . . . . . . . . . . . . . . . . . . . . . . . . . . . . . . . . . . . . . . . . . . . . . . . . . . . . . . 215
Index . . . . . . . . . . . . . . . . . . . . . . . . . . . . . . . . . . . . . . . . . . . . . . . . . . . . . . . . . . . . . . . . . . . . . 216
Contents
10 SeqStudio™ Genetic Analyzer Instrument and Software User Guide

Product information
■ Instrument overview . . . . . . . . . . . . . . . . . . . . . . . . . . . . . . . . . . . . . . . . . . . . . . . . . 12
■ Parts of the instrument . . . . . . . . . . . . . . . . . . . . . . . . . . . . . . . . . . . . . . . . . . . . . . . . 13
■ SeqStudio™ Genetic Analyzer consumables . . . . . . . . . . . . . . . . . . . . . . . . . . . . . . 14
■ Software features . . . . . . . . . . . . . . . . . . . . . . . . . . . . . . . . . . . . . . . . . . . . . . . . . . . . . 20
■ SeqStudio™ Plate Manager overview . . . . . . . . . . . . . . . . . . . . . . . . . . . . . . . . . . . 23
■ SeqStudio™ Remote Monitoring App overview . . . . . . . . . . . . . . . . . . . . . . . . . . 25
■ Network connection options . . . . . . . . . . . . . . . . . . . . . . . . . . . . . . . . . . . . . . . . . . . 26
■ Experiment types . . . . . . . . . . . . . . . . . . . . . . . . . . . . . . . . . . . . . . . . . . . . . . . . . . . . . 26
■ Data output . . . . . . . . . . . . . . . . . . . . . . . . . . . . . . . . . . . . . . . . . . . . . . . . . . . . . . . . . 27
■ Secondary analysis software . . . . . . . . . . . . . . . . . . . . . . . . . . . . . . . . . . . . . . . . . . . 28
■ Workflow: Cloud or desktop . . . . . . . . . . . . . . . . . . . . . . . . . . . . . . . . . . . . . . . . . . . 30
■ Workflow: instrument . . . . . . . . . . . . . . . . . . . . . . . . . . . . . . . . . . . . . . . . . . . . . . . . 31
1
SeqStudio™ Genetic Analyzer Instrument and Software User Guide 11

Instrument overview
The Applied Biosystems™ SeqStudio™ Genetic Analyzer with SeqStudio™ DataCollection Software is a fluorescent dye-labeled genetic analysis system usingcapillary electrophoresis technology. It enables both sequencing and fragmentanalysis applications without the need to switch polymer type or capillary arraylength.
The instrument uses the SeqStudio™ Genetic Analyzer Cartridge. It is a self-contained,replaceable cartridge with:
• A 4-capillary array• A universal polymer capable of performing sequencing and fragment analysis• A polymer delivery system (PDS)• Anode buffer
The SeqStudio™ Genetic Analyzer automatically:• Performs an optical alignment each time a cartridge is inserted.• Performs an automatic spectral calibration adjustment (auto calibration) for each
sample to correct for spectral overlap.
The instrument is compatible with 96-well Standard plates and 8-strip Standard tubes.
The SeqStudio™ Genetic Analyzer is a stand-alone instrument. It is run directly fromthe touchscreen with SeqStudio™ Data Collection Software and does not require acomputer. Plate setup can be done directly on the touchscreen, on a computer withSeqStudio™ Plate Manager, or on the Thermo Fisher Cloud. A run can be monitoreddirectly on the instrument touchscreen or remotely on the Thermo Fisher Cloud.
Chapter 1 Product informationInstrument overview1
12 SeqStudio™ Genetic Analyzer Instrument and Software User Guide

Parts of the instrument
2
4
3
1
Figure 1 Front of the instrument1 Front panel indicator—Shows the status of the instrument2 Touchscreen—User interface3 Door—Provides access to the cartridge, the cathode buffer, and sample plate or tubes4 USB port
2
4
5
3
1
Figure 2 Interior of the instrument1 Cartridge rails2 Cartridge3 Cathode buffer (located inside the autosampler)4 Autosampler (contains the plate or tube holder and the cathode buffer)5 Plate or tube holder
Chapter 1 Product informationParts of the instrument 1
SeqStudio™ Genetic Analyzer Instrument and Software User Guide 13

4
31 2
Figure 3 Rear of the instrument1 RJ45 ethernet port2 USB port3 Power receptacle4 On/Off switch
Indicator Instrument status
All lights off Powered off or in Cartridge storage mode.
Blue light (blinking) Starting up.
Blue light Ready to start a run or run is in progress.
Amber light (blinking) Run is paused, door is open, or error state.
SeqStudio™ Genetic Analyzer consumables
Description Cat. No. Amount Storage
SeqStudio™ GeneticAnalyzer Cartridge
A33671 1 cartridge with a SeqStudio™ IntegratedCapillary Protector attached for shipment andstorage.
See page 17
SeqStudio™ GeneticAnalyzer CathodeBuffer Container
A33401 1 package of 4 See page 151
SeqStudio™ IntegratedCapillary Protector
A31923 1 (single-use) for future storage See page 150
Instrument status indicator
Chapter 1 Product informationSeqStudio™ Genetic Analyzer consumables1
14 SeqStudio™ Genetic Analyzer Instrument and Software User Guide

The SeqStudio™ Genetic Analyzer Cartridge is a 4-capillary, self-contained,replaceable cartridge for use with the SeqStudio™ Genetic Analyzer.
The cartridge contains a capillary array, a polymer delivery system, polymer, andanode buffer for 125 injections (500 samples). The cartridge can be used for up to fourmonths after the first use, if it is stored correctly and has not passed the labeled expirydate.
The SeqStudio™ Cartridge has a radio frequency identification (RFID) tag, which isused by the instrument to track remaining usage and expiration.
The cartridge is shipped with an optics cover and an Integrated Capillary Protector.
Remove Before Insertion
1
4
32
Figure 4 Cartridge with optics cover and Integrated Capillary Protector1 Optics cover2 Optics cover hand hold (for removing the optics cover)3 Integrated Capillary Protector4 Cartridge hand hold
SeqStudio™
Genetic AnalyzerCartridge
Chapter 1 Product informationSeqStudio™ Genetic Analyzer consumables 1
SeqStudio™ Genetic Analyzer Instrument and Software User Guide 15

IMPORTANT! Remove the Integrated Capillary Protector before installing thecartridge into the instrument. Installing the cartridge with the ICP in place candamage the capillary array.
1 2 3 4 5 6
Figure 5 Parts of the cartridge1 Universal polymer—Supplies polymer to the polymer delivery pump.2 Polymer delivery system—Pumps polymer into the capillary array.3 Anode buffer reservoir—Genetic Analysis running buffer to support electrophoresis.4 Optical detection window5 Cartridge track—To insert the cartridge into the instrument.6 Capillary array (cathode end)—Tips of the four capillaries that enable electrophoretic
separation of fluorescent-labeled DNA fragments.
6
1 2 3 4 5
Figure 6 Parts of the polymer delivery system1 Universal polymer2 Polymer valve3 Syringe4 Capillary fitting (anode end)5 Buffer valve6 Anode buffer reservoir
Chapter 1 Product informationSeqStudio™ Genetic Analyzer consumables1
16 SeqStudio™ Genetic Analyzer Instrument and Software User Guide

SeqStudio™ Genetic Analyzer Cartridge storage
Condition Description
Shipping Is shipped at 2–8°C.
Store upright at 2–8°C upon receipt.
Save the white storage box and optics cover for off-instrument cartridge storage.
On-instrument storage For routine use, can be used and stored on the instrument for up to 4 months. Ifyou store the cartridge on-instrument:
• The instrument must be powered on.
• A Cathode Buffer Container must also be installed.
The instrument keeps the components under the following conditions when it ispowered on and in Cartridge storage mode:
• Optical detection window—Covered
• Capillary array electrodes—Submerged in cathode buffer (buffer must beabove the fill line in the Cathode Buffer Container)
• Polymer—Chilled
• Anode buffer—Ambient temperature
IMPORTANT! The instrument does not maintain the correct temperatureconditions for the cartridge when it is powered off. Avoid cartridge exposure toambient temperature.
Off-instrument storage For intermittant use, can be stored off-instrument (upright, with an integratedcapillary protector (ICP) and optics cover installed) until the expiry date on thelabel or up to 4 months after first use (see “Store the cartridge“ on page 149).
Note: After you remove the cartridge from the instrument, install an ICP within afew minutes. Avoid cartridge exposure to ambient temperature.
Reuse Can be removed from an instrument then inserted again on the same instrumentor a different instrument, if it was stored properly at 2–8°C and has not expired orexceeded 125 injections.
Information about the cartridge installation and usage is retained in the cartridgehistory (Settings4Cartridge4Instrument–cartridge history).
Chapter 1 Product informationSeqStudio™ Genetic Analyzer consumables 1
SeqStudio™ Genetic Analyzer Instrument and Software User Guide 17

The SeqStudio™ Genetic Analyzer Cathode Buffer Container (CBC) contains runningbuffer for capillary electrophoresis. The container has two compartments. The rearcompartment provides the cathode buffer for electrophoresis. The front compartmentis for capillary wash and waste.
The CBC requires a Reservoir Septa.
See “Assemble the SeqStudio™ Genetic Analyzer Cathode Buffer Container (CBC)“ onpage 152.
1
45
3
2
Figure 7 SeqStudio™ Genetic Analyzer Cathode Buffer Container with Reservoir Septa1 Reservoir Septa2 Notch (inserted towards the rear right in the autosampler)3 Fill line (replace the CBC when the buffer is at the fill line)4 Cathode buffer compartment5 Waste and wash compartment
1
4
2 3
Figure 8 Autosampler1 Location of plate or tubes2 Release button3 Location of Cathode Buffer Container4 Location to position the Cathode Buffer Container notch
SeqStudio™
Genetic AnalyzerCathode BufferContainer
Chapter 1 Product informationSeqStudio™ Genetic Analyzer consumables1
18 SeqStudio™ Genetic Analyzer Instrument and Software User Guide

The cartridge and cathode buffer have radio–frequency identification (RFID) tags. Theinstrument reads and tracks:
• Expiry date (shelf life)• Remaining injections (usage)• Serial number (cartridge only)• Lot number (cathode buffer only)
Table 1 RFID tag read/write events and consumables status updates
Component RFID read RFID write Consumables status update
Cartridge When a cartridgeinserted.
The first time a newcartridge is loaded into aninstrument, themanufacturer expiry dateis listed for Expiry time inthe Consumable statusscreen.
• The Expiry time is reset fromthe manufacturer expiry dateto 4 months from the currentdate of installation.
• After the cartridge has beenloaded and before it is ejected,its cartridge history record isupdated to include its usage onthis instrument.
• During each injection, injectioncount and remaining polymervolume are updated.
Every 8 hours and/or beforeeach run[1]:
• When a cartridge is within2 weeks of expiry date.
• When the number ofinjections is approachingthe 125‑injection limit.
Cathode buffer • When theautosamplerinitializes.
• When a plate isretracted.
• The first time a new CBC isloaded on an instrument, theinstallation date is recorded onthe CBC.
• After each injection, theinjection count is updated.
Every 8 hours and/or beforeeach run[1]:
• When the CBC is within2 days of expiry date.
• When the number ofinjections is approachingthe 125‑injection limit.
[1] If either limit is met, an email notification is also sent to any Cloud users who are linked to this instrument
BEFORE DISMISSING THE WARNING THAT THE CONSUMABLES HAVEREACHED SUPPORTED LIMITS AND CONTINUING WITH OPERATION OF THEINSTRUMENT, PLEASE READ AND UNDERSTAND THE FOLLOWINGIMPORTANT NOTICE AND INFORMATION:
Life Technologies does not recommend the use of consumables that exceed supportedlimits. The recommended limits are designed to promote the production of highquality data and minimize instrument downtime. Reagent and consumable lifetimeminimum performance are based on testing and studies that use reagents andconsumables that have not exceeded supported limits.
The use of consumables beyond the supported limits may impact data quality orcause damage to the instrument or capillary array. The cost of repairing such damageis NOT covered by any Life Technologies product warranty or service plan. Customeruse of expired consumables is at customer's own risk and without recourse to LifeTechnologies. For example, product warranties do not apply to defects resulting fromor repairs required due to misuse, neglect, or accident including, without limitation,operation outside of the environmental or use specifications or not in conformance
Radio frequencyidentification
Important noticeregarding use ofconsumables thatexceed supportedlimits
Chapter 1 Product informationSeqStudio™ Genetic Analyzer consumables 1
SeqStudio™ Genetic Analyzer Instrument and Software User Guide 19

with Life Technologies instructions for the instrument system, software, oraccessories.
Please see your specific service contract or limited product warranty for exactlanguage regarding coverage and ask your Life Technologies representative if youhave further questions.
Software features
The instrument can be operated directly from the touchscreen using the SeqStudio™
Data Collection Software. The touch screen allows scrolling and zooming by pinch.
Plates can be set up and saved on a computer using the SeqStudio™ Plate Managerrunning on a desktop or on the Thermo Fisher Cloud. These plate setups can be savedto and accessed from the instrument from:
• A network drive• A USB drive• The Thermo Fisher Cloud
You can monitor runs directly from the instrument or from the SeqStudio™ RemoteMonitoring App.
Table 2 Features of the software
FeatureSeqStudio™ Data
CollectionSoftware
SeqStudio™ PlateManager (desktop)
SeqStudio™ PlateManager (Cloud) Remote Monitoring App
Plate setup
Create a newplate setup
✓ ✓ ✓ —
Enter plateproperties
✓ ✓ ✓ —
Set up plate wells ✓ ✓ ✓ —
Advanced options for plate setup
Edit sampleproperties
✓ ✓ ✓ —
Edit plate setup ✓ ✓ ✓ —
Manage sizestandards
✓ ✓ ✓ —
Manage runmodules(including edit arun module)
✓ ✓ ✓ —
Chapter 1 Product informationSoftware features1
20 SeqStudio™ Genetic Analyzer Instrument and Software User Guide

FeatureSeqStudio™ Data
CollectionSoftware
SeqStudio™ PlateManager (desktop)
SeqStudio™ PlateManager (Cloud) Remote Monitoring App
Advanced options for plate properties
Adjust fragmentanalysisparameters
✓ ✓ ✓ —
Adjust sequenceparameters
✓ ✓ ✓ —
Adjust the filenaming format
✓ ✓ ✓ —
Select injectionoptions
✓ ✓ ✓ —
Create customdye set
✓ —
(to import, open a platesetup containing a
custom dye set)
—
(to import, open a platesetup containing a
custom dye set)
—
Edit during a run or after a run is complete
Monitor run ✓ — — ✓
Pause or cancel arun
✓ — — ✓
Edit injectionparameters andre-inject samples
✓ — — ✓
View results
View run resultdetails
✓ — — ✓
View PUP score ✓ — — ✓
View trace score(sequenceanalysis only)
✓ — — ✓
View size quality(fragmentanalysis only)
✓ — — ✓
View ContiguousRead Length(sequenceanalysis only)
✓ — — ✓
View and export results
View real-timeresults
✓ — — ✓
Chapter 1 Product informationSoftware features 1
SeqStudio™ Genetic Analyzer Instrument and Software User Guide 21

FeatureSeqStudio™ Data
CollectionSoftware
SeqStudio™ PlateManager (desktop)
SeqStudio™ PlateManager (Cloud) Remote Monitoring App
Adjust thegraphical view
✓ — — ✓
Auto export ormanually exportdata files to theThermo FisherCloud, a networkdrive, or a USB
✓ — — —
Export a resultsreport
✓ — — ✓
Chapter 1 Product informationSoftware features1
22 SeqStudio™ Genetic Analyzer Instrument and Software User Guide
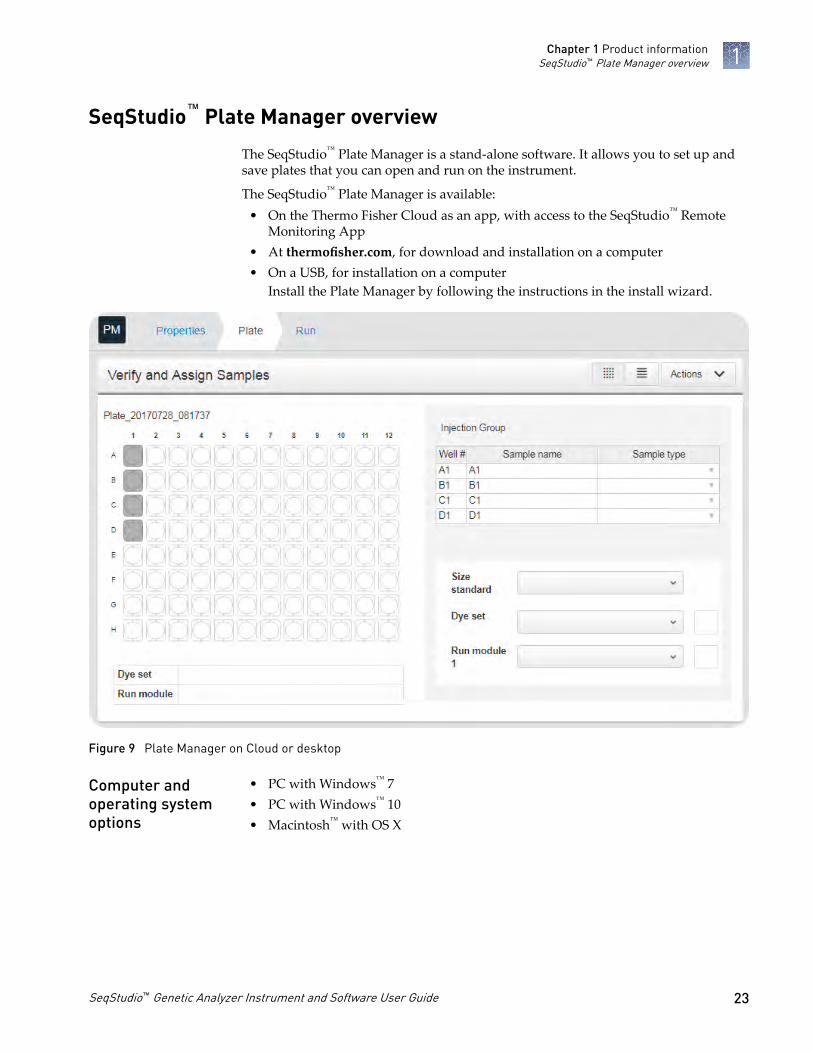
SeqStudio™ Plate Manager overview
The SeqStudio™ Plate Manager is a stand-alone software. It allows you to set up andsave plates that you can open and run on the instrument.
The SeqStudio™ Plate Manager is available:• On the Thermo Fisher Cloud as an app, with access to the SeqStudio™ Remote
Monitoring App• At thermofisher.com, for download and installation on a computer• On a USB, for installation on a computer
Install the Plate Manager by following the instructions in the install wizard.
Figure 9 Plate Manager on Cloud or desktop
• PC with Windows™ 7• PC with Windows™ 10• Macintosh™ with OS X
Computer andoperating systemoptions
Chapter 1 Product informationSeqStudio™ Plate Manager overview 1
SeqStudio™ Genetic Analyzer Instrument and Software User Guide 23

The following browsers are recommended to use the Plate Manager app on ThermoFisher Cloud or a desktop computer:
• Mozilla™ Firefox™ Version 32.0.3+• Google™ Chrome™ Version 38.02+• Apple™ Safari™ Version 7+• Microsoft™ Edge 10+ (Windows™ 10)• Microsoft™ Internet Explorer™ 11 (Windows™ 7 )
The use of other browsers or other versions can result in reduced functionality andimproper display of information.
Recommendedbrowsers
Chapter 1 Product informationSeqStudio™ Plate Manager overview1
24 SeqStudio™ Genetic Analyzer Instrument and Software User Guide
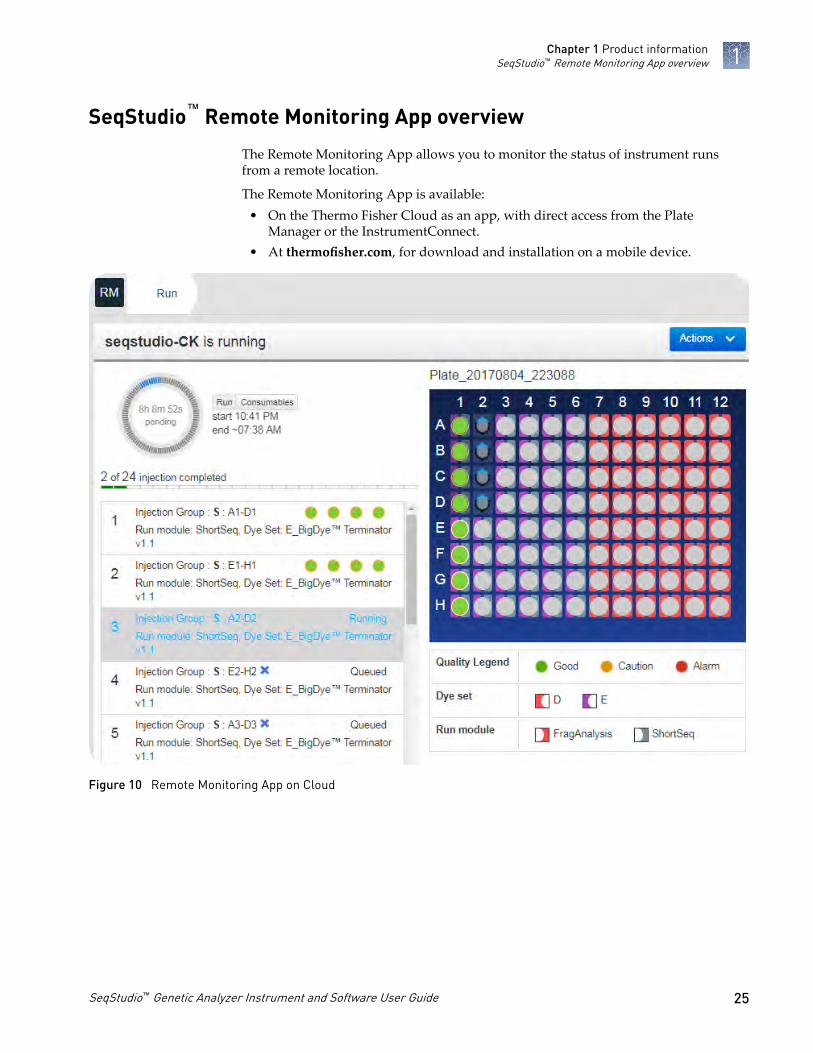
SeqStudio™ Remote Monitoring App overview
The Remote Monitoring App allows you to monitor the status of instrument runsfrom a remote location.
The Remote Monitoring App is available:• On the Thermo Fisher Cloud as an app, with direct access from the Plate
Manager or the InstrumentConnect.• At thermofisher.com, for download and installation on a mobile device.
Figure 10 Remote Monitoring App on Cloud
Chapter 1 Product informationSeqStudio™ Remote Monitoring App overview 1
SeqStudio™ Genetic Analyzer Instrument and Software User Guide 25

Network connection options
The SeqStudio™ Genetic Analyzer can be connected to a network or computer in thefollowing configurations:
Direct connection Local area network (LAN)connection
Thermo Fisher Cloudconnection
Wired Wired or wireless
LAN
Wired or wireless
Experiment types
Sequencing
Sequencing is the determination of the base-pair sequence of a DNA fragment by theformation of extension products of various lengths amplified through PCR.
For more information, see DNA Sequencing by Capillary Electrophoresis Chemistry Guide(Pub. No. 4305080).
Base
Inte
nsity
(RFU
)
Chapter 1 Product informationNetwork connection options1
26 SeqStudio™ Genetic Analyzer Instrument and Software User Guide
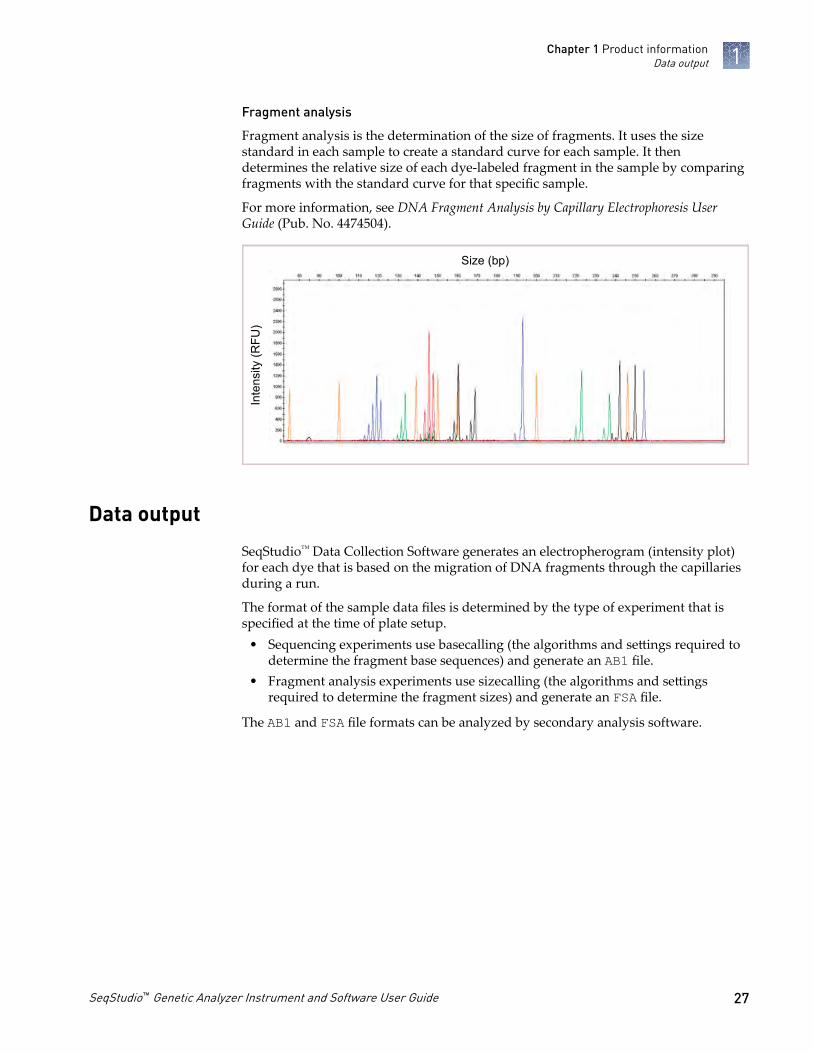
Fragment analysis
Fragment analysis is the determination of the size of fragments. It uses the sizestandard in each sample to create a standard curve for each sample. It thendetermines the relative size of each dye-labeled fragment in the sample by comparingfragments with the standard curve for that specific sample.
For more information, see DNA Fragment Analysis by Capillary Electrophoresis UserGuide (Pub. No. 4474504).
Inte
nsity
(RFU
)Size (bp)
Data output
SeqStudio™ Data Collection Software generates an electropherogram (intensity plot)for each dye that is based on the migration of DNA fragments through the capillariesduring a run.
The format of the sample data files is determined by the type of experiment that isspecified at the time of plate setup.
• Sequencing experiments use basecalling (the algorithms and settings required todetermine the fragment base sequences) and generate an AB1 file.
• Fragment analysis experiments use sizecalling (the algorithms and settingsrequired to determine the fragment sizes) and generate an FSA file.
The AB1 and FSA file formats can be analyzed by secondary analysis software.
Chapter 1 Product informationData output 1
SeqStudio™ Genetic Analyzer Instrument and Software User Guide 27

Secondary analysis software
Secondary analysis software is available for desktop computers and on the ThermoFisher Cloud.
Visit thermofisher.com/cloud for the latest available secondary analysis applications.
Note: Data from the SeqStudio™ Genetic Analyzer may be labeled as "3200" insecondary analysis software.
Thermo Fisher Cloud secondary analysis apps
Analysis App Description
Sequencing Quality Check (QC) module • Automatically checks sequence trace quality.
• Provides a results summary that is based on qualityparameter settings.
• Auto-flags lower-quality traces for further inspection.
Variant Analysis (VA) module • Finds variants in samples that are sequenced on AppliedBiosystems™ genetic analyzers.
• Reports variants at genomic coordinates.
• Allows export of variant calls in standard Variant CallFormat.
Next‑generation Confirmation(NGC) module
• Confirms next-generation sequencing (NGS) variantsusing CE technology.
• Allows visualization of the variants that are detected byboth NGS and CE platforms.
• Allows export of confirmed variants in standard VariantCall Format.
Fragment analysis Sizing Analysis Module PeakScanner™ Software
Performs peak sizing.
Chapter 1 Product informationSecondary analysis software1
28 SeqStudio™ Genetic Analyzer Instrument and Software User Guide

Desktop secondary analysis software
IMPORTANT! Older versions of the desktop secondary analysis software cannotanalyze data files generated by the SeqStudio™ Genetic Analyzer. Contact Support forinformation on obtaining the latest versions of software.
Analysis Software Minimum version required
Sequencing Sequencing Analysis Software 6.2
SeqScape™ Software 3.1
Variant Reporter™ Software 2.1
Minor Variant Finder Software 1.1
Fragment analysis GeneMapper™ Software 5.1
Chapter 1 Product informationSecondary analysis software 1
SeqStudio™ Genetic Analyzer Instrument and Software User Guide 29

Workflow: Cloud or desktop
Get started
Prepare the instrument(page 39)
Prepare the samples(page 35)
Create a plate setup on the Cloud or desktop
Access the Plate Manager on the Cloud(page 55)
Access the Plate Manager on the desktop(page 55)
Create or open a plate setup PSM file(page 55)
Enter plate properties(page 56)
Assign wells: Sample and run information(page 57)
Start and monitor a run
On the instrument: Load the plate or the tube assembly(page 76)
Select a plate setup and start a run(page 77)
Monitor a run from the Thermo Fisher Cloud(page 79)
Monitor a run from a mobile device(page 87)
Monitor a run from the instrument(page 89)
View and analyze results
View results in the Remote Monitoring App on the Cloud(page 83)
View results on the instrument(page 98)
Export results from the instrument (sample data files and QC reports)(page 105)
Analyze data in a secondary analysis software application
Chapter 1 Product informationWorkflow: Cloud or desktop1
30 SeqStudio™ Genetic Analyzer Instrument and Software User Guide

Workflow: instrument
Get started
Prepare the instrument(page 39)
Prepare the samples(page 35)
Create a plate setup on the instrument
Create or import a plate setup(page 66)
Enter plate properties(page 67)
Assign wells: run module, size standard, and dye set(page 69)
Assign wells: sample name, sample type, and custom fields(page 70)
Start and monitor a run
On the instrument: Load the plate or the tube assembly(page 76)
Select a plate setup and start a run(page 77)
Monitor a run from the instrument(page 89)
View and analyze results
View results on the instrument(page 98)
Export results from the instrument (sample data files and QC reports)(page 105)
Analyze data in a secondary analysis software application
Chapter 1 Product informationWorkflow: instrument 1
SeqStudio™ Genetic Analyzer Instrument and Software User Guide 31

Prepare the samples and theinstrument
■ Precautions for use . . . . . . . . . . . . . . . . . . . . . . . . . . . . . . . . . . . . . . . . . . . . . . . . . . . 32
■ Power on the instrument . . . . . . . . . . . . . . . . . . . . . . . . . . . . . . . . . . . . . . . . . . . . . . 33
■ Sign in . . . . . . . . . . . . . . . . . . . . . . . . . . . . . . . . . . . . . . . . . . . . . . . . . . . . . . . . . . . . . . 33
■ Sign in with the Guest instrument profile . . . . . . . . . . . . . . . . . . . . . . . . . . . . . . . . 33
■ Sign out . . . . . . . . . . . . . . . . . . . . . . . . . . . . . . . . . . . . . . . . . . . . . . . . . . . . . . . . . . . . . 34
■ Parts of the home screen . . . . . . . . . . . . . . . . . . . . . . . . . . . . . . . . . . . . . . . . . . . . . . . 34
■ Prepare the samples . . . . . . . . . . . . . . . . . . . . . . . . . . . . . . . . . . . . . . . . . . . . . . . . . . 35
■ Prepare the instrument . . . . . . . . . . . . . . . . . . . . . . . . . . . . . . . . . . . . . . . . . . . . . . . . 39
Precautions for use
CAUTION! PHYSICAL INJURY HAZARD. Do not remove the instrumentcover. There are no components inside the instrument that you can safelyservice yourself. If you suspect a problem, contact technical support.
CAUTION! Moving parts.
CAUTION! FIRE HAZARD. For continued protection against the risk of fire,replace fuses only with listed and certified fuses of the same type and rating asthose currently in the instrument.
CAUTION! Hot surface.
CAUTION! Piercing hazard.
CAUTION! Potential biohazard.
CAUTION! Caution, risk of electrical shock.
2
32 SeqStudio™ Genetic Analyzer Instrument and Software User Guide

Power on the instrument
IMPORTANT! Do not power on the instrument until it has been installed and set upby a Thermo Scientific™ representative.
Press the On/Off switch on the rear panel.
Sign in
1. If the another user is signed in, touch in the home screen, then touch Sign out.
2. In the Sign in screen, touch Sign In, then select your instrument profile andenter your PIN.
Note: If the instrument is left unattended for 120 minutes, the instrument profileis signed out.
Sign in with the Guest instrument profile
In the home screen:
1. In the Sign In screen, touch Sign In.
2. Touch Guest.
Chapter 2 Prepare the samples and the instrumentPower on the instrument 2
SeqStudio™ Genetic Analyzer Instrument and Software User Guide 33

Sign out
In the home screen:
1. Touch .
2. Touch Sign out.
Note: If a run is in progress, Lock the instrument is displayed instead of Signout.
3. Touch Yes to confirm.
Parts of the home screen
1
5
6
3
7
4
2
8
1 Eject icon2 Help3 Instrument name4 Status dial—Touch to create a plate setup.5 Settings—Touch to view previous results (Run History) or configure the instrument.6 Status of consumables—See “Check the consumables status“ on page 39.7 Current user8 Connectivity icons
Chapter 2 Prepare the samples and the instrumentSign out2
34 SeqStudio™ Genetic Analyzer Instrument and Software User Guide

Connectivity icon Status
or The instrument is connected to a wired or wirelessnetwork.
The instrument is connected to network drive.
The current instrument profile is linked to Cloud.
Prepare the samples
Item Guidelines
Plates and tubes • Use MicroAmp™ Optical 96-Well Reaction Plate or MicroAmp™ Reaction Tubes witha tray and retainer set.
IMPORTANT! Fast plates are not compatible with the SeqStudio™ GeneticAnalyzer. Fast plates will damage the cartridge.
• Use the appropriate septa for plates and tubes.
• See “Required materials not supplied“ on page 198 for more information.
Sample preparation guidelines
Chapter 2 Prepare the samples and the instrumentPrepare the samples 2
SeqStudio™ Genetic Analyzer Instrument and Software User Guide 35

Item Guidelines
Fragment analysis samplepreparation
Inte
nsity
(RFU
)
Size (bp)
• Prepare the samples as recommended by the kit for fragment analysis.
• Use 10–20 µL per sample.
• Ensure that Hi‑Di™ Formamide is fresh.– Hi‑Di™ Formamide should not undergo more than two freeze-thaw cycles (one
to aliquot and one for use).
– Use the same day after thawing.
• For more information, see DNA Fragment Analysis by Capillary ElectrophoresisUser Guide (Pub. No. 4474504).
Sequence analysis samplepreparation
• Prepare sequencing reactions according to kit instructions, and purify theextension products with ethanol precipitation, spin columns, or the BigDyeXTerminator™ Purification Kit.
– If ethanol precipitation or spin columns are used, dry the samples in avacuum centrifuge without heat or at low heat for 10–15 minutes or until dry.
Note: Do not over dry the samples.
– Resuspend in 10–20 µL of Hi‑Di™ Formamide.
• Use 65 µL or 130 µL for samples that are prepared with the BigDye XTerminator™
Purification Kit. See BigDye XTerminator™ Purification Kit Protocol(Pub. No. 4374408).
IMPORTANT! Use the appropriate run modules for samples prepared withBigDye XTerminator™ Purification Kit. See “Run modules, read lengths, sizeranges, and run times“ on page 111.
• Use 10–20 µL for samples prepared with Hi‑Di™ Formamide.
• Ensure that Hi‑Di™ Formamide is fresh.– Hi‑Di™ Formamide should not undergo more than two freeze-thaw cycles (one
to aliquot and one for use).
– Use the same day after thawing.
• Do not resuspend samples in water, which can decrease sample stability.
• For more information, see DNA Sequencing by Capillary ElectrophoresisChemistry Guide (Pub. No. 4305080).
Chapter 2 Prepare the samples and the instrumentPrepare the samples2
36 SeqStudio™ Genetic Analyzer Instrument and Software User Guide

• Samples are stable for 16–24 hours on the instrument.• Load a maximum of 48 samples per plate if you use a long run module (Long
Seq, Long Seq BDX, and Long Frag Analysis). The long fragment analysis runmodules can take >24 hours to run an entire 96-well plate, and samples are stableon the instrument for 16–24 hours.
• Add samples to plates in columns. The default injection order is: A1–D1, E1–H1,A2–D2, E2–H2....A12–D12, E12–H12.
1 3
2 4
1 Injection group 1, wells A1–D12 Injection group 2, wells E1–H13 Injection group 3, wells A2–D24 Injection group 4, wells E2–H2
On a clean and level surface:
1. Pipet the sample into the plate.
2. Place a septum onto the plate.a. Align the holes of the septa with the
wells.
b. Press gently until the septum isinserted into position in each well.
3. Centrifuge the plate assembly briefly tocollect the contents at the bottom of eachwell.Centrifuge the plate assembly again ifthe contents are not at the bottom of thewells.
Load the plate onto the instrument immediately or keep the plate on ice and protectedfrom light until it is loaded onto the instrument.
Plate layout andloading guidelines
Prepare the plate
1 2
1 Plate2 Septum
Chapter 2 Prepare the samples and the instrumentPrepare the samples 2
SeqStudio™ Genetic Analyzer Instrument and Software User Guide 37
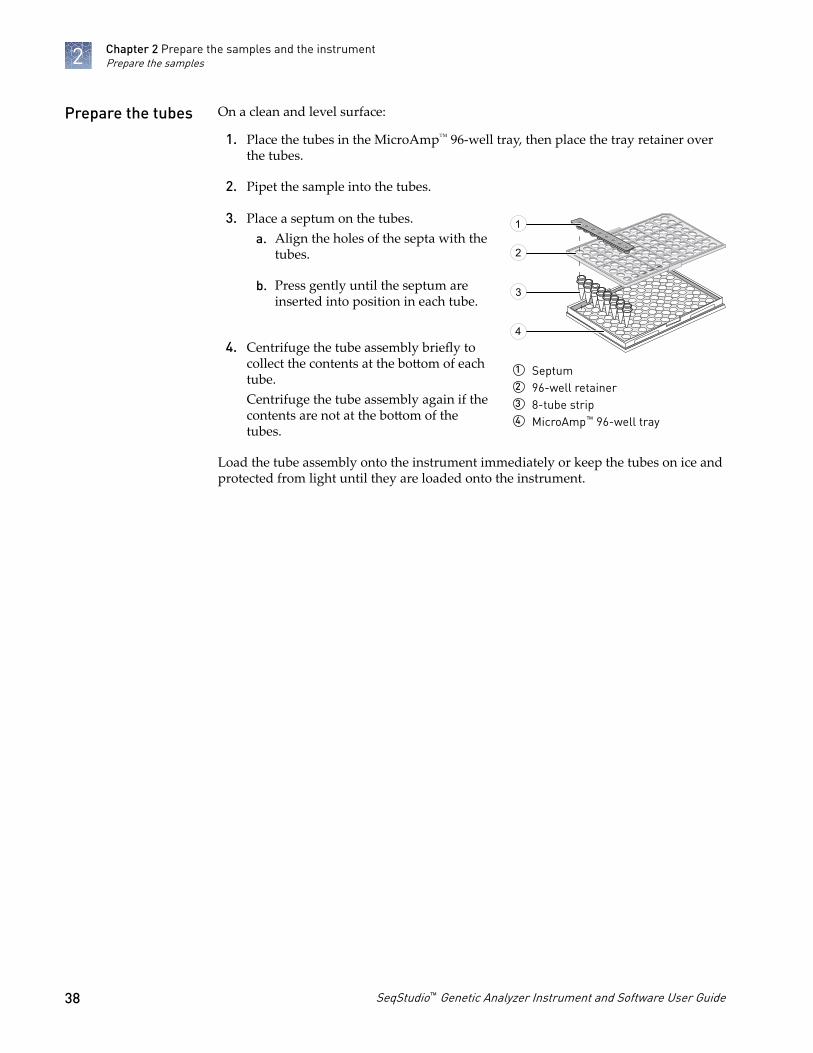
On a clean and level surface:
1. Place the tubes in the MicroAmp™ 96-well tray, then place the tray retainer overthe tubes.
2. Pipet the sample into the tubes.
3. Place a septum on the tubes.a. Align the holes of the septa with the
tubes.
b. Press gently until the septum areinserted into position in each tube.
4. Centrifuge the tube assembly briefly tocollect the contents at the bottom of eachtube.Centrifuge the tube assembly again if thecontents are not at the bottom of thetubes.
Load the tube assembly onto the instrument immediately or keep the tubes on ice andprotected from light until they are loaded onto the instrument.
Prepare the tubes
1
2
3
4
1 Septum2 96-well retainer3 8-tube strip4 MicroAmp™ 96-well tray
Chapter 2 Prepare the samples and the instrumentPrepare the samples2
38 SeqStudio™ Genetic Analyzer Instrument and Software User Guide

Prepare the instrument
1. Touch Settings4Consumable status.
2. Ensure that:• Sufficient consumables are installed for the run.• Installed consumables have not exceeded their expiry date.
Display Cartridge Cathode buffer
NA Not installed on the instrument. Not installed on the instrument.
White OK for use. OK for use.
Yellow OK for use, but:
• It will exceed the manufacturer's expirydate within 2 weeks or
• It will exceed the maximum number ofdays allowed on the instrument (120 days)within 2 weeks
OK for use, but:
• It will exceed the manufacturer's expirydate within 2 days or
• It will exceed the maximum number ofdays allowed on the instrument (14 days)within 2 days
Red Expired because either of the followingconditions have occurred:
• It has exceeded the manufacturer's expirydate or
• It has been installed on the instrument for>120 days
The cartridge is expired.
• It has exceeded the manufacturer's expirydate or
• It has been installed on the instrument for>14 days
See “Insert the Cathode Buffer Container“ on page 153 if a new Cathode BufferContainer is required.See “Insert the cartridge“ on page 147 if a new cartridge is required.
3. Touch Close, then touch .
Check theconsumablesstatus
Chapter 2 Prepare the samples and the instrumentPrepare the instrument 2
SeqStudio™ Genetic Analyzer Instrument and Software User Guide 39

The Eject plate command is disabled for a few minutes after you insert a cartridge. Ifyou are loading the CBC, sample plate, and cartridge at the same time, you can savetime by loading the CBC and sample plate before you insert the cartridge.
For information on loading the individual components, see:• “Install cathode buffer“ on page 151• “Load the plate or the tube assembly“ on page 76• “Insert the cartridge“ on page 147
In the home screen:
1. Touch , touch Eject plate, then open the instrument door when prompted.
2. Press the release button on the autosampler to open the lid, then remove theCBC.
2
1
1 Release button2 Location of CBC
3. Ensure that the level of buffer isabove the fill line.The CBC must be replaced if thebuffer is at or below the fill line (see “Assemble the SeqStudio™ GeneticAnalyzer Cathode Buffer Container(CBC)“ on page 152 and “Insert theCathode Buffer Container“ onpage 153).
4. Reinstall the CBC.
5. Place the plate or tube assemblyfirmly in the autosampler.
Load the CBC, thesample plate, andthe cartridge
1
1 Replace if buffer is at or below the fill line
1
1 New CBC buffer level
Chapter 2 Prepare the samples and the instrumentPrepare the instrument2
40 SeqStudio™ Genetic Analyzer Instrument and Software User Guide

6. Close the autosampler lid: Press down on the center of the lid or press down onboth sides of the lid with equal pressure until the lid clicks shut.
7. Touch Retract plate, then close the instrument door.
8. Touch Eject cartridge, then open the instrument door when prompted.
9. Hold the cartridge at the hand hold above the capillaries, then pull to remove itfrom the instrument.
10. Insert a new cartridge (see “Insert the cartridge“ on page 147).
11. Close the instrument door.
Chapter 2 Prepare the samples and the instrumentPrepare the instrument 2
SeqStudio™ Genetic Analyzer Instrument and Software User Guide 41

Use the instrument with the ThermoFisher Cloud
■ Understanding instrument and Cloud interaction . . . . . . . . . . . . . . . . . . . . . . . . 42
■ Cloud administrators for an instrument . . . . . . . . . . . . . . . . . . . . . . . . . . . . . . . . . 47
■ Register and obtain a Cloud account . . . . . . . . . . . . . . . . . . . . . . . . . . . . . . . . . . . . 49
■ Link the instrument to your Thermo Fisher Cloud account . . . . . . . . . . . . . . . . . 50
■ Change your own Cloud instrument profile PIN . . . . . . . . . . . . . . . . . . . . . . . . . . 51
■ Set up email notifications from the instrument . . . . . . . . . . . . . . . . . . . . . . . . . . . 52
Understanding instrument and Cloud interaction
The words "connect" and "link" are used interchangeably in the software.
In one location you touch a Connect button, in another location you touch a Linkbutton.
Both actions do the same thing:• Connect the instrument to the InstrumentConnect on the Thermo Fisher Cloud
and• Link your local instrument profile to your Thermo Fisher Cloud account.
The first user who links the instrument to the Thermo Fisher Cloud is automaticallyassigned Cloud administrator role for the instrument (even if the user has a standardlocal profile).
Additional instrument administrators can be assigned, and user roles can be changedafter linking.
For more information, see “Cloud instrument profile roles and functions“ onpage 46 and “Cloud administrators for an instrument“ on page 47.
3
"Connect" versus"link"
First user wholinks is assignedadministrator role
42 SeqStudio™ Genetic Analyzer Instrument and Software User Guide

• Local instrument profile—All plates and results are stored on the instrumentunder a local instrument profile.
• Cloud instrument profile—When you link your local instrument profile to yourCloud account, a Cloud instrument profile is created. With a Cloud instrumentprofile:
– You can save results and data files directly to your Cloud account, accessplate setups that you create in the SeqStudio™ Plate Manager on the Cloud ordesktop, and monitor instrument runs from the Cloud.
– All plate setups, data files, and results are automatically copied to yourCloud account if the plate setup Save location is set to Cloud.
In this scenario, your local instrument profile name is created manually on theinstrument before you link. Your local instrument profile name differs from yourCloud instrument profile name.
If you link to the Cloud when you are signed in to the instrument:
Phase Steps that occur
Before you link: • You enter your local instrument profile name in the Sign In screen.
• Your local instrument profile (UserABC) is displayed in the home screen of theinstrument.
• All plates and results that you create are accessible only when you are signed inwith your local instrument profile.
When you link: • You use an option described in “Link the instrument to your Thermo Fisher Cloudaccount“ on page 50 to link.
• If this is the first time you link, a Cloud instrument profile is created using theFirstNameLastInitial of the user name from your thermofisher.com account.Example: [email protected] First name is User, Last name is Gray. Cloudaccount username is User G.
• Your local instrument profile (UserABC) is linked to your Cloud account([email protected]).
• Your Cloud instrument profile (User G.) replaces your local instrument profile.
Local versusCloud instrumentprofiles
If you link whenyou are signed into the instrument
Chapter 3 Use the instrument with the Thermo Fisher CloudUnderstanding instrument and Cloud interaction 3
SeqStudio™ Genetic Analyzer Instrument and Software User Guide 43

Phase Steps that occur
After you link: • Your Cloud instrument profile (User G.) and is displayed in the home screen ofthe instrument.
• Plates and results from your local instrument profile can be copied to the Cloud(see “Export results from the instrument (sample data files and QC reports)“ onpage 105).
• New plates and results are saved under your Cloud instrument profile.
• Your Cloud instrument profile name (User G. ) is available for selection in theSign In screen.
If your Cloud account isunlinked:
• Your local instrument profile (UserABC) is displayed in the home screen of theinstrument.
• Plates and results that were saved under your Cloud instrument profile areaccessible under your local instrument profile.
• New plates and results are saved under local instrument profile and can be copiedto the Cloud (see “Export results from the instrument (sample data files and QCreports)“ on page 105).
• Your local instrument profile name (UserABC) is available for selection in the SignIn screen.
In this scenario, your local instrument profile name is created automatically on theinstrument before you link. The same user name is used for your local instrumentprofile and your Cloud instrument profile. Plates and results are accessible when yousign in with either profile.
If you link to the Cloud when you are not signed in to the instrument:
Phase Steps that occur
Before you link: • In the Sign In screen, you touch Get Started4Connect.
If you link whenyou are not signedin to theinstrument
Chapter 3 Use the instrument with the Thermo Fisher CloudUnderstanding instrument and Cloud interaction3
44 SeqStudio™ Genetic Analyzer Instrument and Software User Guide

Phase Steps that occur
When you link: • You use an option described in “Link the instrument to your Thermo Fisher Cloudaccount“ on page 50 to link.
• If this is the first time you link, a Cloud instrument and a local instrument profile(with standard role) are created with the same name using theFirstNameLastInitial of the user name from your thermofisher.com account.Example: [email protected] First name is User, Last name is Gray. Cloudaccount username is User G.
• Your local instrument profile (User G.) is linked to your Cloud account([email protected]).
• Your Cloud instrument profile (User G.) replaces your local instrument profile.
After you link: • Your Cloud instrument profile (User G.) and is displayed in the home screen ofthe instrument.
• Plates and results from your local instrument profile can be copied to the Cloud(see “Export results from the instrument (sample data files and QC reports)“ onpage 105).
• New plates and results are saved under your Cloud instrument profile.
• Your Cloud instrument profile name (User G. ) is available for selection in theSign In screen.
If your Cloud account isunlinked:
• Your local instrument profile (User G.) is displayed in the home screen of theinstrument.
• Plates and results that were saved under your Cloud instrument profile areaccessible under your local instrument profile.
• New plates and results are saved under local instrument profile and can be copiedto the Cloud (see “Export results from the instrument (sample data files and QCreports)“ on page 105).
• Your local instrument profile name (User G.) is available for selection in the SignIn screen.
IMPORTANT! If you sign in with a local profile, without linking to the cloud, signout, then link using Get Started4Connect, you can potentially have two localinstrument profiles with different names. Plates are results created when you aresigned in with one local instrument profile are not accessible when you are signed inwith the other local instrument profile.
Chapter 3 Use the instrument with the Thermo Fisher CloudUnderstanding instrument and Cloud interaction 3
SeqStudio™ Genetic Analyzer Instrument and Software User Guide 45

Instrument profile Location Functions allowed
Standard Cloud[1] • Create, save, open, import, and run plate setups
• Create and modify run settings
• View and export results
Administrator Cloud[1] All the permissions of a local administrator profile, plus the followingfunctions performed in InstrumentConnect:
• Access the Manage users function on the Cloud to see a list of allinstrument profiles that are linked to the instrument.
• Assign Cloud administrator role to one or more users.
• Remove a user from an instrument.
• Disconnect the instrument from InstrumentConnect.
• Change the instrument name.
[1] The first user who links their local instrument profile to their Cloud account is assigned a Cloud profile with administrator role.
In the top left of the screen you are viewing in the Thermo Fisher Cloud, click , thenselect Help guide.
Cloud instrument profile roles and functions
For moreinformation onusing the ThermoFisher Cloud
Chapter 3 Use the instrument with the Thermo Fisher CloudUnderstanding instrument and Cloud interaction3
46 SeqStudio™ Genetic Analyzer Instrument and Software User Guide

Cloud administrators for an instrument
The first user who links the instrument to the Thermo Fisher Cloud is automaticallyassigned Cloud administrator role for the instrument (even if the user has a standardlocal profile).
At least one Cloud administrator is required for each instrument.
A Cloud administrator can perform the following tasks from the InstrumentConnect:• Access the Manage users function on the Cloud to see a list of all instrumentprofiles that are linked to the instrument.
• Assign Cloud administrator role to one or more users.• Remove a user from an instrument.• Disconnect the instrument from InstrumentConnect.• Change the instrument name.
A Cloud administrator for an instrument can assign instrument administrator role toother users.
1. Sign in to thermofisher.com/cloud.
2. Click to access InstrumentConnect.
3. Select the instrument.
Note: The Manage users and other administrator functions are not displayeduntil you select an instrument.
4. To assign the Admin role to a user, click Manage users, then select theAdministrator check box for the user.
Cloudadministratorfunctions
Assign instrumentadministrator roleto other users
Chapter 3 Use the instrument with the Thermo Fisher CloudCloud administrators for an instrument 3
SeqStudio™ Genetic Analyzer Instrument and Software User Guide 47
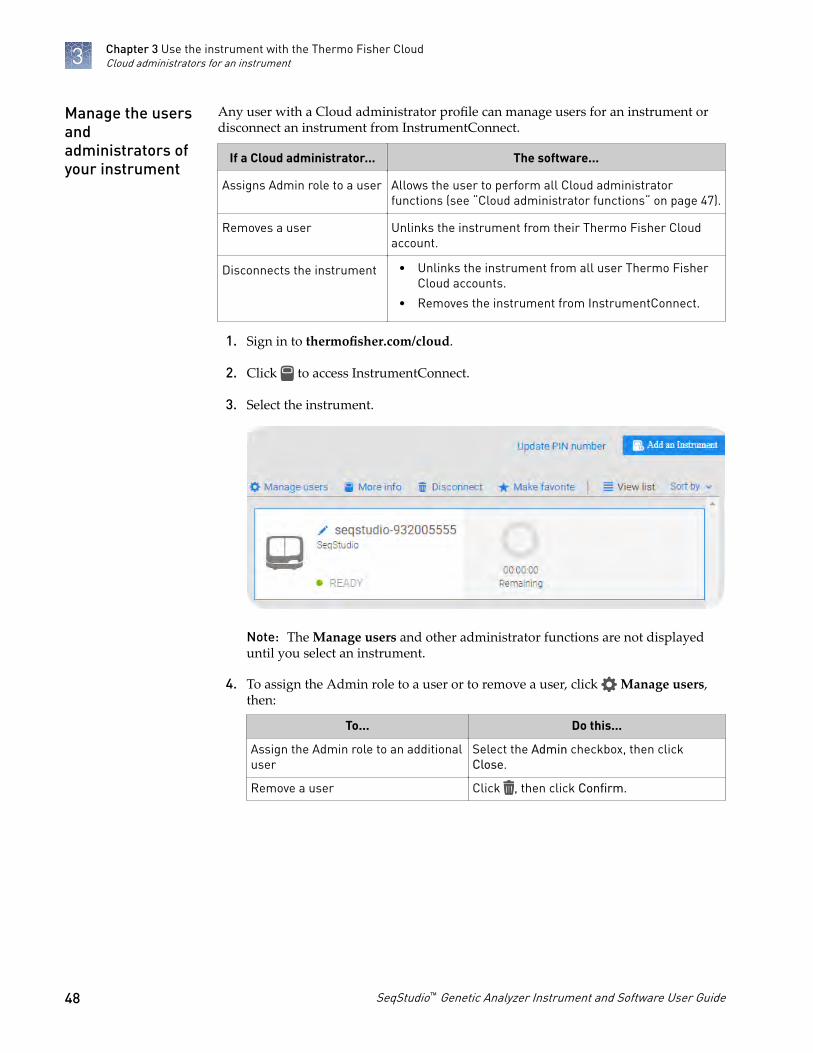
Any user with a Cloud administrator profile can manage users for an instrument ordisconnect an instrument from InstrumentConnect.
If a Cloud administrator... The software...
Assigns Admin role to a user Allows the user to perform all Cloud administratorfunctions (see “Cloud administrator functions“ on page 47).
Removes a user Unlinks the instrument from their Thermo Fisher Cloudaccount.
Disconnects the instrument • Unlinks the instrument from all user Thermo FisherCloud accounts.
• Removes the instrument from InstrumentConnect.
1. Sign in to thermofisher.com/cloud.
2. Click to access InstrumentConnect.
3. Select the instrument.
Note: The Manage users and other administrator functions are not displayeduntil you select an instrument.
4. To assign the Admin role to a user or to remove a user, click Manage users,then:
To... Do this...
Assign the Admin role to an additionaluser
Select the Admin checkbox, then clickClose.
Remove a user Click , then click Confirm.
Manage the usersandadministrators ofyour instrument
Chapter 3 Use the instrument with the Thermo Fisher CloudCloud administrators for an instrument3
48 SeqStudio™ Genetic Analyzer Instrument and Software User Guide

You cannot disconnect individual users from an instrument.
To disconnect a user, or to unlink the instrument from a Cloud account, you mustdisconnect the instrument from InstrumentConnect. Doing so unlinks all instrumentprofiles and removes the instrument from InstrumentConnect.
You can remove a user from the instrument, however, doing so deletes the user datafrom the instrument.
For more information, see “Manage the users and administrators of yourinstrument“ on page 48
Register and obtain a Cloud account
1. Go to www.thermofisher.com.
2. On the home page, select Sign In4 Register.
3. Fill in all information, then click Create account.
Disconnectindividual usersfrom aninstrument
Chapter 3 Use the instrument with the Thermo Fisher CloudRegister and obtain a Cloud account 3
SeqStudio™ Genetic Analyzer Instrument and Software User Guide 49

Link the instrument to your Thermo Fisher Cloud account
Note: For detailed information on linking the instrument to your Cloud account, see Appendix B, “Link the instrument to your Cloud account—detailed instructions“.
1. If a user is signed in, touch , then touch Sign out.
2. In the Sign In screen, touch Get started4Connect.
3. In the Connect to the Thermo Fisher Cloud screen, touch a connection option.
Chapter 3 Use the instrument with the Thermo Fisher CloudLink the instrument to your Thermo Fisher Cloud account3
50 SeqStudio™ Genetic Analyzer Instrument and Software User Guide

Option Action
Mobiledevices
Note: Before selecting this option, install and sign in to theInstrumentConnect app on your mobile device.
In the Connect to the Thermo Fisher Cloud screen:
1. Touch Mobile devices.
2. Hold the camera on your mobile device over the QR code thatis displayed on the touchscreen.
3. Click Close.
PC In the Connect to the Thermo Fisher Cloud screen, a link code isdisplayed.On a computer:
1. Access the Thermo Fisher Cloud.
2. Access InstrumentConnect.
3. Click Add instrument.
4. Select SeqStudio.
5. Enter the link code.
Instrument In the Connect to the Thermo Fisher Cloud screen, enter youraccount information, then click Link account.
Change your own Cloud instrument profile PIN
1. Sign in to thermofisher.com/cloud.
2. Click to access InstrumentConnect.
3. Click Update PIN number.
Chapter 3 Use the instrument with the Thermo Fisher CloudChange your own Cloud instrument profile PIN 3
SeqStudio™ Genetic Analyzer Instrument and Software User Guide 51

Set up email notifications from the instrument
When an instrument is linked to your Cloud account, email notifications areautomatically sent to your Cloud account email address.
Perform this procedure to disable any of the default notifications.
1. Sign in to the instrument with your Cloud instrument profile and PIN.
2. In the home screen of the instrument, touch Settings4Instrumentsettings4Email notifications.
Note: If you are signed in with a local instrument profile instead of a Cloudinstrument profile, the Email notifications button is not displayed on theInstrument Settings screen.
3. In the Email notifications screen, select or deselect the options for which youwant to receive email notifications, then touch Done.
Chapter 3 Use the instrument with the Thermo Fisher CloudSet up email notifications from the instrument3
52 SeqStudio™ Genetic Analyzer Instrument and Software User Guide

Create or modify a plate setup fromthe Plate Manager
■ Overview of plate setup settings . . . . . . . . . . . . . . . . . . . . . . . . . . . . . . . . . . . . . . . . 53
■ Set up a plate using default settings (Plate Manager) . . . . . . . . . . . . . . . . . . . . . . 55
■ Additional plate settings (Plate Manager) . . . . . . . . . . . . . . . . . . . . . . . . . . . . . . . . 59
Overview of plate setup settings
Category Setting Notes
Plate • Plate properties
• Plate set up security (Shared or Hidden)
• File name convention
• Analysis settings
Analysis settings that are saved with the platesetup:
• Hidden plates—No analysis settings aresaved with the plate setup. The last‑usedanalysis settings for a user are appliedto a plate setup when it is opened.
• Shared plates—The analysis settingsspecified for a plate setup when it iscreated are saved with the plate setup.
User‑created analysis settings:
• Users can name and save analysissettings.
• In the instrument software and in thePlate Manager (Cloud), user‑createdanalysis settings are accessible only tothe user who saves them.
• In the Plate Manager (desktop),user‑created analysis settings areaccessible to all users.
4
SeqStudio™ Genetic Analyzer Instrument and Software User Guide 53

Category Setting Notes
Injection group
(a set of 4 wells)
• (Fragment analysis only) Size standard
• Run module
• Application type (mixed plate only)
• Dye set
User‑created size standards and dye sets areaccessible to all users.
User‑created run modules:
• Users can name and save run modules.
• In the instrument software and in thePlate Manager (Cloud), user‑created runmodules are accessible only to the userwho saves them.
• In the Plate Manager (desktop),user‑created run modules are accessibleto all users.
Well • Sample name
• (Fragment analysis only) Sample type
• (Sequencing only) Specimen andamplicon
• Custom fields 1–5
• Specimen and Amplicon fields areuseful in secondary analysis softwareapplications that organize sample datafiles based on amplicon and specimeninformation.
• Custom fields are text fields in which youcan include additional sample attributesor identifiers. Custom fields can be usedby some secondary analysis applications.
Chapter 4 Create or modify a plate setup from the Plate ManagerOverview of plate setup settings4
54 SeqStudio™ Genetic Analyzer Instrument and Software User Guide
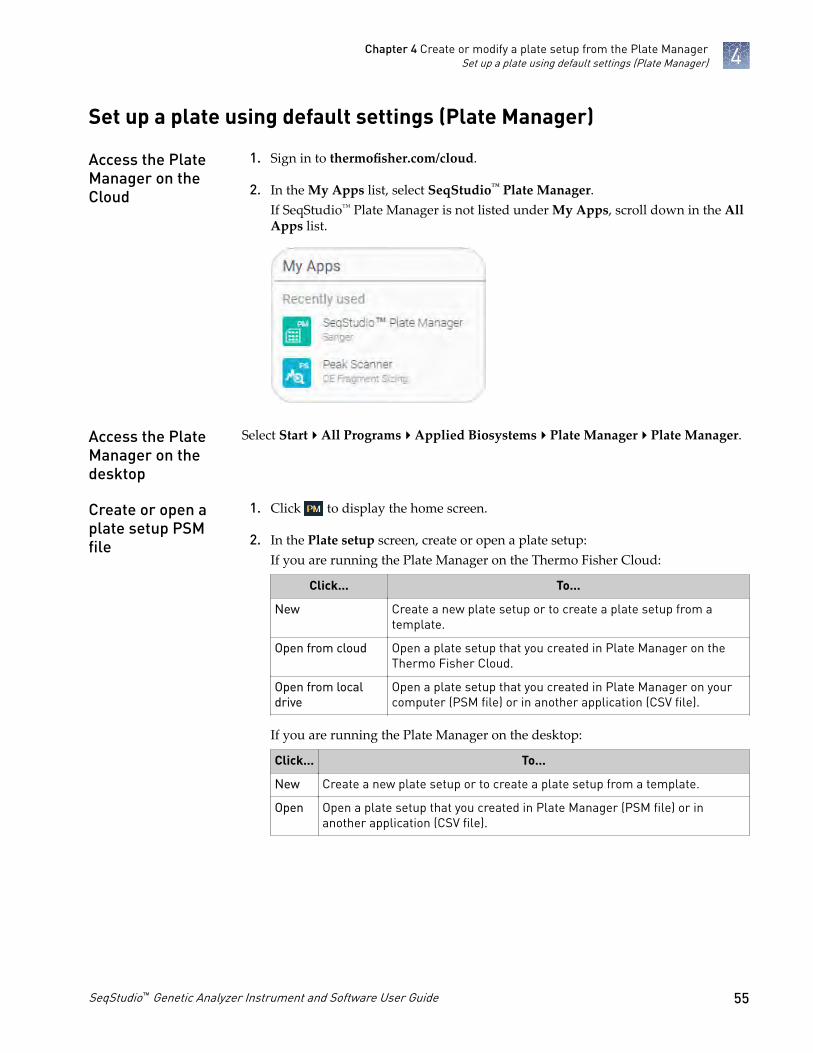
Set up a plate using default settings (Plate Manager)
1. Sign in to thermofisher.com/cloud.
2. In the My Apps list, select SeqStudio™ Plate Manager.If SeqStudio™ Plate Manager is not listed under My Apps, scroll down in the AllApps list.
Select Start4All Programs4Applied Biosystems4Plate Manager4Plate Manager.
1. Click to display the home screen.
2. In the Plate setup screen, create or open a plate setup:If you are running the Plate Manager on the Thermo Fisher Cloud:
Click... To...
New Create a new plate setup or to create a plate setup from atemplate.
Open from cloud Open a plate setup that you created in Plate Manager on theThermo Fisher Cloud.
Open from localdrive
Open a plate setup that you created in Plate Manager on yourcomputer (PSM file) or in another application (CSV file).
If you are running the Plate Manager on the desktop:
Click... To...
New Create a new plate setup or to create a plate setup from a template.
Open Open a plate setup that you created in Plate Manager (PSM file) or inanother application (CSV file).
Access the PlateManager on theCloud
Access the PlateManager on thedesktop
Create or open aplate setup PSMfile
Chapter 4 Create or modify a plate setup from the Plate ManagerSet up a plate using default settings (Plate Manager) 4
SeqStudio™ Genetic Analyzer Instrument and Software User Guide 55

In the Properties tab:
1. (Optional) Edit the Plate name, Barcode, or Owner.
2. Select Hidden or Shared in the Plate setup security field.
Note: Shared plate setups: Analysis settings saved in the plate setup. Hiddenplate setups: The last settings specified by the signed-in user are applied when aHidden plate setup is opened or imported on the instrument.
3. Select the Application type: Sequencing, Fragment analysis, or Mixed plate(sequencing & fragment).A mixed plate allows you to specify fragment analysis and sequence analysissettings on the same plate.
4. (Optional for Sequencing or Mixed plate)Select the I am analyzing my data withSanger variant analysis softwarecheckbox.The amplicon and specimen fields areadded to the Plate view, and the attributesare automatically added to the default file name conventions (see “Modify thedefault file name convention“ on page 72).This feature is useful in secondary analysis software applications that organizefiles based on amplicon and specimen information (Cloud applications: VariantAnalysis (VA) module, Next-generation Confirmation (NGC) module; desktop
Enter plateproperties
Chapter 4 Create or modify a plate setup from the Plate ManagerSet up a plate using default settings (Plate Manager)4
56 SeqStudio™ Genetic Analyzer Instrument and Software User Guide

applications: SeqScape™ Software, Variant Reporter™ Software, Minor VariantFinder Software).
5. Click Next.
In the Plate screen:
1. Click a well to select an injection group, or Shift-click to select multiple injectiongroups.Each set of 4 wells on the plate is referred to as an injection group.The default injection order is: A1-D1, E1-H1, A2-D2, E2-H2....A12-D12, E12-H12.
2. If you are creating a mixed plate, select the Application type for the injectiongroup.
3. (Fragment analysis only) Select the sample type for each well: Allelic ladder,Negative control, Positive control, or Sample.
4. (Fragment analysis only) Select a size standard for the injection group.
5. Select a dye set for the injection group.
Assign wells:Sample and runinformation
Chapter 4 Create or modify a plate setup from the Plate ManagerSet up a plate using default settings (Plate Manager) 4
SeqStudio™ Genetic Analyzer Instrument and Software User Guide 57

6. Select a run module for the injection group.For more information, see “Run modules, read lengths, size ranges, and runtimes“ on page 111
7. Click Next and proceed to “Save a plate setup in the Plate Manager“ onpage 58.
After you assign wells to a plate setup:
1. In the Save the plate setup dialog box, modify any settings as needed.
2. Click Save.
Save a plate setupin the PlateManager
Chapter 4 Create or modify a plate setup from the Plate ManagerSet up a plate using default settings (Plate Manager)4
58 SeqStudio™ Genetic Analyzer Instrument and Software User Guide
Note: The Monitor my run button is available only in the Cloud app.
If you are running the PlateManager on the... The plate setup is saved as a...
Cloud Plate setup that you can open from the Cloud andrun on the instrument.
Desktop PSM file that you can open from a network driveor a USB and run on the instrument.
Proceed to Chapter 6, “Start and monitor a run“.
Additional plate settings (Plate Manager)
In the Plate screen:
1. Select Actions4Add injection.
2. Select an injection group, then select a run module for the replicate injections.
Factory-installed items cannot be edited or deleted. To create a new item from afactory-installed item, copy, edit, then save the new item.
In the Plate properties screen:
1. Click Setting details.
2. To create new analysis settings:a. Select the default analysis settings or user-created analysis settings, then
click Copy.
b. Enter a name and edit settings as needed (see “Fragment analysis settings(size calling)“ on page 113 or “Sequencing settings (base calling)“ onpage 115).
c. As needed, click Edit or Delete (user-created settings only).
For more information, see “Manage analysis settings“ on page 129.
3. Click Close.
Specify replicateinjections
Edit analysissettings
Chapter 4 Create or modify a plate setup from the Plate ManagerAdditional plate settings (Plate Manager) 4
SeqStudio™ Genetic Analyzer Instrument and Software User Guide 59

The file name convention determines how the data files (AB1 or FSA) associated witha plate are named.
The default file name convention is:
Application Default settings
Fragment analysis <well>_<sample name>_<sample type>_<date and timestamp>.fsaSequence analysis <well>_<sample name>_<date and timestamp>.ab1Sequence analysis with theSanger variant analysisoption selected
<well>_<sample name>_<amplicon>_<specimen>_<date andtimestamp>.ab1
To change the default settings, in the Properties tab:
1. Select Actions4Edit the file name convention.
2. Click File attributes, then select the attributes to include in or exclude from thedata file name.
For information on creating custom fields to include in file name conventions, see “Define custom fields“ on page 73.
3. (Optional) Click-drag to move an attribute to another position.
4. Click Save.
In the Properties screen:
Select:
• Hidden—Prevents other users from using or accessing the plate• Shared—Allows other users to access and edit the plate
Modify the defaultfile nameconvention
Hide or share aplate (Plate setupsecurity)
Chapter 4 Create or modify a plate setup from the Plate ManagerAdditional plate settings (Plate Manager)4
60 SeqStudio™ Genetic Analyzer Instrument and Software User Guide

Custom fields are text fields in which you can include additional sample attributes oridentifiers. Custom fields can be used by some secondary analysis applications.
In the Plate tab:
1. Select Action4Add custom field.
2. Enter information in the custom field in the table at the right of the plate.
Define customfields
Chapter 4 Create or modify a plate setup from the Plate ManagerAdditional plate settings (Plate Manager) 4
SeqStudio™ Genetic Analyzer Instrument and Software User Guide 61

Create or modify a plate setup fromthe instrument
■ PSM and CSV plate setup files for import into the instrument . . . . . . . . . . . . . . 63
■ Shared (public), hidden (my plates), and guest plate setup files . . . . . . . . . . . . . 64
■ Overview of plate setup settings . . . . . . . . . . . . . . . . . . . . . . . . . . . . . . . . . . . . . . . . 65
■ (Optional) Set up for auto export of sample data files (AB1 and FSA) . . . . . . . . 66
■ Set up a plate using default settings (instrument) . . . . . . . . . . . . . . . . . . . . . . . . . 66
■ Set optional plate settings (instrument) . . . . . . . . . . . . . . . . . . . . . . . . . . . . . . . . . . 71
5
62 SeqStudio™ Genetic Analyzer Instrument and Software User Guide
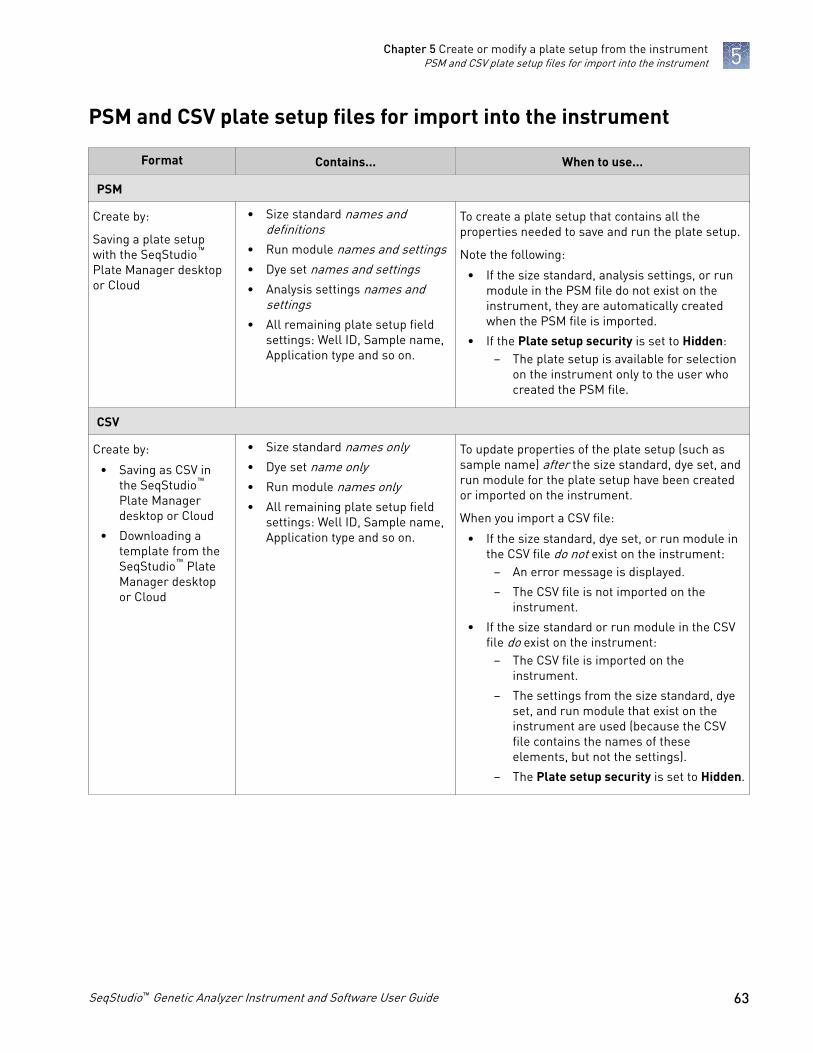
PSM and CSV plate setup files for import into the instrument
Format Contains... When to use...
PSM
Create by:
Saving a plate setupwith the SeqStudio™
Plate Manager desktopor Cloud
• Size standard names anddefinitions
• Run module names and settings• Dye set names and settings• Analysis settings names and
settings• All remaining plate setup field
settings: Well ID, Sample name,Application type and so on.
To create a plate setup that contains all theproperties needed to save and run the plate setup.
Note the following:
• If the size standard, analysis settings, or runmodule in the PSM file do not exist on theinstrument, they are automatically createdwhen the PSM file is imported.
• If the Plate setup security is set to Hidden:– The plate setup is available for selection
on the instrument only to the user whocreated the PSM file.
CSV
Create by:
• Saving as CSV inthe SeqStudio™
Plate Managerdesktop or Cloud
• Downloading atemplate from theSeqStudio™ PlateManager desktopor Cloud
• Size standard names only• Dye set name only• Run module names only• All remaining plate setup field
settings: Well ID, Sample name,Application type and so on.
To update properties of the plate setup (such assample name) after the size standard, dye set, andrun module for the plate setup have been createdor imported on the instrument.
When you import a CSV file:
• If the size standard, dye set, or run module inthe CSV file do not exist on the instrument:
– An error message is displayed.
– The CSV file is not imported on theinstrument.
• If the size standard or run module in the CSVfile do exist on the instrument:
– The CSV file is imported on theinstrument.
– The settings from the size standard, dyeset, and run module that exist on theinstrument are used (because the CSVfile contains the names of theseelements, but not the settings).
– The Plate setup security is set to Hidden.
Chapter 5 Create or modify a plate setup from the instrumentPSM and CSV plate setup files for import into the instrument 5
SeqStudio™ Genetic Analyzer Instrument and Software User Guide 63

Shared (public), hidden (my plates), and guest plate setup files
Create bysetting Plate
setupsecurity to...
Accessible tousers...
Stored in folder oninstrument... Analysis settings used... File name convention
used...
Shared All users, includingguest
Public Analysis settings saved inthe plate setup
Last settings specifiedby the signed-in user(not saved with platesetup)
Note: If a guest user edits a shared plate setup, the plate must be saved under a new name, and the Plate setupsecurity is set to Hidden and cannot be changed.
Hidden Only the user whocreated the platesetup
My plates Last settings specified by thesigned-in user (not savedwith plate setup)
Last settings specifiedby the signed-in user(not saved with platesetup)
Guest platesetupsecurity isautomaticallyset to Hiddenand cannotbe changed
Guest user only My plates Last settings specified by thesigned-in user (not savedwith plate setup)
Last settings specifiedby the signed-in user(not saved with platesetup)
Chapter 5 Create or modify a plate setup from the instrumentShared (public), hidden (my plates), and guest plate setup files5
64 SeqStudio™ Genetic Analyzer Instrument and Software User Guide

Overview of plate setup settings
Category Setting Notes
Plate • Plate properties
• Plate set up security (Shared or Hidden)
• File name convention
• Analysis settings
Analysis settings that are saved with the platesetup:
• Hidden plates—No analysis settings aresaved with the plate setup. The last‑usedanalysis settings for a user are appliedto a plate setup when it is opened.
• Shared plates—The analysis settingsspecified for a plate setup when it iscreated are saved with the plate setup.
User‑created analysis settings:
• Users can name and save analysissettings.
• In the instrument software and in thePlate Manager (Cloud), user‑createdanalysis settings are accessible only tothe user who saves them.
• In the Plate Manager (desktop),user‑created analysis settings areaccessible to all users.
Injection group
(a set of 4 wells)
• (Fragment analysis only) Size standard
• Run module
• Application type (mixed plate only)
• Dye set
User‑created size standards and dye sets areaccessible to all users.
User‑created run modules:
• Users can name and save run modules.
• In the instrument software and in thePlate Manager (Cloud), user‑created runmodules are accessible only to the userwho saves them.
• In the Plate Manager (desktop),user‑created run modules are accessibleto all users.
Well • Sample name
• (Fragment analysis only) Sample type
• (Sequencing only) Specimen andamplicon
• Custom fields 1–5
• Specimen and Amplicon fields areuseful in secondary analysis softwareapplications that organize sample datafiles based on amplicon and specimeninformation.
• Custom fields are text fields in which youcan include additional sample attributesor identifiers. Custom fields can be usedby some secondary analysis applications.
Chapter 5 Create or modify a plate setup from the instrumentOverview of plate setup settings 5
SeqStudio™ Genetic Analyzer Instrument and Software User Guide 65

(Optional) Set up for auto export of sample data files (AB1 and FSA)
By default, sample data files (AB1 and FSA) are saved to the instrument.
When you create a plate setup, you can also set the Save location to Cloud, NetworkDrive, and/or USB.
1
1 Save location
When the plate is run, the instrument automatically exports the sample data files tothe save locations.
Before you can select these save locations, set up the instrument:• “Link the instrument to your Thermo Fisher Cloud account“ on page 50• “Connect to a network drive“ on page 119• Insert a USB into the USB port on the front of the instrument (Figure 1 on
page 13)
Set up a plate using default settings (instrument)
In the home screen:
1. Touch Set up run.
2. Create, open, or import a plate setup:
Create or import aplate setup
Chapter 5 Create or modify a plate setup from the instrument(Optional) Set up for auto export of sample data files (AB1 and FSA)5
66 SeqStudio™ Genetic Analyzer Instrument and Software User Guide

To Procedure
Create a new platesetup
1. Touch Create new plate setup.
2. See “Enter plate properties“ on page 67.
Open an existingplate setup on theinstrument
1. Touch My Instrument.
2. Touch:
• My plates folder to select hidden plates that you havecreated.
• Public folder to select (1) shared plates that werecreated by any user or (2) any plates that werecreated by a Guest user.
For more information, see “Shared (public), hidden (myplates), and guest plate setup files“ on page 64.
Import a platesetup
1. Touch Cloud, USB, or Network Drive.
2. Select:
• PSM file
• CSV file
For more information, see “PSM and CSV plate setup files forimport into the instrument“ on page 63
In the Plate properties screen:
1. Touch the Plate name field, then enter the plate name.
2. Touch Applications, then select Sequencing, Fragment analysis, or Mixed (allowsyou to specify fragment analysis and sequence analysis settings on the sameplate).
3. (Optional) Touch the Barcode field, then use a scanner to scan the barcode.
4. (Optional) Touch the Owner field, then enter the plate owner name.
Enter plateproperties
Chapter 5 Create or modify a plate setup from the instrumentSet up a plate using default settings (instrument) 5
SeqStudio™ Genetic Analyzer Instrument and Software User Guide 67

5. (Optional) Touch the More options to check the Plate setup security, Analysissettings, and File name convention.
6. If you want to save the plate to a location in addition to the instrument, touchSave location, then select a location for the run results.The plate setup is always saved to the instrument. In addition, you can save theplate to the Cloud, a network, or a USB, which will auto export the sample datafiles.
IMPORTANT! To view analyzed data in the Remote Monitoring App on theCloud, you must save the plate setup to the Cloud.
Note: If you save a plate setup to the Cloud, a network, or a USB, then access theplate setup at a later time when the instrument is not linked to the Cloud, anetwork, or a USB, the save location is displayed with strikethrough text.
1 Original location to which the plate was saved, but is no longer accessible by theinstrument.
7. (Optional for Sequencing or Mixed plate)Touch the I am analyzing my data withSanger variant analysis softwarecheckbox.The amplicon and specimen fields areadded to the Plate view, and theattributes are automatically added to thedefault file name conventions (see “Modify the default file name convention“ onpage 72).This feature is useful in secondary analysis software applications that organizefiles based on amplicon and specimen information (Cloud applications: VariantAnalysis (VA) module, Next-generation Confirmation (NGC) module; desktopapplications: SeqScape™ Software, Variant Reporter™ Software, Minor VariantFinder Software).
Chapter 5 Create or modify a plate setup from the instrumentSet up a plate using default settings (instrument)5
68 SeqStudio™ Genetic Analyzer Instrument and Software User Guide

In the Plate properties screen:
1. At the top-right of the screen, touch Plate.
1 Plate tab2 Save button is not enabled until you create an injection group
1
2
Each set of 4 wells on the plate is referred to as an injection group.An injection group is identified by the first well in the set of 4 (for example,Injection Group A1 contains wells A1–D1).The default injection order is: A1-D1, E1-H1, A2-D2, E2-H2....A12-D12, E12-H12.
2. Select injection groups, then touch Edit.
• Touch a well to select a single injection group.• Touch and drag to select multiple injection groups or the entire plate.
3. If you are creating a mixed plate, select the Application type for the wells.
Assign wells: runmodule, sizestandard, and dyeset
Chapter 5 Create or modify a plate setup from the instrumentSet up a plate using default settings (instrument) 5
SeqStudio™ Genetic Analyzer Instrument and Software User Guide 69

4. Touch Run modules, then select a run module.For more information, see“Run modules, read lengths, size ranges, and runtimes“ on page 111.
5. Touch Dye set, then select a dye set for the injection group.
6. (Fragment analysis only) Touch Size standard, then select a size standard for theinjection group.
In the Edit plate screen:
1. Touch Sample name to display the well attributes fields.
2. Touch a setting, then enter the definition for the selected wells:
• (Fragment analysis only) Sample type—Sample, Positive Control, NegativeControl, or Allelic Ladder.
• Custom fields—Text fields to include additional sample attributes oridentifiers that can be used by secondary analysis applications.
• (Sequencing only) Amplicon and Specimen—Amplicon and Specimen namesfor Sanger Sequence analysis, if you selected the option in the PlateProperties screen.
Assign wells:sample name,sample type, andcustom fields
Chapter 5 Create or modify a plate setup from the instrumentSet up a plate using default settings (instrument)5
70 SeqStudio™ Genetic Analyzer Instrument and Software User Guide
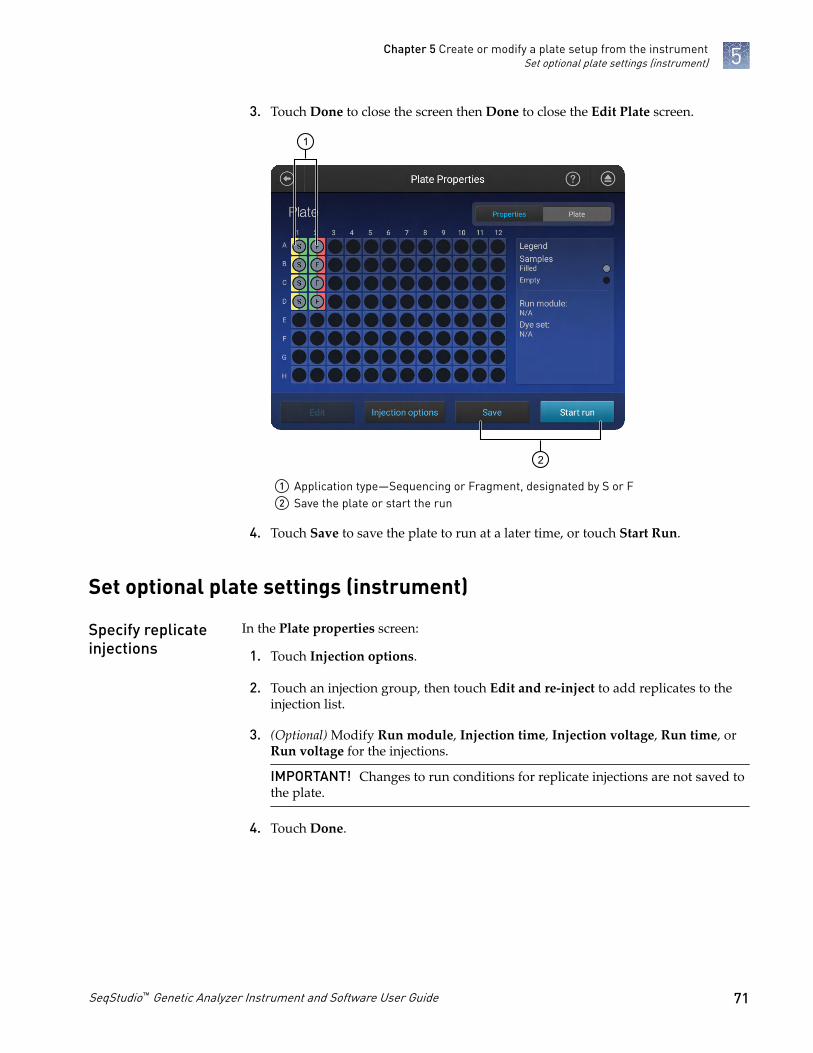
3. Touch Done to close the screen then Done to close the Edit Plate screen.
2
1
1 Application type—Sequencing or Fragment, designated by S or F2 Save the plate or start the run
4. Touch Save to save the plate to run at a later time, or touch Start Run.
Set optional plate settings (instrument)
In the Plate properties screen:
1. Touch Injection options.
2. Touch an injection group, then touch Edit and re-inject to add replicates to theinjection list.
3. (Optional) Modify Run module, Injection time, Injection voltage, Run time, orRun voltage for the injections.
IMPORTANT! Changes to run conditions for replicate injections are not saved tothe plate.
4. Touch Done.
Specify replicateinjections
Chapter 5 Create or modify a plate setup from the instrumentSet optional plate settings (instrument) 5
SeqStudio™ Genetic Analyzer Instrument and Software User Guide 71

In the Properties tab of the Plate properties screen:
1. Touch More options4Analysis settings.
2. Select a setting.See “Manage analysis settings“ on page 129 for detailed information.
Note: The last setting selected is used as the default for new plates.
3. Touch Done.
The default file name convention determines how the data files (AB1 or FSA)associated with a plate are named.
The default file name convention is:
Application Default settings
Fragment analysis <well>_<sample name>_<sample type>_<date and timestamp>.fsaSequence analysis <well>_<sample name>_<date and timestamp>.ab1Sequence analysis with theSanger variant analysisoption selected
<well>_<sample name>_<amplicon>_<specimen>_<date andtimestamp>.ab1
1. Access the File name convention screen:
From Action
Plate properties screen Select the Properties tab, then touch More options4Filename convention.
Home screen Touch Settings4Run settings 4File name convention.
2. Touch Attributes.
Modify analysissettings
Modify the defaultfile nameconvention
Chapter 5 Create or modify a plate setup from the instrumentSet optional plate settings (instrument)5
72 SeqStudio™ Genetic Analyzer Instrument and Software User Guide

3. Select the attributes to include in the data file name.
For information on creating custom fields to include in file name conventions, see “Define custom fields“ on page 73.
4. Touch Done.
5. Touch and drag attributes up or down in the list.
6. Touch Done.
For more information, see “Shared (public), hidden (my plates), and guest plate setupfiles“ on page 64.
1. Touch More Options4Plate Setup security.
2. Touch an option:
• Hidden—Prevents other users from using or accessing the plate• Shared—Allows other users to access and edit the plate
Note: Shared plate setups: Analysis settings saved in the plate setup. Hiddenplate setups: The last settings specified by the signed-in user are applied when aHidden plate setup is opened or imported on the instrument.
3. Touch Done, then touch Save.
Custom fields are text fields in which you can include additional sample attributes oridentifiers. Custom fields can be used by some secondary analysis applications.
In the Plate tab of the Plate properties screen:
1. Select injection groups, then touch Edit.
• Touch a well to select a single injection group.• Touch and drag to select multiple injection groups or the entire plate.
2. Click Edit.
Hide or share aplate (Plate setupsecurity)
Define customfields
Chapter 5 Create or modify a plate setup from the instrumentSet optional plate settings (instrument) 5
SeqStudio™ Genetic Analyzer Instrument and Software User Guide 73

3. Touch Sample name to display the injection group and well attributes fields.
1
1 Touch the sample name field
4. Touch a custom field, then enter the definition for the selected wells.
5. Click Done.
Chapter 5 Create or modify a plate setup from the instrumentSet optional plate settings (instrument)5
74 SeqStudio™ Genetic Analyzer Instrument and Software User Guide

In the Plate properties screen:
1. Touch Injection options.
2. Touch an injection group, then configure the injection list:
• Touch and drag an injection group to a new location in the injection list.• Touch Inject first—Moves the selected injection group to the top of the
injection list.• Touch Edit and re-inject—Adds replicates or re-injections to the injection list.
You can also modify Run module, Injection time, Injection voltage, Runtime, or Run voltage for these injections.
Note: Changes to Injection time, Injection voltage, Run time, or Runvoltage are not saved to the plate setup and will be used during the currentplate run only.
3. Touch Done.
(Optional) Viewthe injection list,change injectionsettings or order,or specifyreplicates and re-injections
Chapter 5 Create or modify a plate setup from the instrumentSet optional plate settings (instrument) 5
SeqStudio™ Genetic Analyzer Instrument and Software User Guide 75

Start and monitor a run
■ Load the plate or the tube assembly . . . . . . . . . . . . . . . . . . . . . . . . . . . . . . . . . . . . . 76
■ Select a plate setup and start a run . . . . . . . . . . . . . . . . . . . . . . . . . . . . . . . . . . . . . . 77
■ Lock the touchscreen . . . . . . . . . . . . . . . . . . . . . . . . . . . . . . . . . . . . . . . . . . . . . . . . . 79
■ Monitor a run from the Thermo Fisher Cloud . . . . . . . . . . . . . . . . . . . . . . . . . . . . 79
■ Monitor a run from a mobile device . . . . . . . . . . . . . . . . . . . . . . . . . . . . . . . . . . . . . 87
■ Monitor a run from the instrument . . . . . . . . . . . . . . . . . . . . . . . . . . . . . . . . . . . . . 89
■ Unload the plate or the tube assembly . . . . . . . . . . . . . . . . . . . . . . . . . . . . . . . . . . . 95
Load the plate or the tube assembly
In the home screen:
1. Touch , touch Eject plate, then open the instrument door when prompted.
2. Press the release button on the autosampler to open the lid.
3. Place the plate or tube assembly firmly in the autosampler.
4. Check the buffer fill level:a. Remove the CBC.
b. Ensure that the level of buffer isabove the fill line.If the buffer is at or below thefill line, see “Assemble theSeqStudio™ Genetic AnalyzerCathode Buffer Container(CBC)“ on page 152 and “Insert the Cathode BufferContainer“ on page 153.If the buffer is above the fillline, reinsert the CBC.
6
1
1 Replace if buffer is at or below the fill line
1
1 New CBC buffer level
76 SeqStudio™ Genetic Analyzer Instrument and Software User Guide

5. Close the autosampler lid: Press down on the center of the lid or press down onboth sides of the lid with equal pressure until the lid clicks shut.
6. Touch Retract plate, then close the instrument door.
Select a plate setup and start a run
After you load the plate in the instrument(see “Load the plate or the tubeassembly“ on page 76):
1. In the instrument home screen,touch Setup run.
2. Select the location of your platesetup, then select the plate setup.For information on plate setup files,see “PSM and CSV plate setup filesfor import into the instrument“ onpage 63 and “Shared (public),hidden (my plates), and guest platesetup files“ on page 64.
Chapter 6 Start and monitor a runSelect a plate setup and start a run 6
SeqStudio™ Genetic Analyzer Instrument and Software User Guide 77
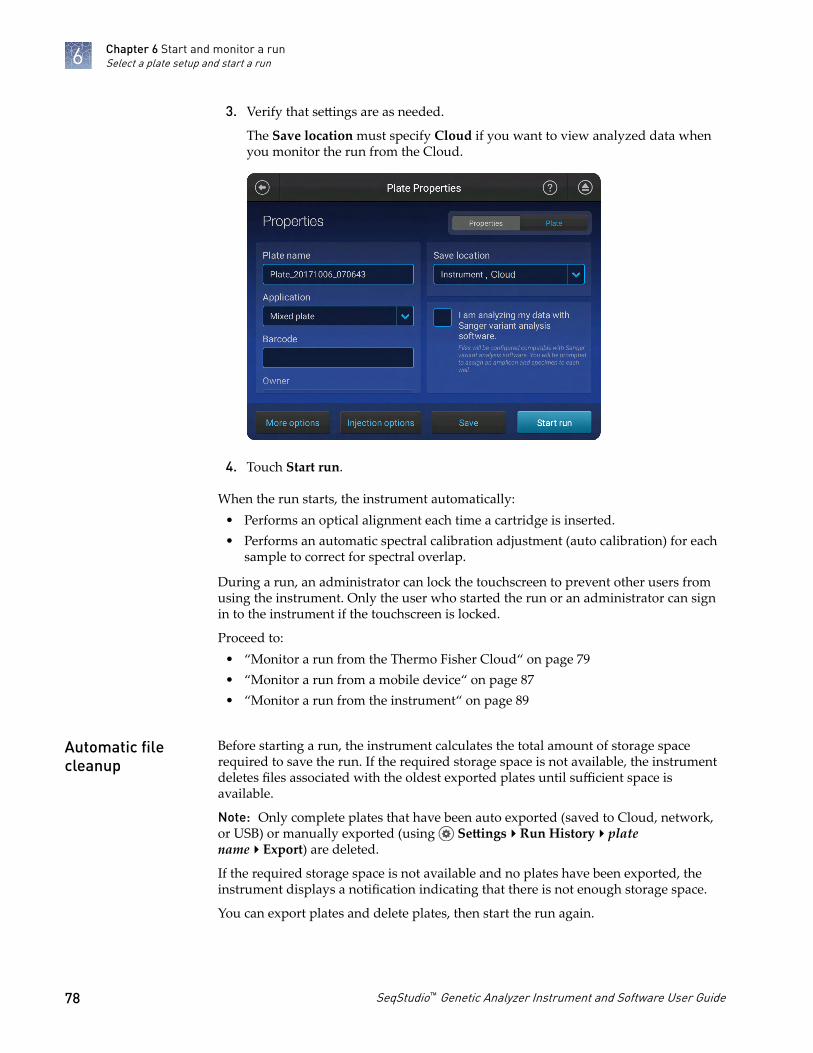
3. Verify that settings are as needed.
The Save location must specify Cloud if you want to view analyzed data whenyou monitor the run from the Cloud.
4. Touch Start run.
When the run starts, the instrument automatically:• Performs an optical alignment each time a cartridge is inserted.• Performs an automatic spectral calibration adjustment (auto calibration) for each
sample to correct for spectral overlap.
During a run, an administrator can lock the touchscreen to prevent other users fromusing the instrument. Only the user who started the run or an administrator can signin to the instrument if the touchscreen is locked.
Proceed to:• “Monitor a run from the Thermo Fisher Cloud“ on page 79• “Monitor a run from a mobile device“ on page 87• “Monitor a run from the instrument“ on page 89
Before starting a run, the instrument calculates the total amount of storage spacerequired to save the run. If the required storage space is not available, the instrumentdeletes files associated with the oldest exported plates until sufficient space isavailable.
Note: Only complete plates that have been auto exported (saved to Cloud, network,or USB) or manually exported (using Settings4Run History4platename4Export) are deleted.
If the required storage space is not available and no plates have been exported, theinstrument displays a notification indicating that there is not enough storage space.
You can export plates and delete plates, then start the run again.
Automatic filecleanup
Chapter 6 Start and monitor a runSelect a plate setup and start a run6
78 SeqStudio™ Genetic Analyzer Instrument and Software User Guide

Lock the touchscreen
During a run, you can lock the touchscreen to prevent other users from using theinstrument. This feature is not available to Guest users.
Only the user who locked the touchscreen or an administrator can sign in to theinstrument if the touchscreen is locked.
1. Touch .
2. Touch Profile.
3. Touch Lock instrument.
Note: If a run is not in progress, Sign out is displayed instead of Lockinstrument.
Monitor a run from the Thermo Fisher Cloud
A run is accessible from InstrumentConnect for 24 hours after the run is complete, oruntil another run is started.
1. Sign in to thermofisher.com/cloud.
2. Click to access InstrumentConnect.
3. Click the run status dial to display the Remote Monitoring App.
Open the RemoteMonitoring Appfrom InstrumentConnect App
Chapter 6 Start and monitor a runLock the touchscreen 6
SeqStudio™ Genetic Analyzer Instrument and Software User Guide 79

Figure 11 Remote Monitoring App
Chapter 6 Start and monitor a runMonitor a run from the Thermo Fisher Cloud6
80 SeqStudio™ Genetic Analyzer Instrument and Software User Guide

A run is accessible from the Plate Manager for 24 hours after the run is complete, oruntil another run is started.
You can open the Remote Monitoring App immediately after you save a plate setup orat a later time.
In the Plate Manager on the Thermo Fisher Cloud:
• To open the Remote Monitoring App immediately after you save a plate setupand start the run, click Monitor my run.
Open the RemoteMonitoring Appfrom the PlateManager
Chapter 6 Start and monitor a runMonitor a run from the Thermo Fisher Cloud 6
SeqStudio™ Genetic Analyzer Instrument and Software User Guide 81

• To open the Remote Monitoring App at a later time, click , then select aninstrument or click to access InstrumentConnect.
1
1 Select an instrument or click to access InstrumentConnect.
Figure 12 Remote Monitoring App
Chapter 6 Start and monitor a runMonitor a run from the Thermo Fisher Cloud6
82 SeqStudio™ Genetic Analyzer Instrument and Software User Guide

1. In any screen in the Thermo Fisher Cloud, click .
2. Click a notification, then click Mark as read to dismiss the notification.
1. Open the Remote Monitoring App (see “Open the Remote Monitoring App fromInstrument Connect App“ on page 79).
2. Click an injection group in the injection list or the plate view.
The status dials are color-coded for quality alerts:• —All QC tests passed.• —At least 1 warning quality alert was triggered.• —At least 1 failing quality alert was triggered.
For information on quality alerts, see:• “Data quality alerts“ on page 156• “Sizecalling and basecalling quality alerts“ on page 156
Note: The Analyzed tab is disabled if the Save location for the plate setup is notset to Cloud or if the injection group has not finished running.
3. In the Quality alerts screen, click the Raw, EPT, or Analyzed tab to view data.
4. As needed, select Actions4Re-inject group, select the Run module and settings,then click Inject.
Pause or cancel an injection in the Remote Monitoring App
Select:
• Actions4Pause plate to pause the run after the currect injection is complete.• Actions4Stop current injection to immediately stop the injection.
View notificationsfrom theinstrument on theCloud
View results in theRemoteMonitoring App onthe Cloud
Chapter 6 Start and monitor a runMonitor a run from the Thermo Fisher Cloud 6
SeqStudio™ Genetic Analyzer Instrument and Software User Guide 83

Edit injection group run settings
In the Results screen:
1. Select Actions4Edit injection group.
2. Edit settings as needed, then click OK.
Re-inject or delete an injection group
In the Results screen:
Select Actions4Re-inject group or Actions4Delete injection group.
Export a QC report
The QC Report command is not available for an injection until the injection iscomplete. The QC Report command is not available for any injections if the platesetup Save location does not specify the Cloud.
In the Remote Monitor screen:
Select Actions4QC Report.A PDF of the plate QC report is generated.
Remote Monitoring App raw trace
1
2
3
4 5 6
Figure 13 Fragment analysis raw trace1 Zoom in/out.2 Raw trace.3 Thumbnail trace—Click-drag to view another region of the trace.4 Lock/unlock trace zooming for all traces in the injection group.5 View Options—Select the dye color to display; set vertical scaling.6 Cursor position indicator (red line).
Chapter 6 Start and monitor a runMonitor a run from the Thermo Fisher Cloud6
84 SeqStudio™ Genetic Analyzer Instrument and Software User Guide

1
2
3 4
Figure 14 Sequence analysis raw trace1 Zoom in/out.2 Raw trace.3 Lock/unlock trace zooming for all traces in the injection group.4 View Options—Select the basecalls to display; set vertical scaling.
Remote Monitoring App EPT trace
The EPT view (ElectroPhoresis Telemetry) shows instrument data conditions(currents, temperatures, electrophoresis voltage) as a function of time.
Chapter 6 Start and monitor a runMonitor a run from the Thermo Fisher Cloud 6
SeqStudio™ Genetic Analyzer Instrument and Software User Guide 85

Remote Monitoring App analyzed trace
2
3
4
5
1
86 7
Figure 15 Fragment analysis analyzed trace1 Lock/unlock trace zooming for all traces in the injection group.2 Zoom in/out.3 Analyzed trace.4 Thumbnail trace—Click-drag to view another region of the trace.5 View Options—Select the dye colors to display; show/hide quality bars and values; set
vertical scaling.6 Cursor position indicator (red vertical and horizontal tick marks outside trace).7 Size standard curve (red line).8 Actions—Select commands to pause and cancel injections.
1
4 5 6
2
3
Figure 16 Sequence analysis analyzed trace1 Zoom in/out.2 Analyzed trace.3 Thumbnail trace—Click-drag to view another region of the trace.4 Lock/unlock trace zooming for all traces in the injection group.5 View Options—Select the basecalls to display; show/hide quality bars and values; set
vertical scaling.6 Search for a sequence.
Chapter 6 Start and monitor a runMonitor a run from the Thermo Fisher Cloud6
86 SeqStudio™ Genetic Analyzer Instrument and Software User Guide

Monitor a run from a mobile device
Before you begin, see “Link the instrument from a mobile device“ on page 169.
1. On your mobile device, launch InstrumentConnect.
2. Touch the instrument to monitor.
3. Swipe left to view consumable status.
Chapter 6 Start and monitor a runMonitor a run from a mobile device 6
SeqStudio™ Genetic Analyzer Instrument and Software User Guide 87

4. Touch the status dial to view the injection list.
5. Touch an injection group to display quality alerts, then touch View raw plot toview the data.
• Swipe left to view the entire trace.• Pinch-zoom to expand the trace.
Chapter 6 Start and monitor a runMonitor a run from a mobile device6
88 SeqStudio™ Genetic Analyzer Instrument and Software User Guide

Monitor a run from the instrument
In the Plate properties screen:
1. Touch Injection options.
2. Touch an injection group, then configure the injection list:
• Touch and drag an injection group to a new location in the injection list.• Touch Inject first—Moves the selected injection group to the top of the
injection list.• Touch Edit and re-inject—Adds replicates or re-injections to the injection list.
You can also modify Run module, Injection time, Injection voltage, Runtime, or Run voltage for these injections.
Note: Changes to Injection time, Injection voltage, Run time, or Runvoltage are not saved to the plate setup and will be used during the currentplate run only.
3. Touch Done.
In the home screen:
View the run time information and the status dial for each capillary.
The status dials are color-coded for quality alerts:• —All QC tests passed.• —At least 1 warning quality alert was triggered.• —At least 1 failing quality alert was triggered.
If an injection group is set to re-inject, the number of the current injection is displayedon the status dials.For information on quality alerts, see:
• “Data quality alerts“ on page 156• “Sizecalling and basecalling quality alerts“ on page 156
(Optional) Viewthe injection list,change injectionsettings or order,or specifyreplicates and re-injections
View the runstatus
Chapter 6 Start and monitor a runMonitor a run from the instrument 6
SeqStudio™ Genetic Analyzer Instrument and Software User Guide 89

During a run, in the home screen:
Touch one of the injection dials to display the trace for the selected capillary.The status dials are color-coded for quality alerts:
• —All QC tests passed.• —At least 1 warning quality alert was triggered.• —At least 1 failing quality alert was triggered.
For information on quality alerts, see:• “Data quality alerts“ on page 156• “Sizecalling and basecalling quality alerts“ on page 156
In the home screen:
1. Touch Actions.
2. Manage the plate or injections:
Touch To
View results View the list of injections and status.
Edit plate For injections that have not yet been run, edit Sample Name,Run Module, Dye Set, Size Standard, Sample Type, and customfields.
Pause plate Stop the run after the current injection is complete.Touch Resume to continue the run.
Stop currentinjection
Stop the current injection immediately.Touch Resume to continue the run.
Cancel remaininginjections
Specify whether to cancel the run immediately or after thecurrent injection is complete.
Injection options Move an injection to the top of the injection list, edit runmodule information, and/or reinject samples.
View real-timeresults
Pause a plate orcancel or stopinjections
Chapter 6 Start and monitor a runMonitor a run from the instrument6
90 SeqStudio™ Genetic Analyzer Instrument and Software User Guide

When a run is complete, in the home screen:
1. Touch View Results.
2. Touch List view.Each injection group displays a QC color for each capillary:
• —All QC tests passed.• —At least 1 warning quality alert was triggered.• —At least 1 failing quality alert was triggered.
For information on quality alerts, see:• “Data quality alerts“ on page 156• “Sizecalling and basecalling quality alerts“ on page 156
3. Touch an injection group.
4. View the results in the Run Result Details screen, or touch for well details.See “Fragment analysis results“ on page 92 or “Sequencing results“ onpage 94 for detailed information.
5. Touch a sample file name.If the data triggered any quality alerts, a QC alerts screen is displayed. See “Dataquality alerts“ on page 156 and “Sizecalling and basecalling quality alerts“ onpage 156 for detailed information.Touch View data to display the analyzed trace for the sample. See “Fragmentanalysis trace“ on page 92 or “Sequence analysis trace“ on page 93 fordetailed information.
6. Touch and drag the thumbnail view of the analyzed trace (below the trace) toscroll left or right.
7. (Optional) Adjust the graphical view (see “Adjust the trace display“ on page 95).
8. Touch or to scroll to the raw data or EPT Plot (ElectroPhoresis Telemetry).See “EPT plot“ on page 102.
View results forthe current plate
Chapter 6 Start and monitor a runMonitor a run from the instrument 6
SeqStudio™ Genetic Analyzer Instrument and Software User Guide 91

Fragment analysis trace
7
61
2
3
4
5
1 Trace color hide/show—Touch to open, then touch a color to hide or show.2 Analyzed trace3 Size standard curve (red line)4 Thumbnail trace—Drag the center of the pane in the thumbnail trace to display another
trace area in the top pane. Drag the right or left handle of the pane to zoom horizontally.5 Basepair or scan display selection.6 Zoom tools—Touch to open.7 Next trace tool—Touch to view the raw trace or EPT for the well.
Fragment analysis results
Setting Description
Quality QC flags
• —All QC tests passed.
• —At least 1 warning quality alert was triggered.
• —At least 1 failing quality alert was triggered.
SQ Size Quality
• If SQ is ≤0.75, it passes the QC test and does not trigger a quality alert ( ).
• If SQ is 0.25–0.74, it triggers a warning quality alert ( ).
• If SQ is <.25, it triggers a failing quality alert ( ).
How Size Quality is determined
The Size Quality algorithm evaluates the similarity between the fragment pattern forthe size standard dye specified in the size standard definition and the actualdistribution of size standard peaks in the sample, calculates an interim SQ (a valuebetween 0 and 1).
Chapter 6 Start and monitor a runMonitor a run from the instrument6
92 SeqStudio™ Genetic Analyzer Instrument and Software User Guide

Setting Description
Exported The sample has been auto exported (saved to Cloud, network, or USB) or manuallyexported (using Settings4Run History4plate name4Export).
Well details (see below).
Well details
Sample file name, QC flag, sample name, sample type, settings used to acquire the data (size standard, run moduleand dye set), Sizing quality value, and export status.
Sequence analysis trace
74
1
2
3
5
6
1 Size Quality bars and values:
• QV ³20• QV 10–19• QV <10
2 Bases—Mixed bases are displayed in red (if they exceed the Mixed base thresholdspecified in analysis settings).
3 Trace color hide/show—Touch to open, then touch a color to hide or show.4 Analyzed trace5 Thumbnail trace—Drag the center of the pane in the thumbnail trace to display another
trace area in the top pane. Drag the right or left handle of the pane to zoom horizontally.6 Zoom tools—Touch to open.7 Next trace tool—Touch to view the raw trace or EPT for the well.
Chapter 6 Start and monitor a runMonitor a run from the instrument 6
SeqStudio™ Genetic Analyzer Instrument and Software User Guide 93

Sequencing results
Result Description
Quality QC flags
• —All QC tests passed.
• —At least 1 warning quality alert was triggered.
• —At least 1 failing quality alert was triggered.
CRL (Contiguous ReadLength)
The longest uninterrupted segment of bases with an average Quality Value (QV) ³20.
In addition to evaluating the QV of a base call, the software considers the QV of adjacentbases within a ±20-bp moving average to determine a contiguous read length based onquality values:
• The software starts from the 5¢ end and calculates the average QV across a movingwindow size of 20, sliding 1 bp at a time, to the 3¢ end.
• The resulting longest contiguous segment is determined as the CRL.
Note: The contiguous read length passing criteria for install checks is anuninterrupted segment of bases with an average Quality Value (QV) of 30.
Exported The sample has been auto exported (saved to Cloud, network, or USB) or manuallyexported (using Settings4Run History4plate name4Export).
Well details (see below).
Well details
Sample file name, QC flag, sample name, CRL, signal strength, Median PUP, Trace score, run module and dye setused to acquire the data, and export status.
Signal strength The average relative fluorescence unit (RFU) for all dyes across the electropherogramin the raw data.
Trace score The average basecall quality value (QV) of bases in the clear range sequence of a trace.
The clear range is the region of the sequence that remains after excluding the low-quality or error-prone sequence at the 5¢ and 3¢ ends. The clear range is calculated bythe KB basecaller using QVs.
Median PUP (pull-up peak) A measure of noise or pull-up that is determined by taking the mean of the ratios ofsignal strength calculated for each base-called peak: (primary peak/secondary peakunder the primary peak).
A higher value indicates less baseline or secondary noise. A lower value indicates anelevated baseline or secondary noise.
Example 1: Main called base signal strength is 1,000 RFU and the largest secondarypeak beneath it is 10 RFU; PuP=100
Example 2: Main called base signal strength is 1,000 RFU and the largest secondarypeak beneath it is 100 RFU; PuP=10
Chapter 6 Start and monitor a runMonitor a run from the instrument6
94 SeqStudio™ Genetic Analyzer Instrument and Software User Guide

Adjust the trace display
See “View results for the current plate“ on page 91 to access results.
• Drag one finger to pan to the left or right.
• Zoom in and out by pinching and expanding with two fingers.
• Touch on the left border of the trace, then touch a dye to deselect.
• Touch on the right border of the trace, then touch Zoom In, Zoom Out, or Fit to screen to adjust the display.
• Drag the center of the pane in thumbnail view to scroll left or right.
• Drag the right or left handle of the pane to zoom horizontally.
Unload the plate or the tube assembly
When the run is complete:
1. Touch , touch Eject plate, then open the instrument door when prompted.
2. Press the release button on the autosampler to open the lid.
3. Remove the plate or tube assembly.
Chapter 6 Start and monitor a runUnload the plate or the tube assembly 6
SeqStudio™ Genetic Analyzer Instrument and Software User Guide 95

4. Close the autosampler lid: Press down on the center of the lid or press down onboth sides of the lid with equal pressure until the lid clicks shut.
5. Touch Retract plate, then close the instrument door.
Chapter 6 Start and monitor a runUnload the plate or the tube assembly6
96 SeqStudio™ Genetic Analyzer Instrument and Software User Guide

View and analyze results
■ View results in the Remote Monitoring App on the Cloud . . . . . . . . . . . . . . . . . 97
■ View results on the instrument . . . . . . . . . . . . . . . . . . . . . . . . . . . . . . . . . . . . . . . . . 98
■ Export results from the instrument (sample data files and QC reports) . . . . . . 105
■ Analyze data . . . . . . . . . . . . . . . . . . . . . . . . . . . . . . . . . . . . . . . . . . . . . . . . . . . . . . . 106
View results in the Remote Monitoring App on the Cloud
1. Open the Remote Monitoring App (see “Open the Remote Monitoring App fromInstrument Connect App“ on page 79).
2. Click an injection group in the injection list or the plate view.
The status dials are color-coded for quality alerts:• —All QC tests passed.• —At least 1 warning quality alert was triggered.• —At least 1 failing quality alert was triggered.
For information on quality alerts, see:• “Data quality alerts“ on page 156• “Sizecalling and basecalling quality alerts“ on page 156
Note: The Analyzed tab is disabled if the Save location for the plate setup is notset to Cloud or if the injection group has not finished running.
3. In the Quality alerts screen, click the Raw, EPT, or Analyzed tab to view data.
4. As needed, select Actions4Re-inject group, select the Run module and settings,then click Inject.
7
SeqStudio™ Genetic Analyzer Instrument and Software User Guide 97

View results on the instrument
When a run is complete, in the home screen:
1. Touch View Results.
2. Touch List view.Each injection group displays a QC color for each capillary:
• —All QC tests passed.• —At least 1 warning quality alert was triggered.• —At least 1 failing quality alert was triggered.
For information on quality alerts, see:• “Data quality alerts“ on page 156• “Sizecalling and basecalling quality alerts“ on page 156
3. Touch an injection group.
4. View the results in the Run Result Details screen, or touch for well details.See “Fragment analysis results“ on page 92 or “Sequencing results“ on page 94for detailed information.
5. Touch a sample file name.If the data triggered any quality alerts, a QC alerts screen is displayed. See “Dataquality alerts“ on page 156 and “Sizecalling and basecalling quality alerts“ onpage 156 for detailed information.Touch View data to display the analyzed trace for the sample. See “Fragmentanalysis trace“ on page 92 or “Sequence analysis trace“ on page 93 for detailedinformation.
6. Touch and drag the thumbnail view of the analyzed trace (below the trace) toscroll left or right.
7. (Optional) Adjust the graphical view (see “Adjust the trace display“ on page 95).
8. Touch or to scroll to the raw data or EPT Plot (ElectroPhoresis Telemetry).See “EPT plot“ on page 102.
View results forthe current plate
Chapter 7 View and analyze resultsView results on the instrument7
98 SeqStudio™ Genetic Analyzer Instrument and Software User Guide

Fragment analysis trace
7
61
2
3
4
5
1 Trace color hide/show—Touch to open, then touch a color to hide or show.2 Analyzed trace3 Size standard curve (red line)4 Thumbnail trace—Drag the center of the pane in the thumbnail trace to display another
trace area in the top pane. Drag the right or left handle of the pane to zoom horizontally.5 Basepair or scan display selection.6 Zoom tools—Touch to open.7 Next trace tool—Touch to view the raw trace or EPT for the well.
Fragment analysis results
Setting Description
Quality QC flags
• —All QC tests passed.
• —At least 1 warning quality alert was triggered.
• —At least 1 failing quality alert was triggered.
SQ Size Quality
• If SQ is ≤0.75, it passes the QC test and does not trigger a quality alert ( ).
• If SQ is 0.25–0.74, it triggers a warning quality alert ( ).
• If SQ is <.25, it triggers a failing quality alert ( ).
How Size Quality is determined
The Size Quality algorithm evaluates the similarity between the fragment pattern forthe size standard dye specified in the size standard definition and the actualdistribution of size standard peaks in the sample, calculates an interim SQ (a valuebetween 0 and 1).
Chapter 7 View and analyze resultsView results on the instrument 7
SeqStudio™ Genetic Analyzer Instrument and Software User Guide 99

Setting Description
Exported The sample has been auto exported (saved to Cloud, network, or USB) or manuallyexported (using Settings4Run History4plate name4Export).
Well details (see below).
Well details
Sample file name, QC flag, sample name, sample type, settings used to acquire the data (size standard, run moduleand dye set), Sizing quality value, and export status.
Sequence analysis trace
74
1
2
3
5
6
1 Size Quality bars and values:
• QV ³20• QV 10–19• QV <10
2 Bases—Mixed bases are displayed in red (if they exceed the Mixed base thresholdspecified in analysis settings).
3 Trace color hide/show—Touch to open, then touch a color to hide or show.4 Analyzed trace5 Thumbnail trace—Drag the center of the pane in the thumbnail trace to display another
trace area in the top pane. Drag the right or left handle of the pane to zoom horizontally.6 Zoom tools—Touch to open.7 Next trace tool—Touch to view the raw trace or EPT for the well.
Chapter 7 View and analyze resultsView results on the instrument7
100 SeqStudio™ Genetic Analyzer Instrument and Software User Guide

Sequencing results
Result Description
Quality QC flags
• —All QC tests passed.
• —At least 1 warning quality alert was triggered.
• —At least 1 failing quality alert was triggered.
CRL (Contiguous ReadLength)
The longest uninterrupted segment of bases with an average Quality Value (QV) ³20.
In addition to evaluating the QV of a base call, the software considers the QV of adjacentbases within a ±20-bp moving average to determine a contiguous read length based onquality values:
• The software starts from the 5¢ end and calculates the average QV across a movingwindow size of 20, sliding 1 bp at a time, to the 3¢ end.
• The resulting longest contiguous segment is determined as the CRL.
Note: The contiguous read length passing criteria for install checks is anuninterrupted segment of bases with an average Quality Value (QV) of 30.
Exported The sample has been auto exported (saved to Cloud, network, or USB) or manuallyexported (using Settings4Run History4plate name4Export).
Well details (see below).
Well details
Sample file name, QC flag, sample name, CRL, signal strength, Median PUP, Trace score, run module and dye setused to acquire the data, and export status.
Signal strength The average relative fluorescence unit (RFU) for all dyes across the electropherogramin the raw data.
Trace score The average basecall quality value (QV) of bases in the clear range sequence of a trace.
The clear range is the region of the sequence that remains after excluding the low-quality or error-prone sequence at the 5¢ and 3¢ ends. The clear range is calculated bythe KB basecaller using QVs.
Median PUP (pull-up peak) A measure of noise or pull-up that is determined by taking the mean of the ratios ofsignal strength calculated for each base-called peak: (primary peak/secondary peakunder the primary peak).
A higher value indicates less baseline or secondary noise. A lower value indicates anelevated baseline or secondary noise.
Example 1: Main called base signal strength is 1,000 RFU and the largest secondarypeak beneath it is 10 RFU; PuP=100
Example 2: Main called base signal strength is 1,000 RFU and the largest secondarypeak beneath it is 100 RFU; PuP=10
Chapter 7 View and analyze resultsView results on the instrument 7
SeqStudio™ Genetic Analyzer Instrument and Software User Guide 101

EPT plot
The EPT view (ElectroPhoresis Telemetry) shows instrument data conditions(currents, temperatures, electrophoresis voltage) as a function of time.
Touch on the left border of the plot to display the legend.
Chapter 7 View and analyze resultsView results on the instrument7
102 SeqStudio™ Genetic Analyzer Instrument and Software User Guide

Adjust the trace display
See “View results for the current plate“ on page 91 to access results.
• Drag one finger to pan to the left or right.
• Zoom in and out by pinching and expanding with two fingers.
• Touch on the left border of the trace, then touch a dye to deselect.
• Touch on the right border of the trace, then touch Zoom In, Zoom Out, or Fit to screen to adjust the display.
• Drag the center of the pane in thumbnail view to scroll left or right.
• Drag the right or left handle of the pane to zoom horizontally.
Chapter 7 View and analyze resultsView results on the instrument 7
SeqStudio™ Genetic Analyzer Instrument and Software User Guide 103
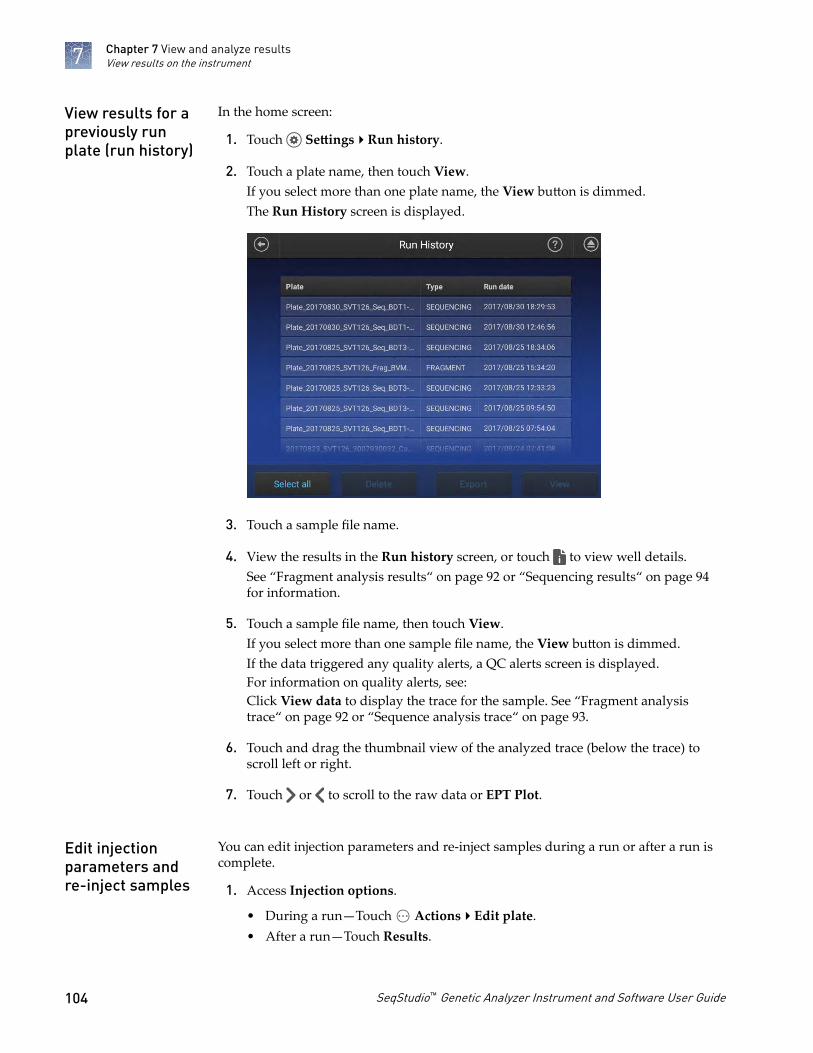
In the home screen:
1. Touch Settings4Run history.
2. Touch a plate name, then touch View.If you select more than one plate name, the View button is dimmed.The Run History screen is displayed.
3. Touch a sample file name.
4. View the results in the Run history screen, or touch to view well details.See “Fragment analysis results“ on page 92 or “Sequencing results“ on page 94for information.
5. Touch a sample file name, then touch View.If you select more than one sample file name, the View button is dimmed.If the data triggered any quality alerts, a QC alerts screen is displayed.For information on quality alerts, see:Click View data to display the trace for the sample. See “Fragment analysistrace“ on page 92 or “Sequence analysis trace“ on page 93.
6. Touch and drag the thumbnail view of the analyzed trace (below the trace) toscroll left or right.
7. Touch or to scroll to the raw data or EPT Plot.
You can edit injection parameters and re-inject samples during a run or after a run iscomplete.
1. Access Injection options.
• During a run—Touch Actions4Edit plate.• After a run—Touch Results.
View results for apreviously runplate (run history)
Edit injectionparameters andre-inject samples
Chapter 7 View and analyze resultsView results on the instrument7
104 SeqStudio™ Genetic Analyzer Instrument and Software User Guide
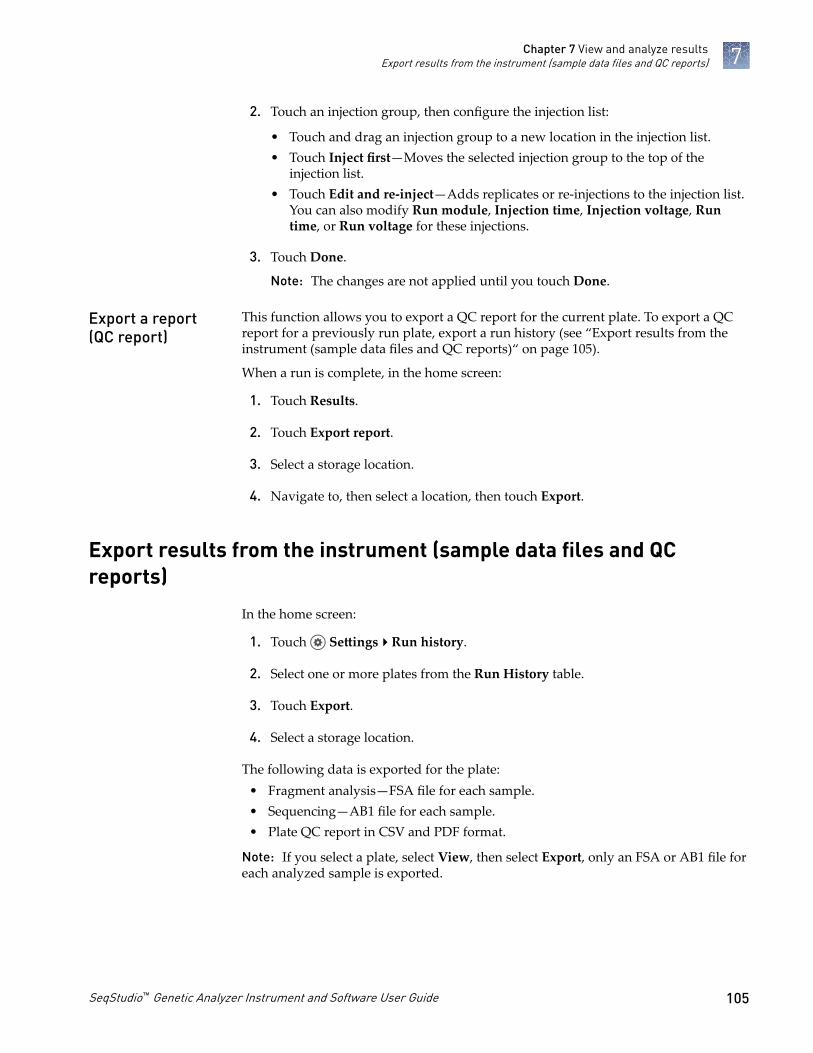
2. Touch an injection group, then configure the injection list:
• Touch and drag an injection group to a new location in the injection list.• Touch Inject first—Moves the selected injection group to the top of the
injection list.• Touch Edit and re-inject—Adds replicates or re-injections to the injection list.
You can also modify Run module, Injection time, Injection voltage, Runtime, or Run voltage for these injections.
3. Touch Done.
Note: The changes are not applied until you touch Done.
This function allows you to export a QC report for the current plate. To export a QCreport for a previously run plate, export a run history (see “Export results from theinstrument (sample data files and QC reports)“ on page 105).
When a run is complete, in the home screen:
1. Touch Results.
2. Touch Export report.
3. Select a storage location.
4. Navigate to, then select a location, then touch Export.
Export results from the instrument (sample data files and QCreports)
In the home screen:
1. Touch Settings4Run history.
2. Select one or more plates from the Run History table.
3. Touch Export.
4. Select a storage location.
The following data is exported for the plate:• Fragment analysis—FSA file for each sample.• Sequencing—AB1 file for each sample.• Plate QC report in CSV and PDF format.
Note: If you select a plate, select View, then select Export, only an FSA or AB1 file foreach analyzed sample is exported.
Export a report(QC report)
Chapter 7 View and analyze resultsExport results from the instrument (sample data files and QC reports) 7
SeqStudio™ Genetic Analyzer Instrument and Software User Guide 105

Analyze data
1. Export results (see “Export results from the instrument (sample data files and QCreports)“ on page 105) or use auto exported data.
2. Use an appropriate fragment analysis or sequencing application to analyze thedata.
Note: Data from the SeqStudio™ Genetic Analyzer may be labeled as "3200" insecondary analysis software.
For more information, see “Secondary analysis software“ on page 28
Chapter 7 View and analyze resultsAnalyze data7
106 SeqStudio™ Genetic Analyzer Instrument and Software User Guide

Manage the software (PlateManager)
■ Add a custom dye calibration to the Plate Manager . . . . . . . . . . . . . . . . . . . . . . 107
■ Download a plate setup template as a CSV file . . . . . . . . . . . . . . . . . . . . . . . . . . 107
■ Save a plate setup as a PDF . . . . . . . . . . . . . . . . . . . . . . . . . . . . . . . . . . . . . . . . . . . 108
■ Save a plate setup as a CSV file . . . . . . . . . . . . . . . . . . . . . . . . . . . . . . . . . . . . . . . . 108
■ Create a plate setup template . . . . . . . . . . . . . . . . . . . . . . . . . . . . . . . . . . . . . . . . . 108
■ Delete plate setups . . . . . . . . . . . . . . . . . . . . . . . . . . . . . . . . . . . . . . . . . . . . . . . . . . 109
■ Manage email notifications in the Thermo Fisher Cloud . . . . . . . . . . . . . . . . . . 110
■ Manage run modules . . . . . . . . . . . . . . . . . . . . . . . . . . . . . . . . . . . . . . . . . . . . . . . . 110
■ Manage size standards . . . . . . . . . . . . . . . . . . . . . . . . . . . . . . . . . . . . . . . . . . . . . . . 112
■ Manage analysis settings . . . . . . . . . . . . . . . . . . . . . . . . . . . . . . . . . . . . . . . . . . . . . 113
Add a custom dye calibration to the Plate Manager
On the instrument:
1. Open a plate setup that specifies the custom dye set of interest.
2. Export a plate setup that specifies the custom dye.
3. Open the exported plate setup in the Plate Manager.The custom dye is imported and is available for selection when you create newplates.
Download a plate setup template as a CSV file
1. Click to display the home screen.
2. Click New, select Create from template, then click Download for the template ofinterest.
Note: You cannot add plate setups to the list of templates. However, you can create aplate setup with "Template" suffix, and use it as a starting point for creating new platesetups.
8
SeqStudio™ Genetic Analyzer Instrument and Software User Guide 107

Save a plate setup as a PDF
In the Plate tab:
Select Actions4Print plate view.
The plate view and table view are exported.
Save a plate setup as a CSV file
In the Plate tab:
1. Select Actions4Save as CSV.
2. Navigate to and select a storage destination.
The plate setup is saved as a CSV file. The names of the dye set, run module, and sizestandard are included in the CSV file.
Create a plate setup template
Note: You cannot add templates to the list of templates you select when you create aplate setup. However, you can create a plate setup with "Template" suffix, then use itas a starting point for creating new plate setups.
1. Click New, select Create from template, then click Download for the template ofinterest.
2. Modify the CSV file as needed.
3. Save the plate setup with a "Template" suffix (example:Plate_FragAnalysis_Template), or other identifier.
Chapter 8 Manage the software (Plate Manager)Save a plate setup as a PDF8
108 SeqStudio™ Genetic Analyzer Instrument and Software User Guide

Delete plate setups
To delete plate setups from the Plate Manager:
On the... Use...
Desktop Windows™ Explorer to delete PSM or CSV files.
Note: The location shown in the figure is an example. Users can save PSM files in anylocation.
Cloud Click in the Thermo Fisher Cloud, then use DataConnect to delete PSM files.
Chapter 8 Manage the software (Plate Manager)Delete plate setups 8
SeqStudio™ Genetic Analyzer Instrument and Software User Guide 109

Manage email notifications in the Thermo Fisher Cloud
1. In any screen in the Thermo Fisher Cloud, click .
2. Click Settings.
3. Select or deselect your email address.
Manage run modules
This function manages the list of run modules that you can select from when youcreate a plate setup.
To assign a run module to a plate, see “Assign wells: run module, size standard, anddye set“ on page 69.
Factory-installed items cannot be edited or deleted. To create a new item from afactory-installed item, copy, edit, then save the new item.
For more information, see “Run modules, read lengths, size ranges, and run times“ onpage 111.
The default run modules are for the following read lengths:• Long— ≥800 bases• Medium— ≥500 to 799 bases• Short— ≥350 to 499 bases
1. In the Plate tab, select Actions4Manage run modules.
2. To create a new run module:a. Select a default run module or a user-created run module, then click Copy.
b. Enter values, click Advanced to enter additional settings, then click Save.
See “Run module settings“ on page 111 for detailed information.
3. As needed, select a run module of interest, then click Edit or Delete (user-createdrun modules only).
Chapter 8 Manage the software (Plate Manager)Manage email notifications in the Thermo Fisher Cloud8
110 SeqStudio™ Genetic Analyzer Instrument and Software User Guide
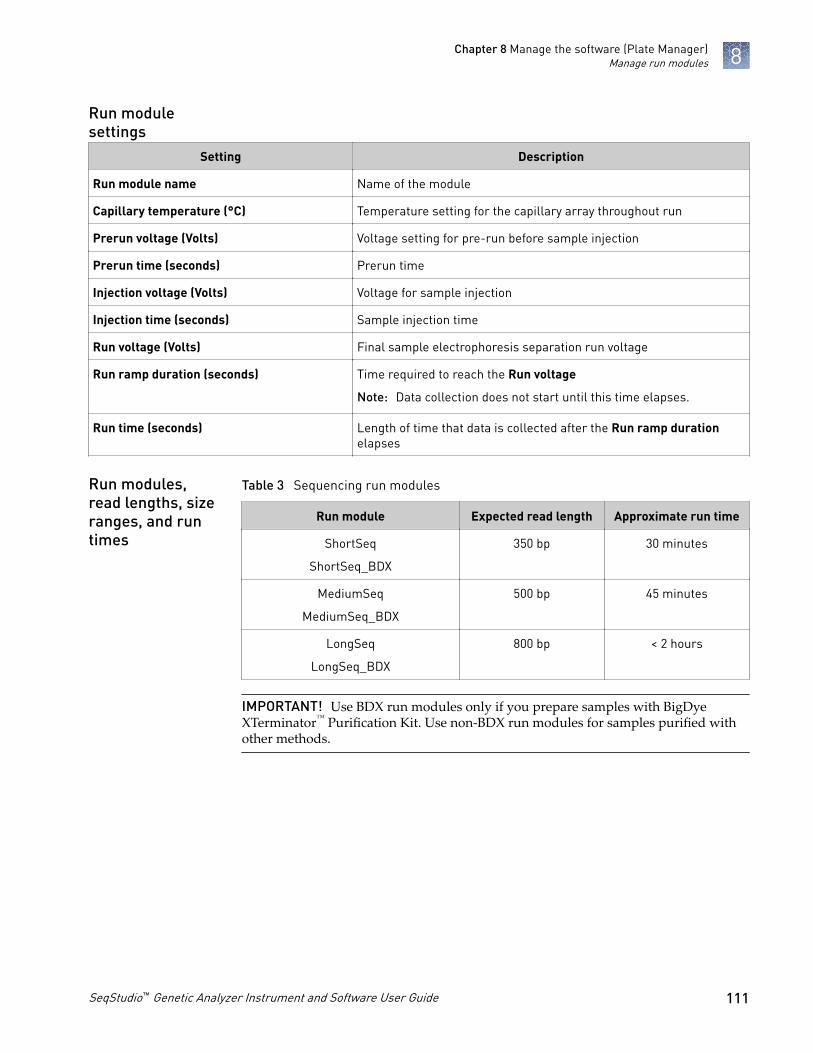
Setting Description
Run module name Name of the module
Capillary temperature (°C) Temperature setting for the capillary array throughout run
Prerun voltage (Volts) Voltage setting for pre-run before sample injection
Prerun time (seconds) Prerun time
Injection voltage (Volts) Voltage for sample injection
Injection time (seconds) Sample injection time
Run voltage (Volts) Final sample electrophoresis separation run voltage
Run ramp duration (seconds) Time required to reach the Run voltage
Note: Data collection does not start until this time elapses.
Run time (seconds) Length of time that data is collected after the Run ramp durationelapses
Table 3 Sequencing run modules
Run module Expected read length Approximate run time
ShortSeq
ShortSeq_BDX
350 bp 30 minutes
MediumSeq
MediumSeq_BDX
500 bp 45 minutes
LongSeq
LongSeq_BDX
800 bp < 2 hours
IMPORTANT! Use BDX run modules only if you prepare samples with BigDyeXTerminator™ Purification Kit. Use non-BDX run modules for samples purified withother methods.
Run modulesettings
Run modules,read lengths, sizeranges, and runtimes
Chapter 8 Manage the software (Plate Manager)Manage run modules 8
SeqStudio™ Genetic Analyzer Instrument and Software User Guide 111

Table 4 Fragment analysis run modules
Run module Optimal sizing range Approximate runtime Compatible size standards
SNaPshot 40–120 bp 25 minutes GeneScan™ 120 LIZ™ SizeStandard
FragAnalysis 60–460 bp 45 minutes All except GeneScan™ 1200 LIZ™
Size Standard
LongFragAnalysis[1] 60–600 bp < 2 hours • GeneScan™ 600 LIZ™ SizeStandard v2.0
• GeneScan™ 1200 LIZ™ SizeStandard
[1] Load a maximum of 48 samples per plate if you use a long run module.
Note: The following size standards hav not been validated for use with theinstrument. A default size standard definition is not provided in the software.· GeneScan™ 500 LIZ™ dye Size Standard· GeneScan™ 350 ROX™ dye Size Standard· GeneScan™ 400HD ROX™ dye Size Standard
Manage size standards
This function manages the list of size standard definitions that you can select fromduring plate set up.
To assign a size standard definition to a plate, see “Assign wells: run module, sizestandard, and dye set“ on page 69.
A size standard defines the sizes in basepairs of known fragments. It is used togenerate a standard curve. The standard curve is used to determine the sizing offragments in unknown samples.
Factory-installed items cannot be edited or deleted. To create a new item from afactory-installed item, copy, edit, then save the new item.
Size standard definitions are accessible to all users.
1. In the Plate tab, select Actions4Manage size standards.
2. To create a new size standard:a. Select a default size standard or a user-created size standard, then click
Copy.
b. Enter a name and select a dye color, then edit the fragment sizes (basepairs).
c. Click Save:
3. As needed, select a size standard of interest, then click Edit or Delete(user-created size standards only).
Chapter 8 Manage the software (Plate Manager)Manage size standards8
112 SeqStudio™ Genetic Analyzer Instrument and Software User Guide

Manage analysis settings
In the Properties tab:
1. Select Actions4Analysis settings.
2. To create new analysis settings:a. Select the default analysis settings or user-created analysis settings, then
click Copy.
b. Enter a name and edit settings as needed (see “Fragment analysis settings(size calling)“ on page 113 or “Sequencing settings (base calling)“ onpage 115).
c. As needed, click Delete (user-created settings only).
3. Click Save.
Setting Description
Size calling method • Local Southern—(default) Determines the fragment sizes using the reciprocalrelationship between fragment length and electrophoretic mobility.
• Global Southern—Compensates for standard fragments with anomalouselectrophoretic mobility (similar to least squares methods).
• 2nd LSQ (2nd Order Least Squares)—Uses regression analysis to build a bestfitsize calling curve.
• 3rd LSQ (3rd Order Least Squares)—Uses regression analysis to build a bestfitsize calling curve.
• Cubic Spline Interpolation—Forces the sizing curve through all the known pointsof the selected size standard.
Analysis range • Full Range—(default) To analyze the entire scan region as collected by the geneticanalysis instrument, including the primer peak.
• Partial Range—To analyze only data points within a specified range. Enter StartPoint in data points after the primer peak and before the first required sizestandard peak. Enter a Stop Point after the last required size standard fragment.Start and Stop points may vary from instrument to instrument and platform toplatform. View raw data to determine the appropriate analysis range.Data points outside the specified analysis range are ignored.
Note: Ensure the Analysis Range contains all size standard fragments included in theSizing Range.
Sizing range The size range (in base pairs) appropriate for the kit you are using:
• Full Range for the software to analyze fragments of all sizes in the AnalysisRange.
• Partial Range for the software to analyze only fragments within a specified range.Enter a Start Size and a Stop Size appropriate for the size standard used.
Fragment analysissettings (sizecalling)
Chapter 8 Manage the software (Plate Manager)Manage analysis settings 8
SeqStudio™ Genetic Analyzer Instrument and Software User Guide 113

Setting Description
Peak amplitudes The peak height threshold (RFU) for peak detection for each dye color.
Peaks below the threshold are not detected. For example, if you use the default valuesof 175 RFU, peaks with heights equal to or greater than 175 RFU are detected. Peakswith heights below 175 RFU are still displayed in the electropherogram plots but arenot detected or labeled.
Note: Use the same peak amplitude thresholds in secondary analysis software.
Primer peak If the primer peaks in your application obscure peaks of interest, select Present. Thisinstructs the algorithm to ignore primer peaks. Primer peaks are still displayed in thetrace.
If this setting does not allow detection of the 20- and 40-mer peaks for samples thatuse the GS600 LIZ™ size standard, running samples with the GS600_LIZ_(60‑600) orother size standards that include lower bp starting points may allow detection of thepeaks.
Common settings
Smoothing Select an option to smooth the outline of peaks and reduce the number of false peaksdetected:
• None (default) to apply no smoothing. Best if the data display sharp, narrow peaksof interest.
• Light to provide the best results for typical data. Light smoothing slightly reducespeak height.
• Heavy for data with very sharp, narrow peaks of interest. Heavy smoothing cansignificantly reduce peak height.
Baseline Window Specify a window to adjust the baseline signals of all detected dye colors to the samelevel for an improved comparison of relative signal intensity. Note the following:
• A small baseline window relative to the width of a cluster, or grouping of peaksspatially close to each other, can result in shorter peak heights.
• Larger baseline windows relative to the peaks being detected can create anelevated baseline, resulting in peaks that are elevated or not resolved to thebaseline.
Minimum Peak Half Width Specify the minimum full peak width at half maximum Peak Height required for peakdetection. The range is 2 to 99 data points.
Peak Window Size Enter a window width in data points for peak detection sensitivity. If more than onepeak apex is within the window, all are labeled as a single peak. Note the following:
• The maximum value is the number of data points between peaks.
• The Peak Window Size setting is limited to odd numbers.
To increase peak detection sensitivity: Increase polynomial degree, decrease peakwindow size. To decrease peak detection sensitivity: Decrease polynomial degree,increase peak window size.
Chapter 8 Manage the software (Plate Manager)Manage analysis settings8
114 SeqStudio™ Genetic Analyzer Instrument and Software User Guide

Setting Description
Polynomial Degree Polynomial Degree cannot be greater than Peak Window Size.
Adjust to affect the sensitivity of peak detection. You can adjust this parameter to detecta single base pair difference while minimizing the detection of shoulder effects and/ornoise.
The peak detector calculates the first derivative of a polynomial curve fitted to the datawithin a window that is centered on each data point in the analysis range.
Using curves with larger polynomial degree values allows the curve to more closelyapproximate the signal and, therefore, captures more of the peak structure in theelectropherogram.
Slope Thresholds PeakStart and End
• Peak Start—The peak starts when the first derivative (slope of the tangent) in thebeginning of the peak signal before the inflection point becomes equal to orexceeds the Peak Start value. This threshold is set to 0 by default, which meansthat the peak will normally start at the leftmost point where the slope of thetangent is closest to 0° (horizontal line). A value other than 0 moves the peak startpoint toward its center. The value entered must be non-negative.
• Peak End—The peak ends when the first derivative (slope of the tangent) in theend of the peak signal after the inflection point becomes equal to or exceeds thePeak End value. This value is set to 0 by default, which means that the peak willnormally end at the rightmost point where the slope of the tangent is closest to 0°(horizontal line). A value other than 0 moves the peak end point toward its center.The value entered in this field must be non-positive.
Using curves with larger polynomial degree values allows the curve to more closelyapproximate the signal and, therefore, captures more of the peak structure in theelectropherogram.
The default settings are optimized for sequencing of PCR amplicons from diploidgenes, which are expected to have Mixed bases and which should end At PCR Stop.
For sequencing from plasmid templates, which are of pure sequence (no Mixed bases)and have longer sequence read times than PCR products, create new analysis settingsand disable (uncheck) At PCR Stop and Mixed base threshold checkboxes.
Setting Description
Quality Threshold • Basecall assignment (ambiguous bases):– Do not assign Ns to basecalls
– Assign Ns to basecalls with QV<5— Bases with a QV less than the thresholddisplay N instead of the base letter
• End base—Last base on which to perform basecalling:– At PCR Stop
– After X number of bases
– After X number of Ns in X number of bases
– After X number of Ns
Note: If you have PCR products with sequences that end while data is still beingcollected, select the At PCR Stop checkbox.
Sequencingsettings (basecalling)
Chapter 8 Manage the software (Plate Manager)Manage analysis settings 8
SeqStudio™ Genetic Analyzer Instrument and Software User Guide 115
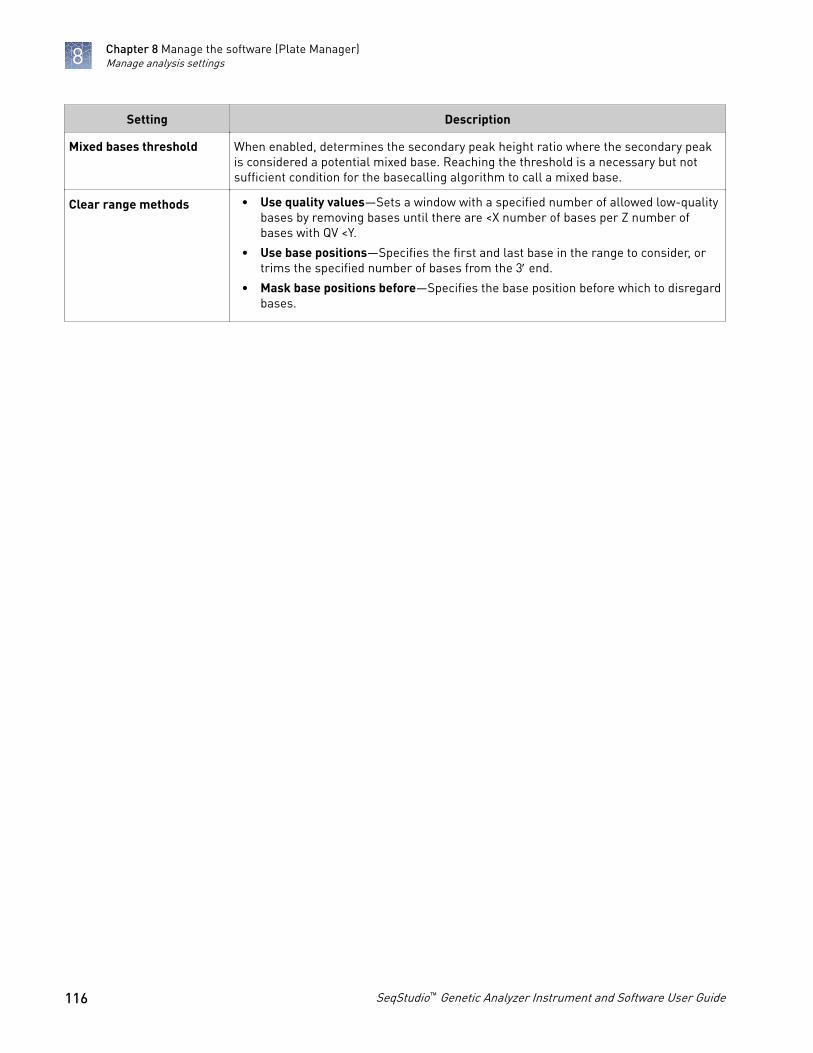
Setting Description
Mixed bases threshold When enabled, determines the secondary peak height ratio where the secondary peakis considered a potential mixed base. Reaching the threshold is a necessary but notsufficient condition for the basecalling algorithm to call a mixed base.
Clear range methods • Use quality values—Sets a window with a specified number of allowed low-qualitybases by removing bases until there are <X number of bases per Z number ofbases with QV <Y.
• Use base positions—Specifies the first and last base in the range to consider, ortrims the specified number of bases from the 3¢ end.
• Mask base positions before—Specifies the base position before which to disregardbases.
Chapter 8 Manage the software (Plate Manager)Manage analysis settings8
116 SeqStudio™ Genetic Analyzer Instrument and Software User Guide

Manage the software (instrument)
■ Connect the instrument to a network drive . . . . . . . . . . . . . . . . . . . . . . . . . . . . . 117
■ Link the instrument to your Thermo Fisher Cloud account . . . . . . . . . . . . . . . . 123
■ Lock the touchscreen . . . . . . . . . . . . . . . . . . . . . . . . . . . . . . . . . . . . . . . . . . . . . . . . 124
■ Manage plate setups . . . . . . . . . . . . . . . . . . . . . . . . . . . . . . . . . . . . . . . . . . . . . . . . . 125
■ Manage run settings (instrument) . . . . . . . . . . . . . . . . . . . . . . . . . . . . . . . . . . . . . 126
■ Manage instrument settings . . . . . . . . . . . . . . . . . . . . . . . . . . . . . . . . . . . . . . . . . . 135
■ Manage instrument profiles on the instrument . . . . . . . . . . . . . . . . . . . . . . . . . . 138
■ Manage storage space . . . . . . . . . . . . . . . . . . . . . . . . . . . . . . . . . . . . . . . . . . . . . . . . 140
Connect the instrument to a network drive
On the destination computer:
1. In the Windows™ desktop, click .
2. In the search field at the bottom of the pane, type command prompt, then pressEnter.
3. At the command prompt, type ipconfig, then press Enter.
9
Determine IPaddress for acomputer on anetwork
SeqStudio™ Genetic Analyzer Instrument and Software User Guide 117

4. Note the IP address listed.
Note: The location and number of digits in your IP address may differ from theIPv4 Address example shown below.
In the Windows™ desktop:
1. On a Windows™ computer, server, or network drive, create a folder to store yourplates and results. Example: C:/Users/Your Name/SharedData.
2. Create subfolders in the SharedData folder. Example: PlateSetups and Results.
3. Right click on a folder, then select Sharing4Advanced or Sharewith4Advanced sharing.
4. Select the Sharing tab.
5. Click Advanced sharing.
6. Select Share this folder.
7. Click Permissions, then select Full Control or Read, Write, and Delete options.
IMPORTANT! Without these permissions, the instrument cannot autoexportresults when a run is complete.
8. Click OK, click OK, then click Close.
Create folders andenable networkfolder sharing
Chapter 9 Manage the software (instrument)Connect the instrument to a network drive9
118 SeqStudio™ Genetic Analyzer Instrument and Software User Guide

See your laboratory administrator for the information you need to connect to anetwork drive.
From any screen that displays Network drive or Save location as an option, youcan connect to the drive for the first time.
IMPORTANT! Before saving to the network drive, ensure that the folder is shared (see “Create folders and enable network folder sharing“ on page 118 ).
1. Touch Network drive or Save location field.
2. Touch the Destination field, then touch the appropriate field to enter the IPaddress and shared folder name, then touch Done.For more information, see “Determine IP address for a computer on anetwork“ on page 117.
3. If necessary, touch the appropriate fields to enter a domain name, username, andpassword.
4. Touch Connect.
Before you begin, create a plate setup (PSM file or CSV file) in the Cloud location thatyou want to set as the default location.
To set the default location, you must select a plate setup.
1. In the home screen of the instrument, touch Setup run, then touch Cloud.The Setup Run screen is displayed.
2. Select a folder (if needed), then select a plate file.The plate file is imported.
3. Touch to return to the Setup Run screen.
Connect to anetwork drive
Set up a defaultCloud location foropening platesetups
Chapter 9 Manage the software (instrument)Connect the instrument to a network drive 9
SeqStudio™ Genetic Analyzer Instrument and Software User Guide 119

1. In the home screen of the instrument, touch Setup run, then touch Create newplate setup.
2. Touch Save location.
3. Touch the Cloud Destination field.The Select Directory screen is displayed.
4. Select or create a folder.
5. Touch Done.
Before you begin, create a plate setup (PSM file or CSV file) in the shared directory onthe computer that you want to set as the default location.
To set the default location, you must select a plate setup.
1. Determine the IP address of the computer on which you created shared folders(see “Determine IP address for a computer on a network“ on page 117 and “Create folders and enable network folder sharing“ on page 118 ).
2. In the home screen of the instrument, touch Setup run, then touch NetworkDrive.
If your instrumentprofile
This screen isdisplayed How to proceed
Is not connected to anetwork drive
Connect 1. In the Network Destination field,enter the IP address of thecomputer followed by the foldernames you created. Example:10.43.32.82/SharedData/Results.
2. If required by your network, enterDomain, User Name, andPassword to access the sharedlocation.
3. Touch Connect. The Setup Runscreen is displayed.
Is connected to anetwork drive
Select Directory Proceed to step 3.
3. In the Setup Run screen:
Touch To
Set up import Change the Network Destination you specified in the previous step.
A folder name Navigate to the location you want to set as the default.
A plate name Import the plate.
Set up a defaultCloud location forsaving results(auto export)
Set up a defaultnetwork locationfor opening platesetups
Chapter 9 Manage the software (instrument)Connect the instrument to a network drive9
120 SeqStudio™ Genetic Analyzer Instrument and Software User Guide
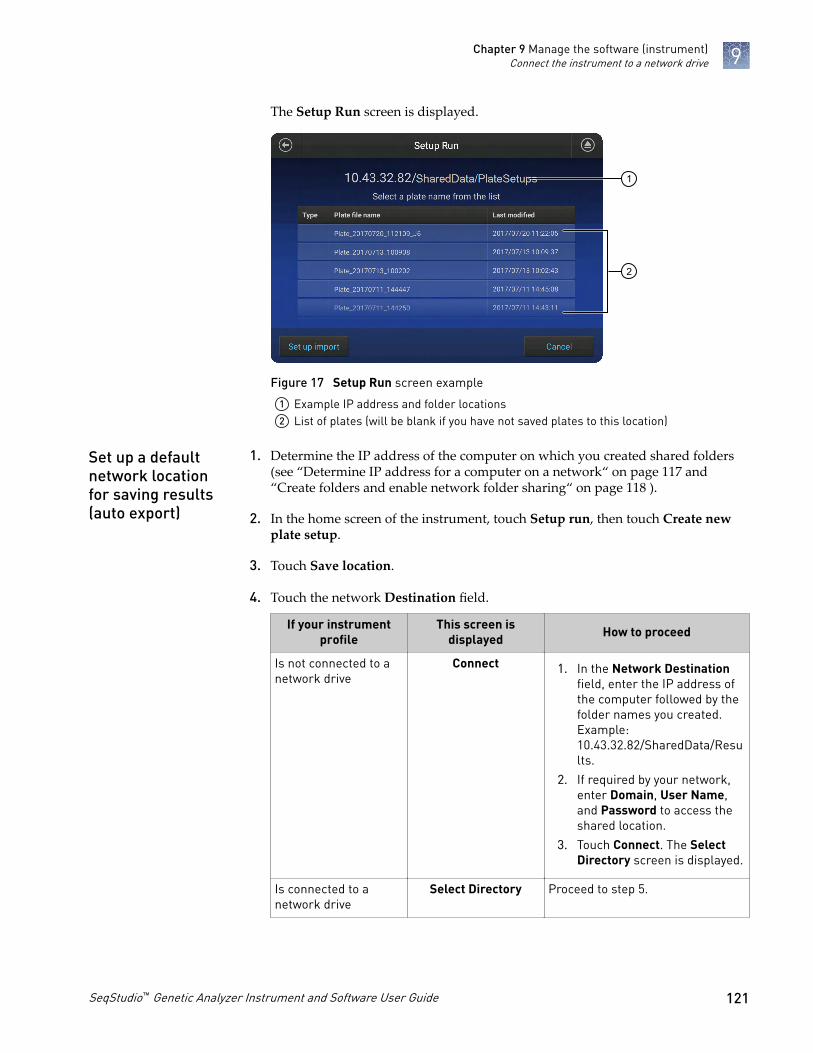
The Setup Run screen is displayed.
1
2
Figure 17 Setup Run screen example
1 Example IP address and folder locations2 List of plates (will be blank if you have not saved plates to this location)
1. Determine the IP address of the computer on which you created shared folders(see “Determine IP address for a computer on a network“ on page 117 and “Create folders and enable network folder sharing“ on page 118 ).
2. In the home screen of the instrument, touch Setup run, then touch Create newplate setup.
3. Touch Save location.
4. Touch the network Destination field.
If your instrumentprofile
This screen isdisplayed How to proceed
Is not connected to anetwork drive
Connect 1. In the Network Destinationfield, enter the IP address ofthe computer followed by thefolder names you created.Example:10.43.32.82/SharedData/Results.
2. If required by your network,enter Domain, User Name,and Password to access theshared location.
3. Touch Connect. The SelectDirectory screen is displayed.
Is connected to anetwork drive
Select Directory Proceed to step 5.
Set up a defaultnetwork locationfor saving results(auto export)
Chapter 9 Manage the software (instrument)Connect the instrument to a network drive 9
SeqStudio™ Genetic Analyzer Instrument and Software User Guide 121

5. In the Select Directory screen:
Touch To
New folder Create a subfolder.
Set up export Change the Network Destination you specified in the previousstep.
Select this folder Select the directory shown at the top of the screen.
1
2
Figure 18 Select Directory screen example
1 Example IP address and folder locations2 List of folders
6. In the Save Destination screen, touch Done.
Chapter 9 Manage the software (instrument)Connect the instrument to a network drive9
122 SeqStudio™ Genetic Analyzer Instrument and Software User Guide

Link the instrument to your Thermo Fisher Cloud account
Note: For detailed information on linking the instrument to your Cloud account, see Appendix B, “Link the instrument to your Cloud account—detailed instructions“.
1. If a user is signed in, touch , then touch Sign out.
2. In the Sign In screen, touch Get started4Connect.
3. In the Connect to the Thermo Fisher Cloud screen, touch a connection option.
Chapter 9 Manage the software (instrument)Link the instrument to your Thermo Fisher Cloud account 9
SeqStudio™ Genetic Analyzer Instrument and Software User Guide 123

Option Action
Mobiledevices
Note: Before selecting this option, install and sign in to theInstrumentConnect app on your mobile device.
In the Connect to the Thermo Fisher Cloud screen:
1. Touch Mobile devices.
2. Hold the camera on your mobile device over the QR code thatis displayed on the touchscreen.
3. Click Close.
PC In the Connect to the Thermo Fisher Cloud screen, a link code isdisplayed.On a computer:
1. Access the Thermo Fisher Cloud.
2. Access InstrumentConnect.
3. Click Add instrument.
4. Select SeqStudio.
5. Enter the link code.
Instrument In the Connect to the Thermo Fisher Cloud screen, enter youraccount information, then click Link account.
Lock the touchscreen
During a run, you can lock the touchscreen to prevent other users from using theinstrument. This feature is not available to Guest users.
Only the user who locked the touchscreen or an administrator can sign in to theinstrument if the touchscreen is locked.
1. Touch .
2. Touch Profile.
3. Touch Lock instrument.
Note: If a run is not in progress, Sign out is displayed instead of Lockinstrument.
Chapter 9 Manage the software (instrument)Lock the touchscreen9
124 SeqStudio™ Genetic Analyzer Instrument and Software User Guide

Manage plate setups
1. Touch Set up run, then touch My instrument.
2. Touch Manage at the bottom left of the screen.
3. Touch a plate, then touch Export or Delete.
4. If you touched:
• Export, select a storage location, then touch Export.• Delete, then touch Yes to delete the plate setup.
Export or delete aplate setup(PSM file)
Chapter 9 Manage the software (instrument)Manage plate setups 9
SeqStudio™ Genetic Analyzer Instrument and Software User Guide 125

Note: You can create a plate setup in CSV or PSM file in the Plate Manager (desktopor Cloud).
Before importing a CSV file, see “PSM and CSV plate setup files for import into theinstrument“ on page 63.
In the home screen:
1. Touch Set up run, then touch Cloud , Network, or USB.
2. Navigate to, then select a CSV or PSM file.
Manage run settings (instrument)
This function manages the list of run modules that you can select from when youcreate a plate setup.
To assign a run module to a plate, see “Assign wells: run module, size standard, anddye set“ on page 69“Assign wells: run module, size standard, and dye set“ on page 69.
Factory-installed items cannot be edited or deleted. To create a new item from afactory-installed item, copy, edit, then save the new item.
Run modules are accessible only to the user who creates them.
For more information, see “Run modules, read lengths, size ranges, and run times“ onpage 111.
Import a platesetup from a CSVor PSM file
Manage runmodules
Chapter 9 Manage the software (instrument)Manage run settings (instrument)9
126 SeqStudio™ Genetic Analyzer Instrument and Software User Guide
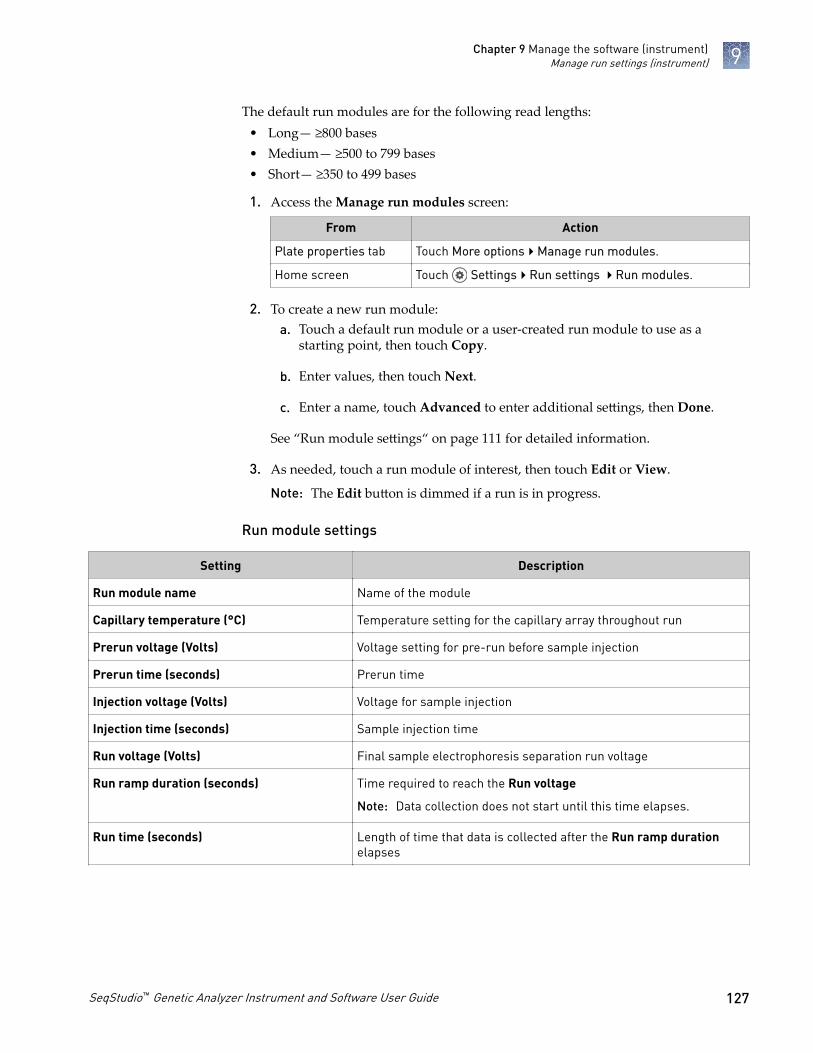
The default run modules are for the following read lengths:• Long— ≥800 bases• Medium— ≥500 to 799 bases• Short— ≥350 to 499 bases
1. Access the Manage run modules screen:
From Action
Plate properties tab Touch More options4Manage run modules.
Home screen Touch Settings4Run settings 4Run modules.
2. To create a new run module:a. Touch a default run module or a user-created run module to use as a
starting point, then touch Copy.
b. Enter values, then touch Next.
c. Enter a name, touch Advanced to enter additional settings, then Done.
See “Run module settings“ on page 111 for detailed information.
3. As needed, touch a run module of interest, then touch Edit or View.
Note: The Edit button is dimmed if a run is in progress.
Run module settings
Setting Description
Run module name Name of the module
Capillary temperature (°C) Temperature setting for the capillary array throughout run
Prerun voltage (Volts) Voltage setting for pre-run before sample injection
Prerun time (seconds) Prerun time
Injection voltage (Volts) Voltage for sample injection
Injection time (seconds) Sample injection time
Run voltage (Volts) Final sample electrophoresis separation run voltage
Run ramp duration (seconds) Time required to reach the Run voltage
Note: Data collection does not start until this time elapses.
Run time (seconds) Length of time that data is collected after the Run ramp durationelapses
Chapter 9 Manage the software (instrument)Manage run settings (instrument) 9
SeqStudio™ Genetic Analyzer Instrument and Software User Guide 127

Run modules, read lengths, size ranges, and run times
Table 5 Sequencing run modules
Run module Expected read length Approximate run time
ShortSeq
ShortSeq_BDX
350 bp 30 minutes
MediumSeq
MediumSeq_BDX
500 bp 45 minutes
LongSeq
LongSeq_BDX
800 bp < 2 hours
IMPORTANT! Use BDX run modules only if you prepare samples with BigDyeXTerminator™ Purification Kit. Use non-BDX run modules for samples purified withother methods.
Table 6 Fragment analysis run modules
Run module Optimal sizing range Approximate runtime Compatible size standards
SNaPshot 40–120 bp 25 minutes GeneScan™ 120 LIZ™ SizeStandard
FragAnalysis 60–460 bp 45 minutes All except GeneScan™ 1200 LIZ™
Size Standard
LongFragAnalysis[1] 60–600 bp < 2 hours • GeneScan™ 600 LIZ™ SizeStandard v2.0
• GeneScan™ 1200 LIZ™ SizeStandard
[1] Load a maximum of 48 samples per plate if you use a long run module.
Note: The following size standards hav not been validated for use with theinstrument. A default size standard definition is not provided in the software.· GeneScan™ 500 LIZ™ dye Size Standard· GeneScan™ 350 ROX™ dye Size Standard· GeneScan™ 400HD ROX™ dye Size Standard
This function manages the list of size standard definitions that you can select fromduring plate set up.
To assign a size standard definition to a plate, see “Assign wells: run module, sizestandard, and dye set“ on page 69.
A size standard defines the sizes in basepairs of known fragments. It is used togenerate a standard curve. The standard curve is used to determine the sizing offragments in unknown samples.
Factory-installed items cannot be edited or deleted. To create a new item from afactory-installed item, copy, edit, then save the new item.
Manage sizestandarddefinitions
Chapter 9 Manage the software (instrument)Manage run settings (instrument)9
128 SeqStudio™ Genetic Analyzer Instrument and Software User Guide
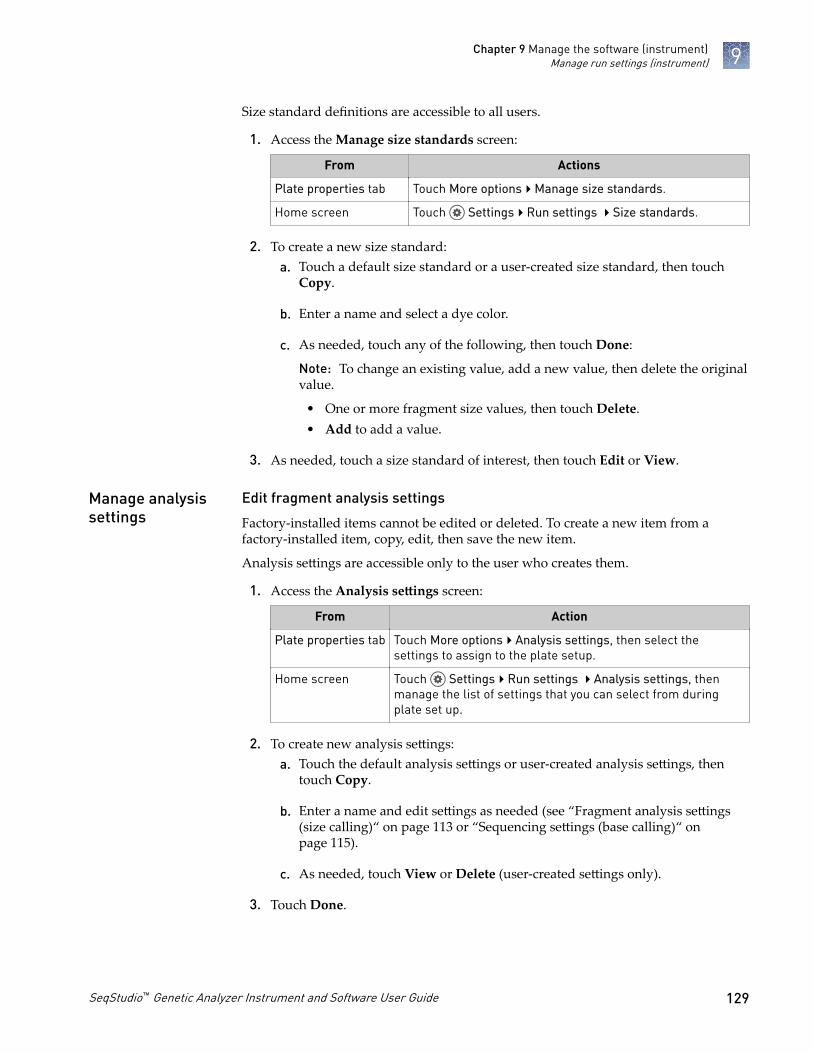
Size standard definitions are accessible to all users.
1. Access the Manage size standards screen:
From Actions
Plate properties tab Touch More options4Manage size standards.
Home screen Touch Settings4Run settings 4Size standards.
2. To create a new size standard:a. Touch a default size standard or a user-created size standard, then touch
Copy.
b. Enter a name and select a dye color.
c. As needed, touch any of the following, then touch Done:
Note: To change an existing value, add a new value, then delete the originalvalue.
• One or more fragment size values, then touch Delete.• Add to add a value.
3. As needed, touch a size standard of interest, then touch Edit or View.
Edit fragment analysis settings
Factory-installed items cannot be edited or deleted. To create a new item from afactory-installed item, copy, edit, then save the new item.
Analysis settings are accessible only to the user who creates them.
1. Access the Analysis settings screen:
From Action
Plate properties tab Touch More options4Analysis settings, then select thesettings to assign to the plate setup.
Home screen Touch Settings4Run settings 4Analysis settings, thenmanage the list of settings that you can select from duringplate set up.
2. To create new analysis settings:a. Touch the default analysis settings or user-created analysis settings, then
touch Copy.
b. Enter a name and edit settings as needed (see “Fragment analysis settings(size calling)“ on page 113 or “Sequencing settings (base calling)“ onpage 115).
c. As needed, touch View or Delete (user-created settings only).
3. Touch Done.
Manage analysissettings
Chapter 9 Manage the software (instrument)Manage run settings (instrument) 9
SeqStudio™ Genetic Analyzer Instrument and Software User Guide 129

Edit sequencing settings
Factory-installed items cannot be edited or deleted. To create a new item from afactory-installed item, copy, edit, then save the new item.
Analysis settings are accessible only to the user who creates them.
1. Access the Analysis settings screen:
From Action
Plate properties tab Touch More options4Analysis settings, then select thesettings to assign to the plate setup.
Home screen Touch Settings4Run settings 4Analysis settings, thenmanage the list of settings that you can select from duringplate set up.
2. To create new analysis settings:a. Touch the default analysis settings or user-created analysis settings, then
touch Copy.
b. Enter a name and edit settings as needed (see “Sequencing settings (basecalling)“ on page 115).
c. As needed, touch View or Delete (user-created settings only).
3. Touch Done.
Fragment analysis settings (size calling)
Setting Description
Size calling method • Local Southern—(default) Determines the fragment sizes using the reciprocalrelationship between fragment length and electrophoretic mobility.
• Global Southern—Compensates for standard fragments with anomalouselectrophoretic mobility (similar to least squares methods).
• 2nd LSQ (2nd Order Least Squares)—Uses regression analysis to build a bestfitsize calling curve.
• 3rd LSQ (3rd Order Least Squares)—Uses regression analysis to build a bestfitsize calling curve.
• Cubic Spline Interpolation—Forces the sizing curve through all the known pointsof the selected size standard.
Analysis range • Full Range—(default) To analyze the entire scan region as collected by the geneticanalysis instrument, including the primer peak.
• Partial Range—To analyze only data points within a specified range. Enter StartPoint in data points after the primer peak and before the first required sizestandard peak. Enter a Stop Point after the last required size standard fragment.Start and Stop points may vary from instrument to instrument and platform toplatform. View raw data to determine the appropriate analysis range.Data points outside the specified analysis range are ignored.
Note: Ensure the Analysis Range contains all size standard fragments included in theSizing Range.
Chapter 9 Manage the software (instrument)Manage run settings (instrument)9
130 SeqStudio™ Genetic Analyzer Instrument and Software User Guide
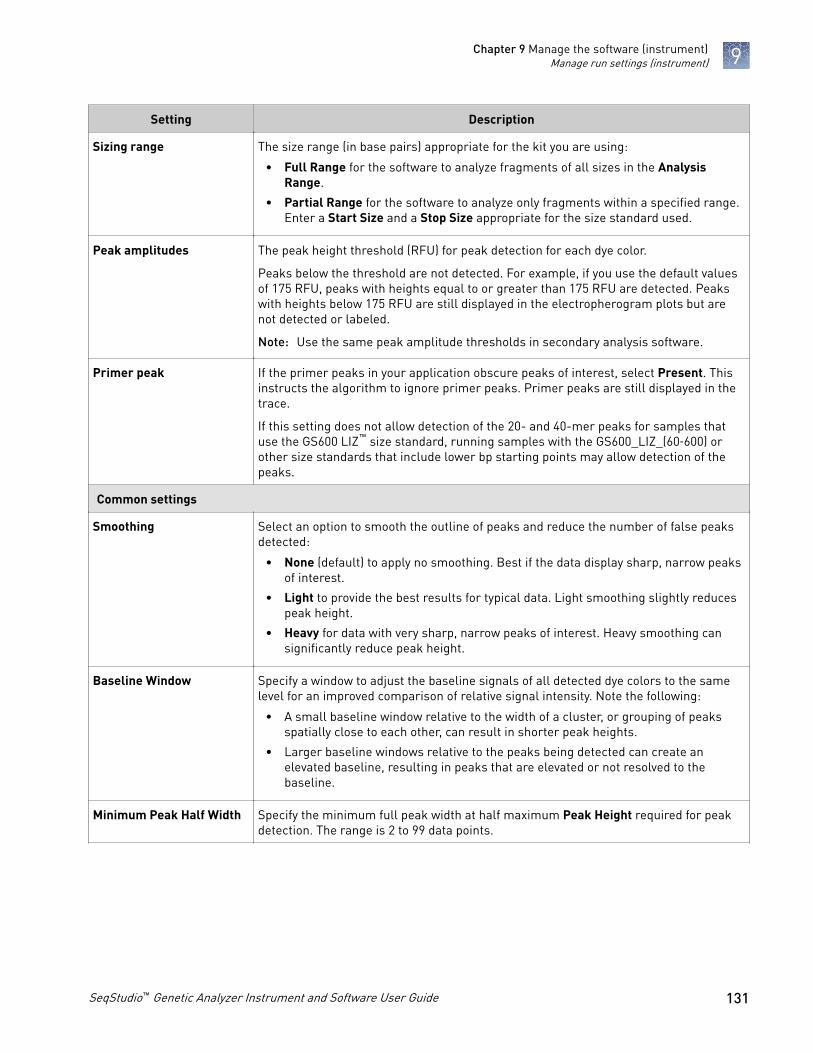
Setting Description
Sizing range The size range (in base pairs) appropriate for the kit you are using:
• Full Range for the software to analyze fragments of all sizes in the AnalysisRange.
• Partial Range for the software to analyze only fragments within a specified range.Enter a Start Size and a Stop Size appropriate for the size standard used.
Peak amplitudes The peak height threshold (RFU) for peak detection for each dye color.
Peaks below the threshold are not detected. For example, if you use the default valuesof 175 RFU, peaks with heights equal to or greater than 175 RFU are detected. Peakswith heights below 175 RFU are still displayed in the electropherogram plots but arenot detected or labeled.
Note: Use the same peak amplitude thresholds in secondary analysis software.
Primer peak If the primer peaks in your application obscure peaks of interest, select Present. Thisinstructs the algorithm to ignore primer peaks. Primer peaks are still displayed in thetrace.
If this setting does not allow detection of the 20- and 40-mer peaks for samples thatuse the GS600 LIZ™ size standard, running samples with the GS600_LIZ_(60‑600) orother size standards that include lower bp starting points may allow detection of thepeaks.
Common settings
Smoothing Select an option to smooth the outline of peaks and reduce the number of false peaksdetected:
• None (default) to apply no smoothing. Best if the data display sharp, narrow peaksof interest.
• Light to provide the best results for typical data. Light smoothing slightly reducespeak height.
• Heavy for data with very sharp, narrow peaks of interest. Heavy smoothing cansignificantly reduce peak height.
Baseline Window Specify a window to adjust the baseline signals of all detected dye colors to the samelevel for an improved comparison of relative signal intensity. Note the following:
• A small baseline window relative to the width of a cluster, or grouping of peaksspatially close to each other, can result in shorter peak heights.
• Larger baseline windows relative to the peaks being detected can create anelevated baseline, resulting in peaks that are elevated or not resolved to thebaseline.
Minimum Peak Half Width Specify the minimum full peak width at half maximum Peak Height required for peakdetection. The range is 2 to 99 data points.
Chapter 9 Manage the software (instrument)Manage run settings (instrument) 9
SeqStudio™ Genetic Analyzer Instrument and Software User Guide 131

Setting Description
Peak Window Size Enter a window width in data points for peak detection sensitivity. If more than onepeak apex is within the window, all are labeled as a single peak. Note the following:
• The maximum value is the number of data points between peaks.
• The Peak Window Size setting is limited to odd numbers.
To increase peak detection sensitivity: Increase polynomial degree, decrease peakwindow size. To decrease peak detection sensitivity: Decrease polynomial degree,increase peak window size.
Polynomial Degree Polynomial Degree cannot be greater than Peak Window Size.
Adjust to affect the sensitivity of peak detection. You can adjust this parameter to detecta single base pair difference while minimizing the detection of shoulder effects and/ornoise.
The peak detector calculates the first derivative of a polynomial curve fitted to the datawithin a window that is centered on each data point in the analysis range.
Using curves with larger polynomial degree values allows the curve to more closelyapproximate the signal and, therefore, captures more of the peak structure in theelectropherogram.
Slope Thresholds PeakStart and End
• Peak Start—The peak starts when the first derivative (slope of the tangent) in thebeginning of the peak signal before the inflection point becomes equal to orexceeds the Peak Start value. This threshold is set to 0 by default, which meansthat the peak will normally start at the leftmost point where the slope of thetangent is closest to 0° (horizontal line). A value other than 0 moves the peak startpoint toward its center. The value entered must be non-negative.
• Peak End—The peak ends when the first derivative (slope of the tangent) in theend of the peak signal after the inflection point becomes equal to or exceeds thePeak End value. This value is set to 0 by default, which means that the peak willnormally end at the rightmost point where the slope of the tangent is closest to 0°(horizontal line). A value other than 0 moves the peak end point toward its center.The value entered in this field must be non-positive.
Using curves with larger polynomial degree values allows the curve to more closelyapproximate the signal and, therefore, captures more of the peak structure in theelectropherogram.
Chapter 9 Manage the software (instrument)Manage run settings (instrument)9
132 SeqStudio™ Genetic Analyzer Instrument and Software User Guide

Sequencing settings (base calling)
The default settings are optimized for sequencing of PCR amplicons from diploidgenes, which are expected to have Mixed bases and which should end At PCR Stop.
For sequencing from plasmid templates, which are of pure sequence (no Mixed bases)and have longer sequence read times than PCR products, create new analysis settingsand disable (uncheck) At PCR Stop and Mixed base threshold checkboxes.
Setting Description
Quality Threshold • Basecall assignment (ambiguous bases):– Do not assign Ns to basecalls
– Assign Ns to basecalls with QV<5— Bases with a QV less than the thresholddisplay N instead of the base letter
• End base—Last base on which to perform basecalling:– At PCR Stop
– After X number of bases
– After X number of Ns in X number of bases
– After X number of Ns
Note: If you have PCR products with sequences that end while data is still beingcollected, select the At PCR Stop checkbox.
Mixed bases threshold When enabled, determines the secondary peak height ratio where the secondary peakis considered a potential mixed base. Reaching the threshold is a necessary but notsufficient condition for the basecalling algorithm to call a mixed base.
Clear range methods • Use quality values—Sets a window with a specified number of allowed low-qualitybases by removing bases until there are <X number of bases per Z number ofbases with QV <Y.
• Use base positions—Specifies the first and last base in the range to consider, ortrims the specified number of bases from the 3¢ end.
• Mask base positions before—Specifies the base position before which to disregardbases.
Chapter 9 Manage the software (instrument)Manage run settings (instrument) 9
SeqStudio™ Genetic Analyzer Instrument and Software User Guide 133

The default file name convention determines how the data files (AB1 or FSA)associated with a plate are named.
The default file name convention is:
Application Default settings
Fragment analysis <well>_<sample name>_<sample type>_<date and timestamp>.fsaSequence analysis <well>_<sample name>_<date and timestamp>.ab1Sequence analysis with theSanger variant analysisoption selected
<well>_<sample name>_<amplicon>_<specimen>_<date andtimestamp>.ab1
1. Access the File name convention screen:
From Action
Plate properties screen Select the Properties tab, then touch More options4Filename convention.
Home screen Touch Settings4Run settings 4File name convention.
2. Touch Attributes.
3. Select the attributes to include in the data file name.
For information on creating custom fields to include in file name conventions, see “Define custom fields“ on page 73.
4. Touch Done.
5. Touch and drag attributes up or down in the list.
6. Touch Done.
Modify the defaultfile nameconvention
Chapter 9 Manage the software (instrument)Manage run settings (instrument)9
134 SeqStudio™ Genetic Analyzer Instrument and Software User Guide

Manage instrument settings
In the home screen:
1. Touch Settings4Instrument settings 4About to access the instrumentinformation:
• Model name• Ethernet IP address• Ethernet MAC address• Wireless IP address• Wireless MAC address• Instrument software release• Instrument serial number
2. (Optional) Touch EULA to display the end-user licence agreement or touchDetails to display additional instrument information.
If the instrument is linked to the Cloud, only a Cloud administrator for the instrumentcan change the instrument name. The instrument name can be changed by a Cloudadministrator on the instrument or in InstrumentConnect.
In the home screen:
1. Touch Settings4Instrument Settings4Instrument name.
2. Touch the Instrument Name field, enter an instrument name, then touch Done.
3. Touch OK.
When you change the instrument name, the software unlinks all instrument profiles.
Demo mode allows you to use all features of the system and provides simulatedreal-time data and results. You cannot save plates or settings in Demo mode.
In the home screen:
1. Touch Settings4Instrument settings4Turn Demo mode on.
2. Touch OK to allow the instrument to restart.The instrument automatically restarts in Demo mode.
In the home screen:
1. Touch Settings4Instrument settings4Date and Time.
2. Slide the control to select a time-setting option:
• The instrument automatically detects the time via the network.• Enter the time manually.
3. Touch Time zone, then select a time zone.
Displayinstrumenthardware andsoftwareinformation
Change theinstrument name
Enable Demomode
Manage date andtime settings
Chapter 9 Manage the software (instrument)Manage instrument settings 9
SeqStudio™ Genetic Analyzer Instrument and Software User Guide 135

4. Touch Date/Format, then select the display order for the month, day, and year.
5. Touch Time/Format, then select a 12-Hour or 24-Hour time display format.
6. Click OK.
Note: For a direct connection between the instrument and a computer, set up a wiredconnection.
In the home screen:
1. Touch Settings4Insrument settings4Network Configuration.
2. Touch Edit, or touch one of the network settings fields.
3. (Optional) Edit the Wireless network settings.a. Select a Network that was automatically detected by instrument.
b. Enter a password, if prompted.
c. Click Join.
d. Click OK when the authentication is completed.
4. (Optional) Edit the Wired network settings.a. Select DHCP or Static IP.
An IP address is automatically assigned if DHCP is selected.
b. (Static IP only) Enter an IP address, Subnet mask, Default gateway, PrimaryDNS server, and Secondary DNS server.For more information, see “Determine IP address for a computer on anetwork“ on page 117.
5. Touch OK.
Manage thenetworkconfiguration
Chapter 9 Manage the software (instrument)Manage instrument settings9
136 SeqStudio™ Genetic Analyzer Instrument and Software User Guide

In the home screen:
1. Touch Settings4Instrument settings4About.
2. Touch Check for updates.If the software update is located on a USB, it may take 10–15 seconds for theinstrument to recognize the USB.
3. Touch:
• Update if an update is available.• Cancel if there is no update available.
A message is displayed during the software updated, then the instrumentautomatically restarts.
Check forsoftware updates(administratoronly)
Chapter 9 Manage the software (instrument)Manage instrument settings 9
SeqStudio™ Genetic Analyzer Instrument and Software User Guide 137

Manage instrument profiles on the instrument
Instrument profile Location Functions allowed
Standard Local[1] • Create, save, open, import, and run plate setups
• Create and modify run settings
• View and export results
Administrator Local[1] All standard user functions, plus:
• Create or delete an instrument profile
• Change an instrument profile from Standard to Administratoraccess
• Reset an instrument profile PIN for another user
• Unlock instrument touchscreen
• Backup user data (plates and results)
• Delete Cloud instrument profile from the instrument, whichremoves the instrument from the InstrumentConnect. The user canlink the instrument to the Cloud again using a local instrumentprofile. After a user relinks to the Cloud, the Cloud instrumentprofile is displayed on the home screen and the instrument is listedin the InstrumentConnect.
Guest Local All standard user functions, except:
• Cannot link to the Thermo Fisher Cloud
• Cannot modify a public plate setup
Note: Standard instrument profiles cannot access Guest instrumentprofile plate setups unless the Plate Setup Security is set to Shared.
[1] The first user who signs in to the instrument is assigned a local profile with administrator role.
For more information, see Chapter 3, “Use the instrument with the Thermo FisherCloud“
An instrument profile can be assigned standard or administrator roles. For moreinformation, see “Change the role of a local instrument profile (administrator only)“ on page 139.
In the home screen:
1. Touch .
2. Touch All accounts.
3. Touch Add Profile.
4. Touch User name, enter an instrument profile name, then touch Done.
5. Touch PIN (4 digits required), enter a four-digit numerical PIN, then touchEnter.
Local instrument profile roles and functions
Create a localinstrument profilefor another user(administratoronly)
Chapter 9 Manage the software (instrument)Manage instrument profiles on the instrument9
138 SeqStudio™ Genetic Analyzer Instrument and Software User Guide

6. Touch Confirm PIN, reenter the PIN, then touch Enter.
7. Touch Create profile.
8. Touch Done.
In the home screen:
1. Touch .
2. Touch All accounts.
3. Touch the account of interest.
4. Slide the control from Standard to Administrator or from Administrator toStandard.
5. Touch Done.
Local administrators and Cloud administrators can delete local and Cloud profiles.
IMPORTANT! Before proceeding, back up user data to retain plates and results(“Back up user data (plates and results) (administrator only)“ on page 142).
In the home screen:
1. Touch .
2. Touch All accounts.
3. Touch the instrument profile to delete.
4. Touch Delete account.
5. Touch Yes to confirm.
6. Touch Done.
Local administrators and Cloud administrators can delete the PIN for a localinstrument profile.
In the home screen:
1. Touch .
2. Touch All accounts.
3. Touch the instrument profile of interest.
4. Touch Delete PIN.The user will be prompted for a new pin upon the next sign in.
Change the role ofa local instrumentprofile(administratoronly)
Delete aninstrument profilefrom aninstrument(administratoronly)
Delete the PIN fora local instrumentprofile(administratoronly)
Chapter 9 Manage the software (instrument)Manage instrument profiles on the instrument 9
SeqStudio™ Genetic Analyzer Instrument and Software User Guide 139

5. Touch Yes to confirm.
6. Touch Done.
If you are not signed in to the instrument when you link the instrument to your Cloudaccount, the software creates a local instrument profile with Standard role using theFirstName LastInitial of your Cloud account.
For more information, see “Link the instrument to your Thermo Fisher Cloudaccount“ on page 50.
Sign in to access these features (see “Sign in“ on page 33).
1. Touch .
2. Touch Edit.
3. Touch Old PIN, enter your current PIN, then touch Enter.Touch the Show PIN checkbox to switch the PIN display on or off.
4. Touch PIN (4 digits required), enter a new four-digit numerical PIN, then touchEnter.
5. Touch Confirm PIN, reenter your new PIN, then touch Enter.
6. Touch Done.
Manage storage space
Before starting a run, the instrument calculates the total amount of storage spacerequired to save the run. If the required storage space is not available, the instrumentdeletes files associated with the oldest exported plates until sufficient space isavailable.
Note: Only complete plates that have been auto exported (saved to Cloud, network,or USB) or manually exported (using Settings4Run History4platename4Export) are deleted.
If the required storage space is not available and no plates have been exported, theinstrument displays a notification indicating that there is not enough storage space.
You can export plates and delete plates, then start the run again.
Create your ownlocal instrumentprofile
Change your ownlocal instrumentprofile PIN
Automatic filecleanup
Chapter 9 Manage the software (instrument)Manage storage space9
140 SeqStudio™ Genetic Analyzer Instrument and Software User Guide

1. Touch Set up run, then touch My instrument.
2. Touch Manage at the bottom left of the screen.
3. Touch a plate, then touch Export or Delete.
4. If you touched:
• Export, select a storage location, then touch Export.• Delete, then touch Yes to delete the plate setup.
In the home screen:
1. Touch Settings4Run history.
2. Select one or more plates from the Run History table.
3. Touch Export.
4. Select a storage location.
The following data is exported for the plate:• Fragment analysis—FSA file for each sample.• Sequencing—AB1 file for each sample.• Plate QC report in CSV and PDF format.
Note: If you select a plate, select View, then select Export, only an FSA or AB1 file foreach analyzed sample is exported.
Export or delete aplate setup(PSM file)
Export resultsfrom theinstrument(sample data filesand QC reports)
Chapter 9 Manage the software (instrument)Manage storage space 9
SeqStudio™ Genetic Analyzer Instrument and Software User Guide 141
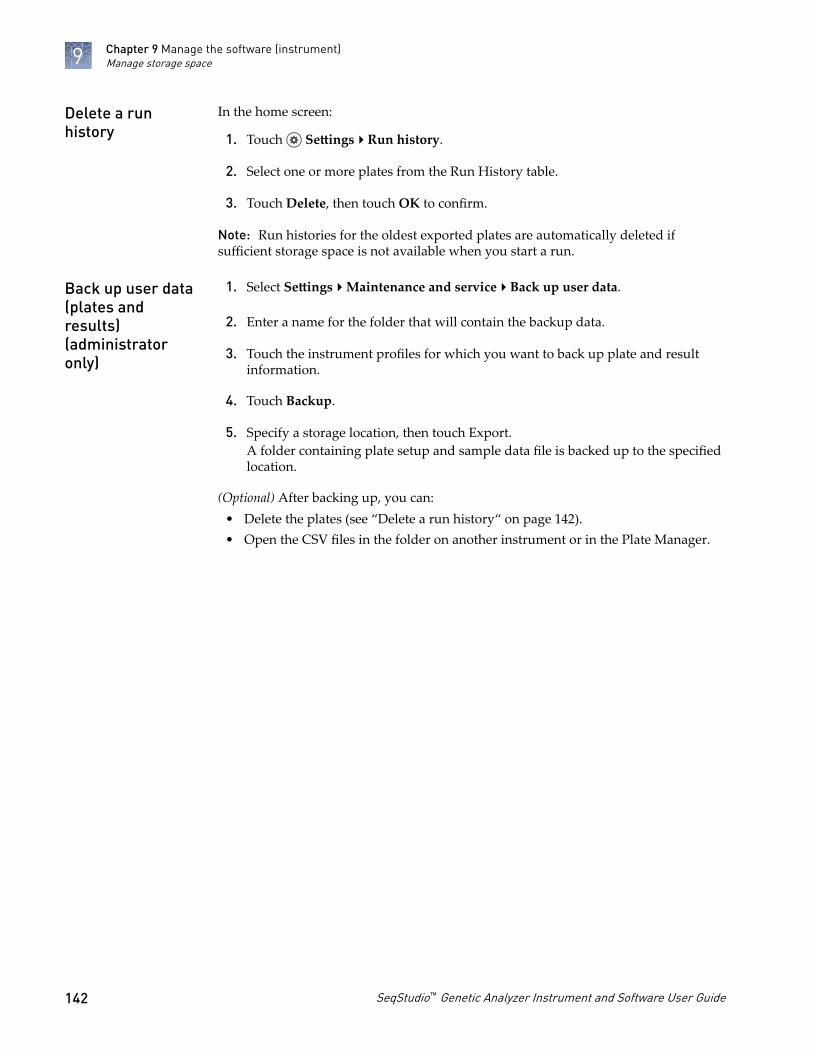
In the home screen:
1. Touch Settings4Run history.
2. Select one or more plates from the Run History table.
3. Touch Delete, then touch OK to confirm.
Note: Run histories for the oldest exported plates are automatically deleted ifsufficient storage space is not available when you start a run.
1. Select Settings4Maintenance and service4Back up user data.
2. Enter a name for the folder that will contain the backup data.
3. Touch the instrument profiles for which you want to back up plate and resultinformation.
4. Touch Backup.
5. Specify a storage location, then touch Export.A folder containing plate setup and sample data file is backed up to the specifiedlocation.
(Optional) After backing up, you can:• Delete the plates (see “Delete a run history“ on page 142).• Open the CSV files in the folder on another instrument or in the Plate Manager.
Delete a runhistory
Back up user data(plates andresults)(administratoronly)
Chapter 9 Manage the software (instrument)Manage storage space9
142 SeqStudio™ Genetic Analyzer Instrument and Software User Guide

Maintain the instrument
■ Regular maintenance tasks . . . . . . . . . . . . . . . . . . . . . . . . . . . . . . . . . . . . . . . . . . . 143
■ Manage the cartridge . . . . . . . . . . . . . . . . . . . . . . . . . . . . . . . . . . . . . . . . . . . . . . . . 145
■ Install cathode buffer . . . . . . . . . . . . . . . . . . . . . . . . . . . . . . . . . . . . . . . . . . . . . . . . 151
Regular maintenance tasks
When a cartridge is installed in the instrument, the volume of buffer in the CathodeBuffer Container (CBC) must be above the fill line.
Check the cathode buffer fill level before each run. It is recommended to check onetime each week if the instrument is not in use.
In the home screen:
1. Touch , touch Eject plate, then open the instrument door when prompted.
2. Press the release button on the autosampler to open the lid, then remove theCBC.
2
1
1 Release button2 CBC
3. Ensure that the level of buffer isabove the fill line.If the buffer is at or below the fillline, see “Assemble the SeqStudio™
Genetic Analyzer Cathode BufferContainer (CBC)“ onpage 152“Insert the Cathode BufferContainer“ on page 153.
10
Check the cathodebuffer fill level
1
1 Replace if buffer is at or below the fill line
SeqStudio™ Genetic Analyzer Instrument and Software User Guide 143

4. Reinstall the CBC.
5. Close the autosampler lid: Press down on thecenter of the lid or press down on both sidesof the lid with equal pressure until the lidclicks shut.
6. Touch Retract plate, close the instrument door, then touch Done when theConsumables Status screen is displayed.
Power off the instrument before cleaning.
IMPORTANT! The instrument does not maintain the correct temperature conditionsfor the cartridge when it is powered off. Avoid cartridge exposure to ambienttemperature.
• Wipe the exterior of the instrument with a lint-free cloth and deionized water.
IMPORTANT! Do not allow any moisture to reach the interior of the instrumentthrough the door.
• Wipe the touchscreen with a lint-free cloth and glass cleaner.
The autosampler is attached to the instrument.
Clean spills to prevent a build-up of crystallized polymer or dried salt from thebuffers.
Power off the instrument before cleaning the autosampler.
1. Wipe the exterior of the autosampler with a lint-free cloth and deionized water.
IMPORTANT! Do not pour liquid directly on to the autosampler. This willdamage the heater at the bottom of the cathode buffer reservoir.
Note: Do not use detergents or solvents.
2. Use a lint-free cloth to absorb any liquid spilled in the individual wells of theautosampler.
1
1 New CBC buffer level
Clean theinstrumentexterior andtouchscreen
Clean theautosampler
Chapter 10 Maintain the instrumentRegular maintenance tasks10
144 SeqStudio™ Genetic Analyzer Instrument and Software User Guide

Manage the cartridge
Condition Description
Shipping Is shipped at 2–8°C.
Store upright at 2–8°C upon receipt.
Save the white storage box and optics cover for off-instrument cartridge storage.
On-instrument storage For routine use, can be used and stored on the instrument for up to 4 months. Ifyou store the cartridge on-instrument:
• The instrument must be powered on.
• A Cathode Buffer Container must also be installed.
The instrument keeps the components under the following conditions when it ispowered on and in Cartridge storage mode:
• Optical detection window—Covered
• Capillary array electrodes—Submerged in cathode buffer (buffer must beabove the fill line in the Cathode Buffer Container)
• Polymer—Chilled
• Anode buffer—Ambient temperature
IMPORTANT! The instrument does not maintain the correct temperatureconditions for the cartridge when it is powered off. Avoid cartridge exposure toambient temperature.
Off-instrument storage For intermittant use, can be stored off-instrument (upright, with an integratedcapillary protector (ICP) and optics cover installed) until the expiry date on thelabel or up to 4 months after first use (see “Store the cartridge“ on page 149).
Note: After you remove the cartridge from the instrument, install an ICP within afew minutes. Avoid cartridge exposure to ambient temperature.
Reuse Can be removed from an instrument then inserted again on the same instrumentor a different instrument, if it was stored properly at 2–8°C and has not expired orexceeded 125 injections.
Information about the cartridge installation and usage is retained in the cartridgehistory (Settings4Cartridge4Instrument–cartridge history).
If a cartridge is installed on the instrument, the instrument will enter Cartridgestorage mode after the time you specify.
The instrument keeps the components under the following conditions when it ispowered on and in Cartridge storage mode:
• Optical detection window—Covered• Capillary array electrodes—Submerged in cathode buffer (buffer must be above
the fill line in the Cathode Buffer Container)• Polymer—Chilled• Anode buffer—Ambient temperature
SeqStudio™ Genetic Analyzer Cartridge storage
Set cartridgestorage mode(administratoronly)
Chapter 10 Maintain the instrumentManage the cartridge 10
SeqStudio™ Genetic Analyzer Instrument and Software User Guide 145

In the home screen:
1. Touch Settings4Cartridge 4Cartridge Storage Mode.
2. Select the duration of instrument inactivity before the instrument entersCartridge Storage Mode.
3. Touch OK.
This function lists the cartridges that have been installed on this instrument.
1. Touch Settings4Cartridge4Instrument-cartridge history.
2. (Optional) Touch Export.
This function lists the instruments on which the cartridge has been installed.
Touch Settings4Consumables status, then touch Cartridge history.
Check or exportthe Instrument-cartridge history
Check or exportthe cartridgehistory
Chapter 10 Maintain the instrumentManage the cartridge10
146 SeqStudio™ Genetic Analyzer Instrument and Software User Guide
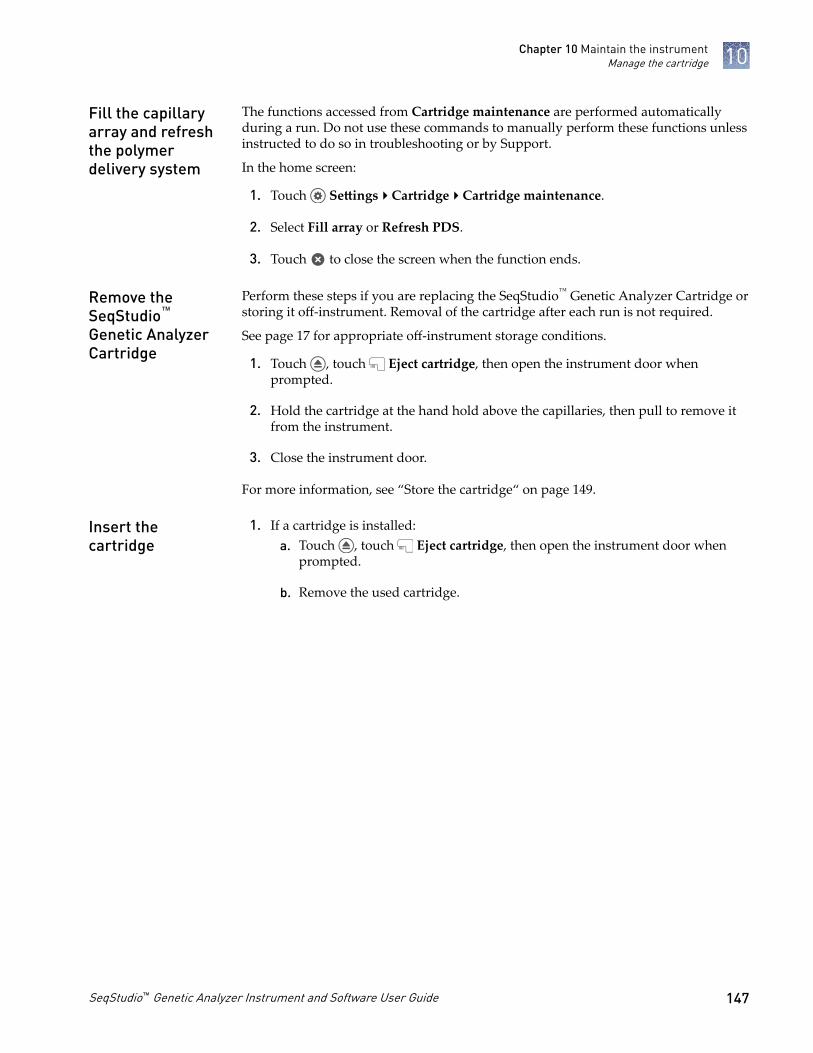
The functions accessed from Cartridge maintenance are performed automaticallyduring a run. Do not use these commands to manually perform these functions unlessinstructed to do so in troubleshooting or by Support.
In the home screen:
1. Touch Settings4Cartridge4Cartridge maintenance.
2. Select Fill array or Refresh PDS.
3. Touch to close the screen when the function ends.
Perform these steps if you are replacing the SeqStudio™ Genetic Analyzer Cartridge orstoring it off-instrument. Removal of the cartridge after each run is not required.
See page 17 for appropriate off-instrument storage conditions.
1. Touch , touch Eject cartridge, then open the instrument door whenprompted.
2. Hold the cartridge at the hand hold above the capillaries, then pull to remove itfrom the instrument.
3. Close the instrument door.
For more information, see “Store the cartridge“ on page 149.
1. If a cartridge is installed:a. Touch , touch Eject cartridge, then open the instrument door when
prompted.
b. Remove the used cartridge.
Fill the capillaryarray and refreshthe polymerdelivery system
Remove theSeqStudio™
Genetic AnalyzerCartridge
Insert thecartridge
Chapter 10 Maintain the instrumentManage the cartridge 10
SeqStudio™ Genetic Analyzer Instrument and Software User Guide 147

2. Prepare the cartridge.a. Remove the cartridge from the box.
Note: Save the box for off-instrument cartridge storage.
Remove Before Insertion
b. Remove the optics cover from thecartridge by grasping the fingerholds, then pulling toward you.
Note: Save the optics cover for off-instrument cartridge storage.Avoid touching the capillaries thatare protected by the optics cover.
c. Pinch the clamp on the SeqStudio™
Integrated Capillary Protector, thenpull down.
Discard the SeqStudio™ IntegratedCapillary Protector. The SeqStudio™
Integrated Capillary Protector issingle-use. Use a new SeqStudio™
Integrated Capillary Protector if youstore the cartridge.
1
1 Optics cover
Chapter 10 Maintain the instrumentManage the cartridge10
148 SeqStudio™ Genetic Analyzer Instrument and Software User Guide

3. Grasp the cartridge above the capillaries.
4. Position the cartridge:a. Orient the cartridge with the
embossed arrow pointing toward therear of the instrument.
b. Align the guides at the top of thecartridge with the insertion rails inthe instrument.
5. Slide the cartridge into the instrumentuntil it clicks into place.
6. Close the instrument door, then touchDone when the Consumables Statusscreen is displayed.The cartridge is initialized.
1. Touch , touch Eject cartridge, then open the instrument door whenprompted.
2. Hold the cartridge at the hand holds above the capillaries, then pull to remove itfrom the instrument.
3. Close the instrument door.
4. Carefully place the optics cover on thecartridge to avoid damage to thecapillaries.
2
1
1 Insertion rails2 Embossed arrow
Store thecartridge
1
1 Optics cover
Chapter 10 Maintain the instrumentManage the cartridge 10
SeqStudio™ Genetic Analyzer Instrument and Software User Guide 149

5. Place a new SeqStudio™ IntegratedCapillary Protector on the cartridge:pinch the clamp on the ICP, then pushup on to the capillaries.
6. Place the cartridge in the white storagebox.
7. Store upright at 2–8°C.
Note: Do not leave the cartridge atroom temperature for more than onehour.
IMPORTANT! Do not freeze the cartridge. It cannot be used after freezing.
The SeqStudio™ Integrated Capillary Protector (ICP) is a single-use protective coverthat clamps onto the SeqStudio™ Genetic Analyzer Cartridge. The ICP prevents thecapillary array from drying out during off-instrument storage of the cartridge, and isremoved before insertion of the cartridge into the SeqStudio™ Genetic Analyzer.
Each cartridge is supplied with an ICP for shipping and one additional ICP for off-instrument cartridge storage.
1
Figure 19 SeqStudio™ Integrated Capillary Protector1 Clamp mechanism for attaching to cartridge
IMPORTANT! Remove the Integrated Capillary Protector before installing thecartridge into the instrument. Installing the cartridge with the ICP in place candamage the capillary array.
SeqStudio™ Integrated Capillary Protector storage
Condition Description
Shipping Is shipped at 2–8°C.
Before opening, can be stored until expiry date on label at 2–8°C.
Discard the shipping ICP when you insert a new cartridge in the instrument.
Reuse Do not reuse.
Use a new ICP for off-instrument cartridge storage.
IMPORTANT! If an ICP is used for off-instrument cartridge storage more thanone time, the capillary array will not be kept fully hydrated.
SeqStudio™
IntegratedCapillaryProtector
Chapter 10 Maintain the instrumentManage the cartridge10
150 SeqStudio™ Genetic Analyzer Instrument and Software User Guide
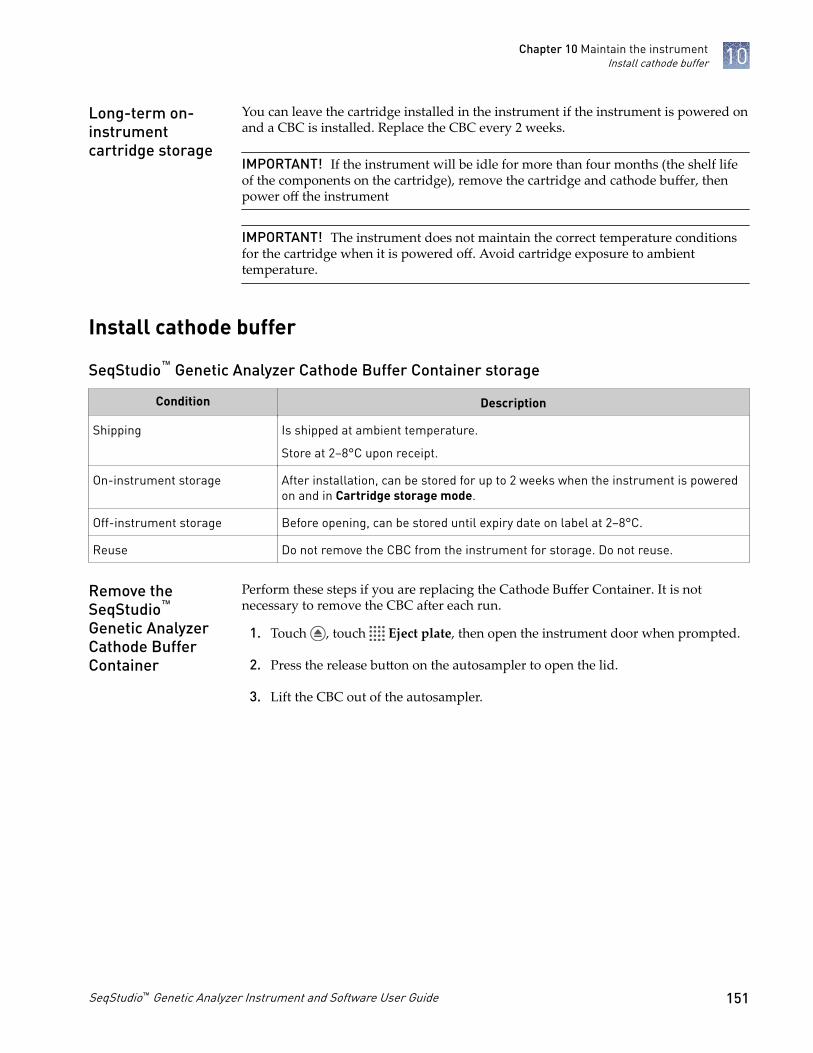
You can leave the cartridge installed in the instrument if the instrument is powered onand a CBC is installed. Replace the CBC every 2 weeks.
IMPORTANT! If the instrument will be idle for more than four months (the shelf lifeof the components on the cartridge), remove the cartridge and cathode buffer, thenpower off the instrument
IMPORTANT! The instrument does not maintain the correct temperature conditionsfor the cartridge when it is powered off. Avoid cartridge exposure to ambienttemperature.
Install cathode buffer
Condition Description
Shipping Is shipped at ambient temperature.
Store at 2–8°C upon receipt.
On-instrument storage After installation, can be stored for up to 2 weeks when the instrument is poweredon and in Cartridge storage mode.
Off-instrument storage Before opening, can be stored until expiry date on label at 2–8°C.
Reuse Do not remove the CBC from the instrument for storage. Do not reuse.
Perform these steps if you are replacing the Cathode Buffer Container. It is notnecessary to remove the CBC after each run.
1. Touch , touch Eject plate, then open the instrument door when prompted.
2. Press the release button on the autosampler to open the lid.
3. Lift the CBC out of the autosampler.
Long-term on-instrumentcartridge storage
SeqStudio™ Genetic Analyzer Cathode Buffer Container storage
Remove theSeqStudio™
Genetic AnalyzerCathode BufferContainer
Chapter 10 Maintain the instrumentInstall cathode buffer 10
SeqStudio™ Genetic Analyzer Instrument and Software User Guide 151

Equilibrate the CBC to room temperature (15 minutes to overnight) beforeassembling.
On a clean and level surface:
1. Ensure that the buffer is above the fill line.
2. Carefully peel off the seal.
3. Wipe off any buffer on top of the CBC with a lint-free tissue. Ensure that the topof the container is dry.
4. Place the reservoir septa on the CBC, then press firmly to seat the septa.
Note: The CBC is filled significantly above Fill Line to account for evaporation.Replace the CBC when the fluid level is at or below the fill line.
Assemble theSeqStudio™
Genetic AnalyzerCathode BufferContainer (CBC)
Chapter 10 Maintain the instrumentInstall cathode buffer10
152 SeqStudio™ Genetic Analyzer Instrument and Software User Guide
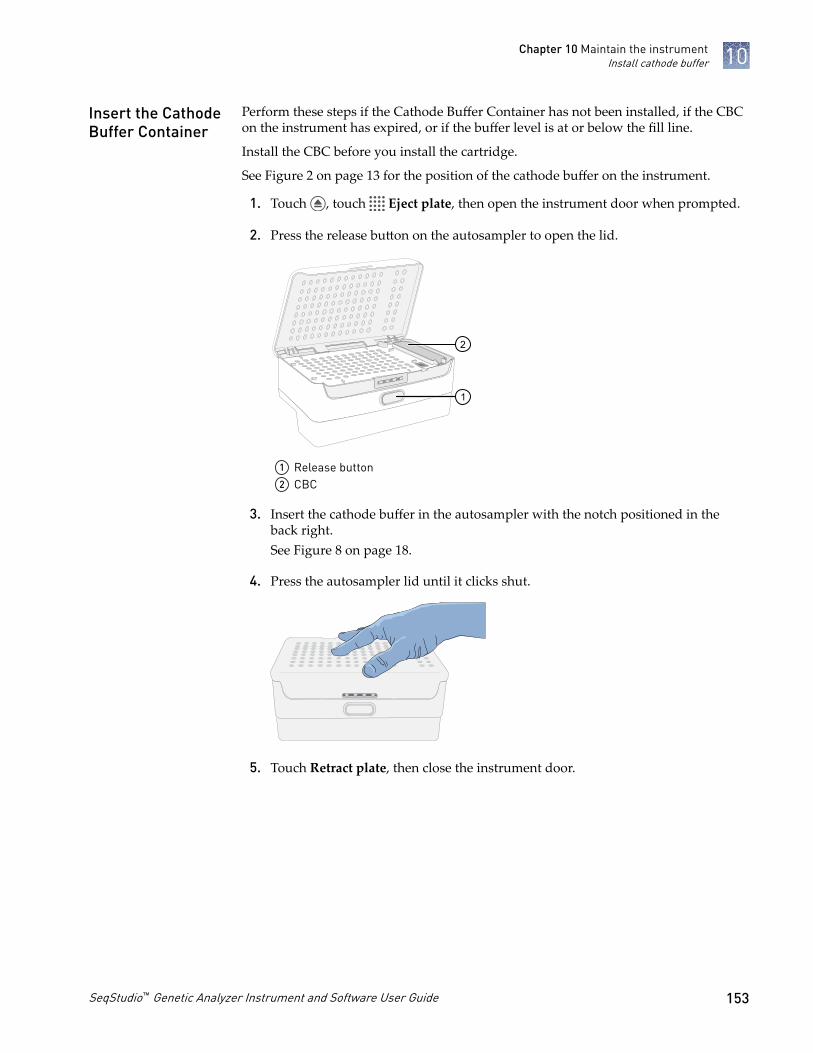
Perform these steps if the Cathode Buffer Container has not been installed, if the CBCon the instrument has expired, or if the buffer level is at or below the fill line.
Install the CBC before you install the cartridge.
See Figure 2 on page 13 for the position of the cathode buffer on the instrument.
1. Touch , touch Eject plate, then open the instrument door when prompted.
2. Press the release button on the autosampler to open the lid.
2
1
1 Release button2 CBC
3. Insert the cathode buffer in the autosampler with the notch positioned in theback right.See Figure 8 on page 18.
4. Press the autosampler lid until it clicks shut.
5. Touch Retract plate, then close the instrument door.
Insert the CathodeBuffer Container
Chapter 10 Maintain the instrumentInstall cathode buffer 10
SeqStudio™ Genetic Analyzer Instrument and Software User Guide 153

Troubleshooting
■ Troubleshooting resources . . . . . . . . . . . . . . . . . . . . . . . . . . . . . . . . . . . . . . . . . . . . 154
■ Troubleshooting workflow . . . . . . . . . . . . . . . . . . . . . . . . . . . . . . . . . . . . . . . . . . . 155
■ Export log files for plates, install runs, injections, and instrument . . . . . . . . . . 155
■ View the raw data and the EPT plot . . . . . . . . . . . . . . . . . . . . . . . . . . . . . . . . . . . . 156
■ Data quality alerts . . . . . . . . . . . . . . . . . . . . . . . . . . . . . . . . . . . . . . . . . . . . . . . . . . 156
■ Sizecalling and basecalling quality alerts . . . . . . . . . . . . . . . . . . . . . . . . . . . . . . . 156
■ Check size standard quality . . . . . . . . . . . . . . . . . . . . . . . . . . . . . . . . . . . . . . . . . . . 157
■ Instrument troubleshooting . . . . . . . . . . . . . . . . . . . . . . . . . . . . . . . . . . . . . . . . . . . 158
■ Cartridge troubleshooting . . . . . . . . . . . . . . . . . . . . . . . . . . . . . . . . . . . . . . . . . . . . 159
■ Sample and data troubleshooting . . . . . . . . . . . . . . . . . . . . . . . . . . . . . . . . . . . . . . 160
■ EPT data . . . . . . . . . . . . . . . . . . . . . . . . . . . . . . . . . . . . . . . . . . . . . . . . . . . . . . . . . . . 164
■ Software troubleshooting . . . . . . . . . . . . . . . . . . . . . . . . . . . . . . . . . . . . . . . . . . . . . 165
■ Service tools . . . . . . . . . . . . . . . . . . . . . . . . . . . . . . . . . . . . . . . . . . . . . . . . . . . . . . . . 167
Troubleshooting resources
Document Pub. No.
Troubleshooting Sanger sequencing data User Bulletin MAN0014435
DNA Sequencing by Capillary Electrophoresis ChemistryGuide
4305080
DNA Fragment Analysis by Capillary Electrophoresis UserGuide
4474504
A
154 SeqStudio™ Genetic Analyzer Instrument and Software User Guide

Troubleshooting workflow
Follow this general workflow when you are troubleshooting:
Review the analyzed data.
▼
Review the raw data, then review the EPT plot.
▼
(Fragment analysis) Check size standard quality (“Check sizestandard quality“ on page 157).
▼
Check the CBC buffer fill level.
▼
Check that the cartridge is installed and engaged, and thatcapillary tips are not bent or damaged.
▼
Check that the sample plate is installed, confirm that samplesare in the wells that are specified in the plate setup, and make
sure that samples are at bottom of wells (no bubbles arevisible).
Export log files for plates, install runs, injections, and instrument
Export log files and provide them to Thermo Fisher Scientific if directed to do so byTechnical Support.
In the home screen:
1. Touch Settings4Maintenance and Service4Export logs.
2. Select one of the following options.
• Export logs for the last injection—Includes all run types: analysis run, installrun, and calibration run.
• Export logs for the last / current plate—Includes all run types.• Export logs for selected plates—Includes options to export logs for regular
runs and install check runs for the analysis run for the current user.• Export recent instrument server logs—Includes instrument export logs only.
3. Touch Export.
4. Select a storage location.
Note: Log files can be large. Select a location with adequate storage space.
A ZIP file containing log information is exported.
Appendix A TroubleshootingTroubleshooting workflow A
SeqStudio™ Genetic Analyzer Instrument and Software User Guide 155

View the raw data and the EPT plot
The EPT view (ElectroPhoresis Telemetry) shows instrument data conditions(currents, temperatures, electrophoresis voltage) as a function of time.
When a run is complete, in the home screen:
1. Touch Results.
2. Touch List view.
3. Touch an injection group.
4. Touch a sample file name.If the data triggered any quality alerts, a QC alerts screen is displayed.Click View data to display the trace for the sample.
5. Touch or to scroll to the raw data or EPT Plot.
Data quality alerts
Quality alert Description Action
Offscale peaks. Adjust the injectionparameters and/or the sampleconcentration.
At least 10 scans have saturated theCCD camera.
• Reduce the injection voltage.
• Dilute the sample.
No sample was detected. Poor signal‑to‑noise ratio with lowsignal detected.
• Verify that the sample volumefollows recommendations in theuser manual.
• Troubleshoot upstream PCR andsequencing steps.
Sizecalling and basecalling quality alerts
Table 7 Sizecalling quality alerts
Quality alert Description Action
Sizing quality value is low due to poor sizestandard peak quality. Peak height uniformity islow or the fitting quality in sizing is poor.
Low resolution or poor qualitydata is present.
• Re-inject the sample.
• If the problem persists,check the sample quality.
Sizecaller found broad peak(s) in the sizestandard peak(s).
Sizing quality value is in the intermediate range;check size standard data quality.
Appendix A TroubleshootingView the raw data and the EPT plotA
156 SeqStudio™ Genetic Analyzer Instrument and Software User Guide

Quality alert Description Action
The number of size standard peaks detected isless than what is defined in the size standard.
Size standard definitionincludes peaks that are notpresent in the sample. Example:Sample peaks are detected upto 500 bp, but the size standarddefinition includes peak sizesthat are >500 bp.
Use or create a size standarddefinition with the appropriatenumber of peaks and peaksizes.
The analysis range is too small. Correct theanalysis range in analysis settings and re-analyze in secondary analysis software or re-inject sample.
Various causes. • Analyze the data in asecondary analysissoftware with a correctedanalysis range.
• Re-inject the sample.
Table 8 Basecalling quality alerts
Quality alert Description Action
Basecalling failed due to poor qualitydata.
Poor quality data is present. • Re-inject the sample.
• If the problem persists, preparefresh sample.
• Troubleshoot upstream PCR andsequencing steps.
Check size standard quality
1. Touch Settings4Run history.
2. Touch a plate name, then touch View.
3. Touch a sample file name, then touch View.If the data triggered any quality alerts, a QC alerts screen is displayed.
4. Touch View data to display the trace.
Appendix A TroubleshootingCheck size standard quality A
SeqStudio™ Genetic Analyzer Instrument and Software User Guide 157

5. Touch on the left border of the trace, then deselect all dyes except the sizestandard dye (red or orange).
6. As needed, touch on the right border of the trace to zoom on the trace.
Instrument troubleshooting
Observation Possible cause Recommended action
There was a loss of power tothe instrument
There was a power failure. Restart the instrument. The Sign In screen isdisplayed. A run that was in progress at thetime of the power failure must be restarted.
Run a control sample to ensure that theconsumables have not degraded, especially ifthe consumables reached room temperature.
Replace the consumables if the results with acontrol sample show that the consumableshave degraded.
The RFID tags on the cartridgeor the cathode buffer are notread
The label on the cartridge orthe Cathode Buffer Container isdamaged, not positionedproperly, or has been removed.
Ensure that the labels are present and notvisibly damaged.
Ensure that the consumables are installedcorrectly. The Cathode Buffer Container shouldbe firmly seated in the autosampler. Thecartridge will click into place when it isinstalled correctly.
The RFID reader ismalfunctioning.
Insert consumables that have previously hadRFID tags read. Contact technical support ifthe RFID tags are not read.
The run stopped and Resume isdisplayed
A user paused the run. Touch Resume to continue the run.
The amber light is blinking The run was paused. Touch Resume to continue the run.
The instrument door is open. Close the instrument door.
There was an instrument error. Follow the instructions in the error message.
Restart the instrument.
The electrophoresis failed orCurrent check failed isdisplayed
There is insufficient cathodebuffer.
Check the fill line on the Cathode BufferContainer. Replace the Cathode BufferContainer if the buffer is at or below the fillline.
Appendix A TroubleshootingInstrument troubleshootingA
158 SeqStudio™ Genetic Analyzer Instrument and Software User Guide

Observation Possible cause Recommended action
The electrophoresis failed orCurrent check failed isdisplayed
The Cathode Buffer Containerhas been installed on theinstrument for more than twoweeks or used for more than125 injections.
Replace the Cathode Buffer Container.
The septum on either theCathode Buffer Container orthe sample plate is notinstalled correctly.
Ensure that the septa are fully inserted intoboth the Cathode Buffer Container and thesample plate.
Buffer or other liquid wasspilled on top of the reservoirseptum or on top of theautosampler.
Wipe the spill with a lint-free cloth.
There is condensation on theCathode Buffer Container oraround the reservoir septum.
Wipe the condensation with a lint-free cloth.
Ensure that the humidity in the lab is non-condensing.
Cartridge troubleshooting
Observation Possible cause Recommended action
There are crystals on thecartridge capillary array
Small amounts of leakagearound the cartridge capillaryarray are normal.
No action is required.
There are crystals on thecartridge polymer deliverysystem
There is a leak in the polymerdelivery system.
Run a control sample to determine if thecartridge function is affected.
Replace the cartridge if the leak affects thecartridge function.
Poor-quality data is observedafter prolonged drying of thecapillary tips
The capillary tips developblockages if they are allowed todry out.
Use an Integrated Capillary Protector when thecartridge is off the instrument to prevent thecapillary tips from drying out.
Clear the blockage by running polymer throughthe capillaries.
1. Touch Settings4Cartridge4Cartridgemaintenance4Fill array.
2. Touch when the function ends.3. Run a control sample.4. Replace the cartridge if there is poor-
quality data with the control sample.
Follow the recommendations for cartridgestorage to prevent drying of the capillary tips.See page 17.
Appendix A TroubleshootingCartridge troubleshooting A
SeqStudio™ Genetic Analyzer Instrument and Software User Guide 159

Sample and data troubleshooting
See also “Data quality alerts“ on page 156, “Sizecalling and basecalling qualityalerts“ on page 156, and Troubleshooting Sanger sequencing data User Bulletin(Pub. No. MAN0014435).
Observation Possible cause Recommended action
or QC flags aredisplayed
Note: Samples are stable onthe instrument for 16–24 hours.Determine if samples will bestable if a re-injection isrecommended, then plan there-injection accordingly.
The signal strength was low(in-run alert or end-or-runalert).
Re-inject the samples with adjusted injectionconditions.
Injection time, voltage, or a combination ofthese conditions can be adjusted.
Ensure that high-quality DNA is used as thestarting material.
Reamplify the DNA and repeat the experiment.
See:
• DNA Sequencing by CapillaryElectrophoresis Chemistry Guide (Pub.No. 4305080)
• DNA Fragment Analysis by CapillaryElectrophoresis User Guide (Pub.No. 4474504)
Prepare samples with fresh Hi‑Di™ Formamide.
Use a larger sample volume.
Ensure that the sample is mixed sufficiently.
Centrifuge the plate assembly or tubeassembly to ensure that the sample is at thebottom of the well or tube, and that no bubblesare visible. Repeat this step until all thesample is concentrated at the bottom of thewell or tube and there are no visible bubbles.
The signal strength was high(in-run alert or end-or-runalert).
Re-inject the samples with adjusted injectionconditions.
Injection time, voltage, or a combination ofthese conditions can be adjusted.
Dilute the sample, then re-inject the sample.
There was a sporadic set oflow-quality data.
Re-inject the sample. The affected samplegroup may show higher-quality data in the nextinjection.
Offscale signal is detected isdisplayed
Note: Samples are stable onthe instrument for 16–24 hours.Determine if samples will bestable if a re-injection isrecommended, then plan there-injection accordingly.
The sample concentration istoo high.
Dilute the sample, prepare a new plate, andstart a new run.
Quantitate the sample prior to adding reagentsfor capillary electrophoresis.
The injection conditions are toostrong for the sample.
Re-inject the samples with adjusted injectionconditions.
Injection time, voltage, or a combination ofthese conditions can be adjusted.
Appendix A TroubleshootingSample and data troubleshootingA
160 SeqStudio™ Genetic Analyzer Instrument and Software User Guide

Observation Possible cause Recommended action
There is no signal or a lowsignal
Note: Samples are stable onthe instrument for 16–24 hours.Determine if samples will bestable if a re-injection isrecommended, the plan the re-injection accordingly.
The sample volume wasinsufficient.
Use the recommended sample volume.
See “Sample preparation guidelines“ onpage 35.
The sample concentration wastoo low.
Re-inject the samples with adjusted injectionconditions.
Injection time, voltage, or a combination ofthese conditions can be adjusted.
There were bubbles in thesample wells.
Centrifuge the sample plate or tubes to removethe bubbles before loading onto theinstrument.
If the samples have been run, centrifuge theplate or tubes, then set up a re-injection.
The sequence reaction failed. Review the sequence analysis protocol, thetemplate quality, and the template quantity. Setup a new plate and repeat the reaction.
See Troubleshooting Sanger sequencing dataUser Bulletin (Pub. No. MAN0014435).
The Hi‑Di™ Formamide used toprepare the samples wasdegraded.
Prepare the samples with fresh Hi‑Di™
Formamide and repeat the experiment.
See “Sample preparation guidelines“ onpage 35.
The sample was prepared withthe BigDye XTerminator™
Purification Kit but a BDX runmodule was not selected.
Re-inject the sample with the correct module.
The sample was degraded. Prepare the sample according to the protocolprovided with the kits for sample preparation.See “Sample preparation guidelines“ onpage 35 for sample preparation guidelines.
IMPORTANT! Do not resuspend samples inwater.
The sample had a highconcentration of salt.
Dilute or desalt the samples.
There was an excess ofunlabeled template competingwith the fragments labeled withdye during the injection.
Dilute or desalt the samples.
See:
• DNA Sequencing by CapillaryElectrophoresis Chemistry Guide (Pub.No. 4305080)
• DNA Fragment Analysis by CapillaryElectrophoresis User Guide (Pub.No. 4474504)
Appendix A TroubleshootingSample and data troubleshooting A
SeqStudio™ Genetic Analyzer Instrument and Software User Guide 161

Observation Possible cause Recommended action
There is no signal or a lowsignal
Note: Samples are stable onthe instrument for 16–24 hours.Determine if samples will bestable if a re-injection isrecommended, the plan the re-injection accordingly.
A capillary array tip is blocked. Flush the capillary array.
1. Touch Settings4Cartridge4Cartridgemaintenance.
2. Touch Refresh PDS.3. Touch to close the screen when the
function ends.
Replace the cartridge if the problem persists.
The cartridge is damaged. Inspect the cartridge for damage. Replace thecartridge if there is damage.
There was poor resolution,poor size quality, or a poorsequencing result
The samples degraded overtime while on the instrument.
Analyze a maximum of 48 samples on a platefor long run modules. Additional samples willtake more than 24 hours and the samples candegrade.
Note: Thermal breakdown of samples isnormal. Samples are stable for 16–24 hours onthe instrument.
Use Hi‑Di™ Formamide to prepare the samples.Sample stability is optimal in Hi‑Di™
Formamide.
The temperature and/orhumidity in the lab is too highfor optimal sample stability.
Ensure that the conditions in the lab are withinthe operating range for the instrument (15–30°C and 20–80% relative humidity).
Sample stability can be lower near the highend of the operating range of the instrumentfor temperature and humidity.
Use 20 µL of sample instead of 10 µL.
A larger sample volume can reduce samplebreakdown under hot and humid conditions.
There was a sporadic dataquality failure.
Note: A sporadic data qualityfailure can happen occasionally.
Repeat the injection.
Poor resolution in somecapillaries
Poor-quality samples wereused.
See “Sample preparation guidelines“ onpage 35.
Use a control sample to determine if the poorresolution is due to the samples are anotherfactor.
A capillary was damaged or isblocked.
Try to clear the capillary, then replace thecartridge if the poor resolution is due to thecartridge and not the sample.
1. Touch Settings4Cartridge4Cartridgemaintenance4Fill array.
2. Touch when the function ends.3. Run a control sample.
Appendix A TroubleshootingSample and data troubleshootingA
162 SeqStudio™ Genetic Analyzer Instrument and Software User Guide

Observation Possible cause Recommended action
Poor resolution in all thecapillaries
The cartridge has been used formore than 125 injections, ispast the labeled expirationdate, or has degraded polymerfrom incorrect storage.
Replace the cartridge.
The Hi‑Di™ Formamide that wasused to prepare the sampleswas degraded.
Prepare the samples with fresh Hi‑Di™
Formamide and repeat the reaction.
See:
• “Sample preparation guidelines“ onpage 35
• DNA Fragment Analysis by CapillaryElectrophoresis User Guide (Pub.No. 4474504)
There was too much sampleinjected.
Dilute the sample and re-inject it.
Spikes are present in rawand/or analyzed fluorescencedata
Trace impurities passed thedetector.
For fragment analysis, increasing theMinimum peak half width setting in theanalysis settings (under Common settings) canreduce the identification of spikes as peaks.
Note: Secondary sequencing and fragmentanalysis software can recognize and ignorespikes.
Repeat the injection if necessary.
There is noise in the baseline Fluorescent contamination hasbuilt up in the CBC.
Replace the CBC. Use a new reservoir septumwhen assembling the new CBC.
Sample carryover from aprevious injection
Sample carryover on theSeqStudio™ Genetic Analyzercan occur in trace amountswhen previous injections areoff-scale. Very strong peaks, forexample, primer peaks in afragment analysis sample, aretypically visible in subsequentinjections.
Replace the reservoir septum on the CBCbefore the next injection to minimize thecarryover effect.
Dye blobs are seen in thesequencing data
Impurities remained in thesample after the samplepurification. The impuritiescause dye blobs to appear inthe sequencing data.
Improve the sample purification method. See “Sample preparation guidelines“ on page 35for guidelines.
Extra peaks are present insequencing traces
The data was off-scale. Off-scale data causes spectral pull-up peaks associated withcamera saturation.
Dilute the sample, then reinject it.
The sample was contaminated. Reamplify the DNA and repeat the sequencingreaction.
There was renaturation of thesample.
Heat-denature the samples prepared withfresh Hi‑Di™ formamide, then place thesamples on ice immediately.
Appendix A TroubleshootingSample and data troubleshooting A
SeqStudio™ Genetic Analyzer Instrument and Software User Guide 163

Observation Possible cause Recommended action
Extra peaks are present insequencing traces
There was excess resolution. Adjust the secondary analysis methods toaccount for extra side peaks.
There are pull-up or pull-downpeaks in the data
The dye calibration is notcurrent or is not matched to thesamples. This can be because ahigh-quality sample has notbeen run with the dye set.
Run a dye calibration with the dye set beingused.
The automated spectral calibration algorithmrequires high-quality data to generate anoptimized matrix.
The incorrect dye was selectedin the Plate setup.
Note: This is applicable to bothsequence analysis andfragment analysis.
Correct the dye set and repeat the injection.
There are error messagesabout spectral issuesThese error messages are seenmore often in fragment analysisdata and sequence analysisdata.
A high-quality sample has notbeen run with the dye set.
Run a dye calibration with the dye set beingused.
The automated spectral calibration algorithmrequires data to generate an optimized matrix.
There is a short read lengthand uneven peak spacing insequence data
The incorrect dye set wasselected in the Plate setup.
Correct the dye set and repeat the injection.
Select from the following:
• E_BigDye™ Terminator v1.1
• Z_BigDye™ Terminator v3.1
• Z_BigDye™ Direct
EPT data
Observation Possible cause Recommended action
There is a fluctuating orunstable electrophoresiscurrent, or Current checkfailed is displayed
There is a bubble in thepolymer system.
Flush the capillary array.
1. Touch Settings4Cartridge4Cartridgemaintenance.
2. Touch Refresh PDS.3. Touch to close the screen when the
function ends.
Replace the cartridge if the problem persists.
The cartridge is damaged. Inspect the cartridge for damage and replacethe cartridge.
Appendix A TroubleshootingEPT dataA
164 SeqStudio™ Genetic Analyzer Instrument and Software User Guide

Software troubleshooting
Observation Possible cause Recommended action
Strikethrough text is displayed in Save location inPlate properties screen
1 Strikethrough text
The original location to whichthe plate was saved is nolonger accessible by theinstrument.
No action.
Import failed message when you select a CSVplate setup on the instrument
The message also indicates that a valid runmodule, dye set, and/or size standard is notpresent.
The CSV file specifies thename of a run module, dyeset, and/or size standard thatdoes not exist on theinstrument.
IMPORTANT! A CSV filecontains only the name of therun module, dye set, and/orsize standard, it does notcontain the settings.
Add the run module, dye set,and/or size standard to theinstrument by selecting aPSM file that contains theitems, or by creating theitems manually.
Import CSV fails but import PSM with samesettings imports with no errors
The size standard, dye set, orrun module specified in theCSV file does not exist on theinstrument.
The CSV file contains thenames only of the sizestandard, dye set, or runmodule, it does not containthe settings.
The PSM file contains thenames and settings of thesize standard, dye set, or runmodule. The size standard,dye set, or run module areautomatically created whenthe PSM file is imported.
Create the size standard, dyeset, or run module on theinstrument.
When saving a PSM file in Plate Manager (Cloud),"You do not have edit permission to the cloudgroup" message is displayed
You are saving to a ThermoFisher Cloud group and youdo not have edit permissionsfor the group.
Save to a different location, orrequest edit permissionsfrom the group administrator.
Analysis settings or run module is not available forselection by some users
This situation is seen on the instrument.
Analysis settings and runmodules are saved per user.
If the analysis settings or runmodules are associated witha hidden plate setup, theanalysis settings or runmodules are not listed for
Change the plate setupsecurity from Hidden toShared (see “Hide or share aplate (Plate setup security)“ on page 73).
Appendix A TroubleshootingSoftware troubleshooting A
SeqStudio™ Genetic Analyzer Instrument and Software User Guide 165

Observation Possible cause Recommended action
Analysis settings or run module is not available forselection by some users
This situation is seen on the instrument.
selection unless the user whocreated the plate setup issigned in.
Create the analysis settingsor run modules manually.
Your local instrument profile name is not availablefor sign in
Your local instrument profileis linked to your Cloudaccount and is replaced byyour Cloud profile.
See “Local instrument profileroles and functions“ onpage 138.
Sign in with your Cloudprofile.
Cloud account is already linked to a local profilemessage
You have a local instrumentprofile that has previouslybeen linked to Cloud account.You touched GetStarted4Connect, then typedin your Cloud account emailand password.
Return to Sign in screen, thenselect your local profile fromthe Sign in list.
Another user was signed in tothe instrument. You selected
Cloud in the Set up runscreen or in the Save locationfield in the Plate propertiesscreen, then typed in yourCloud account email andpassword.
Return to Sign in screen,touch , touch Sign out, thenselect your local profile fromthe Sign in list.
The Notifications button is not displayed inInstrument Settings
You are signed in to theinstrument with a localinstrument profile.
Sign in to the instrument witha Cloud instrument profile.
A button is dimmed The function is available tousers with administrator roleonly.
None.
Sample data files from the SeqStudio™ GeneticAnalyzer can be opened but not analyzed insecondary analysis software
• Sequencing Analysis Software
• GeneMapper™ Software
• SeqScape™ Software
• Variant Reporter™ Software
An updated version of thesecondary analysis softwareis required.
Download and run the latestversion of secondary analysissoftware. See “Secondaryanalysis software“ onpage 28.
Note: The SeqStudio™
Genetic Analyzer instrumentmodel is listed as 3200.
Files cannot be imported into Thermo FisherCloud applications or cannot be analyzed inThermo Fisher Cloud sequencing apps
The sample name or filename used a specialcharacter.
Rename the sample name orfile name.
Note: Special characters (/,&, @, %) will impact fileimport into Thermo FisherCloud applications.
Unexpected error is displayed There was a software error. Follow the instructions in theerror message.
Appendix A TroubleshootingSoftware troubleshootingA
166 SeqStudio™ Genetic Analyzer Instrument and Software User Guide

Observation Possible cause Recommended action
Unexpected error is displayed Export the log files todetermine the potentialsource of the unexpectederror. See “Export log files forplates, install runs, injections,and instrument“ on page 155.
Restart the system using theOn/Off switch on the rearpanel. See “Power on theinstrument“ on page 33.
Service tools
The Service tools function is password-protected and for service use only.
Appendix A TroubleshootingService tools A
SeqStudio™ Genetic Analyzer Instrument and Software User Guide 167

Link the instrument to your Cloudaccount—detailed instructions
■ Workflow: Set up the instrument for Thermo Fisher Cloud access . . . . . . . . . . 168
■ Network requirements . . . . . . . . . . . . . . . . . . . . . . . . . . . . . . . . . . . . . . . . . . . . . . . 169
■ Link the instrument from a mobile device . . . . . . . . . . . . . . . . . . . . . . . . . . . . . . 169
■ Link the instrument using a link code . . . . . . . . . . . . . . . . . . . . . . . . . . . . . . . . . . 170
■ Link the instrument using your Cloud account . . . . . . . . . . . . . . . . . . . . . . . . . . 174
■ Set up email notifications from the instrument . . . . . . . . . . . . . . . . . . . . . . . . . . 176
Workflow: Set up the instrument for Thermo Fisher Cloud access
Register and obtain a Cloud account(page 49)
▼
Link the instrument to the Thermo Fisher Cloud in any of thefollowing ways:
• Link the instrument from a mobile device(page 169)
• Link the instrument using a link code(page 170)
• Link the instrument using your Cloud account(page 174)
▼
Set up email notifications from the instrument(page 52)
B
168 SeqStudio™ Genetic Analyzer Instrument and Software User Guide

Network requirements
The instrument is factory-configured for IPv4 TCP/IP communication and includes afast Ethernet adapter (10/100 Mbps) with a RJ45-type connector for integrating thedevice into a local area network (LAN).
By default, the instrument is configured to use the Dynamic Host ConfigurationProtocol (DHCP) but can use a static IP address.
The instrument should be configured behind a firewall. Contact Support forinformation on required firewall exceptions.
Link the instrument from a mobile device
1. Sign in to thermofisher.com/cloud.
2. Click to access InstrumentConnect.
3. If you have not previously set up a PIN, click Update PIN, then enter a PIN thatyou will use to sign in to the instrument.
4. From the instrument Sign In screen, navigate to the Connect to the ThermoFisher Cloud screen:
Do you have a localinstrument profile? Description
Yes 1. Touch Sign in, then enter your PIN.
2. In the home screen, touch Setup run.
3. In the Setup run screen, touch Cloud.
No Touch Get started4Connect.
5. Touch Mobile devices.
Create a CloudPIN and generatethe QR code on theinstrument
Appendix B Link the instrument to your Cloud account—detailed instructionsNetwork requirements B
SeqStudio™ Genetic Analyzer Instrument and Software User Guide 169

The QR code is displayed.
1. On your mobile device, download the InstrumentConnect from the Apple Storeor from Google™ Play.
2. Launch, then sign in to the mobile app on your mobile device.
3. Register the instrument:a. Touch , then touch Register Instrument.
b. Touch QR code on your mobile device.
c. With your mobile device, scan the QR code displayed in the instrumenttouchscreen.
Link the instrument using a link code
1. From the instrument Sign In screen, navigate to the Connect to the ThermoFisher Cloud screen:
Do you have a localinstrument profile? Description
Yes 1. Touch Sign in, then enter your PIN.
2. In the home screen, touch Setup run.
3. In the Setup run screen, touch Cloud.
No Touch Get started4Connect.
Register theinstrument withthe InstrumentConnect App
Appendix B Link the instrument to your Cloud account—detailed instructionsLink the instrument using a link codeB
170 SeqStudio™ Genetic Analyzer Instrument and Software User Guide

2. Touch PC.
A unique link code is displayed.
3. Sign into your Thermo Fisher Cloud on a separate computer.Go to thermofisher.com/cloud.
Appendix B Link the instrument to your Cloud account—detailed instructionsLink the instrument using a link code B
SeqStudio™ Genetic Analyzer Instrument and Software User Guide 171

4. Click , then click Add an Instrument.
5. Select SeqStudio™, then click Next.
Appendix B Link the instrument to your Cloud account—detailed instructionsLink the instrument using a link codeB
172 SeqStudio™ Genetic Analyzer Instrument and Software User Guide

6. Enter the link code from the instrument touchscreen (from step 2), then clickSend.
7. If you have not previously set up a PIN, enter a PIN to use when you sign in toan instrument, then click Send.
A start linking message is displayed.A confirmation message is displayed on the instrument touchscreen when theinstrument is linked and connected to the Thermo Fisher Cloud.
The first time the instrument is linked, the software automatically:• Creates a Cloud instrument profile with the First Name and Last Name from
your Thermo Fisher Cloud account.• Registers the instrument in the InstrumentConnect software.
Appendix B Link the instrument to your Cloud account—detailed instructionsLink the instrument using a link code B
SeqStudio™ Genetic Analyzer Instrument and Software User Guide 173

Link the instrument using your Cloud account
1. From the instrument Sign In screen, navigate to the Connect to the ThermoFisher Cloud screen:
Do you have a localinstrument profile? Description
Yes 1. Touch Sign in, then enter your PIN.
2. In the home screen, touch Setup run.
3. In the Setup run screen, touch Cloud.
No Touch Get started4Connect.
2. Touch Instrument.
3. Enter your Thermo Fisher Cloud account username (email address) andpassword, then touch Link account.
Appendix B Link the instrument to your Cloud account—detailed instructionsLink the instrument using your Cloud accountB
174 SeqStudio™ Genetic Analyzer Instrument and Software User Guide

4. If you have not previously set up a PIN, enter a PIN to use when you sign in toan instrument, then touch Done.
A confirmation message is displayed when the instrument is linked andconnected to the Thermo Fisher Cloud.
The first time the instrument is linked, the software automatically:• Creates a Cloud instrument profile with the First Name and Last Name from
your Thermo Fisher Cloud account.• Registers the instrument in the InstrumentConnect software.
Appendix B Link the instrument to your Cloud account—detailed instructionsLink the instrument using your Cloud account B
SeqStudio™ Genetic Analyzer Instrument and Software User Guide 175

Set up email notifications from the instrument
When an instrument is linked to your Cloud account, email notifications areautomatically sent to your Cloud account email address.
Perform this procedure to disable any of the default notifications.
1. Sign in to the instrument with your Cloud instrument profile and PIN.
2. In the home screen of the instrument, touch Settings4Instrumentsettings4Email notifications.
Note: If you are signed in with a local instrument profile instead of a Cloudinstrument profile, the Email notifications button is not displayed on theInstrument Settings screen.
3. In the Email notifications screen, select or deselect the options for which youwant to receive email notifications, then touch Done.
Appendix B Link the instrument to your Cloud account—detailed instructionsSet up email notifications from the instrumentB
176 SeqStudio™ Genetic Analyzer Instrument and Software User Guide

Dye calibration and install standardchecks
■ Calibrate dyes . . . . . . . . . . . . . . . . . . . . . . . . . . . . . . . . . . . . . . . . . . . . . . . . . . . . . . 177
■ Perform an install run . . . . . . . . . . . . . . . . . . . . . . . . . . . . . . . . . . . . . . . . . . . . . . . . 188
Calibrate dyes
Dye calibration compensates for dye emission spectral overlap.
1.0
0.8
0.6
0.4
0.2
0 5 10 15 20 25 30 35 40
result = 0, q = 0.998, c = 6.374
Capillary 1
Figure 20 Dye emission spectra for the J6 (DS-36) dye set showing spectral overlap
System dye sets are available from Thermo Fisher Scientific.
System dye sets
Fragment analysis dye sets Sequence analysis dye sets
• D (DS-30, DS-31)
• E5 (DS-02)
• F (DS-32)
• G5 (DS-33)
• J6 (DS-36)
• E_BigDye™ Terminator v1.1
• Z_BigDye™ Terminator v3.1
• Z_BigDye™ Direct
Custom dye sets are any dyes that are not available from Thermo Fisher Scientific.Custom dye sets require manual calibration.
C
Overview ofsystem dye setand custom dyeset calibration
System versuscustom dyes
SeqStudio™ Genetic Analyzer Instrument and Software User Guide 177

Three types of calibration can occur on the instrument:• Factory calibration—Default calibration provided with the instrument. It is not
optimized for a specific instrument.• Manual calibration—Manual procedure performed by the user that provides a
baseline calibration for the instrument on which it is run. Reduces pull-up (falsesecondary peaks under a true peak).
• Auto calibration—Automatic adjustment of the baseline calibration to optimallyreduce pull-up (false secondary peaks under a true peak). The instrumentperforms an auto calibration for system and custom dyes.
• Sequence analysis dye sets —Do not typically require manual calibration.• Fragment analysis dye sets—Manual calibration is recommended one time before
use.
Note: With high-quality sample data, it is possible for auto calibration to passusing the factory calibration.
To determine if a dye set requires manual calibration, review the calibration historyfor the dye set.
Factory, auto, andmanualcalibration
Determine ifmanualcalibration isrequired
Appendix C Dye calibration and install standard checksCalibrate dyesC
178 SeqStudio™ Genetic Analyzer Instrument and Software User Guide

In the home screen:
1. Touch Settings4Maintenance and Service4Calibration4Calibrationhistory.
2. Examine the entry for the dye set of interest. If the dye set does not list a date anda cartridge serial number for a manual calibration or a date for auto calibration,the dye set requires manual calibration.
2
4
3
1
1
5
1
Figure 21 Fragment analysis dye sets example
1 Manual calibration is recommended—No auto calibration or manual calibration hasbeen performed.
2 Manual calibration is not required—A manual calibration has been performed.3 Manual calibration is not required—The factory calibration has been optimized for the
instrument by auto calibration.4 Manual calibration is recommended—Auto calibration has been performed, but only
2 capillaries passed.5 Manual calibration is not required—A manual calibration and an auto calibration have
been performed.
Appendix C Dye calibration and install standard checksCalibrate dyes C
SeqStudio™ Genetic Analyzer Instrument and Software User Guide 179

A system dye calibration requires ~30 minutes to complete.
Prepare the dye set calibration standards and plate as described in the productinformation sheet for the dye set.
In the home screen:
1. Touch Settings4Maintenance and Service4Calibration4Dye Calibration.
2. Touch the injection group for the dye set in the plate, then touch Dye set.
Perform a systemdye calibration
Appendix C Dye calibration and install standard checksCalibrate dyesC
180 SeqStudio™ Genetic Analyzer Instrument and Software User Guide

3. Touch Sequence Standard or Matrix Standard, then select a system dyecalibration standard provided with the instrument.
4. Touch Calibrate.The calibration run starts.
IMPORTANT! If the dye calibration fails:
· The results of the calibration are not saved, and the calibration plate is not movedto Run History.
· The instrument does not allow you to rerun the plate setup for a failed calibration.Close the calibration screen, then start a new calibration.
Spectral Quality Value
A spectral Quality Value reflects the confidence that the individual dye emissionsignals can be separated from the overall measured fluorescence signal. It is ameasure of the consistency between the final matrix and the data from which it wascomputed. A Quality Value of 1.0 indicates high consistency, providing an idealmatrix with no detected pull-up/pull-down peaks.
In rare cases, a high Quality Value can be computed for a poor matrix. This canhappen if the matrix standard contains artifacts, leading to the creation of one or moreextra peaks. The extra peak(s) causes the true dye peak to be missed by the algorithm,and can lead to a higher Quality Value than would be computed with the correctpeak. Therefore, it is important to visually inspect the spectral calibration profile foreach capillary.
Appendix C Dye calibration and install standard checksCalibrate dyes C
SeqStudio™ Genetic Analyzer Instrument and Software User Guide 181

Condition number
A Condition Number indicates the amount of overlap between the dye peaks in thefluorescence emission spectra of the dyes in the dye set.
If there is no overlap in a dye set, the Condition Number is 1.0 (ideal conditions), thelowest possible value. The condition number increases with increasing peak overlap.
The ranges that the software uses to determine if a capillary passes or fails are:
Dye Set Quality Value Minimum Condition NumberMaximum
AnyDye 0.8 (default) 20.0 (default)
D 0.8 8.5
E 0.95 5.5
E5 0.95 6.0
F 0.95 8.5
G5 0.95 13.5
J6 0.95 8.0
Z 0.95 5.5
Add a custom dye set to the software based on a system dye
In the home screen:
1. Touch Settings4Maintenance and Service4 Calibration4Dye calibration.
2. Touch Custom Dye.
3. Touch Add.
4. Touch the system dye to use as a starting point for the custom dye settings.
Perform a customdye calibration
Appendix C Dye calibration and install standard checksCalibrate dyesC
182 SeqStudio™ Genetic Analyzer Instrument and Software User Guide

5. Modify the settings as needed then touch Next.
6. Enter a Dye set name, then touch Done.
Add a custom dye set to the software using the Any Dye template
In the home screen:
1. Touch Settings4Maintenance and Service4 Calibration4Dye calibration.
2. Touch Custom Dye.
3. Touch Add.
4. Select Any Dye to use as a starting point for the custom dye settings.All dyes are selected by default.
Appendix C Dye calibration and install standard checksCalibrate dyes C
SeqStudio™ Genetic Analyzer Instrument and Software User Guide 183
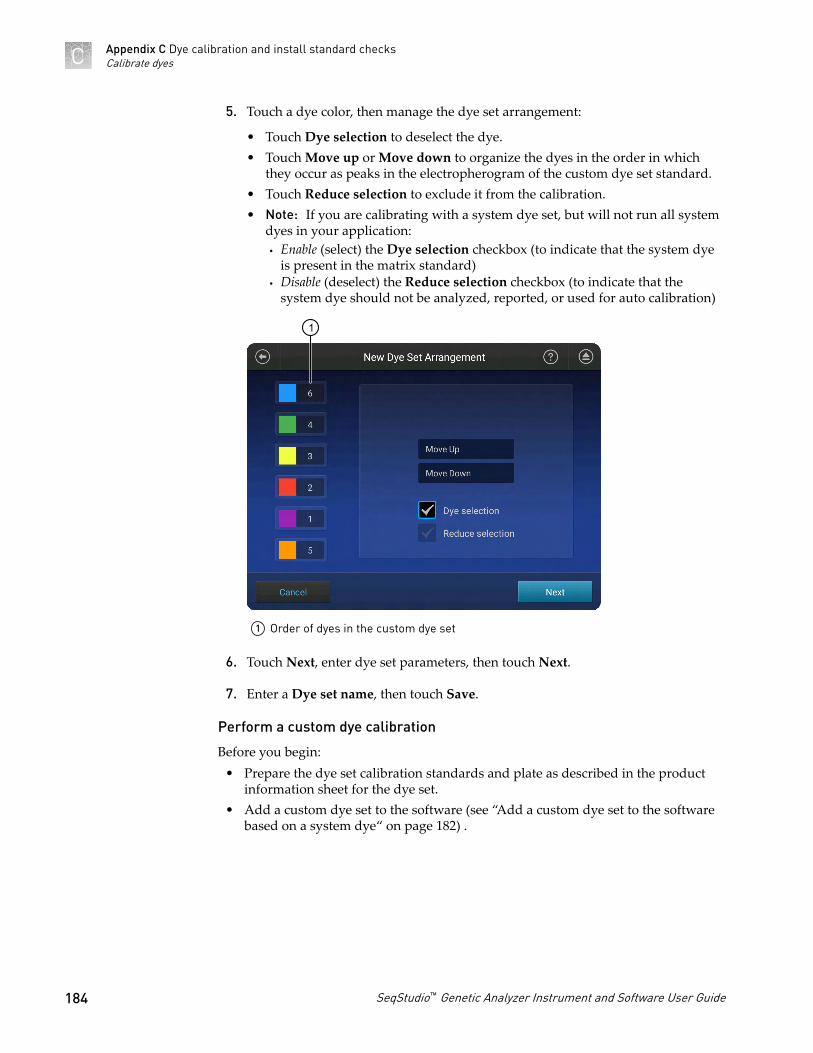
5. Touch a dye color, then manage the dye set arrangement:
• Touch Dye selection to deselect the dye.• Touch Move up or Move down to organize the dyes in the order in which
they occur as peaks in the electropherogram of the custom dye set standard.• Touch Reduce selection to exclude it from the calibration.• Note: If you are calibrating with a system dye set, but will not run all system
dyes in your application:· Enable (select) the Dye selection checkbox (to indicate that the system dye
is present in the matrix standard)· Disable (deselect) the Reduce selection checkbox (to indicate that the
system dye should not be analyzed, reported, or used for auto calibration)
1
1 Order of dyes in the custom dye set
6. Touch Next, enter dye set parameters, then touch Next.
7. Enter a Dye set name, then touch Save.
Perform a custom dye calibration
Before you begin:• Prepare the dye set calibration standards and plate as described in the product
information sheet for the dye set.• Add a custom dye set to the software (see “Add a custom dye set to the software
based on a system dye“ on page 182) .
Appendix C Dye calibration and install standard checksCalibrate dyesC
184 SeqStudio™ Genetic Analyzer Instrument and Software User Guide

In the home screen:
1. Touch Settings4Maintenance and Service4 Calibration4Dye calibration.
2. Touch the injection group for the dye set in the plate, then touch Dye set.
3. Touch a custom dye set.
4. Touch Calibrate.
5. When the run is complete, touch View results.
6. Ensure that all capillaries passed the calibration, then click Done.
IMPORTANT! If the dye calibration fails:
· The results of the calibration are not saved, and the calibration plate is not movedto Run History.
· The instrument does not allow you to rerun the plate setup for a failed calibration.Close the calibration screen, then start a new calibration.
Add a custom dye to the Plate Manager or another instrument
• To add a custom dye set to the Plate Manager:a. Open a plate setup that specifies the custom dye set of interest.
b. Export a plate setup that specifies the custom dye (see “Export or delete aplate setup (PSM file)“ on page 125).
c. Open the exported plate setup in the Plate Manager.
• To transfer a custom dye set to another instrument:a. Touch Settings4Maintenance and Service4Calibration4Calibration
history.
b. Touch Custom dye.
Appendix C Dye calibration and install standard checksCalibrate dyes C
SeqStudio™ Genetic Analyzer Instrument and Software User Guide 185

c. Touch Manage.
d. Touch a custom dye, then touch Export.
e. Select a location, then touch Export.
f. Import the custom dye on another instrument ( Settings4Maintenanceand Service4 Calibration4Dye calibration4Customdye4Manage4Import).
In the home screen:
1. Touch Settings4Maintenance and Service4Calibration history.
2
4
3
1
1
5
1
1 Factory calibration (default calibration that is not optimized for the instrument).2 Manual dye calibration performed by a user.3 Factory calibration that has been optimized by auto calibration and does not require
manual calibration.4 Automatic adjustment of the baseline calibration to optimally reduce pull‑up (false
secondary peaks under a true peak).5 A manual dye calibration and an auto dye calibration have been performed.
2. Touch a dye set.A thumbnail of each capillary calibration spectrum is displayed, with the q, and cvalues (see “Spectral Quality Value“ on page 181 and “Condition number“ onpage 182).
3. Touch and to view a full-screen calibration spectrum for each capillary.
4. Touch to return to the list of dye sets on the Calibration History screen.
View the dyecalibration history
Appendix C Dye calibration and install standard checksCalibrate dyesC
186 SeqStudio™ Genetic Analyzer Instrument and Software User Guide

5. (Optional) Touch Filter to narrow the dye set list down by dye sets.a. Select or deselect the dyes listed.
b. (Optional) Touch Deselect All to clear the dye set selections.
c. Touch Done.
6. Touch OK.
In the home screen:
• Touch Settings4Maintenance and Service4 Calibration4Dyecalibration4Custom dye4Manage.
1. Touch the custom dye set.
2. Touch Import or Export.
Import or export acustom dye set
Appendix C Dye calibration and install standard checksCalibrate dyes C
SeqStudio™ Genetic Analyzer Instrument and Software User Guide 187

Perform an install run
Install checks are performed by a Thermo Fisher Scientific Field Service Engineer atthe time of installation.
An install check can be run at any time with the following reagents to ensureinstrument performance:
Install check type Reagent
Sequencing • 3500/3500xL Sequencing Standards, BigDye™ Terminator v3.1
• 3500/3500xL Sequencing Standards, BigDye™ Terminator v1.1
Fragment D33 GeneScan™ Installation Standards with GeneScan™ 600 LIZ™
Size Standard v2.0
You can include multiple injection groups, multiple applications, and/or multiplechemistries on an install run plate. For example, you can prepare an install run platethat contains replictate injections of the fragment install standard and bothsequencing standards.
Figure 22 Example install run plate with multiple applications and replicate injections
Overview of installchecks
Appendix C Dye calibration and install standard checksPerform an install runC
188 SeqStudio™ Genetic Analyzer Instrument and Software User Guide

An install run requires ~45 minutes to complete each injection group.
Prepare the installation standard and plate as described in the product informationsheet for the installation standard.
In the home screen:
1. Touch Settings4Maintenance and service4Install run4Install run.
2. Touch an injection group on the plate to select a location for the install standards.
A plate can be set up with different injection groups for one install run.
3. Touch Chemistry, then select the type of install run.Select None to cancel the selection.
4. Repeat the steps above for additional injection groups and/or multiplechemistries.
5. Touch Start Run.
Perform an installrun
Appendix C Dye calibration and install standard checksPerform an install run C
SeqStudio™ Genetic Analyzer Instrument and Software User Guide 189

1. Open the install run results summary:
• To view results immediately after the install run completes, touch Results.• To view results for a previous install run, touch Settings4Maintenance
and Service4Install run4Install run history.
View install runresults
Appendix C Dye calibration and install standard checksPerform an install runC
190 SeqStudio™ Genetic Analyzer Instrument and Software User Guide

2. Touch an install run to display the results, including the pass/fail results.
Each injection group displays a QC color for each capillary:• —All QC tests passed.• —At least 1 warning quality alert was triggered.• —At least 1 failing quality alert was triggered.
For information on quality alerts, see:• “Data quality alerts“ on page 156• “Sizecalling and basecalling quality alerts“ on page 156
Appendix C Dye calibration and install standard checksPerform an install run C
SeqStudio™ Genetic Analyzer Instrument and Software User Guide 191

3. Touch Detail to see allele-specific details for fragment analysis and basecallaccuracy for sequencing.
4. Touch Export report (see “Export the install run report“ on page 193).
Fragment analysis install run pass/fail criteria
Result Acceptance criteria
# Allele peaks 15 for all four capillaries
# Size standard peaks 34 for all four capillaries
Standard deviation of the observed allele fragment sizesfor all 4 capillaries
<0.15 base pairs (bp)
Appendix C Dye calibration and install standard checksPerform an install runC
192 SeqStudio™ Genetic Analyzer Instrument and Software User Guide

Sequence analysis install run pass/fail criteria
Result Acceptance criteria
QV30 CRL (contiguous readlength)
Note: The contiguous readlength passing criteria forinstall checks is anuninterrupted segment ofbases with an average QualityValue (QV) of 30.
BigDye™ Terminator v3.1
Capillaries with QV30 CRL ≥500 bp pass.
BigDye™ Terminator v1.1
Capillaries with a QV30 CRL ≥500 bp pass.
The remaining results on the screen are for information only.
1. Touch Settings4Maintenance and Service4Install run4Install run history.
2. Touch the install run of interest.
3. Touch Export report.
4. Select a destination for the report.
5. Touch OK.
Export the installrun report
Appendix C Dye calibration and install standard checksPerform an install run C
SeqStudio™ Genetic Analyzer Instrument and Software User Guide 193

Example fragment analysis run report
Appendix C Dye calibration and install standard checksPerform an install runC
194 SeqStudio™ Genetic Analyzer Instrument and Software User Guide

Example sequencing run report
In the home screen:
1. Touch Settings4Maintenance and Service4Install run history.
View the installrun history
Appendix C Dye calibration and install standard checksPerform an install run C
SeqStudio™ Genetic Analyzer Instrument and Software User Guide 195
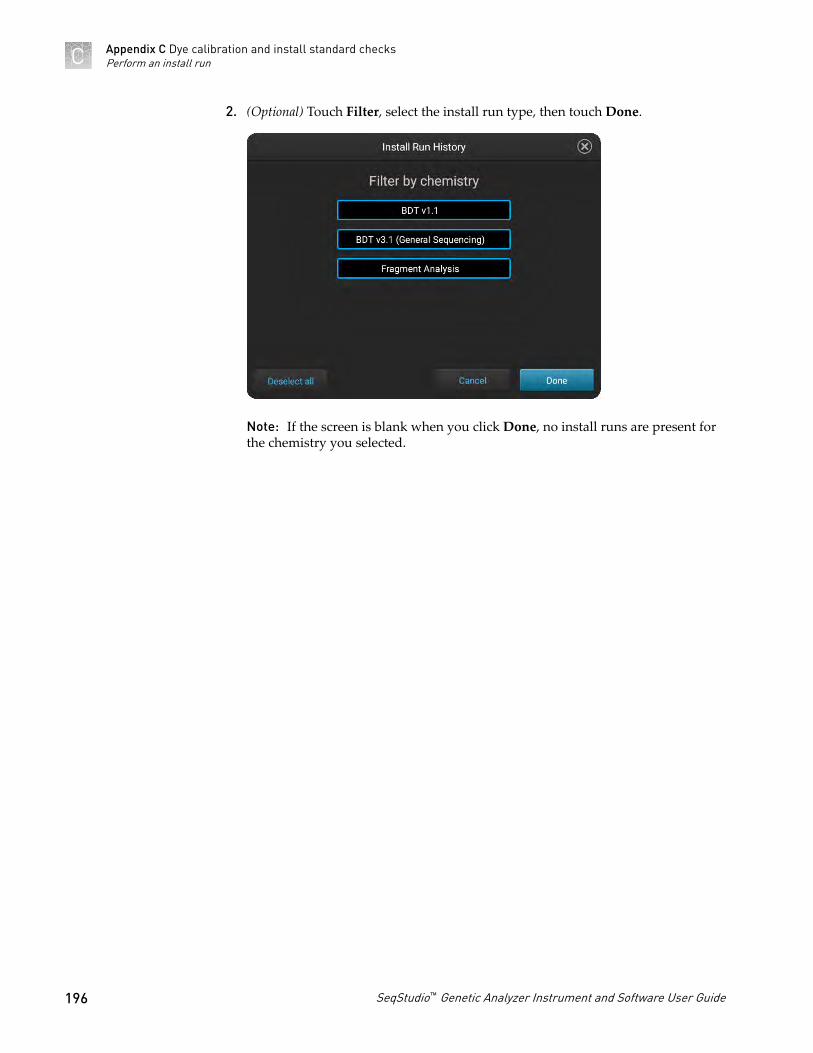
2. (Optional) Touch Filter, select the install run type, then touch Done.
Note: If the screen is blank when you click Done, no install runs are present forthe chemistry you selected.
Appendix C Dye calibration and install standard checksPerform an install runC
196 SeqStudio™ Genetic Analyzer Instrument and Software User Guide

Run modules
Run modules, read lengths, size ranges, and run times
Table 9 Sequencing run modules
Run module Expected read length Approximate run time
ShortSeq
ShortSeq_BDX
350 bp 30 minutes
MediumSeq
MediumSeq_BDX
500 bp 45 minutes
LongSeq
LongSeq_BDX
800 bp < 2 hours
IMPORTANT! Use BDX run modules only if you prepare samples with BigDyeXTerminator™ Purification Kit. Use non-BDX run modules for samples purified withother methods.
Table 10 Fragment analysis run modules
Run module Optimal sizing range Approximate runtime Compatible size standards
SNaPshot 40–120 bp 25 minutes GeneScan™ 120 LIZ™ SizeStandard
FragAnalysis 60–460 bp 45 minutes All except GeneScan™ 1200 LIZ™
Size Standard
LongFragAnalysis[1] 60–600 bp < 2 hours • GeneScan™ 600 LIZ™ SizeStandard v2.0
• GeneScan™ 1200 LIZ™ SizeStandard
[1] Load a maximum of 48 samples per plate if you use a long run module.
Note: The following size standards hav not been validated for use with theinstrument. A default size standard definition is not provided in the software.· GeneScan™ 500 LIZ™ dye Size Standard· GeneScan™ 350 ROX™ dye Size Standard· GeneScan™ 400HD ROX™ dye Size Standard
D
SeqStudio™ Genetic Analyzer Instrument and Software User Guide 197

Parts and materials
Required materials not supplied
Unless otherwise indicated, all materials are available through thermofisher.com.MLS: Fisher Scientific (fisherscientific.com) or other major laboratory supplier.
Item Source
Software
(Optional) SeqStudio™ Plate Manager and AppAvailable on the Thermo
Fisher Cloud or for downloadat thermofisher.com
(Optional) SeqStudio™ Remote Monitoring App Available on the ThermoFisher Cloud(Optional) InstrumentConnect
Equipment
(Optional) Handheld Barcode Scanner 4488442
Consumables for SeqStudio™ Genetic Analyzer
SeqStudio™ Genetic Analyzer Cartridge A33671
SeqStudio™ Genetic Analyzer Cathode Buffer Container A33401
SeqStudio™ Integrated Capillary Protector A31923
Tubes, plates, and other consumables
MicroAmp™ Optical 96-Well Reaction Plate 4316813
MicroAmp™ Optical 96-Well Reaction Plate with Barcode 4326659
MicroAmp™ Optical 8-Tube Strip, 0.2 mL 4316567
Septa for SeqStudio™ Genetic Analyzer, 96 well A36541
Septa for SeqStudio™ Genetic Analyzer, 8 strip A36543
MicroAmp™ 96-Well Tray/Retainer Set
(Adapter for 8-Tube Strip)403081
Reservoir Septa
(For Cathode Buffer Container)A35640
Reagents
Hi‑Di™ Formamide 4401457
E
198 SeqStudio™ Genetic Analyzer Instrument and Software User Guide

Item Source
BigDye XTerminator™ Purification Kit 4376486
Sequencing kits
BigDye™ Terminator v1.1 Cycle Sequencing Kit 4337449
BigDye™ Terminator v3.1 Cycle Sequencing Kit 4337454
BigDye™ Direct Cycle Sequencing Kit 4458689
Fragment analysis dye calibration standards
GeneScan™ 600 LIZ™ Size Standard v2.0 4408399
GeneScan™ 120 LIZ™ Size Standard 4324287
GeneScan™ 1200 LIZ™ Size Standard 4379950
GeneScan™ 500 ROX™ dye Size Standard 401734
GeneScan™ 500 LIZ™ dye Size Standard[1] 4322682
GeneScan™ 350 ROX™ dye Size Standard[1] 401735
GeneScan™ 400HD ROX™ dye Size Standard[1] 402985
[1] This size standard has not been validated for use with the instrument. A default size standard definition is not provided in the software.
Appendix E Parts and materialsRequired materials not supplied E
SeqStudio™ Genetic Analyzer Instrument and Software User Guide 199

Instrument specifications and layout
■ Instrument dimensions . . . . . . . . . . . . . . . . . . . . . . . . . . . . . . . . . . . . . . . . . . . . . . . 200
■ Instrument clearances . . . . . . . . . . . . . . . . . . . . . . . . . . . . . . . . . . . . . . . . . . . . . . . . 200
■ Environmental requirements . . . . . . . . . . . . . . . . . . . . . . . . . . . . . . . . . . . . . . . . . . 201
■ Electrical requirements . . . . . . . . . . . . . . . . . . . . . . . . . . . . . . . . . . . . . . . . . . . . . . . 202
■ Electrical protective devices . . . . . . . . . . . . . . . . . . . . . . . . . . . . . . . . . . . . . . . . . . . 202
■ Network requirements . . . . . . . . . . . . . . . . . . . . . . . . . . . . . . . . . . . . . . . . . . . . . . . 203
■ Safety requirements . . . . . . . . . . . . . . . . . . . . . . . . . . . . . . . . . . . . . . . . . . . . . . . . . 203
Instrument dimensions
Ensure that the installation site bench space can accommodate the dimensions andsupport the weight.
Configuration Height Length (depth) Width Weight
(Door Closed)
(Door Open)
44.2 cm (17.4 in.)
56.9 cm (22.4 in.)
64.8 cm (25.5 in.) 49.5 cm (19.5 in.) 53.5 kg (118 lbs)
WARNING! PHYSICAL INJURY HAZARD. Do not attempt to lift or move theinstrument without professional assistance. The crated instrument is heavy.Any incorrect lifting or moving of the crated instrument can cause seriousinjury.
Instrument clearances
During instrument setup and maintenance, it is necessary to access the back and sidesof the instrument. If the back of the instrument faces a wall, it will be necessary tohave enough space to rotate the instrument on the bench for access.
IMPORTANT! For safety, the power outlet used for powering the instrument must beaccessible at all times.
Component Top Front Left Right Back
SeqStudio™ GeneticAnalyzer
30.5 cm(12.0 in)
30.5 cm(12.0 in)
10.0 cm(4.0 in)
20.0 cm(8.0 in)
10.0 cm(4.0 in)
F
200 SeqStudio™ Genetic Analyzer Instrument and Software User Guide

Environmental requirements
Ensure that the installation room is maintained under correct environmentalconditions.
Condition Acceptable range
Installation site Indoor use only
Electromagneticinterference
Do not use this device in close proximity to sources of strong electromagnetic radiation (forexample, unshielded intentional RF sources). Strong electromagnetic radiation may interferewith the proper operation of the device.
This equipment has been designed and tested to CISPR 11 Class A. In a domesticenvironment it may cause radio interference. You may need to take measures to mitigate theinterference.
Altitude Located between sea level and 2000 m (6500 ft.) above sea level
Humidity (instrumentand computer)
• Operation: 20%–80% (noncondensing)
• Transport and storage: 15%–80% (noncondensing)
Temperature(instrument andcomputer)
• Operation: 15°C to 30°C (60°F to 85°F)
Note: The room temperature must not fluctuate more than 2°C over a 2-hour period.
• Transport and storage: –20°C to 60°C (–4°F to 140°F)
Transient category Installation categories II
Overvoltage category Installation categories II
Vibration Ensure that the instrument is not adjacent to strong vibration sources, such as a centrifuge,pump, or compressor. Excessive vibration will affect instrument performance.
Pollution degree II
Install the instrument in an environment designated pollution degree II (only non-conductivepollution (e.g., dust) occurs except that occasionally a temporary conductivity caused bycondensation is to be expected). Typical pollution degree II environments are laboratoriesand office spaces.
Liquid wastecollection
Dispose of the polymer, buffer, reagents and any liquid waste as hazardous waste incompliance with local and national regulations.
Other conditions Ensure the installation site is away from any vents that could expel particulate material onthe system components.
Avoid placing the instrument and computer adjacent to heaters, cooling ducts, or in directsunlight.
Appendix F Instrument specifications and layoutEnvironmental requirements F
SeqStudio™ Genetic Analyzer Instrument and Software User Guide 201

Electrical requirements
CAUTION! Do not unpack or plug in any components until the Field ServiceEngineers (FSEs) have configured the system for the proper operating voltage.
WARNING! For safety, the power outlet used for powering the instrumentmust be accessible at all times. See “Instrument clearances“ on page 200 forinformation about the space needed between the wall and the instrument. Incase of emergency, you must be able to immediately disconnect the main powersupply to all the equipment. Allow adequate space between the wall and theequipment so that the power cords can be disconnected in case of emergency.
• Electric receptacle required: 2-prong with ground pin• Maximum power dissipation: 380 W (approximately, not including computer and
monitor)• Mains AC line voltage tolerances must be up to ±10 percent of nominal voltage
Rated voltage Circuit required Rated frequency Rated power
100–240 ±10% VAC[1] 10 A 50–60 Hz 400 W
[1] If the supplied power fluctuates beyond the rated voltage, a power line regulator may be required. High or low voltages can adversely affect the electronic components of the instrument.
Electrical protective devices
We recommend several protective devices to protect the system in environments withlarge voltage and power fluctuations.
Device Description
Power lineregulator
We recommend the use of a 1.5-kVA power line regulator in areas where the supplied powerfluctuates in excess of ± 10% of the normal voltage. Power fluctuations can adversely affect thefunction of the instrument and computer.
Note: A power line regulator monitors the input current and adjusts the power supplied to theinstrument or computer. It does not protect against a power surge or failure.
Appendix F Instrument specifications and layoutElectrical requirementsF
202 SeqStudio™ Genetic Analyzer Instrument and Software User Guide

Device Description
Uninterruptiblepower supply(UPS)
We recommend the use of a 1.5-kVA uninterruptible power supply (UPS), especially in areasprone to power failure. Power failures and other events that abruptly terminate the function ofthe instrument and computer can corrupt data and possibly damage the system.
WARNING! PHYSICAL INJURY HAZARD. Do not attempt to lift the UPS unit withoutassistance of at least two people. Improper lifting can cause painful and permanent backinjury. Refer to the UPS manufacturer user guide for more information.
IMPORTANT! UPSs provide power for a limited time. They are meant to delay the effects of apower outage, not to serve as replacement power sources. In the event of a power loss, poweroff the instrument and computer unless you expect to regain power within the battery life of theUPS.
Surge protector We recommend the use of a 10-kVA surge protector (line conditioner) in areas with frequentelectrical storms or near devices that are electrically noisy, such as refrigerators, airconditioners, or centrifuges. Short-duration, high-voltage power fluctuations can abruptlyterminate the function of, and thereby damage the components of, the computer and theinstrument.
Note: A dedicated line and ground between the instrument, computer, and the building’s mainelectrical service can also prevent problems caused by power fluctuations.
Network requirements
The instrument is factory-configured for IPv4 TCP/IP communication and includes afast Ethernet adapter (10/100 Mbps) with a RJ45-type connector for integrating thedevice into a local area network (LAN). If the instrument will be connected to a LAN,an active, tested network jack must be in place before the scheduled installation date.Also, a representative from your information technologies department must completeand return the SeqStudio™ Genetic Analyzer IT Checklist (Pub. No. MAN0016055) beforeinstallation, and be available during the installation to help connect the instrument toyour network.
Safety requirements
A safety representative from your facility must ensure that:• Personnel establish and follow all applicable safety practices and policies to
protect laboratory personnel from potential hazards.• All applicable safety devices and equipment are available at all times.
Safety practices
Appendix F Instrument specifications and layoutNetwork requirements F
SeqStudio™ Genetic Analyzer Instrument and Software User Guide 203

Your laboratory has specific safety practices and policies designed to protectlaboratory personnel from potential hazards that are present. Follow all applicablesafety-related procedures at all times.
The following safety equipment and protection from hazards must be available at theinstallation site:
• Protection from any sources of hazardous chemicals, radiation (for example,lasers, radioisotopes, radioactive wastes, and contaminated equipment), andpotentially infectious biological material that may be present in the area wherethe service representative will work.
• Appropriate fire extinguisher:– You are responsible for providing an appropriate fire extinguisher for use on
or near the equipment.– The types and sizes of fire extinguishers shall be suitable for use on electrical
and chemical fires as specified in current codes, regulations, and/orstandards, and with approval of the Fire Marshall or other authority havingjurisdiction.
– The installation of appropriate fire extinguishers shall be in addition to otherfire-protection systems and not as a substitute or alternative to them.
• Eyewash• Safety shower• Eye and hand protection• Adequate ventilation, including vent line/fume hood, if applicable• Biohazard waste container, if applicable• First-aid equipment• Spill cleanup equipment• Applicable Safety Data Sheets (SDSs)
Required safetyequipment
Appendix F Instrument specifications and layoutSafety requirementsF
204 SeqStudio™ Genetic Analyzer Instrument and Software User Guide

Safety
WARNING! GENERAL SAFETY. Using this product in a manner not specifiedin the user documentation may result in personal injury or damage to theinstrument or device. Ensure that anyone using this product has receivedinstructions in general safety practices for laboratories and the safetyinformation provided in this document.
· Before using an instrument or device, read and understand the safetyinformation provided in the user documentation provided by themanufacturer of the instrument or device.
· Before handling chemicals, read and understand all applicable Safety DataSheets (SDSs) and use appropriate personal protective equipment (gloves,gowns, eye protection, etc). To obtain SDSs, see the “Documentation andSupport” section in this document.
Symbols on this instrument
Symbols may be found on the instrument to warn against potential hazards or conveyimportant safety information. In this document, the hazard symbol is used along withone of the following user attention words:
• CAUTION! – Indicates a potentially hazardous situation that, if not avoided,may result in minor or moderate injury. It may also be used to alert againstunsafe practices.
• WARNING! – Indicates a potentially hazardous situation that, if not avoided,could result in death or serious injury.
• DANGER! – Indicates an imminently hazardous situation that, if not avoided,will result in death or serious injury.
Symbol English Français
Caution, risk of danger
Consult the manual for further safetyinformation.
Attention, risque de danger
Consulter le manuel pour d’autresrenseignements de sécurité.
Caution, risk of electrical shock Attention, risque de choc électrique
Caution, piercing hazard Attention, danger de perforation
Caution, hot surface Attention, surface chaude
G
SeqStudio™ Genetic Analyzer Instrument and Software User Guide 205

Symbol English Français
Potential biohazard Danger biologique potentiel
On On (marche)
Off Off (arrêt)
On/Off On/Off (marche/arrêt)
Protective conductor terminal (mainground)
Borne de conducteur de protection(mise à la terre principale)
Terminal that can receive or supplyalternating current or voltage
Borne pouvant recevoir ou envoyerune tension ou un courant de typealternatif
Do not dispose of this product inunsorted municipal waste
CAUTION! To minimizenegative environmentalimpact from disposal ofelectronic waste, do notdispose of electronic waste inunsorted municipal waste.Follow local municipal wasteordinances for properdisposal provision andcontact customer service forinformation about responsibledisposal options.
Ne pas éliminer ce produit avec lesdéchets usuels non soumis au trisélectif.
MISE EN GARDE! Pourminimiser les conséquencesnégatives surl’environnement à la suite del’élimination de déchetsélectroniques, ne paséliminer ce déchetélectronique avec les déchetsusuels non soumis au trisélectif. Se conformer auxordonnances locales sur lesdéchets municipaux pour lesdispositions d’élimination etcommuniquer avec le serviceà la clientèle pour desrenseignements sur lesoptions d’éliminationresponsable.
Conformity mark Description
Indicates conformity with safetyrequirements for Canada and U.S.A.
Conformitysymbols
Appendix G SafetySymbols on this instrumentG
206 SeqStudio™ Genetic Analyzer Instrument and Software User Guide

Conformity mark Description
Indicates conformity with EuropeanUnion requirements.
Indicates conformity with Australianstandards for electromagneticcompatibility.
Safety alerts on this instrument
Additional text may be used with one of the symbols described above when morespecific information is needed to avoid exposure to a hazard. See the following tablefor safety alerts found on the instrument.
English Français
CAUTION! Hazardous chemicals.Read the Safety Data Sheets (SDSs)before handling.
MISE EN GARDE! Produitschimiques dangereux. Lire lesfiches signalétiques (FS) avant demanipuler les produits.
CAUTION! Hazardous waste. Referto SDS(s) and local regulations forhandling and disposal.
MISE EN GARDE! Déchetsdangereux. Lire les fichessignalétiques (FS) et laréglementation locale associées à lamanipulation et à l’élimination desdéchets.
DANGER! Class 3B (III) visibleand/or invisible laser radiationpresent when open and interlocksdefeated. Avoid exposure to beam.
DANGER! Rayonnement laser ouDEL visible ou invisible de classe 3B(III) présent en position ouverte etavec les dispositifs de sécurité nonenclenchés. Éviter toute expositionau faisceau.
Appendix G SafetySafety alerts on this instrument G
SeqStudio™ Genetic Analyzer Instrument and Software User Guide 207

Safety information for instruments not manufactured by ThermoFisher Scientific
Some of the accessories provided as part of the instrument system are not designed orbuilt by Thermo Fisher Scientific. Consult the manufacturer's documentation for theinformation needed for the safe use of these products.
Instrument safety
CAUTION! Do not remove instrument protective covers. If you remove theprotective instrument panels or disable interlock devices, you may be exposedto serious hazards including, but not limited to, severe electrical shock, laserexposure, crushing, or chemical exposure.
CAUTION! Moving Parts. Moving parts can crush, pinch and cut. Keep handsclear of moving parts while operating the instrument. Disconnect power beforeservicing.
WARNING! Ensure appropriate electrical supply. For safe operation of theinstrument:
· Plug the system into a properly grounded receptacle with adequate currentcapacity.
· Ensure the electrical supply is of suitable voltage.· Never operate the instrument with the ground disconnected. Grounding
continuity is required for safe operation of the instrument.
WARNING! Power Supply Line Cords. Use properly configured and approvedline cords for the power supply in your facility.
WARNING! Disconnecting Power. To fully disconnect power either detach orunplug the power cord, positioning the instrument such that the power cord isaccessible.
General
Physical injury
Electrical
Appendix G SafetySafety information for instruments not manufactured by Thermo Fisher ScientificG
208 SeqStudio™ Genetic Analyzer Instrument and Software User Guide

CAUTION! Cleaning and Decontamination. Use only the cleaning anddecontamination methods specified in the manufacturer's user documentation.It is the responsibility of the operator (or other responsible person) to ensurethe following requirements are met:
· No decontamination or cleaning agents are used that could cause aHAZARD as a result of a reaction with parts of the equipment or withmaterial contained in the equipment.
· The instrument is properly decontaminated a) if hazardous material isspilled onto or into the equipment, and/or b) prior to having the instrumentserviced at your facility or sending the instrument for repair, maintenance,trade-in, disposal, or termination of a loan (decontamination forms may berequested from customer service).
· Before using any cleaning or decontamination methods (except thoserecommended by the manufacturer), users should confirm with themanufacturer that the proposed method will not damage the equipment.
To minimize negative environmental impact from disposal of electronic waste, do notdispose of electronic waste in unsorted municipal waste. Follow local municipal wasteordinances for proper disposal provision and contact customer service for informationabout responsible disposal options.
WARNING! LASER HAZARD. Under normal operating conditions, theSeqStudio™ Genetic Analyzer is categorized as a Class 1 laser product.However, removing the protective covers and defeating the interlock(s) mayresult in exposure to the internal Class 3B laser. Lasers can burn the retina,causing permanent blind spots. To ensure safe laser operation:
· Never look directly into the laser beam.· Do not remove safety labels, instrument protective panels, or defeat safety
interlocks.· The system must be installed and maintained by a Thermo Fisher Scientific
Technical Representative.
· Remove jewelry and other items that can reflect a laser beam into your eyesor those of others
· Wear proper eye protection and post a laser warning sign at the entrance tothe laboratory if the laser protection is defeated for servicing
· DO NOT operate the laser when it cannot be cooled by its cooling fan; anoverheated laser can cause severe burns on contact.
Safety and electromagnetic compatibility (EMC) standards
The instrument design and manufacture complies with the standards andrequirements for safety and electromagnetic compatibility as noted in the followingtable:
Cleaning anddecontamination
Instrumentcomponent andaccessorydisposal
Laser
Appendix G SafetySafety and electromagnetic compatibility (EMC) standards G
SeqStudio™ Genetic Analyzer Instrument and Software User Guide 209
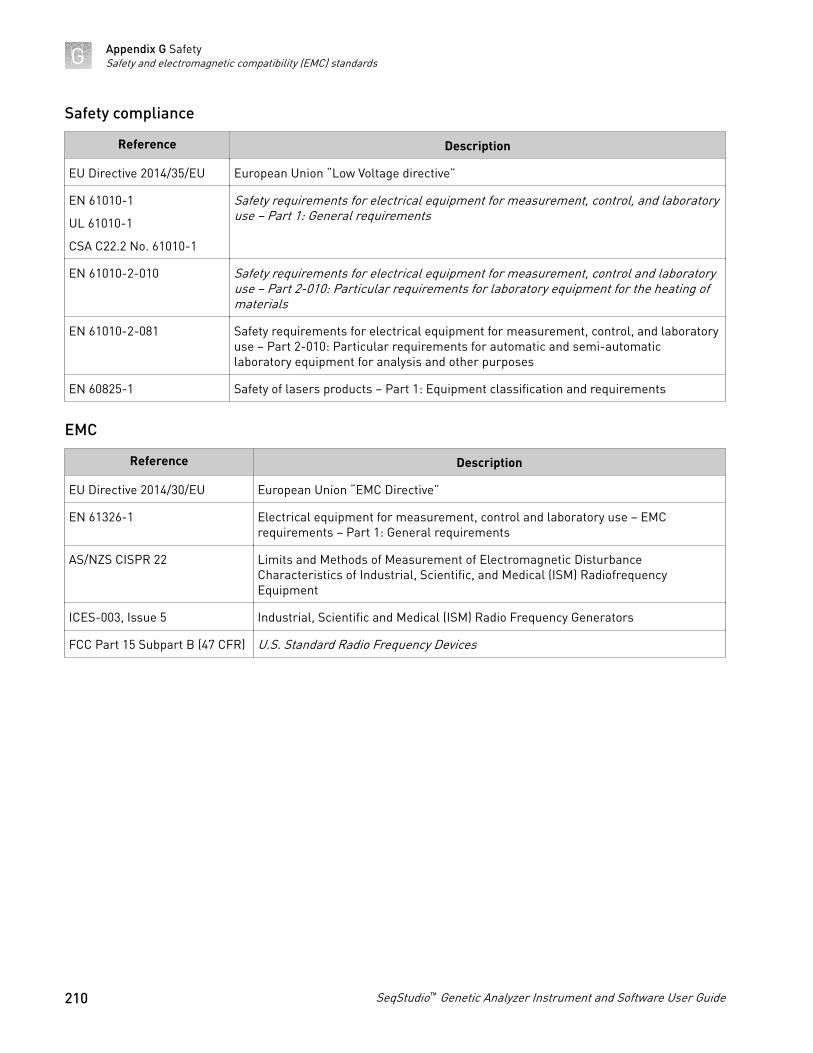
Reference Description
EU Directive 2014/35/EU European Union “Low Voltage directive”
EN 61010-1
UL 61010-1
CSA C22.2 No. 61010-1
Safety requirements for electrical equipment for measurement, control, and laboratoryuse – Part 1: General requirements
EN 61010-2-010 Safety requirements for electrical equipment for measurement, control and laboratoryuse – Part 2-010: Particular requirements for laboratory equipment for the heating ofmaterials
EN 61010-2-081 Safety requirements for electrical equipment for measurement, control, and laboratoryuse – Part 2-010: Particular requirements for automatic and semi-automaticlaboratory equipment for analysis and other purposes
EN 60825-1 Safety of lasers products – Part 1: Equipment classification and requirements
Reference Description
EU Directive 2014/30/EU European Union “EMC Directive”
EN 61326-1 Electrical equipment for measurement, control and laboratory use – EMCrequirements – Part 1: General requirements
AS/NZS CISPR 22 Limits and Methods of Measurement of Electromagnetic DisturbanceCharacteristics of Industrial, Scientific, and Medical (ISM) RadiofrequencyEquipment
ICES-003, Issue 5 Industrial, Scientific and Medical (ISM) Radio Frequency Generators
FCC Part 15 Subpart B (47 CFR) U.S. Standard Radio Frequency Devices
Safety compliance
EMC
Appendix G SafetySafety and electromagnetic compatibility (EMC) standardsG
210 SeqStudio™ Genetic Analyzer Instrument and Software User Guide

Reference Description
RFID FCC Notice (for U.S. Customers):
This device complies with Part 15 of the FCC Rules:
Operation is subject to the following conditions:
1. This device many not cause harmful interference, and
2. This device must accept any interference received, Including interference thatmay cause undesired operation
Changes and Modifications not expressly approved by Thermo Fisher Scientific canvoid your authority to operate this equipment under Federal CommunicationsCommissions rules.
Canada (English):
This device complies with Industry Canada licence-exempt RSS standard(s).Operation is subject to the following two conditions:
(1) this device may not cause interference, and (2) this device must accept anyinterference, including interference that may cause undesired operation of thedevice.
Canada (Français):
Le présent appareil est conforme aux CNR d'Industrie Canada applicables auxappareils radio exempts de licence. L'exploitation est autorisée aux deuxconditions suivantes :
(1) l'appareil ne doit pas produire de brouillage, et (2) l'utilisateur de l'appareil doitaccepter tout brouillage adioélectrique subi, même si le brouillage est susceptibled'en compromettre le fonctionnement.
Reference Description
Directive 2012/19/EU European Union “WEEE Directive”—Waste electrical and electronic equipment
Directive 2011/65/EU European Union “RoHS Directive”—Restriction of hazardous substances in electricaland electronic equipment
SJ/T 11364-2014 “China RoHS” Standard—Marking for the Restricted Use of Hazardous Substances inElectronic and Electrical Products
Reference Description
Directive 2014/53/EU (as ofJune 12, 2017)
European Union “RE Directive”—Radio equipment
Environmental design
Radio compliance
Appendix G SafetySafety and electromagnetic compatibility (EMC) standards G
SeqStudio™ Genetic Analyzer Instrument and Software User Guide 211

Chemical safety
WARNING! GENERAL CHEMICAL HANDLING. To minimize hazards,ensure laboratory personnel read and practice the general safety guidelines forchemical usage, storage, and waste provided below. Consult the relevant SDSfor specific precautions and instructions:
· Read and understand the Safety Data Sheets (SDSs) provided by thechemical manufacturer before you store, handle, or work with any chemicalsor hazardous materials. To obtain SDSs, see the “Documentation andSupport” section in this document.
· Minimize contact with chemicals. Wear appropriate personal protectiveequipment when handling chemicals (for example, safety glasses, gloves, orprotective clothing).
· Minimize the inhalation of chemicals. Do not leave chemical containers open.Use only with adequate ventilation (for example, fume hood).
· Check regularly for chemical leaks or spills. If a leak or spill occurs, followthe manufacturer's cleanup procedures as recommended in the SDS.
· Handle chemical wastes in a fume hood.· Ensure use of primary and secondary waste containers. (A primary waste
container holds the immediate waste. A secondary container contains spillsor leaks from the primary container. Both containers must be compatiblewith the waste material and meet federal, state, and local requirements forcontainer storage.)
· After emptying a waste container, seal it with the cap provided.· Characterize (by analysis if necessary) the waste generated by the particular
applications, reagents, and substrates used in your laboratory.· Ensure that the waste is stored, transferred, transported, and disposed of
according to all local, state/provincial, and/or national regulations.· IMPORTANT! Radioactive or biohazardous materials may require special
handling, and disposal limitations may apply.
Appendix G SafetyChemical safetyG
212 SeqStudio™ Genetic Analyzer Instrument and Software User Guide

Biological hazard safety
WARNING! BIOHAZARD. Biological samples such as tissues, body fluids,infectious agents, and blood of humans and other animals have the potential totransmit infectious diseases. Conduct all work in properly equipped facilitieswith the appropriate safety equipment (for example, physical containmentdevices). Safety equipment can also include items for personal protection, suchas gloves, coats, gowns, shoe covers, boots, respirators, face shields, safetyglasses, or goggles. Individuals should be trained according to applicableregulatory and company/ institution requirements before working withpotentially biohazardous materials. Follow all applicable local, state/provincial,and/or national regulations. The following references provide generalguidelines when handling biological samples in laboratory environment.
· U.S. Department of Health and Human Services, Biosafety in Microbiologicaland Biomedical Laboratories (BMBL), 5th Edition, HHS Publication No. (CDC)21-1112, Revised December 2009; found at:www.cdc.gov/biosafety/publications/bmbl5/BMBL.pdf
· World Health Organization, Laboratory Biosafety Manual, 3rd Edition,WHO/CDS/CSR/LYO/2004.11; found at:www.who.int/csr/resources/publications/biosafety/Biosafety7.pdf
Appendix G SafetyBiological hazard safety G
SeqStudio™ Genetic Analyzer Instrument and Software User Guide 213

Documentation and support
Related documentation
Document Pub. No.
SeqStudio™ Genetic Analyzer Sample Preparation and Instrument QuickReference
MAN0016144
SeqStudio™ Genetic Analyzer Software Quick Reference MAN0017087
DNA Fragment Analysis by Capillary Electrophoresis User Guide 4474504
DNA Sequencing by Capillary Electrophoresis Chemistry Guide 4305080
Troubleshooting Sanger sequencing data MAN0014435
SeqStudio™ Genetic Analyzer Site Preparation Guide MAN0016143
Customer and technical support
Visit thermofisher.com/support for the latest in services and support, including:• Worldwide contact telephone numbers• Product support, including:
– Product FAQs– Software, patches, and updates– Training for many applications and instruments
• Order and web support• Product documentation, including:
– User guides, manuals, and protocols– Certificates of Analysis– Safety Data Sheets (SDSs; also known as MSDSs)
Note: For SDSs for reagents and chemicals from other manufacturers,contact the manufacturer.
214 SeqStudio™ Genetic Analyzer Instrument and Software User Guide

Limited product warranty
Life Technologies Corporation and/or its affiliate(s) warrant their products as set forthin the Life Technologies' General Terms and Conditions of Sale found on LifeTechnologies' website at www.thermofisher.com/us/en/home/global/terms-and-conditions.html. If you have any questions, please contact LifeTechnologies at www.thermofisher.com/support.
Documentation and supportLimited product warranty
SeqStudio™ Genetic Analyzer Instrument and Software User Guide 215

Index
3200 data, SeqStudio Genetic Analyzer 28, 106
AAB1 file
export automatically 66export manually 105, 141
amber light blinking 14analysis software 28analyze data, SeqStudio Genetic Analyzer (3200) 28,
106auto calibration 178auto export
sample data files (AB1 and FSA) 66set Cloud location 120set network location 121
autospectral 178
Bbase calling settings 115, 133biohazard safety 213
Ccalibration. See dye calibrationcancel injection 90cartridge
history 146instruments on which a cartridge has been instal-
led 146load 40maximum days allowed on instrument 39remove 147reuse 17, 145storage 17, 145storage, on-instrument long-term 151
cartridge storage mode 145cathode buffer
assemble 152check fill line 40load 40maximum days allowed on instrument 39
CBC. See cathode buffer
Cloud. See Thermo Fisher Cloudcondition number 181connect instrument to Cloud. See linkconsumables status
check 39updates 19
CSV fileimport 66save plate setup 108
custom dye 177, 182See also dye calibration, custom
custom field 61, 73
Ddate and time 135delete, plate 125, 141Demo mode 135documentation, related 154, 214dye calibration
auto calibration 178custom dye 177custom dye, add 182, 183custom, add to Plate Manager or another instru-
ment 185custom, import or export 187custom, perform 184factory 178history 186manual 178manual calibration, determine if required 178overview 177perform 180system dye 177
EEPT plot, remote monitor 85export, plate 125, 141
Ffile name convention 60, 72, 134fill level 143firmware version 135
216 SeqStudio™ Genetic Analyzer Instrument and Software User Guide

fragment analysis, run module, size ranges and runtimes 111, 128, 197
front panel 14FSA file
export automatically 66export manually 105, 141
Iimport plate setup, CSV or PSM file 66, 126injection
cancel 90options 75, 89, 104order, change 75, 89, 104order, default 37re-inject 75, 89, 104
injection group, definition 37install check. See install runinstall run
history 195log file, export 155overview 188perform 189results 190sequence and fragment in same run 188
instrumentdisconnect from Cloud 48lock 79, 124log file 155remove user 48view results 98
instrument conditions during run 102instrument name 135instrument profile
delete 139PIN, change 51, 140
Instrument-cartridge history, view or export 146IP address 117, 135
Llimited product warranty 215load
cartridge 147CBC, sample plate, and cartridge order 40plate 76tubes 76
lock instrument 79, 124log file
export 155install run 155
Mmanual dye calibration 178mobile device
monitor a run 87view results 87
My plates. See hidden
Nnetwork
auto export location 121connect instrument to 136connect to 119open plate setup default location 120
Ppause plate 90PCR amplicons from diploid genes, sequencing set-
tings 115, 133PDF, plate setup 108plasmid templates, sequencing settings 115, 133plate
load 40loading guidelines 37pause 90
Plate Manageradd custom dye calibration 107operating system requirements 23
plate setupcreate on instrument 66CSV file, import 66delete 109guest 56, 64hidden (my plates) 60, 73hidden (my plates), definition 64hidden (my plates), set in Plate Manager 56import from CSV or PSM file 126import on instrument 66open 66PSM file, import 66security 60, 73security, definition 64security, set in Plate Manager 56set default open location on Cloud 119set default open location on network 120shared (public) 60, 73shared (public), definition 64shared (public), set in Plate Manager 56template 107, 108
plate type supported 35polymer delivery system (PDS), refresh 147private plate setup. See hidden
Index
SeqStudio™ Genetic Analyzer Instrument and Software User Guide 217

profile. See instrument profilePSM file
See also plate setupcreate or open in Plate Manager 55import 66
See also plate setuppublic plate setup 60, 73
See also shared
QQ and Condition 182QC report, export 105quality flag 92, 99quality value, spectral calibration 181QV30 CRL 193
Rraw data 156raw trace, remote monitor 84re-inject, remote monitor 84re-injection 75, 89, 104related documentation 154, 214remote monitor
analyzed trace 86EPT plot 85pause or cancel run 83raw trace 84re-inject 84view results 83, 97
remove plate associated with inactive user 142replicate injection 59, 71results
export automatically 66export manually 105, 141view, instrument 98view, mobile device 87view, remote monitor 83, 97
results report, export 105RFID read and write 19run, pause or cancel 90run history, delete 142run module
read length and run time 111, 128, 197settings 111, 127size range and run time 111, 128, 197
Ssafety, biohazard 213safety practices 203safety, required equipment 204sample
plates and tubes supported 35purification 35stability on instrument 37volume requirements 35
sample plate. See platesecondary analysis software 28sequencing
results 94, 101run module, read lengths and run times 111,
128, 197sequencing settings
description 115, 133PCR amplicons from diploid genes 115, 133plasmid templates 115, 133
serial number 135sign in 33sign out 34size calling settings 113, 130Size Quality 92, 99size standard quality 157sleep mode 145smart phone. See mobile devicespectral calibration
condition number 181quality value 181
SQ 92, 99support, customer and technical 214symbols, safety 205system dye 177
Ttemplate, plate setup 107, 108terms and conditions 215Thermo Fisher Cloud
auto export default location 120browser requirements 24disconnect instrument 48open plate setup default location 119operating system requirements 23
ThermoFisher Cloud, analysis software 28troubleshooting, log file, export 155tube type supported 35
Uupdate software 137
Wwarranty 215wired or wireless instrument connection 136
Index
218 SeqStudio™ Genetic Analyzer Instrument and Software User Guide


thermofisher.com/support | thermofisher.com/askaquestion
thermofisher.com
19 October 2017


![Member [191] Beam: B 202 W18x86 (A992) Seq: A Length: 37 … · Connection : Shear conn Connection : End plate Plate, Size as required Wide gage, Welded extended tee: No Shr pl on](https://static.fdocuments.in/doc/165x107/5b4355fd7f8b9abe2a8b48f3/member-191-beam-b-202-w18x86-a992-seq-a-length-37-connection-shear.jpg)


