Redmond Bike Park Design Guidelines
32
A place for community Designed by the community Built by the community Design Guidelines August 9, 2013 Version 2.0
-
Upload
carolyn-hope -
Category
Documents
-
view
232 -
download
2
description
These design guidelines compliment and provide more detail to the engineering plans for the Redmond Bike Park in Redmond, WA. For more information please go to www.redmond.gov/bikepark
Transcript of Redmond Bike Park Design Guidelines
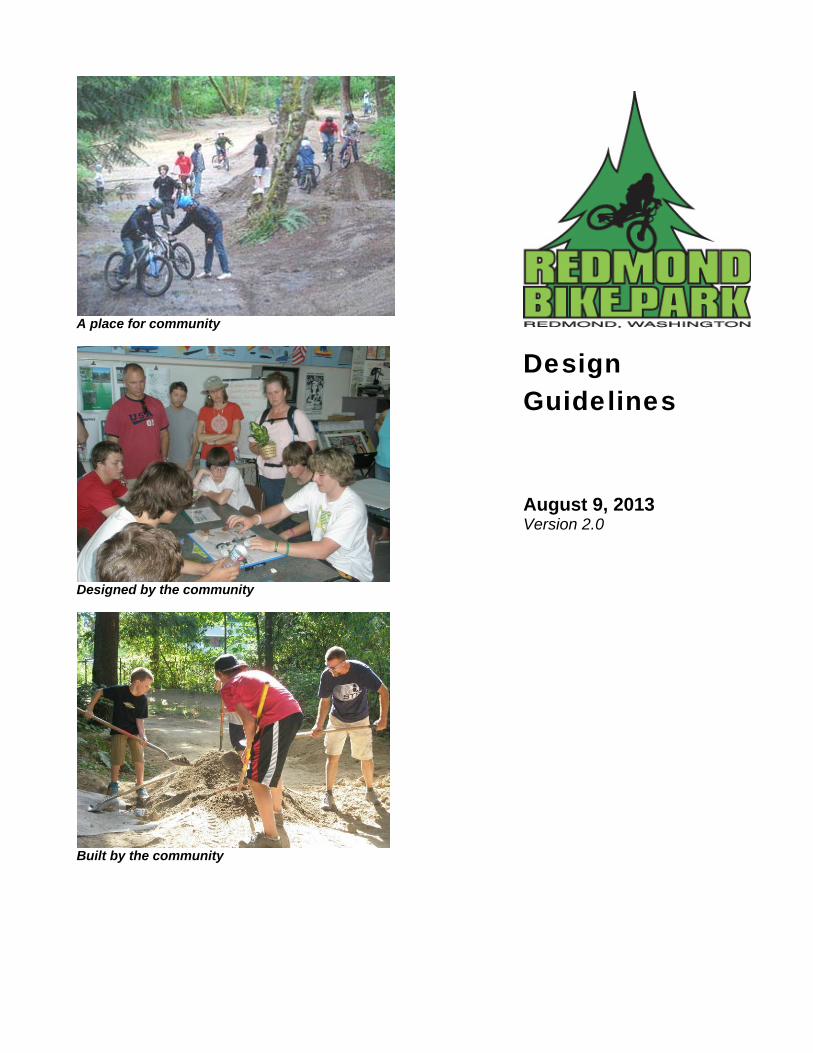
A place for community
Designed by the community
Built by the community
Design Guidelines August 9, 2013 Version 2.0

Acknowledgements This project was made possible by the following people and organizations. Thank you for all of your expertise and your commitment to this project.
Design Team
Partners
Redmond Bike Park Steering Committee
Nikolas Clarke, Co-chair Stuart Gold Doug Schmidt, Co-chair Adam Mukerjee Gork Barrette Josh Randall Daniel Cashon-Smith Peter Scott Andrew Clarke Landon Pratt Jason Gibb Tyler Wehr
City Staff
Carolyn Hope Teresa Kluver Greg Byszeski Thara Johnson Dave Almond Lisa Rigg
Contents
1.0 Overview ........................................................................................................................................... 1
1.1 Introduction ................................................................................................................................... 1
1.2 Background ................................................................................................................................... 2
1.3 Construction and Maintenance Schedule ..................................................................................... 2
1.4 Purpose and Scope of Design Guidelines .................................................................................... 3
1.5 Risk Management ......................................................................................................................... 4
1.6 Environmental Responsibility ........................................................................................................ 5
1.7 Rider Responsibility ...................................................................................................................... 6
1.8 Park Maintenance ......................................................................................................................... 6
2.0 Park Design Concepts ...................................................................................................................... 8
2.1. Jump Park .................................................................................................................................... 8
2.2 Pump Track ............................................................................................................................... 10
2.3 Multi-Use Soft Surface Trails .................................................................................................... 10
3.0 Technical Trail Feature Design Guidelines ................................................................................ 11
3.1 Materials ................................................................................................................................. 11
3.2 Dirt Jumps and Start Mounds ................................................................................................. 12
3.3 Log Rides and Skinnies .......................................................................................................... 22
3.4 Drops....................................................................................................................................... 23
4.0 Other Park Details ...................................................................................................................... 24
4.1 Fencing ................................................................................................................................... 24
4.2 Chicane Fence ....................................................................................................................... 25
4.3 Signs ...................................................................................................................................... 26
Definitions ............................................................................................................................................. 28
References ........................................................................................................................................... 29
Design Guidelines
1 | P a g e
1.0 Overview
1.1 Introduction
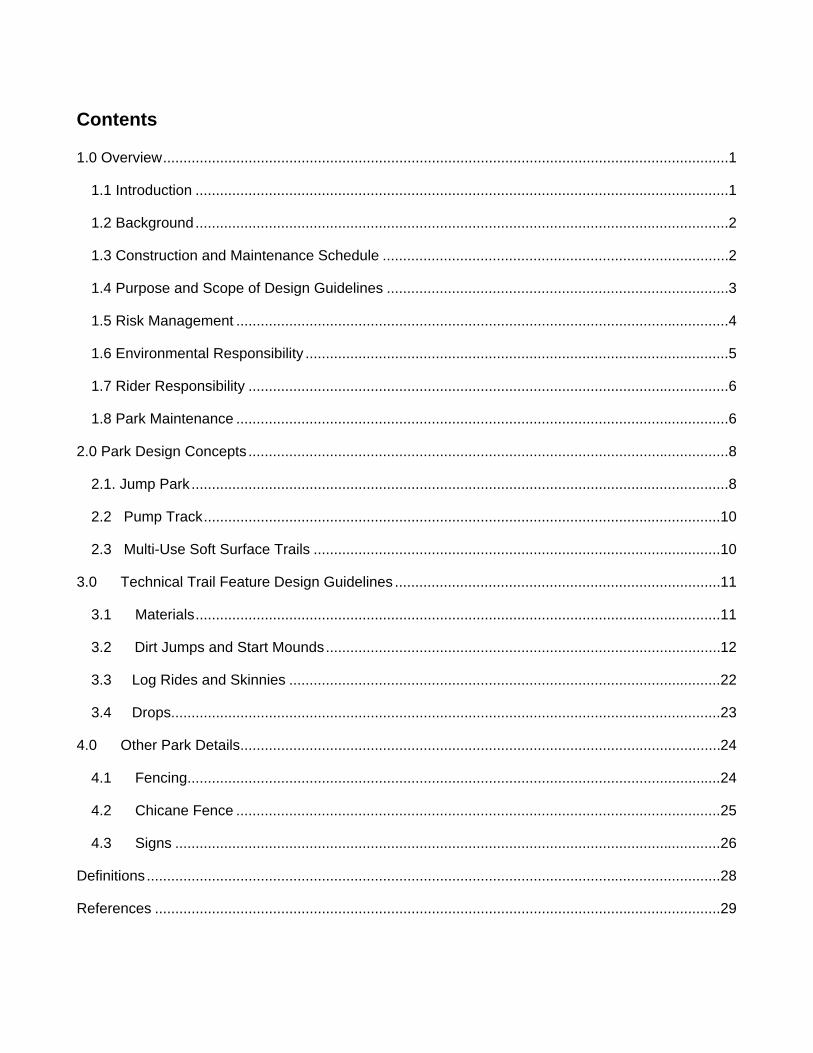
Redmond Bike Park at Hartman Park is a City of Redmond park located on Education Hill, which has three schools within two blocks of the park. The Redmond Bike Park is located on a nicely wooded 7.1 acre forest with a slightly sloped terrain toward the southwest where a wetland exists. The Redmond Bike Park utilizes a 2.5 acre area on the western side of the property outside of the wetland buffer. The Redmond Bike Park is connected to Hartman Park by a sidewalk at the southwest corner parking lot and via a soft surface trail that runs south to the Ashford Trail, which runs east-west across the Redmond Bike Park’s northern boundary. The Ashford Trail connects to Perrigo Park, an open space area to the east.
Exhibit 1: Redmond Bike Park Location
Design Guidelines
2 | P a g e
The Redmond Bike Park will provide a unique riding experience for BMX and mountain bicyclists. This park will be designed for dirt jump riders of all skill levels. The park is located in the city’s most residential neighborhood, with the highest percentage of children. In fact, this site was constructed nearly 20 years ago by youth in the community. Children of all ages, adults, and complete families come to this park to ride bikes.
1.2 Background
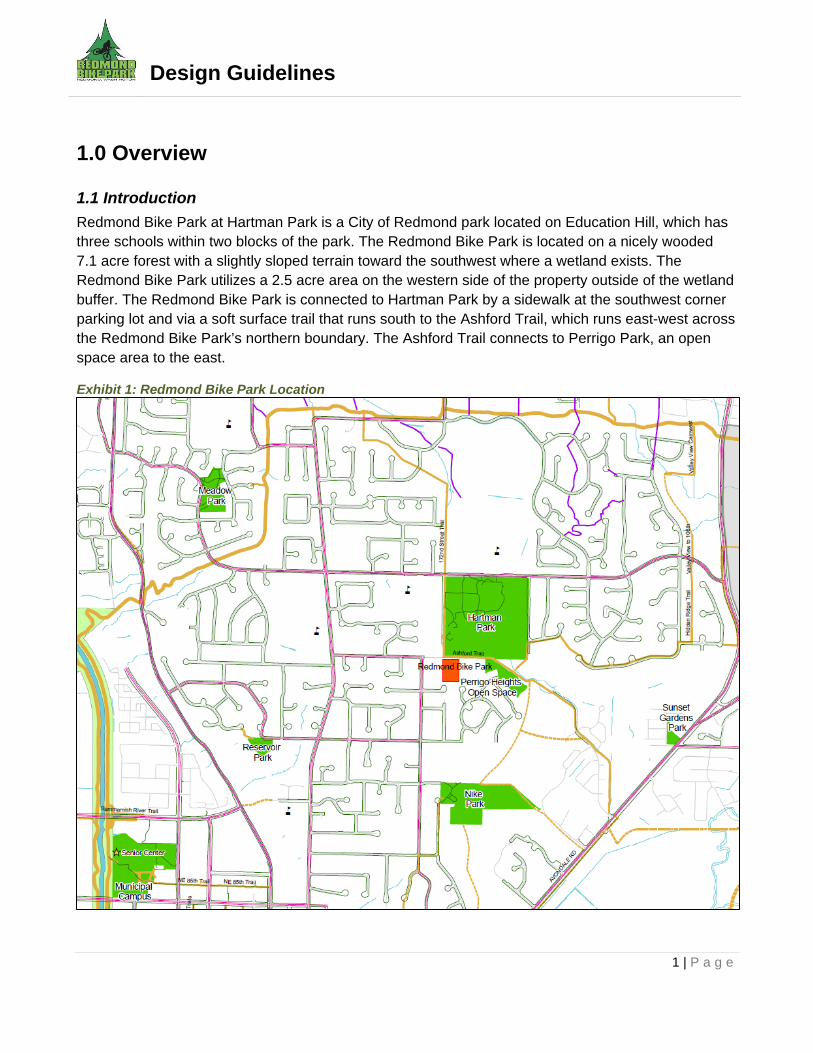
The purpose of the Redmond Bike Park development project is to legitimize the 20-year use of the property as a city park for bicycle dirt jumps. Since the 1990s, neighborhood youth have been building dirt jumps on the site, which is owned by the City. Over the years, the City conducted some maintenance and demolition at the site. Previous Mayor Ives decided to officially allow the site and instructed parks department staff to post signs, provide garbage cans, and conduct periodic maintenance. In 2009, Mayor Marchione instructed staff to investigate concerns raised by neighbors and take steps to resolve them and formalize the park use. Between 2009 and 2011, the City worked with community members through a series of 10 meetings to discuss concerns and work through design issues for the proposed redevelopment of the park, finalized the design, and applied for permits. The permits were appealed and a two year long appeal process followed. However, a settlement agreement was stuck in 2013 and the project was redesigned to meet the terms of the settlement agreement. The goals of the Redmond Bike Park design include:
1. Build a City approved bike park design that reflects the community’s desires that can be constructed and maintained by City staff and volunteers,
2. Provide for skills progression by building features for beginner, intermediate and advanced riders with clear signage and appropriate safety features, and
3. Improve the aesthetics and environmental conditions of the site after years of unsanctioned activity at the site.
1.3 Construction and Maintenance Schedule
Construction of this project is slated to begin in the fall of 2013. This schedule may vary based on the amount of volunteer support received for construction. Three major work parties are scheduled on three weekends, a month apart, where the City’s consultant, Hilride Progression Development Group, will provide training and spearhead the construction process with City staff. Volunteers who undergo
Exhibit 2 – Existing Conditions
Existing conditions, prior to redevelopment
Design Guidelines
3 | P a g e
trail builder training and background check will be allowed to lead their own work parties and help maintain the park throughout the year, with permission of the Redmond Bike Park manager.
1.4 Purpose and Scope of Design Guidelines
The purpose of this document is to establish the design guidelines for the features within Redmond Bike Park. The design guidelines supplement the engineering plans and will help to ensure that the bicycle features are built in a responsible and sustainable manner while maximizing the riding experience for mountain bikers.
The design guidelines provide a method for constructing the features described in the site plan layout, as shown in the following exhibit. Bike features such as jumps, bridges, log rides, and drops are called technical trail features (TTF). Conditions on the ground will determine the exact final trail routing and TTF locations. For that reason, approximate trail locations and routing will be shown on the map and may move slightly after construction begins. Trails will be routed and built according to the guidelines and specifications described in this document.
TTFs are not designed to specific engineering standards, as they have to be adjusted in the field based on environmental conditions, soil conditions, and flow between features. TTFs made of natural features such as soil and wood change constantly, requiring maintenance, and over time requiring reconstruction or changes. This document will serve the park during initial park development and in the future when community members or the City deem changes are necessary.
This document will provide design guidelines for all of the TTFs envisioned for the bike park. TTFs will be described by type and by skill level. These guidelines also provide some specifications on the types of materials needed, construction methods, and environmental responsibility.
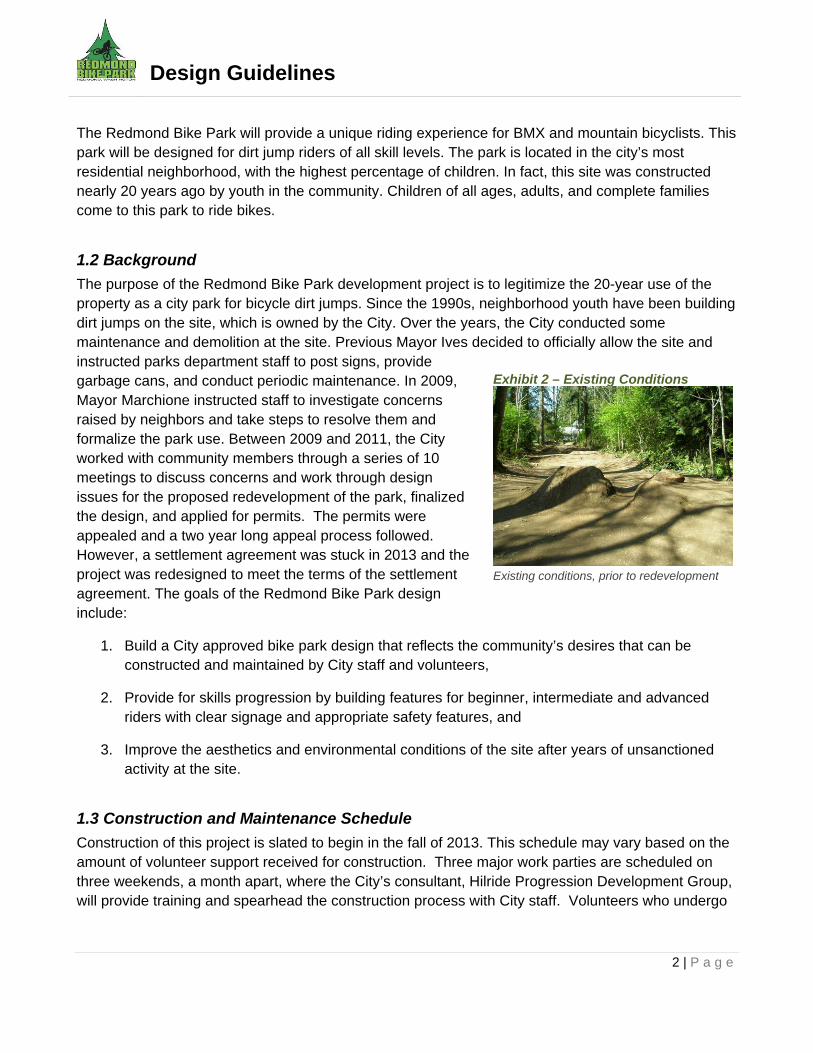
Exhibit 3 - Technical Trail Features
BMX jumping a gap at Greenlake in Seattle
Bridge in Whistler
Design Guidelines
4 | P a g e
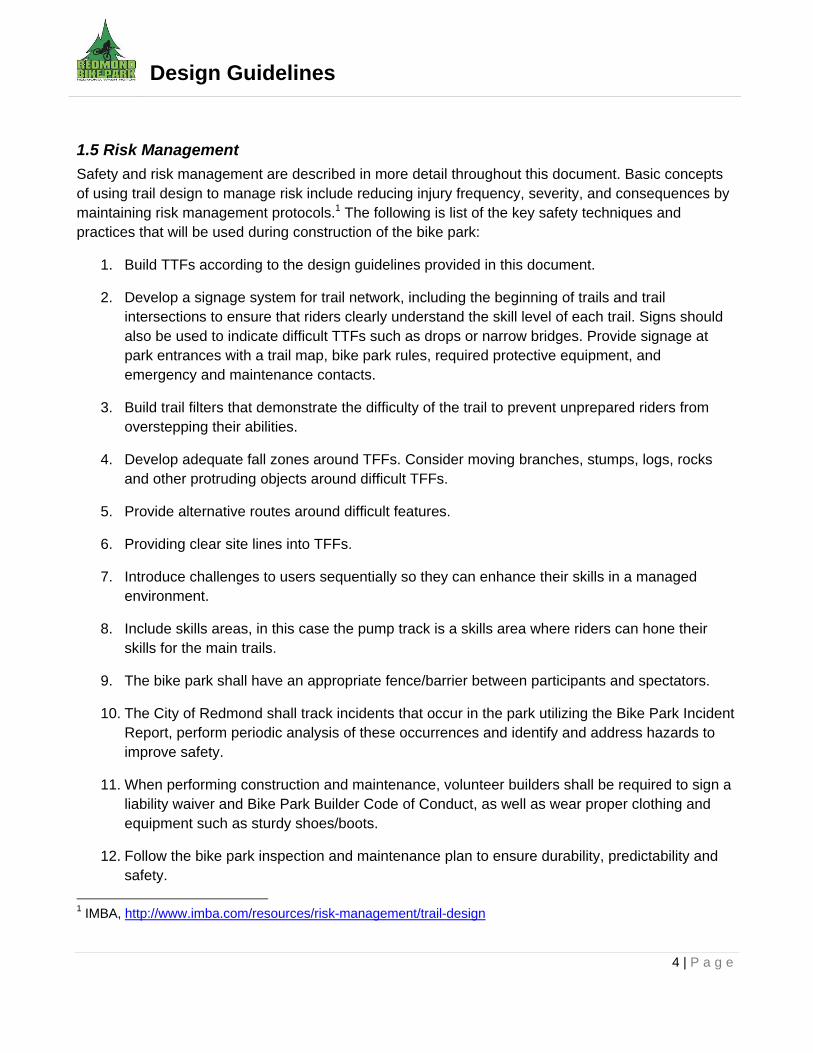
1.5 Risk Management
Safety and risk management are described in more detail throughout this document. Basic concepts of using trail design to manage risk include reducing injury frequency, severity, and consequences by maintaining risk management protocols.1 The following is list of the key safety techniques and practices that will be used during construction of the bike park:
1. Build TTFs according to the design guidelines provided in this document.
2. Develop a signage system for trail network, including the beginning of trails and trail intersections to ensure that riders clearly understand the skill level of each trail. Signs should also be used to indicate difficult TTFs such as drops or narrow bridges. Provide signage at park entrances with a trail map, bike park rules, required protective equipment, and emergency and maintenance contacts.
3. Build trail filters that demonstrate the difficulty of the trail to prevent unprepared riders from overstepping their abilities.
4. Develop adequate fall zones around TFFs. Consider moving branches, stumps, logs, rocks and other protruding objects around difficult TFFs.
5. Provide alternative routes around difficult features.
6. Providing clear site lines into TFFs.
7. Introduce challenges to users sequentially so they can enhance their skills in a managed environment.
8. Include skills areas, in this case the pump track is a skills area where riders can hone their skills for the main trails.
9. The bike park shall have an appropriate fence/barrier between participants and spectators.
10. The City of Redmond shall track incidents that occur in the park utilizing the Bike Park Incident Report, perform periodic analysis of these occurrences and identify and address hazards to improve safety.
11. When performing construction and maintenance, volunteer builders shall be required to sign a liability waiver and Bike Park Builder Code of Conduct, as well as wear proper clothing and equipment such as sturdy shoes/boots.
12. Follow the bike park inspection and maintenance plan to ensure durability, predictability and safety.
1 IMBA, http://www.imba.com/resources/risk-management/trail-design

Design Guidelines
5 | P a g e
1.6 Environmental Responsibility
One of the key goals of this project is to improve the environmental quality of the property after years of neglect. The following are some key sustainable trail practices that the public will be asked to follow in the form of park rules or maintenance requirements:
1. Riders are not allowed to build new TTFs or modify TTFs without a express permission from the City contact for the bike park
2. Prohibit harvesting soil from the park, any maintenance or construction activities will have soil provided from off-site sources
3. Prevent damage surrounding vegetation by riding off trail, for example
4. Avoid trail routing that encourages users to take shortcuts where an easier route or interesting feature is visible. If an interesting feature exists, locate the trail to provide the desired access to the trail user. Use landforms or vegetation to block potential shortcut routes. Alter the shortcut route if it is superior to the original route.
5. Discourage shortcuts by using rocks, branches, fallen trees or new plantings. If short cuts are made, close them and provide signs, explaining trail closure rationale.
6. Avoid exposing roots or covering exposed roots with TTFs.
7. Avoid using heavy machinery near the root zone of trees.
8. Report trail damage, flooding and ponding of water, vandalism and other problems to the City as soon as possible
9. Maintain stormwater controls to protect the nearby wetland from sedimentation2
2 Evergreen Mountain Bike Alliance, 2009. Duthie Hill Mountain Bike High Level Design and Trail Standards. IMBA, 2004. Trail Solutions: IMBA’s Guide to Building Sweet Singletrack
Exhibit 4 – Restore Property
Borough pits need to be filled and revegetated

Design Guidelines
6 | P a g e
1.7 Rider Responsibility
The Redmond Bike Park will encourage riders to follow the International Mountain Bicycling Association Rules of the Trail, which include:
Ride on open trails only
Leave no trace
Control your bicycle
Never scare animals
Plan ahead including wearing the appropriate protective equipment and bicycle for these TTFs
Always yield trail to other trail users (in this park, always ride in the correct direction of the one-way trails and on the multi-purpose trail, always yield to pedestrians)
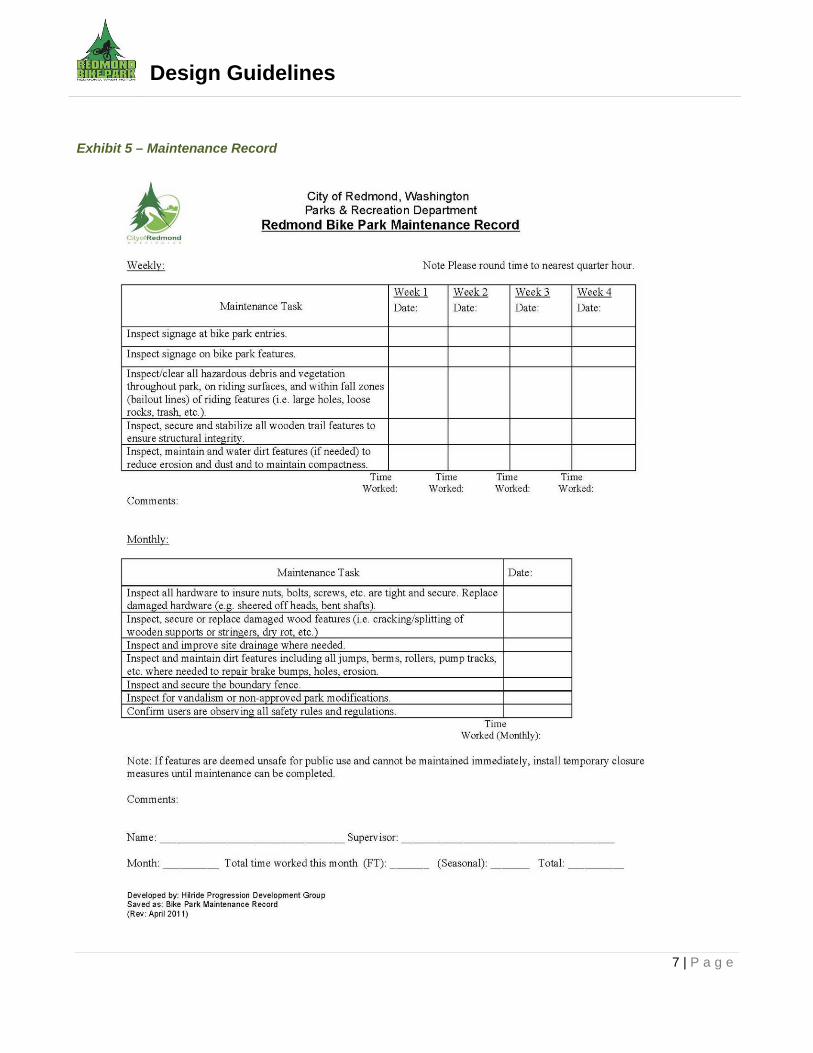
1.8 Park Maintenance
The City will be responsible for maintenance inspections of the park and performing maintenance on the trails and TTFs. The City may call on volunteers for periodic work parties to assist with maintenance. The following exhibit provides a weekly and monthly maintenance check list.
Design Guidelines
7 | P a g e
Exhibit 5 – Maintenance Record
Design Guidelines
8 | P a g e
2.0 Park Design Concepts
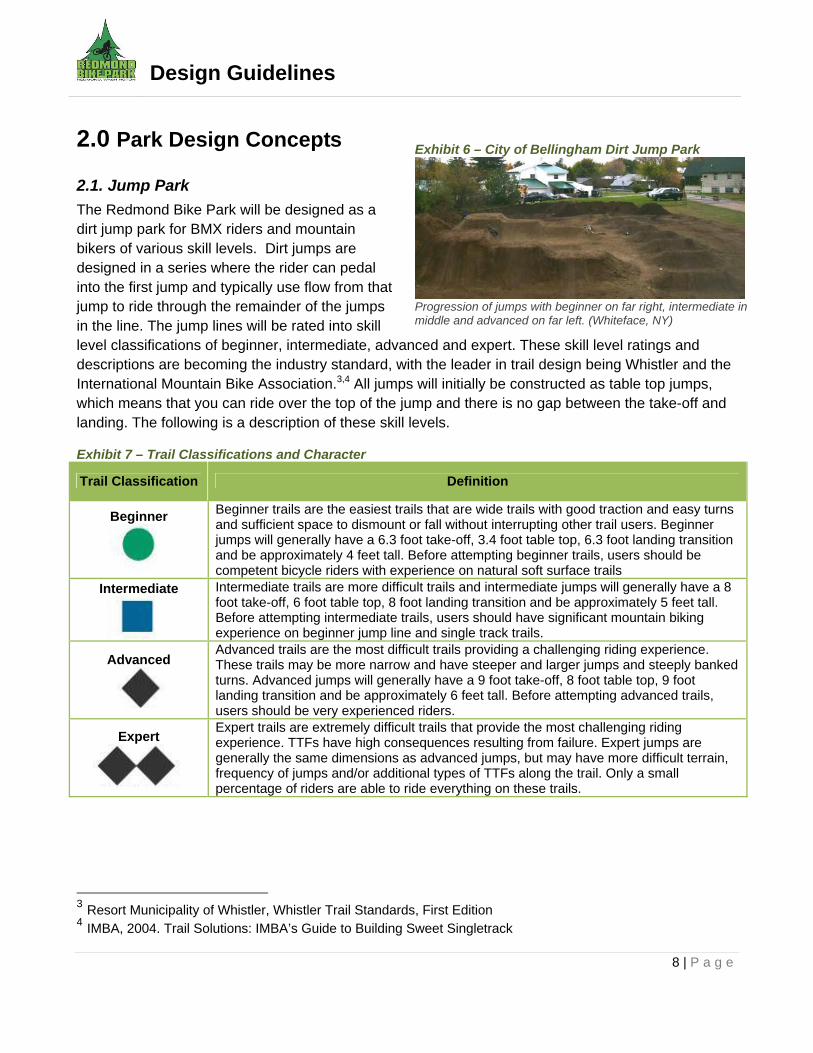
2.1. Jump Park
The Redmond Bike Park will be designed as a dirt jump park for BMX riders and mountain bikers of various skill levels. Dirt jumps are designed in a series where the rider can pedal into the first jump and typically use flow from that jump to ride through the remainder of the jumps in the line. The jump lines will be rated into skill level classifications of beginner, intermediate, advanced and expert. These skill level ratings and descriptions are becoming the industry standard, with the leader in trail design being Whistler and the International Mountain Bike Association.3,4 All jumps will initially be constructed as table top jumps, which means that you can ride over the top of the jump and there is no gap between the take-off and landing. The following is a description of these skill levels.
Exhibit 7 – Trail Classifications and Character
Trail Classification Definition
Beginner
Beginner trails are the easiest trails that are wide trails with good traction and easy turns and sufficient space to dismount or fall without interrupting other trail users. Beginner jumps will generally have a 6.3 foot take-off, 3.4 foot table top, 6.3 foot landing transition and be approximately 4 feet tall. Before attempting beginner trails, users should be competent bicycle riders with experience on natural soft surface trails
Intermediate
Intermediate trails are more difficult trails and intermediate jumps will generally have a 8 foot take-off, 6 foot table top, 8 foot landing transition and be approximately 5 feet tall. Before attempting intermediate trails, users should have significant mountain biking experience on beginner jump line and single track trails.
Advanced
Advanced trails are the most difficult trails providing a challenging riding experience. These trails may be more narrow and have steeper and larger jumps and steeply banked turns. Advanced jumps will generally have a 9 foot take-off, 8 foot table top, 9 foot landing transition and be approximately 6 feet tall. Before attempting advanced trails, users should be very experienced riders.
Expert
Expert trails are extremely difficult trails that provide the most challenging riding experience. TTFs have high consequences resulting from failure. Expert jumps are generally the same dimensions as advanced jumps, but may have more difficult terrain, frequency of jumps and/or additional types of TTFs along the trail. Only a small percentage of riders are able to ride everything on these trails.
3 Resort Municipality of Whistler, Whistler Trail Standards, First Edition 4 IMBA, 2004. Trail Solutions: IMBA’s Guide to Building Sweet Singletrack
Exhibit 6 – City of Bellingham Dirt Jump Park
Progression of jumps with beginner on far right, intermediate in middle and advanced on far left. (Whiteface, NY)
Design Guidelines
9 | P a g e
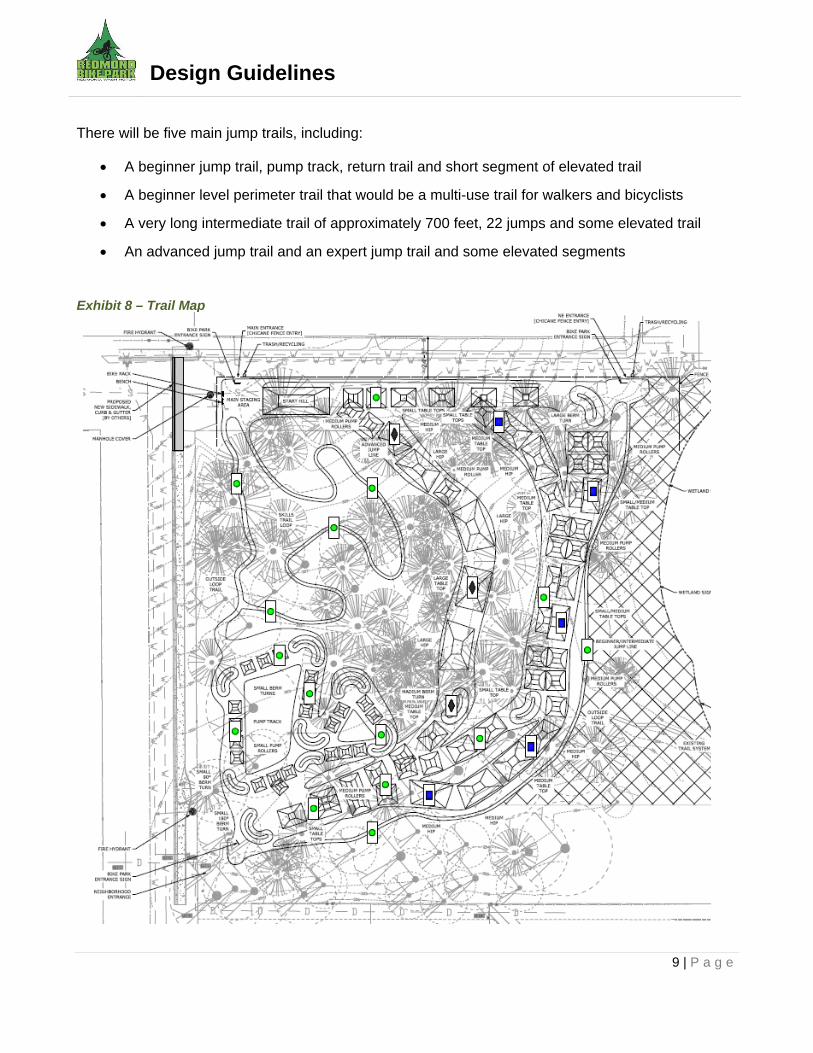
There will be five main jump trails, including:
A beginner jump trail, pump track, return trail and short segment of elevated trail
A beginner level perimeter trail that would be a multi-use trail for walkers and bicyclists
A very long intermediate trail of approximately 700 feet, 22 jumps and some elevated trail
An advanced jump trail and an expert jump trail and some elevated segments
Exhibit 8 – Trail Map
Design Guidelines
10 | P a g e
The following is a breakdown of the number of linear feet of trails by skill level
Exhibit 9 – Length of Trail by Type
Trail Classification Approximate
Length of Trails (feet)
Beginner 800
Intermediate 200
Advanced 100
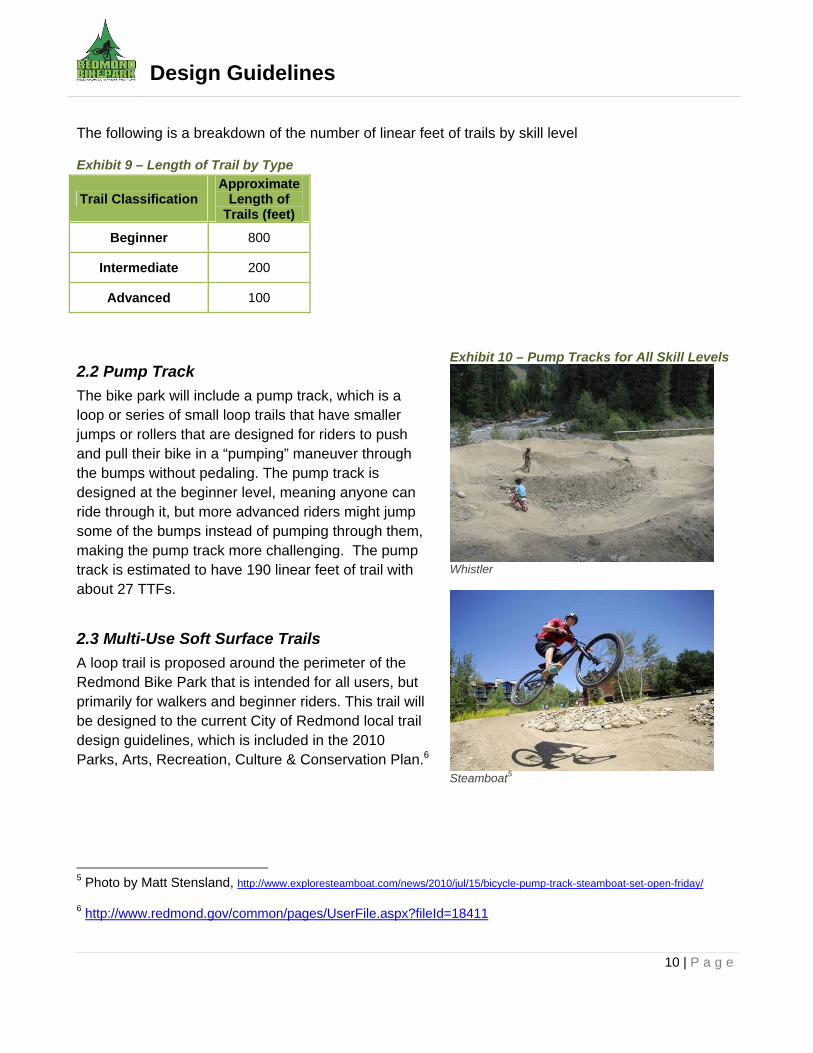
2.2 Pump Track
The bike park will include a pump track, which is a loop or series of small loop trails that have smaller jumps or rollers that are designed for riders to push and pull their bike in a “pumping” maneuver through the bumps without pedaling. The pump track is designed at the beginner level, meaning anyone can ride through it, but more advanced riders might jump some of the bumps instead of pumping through them, making the pump track more challenging. The pump track is estimated to have 190 linear feet of trail with about 27 TTFs.
2.3 Multi-Use Soft Surface Trails
A loop trail is proposed around the perimeter of the Redmond Bike Park that is intended for all users, but primarily for walkers and beginner riders. This trail will be designed to the current City of Redmond local trail design guidelines, which is included in the 2010 Parks, Arts, Recreation, Culture & Conservation Plan.6
5 Photo by Matt Stensland, http://www.exploresteamboat.com/news/2010/jul/15/bicycle-pump-track-steamboat-set-open-friday/
6 http://www.redmond.gov/common/pages/UserFile.aspx?fileId=18411
Exhibit 10 – Pump Tracks for All Skill Levels
Whistler
Steamboat5
Design Guidelines
11 | P a g e
3.0 Technical Trail Feature Design Guidelines
Trail Features (TTFs) are natural or manmade obstacles along the trail that require bike handling skills to ride. They range from easy such as a one foot roller in a pump track, to intermediate such as a 5 foot tall jump, to advanced features such as a 6 inch wide log ride. This section will first address TTF design guidelines and general construction specifications.
3.1 Materials
The following materials will be used for wooden TTF construction:
Framing (posts, stringers, braces): pressure treated dimensional lumber (in some cases, cedar or Douglas fir logs may be used for stringers and sleepers/sills)
Footings: pressure treated posts, poured concrete, concrete pier block, or rock (2-4”cobble +5/8”crushed)
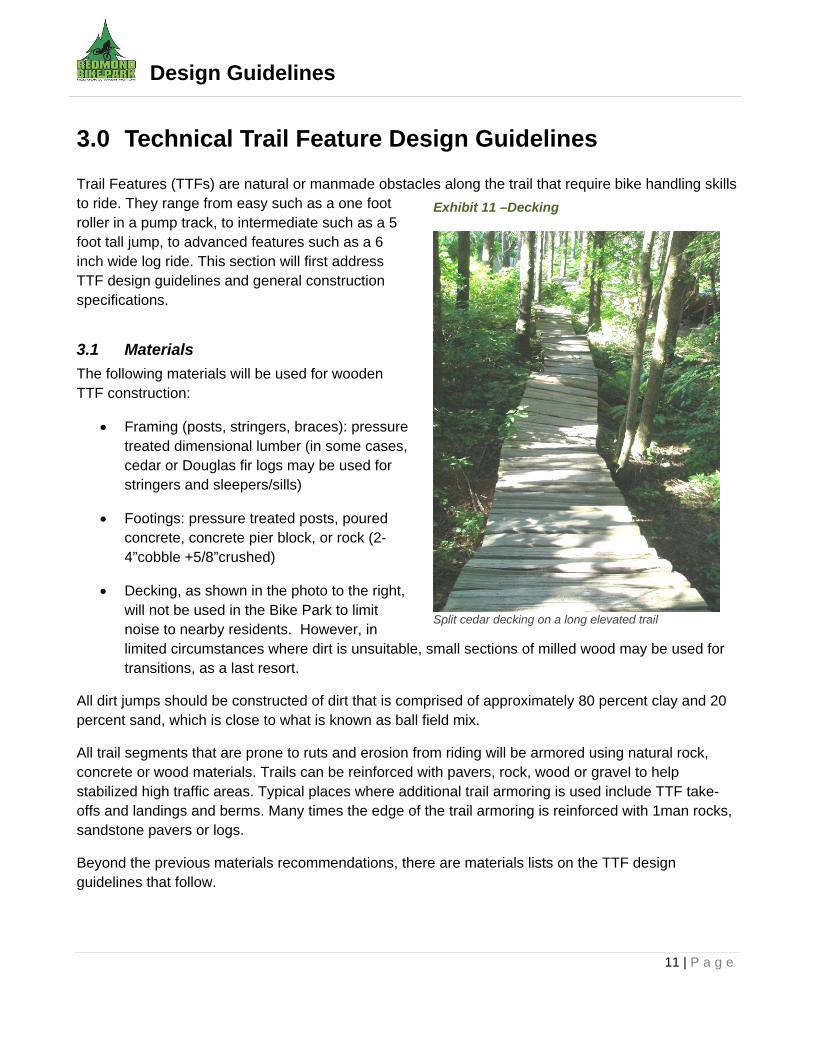
Decking, as shown in the photo to the right, will not be used in the Bike Park to limit noise to nearby residents. However, in limited circumstances where dirt is unsuitable, small sections of milled wood may be used for transitions, as a last resort.
All dirt jumps should be constructed of dirt that is comprised of approximately 80 percent clay and 20 percent sand, which is close to what is known as ball field mix.
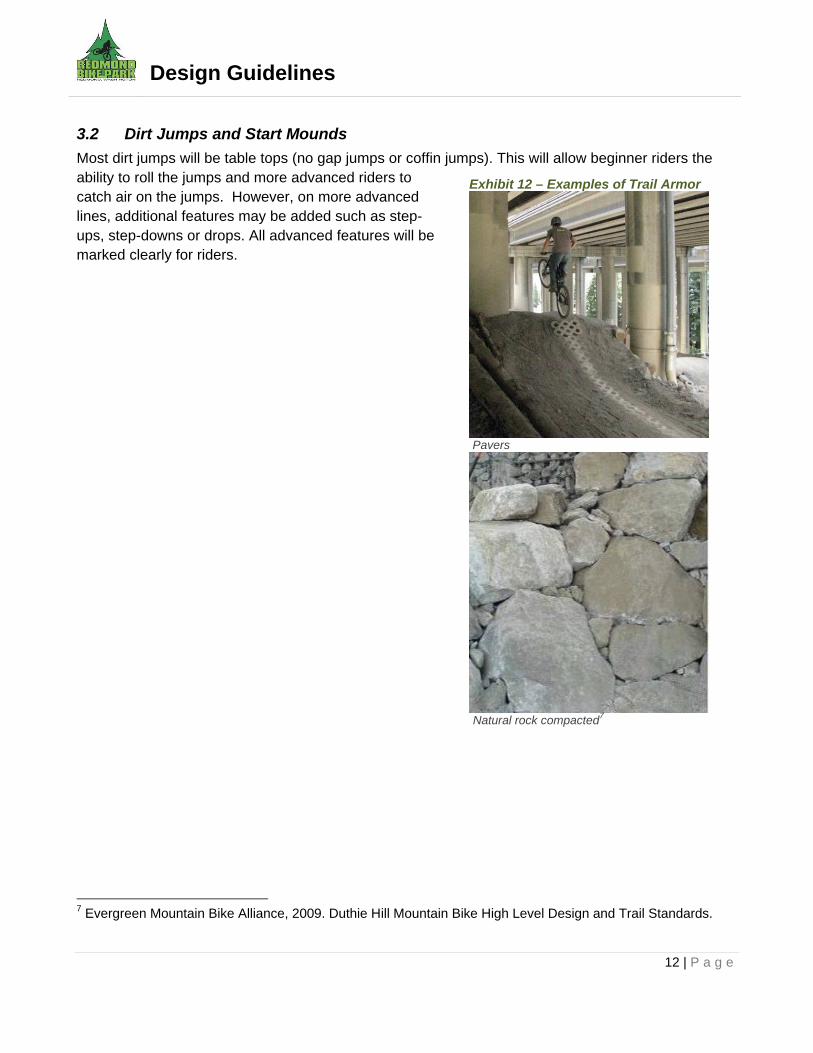
All trail segments that are prone to ruts and erosion from riding will be armored using natural rock, concrete or wood materials. Trails can be reinforced with pavers, rock, wood or gravel to help stabilized high traffic areas. Typical places where additional trail armoring is used include TTF take-offs and landings and berms. Many times the edge of the trail armoring is reinforced with 1man rocks, sandstone pavers or logs.
Beyond the previous materials recommendations, there are materials lists on the TTF design guidelines that follow.
Exhibit 11 –Decking
Split cedar decking on a long elevated trail
Design Guidelines
12 | P a g e
3.2 Dirt Jumps and Start Mounds
Most dirt jumps will be table tops (no gap jumps or coffin jumps). This will allow beginner riders the ability to roll the jumps and more advanced riders to catch air on the jumps. However, on more advanced lines, additional features may be added such as step-ups, step-downs or drops. All advanced features will be marked clearly for riders.
7 Evergreen Mountain Bike Alliance, 2009. Duthie Hill Mountain Bike High Level Design and Trail Standards.
Exhibit 12 – Examples of Trail Armor
Pavers
Natural rock compacted7
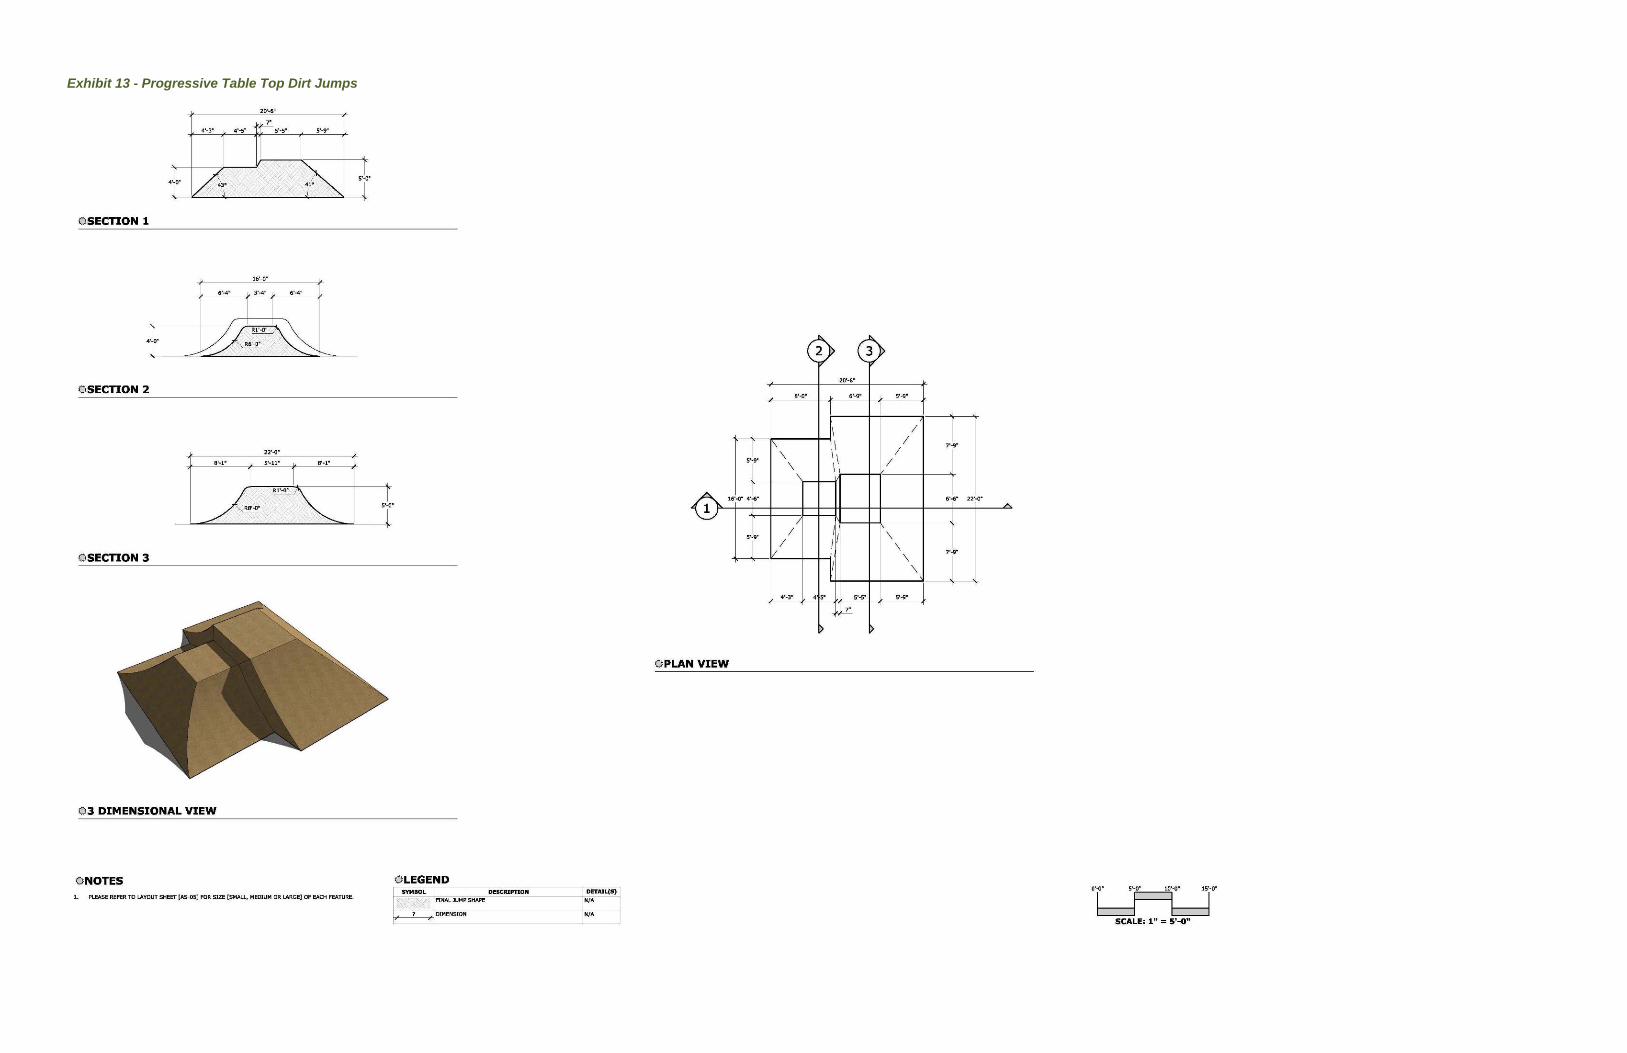
Exhibit 13 - Progressive Table Top Dirt Jumps
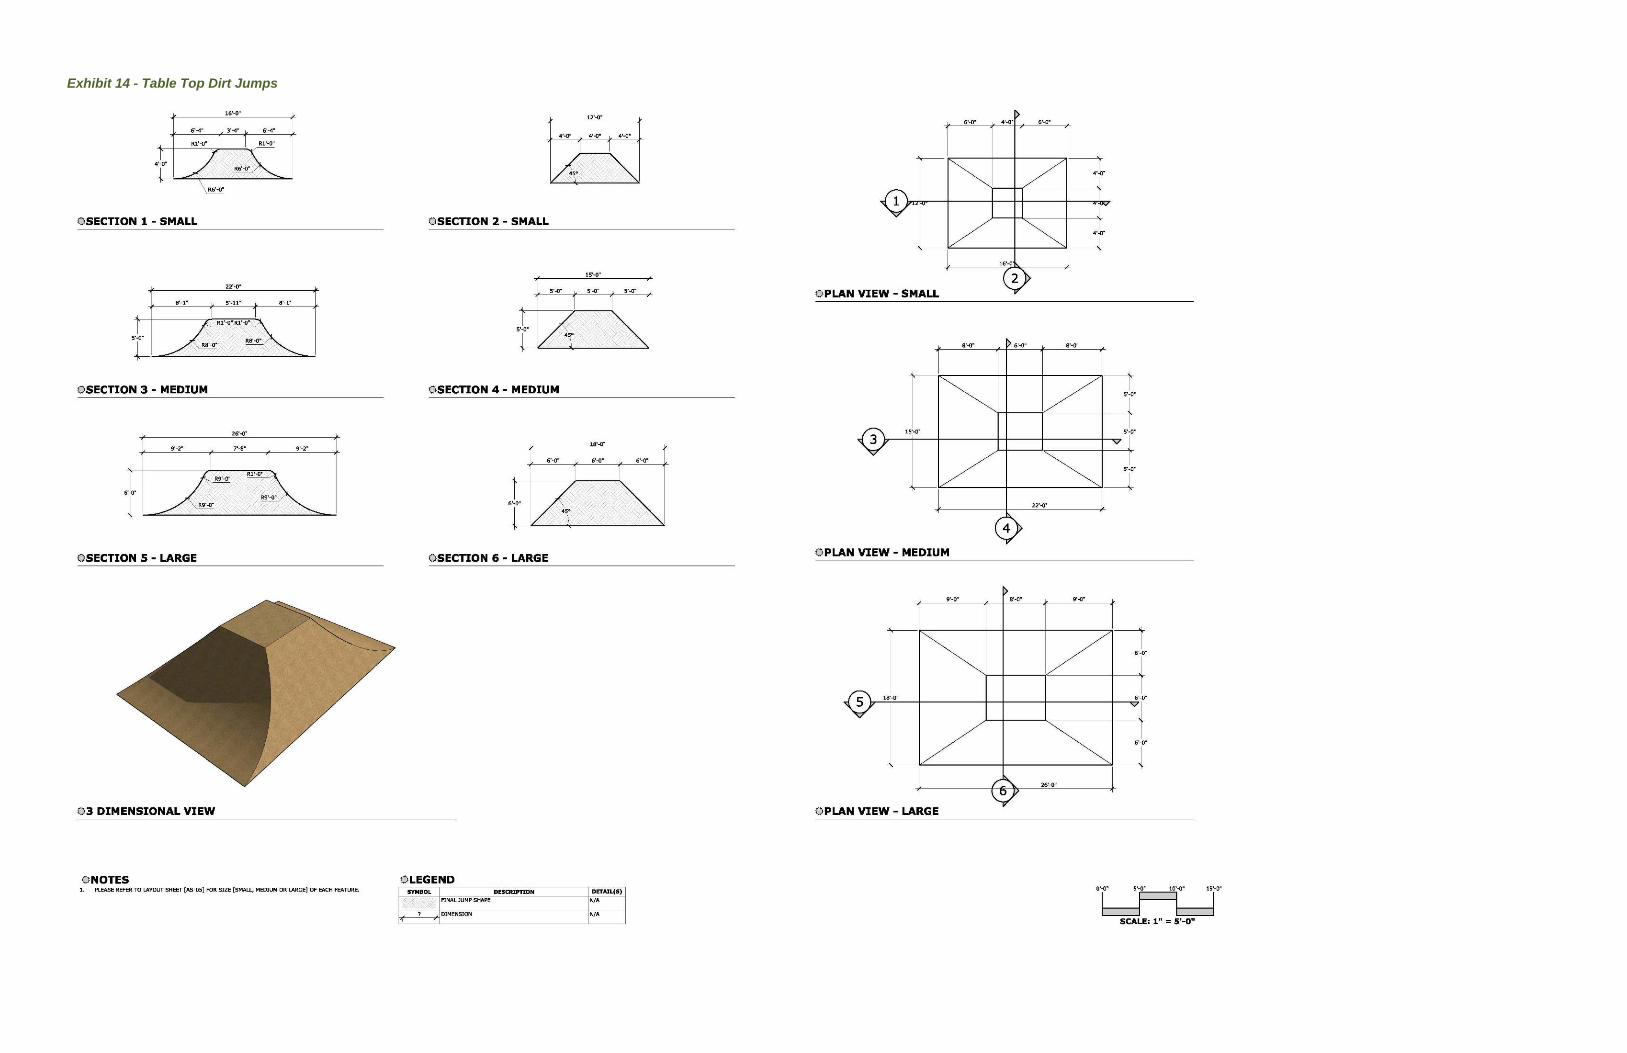
Exhibit 14 - Table Top Dirt Jumps
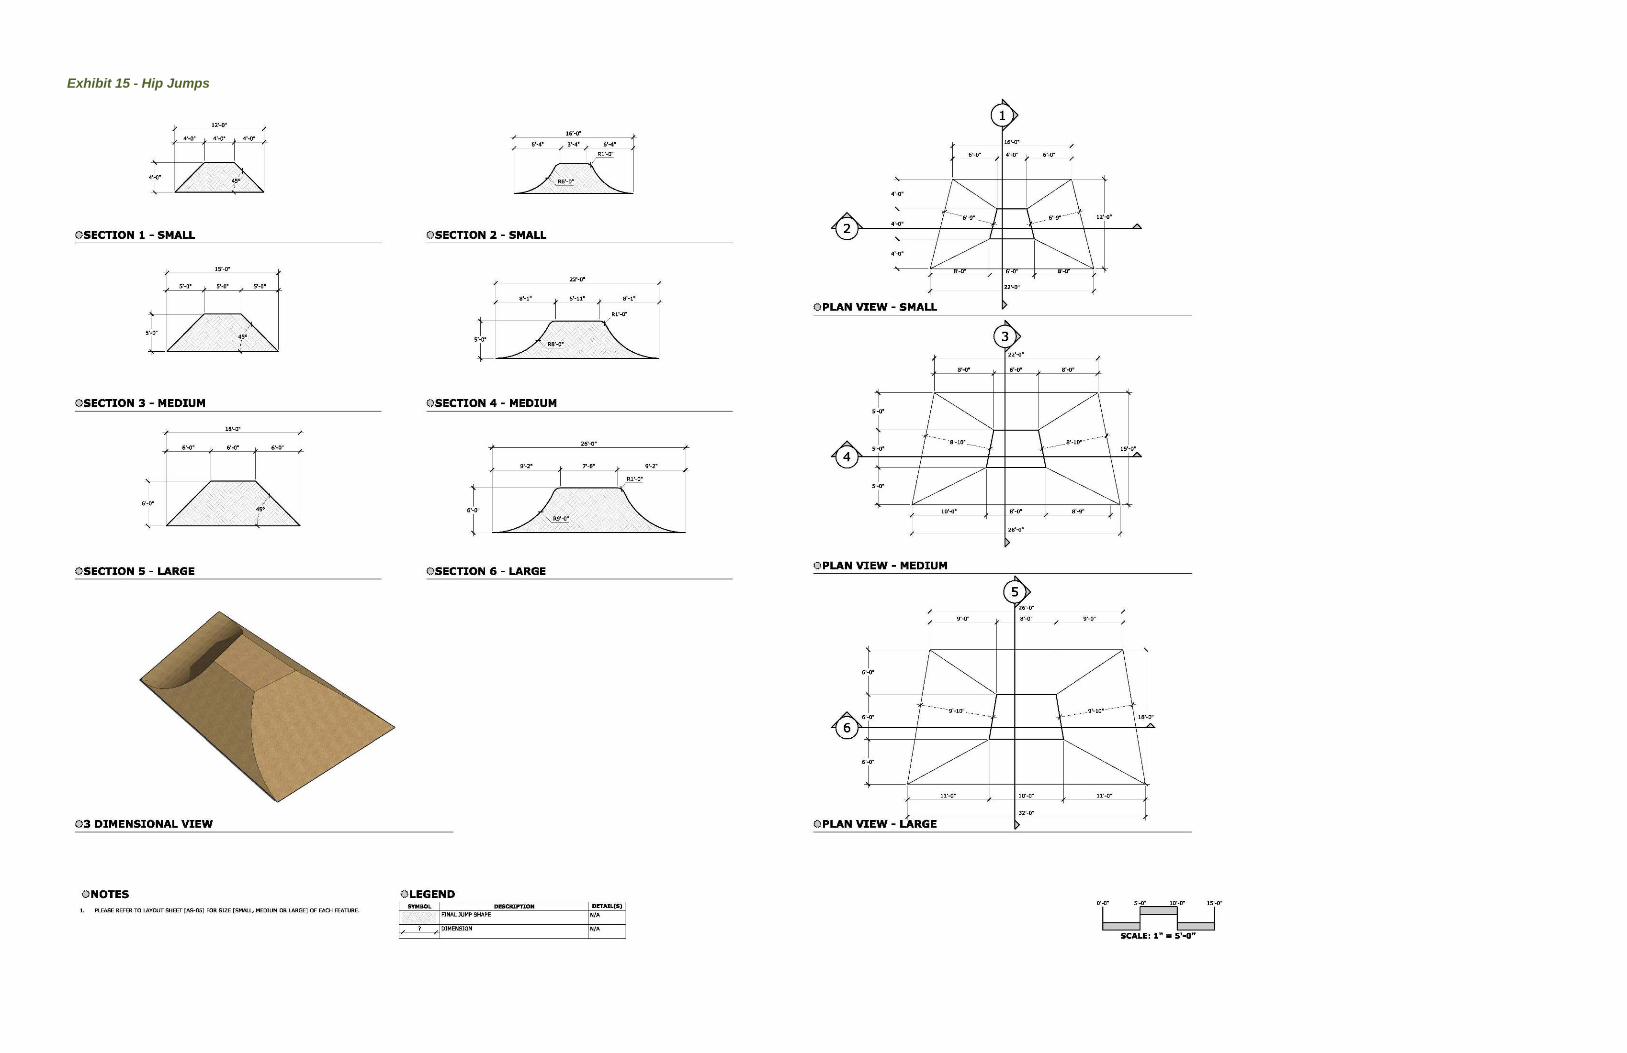
Exhibit 15 - Hip Jumps
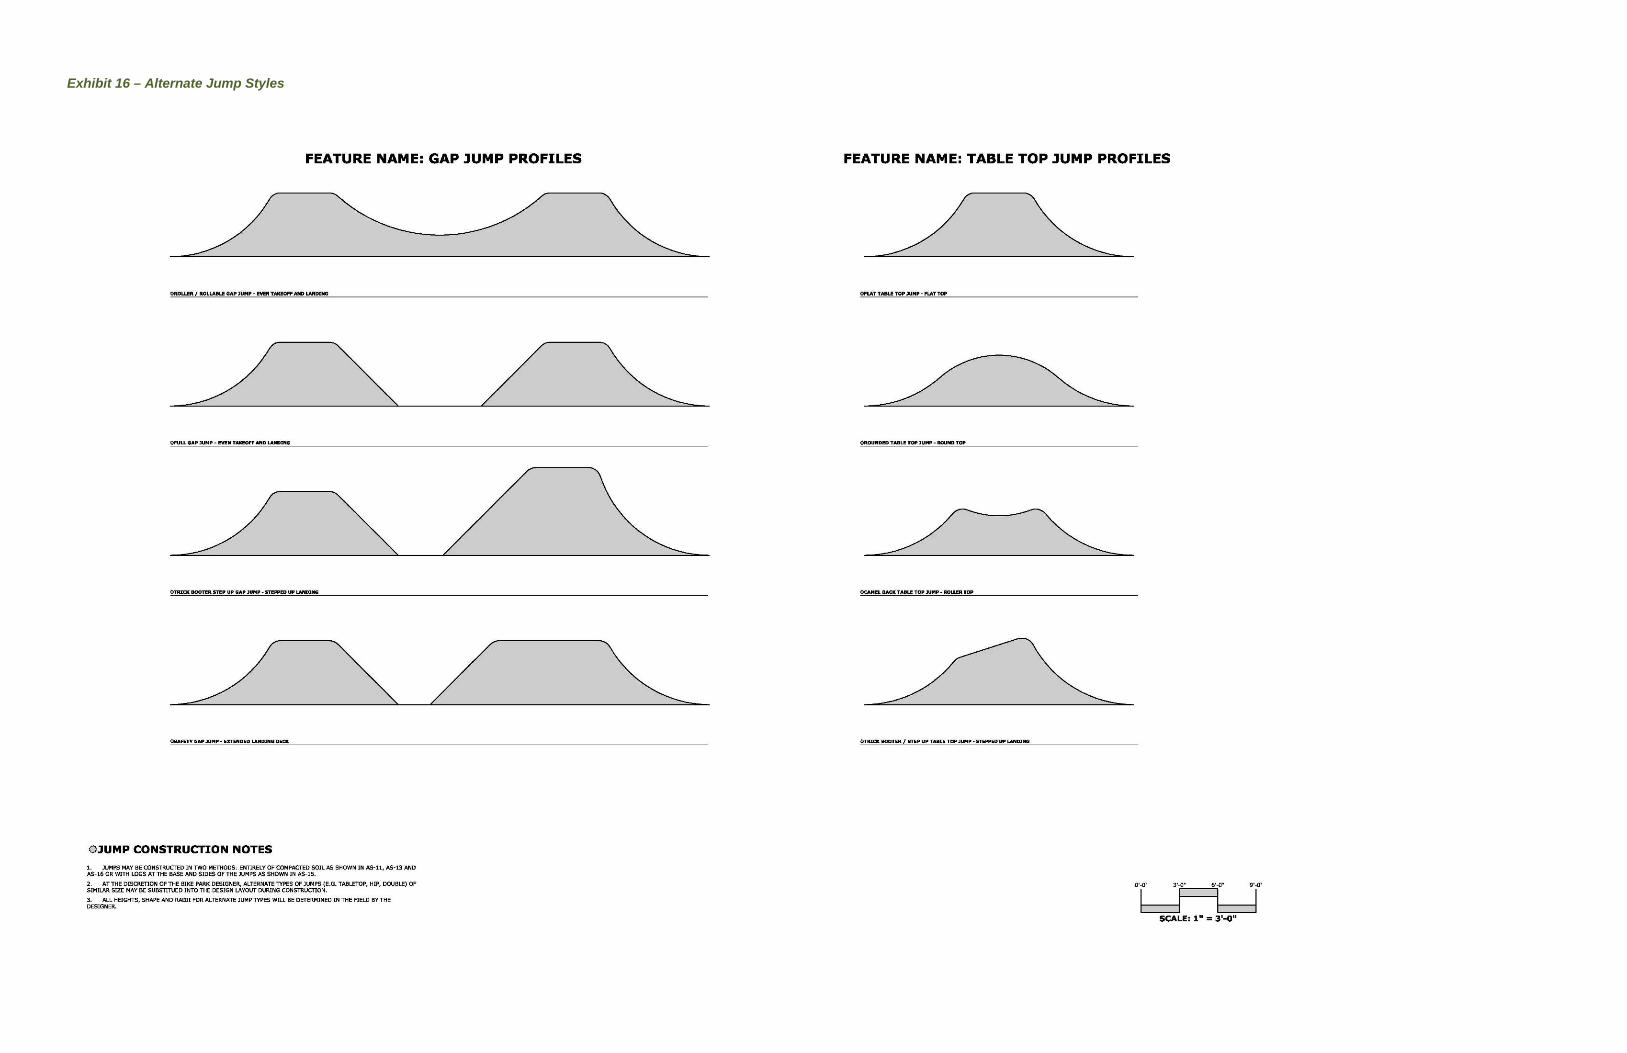
Exhibit 16 – Alternate Jump Styles
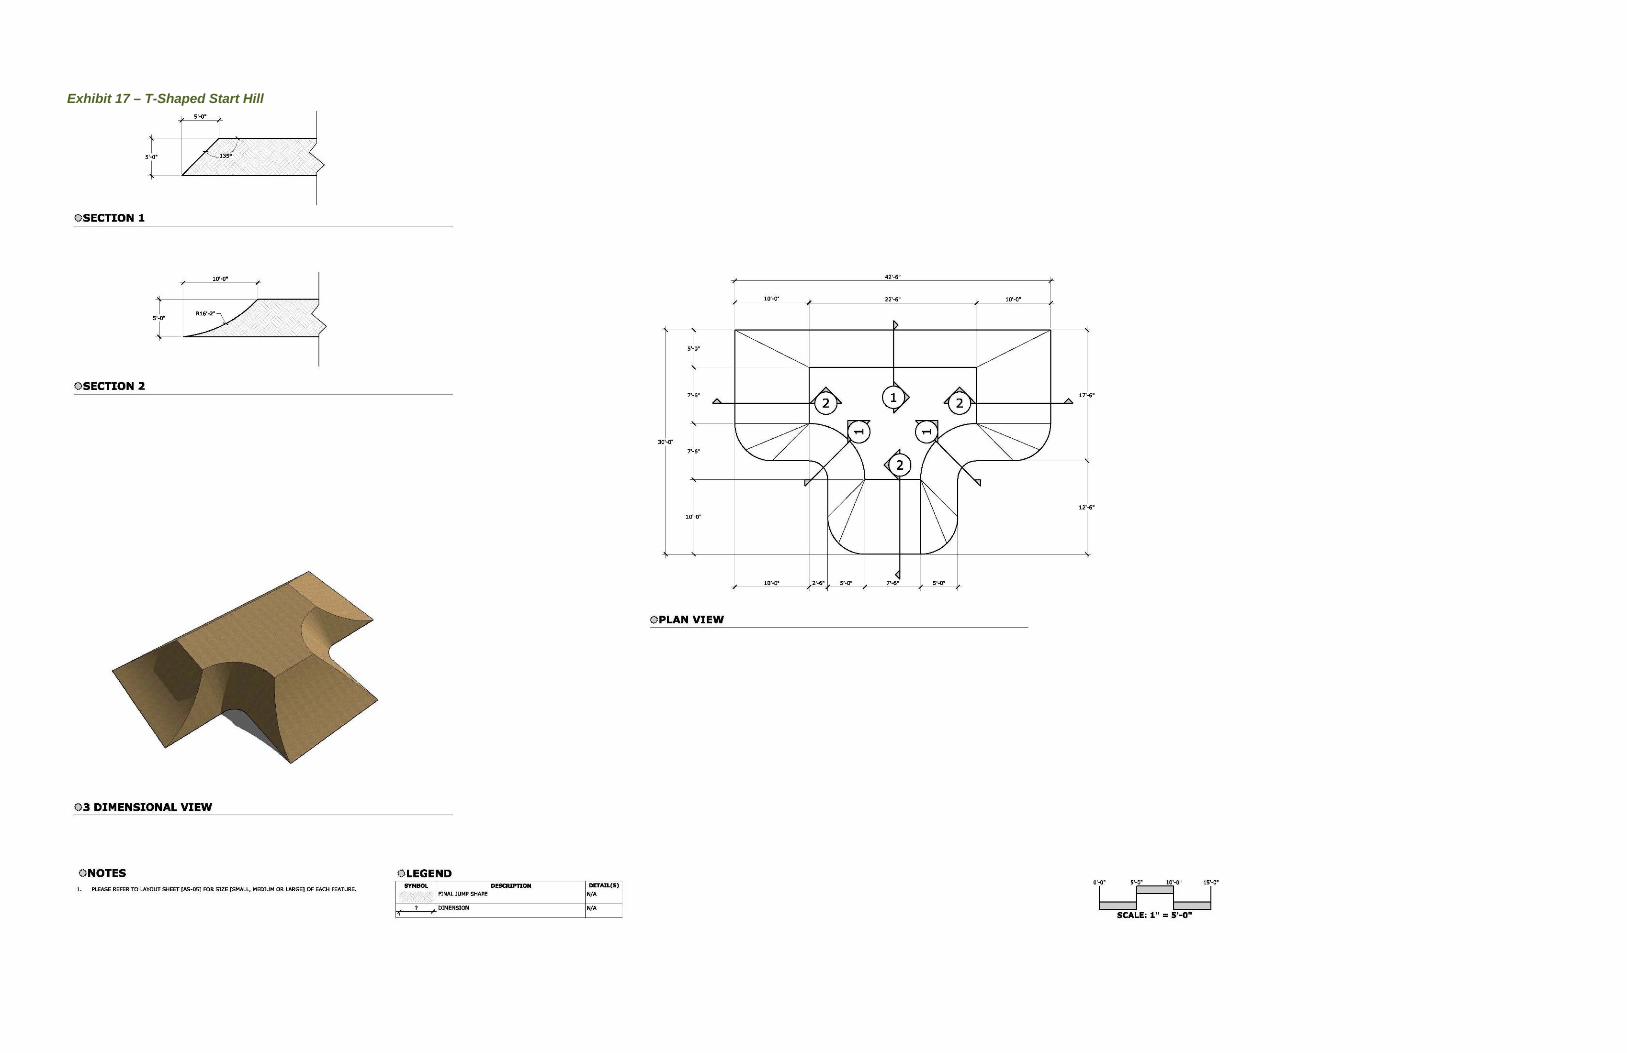
Exhibit 17 – T-Shaped Start Hill
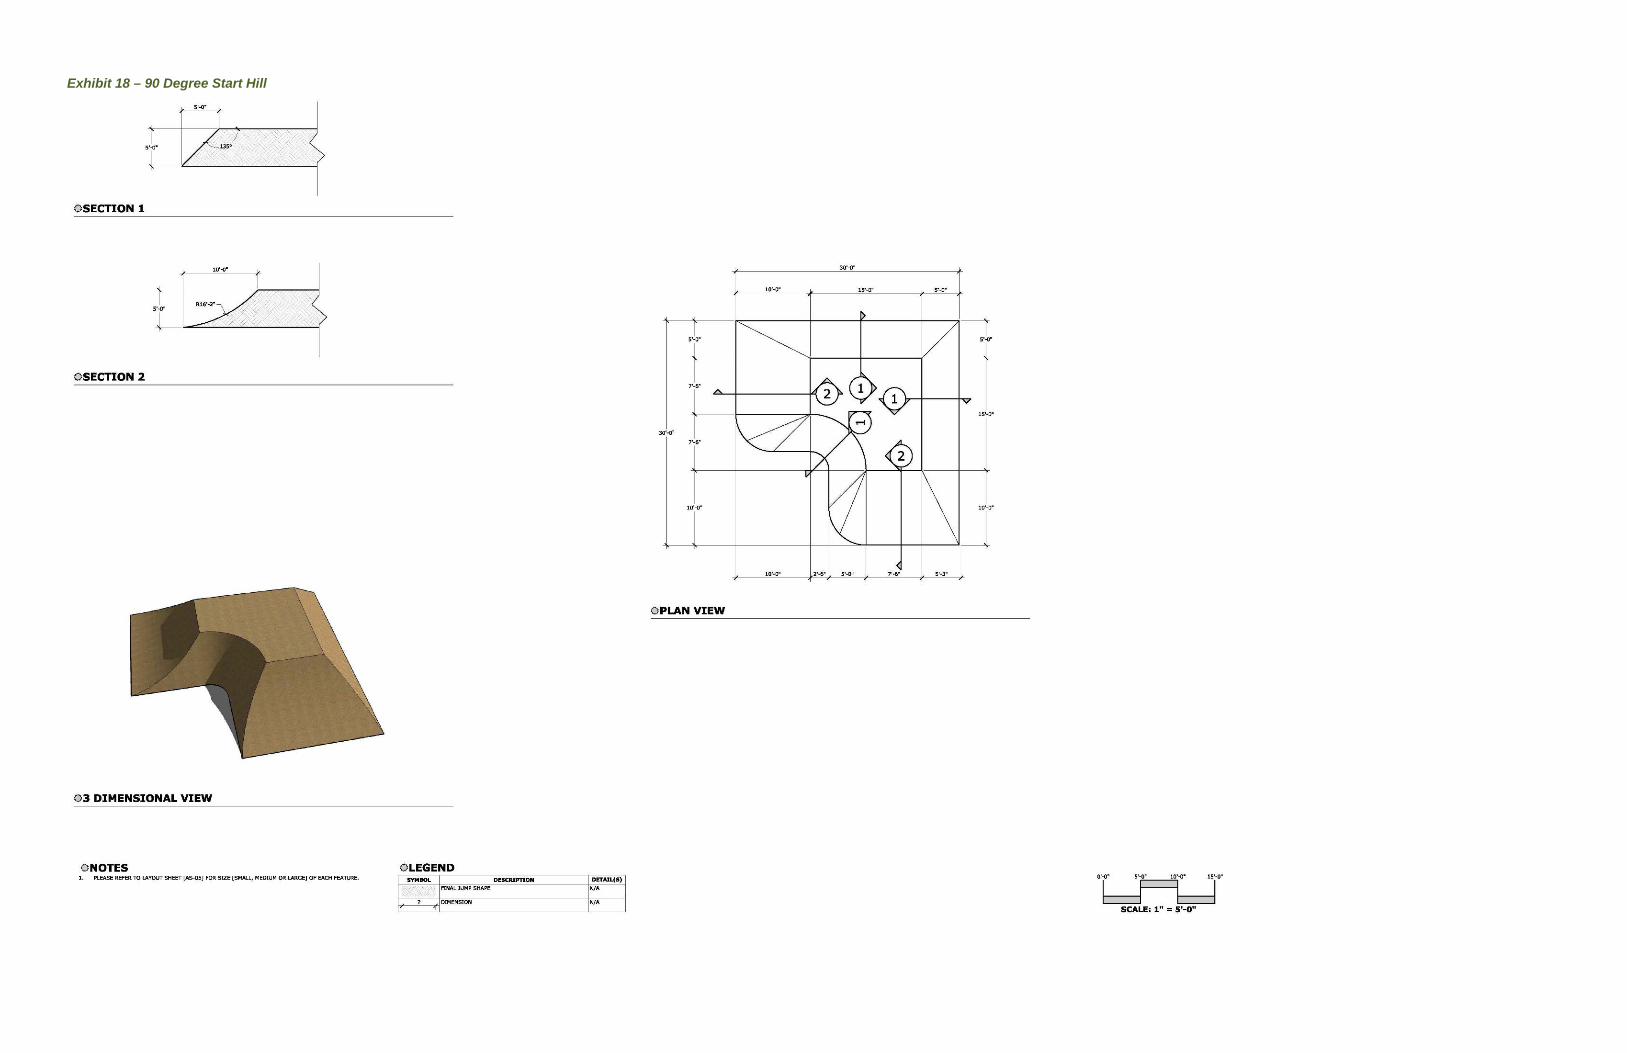
Exhibit 18 – 90 Degree Start Hill
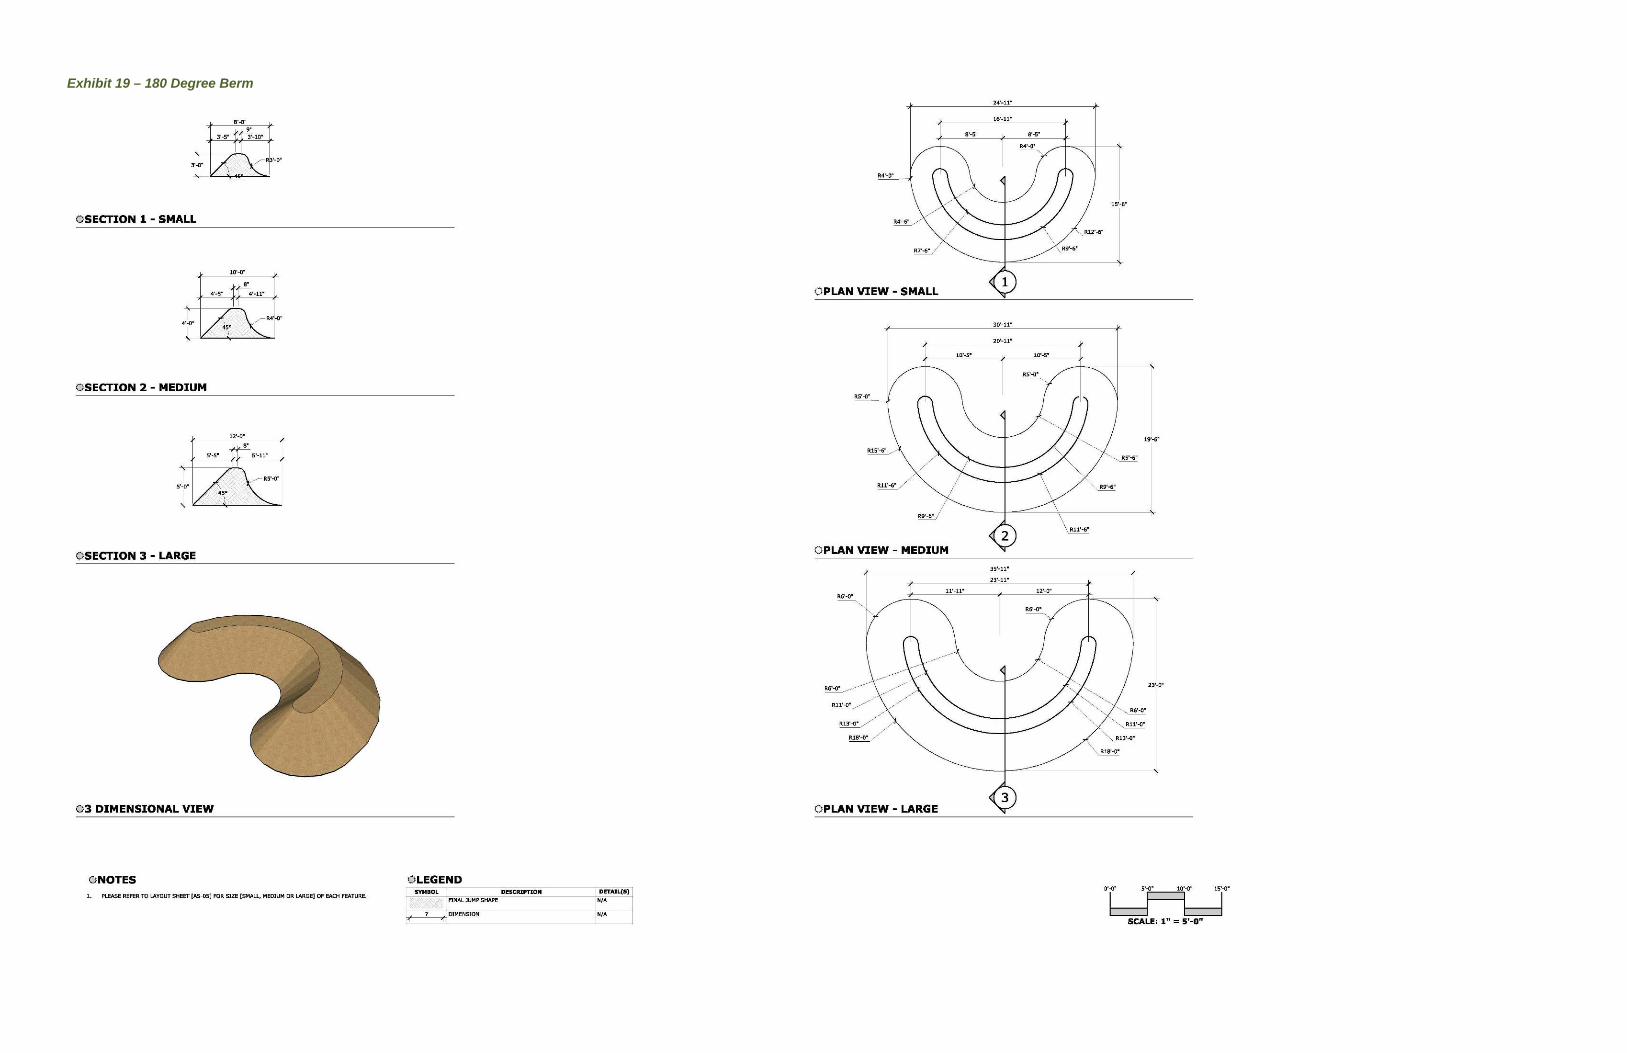
Exhibit 19 – 180 Degree Berm
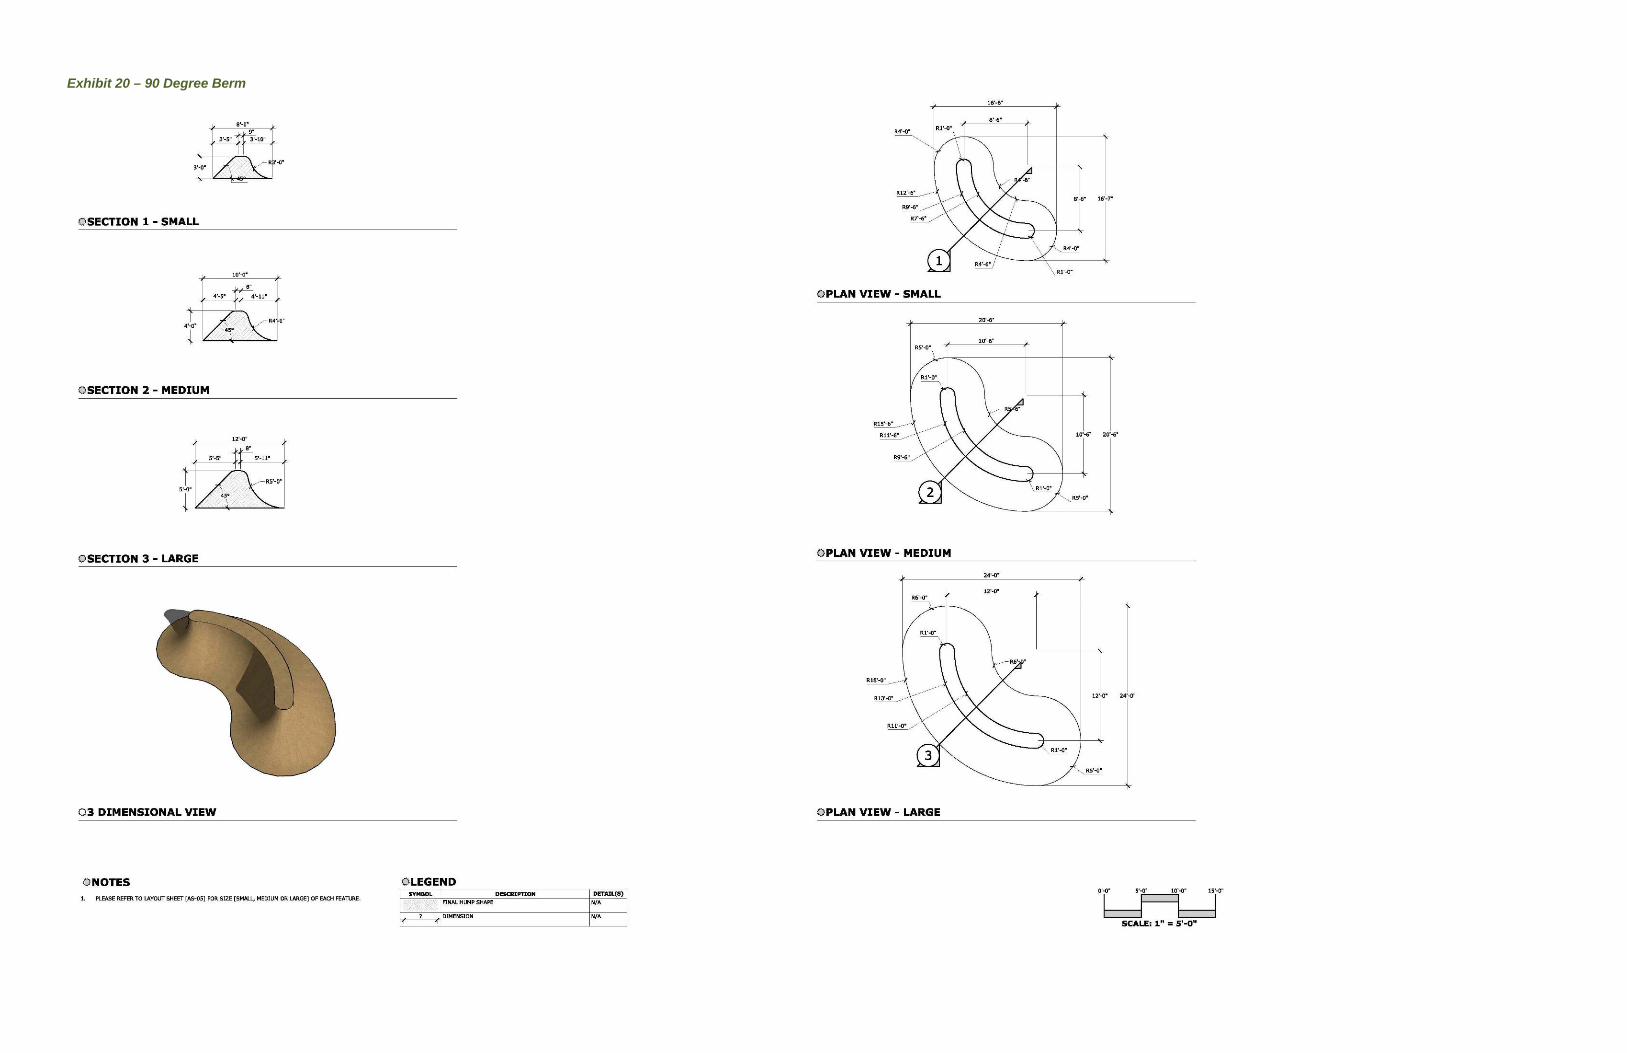
Exhibit 20 – 90 Degree Berm
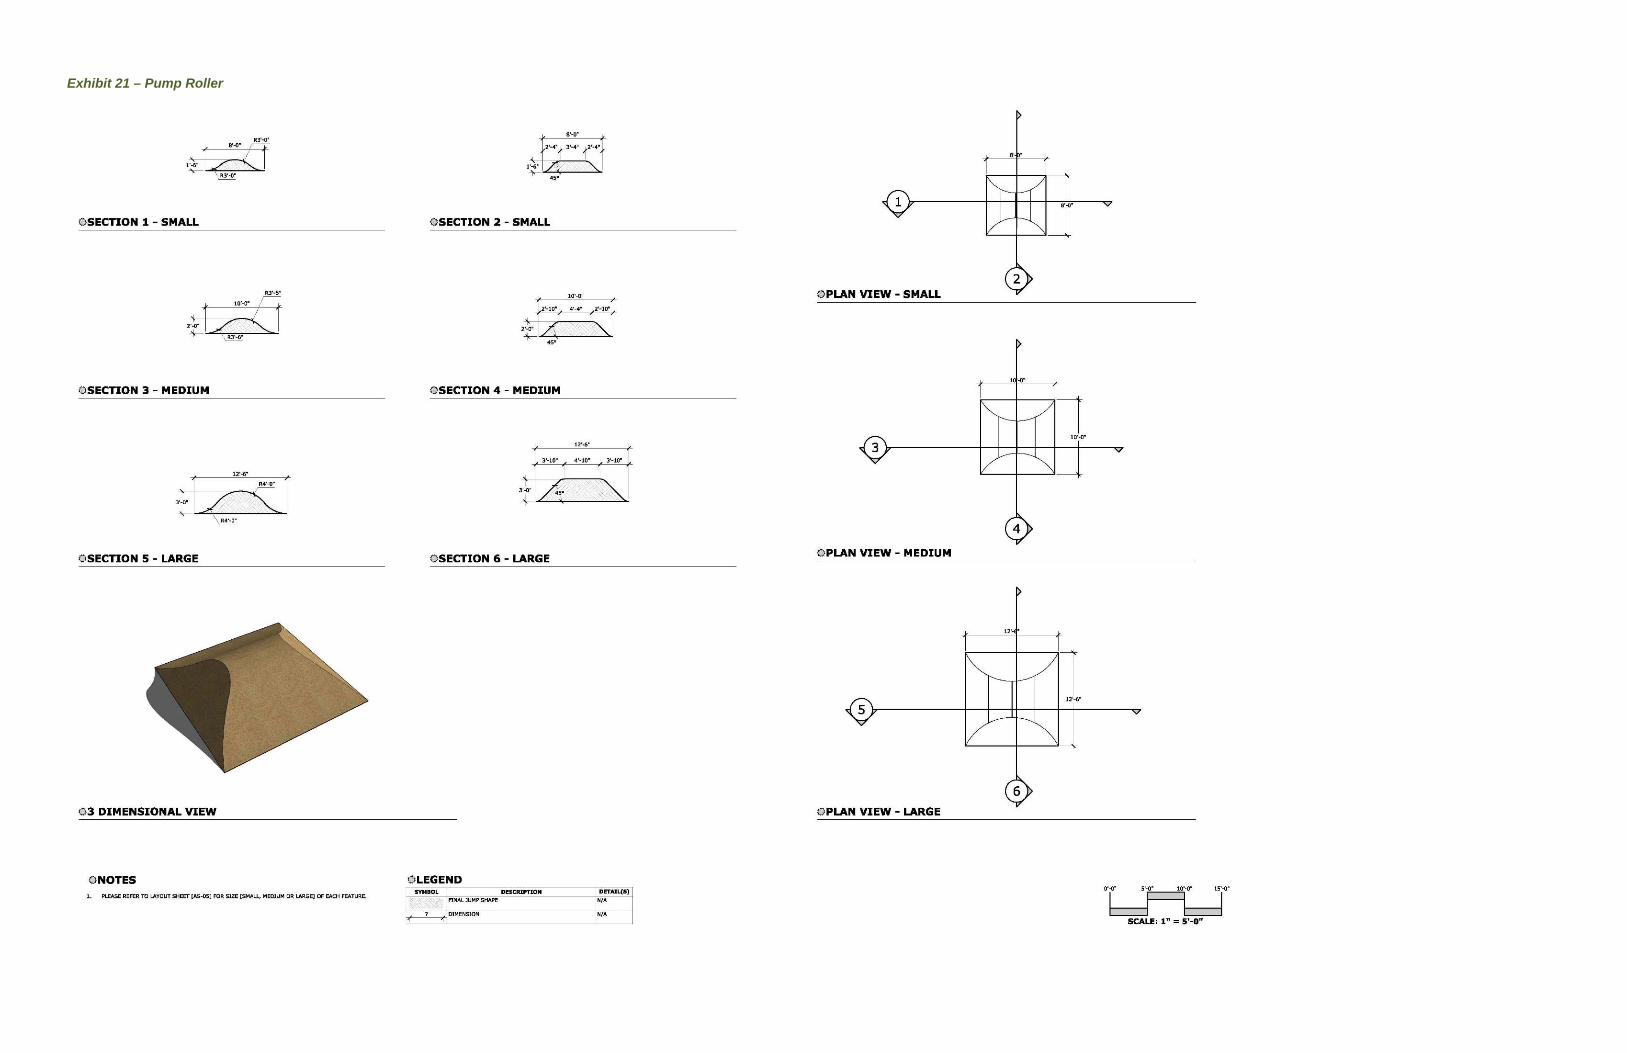
Exhibit 21 – Pump Roller
Design Guidelines
22 | P a g e
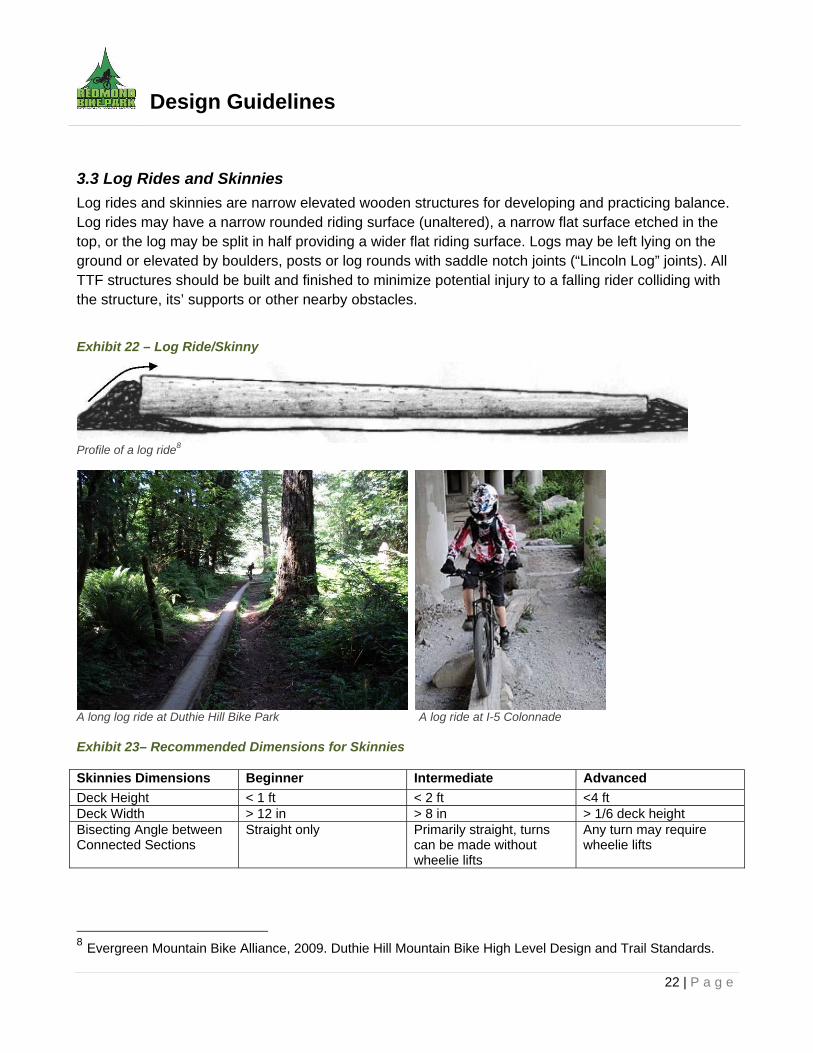
3.3 Log Rides and Skinnies
Log rides and skinnies are narrow elevated wooden structures for developing and practicing balance. Log rides may have a narrow rounded riding surface (unaltered), a narrow flat surface etched in the top, or the log may be split in half providing a wider flat riding surface. Logs may be left lying on the ground or elevated by boulders, posts or log rounds with saddle notch joints (“Lincoln Log” joints). All TTF structures should be built and finished to minimize potential injury to a falling rider colliding with the structure, its’ supports or other nearby obstacles.
Exhibit 22 – Log Ride/Skinny
Profile of a log ride8
A long log ride at Duthie Hill Bike Park A log ride at I-5 Colonnade Exhibit 23– Recommended Dimensions for Skinnies Skinnies Dimensions Beginner Intermediate Advanced
Deck Height < 1 ft < 2 ft <4 ft Deck Width > 12 in > 8 in > 1/6 deck height Bisecting Angle between Connected Sections
Straight only Primarily straight, turns can be made without wheelie lifts
Any turn may require wheelie lifts
8 Evergreen Mountain Bike Alliance, 2009. Duthie Hill Mountain Bike High Level Design and Trail Standards.
Design Guidelines
23 | P a g e
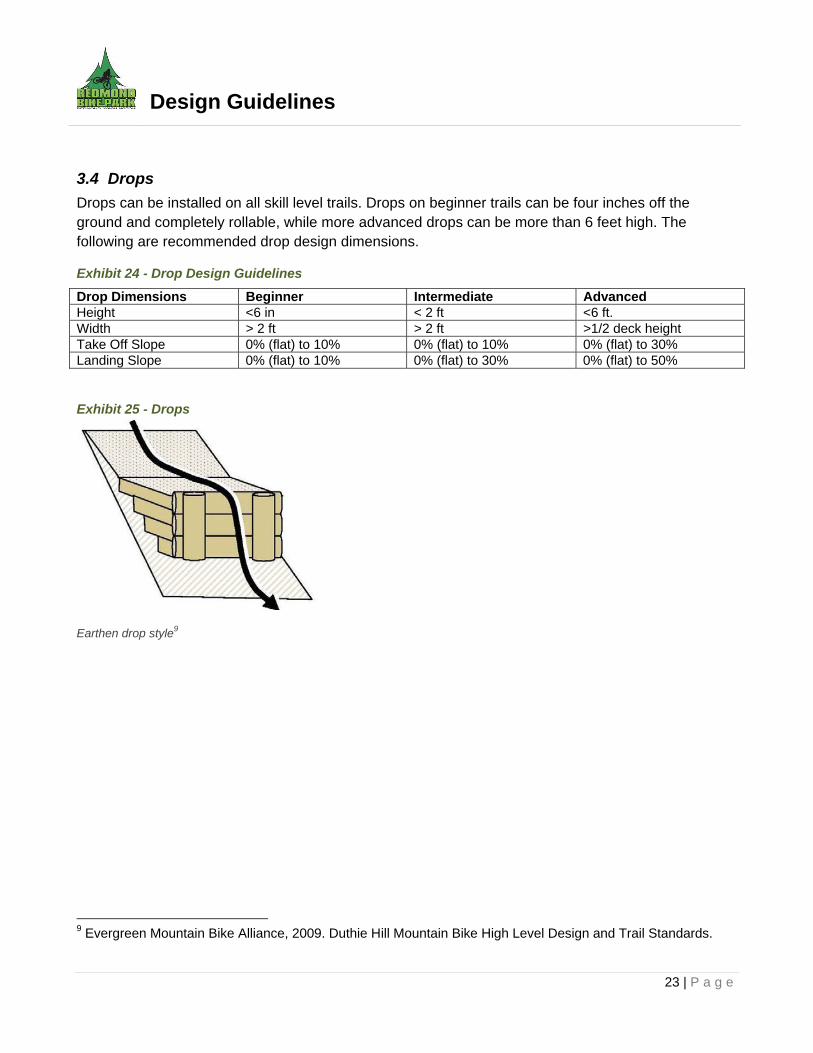
3.4 Drops
Drops can be installed on all skill level trails. Drops on beginner trails can be four inches off the ground and completely rollable, while more advanced drops can be more than 6 feet high. The following are recommended drop design dimensions.
Exhibit 24 - Drop Design Guidelines
Drop Dimensions Beginner Intermediate Advanced Height <6 in < 2 ft <6 ft. Width > 2 ft > 2 ft >1/2 deck height Take Off Slope 0% (flat) to 10% 0% (flat) to 10% 0% (flat) to 30% Landing Slope 0% (flat) to 10% 0% (flat) to 30% 0% (flat) to 50%
Exhibit 25 - Drops
Earthen drop style9
9 Evergreen Mountain Bike Alliance, 2009. Duthie Hill Mountain Bike High Level Design and Trail Standards.
Design Guidelines
24 | P a g e
4.0 Other Park Details The park will include signage, fencing, benches and possibly other park furnishings. These may be phased in over time and may change, based on how the park is used and functions once complete.
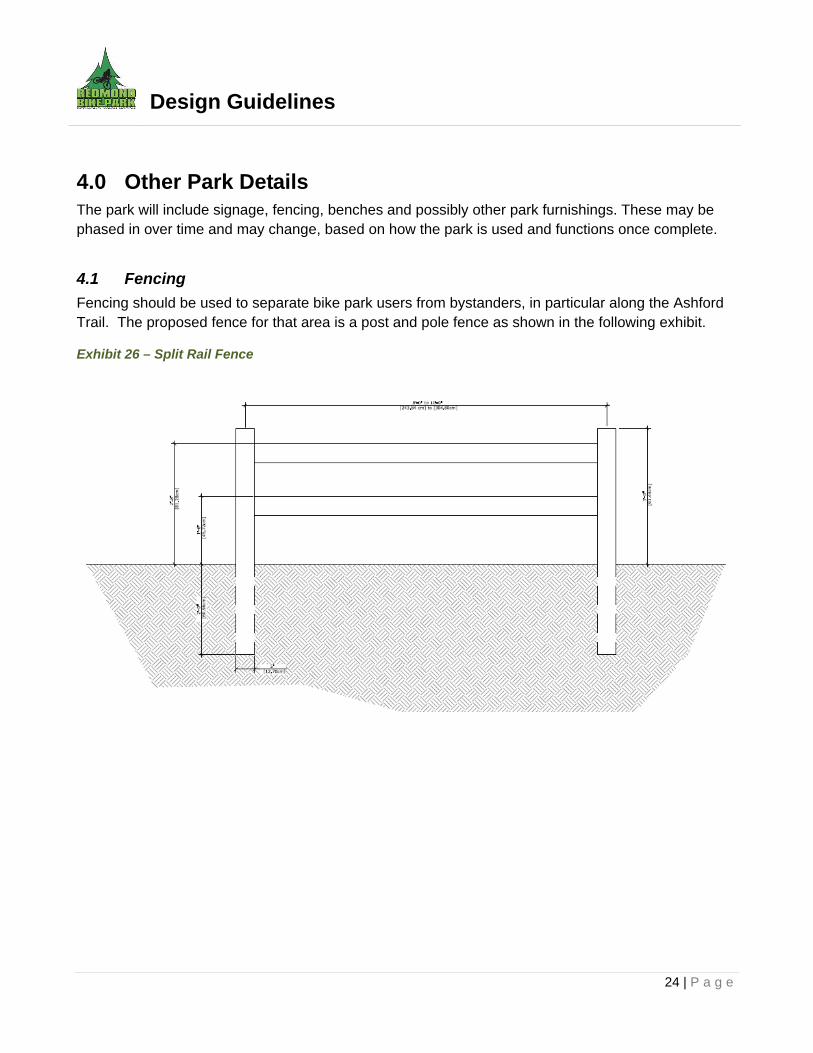
4.1 Fencing
Fencing should be used to separate bike park users from bystanders, in particular along the Ashford Trail. The proposed fence for that area is a post and pole fence as shown in the following exhibit.
Exhibit 26 – Split Rail Fence
Design Guidelines
25 | P a g e
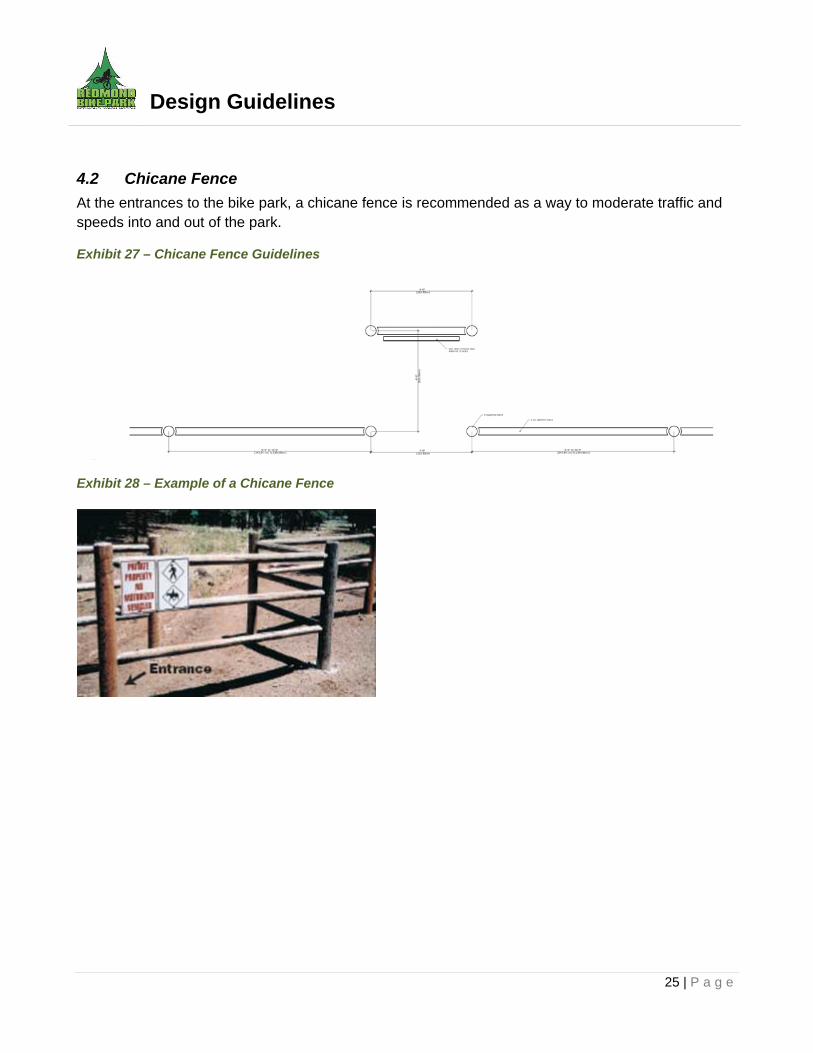
4.2 Chicane Fence
At the entrances to the bike park, a chicane fence is recommended as a way to moderate traffic and speeds into and out of the park.
Exhibit 27 – Chicane Fence Guidelines
Exhibit 28 – Example of a Chicane Fence
Design Guidelines
26 | P a g e
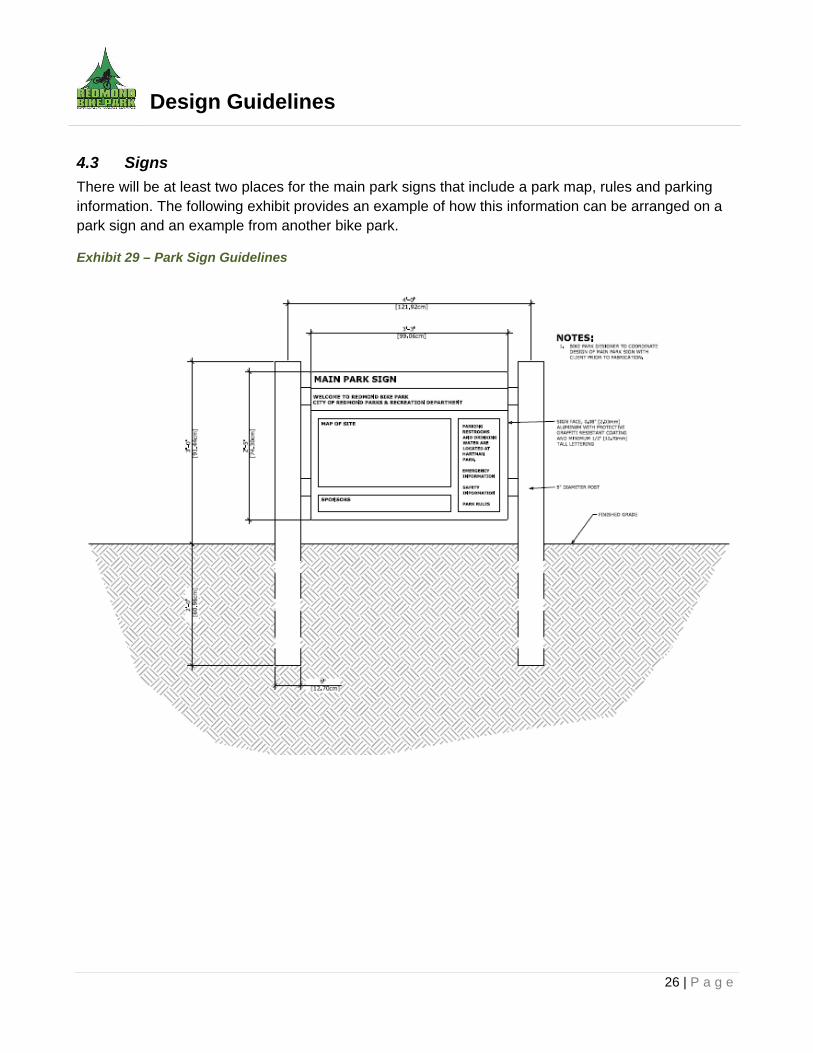
4.3 Signs
There will be at least two places for the main park signs that include a park map, rules and parking information. The following exhibit provides an example of how this information can be arranged on a park sign and an example from another bike park.
Exhibit 29 – Park Sign Guidelines
Design Guidelines
27 | P a g e
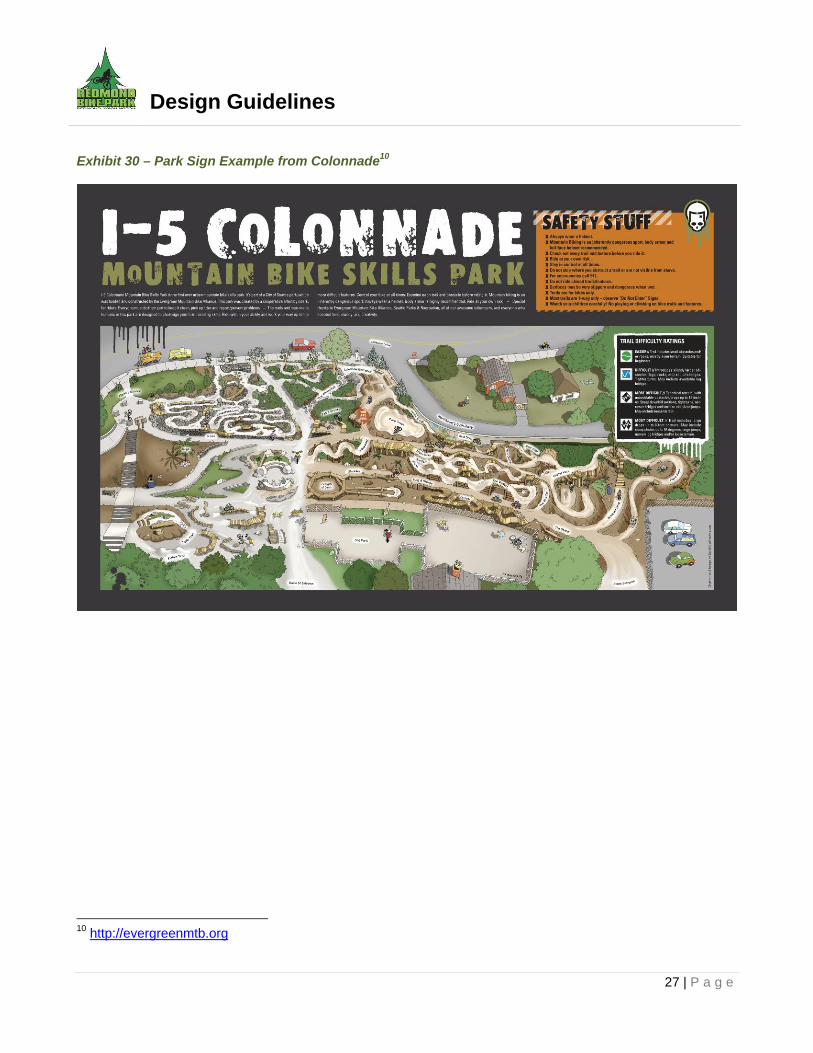
Exhibit 30 – Park Sign Example from Colonnade10
10 http://evergreenmtb.org
Design Guidelines
28 | P a g e
Definitions BERM – built up bank on the outside of a corner to improve cornering.
COFFIN JUMP – a jump constructed from material excavated from behind the jump, leaving a hole.
DROP – a drop in the trail, possibly at the end of a log or off a rock; may require a technique depending on the vertical drop and/or the angle of descent.
GAP JUMP – two ramps placed back to back with a space between them, the rider must travel with enough velocity to cross the space and land on the second ramp.
LADDER – a TTF with rungs attached to stringers
ROLLABLE – a section that can be ridden without requiring higherlevel rider skills; for example, an elevated bridge intersection/corner that can be ridden without having to hop and rotate.
TTF – Technical Trail Feature – an obstacle on the trail requiring negotiation, the feature can be either man made or natural, such as an elevated bridge or a rock face respectively.
STEP DOWN – a jump where there is a gap between the take-off and landing and the landing is lower than the take off.
STEP UP – a jump where the take off is shorter than the landing and there is typically a gap or roller in between the take-off and landing.
WHEELIE LIFT - technique used to pedal off drops-off or logs with the back wheel landing before the front wheel.
Design Guidelines
29 | P a g e
References Evergreen Mountain Bike Alliance, 2009. Duthie Hill Mountain Bike High Level Design and Trail Standards. Evergreen Mountain Bike Alliance, 2010. Colonnade Phase 2 High Level Design and Trail Standards. IMBA, 2004. Trail Solutions: IMBA’s Guide to Building Sweet Singletrack IMBA, 18 Steps to Building a Dirt Jump or Freeride Park http://www.imba.com/resources/freeriding/18-steps-building-dirt-jump-or-freeride-park Resort Municipality of Whistler, Whistler Trail Standards, First Edition http://www.whistler.ca/images/stories/PDF/Resort%20Experience/Cycling_Committee/trail_standards_first_edition.pdf