R500 SERIES USER MANUAL - ravincrossbows.com
44
STOP Use of non-Ravin components and accessories, including non-Ravin arrows and nocks or non-Ravin strings and cables, may cause the system to not operate as designed, potentially resulting in an unsafe condition that could lead to serious injury or death. RAVINCROSSBOWS.COM R500 SERIES USER MANUAL
Transcript of R500 SERIES USER MANUAL - ravincrossbows.com
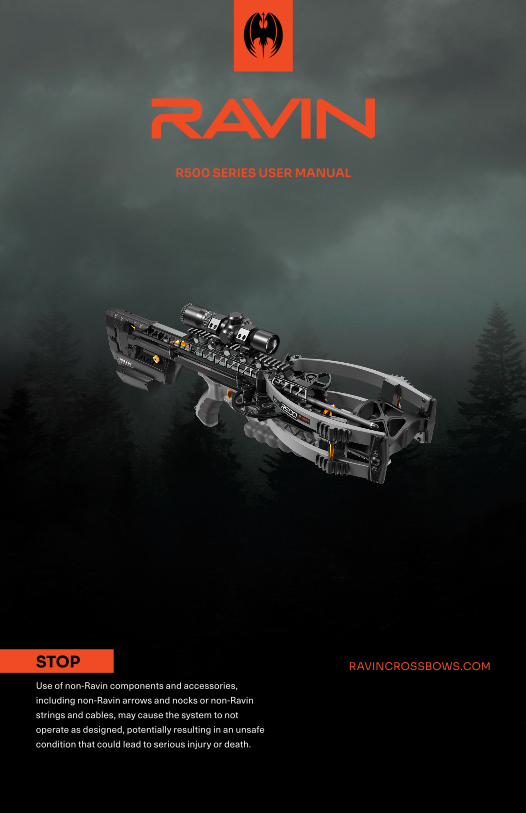
STOP Use of non-Ravin components and accessories, including non-Ravin arrows and nocks or non-Ravin strings and cables, may cause the system to not operate as designed, potentially resulting in an unsafe condition that could lead to serious injury or death.
RAVINCROSSBOWS.COM
R500 SERIES USER MANUAL

Ravin supplies the hunters of the future with apex performance crossbows and gear. With a Ravin in your hands, you become the weapon and you take your place on the cutting edge.
Ravin consistently leads the industry with technical innovations, making crossbows that are faster, smaller, and smarter. There is no status quo we won’t upend, a fact proven by each new Ravin release. Our groundbreaking HexCoil Technology, VersaDrive Cocking System, and Electric Drive System work in perfect synchronicity to make you master of the bow and god of the hunt.
WHY RAVIN?
1
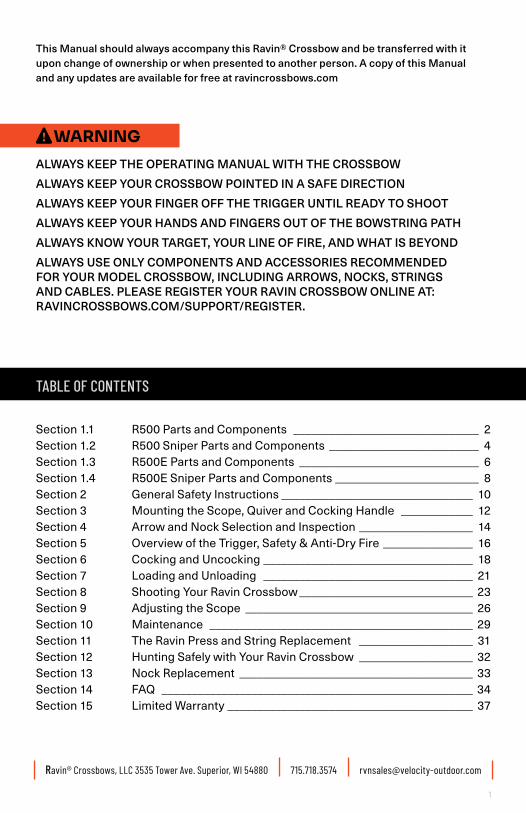
ALWAYS KEEP THE OPERATING MANUAL WITH THE CROSSBOWALWAYS KEEP YOUR CROSSBOW POINTED IN A SAFE DIRECTIONALWAYS KEEP YOUR FINGER OFF THE TRIGGER UNTIL READY TO SHOOTALWAYS KEEP YOUR HANDS AND FINGERS OUT OF THE BOWSTRING PATHALWAYS KNOW YOUR TARGET, YOUR LINE OF FIRE, AND WHAT IS BEYONDALWAYS USE ONLY COMPONENTS AND ACCESSORIES RECOMMENDED FOR YOUR MODEL CROSSBOW, INCLUDING ARROWS, NOCKS, STRINGS AND CABLES. PLEASE REGISTER YOUR RAVIN CROSSBOW ONLINE AT: RAVINCROSSBOWS.COM/SUPPORT/REGISTER.
WARNING
Section 1.1 R500 Parts and Components _______________________________ 2Section 1.2 R500 Sniper Parts and Components _________________________ 4Section 1.3 R500E Parts and Components ______________________________ 6Section 1.4 R500E Sniper Parts and Components ________________________ 8Section 2 General Safety Instructions ________________________________ 10Section 3 Mounting the Scope, Quiver and Cocking Handle ____________ 12Section 4 Arrow and Nock Selection and Inspection ___________________ 14Section 5 Overview of the Trigger, Safety & Anti-Dry Fire _______________ 16Section 6 Cocking and Uncocking ___________________________________ 18Section 7 Loading and Unloading ___________________________________ 21Section 8 Shooting Your Ravin Crossbow _____________________________ 23Section 9 Adjusting the Scope ______________________________________ 26Section 10 Maintenance ____________________________________________ 29Section 11 The Ravin Press and String Replacement ___________________ 31Section 12 Hunting Safely with Your Ravin Crossbow ___________________ 32Section 13 Nock Replacement _______________________________________ 33Section 14 FAQ ____________________________________________________ 34Section 15 Limited Warranty _________________________________________ 37
This Manual should always accompany this Ravin® Crossbow and be transferred with it upon change of ownership or when presented to another person. A copy of this Manual and any updates are available for free at ravincrossbows.com
TABLE OF CONTENTS
Ravin® Crossbows, LLC 3535 Tower Ave. Superior, WI 54880 715.718.3574 [email protected]

R AVIN R500 SERIES USER MANUAL | 7 15 .7 18 .35 74 | R AVINCROSSBOWS.COM
SECTION 1.1 – R500 PARTS AND COMPONENTS
R500Crossbow
1. Adjustable Buttstock 2. Safety Selector 3. Adjustable Cheek Pad 4. Scope 5. Top Cover
6. Arrow Rest 7. Split Limb 8. Riser 9. Limb Bumper
10. Limb Dampener
11. Fore Grip 12. Cam 13. Grip 14. Guide
1
23
4
5 67
910
1112
13
148
3
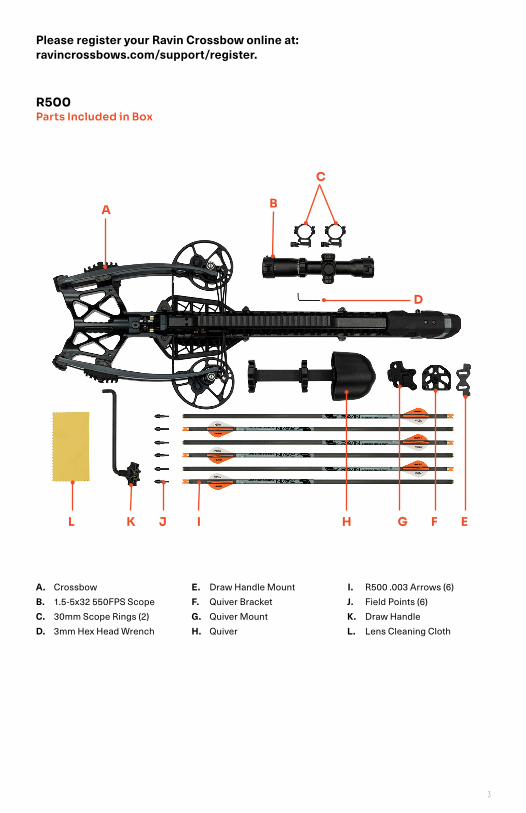
Please register your Ravin Crossbow online at: ravincrossbows.com/support/register.
R500Parts Included in Box
A. CrossbowB. 1.5-5x32 550FPS ScopeC. 30mm Scope Rings (2)D. 3mm Hex Head Wrench
E. Draw Handle MountF. Quiver BracketG. Quiver MountH. Quiver
I. R500 .003 Arrows (6)J. Field Points (6)K. Draw HandleL. Lens Cleaning Cloth
A B
C
D
I H G F EJKL

R AVIN R500 SERIES USER MANUAL | 7 15 .7 18 .35 74 | R AVINCROSSBOWS.COM
54
1. Adjustable Buttstock 2. Safety Selector 3. Adjustable Cheek Pad 4. Scope Level (only on R00
Sniper and R500E Sniper) 5. Scope
6. Top Cover 7. Arrow Rest 8. Split Limb 9. Riser
10. Limb Bumper
11. Limb Dampener 12. Fore Grip 13. Cam 14. Grip 15. Guide
1
23
6 78
9
1011
1213
14
15
R500 SNIPER PACKAGECrossbow
SECTION 1.2 – R500 SNIPER PARTS AND COMPONENTS

5
AB
C D E
F
K J I H GLMN
A. CrossbowB. 1-8x24 mm Adjustable
Turret ScopeC. Scope LevelD. 30mm Offset Scope Rings
E. Turret FPS Tapes F. 3mm Hex Head WrenchG. Draw Handle MountH. Quiver BracketI. Quiver Mount
J. QuiverK. R500 .001 Arrows (6)L. Field Points (6)M. Draw HandleN. Lens Cleaning Cloth
Please register your Ravin Crossbow online at: ravincrossbows.com/support/register.
R500 SNIPER PACKAGEParts Included in Box

R AVIN R500 SERIES USER MANUAL | 7 15 .7 18 .35 74 | R AVINCROSSBOWS.COM
1. Adjustable Buttstock 2. Safety Selector 3. Adjustable Cheek Pad 4. Scope 5. Top Cover 6. Arrow Rest
7. Split Limb 8. Riser 9. Limb Bumper
10. Limb Dampener 11. Fore Grip 12. Cam
13. Grip 14. Guide 15. Electric Drive (only on R500E
and R500E Sniper) 16. Electric Drive Battery (only
on R500E and R500E Sniper)
R500EElectric Crossbow
SECTION 1.3 – R500E PARTS AND COMPONENTS
1
23
4
5 6
7
910
1112
13
1415168
7
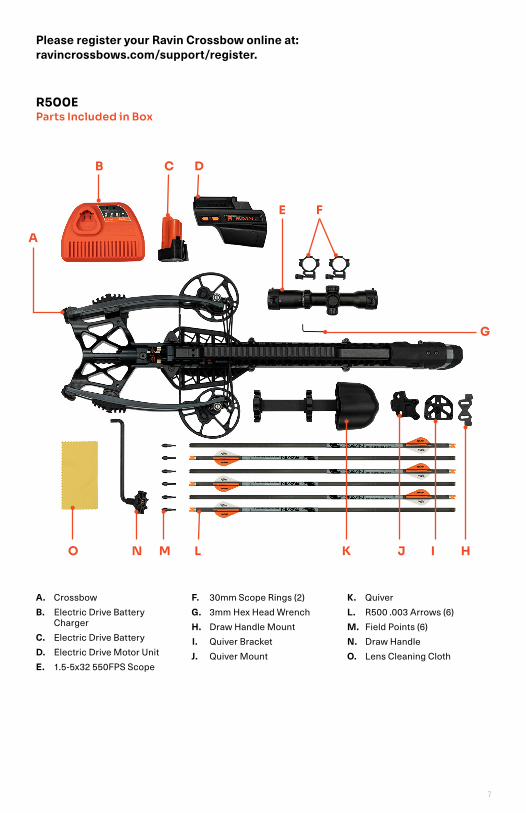
Please register your Ravin Crossbow online at: ravincrossbows.com/support/register.
R500E Parts Included in Box
A
B C D
E
G
L K J I HMNO
F
A. CrossbowB. Electric Drive Battery
ChargerC. Electric Drive BatteryD. Electric Drive Motor UnitE. 1.5-5x32 550FPS Scope
F. 30mm Scope Rings (2)G. 3mm Hex Head WrenchH. Draw Handle MountI. Quiver BracketJ. Quiver Mount
K. QuiverL. R500 .003 Arrows (6)M. Field Points (6)N. Draw HandleO. Lens Cleaning Cloth

R AVIN R500 SERIES USER MANUAL | 7 15 .7 18 .35 74 | R AVINCROSSBOWS.COM
1. Adjustable Buttstock2. Safety Selector3. Adjustable Cheek Pad4. Scope Level (only on R00
Sniper and R500E Sniper)5. Scope6. Top Cover
7. Split Limb8. Arrow Rest9. Riser
10. Limb Bumper11. Limb Dampener12. Fore Grip13. Cam
14. Grip15. Guide16. Electric Drive (only on R500E
and R500E Sniper)17. Electric Drive Battery (only
on R500E and R500E Sniper)
54
1
23
6 78
9
1011
1213
14
15
R500E SNIPER PACKAGEElectric Crossbow
1617
SECTION 1.4 – R500E SNIPER PARTS AND COMPONENTS

9
Please register your Ravin Crossbow online at: ravincrossbows.com/support/register.
R500E SNIPER PACKAGEParts Included in Box
A
B C D
I
N M L K JOPQ
A. CrossbowB. Electric Drive Battery
ChargerC. Electric Drive BatteryD. Electric Drive Motor UnitE. 1-8x24 mm Adjustable
Turret Scope
F. Scope LevelG. 30mm Offset Scope RingsH. Turret FPS Tapes I. 3mm Hex Head WrenchJ. Draw Handle MountK. Quiver Bracket
L. Quiver MountM. QuiverN. R500 .001 Arrows (6)O. Field Points (6)P. Draw HandleQ. Lens Cleaning Cloth
F G HE

R AVIN R500 SERIES USER MANUAL | 7 15 .7 18 .35 74 | R AVINCROSSBOWS.COM
SECTION 2 – GENERAL SAFETY INSTRUCTIONS
Your new Ravin Crossbow is a dangerous and deadly weapon that is designed for hunting and target shooting only. Use for any other purposes can cause serious injury or death.
Whether you are an experienced crossbow shooter or have never handled one before, CAREFULLY READ THE ENTIRE MANUAL and its warnings before using your Ravin Crossbow. It explains your Ravin Crossbow’s operation, handling and warns of the potential danger, including property damage, serious personal injury or death that can result from using it unsafely. We want you to shoot your Ravin Crossbow safely.
Your safety and the safety of others requires that you always remain aware of the danger inherent in handling your Ravin Crossbow. You are responsible for safely operating your Ravin Crossbow.
Your Ravin Crossbow is a precision weapon, engineered to work with the tolerances and designs of genuine Ravin components and accessories (including, arrows, nocks, bowstring, and cables). To safely achieve the potential of your Ravin Crossbow it is essential that you use only Ravin components and accessories. Use of non-Ravin components and accessories will degrade the performance of your bow and may cause the system to not operate as designed, potentially resulting in an unsafe condition that could lead to serious injury or death.
Product warranty registration is for your safety and convenience. Registering your product will ensure you receive any important updates pertaining to your Ravin Crossbow. Please register your Ravin Crossbow online at: ravincrossbows.com/support/register.
SERIOUS INJURY WILL RESULT FROM DISCHARGING YOUR RAVIN CROSSBOW WITH ANY PART OF YOUR BODY IN THE RELEASE PATH OF THE BOWSTRING. TO AVOID POSSIBLE FINGER AMPUTATION, ALWAYS KEEP FINGERS OUT OF THE BOWSTRING PATH AND BELOW THE FINGER GUARD.
TO MINIMIZE RISK OF PROPERTY DAMAGE, DEATH, OR SERIOUS INJURY:DO NOT REMOVE, MODIFY, OR DEACTIVATE THE SAFETY FEATURES ON YOUR RAVIN CROSSBOW OR ANY OF ITS PARTS OR ACCESSORIES.DO NOT USE YOUR RAVIN CROSSBOW FOR ANY PURPOSE OTHER THAN HUNTING OR TARGET SHOOTING.
DANGER
WARNING

1 1
USE ONLY RAVIN COMPONENTS AND ACCESSORIES DESIGNED TO WORK WITH THE TOLERANCES OF YOUR RAVIN CROSSBOW.FOLLOW THE SAFETY ADVICE AND INSTRUCTIONS IN THIS MANUAL.ALWAYS WEAR SAFETY GLASSES WHEN HANDLING OR USING YOUR RAVIN CROSSBOW.ALWAYS KEEP YOUR FINGERS BELOW THE FINGER GUARD.UNLOAD AND UNCOCK BEFORE TRANSPORTING OR PERFORMING MAINTENANCE ON YOUR RAVIN CROSSBOW.• STORE YOUR RAVIN CROSSBOW IN A LOCKED CABINET OR SAFE,
WELL BEYOND THE REACH OF CHILDREN.• DO NOT RELY TOTALLY ON ANY MECHANICAL SAFETY MECHANISM.
ONLY SAFE HANDLING HABITS WILL ENSURE THE SAFE USE OF YOUR RAVIN CROSSBOW.
• HANDLE YOUR RAVIN CROSSBOW CAREFULLY, ESPECIALLY WHEN COCKED AND LOADED.
• ALWAYS POINT YOUR CROSSBOW IN A SAFE DIRECTION AND NEVER POINT YOUR CROSSBOW IN THE DIRECTION OF ANOTHER PERSON
Ensure all users of your Ravin Crossbow follow the safety advice and instructions in this manual, keep this manual with your Ravin Crossbow.
The warranty for your Ravin Crossbow is void if any of the following occur:
The instructions in the manual are not followed.
Your Ravin Crossbow or any of its parts or accessories are modified from their original condition.
Damage is caused from abuse or neglect.
Damage is caused by dry firing or by using underweight arrows.
Use of arrows, nocks, string, or cables other than genuine Ravin components.
Your Ravin Crossbow is disassembled.
Use of replacement parts not approved by the manufacturer.
Damage to the scope from over-tightening the mounting rings.
Use of fixed-blade broadheads with a maximum diameter greater than 1 1/2” with the R500 Series.
CAUTION
NOTICE

R AVIN R500 SERIES USER MANUAL | 7 15 .7 18 .35 74 | R AVINCROSSBOWS.COM
A. Mounting the ScopeThe scope is specifically designed for your Ravin Crossbow. While the dovetail scope mount rail will accept a variety of crossbow scopes, accuracy may be degraded by using a crossbow scope not matched to your Ravin Crossbow.
We highly recommended that you have your scope mounted at your local pro shop. If you elect to mount the scope yourself, please use the following procedure.
1. Attach each scope ring base on the rail approximately in the positions shown, considering proper eye relief of approximately 2"- 3" from your eye to the eyepiece when holding your Ravin Crossbow in a shooting position (Figure 1). Lightly snug up the nut or screw on each scope ring base so you can still adjust them on the rail.
2. Lay the scope into the ring bases. Place the top rings on the ring bases so the scope is surrounded (Figure 2). Lightly snug up the screws on the top rings so you can still freely move the scope in the rings.
3. Before tightening the rings, look through the scope in your normal shooting position. Adjust the scope (forward or backward) until you find the furthest point forward to ensure maximum eye relief (at least 2 inches from your eye) that allows you to see a full field of view. Tighten each scope ring base nut or screw to 40 in.-lbs.
4. Position your Ravin Crossbow as level as possible. Place a level on the limb mounts to confirm your Ravin Crossbow is level (Figure 3).
5. Place a level on the elevation turret. Rotate the scope in the rings until it is level with your limb mounts (Figure 4). The horizontal reticle markings should be parallel with your Ravin Crossbow limbs.
6. Tighten the scope ring screws, alternating between front and back screws, while keeping an eye on your scope levels. Keep slightly tightening and alternating from front to back and torque to 30 in.-lbs. Over-tightening the mounting rings will damage the scope and void the warranty!
SECTION 3 – MOUNTING THE SCOPE, QUIVER AND DRAW HANDLE
Figure 4
LEVEL SCOPE
Figure 3
LEVEL LIMBS
Figure 2
TOP RINGS
Figure 1
BOTTOM RINGS
Figure 5

13
7. Rotate the FPS selection dial to match the manufacturers advertised speed of your Ravin Crossbow (Figure 5).
B. Attaching and Removing the QuiverAttach the mounting bracket to the bottom of your Ravin Crossbow. Screw the mounting bracket into the hole on the bottom of the Picatinny rail with the sloped surfaces on the mounting bracket pointing forward (Figure 6).
1. To attach the Quiver to the mounting bracket, press and hold the thumb release on the mounting bracket (Figure 7). Position the posts of the quiver in the holes on the mounting bracket with the hood facing forward (Figure 8). Release the thumb release to lock the quiver in place. Reverse the process to remove the quiver from your crossbow.
2. The quiver can be mounted on either side of the mounting bracket. Most right-handed shooters prefer to locate the quiver on the right side of your Ravin Crossbow (when viewed from the top of your Ravin Crossbow).
C. Attaching and Removing the Draw Handle1. Attach the mounting bracket to the bottom of your Ravin Crossbow. Screw the
mounting bracket into the hole on the bottom of the Picatinny rail with the sloped surfaces on the mounting bracket pointing forward (Figure 9).
2. Position the handle in the slots on the draw handle bracket with the draw handle grip facing forward (Figure 10). Press firmly and the draw handle will snap into position. Reverse the process to remove the draw handle from your Ravin Crossbow.
3. The draw handle can be mounted on either side of the mounting bracket. Most right-handed shooters prefer to locate the draw handle bracket on the left side of your Ravin Crossbow (when viewed from the top of your Ravin Crossbow).
Figure 10
Figure 6 Figure 8Figure 7
Figure 9

R AVIN R500 SERIES USER MANUAL | 7 15 .7 18 .35 74 | R AVINCROSSBOWS.COM
TO MINIMIZE RISK OF SERIOUS INJURY FROM IMPROPER USE OR SELECTION OF ARROWS FOR YOUR RAVIN CROSSBOW:• USE ONLY R500 ARROWS IN YOUR R500 SERIES CROSSBOWS• USE ONLY RAVIN ARROWS WITH RAVIN CLIP-ON NOCKS RECOMMENDED
FOR THIS RAVIN CROSSBOW.• DO NOT USE RAVIN ARROWS ON ANY OTHER CROSSBOW.• FULLY ENGAGE THE RAVIN CLIP-ON NOCK WITH THE BOWSTRING. DOING
SO REQUIRES A SIGNIFICANT AMOUNT OF FORCE. YOU SHOULD HEAR AN AUDIBLE CLICK.
• CONFIRM THE NOCK IS PROPERLY INDEXED WITH THE ODD COLOR (WHITE) FLETCHING DOWN.
• DO NOT USE FIXED-BLADE BROADHEADS WITH A MAXIMUM DIAMETER GREATER THAN 1 1/2".
• USE ONLY MECHANICAL BROADHEADS RATED FOR CROSSBOWS. PREMATURE BLADE OPENING CAN DEFLECT THE ARROW IN AN UNINTENDED DIRECTION AND DAMAGE YOUR RAVIN CROSSBOW.
• INSPECT CARBON ARROW SHAFTS AND NOCKS FOR HAIRLINE FRACTURES OR CRACKS. FIRING A DAMAGED ARROW CAN CAUSE THE ARROW SHAFT TO SHATTER, SCATTERING FRAGMENTS. FIRING AN ARROW WITH A DAMAGED NOCK CAN CAUSE THE BOW TO DRY FIRE. ANY DAMAGED ARROWS SHOULD BE DISPOSED OF IMMEDIATELY.
• NEVER USE PLIERS OR OTHER METAL TOOLS TO PULL ARROWS OUT OF TARGETS.
• INSPECT AND FLEX ARROWS FOR DAMAGE. DAMAGED ARROWS CAN FLY IN UNINTENDED DIRECTIONS.
• DO NOT USE ARROWS WITH FLAT, HALF-MOON, SLOTTED MOON, OR UNIVERSAL NOCKS.
• DO NOT USE ARROWS LIGHTER THAN 400 GRAINS (INCLUDING TIP). LIGHTER ARROWS CAN CAUSE A DRY FIRE EFFECT AND RESULT IN LIMBS BREAKAGE.
• DO NOT FIRE YOUR CROSSBOW IF THE CENTER SERVING IS WORN, DAMAGED OR SEPARATED.
• INSPECT STRINGS AND CABLES BEFORE EACH USE. IMMEDIATELY REPLACE WORN, FRAYING, SEPARATED OR DAMAGED STRINGS, CABLES OR CENTER SERVING.
SECTION 4 – ARROW & NOCK SELECTION AND INSPECTION
WARNING

15
• Damage to your Ravin Crossbow caused by firing a damaged or unapproved arrow or broadhead is not covered by the warranty.
USE ONLY R500 ARROWS IN YOUR R500 SERIES CROSSBOWSYour Ravin Crossbow is specifically engineered to work with designs, dimensions, tolerances, and materials of genuine Ravin components and accessories. Use of non-Ravin components and accessories, including non-Ravin arrows and nocks or non-Ravin string and cables, may cause the system to not operate as designed, potentially resulting in an unsafe condition that could lead to serious injury or death.
Ravin Arrows with Ravin Clip-on nocks are specifically designed for use with the Ravin String and Cables on your Ravin Crossbow. Use of any arrows or nocks not designed for use with your Ravin Crossbow may not have the same designs, dimensions, tolerances, or materials, which could potentially interfere with the operation of your crossbow, including but not limited to the anti-dry fire trigger mechanism, and lead to serious injury or death. DO NOT USE NON-RAVIN ARROWS OR NOCKS. Ravin Arrows are included with your Ravin Crossbow.
The anti-dry fire mechanism on your Ravin Crossbow is located behind the bowstring and is designed to accommodate and work with the combination of Ravin Clip-on nocks and Ravin Strings and Cables. The Ravin Clip-on nock may not properly engage with any non-Ravin bowstring or with a center serving that is worn, damaged or separated. The trigger and anti-dry fire system are not intended or designed to be used with any other nocks, such as flat, half-moon, slotted moon, or universal nocks. Ravin Arrows are specifically designed for this model Ravin Crossbow and CANNOT be used on any other crossbow.
Ravin Clip-on nocks are molded from a fiber-reinforced material designed to better withstand the extreme forces generated by your Ravin Crossbow. Non-Ravin nocks may fracture, creating a dry fire condition that can damage your crossbow. The rear metal inserts glued in your Ravin Arrows more uniformly distribute bowstring energy to the arrow shaft. Arrow shafts without a metal insert are more likely to fracture, creating a dry fire condition and potentially discharging sharp fragments of the broken arrow shaft at high speeds. DO NOT USE NON-RAVIN ARROWS OR NOCKS WITH YOUR RAVIN CROSSBOW.Use only R500 Series Ravin Arrows with the Ravin Clip-on nock recommended for this Ravin Crossbow. The Ravin Arrows are correctly weighted and include the required Ravin Clip-on nock. Lighter arrows are not designed to absorb the high energy generated by your Ravin Crossbow and will create a dry fire condition that can damage the crossbow.
Visually inspect each arrow for damage before each use. Look for damage to the nock and vanes. Check for any splintering or cracking to the carbon shaft by flexing the arrow back and forth in your hand. Rotate and repeat this inspection process four to five times around the entire circumference of the shaft. If you find an arrow to be damaged
NOTICE
Properly flex-test each arrow

R AVIN R500 SERIES USER MANUAL | 7 15 .7 18 .35 74 | R AVINCROSSBOWS.COM
in any way, discard it immediately. Firing a damaged arrow can cause serious personal injury and damage to your Ravin Crossbow.
Make sure the nock and odd color (white) fletching are properly oriented. The nock opening should be perpendicular to the white (cock) fletching. If the nock is not in the proper orientation, rotate the nock to the required position. Inspect the nock to insure there are no chips or cracks. If the nock is damaged, discard the damaged nock and replace with an approved Ravin clip on nock.
Do NOT use fixed-blade broadheads with a maximum diameter greater than 1 1/2". Use only mechanical broadheads rated for crossbows. Premature blade opening can deflect the arrow in an unintended direction and/or damage your Ravin Crossbow.
Fletching may become curled or deformed during storage and transport. Be sure fletching’s are perfectly straight before use. To straighten fletching’s that have become curled or deformed, run hot water over fletching’s until they become straight.
TO MINIMIZE RISK OF DEATH OR SERIOUS INJURY WHEN SHOOTING YOUR RAVIN CROSSBOW:• DO NOT REMOVE, MODIFY, OR DEACTIVATE THE SAFETY FEATURES ON
YOUR RAVIN CROSSBOW.• NEVER MOVE THE SAFETY TO THE FIRE POSITION UNTIL YOU ARE READY
TO FIRE.• DO NOT PUT YOUR FINGER IN THE TRIGGER GUARD WHILE DEACTIVATING
THE SAFETY OR YOU MIGHT INADVERTENTLY PULL THE TRIGGER.• DO NOT PUT YOUR FINGER ON THE TRIGGER UNTIL YOU ARE READY TO
FIRE YOUR RAVIN CROSSBOW.• NEVER PUT YOUR FINGER ON THE TRIGGER OF YOUR RAVIN CROSSBOW
WHEN LOADING WITH THE SAFETY OFF. DOING SO IS A DANGEROUS PRACTICE THAT CAN RESULT IN ACCIDENTAL DISCHARGE OF YOUR RAVIN CROSSBOW.
• DO NOT RELY TOTALLY ON ANY MECHANICAL SAFETY MECHANISM. ONLY SAFE HANDLING HABITS WILL ENSURE THE SAFE USE OF YOUR RAVIN CROSSBOW.
• DO NOT APPLY WAX TO THE CENTER SERVING OR THE BOWSTRING. WAX BUILDUP ON THE BOWSTRING CLASP CAN LEAD TO TRIGGER
SECTION 5 – OVERVIEW OF THE TRIGGER, SAFETY AND ANTI-DRYFIRE
WARNING
White fletch down
Nock opening perpendicular
Example of curled or deformed fletchings

1 7
MALFUNCTION, INCLUDING A DELAY IN BOWSTRING RELEASE AFTER TRIGGER PULL IN COLD TEMPERATURES.
• DO NOT USE NON-RAVIN COMPONENTS AND ACCESSORIES. NON-RAVIN COMPONENTS AND ACCESSORIES MAY CAUSE THE SYSTEM TO NOT OPERATE AS DESIGNED, POTENTIALLY RESULTING IN AN UNSAFE CONDITION THAT COULD LEAD TO SERIOUS INJURY OR DEATH.
The Trac Trigger Firing System™ (TTFS) that slides along the rail contains the safety and anti-dry fire mechanisms (Figure 11). Engaging the TTFS with the bowstring automatically activates the safety and the anti-dry fire mechanism. The safety is in the SAFE position (pointing at white dot) when the TTFS is engaged with the bowstring. If the safety is not engaged, push the safety to the SAFE position.
The trigger mechanism works in conjunction with the Trac Trigger Firing System™. When the TTFS housing is in the rearmost position the trigger mechanism is automatically engaged.
The trigger pull on your Ravin Crossbow is about 4.0 pounds, which is one of the most precise of any crossbow on the market. Do not put your finger inside the trigger guard while deactivating the safety or you might inadvertently pull the trigger. Do not put your finger on the trigger until you are ready to fire. The safety must always be in the SAFE position (pointing at white dot) until you are ready to fire (Figure 12).
The anti-dry fire mechanism will only disengage when a Ravin Arrow is fully inserted into the trigger mechanism and the Ravin Clip-on nock is clipped onto the bowstring. Flat, half-moon, slotted moon, or universal nocks will not release the anti-dry fire mechanism. Nocking a Ravin Arrow on the string disengages the anti-dry fire mechanism.
Moving the safety to the FIRE position (pointing at red dot) will allow your Ravin Crossbow to fire when the trigger is pulled (Figure 13).
Figure 11 Figure 12 Figure 13

R AVIN R500 SERIES USER MANUAL | 7 15 .7 18 .35 74 | R AVINCROSSBOWS.COM
TO MINIMIZE RISK OF SERIOUS INJURY FROM ACCIDENTAL DISCHARGE DURING COCKING OR UNCOCKING OF YOUR RAVIN CROSSBOW:• ALWAYS WEAR SAFETY GLASSES.• VERIFY THE SAFETY IS IN THE SAFE POSITION.• DO NOT PLACE ANY PART OF YOUR BODY INTO
THE BOWSTRING PATH.• DO NOT ATTEMPT TO COCK OR UNCOCK
YOUR RAVIN CROSSBOW BY HAND.• DO NOT LEAVE YOUR RAVIN CROSSBOW
COCKED WHEN IT IS NOT IN USE OR UNSUPERVISED.
• REMOVE ANY DEBRIS OR OBSTRUCTION ON THE DRAW HANDLE OR IN THE RECESSED HOLE.
• DRAW HANDLE CONTAINS A POWERFUL MAGNET THAT MAY INTERFERE WITH PACEMAKERS OR MEDICAL IMPLANTS.
• Do not leave your Ravin Crossbow cocked for more than 8 hours.
A. Cocking - Manually1. Remove the draw handle from the mounting bracket.
Remove any debris or obstruction between the drive shaft and draw handle (Figure 14).
2. Place the draw handle head in the recessed hole on either side of the stock. There is a magnet in the draw handle that will assist in holding the handle in place.
SECTION 6 – COCKING AND UNCOCKING
WARNING
NOTICE
Figure 16
Figure 19
Figure 14
Figure 15
Figure 17
Figure 18
1 9
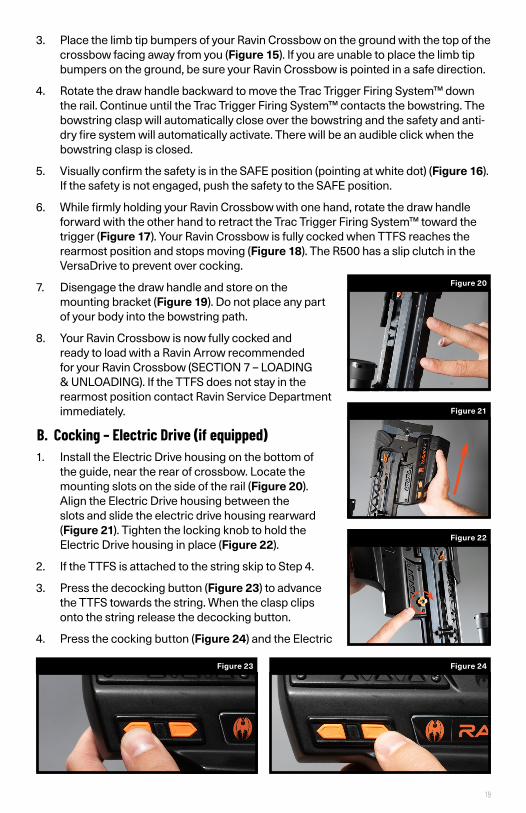
3. Place the limb tip bumpers of your Ravin Crossbow on the ground with the top of the crossbow facing away from you (Figure 15). If you are unable to place the limb tip bumpers on the ground, be sure your Ravin Crossbow is pointed in a safe direction.
4. Rotate the draw handle backward to move the Trac Trigger Firing System™ down the rail. Continue until the Trac Trigger Firing System™ contacts the bowstring. The bowstring clasp will automatically close over the bowstring and the safety and anti-dry fire system will automatically activate. There will be an audible click when the bowstring clasp is closed.
5. Visually confirm the safety is in the SAFE position (pointing at white dot) (Figure 16). If the safety is not engaged, push the safety to the SAFE position.
6. While firmly holding your Ravin Crossbow with one hand, rotate the draw handle forward with the other hand to retract the Trac Trigger Firing System™ toward the trigger (Figure 17). Your Ravin Crossbow is fully cocked when TTFS reaches the rearmost position and stops moving (Figure 18). The R500 has a slip clutch in the VersaDrive to prevent over cocking.
7. Disengage the draw handle and store on the mounting bracket (Figure 19). Do not place any part of your body into the bowstring path.
8. Your Ravin Crossbow is now fully cocked and ready to load with a Ravin Arrow recommended for your Ravin Crossbow (SECTION 7 – LOADING & UNLOADING). If the TTFS does not stay in the rearmost position contact Ravin Service Department immediately.
B. Cocking – Electric Drive (if equipped)1. Install the Electric Drive housing on the bottom of
the guide, near the rear of crossbow. Locate the mounting slots on the side of the rail (Figure 20). Align the Electric Drive housing between the slots and slide the electric drive housing rearward (Figure 21). Tighten the locking knob to hold the Electric Drive housing in place (Figure 22).
2. If the TTFS is attached to the string skip to Step 4.
3. Press the decocking button (Figure 23) to advance the TTFS towards the string. When the clasp clips onto the string release the decocking button.
4. Press the cocking button (Figure 24) and the Electric
Figure 20
Figure 23 Figure 24
Figure 22
Figure 21
R AVIN R500 SERIES USER MANUAL | 7 15 .7 18 .35 74 | R AVINCROSSBOWS.COM
Drive will retract the TTFS until it reaches the rearmost position. The Electric Drive will automatically shut off and you must release the cocking button.
5. Your Ravin Crossbow is now fully cocked and ready to load with the Ravin Arrow recommended for your Ravin Crossbow (SECTION 7 – LOADING & UNLOADING). If the TTFS does not stay in the rearmost position contact Ravin Service Department immediately.
C. Uncocking - Manually1. Point your Ravin Crossbow in a safe direction.
2. Visually confirm the safety is in the SAFE position (pointing at white dot). If the safety is not engaged, push the safety to the SAFE position.
3. Unload your Ravin Crossbow as explained in SECTION 7 – LOADING & UNLOADING before uncocking your Ravin Crossbow.
4. Remove the draw handle from the mounting bracket. Remove any debris or obstruction between the drive shaft and draw handle.
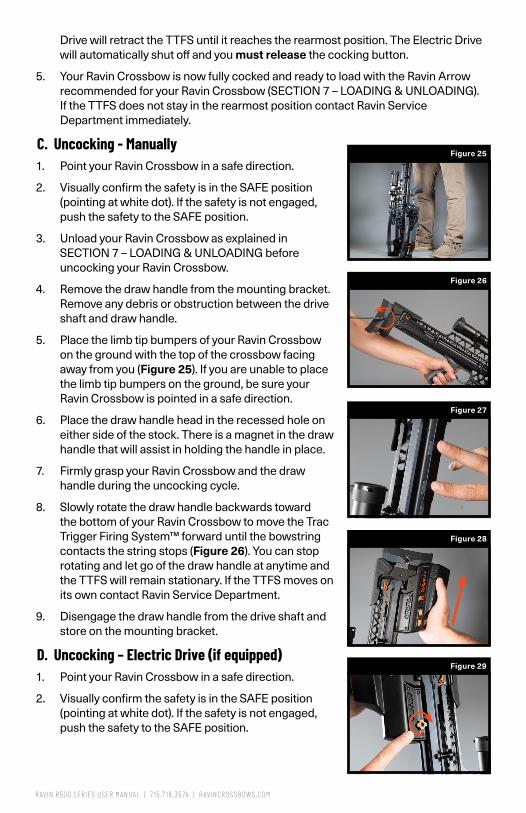
5. Place the limb tip bumpers of your Ravin Crossbow on the ground with the top of the crossbow facing away from you (Figure 25). If you are unable to place the limb tip bumpers on the ground, be sure your Ravin Crossbow is pointed in a safe direction.
6. Place the draw handle head in the recessed hole on either side of the stock. There is a magnet in the draw handle that will assist in holding the handle in place.
7. Firmly grasp your Ravin Crossbow and the draw handle during the uncocking cycle.
8. Slowly rotate the draw handle backwards toward the bottom of your Ravin Crossbow to move the Trac Trigger Firing System™ forward until the bowstring contacts the string stops (Figure 26). You can stop rotating and let go of the draw handle at anytime and the TTFS will remain stationary. If the TTFS moves on its own contact Ravin Service Department.
9. Disengage the draw handle from the drive shaft and store on the mounting bracket.
D. Uncocking – Electric Drive (if equipped)1. Point your Ravin Crossbow in a safe direction.
2. Visually confirm the safety is in the SAFE position (pointing at white dot). If the safety is not engaged, push the safety to the SAFE position.
Figure 27
Figure 25
Figure 28
Figure 29
Figure 26

2 1
3. Unload your Ravin Crossbow as explained in SECTION 7 – LOADING & UNLOADING before uncocking your Ravin Crossbow.
4. If the Electric Drive is mounted on the crossbow, skip to step 6.
5. Install the Electric Drive on the bottom of the guide, near the back of crossbow. Locate the mounting slots on the side of the rail (Figure 27). Align the Electric Drive housing between the slots and slide the housing rearward (Figure 28). Tighten the locking knob to hold the housing in place (Figure 29
6. Depress the decocking button (Figure 30) to advance the TTFS towards the string stops. When the string contacts the sting stops release the decocking button.
7. Your Ravin Crossbow is now fully uncocked.
TO MINIMIZE RISK OF SERIOUS INJURY FROM ACCIDENTAL DISCHARGE DURING LOADING AND UNLOADING OF YOUR RAVIN CROSSBOW:• USE ONLY R500 SERIES ARROWS IN YOUR R500 SERIES CROSSBOW• ALWAYS WEAR SAFETY GLASSES WHEN LOADING AND UNLOADING YOUR
RAVIN CROSSBOW.• VERIFY THE SAFETY IS IN THE SAFE POSITION BEFORE LOADING OR
UNLOADING AN ARROW.• DO NOT PLACE ANY PART OF YOUR BODY INTO THE BOWSTRING PATH.• DO NOT LOAD AN ARROW IN YOUR RAVIN CROSSBOW UNTIL YOU ARE AT
YOUR SHOOTING LOCATION.• INDEX YOUR ARROW WITH THE ODD COLOR (WHITE) FLETCHING
FACING DOWN.• UNLOAD YOUR RAVIN CROSSBOW BEFORE MOVING TO A DIFFERENT
SHOOTING LOCATION.• CAREFULLY HOLD THE ARROW JUST BEHIND THE BROADHEAD OR POINT.
NEVER POSITION YOUR HAND IN FRONT OF THE ARROW TIP.• FULLY ENGAGE THE RAVIN CLIP-ON NOCK WITH THE BOWSTRING. DOING
SO REQUIRES ABOUT 5 POUNDS OF FORCE. YOU SHOULD HEAR AN AUDIBLE CLICK.
• POINT YOUR RAVIN CROSSBOW IN A SAFE DIRECTION WHEN LOADING OR UNLOADING.
SECTION 7 – LOADING AND UNLOADING
WARNING
Figure 30

R AVIN R500 SERIES USER MANUAL | 7 15 .7 18 .35 74 | R AVINCROSSBOWS.COM
A. Loading1. Inspect and flex your Ravin Arrow as discussed in SECTION 4 – ARROW & NOCK
SELECTION AND INSPECTION. Do NOT use fixed-blade broadheads with a maximum diameter greater than 1 1/2". Use only mechanical broadheads rated for crossbows. Premature blade opening can deflect the arrow in an unintended direction and damage your Ravin Crossbow.
2. Cock your Ravin Crossbow as discussed in SECTION 6 - COCKING AND UNCOCKING. Visually confirm that the safety is in the SAFE position (pointing at white dot). If the safety is not engaged, push the safety to the SAFE position.
3. Point your Ravin Crossbow in a safe direction when loading or unloading. NEVER PLACE YOUR HAND IN THE BOWSTRING PATH (Figure 31). Always keep your hand forward of the string stops.
4. Grasp your Ravin Arrow directly behind the tip (Figure 32). Never position your hand in front of the arrow tip. The odd color (white) fletching must be positioned downward in the guide (SECTION 4 – ARROW & NOCK SELECTION AND INSPECTION).
5. With your crossbow pointed in a safe direction, insert the nock end of the Ravin Arrow under the top cover and into the center of the TTFS (Figure 33) until the Ravin Clip-on nock clips onto the bowstring. It takes a significant amount of force to fully engage a Ravin Arrow with the bowstring so push firmly. You should hear an audible click. If you are unsure whether the arrow is fully nocked, pull the arrow forward and completely remove the nock from the TTFS and try again. Confirm that the odd color (white) fletching is in the down position. If the Ravin Clip-on nock is not fully clipped onto the string, your Ravin Crossbow will not fire.
6. Lay the Ravin Arrow centered on the arrow rest just forward of the string stops on your Ravin Crossbow (Figure 34). Your Ravin Crossbow is now fully loaded and ready to fire. Sliding the safety to the FIRE position (pointing at red dot) will allow your Ravin Crossbow to fire!
B. Unloading your Cocked Crossbow1. Point your Ravin Crossbow in a safe direction.
2. Visually confirm that the safety is in the SAFE position (pointing at white dot). If the safety is not engaged, push the safety to the SAFE position.
3. Grasp your Ravin Arrow directly behind the tip and pull the arrow forward until it clears the top cover (Figure 35). NEVER PLACE YOUR HAND IN THE BOWSTRING PATH (Figure 36). Always keep your hand in front of the string stops.
4. Secure the arrow in the quiver.
5. Your Ravin Crossbow is now unloaded and can be uncocked (SECTION 6 - COCKING AND UNCOCKING).
SERIOUS INJURY CAN RESULT FROM DISCHARGING YOUR RAVIN CROSSBOW WITH ANY PART OF YOUR BODY IN THE RELEASE PATH OF THE BOWSTRING. TO AVOID POSSIBLE FINGER AMPUTATION, ALWAYS KEEP FINGERS OUT OF THE BOWSTRING PATH AND BELOW THE FINGER GUARD.
SERIOUS INJURY CAN RESULT FROM DISCHARGING YOUR RAVIN CROSSBOW WITH ANY PART OF YOUR BODY IN THE RELEASE PATH OF THE BOWSTRING. TO AVOID POSSIBLE FINGER AMPUTATION, ALWAYS KEEP FINGERS OUT OF THE BOWSTRING PATH AND BELOW THE FINGER GUARD.
TO MINIMIZE RISK OF DEATH OR SERIOUS INJURY WHEN SHOOTING YOUR RAVIN CROSSBOW:• ONLY USE R500 SERIES ARROWS IN YOUR R500 SERIES CROSSBOW• FOLLOW THE SAFETY ADVICE AND INSTRUCTIONS IN THIS MANUAL.• DO NOT REMOVE, MODIFY, OR DEACTIVATE THE SAFETY FEATURES ON
YOUR RAVIN CROSSBOW.• DO NOT USE YOUR RAVIN CROSSBOW FOR ANY PURPOSE OTHER THAN
HUNTING OR TARGET SHOOTING.• DO NOT DISCHARGE YOUR RAVIN CROSSBOW WITH ANY PART OF
YOUR BODY IN THE RELEASE PATH OF THE BOWSTRING.• ALWAYS WEAR SAFETY GLASSES WHEN SHOOTING YOUR
RAVIN CROSSBOW.• NEVER MOVE THE SAFETY TO THE FIRE POSITION UNTIL YOU ARE READY
TO FIRE YOUR RAVIN CROSSBOW.
SECTION 8 – SHOOTING YOUR RAVIN CROSSBOW
DANGER
WARNING
Figure 32
Figure 31
Figure 33
Figure 34
SAFE ZONE
Figure 35 Figure 36
SAFE ZONE
ARROW REST

23
B. Unloading your Cocked Crossbow1. Point your Ravin Crossbow in a safe direction.
2. Visually confirm that the safety is in the SAFE position (pointing at white dot). If the safety is not engaged, push the safety to the SAFE position.
3. Grasp your Ravin Arrow directly behind the tip and pull the arrow forward until it clears the top cover (Figure 35). NEVER PLACE YOUR HAND IN THE BOWSTRING PATH (Figure 36). Always keep your hand in front of the string stops.
4. Secure the arrow in the quiver.
5. Your Ravin Crossbow is now unloaded and can be uncocked (SECTION 6 - COCKING AND UNCOCKING).
SERIOUS INJURY CAN RESULT FROM DISCHARGING YOUR RAVIN CROSSBOW WITH ANY PART OF YOUR BODY IN THE RELEASE PATH OF THE BOWSTRING. TO AVOID POSSIBLE FINGER AMPUTATION, ALWAYS KEEP FINGERS OUT OF THE BOWSTRING PATH AND BELOW THE FINGER GUARD.
SERIOUS INJURY CAN RESULT FROM DISCHARGING YOUR RAVIN CROSSBOW WITH ANY PART OF YOUR BODY IN THE RELEASE PATH OF THE BOWSTRING. TO AVOID POSSIBLE FINGER AMPUTATION, ALWAYS KEEP FINGERS OUT OF THE BOWSTRING PATH AND BELOW THE FINGER GUARD.
TO MINIMIZE RISK OF DEATH OR SERIOUS INJURY WHEN SHOOTING YOUR RAVIN CROSSBOW:• ONLY USE R500 SERIES ARROWS IN YOUR R500 SERIES CROSSBOW• FOLLOW THE SAFETY ADVICE AND INSTRUCTIONS IN THIS MANUAL.• DO NOT REMOVE, MODIFY, OR DEACTIVATE THE SAFETY FEATURES ON
YOUR RAVIN CROSSBOW.• DO NOT USE YOUR RAVIN CROSSBOW FOR ANY PURPOSE OTHER THAN
HUNTING OR TARGET SHOOTING.• DO NOT DISCHARGE YOUR RAVIN CROSSBOW WITH ANY PART OF
YOUR BODY IN THE RELEASE PATH OF THE BOWSTRING.• ALWAYS WEAR SAFETY GLASSES WHEN SHOOTING YOUR
RAVIN CROSSBOW.• NEVER MOVE THE SAFETY TO THE FIRE POSITION UNTIL YOU ARE READY
TO FIRE YOUR RAVIN CROSSBOW.
SECTION 8 – SHOOTING YOUR RAVIN CROSSBOW
DANGER
WARNING

R AVIN R500 SERIES USER MANUAL | 7 15 .7 18 .35 74 | R AVINCROSSBOWS.COM
• WHEN SHOOTING FROM A BENCH REST DO NOT PERMIT YOUR FORE-GRIP HAND TO ROTATE INTO THE BOWSTRING PATH.
• DO NOT TILT YOUR RAVIN CROSSBOW FROM SIDE TO SIDE.• DO NOT PUT YOUR FINGER ON THE TRIGGER UNTIL YOU ARE READY TO
FIRE YOUR RAVIN CROSSBOW.• KNOW YOUR INTENDED TARGET AND WHAT IS BEYOND IT BEFORE
PULLING THE TRIGGER. AN ARROW CAN CAUSE DEATH OR SERIOUS INJURY EVEN BEYOND ITS EFFECTIVE HUNTING RANGE.
• BE CERTAIN YOUR BACKSTOP IS ADEQUATE WHEN TARGET SHOOTING.• ALWAYS KEEP YOUR LOADED RAVIN CROSSBOW POINTED TOWARD
THE TARGET. ACCIDENTALLY POINTING IT IN THE DIRECTION OF OTHERS CAN CAUSE DEATH OR SERIOUS INJURY IN THE EVENT OF ACCIDENTAL DISCHARGE.
• APPLY A NON-WAX LUBRICANT (RAVIN SERVING FLUID) TO THE CENTER SERVING OF THE BOWSTRING BEFORE OPERATING YOUR RAVIN CROSSBOW IN TEMPERATURES BELOW 32˚ F.
• DO NOT FIRE YOUR RAVIN CROSSBOW IF IT IS NOT IN PROPER WORKING CONDITION. IF YOU HAVE ANY QUESTIONS, CONTACT CUSTOMER SERVICE AT 715.718.3574.
• UNLOAD YOUR RAVIN CROSSBOW BEFORE HANDING IT TO ANOTHER PERSON.
• KEEP BYSTANDERS WELL BEHIND YOU WHEN SHOOTING YOUR RAVIN CROSSBOW. A MALFUNCTION OF YOUR RAVIN CROSSBOW CAN CAUSE DEATH OR SERIOUS INJURY TO BYSTANDERS.
• REQUIRE BYSTANDERS TO ALWAYS WEAR SAFETY GLASSES.• NEVER ALLOW YOUR RAVIN CROSSBOW TO BE USED BY ANYONE WHO HAS
NOT READ AND UNDERSTANDS THIS MANUAL.• DO NOT RELY TOTALLY ON YOUR RAVIN CROSSBOW’S SAFETY
MECHANISM. ONLY SAFE HANDLING HABITS WILL ENSURE THE SAFE USE OF YOUR RAVIN CROSSBOW.
• SEEK A DOCTOR’S ADVICE IF YOU ARE TAKING MEDICATION TO BE SURE THAT YOU CAN SHOOT AND HANDLE A RAVIN CROSSBOW SAFELY.
• DO NOT CONSUME DRUGS OR ALCOHOL BEFORE OR WHILE USING YOUR RAVIN CROSSBOW. YOUR VISION AND JUDGMENT CAN BE SERIOUSLY IMPAIRED, MAKING YOUR HANDLING OF YOUR RAVIN CROSSBOW UNSAFE.
25
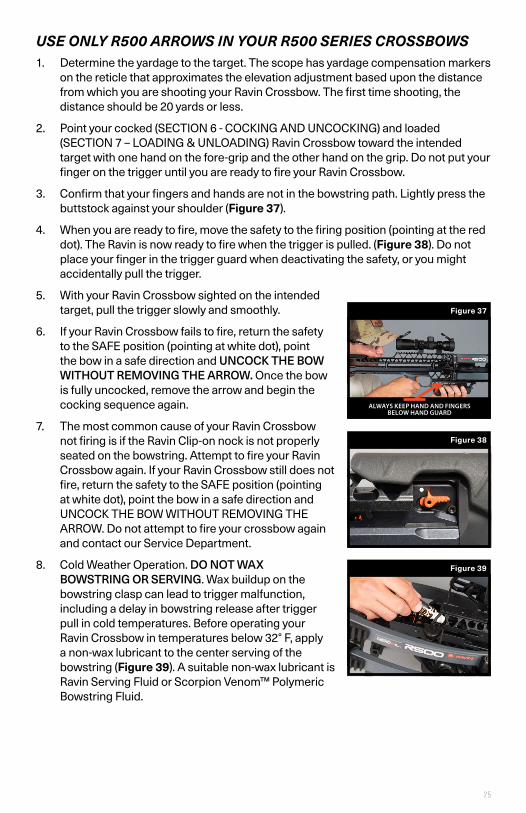
USE ONLY R500 ARROWS IN YOUR R500 SERIES CROSSBOWS1. Determine the yardage to the target. The scope has yardage compensation markers
on the reticle that approximates the elevation adjustment based upon the distance from which you are shooting your Ravin Crossbow. The first time shooting, the distance should be 20 yards or less.
2. Point your cocked (SECTION 6 - COCKING AND UNCOCKING) and loaded (SECTION 7 – LOADING & UNLOADING) Ravin Crossbow toward the intended target with one hand on the fore-grip and the other hand on the grip. Do not put your finger on the trigger until you are ready to fire your Ravin Crossbow.
3. Confirm that your fingers and hands are not in the bowstring path. Lightly press the buttstock against your shoulder (Figure 37).
4. When you are ready to fire, move the safety to the firing position (pointing at the red dot). The Ravin is now ready to fire when the trigger is pulled. (Figure 38). Do not place your finger in the trigger guard when deactivating the safety, or you might accidentally pull the trigger.
5. With your Ravin Crossbow sighted on the intended target, pull the trigger slowly and smoothly.
6. If your Ravin Crossbow fails to fire, return the safety to the SAFE position (pointing at white dot), point the bow in a safe direction and UNCOCK THE BOW WITHOUT REMOVING THE ARROW. Once the bow is fully uncocked, remove the arrow and begin the cocking sequence again.
7. The most common cause of your Ravin Crossbow not firing is if the Ravin Clip-on nock is not properly seated on the bowstring. Attempt to fire your Ravin Crossbow again. If your Ravin Crossbow still does not fire, return the safety to the SAFE position (pointing at white dot), point the bow in a safe direction and UNCOCK THE BOW WITHOUT REMOVING THE ARROW. Do not attempt to fire your crossbow again and contact our Service Department.
8. Cold Weather Operation. DO NOT WAX BOWSTRING OR SERVING. Wax buildup on the bowstring clasp can lead to trigger malfunction, including a delay in bowstring release after trigger pull in cold temperatures. Before operating your Ravin Crossbow in temperatures below 32° F, apply a non-wax lubricant to the center serving of the bowstring (Figure 39). A suitable non-wax lubricant is Ravin Serving Fluid or Scorpion Venom™ Polymeric Bowstring Fluid.
Figure 38
Figure 37
ALWAYS KEEP HAND AND FINGERS BELOW HAND GUARD
Figure 39

R AVIN R500 SERIES USER MANUAL | 7 15 .7 18 .35 74 | R AVINCROSSBOWS.COM
SERIOUS INJURY CAN RESULT FROM DISCHARGING YOUR RAVIN CROSSBOW WITH ANY PART OF YOUR BODY IN THE RELEASE PATH OF THE BOWSTRING. TO AVOID POSSIBLE FINGER AMPUTATION, ALWAYS KEEP FINGERS OUT OF THE BOWSTRING PATH AND BELOW THE FINGER GUARD.
TO MINIMIZE RISK OF DEATH OR SERIOUS INJURY WHEN SHOOTING YOUR RAVIN CROSSBOW:• FOLLOW THE SAFETY ADVICE AND INSTRUCTIONS IN THIS MANUAL.• ALWAYS WEAR SAFETY GLASSES.• NEVER LOOK AT THE SUN THROUGH THE SCOPE – PERMANENT EYE
DAMAGE CAN OCCUR.• NEVER MOVE THE SAFETY TO THE FIRE POSITION UNTIL YOU ARE READY
TO FIRE YOUR RAVIN CROSSBOW.• DO NOT PUT YOUR FINGER ON THE TRIGGER UNTIL YOU ARE READY
TO FIRE YOUR RAVIN CROSSBOW.• KNOW YOUR INTENDED TARGET AND WHAT IS BEYOND IT BEFORE
PULLING YOUR TRIGGER. AN ARROW CAN CAUSE DEATH OR SERIOUS INJURY EVEN BEYOND ITS EFFECTIVE HUNTING RANGE.
• BE CERTAIN YOUR BACKSTOP IS ADEQUATE WHEN TARGET SHOOTING.• ALWAYS KEEP YOUR LOADED RAVIN CROSSBOW POINTED TOWARD
THE TARGET. ACCIDENTALLY POINTING IT IN THE DIRECTION OF OTHERS CAN CAUSE DEATH OR SERIOUS INJURY IN THE EVENT OF ACCIDENTAL DISCHARGE.
Your Ravin Crossbow comes with one of the scopes below:
550 FPS - 30 to 100 yard markings (10-30 yards uses same point of aim)
Adjustable Turret Scope - See packaging for sighting instructions
You should have already mounted your scope as explained in Section 3. Confirm the FPS speed dial setting matches the advertised speed of your Ravin Crossbow (excludes Adjustable Turret Scope).
SECTION 9 – ADJUSTING THE SCOPE
DANGER
WARNING

27
A. Ocular Lens AdjustmentYou need to adjust the ocular lens on the scope to match your eye characteristics.
1. Hold the scope about two or three inches from your eye and look through the eye piece at an object at a normal shooting distance of perhaps 20 yards away.
2. If the reticle and the object are not sharply defined, look through the scope and turn the eye piece at the rear of the scope (either direction) to adjust the focus (Figure 40). Continue to adjust the lens until the reticle is clear and sharp.
B. Sighting in the Scope1. Sighting in your scope involves adjusting the point of aim (POA) to match with the
point of impact (POI).
2. Choose a place to shoot your Ravin Crossbow that is safe. Place a target in front of a backstop and set up for first shot at 10 yards.
3. Before taking the first shot, rotate the FPS speed dial to match the manufacturers advertised speed of your Ravin Crossbow (SECTION 3, A-7). The speed of your Ravin Crossbow can be found in the owner’s manual.
4. Take a shot at the center of the target using the top dot on the reticle.
5. Remove the protective cap from the windage adjustment and elevation adjustment dials to make suitable adjustments to bring the point of impact (POI) closer to the point of aim (POA). For example, if the point of impact is lower than the point of aim, rotate the elevation adjustment dial in the UP direction as shown on the elevation turret. At 10 yards each click moves the point of impact .05".
6. Once the point of impact is the same as the point of aim at 10 yards, repeat this process at 30 yards. At 30 yards each click moves the point of impact .15".
7. Once the point of impact is the same as the point of aim at 30 yards, repeat this process at 50 yards using the 50-yard aiming point on the reticle. At 50 yards each click moves the point of impact .25". When you are happy with the 50-yard POI, replace the protective caps. You have now zeroed the scope.
8. As with all weapons (rifles, bows and crossbows), after extended periods of storage or travel it is wise to check the point of impact before attempting long range shots. To check the accuracy of your Ravin Crossbow first take a shot at 10 yards and then 20 yards before attempting longer shots.
C. Calibrating the Scope to the Crossbow SpeedFor the crossbow speed calibration to function properly, a Ravin Arrow is recommended for this Ravin Crossbow and equipped with a 100gr field point or broadhead. If a heavier or lighter (Minimum 100gr) broadhead or field point is used at any time you must repeat the zeroing process above for your scope.
1. Now that you have zeroed your Ravin Crossbow at 50 yards, as discussed above, choose a place to shoot your Ravin Crossbow that is safe. Place a target in front of a backstop at 40 yards.
Figure 40
R AVIN R500 SERIES USER MANUAL | 7 15 .7 18 .35 74 | R AVINCROSSBOWS.COM
2. Take a shot at its center using the 40-yard aiming point on the reticle. If the point of impact is higher than the point of aim, turn the FPS speed dial to a slightly lower number. If the point of impact is lower than the point of aim, turn the FPS speed dial to a slightly higher number.
3. Once the point of impact is the same as the point of aim at 40 yards the scope is calibrated for your Ravin Crossbow speed. DO NOT ADJUST the FPS speed dial for other distances. If the FPS speed dial is changed you will need to recalibrate your Ravin Crossbow using this process.
D. Illuminated ReticleYour scope is equipped with a selectable red or green illuminated reticle. The illumination rheostat is located on the left side of the scope. High brightness settings are recommended for daytime use when ambient light is bright. At times of low light such as dawn or dusk, a lower brightness setting is recommended. The lower settings may not be visible during bright daylight. Reticles are black in the “R” or “G” position if the battery is low or defective.
Ravin illuminated scope models use a CR2032 coin style lithium battery. To insert a battery, unscrew the battery compartment cap on the top of the rheostat adjustment turret and insert a new battery “+” side up. Warning: Always hold onto the lower half of the rheostat when loosening or tightening the battery compartment cap to ensure no damage is done.
E. Care and Maintenance of your ScopeYour scope is a precision instrument that deserves a high level of care. Do not attempt to disassemble or clean the scope internally. Store the scope in a dry environment. Never store the scope in places such as vehicles on hot days. High temperatures can adversely affect the lubricants and sealants.
Keep the protective lens covers in place when the scope is not in use. The external lens coatings should occasionally be wiped clean with the lens cloth provided or an optical quality lens paper. Remove any external dirt with a soft brush to avoid scratching the lens.
Unnecessary rubbing or use of a coarse cloth may cause permanent damage to lens coatings. To clean the external surface of the scope it is recommended that a cleaning cloth is used to protect the scope against corrosion.
29
FIRING A RAVIN CROSSBOW THAT IS NOT IN PROPER WORKING CONDITION IS EXTREMELY DANGEROUS. TO MINIMIZE RISK OF DEATH OR SERIOUS INJURY WHILE SERVICING YOUR RAVIN CROSSBOW:• ALWAYS WEAR SAFETY GLASSES.• UNLOAD AND UNCOCK BEFORE SERVICING.• SEEK A QUALIFIED PROFESSIONAL TO CHANGE CABLES, STRING,
ARROW REST OR LIMBS.• ONLY USE MANUFACTURER-APPROVED REPLACEMENT PARTS.• DO NOT FIRE YOUR RAVIN CROSSBOW IF THE STRING OR CABLES ARE
WORN, DAMAGED OR MODIFIED.• USE ONLY RAVIN STRING AND CABLES RECOMMENDED FOR YOUR
RAVIN CROSSBOW.• REPLACE THE ENTIRE BOWSTRING IF THE CENTER SERVING IS WORN,
DAMAGED OR SEPARATED. RAVIN CLIP-ON NOCKS ARE DESIGNED FOR USE ONLY WITH THE FACTORY CENTER SERVING ON GENUINE RAVIN BOWSTRINGS. DO NOT RE-SERVE OLD BOWSTRINGS.
• DO NOT LUBRICATE THE INTERNAL COMPONENTS OF YOUR TRIGGER ASSEMBLY. LUBRICANT CAN CAUSE CONTAMINANTS TO ACCUMULATE IN THE TRIGGER ASSEMBLY THAT CAN LEAD TO TRIGGER MALFUNCTION.
• DO NOT APPLY WAX TO THE CENTER SERVING OR THE BOWSTRING. WAX BUILDUP ON THE BOWSTRING CLASP CAN LEAD TO TRIGGER MALFUNCTION, INCLUDING A DELAY IN BOWSTRING RELEASE AFTER TRIGGER PULL IN COLD TEMPERATURES.
The warranty for your Ravin Crossbow is void if any of the following occur:
• The instructions in the manual are not followed.
• Your Ravin Crossbow or any of its parts or accessories are modified from their original condition.
• Damage is caused by abuse or neglect.
• Damage is caused by dry firing or by using underweight arrows.
• Your Ravin Crossbow is disassembled.
• Use of replacement parts, arrows or nocks not approved by this manufacturer.
• Use of fixed-blade broadheads with a maximum diameter greater than 1 1/2".
Regular inspection and maintenance will extend the life of your Ravin Crossbow.
SECTION 10 - MAINTENANCE
WARNING
NOTICE

R AVIN R500 SERIES USER MANUAL | 7 15 .7 18 .35 74 | R AVINCROSSBOWS.COM
1. General: Check for worn or loose parts.
2. String & Cables: Immediately replace worn or damaged string and cables. Care and maintenance of bowstring, cables and center serving are particularly important, as improperly maintained string and cables could break and/or cause a dry fire event in the crossbow. Use only Ravin approved string and cables. We recommend changing the string and cables at least every two years or 200 shots, whichever occurs first, or sooner if wear or damage is visible. Use of non-Ravin string and cables, or firing your Ravin Crossbow with worn, damaged or modified string and cables may cause the trigger and anti-dry fire system to not operate as designed, potentially resulting in an unsafe condition that could lead to property damage, serious injury or death. NEVER USE NON-Ravin STRING AND CABLES ON YOUR Ravin CROSSBOW.
3. Center Serving: The Ravin Clip-on nock may not properly engage with the center serving if it is worn, damaged or separated, potentially resulting in an unsafe condition that could lead to serious injury or death. Firing your Ravin Crossbow with worn or damaged center serving may introduce gaps in the fit of the nock on the bowstring, causing the trigger and anti-dry fire system to not operate as designed. Replace the string and cables if the center serving is worn, damaged or separated. DO NOT RE-SERVE OLD BOWSTRINGS. Ravin Clip-on nocks are designed for use only with the genuine Ravin bowstrings and may not operate correctly with aftermarket center serving. Figures below shows examples of worn, damaged or separated center servings that should be replaced.
4. Cam Timing: Small dots are machined into the Hexcoil cams as a reference to ensure your Ravin Crossbow is tuned to specification. When uncocked and viewed from above, the top cable will align between or over the dots on both cams (Figure 41). The cables can be in different locations between the dots and your Ravin Crossbow is still timed. When the string and cables become worn the timing will be affected and one or both cables will be outside the dots (Figure 42). When this occurs the string and cables must be replaced. NEVER USE NON-Ravin STRING AND CABLES ON YOUR Ravin CROSSBOW.
5. String and Center Serving: To extend the life of your serving, apply a non-wax lubricant along the entire length of serving and allow to dry. Lubricant can be applied once a year and prior to hunting in cold weather. A suitable non-wax lubricant is Ravin Serving Fluid or Scorpion Venom™ Polymeric Bowstring Fluid. DO NOT WAX THE STRING OR CENTER SERVING. This can cause a buildup of wax in the trigger mechanism or cams, leading to a possible malfunction. When bowstring wax freezes it acts like an adhesive. If wax has gotten into the trigger assembly, return your Ravin Crossbow to our service department for service.
6. Cold Weather Operation: Apply a Ravin-approved non-wax lubricant to the center serving of the bowstring before operating your Ravin Crossbow. A suitable non-wax lubricant is Ravin Serving Fluid or Scorpion Venom™ Polymeric Bowstring Fluid.
Figure 41
Figure 42

3 1
7. Trigger Assembly: Do not lubricate the internal components of the trigger assembly. Lubricants can cause contaminants to accumulate in the trigger assembly that can lead to trigger malfunction. If wax has gotten into the trigger assembly, return your Ravin Crossbow to our service department for service.
8. Arrow Rest: If the rollers on the arrow rest become damaged or worn, the entire arrow rest must be replaced.
9. Storage: Store your Ravin Crossbow in a locked cabinet or safe located in a cool and dry location. Do not expose your Ravin Crossbow to extreme heat or cold.
10. Service: To obtain service please contact our Service Department at:
Ravin Crossbows 3535 Tower Ave., Superior, WI 54880
Phone: 715.718.3574 [email protected]
IMPROPER USE OF THE RAVIN PRESS IS EXTREMELY DANGEROUS. TO MINIMIZE RISK OF DEATH OR SERIOUS INJURY WHILE SERVICING YOUR RAVIN CROSSBOW:
• CAREFULLY READ THE INSTRUCTIONS PROVIDED WITH THE RAVIN PRESS BEFORE USE.
• ALWAYS UNLOAD AND FULLY UNCOCK YOUR RAVIN CROSSBOW BEFORE SERVICING.
• USE ONLY THE RAVIN PRESS ON YOUR RAVIN CROSSBOW.• DO NOT USE THE RAVIN PRESS ON ANY OTHER CROSSBOWS.• ONLY USE MANUFACTURER-APPROVED REPLACEMENT PARTS.• REPLACE STRING AND CABLES EVERY TWO YEARS OR 200 SHOTS,
WHICHEVER OCCURS FIRST, OR SOONER IF WEAR OR DAMAGE IS VISIBLE.
The warranty for your Ravin Crossbow is void if any of the following occur:
• The instructions for the Ravin Press are not followed.
• Use of a crossbow press other than the Ravin Press on your Ravin Crossbow.
• Use of replacement parts not approved by the manufacturer.
We highly recommend that you have your string and cables replaced at your local pro shop or the Ravin Service Department.
SECTION 11 – THE RAVIN PRESS AND STRING REPLACEMENT
WARNING
NOTICE

R AVIN R500 SERIES USER MANUAL | 7 15 .7 18 .35 74 | R AVINCROSSBOWS.COM
TO MINIMIZE RISK OF DEATH OR SERIOUS INJURY WHEN HUNTING WITH YOUR RAVIN CROSSBOW:• TAKE A HUNTER’S EDUCATION AND SAFETY COURSE PRIOR TO USE. IN
FACT, MOST STATES REQUIRE THAT YOU COMPLETE SUCH A COURSE PRIOR TO OBTAINING YOUR HUNTING LICENSE.
• DO NOT FIRE YOUR RAVIN CROSSBOW IF BRANCHES OR OTHER OBSTRUCTIONS BLOCK ITS LIMBS’ RELEASE PATH. DOING SO COULD CAUSE THE LIMBS, BOWSTRING, OR CABLES TO BREAK.
• NEVER SHOOT UNLESS YOU HAVE A CLEAR VIEW OF YOUR TARGET. MOVEMENT CAN BE A CAMOUFLAGED HUNTER.
• DO NOT FIRE UNLESS THE ARROW HAS AN UNOBSTRUCTED PATH TO THE TARGET. ARROWS CAN BE DEFLECTED BY OBSTACLES AND CAN STRIKE AN UNINTENDED TARGET.
• HUNTING WITH YOUR RAVIN CROSSBOW FROM ELEVATED SURFACES SUCH AS TREE STANDS IS DANGEROUS AND CAN RESULT IN DEATH OR SERIOUS INJURY.
• DO NOT PUT YOUR FINGER ON THE TRIGGER UNTIL YOU ARE READY TO FIRE YOUR RAVIN CROSSBOW.
• INSERTING A GLOVED FINGER INTO THE TRIGGER GUARD CAN CAUSE ACCIDENTAL DISCHARGE OF YOUR RAVIN CROSSBOW.
• KNOW YOUR INTENDED TARGET AND WHAT IS BEYOND IT BEFORE PULLING YOUR TRIGGER. AN ARROW CAN CAUSE DEATH OR SERIOUS INJURY EVEN BEYOND ITS EFFECTIVE HUNTING RANGE.
• ALWAYS KEEP YOUR LOADED RAVIN CROSSBOW POINTED TOWARD THE TARGET. ACCIDENTALLY POINTING IT IN THE DIRECTION OF OTHERS CAN CAUSE DEATH OR SERIOUS INJURY IN THE EVENT OF ACCIDENTAL DISCHARGE.
• KEEP BYSTANDERS WELL BEHIND YOU WHEN SHOOTING YOUR RAVIN CROSSBOW. A MALFUNCTION OF YOUR RAVIN CROSSBOW CAN CAUSE DEATH OR SERIOUS INJURY TO BYSTANDERS.
• REQUIRE BYSTANDERS TO ALWAYS WEAR SAFETY GLASSES.• DO NOT RELY TOTALLY ON YOUR RAVIN CROSSBOW’S MECHANICAL
SAFETY MECHANISM. ONLY SAFE HANDLING HABITS WILL ENSURE THE SAFE USE OF YOUR RAVIN CROSSBOW.
SECTION 12 – HUNTING SAFELY WITH YOUR RAVIN CROSSBOW
WARNING

33
The warranty for your Ravin Crossbow is void if any of the following occur:
• Ensure all users of this Ravin Crossbow follow the safety advice and instructions in this manual, keep this manual with your Ravin Crossbow.
• Check your local, state, or provincial regulations before transporting your Ravin Crossbow. Some jurisdictions require that a crossbow be cased during transport.
TO MINIMIZE RISK OF SERIOUS INJURY FROM DAMAGED, OBSOLETE, OR UNAPPROVED NOCKS IN YOUR RAVIN ARROWS:• USE ONLY RAVIN ARROWS WITH ORANGE RAVIN CLIP-ON NOCKS
RECOMMENDED FOR YOUR RAVIN CROSSBOW.• IF YOU HAVE ANY OLDER RAVIN ARROWS WITH THE ORIGINAL WHITE
CLIP-ON NOCKS, RAVIN RECOMMENDS REMOVING AND DISCARDING EXISTING WHITE NOCKS FROM ARROWS AND REPLACING WITH THE NEW ORANGE RAVIN CLIP-ON NOCK.
• FULLY ENGAGE THE RAVIN CLIP-ON NOCK WITH THE BOWSTRING. DOING SO REQUIRES A SIGNIFICANT AMOUNT OF FORCE. YOU SHOULD HEAR AN AUDIBLE CLICK.
• CONFIRM THE NOCK IS PROPERLY INDEXED WITH THE FLETCHING.• INSPECT CARBON ARROW SHAFTS AND NOCKS FOR HAIRLINE FRACTURES
OR CRACKS. FIRING A DAMAGED ARROW CAN CAUSE THE ARROW SHAFT TO SHATTER, SCATTERING FRAGMENTS. FIRING AN ARROW WITH A DAMAGED NOCK CAN CAUSE THE BOW TO DRY FIRE.
• INSPECT ARROWS FOR DAMAGE. DAMAGED ARROWS CAN FLY IN UNINTENDED DIRECTIONS.
• Damage to your Ravin Crossbow caused by firing a damaged, obsolete, or unapproved nocks or arrows is not covered by the warranty.
Ravin Arrows with orange Ravin Clip-on nocks are specifically designed for use with the Ravin String and Cables on your Ravin Crossbow. Use of any arrows or nocks not designed for use with your Ravin Crossbow could potentially interfere with the operation of the crossbow. DO NOT USE NON-RAVIN ARROWS OR NOCKS.
1. Nock removal. Grip the nock with pliers and twist while pulling the nock out. Discard the old nock. NEVER grip the arrow shaft or aluminum nock bushing with the pliers or any other tool.
NOTICE
SECTION 13 – NOCK REPLACEMENT
WARNING
NOTICE

R AVIN R500 SERIES USER MANUAL | 7 15 .7 18 .35 74 | R AVINCROSSBOWS.COM
2. Install new nock. Use only the supplied nock installation tool to install the new orange nock.a. Place new orange nock into Nock Installation Tool. Make sure to turn the nock
until it falls all the way down into the Nock Installation Tool.b. Locate the aluminum nock bushing at the rear of the arrow. Press the new nock
into the nock bushing until the nock is tight. Do not use pliers to insert the new nock or you may damage the nock. DO NOT glue the nock into the bushing.
c. Use the pointer on the Nock Installation Tool and turn until the new nock is properly aligned with the white cock vane on the arrow as shown.
d. Place the Nock Installation Tool on a tabletop, and with two hands grasp the arrow shaft, near the fletching, and push downward until the nock is flush with the nock bushing. After you have fully installed an approved Ravin nock, make sure the pointer on the Nock Installation Tool is still aligned with the white cock vane.
3. Inspection. Inspect the nock to ensure it is flush with the nock bushing and there are no chips, cracks, or other damage present. If the nock is damaged, remove and discard the nock and replace it with an approved Ravin nock.
4. Video Instructions. For more information go to: http://ravincrossbows.com/safety-instruction/
WHERE IS THE SERIAL NUMBER LOCATED?The serial number is located on the right side of the guide, near the buttstock.
WHERE CAN I GET MY RAVIN SERVICED?At any Ravin certified dealer. If you are having trouble finding one, you can use the dealer locator that is on ravincrossbows.com.
WHY SHOULD I REGISTER MY CROSSBOW?Product registration is for your safety and convenience. Registering your product will ensure you receive any important updates pertaining to your Ravin Crossbow.
WHAT TYPE OF ARROWS AND NOCKS SHOULD I USE WITH MY R500 SERIES RAVIN CROSSBOW?Only use R500 Series Arrows in R500 Series Crossbows
WHAT IF I HAVE MORE QUESTIONS?For further inquiries call our customer service number at 715.718.3574 or email us at [email protected].
HOW DO I PROPERLY SIGHT IN MY RAVIN?Once you have your scope properly mounted on your bow, set your speed dial to the manufactured suggested speed of your crossbow. Start at 10 yards to make sure you are on target and adjust with your vertical and horizontal adjustment turrets to zero the bow. Next, back up to 20 yards and do the same. Back up to 50 yards and zero the bow in here to where you are confident. After this has been done, move back to 40 yards to calibrate your bow for the rest of your reticles. At this point you want to focus on using just your speed dial for vertical adjustment of all your reticles out to 100 yards.
SECTION 14 - FAQ
35
Take a shot at 40 yards with your 40-yard reticle. If you hit high you will need to turn your speed dial slightly down to a lower number until you hit exactly what you are aiming at. If you hit low, you will need to turn your speed dial to a slightly higher number until you hit exactly what you are aiming at. Upon doing this the rest of your reticles will be set out to 100 yards.
CAN I TAKE THE TRIGGER BOX OFF THE STRING IF I DON’T SHOOT IT?The trigger box will stay connected to the string until the bow is fired. It will not hurt the bow or cause damage by being attached and left on the string after the bow is de-cocked. The next time you would like to shoot, make sure your safety is in the safe position, cock your bow back and load an arrow.
HOW LONG CAN I KEEP MY CROSSBOW COCKED?It is safe to keep your crossbow cocked while you are hunting in a stationary position. For personal safety reasons, do not stalk or walk to or from your hunting location with your Ravin Crossbow cocked. Do not keep your crossbow cocked for more than 8 hours.
HOW DO I POSITION MY ARROW?Nock your arrow on your Ravin Crossbow with the odd colored fletching pointing straight down.
WHAT DO I DO IF THE REST COMES LOOSE?Put a little Loctite on each screw and alternately tighten the screws. The rest will self-center.
DO I USE SERVING FLUID OR WAX?We recommend using Ravin Serving Fluid. This is a non-wax lubricant. This can be used on the string and is also designed to be put right on to the center serving. For further instructions, page 25, number 8.
HOW LONG SHOULD STRING AND CABLES LAST?We recommend changing the string and cables about every two years or 200 shots, whichever occurs first or sooner if wear or damage is visible. The string life can vary depending on the care and maintenance, the number of shots and weather conditions during use.
HOW DO I CHANGE MY STRING AND CABLES?Once your crossbow needs to have string and cables replaced, we would suggest taking it to your local Ravin dealer. If you need to look up who your closest dealer is you can use the ‘Dealer Locator’ at ravincrossbows.com.
CAN MY ARROWS BE RE-FLETCHED? WHAT ARE THE RE-FLETCHING SPECS?Yes, your arrows can be re-fletched with a 1 degree off-set.
DOES RAVIN MAKE LIGHTED NOCKS?Ravin does offer lighted nocks. They are available online at ravincrossbows.com or at any Ravin dealer.

R AVIN R500 SERIES USER MANUAL | 7 15 .7 18 .35 74 | R AVINCROSSBOWS.COM
WHAT DO YOU RECOMMEND FOR BROADHEADS AND TARGETS?Both fixed and expandable broadheads will work out of your Ravin, however, we recommend using one of the Ravin expandable broadheads for best downrange accuracy. Also, make sure that when selecting a broadhead that it is rated for crossbows and even more specifically for the speed of your bow.
WHAT IS THE DRAW WEIGHT?Approximately 17lbs.
EXPLANATION OF MAGNIFICATION SPEED DIALYour scope’s reticles are adjusted by using your speed dial which is your magnification setting. This means that once you properly sight in and calibrate your scope using the speed dial your magnification will become a fixed power at that point as well. Moving the dial to a different magnification setting after your bow has been properly sighted in and calibrated with the speed dial will result in an accuracy issue, vertically.
WHAT IS THE WARRANTY ON MY RAVIN CROSSBOW?New Ravin Crossbows are covered under a five-year limited warranty against defects in materials and workmanship to the stock, trigger, cocking mechanism and limb assembly when used normally in accordance with Ravin’s published instructions and guidelines. Our liability extends to parts, labor and return transportation to the customer, and is non-transferable. This limited warranty does not cover strings, cables, scopes, arrows, transportation of product to our service center or damage caused by abuse, dry firing and using arrows other than Ravin Arrows recommended for your crossbow. Failure to follow safety advice and usage instructions in this manual, modification, or failure to perform normal maintenance or any other expenses or damage to property or person. This warranty gives you specific legal rights and you may also have other rights that vary from state to state.

37
Congratulations on the purchase of your new crossbow from Ravin Crossbows. By using your Ravin Crossbow, you are agreeing to be bound by the terms of this Limited Warranty.
With proper usage and care you will enjoy many years of use. It is important to follow proper safety, assembly, and equipment usage procedures. This information is in your manual. Serious injuries to yourself or others, damage to your Ravin Crossbow, or poor performance from your Ravin Crossbow could result from failure to thoroughly read, understand, and follow these instructions. If any part of this manual is unclear to you, further information is available at ravincrossbows.com/support or you can contact the Service Department at 715.718.3574.
Use only manufacturer-approved replacement parts. Use of replacement parts not approved by Ravin will void your warranty.
If you elect to replace the strings and cables yourself, use only the Ravin Press specifically designed to compress the limbs on your Ravin Crossbow. Do not use the Ravin Press on any other crossbow. The Ravin Press is sold separately. Carefully read the instructions and its warnings supplied with the Ravin Press before use.
Five-Year Non-Transferable Limited Warranty New Ravin® Crossbows are covered under a five-year limited warranty from date of purchase against defects in materials and workmanship to the stock, trigger and cocking mechanism and limb assembly, when used normally in accordance with our published instructions and guidelines. Our liability extends to parts, labor and return transportation to the customer and is non-transferable. This limited warranty does not cover strings, cables, arrow rest, scopes, arrows, transportation of your Ravin Crossbow to our Service Center; damage caused by abuse, dry firing, using arrows other than Ravin Arrows recommended for your Ravin Crossbow, failure to follow safety advice and usage instructions in the manual, modification, or failure to perform normal maintenance; or any other expenses or damage to property or person. This warranty gives you specific legal rights and you may also have other rights that vary from state to state.
Product Registration is for your safety and convenience. Unless you register your product, we will be unable to send you important updates about your Ravin Crossbow. Please register your Ravin Crossbow by using the enclosed registration card or online at ravincrossbows.com/support/register
To obtain service: Please call for a return authorization number (RA#) prior to sending the unit and write the RA# on the outside of the package. The Serial No. on your Ravin Crossbow is required to receive an RA#. Attach to the product your name, address, telephone number and a letter describing the problem. Carefully package and return product prepaid, clearly writing the RA# below the address. Return the unit to an authorized Service Center or directly to the factory. For a listing of authorized service centers please call the factory at the number listed below. Ravin Crossbows deemed to be covered under the five-year warranty will be repaired and shipped to you at no charge. You will be responsible for the shipping charges into the service center, and possibly labor charges for repairs completed at a non-factory authorized service center. Ravin Crossbows not covered under this warranty will be subject to normal charges. We will obtain your permission before we repair your Ravin Crossbow if it is not covered by warranty. For further inquiries contact the Service Department: ravincrossbows.com/support or 715.718.3574.
SECTION 15 – LIMITED WARRANTY

R AVIN R500 SERIES USER MANUAL | 7 15 .7 18 .35 74 | R AVINCROSSBOWS.COM
DISCLAIMER TO THE EXTENT PERMITTED BY LAW, THIS LIMITED WARRANTY AND THE REMEDIES SET FORTH ARE EXCLUSIVE AND IN LIEU OF ALL OTHER WARRANTIES, REMEDIES AND CONDITIONS, WHETHER ORAL, WRITTEN, STATUTORY, EXPRESS OR IMPLIED. RAVIN DISCLAIMS ALL STATUTORY AND IMPLIED WARRANTIES, INCLUDING WITHOUT LIMITATION, WARRANTIES OF MERCHANTABILITY AND FITNESS FOR A PARTICULAR PURPOSE, WARRANTY OF NON-INFRINGEMENT OF THIRD PARTY RIGHTS, AND WARRANTIES AGAINST HIDDEN OR LATENT DEFECTS, TO THE EXTENT PERMITTED BY LAW. IN SO FAR AS SUCH WARRANTIES CANNOT BE DISCLAIMED, RAVIN LIMITS THE DURATION AND REMEDIES OF SUCH WARRANTIES TO THE DURATION OF THIS LIMITED WARRANTY. IN NO EVENT SHALL RAVIN BE LIABLE FOR ANY CONSEQUENTIAL, INDIRECT, INCIDENTAL, SPECIAL, EXEMPLARY OR PUNITIVE DAMAGES, ARISING OUT OF OR RELATING TO ANY BREACH OF THE TERMS OF THIS LIMITED WARRANTY, AND NOTWITHSTANDING THE FAILURE OF ANY AGREED OR OTHER REMEDY OF ITS ESSENTIAL PURPOSE. LIMITATIONS OF LIABILITY. TO THE MAXIMUM EXTENT PERMITTED BY APPLICABLE LAW, THE EXCLUSIVE REMEDY, AND THE SOLE LIABILITY OF RAVIN FOR ANY AND ALL CLAIMS, LOSSES, INJURIES OR DAMAGES, ARISING OUT OF OR RELATING TO ANY BREACH OF THE TERMS OF THIS LIMITED WARRANTY, SHALL NOT EXCEED THE PRICE PAID FOR THE PRODUCT.
Any cause of action you may have with respect to the terms of this Limited Warranty must be brought within one (1) year of when the cause of action arose. If any portion of this Limited Warranty is held to be invalid, such holding shall not invalidate the other provisions. This Limited Warranty constitutes the entire agreement between you and Ravin, and all promises, representations, understandings, warranties, and agreements with reference to the subject matter hereof an inducement for purchasing your Ravin Crossbow relied upon by you are expressed herein. The validity, performance, and construction of this Limited Warranty shall be governed and interpreted in accordance with the laws of Wisconsin. The Parties hereby consent and submit to the exclusive jurisdiction of any of the federal or state courts located in the State of Wisconsin with respect to the enforcement of any rights or remedies hereunder.

FIELD NOTES
39

FIELD NOTES
R AVIN R500 SERIES USER MANUAL | 7 15 .7 18 .35 74 | R AVINCROSSBOWS.COM

FIELD NOTES
41

R AVIN R500 SERIES USER MANUAL | 7 15 .7 18 .35 74 | R AVINCROSSBOWS.COM
RAVINCROSSBOWS.COM10 1500