QHSE Toolbox
88
description
safety references
Transcript of QHSE Toolbox


© 2011 Transocean. All rights reserved.

iii
Table of Contents About This Guide ............................................................................................................................................................. 1
In This Chapter .............................................................................................................................................................. 1 Text Conventions ........................................................................................................................................................... 2 Symbols Used ............................................................................................................................................................... 2 Navigation Terms .......................................................................................................................................................... 3 Names of Window Elements .......................................................................................................................................... 3
Getting to Know the Toolbox .......................................................................................................................................... 5 In This Chapter .............................................................................................................................................................. 5 Access the Toolbox and Log In ...................................................................................................................................... 6 Layout of the Toolbox Start Screen ................................................................................................................................ 6 Start Screen Tool Ribbon............................................................................................................................................... 8 Start Screen Search Tabs .............................................................................................................................................. 9 Document Window Tool Ribbons ................................................................................................................................. 10 Icons on the Edit Ribbon .............................................................................................................................................. 12 Icons on the View Ribbon ............................................................................................................................................ 14
Early General Tasks ....................................................................................................................................................... 17 In This Chapter ............................................................................................................................................................ 17 Import a Document from THINK ................................................................................................................................... 18 Search for a Local Toolbox Document ......................................................................................................................... 22 Search for a Global Toolbox Document ....................................................................................................................... 24 Print a Blank Document ............................................................................................................................................... 26 Copy a Document ........................................................................................................................................................ 28
Procedure Documents (MRSPs and RRPs) .................................................................................................................. 29 In This Chapter ............................................................................................................................................................ 29 Create an MRSP or RRP ............................................................................................................................................. 30 Add Supplemental Information ..................................................................................................................................... 33 Add RMS Information .................................................................................................................................................. 33 Alerts ........................................................................................................................................................................... 36 Edit or Revise a Procedure .......................................................................................................................................... 36
Written Risk Assessments (WRAs) ............................................................................................................................... 39 In This Chapter ............................................................................................................................................................ 39 Create an Unassociated WRA ..................................................................................................................................... 40 Link a WRA to a Procedure ......................................................................................................................................... 42 Create an Associated WRA ......................................................................................................................................... 44 List the Required Tools and Equipment ....................................................................................................................... 46 Edit or Revise a WRA .................................................................................................................................................. 47 Release a WRA ........................................................................................................................................................... 48
Late General Tasks ........................................................................................................................................................ 49 In This Chapter ............................................................................................................................................................ 49 Attach a File ................................................................................................................................................................ 50 Link to a Supporting Document .................................................................................................................................... 52 Translate a Document ................................................................................................................................................. 54 Edit a Translated Document ........................................................................................................................................ 55 Run a Report ............................................................................................................................................................... 57
Approve Documents ...................................................................................................................................................... 61 In This Chapter ............................................................................................................................................................ 61

QHSE Toolbox in TO5
iv
Retain a WRA (Department Head) ............................................................................................................................... 62 OIM Tools and Ribbons ............................................................................................................................................... 64 Approve a Document (OIM) ......................................................................................................................................... 65
QHSE Toolbox on the Web ............................................................................................................................................ 69 In This Chapter ............................................................................................................................................................ 69 Access the Web Toolbox ............................................................................................................................................. 70 Access the Legacy THINK Site .................................................................................................................................... 71 View a Document on the Web...................................................................................................................................... 71 View a Web Document Attachment.............................................................................................................................. 74 View a Translated Web Document ............................................................................................................................... 74 Print a Document from the Web ................................................................................................................................... 75 View a Report on the Web ........................................................................................................................................... 76 Save a Web Document or Report ................................................................................................................................ 77
Saving a Document.................................................................................................................................................. 77 Saving a Report ....................................................................................................................................................... 80
Index ............................................................................................................................................................................... 83

1
About This Guide
In This Chapter This chapter provides information about the following subjects:
• Conventions and symbols used in this document
• Terms used to describe how to navigate the screen
• Names used for elements of the QHSE Toolbox window

QHSE Toolbox
2
Text Conventions This document uses the following formatting conventions to help distinguish software terms from descriptive text.
Text Conventions
Feature or Action Description of Convention
Key names Names of keys are given in bold type and reflect the spelling and capitalization found on the keyboard. A plus (+) sign between two key names indicates that the two keys named should be pressed at the same time.
USER INPUT User input is described in uppercase letters.
File names Variables New terms
File names, variables, and new terms are given in italics.
Type (...some text...) When you are instructed to type information, type the information without pressing the Enter key.
Enter (...some text...) When you are instructed to enter information, type the information and then press the Enter key.
Command names Button names Text box names Checkbox names Window names
These elements are described in bold type when mentioned as the focus of an action. The capitalization and spelling are the same as used in the software.
Symbols Used The following symbols are used to draw attention to certain pieces of information.
Symbols Used
Symbol Meaning
Important: If this information is not heeded, the software might produce an unexpected or undesirable result.
Note: Useful information related to the current topic.
Tip: Information that is helpful for completing the current task, but not vital to know.

About This Guide
3
Navigation Terms Navigation in the context of software refers to ways of moving around the software. The following navigation terms are used throughout this documentation.
Navigation Terms
Term Description
Click Press the left mouse button once.
Double-click Press the left mouse button twice in quick succession.
Drag Dragging involves three actions: 1 Press the left mouse button and hold it down to "grab" the object on the screen (or
sometimes to just start drawing a line or highlighting some text on the screen). 2 "Pull" the object to the desired new location. 3 Let go of the mouse button.
Highlight Shade a selected region on the screen by dragging the cursor over the region to be selected.
Menu > Path The menu path indicates how to get from the current window to a menu option. For example, File > New means click the File menu and then click the New option on the File menu.
Scroll View information that is off-screen by moving the viewable region. Most often used to describe vertical scrolling through a menu or up and down a page. Horizontal scrolling is less common but might be required for wide pages, for example.
Select Choose one item from various options. This is usually done by clicking the item, or by clicking a radio button or checkbox next to the item.
Names of Window Elements Window elements are visible features of a software display that help the user to manage information. The following table describes common window elements used in Toolbox.
Window Elements
Element Description
Button A control on the window that initiates an action (for example, the OK button). Often rectangular, and usually contains brief text to describe the action that the button will perform.
Dialog Box A pop-up window (usually relatively small) that appears in front of the main window that is being worked in, and prompts the user to enter additional information.
Icon Pictures or symbols that act like buttons.
Message A small pop-up window that provides additional information and usually an OK button, but does not require the user to enter information. One example is an error message.
Optional field An entry field that the user does not need to complete.
Required field An entry field that the user must complete.
Screen The display area of the computer monitor. Sometimes confused with Window.

QHSE Toolbox
4
Element Description
Tab Part of a special type of window. A “tabbed” window enables access to multiple information or function groups within a small screen region. The tab is a small, labeled projection that names the information or function group and enables access to the group.
Window The part of the screen that the software uses to display content. The user can shrink a window to a relatively small area so that other windows are visible simultaneously, or resize the window to fill the whole screen.
Window resize tool A small region in the lower right corner of a window that can be dragged, enabling a user to make the window any convenient size.
Entry fields are window elements that enable a user to provide information. Depending on the type of entry field, a user might need to select one or more options, or they might enter text into an empty field. The following table describes some common entry fields.
Entry Fields
Entry Field Example Name Description
Dropdown selection box
This type of entry field provides a list of options, from which the user selects one appropriate choice. Click the downward arrow on the right-hand side of the box to see the list of options, and then click an option to select it.
Checkbox Checkboxes are used to allow one or more options to be selected from a list of several; a check mark in the box adjacent to an option indicates that the option is selected. To remove a check mark (clear an option), click the checkbox again.
Radio button Radio buttons are used when only one
option should be selected from several mutually incompatible possibilities. A dot in the middle of the circle indicates that the option is selected. If you change your mind, click one of the other options.
Text box This type of field is most often used to
enter single words or short phrases, but large text fields can be used if it might be necessary to enter several sentences.
Scrolling text box
A scrolling text box enables long strings of text to be present within a small screen region. To view all the text in the box, use the up and down scroll arrows on the right side of the box.

5
Getting to Know the Toolbox
In This Chapter This chapter provides information about the following subjects:
• How to access the QHSE Toolbox and log in
• How the start screen is laid out
• Functions of the various icons on the start screen
• Features of related screens that are easily reached from the start screen

QHSE Toolbox
6
Access the Toolbox and Log In After you have installed the QHSE Toolbox on your computer, the Toolbox shortcut icon is displayed on your desktop.
Desktop shortcut icon for the QHSE Toolbox
To start the QHSE Toolbox:
1. Double-click the shortcut icon. Alternatively, click Start > All Programs > Transocean > QHSE Toolbox XXX (where XXX is the rig-specific acronym).
The login dialog box is displayed.
2. Enter the same user name and password that you use to log in to the Windows network, and then click OK.
The Toolbox Start screen is displayed.
Layout of the Toolbox Start Screen The opening screen of the Toolbox has the following appearance:
Toolbox start screen

Getting to Know the Toolbox
7
Along the top edge of the screen is the title bar, which identifies the rig and the version of Toolbox that you are using. At the far right of the title bar are the standard three Windows icons: one for minimizing the screen to the Windows task bar (at the bottom of the screen), the second to resize the screen, and the third to close the application.
Immediately underneath the title bar is the tool ribbon.
Tool ribbon
For information about the icons on the tool ribbon, see Start Screen Tool Ribbon.
Underneath the tool ribbon are the search tabs, along with the search filter fields for the selected tab. The tab that is selected by default on the start screen is the Search Local RSP and Risk Assessments tab. (For information about the other tabs, see Start Screen Search Tabs.)
Search Local RSP and Risk Assessments tab
For more information about the activities associated with these tabs, see one of the following topics:
Search for a Local Toolbox Document
Search for a Global Toolbox Document
Retain a WRA (Department Head)
Approve a Document (OIM)
Underneath the search filter fields is the search results region. On the Search Local and Search Global tabs, this region is divided into three panes, one for each type of Toolbox document (MRSP, RRP, and WRA). No search has been made at this point, so each pane is empty.

QHSE Toolbox
8
Search results region
Start Screen Tool Ribbon On the start screen, the tool ribbon consists of the following sections:
Icons and Regions on the Start Screen Tool Ribbon, and Associated Actions
Icons Region Name Actions
Actions Click one of these icons to open an empty document of the appropriate type and start creating content.
Tools On the Start screen, the only tool available is the Risk Matrix. Click this icon to see the standard risk matrix.
Blank Forms Click one of these icons to obtain a blank form for filling out manually.
Reports Click one of these icons to display a report. Additional buttons within the displayed report enable you to print the report or export the data into a different format.

Getting to Know the Toolbox
9
Icons Region Name Actions
Import Click this button to import a TSTP or TRA from THINK into the QHSE Toolbox. This button is available for six months after the QHSE Toolbox is activated on a particular rig.
Help Click this icon to get help with a Toolbox feature.
When you open an existing document or start to create a document, a new window opens in front of the Start screen. The tool ribbon on this new window has different icons that enable you to carry out the different tasks required when creating or editing a document. For further information, see Document Window Tool Ribbons.
Start Screen Search Tabs There are four search tabs on the Start screen. When Toolbox is opened, the Search Local RSP & Risk Assessment tab is displayed.
Search Local RSP and Risk Assessments tab
The second tab (for searching global documents) is similar, but with an additional two rows of search filter fields.
Search Global RSP and Risk Assessments tab

QHSE Toolbox
10
The third tab contains search filter fields for locating WRAs that have been submitted for retention (and so are in Pending Supervisor status).
Dept. Head Review & Approval tab
Similarly, the last tab is for locating procedure documents (MRSPs and RRPs) that are in Pending OIM status, awaiting approval from the OIM.
OIM Review & Approval tab
Document Window Tool Ribbons When you open an existing document or start to create a document, a new window (the document window) opens in front of the Start screen. The tool ribbon on the document window has different icons from those on the Start screen. These icons enable you to carry out the different tasks required when creating or editing a document. Often, a second ribbon is "hidden" behind the ribbon that is visible; this hidden ribbon is accessed by clicking a tab in the top left corner of the window.
The exact appearance of a document window tool ribbon depends on the following factors:
• The type of document (MRSP, RRP, WRA)
• How or why you get to the document (to create a new document, as the result of a search, or as a blank form for manual completion)
• The document status (Approved, Saved, Pending Supervisor, Pending OIM)
• Your job title
When you start to create a document (using the icons in the Actions section of the Start screen ribbon), the Edit ribbon is displayed. This ribbon has the following appearance.
Edit ribbon
The icons in the Clipboard and Font sections of this ribbon are grayed out when the document window first opens, because no text has yet been entered. As soon as you add text to the document or edit existing text, these icons become active.

Getting to Know the Toolbox
11
For more information about the icons on the Edit ribbon, see Icons on the Edit Ribbon.
Clicking the View tab in the top left corner opens the View ribbon, which has the following appearance. (This ribbon, rather than the Edit ribbon, is initially displayed if you open an approved procedure document.)
View ribbon
NOTE: On procedure documents, the Print for Job icon is active only if the procedure has been approved, and the View Saved Plan icon is active only if a revised version of the procedure has been saved in the Toolbox, but not yet approved.
If you open an existing WRA instead of creating a new one, only the View ribbon is available, and it looks slightly different from the standard View ribbon. For example, if you search for an approved WRA and open it, the ribbon looks something like the first of the following screenshots. If instead the WRA is only in Saved status, the ribbon looks like the second screenshot.
Ribbon on an approved WRA
Ribbon on a WRA in Saved status
NOTE: If the WRA is linked to a procedure, the Link to Procedure link will be inactive, and Release Link will be active instead.

QHSE Toolbox
12
Finally, if you create a blank document using the icons in the Blank Forms section of the Start screen ribbon, the ribbon has the following appearance. No other icons are required in this case because the document is going to be printed and then completed by hand.
Ribbon on a blank document
For more information about the icons on the View ribbons, see Icons on the View Ribbons.
OIMs have additional ribbons (and the associated tabs) to enable them to approve or reject documents. For more information, see OIM Tools and Ribbons.
Icons on the Edit Ribbon The following icons are available on the Edit ribbon.
Icons and Regions on the Edit Ribbon, and the Associated Actions
Icons Region Name Actions
Actions Click Save to save the current document to the Toolbox. Click Submit if the document is ready for the OIM or Department Head to review.
Print Click the Include Images icon to include printouts of any attached image files when the document is printed. Click the Print Preview icon to see how the document will look when printed. (The print preview window also has a Print for Job icon, so you can print directly from the preview instead of closing it and printing from the document.) Click the Print for Job icon to get a printout of the document.
Clipboard These icons enable you to copy text, to paste copied text to a new location, and to copy text while deleting it from its current location.

Getting to Know the Toolbox
13
Icons Region Name Actions
Font These icons enable you to change the appearance of selected text in the document. Click the top link to display a list of fonts; click the first three icons on the lower row to change the style of the text to bold, italic, or underlined. Click the last icon (the square) to display a palette of colors that you can use to recolor the selected text.
Tools (first half) Click the Local Language icon to open a new window that enables you to translate the document. The second icon opens a copy of the standard risk matrix. When the cursor is in a Procedure Step text field, clicking the last icon inserts a timeout step above the current step. However, if this icon is clicked when the step is selected and the cursor is NOT in the text field, the timeout step is added to the end of the procedure.
Tools (2nd half) The top two icons move the current step up or down in the step sequence. The middle icon adds a step above the current step. The bottom icon deletes the current step.
Attachments Clicking Attach File opens a window that enables you to select a file from your desktop to attach to the current document. To delete an attachment in the current document, select the file name in the File Attachments section of the Supporting Documents tab and click Remove Attachment.
Help Click this icon to get help with a Toolbox feature.

QHSE Toolbox
14
Icons on the View Ribbon The following icons are available on View ribbons. Not all icons in the Actions region will be available on a particular version of the View ribbon, because icons are only present if they are likely to be needed for that document.
Icons and Regions on the View Ribbon, and the Associated Actions
Icons Region Name Actions
Print Click the Include Images icon to include printouts of any attached image files when the document is printed. Click the Print Preview icon to see how the document will look when printed. (The print preview window also has a Print for Job icon, so you can print directly from the preview instead of closing it and printing from the document.) Click the Print for Job icon to get a printout of the document.
Actions (Create WRA)
This icon is available on approved procedure documents. Clicking the Create WRA icon opens a new WRA document that is automatically linked to the MRSP or RRP from which it was opened. For more information about this process, see Create an Associated WRA.
Actions (Copy Plan)
This icon is useful if you want to create a document that is similar to the current document. For more information, see Copy a Document.
Actions (View Saved Plan)
This icon is active only if you open an approved document that has a revised version in progress. In such a situation, the approved version is opened first; clicking this icon opens the working draft of the revised version of the procedure.
Actions (Release) This icon is available only on WRAs. Clicking the Release icon removes the WRA from the Toolbox database.
Actions (Retain) This icon is available only on WRAs. Clicking the Retain icon saves the WRA to the Toolbox database.

Getting to Know the Toolbox
15
Icons Region Name Actions
Actions (Links) These links are available only on WRAs. Clicking Link to Procedure opens a window that enables you to select the MRSP or RRP to which the WRA should be linked. (For more information, see Link a WRA to a Procedure.) Clicking Release Link breaks the link between a WRA and the associated MRSP or RRP, but does not remove the WRA from the Toolbox.
Help Click this icon to get help with a Toolbox feature.


17
Early General Tasks
In This Chapter This chapter provides information about the following tasks:
• Importing a legacy document (TSTP, TRA) from THINK
• Searching for a document (MRSP, RRP, WRA) in the local or global database
• Printing a blank document to fill out manually
• Copying a document to save time when creating a similar document

QHSE Toolbox
18
Import a Document from THINK TSTPs and TRAs can be imported into the QHSE Toolbox.
NOTE: This feature will be available for only six months after the QHSE Toolbox is activated on a particular rig.
To import a THINK item:
1. Click the Import from THINK icon on the ribbon.
Import from THINK icon
The Import from THINK window opens, enabling you to search for the document to be imported.
Import from THINK window
2. Complete any of the following fields to filter the documents that will be listed, then click the Search button.
Fields for Filtering Documents to Import from THINK
Field Name Description
Doc Type Select the type of THINK document from the dropdown menu.
Number Enter the document number.
Department Select the department from the dropdown menu.

Early General Tasks
19
Field Name Description
Location Select the location.
Activity Enter the activity for which the document was written.
The documents that fulfill your search criteria are displayed.
Documents ready for selection
Documents that have already been converted are indicated by a check mark in one of the three boxes on the left. In the example screenshot above, the first document has previously been converted to a WRA. It can still be converted to an RRP or MRSP, but if you attempt to import it as a WRA, an alert will pop up to remind you that the THINK document is already available in this format in the Toolbox. However, you are not prevented from creating a duplicate.
NOTE: Text in one section of the table might sometimes be cut off, as in the Activity column of the third document in the above screenshot. To view the rest of the text, enlarge the section by grabbing a section border in the heading row and moving it to one side.
3. Locate the document that you want to import.
4. To confirm that the document is the one that you intend to import, double-click the line entry for the document.
A preview of the document is displayed.

QHSE Toolbox
20
Preview of THINK document
5. Review the information in the preview, then close the preview screen.
6. Click the line entry for the document that you want to import.
The line item is highlighted.
7. At the bottom of the screen, select the type of Toolbox document to which this THINK document should be converted.
Select the Toolbox document type
8. Click Import.
The relevant parts of the THINK document are imported into Toolbox as the document type that you specify, and the new document opens in an editing window.
9. Edit the following fields in the Header Information section as required.
Fields in the Header Information Section (an RRP uses only the first four fields)
Field Name Description
Number (This field is not active; the number is generated automatically when the document is approved.)
Department Select the department from the dropdown menu.
Location Select the location.
Activity Enter the activity for which the document was written.
Rig Class (MRSP only) This field is automatically populated according to the rig that is running Toolbox.

Early General Tasks
21
Field Name Description
Category (MRSP only) Select the document category. When a category is selected, the number of subcategories is reduced to those appropriate to the selected category.
Subcategory (MRSP only) Select the document subcategory. When a subcategory is selected, the number of operational activities is reduced to those appropriate to the selected subcategory.
Operational Activity
(MRSP only) Select an operational activity.
10. Check the information in the procedure steps, and edit it if necessary.
11. Check the information in the Supplemental Information tab, the RMS Information tab, and the Alerts tab. Edit as necessary.
12. Click the Save icon.
Save icon
The appropriate checkbox on the Input from THINK screen is marked to indicate that the THINK document has been imported in that Toolbox document format.
Import indicated by checked checkbox
13. If the document is ready for review, click the Submit icon.

QHSE Toolbox
22
Search for a Local Toolbox Document To search for a local Toolbox document:
1. Click the Search Local RSP & Risk Assessment tab.
The filter fields for a local search are displayed.
Filter fields for a local search
2. Complete any of the following fields to filter the available documents.
Fields for Filtering a Local Toolbox Document Search
Field Name Description
Doc Type Select the type of document from the dropdown menu.
Number Enter the document number.
Department Select the department from the dropdown menu.
Location Select the location.
Activity Enter the activity for which the document was written.
Rig Class This field is automatically populated according to the rig that is running the Toolbox search.
Category Select the document category. When a category is selected, the number of subcategories (next field) is reduced to those appropriate to the category.
Subcategory Select the document subcategory. When a subcategory is selected, the number of operational activities (next field) is reduced to those appropriate to the subcategory.
Operational Activity
Select an operational activity.
3. Click the Search Local button.
The documents that fulfill the search criteria are listed.
If the Doc Type is not specified in the first dropdown menu, documents of any Toolbox type that fulfills the search criteria are displayed, sorted by type. Within a particular document type, documents are sorted by the reference number; you can sort by status, department, location, activity, or last revised date by clicking the appropriate column heading.

Early General Tasks
23
Search results with no Doc Type specified
Some listed documents might have an asterisk in the Status column, or a + to the left of the Status column.
• An asterisk after the Status of the document indicates that the document is currently being revised, but an approved version is available for rig use until the revised version is approved.
• A + on the left of the document row indicates that there are one or more associated documents (usually WRAs) for that document. Click the + to expand the tree and see the line entry for the associated document.
Asterisk and + annotations
To display a document, double-click the line item for the document. The document opens in a new window. If the document is currently being revised, the approved version is displayed. To see the draft version (the one being revised), click the View Saved Plan icon.

QHSE Toolbox
24
View Saved Plan icon
At this stage, you can edit the procedure document or WRA, print it (click the Print for Job icon), copy it, or simply preview it (click the Print Preview icon). You can also search for another document by entering new search criteria and clicking Search.
Search for a Global Toolbox Document To search for a global Toolbox document:
1. Click the Search Global RSP & Risk Assessment tab.
The filter fields for a global search are displayed.
Filter fields for a global search
2. Complete any of the following fields to filter the available documents.
Fields for Filtering a Global Toolbox Document Search
Field Name Description
Doc Type Select the type of document from the dropdown menu.
Number Enter the document number.
Department Select the department from the dropdown menu.
Location Select the location.
Activity Enter the activity for which the document was written.
Rig Class Select the class of rig to which the document applies.
Category Select the document category. When a category is selected, the number of subcategories is reduced to those appropriate to the category.
Subcategory Select the document subcategory. When a subcategory is selected, the number of operational activities is reduced to those appropriate to the subcategory.
Operational Activity
Select an operational activity.

Early General Tasks
25
Field Name Description
Division Select a geographical division to which the document applies. When a division is selected, the number of rig names in the following field will be reduced.
Rig Name Select the name of a rig that uses the document.
Rig Category Select the type of rig that uses the document. When the rig type has been selected, the number of subcategories is reduced to those appropriate to the category.
Rig Subcategory
Select the subcategory of rig that uses the document. When a subcategory has been selected, the number of design class types in the next field is reduced.
Rig Design Class
Select a rig design class.
Rig Name Select the name of a rig that uses the document.
3. Click the Search Global button.
Documents that fulfill the search criteria are listed, as long as they have Approved status.
If the Doc Type is not specified in the first dropdown menu, documents of any Toolbox type that fulfills the search criteria are displayed, sorted by type. Within a particular document type, documents are sorted by the reference number; you can sort by status, department, location, activity, or last revised date by clicking the appropriate column heading.
Global search results with no Doc Type selected
Some listed documents might have an asterisk in the Status column, or a + to the left of the Status column.
• An asterisk after the Status of the document indicates that the document is currently being revised, but an approved version is available for rig use until the revised version is approved.
• A + on the left of the document row indicates that there are one or more associated documents (usually WRAs) for that document. Click the + to expand the tree and see the line entry for the associated document.

QHSE Toolbox
26
Asterisk and + annotations
To display a document, double-click the line item for the document. The document opens in a new window. If the document is currently being revised, the approved version is displayed.
NOTE: Unlike when searching locally, you cannot view or edit draft versions of documents when using the global search tab. Instead, you must copy the version that you see and edit the copy to suit the needs of your own rig.
At this stage, you can:
• Preview the document (click the Print Preview icon)
• Copy the document to the local Toolbox database for local editing and approval
• Search for another document (enter new search criteria and click Search)
Print a Blank Document Sometimes, it is more convenient to print a blank document and fill it out by hand at the specific location than to try to remember all the details of the activity while in front of the computer.
To create and print a blank document:
1. Click the appropriate icon in the Blank Forms section of the ribbon.
Blank Forms section of the ribbon
The Task Count dialog box is displayed, asking for an estimate of the number of steps in the activity.

Early General Tasks
27
Task Count dialog box
2. Enter the number of steps, and then click OK.
A blank form is displayed (in the following example screenshot, a blank MRSP with three steps).
Blank MRSP form
3. (Optional) To confirm that the form will look the way you want it to, click the Print Preview icon.
4. Click the Print for Job icon.

QHSE Toolbox
28
Copy a Document Sometimes, the quickest way to create a document (MRSP, RRP, or WRA) is to copy an existing document that is very similar, make the necessary changes to the copy, and save the new document.
To copy a document:
1. Open the document.
2. Click the Copy Plan icon on the ribbon.
Copy Plan icon
A copy of the document opens in an editing window.
3. Edit the following information as necessary:
• Header information (such as department, location, activity, category)
• Procedure information
• Supporting documents (attachments and linked documents)
• Supplementary information
• Tools and equipment
• RMS information
• Alerts
4. Click the Save icon.
Save icon
5. If the document is ready for review, click the Submit icon.

29
Procedure Documents (MRSPs and RRPs)
In This Chapter This chapter provides information about the following tasks:
• Creating an MRSP or RRP document
• Adding supplemental information to the document
• Adding RMS information to the document
• Acknowledging an alert
• Editing a procedure that is currently in draft stage
• Revising (updating) a procedure that has already been approved and is in use

QHSE Toolbox
30
Create an MRSP or RRP There are several ways to create an MRSP or RRP. You can:
• Start a completely new document
• Copy an existing similar document and edit it to suit your needs
• Print a blank document, fill it out by hand at the task location, and then use the method described in this section to convert the written version to a Toolbox version
This section describes how to start a new procedure document. To use one of the other methods, click the appropriate link above and follow the procedure described therein.
To start a new procedure document:
1. Click the appropriate icon on the ribbon.
Document icons on the ribbon
A blank document opens. The main differences between an MRSP and an RRP are that the MRSP has an extra row of fields in the Header Information section, and it has a red heading under the tabs instead of a blue one.
Blank RRP

Procedure Documents (MRSPs and RRPs)
31
Blank MRSP
2. Complete the following fields in the Header Information section.
Fields in the Header Information Section
Field Name Description
Number (This field is not active; the number is generated automatically when the document is approved.)
Department Select the department from the dropdown menu.
Location Select the location.
Activity Enter the activity for which the document is being written.
Rig Class (MRSP only. This field is not active; the rig class is determined automatically when the document is opened.)
Category (MRSP only) Select the document category. When a category is selected, the number of subcategories is reduced to those appropriate to the category.
Subcategory (MRSP only) Select the document subcategory. When a subcategory is selected, the number of operational activities is reduced to those appropriate to the subcategory.
Operational Activity
(MRSP only) Select an operational activity.
3. In the Procedure Step field, describe the first step of the procedure.
4. In the Required Tools and Equipment field, describe the tools and equipment that are needed for this step.
5. Enter the name of someone who should be responsible for this step.

QHSE Toolbox
32
First step completed
6. Repeat the previous three steps for the next row of the procedure.
The second step of the activity is now complete.
7. Continue adding information to the MRSP or RRP until each step of the activity has been documented.
8. Click the Save icon.
Save icon
At this stage you can:
• Link to supporting documentation
• Add supplementary information
• Create a WRA specifically for this procedure
• Add RMS information
• Attach a file
• Print the document (click the Print for Job icon)
• Submit the document for OIM review (click the Submit icon)
• Translate the document

Procedure Documents (MRSPs and RRPs)
33
Add Supplemental Information Supplemental information is that which does not belong in any particular step, but is useful or necessary for the procedure as a whole.
To add supplemental information to a procedure:
1. Click the Supplemental Information tab.
2. Enter the supplemental information into the free-text field.
Supplemental Information
3. Click the Save icon.
Save icon
Add RMS Information To add RMS information to a procedure:
1. Click the RMS Information tab.
RMS Information tab
2. Click the Link to RMS button.
The RMS Search window displays.

QHSE Toolbox
34
RMS Search window
3. Filter the search by selecting a craft from the dropdown menu, or by entering appropriate information into any of the search fields.
4. Click Search.
The search results display.
RMS search results
5. Double-click the entry that you want to use.
The RMS Plan Detail window opens, describing the RMS plan.

Procedure Documents (MRSPs and RRPs)
35
RMS plan details
6. Click the Link button.
The RMS Plan Detail and RMS Search windows close, and fields in the RMS tab on the new procedure screen are automatically completed with the necessary information.
RMS fields completed
7. Click the Save icon.
Save icon

QHSE Toolbox
36
8. If the procedure is ready for review, click Submit.
Alerts The Alerts tab on a procedure document is used to display alerts that are specific to a rig or procedure. Any information on this tab is non-editable. Anyone can view the alert, but only the OIM can acknowledge the alert.
To view an alert, select the alert and click View Alert. The alert opens as a pdf file.
To acknowledge an alert, click Acknowledge.
Edit or Revise a Procedure You can edit a new procedure that has been saved but not yet approved, or you can create a revised version of an approved procedure. Approved documents that have revisions in progress are denoted by an asterisk in the Status column of the search results.
Asterisk to denote a revision in progress
To edit or revise a procedure:
1. Search for the document.
2. Double-click the line entry for the document on the search results page.
3. If the document is being revised, click the View Saved Plan icon.
View Saved Plan icon
4. Make the required changes to the procedure.
Change the options that are selected from dropdown menus, change text in text entry fields, enter or delete text in the body of the document (including the tabs), or add or remove links, attachments, and associated documents.

Procedure Documents (MRSPs and RRPs)
37
5. Click the Save icon.
Save icon
6. If the document is ready for review, click the Submit icon.


39
Written Risk Assessments (WRAs)
In This Chapter This chapter provides information about the following tasks:
• Creating a WRA from the associated procedure
• Creating an unassociated (standalone) WRA
• Associating (linking) a WRA with a procedure
• Listing the required tools for a procedure
• Editing a WRA that is still in draft stage
• Revising (updating) a WRA that has already been approved and is in use
• Releasing a WRA

QHSE Toolbox
40
Create an Unassociated WRA To create an unassociated (standalone) WRA:
1. Click the New Written Risk Assessment icon under the THINK Process tab.
New Written Risk Assessment icon
The New Written Risk Assessment window opens.
New Written Risk Assessment window
The Number field in the Header Information section is disabled, because a number will automatically be generated when the Department Head approves the WRA for retention.
2. Select the Department to which the risk assessment applies. (If it applies to all areas, select General.)
3. Select the Location to which the risk assessment applies.
4. In the Activity field, enter a brief description of the overall activity to which the risk assessment applies.

Written Risk Assessments (WRAs)
41
5. In the Plan Step field, describe the first step of the activity.
Describe the first step of the activity
6. Move the cursor to the Identify Hazards field, and describe any hazards associated with that step.
7. In the Controls field, describe the precautions required to reduce the risks associated with the hazard.
WRA fields completed
8. Repeat the previous three steps for the next row of the procedure.
The second step of the risk assessment is now complete.
9. Continue adding information to the WRA until each step of the activity has been assessed and documented.
10. If it is advisable or necessary to take a safety timeout after a particular step before carrying out the subsequent step:
(a) Place the cursor in the step after the timeout.
(b) Click the Add Timeout for Safety icon.
Add Timeout for Safety icon
(c) Edit the text in the Plan Step field of the timeout step to indicate the duration of the timeout.

QHSE Toolbox
42
11. Click the Save icon.
Save icon
At this stage you can:
• Associate the WRA with an RRP or MRSP
• Link to supporting documentation
• Attach a file
• List the tools and equipment required for the activity
• Print the WRA (click the Print for Job icon)
• Submit the WRA for approval by the Department Head (click the Submit icon)
• Translate the WRA
Link a WRA to a Procedure An unassociated WRA can be linked to a procedure. Each WRA can be linked to only one procedure, but a procedure can have several associated WRAs.
To associate a WRA with a procedure:
1. Open the WRA.
2. Click the Link to Procedure link in the Actions section of the ribbon.
Link to Procedure link
The Link WRA window opens.

Written Risk Assessments (WRAs)
43
Link WRA window
3. Complete any of the following fields to filter the search.
Fields for Filtering a Link WRA Search
Field Name Description
Doc Type Select the type of document from the dropdown menu.
Number Enter the document number.
Department Select the department from the dropdown menu.
Location Select the location.
Activity Enter the activity for which the document was written.
Rig Class Select the class of rig to which the document applies.
Category Select the document category. When a category is selected, the number of subcategories is reduced to those appropriate to the category.
Subcategory Select the document subcategory. When a subcategory is selected, the number of operational activities is reduced to those appropriate to the subcategory.
Operational Activity
Select an operational activity.
4. Click the Search button.
The documents that fulfill the search requirements are listed.
Search results

QHSE Toolbox
44
5. (Optional) Double-click a document entry to open the document and confirm that it is the one to which the WRA should be linked.
6. Highlight the document entry in the list.
7. Click the Link WRA to... button.
The WRA is linked to the procedure.
Create an Associated WRA You can create a WRA that is automatically associated with an MRSP or RRP. This method saves time because it is not necessary to copy or rewrite information from the procedure document to the WRA, nor is it necessary to manually link the WRA to the procedure.
To create an associated WRA:
1. Open the MRSP or RRP.
2. Click the Create WRA icon on the ribbon.
Create WRA icon
The New WRA window opens. Each step of the procedure is automatically copied from the MRSP or RRP to the new WRA, and the Header Information is automatically the same as that on the MRSP or RRP.
Associated New WRA window

Written Risk Assessments (WRAs)
45
3. Identify the hazards associated with each step.
4. In the Controls field, describe the precautions required to reduce the risks associated with the hazards.
5. If it is advisable or necessary to take a safety timeout after a particular step before carrying out the subsequent step:
(a) Place the cursor in the step after the timeout.
(b) Click the Add Timeout for Safety icon.
Add Timeout for Safety icon
(c) Edit the text in the Plan Step field of the timeout step to indicate the duration of the timeout.
6. Click the Supporting Documents tab.
Supporting Documents tab
7. Link to any supporting documents.
8. Attach any files that could be useful or important.
9. Click the Tools and Equipment tab.
Tools and Equipment tab
10. Add information about the tools and equipment needed for the procedure.

QHSE Toolbox
46
11. Click the Save icon.
Save icon
When the procedure document is opened, the WRA is listed under the Associated Documents tab in the lower left corner.
Associated Documents tab clicked
12. If you want the WRA to be retained, click the Submit icon on the WRA.
The WRA is submitted to the Department Head for approval.
List the Required Tools and Equipment To list the tools and equipment required for a procedure:
1. Open the WRA associated with the procedure.
2. Click the Tools and Equipment tab in the Header Information section.
Tools and Equipment section

Written Risk Assessments (WRAs)
47
3. In the first field, enter the name or description of a tool or piece of equipment that is mentioned in the WRA.
When you enter text in the field, a second row opens for another tool or piece of equipment. You cannot enter text into the Inspected By field; that field remains empty so that it can contain a signature when the WRA is printed.
4. Continue entering names and descriptions (one per row) until all the tools and equipment used in the activity have been documented.
Edit or Revise a WRA You can directly edit a WRA that has a status of Saved or Pending Supervisor. If the WRA is in Approved status, you must copy the WRA and edit the copied version.
To edit or revise a WRA:
1. Search for the document.
2. Double-click the line entry for the document on the search results page.
3. If the WRA has a status of Approved, click the Copy Plan icon and then follow the standard procedure for editing the copy. Otherwise, continue with the next step.
Copy Plan icon
4. Make the required changes to the WRA.
Change the options that are selected from dropdown fields, change text in text entry fields, enter or delete text in the various sections of the document (including the tabs), or add or remove links, attachments, and associated documents.
5. Click the Save icon.
Save icon
6. If the document is ready for review, click the Submit icon.

QHSE Toolbox
48
Release a WRA To release an approved WRA:
1. Search for the WRA.
2. Open the WRA (double-click the line entry).
3. Click the Release icon on the ribbon.
Release icon
The WRA is released.

49
Late General Tasks
In This Chapter This chapter provides information about the following tasks:
• Attaching a file to a procedure or WRA
• Linking to a supporting document
• Providing a local language version of a document (translating the document)
• Editing the translated version of a document
• Running a report

QHSE Toolbox
50
Attach a File To attach a file:
1. Click the Attach File icon on the Edit toolbar.
Attach File icon
The Open window is displayed.
Open window
2. Navigate to the file that you want to attach.
3. Select the file, and then click Open.
The file is attached to the document, and the Supporting Docs panel on the right displays the title of the attachment.

Late General Tasks
51
Attachment listed in the Supporting Docs panel
4. (Optional) To attach the file to a particular step instead of to the document as a whole, select the step from the dropdown menu in the File Attachments section.
Attaching the file to a step
An icon appears next to the step number to indicate that the step has an attachment.

QHSE Toolbox
52
Attachment icon next to step number (step 2 in this case)
5. Click Save.
Save icon
The document is saved to the local database, but not submitted for approval.
Link to a Supporting Document You can link a WRA or procedure document (MRSP, RRP) to other documents that provide additional information. (You can also attach files to the document or associate a WRA with an RRP or MRSP. To find out more about those tasks, click the appropriate link.)
To link to a supporting document:
1. Click the Supporting Documents tab in the Header Information section.
The eDocs HSE Policies section opens.

Late General Tasks
53
eDocs HSE Policies section
2. Provide a brief description or title for the eDoc Policy.
3. Click the Edit URL button.
The Edit Hyperlink dialog box opens.
Edit Hyperlink dialog box
4. Enter the URL of the policy document in the dialog box, and then click OK.
The URL displays in the URL (Optional) field of the eDocs HSE Policies section, and the document is listed in the Supporting Docs panel.
Supporting Docs panel
5. Repeat the previous three steps as necessary to link to any additional supporting documents.

QHSE Toolbox
54
Translate a Document To create a local language version of a document:
1. Open the document that needs to be translated.
2. Click the Edit tab (in the top left corner).
3. Click the Local Language icon on the ribbon.
Local Language icon
A copy of the document opens, with instructions for translating it into the local language.
Local Language version of the current document
4. Translate the title.
5. Translate each procedure step, and the required tools and equipment.
6. Click the Local Supplemental Information tab.

Late General Tasks
55
Local Supplemental Information tab opened
7. Translate the supplemental information.
8. Click the Close icon.
9. Click the Save icon on the original document view.
10. If the document is ready for approval, click the Submit icon.
Edit a Translated Document To edit the local language version of a document:
1. Open the document that has a local language version.
2. On the document view that opens, click the green bar immediately above the Header Information section.
Green bar, indicating translated version available
The local language version of the document opens.

QHSE Toolbox
56
Local Language version of the current document
3. Check that the title has been translated correctly.
4. Edit the translations of each procedure step, and each set of required tools and equipment.
5. Click the Local Supplemental Information tab.
6. Check the translation of the supplemental information.
7. Click the Close icon on the local language tab (top left corner of the screen).
Close button on the local language tab
8. Click the Edit tab on the original screen.

Late General Tasks
57
9. Click the Save icon.
Save icon
10. If the document is ready for review, click the Submit icon.
Run a Report The Toolbox can produce four kinds of report:
• Index Reports list all MRSPs by category and subcategory
• Document Statistics reports provide the total number of each document type (MRSP, RRP, WRA), arranged by division and rig
• Printed for Job Statistics reports provide the total number of each document type that were printed for a job, arranged by division and rig
• Document Statistics by Dept. reports provide the total count of each document type, arranged by department
To produce a report, click the appropriate icon on the ribbon.
Report icons
The Toolbox generates a report for the current date and displays a preview.

QHSE Toolbox
58
Typical Index report
Typical Statistics by Department report

Late General Tasks
59
To run a report for a different time period:
1. Select the start of the time period from the From Date selection box.
2. Select the end date from the To Date selection box.
3. Click the Run Report button.
The toolbar above the report enables you to set various previewing and printing options for the report.
Toolbar for reports
Regions on the Report Toolbar, and Associated Actions
Icons Region Name Actions
Document Map (This function is disabled in Toolbox.)
Page Selection The text field in the middle of this section identifies the
page number of the page currently being displayed. Click the arrows on either side to move to a previous or later page, or to the first or last page of the report.
Refresh Click one of these icons to revert the display to the
previous report, cancel the rendering of the current report, or refresh the display.
Print Options Click the Print icon and the Page Setup icon (on the
left and right) to set the various options for printing the report. The middle icon is a toggle that enables you to see a full-page print preview.
Zoom The number in this selection box sets the size of the
report preview on the screen.
Locate Document
To quickly locate a document in the report, enter text or a document number in the find text field, and then click Find.


61
Approve Documents
In This Chapter This chapter provides information about the following subjects:
• How the Department Head can retain a WRA
• What additional tools are available to the OIM
• How the OIM approves a MRSP or RRP

QHSE Toolbox
62
Retain a WRA (Department Head) To review a draft WRA and retain it:
1. Click the Dept. Head Review & Approval tab.
The search fields for the WRAs that are pending approval are displayed.
Search fields for unapproved WRAs
2. Complete any of the following fields to filter the available documents.
Fields for Filtering a Local Toolbox Document Search
Field Name Description
Doc Type (This field automatically shows WRA, and is not active.)
Number Enter the document number.
Department Select the department from the dropdown menu.
Location Select the location.
Activity Enter the activity for which the document was written.
3. Click the Search button.
Documents that fulfill the search criteria are listed.
WRAs needing supervisor approval
4. Double-click the entry for a document that you want to review.
The document opens.
5. Review the document.
In the Task Information section, steps that have been changed have a pale-colored background. In the following example, the text in the Controls section of step 2 has been changed.

Approve Documents
63
Changed section (step 2, Controls) indicated by pale-colored background
6. If the document is satisfactory, click the Retain icon on the ribbon.
Retain icon
If you click Retain, the QHSE Toolbox assigns an automatic Toolbox reference number to the document. This reference number will display when the document is listed as a result of any search, and the status of the document will display as Approved.

QHSE Toolbox
64
OIM Tools and Ribbons The OIM will see an additional tab in the top left corner of the start screen.
OIM tools tab
When this tab is clicked, the Document Tools ribbon is displayed. The tools on this ribbon enable the OIM to delete or translate a procedure document.
Document Tools ribbon
When the OIM opens a document to review it for approval, the following tabs are displayed above the ribbon.
OIM tabs above the ribbon

Approve Documents
65
The Edit tab opens a standard Edit ribbon with the Submit icon disabled; the Approval tab opens the following ribbon.
Approval ribbon
Approve a Document (OIM) To approve or reject a draft procedure document (MRSP or RRP):
1. Click the OIM Review and Approval tab.
The search fields for unapproved local documents are displayed.
OIM Review and Approval tab
2. Complete any of the following fields to filter the available documents.
Fields for Filtering a Local Toolbox Document Search
Field Name Description
Doc Type Select the type of document from the dropdown menu.
Number Enter the document number.
Department Select the department from the dropdown menu.
Location Select the location.
Activity Enter the activity for which the document was written.
Rig Class Select the class of rig for which the document was written.
Category Select the document category. When a category is selected, the number of subcategories is reduced to those appropriate to the category.
Subcategory Select the document subcategory. When a subcategory is selected, the number of operational activities is reduced to those appropriate to the subcategory.
Operational Activity
Select an operational activity.
3. Click the Search Local button.
The documents that fulfill the search criteria are listed.

QHSE Toolbox
66
4. Double-click the entry for a document that you want to review.
The document opens.
5. Review the document.
In the Task Information section, steps that have been changed have a pale-colored background. In the following example, the text in the Procedure Step column of step 2 has been changed.
Step with changed text indicated by highlighted text box
6. When you have completed the review, determine which of the following actions to take.
Possible Actions
Result of Review Action
Document is complete and correct Approve the document
Document needs further work Send the document back to the writer, or make the changes yourself
Changes that the writer made to the document are incorrect
Reject the changes
7. If the document needs further work and you decide to make the changes yourself, click the Edit tab above the ribbon, and then make the necessary edits. Otherwise, continue with the next step.

Approve Documents
67
Edit and Approval tabs
8. Click the Approval tab above the ribbon.
9. Click the appropriate button.
Actions icons
If you click Approve, the QHSE Toolbox assigns an automatic Toolbox reference number to the document. This reference number will display when the document is listed as a result of any search, and the status of the document will display as Approved.


69
QHSE Toolbox on the Web
In This Chapter This chapter provides information about the following tasks:
• Accessing the Web version of the QHSE Toolbox
• Accessing the legacy THINK site
• Viewing an MRSP or RRP on the Web
• Viewing procedure attachments on the Web
• Viewing the local language version of a procedure
• Printing a document from the Web
• Viewing a report on the Web
• Saving a copy of a document or report to your computer

QHSE Toolbox
70
Access the Web Toolbox The QHSE Toolbox on the Web (Web Toolbox) enables you to view a document or report. You can also print a copy of a document, or save a copy of a document or report to your computer. To edit or approve a document, however, you must use the main QHSE Toolbox application (or the legacy THINK application, if it has not yet been phased out on your rig).
To access the Web Toolbox:
1. Open a browser.
2. In the address field of the browser, enter think.rig-employees.com.
The login page is displayed.
3. Enter your user name and password.
4. Click Login.
The Web version of the QHSE Toolbox opens.
Start page of the Web Toolbox

QHSE Toolbox on the Web
71
At this stage, you can search for a document or report, or you can open the legacy THINK program. For more information, see one of the following sections:
• View a Document on the Web
• View a Report on the Web
• Access the Legacy THINK Site
Access the Legacy THINK Site To access the legacy THINK site, click the Legacy THINK button on the toolbar.
Legacy THINK button
The legacy THINK site will be available for only a limited time after the QHSE Toolbox is rolled out at a particular rig.
View a Document on the Web To view a document on the Web:
1. On the Start screen of the Web Toolbox, complete one or more of the following search fields to filter the available documents.
Fields for Filtering a Web Search
Field Name Description
Doc Type Select the type of document from the dropdown menu.
Number Enter the document number.
Department Select the department from the dropdown menu.
Location Select the location.
Activity Enter the activity for which the document was written.
Rig Class This field is automatically populated according to the rig that is running the Toolbox search.
Category Select the document category. When a category is selected, the number of subcategories (next field) is reduced to those appropriate to the category.
Subcategory Select the document subcategory. When a subcategory is selected, the number of operational activities (next field) is reduced to those appropriate to the subcategory.
Operational Activity Select an operational activity.

QHSE Toolbox
72
Field Name Description
Rig Category Select the type of rig that uses the document. When the rig type has been selected, the number of subcategories is reduced to those appropriate to the category.
Rig Subcategory Select the subcategory of rig that uses the document. When a subcategory has been selected, the number of design class types in the next field is reduced.
Rig Design Class Select a rig design class.
Rig Name Select the name of a rig that uses the document.
2. Click the Search button.
The documents that fulfill your search criteria are listed.
Some listed documents might have an asterisk in the Status column, or a + to the left of the Status column.
• An asterisk after the Status of the document indicates that the document is currently being revised, but an approved version is available for rig use until the revised version is approved.
• A + on the left of the document row indicates that there are one or more associated documents (usually WRAs) for that document. Click the + to expand the tree and see the line entry for the associated document.
Asterisk and + annotations
If the Doc Type is not specified in the first dropdown menu, documents of any Toolbox type that fulfills the search criteria are displayed, sorted by type. Within a particular document type, documents are sorted by the reference number; you can sort by status, rig, department, location, activity, or last revised date by clicking the appropriate column heading.

QHSE Toolbox on the Web
73
Search results
If you drag a column heading to the region slightly above the top left corner of the document table, the documents rearrange into groups that are organized according to the column criteria (as shown in the following screenshot, in which the Location heading has been moved). To expand a group, click the + to the left of the group name.
Search results regrouped by dragging Location column heading to priority spot
3. To view a document, click the link in the Status column for that document.
At this stage, you can print the document or save a copy. (For more information, see Print a Document from the Web, or Save a Web Document or Report.) You can also search for another document by entering new search criteria and clicking Search.

QHSE Toolbox
74
View a Web Document Attachment If a document has one or more attachments, there will be a link to the attachments above the document heading, to the right of the text next to the Print button. The link also indicates the number of attachments.
To view an attachment to a document:
1. Click the Attachments link.
Attachments link
The list of attachments is displayed.
2. In the list, click the link to the attachment that you want to view.
View a Translated Web Document If a local language version of a Web document is available, the main document (in English) will have a highlighted View Local Language link above the document heading, to the right of the text next to the Print button. To see the local language version of a document, click the highlighted link.
Link to the local language version of a document
The local language version can be printed, just as the English version can. For more information, see Print a Document from the Web.
To revert to the English version, click the View English Language link to the right of the text next to the Print button on the translated page.

QHSE Toolbox on the Web
75
Print a Document from the Web To print a document:
1. Click the Print button in the top left corner of the screen.
The Print window opens.
Print window
2. On the General tab, select the printer that you want to use.
3. Click the Preferences button.
The Printing Preferences window opens.
4. Select the Landscape radio button.
5. Click OK.
6. Click Print.

QHSE Toolbox
76
View a Report on the Web To view a report on the Web:
1. Click the Reports button on the toolbar.
The report search page is displayed.
Report search page
2. Complete one or more of the following search filter fields.
Fields for Filtering a Report
Field Name Description
Report Name Select the type of report to be generated.
Rig Category Select the type of rig. When a rig category is selected, the options listed for Rig Subcategory, Rig Design Class, and Rig Name are restricted to those appropriate for the selected rig category.
Rig Subcategory Select the rig subcategory. When a rig subcategory is selected, the options listed for Rig Design Class and Rig Name are restricted to those appropriate for the selected rig subcategory.
Rig Design Class Select the design class of the rig. When a rig design class is selected, the options listed for Rig Name are restricted to those appropriate for the selected rig design class.
Rig Name Select the name of the rig.
Division Select the geographic location of the rig.
Rig Name Select the name of the rig.
Date From Click the button to the right of the Date From field, and then select a date from the date picker.
Date To Click the button to the right of the Date To field, and then select a date from the date picker.
3. Click the Run Report button.
The report is generated, and displays below the search filter fields.
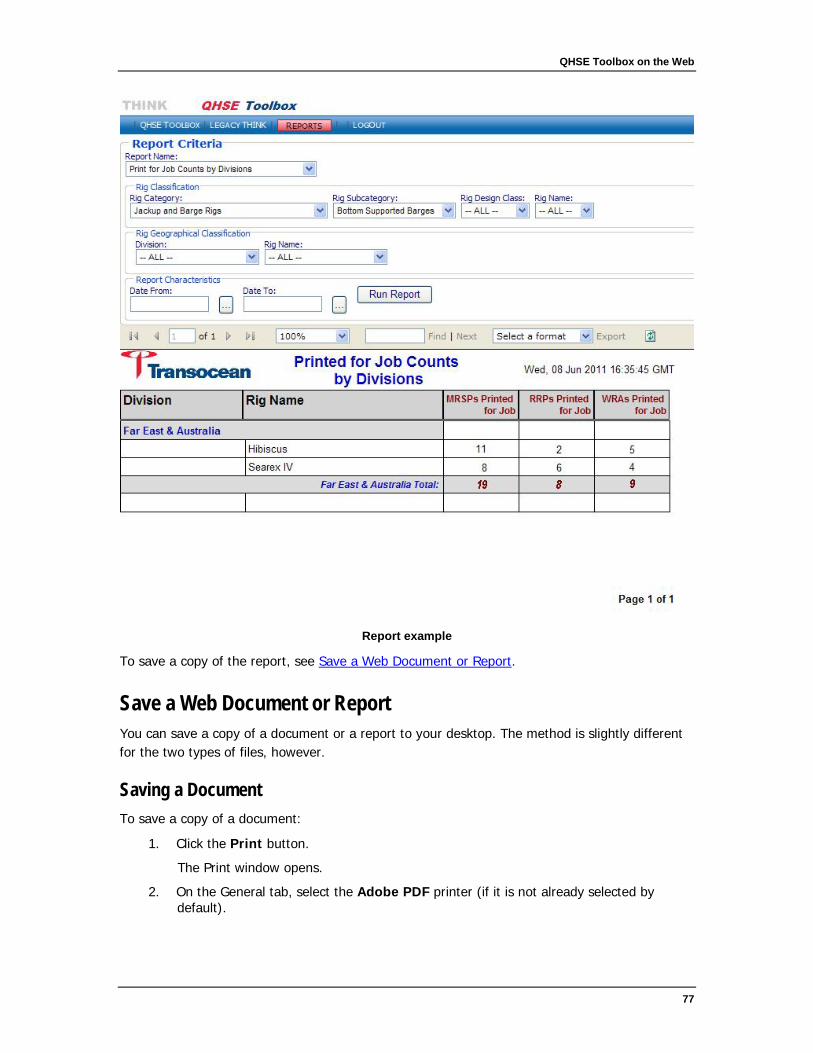
QHSE Toolbox on the Web
77
Report example
To save a copy of the report, see Save a Web Document or Report.
Save a Web Document or Report You can save a copy of a document or a report to your desktop. The method is slightly different for the two types of files, however.
Saving a Document To save a copy of a document:
1. Click the Print button.
The Print window opens.
2. On the General tab, select the Adobe PDF printer (if it is not already selected by default).

QHSE Toolbox
78
Print window
3. Click the Preferences button.
The Printing Preferences window opens.
4. Click the Layout tab.
5. Select the Landscape radio button.

QHSE Toolbox on the Web
79
Printing Preferences window
6. Click OK.
7. Click Print.
The Save PDF File As window opens.

QHSE Toolbox
80
Save PDF File As window
8. In the File name field, enter the name that you want the file to have.
9. In the main section of the window, navigate to the folder where you want to store the file.
10. Click Save.
The document is saved to the location that you specified.
Saving a Report To save a copy of a report:
1. On the toolbar above the report header, select the format in which you want to save the report.
Select the report file format
2. Click the Export link.

QHSE Toolbox on the Web
81
A new browser window opens. Inside it, a File Download window opens.
New browser window with File Download window
3. On the File Download window, click the Save button.
The Save As window opens.

QHSE Toolbox
82
Save As window
4. The File Name field contains the default name that the software has given to the file. Change the name if desired.
5. In the main section of the window, navigate to the folder where you want to store the file.
6. Click Save.
The report is saved to the location that you specified.

83
Index
A add RMS information ................................................. 33 add supplemental information .................................... 33 Alerts tab ................................................................... 36 approved version ....................................................... 22 associate a WRA with a procedure ............................ 42 associated document ................................................. 22 Associated Documents tab ........................................ 44 asterisk in the Status column ..................................... 22 attach a file ................................................................ 50 attachments ............................................................... 18
B blank document ......................................................... 26
C copy an existing document......................................... 28 create a local language version ................................. 54 create a revised version ............................................. 36 create a WRA ............................................................ 44 create an associated WRA......................................... 44 create an MRSP ........................................................ 30 create an unassociated (standalone) WRA ................ 40
D display a document .................................................... 22 document window ...................................................... 10
E edit a new procedure ................................................. 36 edit a WRA ................................................................ 47 Edit ribbon ................................................................. 10 edit the local language version ................................... 55
F formatting conventions ................................................. 2
G global Toolbox document ........................................... 24
I import a THINK item .................................................. 18 Inspected By field ...................................................... 46
L link to a supporting document .................................... 52 local language version ............................................... 54 local Toolbox document ............................................. 22 login ............................................................................. 6
M MRSP ....................................................................... 30
N navigation terms .......................................................... 3
O opening screen ........................................................... 6
P pale-colored background ......................................62, 65 print a blank document .............................................. 26
R reject a draft procedure ............................................. 65 release an approved WRA ........................................ 48 report ........................................................................ 57 revise a procedure .................................................... 36 revise a WRA ............................................................ 47 revisions in progress ................................................. 36 RMS information ....................................................... 33 RRP .......................................................................... 30 run a report ............................................................... 57
S safety timeout ............................................................ 44 search for a global Toolbox document ....................... 24 search for a local Toolbox document ......................... 22 search results region ................................................... 6 search tabs ................................................................. 9 start screen ................................................................. 6 supplemental information .......................................... 33 symbols....................................................................... 2
T Timeout for Safety ..................................................... 44 tool ribbon .......................................................... 6, 8, 10 Toolbox reference number ........................................ 65 tools and equipment .................................................. 46 translate .................................................................... 54 TRAs ......................................................................... 18 TSTPs ....................................................................... 18
U unassociated (standalone) WRA ............................... 40
V View ribbon ............................................................... 10

QHSE Toolbox
84
View Saved Plan........................................................ 22
W Web Toolbox ............................................................. 70
window elements......................................................... 3