Nuke Learning
60
PDF generated using the open source mwlib toolkit. See http://code.pediapress.com/ for more information. PDF generated at: Sun, 06 Jan 2013 07:53:50 UTC Nuke Learning
-
Upload
sebastian-comanescu -
Category
Documents
-
view
98 -
download
5
description
Dt2010 Digital Compositing course of the School of Art Design and Media, Nanyang Technological University
Transcript of Nuke Learning

PDF generated using the open source mwlib toolkit. See http://code.pediapress.com/ for more information.PDF generated at: Sun, 06 Jan 2013 07:53:50 UTC
Nuke Learning

ContentsArticles
Main Page 1Nuke 2Nukes Interface 3Toolbar 4Evaluating Script Structure 5Script Evaluation 9Photoshop Workflow 9Maya Nuke CameraTrack 10Maya Nuke RenderPass 11Final Cut Pro Workflow 15Color Workflow 19Keying Tips 27Rotoscoping 28Format Workflow 31Nuke Links 36Assignments 37Premultiplication 39Linking Values 42Keystroke Shortcuts 46Assets 47Composite Types 51
ReferencesArticle Sources and Contributors 57Image Sources, Licenses and Contributors 58

Main Page 1
Main Page
Welcome to this Nuke [1] Wiki. It was written to serve the needs of the DT2010 Digital Compositing course of the School of Art Design andMedia, Nanyang Technological University [2]. Questions, requests, contributions and suchlike should be sent to me, Martin Constable:
The philosophy of this Wiki is simple: it does not seek to give a complete coverage of every aspect of Nuke practice. There is already a good book[3] on the subject, many excellent tutorial videos [4] and a well written and comprehensive manual. It seeks, instead, to give the sort of informationthat a newbie will require with particular attention to anything that might confuse or confound.
Site structureThe structure of this site is simple, it has three main sections:
Intro sectionA light intro to Nuke and its interface. Here the very important Toolbar section resides. In Nuke, the toolbar is whereall the nodes are to be found and managing the nodes is what working in Nuke is all about. Most of Nuke's key nodesare listed in this section. They are covered with an emphasis on things that might trip up the newbie. For a fullerdescription Nuke's Reference Guide should be consulted.
Important sectionThis consists of only one page, that in turn links to three other pages. These cover the assessment of scripts. Of thesethe Script Evaluation page is the most important. Nuke does not warn you when you are committing errors in yourscript, and frequently such errors are hard to spot. Students: please check this page before submitting any script tome.
Workflows sectionA few 'how tos' covering key compositing operations.
Other sectionVarious pages on a number of workflow related pages. Also an asset download page.
How to use the code snippetsMany of these pages contain short sections of Nuke code. These should be copied and pasted in a blank and newNuke script at the defaiult format of 2048 X 1556.
References[1] http:/ / www. thefoundry. co. uk/ products/ nuke/[2] http:/ / www. adm. ntu. edu. sg/ Pages/ Home. aspx[3] http:/ / www. amazon. com/ Nuke-101-Professional-Compositing-Effects/ dp/ 0321733479[4] http:/ / www. thefoundry. co. uk/ products/ nuke/ training/
Nuke 2
Nuke
What is Compositing?Composting is the art and science of combining multiple output from different sources into one thing. Because ofthis reliance on externally sources material, compositing applications are editing, not authoring, applications.However, in my never humble opinion, compositing is one of the most creative of all the digital skill-sets. Liveaction footage is increasingly being treated as just raw material for the painter / compositor to feed on and the lookand the feel of many modern films and commercials is more and more being determined by the the compositingprocess.
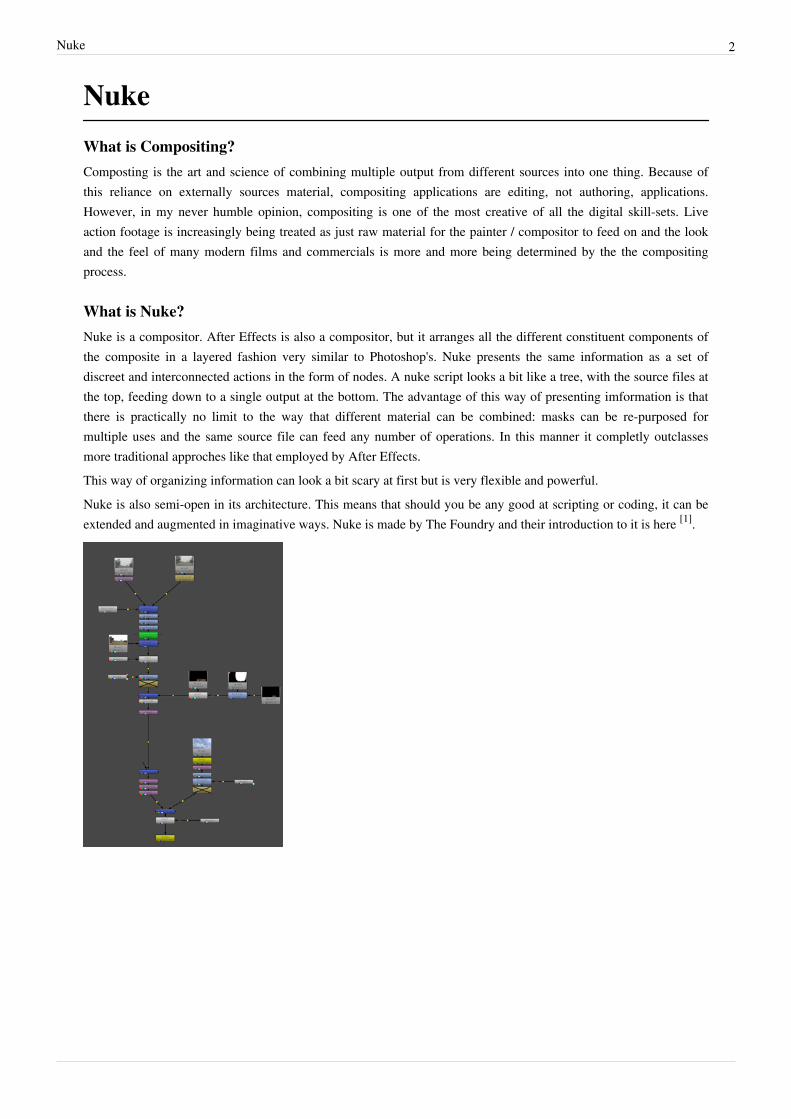
What is Nuke?Nuke is a compositor. After Effects is also a compositor, but it arranges all the different constituent components ofthe composite in a layered fashion very similar to Photoshop's. Nuke presents the same information as a set ofdiscreet and interconnected actions in the form of nodes. A nuke script looks a bit like a tree, with the source files atthe top, feeding down to a single output at the bottom. The advantage of this way of presenting imformation is thatthere is practically no limit to the way that different material can be combined: masks can be re-purposed formultiple uses and the same source file can feed any number of operations. In this manner it completly outclassesmore traditional approches like that employed by After Effects.This way of organizing information can look a bit scary at first but is very flexible and powerful.Nuke is also semi-open in its architecture. This means that should you be any good at scripting or coding, it can beextended and augmented in imaginative ways. Nuke is made by The Foundry and their introduction to it is here [1].

Nukes Interface 3
Nukes InterfaceNuke can be a whimsical program to learn. At first glance it looks really difficult, but as one gets use to the principleof node-based compositing, it quickly becomes a lot easier. Then... it becomes difficult again as all the many nuancesof its use become apparent. However, its interface is one of the simpler ones to learn.
Nuke's panels
Strictly speaking, the Nuke interface is composed of seven elements in the form of separate panels. Only five ofthese can be regarded as vital (marked in asterix below).
Nuke's panelsNode Graph *Viewer *Curve Editor *Properties Bin *Toolbar *Script EditorDope Sheet

Nukes Interface 4
Other interface elementsMost of the complexity of Nuke does not live in its panels but within the properties of the many nodes within theToolbar. Though these properties are different in each node, they share a good deal of interface similarity.Properties PanelProject Settings
ToolbarAs an aspect of the interface, there is nothing much to say about the Toolbar, other than that it is very badly named.It should be called the Node Bar or something, because this is where all the nodes live. The Nodes is where most ofthe action occurs in Nuke. These are the node families of the Toolbar...
Icon Link
Image
Draw
Time
Channel
Color
Filter
Keyer
Merge
Transform
3D
Particles
Deep
Views
Metadata
ToolSets

Toolbar 5
Other
Evaluating Script Structure
StartMistakes made when the script is first being written can cause knock-on problems later on.
Keep all project files within a folderNuke scripts are not like Photoshop files that can be saved as self-sufficient entities. In order for a Nuke script tofunction it must 'know' where all the referenced source files are. To ensure this proper project management isneeded. DT2010 house convention is this:•• Make a folder (project_name and any version or sequence number).•• Save the Nuke script into that folder and name it in a rational manner.•• Create a folder called 'sources' into which all the assets (image sequences, tiffs, tgs etc) are to be placed.As long as the file paths in the Read node (see below) are properly configured, the project is now completelyportable.
Name all assets rationallyDon't always use the names that the assets came with. DCS_00953.jpg or gjfhghjfg.jpg, are not good descriptors.Above all be consistent.
Dont use absolute paths in Read nodesAbsolute paths in the Read node (e.g. My Computer /funky_school_stuff/Martins_Class/session one/Stuff/Asset_Name.JPG) will become meaningless the moment the Nuke script travels outside of the computer in which itwas authored. Instead a relative path should be used. This will point to the media in a manner that is relative to thescript. Below on the left is an absolute path and on the right a relative one (using 'Method 1' outlined below).
Method 1 (easy): DT2010 house convention is this: paste this into the file parameter of the Read node:
[file dirname [value root.name]]/sources/Asset_Name.JPG.
This will only work if you keep all your media in a folder marked ʻsourcesʼ which is in the same folder as your Nukescript.
Evaluating Script Structure 6
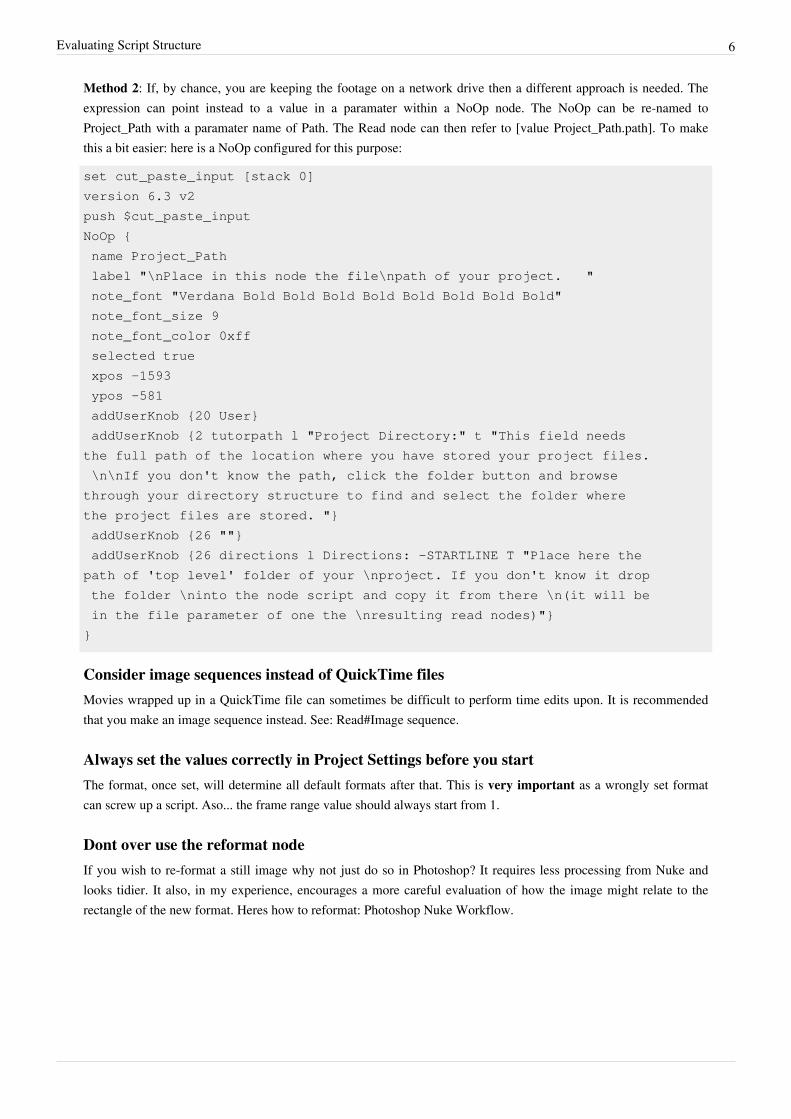
Method 2: If, by chance, you are keeping the footage on a network drive then a different approach is needed. Theexpression can point instead to a value in a paramater within a NoOp node. The NoOp can be re-named toProject_Path with a paramater name of Path. The Read node can then refer to [value Project_Path.path]. To makethis a bit easier: here is a NoOp configured for this purpose:
set cut_paste_input [stack 0]
version 6.3 v2
push $cut_paste_input
NoOp {
name Project_Path
label "\nPlace in this node the file\npath of your project. "
note_font "Verdana Bold Bold Bold Bold Bold Bold Bold Bold"
note_font_size 9
note_font_color 0xff
selected true
xpos -1593
ypos -581
addUserKnob {20 User}
addUserKnob {2 tutorpath l "Project Directory:" t "This field needs
the full path of the location where you have stored your project files.
\n\nIf you don't know the path, click the folder button and browse
through your directory structure to find and select the folder where
the project files are stored. "}
addUserKnob {26 ""}
addUserKnob {26 directions l Directions: -STARTLINE T "Place here the
path of 'top level' folder of your \nproject. If you don't know it drop
the folder \ninto the node script and copy it from there \n(it will be
in the file parameter of one the \nresulting read nodes)"}
}
Consider image sequences instead of QuickTime filesMovies wrapped up in a QuickTime file can sometimes be difficult to perform time edits upon. It is recommendedthat you make an image sequence instead. See: Read#Image sequence.
Always set the values correctly in Project Settings before you startThe format, once set, will determine all default formats after that. This is very important as a wrongly set formatcan screw up a script. Aso... the frame range value should always start from 1.
Dont over use the reformat nodeIf you wish to re-format a still image why not just do so in Photoshop? It requires less processing from Nuke andlooks tidier. It also, in my experience, encourages a more careful evaluation of how the image might relate to therectangle of the new format. Heres how to reformat: Photoshop Nuke Workflow.
Evaluating Script Structure 7
ColorLots of stuff here about premultiplication
Don't color correct an image that has been pre multipliedColor correction must only be done on FG images that are not pre multiplied. To un-premultiply you may use anUnpremult node.
Don't composite a FG that is not pre-multipliedFor a lucid explanation see Premultiplication.
Don't premultiply twice in a rowDouble pre-multiplication is bad. It can lead to fuzzy edges.
Color adjust only RGBBy default all color adjustments work on the alpha of an image as well as the RGB. Almost always this is not a goodthing and can really screw up a comp. Set the color adjustment to RGB only.
Consider using simple color tools before using complex onesFancy nodes with lots of sliders might look fun to play with but are they necessary? You will find that for a lot ofcolor correction work a Multiply or ColorLookup is enough.
Consider using separate color adjustments instead of one large oneThough it is possible to roll many color adjustments into one, they are easier to evaluate if done as separateadjustments. This can be important when 'perception value' pairs like lightness / color or saturation / hue are beingadjusted together.
HousekeepingClean the sink, tidy your bedroom and comb the cat.
Keep a tidy scriptDT2010 students: observe the ʻhouse script conventionsʼ or evolve a good set of your own.
Consider masking stills in PhotoshopA Nuke roto is not always a good way to mask a still image. Consider using Photoshop masks instead: they arequicker to make and usually better at complex forms (far more able to cope with things like the soft edges of hair andfar more capable of handling knock-out shapes and negative shapes). Save Photoshop result as tiff. Look atPhotoshop Workflow for tips on how to do this.
Donʼt leave 'fiddle' values in the parametersWhen reading someone else's script it can be very confusing to open something like a ColorCorrect and discover thatsome of the parameters have been set to random, completely ineffectual values (e.g. a saturation value of .00004). Itis inevitable to want to fiddle with a set of paramaters whilst trying to get the best result, but if a parameter changehas no effect then it should be returned to its default (to set to default Command click on the slider or contextualmenu it). Try to get to know exactly what each parameter does and what its place within the adjustment is.

Evaluating Script Structure 8
Layers, keyers and masks
Avoid side masking a merge nodeSide masks are for things like color corrections, filters etc. They are not to be used to determine transparency in aMerge node. The same mask can be added to the Merge feeds as a Matte value using a Max or Min blend mode.
Observe the primacy of the B feedA script can be bothersome to manage if B feed primacy is not observed. See Primacy of the B Feed.
Manage the bounding boxPoor Bounding Box Consideration can slow down a script with unnecessary processing.
Avoid feeding more than two inputs into a merge nodeThough the Merge node will accept many streams it does not always do so in a way that is consistent andpredictable. Also, a script that has all its merge operations stacked inside of one node is very hard to troubleshoot asits layers can not easily be turned off one by one. It can also be hell to re-order the layers such an arrangement.Consider instead stacking the merge operations one after the other.
Donʼt use a keyer node as a substitute for a merge nodeThe keyer's main job is to deliver an alpha, not to do the layering itself. The foreground of a comp done in a keyer isvery difficult to color edit without also affecting the green screen values. The merging on the foreground with thebackground, and the associated color editing involved, is best handled as a completely separate operation to the keypull.
Avoid to many points when you rotoMany points can be difficult to edit and hell to animate. Use as few as you can. More on roto here: Rotoscoping.
Avoid recycled masksIf a single mask is used on two or more nodes in a row then it can cause problems. This topic is covered fully in theKeyMix page.
Script Evaluation 9
Script EvaluationEvaluating a script is, perhaps, the most important aspect of compositing.Editing the color values of the composite requires that the compositor evolves a method of evaluating this colors.This feedback can be in the form of generalized visual feedback or something more specific like a set of numbervalues. Nuke has a lot of tools that have either been designed specifically for this purpose or can be adapted to beused as such.Evaluating Color
Working on an image it is easy for the eyes to get 'tired' of the script and to become blind to its pictorialshortcomings. The content of an image is not subject to numerical evaluation in the same way that color is. Here area few ways to refresh those eyes:Evaluating Content
Nuke is a very 'adult' application that lets you handle your material in any way that you wish. Unlike Photoshop,Nuke will not give you a warning beep or forbid you from doing anything. For this reason it is very easy toaccidentally do things in the 'wrong' way. This is a short (non comprehensive) list of common 'best practice' items.Of course, like all 'rules', they are there to be broken.Evaluating Script Structure
Photoshop WorkflowIn compositing one it is common to bring Photoshop output into Nuke. It has two main uses: to conform the formatof assets with that of the script and the production of matte paintings for the purpose of background replacement,scene extension etc.
Conforming the format of assetsAssets frequently need their formats conformed to that of the project as set out in the Project Settings. Why not justuse a Reformat node to do this? Well... external reformatting makes fewer demands on your processing and, morimportantly for a student, encourages greater accountability in terms of composition, placement etc.1. Make a new Photoshop document the right dimensions.2.2. Save it and call it Asset.tga (or whatever name and file extension is desired).3.3. Open the asset that needs to be conformed.4.4. Right click on the background and select duplicate.5. In the Destination / Document menu select Asset.tga.6. Resize to fit using Transform (command T). Ensure that Maintain aspect ratio is clicked.7.7. Flatten and save.This method is infinitely less confusing than trying to reformat the original file in Photoshop.
Digital paintingBringing in a Matte painting into Nuke is one of the most satisfying aspects of compositing. However, if it is beingdone right then a workflow should be established. The matte painting and the composite will need always to be in'conversation' with each other: with both of them subject to ongoing adjustments so as they match. The best way tomanage this is to have one master.psd from which RGBs, Alphas, masks etc are all derived. Photoshop's 'save as'menu item will have to be utilized quite heavily for this.

Photoshop Workflow 10
1. Make a new Photoshop document the right dimensions.2.2. Save it and call it Painting_master.tiff (or whatever name is desired). A tiff is easier to manage than a Psd file as
it will save having to change the file extension every time the image is 'saved as'.3. A render from Nuke or an image from the Read image sequence will often be needed as a background on which
to paint on top of. Save, open and drop this into Painting_master.psd in the same way as above (except it will notneed re-sizing).
4.4. Paint away!•• Keep the psd file organised in colored layer sets that correspond to the assets that are needed (e.g. a
foreground, and a set of masks).•• The name of these layer sets should be the same as the assets that is being created.•• Masks can be made by filling a new layer with black, setting it to screen blend mode and painting with white.
This will make it easy to correspond the mask with the psd contents.• Save masks by temporarily removing the blend mode and saving as a flat tiff.
5.5. When saving a Matte there is a high chance that transparency will need to be preserved. Save as tiff but ensurethat:•• There is Photoshop 'checkerboard' transparency showing behind the thing you wish to save.• Save file as tiff. Un-tick Layers in the Save As dialogue box.• Tick Save Transparency in the following TIFF Options dialogue box.
6.6. Done.Tip: if Photoshop to Nuke is being done right then there will be many, many, many 'save as' operations.An example of digital painting master file is in the Assets section.
Maya Nuke CameraTrack This bit unfinished
As I have already mentioned, the CameraTracker is the glue that holds together the 3D world, 2D compositing andlive action footage. The workflow is, in its least detailed form, is this:Consider the case of trying to get some live action footage and a Maya animation to 'agree' with each other. Such acase might be a camera moving round a figure against a green screen. This needs to be placed against an enviromantmade and animated in Maya.In preperation you should prepare a simple piece of real-world geometry that can correspond in some way with theMaya enviroemnt. an example might be a desk, or chair. This placeholder geometrty will be modeled in Nuke andwill serve to unite the scale of the real-world and 3D world.Camera track the live action footage.
From the tracked camera create a scene. The scenes (virtual) camera will contain tracked data from the liveaction footage (real) camera. Using the camera's File menu parameter (the little folder icon) export the cameradata as a .chan file. A .chan file is a common file format for passing camera motion between applications.
Make some placeholder geometry based on the contents of the live action footageUsing the Modeler or any of Nuke's simple geometry nodes, make some simple geometry based on thecontents of the live action footage. This can be anything simple, like a desk or chair. It will only serve as avisula cue to esatblsh the position of your Maya geometry and its scale. What form it takes depends upon whatyou are doing, but it need be no more complex that a cube or even a simple card.
Export the placeholder geometry
Maya Nuke CameraTrack 11
Use the WriteGeo node with which to write out the placeholder as an .obj file.Import into Maya
Import the geometry and camera into Nuke. Ensure that the focal lenghth of the real-world and virtual cameraare the same. Make sure that Maya 'agrees' with Nuke (do a simple playblast in Maya and comp into Nuke).Now make your geomtry and render. Remember to render out any junk masks that are needed.
Maya Nuke RenderPass Unfinished
There are many schools of thought on multi pass rendering with many people employing different approachesconsisting of different passes. The following I have found to be the most flexible. Slightly different approachesmight be used in particular instances, for example a motion pass will be needed if the object is moving and somepost-render motion blur is required.
Key Maya knowledgeA few bits of key Maya knowledge are needed:
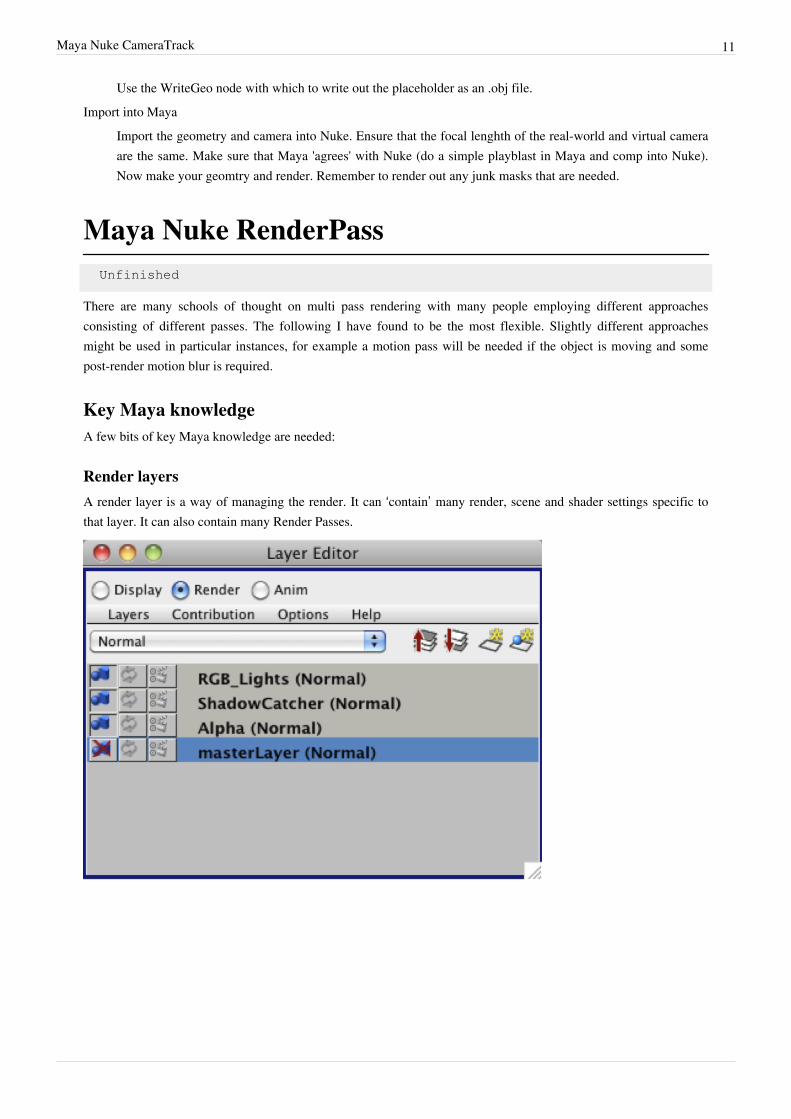
Render layersA render layer is a way of managing the render. It can ‘contain’ many render, scene and shader settings specific tothat layer. It can also contain many Render Passes.

Maya Nuke RenderPass 12
Render passA render pass is a render ‘attribute’ such as light, shadow, reflection etc. A Render Layer can contain many RenderPasses. They are managed through the Render Settings. First turn on Mental Ray then go to the Passes tab. Add allthe passes that are needed (below left) and then associate them as needed to each Render Layer (below right).
The following passes will be needed:AO
Ambient occlusion, which is a ‘map’ of areas hidden from ambient light such as crevices and overhangs.diffuseMaterialColor
This is the flat color of the object with any light or shadow at all. Do not confuse it with diffuse light which isa light pass.
indirectIndirect light.
reflectionThe reflected environment.
shadowRawThis is the shadow that is cast by the lights.
specularNoShadowThis is the specular light i.e. highlights.
matteMatte = alpha.
directIradianceNoShadowDirect light.

Maya Nuke RenderPass 13
Layer overrideMost of the attributes of an object or scene can be made subject to overrides that are specific to a particular RenderLayer. First make a Render Layer and then right click on the attribute and select Create Layer Override.
Render layers specifiedThese are the Render layers that will be needed to set up and their associated Render passes.
MasterLayerThis will contain most of the Render Passes. To get the AO the Ambient Occlusion will need to be turned on in theIndirect Lighting tab of the Mental Ray render settings.
AOdiffuseMaterialColorindirectreflectionshadowRawspeculrNoShadow
AlphaThis contains the simple alpha of the object and it will be used to separate the object from the environment. A LayerOverride will need to be set up for the scene. Go to the Shape Attributes of the ground plane object and turn offPrimary Visibility in Render Stats. This layer will contain only one Render Layer:
matte
ShadowCatcherThis will do something a bit tricky. In order to integrate the object with the new environment the alpha of the shadowthat the object casts onto the ground plane is needed. But the object should not occlude (obscure) the shadow. To dothis the Primary Visibility of the object will need to be turned off as a Layer Override. Though it will be invisible tothe render it will still cast a shadow. The following Render Passes will be needed:
shadowRaw

Maya Nuke RenderPass 14
AOMaybe a reflection pass will also be needed, depending on the physical quality of the ground plane.
RGB_LightsThis is clever. Set a layer attribute for the color of the lights to a pure red, green or blue. This must be donenumerically in the Color Chooser. An RGB light pass can be pulled off from the render, each channel of which willcontain the light information from a particular light. This approaches saves having to do separate Render Layers foreach light. More than three lights can be rendered if they are set to secondary colors and separated out with a but ofsimple maths in the compositing app. It will contain only one pass:
directIradianceNoShadow
CompositingThis is how the passes are assembled in Nuke. A similar arrangement can be used in After Effects. Other passesmight be needed depending on the circumstances. NOTE: Maya outputs images in sRGB color space but Nukeassumes that .exr files are in linear space. You must therefore change colorspace setting in the read nodes fromLinear to sRGB.
Object passes (in order of application)diffuseMaterialColor This is the base layer to which all other layers are applied.directIradianceNoShadow
The most flexible way to use this pass is to mask an ADD node with this pass taking care to ensure that theappropriate channel is set in the mask pull down menu. The color and strength of the mask can be moderatedby the add node color values. This pass should first be moderated by a Multiplication set to zero and maskedby the shadowRaw pass. This will remove the cast shadows from the light.
indirectUse the same approach as in directIradianceNoShadow but without the channel specific bit. This is an RGBpass but only one channel need be used in the mask. Out of habit I usually use the green channel.
specularNoShadowUse the same approach as in indirect.
reflectionThis is also a light pass but as it contains color it is best used in a layer mode with the blend set to Plus.
AOUse this as a mask to a Multiply node.
matteSet the object alpha to this pass and then pre-multiply.

Maya Nuke RenderPass 15
Ground plane passes (in order of application)AO
Use this as a mask on a Multiply. This will act as the ‘foot’ of the shadow.shadowRaw
Use this as a mask on a Multiply. This will act as the main body of the shadow.
LinkThis guy [1] has a very clear tutorial on multi pass rendering setup though his approach is slightly different (e.g. heuses a shader for the AO).
References[1] http:/ / vimeo. com/ 21588228
Final Cut Pro Workflow
Do you need Nuke?First of all determine if you need Nuke or if your color editing needs can not be served within FCP.
Color correcting within FCPA full exposition of color editing within FCP this isn't going to be. However, if you learn one thing on the topic it isthe need to ensure that your light neutrals (i.e. your light grays) do not have a color cast to them (i.e. are not slightlypink, blue, yellow etc). This is often called the white balance of your image.What white balance is...
White balance is in fact a misnomer. An image is white balanced if your light points (i.e. light grays) are notbiased in any way towards pink, yellow, green etc.
Why is white balance important as opposed to grey, black or blue balance?Any value can have a hue bias but it is easier to spot in a light gray.
Super factoid...Once you have neutralized your light values then most other values within your image will magically lookbetter. Sometimes, however, a gamma (mid value) correction is needed.
To neutralise your light grays:1. Identify a light area in your target image that should be light grey but is in fact a mild hue.2. Go to the Effects tab and find Color Correction / Color Correct 3-way. Drop this onto your clip.3. Double-click the clip to open it up in the Viewer window then go to the sub-window behind it that is marked
Color Correct 3-way.4. Using the eyedropper (A), click once on the target area. If the results are ghastly then chances are you chose an
area that is too dark or too light. Reset (D) and try again.5. You can refine the lightness of this area using the lightness slider (B) and its hue by using the color wheel (C).
DONT push these two sliders too far.6. You may switch the change on and off using the Visibility check box (E).7. More Color Correct 3-ways or other Color Corrections can be added should you wish to augment this
correction with some color atmosphere. Tip: when doing so try to ensure that your neutrals are kept neutral. The

Final Cut Pro Workflow 16
Desaturate Highlights filter is useful in this regard.
Fuller notes on this vast topic can be found in notes on my color lecture in the Assets page.
So you need Nuke?Note to Film students: Nuke's advantage is that it can perform color operations that involve complex masks, trackers,color operations and goodness know what. Brilliant notes on the subject can be found in the Color page. Whilst FCPcan easily be mastered by grandmothers and children, Nuke should not be touched by anyone who has not be trainedin unarmed combat and tiger wrestling. Think you are man enough? Read on...
OverviewThere are several problems with working across Nuke and FCP. For a start you must organise your media and filescarefully if you are not to get lost. You must also ensure that your color management workflow is functioningcorrectly. If you dont then color inconsistencies will creep in to your work.
Organise your materialFirst ensure that all your files are named in a rational way. Your sequences, projects, raw media files etc should allfollow a consistent and logical naming convention. I propose:1.1. Under_score all gaps.2.2. Padded numbering.3.3. Short scene description (e.g. 06).4.4. Alphabetical shot indicator (e.g. 06a).5.5. Numerical take indicator (e.g. 06a_04).Do not insert whimsical narrative addendums into these denominators e.g. '06a_04_blue_hat'. Such information canbe contained within an excel spread sheet with as well as any other needful notes.Whatever folder structure you implement it should serve at least three sets of files:

Final Cut Pro Workflow 17
1. Raw files: the original source footage.2. Rendered clips: see Render clips below.3. Corrected clips: the output from Nuke.
Check color flowQuickTime's (and therefore FCP'S) color management is famously whimsical. As you move from QuickTime toNuke and back again the gamma of the image is especially prone to damage. Do a test run: read into Nuke test outputfrom FCP, write this out from Nuke without any adjustment then read back into FCP. If it looks the same as theoriginal then you are home and dry. If not then:• Try changing the colorspace parameter in Nuke from default (1.8) to 2.2.•• Check online to see if other people have encountered the same problem and see what they have done.•• Try changing codecs. This is a pain in the arse and should be avoided if possible. A reliable codec is 10 bit
uncompressed.
Render clipsThe clips in your FCP sequence refer to longer take footage on your hard disc. They will be easier and quicker tomanage if they are rendered out as self sufficient media. This is done through the Meda Manager (right clip onsequence or selected clips). This will give you a new FCP project and a bin full of newly rendered clips thatcorrespond in size to those in the timeline.
Final Cut Pro Workflow 18
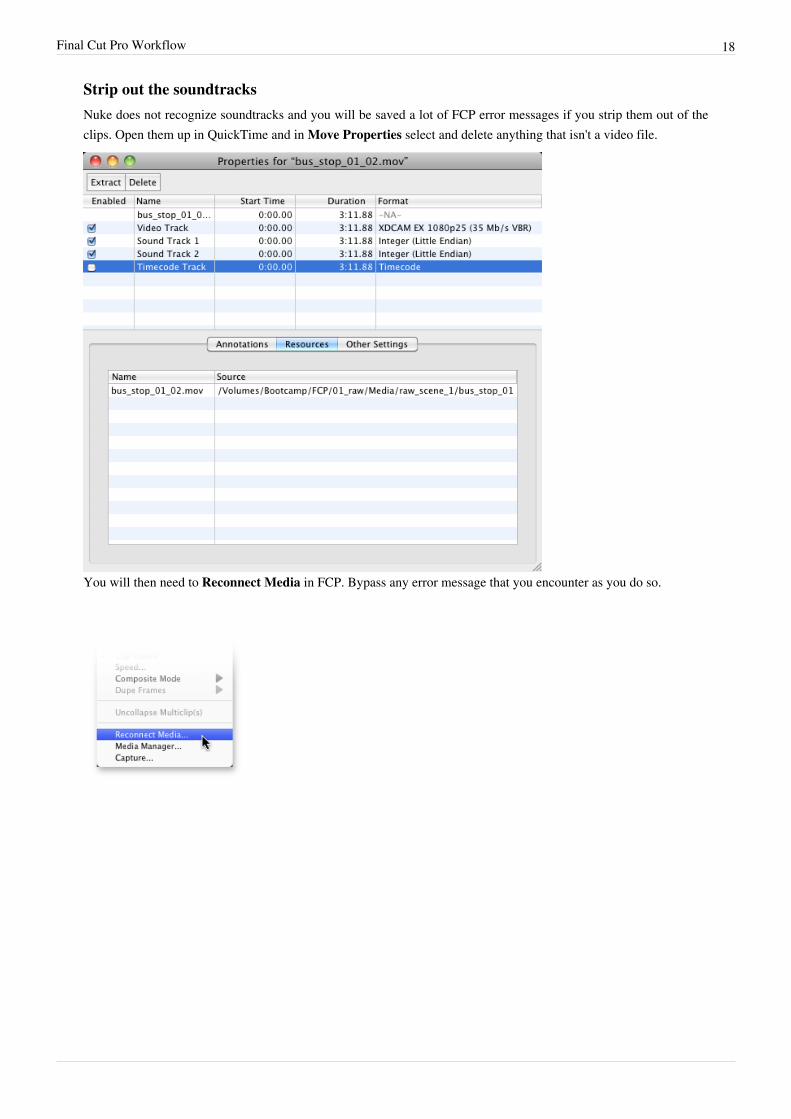
Strip out the soundtracksNuke does not recognize soundtracks and you will be saved a lot of FCP error messages if you strip them out of theclips. Open them up in QuickTime and in Move Properties select and delete anything that isn't a video file.
You will then need to Reconnect Media in FCP. Bypass any error message that you encounter as you do so.

Final Cut Pro Workflow 19
Edit in NukeDo creative whatever voodoo in Nuke you wish. As Nuke does not have a very effective timeline, it is difficultsometimes to compare footage. A [Switch] node and other Timinging nodes should be used for this purpose. TheSwitchGroup device that I made should be very useful in this regard.
Render outUsing a Write node render the result. Check that you have set the correct FPS value in the advanced setting.
Read back into FCPUsing Reconnect Media replace the clips in FCP with those you have rendered out from Nuke.
Color WorkflowEvery image that requires some sort of color-treatment will need unique treatment, however there is a lot ofcommonality to the color-treatment workflow. As a general rule color correction, balancing and stylisation should bedelivered in the order in the following order:
Color correctionCorrecting for poor exposure, incorrect lighting etc.
NormalisationWhen the darkest point of an image is black and the lightest is white then it is 'normalized'. This requires that thedarkest and lightest values be identified. The CurveTool is a good choice for doing this on an entire image or arectangular portion of one. If a non-rectangular region is the subject then the evaluation should be done by eye usingthe Script Evaluation#Viewer window and the f-stop and Gamma sliders. Be warned: the curve tool will returnidentify the absolute lightest and darkest point. This is somtimes not usefull, a visually lightest and darkest pointbeing preffered.Once the darkest and lightest point have been identified they need to be normalized into black and white and theGrade node is probably the fastest way to make this happen. The CurveTool parameters Maximum LuminancePixel value and Minimum Luminance Pixel value swatches can be dragged directly into the blackpoint andwhitepoint parameter values of the Grade tool. Or, if GradeTool info is not available or is not appropriate, then theblackpoint and whitepoint values can be set with their colorpicker (see Color Node Interface for details on how thismight go wrong. The blackpoint and whitepoint values may thereafter be edited (it is not uncommon to want to takethe white point down a bit).
SaturationWhilst the lightness and hue of an image can be empirically wrong, the wrongness / rightness of the saturation of animage is somwhat a subject of opinion. There are two ways to take on saturation:•• The most common way is to imply use a Saturation node to multiply the satuartion value up or down.•• The interesting way is the make a pair of ColorSpace nodes: one concerting from Linear to HSB, the other
converting back to Linear from HSB. Between the two a ColorLookup node is used to perform a contrastadjustment on the saturation values of the image. Funky? Yes.
Color Workflow 20
Color balancingIt is very common for the color balance of an image to be wrong. The test of this is to look at the areas of an imagethat should be neutral (i.e. grey). White walls are ideal subjects for this. If these grey ares have a color cast then theimage needs a color balance. The best way to do this is by using the RGB curves of the ColorLookup node. Thegamma parameter of the Grade node can also be used depending on your workflow needs. The TM sliders of theTMI color slider set can be used for this purpose. An eye should be kept on the RGB number values as presented inthe value information bar of the Viewer window.
Color matchingMatching the values in one image to those of another is a common requirement of color grading. There are a coupleof ways to do this. However, the first thing that should be done is to isolate the target area:
Identify match regionsIf, for example, the skin colors of one face are to be matched in another, then a single region of both faces should beidentified (e.g. the mid skin values of the cheek). The color matching requirement is that the colors of both theseregions should match value for value.
Method 1: by the numbersUsing a ColorLookup tool move the RGB values around till the two sets of values match (it usually makes sense toconsider one of the images as the source and the other as the target). The RGB numbers in the value information barof the Viewer window should be observed.
Method 2: grey scale matchIf two colors match then it is a guarantee that the lightness values of their three channels also match. We can 'reverseengineer' this arrangement. A CopyRectange can be used to copy the match region from the target image and lay iton top of the source image. Using a Transform node this can be moved so that it is directly next to the source matchregion. The channels can be isolated one by one in the Viewer window and matched visually using the color node ofchoice.
Method 3: using the grade nodeusing the following Grade node method that follows a hight point and low point of two images can be matched. Thiscan be more effective than targeting a single value and is particularly useful on objects that have a wide color rangesuch as a face. However, it is not straightforward:1. Using the blackpoint and whitepoint parameters of the Grade node set, in the target image, the light and dark
points. This will move those points to black and white and make the image look weird, but wait...2. The reason these points were set to black and white is that they are now much more easily moved to new values
(moving a 0 or 1 to arbitrary RGB values is easier than moving one arbitrary set of values to another). Using thelift and gain parameters of the Grade node these new black and white values can be moved to new positionswhich may be sampled from the source image. Part B of the videos that are linked below of the page covers thismethod very well.
The advantage of using this meathod over the preceding meathods is that the match is done using two sets of values:a high and a low, not just a single set of values.Some great tutorial videos on color correction and matching from The Foundry [1]

Color Workflow 21
Color stylizationColor stylisation is the point at which the color of an image is changed so as to change its aesthetic ambiance (or'picture values'). There is too much to say on this subject so I will, for the most part, pass by in silence. Just a fewnotes:
Regional adjustmentOne of the big differences between correction and stylization is that the later often involves color edits being appliedregionally as opposed to globally. Highlights, shadows, foreground, background, edges, corners etc all might needtargeted edits. There are different ways to mask these regions:Area mask
This masks out an area of the scene like the top left or the middle and it is not likely to be very heavilyanimated. An area mask can be used to darken the top of the sky, lighten the middle of the scene or darken it'soutside. We can make the area that drives this mask by using a Rectangle, Radial, Roto or RotoPaint node.
Object maskThis masks out an object like an actor or a car and is more likely to be heavily animated.
Value based maskThis makes a mask based on channel-specific values derived from an image. Sometimes the channel is drawndirectly from the target image but is more likely to have been fed out, adjusted so that its values are more'contrasty', then fed back in as a mask. A variant of value based masking is keying.
Value based masking is built into the ColorCorrect node, which makes it an ideal color stylisation tool.
Depth planeWe can usually divide up a scene into at least three regions: foreground, middle ground and background (FG, MGand BG). The foreground often is where the main points of attention lie and might require your special attention. Inthis kind of space we often assume that the contrast values are greatest when they are nearest to the camera. Weconsider depth region contrast in two ways:
1. Contrast between regionsFor example: FG is darker than MG which is darker than BG
1. Contrast within regionsFor example: FG has within it a higher tone contrast. BG has within it a high hue contrast.
As you can see from the above schematic, even a simple arrangement can present multiple nested contrast valuesrelationships within and between regions.
Color Workflow 22
Picture plane spaceA picture plane is the flat 2D plane on which the image lies. Corners, edges and centers are not natural to anyone butpainters, photographers and cinematographers. Don't believe me? Well show me the where the four corners of yourvision are! Even centers are, perceptually, very fugitive things. The picture plane can have geometries thatcompliment or contradict those of the depth plane. For example: the top of a table might have been lightened in thedepth plane but might have been intersected by a picture plane darkening adjustment.
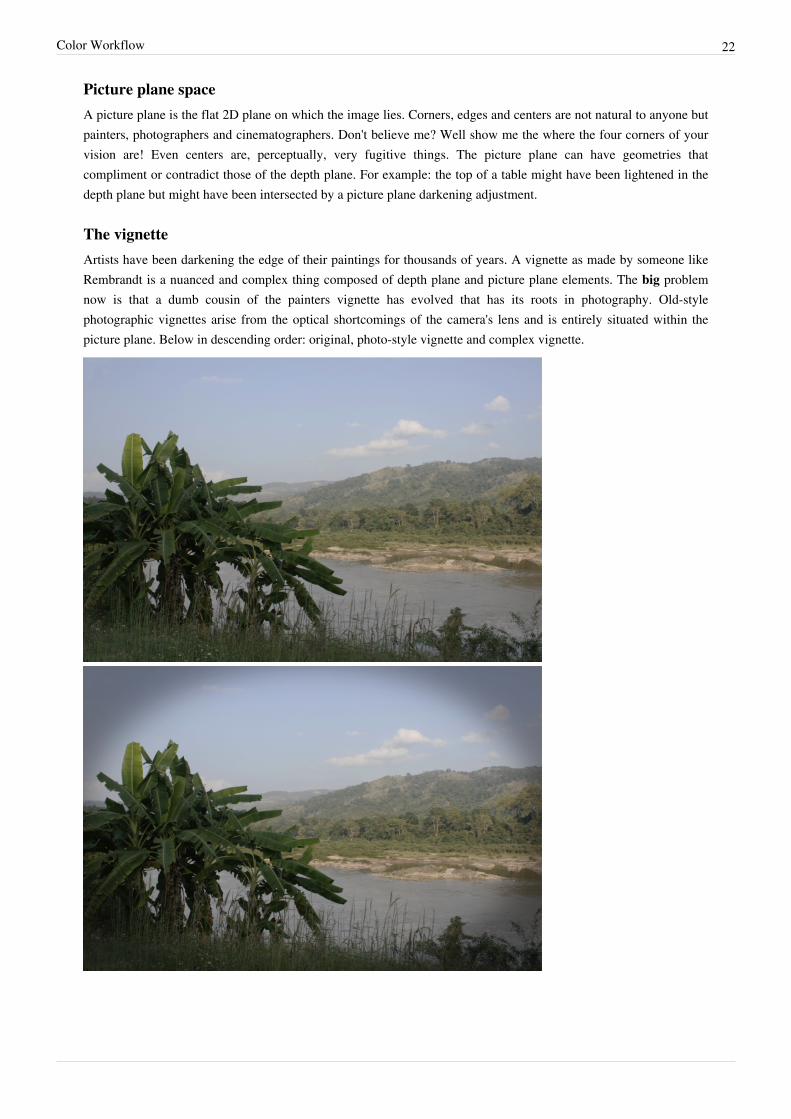
The vignetteArtists have been darkening the edge of their paintings for thousands of years. A vignette as made by someone likeRembrandt is a nuanced and complex thing composed of depth plane and picture plane elements. The big problemnow is that a dumb cousin of the painters vignette has evolved that has its roots in photography. Old-stylephotographic vignettes arise from the optical shortcomings of the camera's lens and is entirely situated within thepicture plane. Below in descending order: original, photo-style vignette and complex vignette.
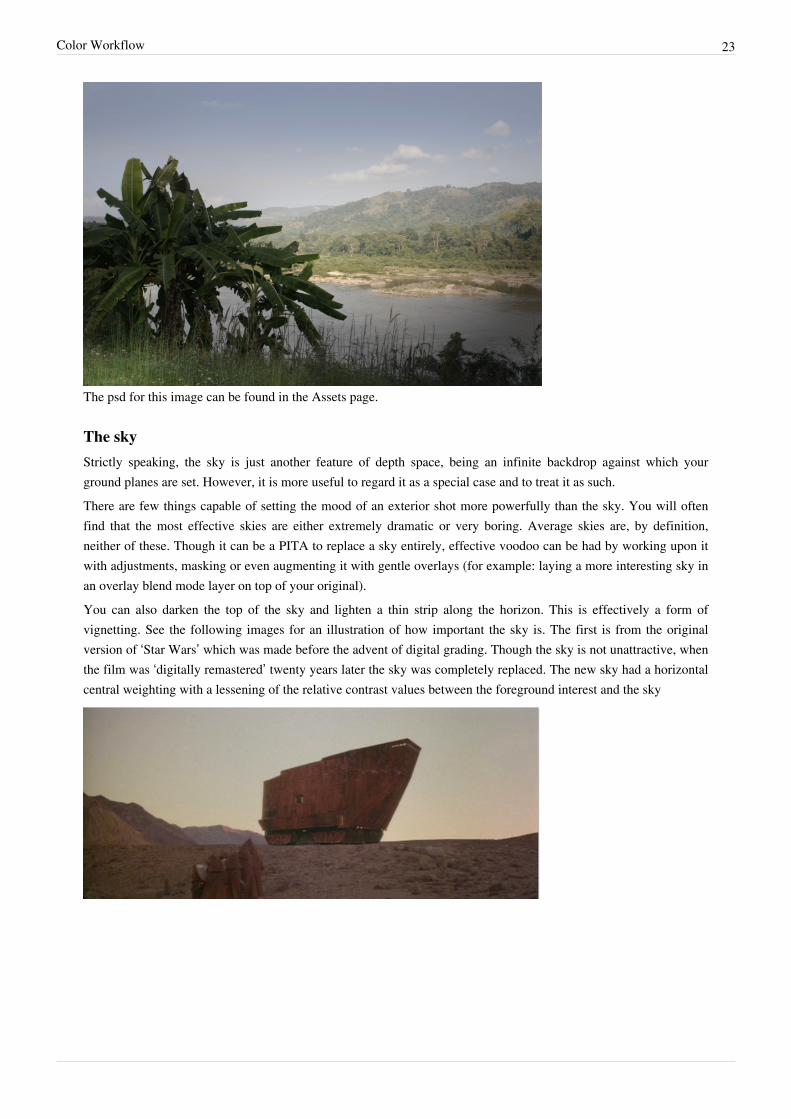
Color Workflow 23
The psd for this image can be found in the Assets page.
The skyStrictly speaking, the sky is just another feature of depth space, being an infinite backdrop against which yourground planes are set. However, it is more useful to regard it as a special case and to treat it as such.There are few things capable of setting the mood of an exterior shot more powerfully than the sky. You will oftenfind that the most effective skies are either extremely dramatic or very boring. Average skies are, by definition,neither of these. Though it can be a PITA to replace a sky entirely, effective voodoo can be had by working upon itwith adjustments, masking or even augmenting it with gentle overlays (for example: laying a more interesting sky inan overlay blend mode layer on top of your original).You can also darken the top of the sky and lighten a thin strip along the horizon. This is effectively a form ofvignetting. See the following images for an illustration of how important the sky is. The first is from the originalversion of ‘Star Wars’ which was made before the advent of digital grading. Though the sky is not unattractive, whenthe film was ‘digitally remastered’ twenty years later the sky was completely replaced. The new sky had a horizontalcentral weighting with a lessening of the relative contrast values between the foreground interest and the sky

Color Workflow 24
This horizontal weighting of the sky at a point midway up the image is nothing new. Painters have (yet again) beenusing this trick for centuries as we can see in Albert Bierstadt’s painting below:
The following pair of images show a somewhat extreme example of sky replacement. The source image was takenwith the specific aim of sky replacement in mind and to serve this the time of day and location were all are taken intoconsideration. The example file is available in the Assets page.
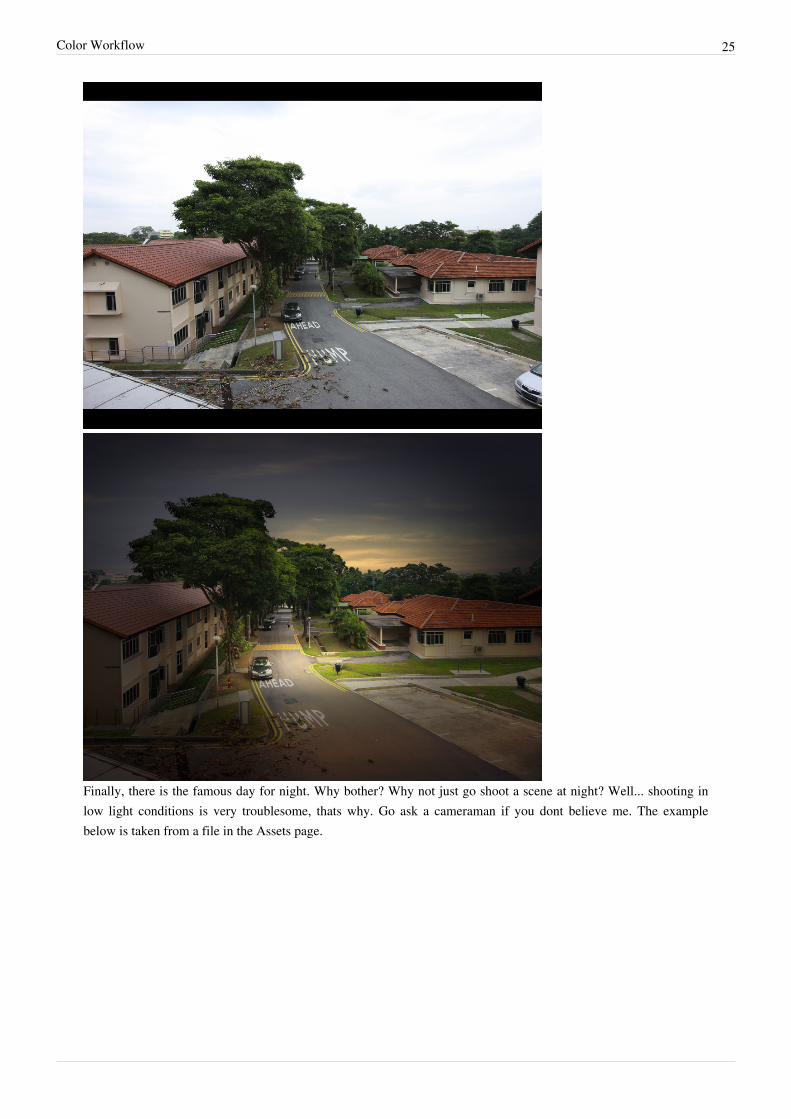
Color Workflow 25
Finally, there is the famous day for night. Why bother? Why not just go shoot a scene at night? Well... shooting inlow light conditions is very troublesome, thats why. Go ask a cameraman if you dont believe me. The examplebelow is taken from a file in the Assets page.

Color Workflow 26
Color miscOther color stuff:
Splitting up of color editsComplex color edits are best split up into small components. This makes them easier to edit and troubleshoot. This isparticularly relevant when using the ColorLookup node which is capable of containing both lightness adjustments(through its master curve) and color adjustments (through its RGB curves).
LinksHere is a very nice tutorial on how to animate a still image of a sky using luminence and displacement. Requiressome knowledge of 3D. [2]

Color Workflow 27
Best practice in structuring a scriptA whole bunch of things to look out for here.
MoreSee also: Color in Nuke.There is loads more on the subject to be said. One day... one day.
References[1] http:/ / www. thefoundry. co. uk/ articles/ 2009/ 12/ 10/ 60/ nuke-basic-workflows-colour-correction/[2] http:/ / www. nukepedia. com/ written-tutorials/ animating-a-sky-in-nuke-based-on-luminance/
Keying TipsThough all keyers are different, it is possible to lay down some general rules about their use. in this section (and inthis entire Wiki) FG (foreground) is used to denote the top layerer in the composite (i.e. the green screen footage)and BG (background) to denote the layer over which it is merged.
Dont output the composite from the keyerMost keyers have the option to output the footage in several ways: premultiplied by the alpha, unpremultiplied by thealpha and composited with the background. Generally outputting directly to a composite is a bad thing. The reason:it is a rare composite that does not require the colors, grain etc of the FG to be adjusted in order for it to match theBG. Outputting a composite precludes such adjustemnt. Therfore: the keyer should be considered as a 'matte puller'not a mergeing tool.
Dont color adjust the FG before it is fed into the keyerAny color adjustemnt done to the FG before it is keyed will effect the performence of the keyer.
A soft matte is softThe MOST important aspect of a matte is the edge. In getting rid of noise artifacts in the black background of theFG it is tempting to be over-enthusiatic and push the matte so far the black to white edges become too hard.
A keyer operates on the entirety of the imageRemember, a keyer operates on the entirety of the image: anything that you do to one part of it is done to all of it. Donot be working away to harden up one part of the alpha, unaware that you are overhardening another part.
Dont blur the matteIf the matte is too sharp a solution is NOT to blur it. this simply damages the quality of the matte and increasesunwelcome edge artifacts. Better to refine the quality of the matte.
Test the matteYou can test the matte in a number of ways: the gamma and f-stop sliders at the top of the Viewer window can bemoved around around to 'test stress' both the black and the white values. You can also do a temporaray comp using ablack, white or bright color as the background. This will make the edge value shortcomings more apparent.

Keying Tips 28
Dont waste a keying operation on junkA keyer need not be the only tool employed to separate the white FG object from its black background. On easilyisolated areas a roto can be used to 'keep in' the white of a matte (a holdout mask) or to 'punch out' the black of amatte (a garbage mask). It is a waste of rescources to use a keyer to get rid of such junk imformation, and is alsolikeley to over-harden the matte. Directions on how to use junk and holdout masks are here.
Despill with HueCorrectNo matter how well you light your subject, the green screen will often (always) cast a bit of green light on the figure.Though some keyers offer the tools to do this within the keyer, the tool of choice for getting rid of this is theHueCorrect node.
RotoscopingTo composite a figure onto a new background it is necessary that the figure is in some way separated from its oldbackground. If the figure has not been shot against a green screen then the chances are some degree of rotoscoping isrequired. If the job is not to be hell then it is advised that the following guidelines are observed:
PlanThe 'uber aim' is to have a smoothly roto'd figure that looks right on its new background. This requires artistry asmuch as anything else: the shape and movement of your target should be observed, absorbed and assimilated into acreatively consistent whole.
SimplifyRotoscoping is essentially a drawing activity and as such a certain amount of creative leeway is allowed. It is ok notto roto absolutely all the details. Shoes got shoelaces? get rid of em! You will need good visual judgement inselecting what not to include in the roto.
Begin at the most complex pointThe roto shapes should be laid down at the point of the sequence that requires the most number of shapes and pointsto outline.
Only roto what is necessaryIt might be that for a particular job only a small part of the figure needs a roto.
Be consistant with edgesIt is ok if your roto is very 'tight' and hugs the figure exactly, it is also ok if it is loose and floats one or two pixelsaway from the figure. Both can be fixed by a bit of dilate and erode. It is not ok if it is both as this will require thatthe erode and dilate are animated.
MovementRoto'ing is an arm of animation. The flow of movement must be carefully observed. Check this flow by looking atthe animated alpha of the roto seperate to the RGB.

Rotoscoping 29
The non-linearity of movementIn the case of a roto made for the swinging arm of a man: a single keyframe is placed at the begining and end of theswing in the expectation that this is all it will need (below).
However, half way through the swing the roto is out of place (below). This is because the swing is an acceleratingmovement.
The options are to add another keyframe or go into the Curve Editor and edit the animation curve of the shape. Theshape of the curve can be edited by changing the length and position of the handles on the two end points. This willre-enge the roto with the arm (below). Movement, especially natural movement, is rarely linear.

Rotoscoping 30
Curve EditorAlways check on the 'shape' of the animation in the Curve Editor (as above).
Roto node tipsNuke's Roto and the RotoPaint nodes are very complex and subject to many niceties of use:
Be economical with pointsA shape in a Roto node is usually made with something called a bezier. If you are a digital artist of any worth youshould get to know the basics of how the bezier works. A typical beginner mistake is to use too many points, but toomany points can be hell to animate. Points should economically describe a shape and not smother it. Tip: A good testof your ability is to write the letter 'S' with only three points.
Transform the entire shapeIn the Transform tab of the Roto node, the entire shape can be moved as a whole. For big movements this ispreferable to moving each point. The big advantage of this method is that it is easier to edit a move if it is brokendown into global shape moves (via the transform tab) and local point moves (switch to the Roto tab to make thesemoves). In the Transform tab translation, rotation, scale and skew are all separately animatable. Which of thesevalues are to be keyed should be carefully considered (actually I habitually animate all of them whether I need to ornot). It is wise to do as much of the roto animation in this tab. 'Tip': the skew parameter is more usefull than youmight suppose.
Break down complex shapes into smaller shapesWhen making a roto for a human it is easier to manage if their form is broken down so that their legs, arms, torso etcare all covered by separate shapes. The centre points for these shapes should correspond roughly to the position ofthe joints.
Organise the shapes into foldersFolders may be created inside of the Roto node, into which shapes can be dropped. This is a good way of organizinglots of shapes and also of collectively editing their movement. If this containing folder is selected then all itscontained shapes are also selected. The movement of the folder contents may be collectivly animated.

Rotoscoping 31
Start at the folder levelOnce the shapes have been organized into folders the folder animation should be your first point of consideration.The contained shapes should only be animated if necessary.
Attach the output from a Tracker to a shape or folderThe output of a tracker node maybe be linked to the translation values of the Transform tab of the Roto shape.However, most usually, they are linked to the containing folder.
Dont let the points wander offThe points of the roto should always correspond to the same feature point of the figure throughout the length of theanimation e.g. a roto point on the elbow of a figure should remain at this corner throughout. If it doesnt then it willanimate wrong.
Format WorkflowThe format of a script is the pixel dimensions (and pixel aspect ratio) of the final output. It is, effectively, thedimensions in pixels of the paper that you are doing your drawing on. When you are doing a pencil drawing on asheet of paper 15cm high X 21cm wide, you would be surprised if it were to suddenly reformat itself to 22cm high X17cm wide. Digital formats are equally inflexible: they must be set correctly from the very beginning of the scriptscreation and must be managed correctly throughout the making of the script.
The format-related nodesFormat management is one thing in Nuke that causes a lot of problems. The following nodes play significant parts inthe managemnt of format:
Project SettingsThe Project Settings is where the 'top level' settings for your script are stored. These are: the format that you areworking in, the frame range (how many frames your project has) and the fps (frames per second). Of these theformat is the most important and is the FIRST thing that you will need to set when you start your script. To find thesettings simply mouse click once anywhere in the Node Graph and press the S key. If you are anywhere else otherthan the Node view then you might get the wrong settings (e.g. the viewer area has its own settings).
Format Workflow 32
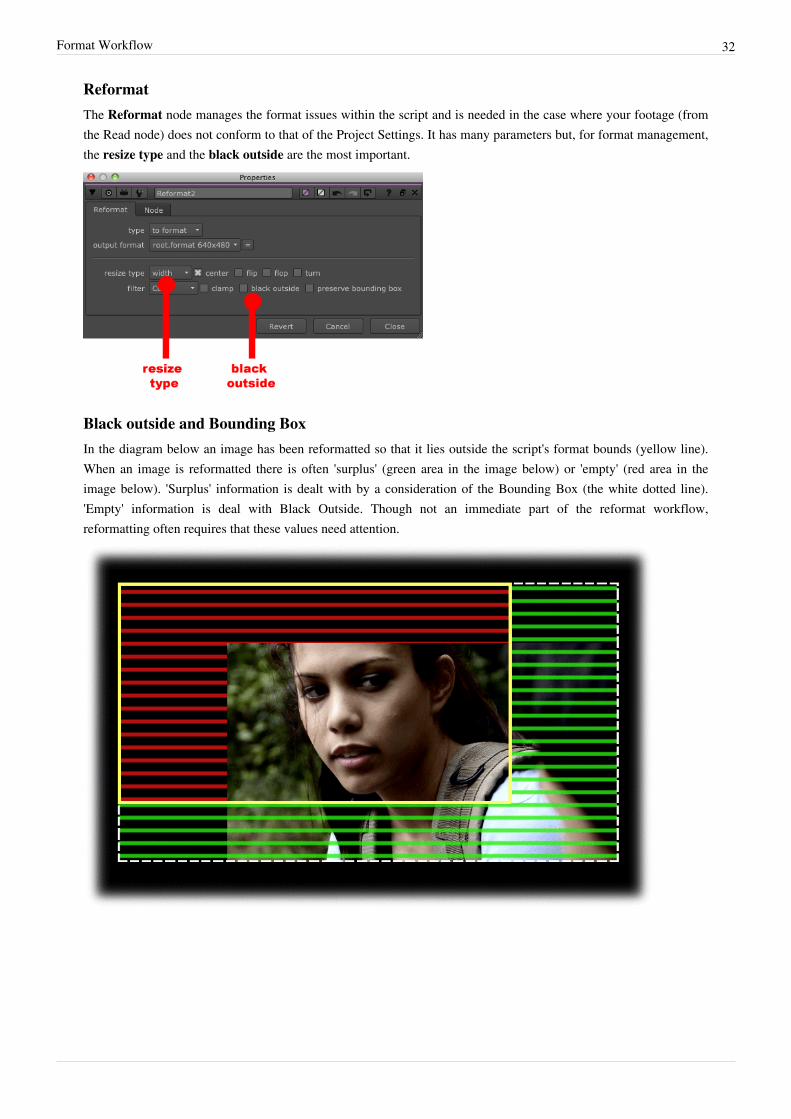
ReformatThe Reformat node manages the format issues within the script and is needed in the case where your footage (fromthe Read node) does not conform to that of the Project Settings. It has many parameters but, for format management,the resize type and the black outside are the most important.
Black outside and Bounding BoxIn the diagram below an image has been reformatted so that it lies outside the script's format bounds (yellow line).When an image is reformatted there is often 'surplus' (green area in the image below) or 'empty' (red area in theimage below). 'Surplus' information is dealt with by a consideration of the Bounding Box (the white dotted line).'Empty' information is deal with Black Outside. Though not an immediate part of the reformat workflow,reformatting often requires that these values need attention.

Format Workflow 33
Read nodeThough it has a format parameter, the Read node is NOT a place where formats are normally managed. See belowfor why.
Three casesEach script is likley to pressent its own unique problems of format managemnt:
Easy 'in-out' caseConsider a simple color adjustment workflow where no re-formatting or complex compositing is required: footage in→ color adjustment → footage out. Such a case presents no problems: just get the format of the parameter in theProject Settings to match that of the Read footage. Easy-peasy.
More complex caseIf, as well as color adjusting your footage, you also need to reformat it then the following issues might beencountered:If the width and the height of the file is of the same proportions as that of the project settings.
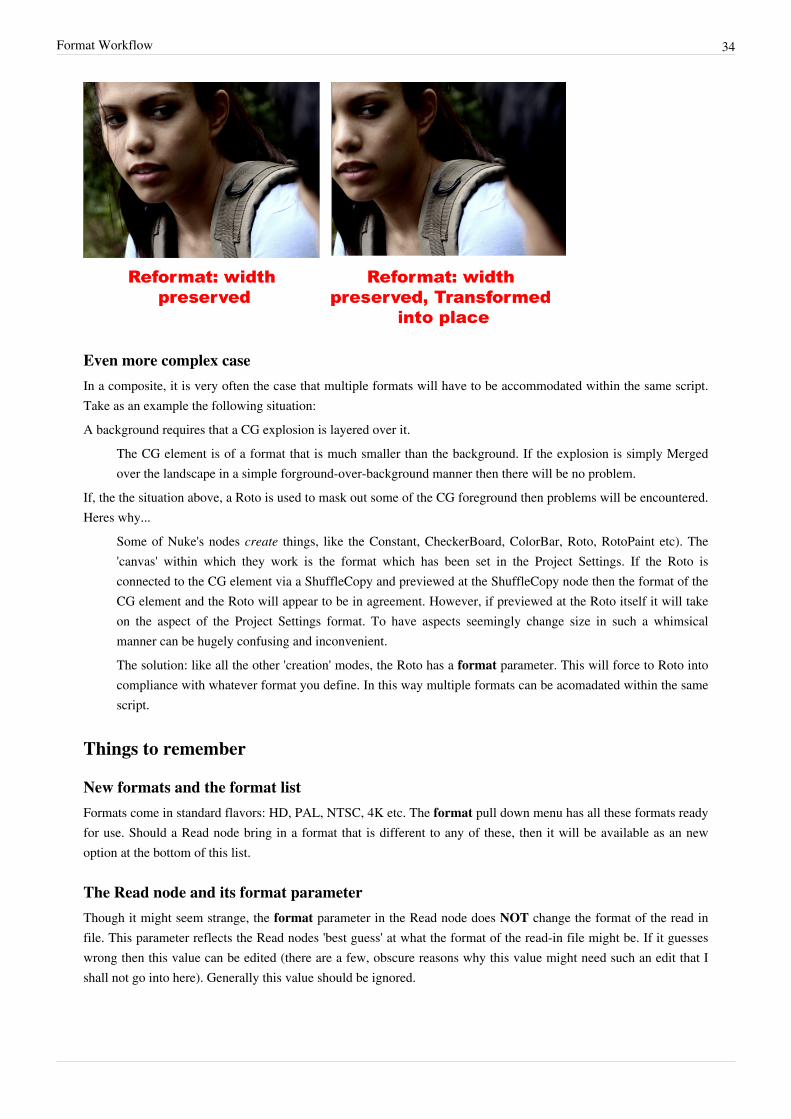
A Reformat node will automatically size it to fit.If the width and the height of the file is not of the same proportions.
You need to decide whether the width of the read file is going to be preserved or the height.If, after choosing to preserve the width or the height, there is some 'emptiness' to deal with then Nuke willstretch the last row of pixels of the image to fill the gap (see below). To deal with the issue you might want totick the black outside parameter. Black Outside is how Nuke deals with transparency. If, with black outside, itwere merged with a new background, then this black can be premultiplied with the Alpha to create atransparency that coincides with the black.
If, after the Read material has been reformatted, it then needs moving then a Transform node will be needed tomove it into place. This should be placed before the Reformat. Such transforms are often needed onlandscapes, where the horizon is too high.
Format Workflow 34
Even more complex caseIn a composite, it is very often the case that multiple formats will have to be accommodated within the same script.Take as an example the following situation:A background requires that a CG explosion is layered over it.
The CG element is of a format that is much smaller than the background. If the explosion is simply Mergedover the landscape in a simple forground-over-background manner then there will be no problem.
If, the the situation above, a Roto is used to mask out some of the CG foreground then problems will be encountered.Heres why...
Some of Nuke's nodes create things, like the Constant, CheckerBoard, ColorBar, Roto, RotoPaint etc). The'canvas' within which they work is the format which has been set in the Project Settings. If the Roto isconnected to the CG element via a ShuffleCopy and previewed at the ShuffleCopy node then the format of theCG element and the Roto will appear to be in agreement. However, if previewed at the Roto itself it will takeon the aspect of the Project Settings format. To have aspects seemingly change size in such a whimsicalmanner can be hugely confusing and inconvenient.The solution: like all the other 'creation' modes, the Roto has a format parameter. This will force to Roto intocompliance with whatever format you define. In this way multiple formats can be acomadated within the samescript.
Things to remember
New formats and the format listFormats come in standard flavors: HD, PAL, NTSC, 4K etc. The format pull down menu has all these formats readyfor use. Should a Read node bring in a format that is different to any of these, then it will be available as an newoption at the bottom of this list.
The Read node and its format parameterThough it might seem strange, the format parameter in the Read node does NOT change the format of the read infile. This parameter reflects the Read nodes 'best guess' at what the format of the read-in file might be. If it guesseswrong then this value can be edited (there are a few, obscure reasons why this value might need such an edit that Ishall not go into here). Generally this value should be ignored.
Format Workflow 35
The merge node format inheritanceShould two different fortmats enter the Merge node, it will elect the background (B) feed as the 'true' format andperform its compositing on this assumption. Should this be a problem, dont forget the marvelous under mergeoperation which will place the B layer on top of the A feed (the opposite of the over operation).
Creation nodes and formatAs mentioned above, Nuke's 'creation' nodes (the Constant, CheckerBoard, ColorBar, Roto, RotoPaint etc) take theirformat from the Project Settings. If you have not managed formats correctly within the script then prblems with thesenodes will likely ocur, especially the Roto and RotoPaint nodes. See the case above above for an example of whatmight happen.
Externally re-formatting still imagesStill images can be reformated in Photoshop. As well as being neater and requiring less processing, it alsoencourages a more careful consideration of the pictorial aspects of the composite.
Other uses for the Format nodeThis node can also be used to flip and flop the image. This is very useful in the process of checking the visualtogetherness of the composite.
The bottom left-hand cornerIn Nuke, 2D positional values are refered to in the form of a coordinate (X and Y) or size (pixel dimentions). Boththese make the asumption that the zero / zero value is located in the bottom left hand corner. Interesting much? A bit,maybe.

Nuke Links 36
Nuke Links
Training vidsAn introduction to Nuke from The Foundry [1]
Training video list from The Foundry (most of these are linked in the pages of this Wiki). [1]
Another page on training from The Foundry, this one with links to many assets. [4]
The Foundry's channel on YouTube. Most of the Nuke specific videos are in the preceding links. [2]
Nuke Station: a whole bunch of video tutorials on a number of Nuke related topics. [3]
ForumsFX Guide [4]
FX Share [5]
VFX talk [6]
Creative Cow [7]
The great CG Society [8]
Digital Tutors forum [9]
Movies and sitchThe Nuke Vimeo channel. Lots of demo reels and stuff. [10]
OtherNukepedia: A good resource for GiZmos, plugins, tutorials etc. Quite high end. [11]
Creative Crash: forums, gizmos, plugins etc. [12]
Some cut and paste Nuke wave expressions for the Curve Editor. Useful for animating wobbly, noisy or repeatingthings. [13]
Nuke users mailing list archive. Very useful for high end users. [14]
A nice blog by a Nuke vfx guy [15]
A good blog on color grading [16]
A great little page of framing within the movies [17]
References[1] http:/ / www. thefoundry. co. uk/ training/ display_training_articles. php[2] http:/ / www. youtube. com/ user/ TheFoundryChannel?feature=watch[3] http:/ / nukestation. com/[4] http:/ / www. fxguide. com/[5] http:/ / www. fxshare. com/[6] http:/ / www. vfxtalk. com/[7] http:/ / forums. creativecow. net/ nuke[8] http:/ / forums. cgsociety. org/ forumdisplay. php?f=30[9] http:/ / www. digitaltutors. com/ forum/ forumdisplay. php?168-The-Foundry-NUKE[10] http:/ / vimeo. com/ groups/ nuke/ videos[11] http:/ / www. nukepedia. com/[12] http:/ / www. creativecrash. com/[13] http:/ / davemne. wordpress. com/ 2011/ 05/ 16/ nuke-wave-expressions-to-copy-and-paste/[14] http:/ / www. mail-archive. com/ nuke-users@support. thefoundry. co. uk/

Nuke Links 37
[15] http:/ / thoughtvfx. blogspot. com/[16] http:/ / www. finalcolor. com/ color. htm[17] http:/ / www. edwardtufte. com/ bboard/ q-and-a-fetch-msg?msg_id=0003iK
Assignments
Place completed work online in Hand_In folder of Digi Paint course in Digital Compositing folder. Ensure that your script is well organised andthat the script name to be the same as the name of its containing folder. Observe the following naming conventions:
FAMILY_NAME in capitals then underscore then Given_Name in title-case then underscore then project numerical_name designator in two digitform.
All images and movies must be outputted in both full resolution and proxy format.
e.g. CHUNG_Poh_Ling_01_Basic.nk
Expectations of this courseThe expectations of this course are:1.1. That you have demonstrated technical competence in all key aspects of Nuke practice.2. That your file is organised according to the DT2010 'house style'. See Evaluating Script Structure for details.3.3. That all your research and reference material are presented in an orderly and consistant manner.4.4. That all assignments have been completed and placed in the online folder.5.5. That you have demonstrated competence in keys aspects of pictorial and / or cinematic skills. Clearly, given the
nature of the topic, these are to an extent negotiable, according to the particular aims of your creative output.6.6. That your creative output is original and engaging.7.7. That you have demonstrated engagement with the course. This might be through asking questions in class, the
seeking of consultations or suchlike.
Assignments
Name Requirement See
01_Basic.nk Make a simple Nuke composite with the following attributes:
• At least one Merge node.• At least one Roto in the role of a mask.• At least one Premult node.• At least one Transform node.
It may be an animated or non-animated composite, it can be sourcedfrom 3D renders, live action footage or still images. Frankly, it can beanything that you feel equal to. The terms of success are that it observes'best practice' in its organization.
The scripts in the Assets page, Evaluating ScriptStructure, Nukes Interface etc.

Assignments 38
02_Tracker.nk Make a simple Nuke composite with the following attributes:
• One Tracker node.• One CornerPin node.•• Footage that you have shot yourself.•• Some sort of replacement effected by these two nodes working
together.•• No dam Reformat nodes at all!!!
It must be an animated composite.The terms of success are that itobserves 'best practice' in its organization. The quality of the footage isalso imporatnt. I want you to get to know the importance of getting goodimformation. The footage should be high-ish rez, clearly shot, not toowobbly etc etc.
The scripts in the Assets page, CornerPin,Tracker etc. Also... the Transform Tools pageaddresses in a general way what a tracker is.
03_Color.nk Make a simple Nuke composite with the following attributes:
• One ColorCorrect node.• One Grade node.• One HueCorrect node.•• Color correct an image / some footage.•• Match two images with each other if you can (bonus points for this)•• Color stylise an image.
Win me over with your splendid sense of color.
Check out the Color page. This page lists all thecolor nodes plus links to other important pages.Most of all, the Color Workflow page. The pdf ofmy color tak is here here (right click todownload) [1]
05_Timing.nk Make a simple Nuke composite with the following attributes:
• One Oflow node.• One Read node with the default timing values changes (e.g. a shift in
time).• One TimeOffset node.
The effect I want you to do must involve two or more clips placed insequence. Also... any other time-related effect that you can think of (slowdown, speed up, freeze, reverse etc).
The Timing scripts in the Assets page.
06_GreenScreen.nk Make a simple Nuke composite that combines the output of two Primattenodes.
The scripts in the Assets page, CombiningAlphas, Primatte, Erode, Green Screen MergeBlend Modes and Keying Tips.
07_FinalProject.nk This is your final (self directed) project. Anyone doing this is excusedfrom all assignments that follow the Color assignment.
Final assignment folder MUST contain the following:
•• The full Nuke script and associated media.•• A jpg of a key scene from final render.•• A full resolution render.•• A half-sized (proxy) render.•• All reference, working drawing etc in a separate folder
Everything, especially the links on the ScriptEvaluation and Composite Types.
References[1] http:/ / opticalenquiry. com/ nuke/ documents/ colortalk/ Color_Adjustemnt. pdf

Premultiplication 39
PremultiplicationDEAR LORD!!!... there is NOTHING that causes more problems for students of Nuke (and their teachers) thanpremultiplication. No matter how carefully it is explained, students often dont know how to use it, or use it badly.Several of the items in the script structure page refer to the perils of poorly managed premultiplication. First, here iswhy premultiplication is needed:
What is premultiplication and why it is neededAll images consist of values that extend from black to white (the three color channels being simply grey-scaleimages) and these values can be expressed as numbers: 1 for white, 0 for black, .5 for mid grey etc. The problem isthat there is no natural value in a digital image for transparency. However, with simple maths we can 'fake' it. First ofall we need:A background (BG), a foreground (FG) and an alpha (A)
Now listen...•• 1 X any number = no change•• 0 X any number = 0From that we can say:• The white values (1) in A multiplied by the FG will effect no change upon the FG.• The black values (0) in A multiplied by the FG will turn the FG black.As below:
Now invert A so that its black values and white values are 'swopped'. Perform the same multiplication over the BG.

Premultiplication 40
Now more maths:•• 0 + any number = no changeSo....• The blacks values (0) in the BG will effect no change upon the FG values.• The blacks values (0) in the FG will effect no change upon the BG values.This gives us a FG plus a BG that looks like (voila!):
The example .psd file is in the Assets page (apologies, the alpha is a bit rough).
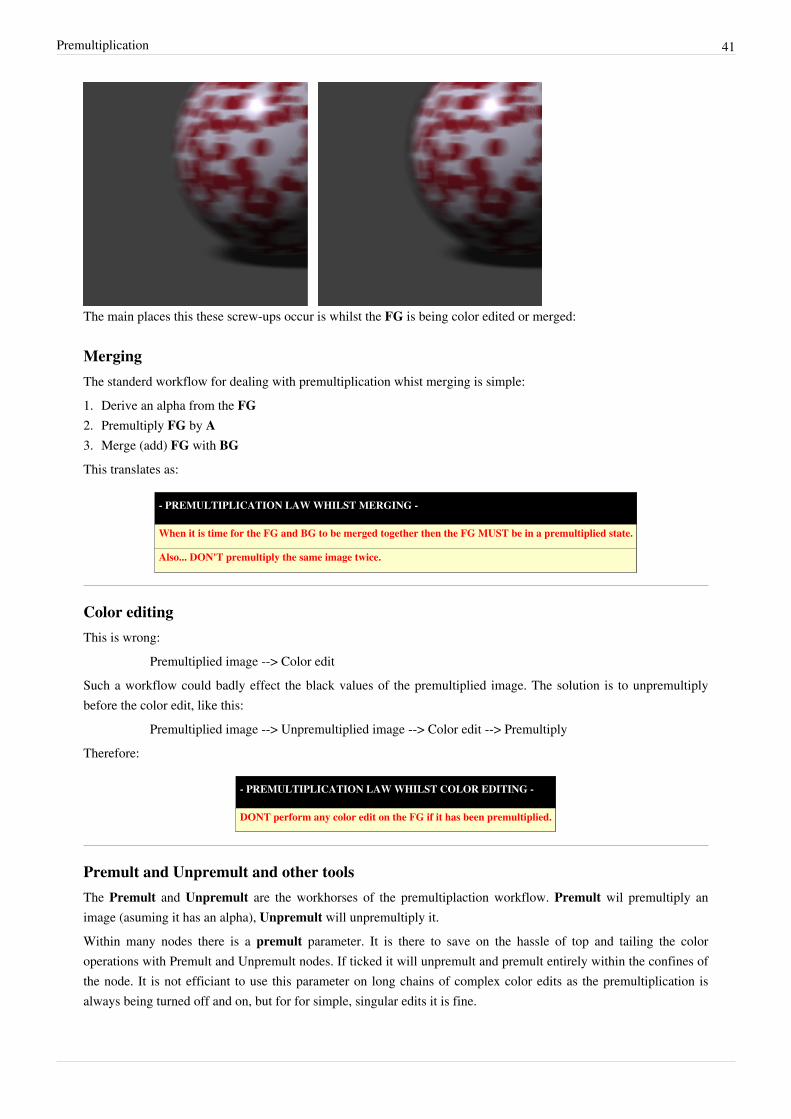
What happens if premultiplication is not handled wellIf premultiplication is not handled well then the maths fails. The following are the main dangers:• If the black of the premultiplied FG is lightened (for example: as a result of a color adjustment), then it will
brighten the BG.This is not a good thing. In the image below the ball was lightened but the color correction of the one onthe right was not preceded by an unpremultiply (Unpremult). In the process the black premultipliedbackground was also lightened which affected the color of the composite.
•• If (in the process of poorly managed premultiplication workflow) the grey of the soft edges is darkened orlightened then the edges of the composite will be noisy.
This is not a good thing. In the image below the ball on the right was premultiplied twice. This imparteda dark rim to the edge of the ball (soft edges are very vulnerable to this sort of thing).
Premultiplication 41
The main places this these screw-ups occur is whilst the FG is being color edited or merged:
MergingThe standerd workflow for dealing with premultiplication whist merging is simple:1. Derive an alpha from the FG2. Premultiply FG by A3. Merge (add) FG with BG
This translates as:
- PREMULTIPLICATION LAW WHILST MERGING -
When it is time for the FG and BG to be merged together then the FG MUST be in a premultiplied state.
Also... DON'T premultiply the same image twice.
Color editingThis is wrong:
Premultiplied image --> Color editSuch a workflow could badly effect the black values of the premultiplied image. The solution is to unpremultiplybefore the color edit, like this:
Premultiplied image --> Unpremultiplied image --> Color edit --> PremultiplyTherefore:
- PREMULTIPLICATION LAW WHILST COLOR EDITING -
DONT perform any color edit on the FG if it has been premultiplied.
Premult and Unpremult and other toolsThe Premult and Unpremult are the workhorses of the premultiplaction workflow. Premult wil premultiply animage (asuming it has an alpha), Unpremult will unpremultiply it.Within many nodes there is a premult parameter. It is there to save on the hassle of top and tailing the coloroperations with Premult and Unpremult nodes. If ticked it will unpremult and premult entirely within the confines ofthe node. It is not efficiant to use this parameter on long chains of complex color edits as the premultiplication isalways being turned off and on, but for for simple, singular edits it is fine.

Premultiplication 42
Linking ValuesThe expression-driven nature of Nuke means that aspects of a Nuke script are incredibly 'open'. It is very easy to linktwo values within the parameters of Nuke so that changes made to one are reflected in the other. One of theadvantages of this that it can make complex animations easy to master, enabling all the related parameters to bedriven from one node.
How to link valuesIt is possible to:
1 Copy the value from the parent parameter to the child parameter by Option dragging the little iconthat looks like a graph from one value to the other (this icon is the Animation menu button). Only thevalue from that frame is copied with no animation.
2 Copy the animated value from the parent parameter to the child parameter by Command draggingon the the Animation menu button. This will automatically write a expresion that directly parents thechild value with the parent value. If the child value is right-clicked on and Edit expression is selected,then something like this will appear:
3 Expressions can be edited and elaborated on. In the case of the expression above it was changed from:parent:Multiply1.value
to...-Multiply1.value

Linking Values 43
This simple maths inverts the child value. The effect of this linkage can be seen in the code below. The coloroperations on the (child) square in the middle of the rectangle is always in opposition to the (parent) background. Ifyou look in the Curve Editor you will notice that the two curves mirror each other, also that the child value can notbe directly edited. However, if you change the parent value you will notice that the child will update.
set cut_paste_input [stack 0]
version 6.3 v2
Constant {
inputs 0
channels rgb
color 0.5
name Constant1
selected true
xpos -231
ypos -489
}
set N1997d5e0 [stack 0]
Add {
value {{-Add1.value}}
name Add2
selected true
xpos -356
ypos -308
}
push $N1997d5e0
Add {
value {{curve 0.4756122231 x5 -0.517770648 0.5 -0.4872667789 x18
0.475839287 -0.4822243452 x25 0.465211302 -0.5001246929 x34
0.4756122231 x40 -0.4102654457 x56 0.4723314047 x64 -0.5041589737 x75
0.4347740412 x83 -0.4853801727}}
name Add1
selected true
xpos -131
ypos -306
}
CopyRectangle {
inputs 2
area {512 389 1536 1167}
name CopyRectangle1
selected true
xpos -248
ypos -189
}

Linking Values 44
How to make brand new parameter knobsThe problem with all the driving factors behind a 'childed' value being hidden behind expressions and animations, isthat they are difficult to edit. Try this:1.1. Make a NoOp node (its a kind of 'blank' node).2. Rename it Master3. Right click on its tab and select Manage user knobs.4. From the resulting dialogue box select Add / Floating Point Slider. Fill in:
• Name: moderator• Label: Moderator (a label can contain upper case letters and spaces)• Tooltip: This moderates you fool!• Minumum: -1• Maximum: 1
5.5. Click done.You now have a crude little node with a sliding value that, currently, does nothing. To make magic change theexpression in the target to:-Multiply1.value*Master.moderatorThis will multiply the expression by the moderator value. See its effect in the Curve Editor and the Viewer Window.Code below:
set cut_paste_input [stack 0]
version 6.3 v2
Constant {
inputs 0
channels rgb
color 0.5
name Constant1
selected true
xpos -486
ypos -536
}
set N504a4c0 [stack 0]
Add {
value {{-Add1.value+(Master.moderator)}}
name Add2
selected true
xpos -604
ypos -355
}
push $N504a4c0
Add {
value {{curve 0.4756122231 x5 -0.517770648 0.5 -0.4872667789 x18
0.475839287 -0.4822243452 x25 0.465211302 -0.5001246929 x34
0.4756122231 x40 -0.4102654457 x56 0.4723314047 x64 -0.5041589737 x75
0.4347740412 x83 -0.4853801727}}
name Add1
selected true
xpos -376

Linking Values 45
ypos -350
}
CopyRectangle {
inputs 2
area {512 389 1536 1167}
name CopyRectangle1
selected true
xpos -493
ypos -233
}
StickyNote {
inputs 0
name StickyNote1
label Animated!
selected true
xpos -645
ypos -436
}
push $cut_paste_input
NoOp {
name Master
tile_color 0xff0000ff
selected true
xpos -616
ypos -493
addUserKnob {20 User}
addUserKnob {7 moderator l Moderator R -1 1}
}

Keystroke Shortcuts 46
Keystroke ShortcutsThe thing that separates a pro from a newbie is how well they are acquainted with shortcuts. Of course, like any proapp, Nuke has hundreds of keyboard shortcuts to its name. However, these are the most commonly used ones:
Common to most tabsZoom (+ and -)Fit (F)Full screen (Option + S)Expand (Spacebar)Fit to screen (F)Move the work space around within the Node Graph (option click + mouse drag)
SettingsOpen Project Settings properties panel (S)
Node GraphSummon the Tab Menu (Tab)Disable node (D)Swap inputs on node with two inputs (Shift X)Select all nodes upstream (Shift + select base node)Make new Viewer node (Command I)Connect selected node to viewer (1, 2, 3 etc up to 20)Create dot on noodle (Command then click on yellow dot)
NodesBlur (B)Merge (M)Roto (P)Grade (G)ColorCorrect (C)Transform (T)Read (R)Write (W)

Keystroke Shortcuts 47
ViewerView RGBA etc (R, G, B or A. Press twice to return to composite view)View Luminance (Y. Press twice to return to composite view)Home in viewer (H)
Curve EditorScale the viewer freely on the X and Y axis (Option + middle mouse button + drag)Insert new control point (Option command click on curve)
AssetsHere are the goodies...
ManualsHere are Nuke's manuals and reference pdfs .
Name 'Description Link
Nuke6.3v2 User Guidesmall.pdf
This is the user guide with tutorials, descriptions etc. This is a very well written introduction toNuke.
Download[1]
(16mb)
Nuke6.3v2 ReferenceGuide.pdf
This is the reference guide with a complete description of all the nodes. Download[2]
(3mb)
ScriptsHere are some scripts, complete with source material. Most of them are quite well annotated.
Name 'Description Link
Premultiplication Good and bad Premultiplication practice: demo with a simple script Download[3]
(40mb)
Color Begin HueCorrect, ColorCorrect, Grade, removing color cast, Visualizing Color Operations Using the SamplerNode
Download[4]
(9mb)
Color Improving BadFootage
Some really bad footage improved. Download[5]
(118mb)
Color Improving GoodFootage
Vistas, skin treatment, mist. Download[6]
(19mb)
Color Misc Examples Sky improvement, day to night, HueCorrect, color cast remove. Download[7]
(19mb)

Assets 48
Luma Key A Sky replacement using a luma key. A complex script. Download[8]
(6mb)
Double Rainbows A novel use for the ColorSpace node and the ShuffleCopy. Download[9]
(6kb)
Panorama.zip A simple carded panorama made using a cylinder in Nuke's 3D environment. Download[10]
(22mb)
Camera Projection.zip A simple camera projection made in Nuke's 3D environment. Download[11]
(22mb)
Camera Tracker.zip A simple camera tracker used to comp a 2D image over a 3D scene. Download[12]
(335mb)!
3D Multipass.zip A multipass scene using an .exr file. Download[13]
(20mb)
Transform Order.zip Showing Transform order Download[14]
(1mb)
Timing.zip Showing Timing stuff. Download[15]
(280mb!)
Tracker.zip Showing the Tracker node. Download[16]
(60mb)
Noise.zip Showing some novel uses of the Noise node and the fBm and Noise function. If you want to make someclods from Noise or if you wish to add some random motion to an object then check these scripts out.
Download[17]
(1mb)
Random
Name Description Link
Chasm.tif A digital painting file showing how a compositing matte is structured. From this file three assets weremade: Shadow, Hole and Lamp. See Photoshop Nuke Workflow.
Right click todownload [18]
(35mb)
RuinMaster.psd.zip
A complex digital painting file. Right click todownload [19]
(135mb)
Vignette.tif A digital painting file showing the differences between two different types of vignettes. Right click todownload [20]
(35mb)

Assets 49
From talk on colorThis is a talk I gave to students (filmmaking, photo, animators, computer engineers even) on the topic of coloradjustment. I tried to talk in terms of broad principles rather than technical specifics. Topics were:Color as numbers
The underlying principles of digital color for the practicing artist.HSV as a thinking space
Understanding an image through its Hue, Saturation and Lightness values.Color correction
Where is color 'wrongness' in an image and how can it be fixed?Color matching
Matching one image with another. This is a vital skill for filmmakers and compositors.Color stylization
The triumph of the creative will over the feeble pixel! Paint your images into the next level!
Name Description Link
Color_Adjustemnt.pdf These are the lecture notes. I recommend that you start here. Right click to download [1]
(5mb)
01_Nuke.zip The digital root of color: Nuke demo files Right click to download [21]
(1mb)
01_PS.zip The digital root of color: PS demo files Right click to download [22]
(1mb)
03_Nuke.zip HSV as a thinking space: Nuke demo files Right click to download [23]
(1mb)
03_PS.zip HSV as a thinking space: NPS demo files Right click to download [24]
(1mb)
04_Nuke.zip Feedback on color: Nuke demo files Right click to download [25]
(75mb)
05_Nuke.zip Color Correction: Nuke demo files Right click to download [26]
(15mb)
05_PS.zip Color Correction: PS demo files Right click to download [27]
(30mb)
06_Nuke.zip Color Matching: Nuke demo files Right click to download [28]
(2mb)
07_Nuke.zip Color Stylisation: Nuke demo files Right click to download [29]
(100mb)
07_PS.zip Color Stylisation: PS demo files Right click to download [30]
(50mb)
Luma.zip Color Stylisation: Nuke example file Right click to download [31]
(10mb)

Assets 50
Improving_Good_Footage.zip Color Stylisation: Nuke example file Right click to download [32]
(200mb)
Improving_Bad_Footage.zip Color Stylisation: Nuke example file Right click to download [33]
(120mb)
References[1] http:/ / opticalenquiry. com/ nuke/ documents/ Nuke6. 3v2_User_Guide_small. pdf[2] http:/ / opticalenquiry. com/ nuke/ documents/ Nuke6. 3v2_Reference_Guide. pdf[3] http:/ / opticalenquiry. com/ nuke/ documents/ Premultiplication. zip[4] http:/ / opticalenquiry. com/ nuke/ documents/ Color_Begin. zip[5] http:/ / opticalenquiry. com/ nuke/ documents/ Color_Improving_Bad_Footage. zip[6] http:/ / opticalenquiry. com/ nuke/ documents/ Color_Improving_Good_Footage. zip[7] http:/ / opticalenquiry. com/ nuke/ documents/ Improving_Misc_Examples. zip[8] http:/ / opticalenquiry. com/ nuke/ documents/ Luma. zip[9] http:/ / opticalenquiry. com/ nuke/ documents/ Double_Rainbows. zip[10] http:/ / opticalenquiry. com/ nuke/ documents/ Panorama. zip[11] http:/ / opticalenquiry. com/ nuke/ documents/ Camera_Projection. zip[12] http:/ / opticalenquiry. com/ nuke/ documents/ Camera_Tracker. zip[13] http:/ / opticalenquiry. com/ nuke/ documents/ 3D_Multipass. zip[14] http:/ / opticalenquiry. com/ nuke/ documents/ Transform_Order. zip[15] http:/ / opticalenquiry. com/ nuke/ documents/ Timing. zip[16] http:/ / opticalenquiry. com/ nuke/ documents/ Tracker. zip[17] http:/ / opticalenquiry. com/ nuke/ documents/ Noise. zip[18] http:/ / opticalenquiry. com/ nuke/ documents/ Chasm. tif[19] http:/ / opticalenquiry. com/ nuke/ documents/ Ruin_Master. psd. zip[20] http:/ / opticalenquiry. com/ nuke/ documents/ Vignette. psd[21] http:/ / opticalenquiry. com/ nuke/ documents/ colortalk/ 01_Nuke. zip[22] http:/ / opticalenquiry. com/ nuke/ documents/ colortalk/ 01_PS. zip[23] http:/ / opticalenquiry. com/ nuke/ documents/ colortalk/ 03_Nuke. zip[24] http:/ / opticalenquiry. com/ nuke/ documents/ colortalk/ 03_PS. zip[25] http:/ / opticalenquiry. com/ nuke/ documents/ colortalk/ 04_Nuke. zip[26] http:/ / opticalenquiry. com/ nuke/ documents/ colortalk/ 05_Nuke. zip[27] http:/ / opticalenquiry. com/ nuke/ documents/ colortalk/ 05_PS. zip[28] http:/ / opticalenquiry. com/ nuke/ documents/ colortalk/ 06_Nuke. zip[29] http:/ / opticalenquiry. com/ nuke/ documents/ colortalk/ 07_Nuke. zip[30] http:/ / opticalenquiry. com/ nuke/ documents/ colortalk/ 07_PS. zip[31] http:/ / opticalenquiry. com/ nuke/ documents/ colortalk/ Luma. zip[32] http:/ / opticalenquiry. com/ nuke/ documents/ Color_Improving_Good_Footage. zip. zip[33] http:/ / opticalenquiry. com/ nuke/ documents/ Color_Improving_Bad_Footage. zip. zip
Composite Types 51
Composite Types This page unfinished.
Types of compositesThere are, of course, an infinite number of ways of using Nuke. However, I have tried to list below a few of thegeneric directions that a compositor might take when looking for project ideas.
Color gradeA color grade is simply editing the color values of a scene. This is perhaps the simplest option but its creative impactshould not be underestimated. See here for an idea of how far this craft can be taken.
Green screenDespite its reputation as the compositor's tool of choice, green screen should not be the first port of call, there areplenty of other options. It is, however, a good option for placing people in impossible enviroments (e.g. the surface ifthe moon).
Live action with CGThe ability to capture and re-purpose movement from live action footage is one of the big-magic items ofcompositing. A camera tracker will often be the glue that binds them and an organised workflow will be important(one that takes you from one application to another and back again). Further magic can be had with an environmentlight that will capture the lighting from the live action and pass it to the CG.
Live action with live actionSeems bizarre to want to incorporate live action with live action. Why not just shoot the whole thing at once? Well:here's why [1], and here [2]. This method comes into its own when shooting such 'multiple me' footage. Getting thetiming right is crucial to such projects. It is wise to make a timing track, exact to a tenth of a second and that thistrack be marked by sound cues. This will be useful to help the actors get their movements synchronized with eachother.Of course, the problems start when camera movement is involved (and not just faked camera movement). Big studioscan afford a camera that can reproduce exactly any movements that are programed into it. However, here [2] is anexcellent example of someone managing to pull it off with a simple tripod-mounted rig.
2.5 DStill images are... kinda still. They can be moved around with Transform nodes but the effect can be flat andunexciting. A set of still images can be placed in a depth formation inside of a 3D environment and filmed with amoving camera. Zooms, pans etc can easily be faked in this way. An example is here [3]. A simple carded panoramacan be found in the Assets page. The screengrab below shows its construction with a basic cylinder. The limits ofcards is that they are flat. A cure is, instead of feeding the image in as a flat texture, to project it onto the surfaceusing camera projection.

Composite Types 52
Camera projectionThis is a close cousin of carding. The main difference is that a projection can be accommodated by reasonablycomplex geometry. In the example in the Assets page a projection is placed on a simple pairing of cards. A screenshot below shows the projection camera at work. The script also uses simple cards.

Composite Types 53
Background replacementIn the beautifully drafted drawing below the green area was shot live-action whilst the red area was CG (or mattepainting or live action footage or whatever). As long as the camera is not moving compositing them together shouldpresent no problem. A matte pull from a bright sky using a luma key is a good way to seperate the sky from thenot-sky. A planr tracker can be used on simple camera motion to match movement.
Should there be overlap then some roto masking will be required. More work maybe... but it will add realism.

Composite Types 54
Scene extensionThe red area of the first of the two images below marks the range of the limits of the original footage used in thereplacement scene that follows. The original psd file for this scene is in the Assets page and an intro to thePhotoshop to Nuke workflow is here. Scene extention is a subset of matt painting. This, of course, is a great optionfor people who can paint.

Composite Types 55
General tips on building a sceneCompositing is a very creative act. Over the years a set of well-tested tricks and tips have evolved that are likely, ifused wisely, to sweeten your chances of success. See also Color Workflow#Color stylization for ideas oncomposition and Script Evaluation#Picture values for tips in scene evaluation.
MatchingMatching the different elements of a composite is the biggest issue in compositing. This match has to take intoaccount all picture values: hue, saturation, lightness, grain, resolution, focus, movement, texture etc etc. It is wisethat the compositor is entirely methodical in addressing these value and mentally ticks them off as the compositeprogresses.
Cast shadowOne of the main things that unites objects with scenes is cast shadow. When making shadows care should be takenthat they match shadows already within the target scene. The two points to look out for are shadow color and thehardness or softness of the shadow edge.
Light effectsLighting voodoo such as glows, godrays, lens flare, reflection etc. can 'paper over' the join between the differentelements of the composite. The 'Tracker' composite in the Assets page shows a simple reflection faked from thesource footage. However, remember that if a lens flare is included that you are implicitly telling the audience that thescene was shot with a camera seen with human eyes. A subtle but significant difference.
Set dressingIn the case of a background replacement or scene extension the painted (or CG'd) element should match the liveaction. Sometimes this might require a bit of set dressing. For example: if the scene is set in a ruin (as in the exampleabove) then some rubble and debris in the live action will make it easier to unite the two.
Faking camera movementSmall pans and camera shakes can be added in post. There are nodes that can do this (CameraShake) or it can befaked with a simple Transform.
OverlapIf an element is added to a scene then it can add realism to place it behind an element that looks as if it is part of thatscene. This is called overlap and the ordering of scene elements in such a wrapped manner is a pictorial device thatpainters have used for thousands of years. An example is a situation where a man has been composited into a sceneand is 'overlapped' behind a tree in the BG footage.
MovementAny sort of movement within a painted or CG element will add realism. Smoke, birds flying, clouds moving, treesswaying etc. Remember to get the speed and scale of these things right.

Composite Types 56
SoundTo a compositor, sound is normally just the junk that comes with the footage which is usually discarded as irrelevant.However, if you are making your own project then a good sound track can be very helpful. The early VFX artistsused sound extensively to hide the shortcoming of their work. Check out 'An American Werewolf in London' (VFXby Rick Baker) for an example of how effective this can be.
References[1] http:/ / www. youtube. com/ watch?v=l-czAssxO8E[2] http:/ / vimeo. com/ 1981837[3] http:/ / vimeo. com/ 4457634

Article Sources and Contributors 57
Article Sources and ContributorsMain Page Source: http://opticalenquiry.com/nuke/index.php?oldid=1850 Contributors: MediaWiki default, Nukejedi
Nuke Source: http://opticalenquiry.com/nuke/index.php?oldid=1648 Contributors: Nukejedi
Nukes Interface Source: http://opticalenquiry.com/nuke/index.php?oldid=1649 Contributors: Nukejedi
Toolbar Source: http://opticalenquiry.com/nuke/index.php?oldid=1847 Contributors: Nukejedi
Evaluating Script Structure Source: http://opticalenquiry.com/nuke/index.php?oldid=1864 Contributors: Nukejedi
Script Evaluation Source: http://opticalenquiry.com/nuke/index.php?oldid=1253 Contributors: Nukejedi
Photoshop Workflow Source: http://opticalenquiry.com/nuke/index.php?oldid=1663 Contributors: Nukejedi
Maya Nuke CameraTrack Source: http://opticalenquiry.com/nuke/index.php?oldid=1763 Contributors: Nukejedi
Maya Nuke RenderPass Source: http://opticalenquiry.com/nuke/index.php?oldid=1818 Contributors: Nukejedi
Final Cut Pro Workflow Source: http://opticalenquiry.com/nuke/index.php?oldid=1815 Contributors: Nukejedi
Color Workflow Source: http://opticalenquiry.com/nuke/index.php?oldid=1598 Contributors: Nukejedi
Keying Tips Source: http://opticalenquiry.com/nuke/index.php?oldid=1776 Contributors: Nukejedi
Rotoscoping Source: http://opticalenquiry.com/nuke/index.php?oldid=1443 Contributors: Nukejedi
Format Workflow Source: http://opticalenquiry.com/nuke/index.php?oldid=1626 Contributors: Nukejedi
Nuke Links Source: http://opticalenquiry.com/nuke/index.php?oldid=1858 Contributors: Nukejedi
Assignments Source: http://opticalenquiry.com/nuke/index.php?oldid=1866 Contributors: Nukejedi
Premultiplication Source: http://opticalenquiry.com/nuke/index.php?oldid=1870 Contributors: Nukejedi
Linking Values Source: http://opticalenquiry.com/nuke/index.php?oldid=1366 Contributors: Nukejedi
Keystroke Shortcuts Source: http://opticalenquiry.com/nuke/index.php?oldid=1633 Contributors: Nukejedi
Assets Source: http://opticalenquiry.com/nuke/index.php?oldid=1856 Contributors: Nukejedi
Composite Types Source: http://opticalenquiry.com/nuke/index.php?oldid=1674 Contributors: Nukejedi

Image Sources, Licenses and Contributors 58
Image Sources, Licenses and ContributorsFile:boonheist.png Source: http://opticalenquiry.com/nuke/index.php?title=File:Boonheist.png License: unknown Contributors: NukejediFile:nuke_script.jpg Source: http://opticalenquiry.com/nuke/index.php?title=File:Nuke_script.jpg License: unknown Contributors: NukejediFile:nuke_interface_2.png Source: http://opticalenquiry.com/nuke/index.php?title=File:Nuke_interface_2.png License: unknown Contributors: NukejediFile:Tool_Bar_01.png Source: http://opticalenquiry.com/nuke/index.php?title=File:Tool_Bar_01.png License: unknown Contributors: NukejediFile:Tool_Bar_02.png Source: http://opticalenquiry.com/nuke/index.php?title=File:Tool_Bar_02.png License: unknown Contributors: NukejediFile:Tool_Bar_03.png Source: http://opticalenquiry.com/nuke/index.php?title=File:Tool_Bar_03.png License: unknown Contributors: NukejediFile:Tool_Bar_04.png Source: http://opticalenquiry.com/nuke/index.php?title=File:Tool_Bar_04.png License: unknown Contributors: NukejediFile:Tool_Bar_05.png Source: http://opticalenquiry.com/nuke/index.php?title=File:Tool_Bar_05.png License: unknown Contributors: NukejediFile:Tool_Bar_06.png Source: http://opticalenquiry.com/nuke/index.php?title=File:Tool_Bar_06.png License: unknown Contributors: NukejediFile:Tool_Bar_07.png Source: http://opticalenquiry.com/nuke/index.php?title=File:Tool_Bar_07.png License: unknown Contributors: NukejediFile:Tool_Bar_08.png Source: http://opticalenquiry.com/nuke/index.php?title=File:Tool_Bar_08.png License: unknown Contributors: NukejediFile:Tool_Bar_09.png Source: http://opticalenquiry.com/nuke/index.php?title=File:Tool_Bar_09.png License: unknown Contributors: NukejediFile:Tool_Bar_010.png Source: http://opticalenquiry.com/nuke/index.php?title=File:Tool_Bar_010.png License: unknown Contributors: NukejediFile:Tool_Bar_011.png Source: http://opticalenquiry.com/nuke/index.php?title=File:Tool_Bar_011.png License: unknown Contributors: NukejediFile:Tool_Bar_012.png Source: http://opticalenquiry.com/nuke/index.php?title=File:Tool_Bar_012.png License: unknown Contributors: NukejediFile:Tool_Bar_013.png Source: http://opticalenquiry.com/nuke/index.php?title=File:Tool_Bar_013.png License: unknown Contributors: NukejediFile:Tool_Bar_014.png Source: http://opticalenquiry.com/nuke/index.php?title=File:Tool_Bar_014.png License: unknown Contributors: NukejediFile:Tool_Bar_015.png Source: http://opticalenquiry.com/nuke/index.php?title=File:Tool_Bar_015.png License: unknown Contributors: NukejediFile:Tool_Bar_016.png Source: http://opticalenquiry.com/nuke/index.php?title=File:Tool_Bar_016.png License: unknown Contributors: NukejediFile:read_01.png Source: http://opticalenquiry.com/nuke/index.php?title=File:Read_01.png License: unknown Contributors: NukejediFile:render_layers.jpg Source: http://opticalenquiry.com/nuke/index.php?title=File:Render_layers.jpg License: unknown Contributors: NukejediFile:render_pass.jpg Source: http://opticalenquiry.com/nuke/index.php?title=File:Render_pass.jpg License: unknown Contributors: NukejediFile:layer_override.jpg Source: http://opticalenquiry.com/nuke/index.php?title=File:Layer_override.jpg License: unknown Contributors: NukejediFile:fcp_02.png Source: http://opticalenquiry.com/nuke/index.php?title=File:Fcp_02.png License: unknown Contributors: NukejediFile:fcp_03.png Source: http://opticalenquiry.com/nuke/index.php?title=File:Fcp_03.png License: unknown Contributors: NukejediFile:fcp_04.png Source: http://opticalenquiry.com/nuke/index.php?title=File:Fcp_04.png License: unknown Contributors: NukejediFile:fcp_05.png Source: http://opticalenquiry.com/nuke/index.php?title=File:Fcp_05.png License: unknown Contributors: NukejediFile:contrast.png Source: http://opticalenquiry.com/nuke/index.php?title=File:Contrast.png License: unknown Contributors: NukejediFile:vignette_1.jpg Source: http://opticalenquiry.com/nuke/index.php?title=File:Vignette_1.jpg License: unknown Contributors: NukejediFile:vignette_2.jpg Source: http://opticalenquiry.com/nuke/index.php?title=File:Vignette_2.jpg License: unknown Contributors: NukejediFile:vignette_3.jpg Source: http://opticalenquiry.com/nuke/index.php?title=File:Vignette_3.jpg License: unknown Contributors: NukejediFile:sky_1.jpg Source: http://opticalenquiry.com/nuke/index.php?title=File:Sky_1.jpg License: unknown Contributors: NukejediFile:sky_2.jpg Source: http://opticalenquiry.com/nuke/index.php?title=File:Sky_2.jpg License: unknown Contributors: NukejediFile:sky_3.jpg Source: http://opticalenquiry.com/nuke/index.php?title=File:Sky_3.jpg License: unknown Contributors: NukejediFile:sky_5.png Source: http://opticalenquiry.com/nuke/index.php?title=File:Sky_5.png License: unknown Contributors: NukejediFile:sky_4.png Source: http://opticalenquiry.com/nuke/index.php?title=File:Sky_4.png License: unknown Contributors: NukejediFile:NTU_day.jpg Source: http://opticalenquiry.com/nuke/index.php?title=File:NTU_day.jpg License: unknown Contributors: NukejediFile:NTU_night.jpg Source: http://opticalenquiry.com/nuke/index.php?title=File:NTU_night.jpg License: unknown Contributors: NukejediFile:ani_nonlin_1.png Source: http://opticalenquiry.com/nuke/index.php?title=File:Ani_nonlin_1.png License: unknown Contributors: NukejediFile:ani_nonlin_2.png Source: http://opticalenquiry.com/nuke/index.php?title=File:Ani_nonlin_2.png License: unknown Contributors: NukejediFile:ani_nonlin_3.png Source: http://opticalenquiry.com/nuke/index.php?title=File:Ani_nonlin_3.png License: unknown Contributors: NukejediFile:roto_1.png Source: http://opticalenquiry.com/nuke/index.php?title=File:Roto_1.png License: unknown Contributors: NukejediFile:format_workflow_02.png Source: http://opticalenquiry.com/nuke/index.php?title=File:Format_workflow_02.png License: unknown Contributors: NukejediFile:format_workflow_04.png Source: http://opticalenquiry.com/nuke/index.php?title=File:Format_workflow_04.png License: unknown Contributors: NukejediFile:format_workflow_01.png Source: http://opticalenquiry.com/nuke/index.php?title=File:Format_workflow_01.png License: unknown Contributors: NukejediFile:format_workflow_03.png Source: http://opticalenquiry.com/nuke/index.php?title=File:Format_workflow_03.png License: unknown Contributors: NukejediFile:premult_1.png Source: http://opticalenquiry.com/nuke/index.php?title=File:Premult_1.png License: unknown Contributors: NukejediFile:premult_2.png Source: http://opticalenquiry.com/nuke/index.php?title=File:Premult_2.png License: unknown Contributors: NukejediFile:premult_3.png Source: http://opticalenquiry.com/nuke/index.php?title=File:Premult_3.png License: unknown Contributors: NukejediFile:premult_4.png Source: http://opticalenquiry.com/nuke/index.php?title=File:Premult_4.png License: unknown Contributors: NukejediFile:premultbad_2.png Source: http://opticalenquiry.com/nuke/index.php?title=File:Premultbad_2.png License: unknown Contributors: NukejediFile:premultbad_1.png Source: http://opticalenquiry.com/nuke/index.php?title=File:Premultbad_1.png License: unknown Contributors: NukejediFile:premult_param.png Source: http://opticalenquiry.com/nuke/index.php?title=File:Premult_param.png License: unknown Contributors: NukejediFile:expression_1.png Source: http://opticalenquiry.com/nuke/index.php?title=File:Expression_1.png License: unknown Contributors: NukejediFile:expression_2.png Source: http://opticalenquiry.com/nuke/index.php?title=File:Expression_2.png License: unknown Contributors: NukejediFile:card.png Source: http://opticalenquiry.com/nuke/index.php?title=File:Card.png License: unknown Contributors: NukejediFile:projection.png Source: http://opticalenquiry.com/nuke/index.php?title=File:Projection.png License: unknown Contributors: NukejediFile:composite_type_1.png Source: http://opticalenquiry.com/nuke/index.php?title=File:Composite_type_1.png License: unknown Contributors: NukejediFile:composite_type_2.png Source: http://opticalenquiry.com/nuke/index.php?title=File:Composite_type_2.png License: unknown Contributors: NukejediFile:composite_type_4.jpg Source: http://opticalenquiry.com/nuke/index.php?title=File:Composite_type_4.jpg License: unknown Contributors: NukejediFile:composite_type_3.jpg Source: http://opticalenquiry.com/nuke/index.php?title=File:Composite_type_3.jpg License: unknown Contributors: Nukejedi