Moodle 2 - Activities - csun.edu · Moodle does not have an internal email program but you may...
24
User Guide Moodle 2 - Activities Communication, Collaboration & Assignments Guide Faculty Technology Center (818) 677-3443 [email protected] http://www.csun.edu/it/academic-technology
Transcript of Moodle 2 - Activities - csun.edu · Moodle does not have an internal email program but you may...

User Guide
Moodle 2 - Activities
Communication, Collaboration & Assignments Guide
Faculty Technology Center
(818) 677-3443
http://www.csun.edu/it/academic-technology

Moodle 2 – Activities Page ii
Table of Contents
Introduction ............................................................................................................................ 1
Setting up grade categories ................................................................................................... 1
Completion Tracking .............................................................................................................. 2
Activity Completion ............................................................................................................. 2
Conditional Activities/Restrict Access ................................................................................. 3
Activity and Resource Cloning ................................................................................................ 3
Communication Tools ............................................................................................................ 4
Internal Communication .................................................................................................... 4
Does Moodle Email? .......................................................................................................... 5
Collaboration Tools ................................................................................................................ 6
Choice ................................................................................................................................ 6
Forum ................................................................................................................................. 8
Chat ..................................................................................................................................13
Blackboard Collaborate (formerly Elluminate) ....................................................................14
Assignments .........................................................................................................................16
Assignment .......................................................................................................................16
Turnitin ..............................................................................................................................19
Other Moodle Activities .........................................................................................................20
View Log of Student Activity ..................................................................................................21
Learn More About Moodle .....................................................................................................22
If You Need Additional Help ..............................................................................................22
Moodle 2 – Activities Page 1
INTRODUCTION
There are a number of robust interactive learning activity modules that you may add to your course with the Add an activity or resource dropdown menu. If you wish, some or all of these activities can push information to a course gradebook. Communication and collaboration may take place using live Chats or asynchronous discussion Forums for conversational activities. You can also use Choices to gain group feedback. Work can be uploaded and submitted by students and scored by teachers using Assignments. These modules have several assessment options, including instructor-assessment, self-assessment, and peer-assessment. Online Quizzes offer several options for automatic and manual scoring.
SETTING UP GRADE CATEGORIES
Categories allow you to organize your course gradebook, when you have a lot of activities. In addition, each category can have its own aggregation method in the gradebook. Category sections in the gradebook can be collapsed, making grading easier. It is recommended that you set up your gradebook with categories before you create activities. This will make them available to you as you create activities. However, categories can also be set up after the activities have been created but it is to your advantage and a time saver, to do it ahead of time.
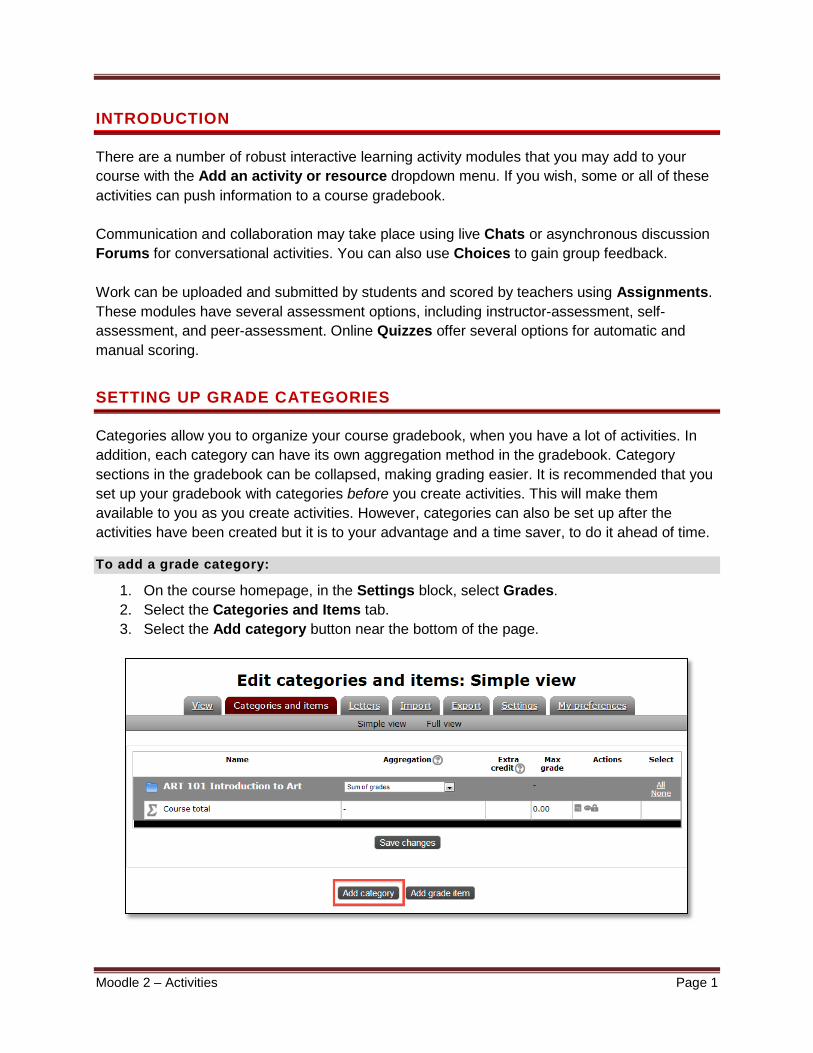
To add a grade category:
1. On the course homepage, in the Settings block, select Grades. 2. Select the Categories and Items tab. 3. Select the Add category button near the bottom of the page.
Moodle 2 – Activities Page 2
4. Give the category a meaningful name. (ex: Quizzes, Assignments)
5. Select the Aggregation method. Refer to the Gradebook documentation if necessary.
6. Select the Save changes button.
You can now choose the grade category in the settings for each activity you create. Any existing activities can be moved into the proper category by going back to Categories and Items and using the Move icon.
COMPLETION TRACKING
Moodle offers two methods for teachers to track the progress of their students: Activity Completion and Conditional Activities/Restrict Access.
Activity Completion
Activity completion allows the teacher to set completion criteria in a specific activity’s settings. Use this feature to allow students to visually track progress by checking off activities as they are completed. Completion can be set to allow students to mark items manually or automatically for completed activities with or without criteria you set.
Activity Completion is activated at the course-level and then controlled within each individual activity.
To activate Activity Completion for your course:
1. On the course homepage, in the Settings block, select Edit settings. 2. In the Student progress section, set Completion tracking to Enabled. 3. At bottom of page, select Save Changes button.
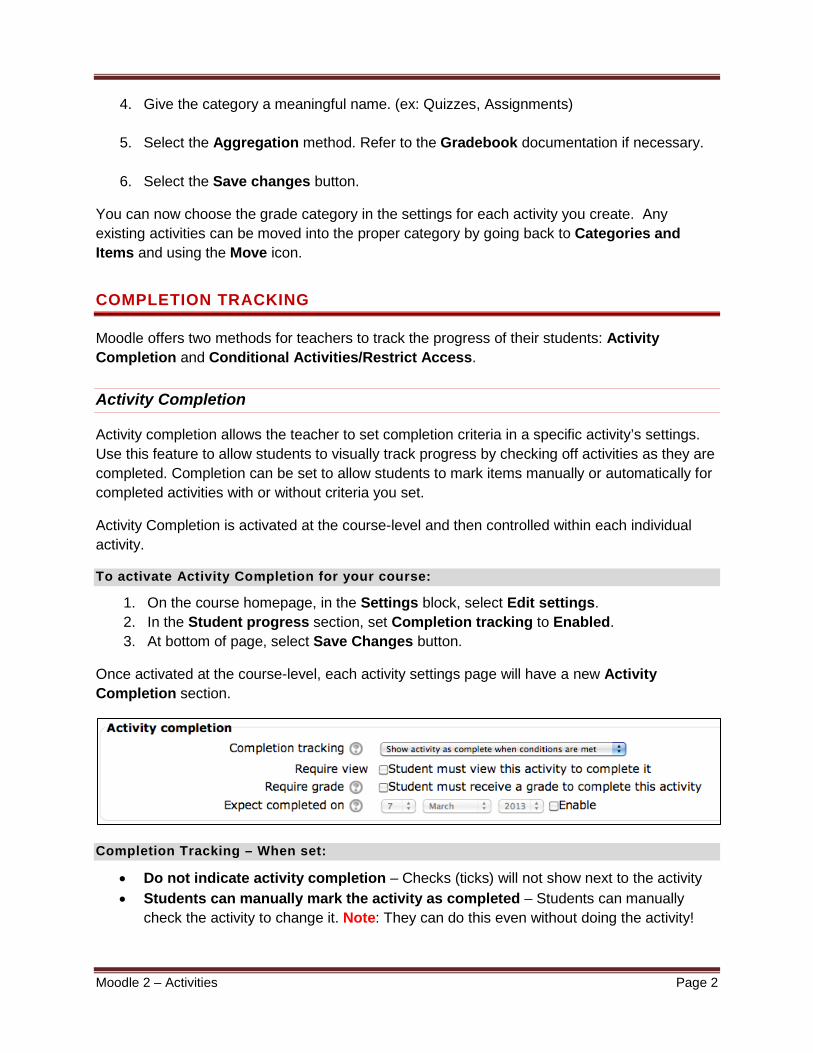
Once activated at the course-level, each activity settings page will have a new Activity Completion section.
Completion Tracking – When set:
• Do not indicate activity completion – Checks (ticks) will not show next to the activity • Students can manually mark the activity as completed – Students can manually
check the activity to change it. Note: They can do this even without doing the activity!
Moodle 2 – Activities Page 3
• Show activity as complete when conditions are met – Additional settings below Completion tracking field will activate and you can add selected criteria. Ex: Students must view and complete assignment by an entered date.
To see an overview of your students’ progress:
1. From course homepage, in the Navigation block, under the course name, select Reports > Activity Completion.
2. A list of all students display along with each activity that has Activity Completion activated. Check marks will be displayed for completed activities.
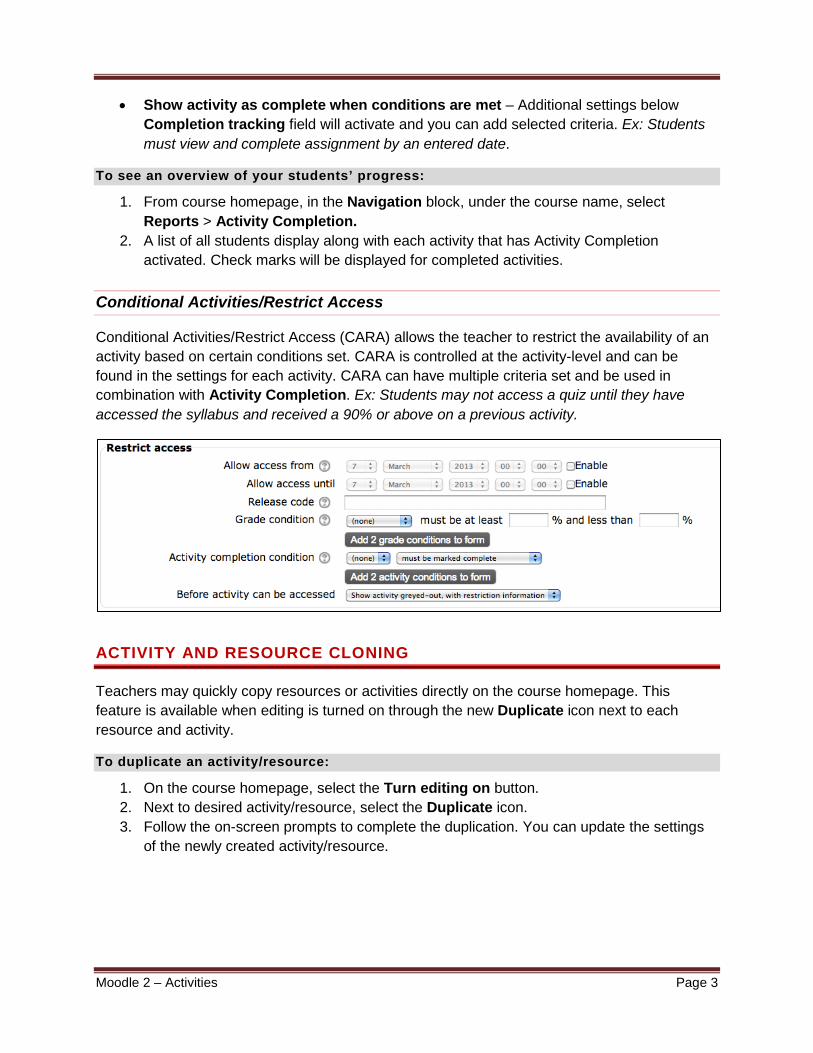
Conditional Activities/Restrict Access
Conditional Activities/Restrict Access (CARA) allows the teacher to restrict the availability of an activity based on certain conditions set. CARA is controlled at the activity-level and can be found in the settings for each activity. CARA can have multiple criteria set and be used in combination with Activity Completion. Ex: Students may not access a quiz until they have accessed the syllabus and received a 90% or above on a previous activity.
ACTIVITY AND RESOURCE CLONING
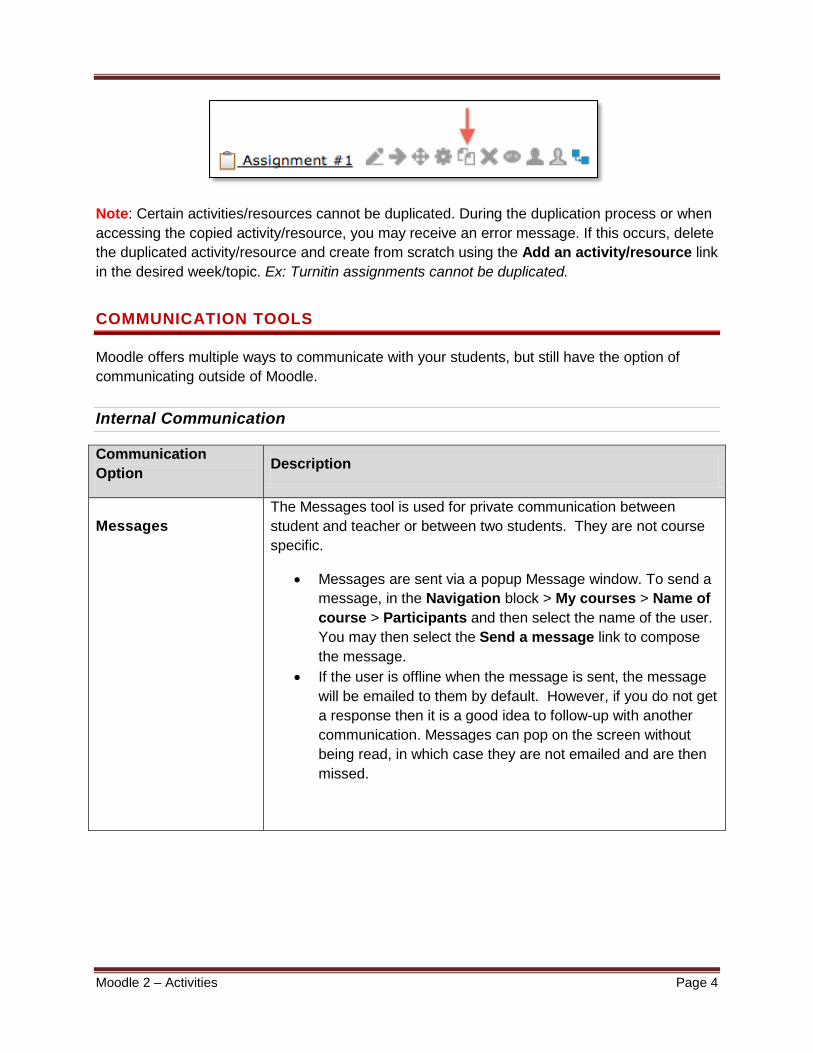
Teachers may quickly copy resources or activities directly on the course homepage. This feature is available when editing is turned on through the new Duplicate icon next to each resource and activity.
To duplicate an activity/resource:
1. On the course homepage, select the Turn editing on button. 2. Next to desired activity/resource, select the Duplicate icon. 3. Follow the on-screen prompts to complete the duplication. You can update the settings
of the newly created activity/resource.
Moodle 2 – Activities Page 4
Note: Certain activities/resources cannot be duplicated. During the duplication process or when accessing the copied activity/resource, you may receive an error message. If this occurs, delete the duplicated activity/resource and create from scratch using the Add an activity/resource link in the desired week/topic. Ex: Turnitin assignments cannot be duplicated.
COMMUNICATION TOOLS
Moodle offers multiple ways to communicate with your students, but still have the option of communicating outside of Moodle.
Internal Communication
Communication Option
Messages
Description
The Messages tool is used for private communication between student and teacher or between two students. They are not course specific.
• Messages are sent via a popup Message window. To send a message, in the Navigation block > My courses > Name of course > Participants and then select the name of the user. You may then select the Send a message link to compose the message.
• If the user is offline when the message is sent, the message will be emailed to them by default. However, if you do not get a response then it is a good idea to follow-up with another communication. Messages can pop on the screen without being read, in which case they are not emailed and are then missed.
Moodle 2 – Activities Page 5
News Forum
The News Forum is designed for class announcements or reminders that the teacher wants to communicate with all class participants. The News Forum is a special forum that only teachers may post to. This forum is automatically created for each course and appears at the top of the course homepage. Note: The News Forum is not meant for last minute announcements as it may take up to two hours for students to receive email notifications.
• The News Forum is a very useful tool for communicating to all the students in a class. In many ways, it is much better than messaging or emailing students. When you post your message to the News Forum, a number of things happen automatically:
o The message is posted and archived by date to the News Forum. Students may select the News Forum and see your post
o A notice is added to the Latest News block on your course homepage. Students may select a link to then be taken directly to the News Forum post.
o Students receive a copy of the message automatically to their CSUN email address. Emails are usually delivered within 2 hours.
Does Moodle Email?
Moodle does not have an internal email program but you may enable a block that allows you to send students emails. You also have the option of using your CSUN provided email account.
Quickmail
The Quickmail block can be added to a course by Turning editing on and going to the Blocks block and using the dropdown menu to select Quickmail. After adding to your course, you will have the option to compose a new email, view drafts, view history, etc.
Some of the advantages/disadvantages of the Quickmail block are:
• You may select the students or group members you want to email and only those receive the message.
• This enhances the existing communications systems of messaging (one user) and subscribed forums (all subscribers) by allowing teachers to select a specific subset of students.
• This is a one-way form of communication to send email from your CSUN email address to your students. Any student responses are sent to your CSUN email address.
• It is not an internal mail system.
Moodle 2 – Activities Page 6
The advantage of Quickmail over the News Forum is that you can pick and choose which students to send the email to and use groups to organize recipients. There is also an archive of the message you have sent in the block within Moodle. The News Forum is still recommended for important announcements because it also shows up in the Latest News block as well as being archived in the forum and sent to students email.
Regular Email
CSUN provides all students, faculty and staff with a CSUN email address. Faculty may utilize this to send class communications if desired. Using your CSUN email address to send class communications has the advantage of being able to use the features of the email client (i.e. Outlook or Gmail).
If you decide you want your students to communicate with you outside of Moodle by sending you emails, a suggestion is to require that they include the course # in the subject line. This allows you then to set up filters in your email program to organize these emails.
COLLABORATION TOOLS
There are a variety of collaboration tools available to you in Moodle. These include:
Choice
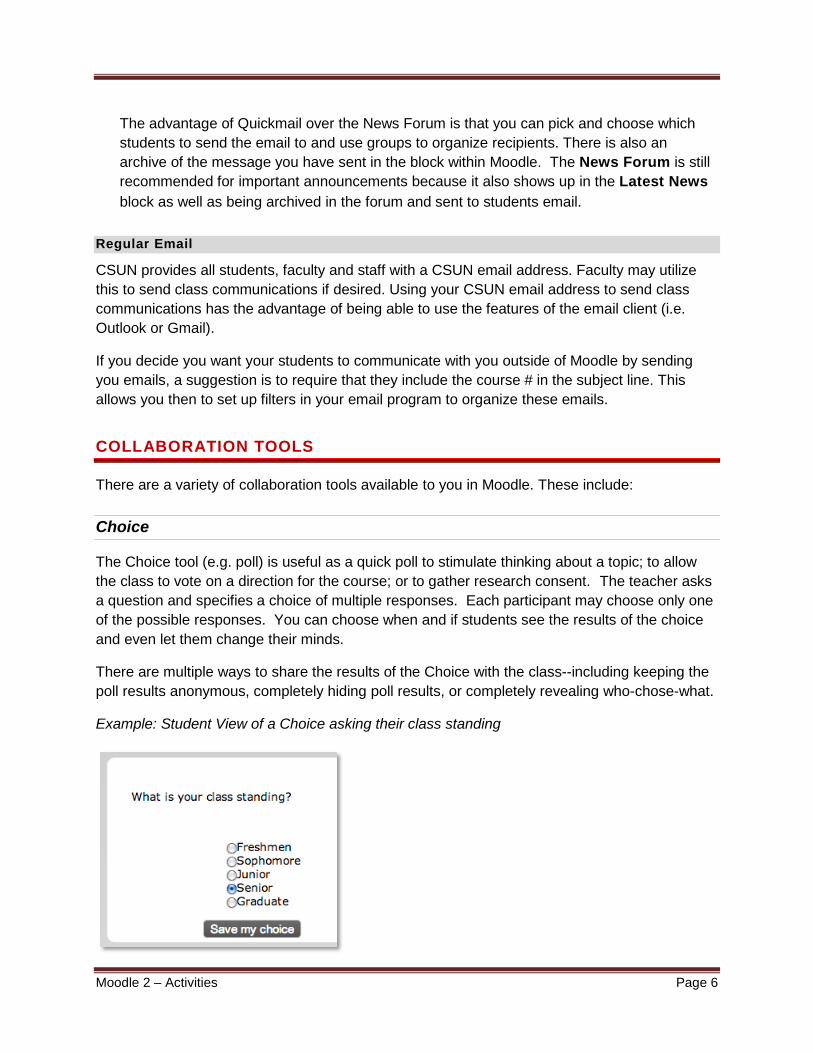
The Choice tool (e.g. poll) is useful as a quick poll to stimulate thinking about a topic; to allow the class to vote on a direction for the course; or to gather research consent. The teacher asks a question and specifies a choice of multiple responses. Each participant may choose only one of the possible responses. You can choose when and if students see the results of the choice and even let them change their minds.
There are multiple ways to share the results of the Choice with the class--including keeping the poll results anonymous, completely hiding poll results, or completely revealing who-chose-what.
Example: Student View of a Choice asking their class standing
Moodle 2 – Activities Page 7
To create a Choice:
1. From course homepage, select the Turn editing on button. 2. In the desired week/topic, select the Add an activity or resource link. 3. From the list of available options, select Choice. 4. Select the Add button. 5. Enter a descriptive name and an introduction/question in the corresponding fields. 6. Choose whether to limit the number of responses allowed. If this is enabled, each
response can be assigned a different limit. When the limit is reached, nobody else will be able to select the response. If limiting the number of responses is disabled, then any number of participants can select each of the responses.
7. Enter responses in each Option field. If you require more than 5 options, select the Add 3 fields to form button. You can fill in any number of choice fields—if you leave some blank, they will not display.
8. Restrict answering: If you want the question to be available for a limited time, select the Restrict answering to this time period checkbox and set the opening and closing dates/times for the choice.
9. Miscellaneous options:
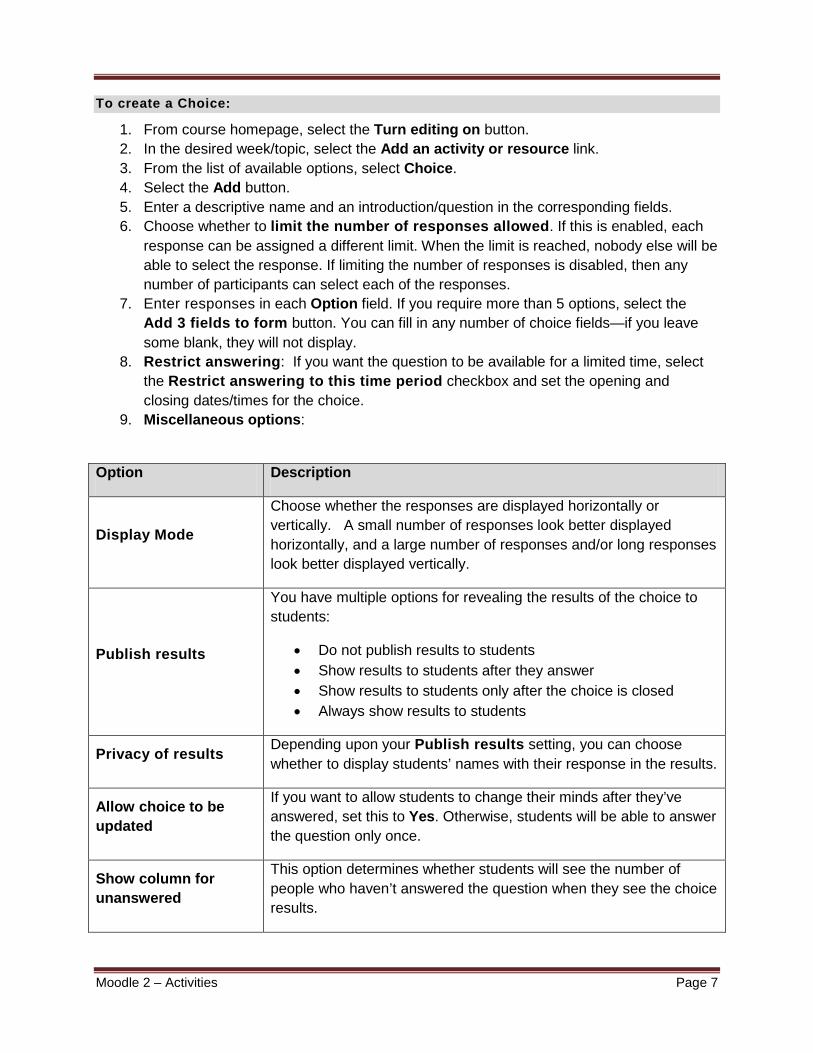
Option Description
Display Mode
Choose whether the responses are displayed horizontally or vertically. A small number of responses look better displayed horizontally, and a large number of responses and/or long responses look better displayed vertically.
Publish results
You have multiple options for revealing the results of the choice to students:
• Do not publish results to students • Show results to students after they answer • Show results to students only after the choice is closed • Always show results to students
Privacy of results Depending upon your Publish results setting, you can choose whether to display students’ names with their response in the results.
Allow choice to be updated
If you want to allow students to change their minds after they’ve answered, set this to Yes. Otherwise, students will be able to answer the question only once.
Show column for unanswered
This option determines whether students will see the number of people who haven’t answered the question when they see the choice results.
Moodle 2 – Activities Page 8
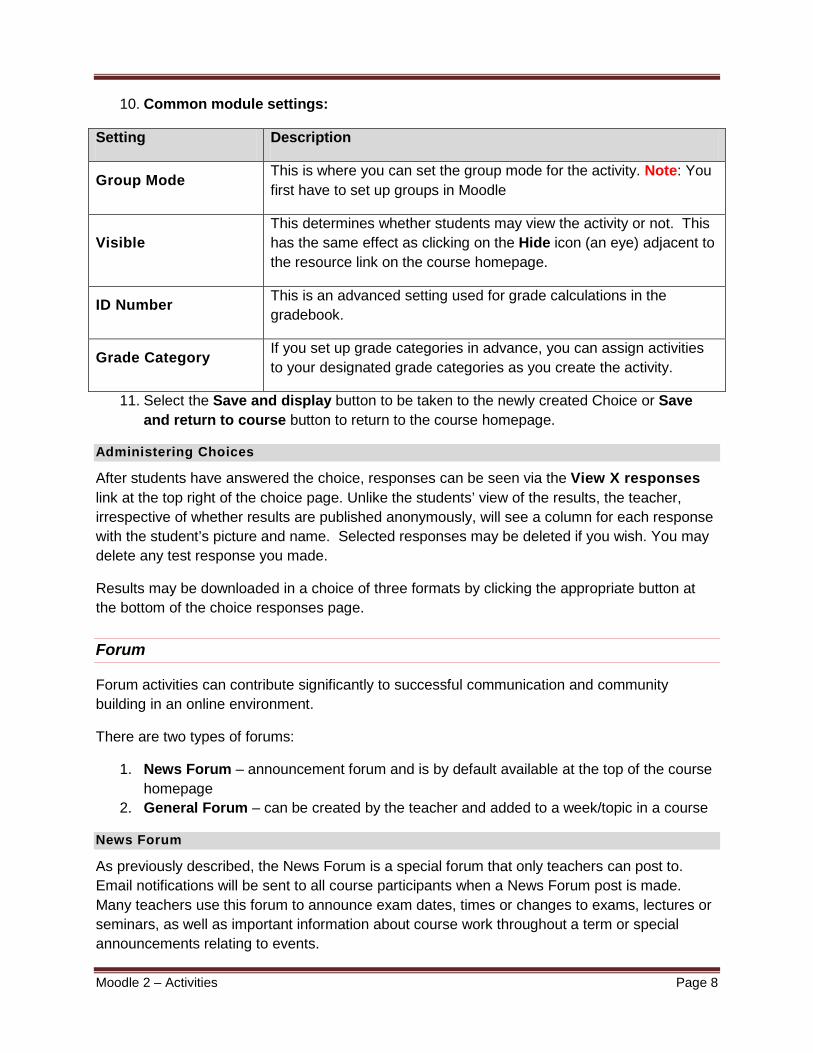
10. Common module settings:
Setting Description
Group Mode This is where you can set the group mode for the activity. Note: You first have to set up groups in Moodle
Visible This determines whether students may view the activity or not. This has the same effect as clicking on the Hide icon (an eye) adjacent to the resource link on the course homepage.
ID Number This is an advanced setting used for grade calculations in the gradebook.
Grade Category If you set up grade categories in advance, you can assign activities to your designated grade categories as you create the activity.
11. Select the Save and display button to be taken to the newly created Choice or Save and return to course button to return to the course homepage.
Administering Choices
After students have answered the choice, responses can be seen via the View X responses link at the top right of the choice page. Unlike the students’ view of the results, the teacher, irrespective of whether results are published anonymously, will see a column for each response with the student’s picture and name. Selected responses may be deleted if you wish. You may delete any test response you made.
Results may be downloaded in a choice of three formats by clicking the appropriate button at the bottom of the choice responses page.
Forum
Forum activities can contribute significantly to successful communication and community building in an online environment.
There are two types of forums:
1. News Forum – announcement forum and is by default available at the top of the course homepage
2. General Forum – can be created by the teacher and added to a week/topic in a course
News Forum
As previously described, the News Forum is a special forum that only teachers can post to. Email notifications will be sent to all course participants when a News Forum post is made. Many teachers use this forum to announce exam dates, times or changes to exams, lectures or seminars, as well as important information about course work throughout a term or special announcements relating to events.

Moodle 2 – Activities Page 9
General Forums
These forums are designed for students to collaborate and share thoughts on a particular topic or theme.
To add a forum:
1. From course homepage, select the Turn editing on button. 2. In the desired week/topic, select the Add an activity or resource link. 3. From the list of available options, select Forum. 4. Select the Add button.
5. Enter the desired name of the forum in the corresponding field. 6. Forum Type – There are multiple types of forums to choose from:
Forum Description
A single simple discussion
A single discussion topic which everyone can reply to. This works best for short focused discussions. The first post will be what you enter in the forum introduction.
Each person posts to one discussion
Each student can post exactly one new discussion topic, which everyone can then reply to. This is useful when you want each student to start a discussion topic.
Moodle 2 – Activities Page 10
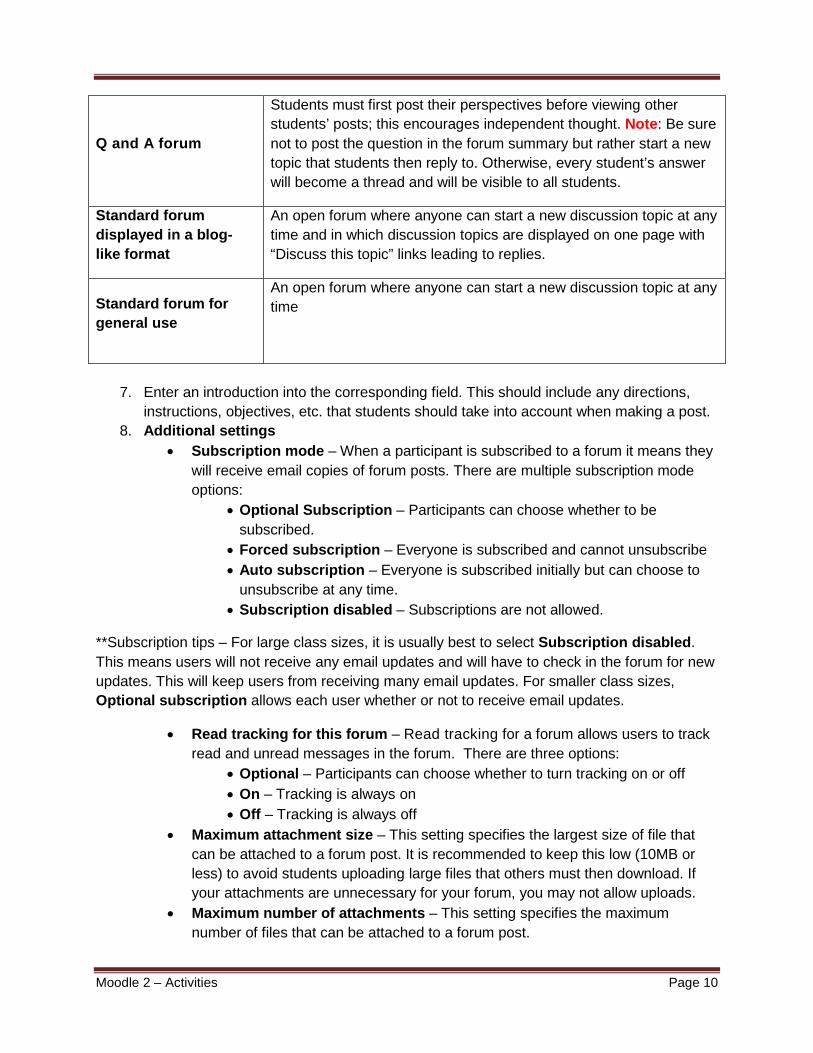
Q and A forum
Students must first post their perspectives before viewing other students’ posts; this encourages independent thought. Note: Be sure not to post the question in the forum summary but rather start a new topic that students then reply to. Otherwise, every student’s answer will become a thread and will be visible to all students.
Standard forum displayed in a blog-like format
An open forum where anyone can start a new discussion topic at any time and in which discussion topics are displayed on one page with “Discuss this topic” links leading to replies.
Standard forum for general use
An open forum where anyone can start a new discussion topic at any time
7. Enter an introduction into the corresponding field. This should include any directions, instructions, objectives, etc. that students should take into account when making a post.
8. Additional settings • Subscription mode – When a participant is subscribed to a forum it means they
will receive email copies of forum posts. There are multiple subscription mode options:
• Optional Subscription – Participants can choose whether to be subscribed.
• Forced subscription – Everyone is subscribed and cannot unsubscribe • Auto subscription – Everyone is subscribed initially but can choose to
unsubscribe at any time. • Subscription disabled – Subscriptions are not allowed.
**Subscription tips – For large class sizes, it is usually best to select Subscription disabled. This means users will not receive any email updates and will have to check in the forum for new updates. This will keep users from receiving many email updates. For smaller class sizes, Optional subscription allows each user whether or not to receive email updates.
• Read tracking for this forum – Read tracking for a forum allows users to track read and unread messages in the forum. There are three options:
• Optional – Participants can choose whether to turn tracking on or off • On – Tracking is always on • Off – Tracking is always off
• Maximum attachment size – This setting specifies the largest size of file that can be attached to a forum post. It is recommended to keep this low (10MB or less) to avoid students uploading large files that others must then download. If your attachments are unnecessary for your forum, you may not allow uploads.
• Maximum number of attachments – This setting specifies the maximum number of files that can be attached to a forum post.
Moodle 2 – Activities Page 11
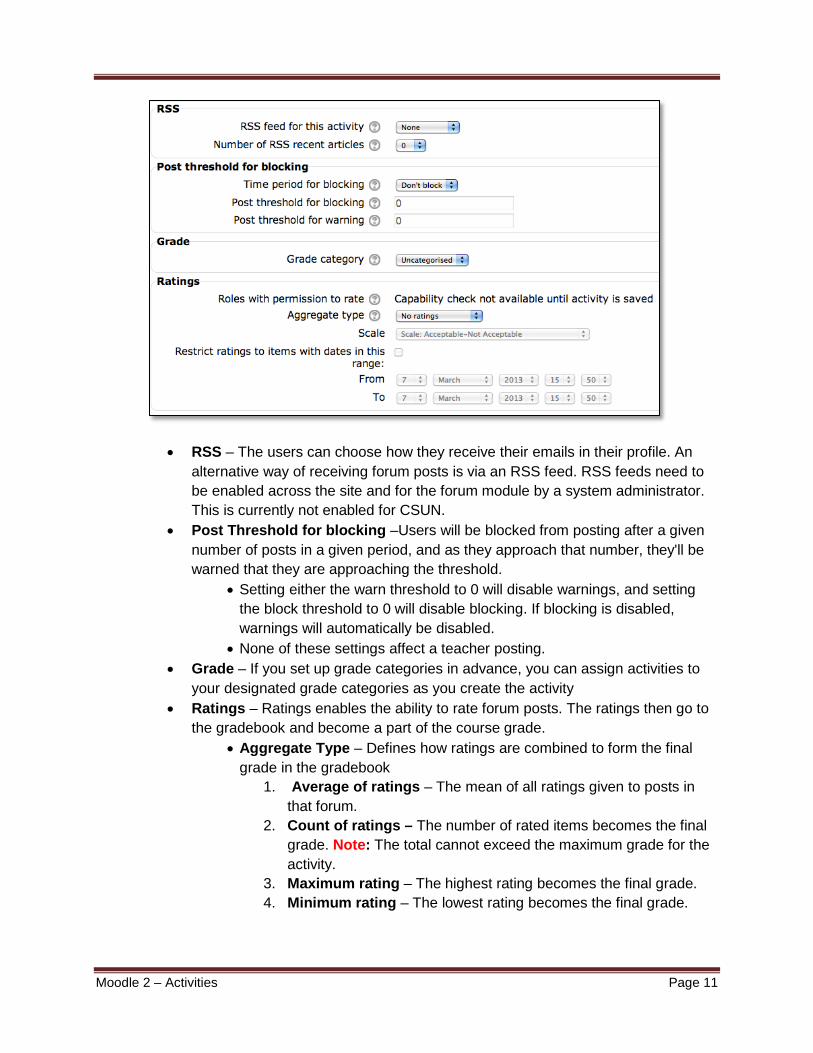
• RSS – The users can choose how they receive their emails in their profile. An alternative way of receiving forum posts is via an RSS feed. RSS feeds need to be enabled across the site and for the forum module by a system administrator. This is currently not enabled for CSUN.
• Post Threshold for blocking –Users will be blocked from posting after a given number of posts in a given period, and as they approach that number, they'll be warned that they are approaching the threshold.
• Setting either the warn threshold to 0 will disable warnings, and setting the block threshold to 0 will disable blocking. If blocking is disabled, warnings will automatically be disabled.
• None of these settings affect a teacher posting. • Grade – If you set up grade categories in advance, you can assign activities to
your designated grade categories as you create the activity • Ratings – Ratings enables the ability to rate forum posts. The ratings then go to
the gradebook and become a part of the course grade. • Aggregate Type – Defines how ratings are combined to form the final
grade in the gradebook 1. Average of ratings – The mean of all ratings given to posts in
that forum. 2. Count of ratings – The number of rated items becomes the final
grade. Note: The total cannot exceed the maximum grade for the activity.
3. Maximum rating – The highest rating becomes the final grade. 4. Minimum rating – The lowest rating becomes the final grade.
Moodle 2 – Activities Page 12
5. Sum of ratings – All the ratings for a user are added together. Note: The total is not allowed to exceed the maximum grade for the forum.
• Restrict ratings to items with dates in this range – Enter a date range where only posts in that date range can be rated. Note: This does not restrict users from posting to the forum in this range; only that posts in the range can be rated.
9. Select the Save and display button to go to the newly created Forum or Save and return to course button to return to the course homepage.
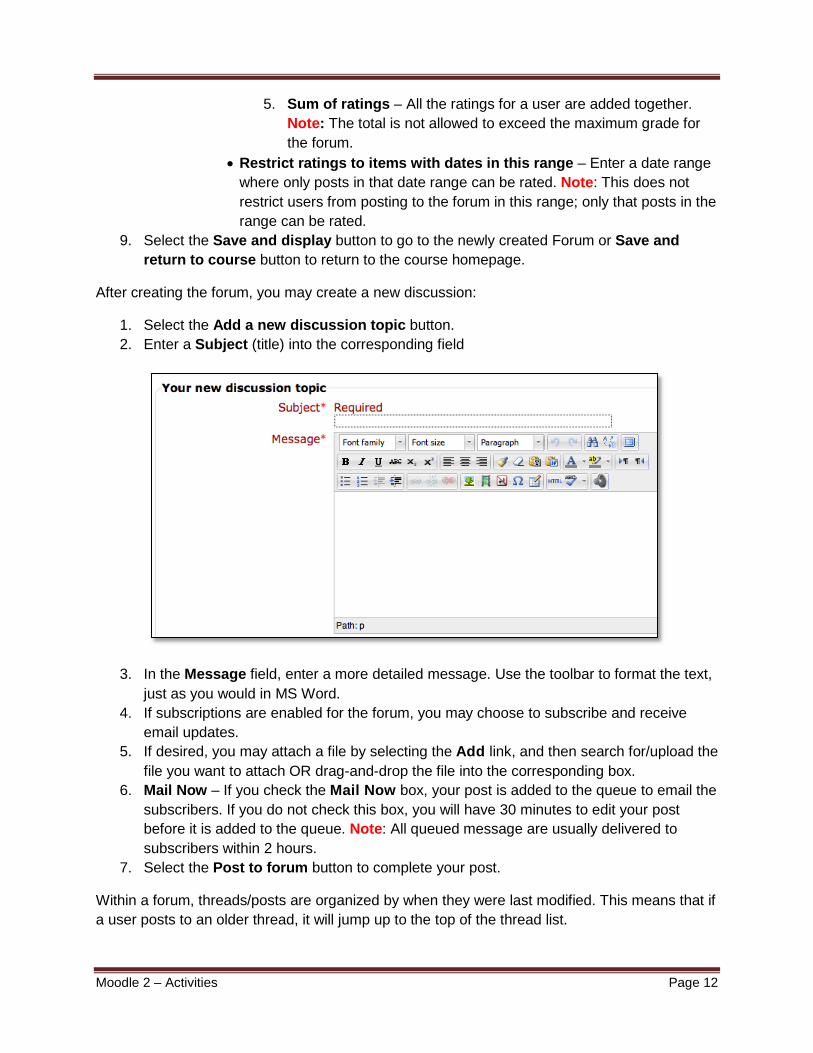
After creating the forum, you may create a new discussion:
1. Select the Add a new discussion topic button. 2. Enter a Subject (title) into the corresponding field
3. In the Message field, enter a more detailed message. Use the toolbar to format the text, just as you would in MS Word.
4. If subscriptions are enabled for the forum, you may choose to subscribe and receive email updates.
5. If desired, you may attach a file by selecting the Add link, and then search for/upload the file you want to attach OR drag-and-drop the file into the corresponding box.
6. Mail Now – If you check the Mail Now box, your post is added to the queue to email the subscribers. If you do not check this box, you will have 30 minutes to edit your post before it is added to the queue. Note: All queued message are usually delivered to subscribers within 2 hours.
7. Select the Post to forum button to complete your post.
Within a forum, threads/posts are organized by when they were last modified. This means that if a user posts to an older thread, it will jump up to the top of the thread list.
Moodle 2 – Activities Page 13
Chat
The Chat activity module allows participants to have a real-time synchronous discussion via the Web. The chat tool is recommended for small synchronous interactions, such as office hours, small group discussions and other activities without too many simultaneous participants.
For larger synchronous class meetings we strongly recommend that you use Collaborate; described in the following section.
To create a Chat:
1. From course homepage, select the Turn editing on button. 2. In the desired week/topic, select the Add an activity or resource link. 3. From the list of available options, select Chat. 4. Select the Add button.
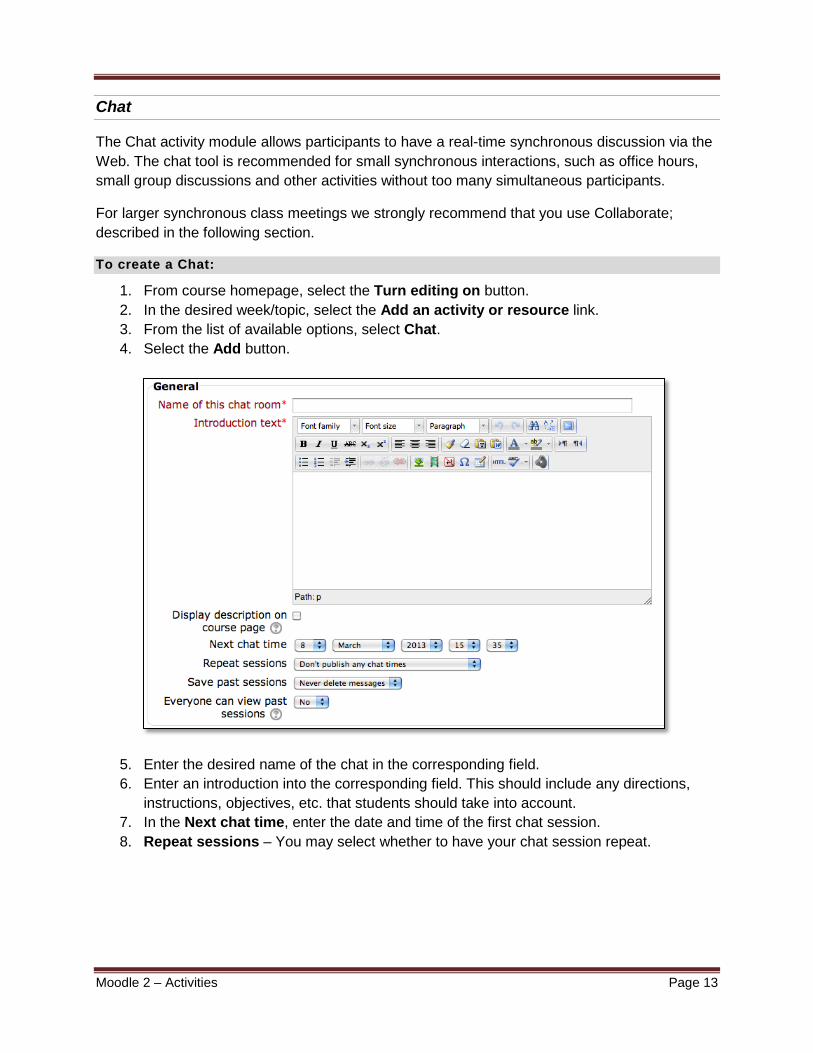
5. Enter the desired name of the chat in the corresponding field. 6. Enter an introduction into the corresponding field. This should include any directions,
instructions, objectives, etc. that students should take into account. 7. In the Next chat time, enter the date and time of the first chat session. 8. Repeat sessions – You may select whether to have your chat session repeat.
Moodle 2 – Activities Page 14
Option Description
Don’t publish any chat times
Creates a chat room that is always open and has no specified meeting times
No repeats Creates a one-time chat room that will meet only during the time specified in Next chat time field
At the same time every day
Creates an entry in the course calendar for a daily chat at the time specified in Next chat time field
At the same time every week Creates a weekly entry in the course calendar
9. Save past sessions – When a chat is complete, the transcript will be available for amount of time specified here.
10. Everyone can view past sessions – This determines whether transcripts are available to students or just the teacher.
11. Select the Save and display button to go to the newly created Chat or Save and return to course button to return to the course homepage.
Chat activities are always open to students, even if you’ve set chat times. Moodle does not restrict access to the chat based on the times you set when you created it. Instead, it creates entries in the course calendar that remind people to log in for the chat at certain times. Students can wander into the chat at another time, talk by themselves or anyone else who wanders in as well.
Blackboard Collaborate (formerly Elluminate)
Collaborate is a real-time virtual environment designed for e-learning and collaboration. It adds live discussions and dynamic interaction to synchronous learning environments, allowing teachers and students to text chat, talk over the Internet via microphone and share whiteboards and applications. Sessions can also be recorded for later viewing. To create a Collaborate session:
1. From course homepage, select the Turn editing on button. 2. In the desired week/topic, select the Add an activity or resource link. 3. From the list of available options, select Blackboard Collaborate. 4. Select the Add button.
Moodle 2 – Activities Page 15
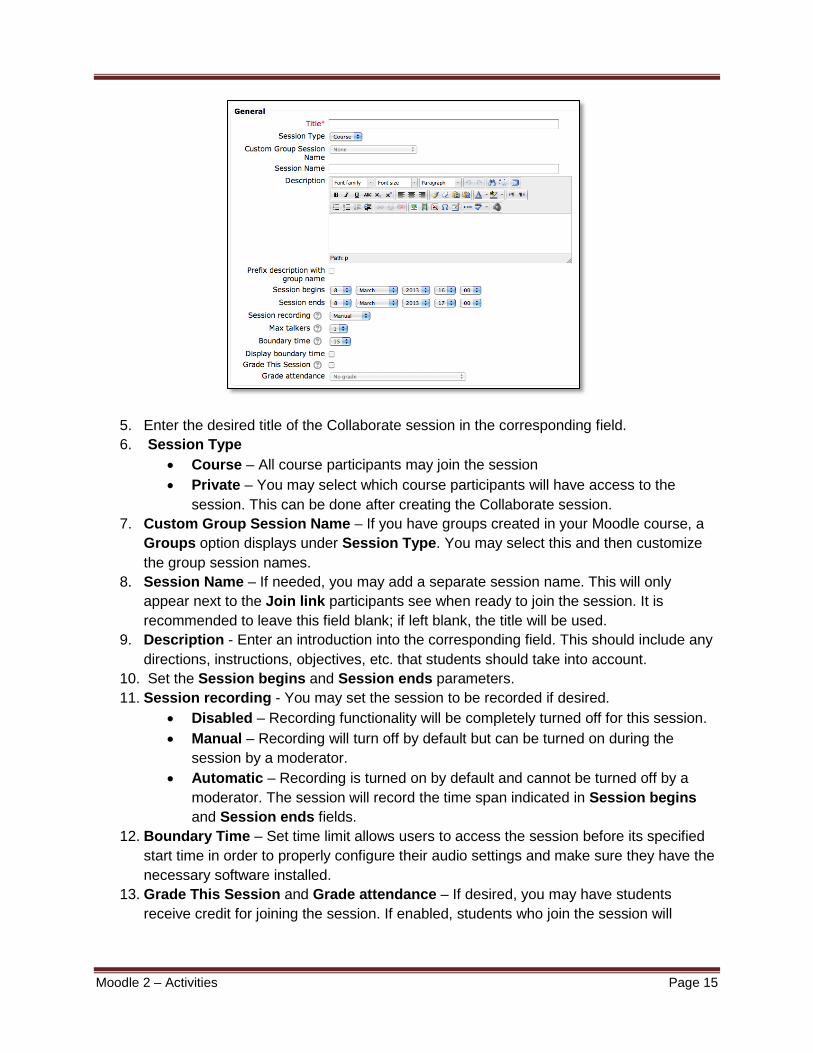
5. Enter the desired title of the Collaborate session in the corresponding field. 6. Session Type
• Course – All course participants may join the session • Private – You may select which course participants will have access to the
session. This can be done after creating the Collaborate session. 7. Custom Group Session Name – If you have groups created in your Moodle course, a
Groups option displays under Session Type. You may select this and then customize the group session names.
8. Session Name – If needed, you may add a separate session name. This will only appear next to the Join link participants see when ready to join the session. It is recommended to leave this field blank; if left blank, the title will be used.
9. Description - Enter an introduction into the corresponding field. This should include any directions, instructions, objectives, etc. that students should take into account.
10. Set the Session begins and Session ends parameters. 11. Session recording - You may set the session to be recorded if desired.
• Disabled – Recording functionality will be completely turned off for this session. • Manual – Recording will turn off by default but can be turned on during the
session by a moderator. • Automatic – Recording is turned on by default and cannot be turned off by a
moderator. The session will record the time span indicated in Session begins and Session ends fields.
12. Boundary Time – Set time limit allows users to access the session before its specified start time in order to properly configure their audio settings and make sure they have the necessary software installed.
13. Grade This Session and Grade attendance – If desired, you may have students receive credit for joining the session. If enabled, students who join the session will
Moodle 2 – Activities Page 16
automatically receive full credit regardless of the quality of their participation in the session.
14. Select the Save and display button to go to the newly created Collaborate session or Save and return to course button to return to the course homepage.
Users may join the Collaborate session by selecting the Collaborate session name from the course homepage and the Join link. If no Join link appears, check if the user is trying to join the session on the right day and time and that it is within the boundary time limit.
Users may view a previously recorded Collaborate session by selecting the Collaborate session from the course homepage and the Play recording link. If no Play recording link appears, the session may have not finished processing yet. Sessions are normally processed and available for viewing within 24 hours of when the session ended.
ASSIGNMENTS
Assignments allow the teacher to grade various types of student submissions.
Assignment
In the previous version of Moodle, assignments were broken down into multiple types: Online Text, Upload a single files, Offline assignment and Advanced uploading of files. In Moodle 2, these have all been combined. Teachers have the option to replicate the previous assignment types by selecting which settings to enable.
To create an assignment:
1. From course homepage, select the Turn editing on button. 2. In the desired week/topic, select the Add an activity or resource link. 3. From the list of available options, select Assignment. 4. Select the Add button. 5. Enter the desired name of the assignment in the corresponding field. 6. Enter a description into the corresponding field. This should include any directions,
instructions, objectives, etc. that students should take into account.
Moodle 2 – Activities Page 17
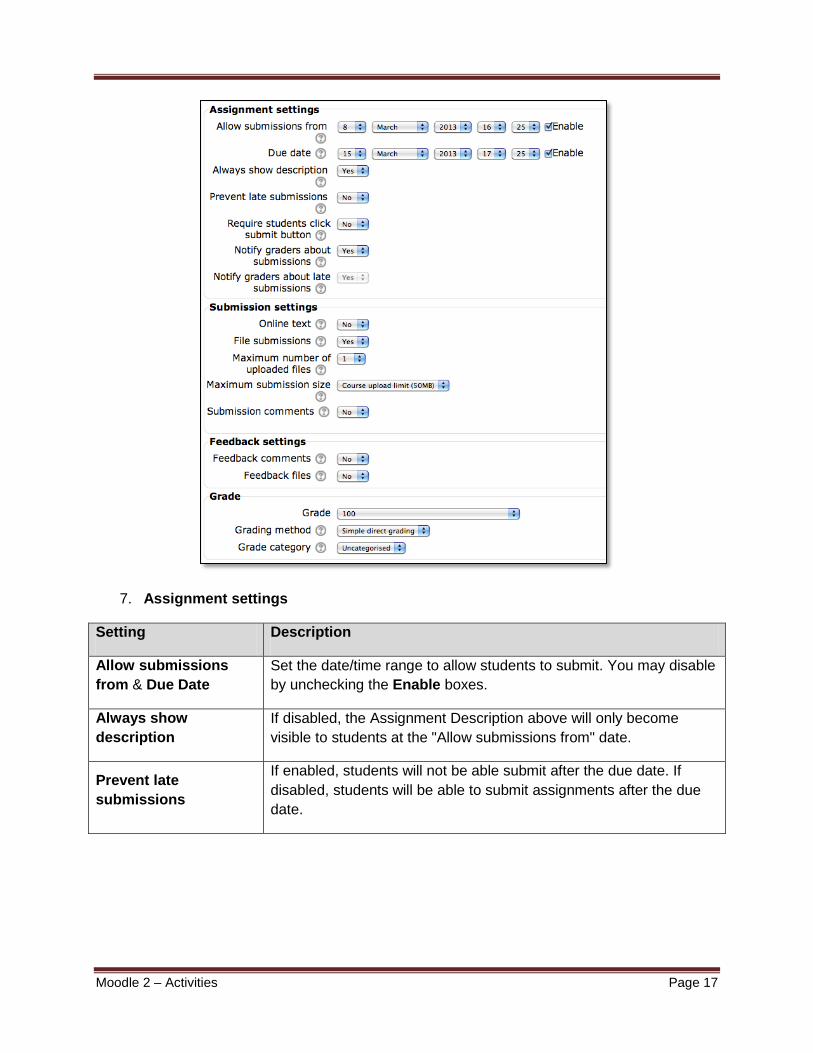
7. Assignment settings
Setting Description
Allow submissions Set the date/time range to allow students to submit. You may disable from & Due Date by unchecking the Enable boxes.
Always show If disabled, the Assignment Description above will only become description visible to students at the "Allow submissions from" date.
Prevent late submissions
If enabled, students will not be able submit after the due date. If disabled, students will be able to submit assignments after the due date.
Moodle 2 – Activities Page 18
Require students click submit button
If enabled, students will have to click a Submit button to declare their submission as final. This allows students to keep a draft version of the submission on the system. If this setting is changed from "No" to "Yes" after students have already submitted, those submissions will be regarded as final. Note – It is recommended to keep this as No for ease of use by students.
Notify graders about submissions
If enabled, teachers receive a message whenever a student submits an assignment, early, on time and late. Note – It is recommended to change this to No to avoid teachers receiving many emails.
Notify grades about late submissions
If enabled, teachers receive a message whenever a student submits an assignment late.
8. Submission settings
Setting Description
Online text If enabled, students are able to type in a submission into an editor field.
File submissions If enabled, students are able to upload one or more files as their submission.
Maximum number of uploaded files
If file submissions are enabled, each student will be able to upload up to this number of files for their submission.
Maximum submission size
Files uploaded by students may be up to this size. Note – It is recommended to keep this low (10MB or less) to avoid students uploading large files. You may raise this limit if your students’ submissions require it.
Submission comments If enabled, students can leave comments on their own submission. This can be used to let students alert the teacher about which file is the master file is in cases of inter-linked files, for instance.
9. Feedback settings • Feedback comments – If enabled, the teacher can leave feedback comments
for each submission. • Feedback files – If enabled, the teacher can upload files with feedback when
marking the assignments. These files may be, but are not limited to marked-up student submissions, documents with comments or spoken audio feedback.
10. Grade – Select the point value that the assignment will be worth in the gradebook.
Moodle 2 – Activities Page 19
11. Grading method – If a point value is desired in the gradebook, select Simple direct grading. For advanced users, you may try Checklist, Marking guide or Rubric.
12. Grade category – If you set up grade categories in advance, you can assign activities to your designated grade categories as you create the activity.
13. Select the Save and display button to be taken to the newly created assignment or Save and return to course button to return to the course homepage.
Turnitin
Turnitin is an online plagiarism detection and prevention program which compares student work to a digital database of publications, papers, and websites. Turnitin is integrated within Moodle so that students can submit their assignments in Moodle instead of on an external website.
Creating a Turnitin assignment:
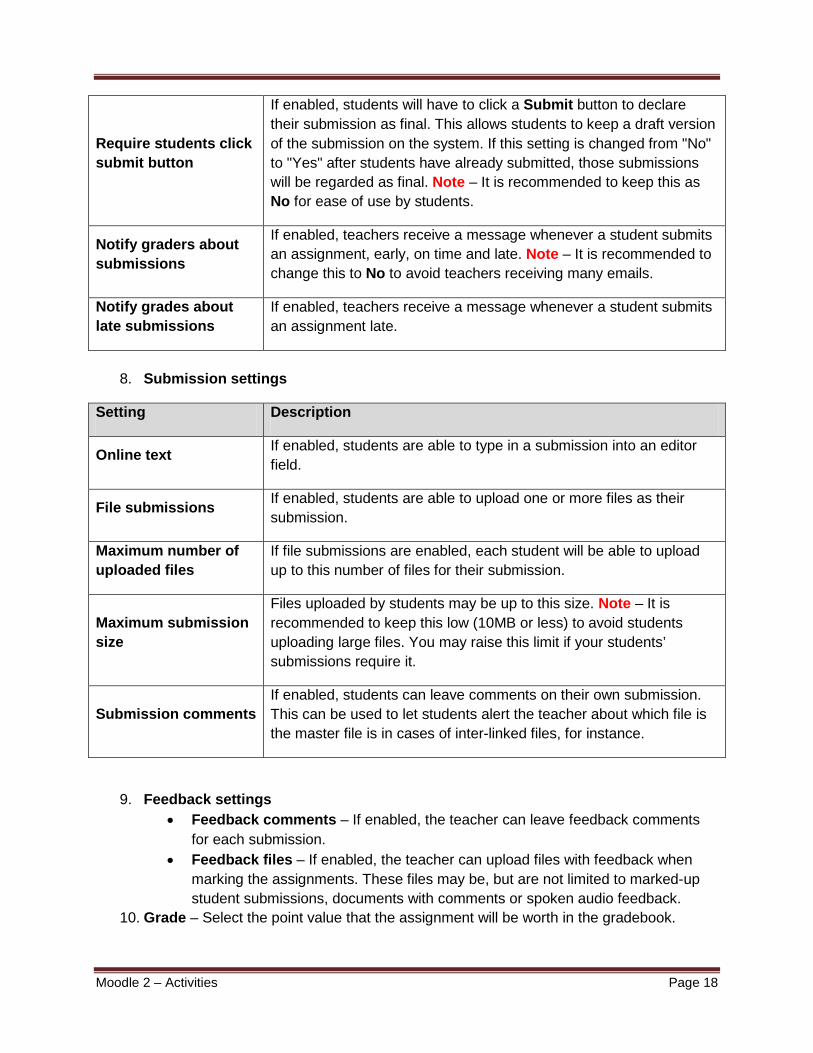
1. From course homepage, select the Turn editing on button. 2. In the desired week/topic, select the Add an activity or resource link. 3. From the list of available options, select Turnitin. 4. Select the Add button. 5. Enter the desired name of the assignment in the corresponding field. 6. Enter a summary into the corresponding field. This should include any directions,
instructions, objectives, etc. that students should take into account.
Moodle 2 – Activities Page 20
7. Fill out the additional settings as desired. If you are not sure what a setting is, you may select the question mark icon next to it for additional information. If you are still not sure what to select, leave the default.
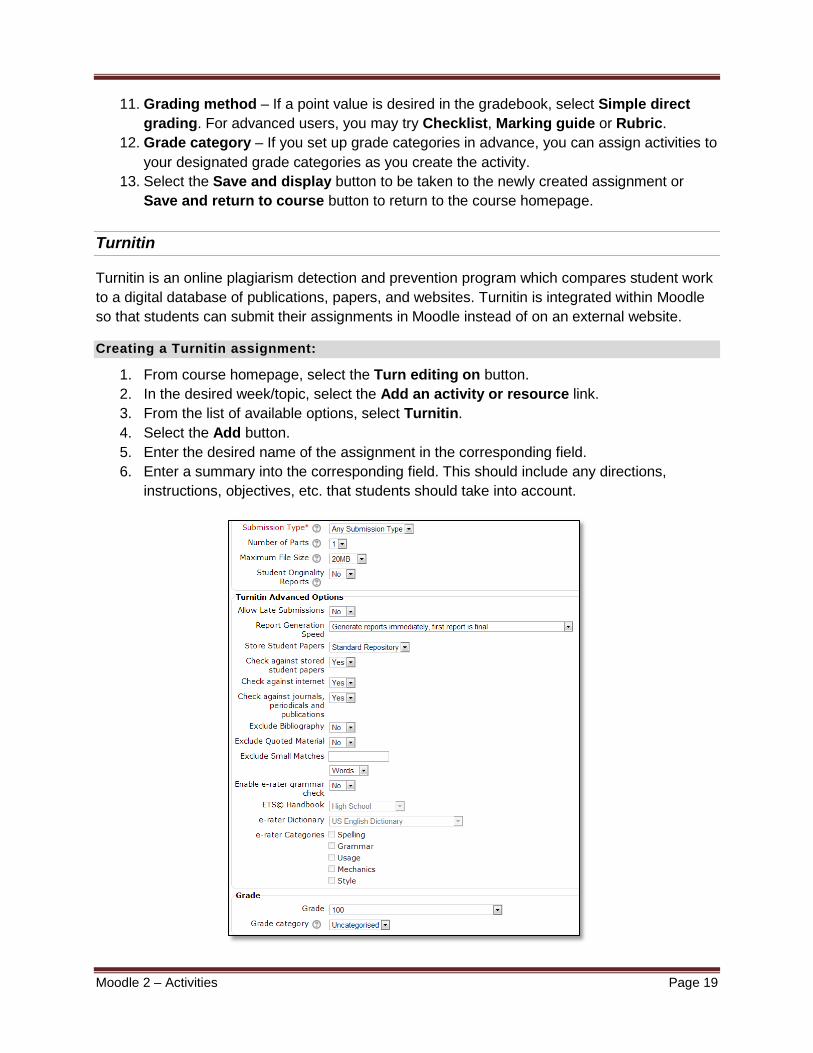
8. Select the Save and display button to go to the newly created Turnitin. Note: By default, Turnitin assignments are open for week from the date and time you created the assignment. In addition, they are worth 100 points. If you would like to change these settings, select the Edit icon on the Summary tab.
Reviewing Turnitin submissions:
1. From the course homepage, select the assignment name. 2. Select Submission inbox tab. 3. Students’ names and submissions are listed; along with the similarity report and grade.
To grade, select icon in the Similarity column or Grade column. 4. You may use the Turnitin document viewer to add Grademarks (comments), a grade,
use a rubric, etc. For assistance using the Turnitin document viewer and tools, please consult Turnitin.com’s documentation.
OTHER MOODLE ACTIVITIES
Moodle has additional activities available for use. These activities are more advanced than the previously described activities and can take significant work in order to set. We recommend these for advanced users.
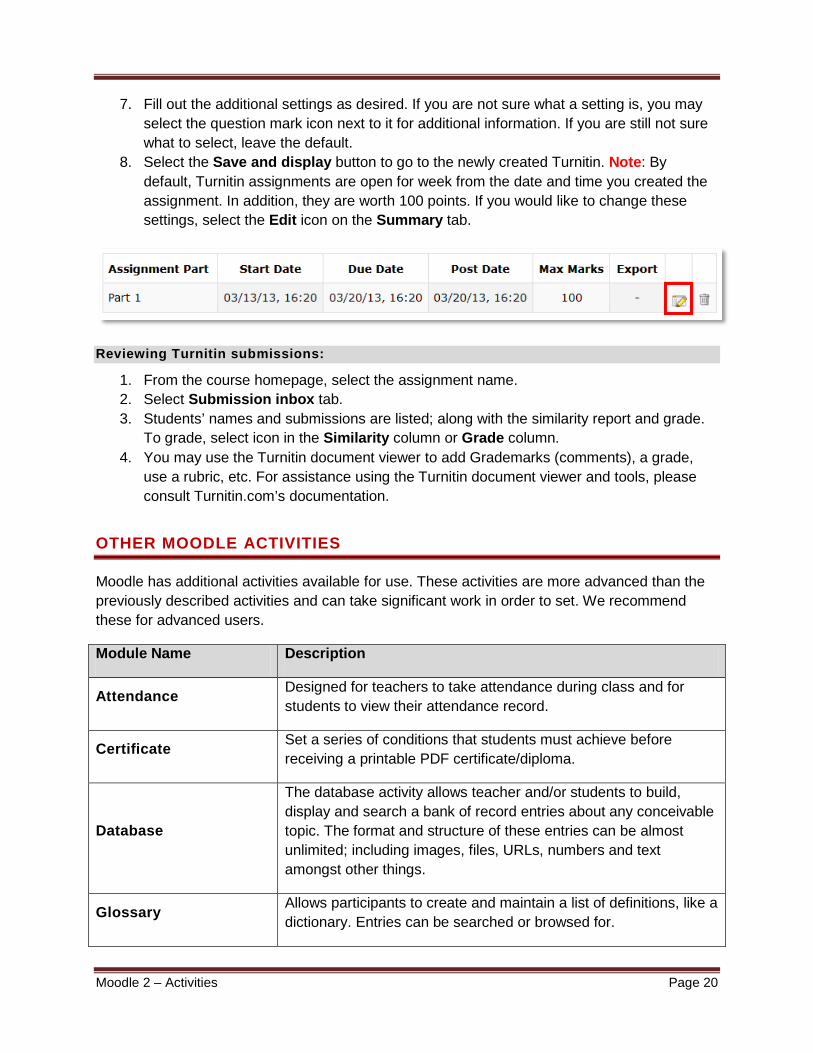
Module Name Description
Attendance Designed for teachers to take attendance during students to view their attendance record.
class and for
Certificate Set a series of conditions that students must achieve before receiving a printable PDF certificate/diploma.
Database
The database activity allows teacher and/or students to build, display and search a bank of record entries about any conceivable topic. The format and structure of these entries can be almost unlimited; including images, files, URLs, numbers and text amongst other things.
Glossary Allows participants to create and maintain a list of definitions, like a dictionary. Entries can be searched or browsed for.
Moodle 2 – Activities Page 21
Lesson
Present a series of webpages to students with the students able to answer a question or choice at the bottom of the page. Based on their selection, they are taken to the next page. This takes advantage of the branch logic capability which allows the teacher to present material in a non-linear manner.
Questionnaire Allows students to complete online feedback style forms and surveys using a variety of question types like multiple choice, radio buttons, check boxes, text box and more.
Wiki A wiki is a collection of collaboratively authored web documents. Basically, a wiki page is a webpage everyone in your class can create together in the browser, without needing to know HTML.
Workshop A peer assessment activity. Students submit their work to have it accessed by other students. There are two grades for a student: their own work and their peer assessment of other students’ work.
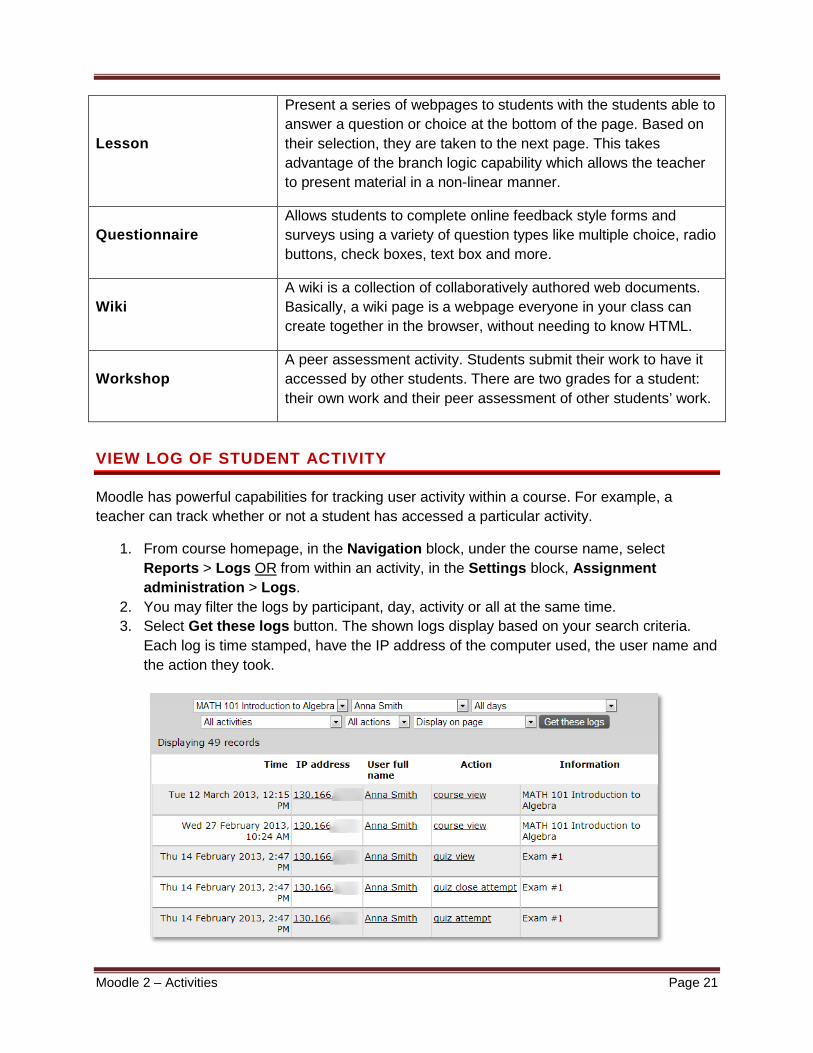
VIEW LOG OF STUDENT ACTIVITY
Moodle has powerful capabilities for tracking user activity within a course. For example, a teacher can track whether or not a student has accessed a particular activity.
1. From course homepage, in the Navigation block, under the course name, select Reports > Logs OR from within an activity, in the Settings block, Assignment administration > Logs.
2. You may filter the logs by participant, day, activity or all at the same time. 3. Select Get these logs button. The shown logs display based on your search criteria.
Each log is time stamped, have the IP address of the computer used, the user name and the action they took.
Moodle 2 – Activities Page 22
LEARN MORE ABOUT MOODLE
There are many free resources available to support you in your learning and teaching within Moodle.
• - The question marks located throughout your Moodle course provide specific information on that particular item or resource.
• Faculty Moodle Help (FMH) – A list of most frequently asked questions by faculty. Links to the FMH can be found in the CSUN block located on each course homepage or at the bottom of each webpage.
• - The Moodle Docs link at the bottom of each window within your Moodle class gives you more general information on the various aspects of Moodle.
• Lynda.csun.edu - Lynda.com is a training resource available to all employees at CSUN. To access Lynda.com, go to: lynda.csun.edu and log in with your CSUN User ID and password.
If You Need Additional Help
Contact the Faculty Technology Center at:
Phone: (818) 677-3443 Email: [email protected] In Person: OV 34