Module 5: Configuring Microsoft Windows XP...
48
Contents Overview 1 Examining Workgroups and User Accounts 2 Creating and Authenticating Local User Accounts 5 Configuring Local Security 9 Configuring Logon Options in a Workgroup 20 onfiguring Networking Options in a Workgroup 22 Lab 5A:Operating in a Workgroup 30 Joining a Domain 31 Operating in a Domain 33 Lab 5B: Operating in a Domain 36 Review 38 Module 5: Configuring Microsoft Windows XP Professional to Operate in Microsoft Networks
Transcript of Module 5: Configuring Microsoft Windows XP...

Contents
Overview 1
Examining Workgroups and User Accounts 2
Creating and Authenticating Local User Accounts 5
Configuring Local Security 9
Configuring Logon Options in a Workgroup 20
onfiguring Networking Options in a Workgroup 22
Lab 5A:Operating in a Workgroup 30
Joining a Domain 31
Operating in a Domain 33
Lab 5B: Operating in a Domain 36
Review 38
Module 5: Configuring Microsoft Windows XP Professional to Operate in Microsoft Networks

BETA MATERIALS FOR MICROSOFT CERTIFIED TRAINER PREPARATION PURPOSES ONLY
Information in this document, including URL and other Internet Web site references, is subject to change without notice. Unless otherwise noted, the example companies, organizations, products, domain names, e-mail addresses, logos, people, places, and events depicted herein are fictitious, and no association with any real company, organization, product, domain name, e-mail address, logo, person, places or events is intended or should be inferred. Complying with all applicable copyright laws is the responsibility of the user. Without limiting the rights under copyright, no part of this document may be reproduced, stored in or introduced into a retrieval system, or transmitted in any form or by any means (electronic, mechanical, photocopying, recording, or otherwise), or for any purpose, without the express written permission of Microsoft Corporation. Microsoft may have patents, patent applications, trademarks, copyrights, or other intellectual property rights covering subject matter in this document. Except as expressly provided in any written license agreement from Microsoft, the furnishing of this document does not give you any license to these patents, trademarks, copyrights, or other intellectual property. 2001 Microsoft Corporation. All rights reserved. Microsoft, BackOffice, MS-DOS, Windows, Windows NT, Active Directory, ActiveX, BackOffice, DirectX are either registered trademarks or trademarks of Microsoft Corporation in the U.S.A. and/or other countries. The names of actual companies and products mentioned herein may be the trademarks of their respective owners.
Module 5: Configuring Microsoft Windows XP Professional to Operate in Microsoft Networks iii
BETA MATERIALS FOR MICROSOFT CERTIFIED TRAINER PREPARATION PURPOSES ONLY
Instructor Notes This module provides students with the skills to configure Microsoft® Windows® XP Professional to operate in a workgroup or in a domain. The module explains user accounts, Microsoft Management Console (MMC), customized consoles, local security, and how joining a domain affects security settings and Group Policy. The module discusses the new logon options available in Windows XP Professional, including the Welcome screen and the Fast User Switching option. In addition to the logon and authentication processes, the module presents common security options, and the Group Policy settings local policies, and account policies that may need to be configured.
After completing this module, students will be able to:
!" Discuss workgroups and local user accounts. !" Create and authenticate local user accounts. !" Configure local security. !" Configure logon and network options in a workgroup. !" Join a domain. !" Describe the authentication process in a domain. !" Explain the effects that joining a domain has on local accounts and local
security.
Presentation: 45 Minutes Labs: 90 Minutes
iv Module 5: Configuring Microsoft Windows XP Professional to Operate in Microsoft Networks
BETA MATERIALS FOR MICROSOFT CERTIFIED TRAINER PREPARATION PURPOSES ONLY
Materials and Preparation This section provides the materials and preparation tasks that you need to teach this module.
Required Materials To teach this module, you need the following materials:
• Microsoft PowerPoint® file 2272A_04.ppt
Preparation Tasks To prepare for this module, you should:
!" Read all of the materials for this module. !" Complete the labs. !" Review the Delivery Tips and Key Points for each section and topic.

Module 5: Configuring Microsoft Windows XP Professional to Operate in Microsoft Networks v
BETA MATERIALS FOR MICROSOFT CERTIFIED TRAINER PREPARATION PURPOSES ONLY
Instructor Setup for Labs This section provides setup instructions that are required to prepare the instructor computer or classroom configuration for a lab.
Lab 5A: Operating in a Workgroup !"To prepare for the lab • The student computers must be configured to operate in a domain, they will
reconfigure the computers to operate in a workgroup.
Lab 5B: Operating in a Domain !"To prepare for the lab 1. The student computers must be configured to operate in a Workgroup. 2. The student computers need access to a computer running Microsoft
Windows 2000 Server configured as a domain controller (DC). 3. The DC needs 24 users that were created by using the naming convention
DomUserXXX (where XXX is the first three letters of the computer name). 4. The DC needs an organizational unit named Lab4 Computers created. The
organizational unit will require the creation of a corporate security Group Policy setting. To create this Group Policy setting: a. In a console that contains the Group Policy Snap-in, expand Computer
Configuration, expand Windows Settings, expand Security Settings, and then expand Security Options.
b. Configure Message text for users attempting to log on. The text should be: This is the Corporate Security Policy.
c. Configure Message Title for users attempting to log on. The title should be: Corporate Security Policy.
5. The instructor will need to use Active Directory Users and Computers to move student computers from the Computers group to the Lab5 Computers organizational unit prior to starting Exercise 3.
6. After students complete Exercise 3, the instructor should move the computers from the Lab5 Computers organizational unit to the Computers group.

vi Module 5: Configuring Microsoft Windows XP Professional to Operate in Microsoft Networks
BETA MATERIALS FOR MICROSOFT CERTIFIED TRAINER PREPARATION PURPOSES ONLY
Module Strategy Use the following strategy to present this module:
!" Examining Workgroups and User Accounts In this section, introduce students to the concepts and characteristics of workgroups and user accounts. First explain that a workgroup is a peer-to-peer network, and explain that each user needs a local user account on each computer to which he or she needs access. Next, describe the differences between local user accounts and domain user accounts, and ensure that the students understand where each type of account is stored.
!" Creating and Authenticating Local Accounts In this section, present the information on creating local user accounts through the Computer Management console, and explain that this is how they will usually create accounts. Demonstrate how to create local user accounts through Control Panel, and emphasize that the default account type of Administrator with no password presents a security risk. Present the information on authenticating local accounts by using the build slide, and emphasize that in a workgroup, the account must exist on each computer to which the user needs to gain access.
!" Configuring Local Security This section introduces Microsoft Management Console (MMC) and its function in configuring local security. In this section, explain that the Computer Management console that was discussed in the last section is a pre-configured console, and that all pre-configured and customized consoles are saved in the Administrative Tools folder by default. Next, introduce MMC by opening it and adding snap-ins. Ensure that students understand the definitions of console, console tree, snap-in, and details pane. Next, demonstrate how to create a customized security console by adding the Group Policy and Local Users and Groups snap-ins. Next, use the customized security console to demonstrate how to configure account policies and local policies. Discuss the sample policies in the tables, and discuss why the recommended configurations help to secure the network and its member computers. Finally, use the customized security console to demonstrate how to configure Ctrl+Alt+Del options. Demonstrate the Explain tabs, and discuss why the recommended settings for the options help to secure the network and its member computers.
!" Configuring Logon Options in a Workgroup In this section, explain that the default Welcome screen can be changed to a Classic logon screen requiring the user to press CTRL+ALT+DEL. Discuss the advantages and disadvantages of the Welcome screen, and how it affects Fast User Switching.
!" Configuring Networking Options in a Workgroup In this section, emphasize the need to run the New Connection Wizard in a workgroup configuration to enable connection sharing, an Internet firewall, and other security practices, such as file sharing. First, present the information on connection sharing. Be sure to emphasize that there are five options, only two of which share an Internet connection. Next, present the information on networking information for computers in a workgroup. Finally, demonstrate how to enable Internet Connection Sharing and an Internet Connection Firewall.

Module 5: Configuring Microsoft Windows XP Professional to Operate in Microsoft Networks vii
BETA MATERIALS FOR MICROSOFT CERTIFIED TRAINER PREPARATION PURPOSES ONLY
!" Lab A: Operating in a Workgroup In Exercise 1, students will join a workgroup called GroupX (where X is a number assigned by the instructor). You will need to assign each pair of students one group number. Each student will create a user account named UserXXX (where XXX is the first three letters of each student's computer name) When they try to gain access to their partners’ computers by using their new user accounts, they will be unsuccessful, because their user accounts are not created on their partners’ computer. They will then change the way users log on or log off by disabling the enabling the Fast User Switching option. In Exercise 2, students will create a custom security console, and then configure the User Rights Assignment and CTRL+ALT+DELETE options. They will then create a message that appears to all users when they log on.
!" Joining a Domain In this section, present the requirements and benefits of joining a domain.
!" Operating in a Domain In this section, present the results of joining a domain. Ensure that students understand the difference between domain user accounts and domain computer accounts. Emphasize the function of the Active Directory™ directory service in user authentication, and explain why cached credentials are important. Explain the function of security identifiers (SIDs) and access control entries (ACEs) in controlling access to domain resources. Emphasize that a user who logs on to a local computer may gain access to domain resources, but will be prompted for domain credentials each time that user tries to gain access to a new server. Entering a valid user name and password establishes a connection with that server. Explain that establishing a session with a server in this way does not have the same effect on the user account as logging on does. Finally, explain how domain user accounts are subject to Group Policy and security settings configured for the domain, and that domain policies and settings override local policies and settings.
!" Lab B: Operating in a Domain In Exercise 1, the students will join the nwtraders.msft domain, and examine the effects of operating in a domain. After completing Exercise 1, students must stop until you configure changes on the domain controller. Do not allow them to continue to Exercise 2 until you have configured changes on the domain controller. In Exercise 2, students will examine the effects of Group Policy on their local computers. See the Instructor Setup for Labs section in these Instructor Notes to properly set up the DC for this lab.


Module 5: Configuring Microsoft Windows XP Professional to Operate in Microsoft Networks 1
BETA MATERIALS FOR MICROSOFT CERTIFIED TRAINER PREPARATION PURPOSES ONLY
Overview
! Examining Workgroups and User Accounts
! Creating and Authenticating Local Accounts
! Configuring Local Security
! Configuring Logon Options in a Workgroup
! Configuring Networking Options in a Workgroup
! Joining a Domain
! Operating in a Domain
Both workgroups and domains are network environments; however, the way in which user accounts, authentication, and security are handled in each is quite different. To configure Microsoft® Windows® XP Professional to operate in a workgroup or a domain, you must correctly create and configure user accounts, and configure the security of the network. As an Information Technology (IT) professional, it is critical that you understand the similarities and differences between workgroups and domains so that you are able to configure Windows XP Professional to operate properly in your networking environment.
After completing this module, you will be able to:
!" Discuss workgroups and local user accounts. !" Create and authenticate local user accounts. !" Configure local security. !" Configure logon and network options in a workgroup. !" Join a domain. !" Describe the authentication process in a domain. !" Explain the effects that joining a domain has on local accounts and local
security.
Topic Objective To provide an overview of the module topics and objectives.
Lead-in In this module, you will learn about configuring computers running Microsoft Windows XP Professional to operate in a Microsoft Windows workgroup or domain.
2 Module 5: Configuring Microsoft Windows XP Professional to Operate in Microsoft Networks
BETA MATERIALS FOR MICROSOFT CERTIFIED TRAINER PREPARATION PURPOSES ONLY
#### Examining Workgroups and User Accounts
! Examining Workgroups
! Examining User Accounts
To configure Windows XP Professional to operate in Microsoft Windows networks, you must understand how a workgroup environment affects configuration. You must also be able to differentiate the types of user accounts and their capabilities.
Topic Objective To introduce the following topics.
Lead-in An understanding of workgroups and user accounts is crucial to configuring Windows XP Professional to operate in Microsoft Windows networks.

Module 5: Configuring Microsoft Windows XP Professional to Operate in Microsoft Networks 3
BETA MATERIALS FOR MICROSOFT CERTIFIED TRAINER PREPARATION PURPOSES ONLY
Examining Workgroups
Workgroup Characteristics:
$ Peer-to-peer network
$ No centralized administration
A workgroup is a grouping of computers on a network that share resources, such as files and printers. A workgroup is referred to as a peer-to-peer network because all of the computers in a workgroup can share resources as equals, or as peers, without a dedicated server.
Why Workgroups Are Used In smaller organizations, the ability for computers in a workgroup to share resources without having to dedicate a computer as a server saves the organization the additional expense of a server and server software. Computers running server software in a workgroup are known as stand-alone servers. Workgroups are also used in organizations where centralized administration of resources and accounts is either not needed, or is undesirable.
Limitations of Workgroups Although workgroups can be very useful, they become unwieldy if more than ten computers are on a network. In a workgroup, all user accounts are local user accounts. Each user must have a local user account on each computer to which he or she needs to gain access. Thus, if five workers have five computers in a workgroup, and they all need access to each other’s resources, there would be 25 user accounts in the workgroup—one local user account for each employee on each computer. When a change is made to a user account in a workgroup, the change must be made on each individual computer in the workgroup so that the user continues to have access to all of the needed resources.
Topic Objective To introduce the concept of workgroups.
Lead-in A workgroup is a peer-to-peer network that does not support centralized resources or administration.

4 Module 5: Configuring Microsoft Windows XP Professional to Operate in Microsoft Networks
BETA MATERIALS FOR MICROSOFT CERTIFIED TRAINER PREPARATION PURPOSES ONLY
Examining User Accounts
Local User Accounts !Enable users to log on and gain access to
resources on a specific computer!Reside in Security Accounts Manager!Must be created on each computer in a
workgroup
Domain User Accounts !Enable users to log on to the domain to gain
access to network resources!Reside in Active Directory
Built-in User Accounts
!Enable users to perform administrative tasks or gain temporary access to network resources
!Reside in SAM (local built-in user accounts)!Reside in Active Directory (domain built-in
user accounts)Administrator
and Guest
A user account contains a user’s unique credentials and enables a user to log on to a domain to gain access to network resources, or to log on to a specific computer to gain access to resources on that computer. Each person who regularly uses resources on networked computers should have a user account.
The following table describes the types of user accounts that Windows XP Professional provides.
User account type Description Local user account Enables a user to log on to a specific computer to gain
access to resources on that computer. Users can gain access to resources on another computer on a network if they have a separate account on that other computer. These user accounts reside in computer’s Security Account Manager (SAM).
Domain user account Enables a user to log on to the domain to gain access to network resources. The user can gain access to network resources from any computer on the network by using a single user account and password. These user accounts reside in the Active Directory™ directory service.
Built-in user account Enables a user to perform administrative tasks or to gain temporary access to network resources. There are two built-in user accounts, which cannot be deleted: Administrator and Guest. The local Administrator and Guest user accounts reside in the SAM and the domain Administrator and Guest user accounts reside in Active Directory.
Built-in user accounts are automatically created during the installation of Microsoft Windows 2000 and Active Directory.
Topic Objective To differentiate between local user accounts and domain user accounts.
Lead-in A user account contains a user’s unique credentials and enables a user to log on and gain access to local or network resources.
Key Point Local user accounts reside in Security Account Manager (SAM), which is the local security account database on a computer. Domain user accounts reside in Active Directory.

Module 5: Configuring Microsoft Windows XP Professional to Operate in Microsoft Networks 5
BETA MATERIALS FOR MICROSOFT CERTIFIED TRAINER PREPARATION PURPOSES ONLY
#### Creating and Authenticating Local User Accounts
! Creating Local User Accounts
! Authenticating Local User Accounts
SAM
User1User2User3
SAM
User1User2User3
SAM
User1User2User3
SAM
User1User2User3
Local user accounts, which are the only type of user accounts in a workgroup environment, are created on the computer on which they will be used, and enable the user to gain access to resources on that computer.
A local user account resides in a security account database, called the Security Account Manager (SAM), of the computer on which the user account is created. Because the local user account resides locally, it controls access only to local resources, which are those resources that reside on the local computer.
When a local user account is authenticated, it is authenticated against the credentials in the local SAM.
This course does not address the administration of user accounts. For more information about administering user accounts, see Module 1, “Introduction to Windows 2000 Administration” and Module 2, “Setting up User Accounts” of Course 2028A, Basic Administration of Microsoft Windows 2000.
Topic Objective To give an overview of the subtopics, and introduce the concept of a workgroup.
Lead-in A workgroup is a network in which computers share resources in a peer-to-peer configuration. User accounts are configured differently in a workgroup than in a domain.
Note

6 Module 5: Configuring Microsoft Windows XP Professional to Operate in Microsoft Networks
BETA MATERIALS FOR MICROSOFT CERTIFIED TRAINER PREPARATION PURPOSES ONLY
Creating Local User Accounts
In a workgroup environment, a local user account must be created on each computer to which the individual needs to gain access. To create a user account in a workgroup:
1. Click Start, right-click My Computer, and then click Manage. 2. In the Computer Management console, expand Local Users and Groups,
right-click Users, and then click New User. 3. On the New User page, enter the User Name, the Full Name (optional), and
then a Description (optional). The default account type is “Limited,” formerly known as a User account. Limited accounts have restricted privileges. If necessary, you can change the account type in Control Panel after creating the account.
4. Type a password, and then confirm the password.
Although a password is optional, you should always assign a password to accounts that you create to increase network security.
5. Select either User must change password at next logon (recommended), or User cannot change password, and then select Account is Disabled unless the user will begin using the account soon.
You can select or deselect the options mentioned in step 5, as well as disable or enable an account, by right-clicking a user in the details pane, and then clicking Properties.
6. Click Create.
Topic Objective To describe the steps necessary to create a user account in a workgroup.
Lead-in You create user accounts by using the Computer Management console in MMC.
Delivery Tip Demonstrate this process for creating users, and also demonstrate how to create users in Control Panel. Emphasize that when creating accounts in Control Panel, the default account type is an administrator account with no password, and that this type of account can pose a security risk.
Important
Key Points To increase security, require users to change their password at next logon, and disable any account that will not be used soon.
Note

Module 5: Configuring Microsoft Windows XP Professional to Operate in Microsoft Networks 7
BETA MATERIALS FOR MICROSOFT CERTIFIED TRAINER PREPARATION PURPOSES ONLY
Default User Account Types When a user account is created, it has a default account type. An account type determines what actions the user is able to perform on the computer. In a workgroup, the default account type depends on how you create the user. If the user account is created through Computer Management, the default account type is Restricted User. If the account is created in Control Panel, the default account type is Administrator, with no password. This account type can constitute a security risk; therefore all user accounts should be created through the Computer Management console.
Account Type Privileges Each account’s type is displayed beneath the account name on the Welcome screen. The three account types and their associated privileges are.
!" A Restricted user account (a member of the Users group) can:
• Change the picture associated with that user’s account
• Change the user’s own Password
• Remove the user’s own password !" A Standard user account (a member of the Power Users group) has the
same privileges as a Limited account user, and can also:
• Make basic changes to computer settings, such as display properties and power options.
!" A Computer Administrator account (a member of the Administrators group) has the same privileges as a Standard account user, and can also:
• Create, change, and delete accounts.
• Make computer-wide changes, and gain access to all files on the computer.
• Install all hardware and software.
Changing Account Types To change the account type of a local user account in a workgroup:
1. Click Start, click Control Panel, click User Accounts, and then click Change an account.
2. Click Change the account type, select an account type, and then click Change Account Type. The user account will appear with the new account type beneath the user name.

8 Module 5: Configuring Microsoft Windows XP Professional to Operate in Microsoft Networks
BETA MATERIALS FOR MICROSOFT CERTIFIED TRAINER PREPARATION PURPOSES ONLY
Authenticating Local User Accounts
Credentials sentCredentials sent SAM
User logs on locallyUser logs on locally11
33Access token
created
Access Token
Access Token
Logoninformation
compared
Logoninformation
compared22
When users log on to a local computer, the authentication process proceeds as follows:
1. The user provides a user name and a password, and Windows XP Professional forwards this information to the SAM of that local computer.
2. Windows XP Professional compares the logon information with the user information that is in the SAM.
3. If the information matches and the user account is valid, Windows XP Professional creates an access token for the user. An access token is the user’s identification for that local computer, and contains the user’s security settings. These security settings enable the user to gain access to the appropriate resources and perform specific system tasks.
In a workgroup, the user logs on to the local computer and is authenticated. When the user then needs to gain access to resources on another computer in the workgroup, that user’s credentials are sent to that computer. If the SAM on the other computer accepts the credentials, the user is authenticated, receives an access token, and can gain access to the resources on the computer. If the SAM does not accept the credentials, the user is prompted for valid credentials.
This workgroup authentication process requires that any change to a user account, such as a password change, be performed on each computer to which the user needs access.
Topic Objective To describe the authentication process for local accounts.
Lead-in When users log on locally, the SAM on the local computer authenticates their credentials.
Key Points Because each computer in a workgroup must authenticate users when they try to gain access to its resources, it is vital that any change to user accounts be made on each computer to which the users need access.
Module 5: Configuring Microsoft Windows XP Professional to Operate in Microsoft Networks 9
BETA MATERIALS FOR MICROSOFT CERTIFIED TRAINER PREPARATION PURPOSES ONLY
#### Configuring Local Security
! Introduction to Microsoft Management Console
! Creating a Customized Security Console
! Configuring Account Policies
! Configuring Local Policies
! Configuring Ctrl+Alt+Delete Options
Microsoft Management Console (MMC) enables you to gain access to administrative tools, and also to create custom consoles focused on particular tasks or computers, for example to create a console focused on local security. When you configure local security, you set policies on individual accounts and individual computers.
To configure local security, you must either gain access to pre-configured MMC consoles, such as the Computer Management console, or create customized consoles. Pre-configured consoles, which reside in the Administrative Tools folder, cannot be customized.
The Administrative Tools folder is not visible on the default Start menu by default. To make Administrative Tools visible on the Start Menu:
1. Right-click Start, and then click Properties. 2. On the Start Menu tab, ensure that Start Menu is selected, and then click
Customize. 3. On the Advanced tab of the Customize Start Menu property sheet, select
Administrative Tools, and then click OK twice.
The Classic Start Menu, which is the Start Menu available in previous versions of Windows, is available. To use the Classic Start Menu, open the Start Menu Properties sheet, and select Classic Start Menu.
Important security options can be configured by using a customized MMC console focused on local security. For example, Ctrl+Alt+Delete options can be configured to increase security.
Topic Objective To introduce the concept of local security, and how it is configured.
Lead-in When you configure Local Security, you set Group Policy settings on individual accounts and individual computers.
Delivery Tip Open the Administrative Tools folder, and discuss some of the pre-configured consoles and their purposes.
Note
10 Module 5: Configuring Microsoft Windows XP Professional to Operate in Microsoft Networks
BETA MATERIALS FOR MICROSOFT CERTIFIED TRAINER PREPARATION PURPOSES ONLY
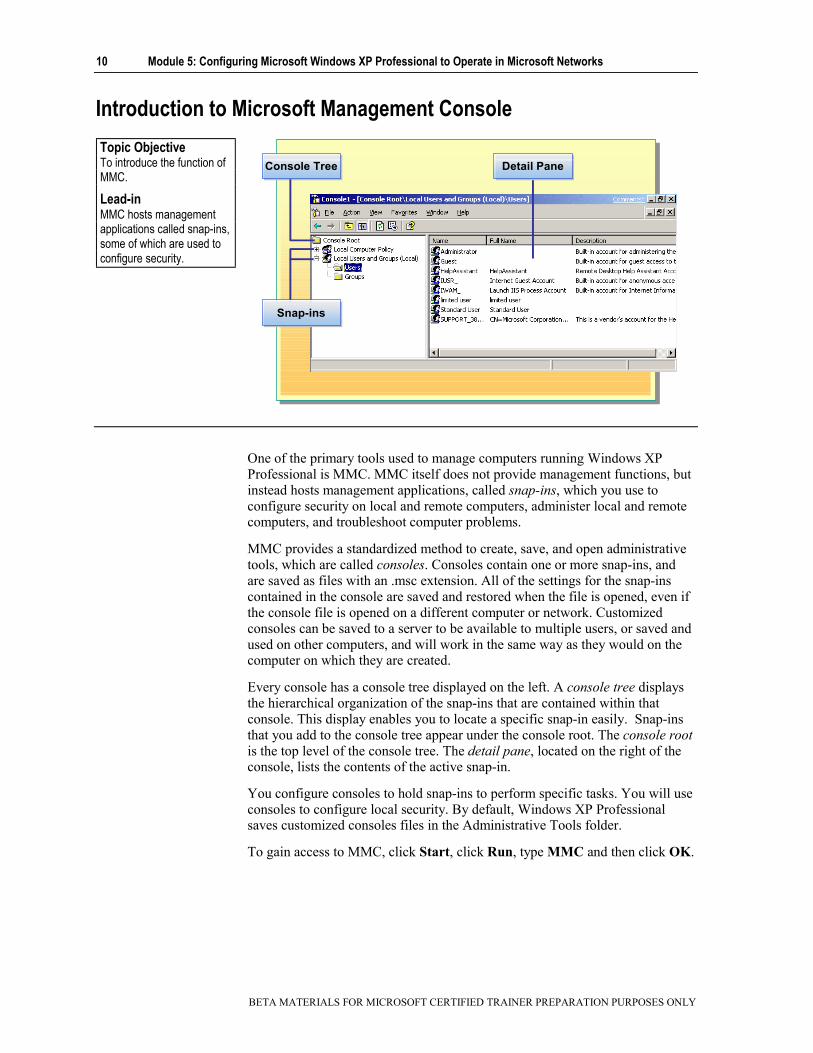
Introduction to Microsoft Management Console
Console TreeConsole Tree
Snap-insSnap-ins
Detail PaneDetail Pane
One of the primary tools used to manage computers running Windows XP Professional is MMC. MMC itself does not provide management functions, but instead hosts management applications, called snap-ins, which you use to configure security on local and remote computers, administer local and remote computers, and troubleshoot computer problems.
MMC provides a standardized method to create, save, and open administrative tools, which are called consoles. Consoles contain one or more snap-ins, and are saved as files with an .msc extension. All of the settings for the snap-ins contained in the console are saved and restored when the file is opened, even if the console file is opened on a different computer or network. Customized consoles can be saved to a server to be available to multiple users, or saved and used on other computers, and will work in the same way as they would on the computer on which they are created.
Every console has a console tree displayed on the left. A console tree displays the hierarchical organization of the snap-ins that are contained within that console. This display enables you to locate a specific snap-in easily. Snap-ins that you add to the console tree appear under the console root. The console root is the top level of the console tree. The detail pane, located on the right of the console, lists the contents of the active snap-in.
You configure consoles to hold snap-ins to perform specific tasks. You will use consoles to configure local security. By default, Windows XP Professional saves customized consoles files in the Administrative Tools folder.
To gain access to MMC, click Start, click Run, type MMC and then click OK.
Topic Objective To introduce the function of MMC.
Lead-in MMC hosts management applications called snap-ins, some of which are used to configure security.

Module 5: Configuring Microsoft Windows XP Professional to Operate in Microsoft Networks 11
BETA MATERIALS FOR MICROSOFT CERTIFIED TRAINER PREPARATION PURPOSES ONLY
Creating a Customized Security Console
Creating such a console enables you to open one tool to perform a variety of related tasks. To create a customized console, you add snap-ins and save the resulting console with a descriptive name.
To create a customized local security console:
1. Click Start, click Run, type mmc and then click OK. 2. On the File menu, click Add/Remove Snap-in. 3. In the Add/Remove Snap-in window, click Add. 4. In the Add Standalone Snap-in window, select Group Policy from the
alphabetized list, and then click Add. 5. In the Select Group Policy Object window, verify that Local Computer is
displayed, and then click Finish. The Group Policy snap-in, which enables you to configure computer and user settings, displays as Local Computer Policy in the console tree.
6. In the Add Standalone Snap-in window, select Local Users and Groups, and then click Add. You can use some snap-ins to manage a remote computer. When you select this type of snap-in, a dialog box appears in which you specify the computer that the snap-in will manage. Click Local computer or Another computer, type the name of the computer, and then click Finish.
Topic Objective To describe the process for creating a custom console from which security can be configured.
Lead-in To create a customized console focused on local security, you add the Group Policy and Local Users and Groups snap-ins.
For Your Information Adding the Local Users and Groups snap-in and the Group Policy snap-in to the same console enables you to create and manage users and groups in the same console, without needing to switch to the Computer Management console, which also contains this snap-in.

12 Module 5: Configuring Microsoft Windows XP Professional to Operate in Microsoft Networks
BETA MATERIALS FOR MICROSOFT CERTIFIED TRAINER PREPARATION PURPOSES ONLY
7. Close the Add Standalone Snap-in window. 8. In the Add/Remove Snap-in window, click OK. 9. On the File menu, click Save, type Local Security Console and then click
Save.
When you attempt to close the customized console that you have created, a message will ask “Save settings changes to console name?” Clicking Yes will save the console. Clicking No will not save the console, but any changes that you made to the settings will apply. Clicking Cancel will leave the console open without saving the console.
Important

Module 5: Configuring Microsoft Windows XP Professional to Operate in Microsoft Networks 13
BETA MATERIALS FOR MICROSOFT CERTIFIED TRAINER PREPARATION PURPOSES ONLY
Configuring Account Policies
The Group Policy snap-in contains Computer Configuration settings. All settings under Computer Configuration affect every user who logs on to the computer. One part of configuring computer security is configuring Account Policies on the computer. To gain access to Account Policies:
1. Open a saved console that includes the Group Policy snap-in. 2. Expand Local Computer Policy, expand Computer Configuration,
expand Windows Settings, expand Security Settings, and then expand Account Policies. Account Policies consists of Password Policy and Account Lockout Policy. Password Policy settings enable you to configure the criteria for passwords. Account Lockout Policy settings enable you to configure the criteria for and behavior of lockouts.
Topic Objective To describe the purpose of Account Policies, and how to configure them.
Lead-in The Computer Configuration node in the Group Policy snap-in contains settings that affect every user who logs on to the computer.
14 Module 5: Configuring Microsoft Windows XP Professional to Operate in Microsoft Networks
BETA MATERIALS FOR MICROSOFT CERTIFIED TRAINER PREPARATION PURPOSES ONLY
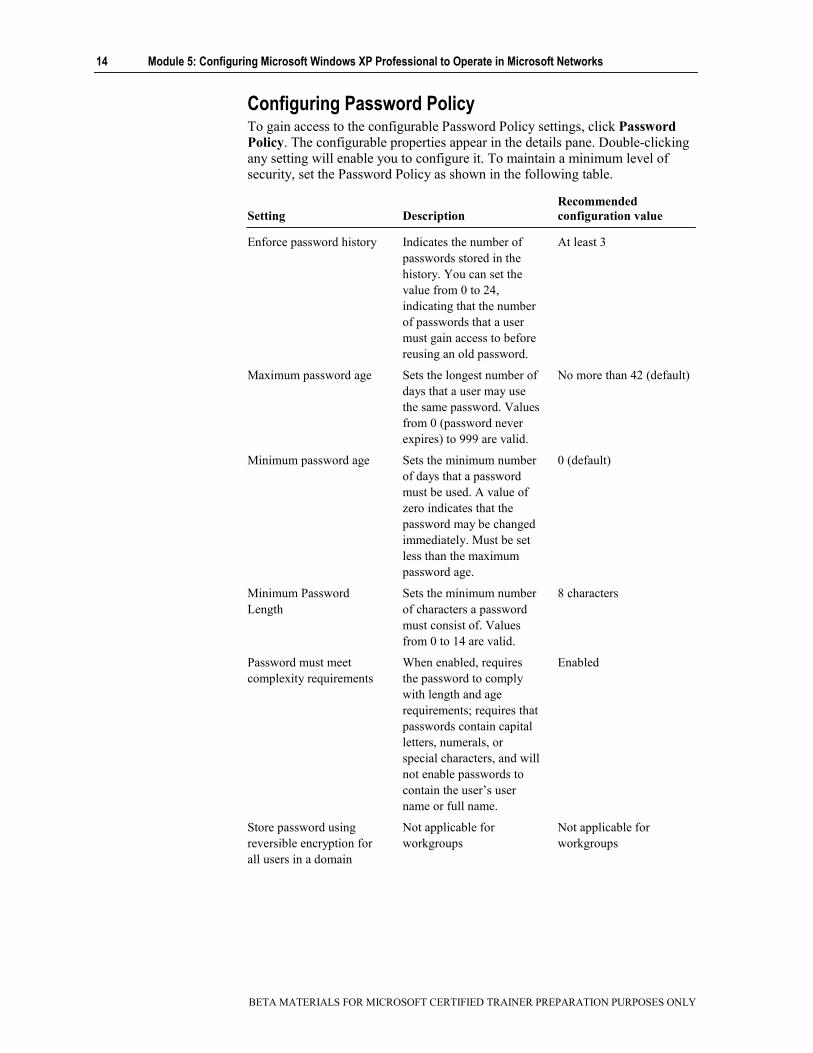
Configuring Password Policy To gain access to the configurable Password Policy settings, click Password Policy. The configurable properties appear in the details pane. Double-clicking any setting will enable you to configure it. To maintain a minimum level of security, set the Password Policy as shown in the following table.
Setting
Description
Recommended configuration value
Enforce password history Indicates the number of
passwords stored in the history. You can set the value from 0 to 24, indicating that the number of passwords that a user must gain access to before reusing an old password.
At least 3
Maximum password age Sets the longest number of days that a user may use the same password. Values from 0 (password never expires) to 999 are valid.
No more than 42 (default)
Minimum password age Sets the minimum number of days that a password must be used. A value of zero indicates that the password may be changed immediately. Must be set less than the maximum password age.
0 (default)
Minimum Password Length
Sets the minimum number of characters a password must consist of. Values from 0 to 14 are valid.
8 characters
Password must meet complexity requirements
When enabled, requires the password to comply with length and age requirements; requires that passwords contain capital letters, numerals, or special characters, and will not enable passwords to contain the user’s user name or full name.
Enabled
Store password using reversible encryption for all users in a domain
Not applicable for workgroups
Not applicable for workgroups

Module 5: Configuring Microsoft Windows XP Professional to Operate in Microsoft Networks 15
BETA MATERIALS FOR MICROSOFT CERTIFIED TRAINER PREPARATION PURPOSES ONLY
Configuring Account Lockout Policy To gain access to the configurable Account Lockout Policy settings, click Account Lockout Policy. The configurable properties appear in the details pane. Double-clicking any setting will enable you to configure it. To maintain a minimum level of security, set the Account Lockout Policy settings as shown in the following table.
Setting
Description
Recommended configuration value
Account lockout duration Indicates the number of
minutes the account is locked out. Values from 0 to 99999 (69.4 days) are valid. A value of 0 indicates that an account is locked out until reset by an administrator.
At least 30 minutes
Account lockout threshold Indicates the number of invalid logon attempts permitted before the user account is locked out. A value of 0 indicates that the account will not be locked out, despite the number of invalid attempts.
No more than 5
Reset account lockout counter after
Indicates the number of minutes to wait before resetting the account lockout counter.
At least 30 minutes
16 Module 5: Configuring Microsoft Windows XP Professional to Operate in Microsoft Networks
BETA MATERIALS FOR MICROSOFT CERTIFIED TRAINER PREPARATION PURPOSES ONLY
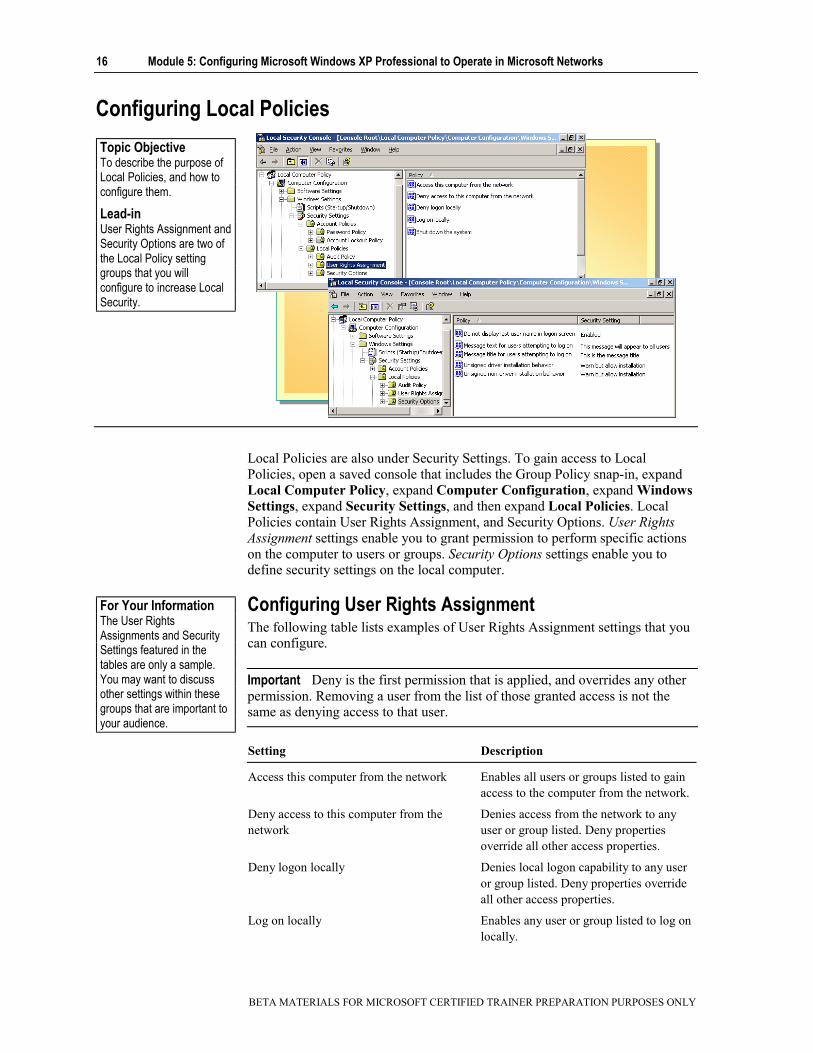
Configuring Local Policies
Local Policies are also under Security Settings. To gain access to Local Policies, open a saved console that includes the Group Policy snap-in, expand Local Computer Policy, expand Computer Configuration, expand Windows Settings, expand Security Settings, and then expand Local Policies. Local Policies contain User Rights Assignment, and Security Options. User Rights Assignment settings enable you to grant permission to perform specific actions on the computer to users or groups. Security Options settings enable you to define security settings on the local computer.
Configuring User Rights Assignment The following table lists examples of User Rights Assignment settings that you can configure.
Deny is the first permission that is applied, and overrides any other permission. Removing a user from the list of those granted access is not the same as denying access to that user.
Setting Description Access this computer from the network Enables all users or groups listed to gain
access to the computer from the network.
Deny access to this computer from the network
Denies access from the network to any user or group listed. Deny properties override all other access properties.
Deny logon locally Denies local logon capability to any user or group listed. Deny properties override all other access properties.
Log on locally Enables any user or group listed to log on locally.
Topic Objective To describe the purpose of Local Policies, and how to configure them.
Lead-in User Rights Assignment and Security Options are two of the Local Policy setting groups that you will configure to increase Local Security.
For Your Information The User Rights Assignments and Security Settings featured in the tables are only a sample. You may want to discuss other settings within these groups that are important to your audience.
Important

Module 5: Configuring Microsoft Windows XP Professional to Operate in Microsoft Networks 17
BETA MATERIALS FOR MICROSOFT CERTIFIED TRAINER PREPARATION PURPOSES ONLY
Configuring Security Options The following table lists some of the settings important to local security.
Setting Description Recommended value Interactive logon: Do not display last user name
Indicates whether or not a previous user’s name is shown on the logon screen.
Enabled
Interactive logon: Message text for users attempting to log on
When enabled, displays a message box with the specified text.
Enabled if needed.
Interactive logon: Message title for users attempting to log on
When enabled, supplies a title for a message displayed to users.
Enabled when displaying any message text at logon.
Devices: Unsigned driver installation behavior
Indicates computer behavior when a user attempts to install an unsigned driver.
Warn, but allow installation.
Key Points Unsigned means the origin of the driver or other software cannot be determined.

18 Module 5: Configuring Microsoft Windows XP Professional to Operate in Microsoft Networks
BETA MATERIALS FOR MICROSOFT CERTIFIED TRAINER PREPARATION PURPOSES ONLY
Configuring Ctrl+Alt+Del Options
Changes to settings under User Configuration affect users or groups of users on the local computer. In a domain, User Configuration affects users or groups of users on any computer that they log on to. User Configuration usually consists of Software Settings, Windows Settings, and Administrative Templates; however, this can change if additional snap-ins or extensions are added. The setting groups that are located under Administrative Templates enable you to configure security settings for specific areas.
Each setting under Administrative Template has an Explain tab that provides information about the setting. Each setting can be set to Not Configured, Enabled, or Disabled, but is set to Not Configured by default.
To gain access to the Ctrl+Alt+Del options, open a customized console that contains the Local Computer Policy snap-in. Expand Local Computer Policy, expand User Configuration, expand Administrative Templates, expand System, and then click Ctrl+Alt+Del Options. The following table lists the possible settings.
Setting Description Use this setting when Remove Task Manager
If this setting is enabled and users try to open Task Manager, a message appears explaining that a policy prevents the action.
You do not want users to start and stop programs by using Task Manager, monitor the performance of their computers, find the executable names of programs, or change the priority of the process in which programs run.
Remove Lock Computer
Prevents users from locking their computer. When a user locks a computer, only the user or an administrator can unlock it.
You do not want users to lock a computer; for example, when multiple people may need to use a single computer.
Topic Objective To describe the process for configuring the Ctrl+Alt+Del security template options.
Lead-in To gain access to the Ctrl+Alt+Del options, open a customized console that contains the Local Computer Policy snap-in.
Note

Module 5: Configuring Microsoft Windows XP Professional to Operate in Microsoft Networks 19
BETA MATERIALS FOR MICROSOFT CERTIFIED TRAINER PREPARATION PURPOSES ONLY
(continued) Setting Description Use this setting when Remove Change Password
Prevents users from changing their Windows password on demand. However, users can change their passwords when prompted by the system.
You do not want users to change their passwords other than at specified times.
Remove Logoff Prevents the user from logging off from Windows XP Professional.
Logging off would keep users from gaining access to necessary programs. For example, when a computer is set up as a kiosk on which many people need access to particular programs, and do not need to log on to do so.

20 Module 5: Configuring Microsoft Windows XP Professional to Operate in Microsoft Networks
BETA MATERIALS FOR MICROSOFT CERTIFIED TRAINER PREPARATION PURPOSES ONLY
Configuring Logon Options in a Workgroup
! Changing the Welcome Screen
! Enabling Fast User Switching
The Welcome Screen and Fast User Switching are two logon options available in a workgroup environment.
Changing the Welcome Screen The default Welcome screen provides a quick and easy method for users to log on by enabling them to select their user accounts and immediately type their passwords. This default screen displays all of the valid user accounts that have been created on the local computer. The user icons in front of each account can be replaced by an actual picture of the user, or by another image file. By default, the Administrator account is one of the accounts displayed on the Welcome screen. However, when another account is granted administrator privileges, the Administrator account will no longer appear.
You can change the Welcome screen to require users to press the CTRL+ALT+DELETE keys to display the Welcome to Windows dialog box. The user is then required to type a valid user name and password. This option displays only the user name of the last user to log on in the dialog box. To change the Welcome screen, open Control Panel, and then click User Accounts. Click Change the way users log on or off, and then clear the Use the Welcome Screen check box.
Topic Objective To describe the processes for configuring logon options.
Lead-in Windows XP Professional provides logon options not previously available in Microsoft Windows.
Module 5: Configuring Microsoft Windows XP Professional to Operate in Microsoft Networks 21
BETA MATERIALS FOR MICROSOFT CERTIFIED TRAINER PREPARATION PURPOSES ONLY
Enabling Fast User Switching The Fast User Switching option enables users to switch between user accounts without closing programs or logging off, and is enabled by default. For example, the ability to change user accounts without logging off enables users who need to perform administrative functions to gain access to the Administrator account (or another account with administrative privileges), perform the administrative function, and then return to their own accounts without having to shut down programs or log off.
While the Fast User Switching option enables multiple users to be simultaneously logged on and running programs, the performance of the computer will be dependent on the speed of the computer and the amount of memory available.
When the Fast User Switching option is enabled, the user will see three options in the Log Off Windows dialog box: Log Off, Switch User, and Cancel. The Switch User button can be used to switch to another logged on user account, or to log on an additional user. When the Fast User Switching option is disabled, the Switch User button does not appear. Fast User Switching also adds an additional tab in the Windows Task Manager. On this tab, labeled Users, users can log off, and users with administrative privileges can log off themselves or other users.
To disable Fast User Switching:
1. Click Start, click Control Panel, double-click User Accounts and then click Change the way users log on or off.
2. Clear the Use Fast User Switching check box, and then click Apply options.
Fast User Switching is available only when the Use the Welcome Screen feature is enabled; therefore, disabling the Use Welcome Screen for fast and easy logon option also disables the Fast User Switching option.
Note

22 Module 5: Configuring Microsoft Windows XP Professional to Operate in Microsoft Networks
BETA MATERIALS FOR MICROSOFT CERTIFIED TRAINER PREPARATION PURPOSES ONLY
####Configuring Networking Options in a Workgroup
! Configuring Internet Connection Sharing
! Configuring Network Information
! Enabling ICS and Internet Connection Firewalls
In a workgroup environment, you must configure networking options to share Internet connections, files, or printers, and protect your network from outside tampering by using an Internet connection firewall. You configure networking options in a workgroup by using the Network Setup Wizard. The Network Setup Wizard configures Internet Connection Sharing (ICS), which enables you to share a single internet connection among all the computers on your network. In a workgroup environment, you must run the Network Setup Wizard before you can configure the following options:
!" Internet Connection Firewall (ICF). Enables you to use one computer to secure your entire network and protect your Internet connection.
!" Folder Sharing. Enables users on the network to gain access to files stored on other computers on the network.
!" Printer Sharing. Enables users on the network to gain access to printers on the network.
Before you use the Network Setup Wizard to configure ICS, you should first complete the Home and Small Network Setup checklist. To gain access to the wizard and the checklist:
1. Click Start, click Control Panel, click Network and Internet Connections, and then click Setup or change your home or small office network.
2. On the Welcome page of the Network Setup Wizard, click Next, and then click Checklist for creating a network. The Home and Small Network Setup checklist contains a list of tasks to complete before running the wizard, and links to references that can help you complete the tasks.
3. Complete the checklist, and then click Network Setup Wizard to return to the wizard.
Topic Objective To give an overview of the subtopics, and introduce the concept of workgroup network configuration.
Lead-in When you are using a workgroup configuration, you must run the Network Setup Wizard to enable computers on the network to share files, printers, and Internet connections.
Key Points You must run the Network Setup Wizard before you can enable file or print sharing, Internet connection sharing, or an Internet connection firewall.
Module 5: Configuring Microsoft Windows XP Professional to Operate in Microsoft Networks 23
BETA MATERIALS FOR MICROSOFT CERTIFIED TRAINER PREPARATION PURPOSES ONLY
Configuring Connection Sharing
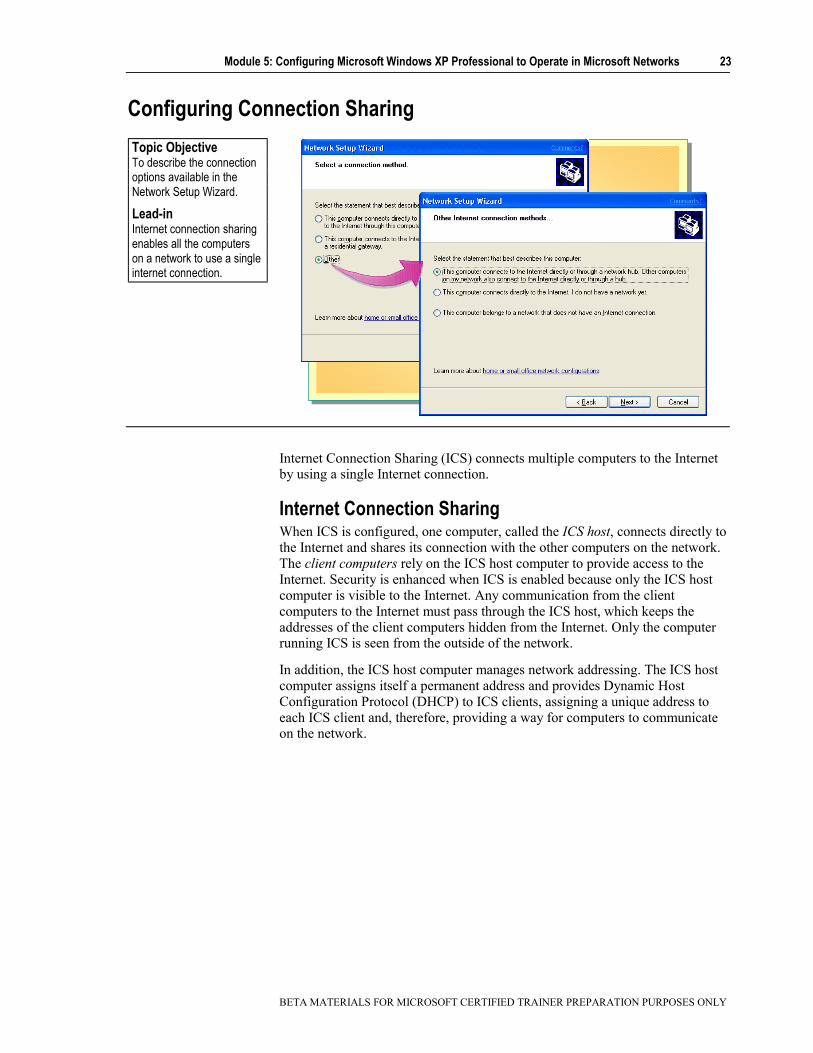
Internet Connection Sharing (ICS) connects multiple computers to the Internet by using a single Internet connection.
Internet Connection Sharing When ICS is configured, one computer, called the ICS host, connects directly to the Internet and shares its connection with the other computers on the network. The client computers rely on the ICS host computer to provide access to the Internet. Security is enhanced when ICS is enabled because only the ICS host computer is visible to the Internet. Any communication from the client computers to the Internet must pass through the ICS host, which keeps the addresses of the client computers hidden from the Internet. Only the computer running ICS is seen from the outside of the network.
In addition, the ICS host computer manages network addressing. The ICS host computer assigns itself a permanent address and provides Dynamic Host Configuration Protocol (DHCP) to ICS clients, assigning a unique address to each ICS client and, therefore, providing a way for computers to communicate on the network.
Topic Objective To describe the connection options available in the Network Setup Wizard.
Lead-in Internet connection sharing enables all the computers on a network to use a single internet connection.

24 Module 5: Configuring Microsoft Windows XP Professional to Operate in Microsoft Networks
BETA MATERIALS FOR MICROSOFT CERTIFIED TRAINER PREPARATION PURPOSES ONLY
ICS Connection Types The Network Setup Wizard must be run on each computer that is a part of your workgroup. When you run the wizard, you can choose whether the computer should be the ICS host or a client computer. The options include:
!" This computer connects directly to the Internet. The other computers on my network connect to the Internet through this computer This configuration designates the computer as the ICS host. When the Network Setup Wizard is run, it detects if there are multiple network adapters installed in the computer. It then asks if you want to create the Network Bridge. Network adapters that are connected to the Internet, such as an Ethernet adapter connected to an external DSL or cable modem, should not be added to the Network Bridge.
• Network Bridge Network Bridge simplifies the setup and configuration of small networks that consist of mixed network media types, such as Ethernet, home phone line network adapters (HPNA), wireless, and IEEE 1394 devices. Each media type is its own network segment. You can create a single subnet for the entire home or small office network by using Network Bridge across mixed media segments. Network Bridge offers increased flexibility by allowing a mixture of media types and by automating the difficult configurations that are normally associated with mixed media networks.
!" This computer connects to the Internet through another computer on my network or through a residential gateway This configuration designates the computer as a client of the ICS host or a residential gateway. A residential gateway is a hardware device that works similarly to a host computer. Typically, a DSL or cable modem is connected to the residential gateway, which is connected to an Ethernet hub. By using this configuration, the computer can send and receive e-mail and gain access to the Web as if it were connected directly to the Internet.
• ICS Discovery and Control ICS Discovery and Control provides a method that allows ICS clients remote access to information about the network’s Internet connection. ICS Discovery and Control uses Universal Plug and Play (UPnP). ICS clients can discover the ICS host, control the connection status of the ICS host to the Internet service provider (ISP), and view basic statistical information about the Internet connection.

Module 5: Configuring Microsoft Windows XP Professional to Operate in Microsoft Networks 25
BETA MATERIALS FOR MICROSOFT CERTIFIED TRAINER PREPARATION PURPOSES ONLY
Non-ICS Connection Types If you choose the Other option, you are offered three connection options that do not use ICS:
!" This computer connects to the Internet directly or through a network hub. Other computers on my network also connect to the Internet directly or through a hub Select this option when each computer on the network has a direct connection to the Internet by way of a network hub and a DSL or cable modem connection. This network configuration typically has an external DSL or cable modem connected to an Ethernet network hub.
The preceding option is not a recommended network configuration. It exposes all computers on the network directly to the Internet, creating potential security problems. It is recommended that there be a secure host device, such as a computer running Windows XP with ICS and Internet Connection Firewall enabled.
If you are using this non-ICS configuration for your home or small office network, it is recommended that you disable file and print sharing on the TCP/IP protocol and enable it on the IPX/SPX protocol. If you share files and folders on your computers that use the TCP/IP protocol, they could be seen on the Internet. Enable only IPX/SPX for file and printer sharing if you are using this network configuration for your home or small office.
!" This computer connects directly to the Internet. I do not have a network yet Select this option if you have only one computer and it has an Internet connection. The Network Setup Wizard configures this computer to use the Internet Connection Firewall to protect your computer from intrusions from the Internet.
!" This computer belongs to a network that does not have an Internet connection Select this option if you have two or more computers on a network and none of them has an Internet connection. If you have different network adapter types, such as Ethernet, home phone line network adapters (HPNA), or wireless installed in your computer running Windows XP, the Network Setup Wizard can create a network bridge to enable all of the computers in your network to communicate.
Important

26 Module 5: Configuring Microsoft Windows XP Professional to Operate in Microsoft Networks
BETA MATERIALS FOR MICROSOFT CERTIFIED TRAINER PREPARATION PURPOSES ONLY
Configuring Network Settings
After configuring the computer’s connection method, you must identify the computer by giving it a description and a name. Then you must name your workgroup. Finally, you must apply the network settings that you have configured.
Computer Name A computer name identifies your computer on the network. To participate in the network, each computer must have a unique name. If two computers have the same name, it creates a conflict for network communications. When choosing a computer name, it is suggested that you keep it short and simple, such as ICS host, or family room.
Some Internet service providers (ISPs) require that you use a specific computer name. The computer name identifies the computer to the ISP's network and is used to validate your Internet account. Check with your ISP to see if it requires a specific computer name. If so, do not change the computer name that has been provided by your ISP.
The computer name is limited to fifteen characters and cannot contain spaces or any of the following special characters: ; : " < > * + = \ | ? ,
Computer Description The computer description is a short explanation of the computer. For example, you may want to have a description such as “ICS host” or “Lobby Computer.” If your network uses a combination of Windows operating systems, such as Windows XP, Microsoft Windows Millennium Edition, and Microsoft Windows 98, the computer description is displayed only on Windows XP.
Topic Objective To describe the computer and workgroup names that must be configured.
Lead-in Each computer in a workgroup must have a unique computer name, and every computer on the network must share the same workgroup name.
Module 5: Configuring Microsoft Windows XP Professional to Operate in Microsoft Networks 27
BETA MATERIALS FOR MICROSOFT CERTIFIED TRAINER PREPARATION PURPOSES ONLY
Workgroup Name You identify your network by naming the workgroup. All computers on the network should have the same workgroup name. You specify a computer’s workgroup name on the Computer Name tab in the My Computer property sheet.
Applying Network Settings After you have configured the computer and workgroup settings, you will see the Ready to apply network settings page. Confirm that the information on this page is correct, and then click Next. If the network setting information is incorrect, click Back to modify the settings, and then complete the wizard.

28 Module 5: Configuring Microsoft Windows XP Professional to Operate in Microsoft Networks
BETA MATERIALS FOR MICROSOFT CERTIFIED TRAINER PREPARATION PURPOSES ONLY
Enabling ICS and Internet Connection Firewalls
After you have completed the Network Setup Wizard, you can enable ICS and an Internet Connection Firewall (ICF).
You can also enable Internet users to be able to gain access to services and programs running on the network through the ICF or the ICS.
Internet Connection Firewall Windows XP provides the added security of firewall protection to small networks that are connected to the Internet. A firewall checks all communications that cross the connection between the Internet and your computer and selects which information is received. Internet Connection Firewall protects the computer by allowing or denying communications that are addressed to the computer from the Internet.
In most home or small office networks, ICF will be set up on the ICS host computer; however, the firewall can be enabled on any Internet connection.
For the ICF, you can specify security logging of Internet users that are gaining access to services and programs. You can also configure how to handle Internet Control Message Protocol (ICMP) traffic that is sent to the computer running ICF.
Topic Objective To describe the process for configuring ICS and ICF.
Lead-in You must enable ICS and ICF to protect your computer.

Module 5: Configuring Microsoft Windows XP Professional to Operate in Microsoft Networks 29
BETA MATERIALS FOR MICROSOFT CERTIFIED TRAINER PREPARATION PURPOSES ONLY
Enabling ICS and ICF To enable ICS and ICF:
1. Click Start, click Control Panel, click Network and Internet Connections, and then click Network Connections.
2. Right-click the connection for which you want to enable ICS and ICF, and then click Properties.
3. On the Advanced tab, select the check box under Internet Connection Firewall, and then select the check box under Internet Connection Sharing.
4. If you want to further configure ICS or ICF, click Settings, select the desired options, and then click OK twice.

30 Module 5: Configuring Microsoft Windows XP Professional to Operate in Microsoft Networks
BETA MATERIALS FOR MICROSOFT CERTIFIED TRAINER PREPARATION PURPOSES ONLY
Lab 5A:Operating in a Workgroup
Objectives After completing this lab, you will be able to:
!" Join a workgroup. !" Manage computers running Windows XP Professional operating in a
workgroup. !" Configure classic Windows Logon and Fast User Switching. !" Configure Local Security settings.
Prerequisites Before working on this lab, you must have:
!" Completed Lab 1C Upgrading Windows 98 to Windows XP Professional. !" A computer running Windows XP Professional operating in a workgroup. !" Experience using the Windows XP Professional interface.
Lab Setup To complete this lab, you need a computer running Windows XP Professional that is a member of a workgroup.
The Instructor will assign pairs of students to work in the same workgroup.
Estimated time to complete this lab: 45 minutes
Topic Objective To introduce the lab.
Lead-in In this lab, you will join a workgroup, manage computers running in a workgroup, configure logon options and fast user switching, and configure local security.

Module 5: Configuring Microsoft Windows XP Professional to Operate in Microsoft Networks 31
BETA MATERIALS FOR MICROSOFT CERTIFIED TRAINER PREPARATION PURPOSES ONLY
Joining a Domain
Joining a Domain Requires:
! A Domain Name
! A Pre-existing Computer Account or the Permissiont to Create a Domain Computer Account
! An Available Domain Controller and a Server Running the DNS Service
A computer in a workgroup, or a standalone computer, may easily be joined to an available domain. Joining a domain enables users with domain user accounts to gain access to the resources contained on that domain. Joining a domain also makes the computer and users subject to Group Policy, Account Policies, and security settings configured for the domain. Joining a domain requires the following:
!" A domain name. You must have the exact name of the domain to which you want to join the computer.
!" A computer account. Before a computer can join a domain, it must have an account in the domain. A domain administrator can create the account by using the unique computer name, or you may create the account during installation if you have appropriate privileges. If you create the account during installation, Setup prompts you for the name and password of a user account that has the authority to add domain computer accounts.
!" An available domain controller and a server running the DNS server software (called the DNS server). At least one domain controller on the domain that you are joining and one DNS server must be online when you install a computer in the domain.
Topic Objective To describe the requirements for, and the effects of, joining a domain.
Lead-in Joining a computer to a domain enables users with domain user accounts to gain access to the resources contained on that domain.

32 Module 5: Configuring Microsoft Windows XP Professional to Operate in Microsoft Networks
BETA MATERIALS FOR MICROSOFT CERTIFIED TRAINER PREPARATION PURPOSES ONLY
To join a domain, perform these actions:
1. Click Start, right-click My Computer, and then click Properties. 2. On the Computer Name tab, click Change. 3. On the Computer Name Changes page, select Domain, enter the name of
the domain, and then click OK. 4. If prompted, enter the name and password of a user account that has the
authority to create domain computer accounts, and then click OK. 5. When a message appears welcoming you to the domain, click OK, and then
click OK in the message stating that you must restart the computer. 6. Restart the computer for the change to take effect.
After joining a domain, the user, group, and account policies configured for the domain will always supersede policies configured on the local computer.

Module 5: Configuring Microsoft Windows XP Professional to Operate in Microsoft Networks 33
BETA MATERIALS FOR MICROSOFT CERTIFIED TRAINER PREPARATION PURPOSES ONLY
Operating in a Domain
! Domain Computer Accounts
! User Authentication in a Domain
! Cached Credentials
! Security Identifiers and Access Control Entries
! Group Policy and Security Settings
To join a domain, a computer must have a unique domain computer account. Additionally, user authentication and security are handled differently than in workgroup.
Domain Computer Accounts Without a domain computer account, a user cannot use the computer to log on to the domain, even if the user has a valid domain user account.
Users have the choice of logging on to the local computer, or logging on to a domain of which the computer is a member. Because of the choice of where to log on, the Welcome screen that you see in a workgroup is not available in a domain. Users must press CTRL+ALT+DELETE to display the Welcome to Windows dialog box. The user is required to enter a valid user name and password, and then choose whether to log on to the local computer or a domain.
Because the Welcome screen is not available in a domain, Fast User Switching is also unavailable in a domain.
User Authentication in a Domain When users log on to a Windows 2000 domain, their credentials are checked against the domain security subsystem, which is the Active Directory database. Active Directory stores all of the credential information for computer and user accounts in the domain, and also other security information. Because users’ credentials are authenticated against this centralized database, users in a domain can log on from any computer in the domain, except those computers on which they are specifically denied access.
Topic Objective To describe how joining a domain affects the operation of the computer.
Lead-in When a computer is connected to a domain, certain aspects of its operation differ from when it is in a workgroup or operating as a stand-alone computer.
Ensure that students understand the difference between a domain user account and a domain computer account.
Note

34 Module 5: Configuring Microsoft Windows XP Professional to Operate in Microsoft Networks
BETA MATERIALS FOR MICROSOFT CERTIFIED TRAINER PREPARATION PURPOSES ONLY
Cached Credentials When users that have domain user accounts log on to a computer, a copy of their credentials are cached in a secure area of the local computer’s registry. These cached credentials are used to enable the user to log on to the computer if Active Directory is not available to authenticate the user. The unavailability of Active Directory may occur when the domain controller is offline, there are other network problems, or the computer is not connected to the network, for example when mobile users travel.
Security Identifiers and Access Control Entries Each time that a computer or user account is created in a domain or on a local computer, it is assigned a unique security identifier (SID). In networks running Windows XP Professional and Windows 2000, operating system internal processes refer to an account’s SID rather than to the account's user or group name.
Each directory object, or resource, is protected by access control entries (ACEs) that identify which users or groups can gain access to that object. An ACE is created for an object by granting permissions to a shared resource. Each ACE contains the SID of each user or group who has permission to gain access to that object and defines what level of access is allowed. For example, a user might have read-only access to one set of files, read-and-write access to another set of files, and no access to still another set of files.
When a user that has a valid user name and password logs on locally, the user account’s credentials are checked against the local SAM, the account is authenticated, and receives an access token. When a user on the same computer logs on to a domain, the user’s credentials are authenticated through Active Directory. When the user then attempts to gain access to any resource, the user account’s SID is used to verify permissions.
A computer account’s SID is verified when the computer attempts to establish a connection with a domain resource.
A user could possibly have a local user account and a domain user account that have the same user names and passwords. However, because a SID is created for each account, the SIDs for the two accounts would be different.
Users who log on to the local computer may still gain access to domain resources, but each time they try to gain access to a domain resource, they will be prompted for a valid domain user name and password. Entering this information does not enable users to log on to the domain, but instead establishes a session with the server on which the resource resides. Users will then be able to gain access to resources on that particular server, but will have to reenter their user names and passwords if they try to gain access to resources on another server.
Key Points When a user logs on locally and then gains access to domain resources, the user is not logging on to the domain. Therefore, account changes that take place at logon do not occur.

Module 5: Configuring Microsoft Windows XP Professional to Operate in Microsoft Networks 35
BETA MATERIALS FOR MICROSOFT CERTIFIED TRAINER PREPARATION PURPOSES ONLY
Group Policy and Security Settings Remember that when you install the Group Policy snap-in on a local computer, it displays as Local Computer Policy, which contains both Computer Configuration and User Configuration. In a domain, the Group Policy snap-in displays as Group Policy, and also has the Computer Configuration and User Configuration sub-sections. Domain administrators control Group Policy for the domain, and Group Policy for the domain overrides Local Computer Policy.
When changes are made to domain's Computer Configuration settings, the changes affect all computers on the domain. Those changes take effect the next time each computer is restarted, or, if a computer is not restarted, the Computer Configuration settings are automatically disseminated to computers on the domain every eight hours. Similarly, changes to User Configuration settings take effect the next time each user logs on, or, if a user does not log on, the User Configuration changes are pushed out to all user accounts on the domain every 24 hours.

36 Module 5: Configuring Microsoft Windows XP Professional to Operate in Microsoft Networks
BETA MATERIALS FOR MICROSOFT CERTIFIED TRAINER PREPARATION PURPOSES ONLY
Lab 5B: Operating in a Domain
Objectives After completing this lab, you will be able to:
!" Configure a computer running Windows XP Professional to join a domain. !" Explain the process of using cached credentials during logon if network
connectivity is lost. !" Understand the effects of Group Policy on the local computer.
Prerequisites !" Completed Lab 1C Upgrading Windows 98 to Windows XP Professional. !" Completed Lab 5A: Operating in a Workgroup. !" Before working on this lab, you must have knowledge about the difference
between a workgroup and a domain.
Topic Objective To introduce the lab.
Lead-in In this lab, you will configure a computer running Windows XP Professional to join a domain, and observe the effects on the computer of joining a domain.

Module 5: Configuring Microsoft Windows XP Professional to Operate in Microsoft Networks 37
BETA MATERIALS FOR MICROSOFT CERTIFIED TRAINER PREPARATION PURPOSES ONLY
Lab Setup To complete this lab, you need the following:
!" A computer running Windows XP Professional in a workgroup. !" Student computers with access to a computer running Windows 2000 Server
configured as a primary domain controller. !" The PDC requires 24 users created by using the naming convention
DomUserxxx (where xxx is the first three letters of the computer name). !" The PDC with an organizational unit named Lab5b Computers created.
• The Organizational Unit will require a Group Policy setting created. Under Computer Configuration, Windows Settings, Security Settings, Security Options. Configure Message Text for users attempting to log on. The text should be: This is the Corporate Security Policy. Configure Message Title for users attempting to log on. The title should be: Corporate Security Policy
!" The instructor will need to use Active Directory Users and Computers to move student computers from the Computers group to the Lab5b Computers OU prior to starting Exercise 2.
!" After students complete Exercise 2, the instructor should move the computers from the Lab5b Computers OU to the Computers group.
Estimated time to complete this lab: 45 minutes

38 Module 5: Configuring Microsoft Windows XP Professional to Operate in Microsoft Networks
BETA MATERIALS FOR MICROSOFT CERTIFIED TRAINER PREPARATION PURPOSES ONLY
Review
! Examining Workgroups and User Accounts
! Creating and Authenticating Local Accounts
! Configuring Local Security
! Configuring Logon Options in a Workgroup
! Configuring Networking Options in a Workgroup
! Joining a Domain
! Operating in a Domain
1. A team in your building has requested that you set up a user account for a temporary employee. The team uses a workgroup, and the employee will need access to shared files on other computers. When the employee logs on to her workstation, she can gain access to local files, but cannot gain access to any of the shared resources. What is the cause, and what is the solution? You did not create user accounts for the employee on the computers where the resources reside. The solution is to ensure that each computer to which she needs access has a valid local user account with the same user name and password.
2. Under what circumstances should you create a password for a new account? Under what circumstances should you disable a user account when you create it? To increase security, you should always create a password for user accounts. Disable the user account when it will not be used immediately. Disabling unused accounts prevents their being misused.
3. What is the authentication process for local user accounts? The user logs on by providing a user name and a password, and Windows XP Professional forwards this information to the Security Accounts Manager (SAM) of that local computer. Windows XP Professional compares the logon information with the user information that is in the SAM. If the information matches and the user account is valid, Windows XP Professional creates an access token for the user.
Topic Objective To reinforce module objectives by reviewing key points.
Lead-in The review topics cover some of the key topics taught in the module.

Module 5: Configuring Microsoft Windows XP Professional to Operate in Microsoft Networks 39
BETA MATERIALS FOR MICROSOFT CERTIFIED TRAINER PREPARATION PURPOSES ONLY
4. What is the purpose of MMC, and what is its function in configuring local security? MMC provides a standardized method to create, save, and open administrative tools, which are called consoles. MMC itself does not provide management functions, but instead hosts management applications, called snap-ins. Consoles contain one or more snap-ins, and are saved as files with an .msc extension. To configure local security, you must use MMC to add the Group Policy snap-in to a console.
5. A user, who has a domain user account, is frustrated because although he is logged on, every time he tries to gain access to a resource on a server, he is prompted for his user name and password. What is the likely cause of his problem, and why does the problem occur? He may have logged on to the local computer, rather than onto the domain. This is especially likely if his local and domain user accounts have the same user names and passwords. Although the user name and passwords are the same, the accounts have different SIDs.
6. Your supervisor has asked you to address a problem in a department, which is set up as a workgroup. The manager has determined that having the user names of each user account displayed on the Welcome screen is a security risk. What is your solution, and are there any ramifications to the solution? You can change the Welcome screen to require users to press CTRL+ALT+DELETE to display the Log On to Windows dialog box, which eliminates the display of user accounts on the Welcome screen. However, this change also disables Fast User Switching. You may also configure the login screen to not display the last user to log in.
7. The advertising department’s computers were in a workgroup, and at logon, the computers displayed the department’s mission statement. Last night, you joined the department’s computers to the nation-wide company domain. This morning, the company’s security policy displayed when the advertising department users logged on. What caused the change in display at logon? The domain Group Policy has different Security Options configured, and that Group Policy setting overrides the Local Computer Policy. Specifically, the Message text for users attempting to logon domain security option contains the company security policy.

THIS PAGE INTENTIONALLY LEFT BLANK