Mixed Bouquet Instructions FREE pattern FINAL...
7
Transcript of Mixed Bouquet Instructions FREE pattern FINAL...

Mixed BouquetMixed BouquetMixed BouquetMixed BouquetMixed BouquetMixed BouquetMixed BouquetMixed BouquetMixed BouquetMixed BouquetMixed BouquetMixed BouquetMixed BouquetMixed BouquetMixed BouquetMixed BouquetMixed BouquetMixed BouquetMixed BouquetMixed BouquetMixed BouquetMixed BouquetMixed BouquetMixed BouquetMixed BouquetMixed BouquetMixed BouquetMixed BouquetMixed BouquetMixed BouquetMixed BouquetMixed BouquetMixed BouquetMixed BouquetMixed BouquetMixed BouquetMixed BouquetMixed BouquetMixed BouquetMixed BouquetMixed BouquetMixed BouquetMixed BouquetMixed BouquetMixed BouquetMixed BouquetMixed BouquetMixed BouquetMixed BouquetMixed BouquetMixed BouquetMixed BouquetMixed BouquetMixed BouquetMixed BouquetMixed BouquetMixed BouquetMixed BouquetMixed BouquetMixed BouquetMixed BouquetMixed BouquetMixed BouquetMixed BouquetMixed BouquetMixed BouquetMixed BouquetMixed BouquetMixed BouquetMixed BouquetMixed BouquetMixed BouquetMixed BouquetMixed BouquetMixed BouquetMixed BouquetMixed BouquetMixed BouquetMixed BouquetMixed BouquetMixed BouquetMixed BouquetMixed BouquetMixed BouquetMixed BouquetMixed BouquetMixed BouquetMixed BouquetMixed BouquetMixed BouquetMixed BouquetMixed BouquetMixed BouquetMixed BouquetMixed BouquetMixed BouquetMixed BouquetMixed BouquetMixed BouquetMixed BouquetMixed BouquetMixed BouquetMixed BouquetMixed BouquetMixed BouquetMixed BouquetMixed BouquetMixed BouquetMixed BouquetMixed BouquetMixed BouquetMixed BouquetMixed BouquetMixed BouquetMixed BouquetMixed BouquetMixed BouquetMixed BouquetMixed BouquetMixed BouquetMixed BouquetMixed BouquetMixed BouquetMixed BouquetMixed BouquetMixed BouquetMixed BouquetMixed BouquetMixed BouquetMixed BouquetMixed BouquetMixed BouquetMixed BouquetMixed BouquetMixed BouquetMixed BouquetMixed BouquetMixed BouquetMixed BouquetMixed BouquetMixed BouquetMixed BouquetMixed BouquetMixed BouquetMixed BouquetMixed BouquetMixed BouquetMixed BouquetMixed BouquetMixed BouquetMixed BouquetMixed BouquetMixed BouquetMixed BouquetMixed BouquetMixed BouquetMixed BouquetMixed BouquetMixed BouquetMixed BouquetMixed BouquetMixed BouquetMixed BouquetMixed BouquetMixed BouquetMixed BouquetMixed BouquetMixed BouquetMixed BouquetMixed BouquetMixed BouquetMixed BouquetMixed BouquetMixed BouquetMixed BouquetMixed BouquetMixed BouquetMixed BouquetMixed BouquetMixed BouquetMixed BouquetMixed BouquetMixed BouquetMixed BouquetMixed BouquetMixed BouquetMixed BouquetMixed BouquetMixed BouquetMixed BouquetMixed BouquetMixed BouquetMixed BouquetMixed BouquetMixed BouquetMixed BouquetMixed BouquetMixed BouquetMixed BouquetMixed BouquetMixed BouquetMixed BouquetMixed BouquetMixed BouquetMixed BouquetMixed BouquetMixed BouquetMixed BouquetMixed BouquetMixed BouquetMixed BouquetMixed BouquetMixed Bouquet
©2016 Jennifer Bosworth
Mixed BouquetGeneral Instructions
– page 1
Before You Begin• Please read through all instructions carefully before beginning.• � ere are three essentials to creating beautifully pieced blocks:
ACCURATE CUTTINGPRECISE ¼” SEAM ALLOWANCESCAREFUL PRESSING
It’s details like these that distinguish a good quilt from a great quilt!Being o� by even 1| 16” on any piece can make your � nished block ½” too short.
• Some terms and de� nitions to know:RST = Right Sides Together WOF = Width of Fabric
• When making this quilt with fabrics other than those shown, you may want to attach swatches to the legend below for reference:
� e sample quilt was sewn with Maywood Studio fabrics including:Shadow Play and Welcome Home - Collection One by Jennifer Bosworth
Fabric IMAS513-RP
Fabric JMAS513-RP2
Fabric FMAS609-R4
Fabric HMAS610-R4
Fabric GMAS8363-ER
Fabric MMAS8366-G
Fabric LMAS8362-Q
Fabric KMAS8360-Q
Fabric DMAS8368-R
Fabric AMAS8360-R
Fabric CMAS609-ER
Fabric BMAS8366-R
Fabric EMAS8366-E

©2016 Jennifer Bosworth– page 2 ©2016 Jennifer Bosworth– page 2
Make (80) Half-Square Triangle Units
Save Time!Make it quick-and-easy with
3” Star Singles™available at
ShabbyFabrics.com.
Step 1 Step 2 Step 3 Step 4
K K
G G
Use Fabric G and Fabric K.
Step 1: Place two 3⅞” × 3⅞” squares RST with the lighter fabric on the top. Draw a line from one corner diagonally to the other corner. Step 2: Sew ¼” on either side of the drawn line. Step 3: Cut on the drawn line. Step 4: Open and press seam toward the darker fabric. You will now have two pieces.
Continue until you have a total of 80 Half-Square Triangle units. Each Half-Square Triangle unit should be 3½" × 3½".
Sew 62 of the Half-Square Triangle units together, as shown, to make 31 Half-Square Triangle sets. Press seams open. Set aside with the remaining 18 individual Half-Square Triangle units.
Cut the FabricFrom Fabric A, cut:
• (6) 3½” × 3½” squares• (7) 2” × 3½” rectangles• (2) 2” × 2” squares
From Fabric B, cut:• (40) 2” × 2” squares
From Fabric C, cut:• (31) 2” × 3½” rectangles• (18) 2” × 2” squares
From Fabric D, cut:• (2) 2” × WOF strips
From Fabric E, cut:• (2) 2” × WOF strips
From Fabric F, cut:• (24) 2” × 2” squares
From Fabric G, cut:• (40) 3⅞” × 3⅞” squares
From Fabric H, cut:• (16) 2” × 2” squares• Enough 2½” strips so that, when pieced, binding
measures at least 226" long.
*Fabric K is your outer border fabric. First determine whether you prefer pieced borders or continuous borders.
• For pieced outer borders, cut (6) 5½” × WOF• For continuous outer borders, cut (4) 5½” × 60”
From Fabric I, cut:• (40) 2” × 2” squares
From Fabric J, cut:• (5) 2” × WOF for inner borders
From Fabric K, cut:• (40) 3⅞” × 3⅞” squares• See note below for outer borders*
From Fabric L, cut:• (6) 3½” × 3½” squares• (7) 2” × 3½” rectangles• (2) 2” × 2” squares
From Fabric M, cut:• (40) 2” × 2” squares

©2016 Jennifer Bosworth– page 3 ©2016 Jennifer Bosworth– page 3
Make (6) Patched-Border Blocks
F
F
M I
I M
I
M
M
I
F
F
L
C
CB
B B
B
C CA
Make (6) 4-Corners BlocksUse 3½” × 3½” squares from Fabric A, 2” × 2” squares from Fabric B, and 2” × 3½” rectangles from Fabric C.Referring to diagram (right), sew the blocks together one row at a time, pressing all seams away from Fabric C. � en sew the rows together, pressing seams open.Continue until you have a total of (6) 4-Corners blocks. Each block should measure 6½” × 6½”.
Make (7) Pink/Cream Half Blocks
B B
CC
C
A
For this block, press all seams open.Use 2” × 2” squares from Fabric F, Fabric I, and Fabric M, and 3½” × 3½” squares from Fabric L.Referring to diagram (right), start with the center row by sewing the I/M units together. Sew I/M units to the sides of the L unit.Assemble the top and bottom rows. Sew to the top and bottom of the center row.Continue until you have a total of (6) Patched Border blocks. Each block should measure 6½” × 6½”.
Use 2” × 3½” rectangles from Fabric A and Fabric C, and 2” × 2” squares from Fabric B and Fabric C.Referring to diagram (right), sew the block one row at a time, pressing seams away from Fabric C. � en sew the rows together, pressing seams open.Continue until you have a total of (7) Pink/Cream Half blocks. Each block should measure 3½” × 6½”.
©2016 Jennifer Bosworth
D
E
D
D
E
E
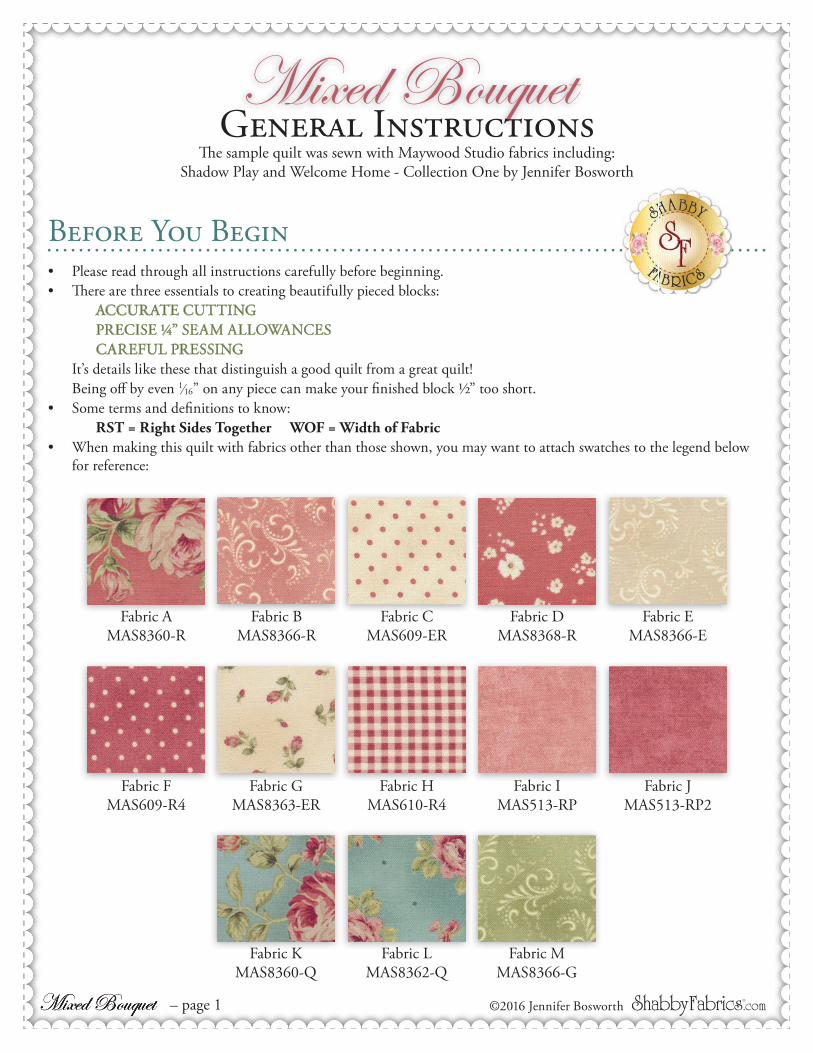
Make (20) Pink/Cream 4-Patch UnitsReferring to the diagram (left), sew one Fabric D strip to one Fabric E strip, pressing seam open. Repeat with second set of Fabric D and Fabric E strips.
Cut each D/E strip into 2" sections. You will need a total of 40 D/E sections.
Referring to the diagram (right), sew two sections together to form a 4-Patch unit. Press seams open.
Continue until you have a total of (20) Pink/Cream 4-Patch units. Each 4-Patch unit should be 3½" × 3½".
Make (2) Multi-Color Corner Units
Make (2) Pink/Cream Corner Units
HM
IL
CA
BC
Use 2” × 2” squares from Fabric H, Fabric I, Fabric L, and Fabric M.Referring to diagram (right), sew the block one row at a time, then sew the rows together, pressing all seams open.Repeat to make a total of (2) Multi-Color Corner units. Each unit should measure 3½” × 3½”.
Use 2” × 2” squares from Fabric A, Fabric B, and Fabric C.Referring to diagram (right), sew the block one row at a time, then sew the rows together, pressing all seams open.Repeat to make a total of (2) Pink/Cream Corner units. Each unit should measure 3½” × 3½”.
©2016 Jennifer Bosworth
D
E
D
D
E
E
Make (20) Pink/Cream 4-Patch UnitsReferring to the diagram (left), sew one Fabric Dstrip to one Fabric E strip, pressing seam open. Repeat with second set of Fabric D and Fabric E strips.
Cut each D/E strip into 2" sections. You will need a total of 40 D/E sections.
Referring to the diagram (right), sew two sections together to form a 4-Patch unit. Press seams open.
Continue until you have a total of (20) Pink/Cream 4-Patch units. Each 4-Patch unit should be 3½" × 3½".
Make (2) Multi-Color Corner Units
Make (2) Pink/Cream Corner Units
HM
IL
CA
BC
Use 2” × 2” squares from Fabric H, Fabric I, Fabric L, and Fabric M.Referring to diagram (right), sew the block one row at a time, then sew the rows together, pressing all seams open.Repeat to make a total of (2) Multi-Color Corner units. Each unit should measure 3½” × 3½”.
Use 2” × 2” squares from Fabric A, Fabric B, and Fabric C.Referring to diagram (right), sew the block one row at a time, then sew the rows together, pressing all seams open.Repeat to make a total of (2) Pink/Cream Corner units. Each unit should measure 3½” × 3½”.
– page 4
Make (7) Patched-Border Half Blocks
H HMI
IM L
Use 2” × 2” squares from Fabric H, Fabric I, and Fabric M, and 2” × 3½” rectangles from Fabric L.
Referring to diagram (right), sew the block one row at a time, then sew the rows together, pressing all seams open.Continue until you have a total of (7) Patched-Border Half blocks. Each block should measure 3½” × 6½”.

©2016 Jennifer Bosworth©2016 Jennifer Bosworth
Finish the QuiltLayer quilt top, batting, and backing. Quilt as desired.
Sew all binding strips into one continuous piece. Fold the binding strip in half lengthwise with wrong sides together and press. Line up raw edges of the binding strip with the raw edge of the quilt. Sew the binding to the front side of the quilt, starting at any side. Turn the binding over and hand stitch to the back of the quilt.
– page 5
Enjoy your fi nished quilt!
Add the BordersFor the following steps, all seams are pressed toward the inner border.
Referring to image (below), add borders as shown. Piece all the inner border strips into one continuous piece. Sew the side inner borders FIRST, then trim to be even with the quilt. Repeat for the top and bottom inner borders.
If working with continuous outer borders, sew left and right outer borders FIRST, followed by the top and bottom outer borders.
If working with pieced borders, piece all outer border strips into one continuous piece. Sew left and right borders FIRST, followed by the top and bottom borders.
Assemble the QuiltReferring to image (right), sew blocks together, row by row, pressing seams open. Join rows, two at a time (Row 1 to Row 2, Row 3 to Row 4, and so on). Finally, join Rows 1/2/3/4 to Rows 4/6/7/8 and to Rows 9/10/11, pressing all seams open.
Visit us online 24/7 atShabbyFabrics.com for beautiful fabrics,
patterns, kits and BOM projects.