LEON CUP RACER - LMS Engineering · Chassis and Suspension \ Front suspension McPherson, adjustable...
45
Transcript of LEON CUP RACER - LMS Engineering · Chassis and Suspension \ Front suspension McPherson, adjustable...


2
INDEX
1 TECHNICAL INFORMATION ........................................................................................... 4
SEAT Leon Cup Racer TCR display ....................................................................... 4 1.1
Dimensions and weight.............................................................................................. 5 1.2
Body-shell .................................................................................................................... 6 1.3
Powertrain .................................................................................................................... 7 1.4
Wheels ......................................................................................................................... 9 1.5
Electronic units ............................................................................................................ 9 1.6
2 DRIVER CONTROL ......................................................................................................... 10
Main panel ................................................................................................................. 10 2.1
Steering wheel module ............................................................................................ 10 2.2
Display alarms and shift lights ................................................................................ 11 2.3
Gearbox functioning ................................................................................................. 13 2.4
Standing start procedure ......................................................................................... 13 2.5
Speed limiter (Virtual Safety Car) .......................................................................... 14 2.6
Driver has to consider .............................................................................................. 14 2.7
3 ELECTRONICS ................................................................................................................ 15
AIM MXG ................................................................................................................... 15 3.1
MXG connection schemes ...................................................................................... 16 3.2
Data acquisition ........................................................................................................ 17 3.3
Fusebox ..................................................................................................................... 19 3.4
Fuel level display ...................................................................................................... 21 3.5
Auxiliary connectors ................................................................................................. 22 3.6
4 SETTING ADJUSTMENTS ............................................................................................. 25
Standard set-up ........................................................................................................ 25 4.1
Steering rack centering ............................................................................................ 26 4.2
Suspension ................................................................................................................ 26 4.3
Front camber and toe adjustments ........................................................................ 26 4.4
Rear camber and toe adjustments ......................................................................... 27 4.5
Dampers ..................................................................................................................... 28 4.6
Anti-roll bars .............................................................................................................. 30 4.7
Kinematics ................................................................................................................. 31 4.8

3
Brakes ........................................................................................................................ 33 4.9
Aero ............................................................................................................................ 33 4.10
5 WORKSHOP MAINTENANCE ....................................................................................... 34
First roll-out ................................................................................................................ 34 5.1
Check-list ................................................................................................................... 34 5.2
Body-shell and engine identification ...................................................................... 35 5.3
Fluids .......................................................................................................................... 36 5.4
Engine ........................................................................................................................ 36 5.5
Air filter ....................................................................................................................... 37 5.6
SADEV ST82-17 gearbox ....................................................................................... 38 5.7
LSD – Limited Slip Differential ................................................................................ 38 5.8
Fuel tank .................................................................................................................... 39 5.9
Airjacks ....................................................................................................................... 42 5.10
6 PARTS MILEAGE ............................................................................................................. 44
7 SAFETY ............................................................................................................................. 45

4
1 TECHNICAL INFORMATION
SEAT Leon Cup Racer TCR display 1.1
Engine \ Type Turbocharged; 4-cylinder in line \ Fuel supply system Direct fuel injection \ Cylinder capacity 1984 cm3 \ Bore and stroke 82,5 mm x 92,8 mm \ Maximum power 330 HP / 6250 rpm \ Maximum torque 410 Nm / 2000 to 5000 rpm \ Electronic control unit Continental SIMOS \ Exhaust Twin-end racing catalysed 114 dB \ Fuel tank 100 l FIA FT3 Fuel Tank
\ Speed limiter (Virtual Safety Car) 5 variable speeds \ Start rev limiter 4200 rpm
Transmission
\ Transmission Front-wheel drive \ Gearbox 6 speed sequential \ Differential LSD with external preload adjustment \ Clutch 2 plate cerametallic race clutch \ Shift control Paddle-shift on steering wheel
Chassis and Suspension \ Front suspension McPherson, adjustable in height, toe and camber \ Anti-roll bar Front and rear adjustable \ Rear suspension Multi-link adjustable in height, toe and camber \ Front brakes 6-piston callipers, 378 mm steel ventilated discs \ Rear brakes 272 mm steel discs \ Brake pedal Unitary with brake balance regulation \ Hand brake Hydraulic with mechanical locking \ Steering system Full electrical power steering rack \ Rims Seat Sport 10”x18” \ ABS Removed
Body and aerodynamics \ Roll-cage FIA homologated \ Weight 1.150 kg \ Front width (max) 1.950 mm \ Rear width (max) 1.950 mm \ Length 4.547 mm \ Wheel base 2.665 mm
Car check-control \ Acquisition system AIM - MXG 60 channels \ Diagnostics Auto-diagnosis OBDII / DiagRA – LE \ Airjack Complete car kit \ Firer extinguishing system OMP CESAL 2

5
Dimensions and weight 1.2
Dimensions Measurements Remarks
Overall length 4547 mm
Overall bodywork front width 1950 mm
Overall bodywork rear width 1950 mm
Wheel base 2665 mm
Over hang front splitter 897 mm
Over hang front bumper 867 mm
Over hang rear 825 mm
Over hang rear wing 160 mm From the wing to the bumper
Minimum ground clearance - 80 mm according to TCR regulations
Weight Measurements
Total weight in race conditions without fuel 1150 kg **
Car balance 60,5% front / 39,5% rear
Distribution weight/power 3,48 kg/HP
Notes:
* Measured from the rear bumper to the end of rear wing profile.
** The scrutineering dimensions and minimum weight are the ones on the SEAT Leon Cup Racer TCR Technical Form.

6
Body-shell 1.3
Part number Description Material
01 Bonnet Steel
02 Left / right front door Steel
03 Left / right rear door Steel
04 Roof Steel
05 Boot lid Steel
10 Bumper air duct Plastic
11 Bonnet opening Carbon
12 Front splitter Carbon
13 Fender air exit Carbon
14 Front bumper Fiberglass
15 Rear bumper Fiberglass
16 Left / right side trim Carbon, Kevlar & Fiberglass
17 Left / right rear door extension Carbon (painted)
18 Left / right rear fender extension Carbon (painted)
19 Left / right front fender Carbon (painted)
20 Diffuser Carbon
21 Windscreen Glass
22 Left / right front door window Glass
23 Left / right rear door window Glass
24 Left / right rear triangle window Plastic
25 Rear window Plastic

7
Powertrain 1.4
Engine features Description
Type 2,0 TSI / Turbocharged & direct injection
Engine identification CJX
Cylinder capacity 1984 cm3
Corrected cylinder capacity 1984x1,7 = 3372,8 cm3
Maximum power 242 kW (330 HP) at 6250 rpm
Maximum torque 410 Nm at 2000 to 5000 rpm
Maximum rpm 6800 rpm
Specific power 165 HP/l
Electronic control unit CONTINENTAL SIMOS 18.1
Fuel RON MIN 98 / RON MAX 102
Fuel consumption 0,37 to 0,42 l/km
Exhaust / dB Twin-end racing catalysed FIA Homologated / 114 dB
Distribution Chain (sealed)
Oil system Wet sump
Water pump One electric water pump + two auxiliary pumps
Water thermostat Double electronic thermostat
Fan range Operating range 92°C to 87°C
Engine power and torque curve:
Fuel tank features Description
Fuel tank type FIA FT3 homologated fuel tank
Capacity 104 l ±2%
Minimum fuel level before engine fault Less than 1 litre
Ventilation valve FIA homologated roll-over, ventilation and 200 mbar pressure regulator valve
Refuelling Safety FIA plug

8
Gearbox features Description
Transmission Front-wheel drive
Gearbox 6 speed sequential
Differential LSD with external preload adjustment
Clutch 2 plate cerametallic race clutch
Shift control Paddle-shift on steering wheel
Gearbox electronic control unit GCU placed on EM-Box
Gearbox actuator Monobloc electromagnetic actuator
Cooling system Gearbox oil radiator
Downshift over-rev protection Electronically activated
Gear ratios
Final drive 15 57 0,263
GEAR Z1 Z2 Gear
relation Total
relation RPM 3000
GEAR SHIFT 6500
CUT 6800
DIF RPM
1 12 28 0,429 0,113 42 90 94
2 13 23 0,565 0,149 55 119 124 1644
3 22 31 0,710 0,187 69 149 156 1384
4 21 24 0,875 0,230 85 184 192 1285
5 26 25 1,040 0,274 101 219 229 1079
6 29 24 1,208 0,318 117 254 266 947
Gear ratios:
Suspension features Description Remarks
Front damper Bilstein 2 way adjustable / Aluminium body Clicks: 10 bump / 10 rebound
Eibach springs front and rear 160/60/70-80-90-100-110-120 Adjustable
Front antiroll-bar 22x2 // 22x3 Adjustable in 6 positions
Rear bumper Bilstein 2 way adjustable / Aluminium body Clicks: 10 bump / 10 rebound
Rear antiroll-bar 22x3 // 22x4 Adjustable in 6 positions
Front and rear tenders 75/60/2
0
1000
2000
3000
4000
5000
6000
7000
0 20 40 60 80 100 120 140 160 180 200 220 240 260 280 300

9
Brake features Description Remarks
Front calliper AP Racing Monobloc 6 pistons Special: SEAT Sport
Front disc 378x34 Special: SEAT Sport
Front pump AP Racing 19,1 mm
Front pads Pagid 5F6 (RST03) Orange // Thick: 25 mm
Rear calliper AP Racing 2 pistons
Rear disc 272x10 Solid
Rear pump AP Racing 22,2 mm
Rear pads Pagid 5F6 (RS 4-4) Orange
Rear press reducer Pressure limiting valve 25 bar
Rear press reducer (power part) AP Racing 7 position lever Not standard
Brake balance Mechanical
Hand brake features Description Remarks
Hand brake Hydraulic with mechanical locking Acting on rear axle
Brake pump AP Racing 15 mm
Connection type In series with rear brake line
Wheels 1.5
Wheel features Description
Rim dimension 10”x18” ET 36
Rim centre lock 5 studs x 112 mm
Maximum tyre dimension recommended 270/660 R18
Tyre temp difference inside/outside 20ºC
Minimum cold pressure recommended 1.4 bar
Electronic units 1.6
Electronic modules Remarks Software Place
ECU Continental Motorsport Engine bay
GCU Skynam Motorsport Engine bay (EM-Box)
Gearbox actuator XAP Motorsport Engine bay
Low fuel pump control PWM control module Series Roll-cage
Fuel level display SEAT Sport Motorsport Cockpit
Electronic steering rack VW Motorsport Front subframe
ABS/ESP unit Continental Not active Cockpit
Gateway VW Series adapted Cockpit
Black box Audi Motorsport Cockpit
MXG display/logger AIM Motorsport Cockpit
Fuse box SEAT Sport Motorsport Cockpit
Steering driver module SEAT Sport Motorsport Cockpit
Transponder Engine bay
Modules based in series
En
gin
e
EC
U
Lo
w f
ue
l
pu
mp
Ste
eri
ng
rac
k
AB
S/E
SP
Ga
tew
ay
Specific software/mapping: Yes No Yes No Yes
Specific codifications: Yes No Yes Yes Yes
Interchangeable between cars: Yes Yes Yes Yes Yes
Spare part ready for plug and play: Yes Yes Yes Yes Yes
Modification allowed: No No No No No
Notes:
Use always spare parts from SEAT Sport. Although the mentioned parts derive from series cars,
the software and codifications are different and modified by SEAT Sport.
All series modules used on the car are based in the MQB platform. Through the diagnostic tools
available on the VW Group dealers, it is possible to diagnostic any malfunction.

10
2 DRIVER CONTROL
In this section, it is explained how the driver can handle the different commands and functions of the car.
Main panel 2.1
Function Remarks
Ignition switch: It activates the power to all devices. The Main Switch has to be active.
Main switch: It activates the power supply.
Lights switch: It activates the low beam. High beam and flash activation buttons are placed on the steering wheel module.
Turn indicator: It activates the left and right turn lights. A green alarm on the display appears showing that the turn light is blinking.
Brake balance:
Turning the balance wheel you can balance the brake pressure from front to back or vice versa. Do not press the brake pedal while moving the balance wheel. Through the driver display you can check the front and rear brake pressure and the balance in percentage.
Notes:
To start the car, always proceed in this order: Main switch and later ignition switch.
The correct procedure to stop the car is the following:
1. Stop the engine using only the yellow switch (ignition switch/KL-15).
2. Wait at least 60 seconds. If the waiting time is lower, the OBD faults memory is not saved.
3. Switch off the car using the red switch (main switch/KL-30).
If this procedure is followed correctly the OBD faults memory is saved and these faults can be
checked with the diagnostics tools at any time thereafter. These faults are saved until the memory
is deleted manually using the diagnostics program.
The diagnostics tool DiagRA-LE is recommended for customers to be able to check the cars.
Steering wheel module 2.2
The electronic steering wheel module permits
activating different functions without removing hands
from the steering wheel.
Some buttons have double functionality.
Main switch
Ignition switch
Lights switch
Turn indicator
Brake balance

11
Button Function Remarks
Starter Active if gearbox is in Neutral position Active if rpm < 500
Speed limiter / Virtual Safety Car
Active if rpm > 500 Short push to activate/deactivate
Limited speed value (Speed limiter / VSC)
Short push to scroll limited speed value Selected speed value is shown on the display 5 limited speeds: 40, 60, 80, 100 and 120 km/h
Safety brake signal button
Allows entering to and exiting from N without pressing the clutch pedal IMPORTANT: the use of this button is under user responsibility, a bad
use of it may cause fatal damages on the gearbox
Radio
Driver voice activation Maintain pushed to talk
Rain lights Short push to activate/deactivate
Cockpit fan Short push to activate/deactivate
Change display Short push to change display page / rolling change
High beam
Short push to flash Long push to activate/deactivate
Wiper Short push to activate/deactivate
Windscreen water Push to activate water splash + wiper activation
Drink
Activates water pump Note: pump not supplied with the car
− + Tip up / Tip down A led informs when tip up or down paddle has been pressed
CAN info Usual status: led off If there is a CAN Bus problem: led on
Note:
Although it is possible to uncouple completely the steering wheel from the column with the engine
running, it is not advisable (causes fault messages on the OBD).
Display alarms and shift lights 2.3
Car delivery alarm configuration:
LED 1 yellow alarm light: Low oil pressure. If no red alarm follows you can continue. If alarm
disappears you can continue pushing. Check the oil level when back into the pit.
LED 2 red alarm light + POP UP: Very low oil pressure. Big risk to break the turbo or to damage
the engine. Seat Sport recommends slowing down and entering to the pit-lane or stopping in a
safe place.
LED 3 purple alarm light: Battery voltage low warning. You can continue, check the alternator
and the alternator poly-V belt.

12
LED 4 yellow alarm light: Fuel pressure low warning. You can continue, check the fuel level.
LED 5 yellow alarm light: water temperature high. Pay attention, drive out of slipstream and
keep an eye on the values. If no red alarm follows you can continue. If alarm disappears you can
continue pushing.
LED 6 red alarm light: water temperature too high. Drive out of slipstream and keep an eye on
the values. Some torque reductions will appear but you can continue.
LED 6 red alarm + POP-UP message: Critical water temperature. Seat Sport recommends
slowing down and entering to the pit-lane or stopping in a safe place, to avoid damaging the
engine.
LED 7 white alarm light: Gearbox oil temperature high. Drive out of slipstream and keep an eye
on the values if not some torque reductions will appear. You can continue.
LED 8 blue alarm light: Intake air temperature high. Drive out of slipstream and keep an eye on
the values if not some torque reductions will appear. You can continue.
LED 8 red alarm light: Steering initialization needed (it will appear each time the car is switched
on). Turning the steering wheel left and right should disappear. If not, there is a problem in the
electrical steering rack.

13
Gearbox functioning 2.4
R - Reverse mode:
It is possible to put on this R mode if the car is complete stopped and clutch pedal pressed.
In case of clutch pressure sensor malfunction, it is also possible to use the steering wheel (P)
Safety brake signal button to put on or take out the R mode. IMPORTANT: the use of this button
is under user responsibility, a bad use of it may cause fatal damages on the gearbox.
N - Neutral mode:
In N mode, it is possible to move the car pushing externally (pit lane use).
To enter into this mode it is mandatory to press the clutch pedal.
To exit from this mode it is necessary to be completely stopped and pressing the clutch pedal.
It is also possible entering to and exiting from this mode using the steering wheel (P) Safety brake
signal button. IMPORTANT: the use of this button is under user responsibility, a bad use of it may
cause fatal damages on the gearbox.
D - Driving mode:
It is possible to go from N to 1st gear if the car is completely stopped and the clutch pedal is
pressed. Also possible using the steering wheel (P) Safety brake signal button. IMPORTANT: the
use of this button is under user responsibility, a bad use of it may cause fatal damages on the
gearbox.
It is possible to put on Neutral mode at any moment only if the clutch pedal is pressed.
It is not necessary to use the clutch while shifting on the track, only to start from standing position.
Once the vehicle is moving use the steering wheel paddle-shift to upshift or downshift.
The shifting is manual. When the engine reaches rpm limit (6800 rpm) the power is limited and to
stop the car is necessary to press the clutch pedal to avoid engine stalling.
Downshifting is protected preventing the engine from over-revs. If there is a down-shift demand at
too high revs the gearbox will not do it.
Parking mode:
Use the Neutral gearbox mode and lock manually the hand brake using the locking hook. The
gearbox will not be locked, only the car due to the rear brake pressure generated by the hand
brake pump.
To unlock the car just remove the hand brake hook.
To lock the transmission completely, stop the car on 1st or R gear.
Standing start procedure 2.5
Start rev limiter:
This system is automatically and only activated if wheels are absolutely stopped. The throttle pedal can be
fully pressed and engine speed will be limited at 4200 rpm until the car starts moving.
There are many ways to manage standing starts; following the SEAT Sport recommendation is explained.
Process:
1. After the grid formation lap, stop completely the car on the grid line pushing clutch and brake
pedals.
2. 1st gear has to be engaged.
3. Use the hand brake to keep the car stopped and release the brake pedal.
4. When the red starting lights begin, maintaining the clutch pedal fully pressed, push gas pedal flat
out. Engine will limit at 4200 rpm.
5. Preload the car releasing the clutch slowly while you keep the car stopped with the hand brake.
6. When the red light turns off, release the hand brake and control the start with clutch and throttle
pedals. Once the car starts moving the rev limiter will disappear so be careful to avoid engine stall
and wheel spin.
Notes:
Is possible to start at lower engine speed without using the start rev limiter, just get the desired
engine speed playing with the throttle pedal. Advisable no bellow of 3500 rpm.

14
Take care of the time you are keeping the engine preloaded at 4200 rpm. The clutch and the
engine may take temperature very fast. Recommendation no more than 6 seconds of start rev
limiter use.
Speed limiter (Virtual Safety Car) 2.6
The speed limiter system allows limiting the car speed at a predefined value. There are five possibilities:
40, 60, 80, 100 and 120 km/h. This system is recommended for the pit lane area or Virtual Safety Car
(VSC) situations.
Process:
1. Select the speed using the green button on the steering wheel. The is shown on the display.
2. Make a short push on the red starter button on the steering wheel to activate the function at the
previously defined speed. From this moment on throttle pedal may be fully pressed and the speed
will be limited.
3. If the car speed is over the target, the engine torque may be cut. If the speed is below the target,
torque will be applied till the speed is reached.
4. Make a short push on the red starter button on the steering wheel to deactivate the function.
Note:
It can be applied in different gears.
Driver has to consider 2.7
Learning and memorizing the steering wheel buttons placements and functions will allow drivers a
faster action and will help them to keep focused on the track.
Warm up the engine before starting. The minimum water temperature recommended before
loading the engine is 80°C.
Check the brake pedal stiffness when car is stopped or on the acceleration way.
Warm up tyres before attacking. Without blankets use, the rear tyres may need 2 laps to get
warm and the car is very sensitive to this.
Shift up gears when shift light indicates. The shifting lights have been optimized taking into
account gear ratios and engine power.
Shift down gears without stress. If a downshift is required at too high revs it will be electronically
rejected at it will not happen.
In-laps: cool down brakes and engine water to avoid thermal shocks.
There are three different possibilities to show alarms on the display: lateral leds, messages on a
red ribbon in the lower part of the screen and complete screen pop-up messages. If a pop-up
message appears is strongly recommended to stop the car.
If for any reason it is necessary to drop out the car on the track, leave the gearbox in neutral to
save the transmission in case of being towed.
It is important to bed discs as follows to get their maximum life:
o When possible bed discs with used pads.
o To reduce thermal shock during bedding, the brake ducts may be 50% taped off.
o Apply the brakes gently at low speed a few times to ensure a correct installation.
o Apply the brakes moderately, (progressively up to 50% race speed, 25% race pressure), for
10-20 applications to ensure above 80% pads face contact with disc. The contact with the
disc face is particularly important at the inner swept area. The first time a driver gets used to
bedding discs on a car it is worthwhile getting him to return to the pits to check contact is
sufficient before preceding to the next step.
o Progressively build up to about 70% of race speed and 50% of race pressure. Then, apply
brakes for approximately 25 applications.
o Perform one lap cooling down before returning to the pits.
o When returning to the track, come up progressively to race speed and pressure.
15
3 ELECTRONICS
AIM MXG 3.1
MXG is the AIM dash-logger designed to acquire and display data coming from your ECU, the internal
accelerometer and gyro, as well as from the GPS module, analog/digital inputs and predefined math
channels.
Performance and data acquired can also be incremented adding expansion modules.
To enable “the lap time” is necessary to insert the track where you are running. Track load has to be done
by the program GPS Manager available at the RaceStudio3 software.
SmartyCam: The on-board camera that overlays on videos the data sampled by your logger.
RaceStudio3 software, latest MXG firmware and documentation available on AIM website:
http://www.aim-sportline.com/eng/download/index.htm
MXG user guide available on AIM website:
http://www.aim-sportline.com/download/doc/eng/mxs-mxg/MXG_user_guide_101.pdf
16
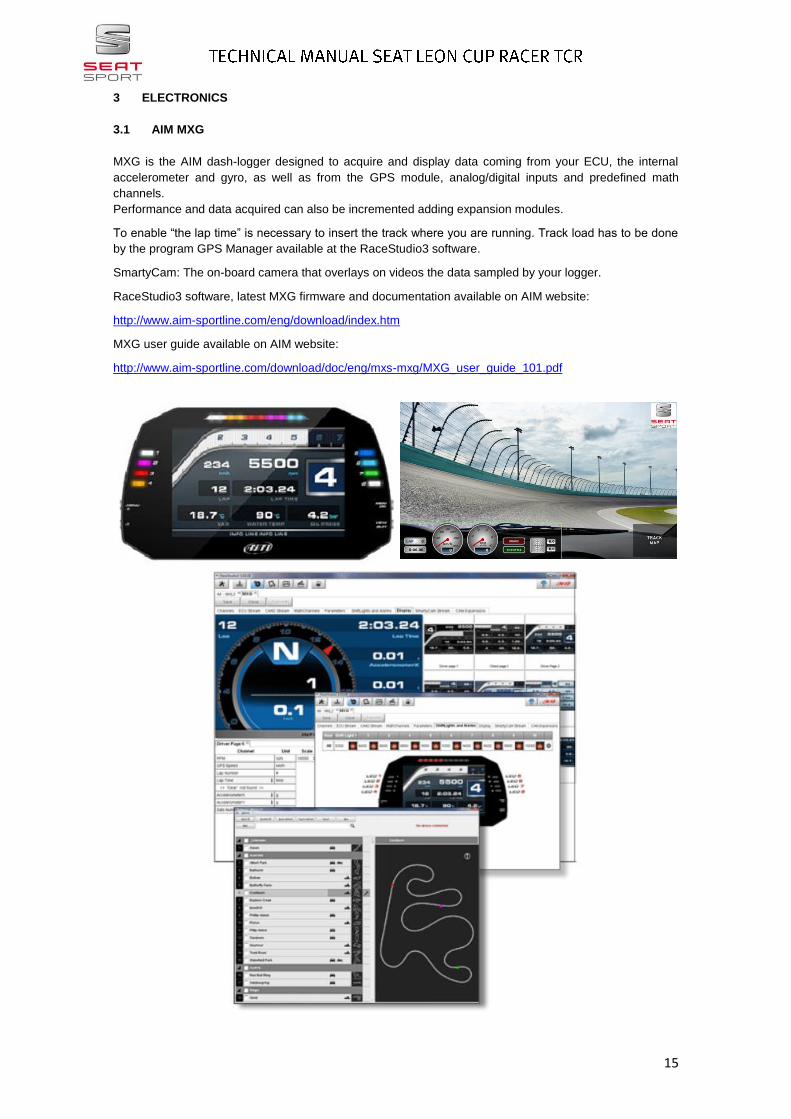
Shift lights and alarms:
1. On the top of the display there are ten gear flash leds that can be freely configured. The rpm
value at which to turn it on and the colour can be defined. Gear dependent lights can be also
defined.
2. On both sides of the screen there are eight alarm leds that can be freely configured. The
conditions to turn them on and off and the colour can be defined. Also messages on a red ribbon
in the lower part of the screen and completely screen pop-up messages can be defined.
Notes:
IMPORTANT: the change of the alarms or shift lights is under user responsibility.
MXG connection schemes 3.2
Scheme 1: Data-logger standard connection scheme (car delivery).
Scheme 2: Data-logger connection scheme with Smarty-cam and expansion module.

17
Features Remarks
Lap-trigger The MXG system uses only GPS signal.
Circuit Through the RaceStudio3 software is possible to activate all the circuits in the world. It is also possible to create and load a new circuit.
Extra sensors In case of adding extra sensors, they have to be connected to an expansion module. This expansion module has to be connected through the data hub as shown in the scheme 2.
Notes:
Channel expansion module and sensors are available through AIM dealers, not SEAT Sport.
If for any reason it is necessary to send data acquisition files to SEAT Sport, following data file
extensions must be sent: .drk, .bak, .gpk, .rrk and .xrk.
Data acquisition 3.3
AIM-MXG channel list:
Channel name Description Unit Recommended scale
P_TURBO Boost pressure bar 0 ... 3
T_ENG_AIR Intake air temperature °C 20 ... 70
T_ENG_OIL Engine oil temperature °C 80 ... 150
T_ENG_WATER Engine coolant temperature °C 70 ... 125
T_AIR External air temperature °C 12 ... 45
RPM_ENG Engine speed rpm 1000 … 7000
FLAG_BRAKE Brake lights on/off 0 … 2
P_BRK_FRONT Front brake pressure bar 0 … 100
P_BRK_REAR Rear brake pressure bar 0 … 100
P_ENG_OIL Engine oil pressure bar 1,5 … 5
P_ENG_FUEL Fuel low pressure bar 0 … 7
FUEL_LEVEL Fuel level l
0 … 110
FUEL_CONS Fuel consumed l
0 … 110
S_FUEL Fuel remaining time l 0 … 120
N_FUEL Fuel remaining laps # 0 … 80
LAP_CONS Fuel lap consumption l /lap 0 … 3
POS_PEDAL Gas pedal position % 0 … 100
TIP_DOWN Tip down Sign 0 … 2
TIP_UP Tip up Sign 0 … 2
G_CH_Y Lateral acceleration G -2,5 … 2,5
G_CH_X Longitudinal acceleration G -1,6 … 1,6
W_CH Yaw rate °/s -50 … 50
V_WHL_RL RL wheel speed km/h 0 … 260
V_WHL_RR RR wheel speed km/h 0 … 260
V_WHL_FL FL wheel speed km/h 0 … 260
V_WHL_FR FR wheel speed km/h 0 … 260
V_WHL_REF ESP reference speed km/h 0 … 260
A_STE Steering angle ° -200 … 200
V_STW_LIMIT Speed limit value km/h 40 … 120
FLAG_STW_OUT1 Steering wheel button state # 0 … 8
FLAG_STW_OUT2 Steering wheel button state # 0 … 8
FLAG_STW_OUT3 Steering wheel button state # 0 … 8
FLAG_FBX_RELAY1 Fusebox relay 1 state # 0 … 8
FLAG_FBX_RELAY2 Fusebox relay 2 state # 0 … 8
FLAG_FBX_F5 Fuse state 5 # 0 … 8
FLAG_FBX_F4 Fuse state 4 # 0 … 8
FLAG_FBX_F3 Fuse state 3 # 0 … 8
FLAG_FBX_F2 Fuse state 2 # 0 … 8
FLAG_FBX_F1 Fuse state 1 # 0 … 8
I_FBX_MAIN Main current A 10 … 40
I_FBX_TURNLIGHT Turnlight current A 0 … 10

18
External Voltage Battery Voltage V 8 … 15
P_GCU_CLUTCH Clutch pressure bar 0 … 100
POS_GCU_GEAR Gear # -1 … 7
T_GCU_OIL Gearbox oil temperature º 80 … 150
U_GCU_GEAR Gearbox potentiometer mV 0 … 5000
POS_XAP_POT Actuator position # 0 … 32767
POS_XAP_POT_FILT Actuator position filtered # 0 … 32767
U_XAP_BAT Actuator power supply V 8 … 15
I_XAP_OUT Actuator output current A 0 … 120
GPS channels Description Unit
GPS_Speed Speed km/h
GPS_Nsat Nº of satellites #
GPS_LatACC Lateral acceleration G
GPS_LonACC Longitudinal acceleration G
GPS_Slope º
GPS_Heading º
GPS_Gyro º/s
GPS_Altitude m
The values shown in the following table are the standard approximate values at 20°C air temperature for
main car control channels.
Channel Idle speed* Values at T_air 20°C Maximum value**
P_TURBO 0 bar 2.35 bar 2.99 bar
P_ENG_FUEL 4.1 bar 4.3 bar 6 bar
P_ENG_OIL 2 bar 3.6 bar 5 bar
T_ENG_AIR 40ºC 42°C >75°C
T_ENG_OIL 80ºC 122°C >145ºC
T_ENG_WATER 90ºC 92°C >115°C
T_GCU_OIL 40ºC 110°C >145°C
Notes:
* These values can change depending on car’s engine temperature. Those are approximate values
when T_ENG_WATER is 90ºC after having warmed the car from cold always at idle speed.
** The maximum value underlined in orange shows the value before performance restrictions or
protection modes are applied.

19
Fusebox 3.4
Fuse box LED label
The fusebox is an electronic box that controls the power supply to practically all
devices. Internally, the thermal fuses reset automatically, so changing a fuse will
never be necessary. In case of malfunction it has to be sent to SEAT Sport.
It is also possible to check if a fuse has blown in the fusebox, so you will know if
the current or signal was sent.
There are three ways to check the correct functioning:
Live measures view in RaceStudio3.
Checking the fusebox control channels in Race Studio Analysis.
Checking the red LEDs on the fusebox.
If a malfunction is detected, it is necessary to control the corresponding wiring or
the device.
In the following table is shown the fuse analysis information:
Channel name: There are 5 channels to analyse.
Bit number: Each channel is able to control 8 fuses.
Data value: Is the value you can check on data acquisition.
Channel name Bit number Data value Description
FLAG_FBX_F5
bit8 -------8 Sadev pump
bit7 ------7- HR-ECU
bit6 -----6-- HR-Fuel pump
bit5 ----5--- Starter
bit4 ---4---- Radio
bit3 --3----- HR-Lambda
bit2 -2------ HR-Miscellaneous
bit1 1------- HR-Injectors
FLAG_FBX_F4
bit8 -------8 MR-ignition coils
bit7 ------7- Sadev-ELV
bit6 -----6-- Drink
bit5 ----5--- Switch Panel / Aux. Data connector
bit4 ---4---- Steering Wheel

20
bit3 --3----- Gear Lever / GCU
bit2 -2------ Diagnosis Connector
bit1 1------- Power steering ECU
FLAG_FBX_F3
bit8 -------8 ECU
bit7 ------7- Front Fan
bit6 -----6-- MXG
bit5 ----5--- Blackbox / Gateway
bit4 ---4---- Differential
bit3 --3----- +30 Aux. connector
bit2 -2------ DSG
bit1 1------- ABS ELV
FLAG_FBX_F2
bit8 -------8 Wiper
bit7 ------7- Turn light
bit6 -----6-- Diagnosis Connector / +15 Aux con.
bit5 ----5--- Cockpit fan
bit4 ---4---- Window
bit3 --3----- not used
bit2 -2------ Transponder
bit1 1------- +15 signal
FLAG_FBX_F1
bit8 -------8 Wiper pump
bit7 ------7- Brake light
bit6 -----6-- High beam
bit5 ----5--- Day light
bit4 ---4---- Low beam
bit3 --3----- Rear light
bit2 -2------ Rain light left
bit1 1------- Rain light right
Example:
In the acquisition screenshot bellow is shown the channel “FLAG_FBX_1” in green. The value is
“7” when braking and 0 when no braking. In this case, the conclusion is that there is a problem on
the brake light line.

21
Fuel level display 3.5
All new SEAT Leon TCR cars have a fuel display to control the fuel remaining at the tank. It is tied to the
roll cage in the rear right door area. The display has to be set after each refuelling. This setting is very
important to get the correct fuel level because it is calculated by the fuel consumption sent from the engine
ECU.
There is a light sensor for automatic brightness
trimming.
Two sensitive zones below the four digits allow
menu navigation.
It is important not to touch the front panel when
it is switching on due to the initial capacitance
setting during start up.
Also take special care wiping with hand the
front panel if device is switched on.
Electrostatics charge could affect the sensitive
touch and set undesired actions.
Terminology:
Following, the terminology description to understand future command tables:
Llp: Left long push (>1s)
Rlp: Right long push (>1s)
Lsp: Left short push (<1s)
Rsp: Right short push (<1s)
STout: Short Timeout (1s)
LTout: Long Timeout (8s)
Fuel level adjustment:
This menu allows the following possibilities:
Set fuel level to full tank value.
Add/remove a fuel quantity to the actual value.
Set an absolute quantity (litres without decimal).
When the value is shown (and blinking), a right short push increases this value litre by litre and a
left short push decreases this value.
Maintaining right/left long push, the value is increased/decreased 10 litres by 10 litres.

22
Set Full level value:
This menu allows setting the maximum tank level or predefined fuel level.
Brightness and bar graph set:
It is possible modify the brightness and bar graph settings.
* Long left push will scroll menu on the other side.
** “Auto” will adjust automatically the brightness. Else, use right / left touch to increase / decrease
light level.
*** “dot” mode will light on only one led on the bar graph. “bAr” mode will light on all leds beginning
from the left side up to the level point. Note that the last led matches with the Full value set.
Auxiliary connectors 3.6
The main car wiring loom is prepared with some auxiliary connectors to make easier the connection of
auxiliary devices.

23
#1: Auxiliary power supply
This connector is placed in the driver cockpit above the central tunnel (front). It could be used for user
requirements such as connecting the TCR scrutineering EVO4 logger.
Auxiliary power supply
Matching connector 191 972 733
Pin-out Terminal
1 +30 up to 8A FS 2,8 x 0,8 (*)
2 GND FS 2,8 x 0,8 (*)
3 CAN H traction FS 2,8 x 0,8 (*)
4 CAN L traction FS 2,8 x 0,8 (*)
5 CAN H chassis FS 2,8 x 0,8 (*)
6 CAN L chassis FS 2,8 x 0,8 (*)
#2: Auxiliary analogic sensors
Two connectors are available connected to the dash logger.
Auxiliary analogic sensors
Matching connector 191 972 713
Pin-out Terminal
1 5v FS 2,8 x 0,8 (*)
2 signal FS 2,8 x 0,8 (*)
3 GND FS 2,8 x 0,8 (*)
#3: Additional power supply
It can be used for any requirement.
Additional power supply
Matching connector 1J0 972 714
Pin-out Terminal
1 +30 up to 8A FS 2,8 x 0,8 (*)
2 +15 up to 5A FS 2,8 x 0,8 (*)
3 GND FS 2,8 x 0,8 (*)
4 GND FS 2,8 x 0,8 (*)
Radio and drink
Behind the driver seat there are two free connectors associated with the steering wheel module.
Connecting here the radio and drinking systems, both can be handled through the steering wheel module.
Radio connector
Matching connector AMP Super-seal 4-way 282106-1
Pin-out Terminal
1 PTT 183024-1 or 183036-1 2 PTT 183024-1 or 183036-1 3 +30 up to 8A 183024-1 or 183036-1
4 GND 183024-1 or 183036-1
Drink connector
Matching connector 1J0 973 822
Pin-out Terminal
1 up to 2.5A
2 GND

24
Power supply cut:
There is a connector that gives power supply to the fusebox, so in
case of disconnection cuts all devices power supply.
You can unplug it in case of transport or for a most safety
disconnection in case of workshop big jobs.
See connector placement close to the fusebox main connectors on
the picture beside.
Transponder:
This auxiliary connector is placed next to the right front headlight. All TCR cars are provided without
transponder.
Transponder
Matching connector 357 972 762
Pin-out Terminal
1 12v FS 2,8 x 0,8
2 GND FS 2,8 x 0,8

25
4 SETTING ADJUSTMENTS
Standard set-up 4.1
Note:
This is also the car delivery set-up. Due to production issues, small changes on this set-up sheet
may occur. Seat Sport recommends doing your own check.

26
Steering rack centering 4.2
As the steering rack is electric, the steering angle sensor has to be electronically aligned with the wheels
at the aligning time.
How to proceed to align the steering angle sensor:
It is necessary fix the steering wheel. To do it, you can use straps fixed between the roll cage and the
steering wheel or other kind of standard tools.
The use of a rack centring stopper tool is not recommended because it is difficult to get the steering angle
sensor at 0 deg. The most important is to obtain the toe alignment with the sensor at 0 deg.
Proceed as following:
Switch on main and ignition switches.
Turn left and right to get the steer angle signal
initialized.
Fix the steering wheel when the steer angle is 0 deg.
Switch off the ignition and main.
Proceed now with the alignment jobs.
Note:
With this process the steering angle signal will be 0 deg with the wheels aligned. This is very
important for the steering assistance and for the electronic slip differential behaviour.
Suspension 4.3
Front Rear
Wheel ratio 1 mm wheel / 0,9 mm damper 1:1
Bilstein damper travel 110 mm 119 mm
Front camber and toe adjustments 4.4
The front suspension is very special on this car due its kinematic characteristics. To reach the front
suspension set-up value is recommended to proceed as following:
1. Car ride height: put the ride height at your choice through damper/spring adjustments.
2. Camber: to change the camber is recommended to move the steering rack arm first. The camber
will change quickly.
3. Toe: to change the toe enlarge or reduce the wishbone adjustment.
4. Check: adjust a second time if necessary.
Note:
Although this process seems strange, it is the best and faster way to obtain the camber and toe
adjustments.
Front wishbone adjustment:
Underneath the front wishbone there is a bolt to control the adjustment movement. Unblock the four
screws that are fixing the camber regulator plate and proceed to the adjustment.
Notes:
After any intervention, fix the wishbone regulator plate bolts in the right tighten.
Maintain the wishbone regulation plate clean and little oiled between plates.

27
Front regulation table:
Camber Toe regulation Wishbone regulation
1,5 turns = 10’ camber
-5.8º 9,5 turns 12 turns
-5,5º 7 turns 8,3 turns
-5º 3,5 turns 4,5 turns
-4,5º 0 0
-4º -3,5 turns -4 turns
-3,8º -6 turns -7 turns
Note:
Take care with the maximum and minimum camber. Although physically the camber adjuster can
reach higher values, it is not recommended due the drive shaft limitations.
Rear camber and toe adjustments 4.5
To reach the rear suspension set-up value is recommended to proceed as following:
1. Car ride height: put the ride height at your choice through damper/spring adjustments.
2. Camber: to change the camber is recommended to move the “boomerang” arm.
3. Toe: to change the toe enlarge or reduce the rear arm.
4. Check: Adjust a second time if necessary.
Notes:
The rear camber regulation does not have relation with the toe movement, so it is possible to
change rear camber without any toe movement.
After the camber adjustment job, check that the ball-joint is placed in the middle of its housing.
Rear camber regulation table:
Camber Arm regulation
-2º 1,5 turns
-2,5º 1 turns
-3º 0,5 turns
-3,5º 0
-4º -0,5 turns
-4,5º -1 turns
-5º -1,5 turns

28
Dampers 4.6
Front dampers
2-way adjustable with 10 clicks in bump and 10 in rebound
Aluminium outer housing
20 mm bump stop (5000 N / 4 mm)
Note:
Clicks adjuster tool delivered with the car.

29
Rear dampers
2-way adjustable with 10 clicks in bump and 10 in rebound
Aluminium outer housing
35 mm bump stop (5000 N / 4 mm)
To set-up the suspension, the following spring range can be used in both front and rear axles:
Springs Nm Remark
160-60-120 120 Front use recommended
160-60-110 (car delivery - front) 110 Front use recommended
160-60-100 100 Front use recommended
160-60-90 (car delivery - rear) 90 Rear use recommended
160-60-80 80 Rear use recommended
160-60-70 70 Rear use recommended

30
Adjustment range of front dampers:
Adjustment range of rear dampers:
Anti-roll bars 4.7
Two front anti-roll bars available: 22x2 and 22x3. Car delivery: 22x3.
FRONT ARB
OD (mm) 22 22
Thickness (mm) 2,0 3,0
Chassis Roll Stiffness from ARB
Hard (Nm/ºChassis) 1548 2021
Mid (Nm/ºChassis) 991 1293
Soft (Nm/ºChassis) 688 898
Two rear anti-roll bars available: 22x3 and 22x4. Car delivery: 22x3.
REAR ARB
OD (mm) 22 22
Thickness (mm) 3,0 4,0
Chassis Roll Stiffness from ARB
Hard (Nm/ºChassis) 1252 1454
Mid (Nm/ºChassis) 1061 1232
Soft (Nm/ºChassis) 898 1043

31
Kinematics 4.8
FRONT

32
REAR

33
Brakes 4.9
To set-up the brakes, the following pumps can be used in both axles:
Master cylinder Push Rod Remarks
AP 15 MM PRT 110
AP 15.9 MM PRT 110
AP 16.8 MM PRT 110
AP 17.8 MM PRT 110
AP 19,1 MM PRT 110 Car delivery front
AP 20,6 MM PRT 110
AP 22,2 MM PRT 110 Car delivery rear
AP 23,8 MM PRT 110
It is not advisable to use more than two pump diameters difference between front and rear.
If the master cylinders are replaced, take care on the correct installation and functioning of the
brake balance bar. The following link shows how to assembly correctly:
https://tiltonracing.com/wp-content/uploads/2013/07/98-1250-600-Series-Balance-Bars.pdf
On the dashboard screen it is shown the front/rear pressure and the balance percentage. The
recommended percentage is 60% front (car delivery).
Brake balance channel:
Aero 4.10
It is strongly recommended checking periodically that all aerodynamic parts and their fixations are in good
conditions.
Rear wing:
The rear wing has extensive regulation. Zero is the standard setting for the car.
Wing angle -5° has considerable influence on the rear down force.
Wing angle -10º has big influence on the rear down force as well as in drag.
Lateral plates are individually adjustable.
Front splitter:
Check periodically the fixations. It has to be in good conditions.
Check the front splitter angle that has to be at 0º when pitch is 0º.
Pitch:
Measure the pitch angle on the body shell over the door sill.

34
5 WORKSHOP MAINTENANCE
First roll-out 5.1
SEAT Sport checks all the cars in a roll-out before customer delivery. This roll-out consists in:
5 circuit laps.
High speed in a long straight.
Start rev limiter checking simulating a standing start.
Speed limiter function checking.
After the roll-out, SEAT Sport engineers check the data acquisition and all car functions.
Note:
Although SEAT Sport does a roll-out, it is strongly recommended to carry out a suspension check
before first customer roll-out and after the first practice. Pay speciall attention to sub-frame, power
train, engine brackets, fixations, etc.
Check-list 5.2
After any rebuild or main job is recommend to carry out a check-list. It is possible to do it using the Live
Measures view in RaceStudio3 and a lap top or directly using car´s display.
Check-list with engine stopped OK
ENGINE Oil level On the dipstick mark / T_oil > 70⁰C
Coolant level On the bottle mark
BRAKES Brake fluid On the bottle mark
Steering wheel functions OK
STEERING WHEEL
Rain lights
Cockpit fan
Display change
Safety brake signal
Windscreen water
Wiper
High beam
AIM Live
Check-list with engine at idle speed OK
ENGINE
Water temperature 87ºC / 92ºC (thermostat cycle)
Electrofan Active at 92ºC
P_ENG_OIL (WT<25ºC) 4 bar
P_ENG_OIL (WT>25ºC) 2,5 bar
P_FUEL > 4,1 bar
Battery voltage > 13,5 volts
Boost pressure 0,3 bar @ 2500 rpm
Speed limiter Check all speed limitations
GEARBOX
Tip
Gear display
Potentiometer values
P_clutch
FUSEBOX
FLAG_FBX_1 0
FLAG_FBX_2 0
FLAG_FBX_3 0
FLAG_FBX_4 0
FLAG_FBX_5 0

35
Body-shell and engine identification 5.3
V.I.N. (Vehicle Identification Number) is welded on the roll cage.
Engine number
CJX XXXXXX
Engine seals: boost, distribution and oil sump

36
Fluids 5.4
Fluids From References Quantity
Engine Castrol Castrol Edge 5W-30 VN0000053000 5,7 l
Gearbox ELF ELF HTX 755 / 80W-140 1,75 l
Clutch Castrol Castrol SRF VN0000062400 -
Drive shaft VW AG VN0000040401 100 gr
Coolant Castrol VN0000060400
5 l VW AG _G013A8JM1 - 15% add./85% dist. water
Brake fluid Castrol Castrol SRF VN0000062400 -
Fuel PANTA NS 102 Ron -
Windscreen Free -
Notes:
Standard fuel minimum 98 Ron from petrol stations may be used.
Is recommended not to mixt fuels, they could contaminate one from the other.
Gearbox is delivered with correct oil level. It is not necessary any level control if there is no
leakage.
Engine 5.5
Control routine before start to run:
Check the oil level: with oil temperature up to 70°C, stop the engine and wait 2 minutes, then
check the oil dipstick. The oil level must be at the top of the marked zone.
Check the water level before start.
With the engine running, check that there is not any oil, water or fuel leakage.
Check the fan functionality. Operating range 92°C to 87°C.
Maintenance routine:
Change the engine oil and oil filter at the indicated mileage.
Engine spare parts must be from VW group or SEAT Sport original parts, detailed on the SEAT
Leon Cup Racer TCR parts catalogue.
Use always the fluids detailed above, User Manual point 5.4.
Clean and check the air filter at least once per event. At urban circuits, clean or replace it more
frequently. It is recommended to have two or three air filters and replacing it during the weekend.
Changing it is strongly recommended in case of rain.
Check that the alternator belt is clean and that there are not small stones inside the Poly-V.
Clean the radiator and intercooler panel often.
If any doubt, contact SEAT Sport service.
Check that the seals are in good conditions, if a replacement is needed contact SEAT Sport.
Parts subject to frequent service:
Engine Torque Remarks
Oil drain plug By hand
Oil filter plastic cover 50 Nm
Oil filter Moisten the “O” ring
Spark plug 28 Nm Use only original parts
For detailed parts substitution information download the Workshop Manual from SEAT Sport website:
http://www.seat-sport.com/seat-leon-cup-racer-2016/

37
Air filter 5.6
Standard air filter cleaning procedure:
Parts subject to frequent service:
Air filter Torque Remarks
Substitution By hand Be careful tightening the small bolts over plastic
Cleaning Clean the cotton air filter following the procedure shown above. Do not use compressed air or high-pressure air to clean. Use only recommended oil for cotton filters.
Notes:
The air filter type and measurements are identified on the
Technical Form. It is not allowed any modification or change.
A clean and properly oiled air filter is basic to ensure boost’s life. It
is strongly recommended to follow the cleaning procedure as well
as the replacement frequency.
After rain conditions use, it is strongly recommended the cleaning
or replacement.

38
SADEV ST82-17 gearbox 5.7
Control routine before start:
Check that there is no oil leakage.
Operating range 70°C to 145°C. Do not load the engine until the temperature is above 70°C.
Routine maintenance:
Change the gearbox oil and clean the filter in the indicated mileage. The oil must be the
recommended one. It can be done with the gearbox mounted on the car.
It is strongly recommended reading the SADEV ST82-17 Technical Manual on the SEAT Sport
website.
http://www.seat-sport.com/seat-leon-cup-racer-2016/
Make sure that the clutch pedal stopper stud exits 11,8 mm from its support.
Potentiometer adjustment:
Using the display or the live measures label of the RaceStudio3 software with a lap top adjust the
potentiometer if any malfunction has been detected.
Potentiometer regulation table:
Acquisition channel Gear Value
U_GCU_GEAR
R 572 mV
N 1100 mV
1 1630 mV
2 2160 mV
3 2700 mV
4 3230 mV
5 3765 mV
6 4300 mV
LSD – Limited Slip Differential 5.8
The differential is a self-locking type, with 6 frictions faces on each side and pressure plates with ramps,
acting either for power or braking phases. The running clearance in the differential is 0.1±0.05mm.
The preload may be adjusted by tightening/untightening the preload nut (see the picture below).
11,8 mm

39
External preload adjustment process:
It is important to note that the lock nut must be pushed while turning (the tool must push the lock nut
completely straight in order to be able to move the nut all the necessary travel). Note that it is made by
"clicks" (20 "clicks" per revolution). Then, it is therefore to stop on a "click" to be sure of the good lock nut
desired position.
It is not necessary to remove the left driveshaft.
Lock the right driveshaft or wheel.
Use the hex-head spanner of 8 mm in order to tighten/untighten the nut marked above. Then you
can adjust the preload:
o By turning clockwise in order to decrease the preload.
o By turning anti-clockwise in order to increase the preload.
Note:
There is a second way to adjust the preload:
o Push the lock nut with the 8 mm hex-head spanner and hold it by hand.
o Turn the right wheel forward to increase the preload or backwards to decrease.
Preload checking process:
Lock the left wheel using the driveshaft bolt spanner with a dynamometer.
Turn the right wheel and check on the dynamometer the preload value.
Notes:
Recommended preload range between 50 and 100 Nm. The cold measured preload is
approximately 15% higher than warm measure.
Preload decreases from approximately 15% after 50 kilometres of running.
Different ramps are available on SADEV Parts Catalogue. Only the ramps homologated on the
SEAT Leon Cup Racer TCR Technical Form can be used: 60/30, 45/30 and 35/30.
For detailed information see the SADEV ST82-17 Technical Manual on the SEAT Sport website:
http://www.seat-sport.com/seat-leon-cup-racer-2016/
Fuel tank 5.9
The new 100l FIA FT3 fuel tank is working with one unique fuel pump coming from series and a complex
Venturi hoses system. The pump is controlled through a series PWM fuel control module.
Fuel tank features Description
Fuel tank type FIA FT3 homologated fuel tank
Capacity 104 l ±2%
Minimum fuel level before engine fault Less than 1 litre
Ventilation valve FIA homologated roll-over, ventilation and 200 mbar pressure regulator valve
Refuelling Safety FIA plug
Refuelling tool:
The fuel tank is served with a FIA approved fast coupling plug. The socket is the necessary connector-tool
that has to be used for refuelling the tank. This part is available on the 2016 Parts Catalogue.

40
Refuelling process:
1. Prepare an external bottle with the desired quantity of fuel. It is recommended using a ground
cable on the bottle to avoid static electrical discharges.
2. Connect the refuelling hose with the socket to the fuel tank plug (#1 on the picture below) and the
fuel will flow inside.
3. Set the fuel level display with the fuel amount inside the tank. This value will be shown on the
display. For more info about the fuel level display check point 3.5 on this User Manual.
4. Pay special attention to the fuel amount refuelled and be accurate when setting the fuel level
display, the driver will not feel any power engine drop until there is less than one litre inside the
tank. Never try one lap more after a power drop.
Fuel tank placed on the car
1. Fuel tank refill plug
2. Fuel pump connector
3. Battery supply
4. Fuel level display
Fuel draining tools:
On the car there is a FIA fast coupling plug placed on the engine bay fuel line ready for draining use.
There are two tools available on the 2016 Parts Catalogue. First, there is a contra-connector D-6 socket
available to connect in the fuel line plug that opens the circuit for draining.

41
Secondly, SEAT Sport has developed a new electronic tool to activate the fuel tank pump permanently or
with the new automatic function.
Fuel draining process:
1. Connect the electric tool on the fuel pump connector (#2 on the picture above), placed on the fuel
tank, and the power supply on the auxiliary battery connector (#3).
2. Connect the fuel socked connector on the engine bay.
3. Switch on the electric tool in automatic or manual mode. If the automatic mode is selected the tool
will stop the draining process when it detects that there is no more fuel inside the tank.
Flow fuel pump filter cleaning process:
1. Drain out the fuel tank completely.
2. Open the fuel tank right side cover (picture 1).
3. Raise a little bit the plate and disconnect the pipes and wirings.
4. Turn the fastening and pull up the pump from the reservoir (picture 2). Pull hard the black hoses
to disconnect them from the main pump. Don’t forget clipping them hard again when mounting.
5. Remove the green mesh filter and clean it (picture 3).
In case you need to take out the reservoir, unclip the green plastic brackets and pull-up the reservoir
(picture 4).
Picture 1 Picture 2
Picture 3 Picture 4

42
Engine fuel filter replacing process:
The engine fuel filter is placed inside the fuel cell. The part is fixed by a tie-wrap and fuel pipes are
connected by fast couplings.
1. Drain out the fuel tank completely.
2. Open the right cover of the fuel tank.
3. Separate the inner foam and introduce the hands inside to cut the tie-wrap and disconnect the
fuel pipes.
Schematic view of the engine fuel filter placement:
Engine fuel filter placement inside the fuel cell:
Airjacks 5.10
The SEAT Leon Cup Racer TCR is provided with an airjack system. The connector is placed on the rear
right side (inside the standard refuelling cover).
Airjack plug on the car:
Airlance view:
Notes:
Maximum air pressure is 30 bar.
Inlet thread of the airlance is M16x1.5

43
IMPORTANT: never work under a vehicle supported only by airjacks unless safety props are
fitted.
Do not use 'U' bolt type clamps as distortion of the body will cause the airjack to stick. Do not
loosen or remove adaptor. Jacks must be vertical during operation. Mounting brackets or clamps
to be fitted to threaded section of body only.
Do not use petrol or paraffin for cleaning the airjacks as this will damage the rubber seals. Use an
alcohol based cleaning fluid as Methylated Spirit. Use only silicone spray or silicone grease when
internal lubrication is necessary.

44
6 PARTS MILEAGE
Engine Inspection Service / km Change Remark
Engine 7.000 12.000 SEAT Sport service
Spark plug 1.000 Use original parts only
Engine oil 1.000 Use recommended oil only
Oil filter 1.000 Use original parts only
Cotton air filter Once per event Once per event season 2 units rolling change adv.
Poly-V belt Once per event 1.000
Fuel tank Inspection Service / km Change Remark
Flow pump filer 1.000 First inspection 150 km
Engine fuel filter 3.000 Use original parts only
Transmission Inspection Service / km Change Remark
Gearbox and diff 2.000
Gearbox oil 500 Use recommended oil only
Gearbox oil filter Clean each oil change
Differential preload Once per event
Clutch 2.000 Check when vibrations
Drive shaft Once per event 2.500
Front axle Inspection Service / km Change Remark
Front dampers 4.000 / 1 year 8.000 SEAT Sport service
Ball joints Once per event 5.000 Always check tolerance
Steering rod inner joint
Once per event 5.000 Always check tolerance
Steering rack 15.000
Steering handle Once per event 4.000 Inspect cracks
Wheel hub Once per event 10.000 Change when noise
Front discs Once per event 1.500 Change when cracks
Disc bells Once per event 5.000 Check float in disc
Brake balance bar Once per event 4.000
Rear axle inspection Service / km Change Remark
Rear dampers 4.000 / 1 year 8.000 SEAT Sport service
Ball joints Once per event 5.000 Always check tolerance
Wheel hub Once per event 10.000 Change when noise
Rear discs 3.000
Wheel nuts 3.000
Safety parts Service / km Change Remark
Extinguisher 5 years 7 years SEAT Sport or OMP service
Backet 5 years
Safety belts 5 years
Fuel cell 5 years 7 years

45
7 SAFETY
Part Remarks Images
Airjack 3 airjacks on the car
Max pressure 30 bar
Safety props: for any job under the car use
always airjack safety props (x3).
Extinguisher Material: aluminium.
Weight: 6,2 kg.
Activation: electric.
Use: cockpit and engine bay.
Check the inner press bottle. It has to be
in the green area.
Fire extinguisher system: check always
that the 9V inner battery is in good
conditions.
Do not forget to put the toggle in ON when
car is running.
Backet FIA Homologated 8855 - 1999
Gel coated fiberglass shell
W side fixing points
HANS compatible
Check the homologation label expiry date
period.
Check always the fixations.
Change if big crash.
Safety belts Check always that the fixations are
correctly fixed.
Check the homologation label expiry date
period.
Check always that the driver is strongly
fixed.