Intro to AccuDraw - Mid-America CADDfiles.midamericacadd.org/2013presentations/MCMC...
32
Your Technology Advantage Introduction to AccuDraw Presented by: Jeanne Aarhus [email protected] 12005 Quail Drive Bellevue, NE 68123-1175 Office: 402-408-9696 www.aarhusassociates.com MCMC Summer 2013 ASSOCIATES aa rhus
Transcript of Intro to AccuDraw - Mid-America CADDfiles.midamericacadd.org/2013presentations/MCMC...

Your
Technology
Advantage
Introduction to
AccuDraw
Presented by:
Jeanne Aarhus [email protected]
12005 Quail Drive
Bellevue, NE 68123-1175
Office: 402-408-9696
www.aarhusassociates.com
MCMC Summer 2013
ASSOCIATES
aarhus

Trademarks
MicroStation, AccuDraw and SmartLine are registered trademarks of Bentley Systems, Inc. Microsoft
and Windows are registered trademarks of Microsoft Corporation. Adobe and Acrobat are trademarks of
Adobe Systems, Incorporated.
Copyright © 2013 Aarhus Associates, LLC. All other product names are trademarks of their respective
owners. Aarhus Associates believes the information in this publication is accurate as of its publication
date. Such information is subject to change without notice and is subject to applicable technical product
descriptions. Aarhus Associates is not responsible for inadvertent errors.
Contact Information
åarhus ASSOCIATES
12005 Quail Drive
Bellevue, NE 68123-1175
www.aarhusassociates.com
Jeanne Aarhus
(402) 408-9696

Your Technology Advantage
Call for Affordable Training with a Quality Guarantee www.aarhusassociates.com
12005 Quail Drive
Bellevue, NE 68123-1175
Office: 402-408-9696
ASSOCIATES
aarhus
Jeanne Aarhus is known for keeping her training sessions fast-moving and fun while still providing a thorough
understanding of the topic. She has been working with various CAD systems and applications since the early 1980’s, when
she began using Intergraph’s VAX-based IGDS system. She has gained experience in many CAD related fields that have included production drawing, coordination, end-user support, programming, and training for PC and UNIX based CAD
applications.
Her specialty is in providing users with the necessary tools to increase productivity and get the job done as efficiently as
possible. She has 25+ years of experience using MicroStation and AutoCAD in the Mapping and AEC environments, and
she continues to focus on maximizing the users time and productivity using these constantly changing tools. She is
certified in all levels of MicroStation and AutoCAD which enables her to assist users moving from one CAD environment
to another easily and proficiently.
She has conducted seminars and workshops on CAD productivity for managers and users in both corporate and college
settings. Jeanne has provided training workshops and been actively involved in International, National and Local CAD Users Groups, and is known for her “real-world” approach to learning. Here are a few comments from previous students:
… Presentation was exactly what I was looking for!
…Jeanne is a great instructor!... Lots of energy!... Made learning fun again!
…Jeanne is very knowledgeable!....and was very pleasant and patient when I needed help!
…Excellent knowledge from instructor, able to answer any questions with real life experience.
…Jeanne Aarhus is one of the best instructors I have ever had.
Bentley Products • MicroStation Update
• MicroStation Fundamentals
• MicroStation for AutoCAD Users
• MicroStation for Power Users
• MicroStation for CAD Managers
• PDF Composer
• Interplot Fundamentals
Adobe Products
• Adobe Professional for CAD Users
• Integrating PDF’s into your Projects
Autodesk Products
• AutoCAD Update
• AutoCAD Fundamentals
• AutoCAD Advanced
• AutoCAD Plotting and Sheet Sets
• AutoCAD Architecture Update
• AutoCAD Architecture Fundamentals
• AutoCAD Architecture Advanced
• AutoCAD Architecture for CAD Managers/Power
Users
• Revit Architecture for ACA Users • Revit Architecture Fundamentals
• Revit Structure
• Tips for Revit Architecture
• Tips for Revit Structure
Other Presentations & Workshops • Productivity Tips & Tricks
MicroStation or AutoCAD
• More Tips & Tricks
MicroStation or AutoCAD
• Customizing MicroStation or AutoCAD
For the USER
• MicroStation for AutoCAD Users
• AutoCAD for MicroStation Users
• Workspaces
Making Them Work for YOU
• AccuDraw & Smartline • Cool Tools for MicroStation
• Cool Tools for AutoCAD
• What’s NEW in MicroStation V8i or XM
• MicroStation “Interesting Occurrences”
ie. (Dirty Tricks)
• Using Styles
• Tips for Users
• Tips for CAD Managers
• Automate Your Standards
MicroStation or AutoCAD
• Manage Your Standards
MicroStation or AutoCAD
Custom Training/Workshop also available
Available Training Classes

Intro to AccuDraw 1
Copyright © 2013 – Jeanne Aarhus, Aarhus Associates, LLC – All Rights Reserved Do Not Duplicate
aa
Using AccuDraw…
The Basics
The AccuDraw utility first delivered with MicroStation J is one of the biggest productivity
enhancements ever. This powerful tool has now been enhanced several times with the release of V8i. If
you tried using AccuDraw early versions and haven’t re-visited it recently, you MUST try it again now.
Many of the initial “irritants” that most of us complained about have been eliminated and the overall
usability of the tool has been greatly enhanced. Now, not only is MicroStation V8i easier and more user
friendly…..it is now "smarter".
I generally have one word of advice for users who still resist using this powerful tool because they don’t
like the interface. First, try it again by docking it and leaving it alone to do it’s job. My rule is as
follows:
Don’t touch it! Or you will be punished!
What do I mean by that? If you dock the AccuDraw dialog and ignore it, it really does work better. If
you constantly pick at it and touch it to use it, then you get in the way of the tools predictability. So, the
secret to making AccuDraw easier to use is to LEAVE IT ALONE! I recommend that you dock it
somewhere and initially forget about it.
Yes, you have to look at it and read it, but DON’T TOUCH IT! Touching is for later when you have
mastered the basics of AccuDraw.
AccuDraw is a tool that tries to “second-guess” the user, and tries to predict what you really want to do.
The amazing thing about it is, it’s usually right! Pretty scary huh? Once you try this utility and give a
fair chancet you won’t know how you ever lived without it!
And AccuDraw in 3D is indispensable! If you ever struggled with the 3D planes, this utility is the
answer to your prayers!
The AccuDraw Dialog
The following dialog must remain open in order to use AccuDraw. Place it in a “convenient” location,
but allow for expansion during specific command options.
Rectangular AccuDraw (docked)
Polar AccuDraw
(Undocked)
Rectangular AccuDraw
(Undocked)
Intro to AccuDraw 2
Copyright © 2013 – Jeanne Aarhus, Aarhus Associates, LLC – All Rights Reserved Do Not Duplicate
aa
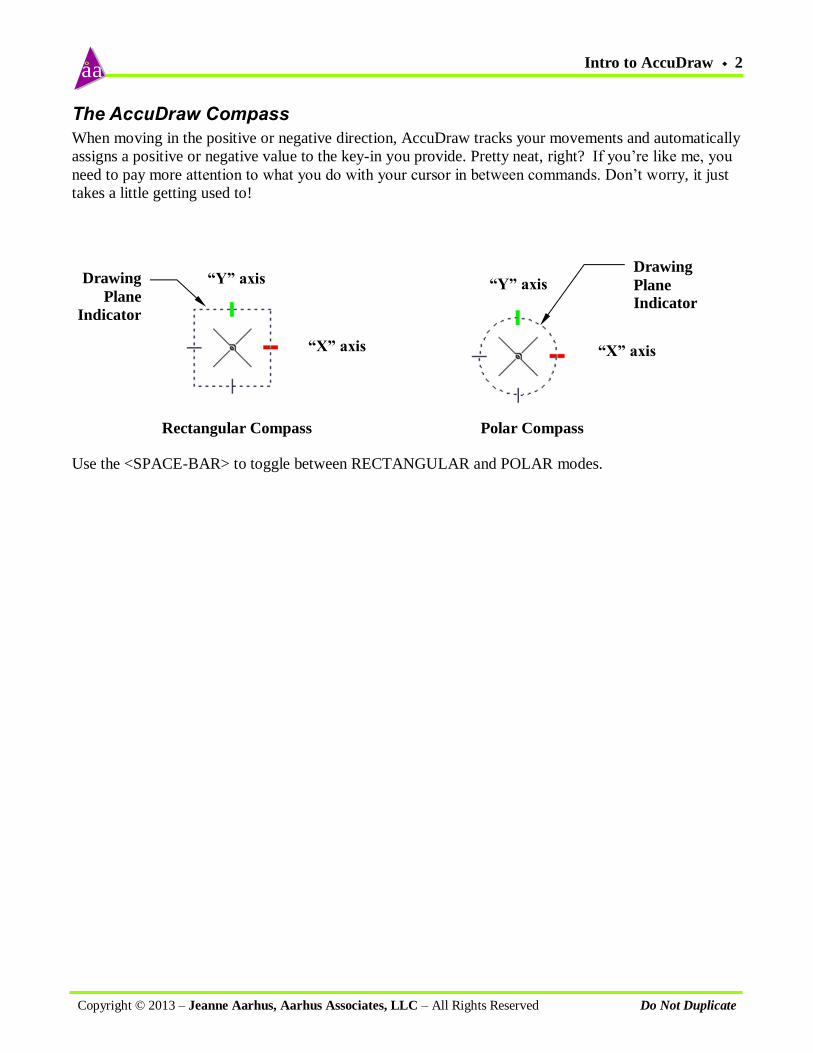
The AccuDraw Compass
When moving in the positive or negative direction, AccuDraw tracks your movements and automatically
assigns a positive or negative value to the key-in you provide. Pretty neat, right? If you’re like me, you
need to pay more attention to what you do with your cursor in between commands. Don’t worry, it just
takes a little getting used to!
Use the <SPACE-BAR> to toggle between RECTANGULAR and POLAR modes.
“Y” axis
“X” axis
“Y” axis
“X” axis
Rectangular Compass Polar Compass
Drawing
Plane
Indicator
Drawing
Plane
Indicator
Intro to AccuDraw 3
Copyright © 2013 – Jeanne Aarhus, Aarhus Associates, LLC – All Rights Reserved Do Not Duplicate
aa
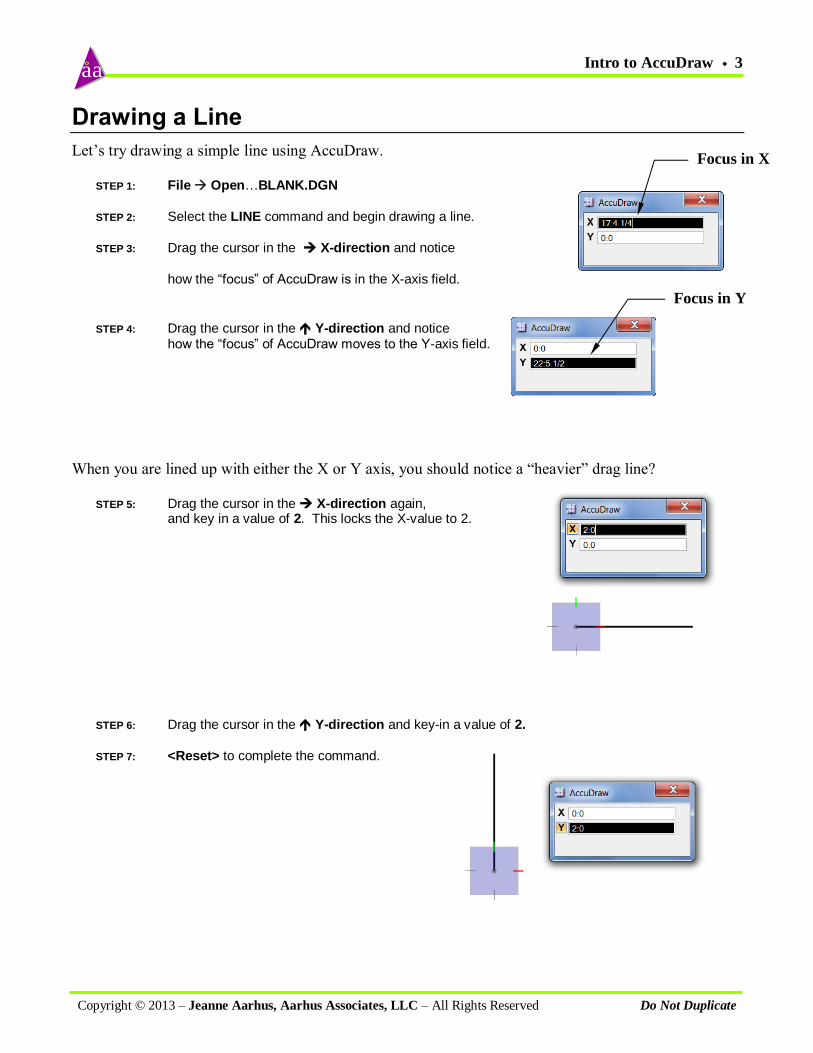
Drawing a Line
Let’s try drawing a simple line using AccuDraw.
STEP 1: File Open…BLANK.DGN
STEP 2: Select the LINE command and begin drawing a line.
STEP 3: Drag the cursor in the X-direction and notice
how the “focus” of AccuDraw is in the X-axis field.
STEP 4: Drag the cursor in the Y-direction and notice
how the “focus” of AccuDraw moves to the Y-axis field.
When you are lined up with either the X or Y axis, you should notice a “heavier” drag line?
STEP 5: Drag the cursor in the X-direction again,
and key in a value of 2. This locks the X-value to 2.
STEP 6: Drag the cursor in the Y-direction and key-in a value of 2.
STEP 7: <Reset> to complete the command.
Focus in X
Focus in Y

Intro to AccuDraw 4
Copyright © 2013 – Jeanne Aarhus, Aarhus Associates, LLC – All Rights Reserved Do Not Duplicate
aa
AccuDraw Distance Indicator
When drawing with AccuDraw it provides a “distance indicator” to help with the placement of repeating
distances.
STEP 1: Select the LINE command and drag the cursor in the
X-direction
STEP 2: Key in 2 to lock the X-distance to 2 units
STEP 3: Drag the cursor in the Y-direction until you see the Repeat Distance Indicator. This allows you to easily draw a 2 unit box.
Recall Previous Distances
Use the <PAGE-UP> and <PAGE-DOWN> keys to scroll through previous distances in AccuDraw.
Locking X and Y Axis
Another method to help automatic your precision drafting is to LOCK to a specific X or Y distance.
STEP 1: Select the LINE command and drag the cursor in the X-direction
STEP 2: Key in X to lock to the X-distance
STEP 3: Drag your cursor in the Y-direction and you notice you get a dashed line indicating that you are locked to that X-value.

Intro to AccuDraw 5
Copyright © 2013 – Jeanne Aarhus, Aarhus Associates, LLC – All Rights Reserved Do Not Duplicate
aa
Let’s take a look at how this can be put to practical use!
We want to draw a line at an angle of ZERO degrees from P1 to where it would line up with the center
of the circle at P2.
STEP 1: File Open….AXIS1.DGN
STEP 2: TENTATIVE SNAP to the MIDPOINT at P1 and <Data Point> to ACCEPT IT.
STEP 3: TENTATIVE SNAP to the CENTER at P2 but DO NOT ACCEPT IT.
STEP 4: Key in X while the TENTATIVE is still active. This locks you to that X-value
STEP 5: Drag the cursor back up until you are lined up with P1 again.
STEP 6: <Data Point> to ACCEPT this point at P3

Intro to AccuDraw 6
Copyright © 2013 – Jeanne Aarhus, Aarhus Associates, LLC – All Rights Reserved Do Not Duplicate
aa
Using POLAR ANGLES
Now we will draw a simple line using the POLAR compass so we can draw based on angles rather then
distances.
STEP 1: File Open….BLANK.DGN
STEP 2: Select the LINE command and hit the <space-bar> to toggle to POLAR mode in AccuDraw.
STEP 3: Start the line anywhere in the drawing
STEP 4: Key in A to move the AccuDraw focus to the ANGLE field
STEP 5: Key in 45 to set the angle to 45 degrees.
Let’s take a look at how this can be put to practical use!
We want to draw the shape displayed below:
STEP 1: Select the LINE command
STEP 2: TENTATIVE SNAP to P1 and <Data Point> to ACCEPT to start the zig-zag line
STEP 3: Key in A and then 45 to LOCK the angle at 45 degrees
STEP 4: Key in 1 for the distance of the first segment
STEP 5: AccuDraw automatically rotates to this angle for the next segment
STEP 6: Using the REPEAT DISTANCE INDICATOR draw the remaining 45 degree segments….pretty easy….eh?????

Intro to AccuDraw 7
Copyright © 2013 – Jeanne Aarhus, Aarhus Associates, LLC – All Rights Reserved Do Not Duplicate
aa
More POLAR mode
Once the compass is rotated to match your current segments, the next thing you need to do is re-align it
back with the view or drawing plane.
Let’s try to draw the example below:
STEP 1: File Open….POLAR2.DGN
STEP 2: Select the LINE command
STEP 3: Hit the <Space Bar> until you are in RECTANGULAR mode in AccuDraw.
STEP 4: Start the line anywhere in your drawing
STEP 5: Drag the cursor in the X-direction and key in 1 for the distance
STEP 6: Hit the <SpaceBar> and switch to POLAR mode in AccuDraw
STEP 7: Hit the <Tab> to move the focus to the ANGLE field if necessary
STEP 8: Key in 45 to lock the angle to 45 degrees
STEP 9: Use the REPEAT DISTANCE INDICATOR to repeat the distance of 1
Again…use the REPEAT DISTANCE INDICATOR to repeat the distance of 1 for the third line
segment

Intro to AccuDraw 8
Copyright © 2013 – Jeanne Aarhus, Aarhus Associates, LLC – All Rights Reserved Do Not Duplicate
aa
We need to re-align the AccuDraw compass with the VIEW to draw the next segment.
STEP 10: Key in V to align the compass with the VIEW ….isn’t this thing great!
STEP 11: Finish drawing the rest of this exercise.

Intro to AccuDraw 9
Copyright © 2013 – Jeanne Aarhus, Aarhus Associates, LLC – All Rights Reserved Do Not Duplicate
aa
Using Rotate Element
Use the RE shortcut to align with previously drawn graphics.
Let’s try to draw this example:
STEP 1: File Open….ROTATE_TO_ELEMENT.DGN
STEP 2: Select the LINE command
STEP 3: HOVER on an existing line element and key-in RE and to align the AccuDraw compass to the existing line.
Using the new tools you used in the first exercise you should be able to complete this exercise.

Intro to AccuDraw 10
Copyright © 2013 – Jeanne Aarhus, Aarhus Associates, LLC – All Rights Reserved Do Not Duplicate
aa
Using the ORIGIN shortcut
Use the O shortcut to locate “reference points” while using the AccuDraw direct distance key-ins
discussed earlier.
STEP 1: File Open….ORIGIN1.DGN
STEP 2: Select the LINE command and TENTATIVE SNAP to P1 but DO NOT ACCEPT IT…
STEP 3: Key in O to set the temporary reference origin to this point
STEP 4: Drag the cursor in the X-direction and key in a distance of 1
STEP 5: <Data Point> to start the line at this location
If you are thinking of practical applications….remember this little tip!
Whenever you find yourself drawing a “temporary construction line” just to get a location to start
drawing something else…..
Use this instead.....

Intro to AccuDraw 11
Copyright © 2013 – Jeanne Aarhus, Aarhus Associates, LLC – All Rights Reserved Do Not Duplicate
aa
Using ACCUDRAW with other BASIC COMMANDS
The RECTANGLE command
STEP 1: File Open…BLANK.DGN
STEP 2: Select the RECTANGLE command
STEP 3: Begin the rectangle with the first <Data Point> anywhere on the drawing
STEP 4: Drag the cursor in the X-direction and key in 2 for the X-distance of the rectangle… DO NOT issue a <data-point>
STEP 5: Drag the cursor in the Y-direction and key in 1 for the Y-distance of the rectangle
STEP 6: <Data Point> to finish the command.
The ARC command
I don’t know how you feel about it…but I have always thought that trimming circles was easier than
drawing arcs…until I used AccuDraw to do it! If you have ever struggled to draw arcs…(get them to
swing in the right direction)…then this exercise is for you!
STEP 1: File Open…BLANK.DGN
STEP 2: Select the ARC command and <data-point> anywhere on the drawing to specify the center of the arc
STEP 3: Drag the cursor in any direction and key in the RADIUS of 1
STEP 4: <Data Point> to accept this location
STEP 5: Drag the cursor around the screen to get the desired SWEEP ANGLE and <data-point> to finish the ARC command.

Intro to AccuDraw 12
Copyright © 2013 – Jeanne Aarhus, Aarhus Associates, LLC – All Rights Reserved Do Not Duplicate
aa
The SMARTLINE command
Let’s try to draw this example:
STEP 1: File Open….SMARTLINE1.DGN
STEP 2: Select the SMARTLINE command and verify that the SEGMENT TYPE is set to LINES
STEP 3: Start the line at P1
STEP 4: Drag the cursor in the X-direction and key in 1 for the distance… <Data Point> to ACCEPT this location
STEP 5: Change the SEGMENT TYPE to ARCS
STEP 6: Drag the cursor in the X-direction and key in 1 for the RADIUS DISTANCE <Data Point> to ACCEPT this location
STEP 7: Drag your cursor around the circle and note that you can swing the arc angle either CLOCKWISE or COUNTER-CLOCKWISE…pretty convenient ..right?
STEP 8: Drag the cursor until you see the 180 degree ARC that we want and <data-point> to ACCEPT
STEP 9: Change the SEGMENT TYPE back to LINES
STEP 10: Drag the cursor in the X-direction and key in 1 for the line distance.

Intro to AccuDraw 13
Copyright © 2013 – Jeanne Aarhus, Aarhus Associates, LLC – All Rights Reserved Do Not Duplicate
aa
Using AccuDraw to Modify Elements
Don’t overlook the benefits of AccuDraw to modify existing elements. Once you tried it, you’ll never
look back!
STEP 1: File Open….MODIFY.DGN
STEP 2: Select the MODIFY command and pick the existing SmartLine at P1
STEP 3: Drag the cursor in the Y-direction and key in a distance of 1… <Data Point> to ACCEPT.
STEP 4: Select the MODIFY command again and identify the element anywhere near P2
STEP 5: Drag the cursor in the Y-direction and <Data Point> anywhere to get an UNKNOWN DISTANCE
Now …here is my question?
How can I get the right side lined up again with the left side? Any ideas?
If you said use the X-AXIS LOCK shortcut key…that’s CORRECT!
STEP 1: Select the MODIFY command and identify the element
anywhere near P3
STEP 2: Drag the cursor in the Y-direction and key in X to lock the X-value
STEP 3: TENTATIVE SNAP to the LEFT-side at P4 and you’re done!

Intro to AccuDraw 14
Copyright © 2013 – Jeanne Aarhus, Aarhus Associates, LLC – All Rights Reserved Do Not Duplicate
aa
Multiple copy
Use the Previous Distance Indicator to make multiple copies easier
Let’s try to draw this next example:
STEP 1: File Open….MCOPY.DGN
STEP 2: Using the RECTANGLE command and ACCUDRAW construct a 1 x 1 unit BOX. Note: If you can’t remember how, just go back to the previous section in the handout.
STEP 3: Select the COPY command and identify your rectangle
STEP 4: Drag the cursor in the X-direction and key in a distance of 2
STEP 5: Make additional copies by utilizing the REPEAT DISTANCE INDICATOR

Intro to AccuDraw 15
Copyright © 2013 – Jeanne Aarhus, Aarhus Associates, LLC – All Rights Reserved Do Not Duplicate
aa
FOCUS…FOCUS…FOCUS
When using the AccuDraw commands, a lot of users complain about the automatic focus shifting from
dialog to dialog, and complain that they can’t keep track of what dialog has focus and when. Well here
are some tips that can help you control this “lack of focus”. Hopefully, this solves any problems you
might have.
ESCaping the FOCUS
The first method is to simply pick in the dialog box where you would like MicroStation to focus in for
you next input. Seems simple enough…but it is a real pain!
The next method allows you to move between dialog boxes and windows in the following order.
Assuming you haven’t altered the “default” preference setting. Just press the <ESC> key to move from
one window to another.
AccuDraw Window
Tools Settings Window
Key-in field
OOPS….once you make it to the key-in field you’re stuck again!!!!
Stuck in the KEYIN Field
Yes, all you have to do is click in the Tool Settings Window and your focus moves….but that’s too hard
for me…
Remember my motto….”MicroStation for the Lazy User”.
Lets find a better way….
STEP 1: Key in ACCUDRAW DIALOG MAIN
Notice that the focus moves immediately to the AccuDraw Window.
Again…..who wants to key that in every time….What if you assigned it to custom shortcut key-in…or
even a Function Key???? Just an idea…!
Assign: F3……. accudraw dialog main

Intro to AccuDraw 16
Copyright © 2013 – Jeanne Aarhus, Aarhus Associates, LLC – All Rights Reserved Do Not Duplicate
aa
Changing YOUR FOCUS
The next setting that allows you to control the focus is a PREFERENCE setting. This one works even
if you never use AccuDraw…although I hope after this session that won’t be you!
STEP 1: Select Workspaces Preferences
STEP 2: Select Tools and UNCHECK the Auto-Focus Tool Settings Window.
This causes the focus to remain in
the key-in field without
automatically moving to the tool
settings window. This is definitely
my preference on this setting! But
then I am an old keyboard user!
LAST …but Definitely Not LEAST
When you are use AccuDraw there are some shortcut key-ins to help you get the focus where you want
it.
Try one of these: GT – go to Tool Settings window
GK – go to Key-in window
Try making this new one! GG – go to AccuDraw Main dialog
All the AccuDraw Shortcuts
The “X”, “Y”, “O”, and “V” key-ins are just the beginning of the delivered AccuDraw shortcut key-ins.
Below is a list of the “default” key-ins.
This file is located in:
X:…..\Workspace\system\data\shortcuts.txt

Intro to AccuDraw 17
Copyright © 2013 – Jeanne Aarhus, Aarhus Associates, LLC – All Rights Reserved Do Not Duplicate
aa
Shortcuts
Enter Smart Lock AccuDraw Lock Smart
Space Change Mode AccuDraw Mode
O Set Origin AccuDraw Set Origin
V View Rotation AccuDraw Rotate View
T Top Rotation AccuDraw Rotate Top
F Front Rotation AccuDraw Rotate Front 3D
S Side Rotation AccuDraw Rotate Side 3D
B Base Rotation AccuDraw Rotate Base Toggle
E Cycle Rotation AccuDraw Rotate Cycle 3D
X Lock X AccuDraw Lock X
Y Lock Y AccuDraw Lock Y
Z Lock Z AccuDraw Lock Z 3D
D Lock Distance AccuDraw Lock Distance
A Lock Angle AccuDraw Lock Angle
LI Lock Index AccuDraw Lock Index
LP Lock ACS Grid Plane AccuDraw Lock GridPlane
LA Lock ACS Plane Lock ACSContext Toggle
LS Lock ACS Plane Snap Lock Snap Construction Toggle
LZ Lock Sticky Z AccuDraw Lock StickyZ
RQ Rotate Quick AccuDraw Rotate Quick
RA Rotate ACS AccuDraw Rotate ACS
RC Rotate to Current ACS AccuDraw Rotate CurrentACS
RE Rotate Element AccuDraw Rotate Element V8i
RV Rotate View AccuDraw Rotate OrientView
RX Rotate about X AccuDraw Rotate X 3D
RY Rotate about Y AccuDraw Rotate Y 3D
RZ Rotate about Z AccuDraw Rotate Z
? Show Shortcuts AccuDraw Dialog Shortcuts
~ Bump Tool Setting AccuDraw Bump ToolSetting
GT Go to Tool Settings Dialog ToolSetting
GK Go to Keyin Dialog CmdBrowse
GS Go to Settings AccuDraw Dialog Settings
GA Get ACS AccuDraw Dialog GetACS
WA Write to ACS AccuDraw Dialog SaveACS
P Point Keyin (single) Point Keyin Single
M Point Keyin (multi) Point Keyin Multiple
I Intersect Snap Snap Intersect
N Nearest Snap Snap Nearest
C Center Snap Snap Center
K Snap Divisor AccuDraw Dialog SnapDivisor
HA AccuSnap on Hold AccuSnap on Hold
HS AccuSnap Toggle AccuSnap Toggle
HU AccuSnap Suspend
Q Quit AccuDraw AccuDraw Quit

Intro to AccuDraw 18
Copyright © 2013 – Jeanne Aarhus, Aarhus Associates, LLC – All Rights Reserved Do Not Duplicate
aa
Making your OWN key-ins via ACCUDRAW
If you are a keyboard person like I am…then you still key several commands in the key-in field.
Well…have you ever run in to commands in some of the dialog boxes that are just too long to key in?
Me too! Here is a great way to create your own shortcut key-ins….this is especially helpful if you are
an old AutoCAD user!
STEP 1: Select the ACCUDRAW command.
STEP 2: Key in GS to activate the AccuDraw Settings dialog.
STEP 3: Select the Shortcut Key-ins button.
STEP 4: Select the New button from the AccuDraw Shortcuts dialog.

Intro to AccuDraw 19
Copyright © 2013 – Jeanne Aarhus, Aarhus Associates, LLC – All Rights Reserved Do Not Duplicate
aa
Next, decide what command you need a shortcut key in for.
STEP 5: In this example, we will make a shortcut for the UPDATE VIEW command (a good for those who
get tired of having to select the buttons on the scroll bar of the view menu.
STEP 6: Let’s Try it!……Cool eh?
STEP 7: You can even edit them if it didn’t work. Just select the Edit button on the AccuDraw Shortcuts dialog, and make the necessary corrections.
In the next example, we will set up a shortcut key-in for the DELETE command.
STEP 1: The following dialog pops up asking if you are creating a duplicate or conflicting shortcut…make
sure you aren’t overwriting an AccuDraw shortcut key-in …..but in this case it is a conflicting one. What this actually means is that there is already a D shortcut keyin for DISTANCE in AccuDraw…so let’s change ours to DE and then click OK…and create it. Yes, the dialog is still there, so always double check what you are conflicting with before you click OK.
STEP 2: I recommend that you save your own shortcuts files and use it rather than overwriting the default file SHORTCUTS.TXT. To use your file set the following:

Intro to AccuDraw 20
Copyright © 2013 – Jeanne Aarhus, Aarhus Associates, LLC – All Rights Reserved Do Not Duplicate
aa
Next you need to tell your workspace to use your new shortcuts file…that is if you created your
own…and didn’t modify the delivered one.
STEP 1: Workspaces
Configuration and select Operation to modify the AccuDraw Shortcuts. Select your new shortcuts file. This setting is saved in the MS_ACCUDRAWKEYS configuration variable.
To restore the default shortcuts file just keyin the following command:
accudraw shortcuts default
There is a maximum of 400 shortcuts allowed.

Intro to AccuDraw 21
Copyright © 2013 – Jeanne Aarhus, Aarhus Associates, LLC – All Rights Reserved Do Not Duplicate
aa
Bump shortcut
A new shortcut has been added that bumps an item in the tool settings dialog box to the next setting. For
example, if you are drawing a SmartLine and the focus is in the AccuDraw dialog box, you can just
press the ~ key and it switches to arcs without moving the focus from the AccuDraw dialog box.
STEP 1: Activate the ACCUDRAW command
STEP 2: Select the SMARTLINE command
STEP 3: Keyin ACCUDRAW BUMP TOOLSETTING
Did you see the command toggle from drawing a line to drawing an arc? There is a shortcut for this
accudraw keyin….the ~ keyin
STEP 4: Try this…..keyin ~
AccuDraw Compass TOO BIG?
At first the size of the compass was ok…but once I learned how to use AccuDraw…I didn’t like the
default size of the accudraw compass…it was too big. Fortunately you can customize it so…I can’t
complain! The default size of the compass is 40…so we’ll make it smaller.
STEP 1: Keyin ACCUDRAW SETTINGS SIZE 20
Like that better? NO?…try any size you like! Values can be anything between 6 and 399.
Setting = 40 (Default) Setting = 20

Intro to AccuDraw 22
Copyright © 2013 – Jeanne Aarhus, Aarhus Associates, LLC – All Rights Reserved Do Not Duplicate
aa
Using ACCUDRAW as a Calculator
Do you ever have to measure something just to divide the distance to place items such as center lines?
Well, here is a neat trick using ACCUDRAW that can save you many steps!
STEP 1: File Open….CALC1.DGN
STEP 2: Select the LINE command
STEP 3: TENTATIVE SNAP to P1 and keyin O to lock in the ORIGIN
STEP 4: TENTATIVE SNAP to the second line at P2, but DO NOT ACCEPT IT.
STEP 5: Keyin /2 and the distance between these two points will be divided in half
STEP 6: <data-point> to start the line
STEP 7: Repeat the same steps on the other end of the lines
Intro to AccuDraw 23
Copyright © 2013 – Jeanne Aarhus, Aarhus Associates, LLC – All Rights Reserved Do Not Duplicate
aa
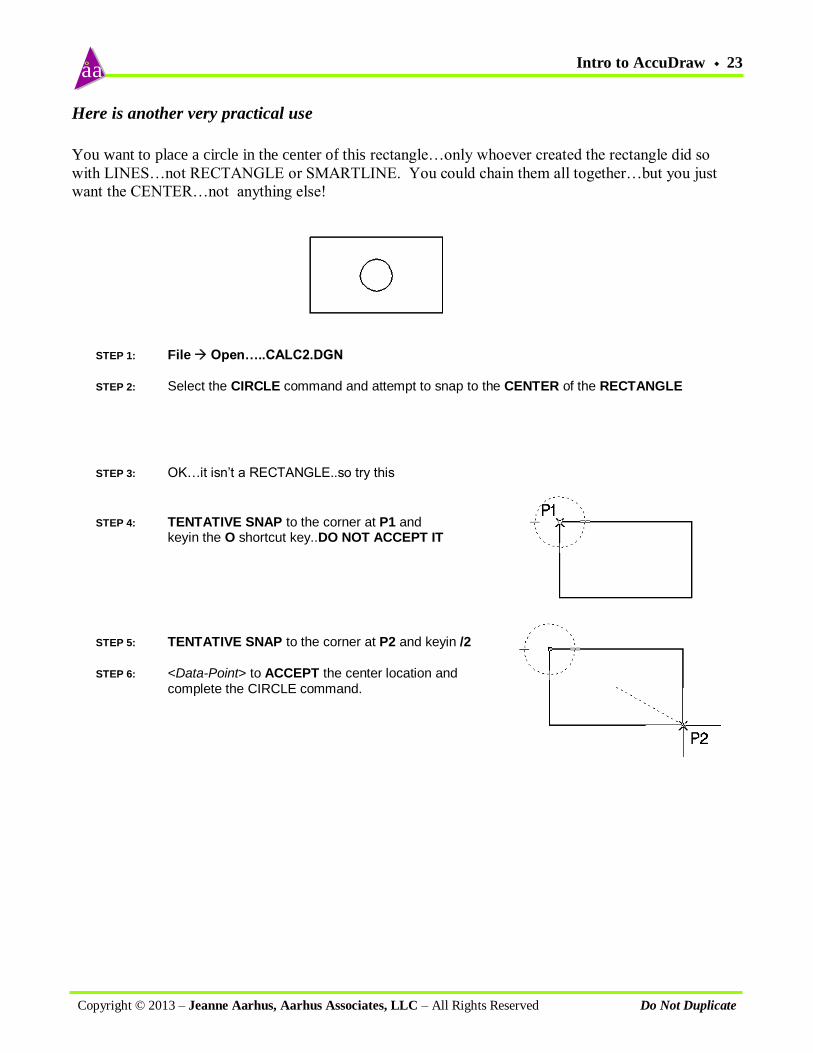
Here is another very practical use
You want to place a circle in the center of this rectangle…only whoever created the rectangle did so
with LINES…not RECTANGLE or SMARTLINE. You could chain them all together…but you just
want the CENTER…not anything else!
STEP 1: File Open…..CALC2.DGN
STEP 2: Select the CIRCLE command and attempt to snap to the CENTER of the RECTANGLE
STEP 3: OK…it isn’t a RECTANGLE..so try this
STEP 4: TENTATIVE SNAP to the corner at P1 and
keyin the O shortcut key..DO NOT ACCEPT IT
STEP 5: TENTATIVE SNAP to the corner at P2 and keyin /2
STEP 6: <Data-Point> to ACCEPT the center location and complete the CIRCLE command.

Intro to AccuDraw 24
Copyright © 2013 – Jeanne Aarhus, Aarhus Associates, LLC – All Rights Reserved Do Not Duplicate
aa
Using SMARTLINE
SMARTLINE is a complex line drawing command that in the right arena can save tons of modifications
down the road…If you wonder if you can benefit from this command answer these questions:
Do you ever FILLET corners?
Do you ever CHAMER corners?
Do you ever FENCE STRETCH an entire segment of an object?
Do you ever RE-FILLET and change a parameter? i.e. Radius?
…there are more…but these will get you started.
STEP 1: File Open….SMARTLINE2.DGN
STEP 2: Select the SMARTLINE command
STEP 3: Modify the VERTEX TYPE to ROUNDED and set the ROUNDING RADIUS to .5
STEP 4: Using a combination of ACCUDRAW and SMARTLINE complete the drawing above.
STEP 1: File Open….SMARTLINE3.DGN
STEP 2: Select the SMARTLINE command
STEP 3: Modify the VERTEX TYPE to CHAMFERED and set the CHAMFER OFFSET to .5
STEP 4: Using a combination of ACCUDRAW and SMARTLINE complete the drawing above.

Intro to AccuDraw 25
Copyright © 2013 – Jeanne Aarhus, Aarhus Associates, LLC – All Rights Reserved Do Not Duplicate
aa
Using AccuDraw in 3D
Use the T, S, and F shortcuts to align with isometric views when drawing in 3D
STEP 1: File Open….3D_1.DGN
STEP 2: Select the CIRCLE command
STEP 3: TENTATIVE SNAP to P1 and keyin O to lock in the ORIGIN
STEP 4: If your ACCUDRAW COMPASS is not aligned to the TOP of the box…keyin T to ROTATE the COMPASS so it does align with the TOP.
STEP 5: TENTATIVE SNAP to P2 and keyin /2 to divide the distance in half
STEP 6: <Data-point> to ACCEPT this location
STEP 7: Keyin a RADIUS of .25
P2

Intro to AccuDraw 26
Copyright © 2013 – Jeanne Aarhus, Aarhus Associates, LLC – All Rights Reserved Do Not Duplicate
aa
Now let’s try the FRONT side of the cube.
STEP 1: TENTATIVE SNAP to P1 and keyin O to lock in the ORIGIN
STEP 2: If your ACCUDRAW COMPASS is not aligned to the FRONT of the box…keyin F to ROTATE the COMPASS so it does align with the FRONT.
STEP 3: TENTATIVE SNAP to P2 and keyin /2 to divide the distance in half
STEP 4: <Data-Point> to ACCEPT this location
STEP 5: Keyin a RADIUS of .25
You can do the SIDE VIEW on your own…right?

Intro to AccuDraw 27
Copyright © 2013 – Jeanne Aarhus, Aarhus Associates, LLC – All Rights Reserved Do Not Duplicate
aa
P3
ROTATE ACS using AccuDraw in 3D
Use the RA shortcut to rotate the drawing plane to an arbitrary angle.
Again…place a .25 RADIUS CIRCLE on the FLAP EDGE of this model. Make
sure it is centered.
STEP 1: File Open….3D_2.DGN
STEP 2: Select the CIRCLE command.
STEP 3: TENTATIVE SNAP to the MIDPOINT of the flap at P1 and keyin O to set the ORIGIN
STEP 4: The AccuDraw Compass is not lined up so keyin RA to
ROTATE ACS and line it up with the flap
STEP 5: TENTATIVE SNAP to the corner of the flap at P2 and <data-point> to ACCEPT to define the ACS ORIGIN
STEP 6: TENTATIVE SNAP to the opposite corner of the flap at P3 and <data-
point> to ACCEPT to define the ACS X-AXIS
STEP 7: TENTATIVE SNAP to the opposite corner of the flap at P4
and <data-point> to ACCEPT to define the ACS Y-AXIS
The AccuDraw Compass should now be lined up with the flap.
Complete the command as in the previous exercise.
P2
P4
P1

Intro to AccuDraw 28
Copyright © 2013 – Jeanne Aarhus, Aarhus Associates, LLC – All Rights Reserved Do Not Duplicate
aa
More 3D…..
Let’s try another 3D exercise.
We are going to add 3D CYLINDERS to the surfaces as shown in the drawing. These cylinders will be
2 units in LENGTH…with a RADIUS of .25 units
This is sooooo easy…you won’t believe it until you’ve done it!
STEP 1: File Open….3D_3.DGN
STEP 2: Turn ON the 3D PRIMITIVES toolbar
STEP 3: Select the CYLINDERS command
Using the techniques you learned in the last exercise duplicate the drawing shown above…it you want to
really test yourself….be sure to CENTER them on each surface.

Intro to AccuDraw 29
Copyright © 2013 – Jeanne Aarhus, Aarhus Associates, LLC – All Rights Reserved Do Not Duplicate
aa
That's probably more than I have time for….but hopefully not
more that you wanted to know!
Thank you for your time Hope you enjoyed the session!
Looking for customized Training and Standards consulting
using your company standards and procedures?
Call for affordable rates and flexible schedules.
Contact:
åarhus ASSOCIATES, LLC
12005 Quail Drive
Bellevue, NE 68123-1175
www.aarhusassociates.com
Jeanne Aarhus
(402) 408-9696
Copyright © 2013 Aarhus Associates, LLC. Aarhus Associates and the Aarhus Associates Logo are registered trademarks of Aarhus Associates. All other
product names are trademarks of their respective owners. Aarhus Associates believes the information in this document is accurate as of its publication date.
Such information is subject to change without notice and is subject to applicable technical product descriptions. Aarhus Associates is not responsible for
inadvertent errors.