Geoportal Server 1.2.4 Installation Guide
48
July 2013 i Geoportal Server 1.2.4 Installation Guide Contents 1. PRE-INSTALLATION REQUIREMENTS ....................................................................................... 2 2. SELECT AN AUTHENTICATION MECHANISM FOR THE GEOPORTAL SERVER ....................................... 2 3. CONFIGURE A DIRECTORY SERVER FOR THE GEOPORTAL .............................................................. 3 4. SET UP THE DATABASE ....................................................................................................... 10 5. DEPLOY AND CONFIGURE THE GEOPORTAL WEB APPLICATION ................................................... 19 6. DEPLOY AND CONFIGURE THE SERVLET WEB APPLICATION........................................................ 27 7. JDBC CONFIGURATION...................................................................................................... 27 8. SMOKETEST THE GEOPORTAL ............................................................................................. 30 9. DESKTOP TOOLS (OPTIONAL) .............................................................................................. 31 9.1. GEOPORTAL CSW CLIENTS ................................................................................................. 31 9.2. GEOPORTAL PUBLISH CLIENT............................................................................................... 31 9.3. WMC CLIENT.................................................................................................................... 32 APPENDIX A: MORE GEOPORTAL CONFIGURATIONS ....................................................................... 33 1.0 CUSTOMIZATION CONFIGURATIONS .......................................................................................... 33 2.0 ADDITIONAL CONFIGURATIONS ................................................................................................ 45
Transcript of Geoportal Server 1.2.4 Installation Guide
July 2013 i
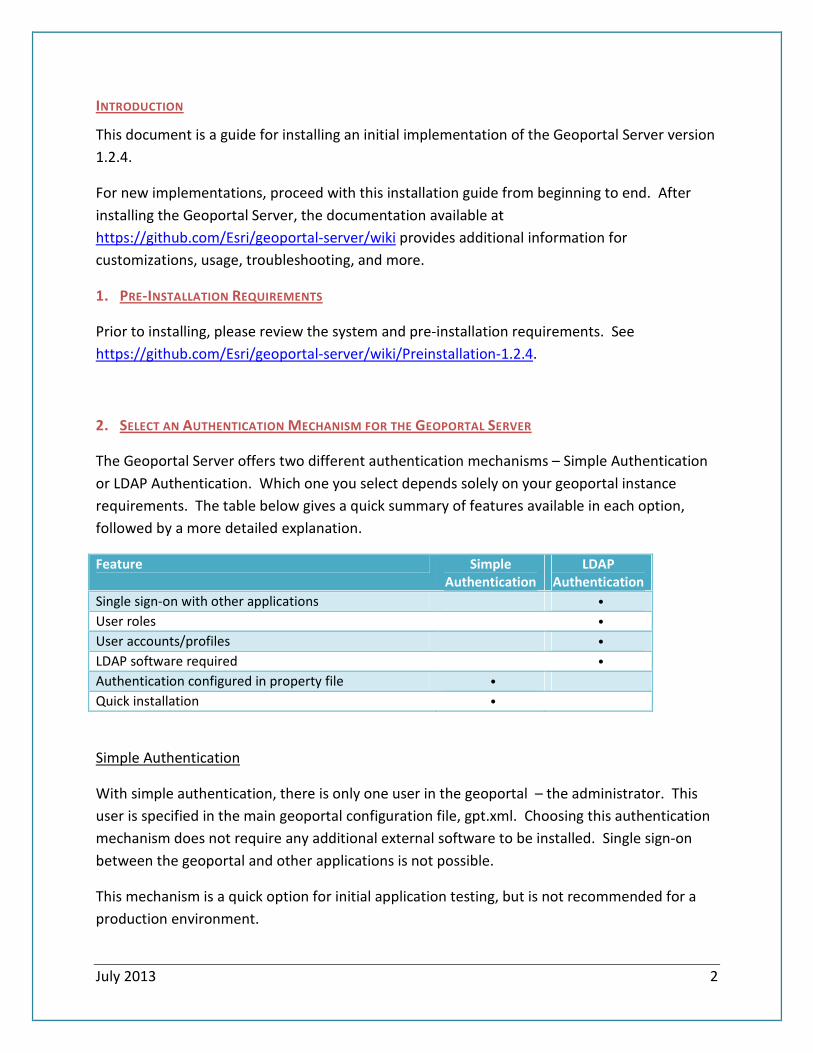
Geoportal Server 1.2.4
Installation Guide
Contents
1. PRE-INSTALLATION REQUIREMENTS ....................................................................................... 2
2. SELECT AN AUTHENTICATION MECHANISM FOR THE GEOPORTAL SERVER ....................................... 2
3. CONFIGURE A DIRECTORY SERVER FOR THE GEOPORTAL .............................................................. 3
4. SET UP THE DATABASE ....................................................................................................... 10
5. DEPLOY AND CONFIGURE THE GEOPORTAL WEB APPLICATION ................................................... 19
6. DEPLOY AND CONFIGURE THE SERVLET WEB APPLICATION ........................................................ 27
7. JDBC CONFIGURATION...................................................................................................... 27
8. SMOKETEST THE GEOPORTAL ............................................................................................. 30
9. DESKTOP TOOLS (OPTIONAL) .............................................................................................. 31
9.1. GEOPORTAL CSW CLIENTS ................................................................................................. 31
9.2. GEOPORTAL PUBLISH CLIENT ............................................................................................... 31
9.3. WMC CLIENT .................................................................................................................... 32
APPENDIX A: MORE GEOPORTAL CONFIGURATIONS ....................................................................... 33
1.0 CUSTOMIZATION CONFIGURATIONS .......................................................................................... 33
2.0 ADDITIONAL CONFIGURATIONS ................................................................................................ 45
July 2013 2
INTRODUCTION
This document is a guide for installing an initial implementation of the Geoportal Server version
1.2.4.
For new implementations, proceed with this installation guide from beginning to end. After
installing the Geoportal Server, the documentation available at
https://github.com/Esri/geoportal-server/wiki provides additional information for
customizations, usage, troubleshooting, and more.
1. PRE-INSTALLATION REQUIREMENTS
Prior to installing, please review the system and pre-installation requirements. See
https://github.com/Esri/geoportal-server/wiki/Preinstallation-1.2.4.
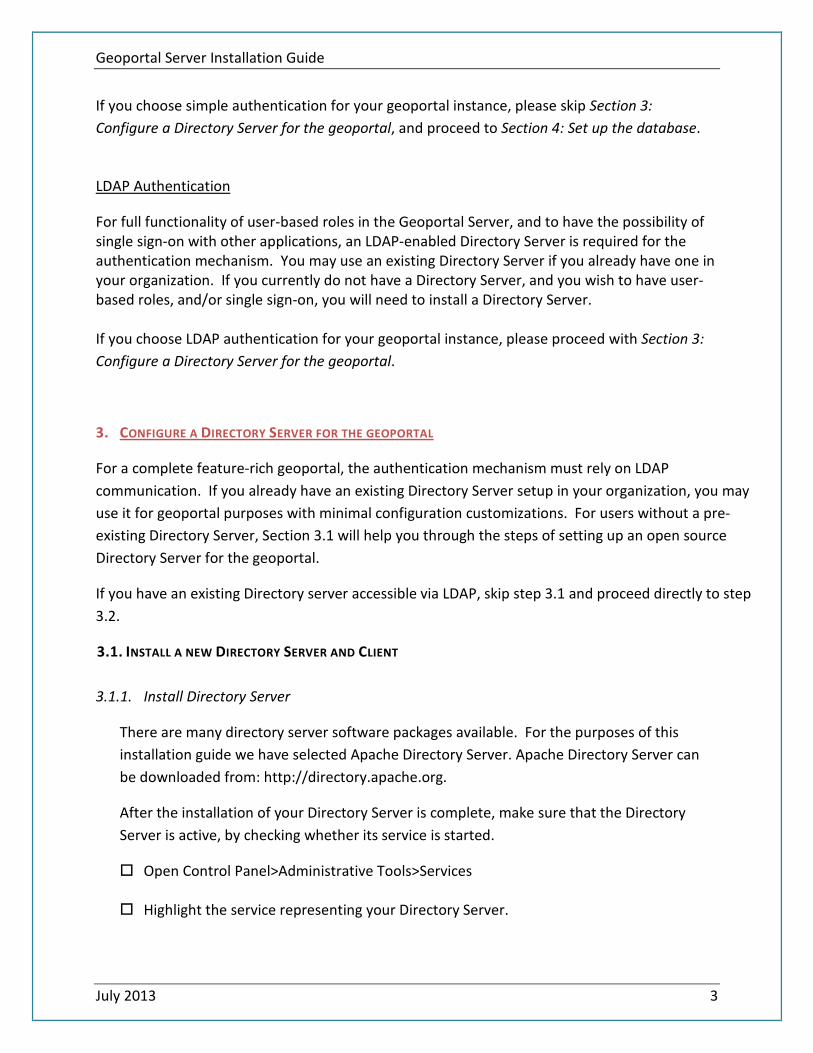
2. SELECT AN AUTHENTICATION MECHANISM FOR THE GEOPORTAL SERVER
The Geoportal Server offers two different authentication mechanisms – Simple Authentication
or LDAP Authentication. Which one you select depends solely on your geoportal instance
requirements. The table below gives a quick summary of features available in each option,
followed by a more detailed explanation.
Feature Simple
Authentication
LDAP
Authentication
Single sign-on with other applications •
User roles •
User accounts/profiles •
LDAP software required •
Authentication configured in property file •
Quick installation •
Simple Authentication
With simple authentication, there is only one user in the geoportal – the administrator. This
user is specified in the main geoportal configuration file, gpt.xml. Choosing this authentication
mechanism does not require any additional external software to be installed. Single sign-on
between the geoportal and other applications is not possible.
This mechanism is a quick option for initial application testing, but is not recommended for a
production environment.
Geoportal Server Installation Guide
July 2013 3
If you choose simple authentication for your geoportal instance, please skip Section 3:
Configure a Directory Server for the geoportal, and proceed to Section 4: Set up the database.
LDAP Authentication
For full functionality of user-based roles in the Geoportal Server, and to have the possibility of
single sign-on with other applications, an LDAP-enabled Directory Server is required for the
authentication mechanism. You may use an existing Directory Server if you already have one in
your organization. If you currently do not have a Directory Server, and you wish to have user-
based roles, and/or single sign-on, you will need to install a Directory Server.
If you choose LDAP authentication for your geoportal instance, please proceed with Section 3:
Configure a Directory Server for the geoportal.
3. CONFIGURE A DIRECTORY SERVER FOR THE GEOPORTAL
For a complete feature-rich geoportal, the authentication mechanism must rely on LDAP
communication. If you already have an existing Directory Server setup in your organization, you may
use it for geoportal purposes with minimal configuration customizations. For users without a pre-
existing Directory Server, Section 3.1 will help you through the steps of setting up an open source
Directory Server for the geoportal.
If you have an existing Directory server accessible via LDAP, skip step 3.1 and proceed directly to step
3.2.
3.1. INSTALL A NEW DIRECTORY SERVER AND CLIENT
3.1.1. Install Directory Server
There are many directory server software packages available. For the purposes of this
installation guide we have selected Apache Directory Server. Apache Directory Server can
be downloaded from: http://directory.apache.org.
After the installation of your Directory Server is complete, make sure that the Directory
Server is active, by checking whether its service is started.
� Open Control Panel>Administrative Tools>Services
� Highlight the service representing your Directory Server.
Geoportal Server Installation Guide
July 2013 4
� If its status is not “Started”, click “Start”.
3.1.2. Install Directory Server Client
There are also many directory server clients available for browsing your directory structure.
For the purposes of this installation guide we have selected Apache Directory Studio,
downloadable from http://directory.apache.org/studio/ .
3.1.3. Define a Connection from the client to the server
The information in this section assumes you have installed Apache Directory Server and
Apache Directory Studio. If you have a different combination of software, you can skip this
step or use the information within it as a guide.
� Launch Apache Directory Studio.
� From the File menu, select “New…” and then “LDAP Connection”.
� On the Network Parameter screen, enter the following parameters:
• Connection name: Can be any name. Here, input local.
• Hostname: The machine name on which the LDAP server was installed, in your
case, this computer so you can input localhost.
• Port: The port number on which the LDAP server is running. For a default Apache
Directory Server service, it will be 10389.
• Encryption method: No encryption for this connection.
� Now click the Check Network Parameter button. You should receive a message that the
connection was successful. Click Next.
� On the Authentication screen, enter the following parameters:
• Authentication Method: Choose Simple Authentication.
• Bind DN or user: enter the distinguished name (DN) of the default admin user.
For Apache Directory Server, the default DN will be uid=admin,ou=system.
• Bind password: The password to the LDAP server for the admin user. For
Apache Directory Server, the default password will be secret.

Geoportal Server Installation Guide
July 2013 5
� Click the Check Authentication button. You should receive a message that the
authentication was successful. Click Finish.
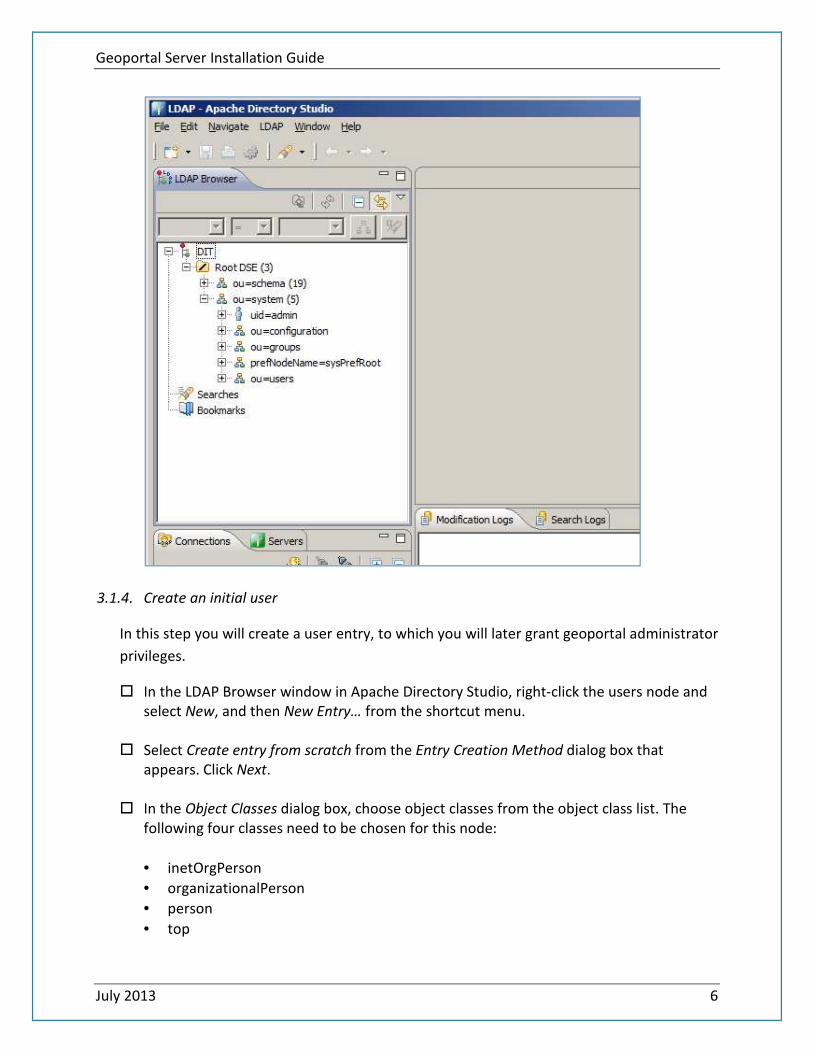
� In the left-hand pane of the window, you should see a tree structure with DIT as the top
node. You are now connected to the LDAP server.
� An initial structure of entries was created when you installed Apache Directory Server. If
you expand the DIT node, and then the ou=system node, you will see nodes with groups
and users beneath it.
Geoportal Server Installation Guide
July 2013 6
3.1.4. Create an initial user
In this step you will create a user entry, to which you will later grant geoportal administrator
privileges.
� In the LDAP Browser window in Apache Directory Studio, right-click the users node and
select New, and then New Entry… from the shortcut menu.
� Select Create entry from scratch from the Entry Creation Method dialog box that
appears. Click Next.
� In the Object Classes dialog box, choose object classes from the object class list. The
following four classes need to be chosen for this node:
• inetOrgPerson
• organizationalPerson
• person
• top

Geoportal Server Installation Guide
July 2013 7
� If more than the four classes listed above are listed, remove the extras by selecting
them in the right-hand panel Selected object classes and clicking the Remove button.
Click Next.
� In the second text box, labeled RDN, select “cn” in the left box and type “gptadmin” in
the right box to make cn= gptadmin. This sets the user's name as gptadmin. Click Next.
� Now you will see the Attributes dialog for the new user. Double click in the Value
column next to the sn attribute. This would be the last name of your user, but for this
example, use the same name, gptadmin.
� Now you will add additional information about your user, using the New Attribute
functionality. Here, we will add first the email, then the password, and finally the
userid attributes.
o For email:
� Put your cursor in the empty cell in the Attribute Description column
beneath sn, and rightclick. Select New Attribute from the right menu.
� Select mail from the Attribute type drop down, and click Next.
� On the resulting Options screen, accept the defaults and click Finish.
� Doubleclick the mail attribute in your Attribute Description column and
enter a fictional email address for gptadmin.
� After entering the email address, click off of the Value column to
preserve the entered information.
o For the password:
� Put your cursor in the empty cell in the Attribute Description column
beneath mail, and rightclick. Select New Attribute from the right menu.
� Select userPassword from the Attribute type drop down, and click Next.
� On the resulting Options screen, accept the defaults and click Finish.
� Upon clicking Finish, the Password Editor dialog appears. Enter a
password for your user, and leave the rest of the defaults. Click OK.
o The uid should be the same as the user name used to create the entry, and the
same as the cn attribute value listed in the table. This id is used to login to the
geoportal interface.
� Put your cursor in the empty cell in the Attribute Description column
beneath userPassword, and rightclick. Select New Attribute from the right
menu.
� Select uid from the Attribute type drop down, and click Next.
� On the resulting Options screen, accept the defaults and click Finish.
� Doubleclick the userid attribute in your Attribute Description column and
enter the same name you entered to create the user, e.g., gptadmin.

Geoportal Server Installation Guide
July 2013 8
� After entering the userid, click off of the Value column to preserve the
entered information.
� After adding the new attributes, click Finish to close the New Entry dialog. The new
gptadmin user should appear as a new node under the users node in the directory
structure.
� You can repeat the above steps to create test users for the remaining geoportal roles.
We suggest using the following user names:
o gptpublisher
o gptuser
Your Directory Server is now ready to be populated with additional geoportal-specific entries.
Follow the steps in Section 3.2 to finish configuring your Directory Server for the geoportal.
3.2. ADAPT AN EXISTING DIRECTORY SERVER
The geoportal relies on user roles in order to grant various user and functionality privileges. The
three pre-defined geoportal roles are:
• Administrator
• Publisher
• Registered User
With LDAP authentication, the definition of the geoportal roles is achieved by creating Directory
Server “group” entries. A group entry is defined as an entry that has an object class of
“groupOfUniqueNames”, thereby allowing it to have member (person) entries.
3.2.1. Create groups for the geoportal roles
The group structure in your Directory Server does not have to adhere to any particular
schema. However it is strongly recommended that you adhere to a group structure which
maps directly to the pre-defined geoportal roles.
If you are working with a newly installed Directory Server, this is fairly straightforward to
create, and instructions are provided in this section.
If you are working with an existing Directory Server, you can either create a new set of
groups specifically for the geoportal, or decide what the best possible mapping is of your
existing groups to the new geoportal roles. This needs to be done in such a way that it does

Geoportal Server Installation Guide
July 2013 9
not disrupt your existing applications’ authentication mechanisms, yet can be adapted to
the geoportal requirements.
The steps in this section assume the following:
a) You are using Apache Directory Studio as your Directory Server client browser.
b) You will be creating groups that directly map to the geoportal roles.
c) You have an organizational unit in your directory structure called “groups”. If you
have another organizational unit, substitute your organizational unit’s name for the
word “groups” in the steps below.
� Open Apache Directory Studio if it isn't already open and connect to your directory
server.
� Right-click the groups node and select New, and then New Entry… from the shortcut
menu.
� Select Create entry from scratch from the Entry Creation Method dialog box that
appears. Click Next.
� In the Object Classes dialog box, choose object classes from the object class list. The
following two classes need to be chosen for this node:
• groupOfUniqueNames
• top
� If more than the two classes listed above are present, remove the extra ones by
selecting them in the right-hand panel Selected Classes and clicking the Remove button.
Click Next.
� On the next screen, go to the second text box, which is labeled RDN. Select “cn” in the
left box and enter a group name of gpt_administrators. This sets the new group’s name
as gpt_administrators. This is the group to which you’ll later assign geoportal
administration privileges.
� Click Next.
� The Attribute dialog box appears where the uniqueMember attribute must be specified.
� Since uniqueMember DN’s are not trivial, temporarily enter placeholder information for
the value of uniqueMember. Even though you are putting in placeholder information, it
still has to conform to LDAP standards. Enter cn=abc.
Geoportal Server Installation Guide
July 2013 10
� Click Finish to create the group. The new group gpt_administrators should appear as an
entry under groups in the directory structure.
� Create two more new groups using the same steps as above. Use the following user
group names, and remember to assign placeholder uniqueMember values to each.
Note that in production, you can map geoportal functionality to existing groups in your
organizational structure.
o For geoportal publisher users, create a group called gpt_publishers
o For geoportal registered users, create a group called gpt_registeredUsers
� Now you will add the gptadmin user to the gpt_administrators group. Navigate to the
Users branch, and right-click on the gptadmin user. Select Copy Entry / DN from the
shortcut menu.
� Go back to the groups branch and click the gpt_administrators group.
� In the Attribute panel on the right-hand side, doubleclick inside the Value column for
the uniqueMember attribute that has the placeholder cn=abc value.
� Press Ctrl+V on your keyboard to paste the copied DN from the clipboard into this value
field. Now, gptadmin is part of the gpt_administrators group.
� Repeat these steps to associate your gptpublisher and gptuser users to the
gpt_publishers, and gpt_registeredUsers groups respectively, using the same steps.
4. SET UP THE DATABASE
IMPORTANT: The following sections assume that you have downloaded and unzipped the
Geoportal Server Installation zip files. Files within those zip files are required for the next steps.
The geoportal database scripts create a schema in the default database in your system. If you
would like the geoportal tables to exist in its own database, you will want to create a new
database upon which you will run the geoportal database scripts. This is recommended for
requirements on backing up or restoring your geoportal database.
CAUTION: These instructions include running database scripts. If you run the database scripts
on top of an existing geoportal installation, you will overwrite your existing geoportal database.
The database setup instructions vary significantly depending on the database software used.
For Linux users, use the Geoportal Server Linux Installation Guide, available from the
https://github.com/Esri/geoportal-server/wiki/How-to-Set-Up-an-Esri-Geoportal-Server-on-
Linux page.
Geoportal Server Installation Guide
July 2013 11
For Windows users:
• Oracle users please follow the steps in section 4.1.
• SQL Server users please skip to section 4.2.
• PostgreSQL users please skip to section 4.3.
• MySQL user please skip to section 4.4
4.1. ORACLE
In this section you will set up the tablespace and schema that will be used for the geoportal.
The geoportal should run in its own tablespace and schema. Creating the geoportal database
schema involves running two scripts:
• A “grants” script that sets the user permissions for creating the geoportal schema.
• A “create schema” script that creates the table structure, procedures and triggers and
populates tables in the geoportal schema.
4.1.1. Setup the Geoportal tablespace
� Open the command console (Start>Run>cmd)
� Type: sqlplus /nolog
Tip: In the following commands, be sure to include the semicolons.
� SQL>connect sys/sys as sysdba;
� SQL>create tablespace geoportal datafile 'C:\oracle\oradata\geoportal.dbf' size 500M
AUTOEXTEND ON;
� SQL>create user geoportal identified by geoportalpwd default tablespace geoportal
temporary tablespace temp;
� SQL>commit;
� SQL>quit.
4.1.2. Run grants_oracle.cmd
� Open a command prompt window. Start>Run>cmd
� Change directories to point to <Geoportal Dir>\Database Scripts\Oracle.
Geoportal Server Installation Guide
July 2013 12
� Run the grants_oracle.cmd file from the command prompt window as described below:
Usage: grants_oracle [sys username] [sys password] [geoportal username]
Where
[sys username] is the username of the sys user in Oracle
[sys password] is the password of the sys user in Oracle
[geoportal username] is the geoportal user you are creating
Sample Input: grants_oracle sys sys geoportal
� When the script finishes executing you will be returned back to the command prompt
and a text file (grants.txt) will open. Check the grants.txt file for error messages.
IMPORTANT: You must fix errors appearing in the grants.txt file; do not continue until
the script runs without errors.
4.1.3. Schema: create_schema_oracle.cmd
� Open a command window. Start>Run>cmd
� Change the directory to the <Geoportal Dir>\Database Scripts\Oracle folder
� Run the create_schema_oracle.cmd file from the command prompt window as
described below:
Usage: create_schema_oracle [geoportal username] [geoportal password]
Where
[geoportal username] is the geoportal user you created earlier.
[geoportal password] is the password of the geoportal user.
Sample Input: create_schema_oracle geoportal geoportalpwd
� When the script finishes executing you will be returned back to the command prompt
and a text file (GPT_Schema.txt) will open. Check the GPT_Schema.txt file for error
messages. Error messages and warnings that state a table or view does not exist can be
ignored. It simply means that the script was trying to delete a nonexistent table. Verify
the following tables are corrected:
• gpt_collection
• gpt_collection_member
• gpt_harvesting_history
Geoportal Server Installation Guide
July 2013 13
• gpt_harvesting_jobs_completed
• gpt_harvesting_jobs_pending
• gpt_resource
• gpt_resource_data
• gpt_search
• gpt_user
4.2. SQL SERVER
In this section you will use a script to set up the database that will be used for the geoportal
web application.
IMPORTANT PREREQUISITES
1) If you have the “Enforce Password Policy” option enabled by default for all new users,
then you will need to choose a user password in keeping with your organization’s password
policy. This is usually a complex password. If you do not select a password in keeping with
the password policy, the script may fail.
2) Verify that your server allows both Windows authentication and SQL Server
authentication. If your server only allows Windows authentication, then the user that the
script creates will not be able to logon to create the tables. The error in the
build_schema.log file will read 'Login failed for user'. To check and possibly change the
security authentication mode (as per Microsoft, article http://msdn.microsoft.com/en-
us/library/ms188670.aspx), do the following:
� Login to SQL Server Management Studio.
� In SQL Server Management Studio Object Explorer, right-click the server, and
then click Properties.
� On the Security page, under Server authentication, select the "SQL Server and
Windows Authentication Mode" radial if it is not already selected, and then click
OK.
� In the SQL Server Management Studio dialog box, click OK to acknowledge the
requirement to restart SQL Server.
4.2.1. Create database schema
To support multi-lingual geoportals, the SQL Server database must be able to support Unicode
characters. If your geoportal will be in a language other than English, you should run the
create_schema_mssql_unicode script for this step. If not, then use the create_schema_mssql
script as shown below. Input parameters are the same for the Unicode version of the script.
� Open a command window. Start>Run>cmd
Geoportal Server Installation Guide
July 2013 14
� Change the directory to the <Geoportal Dir>\Database Scripts\SQL Server folder
� Run the create_schema_mssql script –or the create_schema_mssql_unicode script as
described above - by typing the following:
create_schema_mssql [database server machine] [Geoportal database name]
[Geoportal database user] [Geoportal database user password]
Where
[database server machine] is the name of the machine on which SQL Server is installed,
or the named SQL Server Instance (e.g. <machineName>\instance) if applicable
[Geoportal database name] is the name you designate for the Geoportal database
[Geoportal database user] is the name of the login and user that will have access to the
Geoportal database. This script creates a user if one does not already exist
[Geoportal database user password] is the password for the login and user of the
Geoportal database
Sample Input: create_schema_mssql mymachine geoportal geoportal geoportalpwd
� After running the script, verify that a new database and tables were created. If the
tables were not created, consult the build_schema.log file for any potential errors. The
log file can be found in the same folder as the scripts that you ran. The file should not
contain any errors, except possibly warnings on the ‘maximum key length’; these you
can safely ignore.
o gpt_collection
o gpt_collection_member
o gpt_harvesting_history
o gpt_harvesting_jobs_completed
o gpt_harvesting_jobs_pending
o gpt_resource
o gpt_resource_data
o gpt_search
o gpt_user
Geoportal Server Installation Guide
July 2013 15
4.3. POSTGRESQL
Setting up a PostgreSQL database for the geoportal consists of two steps – setting up database
permissions, and creating the database schema. Each of these steps is accomplished by
running a script, found in the <Geoportal Dir>\Database Scripts\PostgreSQL folder:
• A “grants” scripts that sets the user permissions for creating the geoportal schema
• A “create schema” script that creates the table structure, procedures, and triggers and
populates tables in the geoportal schema.
4.3.1. Grants: grants_pg.cmd
� Open a command prompt window. Start>Run>cmd
� Change directories to point to <Geoportal Dir>\Database Scripts\PostgreSQL.
� Run the grants_pg.cmd file from the command prompt window as described below:
Usage: grants_pg [host] [port] [database] [geoportal schema] [userToConnect]
[geoportalUser]
Where
[host] is the machine name hosting PostgreSQL
[port] is the port number of PostgreSQL. Default = 5432
[database] is the database name for the geoportal. Default = postgres
[geoportal schema] is the name for the geoportal schema. Default=geoportal
[userToConnect] is the name of the user to connect to the database as.
Default=postgres
[geoportalUser] is the name for the geoportal schema owner. Default=geoportal
Sample Input: grants_proxy_pg localhost 5432 postgres geoportal postgres geoportal
� When prompted with the message “Enter password for new role:”, input the password
for the geoportal user.
� When prompted with the message “Enter it again:” input the password for the
geoportal user again.
� When the script finishes executing you will be returned back to the command prompt
and a text file (grants_pg.txt) will open. Check the grants_pg.txt file for error messages.
Geoportal Server Installation Guide
July 2013 16
IMPORTANT: You must fix errors appearing in the grants_pg.txt file; do not continue
until the script runs without errors.
4.3.2. Schema: Run create_schema_pg.cmd
� Run the create_schema_pg.cmd file from the command prompt window as described
below:
Usage: create_schema_pg [host] [port] [geoportal database] [geoportal user]
Where
[host] is the machine name hosting PostgreSQL
[port] is the port number of PostgreSQL. Default = 5432
[geoportal database] is the geoportal database name. Default = postgres
[geoportal user] is the name for the geoportal schema owner. Default = geoportal
Sample Input: create_schema_pg machineName 5432 postgres geoportal
� When prompted with the message “Enter password for geoportal user:”, input the
password for the geoportal user.
� When the script finishes executing you will be returned back to the command prompt
and a text file (Geoportal_Schema.txt) will open. Check the Geoportal_Schema.txt file
for error messages. Error messages and warnings which state that Table or view does
not exist can be ignored. It simply means that the script was trying to delete a
nonexistent table.
� Open the PostgreSQL Administrator tool, and verify that a new schema and following
tables were as created.
o gpt_collection o gpt_collection_member o gpt_harvesting_history o gpt_harvesting_jobs_completed o gpt_harvesting_jobs_pending o gpt_resource o gpt_resource_data o gpt_search o gpt_user
4.4. MYSQL
Geoportal Server Installation Guide
July 2013 17
Setting up a MySQL database for the geoportal consists of two steps – setting up database
permissions, and creating the database schema. Each of these steps is accomplished by
running two scripts, found in the <Geoportal Dir>\Database Scripts\MySQL folder:
• A “grants” scripts that sets the user permissions for creating the geoportal schema
• A “create schema” script that creates the table structure, procedures, and triggers and
populates tables in the geoportal schema.
IMPORTANT: It is assumed that you already have MySQL database software installed and have
mapped the MySQL binaries (e.g., <MySQL Install Dir>\bin) to the PATH environment variable
before running the geoportal database scripts.
4.4.1. Grants: grants_mysql.cmd
� Open a command prompt window. Start>Run>cmd
� Change directories to point to <Geoportal Dir>\Database Scripts\MySQL.
� Run the grants_mysql.cmd file from the command prompt window, as described below.
Usage: grants_mysql [dbserver] [port] [Geoportal database] [sys username] [sys
password] [geoportal username] [geoportal server] [geoportal password]
Where
[dbserver] is the machine hosting MySQL
[port] is the port number of MySQL
[Geoportal database] is the name of the database that will be created and contain
the Geoportal schema
[sys username] is the username of the sys user in MySQL
[sys password] is the password of the sys user in MySQL
[geoportal username] is the geoportal user that will be created and will access the
geoportal database
[geoportal server] is the name of the geoportal web application server machine
[geoportal password] is the geoportal user password
Sample Input (here, the database and geoportal web app are on machine ‘localhost’):
grants_mysql localhost 3306 geoportal root sys geoportal localhost geoportalpwd
� When the script finishes executing you will be returned back to the command prompt
and a text file (grants_mysql.txt) will open.
Geoportal Server Installation Guide
July 2013 18
IMPORTANT: Check the grants_mysql.txt file and the command interface for errors. You
must fix these errors and rerun the script before continuing to the next step. Note that if
you rerun the script after the user was successfully created, you may receive “ERROR 1396
(HY000): Operation CREAT USER failed…” You can ignore this error - see MySQL
documentation for explanation http://bugs.mysql.com/bug.php?id=28331 .
4.4.2. Schema: Run create_schema_mysql.cmd
� Run the create_schema_mysql.cmd file from the command prompt window as
described below:
Usage : create_schema_mysql.cmd [host] [port] [Geoportal database] [geoportal user]
[geoportal password]
Where
[host] is the machine hosting MySQL
[port] is the port number of MySQL
[Geoportal database] is the database that contains the Geoportal Schema; use the
same as in the grants script
[geoportal user] is the geoportal user created in the grants script
[geoportal password] is the geoportal user password
Sample Input: create_schema_mysql localhost 3306 geoportal geoportal geoportalpwd
� When the script finishes executing you will be returned back to the command prompt
and a text file (Geoportal_Schema.txt) will open. Check the Geoportal_Schema.txt file
for any possible error messages. Error messages and warnings that a table or view does
not exist can be ignored as these are checks for existing tables.
� After running the grants and create_schema scripts, verify that a new database and
following tables were created.
o gpt_collection o gpt_collection_member o gpt_harvesting_history o gpt_harvesting_jobs_completed o gpt_harvesting_jobs_pending o gpt_resource o gpt_resource_data o gpt_search o gpt_user
Geoportal Server Installation Guide
July 2013 19
5. DEPLOY AND CONFIGURE THE GEOPORTAL WEB APPLICATION
This step deploys the geoportal web application. First you will deploy the geoportal.war file, and then
you will configure its property file – gpt.xml - so the web application can successfully communicate
with other components of your system.
IMPORTANT: The steps in this section assume you are running Tomcat. If you are running WebLogic or
GlassFish, download the GeoportalServer_InstallationGuide_WebLogic.pdf or
GeoportalServer_InstallationGuide_GlassFish.pdf from https://github.com/Esri/geoportal-
server/wiki/Installation-Version-1.2.4. These guides have different instructions for deploying the
geoportal web application and connecting it to the database.
5.1. DEPLOY GEOPORTAL.WAR
� Copy the geoportal.war file from the <Geoportal Dir>\Web Applications\Geoportal
folder to your <Tomcat>\webapps folder.
� After a few moments, Tomcat should automatically recognize the new war file and
deploy it by creating a geoportal folder. If it does not, restart Tomcat.
IMPORTANT: If your geoportal will need to support searching multibyte characters –
such as Chinese - then you must configure the Tomcat server.xml file to support UTF-8
character encoding. Open the server.xml file from the \\Tomcat\conf folder. Add the
URIEncoding="UTF-8" attribute below to the connector settings referenced by the
<connector> tags for any port the geoportal web application will be using. For example:
<Connector port="8080" protocol="HTTP/1.1" connectionTimeout="20000" redirectPort="8443" URIEncoding="UTF-8"/>
5.2. CONFIGURE THE GEOPORTAL
� Navigate to: <Tomcat Installation Directory>\webapps\geoportal\WEB-
INF\classes\gpt\config
� Open the gpt.xml file in a text editor.
� Now you will update the gpt.xml file with only the essential configurations to run the
geoportal web application. If a setting is not mentioned in the table, it should be left
with its default value. There are many other configurations available in this file for
Geoportal Server Installation Guide
July 2013 20
additional geoportal functionality. These are discussed in Appendix A: More Geoportal
Configurations.
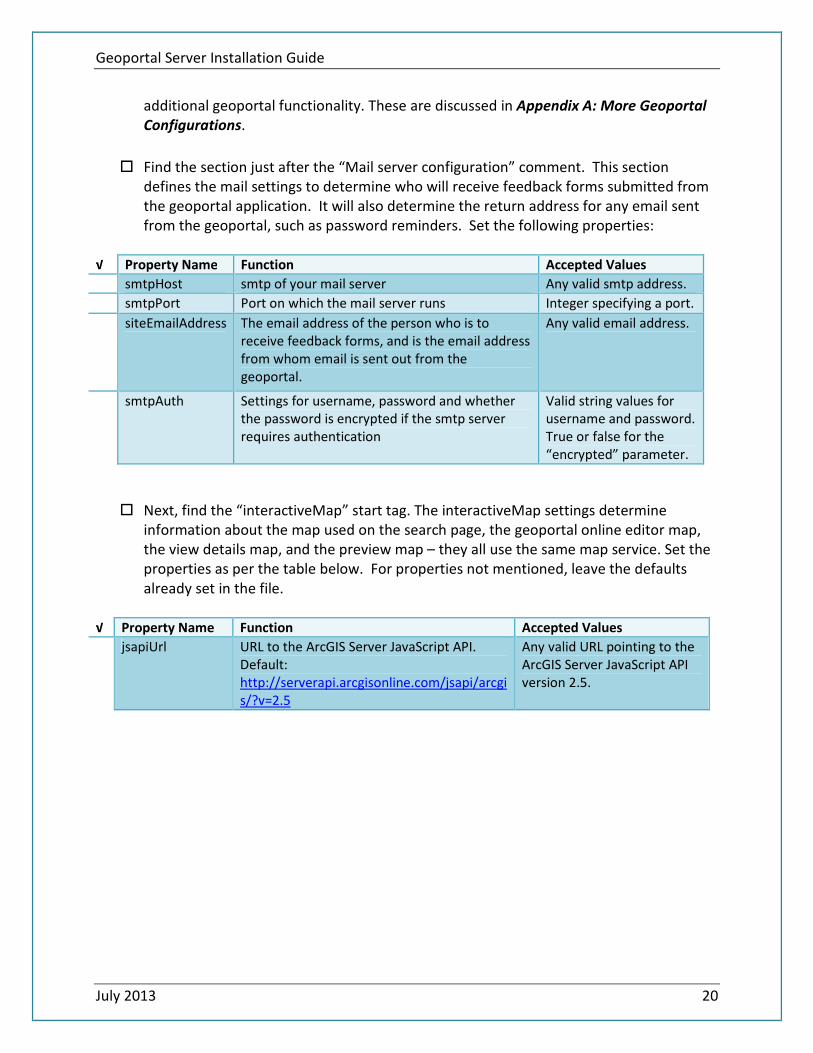
� Find the section just after the “Mail server configuration” comment. This section
defines the mail settings to determine who will receive feedback forms submitted from
the geoportal application. It will also determine the return address for any email sent
from the geoportal, such as password reminders. Set the following properties:
√ Property Name Function Accepted Values
smtpHost smtp of your mail server Any valid smtp address.
smtpPort Port on which the mail server runs Integer specifying a port.
siteEmailAddress The email address of the person who is to
receive feedback forms, and is the email address
from whom email is sent out from the
geoportal.
Any valid email address.
smtpAuth Settings for username, password and whether
the password is encrypted if the smtp server
requires authentication
Valid string values for
username and password.
True or false for the
“encrypted” parameter.
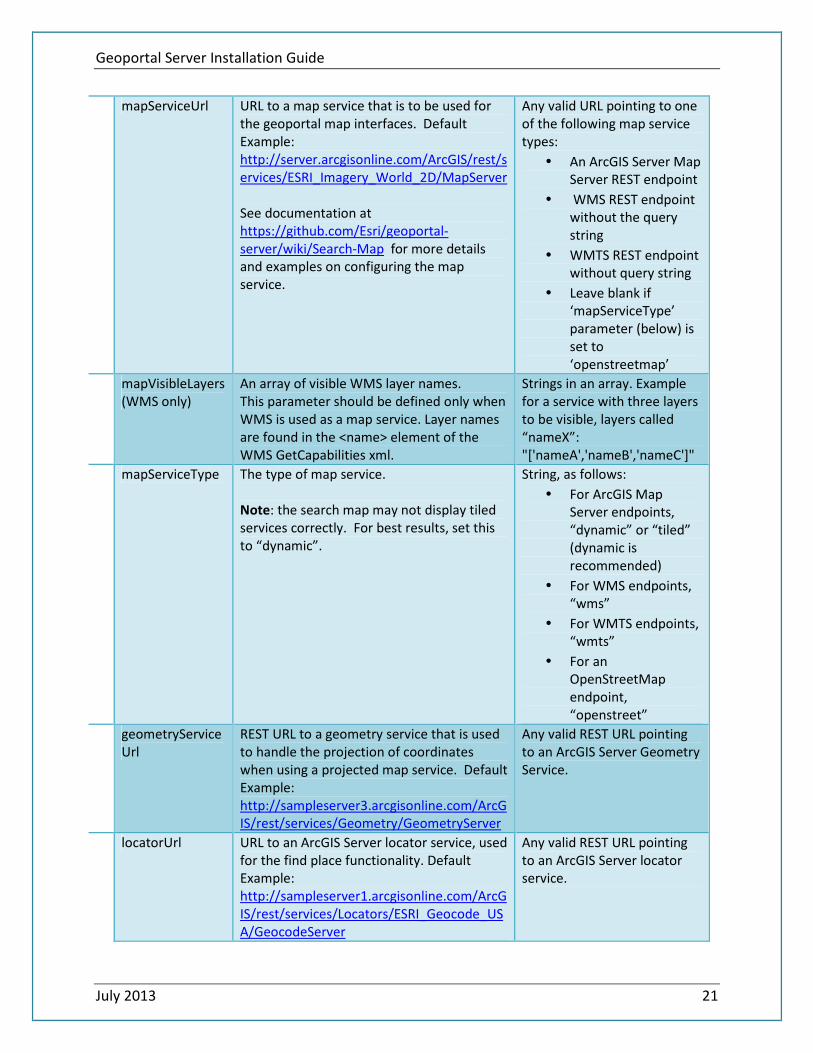
� Next, find the “interactiveMap” start tag. The interactiveMap settings determine
information about the map used on the search page, the geoportal online editor map,
the view details map, and the preview map – they all use the same map service. Set the
properties as per the table below. For properties not mentioned, leave the defaults
already set in the file.
√ Property Name Function Accepted Values
jsapiUrl URL to the ArcGIS Server JavaScript API.
Default:
http://serverapi.arcgisonline.com/jsapi/arcgi
s/?v=2.5
Any valid URL pointing to the
ArcGIS Server JavaScript API
version 2.5.
Geoportal Server Installation Guide
July 2013 21
mapServiceUrl URL to a map service that is to be used for
the geoportal map interfaces. Default
Example:
http://server.arcgisonline.com/ArcGIS/rest/s
ervices/ESRI_Imagery_World_2D/MapServer
See documentation at
https://github.com/Esri/geoportal-
server/wiki/Search-Map for more details
and examples on configuring the map
service.
Any valid URL pointing to one
of the following map service
types:
• An ArcGIS Server Map
Server REST endpoint
• WMS REST endpoint
without the query
string
• WMTS REST endpoint
without query string
• Leave blank if
‘mapServiceType’
parameter (below) is
set to
‘openstreetmap’
mapVisibleLayers
(WMS only)
An array of visible WMS layer names.
This parameter should be defined only when
WMS is used as a map service. Layer names
are found in the <name> element of the
WMS GetCapabilities xml.
Strings in an array. Example
for a service with three layers
to be visible, layers called
“nameX”:
"['nameA','nameB','nameC']"
mapServiceType The type of map service.
Note: the search map may not display tiled
services correctly. For best results, set this
to “dynamic”.
String, as follows:
• For ArcGIS Map
Server endpoints,
“dynamic” or “tiled”
(dynamic is
recommended)
• For WMS endpoints,
“wms”
• For WMTS endpoints,
“wmts”
• For an
OpenStreetMap
endpoint,
“openstreet”
geometryService
Url
REST URL to a geometry service that is used
to handle the projection of coordinates
when using a projected map service. Default
Example:
http://sampleserver3.arcgisonline.com/ArcG
IS/rest/services/Geometry/GeometryServer
Any valid REST URL pointing
to an ArcGIS Server Geometry
Service.
locatorUrl URL to an ArcGIS Server locator service, used
for the find place functionality. Default
Example:
http://sampleserver1.arcgisonline.com/ArcG
IS/rest/services/Locators/ESRI_Geocode_US
A/GeocodeServer
Any valid REST URL pointing
to an ArcGIS Server locator
service.
Geoportal Server Installation Guide
July 2013 22
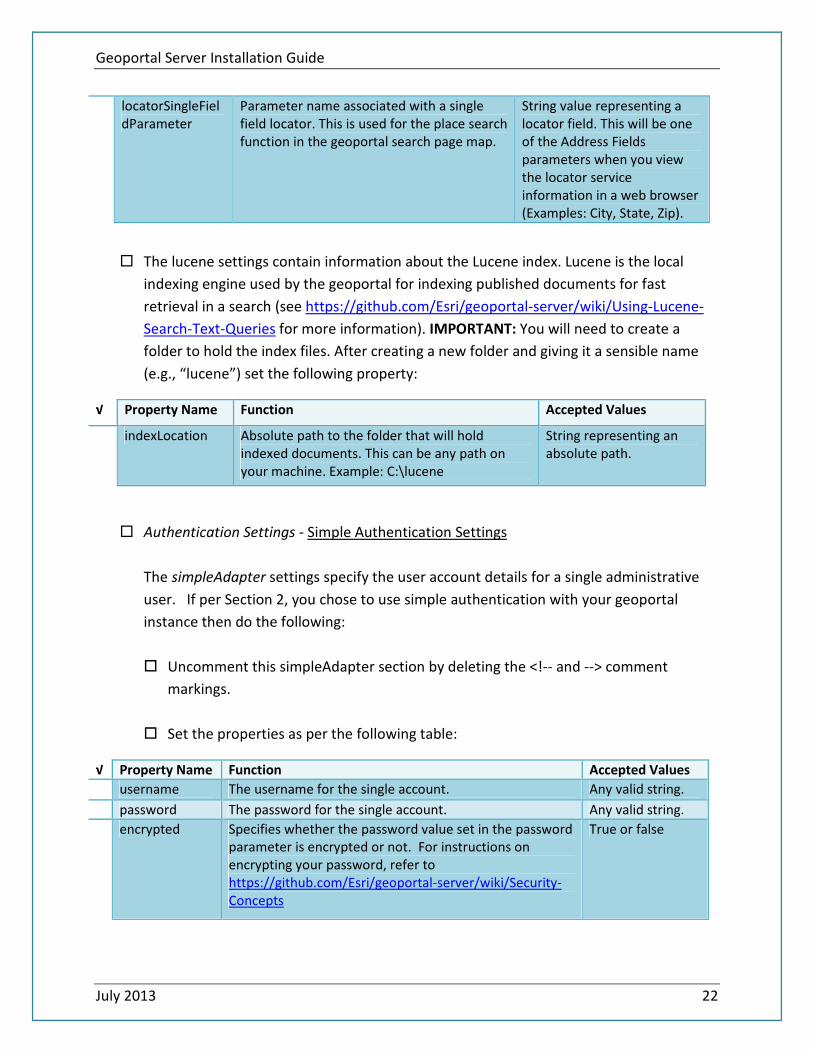
locatorSingleFiel
dParameter
Parameter name associated with a single
field locator. This is used for the place search
function in the geoportal search page map.
String value representing a
locator field. This will be one
of the Address Fields
parameters when you view
the locator service
information in a web browser
(Examples: City, State, Zip).
� The lucene settings contain information about the Lucene index. Lucene is the local
indexing engine used by the geoportal for indexing published documents for fast
retrieval in a search (see https://github.com/Esri/geoportal-server/wiki/Using-Lucene-
Search-Text-Queries for more information). IMPORTANT: You will need to create a
folder to hold the index files. After creating a new folder and giving it a sensible name
(e.g., “lucene”) set the following property:
√ Property Name Function Accepted Values
indexLocation Absolute path to the folder that will hold
indexed documents. This can be any path on
your machine. Example: C:\lucene
String representing an
absolute path.
� Authentication Settings - Simple Authentication Settings
The simpleAdapter settings specify the user account details for a single administrative
user. If per Section 2, you chose to use simple authentication with your geoportal
instance then do the following:
� Uncomment this simpleAdapter section by deleting the <!-- and --> comment
markings.
� Set the properties as per the following table:
√ Property Name Function Accepted Values
username The username for the single account. Any valid string.
password The password for the single account. Any valid string.
encrypted Specifies whether the password value set in the password
parameter is encrypted or not. For instructions on
encrypting your password, refer to
https://github.com/Esri/geoportal-server/wiki/Security-
Concepts
True or false
Geoportal Server Installation Guide
July 2013 23
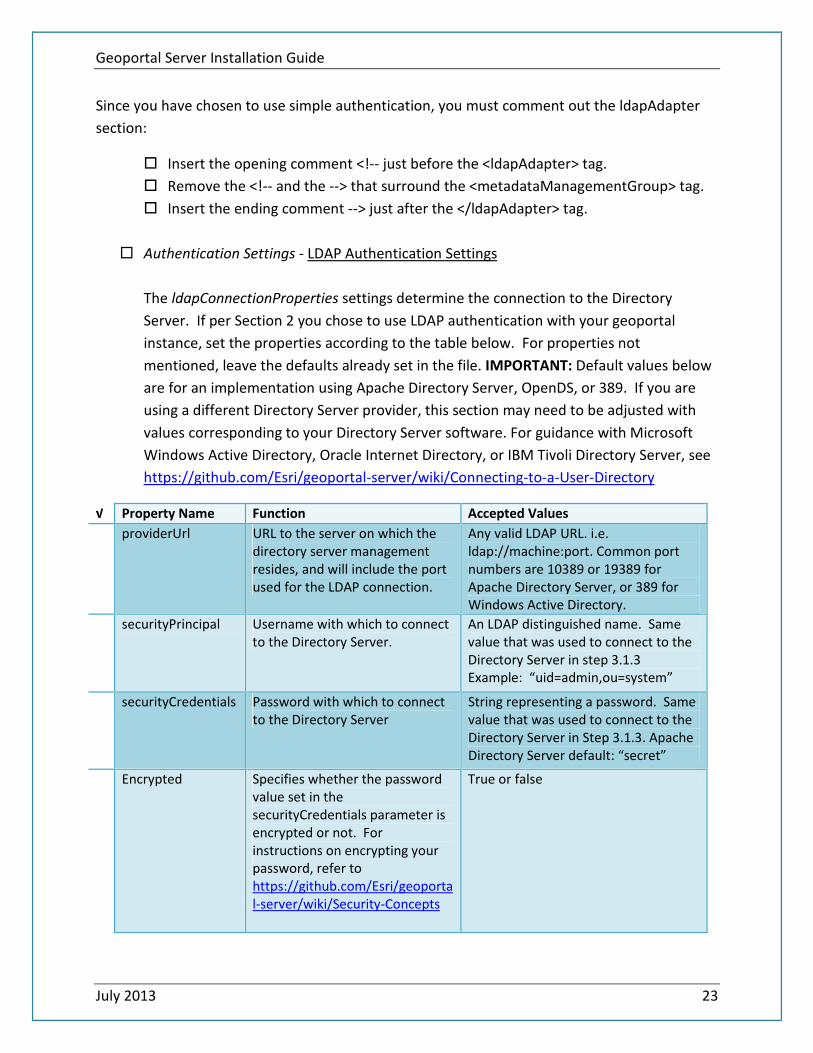
Since you have chosen to use simple authentication, you must comment out the ldapAdapter
section:
� Insert the opening comment <!-- just before the <ldapAdapter> tag.
� Remove the <!-- and the --> that surround the <metadataManagementGroup> tag.
� Insert the ending comment --> just after the </ldapAdapter> tag.
� Authentication Settings - LDAP Authentication Settings
The ldapConnectionProperties settings determine the connection to the Directory
Server. If per Section 2 you chose to use LDAP authentication with your geoportal
instance, set the properties according to the table below. For properties not
mentioned, leave the defaults already set in the file. IMPORTANT: Default values below
are for an implementation using Apache Directory Server, OpenDS, or 389. If you are
using a different Directory Server provider, this section may need to be adjusted with
values corresponding to your Directory Server software. For guidance with Microsoft
Windows Active Directory, Oracle Internet Directory, or IBM Tivoli Directory Server, see
https://github.com/Esri/geoportal-server/wiki/Connecting-to-a-User-Directory
√ Property Name Function Accepted Values
providerUrl URL to the server on which the
directory server management
resides, and will include the port
used for the LDAP connection.
Any valid LDAP URL. i.e.
ldap://machine:port. Common port
numbers are 10389 or 19389 for
Apache Directory Server, or 389 for
Windows Active Directory.
securityPrincipal Username with which to connect
to the Directory Server.
An LDAP distinguished name. Same
value that was used to connect to the
Directory Server in step 3.1.3
Example: “uid=admin,ou=system”
securityCredentials Password with which to connect
to the Directory Server
String representing a password. Same
value that was used to connect to the
Directory Server in Step 3.1.3. Apache
Directory Server default: “secret”
Encrypted Specifies whether the password
value set in the
securityCredentials parameter is
encrypted or not. For
instructions on encrypting your
password, refer to
https://github.com/Esri/geoporta
l-server/wiki/Security-Concepts
True or false
Geoportal Server Installation Guide
July 2013 24
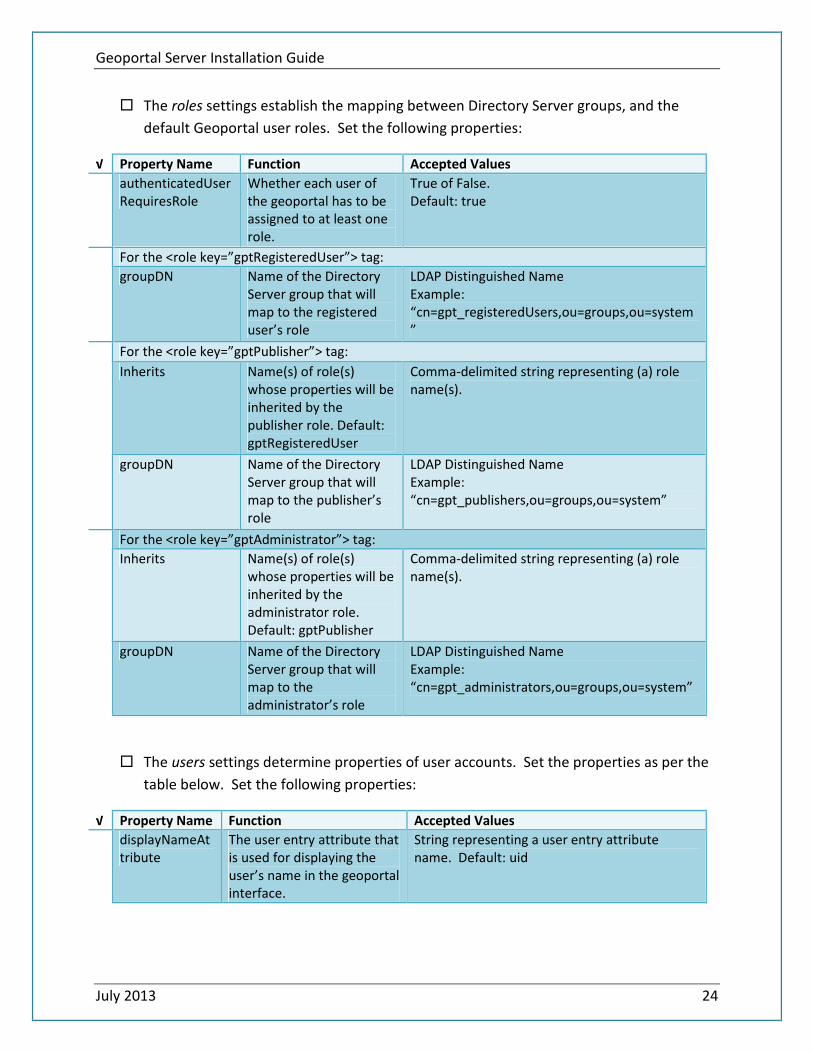
� The roles settings establish the mapping between Directory Server groups, and the
default Geoportal user roles. Set the following properties:
√ Property Name Function Accepted Values
authenticatedUser
RequiresRole
Whether each user of
the geoportal has to be
assigned to at least one
role.
True of False.
Default: true
For the <role key=”gptRegisteredUser”> tag:
groupDN Name of the Directory
Server group that will
map to the registered
user’s role
LDAP Distinguished Name
Example:
“cn=gpt_registeredUsers,ou=groups,ou=system
”
For the <role key=”gptPublisher”> tag:
Inherits Name(s) of role(s)
whose properties will be
inherited by the
publisher role. Default:
gptRegisteredUser
Comma-delimited string representing (a) role
name(s).
groupDN Name of the Directory
Server group that will
map to the publisher’s
role
LDAP Distinguished Name
Example:
“cn=gpt_publishers,ou=groups,ou=system”
For the <role key=”gptAdministrator”> tag:
Inherits Name(s) of role(s)
whose properties will be
inherited by the
administrator role.
Default: gptPublisher
Comma-delimited string representing (a) role
name(s).
groupDN Name of the Directory
Server group that will
map to the
administrator’s role
LDAP Distinguished Name
Example:
“cn=gpt_administrators,ou=groups,ou=system”
� The users settings determine properties of user accounts. Set the properties as per the
table below. Set the following properties:
√ Property Name Function Accepted Values
displayNameAt
tribute
The user entry attribute that
is used for displaying the
user’s name in the geoportal
interface.
String representing a user entry attribute
name. Default: uid

Geoportal Server Installation Guide
July 2013 25
passwordEncry
ptionAlgorithm
The algorithm used for
encrypting passwords sent
from the geoportal to the
Directory Server
Accepted values are “MD5” or “SHA”
Default: “SHA”
newUserDNPat
tern
The pattern of the
distinguished name for new
users.
String value representing a DN pattern,
pointing to the users node.
Example: cn={0},ou=users,ou=system
usernameSearc
hPattern
The search pattern for the
Directory Server to use
when looking for users.
String value representing a user entry pattern.
Leave as default.
searchDIT The path in the Directory
Information Tree to search
for users.
LDAP DN representing the “Users”
organizational unit entry.
Example: ou=users,ou=system
For the <requiredObjectClasses> tag: Each <objectClass> child tag represents a mandatory class
that must be part of a new entry when creating new users in the Directory Server. You may add
to, modify or delete from this list as needed.
For the <userAttributeMap> tag: Each key value of an <attribute> child tag represents a property
of a user’s profile that is used in the geoportal. Each key value has to be mapped to its Directory
Server attribute name equivalent, as represented by the ldapName value. You may add to,
modify or delete from this list as needed.
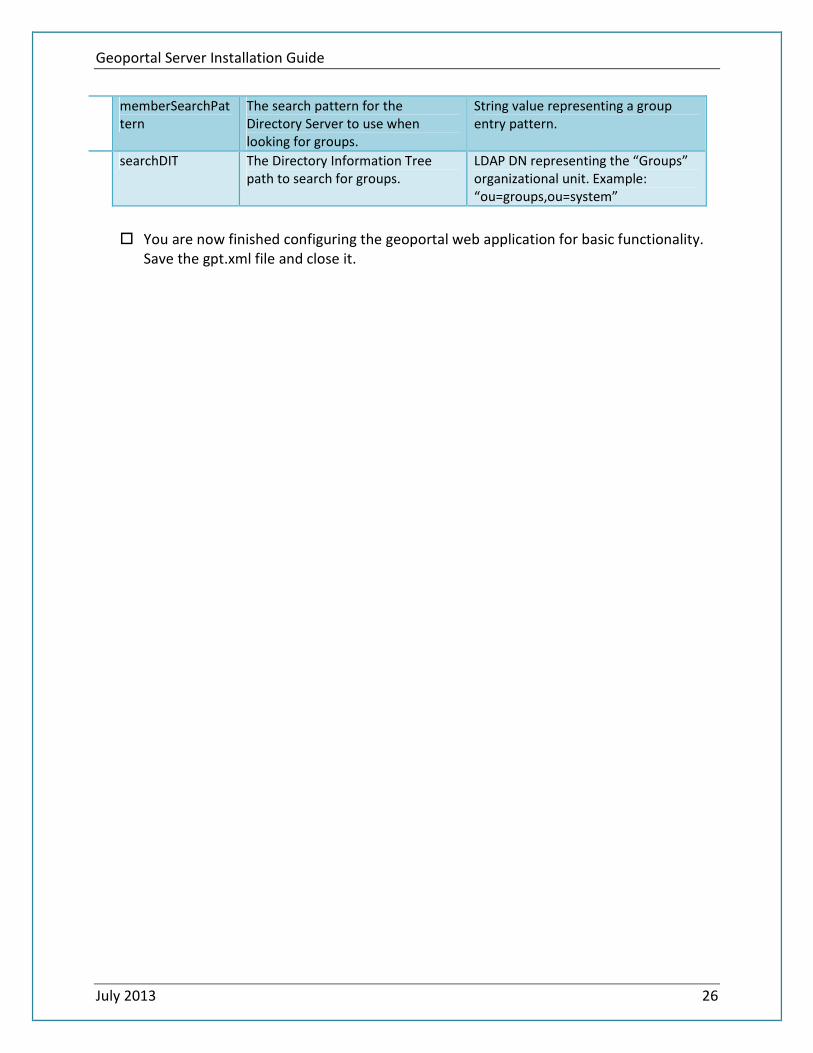
� The groups settings determine the properties of the Directory Server groups, set up to
map to Geoportal user roles. Set the following properties:
√ Property Name Function Accepted Values
displayNameAttrib
ute
The group entry attribute to use for
displaying the group’s name.
Currently not used in the geoportal
interface.
String representing a group entry
attribute name. Default: cn
dynamicMemberO
fGroupsAttribute
A vendor specific attribute that can
be used to determine all the groups
to which a user belongs
String representing a group entry
attribute name.
Default: “”
dynamicMembers
Attribute
A vendor specific attribute that can
be used to determine all the
members of a group.
String representing a group entry
attribute name.
Default: “”
memberAttribute The group entry attribute that is
used to determine which users
belong to the group
String representing a group entry
attribute name. Default:
uniquemember
Geoportal Server Installation Guide
July 2013 26
memberSearchPat
tern
The search pattern for the
Directory Server to use when
looking for groups.
String value representing a group
entry pattern.
searchDIT The Directory Information Tree
path to search for groups.
LDAP DN representing the “Groups”
organizational unit. Example:
“ou=groups,ou=system”
� You are now finished configuring the geoportal web application for basic functionality.
Save the gpt.xml file and close it.
Geoportal Server Installation Guide
July 2013 27
6. DEPLOY AND CONFIGURE THE SERVLET WEB APPLICATION
This step deploys the servlet web application. The servlet is responsible for communication between
the geoportal and ArcCatalog 9.3.x when users are publishing to the Geoportal using the Publish Client
tool. Note that deploying the servlet.war file is only necessary if users with a 9.3.x version of
ArcCatalog will be connecting to your geoportal using the Publish Client. If users will be using
ArcCatalog 10.x to connect to your geoportal, deploying the servlet.war is not necessary. For more
information on the Geoportal Publish Client, see https://github.com/Esri/geoportal-
server/wiki/Geoportal-Publish-Client. Follow the steps below to deploy the servlet.war file.
� Navigate to the <Geoportal Dir>\Web Applications\Servlet folder to find the servlet.war
file.
� Deploy the servlet.war file in the same manner which you deloyed the geoportal.war
file. By default, the servlet web application needs no further configuration unless you
have modified the name of the geoportal web application.
� If you modified the name of your deployed application from “geoportal” to something
else, you must let the servlet know the reference to your newly-named geoportal
application.
o Navigate to: <Tomcat Installation Directory>\servlet\WEB-INF
o Open the web.xml file in a text editor.
o Modify the <param-value> setting (for the redirectURL parameter above) to
point to your machine’s geoportal application deployment path starting from the
web application name:
i.e. /applicationName/com.Esri.Esrimap.Esrimap
� Save the file and close it.
7. JDBC CONFIGURATION
The geoportal uses a Java Naming and Directory Interface (JNDI) key to connect to the
database through a JDBC connection. This allows system components to find the database
connection information using the JNDI key instead of having to store the JDBC connection
information in many places. In this step, we will setup the JNDI configuration and JDBC
connection for Tomcat. JDBC configuration is different for WebLogic or GlassFish; if you are
using those environments, see the requisite installation guides for them available at
https://github.com/Esri/geoportal-server/wiki/Installation-Version-1.2.4.
� Identify the jdbc .jar file that your geoportal’s JNDI key will use for the database JDBC
connection. Database .jar files are typically provided with your database software, but if
Geoportal Server Installation Guide
July 2013 28
you cannot find the .jar files that came with your database, you can obtain them from
the manufacturer’s website.
• Oracle: http://www.oracle.com/technetwork/database/features/jdbc/index-
091264.html
• SQL Server: http://msdn.microsoft.com/en-us/sqlserver/aa937724.aspx
• PostgreSQL: http://jdbc.postgresql.org/download.html
• MySQL: http://dev.mysql.com/downloads/connector/j/
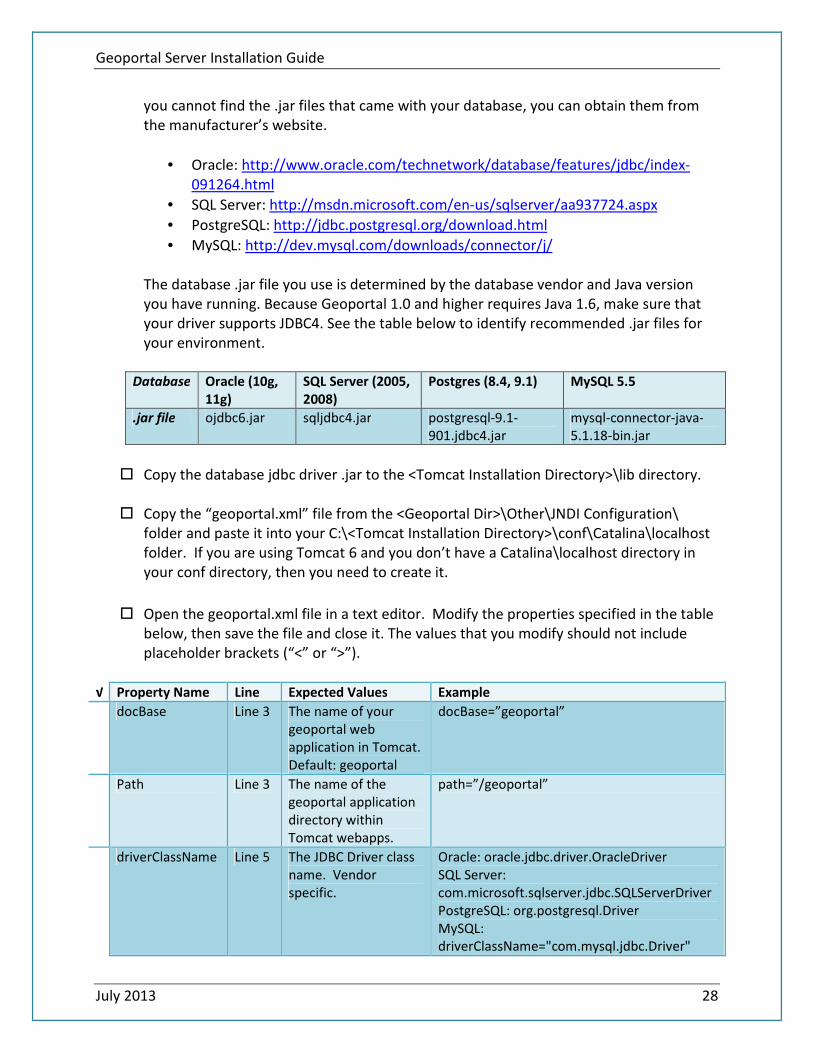
The database .jar file you use is determined by the database vendor and Java version
you have running. Because Geoportal 1.0 and higher requires Java 1.6, make sure that
your driver supports JDBC4. See the table below to identify recommended .jar files for
your environment.
Database Oracle (10g,
11g)
SQL Server (2005,
2008)
Postgres (8.4, 9.1) MySQL 5.5
.jar file ojdbc6.jar sqljdbc4.jar postgresql-9.1-
901.jdbc4.jar
mysql-connector-java-
5.1.18-bin.jar
� Copy the database jdbc driver .jar to the <Tomcat Installation Directory>\lib directory.
� Copy the “geoportal.xml” file from the <Geoportal Dir>\Other\JNDI Configuration\
folder and paste it into your C:\<Tomcat Installation Directory>\conf\Catalina\localhost
folder. If you are using Tomcat 6 and you don’t have a Catalina\localhost directory in
your conf directory, then you need to create it.
� Open the geoportal.xml file in a text editor. Modify the properties specified in the table
below, then save the file and close it. The values that you modify should not include
placeholder brackets (“<” or “>”).
√ Property Name Line Expected Values Example
docBase Line 3 The name of your
geoportal web
application in Tomcat.
Default: geoportal
docBase=”geoportal”
Path Line 3 The name of the
geoportal application
directory within
Tomcat webapps.
path=”/geoportal”
driverClassName Line 5 The JDBC Driver class
name. Vendor
specific.
Oracle: oracle.jdbc.driver.OracleDriver
SQL Server:
com.microsoft.sqlserver.jdbc.SQLServerDriver
PostgreSQL: org.postgresql.Driver
MySQL:
driverClassName="com.mysql.jdbc.Driver"

Geoportal Server Installation Guide
July 2013 29
url Line 6 The JDBC URL
connection string
Oracle*:
jdbc:oracle:thin:@serverName:1521:oracleSID
SQL Server:
jdbc:sqlserver://serverName:1433;databaseNa
me=geoportal
PostgreSQL:
jdbc:postgresql://serverName:5432/postgres
MySQL:
url="jdbc:mysql://serverName:3306/geoportal
"
userName Line 7 geoportal database
user
username=”geoportal”
Oracle ojdbc6.jar:
user=”geoportal”
password Line 8 geoportal database
user password
password=”geoportalpwd”
* The oracleSID (System Identifier) is typically the service_name attribute contained within the
comment descriptor in the tnsnames.ora Oracle configuration file.
Note: Please verify the JDBC settings with official driver documentation found online your
database vendor’s website.
IMPORTANT: If you are using the ojdbc6.jar file and the configuration described above is not
connecting the geoportal to your database, then try the configuration below in your
geoportal.xml file. Users have reported that in some instances, this configuration is successful
with the ojdbc6.jar file. You will need to change the “type” attribute, and add the “factory”
attribute, as shown highlighted below:
<Resource name="jdbc/gpt" auth="Container"
type="oracle.jdbc.pool.OracleDataSource"
factory="oracle.jdbc.pool.OracleDataSourceFactory"
driverClassName="oracle.jdbc.driver.OracleDriver"
� Save the geoportal.xml file.
Additional configuration to support localization (optional)
To allow the Geoportal website to work in multiple languages, a configuration modification is
required to change the default URL encoding of the servlet container. Below is a sample of how
to make this change within Tomcat:
� Navigate to <Tomcat Installation Directory>\Conf\ and open the server.xml file.
Geoportal Server Installation Guide
July 2013 30
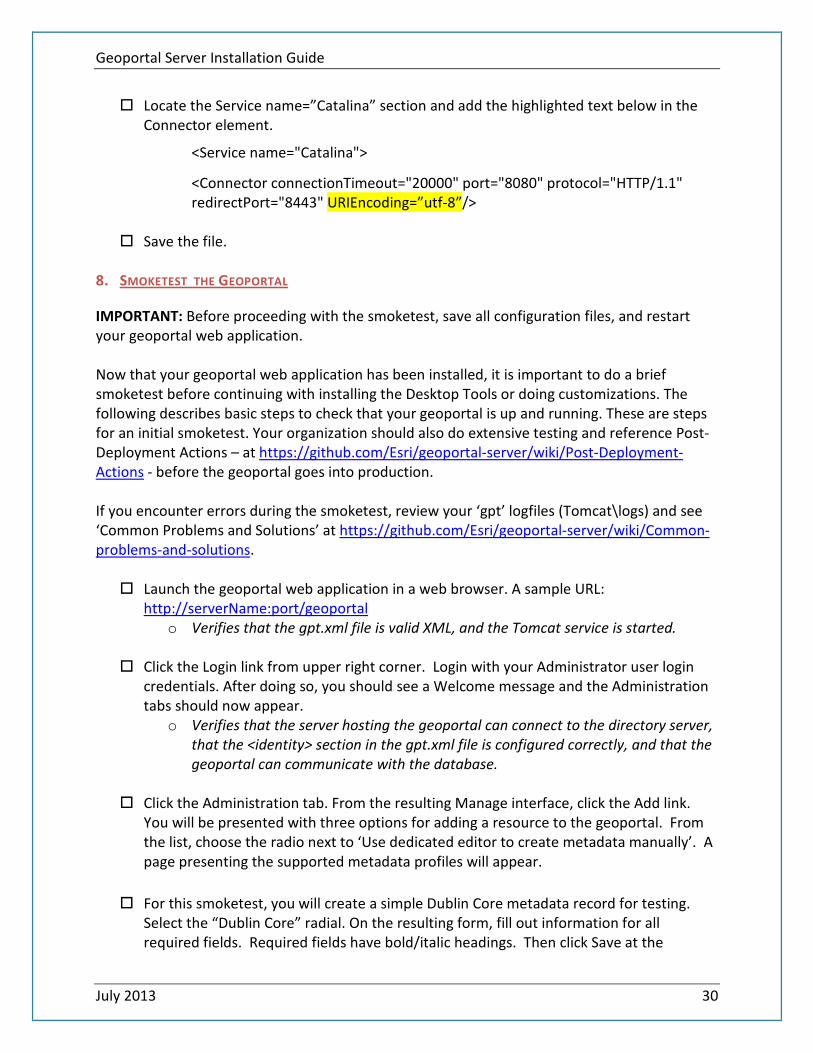
� Locate the Service name=”Catalina” section and add the highlighted text below in the
Connector element.
<Service name="Catalina">
<Connector connectionTimeout="20000" port="8080" protocol="HTTP/1.1"
redirectPort="8443" URIEncoding=”utf-8”/>
� Save the file.
8. SMOKETEST THE GEOPORTAL
IMPORTANT: Before proceeding with the smoketest, save all configuration files, and restart
your geoportal web application.
Now that your geoportal web application has been installed, it is important to do a brief
smoketest before continuing with installing the Desktop Tools or doing customizations. The
following describes basic steps to check that your geoportal is up and running. These are steps
for an initial smoketest. Your organization should also do extensive testing and reference Post-
Deployment Actions – at https://github.com/Esri/geoportal-server/wiki/Post-Deployment-
Actions - before the geoportal goes into production.
If you encounter errors during the smoketest, review your ‘gpt’ logfiles (Tomcat\logs) and see
‘Common Problems and Solutions’ at https://github.com/Esri/geoportal-server/wiki/Common-
problems-and-solutions.
� Launch the geoportal web application in a web browser. A sample URL:
http://serverName:port/geoportal
o Verifies that the gpt.xml file is valid XML, and the Tomcat service is started.
� Click the Login link from upper right corner. Login with your Administrator user login
credentials. After doing so, you should see a Welcome message and the Administration
tabs should now appear.
o Verifies that the server hosting the geoportal can connect to the directory server,
that the <identity> section in the gpt.xml file is configured correctly, and that the
geoportal can communicate with the database.
� Click the Administration tab. From the resulting Manage interface, click the Add link.
You will be presented with three options for adding a resource to the geoportal. From
the list, choose the radio next to ‘Use dedicated editor to create metadata manually’. A
page presenting the supported metadata profiles will appear.
� For this smoketest, you will create a simple Dublin Core metadata record for testing.
Select the “Dublin Core” radial. On the resulting form, fill out information for all
required fields. Required fields have bold/italic headings. Then click Save at the
Geoportal Server Installation Guide
July 2013 31
bottom. After clicking Save, you should receive a success message or a message saying
what is missing in the document to be valid. If you receive a message that something is
missing, fill in the missing information and click Save again.
o Verifies the connection to the database and the user’s ability to publish
metadata.
� Click the Manage link, and in the resulting interface check the box next to your newly
created record in the table. Then select “Set as Approved” from the dropdown box, and
click the “Execute Action” button. The document should now have a Status of Approved.
� Click the Search tab. In the resulting Search interface, type a word in the search field
that was included in your newly approved record’s title or abstract. Then click Search.
Your document should be returned.
o Verifies that the indexing mechanisms in the geoportal are working (e.g., lucene
folder set in the gpt.xml).
� Click on the record returned in the Search results to display its options. Select the
“Metadata” link. The document’s metadata XML should load in a new browser window.
o Verifies that the geoportal is able to retrieve the full XML from the database.
� If the smoketest is completed successfully, you may proceed to the Desktop Tools
section below if you desire to use ArcGIS Desktop to search or publish to your geoportal.
Also, review Appendix A to apply configurations in the gpt.xml file for additional
functionality.
9. DESKTOP TOOLS (OPTIONAL)
There are several Desktop tools that can be used in conjunction with your geoportal.
Installation for each is described below. Machines that have the Desktop Tools installed do not
have to be connected to the geoportal server machine or database, except to have access to
the geoportal server endpoint (e.g., able to connect to the geoportal through a web browser).
9.1. GEOPORTAL CSW CLIENTS
The Geoportal CSW Clients enable searching CSW 2.0.x metadata repositories from ArcGIS
Desktop or ArcGIS Explorer. The CSW Clients install can be found in the <Geoportal
Dir>\Desktop Tools\CSWClients directory. Refer to the documentation at
https://github.com/Esri/geoportal-server/wiki/Geoportal-CSW-Clients for installation
instructions, how to add the CSW Clients to ArcMap and ArcGIS Explorer, and how to use
the CSW Clients.
9.2. GEOPORTAL PUBLISH CLIENT
Geoportal Server Installation Guide
July 2013 32
The Geoportal Publish Client is a tool for ArcCatalog that allows publisher users to easily
publish metadata from their local desktop to the geoportal. The metadata can come from
Shapefiles, personal Geodatabases or Enterprise Geodatabases, or any other local data
formats for which you can create metadata in ArcCatalog. The Publish Client install can be
found in the <Geoportal Dir>\Desktop Tools\PublishClient folder. Refer to the
documentation at https://github.com/Esri/geoportal-server/wiki/Geoportal-Publish-Client
for installation instructions, how to add the Geoportal Publish Client to ArcCatalog, and how
to use the Geoportal Publish Client.
9.3. WMC CLIENT
The WMC Client allows for a Web Map Context (WMC) file to be opened directly in ArcMap.
WMC files adhere to the Open Geospatial Consortium (OGC) specification and have the
extension ".cml", ".wmc", or ".xml". WMC files provide pointers to remote accessible data,
specifically Live Data and Map resources. The WMC Client install can be found in the the
<Geoportal Dir>\Desktop Tools\WMCOpener folder. Refer to the documentation at
https://github.com/Esri/geoportal-server/wiki/WMC-Client for installation instructions,
how to add the WMC Client to ArcMap, and how to use the WMC Client.
Geoportal Server Installation Guide
July 2013 33
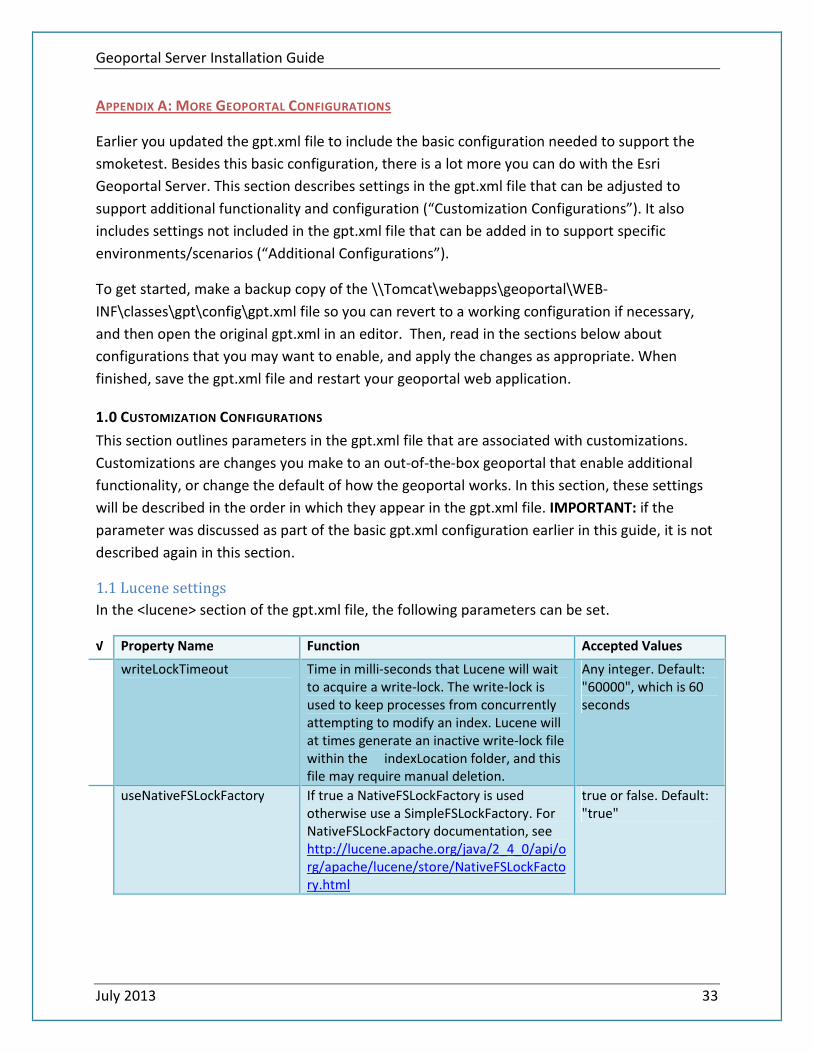
APPENDIX A: MORE GEOPORTAL CONFIGURATIONS
Earlier you updated the gpt.xml file to include the basic configuration needed to support the
smoketest. Besides this basic configuration, there is a lot more you can do with the Esri
Geoportal Server. This section describes settings in the gpt.xml file that can be adjusted to
support additional functionality and configuration (“Customization Configurations”). It also
includes settings not included in the gpt.xml file that can be added in to support specific
environments/scenarios (“Additional Configurations”).
To get started, make a backup copy of the \\Tomcat\webapps\geoportal\WEB-
INF\classes\gpt\config\gpt.xml file so you can revert to a working configuration if necessary,
and then open the original gpt.xml in an editor. Then, read in the sections below about
configurations that you may want to enable, and apply the changes as appropriate. When
finished, save the gpt.xml file and restart your geoportal web application.
1.0 CUSTOMIZATION CONFIGURATIONS
This section outlines parameters in the gpt.xml file that are associated with customizations.
Customizations are changes you make to an out-of-the-box geoportal that enable additional
functionality, or change the default of how the geoportal works. In this section, these settings
will be described in the order in which they appear in the gpt.xml file. IMPORTANT: if the
parameter was discussed as part of the basic gpt.xml configuration earlier in this guide, it is not
described again in this section.
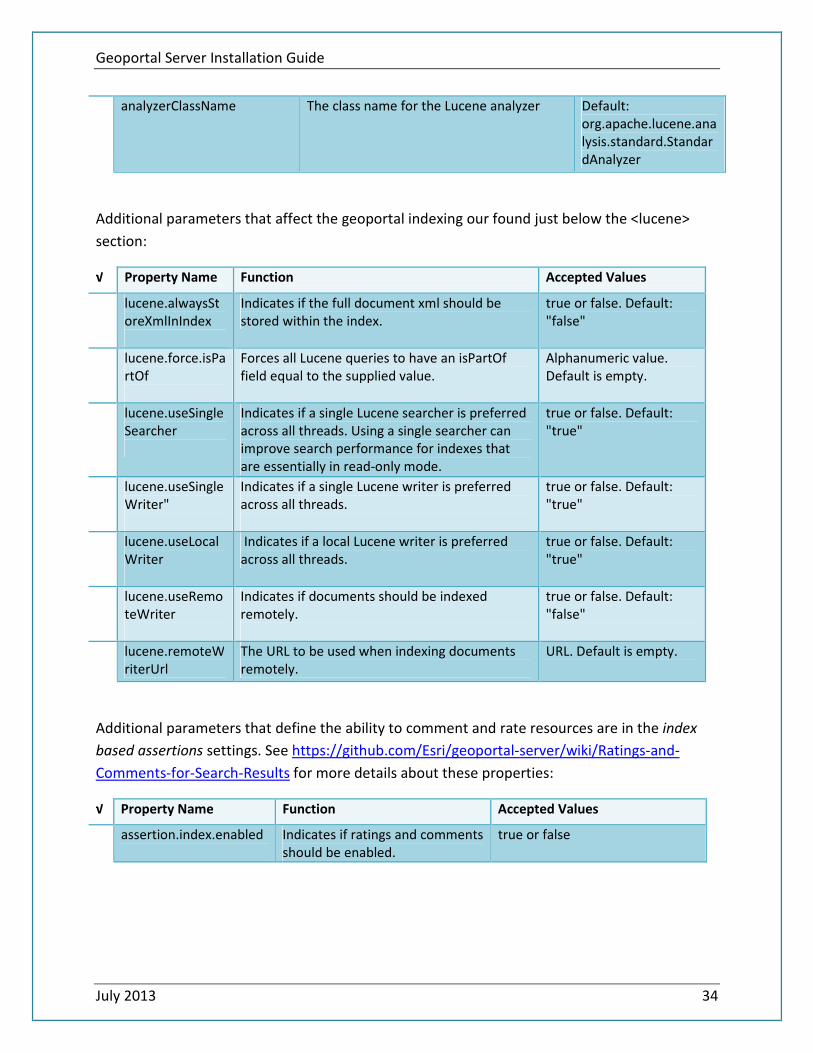
1.1 Lucene settings
In the <lucene> section of the gpt.xml file, the following parameters can be set.
√ Property Name Function Accepted Values
writeLockTimeout Time in milli-seconds that Lucene will wait
to acquire a write-lock. The write-lock is
used to keep processes from concurrently
attempting to modify an index. Lucene will
at times generate an inactive write-lock file
within the indexLocation folder, and this
file may require manual deletion.
Any integer. Default:
"60000", which is 60
seconds
useNativeFSLockFactory If true a NativeFSLockFactory is used
otherwise use a SimpleFSLockFactory. For
NativeFSLockFactory documentation, see
http://lucene.apache.org/java/2_4_0/api/o
rg/apache/lucene/store/NativeFSLockFacto
ry.html
true or false. Default:
"true"
Geoportal Server Installation Guide
July 2013 34
analyzerClassName The class name for the Lucene analyzer Default:
org.apache.lucene.ana
lysis.standard.Standar
dAnalyzer
Additional parameters that affect the geoportal indexing our found just below the <lucene>
section:
√ Property Name Function Accepted Values
lucene.alwaysSt
oreXmlInIndex
Indicates if the full document xml should be
stored within the index.
true or false. Default:
"false"
lucene.force.isPa
rtOf
Forces all Lucene queries to have an isPartOf
field equal to the supplied value.
Alphanumeric value.
Default is empty.
lucene.useSingle
Searcher
Indicates if a single Lucene searcher is preferred
across all threads. Using a single searcher can
improve search performance for indexes that
are essentially in read-only mode.
true or false. Default:
"true"
lucene.useSingle
Writer"
Indicates if a single Lucene writer is preferred
across all threads.
true or false. Default:
"true"
lucene.useLocal
Writer
Indicates if a local Lucene writer is preferred
across all threads.
true or false. Default:
"true"
lucene.useRemo
teWriter
Indicates if documents should be indexed
remotely.
true or false. Default:
"false"
lucene.remoteW
riterUrl
The URL to be used when indexing documents
remotely.
URL. Default is empty.
Additional parameters that define the ability to comment and rate resources are in the index
based assertions settings. See https://github.com/Esri/geoportal-server/wiki/Ratings-and-
Comments-for-Search-Results for more details about these properties:
√ Property Name Function Accepted Values
assertion.index.enabled
Indicates if ratings and comments
should be enabled.
true or false
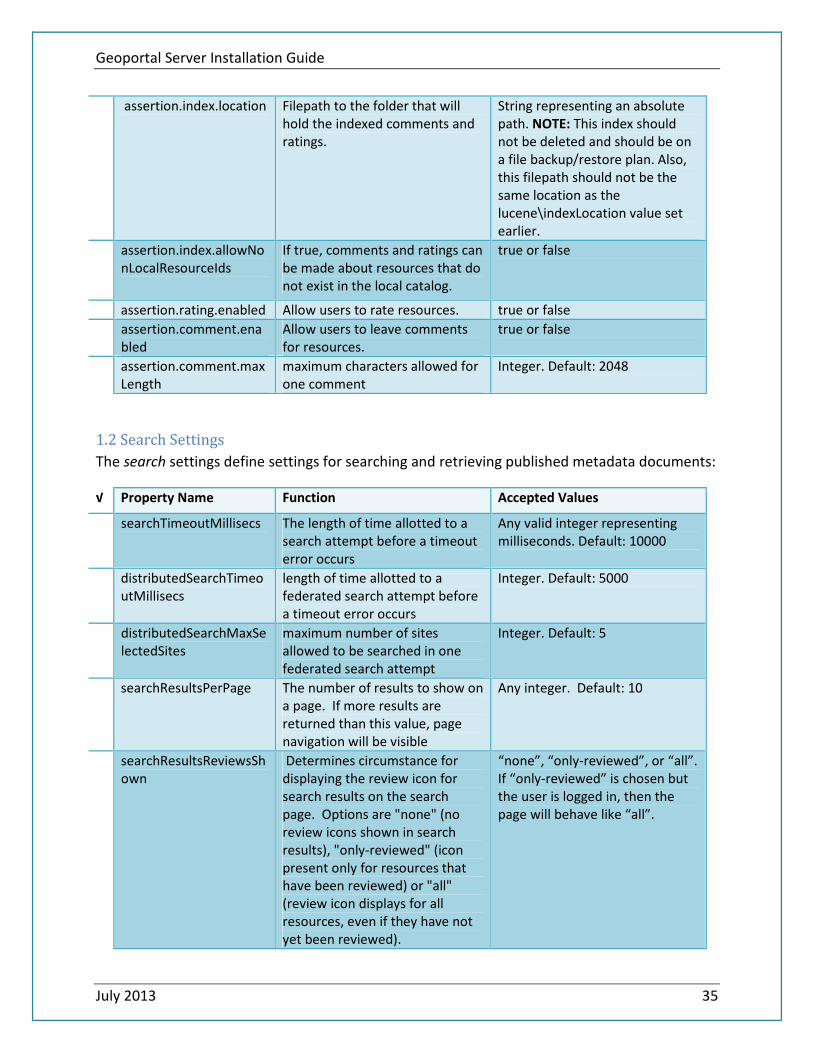
Geoportal Server Installation Guide
July 2013 35
assertion.index.location
Filepath to the folder that will
hold the indexed comments and
ratings.
String representing an absolute
path. NOTE: This index should
not be deleted and should be on
a file backup/restore plan. Also,
this filepath should not be the
same location as the
lucene\indexLocation value set
earlier.
assertion.index.allowNo
nLocalResourceIds
If true, comments and ratings can
be made about resources that do
not exist in the local catalog.
true or false
assertion.rating.enabled Allow users to rate resources. true or false
assertion.comment.ena
bled
Allow users to leave comments
for resources.
true or false
assertion.comment.max
Length
maximum characters allowed for
one comment
Integer. Default: 2048
1.2 Search Settings
The search settings define settings for searching and retrieving published metadata documents:
√ Property Name Function Accepted Values
searchTimeoutMillisecs The length of time allotted to a
search attempt before a timeout
error occurs
Any valid integer representing
milliseconds. Default: 10000
distributedSearchTimeo
utMillisecs
length of time allotted to a
federated search attempt before
a timeout error occurs
Integer. Default: 5000
distributedSearchMaxSe
lectedSites
maximum number of sites
allowed to be searched in one
federated search attempt
Integer. Default: 5
searchResultsPerPage The number of results to show on
a page. If more results are
returned than this value, page
navigation will be visible
Any integer. Default: 10
searchResultsReviewsSh
own
Determines circumstance for
displaying the review icon for
search results on the search
page. Options are "none" (no
review icons shown in search
results), "only-reviewed" (icon
present only for resources that
have been reviewed) or "all"
(review icon displays for all
resources, even if they have not
yet been reviewed).
“none”, “only-reviewed”, or “all”.
If “only-reviewed” is chosen but
the user is logged in, then the
page will behave like “all”.
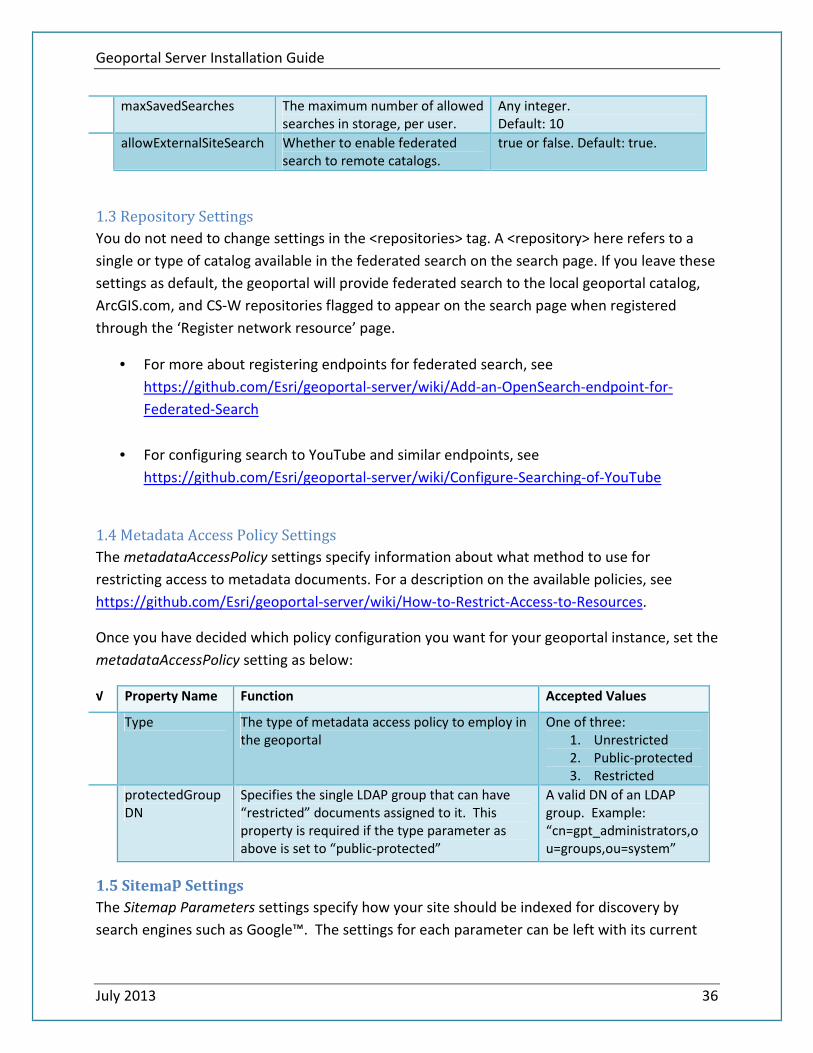
Geoportal Server Installation Guide
July 2013 36
maxSavedSearches The maximum number of allowed
searches in storage, per user.
Any integer.
Default: 10
allowExternalSiteSearch Whether to enable federated
search to remote catalogs.
true or false. Default: true.
1.3 Repository Settings
You do not need to change settings in the <repositories> tag. A <repository> here refers to a
single or type of catalog available in the federated search on the search page. If you leave these
settings as default, the geoportal will provide federated search to the local geoportal catalog,
ArcGIS.com, and CS-W repositories flagged to appear on the search page when registered
through the ‘Register network resource’ page.
• For more about registering endpoints for federated search, see
https://github.com/Esri/geoportal-server/wiki/Add-an-OpenSearch-endpoint-for-
Federated-Search
• For configuring search to YouTube and similar endpoints, see
https://github.com/Esri/geoportal-server/wiki/Configure-Searching-of-YouTube
1.4 Metadata Access Policy Settings
The metadataAccessPolicy settings specify information about what method to use for
restricting access to metadata documents. For a description on the available policies, see
https://github.com/Esri/geoportal-server/wiki/How-to-Restrict-Access-to-Resources.
Once you have decided which policy configuration you want for your geoportal instance, set the
metadataAccessPolicy setting as below:
√ Property Name Function Accepted Values
Type The type of metadata access policy to employ in
the geoportal
One of three:
1. Unrestricted
2. Public-protected
3. Restricted
protectedGroup
DN
Specifies the single LDAP group that can have
“restricted” documents assigned to it. This
property is required if the type parameter as
above is set to “public-protected”
A valid DN of an LDAP
group. Example:
“cn=gpt_administrators,o
u=groups,ou=system”
1.5 Sitemap Settings
The Sitemap Parameters settings specify how your site should be indexed for discovery by
search engines such as Google™. The settings for each parameter can be left with its current
Geoportal Server Installation Guide
July 2013 37
default value. To modify the behavior of your site’s indexing, modify the appropriate
parameters as per the descriptions in the gpt.xml file’s inline comments for the sitemap section.
For more information see https://github.com/Esri/geoportal-server/wiki/Post-Deployment-
Actions#wiki-Register_the_Geoportal_Sitemap_with_Search_Engines.
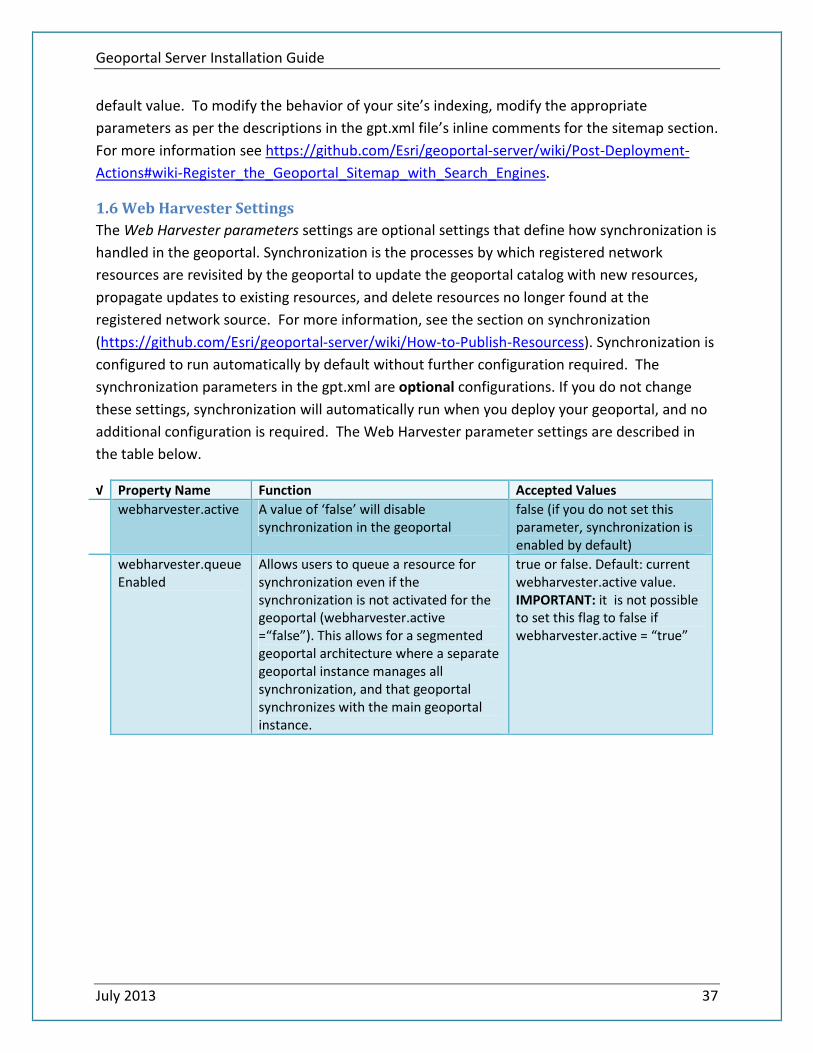
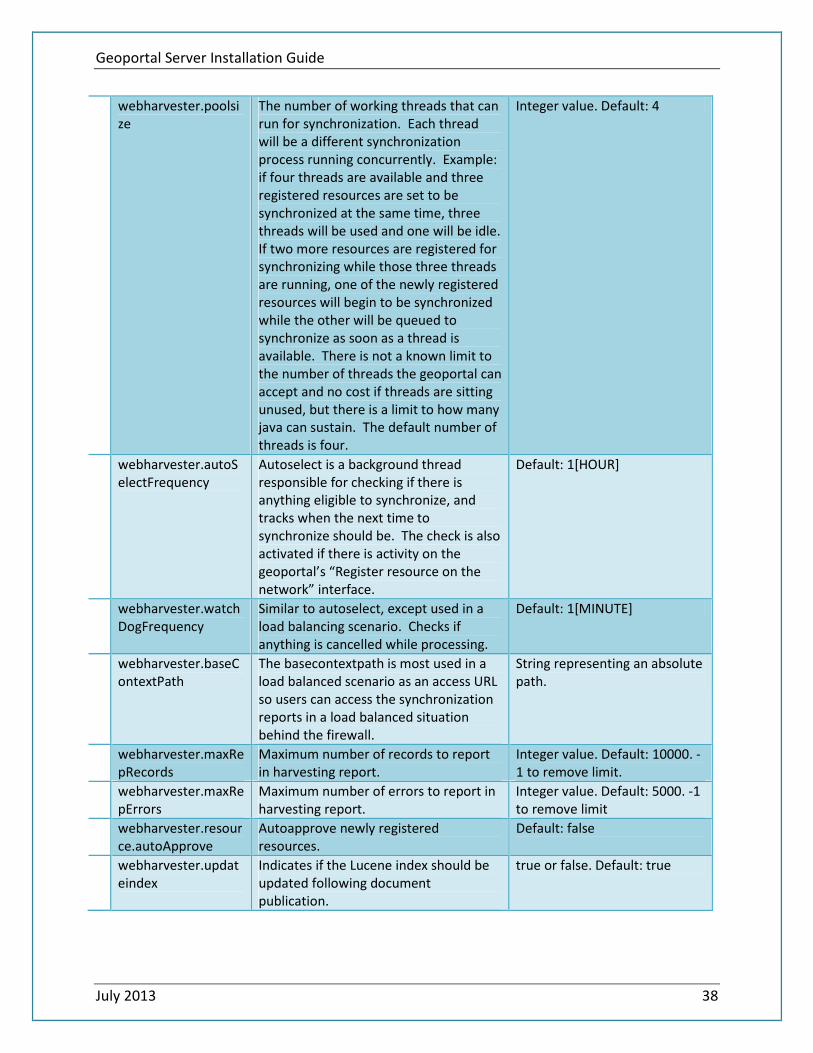
1.6 Web Harvester Settings
The Web Harvester parameters settings are optional settings that define how synchronization is
handled in the geoportal. Synchronization is the processes by which registered network
resources are revisited by the geoportal to update the geoportal catalog with new resources,
propagate updates to existing resources, and delete resources no longer found at the
registered network source. For more information, see the section on synchronization
(https://github.com/Esri/geoportal-server/wiki/How-to-Publish-Resourcess). Synchronization is
configured to run automatically by default without further configuration required. The
synchronization parameters in the gpt.xml are optional configurations. If you do not change
these settings, synchronization will automatically run when you deploy your geoportal, and no
additional configuration is required. The Web Harvester parameter settings are described in
the table below.
√ Property Name Function Accepted Values
webharvester.active A value of ‘false’ will disable
synchronization in the geoportal
false (if you do not set this
parameter, synchronization is
enabled by default)
webharvester.queue
Enabled
Allows users to queue a resource for
synchronization even if the
synchronization is not activated for the
geoportal (webharvester.active
=“false”). This allows for a segmented
geoportal architecture where a separate
geoportal instance manages all
synchronization, and that geoportal
synchronizes with the main geoportal
instance.
true or false. Default: current
webharvester.active value.
IMPORTANT: it is not possible
to set this flag to false if
webharvester.active = “true”
Geoportal Server Installation Guide
July 2013 38
webharvester.poolsi
ze
The number of working threads that can
run for synchronization. Each thread
will be a different synchronization
process running concurrently. Example:
if four threads are available and three
registered resources are set to be
synchronized at the same time, three
threads will be used and one will be idle.
If two more resources are registered for
synchronizing while those three threads
are running, one of the newly registered
resources will begin to be synchronized
while the other will be queued to
synchronize as soon as a thread is
available. There is not a known limit to
the number of threads the geoportal can
accept and no cost if threads are sitting
unused, but there is a limit to how many
java can sustain. The default number of
threads is four.
Integer value. Default: 4
webharvester.autoS
electFrequency
Autoselect is a background thread
responsible for checking if there is
anything eligible to synchronize, and
tracks when the next time to
synchronize should be. The check is also
activated if there is activity on the
geoportal’s “Register resource on the
network” interface.
Default: 1[HOUR]
webharvester.watch
DogFrequency
Similar to autoselect, except used in a
load balancing scenario. Checks if
anything is cancelled while processing.
Default: 1[MINUTE]
webharvester.baseC
ontextPath
The basecontextpath is most used in a
load balanced scenario as an access URL
so users can access the synchronization
reports in a load balanced situation
behind the firewall.
String representing an absolute
path.
webharvester.maxRe
pRecords
Maximum number of records to report
in harvesting report.
Integer value. Default: 10000. -
1 to remove limit.
webharvester.maxRe
pErrors
Maximum number of errors to report in
harvesting report.
Integer value. Default: 5000. -1
to remove limit
webharvester.resour
ce.autoApprove
Autoapprove newly registered
resources.
Default: false
webharvester.updat
eindex
Indicates if the Lucene index should be
updated following document
publication.
true or false. Default: true
Geoportal Server Installation Guide
July 2013 39
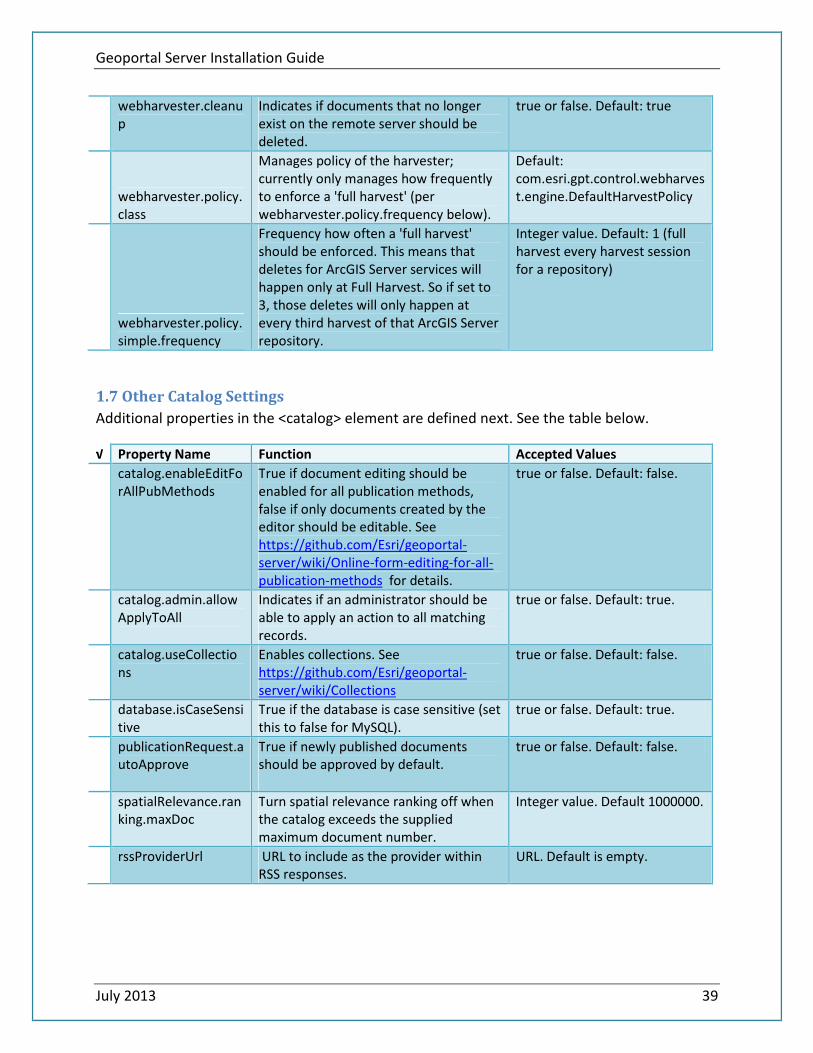
webharvester.cleanu
p
Indicates if documents that no longer
exist on the remote server should be
deleted.
true or false. Default: true
webharvester.policy.
class
Manages policy of the harvester;
currently only manages how frequently
to enforce a 'full harvest' (per
webharvester.policy.frequency below).
Default:
com.esri.gpt.control.webharves
t.engine.DefaultHarvestPolicy
webharvester.policy.
simple.frequency
Frequency how often a 'full harvest'
should be enforced. This means that
deletes for ArcGIS Server services will
happen only at Full Harvest. So if set to
3, those deletes will only happen at
every third harvest of that ArcGIS Server
repository.
Integer value. Default: 1 (full
harvest every harvest session
for a repository)
1.7 Other Catalog Settings
Additional properties in the <catalog> element are defined next. See the table below.
√ Property Name Function Accepted Values
catalog.enableEditFo
rAllPubMethods
True if document editing should be
enabled for all publication methods,
false if only documents created by the
editor should be editable. See
https://github.com/Esri/geoportal-
server/wiki/Online-form-editing-for-all-
publication-methods for details.
true or false. Default: false.
catalog.admin.allow
ApplyToAll
Indicates if an administrator should be
able to apply an action to all matching
records.
true or false. Default: true.
catalog.useCollectio
ns
Enables collections. See
https://github.com/Esri/geoportal-
server/wiki/Collections
true or false. Default: false.
database.isCaseSensi
tive
True if the database is case sensitive (set
this to false for MySQL).
true or false. Default: true.
publicationRequest.a
utoApprove
True if newly published documents
should be approved by default.
true or false. Default: false.
spatialRelevance.ran
king.maxDoc
Turn spatial relevance ranking off when
the catalog exceeds the supplied
maximum document number.
Integer value. Default 1000000.
rssProviderUrl URL to include as the provider within
RSS responses.
URL. Default is empty.
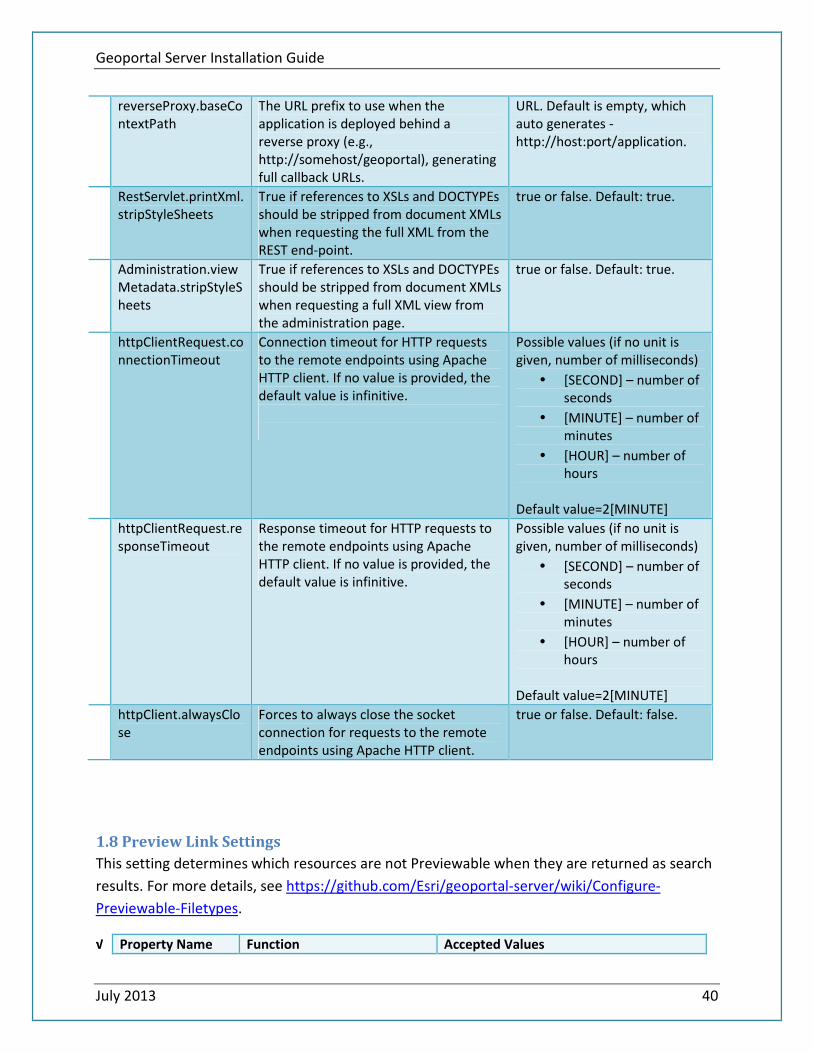
Geoportal Server Installation Guide
July 2013 40
reverseProxy.baseCo
ntextPath
The URL prefix to use when the
application is deployed behind a
reverse proxy (e.g.,
http://somehost/geoportal), generating
full callback URLs.
URL. Default is empty, which
auto generates -
http://host:port/application.
RestServlet.printXml.
stripStyleSheets
True if references to XSLs and DOCTYPEs
should be stripped from document XMLs
when requesting the full XML from the
REST end-point.
true or false. Default: true.
Administration.view
Metadata.stripStyleS
heets
True if references to XSLs and DOCTYPEs
should be stripped from document XMLs
when requesting a full XML view from
the administration page.
true or false. Default: true.
httpClientRequest.co
nnectionTimeout
Connection timeout for HTTP requests
to the remote endpoints using Apache
HTTP client. If no value is provided, the
default value is infinitive.
Possible values (if no unit is
given, number of milliseconds)
• [SECOND] – number of
seconds
• [MINUTE] – number of
minutes
• [HOUR] – number of
hours
Default value=2[MINUTE]
httpClientRequest.re
sponseTimeout
Response timeout for HTTP requests to
the remote endpoints using Apache
HTTP client. If no value is provided, the
default value is infinitive.
Possible values (if no unit is
given, number of milliseconds)
• [SECOND] – number of
seconds
• [MINUTE] – number of
minutes
• [HOUR] – number of
hours
Default value=2[MINUTE]
httpClient.alwaysClo
se
Forces to always close the socket
connection for requests to the remote
endpoints using Apache HTTP client.
true or false. Default: false.
1.8 Preview Link Settings
This setting determines which resources are not Previewable when they are returned as search
results. For more details, see https://github.com/Esri/geoportal-server/wiki/Configure-
Previewable-Filetypes.
√ Property Name Function Accepted Values
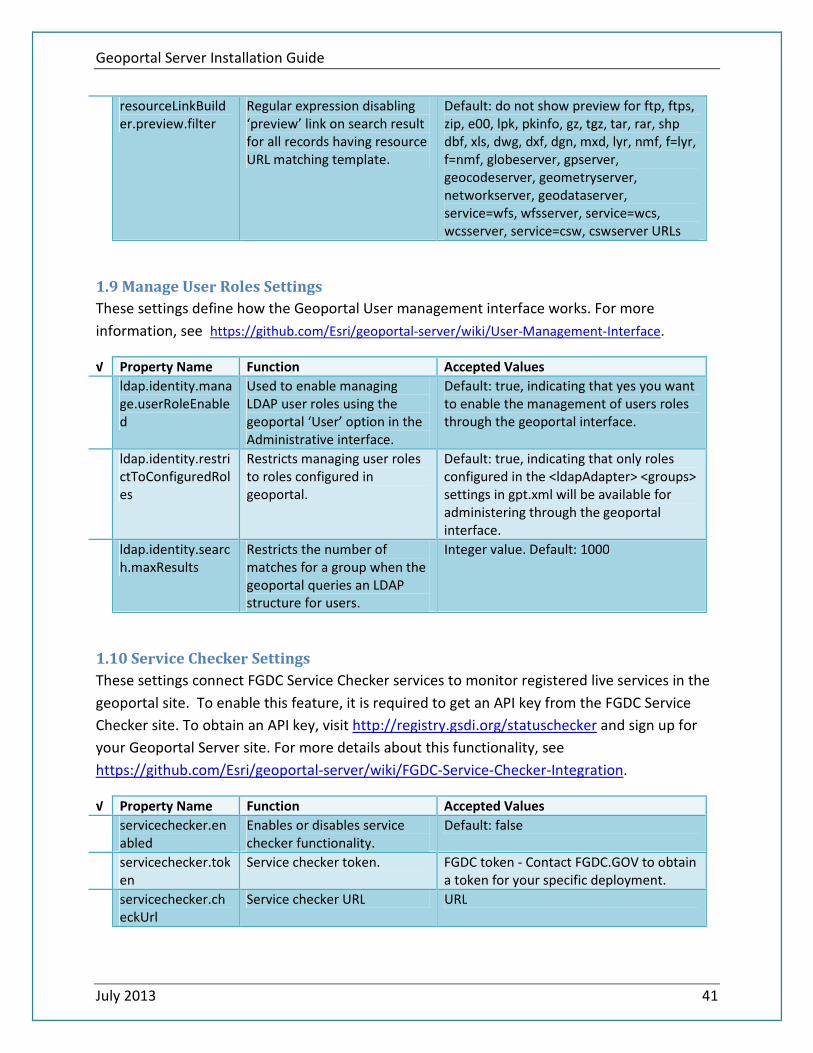
Geoportal Server Installation Guide
July 2013 41
resourceLinkBuild
er.preview.filter
Regular expression disabling
‘preview’ link on search result
for all records having resource
URL matching template.
Default: do not show preview for ftp, ftps,
zip, e00, lpk, pkinfo, gz, tgz, tar, rar, shp
dbf, xls, dwg, dxf, dgn, mxd, lyr, nmf, f=lyr,
f=nmf, globeserver, gpserver,
geocodeserver, geometryserver,
networkserver, geodataserver,
service=wfs, wfsserver, service=wcs,
wcsserver, service=csw, cswserver URLs
1.9 Manage User Roles Settings
These settings define how the Geoportal User management interface works. For more
information, see https://github.com/Esri/geoportal-server/wiki/User-Management-Interface.
√ Property Name Function Accepted Values
ldap.identity.mana
ge.userRoleEnable
d
Used to enable managing
LDAP user roles using the
geoportal ‘User’ option in the
Administrative interface.
Default: true, indicating that yes you want
to enable the management of users roles
through the geoportal interface.
ldap.identity.restri
ctToConfiguredRol
es
Restricts managing user roles
to roles configured in
geoportal.
Default: true, indicating that only roles
configured in the <ldapAdapter> <groups>
settings in gpt.xml will be available for
administering through the geoportal
interface.
ldap.identity.searc
h.maxResults
Restricts the number of
matches for a group when the
geoportal queries an LDAP
structure for users.
Integer value. Default: 1000
1.10 Service Checker Settings
These settings connect FGDC Service Checker services to monitor registered live services in the
geoportal site. To enable this feature, it is required to get an API key from the FGDC Service
Checker site. To obtain an API key, visit http://registry.gsdi.org/statuschecker and sign up for
your Geoportal Server site. For more details about this functionality, see
https://github.com/Esri/geoportal-server/wiki/FGDC-Service-Checker-Integration.
√ Property Name Function Accepted Values
servicechecker.en
abled
Enables or disables service
checker functionality.
Default: false
servicechecker.tok
en
Service checker token. FGDC token - Contact FGDC.GOV to obtain
a token for your specific deployment.
servicechecker.ch
eckUrl
Service checker URL URL

Geoportal Server Installation Guide
July 2013 42
servicechecker.inf
oUrl
Service info URL URL
1.11 Cart Processor Settings
These settings enable and configure the Geoportal Cart functionality. Note, this is a sample
processor; a specific processor can be created based upon the use case. For more details see
https://github.com/Esri/geoportal-server/wiki/Cart-Processor.
√ Property Name Function Accepted Values
catalog.cart.enabl
ed
Enables or disables the cart. Default: false
catalog.cart.maxIt
ems
Maximum number of items in
the cart.
Integer value. Default: 10
catalog.cart.proce
ssor
the Java class used to process
items.
Default: none, but can use
com.esri.gpt.control.cart.ZipXmls per
sample.
1.12 Data Download Customization Settings
The downloadData settings specify information about the default map service and its
corresponding geoprocessing service that is used by the Data Download functionality.
Configuring Data Download is a customization and is not required for the functioning of the
geoportal. For information on how to configure the Data Download function, see
https://github.com/Esri/geoportal-server/wiki/DataDownload-Tab. By default, the taskURL and
mapServiceURL are left blank and the download tab will not appear in the geoportal interface.
1.13 Identity Settings
The identity section defines the settings for the geoportal authentication. The opening tag
“identity” has an encKey attribute which is used to specify an encryption key. This key is used in
conjunction with a two-way encryption algorithm to encode/decode user names and passwords
that are stored in the database, for example, in the information for a metadata repository. The
default value of the key is PtkEsri, which is case-sensitive. The identity element also has a realm
attribute, which is referenced when a publisher user updates a metadata record by using an
external XML editor, such as Altova XMLSpy®. The realm is sometimes - but not always,
depending on the XML editor software or system setup - displayed by the client prompting for
credentials. The realm value helps users better understand that they are about to log into an
editing session for a record from the geoportal. IMPORTANT: If the value of encKey is changed
at any point, any data already stored in the database that was encrypted with the “old” encKey
will become invalid and will have to be re-generated and re-stored in the database to
correspond to the new encKey value.
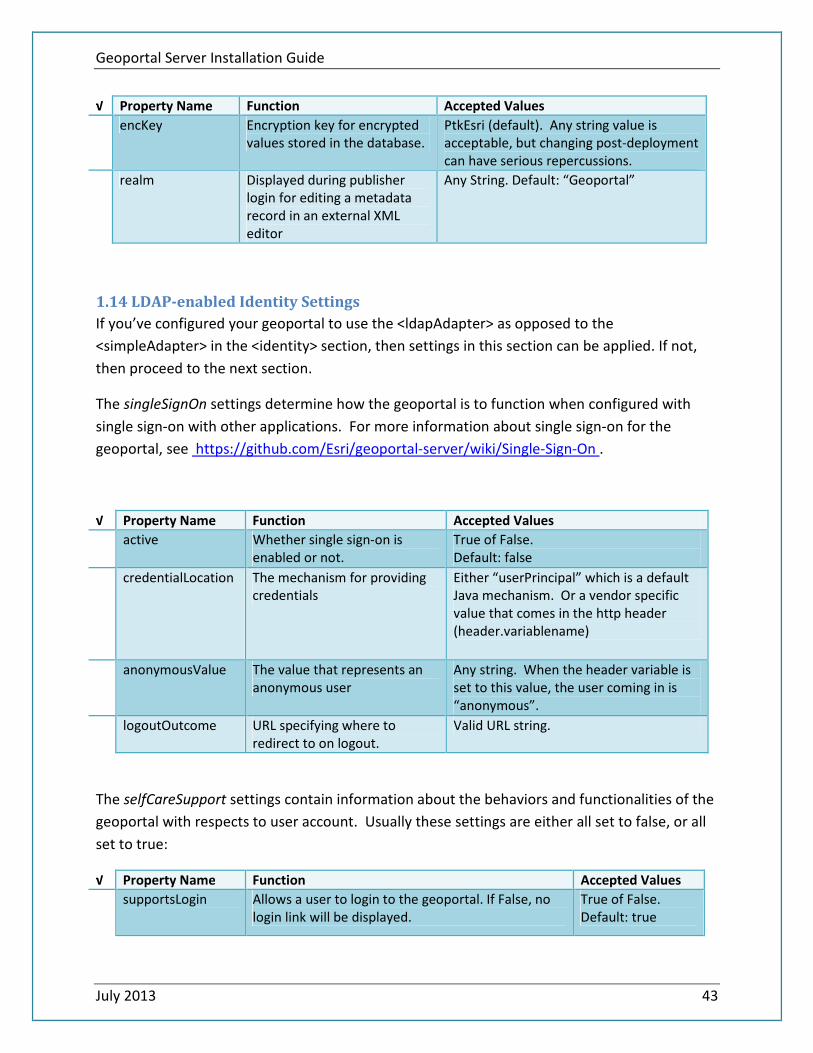
Geoportal Server Installation Guide
July 2013 43
√ Property Name Function Accepted Values
encKey Encryption key for encrypted
values stored in the database.
PtkEsri (default). Any string value is
acceptable, but changing post-deployment
can have serious repercussions.
realm Displayed during publisher
login for editing a metadata
record in an external XML
editor
Any String. Default: “Geoportal”
1.14 LDAP-enabled Identity Settings
If you’ve configured your geoportal to use the <ldapAdapter> as opposed to the
<simpleAdapter> in the <identity> section, then settings in this section can be applied. If not,
then proceed to the next section.
The singleSignOn settings determine how the geoportal is to function when configured with
single sign-on with other applications. For more information about single sign-on for the
geoportal, see https://github.com/Esri/geoportal-server/wiki/Single-Sign-On .
√ Property Name Function Accepted Values
active Whether single sign-on is
enabled or not.
True of False.
Default: false
credentialLocation The mechanism for providing
credentials
Either “userPrincipal” which is a default
Java mechanism. Or a vendor specific
value that comes in the http header
(header.variablename)
anonymousValue The value that represents an
anonymous user
Any string. When the header variable is
set to this value, the user coming in is
“anonymous”.
logoutOutcome URL specifying where to
redirect to on logout.
Valid URL string.
The selfCareSupport settings contain information about the behaviors and functionalities of the
geoportal with respects to user account. Usually these settings are either all set to false, or all
set to true:
√ Property Name Function Accepted Values
supportsLogin Allows a user to login to the geoportal. If False, no
login link will be displayed.
True of False.
Default: true
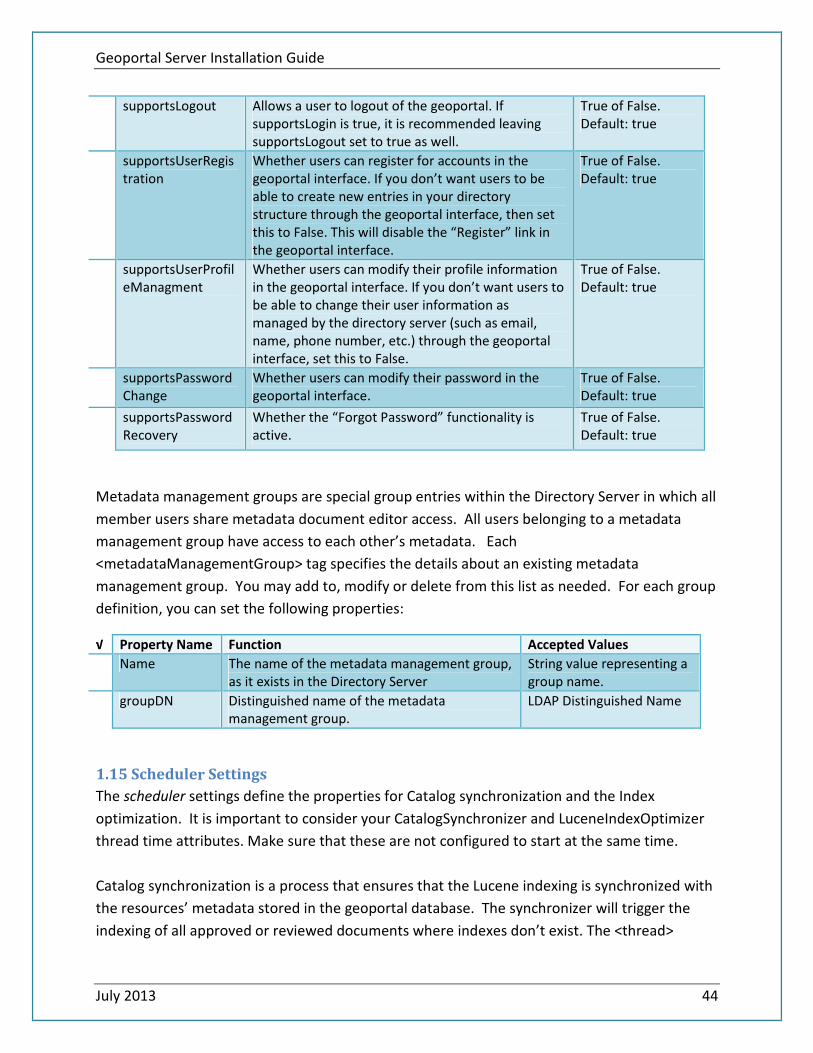
Geoportal Server Installation Guide
July 2013 44
supportsLogout Allows a user to logout of the geoportal. If
supportsLogin is true, it is recommended leaving
supportsLogout set to true as well.
True of False.
Default: true
supportsUserRegis
tration
Whether users can register for accounts in the
geoportal interface. If you don’t want users to be
able to create new entries in your directory
structure through the geoportal interface, then set
this to False. This will disable the “Register” link in
the geoportal interface.
True of False.
Default: true
supportsUserProfil
eManagment
Whether users can modify their profile information
in the geoportal interface. If you don’t want users to
be able to change their user information as
managed by the directory server (such as email,
name, phone number, etc.) through the geoportal
interface, set this to False.
True of False.
Default: true
supportsPassword
Change
Whether users can modify their password in the
geoportal interface.
True of False.
Default: true
supportsPassword
Recovery
Whether the “Forgot Password” functionality is
active.
True of False.
Default: true
Metadata management groups are special group entries within the Directory Server in which all
member users share metadata document editor access. All users belonging to a metadata
management group have access to each other’s metadata. Each
<metadataManagementGroup> tag specifies the details about an existing metadata
management group. You may add to, modify or delete from this list as needed. For each group
definition, you can set the following properties:
√ Property Name Function Accepted Values
Name The name of the metadata management group,
as it exists in the Directory Server
String value representing a
group name.
groupDN Distinguished name of the metadata
management group.
LDAP Distinguished Name
1.15 Scheduler Settings
The scheduler settings define the properties for Catalog synchronization and the Index
optimization. It is important to consider your CatalogSynchronizer and LuceneIndexOptimizer
thread time attributes. Make sure that these are not configured to start at the same time.
Catalog synchronization is a process that ensures that the Lucene indexing is synchronized with
the resources’ metadata stored in the geoportal database. The synchronizer will trigger the
indexing of all approved or reviewed documents where indexes don’t exist. The <thread>
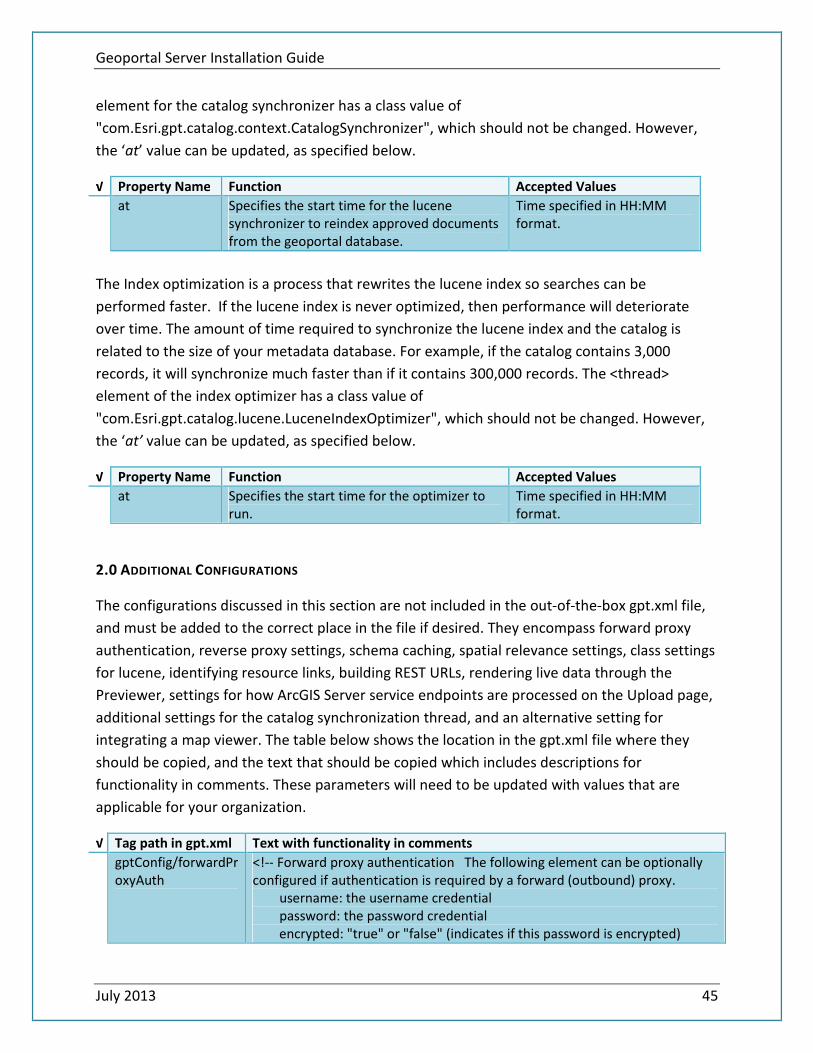
Geoportal Server Installation Guide
July 2013 45
element for the catalog synchronizer has a class value of
"com.Esri.gpt.catalog.context.CatalogSynchronizer", which should not be changed. However,
the ‘at’ value can be updated, as specified below.
√ Property Name Function Accepted Values
at Specifies the start time for the lucene
synchronizer to reindex approved documents
from the geoportal database.
Time specified in HH:MM
format.
The Index optimization is a process that rewrites the lucene index so searches can be
performed faster. If the lucene index is never optimized, then performance will deteriorate
over time. The amount of time required to synchronize the lucene index and the catalog is
related to the size of your metadata database. For example, if the catalog contains 3,000
records, it will synchronize much faster than if it contains 300,000 records. The <thread>
element of the index optimizer has a class value of
"com.Esri.gpt.catalog.lucene.LuceneIndexOptimizer", which should not be changed. However,
the ‘at’ value can be updated, as specified below.
√ Property Name Function Accepted Values
at Specifies the start time for the optimizer to
run.
Time specified in HH:MM
format.
2.0 ADDITIONAL CONFIGURATIONS
The configurations discussed in this section are not included in the out-of-the-box gpt.xml file,
and must be added to the correct place in the file if desired. They encompass forward proxy
authentication, reverse proxy settings, schema caching, spatial relevance settings, class settings
for lucene, identifying resource links, building REST URLs, rendering live data through the
Previewer, settings for how ArcGIS Server service endpoints are processed on the Upload page,
additional settings for the catalog synchronization thread, and an alternative setting for
integrating a map viewer. The table below shows the location in the gpt.xml file where they
should be copied, and the text that should be copied which includes descriptions for
functionality in comments. These parameters will need to be updated with values that are
applicable for your organization.
√ Tag path in gpt.xml Text with functionality in comments
gptConfig/forwardPr
oxyAuth
<!-- Forward proxy authentication The following element can be optionally
configured if authentication is required by a forward (outbound) proxy.
username: the username credential
password: the password credential
encrypted: "true" or "false" (indicates if this password is encrypted)
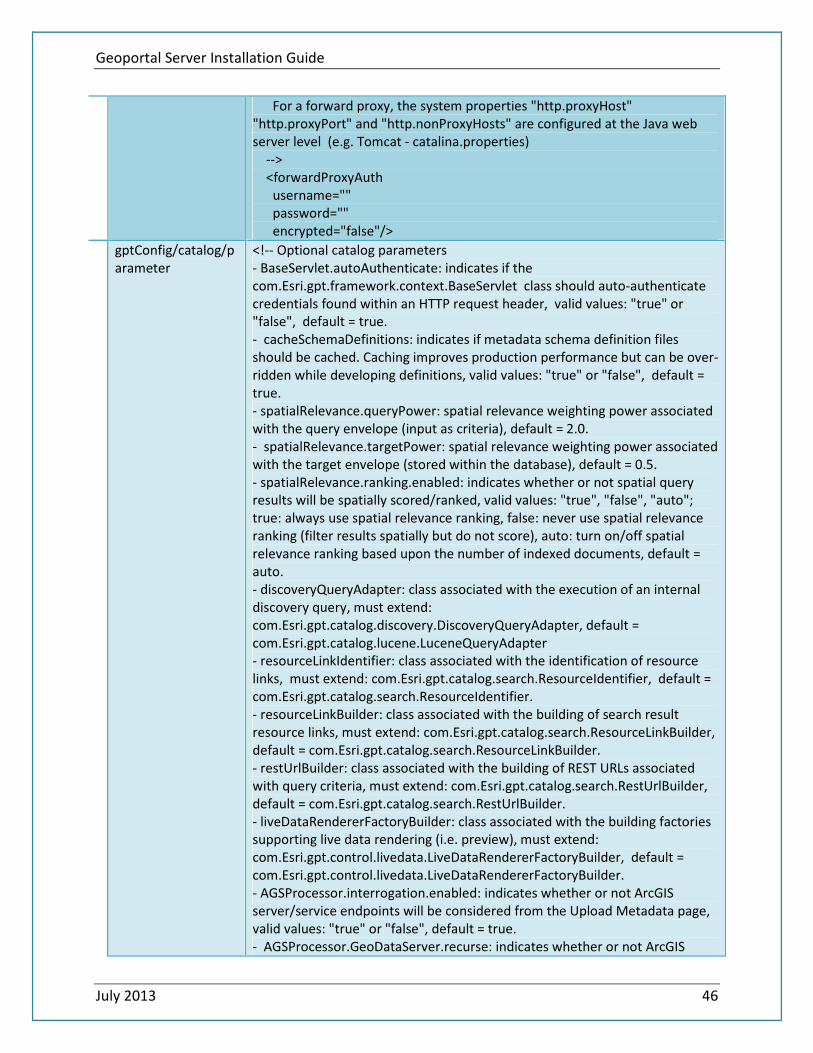
Geoportal Server Installation Guide
July 2013 46
For a forward proxy, the system properties "http.proxyHost"
"http.proxyPort" and "http.nonProxyHosts" are configured at the Java web
server level (e.g. Tomcat - catalina.properties)
-->
<forwardProxyAuth
username=""
password=""
encrypted="false"/>
gptConfig/catalog/p
arameter
<!-- Optional catalog parameters
- BaseServlet.autoAuthenticate: indicates if the
com.Esri.gpt.framework.context.BaseServlet class should auto-authenticate
credentials found within an HTTP request header, valid values: "true" or
"false", default = true.
- cacheSchemaDefinitions: indicates if metadata schema definition files
should be cached. Caching improves production performance but can be over-
ridden while developing definitions, valid values: "true" or "false", default =
true.
- spatialRelevance.queryPower: spatial relevance weighting power associated
with the query envelope (input as criteria), default = 2.0.
- spatialRelevance.targetPower: spatial relevance weighting power associated
with the target envelope (stored within the database), default = 0.5.
- spatialRelevance.ranking.enabled: indicates whether or not spatial query
results will be spatially scored/ranked, valid values: "true", "false", "auto";
true: always use spatial relevance ranking, false: never use spatial relevance
ranking (filter results spatially but do not score), auto: turn on/off spatial
relevance ranking based upon the number of indexed documents, default =
auto.
- discoveryQueryAdapter: class associated with the execution of an internal
discovery query, must extend:
com.Esri.gpt.catalog.discovery.DiscoveryQueryAdapter, default =
com.Esri.gpt.catalog.lucene.LuceneQueryAdapter
- resourceLinkIdentifier: class associated with the identification of resource
links, must extend: com.Esri.gpt.catalog.search.ResourceIdentifier, default =
com.Esri.gpt.catalog.search.ResourceIdentifier.
- resourceLinkBuilder: class associated with the building of search result
resource links, must extend: com.Esri.gpt.catalog.search.ResourceLinkBuilder,
default = com.Esri.gpt.catalog.search.ResourceLinkBuilder.
- restUrlBuilder: class associated with the building of REST URLs associated
with query criteria, must extend: com.Esri.gpt.catalog.search.RestUrlBuilder,
default = com.Esri.gpt.catalog.search.RestUrlBuilder.
- liveDataRendererFactoryBuilder: class associated with the building factories
supporting live data rendering (i.e. preview), must extend:
com.Esri.gpt.control.livedata.LiveDataRendererFactoryBuilder, default =
com.Esri.gpt.control.livedata.LiveDataRendererFactoryBuilder.
- AGSProcessor.interrogation.enabled: indicates whether or not ArcGIS
server/service endpoints will be considered from the Upload Metadata page,
valid values: "true" or "false", default = true.
- AGSProcessor.GeoDataServer.recurse: indicates whether or not ArcGIS
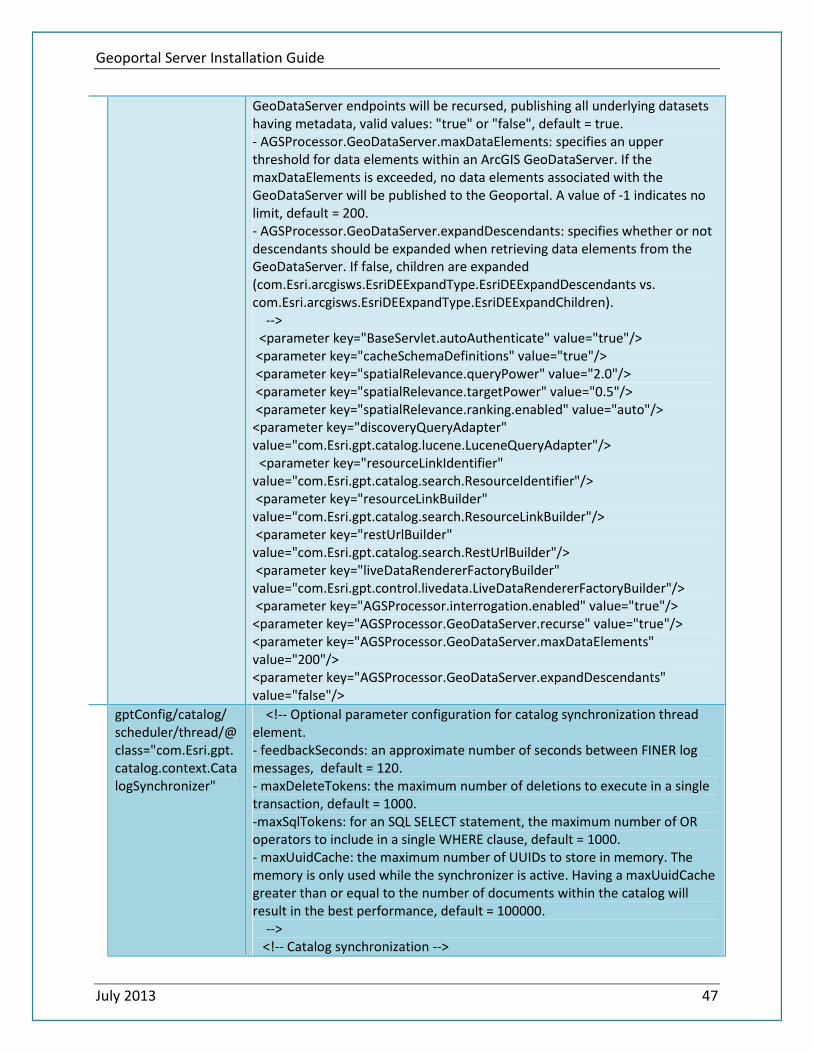
Geoportal Server Installation Guide
July 2013 47
GeoDataServer endpoints will be recursed, publishing all underlying datasets
having metadata, valid values: "true" or "false", default = true.
- AGSProcessor.GeoDataServer.maxDataElements: specifies an upper
threshold for data elements within an ArcGIS GeoDataServer. If the
maxDataElements is exceeded, no data elements associated with the
GeoDataServer will be published to the Geoportal. A value of -1 indicates no
limit, default = 200.
- AGSProcessor.GeoDataServer.expandDescendants: specifies whether or not
descendants should be expanded when retrieving data elements from the
GeoDataServer. If false, children are expanded
(com.Esri.arcgisws.EsriDEExpandType.EsriDEExpandDescendants vs.
com.Esri.arcgisws.EsriDEExpandType.EsriDEExpandChildren).
-->
<parameter key="BaseServlet.autoAuthenticate" value="true"/>
<parameter key="cacheSchemaDefinitions" value="true"/>
<parameter key="spatialRelevance.queryPower" value="2.0"/>
<parameter key="spatialRelevance.targetPower" value="0.5"/>
<parameter key="spatialRelevance.ranking.enabled" value="auto"/>
<parameter key="discoveryQueryAdapter"
value="com.Esri.gpt.catalog.lucene.LuceneQueryAdapter"/>
<parameter key="resourceLinkIdentifier"
value="com.Esri.gpt.catalog.search.ResourceIdentifier"/>
<parameter key="resourceLinkBuilder"
value="com.Esri.gpt.catalog.search.ResourceLinkBuilder"/>
<parameter key="restUrlBuilder"
value="com.Esri.gpt.catalog.search.RestUrlBuilder"/>
<parameter key="liveDataRendererFactoryBuilder"
value="com.Esri.gpt.control.livedata.LiveDataRendererFactoryBuilder"/>
<parameter key="AGSProcessor.interrogation.enabled" value="true"/>
<parameter key="AGSProcessor.GeoDataServer.recurse" value="true"/>
<parameter key="AGSProcessor.GeoDataServer.maxDataElements"
value="200"/>
<parameter key="AGSProcessor.GeoDataServer.expandDescendants"
value="false"/>
gptConfig/catalog/
scheduler/thread/@
class="com.Esri.gpt.
catalog.context.Cata
logSynchronizer"
<!-- Optional parameter configuration for catalog synchronization thread
element.
- feedbackSeconds: an approximate number of seconds between FINER log
messages, default = 120.
- maxDeleteTokens: the maximum number of deletions to execute in a single
transaction, default = 1000.
-maxSqlTokens: for an SQL SELECT statement, the maximum number of OR
operators to include in a single WHERE clause, default = 1000.
- maxUuidCache: the maximum number of UUIDs to store in memory. The
memory is only used while the synchronizer is active. Having a maxUuidCache
greater than or equal to the number of documents within the catalog will
result in the best performance, default = 100000.
-->
<!-- Catalog synchronization -->
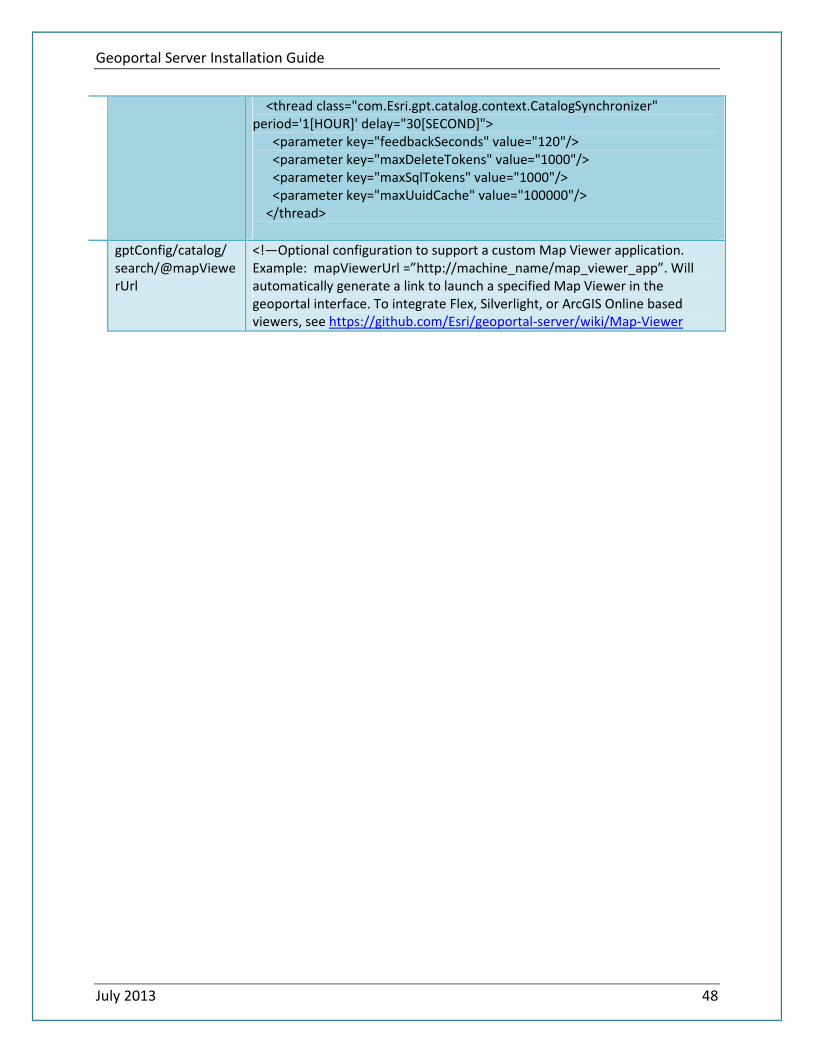
Geoportal Server Installation Guide
July 2013 48
<thread class="com.Esri.gpt.catalog.context.CatalogSynchronizer"
period='1[HOUR]' delay="30[SECOND]">
<parameter key="feedbackSeconds" value="120"/>
<parameter key="maxDeleteTokens" value="1000"/>
<parameter key="maxSqlTokens" value="1000"/>
<parameter key="maxUuidCache" value="100000"/>
</thread>
gptConfig/catalog/
search/@mapViewe
rUrl
<!—Optional configuration to support a custom Map Viewer application.
Example: mapViewerUrl =”http://machine_name/map_viewer_app”. Will
automatically generate a link to launch a specified Map Viewer in the
geoportal interface. To integrate Flex, Silverlight, or ArcGIS Online based
viewers, see https://github.com/Esri/geoportal-server/wiki/Map-Viewer