For Microsoft Dynamics GP 9 - EthoTech · For Microsoft Dynamics GP 9.0 . ... How is the commission...
121
The EthoSeries For Microsoft Dynamics GP 9.0
-
Upload
nguyenkhue -
Category
Documents
-
view
217 -
download
0
Transcript of For Microsoft Dynamics GP 9 - EthoTech · For Microsoft Dynamics GP 9.0 . ... How is the commission...

The EthoSeries
For Microsoft Dynamics GP 9.0
Copyright Manual copyright © 2002 EthoTech, Inc. All rights reserved. Your right to copy this documentation is limited by copyright law and the terms of the
software license agreement. As the software licensee, you may make a reasonable
number of copies or printouts for your own use. Making unauthorized copies,
adaptations, compilations, or derivative works for commercial distribution is prohibited
and constitutes a punishable violation of the law.
Unless otherwise noted, all names of companies, products, street addresses, and persons
contained herein are fictitious and are used solely to document the use of this product.
Trademarks All company or product names mentioned are trademarks or registered trademarks of
EthoTech, Inc., or of their respective holders.
Warranty EthoTech disclaims any warranty regarding the sample code contained in this
documentation, including the warranties of merchantability and fitness for a particular
purpose.
Limitation of liability The content of this manual is furnished for informational use only, is subject to change
without notice, and should not be construed as a commitment by EthoTech. EthoTech
assumes no responsibility or liability for any errors or inaccuracies that may appear in
this manual. Neither EthoTech nor anyone else who has been involved in the creation,
production or delivery of this documentation shall be liable for any indirect, incidental,
special, exemplary or consequential damages, including but not limited to any loss of
anticipated profit or benefits, resulting from the use of this documentation or sample
code.
License agreement Use of this product is covered by a license agreement provided by EthoTech, Inc., with
the software product. If you have any questions, please call EthoTech at 678-384-7500.
Publication date May 2007

THE ETHOSERIES i
Contents
THE ETHOSERIES ......................................................................................................... 5
Commission Plan .................................................................................................................................................. 5 Customer Service Collection ................................................................................................................................. 5 Enhanced Password Security................................................................................................................................ 5 Historical Serial and Lot Number Tracking ............................................................................................................ 5 Next Numeric Collection ........................................................................................................................................ 5 Quick Track ........................................................................................................................................................... 5 Salesperson By Ship To Location ......................................................................................................................... 5
WHAT’S NEW ................................................................................................................. 6
Navigation ............................................................................................................................................................. 6 Table Updates ....................................................................................................................................................... 6 Commission Plan .................................................................................................................................................. 6 Customer Service Collection ................................................................................................................................. 8 Enhanced Password Security................................................................................................................................ 8 Next Numeric Collection ........................................................................................................................................ 8 Salesperson By Ship To Location ......................................................................................................................... 8
INSTALLATION .............................................................................................................. 9
INSTALL / UPDATE THE ETHOSERIES .......................................................................................................... 10 Installing The EthoSeries .................................................................................................................................... 10
REGISTER THE SOFTWARE ......................................................................................................................... 13 Additional Registration Information ..................................................................................................................... 14
PRODUCT SUPPORT .................................................................................................................................. 16 ADD OBJECTS TO SMARTLIST .................................................................................................................... 17
COMMISSION PLAN .................................................................................................... 19
SECURITY ................................................................................................................................................. 19 EthoSeries Windows ........................................................................................................................................... 19 Alternate Dynamics GP Windows ....................................................................................................................... 20
PRODUCT OVERVIEW ................................................................................................................................. 20 How are commissions calculated? ...................................................................................................................... 20 How is the commission rate determined? ........................................................................................................... 20 Who receives commission? ................................................................................................................................ 21 How do splits work?............................................................................................................................................. 21 How are commissions paid? ............................................................................................................................... 21 Why aren’t commission GL distributions attached to sales documents? ............................................................ 21
MODULE SETUP ........................................................................................................................................ 23 Designing the Commission Matrix ....................................................................................................................... 23 Salesperson Commission Plan Setup ................................................................................................................. 23 Customer Commission Plan Setup ..................................................................................................................... 24 Item Commission Plan Setup .............................................................................................................................. 26 Commission Plan Setup ...................................................................................................................................... 28 Commission Plan Matrix Setup ........................................................................................................................... 35 Default Tiers ........................................................................................................................................................ 40 Plan Tiers ............................................................................................................................................................ 41 Item Tiers ............................................................................................................................................................ 42 Salesperson Commission Plan Info .................................................................................................................... 43 Customer Commission Plan Info ......................................................................................................................... 44 Item Commission Plan Info ................................................................................................................................. 46
CREATING COMMISSIONS .......................................................................................................................... 48

THE ETHOSERIES
THE ETHOSERIES ii
Determining the Salespeople for a Sales Document ........................................................................................... 48 Determining Split Amounts .................................................................................................................................. 49 Commission Plan Entry ....................................................................................................................................... 50 Commission Line Trace ....................................................................................................................................... 54
PROCESSING COMMISSIONS ...................................................................................................................... 57 Process Commissions ......................................................................................................................................... 57
ACCRUING COMMISSIONS .......................................................................................................................... 61 Accrue Commissions ........................................................................................................................................... 61
INQUIRIES AND REPORTS ........................................................................................................................... 63 Commission Plan Inquiry ..................................................................................................................................... 63 Accrual Run Inquiry ............................................................................................................................................. 63 Salesperson Accrual Run Inquiry ........................................................................................................................ 64 Commission Run Inquiry ..................................................................................................................................... 64 Salesperson Commission Run Inquiry ................................................................................................................ 65 Commission Plan Summary History .................................................................................................................... 66 Commission Plan SmartList Object ..................................................................................................................... 66 Commission Plan Report ..................................................................................................................................... 67
UTILITIES .................................................................................................................................................. 69 Commission Plan Utilities .................................................................................................................................... 69 Commission Plan Summary Utilities ................................................................................................................... 70 Commission Plan Override Date Document Paid................................................................................................ 71 Mass Update Salespeople .................................................................................................................................. 71 Mass Update Customers ..................................................................................................................................... 72 Mass Update Items ............................................................................................................................................. 73
COMMISSION PLAN EXAMPLE .................................................................................................................... 74 Scenario .............................................................................................................................................................. 74 Salesperson Commission Plan Setup ................................................................................................................. 74 Customer Commission Plan Setup ..................................................................................................................... 75 Item Commission Plan Setup .............................................................................................................................. 75 Commission Plan Setup ...................................................................................................................................... 75 Commission Plan Matrix Setup ........................................................................................................................... 76 Salesperson Commission Plan Info .................................................................................................................... 76 Customer - Salesperson Assignment .................................................................................................................. 76 Customer Commission Plan Info ......................................................................................................................... 77 Create Commissions ........................................................................................................................................... 77 Verify Commission Status ................................................................................................................................... 78 Reduce Commissions for Write-offs .................................................................................................................... 78 Process Commissions ......................................................................................................................................... 78 Commission Run Inquiry ..................................................................................................................................... 79
TROUBLESHOOTING................................................................................................................................... 79 DATABASE SCHEMA................................................................................................................................... 81 COM INTEGRATION ................................................................................................................................... 82
Object .................................................................................................................................................................. 82 Properties ............................................................................................................................................................ 82 Methods ............................................................................................................................................................... 82 Example .............................................................................................................................................................. 83
CUSTOMER SERVICE COLLECTION ......................................................................... 84
SECURITY ................................................................................................................................................. 84 EthoSeries Windows ........................................................................................................................................... 84
ADDITIONAL SALES TRANSACTION ENTRY FIELDS ....................................................................................... 85 EthoSeries Windows ........................................................................................................................................... 85 Alternate Dynamics GP Windows ....................................................................................................................... 85 Module Setup ...................................................................................................................................................... 85 Using Additional Sales Transaction Entry Fields ................................................................................................. 85
APPLY BUTTON FOR SALES ORDER PROCESSING INQUIRY .......................................................................... 86 EthoSeries Windows ........................................................................................................................................... 86 Alternate Dynamics GP Windows ....................................................................................................................... 86 Module Setup ...................................................................................................................................................... 86

THE ETHOSERIES
THE ETHOSERIES iii
Using Apply Button for Sales Order Processing Inquiry ...................................................................................... 86 CHECK FOR DUPLICATE PURCHASE ORDERS .............................................................................................. 86
EthoSeries Windows ........................................................................................................................................... 86 Alternate Dynamics GP Windows ....................................................................................................................... 86 Module Setup ...................................................................................................................................................... 86 Using Check for Duplicate Purchase Orders ....................................................................................................... 86
CREDIT LIMIT PROCESS HOLDS ................................................................................................................. 87 EthoSeries Windows ........................................................................................................................................... 87 Alternate Dynamics GP Windows ....................................................................................................................... 87 Module Setup ...................................................................................................................................................... 87 Using Credit Limit Process Hold .......................................................................................................................... 88
MOVE SALES DOCUMENTS ........................................................................................................................ 88 EthoSeries Windows ........................................................................................................................................... 88 Alternate Dynamics GP Windows ....................................................................................................................... 88 Module Setup ...................................................................................................................................................... 88 Using Move Sales Documents ............................................................................................................................ 89
PRINT SHIPPING LABELS ........................................................................................................................... 89 EthoSeries Windows ........................................................................................................................................... 90 Alternate Dynamics GP Windows ....................................................................................................................... 90 Module Setup ...................................................................................................................................................... 90 Using Print Shipping Labels ................................................................................................................................ 90
RESTOCKING CHARGE BUTTON FOR RETURNS ........................................................................................... 90 EthoSeries Windows ........................................................................................................................................... 90 Alternate Dynamics GP Windows ....................................................................................................................... 90 Module Setup ...................................................................................................................................................... 90 Using Restocking Charge Button for Returns ..................................................................................................... 91
TRACK EXPECTED RECEIPT DATE .............................................................................................................. 91 EthoSeries Windows ........................................................................................................................................... 91 Alternate Dynamics GP Windows ....................................................................................................................... 91 Module Setup ...................................................................................................................................................... 91 Using Track Expected Receipt Date .................................................................................................................... 91
TRACK UNALLOCATED QUANTITIES ............................................................................................................ 92 EthoSeries Windows ........................................................................................................................................... 92 Alternate Dynamics GP Windows ....................................................................................................................... 92 Module Setup ...................................................................................................................................................... 92 Using Track Unallocated Quantities .................................................................................................................... 92
ENHANCED PASSWORD SECURITY ......................................................................... 94
SECURITY ................................................................................................................................................. 94 EthoSeries Windows ........................................................................................................................................... 94 Alternate Dynamics GP Windows ....................................................................................................................... 94 Modify Access Rights .......................................................................................................................................... 94
MODULE SETUP ........................................................................................................................................ 95 Enhanced Password Security.............................................................................................................................. 95 EPS Company Security ....................................................................................................................................... 99 EPS Login Restrictions ...................................................................................................................................... 100
USING ENHANCED PASSWORD SECURITY ................................................................................................. 100 Logging Into Microsoft Dynamics GP ................................................................................................................ 100 Changing Passwords in the User Preferences Window .................................................................................... 102 The Lockout ....................................................................................................................................................... 103
HISTORICAL SERIAL AND LOT NUMBER TRACKING ........................................... 105
SECURITY ............................................................................................................................................... 105 EthoSeries Windows ......................................................................................................................................... 105 Alternate Dynamics GP Windows ..................................................................................................................... 105
MODULE SETUP ...................................................................................................................................... 105 USING HISTORICAL SERIAL AND LOT NUMBER TRACKING ......................................................................... 106
THE ETHOSERIES
THE ETHOSERIES iv
NEXT NUMERIC COLLECTION ................................................................................. 107
SECURITY ............................................................................................................................................... 107 EthoSeries Windows ......................................................................................................................................... 107 Alternate Dynamics GP Windows ..................................................................................................................... 107
MODULE SETUP ...................................................................................................................................... 107 USING NEXT NUMERIC COLLECTION......................................................................................................... 108
Next Batch ID – Payables Batches .................................................................................................................... 108 Next Batch ID – Receivables Batches ............................................................................................................... 108 Next Batch ID – Sales Batches ......................................................................................................................... 108 Next Customer ID .............................................................................................................................................. 108 Next Employee ID .............................................................................................................................................. 108 Next Fixed Asset ID ........................................................................................................................................... 108 Next Item Number ............................................................................................................................................. 109 Next Project Accounting Contract ID ................................................................................................................. 109 Next Project Accounting Project ID ................................................................................................................... 109 Next Prospect ID ............................................................................................................................................... 109 Next Salesperson ID.......................................................................................................................................... 109 Next Vendor Number ......................................................................................................................................... 109 Next WennSoft Job Number .............................................................................................................................. 109
QUICK TRACK ........................................................................................................... 110
SECURITY ............................................................................................................................................... 110 EthoSeries Windows ......................................................................................................................................... 110 Alternate Dynamics GP Windows ..................................................................................................................... 110
MODULE SETUP ...................................................................................................................................... 110 Carrier Setup ..................................................................................................................................................... 110 Shipping Method Carrier Setup ......................................................................................................................... 112
USING QUICK TRACK ............................................................................................................................... 112 Entering Packages ............................................................................................................................................ 112 Package Inquiry ................................................................................................................................................. 114 Tracking Packages through the World Wide Web ............................................................................................ 115
SALESPERSON BY SHIP TO LOCATION ................................................................ 116
SECURITY ............................................................................................................................................... 116 EthoSeries Windows ......................................................................................................................................... 116 Alternate Dynamics GP Windows ..................................................................................................................... 116
MODULE SETUP ...................................................................................................................................... 116 Salesperson By Ship To Setup.......................................................................................................................... 116 Customer Address Salesperson Utilities ........................................................................................................... 117
USING SALESPERSON BY SHIP TO LOCATION ........................................................................................... 117 Customer Address Maintenance ....................................................................................................................... 117 Sales Transaction Entry .................................................................................................................................... 117
APPENDIX A .............................................................................................................. 118

THE ETHOSERIES
THE ETHOSERIES 5
The EthoSeries
The EthoSeries™ offers a variety of modules for enhancing Microsoft Dynamics™ GP. These solutions provide powerful, easy to use functionality to complement Microsoft Dynamics GP Sales Order Processing as well as enhance master records in all modules and the application’s security system. The EthoSeries consists of the following products.
Commission Plan
Customer Service Collection Includes:
Additional Sales Transaction Entry Fields
Apply Button for Sales Order Processing Inquiry
Check for Duplicate Purchase Orders
Credit Limit Process Holds
Move Sales Documents
Print Shipping Labels
Restocking Charge Button for Returns
Track Expected Receipt Date
Track Unallocated Quantities
Enhanced Password Security
Historical Serial and Lot Number Tracking
Next Numeric Collection
Quick Track
Salesperson By Ship To Location

WHAT’S NEW
THE ETHOSERIES 6
What’s New
Navigation
All EthoSeries menu items are now located within submenus off the corresponding Microsoft Dynamics GP menus. For example, the Move Sales Documents window is located in Tools >> Utilities >> Customer Service Collection >> Move Sales Documents, and the Commission Plan Utilities window is located in Tools >> Utilities >> Commission Plan >> Commission Plan Utilities. Appendix A contains a reference to the location of all EthoSeries windows.
Table Updates The EthoSeries now performs all table updates using pass-through SQL rather than using ctree temporary tables. Additionally, a table is now updated directly from its current state to the correct state without going through intermediary stages, meaning that a table is no longer updated multiple times to get to the correct state. This new methodology greatly reduces the time needed to update clients who are updating from old builds or who have large amounts of commission data.
Commission Plan
GL, AP, and Payroll Transaction Integration When processing commissions, GL, AP, and Payroll transactions can now be automatically
created per salesperson. GL commission accrual transactions can now be created for unprocessed commissions via a
new month-end accrual process.
Commission Processing All commissions processed in a given run are assigned a Commission Run ID, and two new
inquiry windows and reports display summary information per run. Summary information is automatically created for all existing processing runs when a Next Commission Processing Run ID is first saved in the Commission Plan Setup window.
Setup and Data Entry A new Mass Update Salespeople window has been added. Customer, Salesperson, and Item Plans may now be marked as required fields in the
Customer, Salesperson, and Item Maintenance windows.
Commission Calculations Commissionable Sale and Cost amounts may now be derived from an inventory item’s List
Price and Standard Cost, in addition to the sales transaction line item Extended Price and Cost. Multipliers can now be applied to the Commissionable Sale and Cost amounts.
When either the Commissionable Sale or Cost amount is manually edited, commission reductions are no longer applied to the commission line.
A new Noncommissioned Salesperson Inquiry window is available from the Commission Plan Entry and Inquiry windows. This new window displays salespeople who were inactive at the time commissions were calculated for a sales document or whose commissions were deleted.
A new Commission Line Trace window is available from the Commission Plan Detail Entry and Inquiry windows. This window shows all steps that occurred to calculate a commission, including the state of relevant setup windows when commissions were originally calculated.
The option to commission the salesperson assigned to the sales document header or line items (Enhanced Line Item functionality) was moved from the EthoSeries SOP Setup window to the Commission Plan setup window.
Commission Reporting Using the Commission Report window, individual commission reports may now be printed and
emailed to each salesperson within the selected range.
WHAT’S NEW
THE ETHOSERIES 7
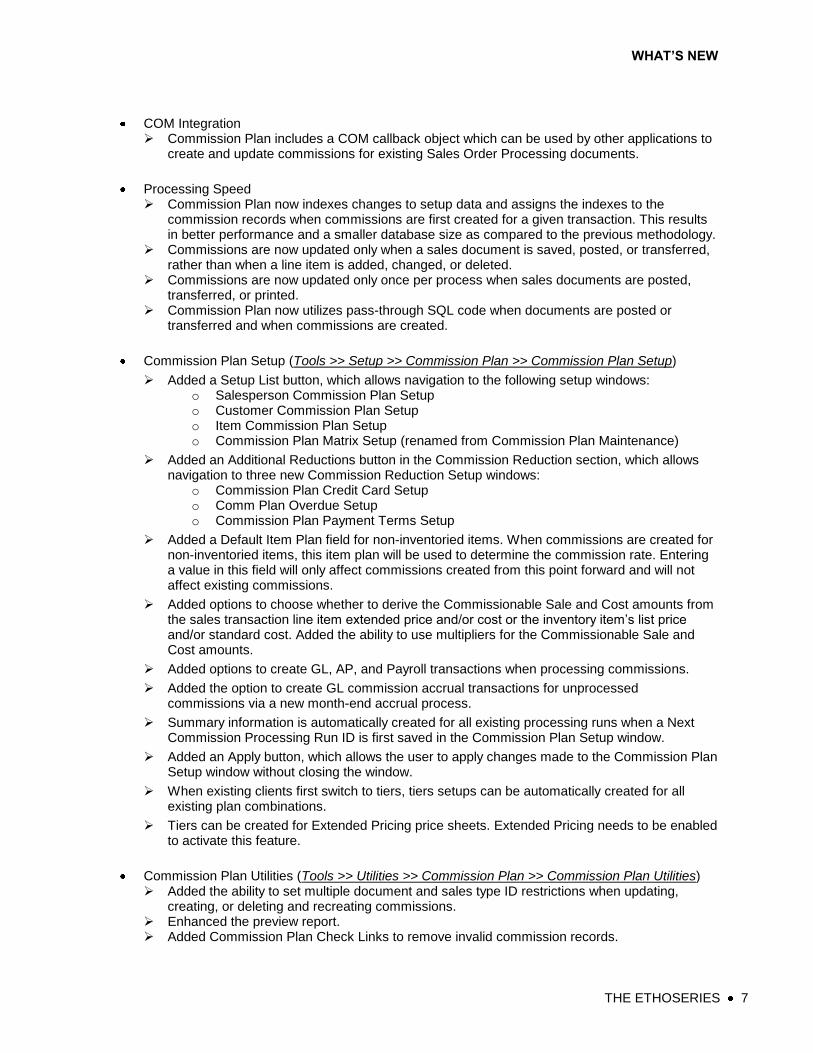
COM Integration Commission Plan includes a COM callback object which can be used by other applications to
create and update commissions for existing Sales Order Processing documents.
Processing Speed Commission Plan now indexes changes to setup data and assigns the indexes to the
commission records when commissions are first created for a given transaction. This results in better performance and a smaller database size as compared to the previous methodology.
Commissions are now updated only when a sales document is saved, posted, or transferred, rather than when a line item is added, changed, or deleted.
Commissions are now updated only once per process when sales documents are posted, transferred, or printed.
Commission Plan now utilizes pass-through SQL code when documents are posted or transferred and when commissions are created.
Commission Plan Setup (Tools >> Setup >> Commission Plan >> Commission Plan Setup)
Added a Setup List button, which allows navigation to the following setup windows: o Salesperson Commission Plan Setup o Customer Commission Plan Setup o Item Commission Plan Setup o Commission Plan Matrix Setup (renamed from Commission Plan Maintenance)
Added an Additional Reductions button in the Commission Reduction section, which allows navigation to three new Commission Reduction Setup windows:
o Commission Plan Credit Card Setup o Comm Plan Overdue Setup o Commission Plan Payment Terms Setup
Added a Default Item Plan field for non-inventoried items. When commissions are created for non-inventoried items, this item plan will be used to determine the commission rate. Entering a value in this field will only affect commissions created from this point forward and will not affect existing commissions.
Added options to choose whether to derive the Commissionable Sale and Cost amounts from the sales transaction line item extended price and/or cost or the inventory item’s list price and/or standard cost. Added the ability to use multipliers for the Commissionable Sale and Cost amounts.
Added options to create GL, AP, and Payroll transactions when processing commissions.
Added the option to create GL commission accrual transactions for unprocessed commissions via a new month-end accrual process.
Summary information is automatically created for all existing processing runs when a Next Commission Processing Run ID is first saved in the Commission Plan Setup window.
Added an Apply button, which allows the user to apply changes made to the Commission Plan Setup window without closing the window.
When existing clients first switch to tiers, tiers setups can be automatically created for all existing plan combinations.
Tiers can be created for Extended Pricing price sheets. Extended Pricing needs to be enabled to activate this feature.
Commission Plan Utilities (Tools >> Utilities >> Commission Plan >> Commission Plan Utilities) Added the ability to set multiple document and sales type ID restrictions when updating,
creating, or deleting and recreating commissions. Enhanced the preview report. Added Commission Plan Check Links to remove invalid commission records.

WHAT’S NEW
THE ETHOSERIES 8
Line item price sheet assignments can be recalculated if using Extended Pricing price sheet tiers.
Commission Plan Entry (Transactions >> Commission Plan >> Commission Plan Entry) Added Refresh and Update buttons. Clicking the Update button will update the commission
status, commission reductions, and commission extended sale and cost amounts for the current document. Clicking the Default button will delete and recreate commissions for the current document – any manual changes will be lost.
Line item price sheet assignments can be edited if using Extended Pricing price sheet tiers.
Commission Plan Detail Entry & Commission Plan Detail Inquiry Zoom Added a Commission Trace expansion button to view the calculation steps for the current
commission line.
Commission Plan Report (Reports >> Commission Plan >> Commission Plan Report) Invoices and returns can be marked individually in the Document Types section. Reports may be printed that display only the selected document types. When a Date Commissions Paid range is selected, only the Posted Documents - Processed
commission status restriction is enabled. Individual reports may now be printed for each salesperson, and the reports may be emailed
to the salespeople.
Customer Service Collection Customer Service Collection Setup
(Tools >> Setup >> Customer Service Collection >> Customer Service Collection Setup): Window was renamed from EthoSeries SOP Setup. The Check for Duplicate Purchase Order feature may now be disabled.
The Move Sales Documents window is now accessed via the Customer Service Collection utilities submenu or the Customer Service Collection Setup window.
Enhanced Password Security Added the following setup options to Enhanced Password Security
(Tools >> Setup >> System >> Enhanced Password Security): Lock out users and/or workstations after 3 consecutive failed login attempts. Lock out all users from specific companies. Set daily/hourly login restrictions for each user.
Added the Enhanced Password Security documentation to this guide to support Microsoft Dynamics GP Help (F1), rather than maintaining a separate Enhanced Password Security user guide.
Next Numeric Collection Added the ability to auto-number the following Project Accounting fields:
(Tools >> Setup >> Next Numeric >> Next Numeric Setup): Contract ID in the Contract Maintenance window. Project ID in the Project Maintenance window.
Salesperson By Ship To Location Salesperson By Ship To Setup
(Tools >> Setup >> Salesperson By Ship To >> Salesperson By Ship To Setup): Setup options were moved from the EthoSeries SOP Setup window.

INSTALLATION
THE ETHOSERIES 9
Installation
This chapter explains how to install The EthoSeries software and is divided into four sections:
INSTALL / UPDATE THE ETHOSERIES describes how to install the product or perform a product
update.
REGISTER THE SOFTWARE shows how to acquire and enter valid registration keys to register the
product.
PRODUCT SUPPORT explains how to contact our product support department with any
questions you may have.
ADDING OBJECTS TO SMARTLIST explains how to add sets of predefined search criteria for The
EthoSeries, called objects, to Microsoft Dynamics GP SmartList.
Note that throughout this manual the word Application or Applications will be used to mean Microsoft Dynamics™ GP and refers to whichever version of the system you have installed.

INSTALLATION
THE ETHOSERIES 10
Install / Update The EthoSeries
Installing The EthoSeries The installation of The EthoSeries is a two-step process:
1. Install The EthoSeries code files.
2. Include the new code in Microsoft Dynamics GP.
*Important Setup Information Back up your Microsoft Dynamics GP system and company databases before installing a new build of any EthoTech product. If modified resources (forms or reports) exist for the product that is being updated, export the modifications using the Microsoft Dynamics GP Customization window. After installing and initializing tables, test all modified resources for the product that is being updated. If errors occur, use the Microsoft Dynamics GP Customization window to import the modified resource(s) in question and retest. Please note that you may be required to recreate modified resources. A table initialization may be performed any time new code is installed. Prior to allowing users into the
system, you must log in to each company as a System Administrator (a user which has been assigned appropriate SQL Server roles to create database objects) to initialize tables.
When starting Microsoft Dynamics GP for the first time after installing The EthoSeries, you must
log into the Application as a system administrator in order to complete the installation process.
When starting the Application, you may be presented with the following prompt.
Select Yes to create the required SQL tables and stored procedures. This process does not destroy any data; it simply creates objects in SQL Server and grants access to these objects for all users. The EthoTech SQL Object Initialization Log window will open at the completion of the initialization process.
This process may take some time to complete and will report a completion status of successful or
unsuccessful. If you receive an unsuccessful message, contact your Microsoft Partner or EthoTech.
Once this procedure has been performed at one workstation, install new code to all other workstations and then all users can log in.
Contact your Microsoft Partner or EthoTech if table updates are unsuccessful.
INSTALLATION
THE ETHOSERIES 11
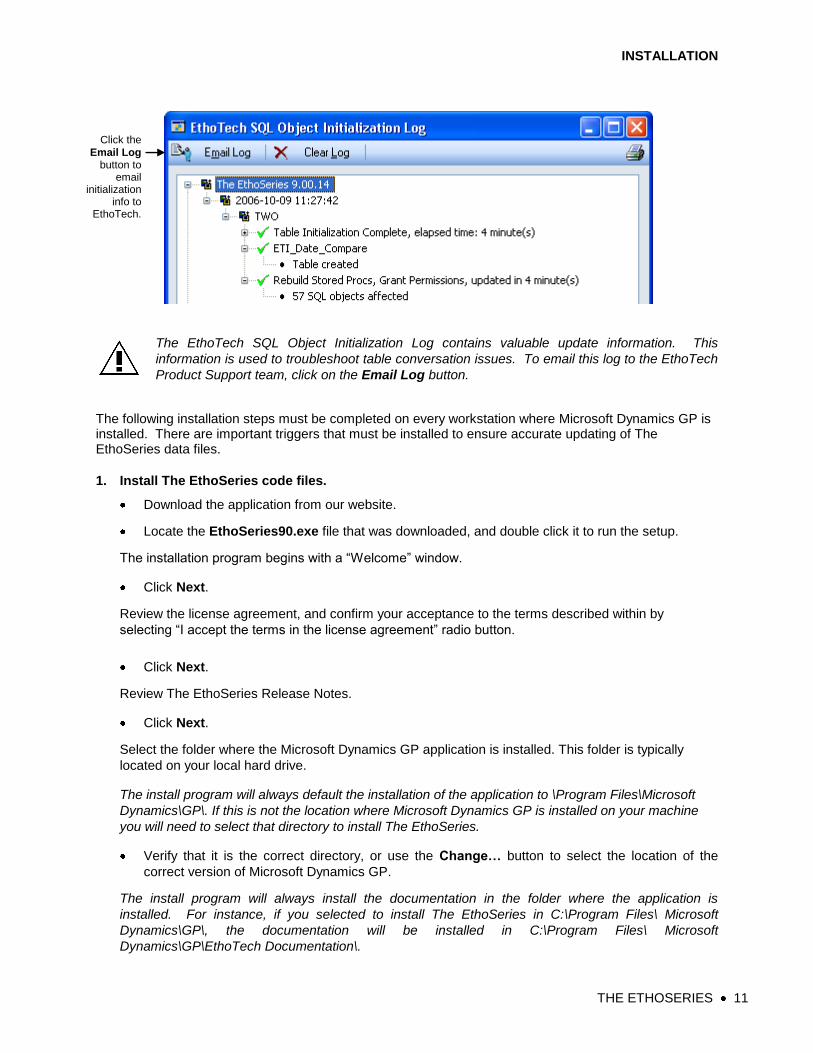
The EthoTech SQL Object Initialization Log contains valuable update information. This
information is used to troubleshoot table conversation issues. To email this log to the EthoTech
Product Support team, click on the Email Log button.
The following installation steps must be completed on every workstation where Microsoft Dynamics GP is installed. There are important triggers that must be installed to ensure accurate updating of The EthoSeries data files.
1. Install The EthoSeries code files.
Download the application from our website.
Locate the EthoSeries90.exe file that was downloaded, and double click it to run the setup.
The installation program begins with a ―Welcome‖ window.
Click Next.
Review the license agreement, and confirm your acceptance to the terms described within by
selecting ―I accept the terms in the license agreement‖ radio button.
Click Next.
Review The EthoSeries Release Notes.
Click Next.
Select the folder where the Microsoft Dynamics GP application is installed. This folder is typically
located on your local hard drive.
The install program will always default the installation of the application to \Program Files\Microsoft
Dynamics\GP\. If this is not the location where Microsoft Dynamics GP is installed on your machine
you will need to select that directory to install The EthoSeries.
Verify that it is the correct directory, or use the Change… button to select the location of the
correct version of Microsoft Dynamics GP.
The install program will always install the documentation in the folder where the application is
installed. For instance, if you selected to install The EthoSeries in C:\Program Files\ Microsoft
Dynamics\GP\, the documentation will be installed in C:\Program Files\ Microsoft
Dynamics\GP\EthoTech Documentation\.
Click the
Email Log button to
email initialization
info to EthoTech.

INSTALLATION
THE ETHOSERIES 12
Click Next.
Review your installation settings.
Click Install.
The setup program will then begin to copy all files to the appropriate directories.
The installation of The EthoSeries has been completed.
Click Finish.
2. Include the new code into Microsoft Dynamics GP.
Once The EthoSeries code files have been copied to your system, you then need to have Microsoft
Dynamics GP ―include‖ the code.
To do so, start Microsoft Dynamics GP.
You will see a prompt asking you if you want to include the new Microsoft Dynamics GP code, as
shown in the following illustration.
Click Yes.
A progress bar will display while the ―unchunking‖ process is executing.
The following will occur:
Your DYNAMICS.SET file will be modified to include the information required to run The
EthoSeries.
A dictionary named ―TAS1006.DIC‖ will be created in your MICROSOFT DYNAMICS GP folder.

INSTALLATION
THE ETHOSERIES 13
Register the Software
By registering your copy of The EthoSeries, you will enable us to keep you informed of all enhancements, improvements, and upgrades for the software. By communicating with you, we can gather information about additional Microsoft Dynamics GP enhancements that will assist us in driving powerful, new features and enhancements into EthoTech products. Software registration can also eliminate unauthorized use of software without imposing restrictive copy protection. EthoTech provides registration keys directly. For more information or to obtain your registration keys, please call (678) 384-7500, email [email protected] or contact your Microsoft Partner.
To register The EthoSeries software:
1. Respond to the prompt.
2. Enter your registration keys.
3. Close the EthoTech Registration window.
1. Respond to the prompt.
Start Microsoft Dynamics GP. Log into a live company database (not the sample company).
When starting Microsoft Dynamics GP, respond to the prompt that informs you that you are running
an unregistered version.
Click Register.
The EthoTech Registration window will display. The Microsoft Dynamics GP system password is
required to access this window.
2. Enter your registration keys.
Enter the keys exactly as you received them.
If you received the keys via email, simply cut and paste the keys into the appropriate field(s) on the
form.
Click Register.
If you mistyped the keys, you will receive a warning message. Try again. If you still receive a warning,
contact EthoTech for assistance. Registration keys will be invalid if the Microsoft Dynamics GP
version, platform or site name is incorrect, or if the Microsoft Dynamics GP System Manager user
count is greater than the EthoTech user count.
3. Close the EthoTech Registration window.
If the module(s) you are registering now appears with a checkbox in its Registered column, close
the EthoTech Registration window.
INSTALLATION
THE ETHOSERIES 14
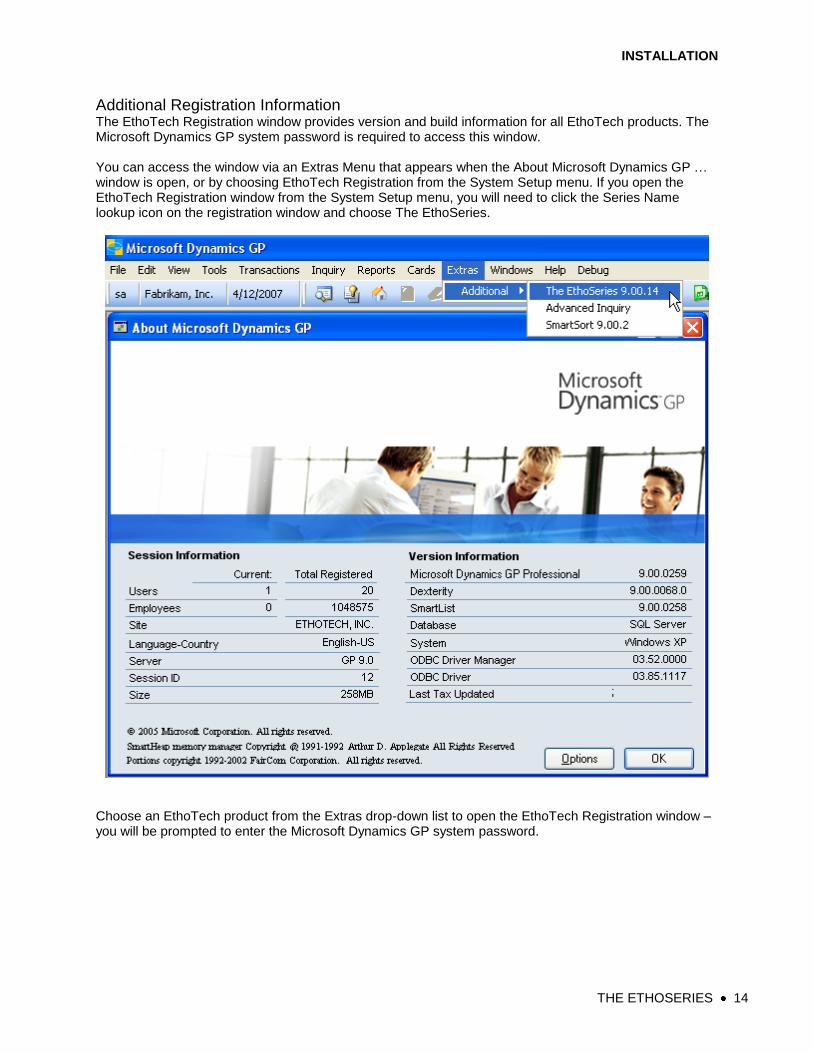
Additional Registration Information The EthoTech Registration window provides version and build information for all EthoTech products. The Microsoft Dynamics GP system password is required to access this window. You can access the window via an Extras Menu that appears when the About Microsoft Dynamics GP … window is open, or by choosing EthoTech Registration from the System Setup menu. If you open the EthoTech Registration window from the System Setup menu, you will need to click the Series Name lookup icon on the registration window and choose The EthoSeries.
Choose an EthoTech product from the Extras drop-down list to open the EthoTech Registration window – you will be prompted to enter the Microsoft Dynamics GP system password.
INSTALLATION
THE ETHOSERIES 15
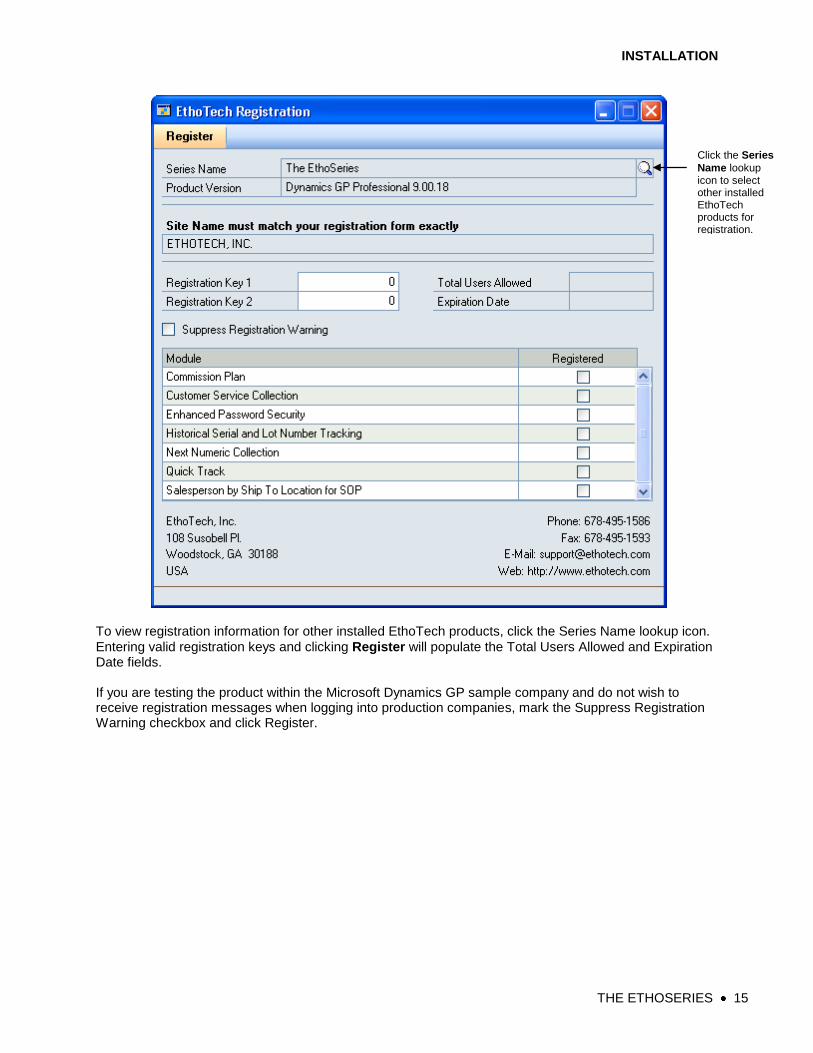
To view registration information for other installed EthoTech products, click the Series Name lookup icon.
Entering valid registration keys and clicking Register will populate the Total Users Allowed and Expiration Date fields. If you are testing the product within the Microsoft Dynamics GP sample company and do not wish to receive registration messages when logging into production companies, mark the Suppress Registration Warning checkbox and click Register.
Click the Series
Name lookup icon to select other installed EthoTech products for registration.

INSTALLATION
THE ETHOSERIES 16
Product Support
EthoTech Product Support is available Monday through Friday from 9:00 am to 5:00 pm EST. Product Support can be reached in the following ways:
678.384.7500 (voice)
678.384.7555 (fax)
http://www.ethotech.com
Before contacting Product Support, please gather information about your Microsoft Dynamics GP system and your EthoTech product. This information will assist our Product Support team in servicing your support needs in a timely and effective manner. Use the following list of questions to help you prepare for contacting Product Support.
1. Describe the process you were following when the error occurred. Please include the module you were in, the windows you were using, what you were doing when you received the error message and list the exact error message.
2. What version of your Microsoft Dynamics GP system are you using? Please include the service pack number as well.
3. What version of your EthoTech product are you using?
4. What database/platform of your Microsoft Dynamics GP system are you using?
5. Are there other 3rd
Party products installed? If so, please list them.
6. Have you attempted to resolve the situation? What have you done so far?
7. Does this problem occur on any other workstation?
8. Does this problem occur for other users of your software?
9. Can you recreate the problem? How? Please list the steps.
10. Do you have a valid backup that can be restored if necessary?
When you call, fax or email EthoTech for product support, please include the following information:
Your name, company name and phone number.
The information gathered from the above list of questions.
In addition, have this manual available when you are connected with Product Support—you may be
directed to various pages in the manual as you are helped with your problem.
INSTALLATION
THE ETHOSERIES 17
Add Objects to SmartList
SmartList is used to create customized inquiries to provide easier, faster access to information stored in your Microsoft Dynamics GP system, including information about accounts, customers, employees, vendors, transactions, and items. You can print or export the search results into Microsoft Word and Microsoft Excel, as well as display them on the screen.
SmartList uses sets of predefined search criteria, called objects, to make searching easy. EthoTech has created SmartList objects to provide access to the valuable information stored in The EthoSeries.
To add SmartList objects for The EthoSeries:
1. Add the Add SmartList Objects window to the Shortcut Bar.
2. Add SmartList Objects for The EthoSeries.
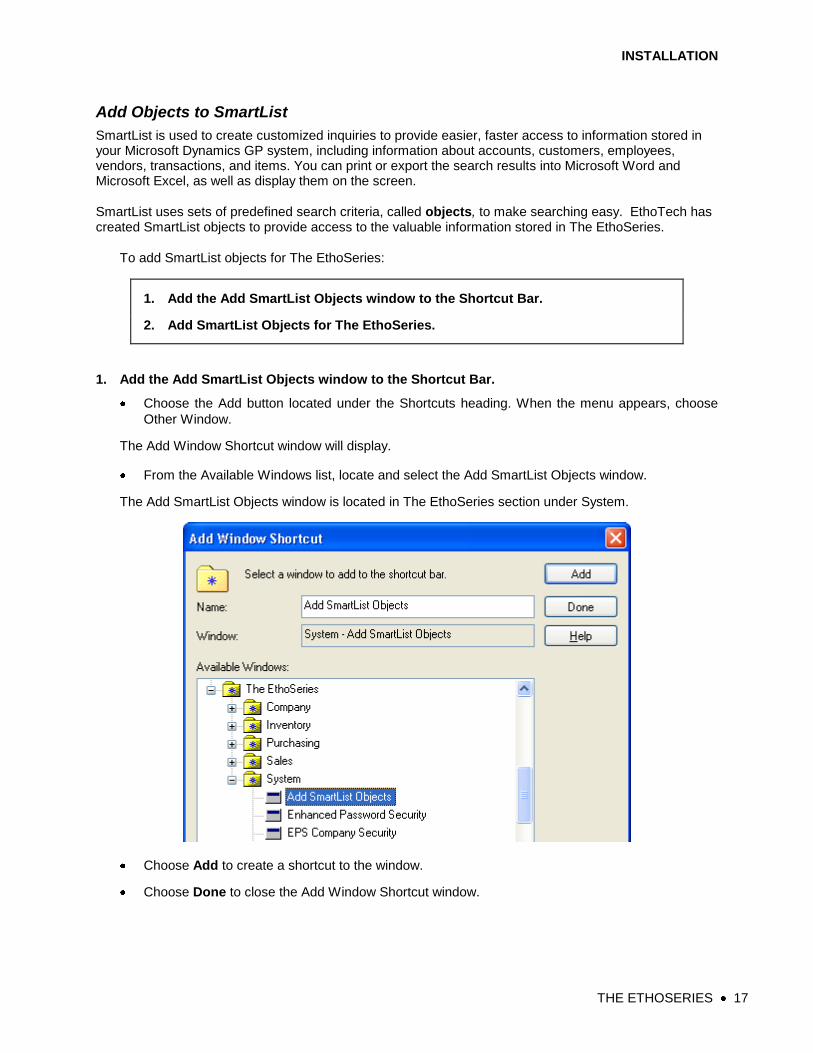
1. Add the Add SmartList Objects window to the Shortcut Bar.
Choose the Add button located under the Shortcuts heading. When the menu appears, choose
Other Window.
The Add Window Shortcut window will display.
From the Available Windows list, locate and select the Add SmartList Objects window.
The Add SmartList Objects window is located in The EthoSeries section under System.
Choose Add to create a shortcut to the window.
Choose Done to close the Add Window Shortcut window.

INSTALLATION
THE ETHOSERIES 18
2. Add SmartList Objects for The EthoSeries.
Open the Add SmartList Objects window from the Shortcut Bar.
Click Add.
SmartList Objects will be created for Commission Plan and Historical Serial and Lot Number Tracking.
NOTE: Re-adding Commission Plan and Historical Serial and Lot Number Tracking SmartList
Objects will delete any Favorites that have been created for those objects.

COMMISSION PLAN
THE ETHOSERIES 19
Commission Plan
Security
This module uses the following windows created by EthoTech: EthoSeries windows and Alternate Dynamics GP windows. EthoSeries windows are automatically assigned to your Microsoft Dynamics GP navigation during installation. Alternate Dynamics GP windows designed by EthoTech need to be granted security access in order to be utilized. Use the Microsoft Dynamics GP Security windows to grant – or remove – access to the EthoSeries and Alternate Dynamics GP windows documented below.
NOTE: Commission Plan does not require the use of any Alternate Dynamics GP windows;
however they are made available for your convenience.
EthoSeries Windows Accrual Run Inquiry
Accrual Runs
Accrue Commissions
Comm Plan Overdue Setup
Commission Line Trace
Commission Plan Credit Card Setup
Commission Plan Default Tiers
Commission Plan Entry
Commission Plan Inquiry Zoom
Commission Plan Item Tiers
Commission Plan Matrix Inquiry
Commission Plan Matrix Setup
Commission Plan Override Date Document Paid
Commission Plan Payment Terms Setup
Commission Plan Reduction Inquiry
Commission Plan Report
Commission Plan Sales Type ID Setup
Commission Plan Setup
Commission Plan Summary History
Commission Plan Summary Utilities
Commission Plan Tiers
Commission Plan Tiers Rate Inquiry
Commission Plan Utilities
Commission Plan Utilities Sales Type ID Restrictions
Commission Run Inquiry
Commission Runs
Customer Commission Plan Info
Customer Commission Plan Info Inquiry
Customer Commission Plan Setup
Customer Plans
Item Commission Plan Info
Item Commission Plan Setup
Item Plans
Mass Update Customers
Mass Update Salespeople
Mass Update Items
Process Commissions

COMMISSION PLAN
THE ETHOSERIES 20
Salesperson Accrual Run Inquiry
Salesperson Commission Plan Info
Salesperson Commission Plan Setup
Salesperson Commission Run Inquiry
Salesperson Commission Plans
Refer to Appendix A for details on locating EthoSeries windows in Microsoft Dynamics GP.
Alternate Dynamics GP Windows Series Window Name Required
Inventory Item Maintenance Recommended
Sales Customer Maintenance Recommended
Sales Salesperson Maintenance Recommended
Sales Receivables Transaction Inquiry - Customer Optional
Sales Receivables Transaction Inquiry - Document Optional
Sales Sales Order Processing Document Inquiry Optional
Sales Sales Transaction Entry Optional – not recommended
Sales Sales Transaction Inquiry Zoom Optional
Product Overview
This document assumes a working knowledge of the Microsoft Dynamics GP Sales Order
Processing and Receivables modules. The EthoTech Commission Plan module is designed to help you calculate the commission or royalties due for Sales Order Processing documents within the Application. Commission Plan does not use or change the Microsoft Dynamics GP standard commission capabilities in any way; instead, an entirely new set of windows and functionality has been added for Commission Plan that can be accessed through the windows described in this document.
How are commissions calculated? Commissions are calculated per sales document line item, and the combination of the customer, item and salesperson determines the commission type and rate. The available commission types are % of Margin, % of Sale, Flat Amount, and Per Unit. Commission Plan utilizes a commission header record that contains summary information for each salesperson receiving commissions on a given sales document and commission detail records that contain line item detail information for each salesperson for each sales document line item. Commission records are automatically created/updated when a sales document is saved, posted or transferred; when the Commission Plan Entry window is opened (for unposted sales documents); when using Commission Plan Utilities; or, when using Dynamics GP Integration Manager. Commission records may be edited after the associated sales document is posted.
How is the commission rate determined? In the most simple commission scenario, all salespeople are paid the same commission on every item sold to any customer. In the most complex scenario, each salesperson is paid a different commission on each different item sold to each different customer, meaning that if you had 10 salespeople, 100 items, and 500 customers you would have 500,000 different commission rates to track (10 * 100 * 500)! Commission Plan provides a mechanism to simplify the setup and maintenance of the commission rates, as maintaining 500,000 different rates would be onerous. Commission Plan uses Customer Plans to group similar customers, Salesperson Plans to group similar salespeople, and Item Plans to group similar inventory items; the combination of these Plans (rather than the combination of the individual customers, salespeople, and items) determines a commission rate.
COMMISSION PLAN
THE ETHOSERIES 21
Commission types and rates are assigned to the various combinations of Salesperson Plans, Customer Plans, and Item Plans in the Commission Plan Matrix Setup window, and the combinations are referred to as the commission matrix. Multiple commission rates may be assigned to a plan combination, allowing for ―sliding scales‖ based on
one of several tier types: commissionable sale amount, margin amount, margin percent, price level, quantity in base unit of measure, unit price, unit price from commissionable sale amount, and unit price from extended price. These scales apply only to the current sales document line item, and commission rates are inclusive rather than additive (once a rate threshold is achieved, the associated commission rate is applied to the entire line item).
Who receives commission? For each sales document, Commission Plan can create commissions either for the salesperson displayed in the Sales Customer Detail Entry window (the sales document header salesperson) or the salesperson displayed in the Sales Item Detail Entry window for each line item (the sales document line item salesperson). If you choose to commission the sales document header salesperson, that salesperson receives commissions for all line items on the document. If you choose to commission the sales document line item salesperson, each salesperson will receive commissions only for those line items to which he or she is assigned. Commission Plan also allows you to assign multiple salespeople to individual customers and inventory items. These salespeople receive commissions in addition to the salesperson(s) assigned to the sales document. Two typical scenarios for assigning additional salespeople to a customer are as follows:
1. Sales managers assigned to each customer in their territory so that they are commissioned each time a sales document is created for one of their customers.
2. Multiple salespeople ―share‖ a customer and all receive commissions when a sales document is created for that customer.
Two typical scenarios for assigning salespeople to an inventory item are as follows:
1. Product managers assigned to each item for which they are responsible so that they are commissioned each time one of their items appears on a sales document.
2. External persons or companies who are paid a royalty each time one of their items appears on a sales document.
How do splits work? In most commission systems, a total commission is calculated for a sales document and that total may then be distributed (split) to multiple salespeople. Since Commission Plan calculates the commission independently for each salesperson for each line sales document line item, and each salesperson may have a different commission rate for each line item, there is no pre-determined total commission for the sales document. Therefore, splits in Commission Plan are defined as a percentage of the salesperson’s normally calculated commission. For example, if Paul normally receives a commission of 10% of the sales price of an item and I have set Paul’s split percentage to 50% for a particular sales document, he will now receive 5% of the sales price.
How are commissions paid? Commission Plan includes a routine for processing commissions (paying them to the salespeople). Commission Plan can be set up to create GL, Payables, and/or Payroll transactions, or used as a reporting tool to outside Payroll systems. Commissions are released for processing either when sales documents are posted or fully relieved, depending on your setup options.
Why aren’t commission GL distributions attached to sales documents? Using standard Dynamics GP commissions, commission expense and payables GL distributions are created when sales documents are created. Once a sales document is posted, these distributions, along
COMMISSION PLAN
THE ETHOSERIES 22
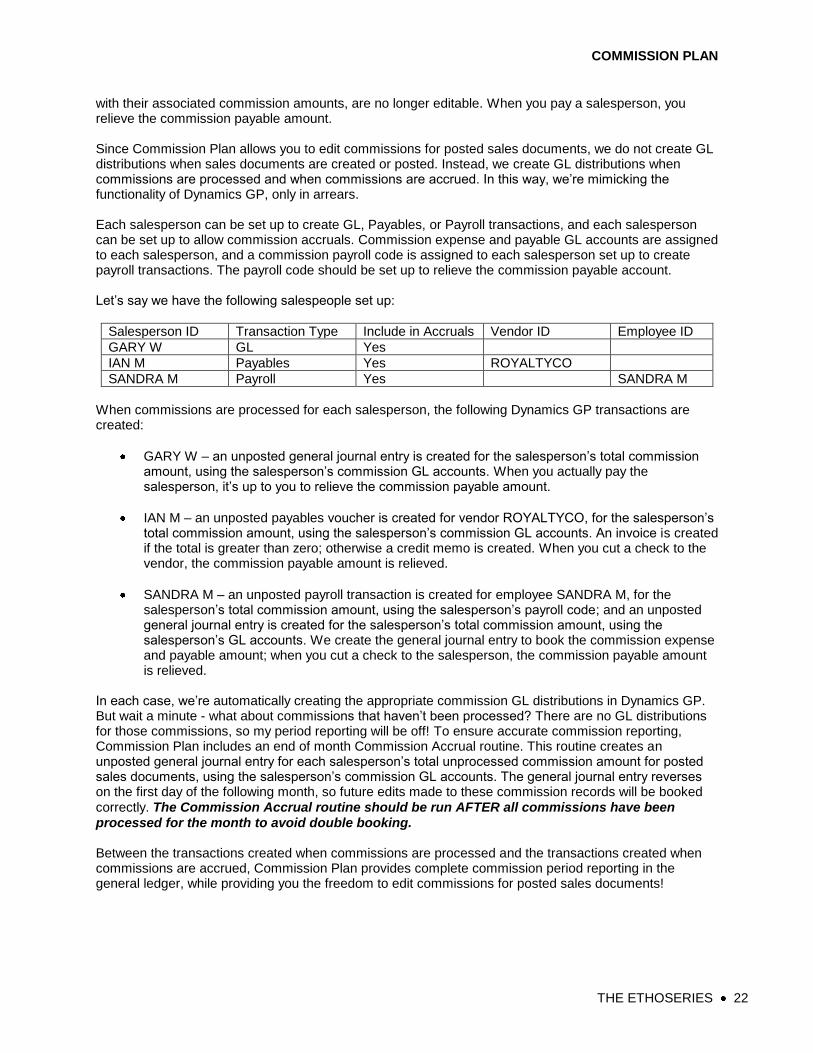
with their associated commission amounts, are no longer editable. When you pay a salesperson, you relieve the commission payable amount. Since Commission Plan allows you to edit commissions for posted sales documents, we do not create GL distributions when sales documents are created or posted. Instead, we create GL distributions when commissions are processed and when commissions are accrued. In this way, we’re mimicking the functionality of Dynamics GP, only in arrears. Each salesperson can be set up to create GL, Payables, or Payroll transactions, and each salesperson can be set up to allow commission accruals. Commission expense and payable GL accounts are assigned to each salesperson, and a commission payroll code is assigned to each salesperson set up to create payroll transactions. The payroll code should be set up to relieve the commission payable account. Let’s say we have the following salespeople set up:
Salesperson ID Transaction Type Include in Accruals Vendor ID Employee ID
GARY W GL Yes
IAN M Payables Yes ROYALTYCO
SANDRA M Payroll Yes SANDRA M
When commissions are processed for each salesperson, the following Dynamics GP transactions are created:
GARY W – an unposted general journal entry is created for the salesperson’s total commission amount, using the salesperson’s commission GL accounts. When you actually pay the salesperson, it’s up to you to relieve the commission payable amount.
IAN M – an unposted payables voucher is created for vendor ROYALTYCO, for the salesperson’s total commission amount, using the salesperson’s commission GL accounts. An invoice is created if the total is greater than zero; otherwise a credit memo is created. When you cut a check to the vendor, the commission payable amount is relieved.
SANDRA M – an unposted payroll transaction is created for employee SANDRA M, for the salesperson’s total commission amount, using the salesperson’s payroll code; and an unposted general journal entry is created for the salesperson’s total commission amount, using the salesperson’s GL accounts. We create the general journal entry to book the commission expense and payable amount; when you cut a check to the salesperson, the commission payable amount is relieved.
In each case, we’re automatically creating the appropriate commission GL distributions in Dynamics GP. But wait a minute - what about commissions that haven’t been processed? There are no GL distributions for those commissions, so my period reporting will be off! To ensure accurate commission reporting, Commission Plan includes an end of month Commission Accrual routine. This routine creates an unposted general journal entry for each salesperson’s total unprocessed commission amount for posted sales documents, using the salesperson’s commission GL accounts. The general journal entry reverses on the first day of the following month, so future edits made to these commission records will be booked correctly. The Commission Accrual routine should be run AFTER all commissions have been processed for the month to avoid double booking. Between the transactions created when commissions are processed and the transactions created when commissions are accrued, Commission Plan provides complete commission period reporting in the general ledger, while providing you the freedom to edit commissions for posted sales documents!
COMMISSION PLAN
THE ETHOSERIES 23
Module Setup
Designing the Commission Matrix Designing the commission matrix (the combination of Salesperson Plans, Customer Plans, and Item Plans to which commission rates are assigned) is the most intricate part of setting up the system. To determine how many Salesperson Plans you’ll need, consider this question: if different salespeople sell the same item to the same customer, does the commission rate vary? If the answer is no, then you only need one Salesperson Plan. If the answer is yes, then you need as many Salesperson Plans as you have commission rates that vary by salesperson. To determine how many Customer Plans you’ll need, consider this question: if the same salesperson sells the same item to different customers, does the commission rate vary? If the answer is no, then you only need one Customer Plan. If the answer is yes, then you need as many Customer Plans as you have commission rates that vary by customer. To determine how many Item Plans you’ll need, consider this question: if the same salesperson sells different items to the same customer, does the commission rate vary? If the answer is no, then you only need one Item Plan. If the answer is yes, then you need as many Item Plans as you have commission rates that vary by item.
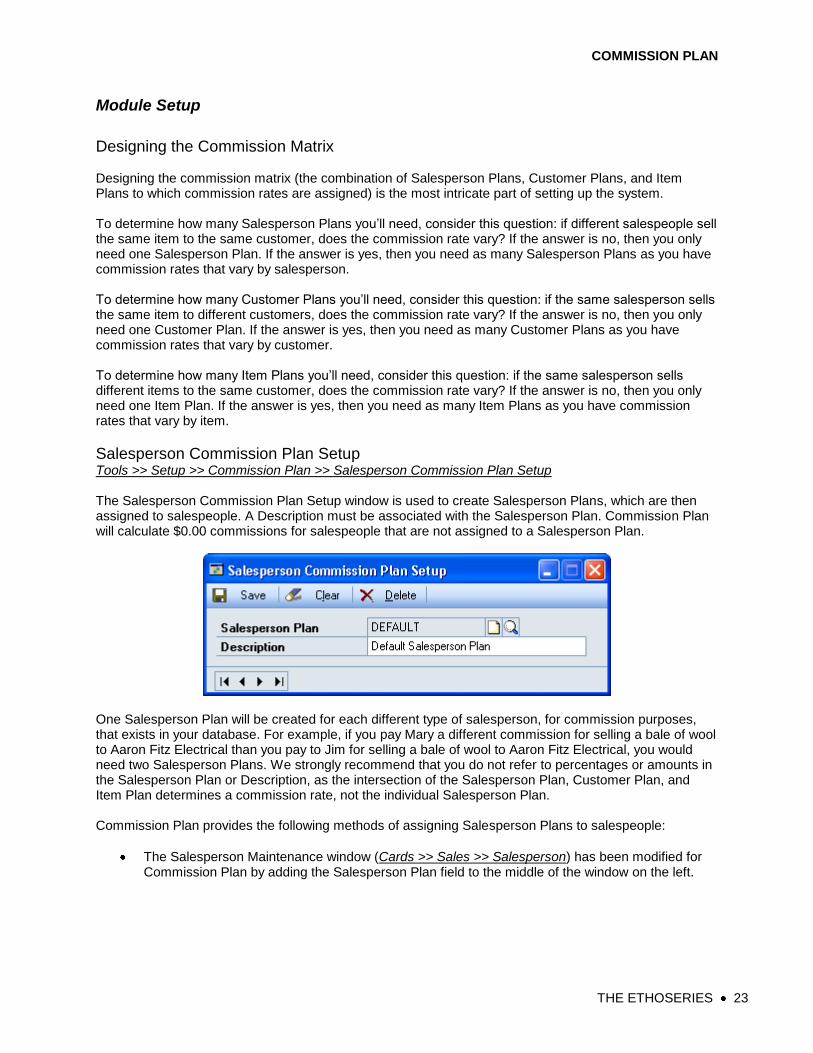
Salesperson Commission Plan Setup Tools >> Setup >> Commission Plan >> Salesperson Commission Plan Setup The Salesperson Commission Plan Setup window is used to create Salesperson Plans, which are then assigned to salespeople. A Description must be associated with the Salesperson Plan. Commission Plan will calculate $0.00 commissions for salespeople that are not assigned to a Salesperson Plan.
One Salesperson Plan will be created for each different type of salesperson, for commission purposes, that exists in your database. For example, if you pay Mary a different commission for selling a bale of wool to Aaron Fitz Electrical than you pay to Jim for selling a bale of wool to Aaron Fitz Electrical, you would need two Salesperson Plans. We strongly recommend that you do not refer to percentages or amounts in the Salesperson Plan or Description, as the intersection of the Salesperson Plan, Customer Plan, and Item Plan determines a commission rate, not the individual Salesperson Plan. Commission Plan provides the following methods of assigning Salesperson Plans to salespeople:
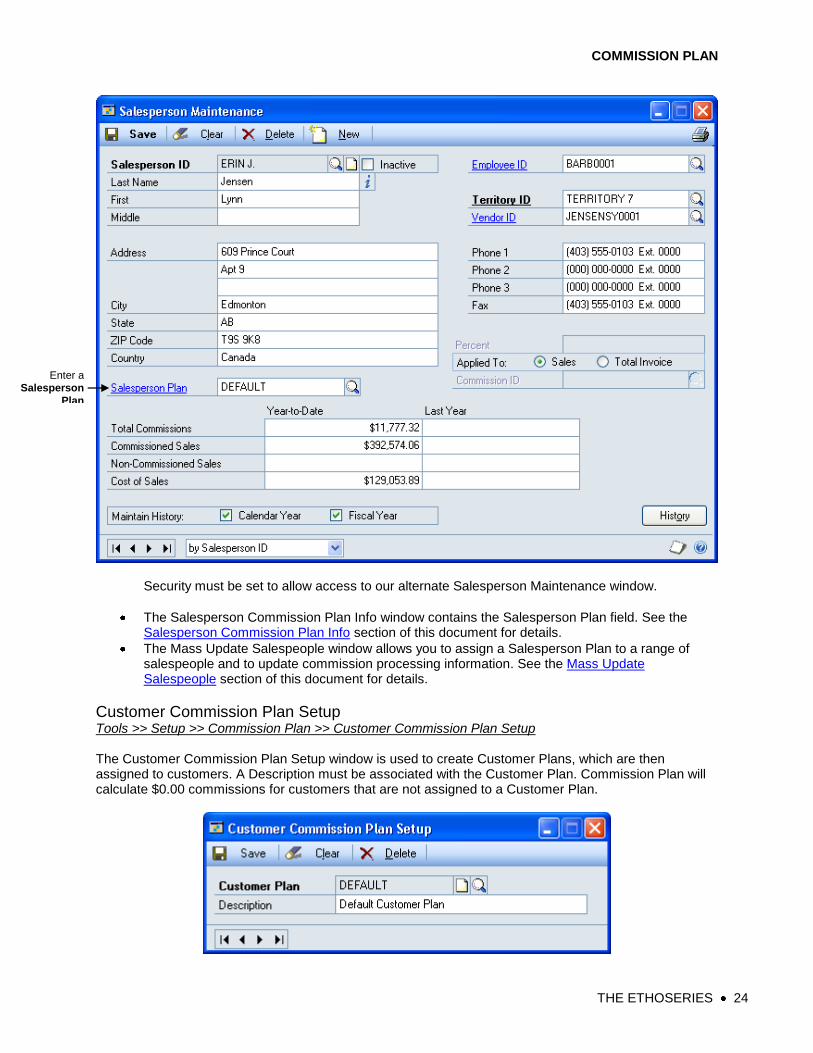
The Salesperson Maintenance window (Cards >> Sales >> Salesperson) has been modified for Commission Plan by adding the Salesperson Plan field to the middle of the window on the left.
COMMISSION PLAN
THE ETHOSERIES 24
Enter a
Salesperson
Plan
Security must be set to allow access to our alternate Salesperson Maintenance window.
The Salesperson Commission Plan Info window contains the Salesperson Plan field. See the Salesperson Commission Plan Info section of this document for details.
The Mass Update Salespeople window allows you to assign a Salesperson Plan to a range of salespeople and to update commission processing information. See the Mass Update Salespeople section of this document for details.
Customer Commission Plan Setup Tools >> Setup >> Commission Plan >> Customer Commission Plan Setup The Customer Commission Plan Setup window is used to create Customer Plans, which are then assigned to customers. A Description must be associated with the Customer Plan. Commission Plan will calculate $0.00 commissions for customers that are not assigned to a Customer Plan.

COMMISSION PLAN
THE ETHOSERIES 25
One Customer Plan will be created for each different type of customer, for commission purposes, that exists in your database. For example, if you pay Mary a different commission for selling a bale of wool to Aaron Fitz Electrical than to Adam Park Resort, you would need two Customer Plans. We strongly recommend that you do not refer to percentages or amounts in the Customer Plan or Description, as the intersection of the Salesperson Plan, Customer Plan, and Item Plan determines a commission rate, not the individual Customer Plan. Commission Plan provides the following methods of assigning Customer Plans to customers:
The Customer Maintenance window (Cards >> Sales >> Customer) has been modified for Commission Plan by adding the Customer Plan field at the bottom right.
Security must be set to allow access to our alternate Customer Maintenance window.
The Customer Commission Plan Info window contains the Customer Plan field. See the Customer Commission Plan Info section of this document for details.
The Mass Update Customer window allows you to assign a Customer Plan to a range of customers. See the Mass Update Customers section of this document for details.
Enter a
Customer Plan
COMMISSION PLAN
THE ETHOSERIES 26
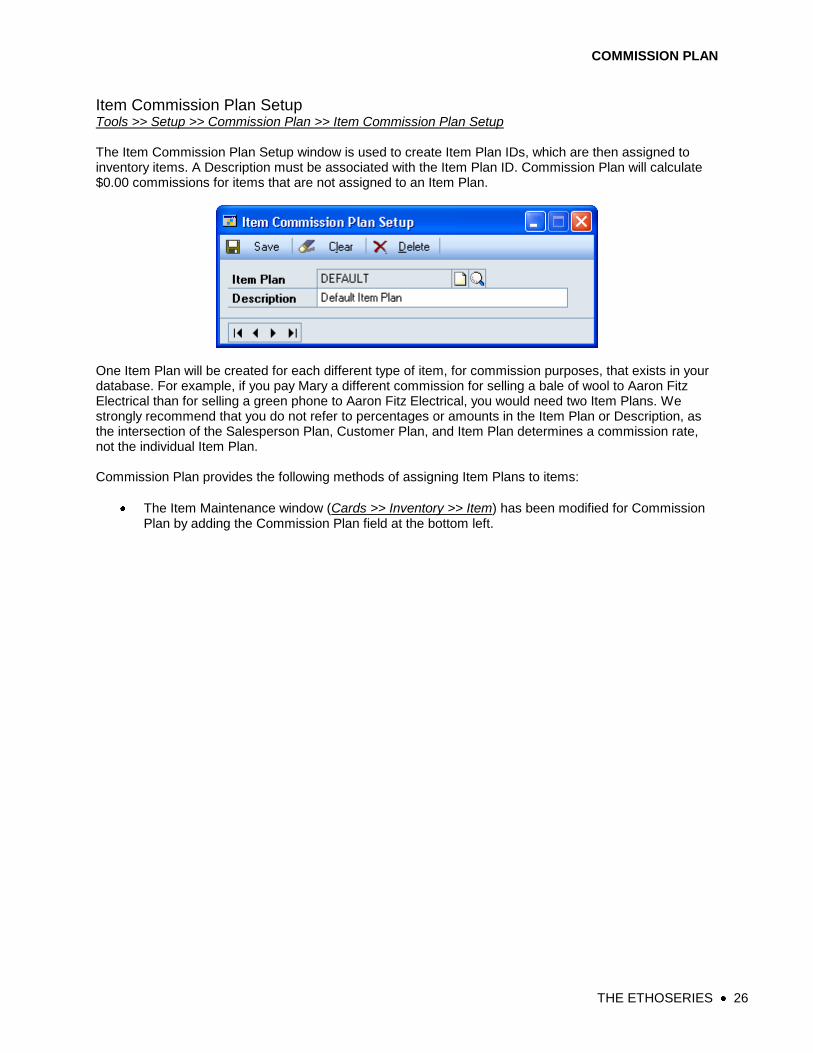
Item Commission Plan Setup Tools >> Setup >> Commission Plan >> Item Commission Plan Setup The Item Commission Plan Setup window is used to create Item Plan IDs, which are then assigned to inventory items. A Description must be associated with the Item Plan ID. Commission Plan will calculate $0.00 commissions for items that are not assigned to an Item Plan.
One Item Plan will be created for each different type of item, for commission purposes, that exists in your database. For example, if you pay Mary a different commission for selling a bale of wool to Aaron Fitz Electrical than for selling a green phone to Aaron Fitz Electrical, you would need two Item Plans. We strongly recommend that you do not refer to percentages or amounts in the Item Plan or Description, as the intersection of the Salesperson Plan, Customer Plan, and Item Plan determines a commission rate, not the individual Item Plan. Commission Plan provides the following methods of assigning Item Plans to items:
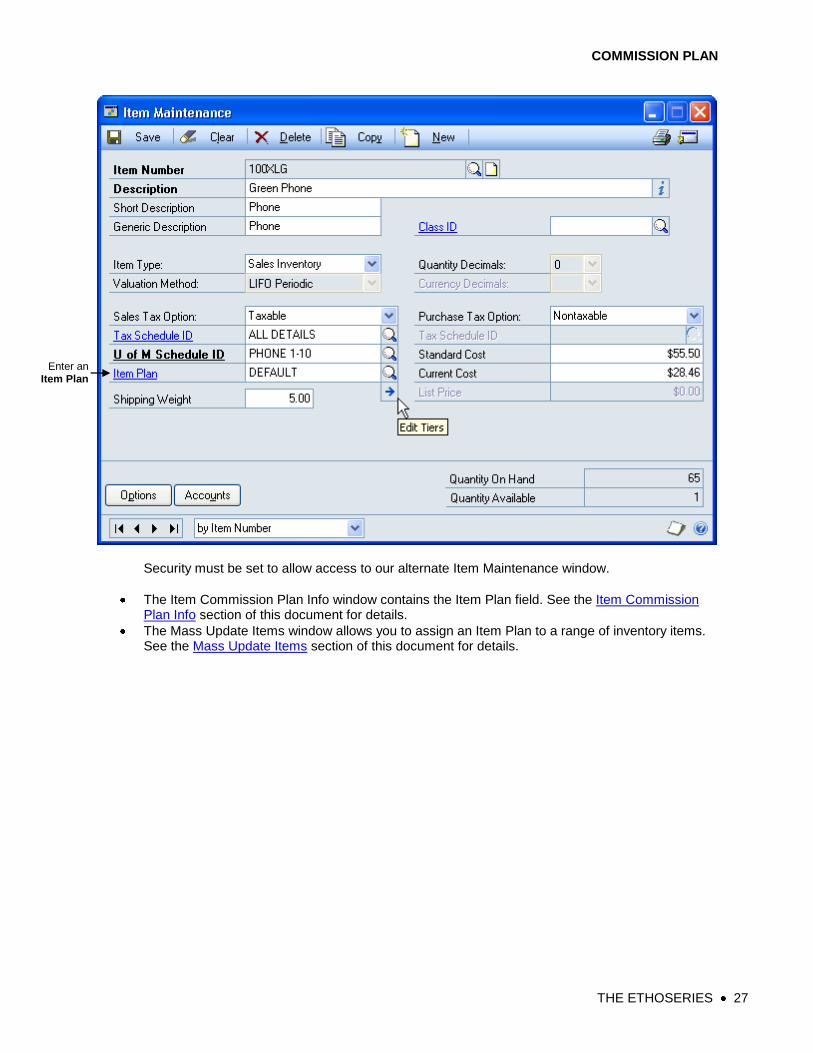
The Item Maintenance window (Cards >> Inventory >> Item) has been modified for Commission Plan by adding the Commission Plan field at the bottom left.
COMMISSION PLAN
THE ETHOSERIES 27
Enter an
Item Plan
Security must be set to allow access to our alternate Item Maintenance window.
The Item Commission Plan Info window contains the Item Plan field. See the Item Commission Plan Info section of this document for details.
The Mass Update Items window allows you to assign an Item Plan to a range of inventory items. See the Mass Update Items section of this document for details.

COMMISSION PLAN
THE ETHOSERIES 28
Commission Plan Setup Tools >> Setup >> Commission Plan >> Commission Plan Setup The Commission Plan Setup window is used to set the parameters by which Commission Plan will operate. From this window you can identify which documents may have Commission Plan information and when commissions are due to salespeople. To distinguish the payment of commissions from the payment of sales documents, Commission Plan refers to commission payment as Commission Processing.
Commissionable Sales Documents: This section controls the sales documents that can have commission records created. Invoices and Returns are pre-selected as these are the only sales documents for which commissions can be processed. All other document types are optional. Commissions can be calculated and created at the time of order; however, they will not be processed until the order has been transferred to an invoice and posted or fully paid depending on the processing method selected.

COMMISSION PLAN
THE ETHOSERIES 29
By default, Commission Plan creates commission records for any sales document assigned to a Document Type marked in the Commission Plan Setup window, regardless of the Sales Type ID used for
the document. Click the Sales Type ID Setup button to open the Commission Plan Sales Type ID Setup window or go to Tools >> Setup >> Commission Plan >> Commission Plan Sales Type ID Setup. This window is used to ignore specified Sales Type IDs when creating commissions for a particular Document Type. Commissions will still be calculated for ignored Sales Type IDs in the following cases:
The Sales Type IDs option is set to All or Restricted (and ignored Sales Type IDs are included in the restricted list) when calculating commissions using the Commission Plan Utilities window.
A user selects a sales document in the Commission Plan Entry window and chooses to calculate commissions for the ignored Sales Type ID.
A sales document with existing commissions is transferred and the resulting document has an ignored Sales Type ID.
In the above example, commissions will not be automatically calculated for invoices whose Sales Type ID is SPECINV.
Commission Tiers:
Marking the Enable Commission Tiers checkbox will allow you to enter multiple commission rates, based on various criteria, for each Salesperson Plan, Customer Plan, and Item Plan combination. If this box is unmarked, then you may enter only one commission rate per plan combination. If commission tiers
are enabled and Dynamics GP Extended Pricing is enabled, then marking the Enable Price Sheet Tiers
checkbox will allow you to set up tiers based on Extended Pricing price sheets. Entering a Default Price
Sheet for Non-inventoried Items will allow commissions to be automatically calculated for non-inventoried sales document line items if a Default Item Plan for Non-inventoried Items has been entered. See the Commission Plan Matrix Setup section of this document for detailed information on tiers functionality.
COMMISSION PLAN
THE ETHOSERIES 30
Commission Plan Assignments:
Marking the Require Customer Plans checkbox will set the Customer Plan field to Required if you are using our alternate Customer Maintenance window or will open our Customer Commission Plan Info window when a customer is saved without a customer plan if you are not using our alternate Customer Maintenance window.
Marking the Require Salesperson Plans checkbox will set the Salesperson Plan field to Required if you are using our alternate Salesperson Maintenance window or will open our Salesperson Commission Plan Info window when a salesperson is saved without a salesperson plan if you are not using our alternate Salesperson Maintenance window.
Marking the Require Item Plans checkbox will set the Item Plan field to Required if you are using our alternate Item Maintenance window or will open our Item Commission Plan Info window when an item is saved without an item plan if you are not using our alternate Item Maintenance window.
Entering a Default Item Plan for Non-inventoried Items will allow commissions to be automatically calculated for non-inventoried sales document line items.
Click the Plan Assignments button to assign Salesperson Plans to salespeople, Customer Plans to customers, and Item Plans to items. You can also use our mass update utilities to perform these tasks. See the Mass Update section of this document for detailed information on mass update functionality.
Commissionable Amounts:
The Commissionable Sale Amount can be derived from either the sales document line extended price (Sales Document Price) or the inventory item’s list price * quantity in base unit of measure (List Price), and a multiplier may be applied to the resulting amount to determine the commissionable sale amount. You may also elect to make this selection independently for each inventory item.
The Commissionable Cost Amount can be derived from either the sales document line extended cost (Sales Document Cost) or the inventory item’s standard cost * quantity in base unit of measure (Standard Cost), and a multiplier may be applied to the resulting amount to determine the commissionable cost amount. You may also elect to make this selection independently for each inventory item. If the commissionable sale or cost amount selection is set to Based on Item, you can use the Item Commission Plan Info window or the Mass Update Items utility to set the commissionable amount source and multiplier.
When the Reduce Commissionable Amounts for Splits checkbox is marked, the commissionable sale and cost amounts on commission line items are reduced by the line item Split percentage before the commission line is calculated; otherwise, the line item commissionable amounts are not affected by the line item Split percentage. Commission splits entered at the commission header (summary) level do not affect the commission line commissionable sale and cost amounts.
Commission Reductions: This section allows you to reduce commissions for Terms Discounts, Trade Discounts, and Write-offs. Since commissions are calculated at the line item level and discounts and write-offs are applied at the document header level, the reductions are calculated in the following manner: a commission reduction percentage is calculated by dividing the amount of the trade discount, terms discount, or write-off by the sales document subtotal (the total of the extended price of all line items), then the commissionable sale and cost amount of each commission line item record is reduced by the commission reduction percentage and commissions are recalculated. Example: Bob is paid 10% of sales when he sells green phones and he receives no commission when he sells phone cords. We enter an invoice with 1 green phone selling for $10.00 and 1 phone cord selling for $2.00, totaling $12 for the invoice. Bob’s commission is $1.00 ($10.00 * 0.10 for the green phone plus zero for the phone cord). We write off $3.00, so the commission reduction percentage is 25% ($3.00 / $12.00).

COMMISSION PLAN
THE ETHOSERIES 31
The commissionable sale amount for the green phone changes to $7.50 ($10.00 * (1 - 0.25)) and the commissionable sale amount for the phone cord changes to $1.50 ($2.00 * (1 - 0.25)). Bob’s commission is now $0.75 ($7.50 * 0.10 for the green phone plus zero for the phone cord).
Click the Addt’l Reductions button to open the Commission Plan Credit Card Setup, Comm Plan Overdue Setup, and Commission Plan Payment Terms Setup windows.
The Commission Plan Credit Card Setup window allows you to enter commission reduction percentages for credit cards.
When a credit card payment is applied to a posted sales document, the commissionable sale and cost amounts of each commission line item record for the document are reduced by the credit card commission reduction percentage and commissions are recalculated.
The Comm Plan Overdue Setup window allows you to enter commission reduction percentages for overdue sales documents.
The Up to Days Overdue is based on the sales document’s due date. Whenever commissions are updated for a posted sales document (posting, applying payments, running Commission Plan Utilities, clicking the Update or Default buttons on the Commission Plan Entry window), Commission Plan compares the system date to the sales document’s due date to calculate a Days Overdue value. If the Days Overdue value falls within one of the Up to Days Overdue ranges from the Comm Plan Overdue Setup window, the commissionable sale and cost amounts of each commission line item record is reduced by the Discount % and commissions are recalculated. In the above example, no reductions are taken until sales documents are 11 days overdue.
The Commission Plan Payment Terms Setup window allows you to enter commission reduction percentages for Payment Terms IDs.

COMMISSION PLAN
THE ETHOSERIES 32
When a sales document is posted, the document’s payment terms ID is compared to the Commission Plan Payment Terms Setup. If a match is found, the commissionable sale and cost amounts of each commission line item record for the document is reduced by the payment terms ID commission reduction percentage and commissions are recalculated.
For all commission reduction types, commissions with a Commission Type of Flat Amount or Per Unit will not be reduced as the commission rate does not depend on the sale price or cost of the item. Commission reductions will not be calculated until a sales document is posted. If you modify your commission reduction settings, use the Commission Plan Utilities window to update unprocessed commission records for posted sales documents. See the Commission Plan Utilities section of this document for details.
Salespeople Receiving Commission:
When the Sales Document Salesperson option is marked, the salesperson displayed in the Sales Customer Detail Entry window will be commissioned for all line items on the sales document. All splits will take place at the commission header level. This means that the commission line commissionable sale and cost amounts may not be automatically modified for splits.
When the Sales Document Line Item Salesperson option is marked, the salesperson displayed in the Sales Item Detail Entry window will be commissioned only for that line item. All splits will take place at the commission line level. This means that the commission line commissionable sale and cost amounts may be automatically modified for splits.
Click the Addt’l Salespeople button to assign additional salespeople to customers and to assign salespeople to inventory items. See the Customer Commission Plan Info and Item Commission Plan Info sections of this documentation for details. See the Determining the Salespeople for a Sales Document section of this document for detailed information on how salespeople are commissioned for a particular sales document.
Commission Processing:
The Commission Recognition Date From selection determines which date will be entered in the Commission Recognition Date field for each commission record. The drop-down list has four choices:
Sales Transaction Originating Order Date -if the current sales transaction was transferred from a sales order, then the Commission Recognition Date will be set to the order; otherwise the Commission Recognition Date will be set to the current sales transaction document date.
Sales Transaction Current Document Date - the Commission Recognition Date will be set to the current sales transaction document date.
Sales Transaction GL Posting Date - the Commission Recognition Date will be set to the sales transaction general ledger posting date - this date will be blank for unposted transactions.
COMMISSION PLAN
THE ETHOSERIES 33
Sales Transaction Paid Date - the Commission Recognition Date will be set to the date a sales invoice is fully relieved or the date a sales return is fully applied - this date will be blank for unposted or unrelieved / unapplied transactions.
Note: The Commission Recognition Date field is currently only used to determine the
commission rate when using the tiers with the Commission Recognition Date tier type.
Additional Commission Recognition Date functionality may be implemented in a future release.
The Enable Commission Processing When drop-down list has three choices:
Document is Posted - commissions are due to salespeople as soon as sales documents are posted within Microsoft Dynamics GP.
Document is Paid - commissions are due when sales documents are fully paid. Invoices and returns are deemed fully paid when the amount remaining, as displayed in Receivables Transaction Inquiry – Customer, is $0.00. This means that invoices must be fully paid and returns must be fully applied before these commissions will be released for processing.
Based on Salesperson - the choice to process commissions when sales documents are posted or paid is made per salesperson rather than company-wide. Use the Salesperson Commission Plan Info window to select whether a salesperson will be paid when sales documents are posted or paid. If you choose Based on Salesperson in the Commission Plan Setup window and do not select a processing method for a salesperson on the Salesperson Commission Plan Info window, that salesperson will be assigned the Invoice is Posted method when commissions are processed.
Note: If you choose the Enable Commission Processing When Document is Paid option, you will
not be able to process commissions for partially paid documents. Microsoft Dynamics GP does
not allow payments to be applied at the line item level, preventing Commission Plan from
determining which commission lines should be processed.
The Next Commission Processing Run ID is used when commissions are processed. The function of this number is similar to that of a batch number in that all commission records processed in a given run are assigned the same Run ID. The Run ID can then be used to filter commission inquiries and reports.
Note: Summary information is created and a Commission Processing Run ID is assigned for all
existing processing runs when a Next Commission Processing Run ID is saved in the
Commission Plan Setup window for the first time.
The Next Commission Accrual Run ID is used when commissions are accrued, and functions like the
Commission Processing Run ID. This field is required only when the Create Accrual Trx option is marked. See the Accruing Commissions section of this document for detailed information on how commissions may be accrued.
The Create GL Trx, Create Payables Trx, and Create Payroll Trx options determine which, if any, Dynamics GP transactions should be created when commissions are processed. If none of these options are marked, Commission Plan may still be used as a reporting tool for outside accounts payable or payroll services.
Marking the Disable Great Plains Commissions checkbox will disable the Microsoft Dynamics GP Commissions button on the Sales Transaction Entry and Sales Transaction Inquiry Zoom windows, and the commission percentage on all salesperson cards will be set to zero, which will prevent Microsoft Dynamics GP commissions from calculating. You can also use the Remove Salesperson Percentages

COMMISSION PLAN
THE ETHOSERIES 34
button on the Commission Plan Utilities window to set the commission percentage to zero on all salesperson cards. If you choose not to disable Microsoft Dynamics GP commissions, you will be prompted to choose Great Plains Commissions or EthoTech Commission Plan when clicking the Commissions button on our alternate Sales Transaction Entry and Sales Transaction Inquiry Zoom windows.

COMMISSION PLAN
THE ETHOSERIES 35
Commission Plan Matrix Setup Tools >> Setup >> Commission Plan >> Commission Plan Matrix Setup The Commission Plan Matrix Setup window is used to define the Commission Plan Matrix and the completion of this window requires that the rules by which commissions will be paid have been determined. It is usually desirable to complete this window after all salespeople have been assigned to Salesperson Plans, all customers have been assigned to Customer Plans, and all items have been assigned to Item Plans. Since it is very difficult to display a three-dimensional matrix within a Microsoft Dynamics GP window, Commission Plan presents a single layer at a time, with each layer represented by the Salesperson Plan. The commission rate to be paid to each salesperson assigned to the current Salesperson Plan is determined by the Customer Plan and Item Plan combinations in the scrolling window. If no match is found in the matrix, then a $0.00 commission with a commission type of Margin is calculated for the sales document line item in question.
The View By field is used for complex plans. This is a display only control for the scrolling window and does not alter the data in any way. You may select to view the matrix line items in Customer Plan order or Item Plan order and you may view a subset of the data by setting a range. The Commission Plan Matrix uses the Salesperson Plan, Customer Plan, and Item Plan to determine the appropriate commission rate for an individual line item in Sales Order Processing. The appearance and functionality of the Commission Plan Matrix Setup window is determined by the Enable Commission Tiers checkbox on the Commission Plan Setup window.
If Commission Tiers are not Enabled A Salesperson Plan, Customer Plan, and Item Plan combination can be assigned a single commission type and rate.

COMMISSION PLAN
THE ETHOSERIES 36
The Type drop-down list lets you select the type of commission to be paid. The four types and their definitions are:
1. No Commission – no commissions will be paid. 2. Margin – the commission paid is a percentage of the sales document Extended Price less the
Extended Cost. 3. Sale – the commission paid is a percentage of the sales document Extended Price. 4. Flat Amount – the commission paid is an amount, such as $5.00, for the item regardless of
price, cost, or quantity. 5. Per Selling Unit – the commission paid is an amount multiplied by the sales document line
item Quantity; and, does not take Unit of Measure into account. For example if you entered a quantity of 3 and a U of M of Case or Each, the commission would be the same.
6. Per Base Unit – the commission paid is an amount multiplied by the sales document line item Quantity in Base Unit of Measure.
Commission Plan uses Commissionable Sale and Cost amounts for the purposes of
calculating commissions for types of Margin and Sale. The Commissionable Sale can be
derived from the sales document line item Extended Price or the inventory item‘s list
price, and the Commissionable Cost can be derived from the sales document line item
Extended Cost or the inventory item‘s standard cost. Both the Commissionable Sale and Cost can
be overridden by the user.
The Percent (%) field allows you to enter a percentage between 0.00% and 327.67% for the Commission Rate to be paid and is used only with Sale and Margin commission types.

COMMISSION PLAN
THE ETHOSERIES 37
The Amount field allows you to enter an amount between $0.00 and $99,999,999,999.99 and is used only with Flat Amount and Per Unit commission types.

COMMISSION PLAN
THE ETHOSERIES 38
Example: in the above screenshot, a salesperson assigned to Salesperson Plan DEFAULT would receive a commission of 15% of the selling price on a line item assigned to Item Plan HARDWARE sold to a customer assigned to Customer Plan DEFAULT. However, that same salesperson would receive no commission on a line item assigned to Item Plan DEFAULT sold to a customer assigned to Customer Plan DEFAULT, as the commission type for this plan combination is No Commission.The salesperson would receive no commission on a line item assigned to Item Plan DEFAULT sold to a customer assigned to Customer Plan WHOLESALE, as no combination of Salesperson Plan DEFAULT, Customer Plan WHOLESALE, and Item Plan DEFAULT exists in the matrix.
If Commission Tiers are Enabled
Multiple commission rates may be assigned to a Salesperson Plan, Customer Plan, and Item Plan combination, allowing for ―sliding scales‖ based on one of several Tier Types: sales amount, margin, units sold, etc. These scales apply only to the current sales document line item, and commission rates are inclusive rather than additive (once a rate threshold is achieved, the associated commission rate is applied
to the entire line item). Mark the Enable Commissions Tiers checkbox in the Commission Plan Setup window to turn on the tiers functionality.
Tier Schedules
A Salesperson Plan, Customer Plan, and Item Plan combination can have a tier schedule assigned by one of the following methods:

COMMISSION PLAN
THE ETHOSERIES 39
The default tier schedule, by marking the Use Default Tiers checkbox. In this case, clicking the
Edit Tiers expansion button will open the Commission Plan Default Tiers window. Editing this window modifies the tier structure for all plan combinations using the default tier schedule.
A tier schedule created specifically for the selected plan combination. In this case, clicking the
Edit Tiers expansion button will open the Commission Plan Tiers window. Editing this window modifies the tier structure only for the selected plan combination.
A tier schedule created for each inventory item assigned to the selected Item Plan, by marking the
Use Item Tiers checkbox. In this case, you will need to click the Edit Tiers expansion button (arrow next to the Item Plan lookup button) on the Item Commission Plan Info window – or our alternate Item Maintenance window – to open the Commission Plan Item Tiers window. Editing this window modifies the tier structure only for the selected inventory item.
Tier Types
For any tier schedule, commission types and rates may be assigned to ranges of any of the following tier types:
Commissionable Sale Amount - rate determined by the Commissionable Sale Amount.
Commission Recognition Date - rate determined by the Commission Recognition Date.
Margin Amount - rate determined by the Margin: Commissionable Sale Amount - Commissionable Cost Amount.
Margin Percent - rate determined by the Margin Percent: ((Commissionable Sale Amount - Commissionable Cost Amount)/Commissionable Sale Amount)*100. This method allows you to use a generic margin tiers setup, rather than tying the margin to a specific item.
Price Sheet / Price Level - if Dynamics GP Extended Pricing is in use, rate determined by the Price Sheet assigned to the sales document line item(s); otherwise, rate determined by the Price Level assigned to the sales document line item(s).
Quantity in Base U of M - rate determined by the Quantity in the item's base Unit of Measure.
Unit Price - rate determined by the Unit Price.
Unit Price from Commissionable Sale Amount - rate determined by the Unit Price from Comm Sale Amt: Commissionable Sale Amount/Qty [the actual line item quantity, not qty in base U of M]. The Comm Sale Amt may be affected by Markdowns, Trade and Terms Discounts, Write-offs, Splits, Multipliers and manual adjustments.
Unit Price from Extended Sale Amount - rate determined by the Unit Price from Extended Price: Extended Price/Qty [the actual line item quantity, not quantity in base U of M]. This method allows the Unit Price to be affected by Markdowns.
For a given tier range, any of the following commission types may be assigned:
Margin – the commission paid is a percentage of the sales document Extended Price less the Extended Cost.
Sale – the commission paid is a percentage of the sales document Extended Price.
Flat Amount – the commission paid is an amount, such as $5.00, for the item regardless of price, cost, or quantity.

COMMISSION PLAN
THE ETHOSERIES 40
Per Unit – the commission paid is an amount multiplied by the sales document line item Quantity; this does not take Unit of Measure into account. For example if you entered a quantity of 3 and a U of M of Case or Each, the commission would be the same.
A commission rate between 0.01% and 327.67% may be entered for Sale and Margin commission types. A commission rate between $0.01 and $99,999,999,999.99 may be entered for Flat Amount and Per Unit commission types. Tier ranges cannot overlap, and different commission types and rates can be assigned to different ranges. The available tier types and commission types are the same for all tier schedules.
Default Tiers Tools >> Setup >> Commission Plan >> Commission Plan Default Tiers Creating a default tier schedule is beneficial if your commission structure doesn’t discriminate by salesperson, customer, or inventory item (Margin Percent and Price Level are commonly used for default tiers); otherwise it will probably be more efficient to assign tiers to individual plan combinations or inventory items.
The tier schedule entered in this window will be used whenever the Use Default Tiers checkbox is marked for a particular plan combination in the Commission Plan Matrix Setup window. Example: In the above screenshot, if the line item margin percentage is between .01% and 5%, a commission of 10% of the line item margin (commissionable sale amount - commissionable cost amount) would be calculated. If the line item margin percentage is above 10%, then a commission of $100.00 would be calculated.

COMMISSION PLAN
THE ETHOSERIES 41
Plan Tiers Tools >> Setup >> Commission Plan >> Commission Plan Matrix Setup >> Edit Tiers
The Commission Plan Tiers window is used to create a tier schedule for a particular plan combination,
and the window is accessed by clicking the Edit Tiers expansion button for a plan combination in the Commission Plan Matrix Setup window.
The tier schedule entered in this window will be used for the associated plan combination as long as neither the Use Default Tiers nor the Use Item Tiers checkbox is marked for that plan combination in the Commission Plan Matrix Setup window. Example: In the above screenshot, if the line item commissionable sale amount is below $5.00, a zero dollar commission would be calculated. If the commissionable sale amount is greater than $10.00 and not greater than $20.00, a commission of 4% of the line item commissionable sale amount would be calculated.

COMMISSION PLAN
THE ETHOSERIES 42
Item Tiers Cards >> Commission Plan >> Item Commission Plan Info >> Item Tiers Expansion The Commission Plan Item Tiers window is used to create a tier schedule for a particular inventory item, and the window is accessed by either of the following methods:
Clicking the Edit Tiers expansion button (arrow next to the Item Plan lookup button) in the Item Commission Plan Info window for a particular inventory item
Clicking the Edit Tiers expansion button (arrow next to the Item Plan lookup button) in our alternate Item Maintenance window for a particular inventory item
The tier schedule entered in this window will be used for any plan combination that contains the inventory
item’s Item Plan if the Use Item Tiers checkbox is marked for that plan combination in the Commission Plan Matrix Setup window. Example: In the above screenshot, if the derived line item unit price is greater than $0.00 and not greater than $18.00, a commission of $2.00 would be calculated. If the derived line item unit price is greater than $100.00, a commission of .02% of the line item commissionable sale amount would be calculated.

COMMISSION PLAN
THE ETHOSERIES 43
Salesperson Commission Plan Info Cards >> Commission Plan >> Salesperson Commission Plan Info The Salesperson Commission Plan Info window is primarily used to assign a Salesperson Plan to a salesperson and define options for processing commissions specific to the listed salesperson.
The Salesperson Plan field is used to enter a Salesperson Plan for the current salesperson. This window is also used to determine when commissions will be processed for a salesperson, what type of Dynamics GP transaction will be created when commissions are processed, whether commission accruals may be processed, and to place a salesperson’s account on hold from receiving commissions – or remove the hold status.
The Enable Commission Processing When drop-down list has two choices and is editable only when
the Enable Commission Processing When setting in the Commission Plan Setup window is set to Based
on Salesperson.
Document is Posted - commissions are due to the salesperson as soon as sales documents are posted within Microsoft Dynamics GP.
Document is Paid - commissions are due when sales documents are fully paid. Invoices and returns are deemed fully paid when the amount remaining as displayed in Receivables Transaction Inquiry – Customer, is $0.00. This means that invoices must be fully paid and returns must be fully applied before commissions may be paid.
The Create Transaction option determines what type of Dynamics GP transaction will be created when commissions are processed. Only the options marked in the Commission Plan Setup window are allowed.

COMMISSION PLAN
THE ETHOSERIES 44
The Create Accrual Trx checkbox determines whether commissions for the current salesperson will be included in the commission accrual routine. See the Accruing Commissions section of this document for detailed information on accruing commissions.
Marking the GL, Payables, or Payroll transaction option will require you to enter Commissions Payable
and Expense Accounts. Marking the Payroll transaction option will also require you to enter a
Commission Payroll Code.
The Hold Commissions checkbox is used to place or remove holds on unprocessed commissions for the selected salesperson. If you change this setting and save the record, you will be prompted to update all existing unprocessed commissions. Commission records created after this point will be set to the hold status assigned to the salesperson. The EthoTech Commission Plan Utilities window (Tools >> Utilities >> Commission Plan >> Commission Plan Utilities) can also be used to update the hold status for existing unprocessed commissions.
Use the Salesperson Commission Plan Info window to assign Salesperson Plans to salespeople
without the need to grant security to the alternate Salesperson Maintenance window provided
by EthoTech.
All options on the Salesperson Commission Plan window can be set for multiple salespeople using the Mass Update Salespeople window. See the Mass Update Salespeople section of this document for details.
Customer Commission Plan Info Cards >> Commission Plan >> Customer Commission Plan Info The Customer Commission Plan Info window is primarily used to assign a Customer Plan to a customer.
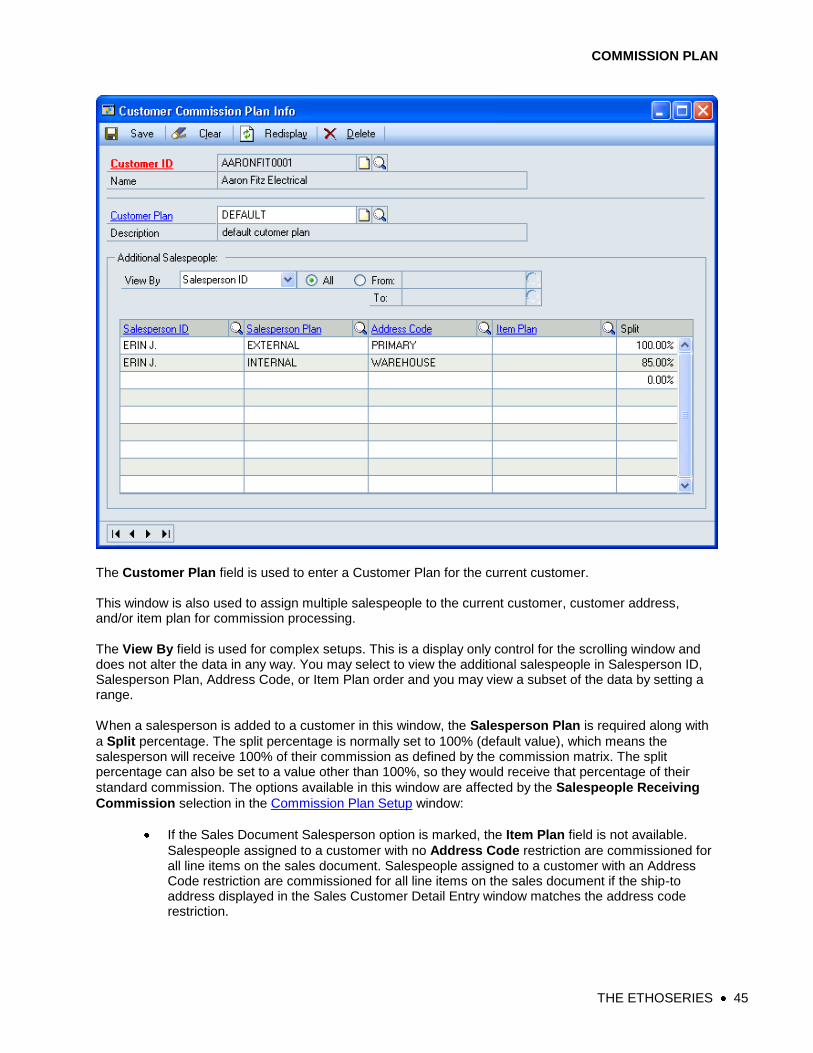
COMMISSION PLAN
THE ETHOSERIES 45
The Customer Plan field is used to enter a Customer Plan for the current customer. This window is also used to assign multiple salespeople to the current customer, customer address, and/or item plan for commission processing.
The View By field is used for complex setups. This is a display only control for the scrolling window and does not alter the data in any way. You may select to view the additional salespeople in Salesperson ID, Salesperson Plan, Address Code, or Item Plan order and you may view a subset of the data by setting a range.
When a salesperson is added to a customer in this window, the Salesperson Plan is required along with
a Split percentage. The split percentage is normally set to 100% (default value), which means the salesperson will receive 100% of their commission as defined by the commission matrix. The split percentage can also be set to a value other than 100%, so they would receive that percentage of their
standard commission. The options available in this window are affected by the Salespeople Receiving
Commission selection in the Commission Plan Setup window:
If the Sales Document Salesperson option is marked, the Item Plan field is not available.
Salespeople assigned to a customer with no Address Code restriction are commissioned for all line items on the sales document. Salespeople assigned to a customer with an Address Code restriction are commissioned for all line items on the sales document if the ship-to address displayed in the Sales Customer Detail Entry window matches the address code restriction.

COMMISSION PLAN
THE ETHOSERIES 46
If the Sales Document Line Item Salesperson option is marked, the Item Plan field is available. Salespeople assigned to a customer with no Address Code or Item Plan restrictions are commissioned for all line items on the sales document. Salespeople assigned to a customer with an Address Code restriction are commissioned only for those line items on the sales document where the ship-to address displayed in the Sales Item Detail Entry window matches the address code restriction. Salespeople assigned to a customer with only an Item Plan restriction are commissioned only for line items on the sales document that are assigned to the item plan. Salespeople assigned to a customer with both an Address Code and an Item Plan restriction are commissioned only for those line items on the sales document that are assigned to the item plan and whose ship-to address matches the address code restriction.
Use the Customer Commission Plan Info window to assign Customer Plans to customers
without the need to grant security to the alternate Customer Maintenance window provided by
EthoTech.
All options on the Customer Commission Plan window can be set for multiple salespeople using the Mass Update Customers window. See the Mass Update Customers section of this document for details.
Item Commission Plan Info Cards >> Commission Plan >> Item Commission Plan Info The Item Commission Plan Info window is primarily used to assign an Item Plan to an inventory item.
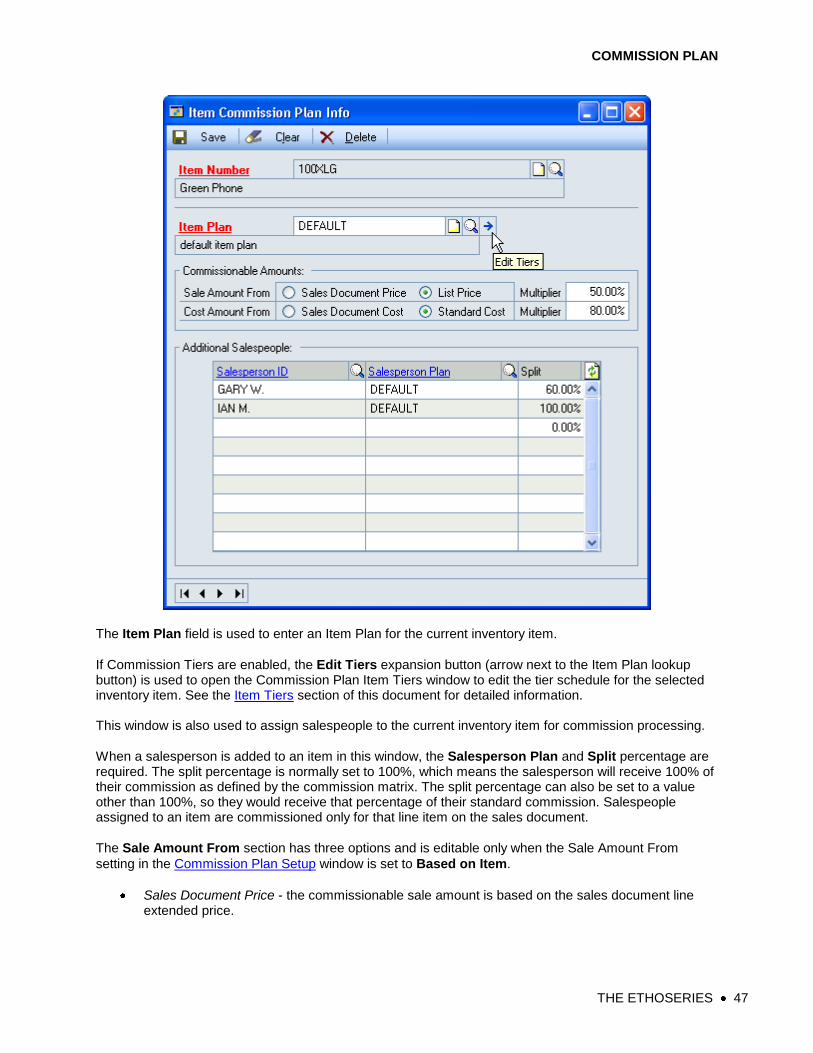
COMMISSION PLAN
THE ETHOSERIES 47
The Item Plan field is used to enter an Item Plan for the current inventory item.
If Commission Tiers are enabled, the Edit Tiers expansion button (arrow next to the Item Plan lookup button) is used to open the Commission Plan Item Tiers window to edit the tier schedule for the selected inventory item. See the Item Tiers section of this document for detailed information. This window is also used to assign salespeople to the current inventory item for commission processing.
When a salesperson is added to an item in this window, the Salesperson Plan and Split percentage are required. The split percentage is normally set to 100%, which means the salesperson will receive 100% of their commission as defined by the commission matrix. The split percentage can also be set to a value other than 100%, so they would receive that percentage of their standard commission. Salespeople assigned to an item are commissioned only for that line item on the sales document.
The Sale Amount From section has three options and is editable only when the Sale Amount From
setting in the Commission Plan Setup window is set to Based on Item.
Sales Document Price - the commissionable sale amount is based on the sales document line extended price.

COMMISSION PLAN
THE ETHOSERIES 48
List Price - the commissionable sale amount is based on the inventory item’s list price * quantity in base unit of measure.
Multiplier - regardless of the commissionable sale amount option, the commissionable sale amount is multiplied by the percentage listed in the Multiplier field. This allows loading or reducing commissionable sale amounts.
The Cost Amount From section has three options and is editable only when the Cost Amount From
setting in the Commission Plan Setup window is set to Based on Item.
Sales Document Cost - the commissionable cost amount is based on the sales document line extended cost.
Standard Cost - the commissionable cost amount is based on the inventory item’s standard cost * quantity in base unit of measure.
Multiplier - regardless of the commissionable cost amount option, the commissionable cost amount is multiplied by the percentage listed in the Multiplier field. This allows loading or reducing commissionable cost amounts.
Use the Item Commission Plan Info window to assign Item Plans to inventory items without the
need to grant security to the alternate Item Maintenance window provided by EthoTech.
All options on the Item Commission Plan window can be set for multiple salespeople using the Mass Update Items window. See the Mass Update Items section of this document for details.
Creating Commissions
Commission Plan commission records are first created by the earliest of the following six (6) events:
Saving a sales document for a document type that has been marked in the Commission Plan Setup window.
Opening the Commission Plan Entry window for an unsaved or unposted sales document.
Posting a sales document.
Transferring a sales document from a document type not marked in the Commission Plan Setup window to a document type that is marked.
Running Commission Plan Utilities.
Using Dynamics GP Integration Manager to create sales transactions in the SOP module.
NOTE: Negative commissions are created for sales returns and invoices with negative
quantities or negative prices.
Determining the Salespeople for a Sales Document The salespeople commissioned for a sales document are determined by different criteria depending on whether Commission Plan is set up to commission the sales document header salesperson or the sales document line item salesperson(s), and are determined in the following order: Sales document header salesperson (The Item Plan field on the Customer Commission Plan Info window is disabled) All Salespeople, except those determined by number 5 below, will be commissioned on all sales line items.

COMMISSION PLAN
THE ETHOSERIES 49
1. Salespeople manually added in Commission Plan Entry. 2. Salespeople from Customer Commission Plan Info whose address code restriction matches
the sales document header ship-to address code. 3. Salespeople from Customer Commission Plan Info without an address code restriction. 4. The salesperson assigned to the sales document header. 5. Salespeople from Item Commission Plan Info assigned to a sales document line item. These
salespeople will only be commissioned on applicable sales document lines. We create commissions for all salespeople that fit the first criteria above, then we create commissions for the salesperson that fits the second criteria who was not already found by the first criteria, then we create commissions for all salespeople that fit the third criteria who were not already found by the first and second criteria, and so on. Sales document line item salesperson(s) (The Item Plan field on the Customer Commission Plan Info window is enabled) All Salespeople, except those determined by numbers 1 and 5 below, will be commissioned only on applicable sales line items.
1. Salespeople manually added in Commission Plan Entry. These salespeople will be commissioned on all sales document line items.
2. Salespeople from Customer Commission Plan Info whose address code restriction matches the sales document line item ship-to address code and whose item plan restriction matches a sales document line item plan.
3. Salespeople from Customer Commission Plan Info whose address code restriction matches the sales document line item ship-to address code only (no item plan restriction).
4. Salespeople from Customer Commission Plan Info whose item plan restriction matches a sales document line item plan only (no address code restriction).
5. Salespeople from Customer Commission Plan Info with neither an address code nor an item plan restriction. These salespeople will be commissioned on all sales document line items.
6. The salesperson(s) attached to the sales document line item(s). 7. Salespeople from Item Commission Plan Info assigned to a sales document line item.
We create commissions for all salespeople that fit the first criteria above, then we create commissions for all salespeople that fit the second criteria who were not already found by the first criteria, then we create commissions for all salespeople that fit the third criteria who were not already found by the first and second criteria, and so on.
NOTE: Using either the header or the line item salesperson setup option, if a salesperson is
assigned using more than one of the above criteria, the information from the first assignment is
used to calculate commissions:
Determining Split Amounts Commission Splits are defined as a percentage of the commission as defined by the Commission Plan Matrix. Example: Mary’s commission rate is 10% of the selling price on bales of wool (defined by the matrix), so when a bale is sold for $10.00 she receives a commission of $1.00 when her split is set to 100% (the default setting). If her split was set to 85%, her commission would change to $0.85 (85% of $1.00). Splits are calculated differently depending on whether the Commission Plan is set up to commission the sales document header or line item salesperson(s).

COMMISSION PLAN
THE ETHOSERIES 50
Sales document header salesperson
The split is calculated at the commission header level (the commission line Split will be 100%).
The net amount for a commission line is calculated using the commission rate found for the commission line Item Plan, Salesperson Plan, and Customer Plan. Then the total of all commission line net amounts is multiplied by the split percentage to reach the net amount for the commission header.
Sales document line item salesperson(s)
The split is calculated at the commission detail level (the commission header Split will be 100%).
If Commission Plan is set up to reduce commissionable amounts for splits: o The commission line commissionable sale and cost amounts are first multiplied by the
split percentage. Then the gross commission line amount is calculated using the commission rate found for the commission line Item Plan, Salesperson Plan, and Customer Plan (if no rate is found, the commissionable sale and cost amounts are set to zero). The net commission line amount is set to the gross commission line amount. The net amount for the commission header is the total of all net commission line amounts.
If Commission Plan is NOT set up to reduce commissionable amounts for splits: o A gross commission line amount is first calculated using the commission rate found for
the commission line Item Plan, Salesperson Plan, and Customer Plan. Then the gross commission line amount is multiplied by the split percentage to reach the net commission line amount. The net amount for the commission header is the total of all net commission line amounts.
Commission Plan Entry Transactions >> Commission Plan >> Commission Plan Entry The Commission Plan Entry window is available from the Sales Transaction Entry Extras menu, the hotkey CTRL + M, the Commission Plan button on the Sales Transaction Entry window (if you are using the alternate window provided by EthoTech) and the Commission Plan Transactions menu. Commission Plan Entry may only be used for document types that have been marked in the Commission Plan Setup window. If you open Commission Plan Entry from Sales Transaction Entry, then the appropriate sales document will be displayed; otherwise you must select the Type and Document Number to display the Commission Plan data.
You may only edit unprocessed commission records in Commission Plan Entry. If you edit a commission
record, the Manual checkbox will be marked. The Processed checkbox provides a visual cue for

COMMISSION PLAN
THE ETHOSERIES 51
commission records that may not be edited. The scrolling window summarizes the Commission Plan information for each salesperson assigned to the document. Additional salespeople can be manually
assigned by entering the Salesperson ID field, in which case the Manual checkbox will be marked. A manually entered salesperson will be initially commissioned for all line items on the sales document. All
other information is added automatically but may be overridden. You may override the Salesperson Plan,
the Customer Plan, and the Split percentage for a specific salesperson on a specific document. If all commissions have been placed on hold for a salesperson (see the Salesperson Commission Plan Info
section of this document), the Hold checkbox will be marked and may not be unmarked; otherwise you can place and remove commission holds for a specific salesperson on a specific document using the Hold checkbox.
If you are using Price Sheet Tiers, you can click the Sales Document Price Sheets expansion button (arrow next to the Document No. lookup button) to open the Commission Plan Sales Document Info window. The Commission Plan Sales Document Info window allows you to view, edit and override price sheet assignments for sales document line items. Changes to a line item price sheet assignment will affect all unprocessed commissions for that line item.
The Price Sheet can be edited for a sales document line item by entering a new price sheet in the
scrolling window. If you edit a price sheet assignment, the Manual checkbox will be marked. Clicking the
Delete button will remove all price sheet assignments for the sales document, and clicking the Update button will give you the option to update, default or cancel the price sheet assignments. If you choose to update, all price sheet assignments for the sales document that have not been manually edited will be recalculated. If you choose to default, all price sheet assignments for the sales document will be deleted and recalculated. Changes to the price sheet assignments become permanent when you click Save, at which time all unprocessed commissions are recalculated.
Click the Noncommissioned Salespeople button to open the Noncommissioned Salesperson Inquiry window, which displays salespeople who are not commissioned because they were inactive at the time commissions were first created for the sales document and salespeople whose commissions for the document were deleted.

COMMISSION PLAN
THE ETHOSERIES 52
The Noncommissioned Salesperson Inquiry window can also be accessed from the
Commission Plan Inquiry Zoom window. See the Commission Plan Inquiry section of this
document for details.
To edit the line item detail for a salesperson’s commission, click on any field on the line of the salesperson
to be viewed, and then click the Commission Detail expansion button (arrow next to the Commission field) to open the Commission Plan Detail Entry window. The Commission Plan Detail Entry window allows you to view, edit and override Commission Plan information for specific line items for the salesperson. Changes to the line item will only apply to this sales document and this salesperson. In addition to changing the Type, Rate %, or Amount, you may change the Item Plan, Salesperson Plan, Split percentage, Commissionable Sale Amount and the Commissionable Cost Amount. The Commission Plan Detail Entry window will be view-only for processed commissions.

COMMISSION PLAN
THE ETHOSERIES 53
The Item Plan can be changed for this line item, for this salesperson only, simply by entering a new Item
Plan in the scrolling window. The Salesperson Plan and Customer Plan can be changed for all line items, for this salesperson only, by entering a new Salesperson Plan or Customer Plan in the main Commission Plan Detail Entry window (you can also change the Salesperson Plan and Customer Plan for all line items for this salesperson only, by entering a new Salesperson Plan or Customer Plan in the Commission Plan Entry window). The Salesperson Plan can be changed for this line item, for this
salesperson only, simply by entering a new Salesperson Plan in the scrolling window. The Commission
Type, Rate % (or Rate Amount, depending on the Type selected), will be set to the values from the
Commission Plan Matrix, and the Gross Commission Amount and Net Commission Amount will be recalculated. You can also override the Commission Type, Rate % (or Rate Amount, depending on the
Type selected), and the Split percentage, and the Gross Commission Amount and Net Commission Amount will be recalculated. If the Reduce Commissionable Amounts for Splits checkbox is marked on the Commission Plan Setup window and the line item split percentage is less than 100%, then the commissionable sale and cost amounts will be reduced by the split percentage before the commission is calculated and the net commission amount will equal the gross commission amount; otherwise the net commission amount will equal the gross commission amount multiplied by the split percentage.
The Commissionable Sale and Commissionable Cost amounts reflect the Extended Sale and Cost fields within the Application. If set up to derive the commissionable cost from the sales document line item extended cost, the commissionable cost is automatically updated when a sales document is posted, as this is when the final sales line item cost is calculated. The commissionable sale and cost amounts are also updated at posting and payment application if Commission Plan is set up to reduce commissions for discounts, write-offs, payment terms, credit card payments , or late payments. If you decide to override the commissionable cost amount, a new commission amount will be calculated based upon the figures entered after backing out any reductions, and the commissionable amounts will not be updated at posting or payment application.
The Commission Trace expansion button (arrow next to the Net Comm Amt field) opens the Commission Line Trace window.

COMMISSION PLAN
THE ETHOSERIES 54
Commission Line Trace The Commission Line Trace window, which is accessed from the Commission Plan Detail Entry and Commission Plan Detail Inquiry Zoom windows, displays the steps taken to derive the commission line amount.
If the Salesperson From is set to Customer CP Info or Item CP Info, the Salesperson expansion button (arrow next to the Salesperson From field) opens an inquiry window that displays customer/salesperson or item/salesperson assignments at the time commissions were created for the sales document.
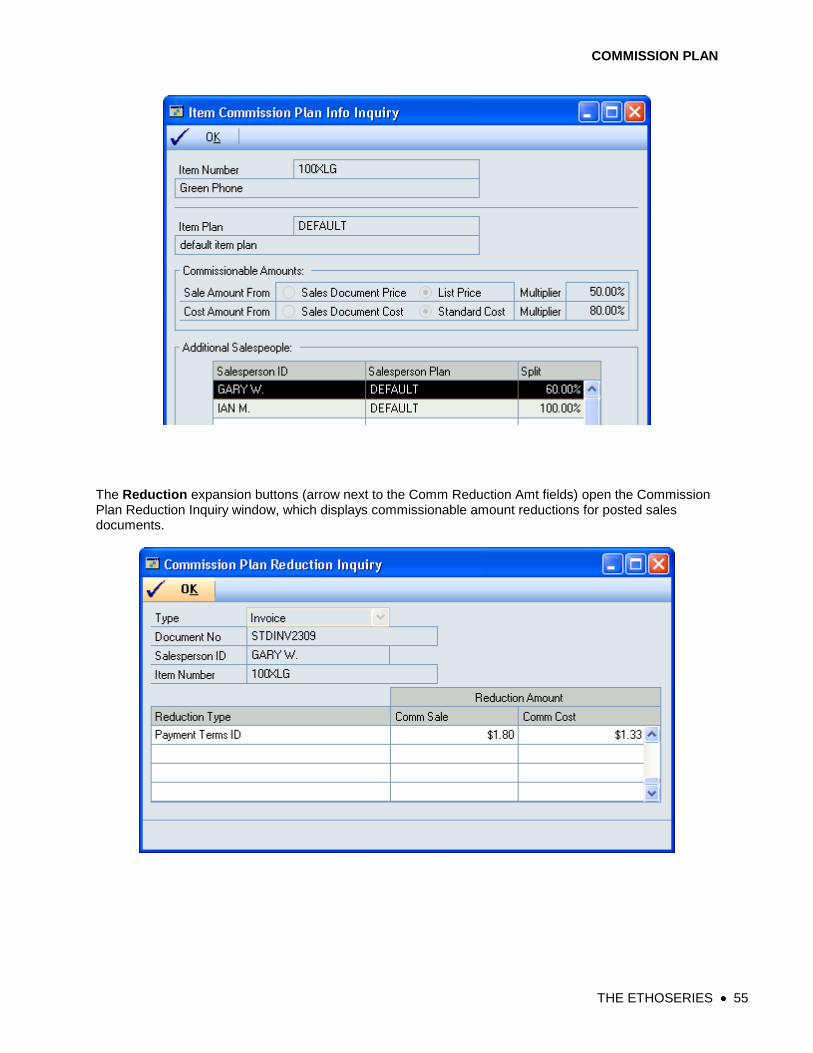
COMMISSION PLAN
THE ETHOSERIES 55
The Reduction expansion buttons (arrow next to the Comm Reduction Amt fields) open the Commission Plan Reduction Inquiry window, which displays commissionable amount reductions for posted sales documents.

COMMISSION PLAN
THE ETHOSERIES 56
The Rate expansion button (arrow next to the Comm Rate field) opens either the Commission Plan Matrix Inquiry window or the Commission Plan Tiers Rate Inquiry window, depending on whether commission tiers were enabled when commissions were calculated for the sales document.
If the commission type or rate is manually edited in the Commission Plan Detail Entry window,
then the rate expansion button window will no longer be accessible for the commission line item.
COMMISSION PLAN
THE ETHOSERIES 57
Processing Commissions
When commissions are processed for a salesperson, the following actions occur:
The salesperson’s commissions are marked Processed and are no longer editable.
A salesperson commission run summary record is created for the salesperson’s total commission amount.
The salesperson’s total commission amount is added to the total commission run summary record.
If the salesperson is set up to create GL, Payables, or Payroll transactions and the salesperson’s total commission amount is not zero, an unposted transaction for the salesperson’s total commission amount is created in the appropriate batch:
o GL - an unposted general journal entry is created for the salesperson’s total commission
amount, using the salesperson’s GL accounts.
o Payables - an unposted voucher is created for the vendor assigned to the salesperson, for the salesperson’s total commission amount, using the salesperson’s GL accounts. An invoice is created if the total is greater than zero; otherwise a credit memo is created.
o Payroll - an unposted transaction is created for the employee assigned to the
salesperson, for the salesperson’s total commission amount, using the salesperson’s payroll code, and an unposted general journal entry is created for the salesperson’s total commission amount, using the salesperson’s GL accounts.
The salesperson’s processed commission records will be updated with the Date Commission Paid entered on the Process Commissions window. Any Dynamics GP transaction created during commission processing will use this date as the document date.
Process Commissions Tools >> Routines >> Commission Plan >> Process Commissions The Process Commissions window is used to pay commissions to salespeople. From this window you may print a preview report, or edit list, to review the documents that will be included in the commission processing.

COMMISSION PLAN
THE ETHOSERIES 58
All commissions processed in the current run will be assigned to the Commission Run ID. The GL,
Payables, and Payroll Batch Numbers will be required if those setup options are marked in the Commission Plan Setup window.
The Date Commissions Paid field is only used when the Process button is selected. Any Dynamics GP transaction created during commission processing will use this date as the document date, and the processed commission records will be updated with this date.
The Document Date range selector uses the Sales Order Processing document date to determine which records should be included for commission processing. For normal processing, the From date will be blank and the To date will be the document cut-off date, such as the end of the prior month.
The Date Document Paid range selector uses the Date Document Paid to determine which records should be included for commission processing. This option is only available if Commission Plan is set up to enable processing when the sales document is paid.
The Salesperson ID range selector allows you to determine whether you want to process commissions for all salespeople or a specific range of salespeople. This is typically used when internal and external salespeople are paid on different timetables, such as monthly and quarterly. If any salesperson in the range is set up to create a Dynamics GP transaction, the following information will be verified per transaction type:
GL o The GL batch number and status o The salesperson’s commissions expense and payable accounts
Payables o The payables batch number and status o The vendor assigned to the salesperson o The salesperson’s commissions expense and payable accounts
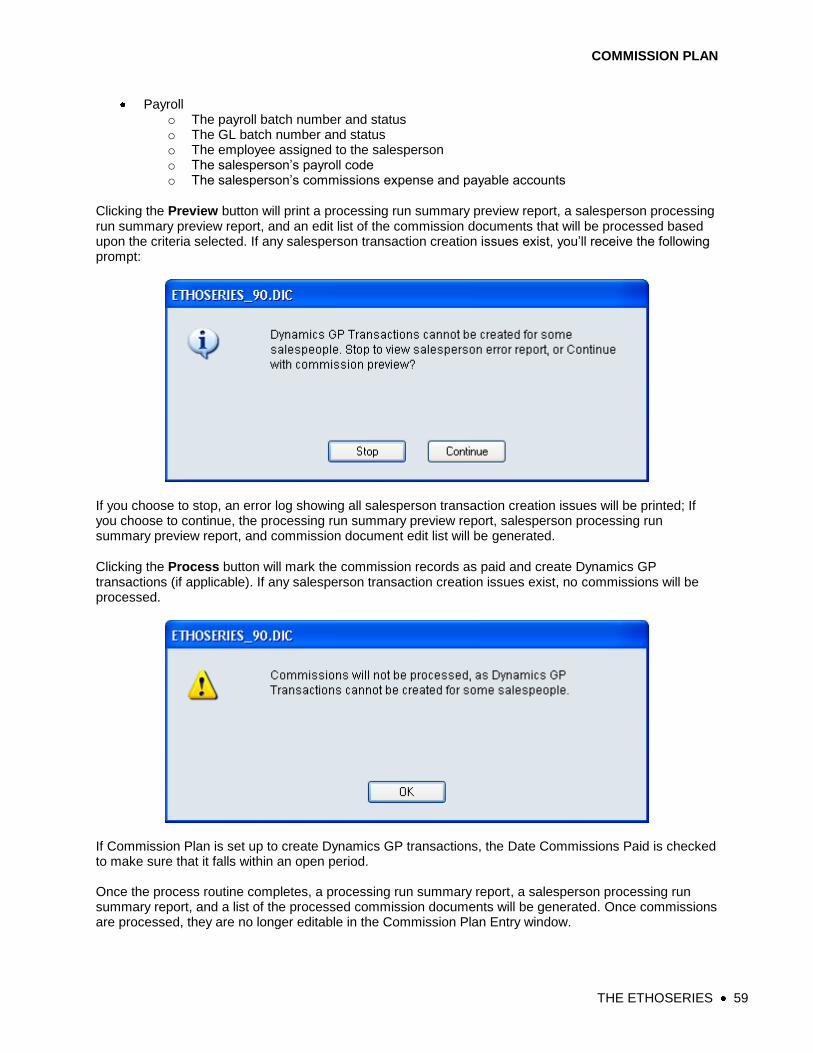
COMMISSION PLAN
THE ETHOSERIES 59
Payroll o The payroll batch number and status o The GL batch number and status o The employee assigned to the salesperson o The salesperson’s payroll code o The salesperson’s commissions expense and payable accounts
Clicking the Preview button will print a processing run summary preview report, a salesperson processing run summary preview report, and an edit list of the commission documents that will be processed based upon the criteria selected. If any salesperson transaction creation issues exist, you’ll receive the following prompt:
If you choose to stop, an error log showing all salesperson transaction creation issues will be printed; If you choose to continue, the processing run summary preview report, salesperson processing run summary preview report, and commission document edit list will be generated.
Clicking the Process button will mark the commission records as paid and create Dynamics GP transactions (if applicable). If any salesperson transaction creation issues exist, no commissions will be processed.
If Commission Plan is set up to create Dynamics GP transactions, the Date Commissions Paid is checked to make sure that it falls within an open period. Once the process routine completes, a processing run summary report, a salesperson processing run summary report, and a list of the processed commission documents will be generated. Once commissions are processed, they are no longer editable in the Commission Plan Entry window.
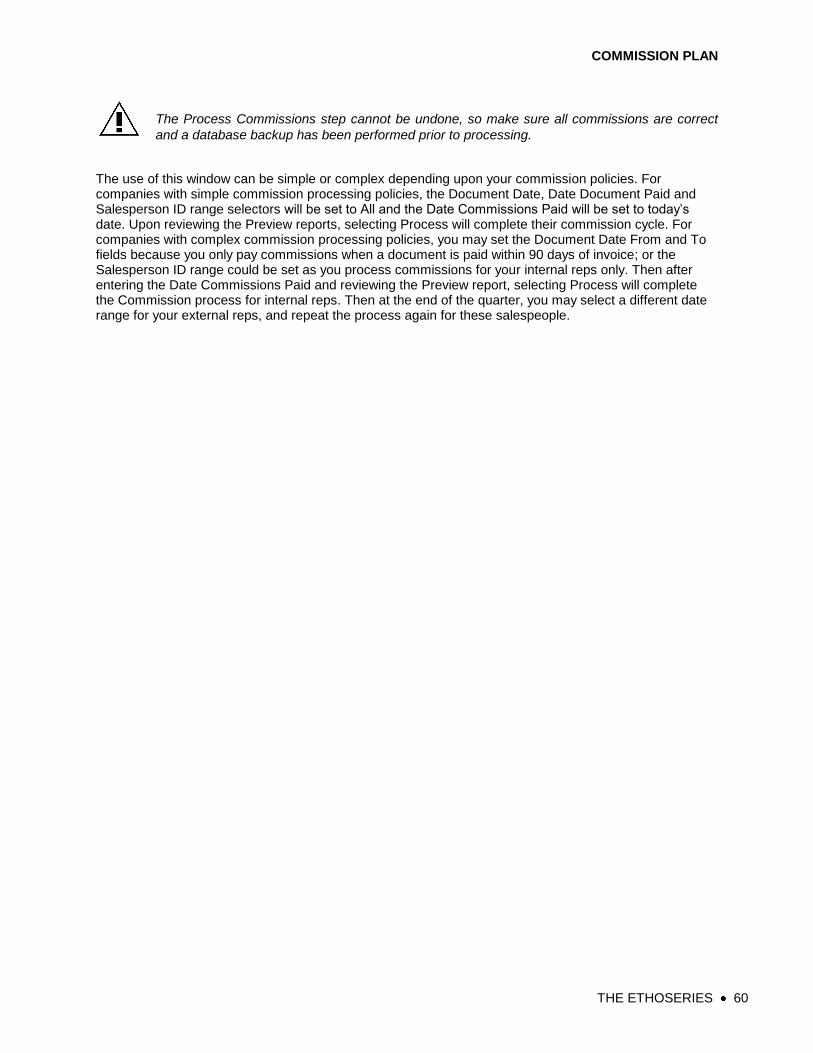
COMMISSION PLAN
THE ETHOSERIES 60
The Process Commissions step cannot be undone, so make sure all commissions are correct
and a database backup has been performed prior to processing.
The use of this window can be simple or complex depending upon your commission policies. For companies with simple commission processing policies, the Document Date, Date Document Paid and Salesperson ID range selectors will be set to All and the Date Commissions Paid will be set to today’s date. Upon reviewing the Preview reports, selecting Process will complete their commission cycle. For companies with complex commission processing policies, you may set the Document Date From and To fields because you only pay commissions when a document is paid within 90 days of invoice; or the Salesperson ID range could be set as you process commissions for your internal reps only. Then after entering the Date Commissions Paid and reviewing the Preview report, selecting Process will complete the Commission process for internal reps. Then at the end of the quarter, you may select a different date range for your external reps, and repeat the process again for these salespeople.

COMMISSION PLAN
THE ETHOSERIES 61
Accruing Commissions
Since commission GL distributions are not created when sales documents are created, Commission Plan includes a month-end routine that allows these accruals to be created. This routine creates an unposted general journal entry for each salesperson’s total unprocessed commission amount for posted sales documents, using the salesperson’s commission GL accounts. The general journal entry reverses on the first day of the following month, so future edits made to these commission records will be booked correctly.
Accrue Commissions Tools >> Routines >> Commission Plan >> Accrue Commissions The Accrue Commissions window is used to create unposted reversing general journal entries for those salespeople for whom the Create Accrual Trx option is marked in the Salesperson Commission Plan Info window.
The Last Accrual Info section displays the last accrual run information. All commissions accrued in the
current run will be assigned to the Accrual Run ID. All accruals are created as unposted general journal
entries assigned to the GL Batch Number.
Unprocessed commissions for each posted sales documents whose document date is less than or equal
to the Cutoff Date are included in the accrual process. The document date of each general journal entry
is set to the Accrual Date. The Reversal Date is set to the first day of the month following the accrual date, and is set as the reversal date of each general journal entry.
The Include Commissions on Hold checkbox determines whether commissions on hold should be included in the accrual run.
Clicking the Preview button will print an accrual run summary preview report, a salesperson accrual run summary preview report, and an edit list of the commission documents that will be accrued. If any salesperson transaction creation issues exist, you’ll receive the following prompt:

COMMISSION PLAN
THE ETHOSERIES 62
If you choose to stop, an error log showing all salesperson transaction creation issues will be printed; if you choose to continue, the accrual run summary preview report, salesperson accrual run summary preview report, and accrual document edit list will be generated.
Clicking the Process button will create the reversing general journal entries. The Accrual and Reversal dates are checked to make sure that they fall within an open period. If any salesperson transaction creation issues exist, no commissions will be accrued.
Once the accrual routine completes, an accrual run summary report, a salesperson accrual run summary report, and a list of the accrued commission documents will be generated.
To avoid double booking, the accrual routine should be run only AFTER all commissions have
been processed for the month, and the routine should be run only ONCE per month.
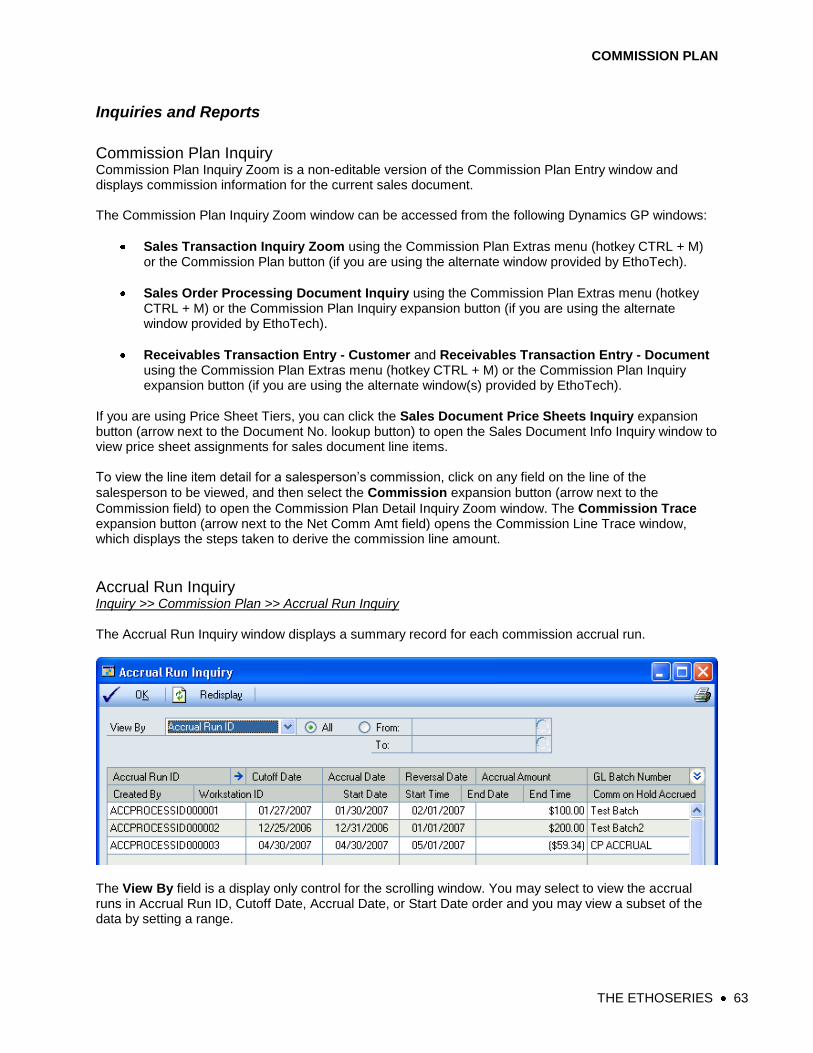
COMMISSION PLAN
THE ETHOSERIES 63
Inquiries and Reports
Commission Plan Inquiry Commission Plan Inquiry Zoom is a non-editable version of the Commission Plan Entry window and displays commission information for the current sales document. The Commission Plan Inquiry Zoom window can be accessed from the following Dynamics GP windows:
Sales Transaction Inquiry Zoom using the Commission Plan Extras menu (hotkey CTRL + M) or the Commission Plan button (if you are using the alternate window provided by EthoTech).
Sales Order Processing Document Inquiry using the Commission Plan Extras menu (hotkey CTRL + M) or the Commission Plan Inquiry expansion button (if you are using the alternate window provided by EthoTech).
Receivables Transaction Entry - Customer and Receivables Transaction Entry - Document using the Commission Plan Extras menu (hotkey CTRL + M) or the Commission Plan Inquiry expansion button (if you are using the alternate window(s) provided by EthoTech).
If you are using Price Sheet Tiers, you can click the Sales Document Price Sheets Inquiry expansion button (arrow next to the Document No. lookup button) to open the Sales Document Info Inquiry window to view price sheet assignments for sales document line items. To view the line item detail for a salesperson’s commission, click on any field on the line of the
salesperson to be viewed, and then select the Commission expansion button (arrow next to the
Commission field) to open the Commission Plan Detail Inquiry Zoom window. The Commission Trace expansion button (arrow next to the Net Comm Amt field) opens the Commission Line Trace window, which displays the steps taken to derive the commission line amount.
Accrual Run Inquiry Inquiry >> Commission Plan >> Accrual Run Inquiry The Accrual Run Inquiry window displays a summary record for each commission accrual run.
The View By field is a display only control for the scrolling window. You may select to view the accrual runs in Accrual Run ID, Cutoff Date, Accrual Date, or Start Date order and you may view a subset of the data by setting a range.

COMMISSION PLAN
THE ETHOSERIES 64
Click the Print icon to print a report of the selected accrual runs; you will also be given an option to print a salesperson summary report for the selected accrual runs.
Click the Salesperson expansion button (arrow next to the Accrual Run ID field) to view a salesperson summary for the current accrual run.
Salesperson Accrual Run Inquiry Inquiry >> Commission Plan >> Accrual Run Inquiry - Salesperson The Salesperson Accrual Run Inquiry window displays a summary record for each salesperson for each commission accrual run.
The View By field is a display only control for the scrolling window. You may select to view the salesperson accrual run summaries in Accrual Run ID, Salesperson ID, or Accrual Date order and you may view a subset of the data by setting a range.
Click the Print icon to print a report of the selected salesperson accrual run summaries.
Commission Run Inquiry Inquiry >> Commission Plan >> Commission Run Inquiry The Commission Run Inquiry window displays a summary record for each commission processing run.
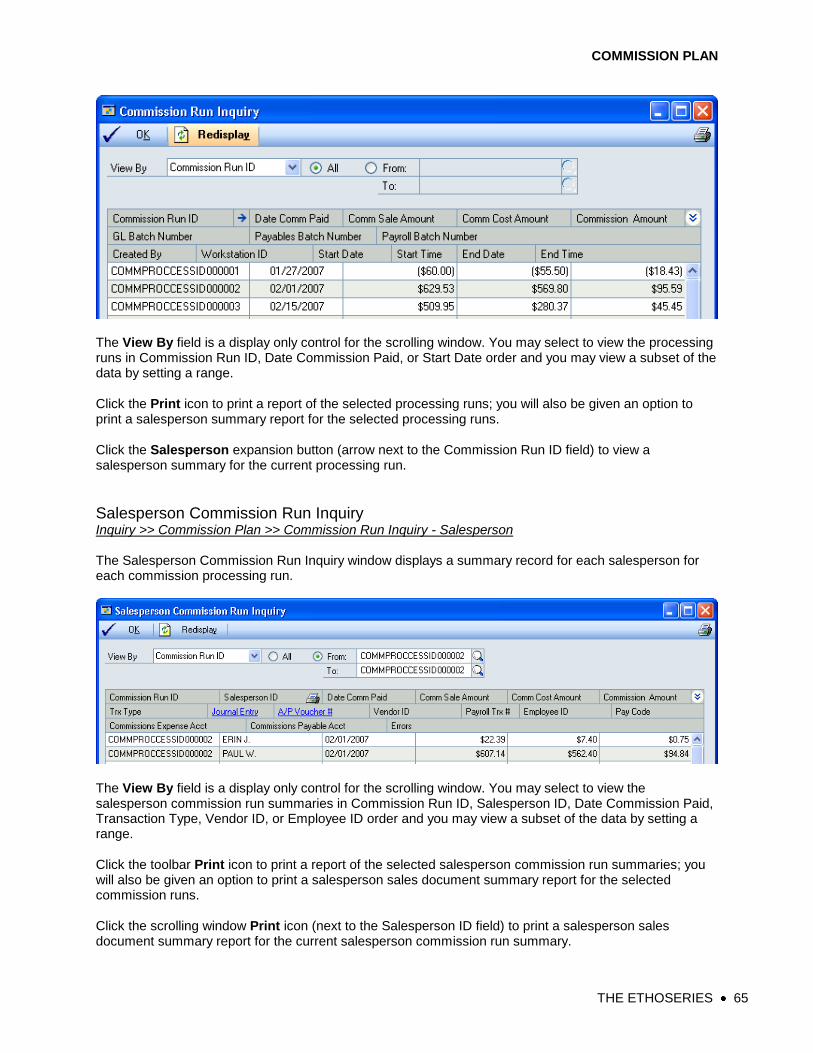
COMMISSION PLAN
THE ETHOSERIES 65
The View By field is a display only control for the scrolling window. You may select to view the processing runs in Commission Run ID, Date Commission Paid, or Start Date order and you may view a subset of the data by setting a range.
Click the Print icon to print a report of the selected processing runs; you will also be given an option to print a salesperson summary report for the selected processing runs.
Click the Salesperson expansion button (arrow next to the Commission Run ID field) to view a salesperson summary for the current processing run.
Salesperson Commission Run Inquiry Inquiry >> Commission Plan >> Commission Run Inquiry - Salesperson The Salesperson Commission Run Inquiry window displays a summary record for each salesperson for each commission processing run.
The View By field is a display only control for the scrolling window. You may select to view the salesperson commission run summaries in Commission Run ID, Salesperson ID, Date Commission Paid, Transaction Type, Vendor ID, or Employee ID order and you may view a subset of the data by setting a range.
Click the toolbar Print icon to print a report of the selected salesperson commission run summaries; you will also be given an option to print a salesperson sales document summary report for the selected commission runs.
Click the scrolling window Print icon (next to the Salesperson ID field) to print a salesperson sales document summary report for the current salesperson commission run summary.

COMMISSION PLAN
THE ETHOSERIES 66
Commission Plan Summary History Inquiry >> Commission Plan >> Summary History The Commission Plan Summary History window displays Commission Plan summary information on a single window for one salesperson at a time.
History is kept for both Calendar and Fiscal periods and can be viewed for all years or a single year. This inquiry window only includes information for processed commissions.
Commission Plan SmartList Object The Commission Plan SmartList Object (see the Add Objects to SmartList section in this documentation) can be used to view commission summary information for all commission records. You can drill-down into the Commission Plan Entry window from a commission record in the SmartList object. (See your Microsoft Dynamics GP SmartList documentation for detailed information on the use of SmartList.)

COMMISSION PLAN
THE ETHOSERIES 67
Commission Plan Report Reports >> Commission Plan >> Commission Plan Report The Commission Plan Report window is used to print current and historical summary and detail reports for sales documents with Commission Plan information. This window has many choices to determine what information will be printed on the report.
The Date type drop-down list controls the date that is used for the Commission Plan Report and includes
Document Date and Date Commission Paid. If Document Date is selected, the Sales Order Processing
document date will be used to determine which records should be included on the report. If Date
Commission Paid is selected, that date will be used to determine which processed commission records
should be included on the report. The Date Document Paid range selector will filter your report data by the date each sales document was paid. This option is not available if Enable Commission Processing
When is set to Document is Posted in the Commission Plan Setup window. The Salesperson ID range
COMMISSION PLAN
THE ETHOSERIES 68
selector can be used to view the Commission Plan Report for a single salesperson or for a range of salespeople. The four Commission Status checkboxes are the most critical selections on the window. These checkboxes analyze the document status within the system and determine which Commission Plan documents should be printed on the report. For example, to just print the documents that are ready to be processed you would only select the Posted Documents – Ready for Processing checkbox, and unselect the others before selecting the Print button.
Unposted Documents. This selection will include all documents in Sales Order Processing that are
not posted. Unposted documents are those sales documents that can still be accessed in Sales
Transaction Entry and are saved in the Sales Transaction Work table. These documents cannot be
processed until such time that they are posted as invoices or returns. Commissions can be created for
unposted documents when the sales document is saved or transferred; when the Commission Plan
Entry window is opened (Transactions >> Commission Plan >> Commission Plan Entry); or by using
Commission Plan Utilities (Tools >> Utilities >> Commission Plan >> Commission Plan Utilities).
Posted Documents – Ready for Processing. This checkbox represents those documents that are
ready for processing within Commission Plan. Based upon your setup selections, either they are
posted invoices or returns or fully applied invoices or returns.
Posted Documents – Not Ready for Processing. These documents represent documents that have
been posted but not fully paid or applied within Microsoft Dynamics GP. This selection is only available
if you have set up your system to process commissions when documents are paid. An invoice or
return is considered paid when the Amount Remaining field, as displayed in Receivables Transaction
Inquiry – Customer is $0.00. Any invoice that is posted and not fully paid or return that is posted and
not fully applied will be included on the report by selecting this checkbox.
Posted Documents – Processed. By selecting this checkbox, commissions that have been
previously processed within Commission Plan will be included on the Commission Plan Report. If you
want to perform historical reporting, this would be the only checkbox you would want to select.
The Document Types section is used to control which Sales Order Processing document types are included on the Commission Plan Report. Invoices and Returns may be included with any of the four previously mentioned checkboxes concerning commission status. Quotes, Orders, Fulfillment Orders and Back Orders can only be used when the Unposted Documents commission status is marked.
The Print Options section is used to control whether a single report will be printed for all selected
salespeople or if one report is printed per salesperson. The Destination button determines whether the report(s) will be printed to the screen, a printer, and/or a file. If you choose to print one report per
salesperson and you choose to print to a file, then you can also Email reports to salespeople. If you
choose to email the reports, click the Email expansion button to open the Email Options window, which will allow you to enter a subject, salutation, cc and bcc email addresses, and a message body.
Click the Print button to print the report(s). If you have selected the One Report Per Salesperson and the Print to File options, then the report will be created for each salesperson by adding the Salesperson ID to the file name selected in the Report Destination window. If you have marked the Email checkbox, the report will be emailed to the salesperson, using the E-mail address displayed in the Internet Information window (Cards >> Sales >> Salesperson >> Internet Address expansion button) for the salesperson.

COMMISSION PLAN
THE ETHOSERIES 69
Utilities
Commission Plan Utilities Tools >> Utilities >> Commission Plan >> Commission Plan Utilities The Commission Plan Utilities window is used primarily when a problem has been discovered with your commission data. This window can also be used during the initial implementation of Commission Plan to populate historical commission records. If a problem is found, or if you suspect there is a problem with your data, use the Preview Report to search the range of documents in question. If you wish to create historical commission records, use the Preview Report to review the range of Sales Order Processing documents for which you want to create commissions. For example, if you started using Sales Order Processing in March 2006 and then started using Commission Plan in January 2007, you might want to create commissions in Commission Plan for the period March 2006 through January 2007. Creating these historical commission records is a valuable test to verify that you have set up Commission Plan in accordance with your commission needs.
Preview. Selecting this button will print a report of all discrepancies between Commission Plan and
Sales Order Processing for the range of sales documents you select.
Update. Selecting this button will update existing commission records or create new commission
records, depending on the Options selected.
Posting Status. Update commission records for Unposted (work) or History (posted) sales
documents.
Sales Type IDs – this option works in conjunction with the Documents range selections to restrict the
sales documents to be updated.
Allowed – excludes any ignored Sales Type IDs from the sales document range.
All – includes all Sales Type IDs in the sales document range, even those set up to be ignored.
Restricted – opens the Commission Plan Utilities Sales Type ID Restrictions window, which
allows the user to select specific Sales Type IDs to include in the sales document range.
Documents. Select ranges based on the following fields: Document Number, Customer ID,
Document Date, Batch Number, Document Type, and Master Number. At least one range selection
must be included.

COMMISSION PLAN
THE ETHOSERIES 70
Options. Choose the appropriate options to create / update commissions.
The Update Existing Commissions checkbox will update the commission status,
commissionable sale and cost amounts (if not overridden by the user), sales document paid date,
commission reductions; and, if using commission tiers, the commission rate.
The Create Commissions checkbox will create commissions only if no commission records
currently exist for a sales document.
The Delete and Recreate Commissions checkbox will delete unprocessed commissions and
recalculate. NOTE: Manual edits to commissions will be lost.
The Update Commission Holds checkbox will set the hold status of all unprocessed
commissions to the salesperson’s hold status as listed on the Salesperson Commission Plan Info
window. NOTE: This option is only available when the Update Existing Commissions checkbox is
marked.
The Reset Salesperson Inactive Status checkbox will refer to the Salesperson Maintenance
window to verify if a salesperson is currently marked Inactive, rather than referencing the
EthoTech inactive tracking table created when commissions were originally calculated for the
document. When the Create Commissions checkbox is marked, commissions will be created for
active salespeople only; inactive salespeople will be ignored. When the Update Existing
Commissions checkbox is marked, commissions will be created for salespeople who were
originally marked inactive and are now active. Running the Update Existing Commissions routine
will not delete an existing commission record for a salesperson that is now marked as inactive.
NOTE: This option is only available when the Update Existing Commissions and Create
Commissions checkbox is marked.
The Reset Price Sheet Assignments checkbox will delete and recreate the line item price sheet
assignments for all sales documents which have unprocessed commissions. NOTE: Manual edits
to price sheet assignments will be lost. This option is only available when Price Sheet Tiers are
enabled.
Commission Check Links. Selecting this button will remove commissions where there is not a
corresponding record in the SOP Work or History tables. It will also remove commission records for
transactions in the SOP History table where the Document Type is not valid (Invoice and Return are
the only valid Document Types for the SOP History table).
Remove Salesperson Percentages. Selecting this button will change the Percent on the
Salesperson Maintenance window to zero percent for ALL salespeople. This will prevent standard
Microsoft Dynamics GP commissions from being created.
Make sure you have a backup before Updating commission records and verify the reports using
the Commission Plan Report window.
When first implementing Commission Plan, you may use Commission Plan Utilities to quickly create the Commission Plan information for sales documents that already exist within Microsoft Dynamics GP. ONLY do this after all other setup has been completed for Commission Plan. The Utilities List button will open the Commission Plan Summary Utilities and Commission Plan Override Date Document Paid windows.
Commission Plan Summary Utilities The Commission Plan Summary Utilities window will add the Commission Plan summary information for each salesperson. This process will step through each processed Commission Plan record and add the value to the salesperson’s history record. We recommend backing up your company database prior to running this utility.
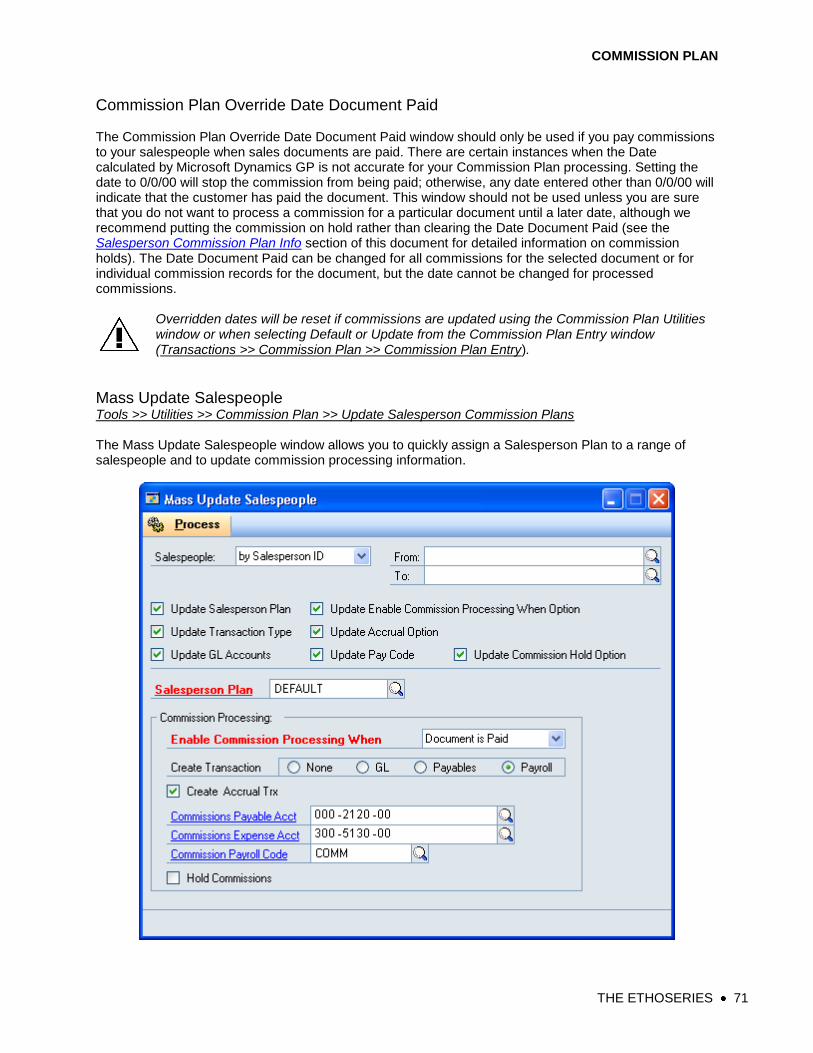
COMMISSION PLAN
THE ETHOSERIES 71
Commission Plan Override Date Document Paid The Commission Plan Override Date Document Paid window should only be used if you pay commissions to your salespeople when sales documents are paid. There are certain instances when the Date calculated by Microsoft Dynamics GP is not accurate for your Commission Plan processing. Setting the date to 0/0/00 will stop the commission from being paid; otherwise, any date entered other than 0/0/00 will indicate that the customer has paid the document. This window should not be used unless you are sure that you do not want to process a commission for a particular document until a later date, although we recommend putting the commission on hold rather than clearing the Date Document Paid (see the Salesperson Commission Plan Info section of this document for detailed information on commission holds). The Date Document Paid can be changed for all commissions for the selected document or for individual commission records for the document, but the date cannot be changed for processed commissions.
Overridden dates will be reset if commissions are updated using the Commission Plan Utilities window or when selecting Default or Update from the Commission Plan Entry window (Transactions >> Commission Plan >> Commission Plan Entry).
Mass Update Salespeople Tools >> Utilities >> Commission Plan >> Update Salesperson Commission Plans The Mass Update Salespeople window allows you to quickly assign a Salesperson Plan to a range of salespeople and to update commission processing information.

COMMISSION PLAN
THE ETHOSERIES 72
The Salespeople drop-down list determines the field that will control the assignment and includes: by Salesperson ID, by Last Name, and by Sales Territory ID. The From and To fields are used for the range. Leaving the From field blank starts at the beginning of the database, and leaving the To field blank will ensure processing to the end of the database.
Mark the Update Salesperson Plan checkbox to update the salesperson plan for salespeople in the selected range. If the Enable Processing When option is set to Based on Salesperson in the Commission Plan Setup
window, the Update Enable Commission Processing When Option checkbox is enabled. If you mark
this option, the Enable Commission Processing When field is required.
If the Update Transaction Type checkbox is marked, the Create Transaction option is enabled. Only those transaction types marked in the Commission Plan Setup window are allowed.
If the Create Accrual checkbox is marked in the Commission Plan Setup window, the Update Accrual
Option checkbox is enabled. If you mark this option, the Create Accrual Trx checkbox is enabled.
If the Update GL Accounts checkbox is marked, the Commissions Payable Account and
Commissions Expense Account fields are enabled.
If the Update Pay Code checkbox is marked, the Commission Payroll Code field is enabled.
If the Update Commission Hold Option checkbox is marked, the Hold Commissions checkbox is enabled. All existing commissions for salespeople in the selected range will be set to the Hold Commissions checkbox value.
Mass Update Customers Tools >> Utilities >> Commission Plan >> Update Customer Commission Plans The Mass Update Customers window allows you to quickly assign a Customer Plan to a range of customers.
The Customers drop-down list determines the field that will control the assignment and includes: by Customer ID, by Name, by Class ID, Type, by Salesperson ID, and by Sales Territory ID. The From and To fields are used for the range. Leaving the From field blank starts at the beginning of the database and leaving the To field blank will ensure processing to the end of the database.

COMMISSION PLAN
THE ETHOSERIES 73
Mass Update Items Tools >> Utilities >> Commission Plan >> Update Item Commission Plans The Mass Update Items window allows you to quickly assign an Item Plan to a range of inventory items and to update commissionable amount information.
The Items drop-down list determines the field that will control the assignment and includes: by Item Number, by Description, by Class ID, by Short Description, and by Generic. The From and To fields are used for the range. Leaving the From field blank starts at the beginning of the database, and leaving the To field blank will ensure processing to the end of the database.
Mark the Update Item Plan checkbox to update the item plan for items in the selected range.
If the Sale Amount From is set to Based on Item in the Commission Plan Setup window, the Update
Commissionable Sale Amount and Update Commissionable Sale Amount Multiplier checkboxes are
enabled. If the Update Commissionable Sale Amount option is marked, the Sale Amount From option is
enabled. If the Update Commissionable Sale Amount Multiplier option is marked, the Sales Amount
From - Multiplier field is enabled.
If the Cost Amount From is set to Based on Item in the Commission Plan Setup window, the Update
Commissionable Cost Amount and Update Commissionable Cost Amount Multiplier checkboxes
are enabled. If the Update Commissionable Cost Amount option is marked, the Cost Amount From
option is enabled. If the Update Commissionable Cost Amount Multiplier option is marked, the Cost
Amount From - Multiplier field is enabled.
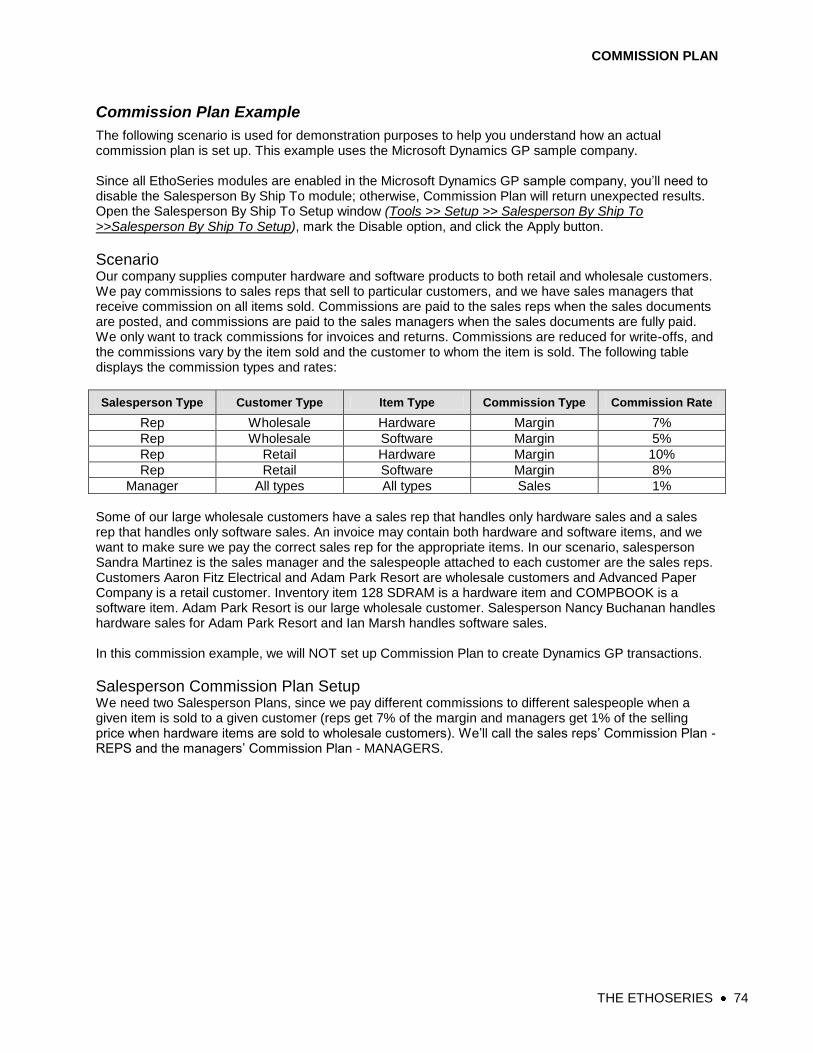
COMMISSION PLAN
THE ETHOSERIES 74
Commission Plan Example
The following scenario is used for demonstration purposes to help you understand how an actual commission plan is set up. This example uses the Microsoft Dynamics GP sample company. Since all EthoSeries modules are enabled in the Microsoft Dynamics GP sample company, you’ll need to disable the Salesperson By Ship To module; otherwise, Commission Plan will return unexpected results. Open the Salesperson By Ship To Setup window (Tools >> Setup >> Salesperson By Ship To >>Salesperson By Ship To Setup), mark the Disable option, and click the Apply button.
Scenario Our company supplies computer hardware and software products to both retail and wholesale customers. We pay commissions to sales reps that sell to particular customers, and we have sales managers that receive commission on all items sold. Commissions are paid to the sales reps when the sales documents are posted, and commissions are paid to the sales managers when the sales documents are fully paid. We only want to track commissions for invoices and returns. Commissions are reduced for write-offs, and the commissions vary by the item sold and the customer to whom the item is sold. The following table displays the commission types and rates:
Salesperson Type Customer Type Item Type Commission Type Commission Rate
Rep Wholesale Hardware Margin 7%
Rep Wholesale Software Margin 5%
Rep Retail Hardware Margin 10%
Rep Retail Software Margin 8%
Manager All types All types Sales 1%
Some of our large wholesale customers have a sales rep that handles only hardware sales and a sales rep that handles only software sales. An invoice may contain both hardware and software items, and we want to make sure we pay the correct sales rep for the appropriate items. In our scenario, salesperson Sandra Martinez is the sales manager and the salespeople attached to each customer are the sales reps. Customers Aaron Fitz Electrical and Adam Park Resort are wholesale customers and Advanced Paper Company is a retail customer. Inventory item 128 SDRAM is a hardware item and COMPBOOK is a software item. Adam Park Resort is our large wholesale customer. Salesperson Nancy Buchanan handles hardware sales for Adam Park Resort and Ian Marsh handles software sales. In this commission example, we will NOT set up Commission Plan to create Dynamics GP transactions.
Salesperson Commission Plan Setup We need two Salesperson Plans, since we pay different commissions to different salespeople when a given item is sold to a given customer (reps get 7% of the margin and managers get 1% of the selling price when hardware items are sold to wholesale customers). We’ll call the sales reps’ Commission Plan - REPS and the managers’ Commission Plan - MANAGERS.

COMMISSION PLAN
THE ETHOSERIES 75
Open the Salesperson Commission Plan Setup window (Tools >> Setup >> Commission Plan >> Salesperson Commission Plan Setup) and create the following records:
Salesperson Plan Description
REPS Sales Reps
MANAGERS Sales Managers
Assign the MANAGERS plan to Sandra Martinez and the REPS plan to all other salespeople (See the Salesperson Commission Plan Setup section of this document).
Customer Commission Plan Setup We need two Customer Plans, since we pay different commissions to a given salesperson when a given item is sold to different customers (reps get 7% of the margin when hardware items are sold to wholesale customers, but they get 10% of the margin when hardware items are sold to retail customers). We’ll call the wholesale customers’ Commission Plan - WHOLESALE and the retail customers’ Commission Plan - RETAIL. Open the Customer Commission Plan Setup window (Tools >> Setup >> Commission Plan >> Customer Commission Plan Setup) and create the following records:
Customer Plan Description
WHOLESALE Wholesale Customers
RETAIL Retail Customers
Assign the WHOLESALE plan to Aaron Fitz Electrical and Adam Park Resort and the RETAIL plan to Advanced Paper Company (See the Customer Commission Plan Setup section of this document).
Item Commission Plan Setup We need two Item Plans, since we pay different commissions to a given salesperson when different items are sold to a given customer (reps get 7% of the margin when hardware items are sold to wholesale customers, but they get 5% of the margin when software items are sold to wholesale customers). We’ll call the hardware items’ Commission Plan - HARDWARE and the software items’ Commission Plan - SOFTWARE. Open the Item Commission Plan Setup window (Tools >> Setup >> Commission Plan >> Item Commission Plan Setup) and create the following records:
Item Plan Description
HARDWARE Hardware Items
SOFTWARE Software Items
Assign the HARDWARE plan to item 128 SDRAM and the SOFTWARE plan to item COMPBOOK (See the Item Commission Plan Setup section of this document).
Commission Plan Setup Since we can have multiple salespeople on an invoice who are commissioned for specific items, we will need to determine the salespeople to commission at the sales documents line item level. Since commissions are paid to sales reps when sales documents are posted and paid to managers when sales documents are fully paid, we’ll need to set up processing based on salesperson. Open the Commission Plan Setup window (Tools >> Setup >> Commission Plan >> Commission Plan Setup) and enter the following:
Commissionable Sales Documents: Invoices, Returns (default setup)
Commission Reductions: Writeoffs
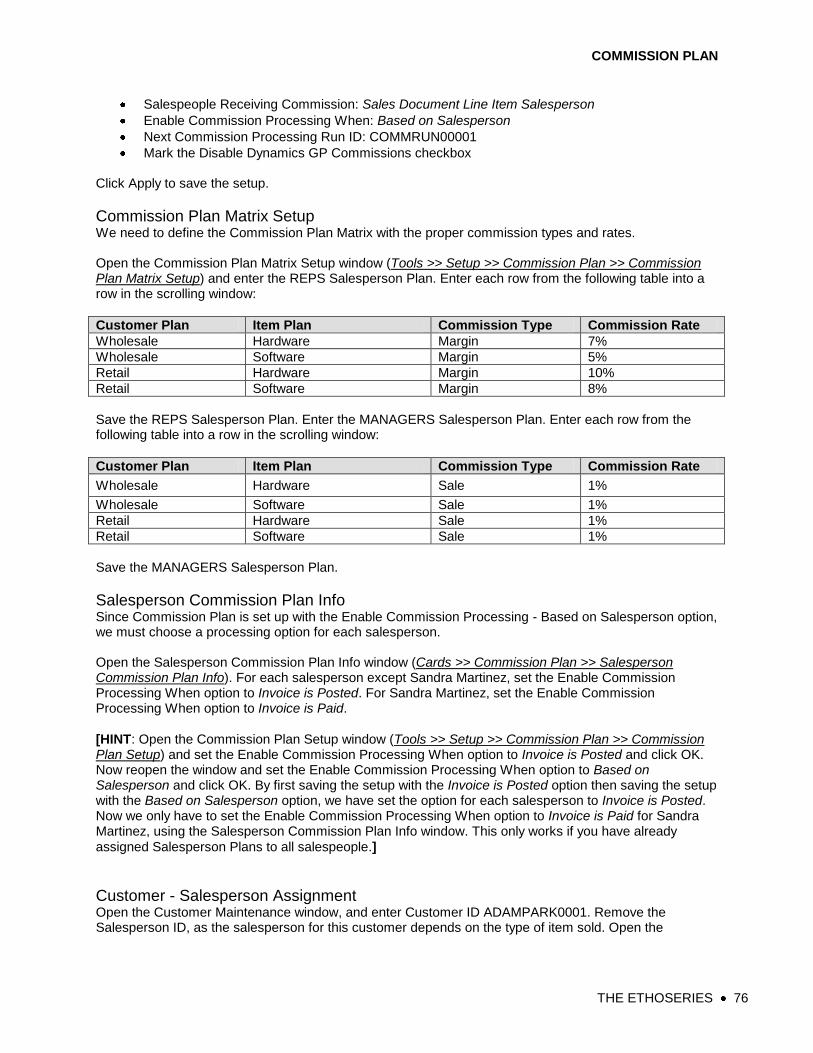
COMMISSION PLAN
THE ETHOSERIES 76
Salespeople Receiving Commission: Sales Document Line Item Salesperson
Enable Commission Processing When: Based on Salesperson
Next Commission Processing Run ID: COMMRUN00001
Mark the Disable Dynamics GP Commissions checkbox Click Apply to save the setup.
Commission Plan Matrix Setup We need to define the Commission Plan Matrix with the proper commission types and rates. Open the Commission Plan Matrix Setup window (Tools >> Setup >> Commission Plan >> Commission Plan Matrix Setup) and enter the REPS Salesperson Plan. Enter each row from the following table into a row in the scrolling window:
Customer Plan Item Plan Commission Type Commission Rate
Wholesale Hardware Margin 7%
Wholesale Software Margin 5%
Retail Hardware Margin 10%
Retail Software Margin 8%
Save the REPS Salesperson Plan. Enter the MANAGERS Salesperson Plan. Enter each row from the following table into a row in the scrolling window:
Customer Plan Item Plan Commission Type Commission Rate
Wholesale Hardware Sale 1%
Wholesale Software Sale 1%
Retail Hardware Sale 1%
Retail Software Sale 1%
Save the MANAGERS Salesperson Plan.
Salesperson Commission Plan Info Since Commission Plan is set up with the Enable Commission Processing - Based on Salesperson option, we must choose a processing option for each salesperson. Open the Salesperson Commission Plan Info window (Cards >> Commission Plan >> Salesperson Commission Plan Info). For each salesperson except Sandra Martinez, set the Enable Commission Processing When option to Invoice is Posted. For Sandra Martinez, set the Enable Commission Processing When option to Invoice is Paid.
[HINT: Open the Commission Plan Setup window (Tools >> Setup >> Commission Plan >> Commission Plan Setup) and set the Enable Commission Processing When option to Invoice is Posted and click OK. Now reopen the window and set the Enable Commission Processing When option to Based on Salesperson and click OK. By first saving the setup with the Invoice is Posted option then saving the setup with the Based on Salesperson option, we have set the option for each salesperson to Invoice is Posted. Now we only have to set the Enable Commission Processing When option to Invoice is Paid for Sandra Martinez, using the Salesperson Commission Plan Info window. This only works if you have already
assigned Salesperson Plans to all salespeople.]
Customer - Salesperson Assignment Open the Customer Maintenance window, and enter Customer ID ADAMPARK0001. Remove the Salesperson ID, as the salesperson for this customer depends on the type of item sold. Open the

COMMISSION PLAN
THE ETHOSERIES 77
Customer Address Maintenance window and remove the Salesperson ID from each address for Adam Park Resort. Enter Customer ID AARONFIT0001 in the Customer Maintenance window and assign Salesperson ID Paul W. Open the Customer Address Maintenance window and for each AARONFIT0001 address set the Salesperson ID to Paul W. Enter Customer ID ADVANCED0001 in the Customer Maintenance window and assign Salesperson ID Paul W. Open the Customer Address Maintenance window and for each ADVANCED0001 address set the Salesperson ID to Paul W.
Customer Commission Plan Info We need to attach our manager, Sandra Martinez, to each customer as an additional salesperson. We also need to attach our hardware and software sales reps to Adam Park Resort, our large wholesale customer. Open the Customer Commission Plan Info window (Cards >> Commission Plan >> Customer Commission Plan Info). For customers Aaron Fitz Electrical and Advanced Paper Company, enter Salesperson ID SANDRA M. Her Salesperson Plan of MANAGERS will default, along with a Split percent of 100%. Leave the Item Plan and Address Code fields blank and save the record. For customer Adam Park Resort, enter Salesperson ID SANDRA M; her Salesperson Plan of MANAGERS and Split of 100% will default. Leave the Item Plan and Address Code fields blank. Enter Salesperson ID NANCY B; her Salesperson Plan of REPS and Split of 100% will default. Enter HARDWARE in the Item Plan field and leave the Address Code field blank. Enter Salesperson ID IAN M; his Salesperson Plan of REPS and Split of 100% will default. Enter SOFTWARE in the Item Plan field and leave the Address Code field blank. Save the record.
CONGRATULATIONS – Commission Plan is now ready for use!
Create Commissions Now we’ll create sales documents for our three Commission Plan customers. Open the Sales Transaction Entry window. Enter and save invoices with line items 128 SDRAM and COMPBOOK for Aaron Fitz Electrical, Adam Park Resort, and Advanced Paper Company. Open the invoice for Aaron Fitz Electrical and open the Commission Plan Entry window using the Extras menu, the hotkey CTRL + M, or the Commission Plan button (if using EthoTech’s alternate Sales Transaction Entry window). You should see commission records for Paul W and Sandra M. Open the Commission Plan Detail Entry window: Paul W should have received a commission of 7% of the margin for item 128 SDRAM and 5% of the margin for item COMPBOOK, and Sandra M should have received a commission of 1% of the sale amount for each item. Open the invoice for Adam Park Resort and open the Commission Plan Entry window. You should see commission records for Ian M, Nancy B, and Sandra M. Open the Commission Plan Detail Entry window: Ian M should have received a commission of 5% of the margin for item COMPBOOK, Nancy B should have received a commission of 7% of the margin for item 128 SDRAM, and Sandra M should have received a commission of 1% of the sale amount for each item. Open the invoice for Advanced Paper Company and open the Commission Plan Entry window. You should see commission records for Paul W and Sandra M. Open the Commission Plan Detail Entry window: Paul W should have received a commission of 10% of the margin for item 128 SDRAM and 8% of the margin for item COMPBOOK and Sandra M should have received a commission of 1% of the sale for each item. Post these sales documents.

COMMISSION PLAN
THE ETHOSERIES 78
Verify Commission Status At this point, commission records for Ian M, Nancy B, and Paul W are ready for processing. Sandra M’s commissions are not ready for processing since the sales documents have not been paid. Run commission reports to verify the commission statuses. Open the Commission Plan Report window (Reports >> Commission Plan >> Commission Plan Report). Print the report with only the Posted Documents – Ready for Processing and Documents with a zero commission amount checkboxes marked; the commission records for Ian M, Nancy B, and Paul W should display. Now print the report with only the Posted Documents - Not Ready for Processing and Documents with a zero commission amount checkboxes marked; the commission records for Sandra M should display.
Reduce Commissions for Write-offs In this step, we’ll pay the invoice for Aaron Fitz Electrical and write off part of the invoice. This will result in a reduction in commissions for Paul W and Sandra M for the invoice. Open the Cash Receipts Entry window. Enter a cash receipt for Aaron Fitz Electrical with an Amount that is $10.00 less than the amount of the invoice we created earlier. Apply the cash receipt to the invoice and enter $10.00 in the Writeoffs field. Save or post the cash receipt. Open the Commission Plan Report window (Reports >> Commission Plan >> Commission Plan Report). Print the report with only the Posted Documents - Ready for Processing and Documents with a zero commission amount checkboxes marked; the commission records for Ian M, Nancy B, and Paul W should display. The commission record for Sandra M should display for the Aaron Fitz Electrical invoice, but not for the Adam Park Resort or Advanced Paper Company invoices since they have not yet been paid. Note that the commissions for Paul W and Sandra M for the Aaron Fitz invoice have been reduced after applying the write-off. To view the commission discount for the writeoff, open the Commission Plan Entry window (Transactions >> Commission Plan >> Commission Plan Entry) for the Aaron Fitz Electrical invoice, then open the Commission Plan Detail Entry window for Paul W: the commissionable sale and cost amounts are less than the extended sale and cost amounts. Click the Commission Trace expansion window to open the Commission Line Trace window: the reduction is displayed in the Commissionable Sale Amount and Commissionable Cost Amount (see the Commission Plan Setup of this document for details on how commission reductions are calculated).
Process Commissions It’s now the end of the month and it’s time to pay commissions to our salespeople. Remember, the sales reps will be paid on all posted documents and the sales manager will be paid on all paid documents. Open the Process Commissions window (Tools >> Routines >> Commission Plan >> Process Commissions). Select the Preview button to view an edit list of the commissions to be paid. Note that Sandra M will not receive commissions for the Adam Park Resort or Advanced Paper Company invoices since they have not yet been paid. If any commissions are incorrect, open the Commission Plan Entry window (Transactions >> Commission Plan >> Commission Plan Entry) for the document and edit the commissions. When the edit report displays the correct commission amounts, enter today’s date in the Date Commissions Paid field on the Process Commissions window and select the Process button. A processed commissions report will print which you can use to enter Payroll or Payables transactions, since we did not set up Commission Plan to create Dynamics GP transactions. Please note that processed commissions may not be modified. This means that if you write off portions of the Adam Park Resort or Advanced Paper Company invoices, commissions for Ian M, Nancy B, and Paul W will not be reduced. However, the commissions for Sandra M will be reduced since they have not been processed.

COMMISSION PLAN
THE ETHOSERIES 79
Commission Run Inquiry Open the Commission Run Inquiry window (Inquiry >> Commission Plan >> Commission Run Inquiry) to view summary data for the commission run. Click the Salesperson Commission Run Inquiry expansion button to view salesperson summary data for the commission run.
Troubleshooting
Problem: When testing in the Microsoft Dynamics GP sample company, the Salesperson ID field is blank in the Commission Plan Entry window, even though I’ve set up Commission Plan correctly.
Solution: Since all EthoTech modules (except Enhanced Password Security) are registered in the Microsoft Dynamics GP sample company, Commission Plan is relying on EthoTech’s Salesperson By Ship To module to enter the correct salesperson on the sales document. Since salespeople have not been assigned to customer addresses, Salesperson By Ship To enters a blank Salesperson ID for the sales document. Use either of the following options to resolve the issue for future sales documents:
Open the Customer Address Salesperson Utilities (Tools >> Utilities >> Salesperson By Ship To >> Customer Address Salesperson Utilities) and select Process. This will add the salesperson on the customer card to each customer address and Commission Plan will function correctly.
Open the Salesperson By Ship To Setup window (Tools >> Setup >> Salesperson By Ship To >>Salesperson By Ship To Setup), mark the Disable option, and click the Apply button.
You’ll need to manually add the correct Salesperson ID to existing sales documents / sales document line items.
Problem: The Salesperson Plan field is blank in the Commission Plan Entry window and the commission amount is zero.
Solution: Add a Salesperson Plan to the salesperson (see the Salesperson Commission Plan Setup section of this document) and then select the Default button on the Commission Plan Entry window to recalculate the commission.
Problem: The Salesperson Plan, Customer Plan, and Item Plans are not blank, but the Commission Type is set to Margin and the commission amount is zero.
Solution: No valid combination of the Salesperson, Customer, and Item Plans exists in the Commission Plan Matrix (see the Commission Plan Matrix Setup section in the document), so by default Commission Plan assigns a Commission Type of No Commission. You can either manually edit the commission if a commission should be paid or set up a valid plan combination in the Commission Plan Matrix Setup window.
Problem: I used the Commission Plan Utilities window to create commissions for historical sales documents, but many of them were assigned zero commissions.
Solution: Check your setups to ensure that customers are assigned to the correct Customer Plans, items are assigned to the correct Items Plans, and salespeople are assigned to the correct Salesperson Plans. Verify that the Commission Plan Matrix is set up correctly. Then use the Commission Plan Utilities window with the Delete and Recreate Commissions checkbox marked to recalculate the commissions.
COMMISSION PLAN
THE ETHOSERIES 80
Problem: I recently created a new salesperson, customer, or inventory item and commissions are not calculating for the salesperson, customer, or item.
Solution: A Salesperson, Customer, or Item Plan was not assigned when the new salesperson, customer, or inventory item was created. Assign the proper Salesperson, Customer, or Item Plan and recalculate commissions using either the Default button on the Commission Plan Entry window (if you only have a few commissions to correct) or the Commission Plan Utility window with the Delete and Recreate Commissions checkbox marked (if you have a large number of commissions to correct). Mark the Require Salesperson Plans, Require Customer Plans, and Require Item Plans checkboxes in the Commission Plan Setup window to avoid this problem in the future (see the Commission Plan Setup section in the document).
Problem: I changed setup options in the Commission Plan Setup window, but when I delete and recreate commissions for a sales document, the commissions don’t reflect the setup changes.
Solution: There are two possibilities for this problem occurring:
You’re using either the Commission Plan Entry or the Commission Plan Utilities window to delete and recreate commissions, and the window was open when you made the changes to the Commission Plan Setup window. Close and reopen the Commission Plan Entry or Commission Plan Utilities window, then delete and recreate commissions again - the setup changes should now be reflected in the commissions.
Some commissions have already been processed for the sales document, so all commissions for the document will continue to use the old setup option. You’ll need to manually edit the unprocessed commissions for the document.

COMMISSION PLAN
THE ETHOSERIES 81
Database Schema
Commission Plan data is stored in the tables listed below:
Setup Tables
Physical Name Display Name
ASI28010 ASI_Customer_Commission_ID_MSTR
ASI28020 ASI Item Commission ID MSTR
ASI28030 ASI Salesperson Commission ID MSTR
ASI28040 ASI IV Item MSTR Commission
ASI28050 ASI_RM_Customer_MSTR_Commission
ASI28060 ASI RM Salesperson MSTR Commission
ASI28070 ASI Sales Manager MSTR
ASI28101 ASI Commission Plan
ASI28210 ASI_Customer_Salesperson_MSTR
ASI28220 ASI_Item_Salesperson_MSTR
ASI28230 ASI_Salesperson_Salesperson_MSTR
ASI28901 ASI_Commission_Plan_Setup
ETI28902 ETI_Comm_Plan_Tiers_MSTR
ETI28903 ETI_Comm_Plan_Doc_ID_Ignore
ETI28904 ETI_Comm_Plan_Credit_Card_MSTR ETI28906 ETI_Comm_Plan_Payment_Terms_MSTR
ETI28908 ETI_Comm_Plan_Past_Due_MSTR
Tracking Tables
Physical Name Display Name
ASI28301 ASI Commission Work
ASI28311 ASI Commission Line
ASI28800 ASI Commission Plan Summary File
ETI28302 ETI_SOP_HDR_Comm_Inactive
ETI28303 ETI_CP_Trx_HIST
ETI28304 ETI_CP_Accrual_HIST
ETI28312 Commission Line Discount Taken
ETI28313 ETI_SOP_LINE_Tiers ETI28910 ETI_SOP_HDR_Indexes
ETI28911 ETI_SOP_LINE_Indexes
ETI28913 ETI_SOP_LINE_Info
ETI28914 ETI_CP_Process_Log
ETI28915 ETI_CP_Accrual_Log

COMMISSION PLAN
THE ETHOSERIES 82
COM Integration
Dynamics GP functions as an automation server, which allows other applications to use COM to access Dynamics GP data and resources. Commission Plan includes a COM callback object which can be used to create, update, or delete and recreate commissions for existing Sales Order Processing (SOP) documents.
Object ETI_CP.CreateUpdateSOPDocCommissions
Properties ETI_CP.CreateUpdateSOPDocCommissions has 2 properties:
SOPNum o Data Type = String o Value = SOP Document Number
SOPType o Data Type = Integer o Value = SOP Document Type (requires the actual sop type, not the value from the SOP
Type drop-down list)
Methods ETI_CP.CreateUpdateSOPDocCommissions has 1 method:
UpdateCommissions o Function returns integer error code o Parameters
UpdateHow
Data Type = Integer
Values o 1 = update existing commissions o 2 = delete and recalculate commissions o 3 = create commissions if none exist o 4 = update existing commissions or create commissions if none
exist
UpdateHolds
Data Type = Integer
Values o 0 = default action o 1 = never update o 2 = update only for new commissions o 3 = update only for existing commissions o 4 = update all
OverrideIgnoredDocIDs
Data Type = Boolean
Values o True = create commissions even though the Sales Type ID is set
to not create commissions o False = use Sales Type ID defaults
ResetSalespersonInactiveFlags
Data Type = Boolean
Values o True = delete existing salesperson inactive records for SOP
document and re-evaluate inactive salespeople o False = use existing inactive salespeople assignments for SOP
document
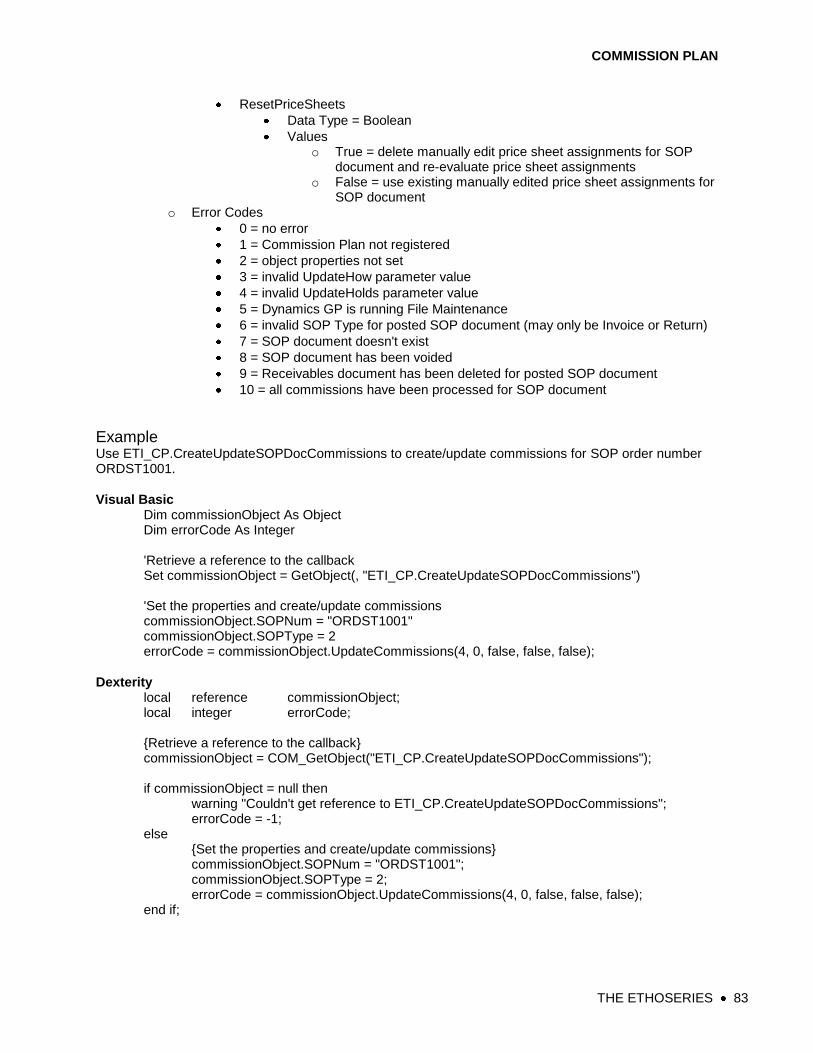
COMMISSION PLAN
THE ETHOSERIES 83
ResetPriceSheets
Data Type = Boolean
Values o True = delete manually edit price sheet assignments for SOP
document and re-evaluate price sheet assignments o False = use existing manually edited price sheet assignments for
SOP document o Error Codes
0 = no error
1 = Commission Plan not registered
2 = object properties not set
3 = invalid UpdateHow parameter value
4 = invalid UpdateHolds parameter value
5 = Dynamics GP is running File Maintenance
6 = invalid SOP Type for posted SOP document (may only be Invoice or Return)
7 = SOP document doesn't exist
8 = SOP document has been voided
9 = Receivables document has been deleted for posted SOP document
10 = all commissions have been processed for SOP document
Example
Use ETI_CP.CreateUpdateSOPDocCommissions to create/update commissions for SOP order number ORDST1001.
Visual Basic Dim commissionObject As Object Dim errorCode As Integer 'Retrieve a reference to the callback Set commissionObject = GetObject(, "ETI_CP.CreateUpdateSOPDocCommissions") 'Set the properties and create/update commissions commissionObject.SOPNum = "ORDST1001" commissionObject.SOPType = 2 errorCode = commissionObject.UpdateCommissions(4, 0, false, false, false);
Dexterity local reference commissionObject; local integer errorCode; {Retrieve a reference to the callback} commissionObject = COM_GetObject("ETI_CP.CreateUpdateSOPDocCommissions"); if commissionObject = null then warning "Couldn't get reference to ETI_CP.CreateUpdateSOPDocCommissions"; errorCode = -1; else {Set the properties and create/update commissions} commissionObject.SOPNum = "ORDST1001"; commissionObject.SOPType = 2; errorCode = commissionObject.UpdateCommissions(4, 0, false, false, false); end if;

CUSTOMER SERVICE COLLECTION
THE ETHOSERIES 84
Customer Service Collection
EthoTech Customer Service Collection extends Microsoft Dynamics GP Sales Order Processing by giving you the ability to: add additional Sales Transaction Entry fields, determine which checks were applied to a specific SOP invoice or return, check for duplicate purchase orders, automatically assign credit limit process holds, move multiple sales documents between batches, print shipping labels, automatically add restocking charges for returns, track unallocated inventory quantities and track expected receipt dates.
Security
This module uses EthoSeries and Alternate Dynamics GP windows – each created by EthoTech. EthoSeries windows are automatically assigned to your Microsoft Dynamics GP navigation during installation. Alternate Dynamics GP windows designed by EthoTech need to be granted security access in order to be utilized. Use the Microsoft Dynamics GP Security window to grant – or remove – access to EthoSeries and Alternate Dynamics GP windows.
EthoSeries Windows Customer Service Collection Setup
Refer to the EthoSeries Windows and Alternate Dynamics GP Windows sections for a list of the
windows used by each feature in Customer Service Collection.
CUSTOMER SERVICE COLLECTION
THE ETHOSERIES 85
Additional Sales Transaction Entry Fields
For customer service and data entry personnel, Additional Sale Transaction Fields provides the ability to display additional Inventory fields for each line item on the Sales Transaction Entry window.
EthoSeries Windows There are no EthoSeries windows for this Customer Service Collection feature.
Alternate Dynamics GP Windows Series Window Name Required
Sales Sales Transaction Entry Required
Module Setup
Microsoft Dynamics GP Modifier This module requires the use of the Modifier in order to display the Additional Sales Transaction Entry Fields.
1. Select Tools >> Customize >> Modifier to open the Modifier.
2. Select The EthoSeries as the product.
3. Select the New button to open the list of available windows.
4. Select the window SOP_Entry, which is the Sales Transaction Entry window.
5. Open the SOP_Entry window by selecting the Open button.
6. Double click on the scrolling window Line_Scroll.
7. From the Layout menu, make sure that Show Field Names and Show Invisible Fields are both selected with a check mark next to each one.
8. Move the fields of your choice from below the scrolling window, into the scrolling window. You may have to either add additional lines or resize some of the existing fields.
9. Save your changes, then return to Microsoft Dynamics GP.
10. Assign security as above, but this time assign security to the Modified Alternate Dynamics GP Window.
The fields you may add to the scrolling window are listed below.
QTY On Hand
QTY On Order
QTY Available
QTY Allocated
ASI QTY Unallocated
ASI Net Quantity Available
ASI Expected Receipt Date
Using Additional Sales Transaction Entry Fields Use Sales Transaction Entry as usual; you should now see the fields you added with the Modifier.

CUSTOMER SERVICE COLLECTION
THE ETHOSERIES 86
Apply Button for Sales Order Processing Inquiry
Apply Button for Sales Order Processing Inquiry makes it possible to determine which checks were applied to a specific SOP invoice. This module also works for SOP returns.
EthoSeries Windows There are no EthoSeries windows for this Customer Service Collection feature.
Alternate Dynamics GP Windows Series Window Name Required
Sales Sales Transaction Inquiry Zoom Optional
Module Setup Apply Button for Sales Order Processing Inquiry does not require any setup procedures other than installation and registration.
Using Apply Button for Sales Order Processing Inquiry Use Microsoft Dynamics GP as usual. In Sales Transaction Inquiry Zoom, you may select the Apply button, the hotkey CTRL + A, or Extras >> Additional >> Apply Documents to determine what check paid the invoice in question or to determine to which document(s) the return in question was applied.
Check for Duplicate Purchase Orders
While entering a document in Sales Transaction Entry, history and unposted documents will be checked for an identical Purchase Order for the given Customer ID. This module will reduce the likelihood of double shipments and assist you in improving customer service.
EthoSeries Windows Customer Service Collection Setup
Refer to Appendix A for details on locating EthoSeries windows in Microsoft Dynamics GP.
Alternate Dynamics GP Windows There are no Alternate Dynamics GP windows for this Customer Service Collection feature.
Module Setup Open the Customer Service Collection Setup window (Tools >> Setup > Customer Service Collection >>
Customer Service Collection Setup) and choose Enable in the Check for Duplicate Purchase Orders
Setup section.
Using Check for Duplicate Purchase Orders Use the Application as usual. When entering a purchase order in the Customer PO Number field on the Sales Transaction Entry or Sales Customer Detail Entry window, Check for Duplicate Purchase Orders will automatically notify you if you have entered a duplicate purchase order for the Customer ID entered.
Please note the Customer ID and Customer PO Number must match exactly for a duplicate to
be identified.
Once a duplicate purchase order is identified, you have the options to:

CUSTOMER SERVICE COLLECTION
THE ETHOSERIES 87
1. Open Inquiry - will open the Sales Order Processing Document Inquiry window, so that you may determine whether this transaction should be continued or not.
2. Continue - will allow you to continue processing the transaction even though a duplicate purchase order has been located.
3. Delete - will allow you to delete or void the transaction.
Credit Limit Process Holds
Whenever a document exceeds a customer’s credit limit, Credit Limit Process Holds will automatically assign a process hold to the sales document. This module adds the power of Microsoft Dynamics GP Process Holds to credit management.
EthoSeries Windows Customer Service Collection Setup
Refer to Appendix A for details on locating EthoSeries windows in Microsoft Dynamics GP.
Alternate Dynamics GP Windows There are no alternate Dynamics GP windows for this Customer Service Collection feature.
Module Setup Open the Open the Customer Service Collection Setup window (Tools >> Setup > Customer Service Collection >> Customer Service Collection Setup).
1. Enter the Process Hold ID that represents your company’s Credit Process Hold.
2. The check box for ―Only assign to documents that have not been on credit hold‖ allows you to only place a document on credit hold once. Any changes to a document that increases the amount owed by the customer for a particular sales document will place the document on credit hold again, unless this check box is selected.
3. For optimal processing, it is usually recommended – but not required – that Receivables Credit Limit Password be turned off, thereby removing the password requirement since the Microsoft Dynamics GP Process Hold will now be in effect in SOP for customers that exceed their credit limit.
The Credit Limit Process Hold is now active. All Sales Documents that are entered that exceed a customer’s credit limit will be assigned to the appropriate Microsoft Dynamics GP Process Hold. Please refer to your Microsoft Dynamics GP Sales Order Processing documentation for more information on utilizing the Process Hold feature.

CUSTOMER SERVICE COLLECTION
THE ETHOSERIES 88
Using Credit Limit Process Hold Use the Application as usual. In Sales Transaction Entry, when a transaction exceeds the customer’s credit limit, a warning message will appear. If you decide to proceed with the transaction, your credit limit process hold will be assigned automatically.
Microsoft Dynamics GP credit limit process hold functionality is suppressed when EthoTech‘s
Credit Limit Process Hold module is enabled.
Using EthoTech’s Credit Limit Process Hold functionality provides the following benefits.
You can see the process hold as soon as it is calculated at the line item level rather than after the sales document is saved.
You are not required to remove the credit limit password, which provides increased security as removing this password in Microsoft Dynamics GP affects your Receivables Management module as well.
You can choose to only assign process holds to documents that have not been on credit hold. For example, after removing a credit limit process hold, adding additional line items to a sales document that place the customer over their credit limit again, will not reassign the credit process hold. This feature can be turned on or off.
Move Sales Documents
Move Sales Documents will move multiple sales documents from one batch to another batch based on a
particular set of restrictions you define. This module is especially useful for customers with multiple people performing data entry duties. There are 14 available restriction types, which include: Master Number, Item Number, Document Type, Type ID, Document Number, Document Date, Customer ID, Customer Name, Phone Number, Quote Exp Date, Requested Ship Date, Salesperson ID, User Defined List 1, and Commitment Status.
EthoSeries Windows
Move Sales Documents
Refer to Appendix A for details on locating EthoSeries windows in Microsoft Dynamics GP.
Alternate Dynamics GP Windows
There are no alternate Dynamics GP windows for this Customer Service Collection feature.
Module Setup Move Sales Documents does not require any additional setup procedures.
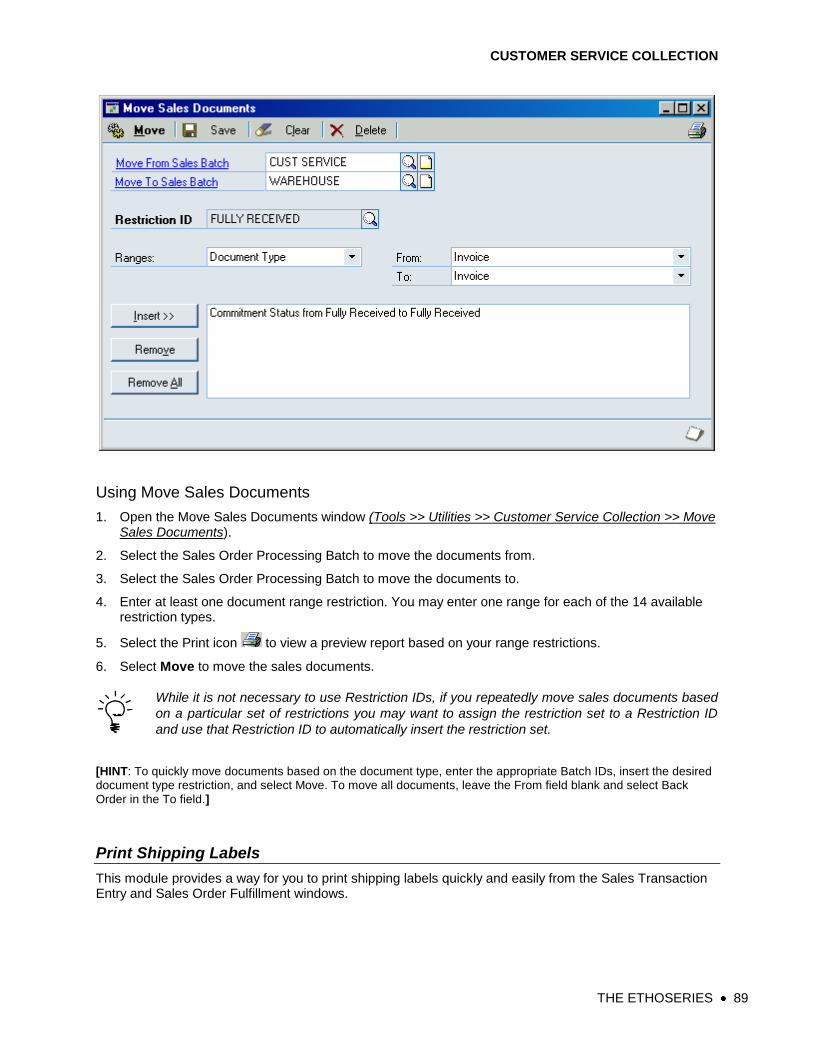
CUSTOMER SERVICE COLLECTION
THE ETHOSERIES 89
Using Move Sales Documents
1. Open the Move Sales Documents window (Tools >> Utilities >> Customer Service Collection >> Move Sales Documents).
2. Select the Sales Order Processing Batch to move the documents from.
3. Select the Sales Order Processing Batch to move the documents to.
4. Enter at least one document range restriction. You may enter one range for each of the 14 available restriction types.
5. Select the Print icon to view a preview report based on your range restrictions.
6. Select Move to move the sales documents.
While it is not necessary to use Restriction IDs, if you repeatedly move sales documents based
on a particular set of restrictions you may want to assign the restriction set to a Restriction ID
and use that Restriction ID to automatically insert the restriction set.
[HINT: To quickly move documents based on the document type, enter the appropriate Batch IDs, insert the desired document type restriction, and select Move. To move all documents, leave the From field blank and select Back
Order in the To field.]
Print Shipping Labels
This module provides a way for you to print shipping labels quickly and easily from the Sales Transaction Entry and Sales Order Fulfillment windows.
CUSTOMER SERVICE COLLECTION
THE ETHOSERIES 90
EthoSeries Windows
Customer Service Collection Setup
Refer to Appendix A for details on locating EthoSeries windows in Microsoft Dynamics GP.
Alternate Dynamics GP Windows Series Window Name Required
Sales Sales Transaction Entry Optional
Sales Sales Order Fulfillment Optional
Module Setup
1. Open the Open the Customer Service Collection Setup window (Tools >> Setup > Customer Service Collection >> Customer Service Collection Setup).
2. Select the Pathname button next to the label: Path to Setup File and select the path for ALL USERS to the Print Shipping Label setup file. Print Shipping Labels stores your default label printer information in a table that must exist in a shared directory, such as E:\Shared, which must be identical for every Microsoft Dynamics GP client.
3. Once a path has been selected, you may then select default printer settings to use for printing your shipping labels.
Using Print Shipping Labels The name of the report used by the Print Shipping Labels product is ASI Shipping Label. Customize this label to your needs to match the format of your labels.
From Sales Transaction Entry and/or Sales Order Fulfillment select an existing document then the Labels button, the hotkey CTRL + B, or Extras >> Additional >> Print Shipping Labels. Enter the number of labels desired and the printer you wish to use. If left blank, the default printer will be used.
Restocking Charge Button for Returns
This module makes it easy for your company to establish and implement a policy on a restocking charge percentage for Sales Order Processing returns. Restocking Charge Button for Returns will ease data entry, reduce errors, and improve efficiency.
EthoSeries Windows
Customer Service Collection Setup
Refer to Appendix A for details on locating EthoSeries windows in Microsoft Dynamics GP.
Alternate Dynamics GP Windows Series Window Name Required
Sales Sales Transaction Entry Optional
Module Setup
1. Open the Open the Customer Service Collection Setup window (Tools >> Setup > Customer Service Collection >> Customer Service Collection Setup).
CUSTOMER SERVICE COLLECTION
THE ETHOSERIES 91
2. Enter the default restocking charge percentage for return document types.
Using Restocking Charge Button for Returns In the Sales Transaction Entry window, select the Restock button, the hotkey CTRL + F, or Extras >> Additional >> Restocking Fee for Returns, which will be active only when you are processing a Return document. By selecting the button, hotkey, or Extras menu item, the restocking charge percentage will be applied to the return and placed in the trade discount field.
Track Expected Receipt Date
This module permits a more "up-to-the-minute" tracking of inventories. If your company needs to know when an item on a purchase order will be received in inventory, Track Expected Receipt Date will track this information for every item and location. This module can be used with EthoTech's Additional Sales Transaction Entry Fields.
EthoSeries Windows
Expected Receipt Date Utilities
Refer to Appendix A for details on locating EthoSeries windows in Microsoft Dynamics GP.
Alternate Dynamics GP Windows Series Window Name Required
Inventory Item Inquiry Optional
Inventory Item Quantities Maintenance Optional
Module Setup
Expected Receipt Date Utilities
1. Open the Expected Receipt Date Utilities window (Tools >> Utilities >> Customer Service Collection >> Expected Receipt Date Utilities).
2. Select Rebuild Expected Date Database to initialize the files.
Using Track Expected Receipt Date
Purchasing Item Detail Entry Enter the Expected Receipt Date into the Microsoft Dynamics GP field: Promised Date. This date will be the Expected Receipt Date. Track Expected Receipt Date will evaluate all open Microsoft Dynamics GP Purchase Orders to determine which PO contains the earliest Expected Receipt Date. Expected receipt dates may be viewed using any of the following EthoSeries Alternate Dynamics GP windows:
Item Inquiry
1. Open the Item Inquiry window (Inquiry >> Inventory >> Item).
2. Select an item to inquire upon.
3. In the left-hand column, the Expected Date has been added near the bottom.

CUSTOMER SERVICE COLLECTION
THE ETHOSERIES 92
Item Quantities Maintenance
1. Open the Item Quantities Maintenance window (Cards >> Inventory >> Quantities/Sites).
2. Select an item to inquire upon.
3. In the left-hand column, the Expected Date has been added near the bottom.
Sales Transaction Entry
1. Open the Sales Transaction Entry window (Transactions >> Sales >> Sales Transaction Entry).
2. When displaying line items with the Show Details option, the Expected Receipt Date will now be displayed.
Track Unallocated Quantities
This module provides you with the ability to track inventory quantities before running out of stock. If you do not automatically allocate inventory to orders upon data entry, Track Unallocated Quantities will track the total quantity on order but not allocated. This module can be used with EthoTech's Additional Sales Transaction Entry Fields.
EthoSeries Windows
Unallocated Item Tracking Utilities
Refer to Appendix A for details on locating EthoSeries windows in Microsoft Dynamics GP.
Alternate Dynamics GP Windows Series Window Name Required
Inventory Item Inquiry Optional
Inventory Item Quantities Maintenance Optional
Module Setup
Unallocated Item Tracking Utilities
1. Open the Unallocated Item Tracking Utilities window (Tools >> Utilities >> Customer Service Collection >> Unallocated Item Tracking Utilities).
2. Select Rebuild Unallocated Database to initialize the files.
Using Track Unallocated Quantities Unallocated Quantities may be viewed using any of the following EthoSeries Alternate Dynamics GP windows:
Item Inquiry
1. Open the Item Inquiry window (Inquiry >> Inventory >> Item).
2. Select an item to inquire upon.
3. In the right hand column, two new fields have been added for this module: Unallocated and Net Available. Net Available is Qty Available minus Qty Unallocated.
CUSTOMER SERVICE COLLECTION
THE ETHOSERIES 93
Item Quantities Maintenance
1. Open the Item Quantities Maintenance window (Cards >> Inventory >> Quantities/Sites).
2. Select an item to inquire upon.
3. In the right hand column, one new field has been added for this module: Unallocated.
Sales Transaction Entry
1. Open the Sales Transaction Entry window (Transactions >> Sales >> Sales Transaction Entry).
2. When displaying line items with the Show Details option, the Qty Unallocated and Net Available will now be displayed.

ENHANCED PASSWORD SECURITY
THE ETHOSERIES 94
Enhanced Password Security
Enhanced Password Security (EPS) will assist with Sarbanes-Oxley (SOX) compliance by allowing you to have a controlled password system for Microsoft Dynamics GP at the application level similar to the security that Microsoft Windows 2003 Server provides at the operating system level. With Enhanced Password Security, you can:
Lock out user accounts by user OR workstation after three (3) failed attempts
Lock out ALL users from specific companies or ALL companies
Lock users out of Microsoft Dynamics GP with a customized alert message
Setup User Login Access Rules to specify the time of day for when users can log into GP
Force users to create unique and secure passwords
Keep users from reusing the same password
Force users to change their password at their next login
Use automated password aging to enforce a policy requiring users to change their password periodically
Allow select users to bypass the EPS password age check. EPS lets you set up password complexity that supports minimum password length, numeric characters, uppercase characters, lowercase characters as well as special characters. EPS even supports any combination of the following rules to store passwords in history:
Number of passwords to remember
Minimum password age
Maximum password age
Security
This module uses the following windows created by EthoTech: EthoSeries windows and Alternate Dynamics GP windows. EthoSeries windows are automatically assigned to your Microsoft Dynamics GP navigation during installation. Alternate Dynamics GP windows designed by EthoTech need to be granted security access in order to be utilized. Use the Microsoft Dynamics GP Security window to grant – or remove – access to the EthoSeries and Alternate Dynamics GP windows documented below.
EthoSeries Windows
Enhanced Password Security
EPS Company Security
EPS Login Restrictions
EPS User Security - System Administrator Only
EPS Workstation Security
Refer to Appendix A for details on locating EthoSeries windows in Microsoft Dynamics GP.
Alternate Dynamics GP Windows Series Window Name Required
System User Setup Optional
Modify Access Rights The Enhanced Password Security system is installed with access to the module available for any user who knows the Microsoft Dynamics GP system password. If you wish to restrict a user from accessing this module, you will have to deny access for that user.
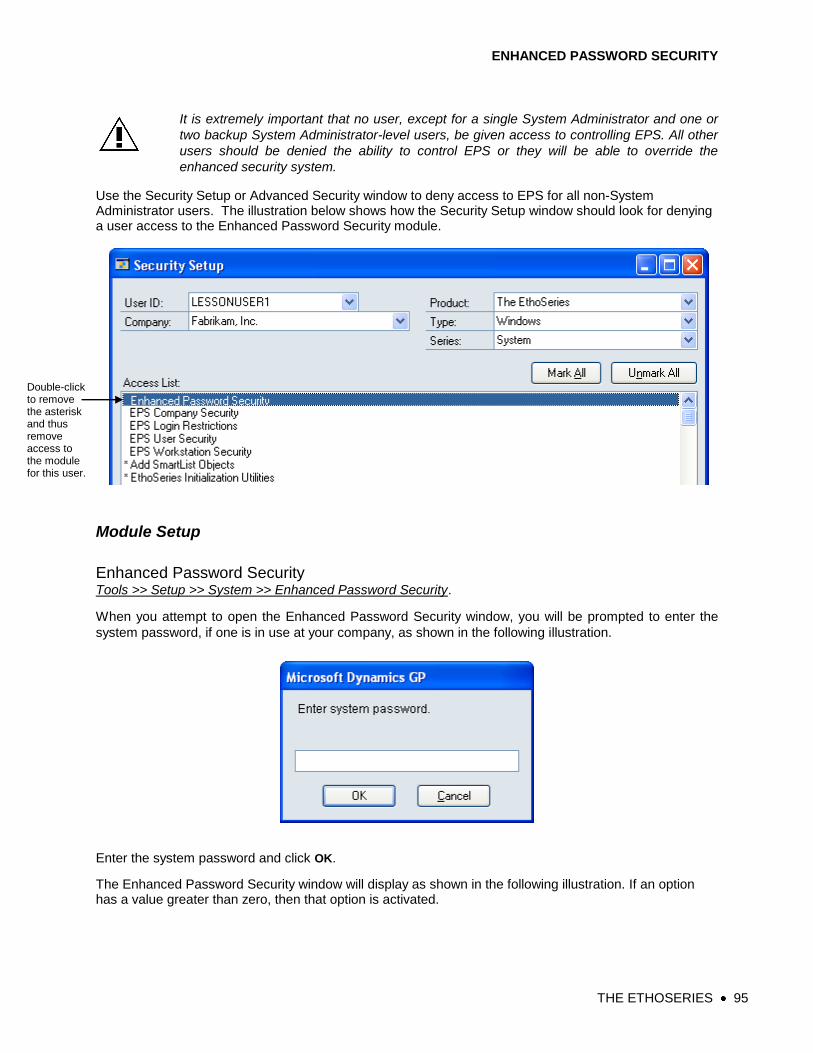
ENHANCED PASSWORD SECURITY
THE ETHOSERIES 95
It is extremely important that no user, except for a single System Administrator and one or
two backup System Administrator-level users, be given access to controlling EPS. All other
users should be denied the ability to control EPS or they will be able to override the
enhanced security system.
Use the Security Setup or Advanced Security window to deny access to EPS for all non-System Administrator users. The illustration below shows how the Security Setup window should look for denying a user access to the Enhanced Password Security module.
Module Setup
Enhanced Password Security Tools >> Setup >> System >> Enhanced Password Security.
When you attempt to open the Enhanced Password Security window, you will be prompted to enter the
system password, if one is in use at your company, as shown in the following illustration.
Enter the system password and click OK.
The Enhanced Password Security window will display as shown in the following illustration. If an option has a value greater than zero, then that option is activated.
Double-click to remove the asterisk and thus remove access to the module for this user.
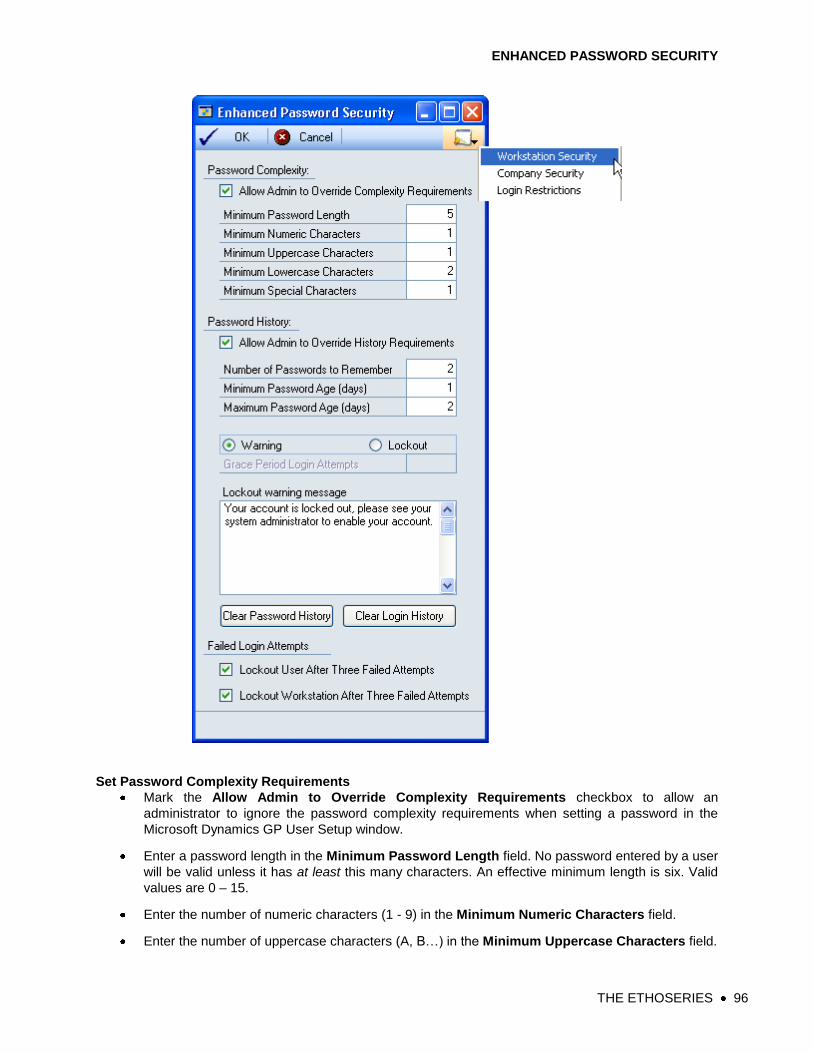
ENHANCED PASSWORD SECURITY
THE ETHOSERIES 96
Set Password Complexity Requirements
Mark the Allow Admin to Override Complexity Requirements checkbox to allow an
administrator to ignore the password complexity requirements when setting a password in the
Microsoft Dynamics GP User Setup window.
Enter a password length in the Minimum Password Length field. No password entered by a user
will be valid unless it has at least this many characters. An effective minimum length is six. Valid
values are 0 – 15.
Enter the number of numeric characters (1 - 9) in the Minimum Numeric Characters field.
Enter the number of uppercase characters (A, B…) in the Minimum Uppercase Characters field.

ENHANCED PASSWORD SECURITY
THE ETHOSERIES 97
Enter the number of lowercase characters (a, b…) in the Minimum Lowercase Characters field.
Enter the number of special characters (~ ! @ $...) in the Minimum Special Characters field.
The maximum password length is set by the Application. Currently, this length is fifteen (15). The minimum password length cannot be greater than the maximum length allowed by the Application. If the minimum password length is greater than zero, the total of the four (4) minimum character fields (numeric, uppercase, lowercase, special) cannot exceed the minimum password length. If the minimum password length is set to zero, the total of the four (4) minimum character fields (numeric, uppercase, lowercase, special) cannot exceed 15.
Set Password History Requirements
Mark the Allow Admin to Override History Requirements checkbox to allow an administrator to
ignore the password history requirements when setting a password in the User Setup window.
Enter the number of passwords to store in the EPS history tables in the Number of Passwords
to Remember field.
In the Minimum Password Age field, enter the length of time (in days) required between
password changes. Valid values are 0 - 999. If enabling the Number of Passwords to
Remember option, the Minimum Password Age should be active. While not required, this option
is strongly recommended to prevent a user from cycling through passwords to get back to their
original password whenever they are prompted to change their password.
In the Maximum Password Age field, enter the length of time (in days). Valid values are 0 - 999.
If the Minimum Password Age is enabled, then it cannot exceed the Maximum Password Age.
Changing the password complexity and/or history requirements does not affect existing
passwords; those passwords will still be valid. However, the next time the user changes
their password, the password must meet the new complexity and/or history requirements.
Select Security Action
When the Maximum Password Age option is active, the Warning and Lockout fields will be
enabled, as shown in the following illustration.
Notice the
Warning and Lockout fields are now enabled
Selecting Lockout enables the
Grace Period Logins Field

ENHANCED PASSWORD SECURITY
THE ETHOSERIES 98
Select the Warning radio button to give the user infinite requests to change their password (they
will never be locked out).
To establish a grace period for the user — effectively giving them a number of friendly requests to
change their password — click the Lockout radio button.
When you click the Lockout button, the Grace Period Logins field will be enabled, as shown in the
illustration above.
Enter a grace period in the Grace Period Logins field. Valid values are 0 - 999.
A value of ―0‖ (zero) and ―1‖ (one) act the same and will give the user only one opportunity
to change their password at the time of the warning. If the user does not change their
password at that time, they will be locked out the next time they attempt to log into Microsoft
Dynamics GP.
Set Lockout Message
You can customize the default message in the Lockout warning message field to read any way you
want — ―Your account is locked out of Microsoft Dynamics GP; please see your system administrator
to enable your account.‖
For example, you might want users to contact a particular person in your organization once they have
been locked out. In this case, you might type in something like this — ―You failed to update your
password in the given time period. You are now locked out of Microsoft Dynamics GP. Please call
Adam at ext. 555 for assistance.‖
To customize the message, just edit the default message in the Lockout warning message field just
as you would edit text in a word processor.
Set Failed Login Attempts
Use the Failed Login Attempts options to specify how EPS will act when a user enters three
consecutive incorrect passwords when attempting to log into Microsoft Dynamics GP. You may
choose to lock out the user and/or the workstation. Open the Microsoft Dynamics GP User Setup
window to clear locked out users. Open the EPS Workstation Security window (Tools >> Setup >>
System >> Enhanced Password Security >> Security List >> Workstation Security) to clear locked out
workstations or to lock out a workstation.
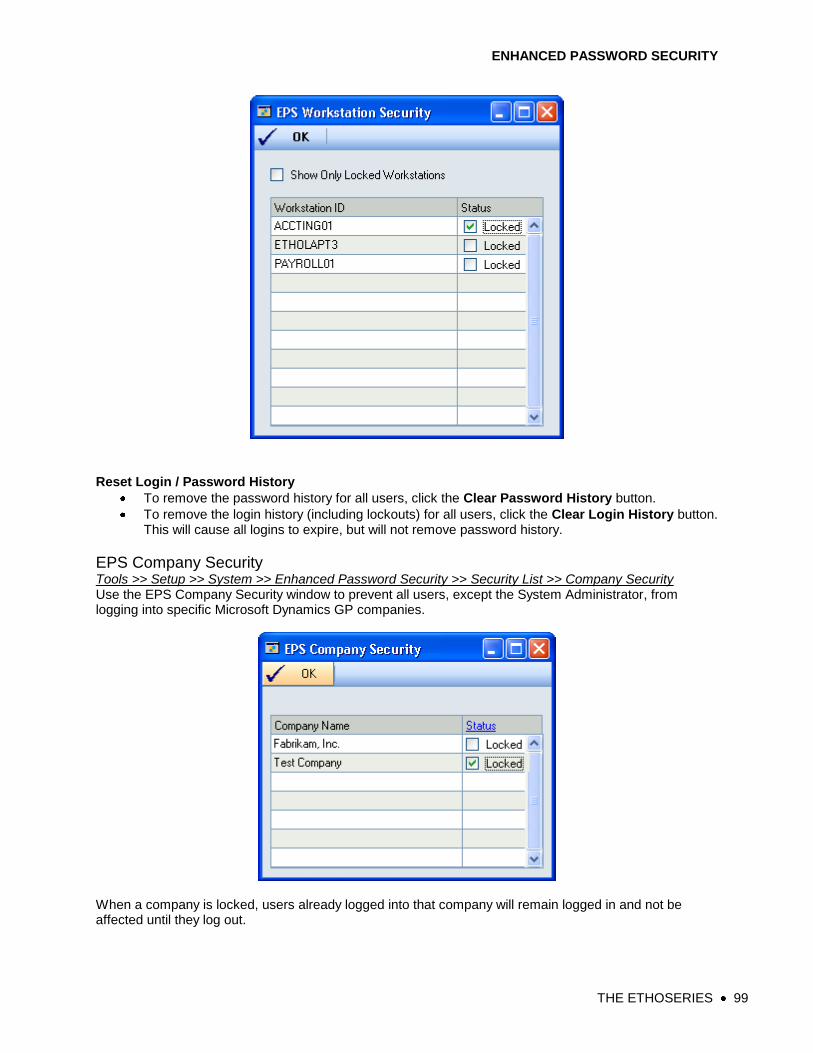
ENHANCED PASSWORD SECURITY
THE ETHOSERIES 99
Reset Login / Password History
To remove the password history for all users, click the Clear Password History button.
To remove the login history (including lockouts) for all users, click the Clear Login History button. This will cause all logins to expire, but will not remove password history.
EPS Company Security Tools >> Setup >> System >> Enhanced Password Security >> Security List >> Company Security Use the EPS Company Security window to prevent all users, except the System Administrator, from logging into specific Microsoft Dynamics GP companies.
When a company is locked, users already logged into that company will remain logged in and not be affected until they log out.

ENHANCED PASSWORD SECURITY
THE ETHOSERIES 100
EPS Login Restrictions Tools >> Setup >> System >> Enhanced Password Security >> Security List >> Login Restrictions Use the EPS Login Restrictions window to limit the hours a user may log into the Application. NOTE: Login times are based on the Windows system time of the Microsoft SQL Server.
Example: In the above screenshot, LESSONUSER1 is only allowed to log in between 7 AM and 6 PM Monday through Friday.
Using Enhanced Password Security
This section explains the user interaction with the Enhanced Password Security system. Once EPS is set up, the Enhanced Password Security system is in effect.
As soon as you activate EPS by entering a Maximum Password Age field and saving your
changes to the Enhanced Password Security window, all existing passwords will
automatically expire. Every user on your system must change their password on their next
login (users already logged into the Application will not be affected until they log out). All
users will be prompted the next time they log in to the Application. This password expiration only
occurs for the activation of EPS. Subsequent changes, such as changing the Maximum Password
Age, will not reset current password ages.
Logging Into Microsoft Dynamics GP When a user enters their User ID and Password in the Welcome to Microsoft Dynamics GP window, EPS performs the following checks:
1. Is the user locked out of the Application – if yes, warn the user that their account is locked out.
2. Is the workstation locked out of the Application – if yes, warn the user that their workstation is locked out.
3. Is the User ID/Password combination valid – if no, warn the user that their password is incorrect –
if this is the 3rd
consecutive login failure, lockout the user and/or workstation if these setup options are marked. NOTE: If the user is currently logged into the Application and is attempting to switch users, the current user will still be logged in after failing 3 consecutive times to log in a different user.
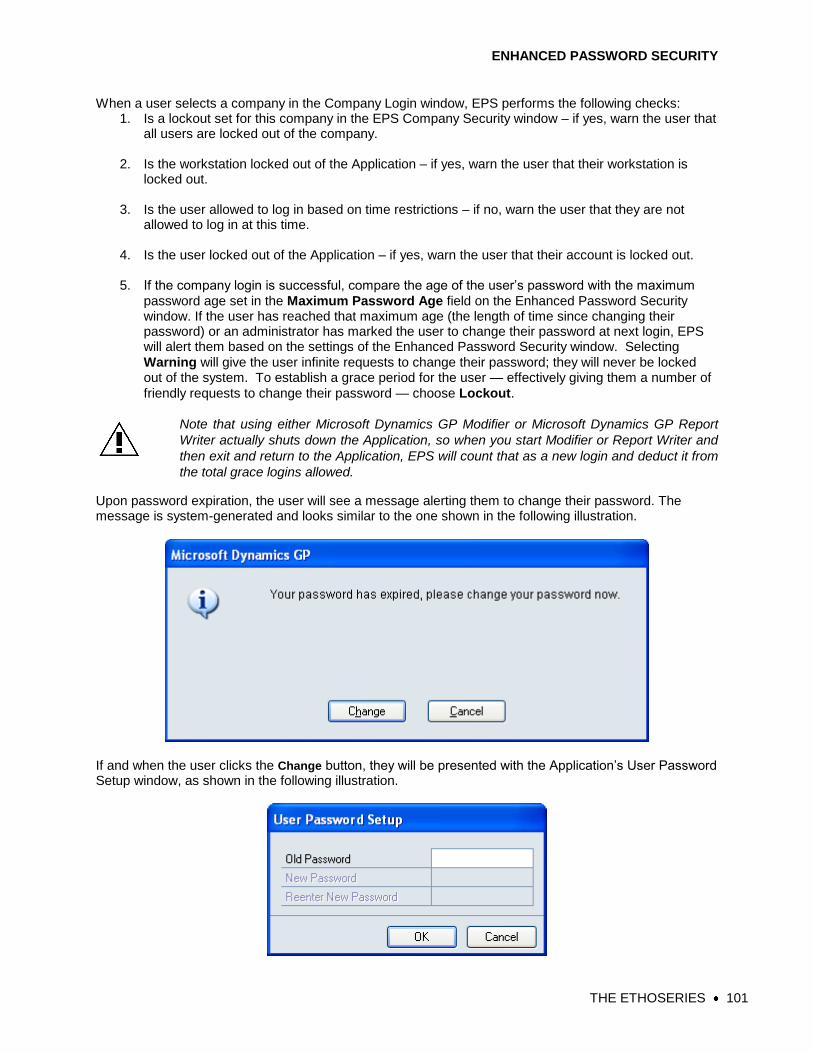
ENHANCED PASSWORD SECURITY
THE ETHOSERIES 101
When a user selects a company in the Company Login window, EPS performs the following checks: 1. Is a lockout set for this company in the EPS Company Security window – if yes, warn the user that
all users are locked out of the company.
2. Is the workstation locked out of the Application – if yes, warn the user that their workstation is locked out.
3. Is the user allowed to log in based on time restrictions – if no, warn the user that they are not
allowed to log in at this time.
4. Is the user locked out of the Application – if yes, warn the user that their account is locked out.
5. If the company login is successful, compare the age of the user’s password with the maximum
password age set in the Maximum Password Age field on the Enhanced Password Security window. If the user has reached that maximum age (the length of time since changing their password) or an administrator has marked the user to change their password at next login, EPS will alert them based on the settings of the Enhanced Password Security window. Selecting
Warning will give the user infinite requests to change their password; they will never be locked out of the system. To establish a grace period for the user — effectively giving them a number of
friendly requests to change their password — choose Lockout.
Note that using either Microsoft Dynamics GP Modifier or Microsoft Dynamics GP Report
Writer actually shuts down the Application, so when you start Modifier or Report Writer and
then exit and return to the Application, EPS will count that as a new login and deduct it from
the total grace logins allowed.
Upon password expiration, the user will see a message alerting them to change their password. The message is system-generated and looks similar to the one shown in the following illustration.
If and when the user clicks the Change button, they will be presented with the Application’s User Password Setup window, as shown in the following illustration.

ENHANCED PASSWORD SECURITY
THE ETHOSERIES 102
If they are a new user who had not previously set up a password, they will see a User
Password Setup window prompting them to enter a ―New‖ Password only and not an ―Old‖
Password.
The user should then enter their old password, enter the new password, and then reenter their
new password in the Reenter New Password field.
Click OK to save the password. If the new password does not meet the complexity / history requirements, the user receives a prompt informing them, a sample of which is shown in the following illustration.
When prompted to change a password, if the user chooses No or if they close the User Preferences window without saving a new password and they face a lockout situation (grace login maximum reached or an administrator has marked the user to change their password at next login), the user is warned that they will be locked out if they log off without changing their password. If a user faces a lockout situation, they will not be allowed to switch companies; instead, they receive a prompt to change their password.
Changing Passwords in the User Preferences Window Users may decide to change their password before it expires. The User Preferences window in Microsoft Dynamics GP provides this functionality. All system controls implemented by EPS are on this window.
IMPORTANT: the user must click OK both on the User Password Setup window and on the
User Preferences window for the password to be saved. It is easy to click the close button
on the User Password Setup window and then click OK on the User Preferences window
and think that the new password has been saved. It has not.

ENHANCED PASSWORD SECURITY
THE ETHOSERIES 103
If the Minimum Password Age option is active, and the required number of days has not passed since the user’s password was last changed, then the user will receive the following message when attempting to change their password:
The Lockout If a user elects not to change their password and your EPS system is set up to use the Lockout/Grace Period combination, they will eventually be locked out of the system. The Lockout message will either be the standard EPS message (as shown in the following illustration) or the message you created in the
Lockout warning message scrolling window on the Enhanced Password Security window.
Be sure to click
OK after changing the password…
…and then click here.

ENHANCED PASSWORD SECURITY
THE ETHOSERIES 104
If an administrator has marked a user to change their password at next login and the user chooses not to change their password, they will be locked out the next time they attempt to log into the system. Only a user with System Administrator access privileges can reset a user’s access to the Application once
they have been locked out, by clearing the Account Locked Out checkbox in the EPS alternate User Setup window or the EPS User Security window.

HISTORICAL SERIAL AND LOT NUMBER TRACKING
THE ETHOSERIES 105
Historical Serial and Lot Number Tracking
With Historical Serial and Lot Number Tracking, all transactions involving a serialized item or lot number can be displayed from one window. This module provides the ability to determine who a specific item was purchased from and sold to, enhancing the value of history maintained by Microsoft Dynamics GP. It tracks posted and unposted transactions and works with the following modules: Inventory, Sales Order Processing, Invoicing and Purchase Order Processing.
Security
This module uses EthoSeries windows created by EthoTech. EthoSeries windows are automatically assigned to your Microsoft Dynamics GP navigation during installation. Use the Microsoft Dynamics GP Security window to grant – or remove – access to these windows.
EthoSeries Windows
Serial Lot Tracking Table Utilities
Serial and Lot Number Tracking Refer to Appendix A for details on locating EthoSeries windows in Microsoft Dynamics GP.
Alternate Dynamics GP Windows This module does not use any Alternate Dynamics GP Windows.
Module Setup
1. Open the Serial Lot Tracking Table Utilities window (Tools >> Utilities >> Hist. Serial - Lot Number Tracking >> Hist. Serial - Lot Number Tracking Utilities).
2. Select Rebuild Serial/Lot Database to initialize the files.
Optionally, the ‗Keep Imported Records‘ checkbox can be marked. Marking this option allows records that have been imported into the Serial and Lot Tracking table to be ignored by the Rebuild and Delete processes. Only records with the Document Type field less than 0 will be ignored with this option.
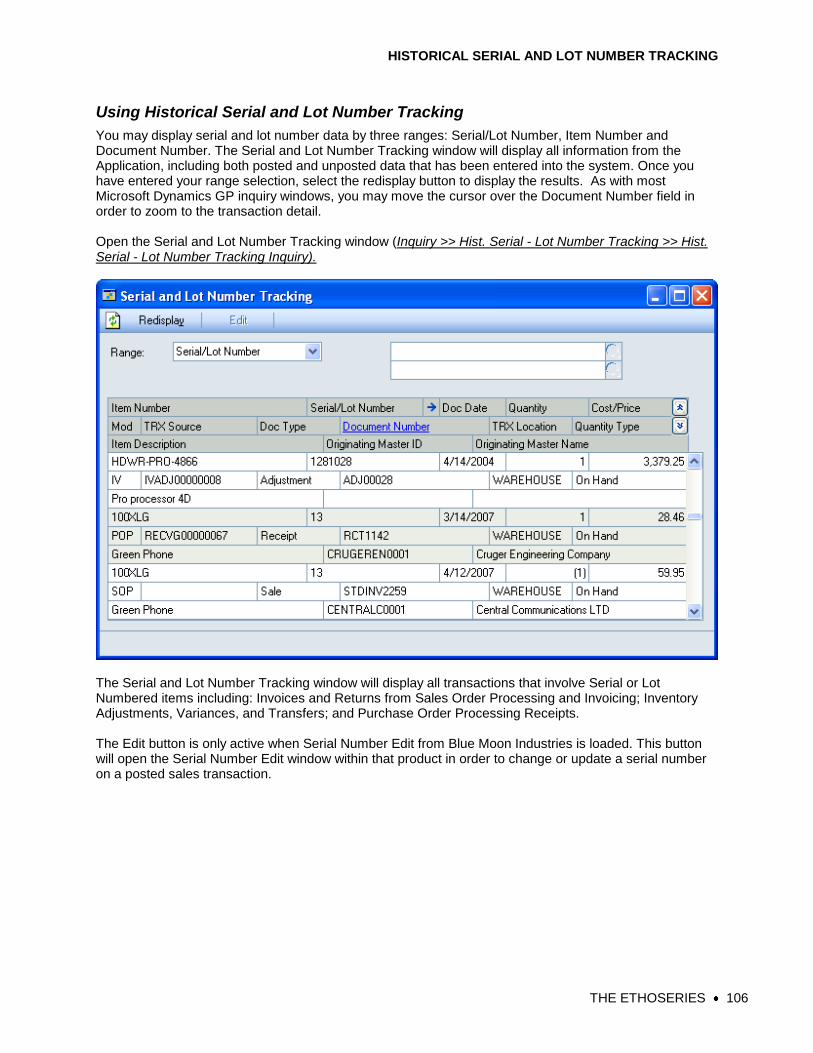
HISTORICAL SERIAL AND LOT NUMBER TRACKING
THE ETHOSERIES 106
Using Historical Serial and Lot Number Tracking
You may display serial and lot number data by three ranges: Serial/Lot Number, Item Number and Document Number. The Serial and Lot Number Tracking window will display all information from the Application, including both posted and unposted data that has been entered into the system. Once you have entered your range selection, select the redisplay button to display the results. As with most Microsoft Dynamics GP inquiry windows, you may move the cursor over the Document Number field in order to zoom to the transaction detail. Open the Serial and Lot Number Tracking window (Inquiry >> Hist. Serial - Lot Number Tracking >> Hist. Serial - Lot Number Tracking Inquiry).
The Serial and Lot Number Tracking window will display all transactions that involve Serial or Lot Numbered items including: Invoices and Returns from Sales Order Processing and Invoicing; Inventory Adjustments, Variances, and Transfers; and Purchase Order Processing Receipts. The Edit button is only active when Serial Number Edit from Blue Moon Industries is loaded. This button will open the Serial Number Edit window within that product in order to change or update a serial number on a posted sales transaction.

NEXT NUMERIC COLLECTION
THE ETHOSERIES 107
Next Numeric Collection
With Advanced Lookups and list-based navigation in Microsoft Dynamics GP, records can be searched for and located from more than just their IDs. Manually maintaining and policing a business policy to create meaningful master record IDs is no longer necessary. EthoTech Next Numeric Collection allows you to simplify this process by setting up an alpha-numeric sequence to automatically generate the next number needed for each of the following master record types: Customers, Vendors, Inventory Items, Fixed Assets, Employees, Salespeople, Prospects, Project Accounting Contract IDs and Project IDs, and WennSoft Job Numbers. And it automatically assigns Batch IDs when creating transaction batches in the Receivables, Sales or Purchasing modules. Next Numeric Collection even keeps track of records that are started and abandoned, avoiding gaps in the alpha-numeric sequence. The results are faster data entry and the elimination of many common errors. This module works with the alternate Customer and Vendor Maintenance windows in the Microsoft Dynamics GP Project Accounting Series and also works with WennSoft's Job Cost product.
Security
This module uses the following windows created by EthoTech: EthoSeries windows and Alternate Dynamics GP windows. EthoSeries windows are automatically assigned to your Microsoft Dynamics GP navigation during installation. Alternate Dynamics GP windows designed by EthoTech need to be granted security access in order to be utilized. Use the Microsoft Dynamics GP Security window to grant – or remove – access to the EthoSeries and Alternate Dynamics GP windows documented below.
EthoSeries Windows
Next Numeric Number Setup
Refer to Appendix A for details on locating EthoSeries windows in Microsoft Dynamics GP.
Alternate Dynamics GP Windows Series Window Name Required
Inventory Item Maintenance Optional
Payroll Employee Maintenance Optional
Purchasing Vendor Maintenance Optional
Purchasing Payables Batch Entry Optional
Sales Customer Maintenance Optional
Sales Receivables Batch Entry Optional
Sales Sales Batch Entry Optional
Sales Sales Prospect Maintenance Optional
Sales Salesperson Maintenance Optional
Module Setup
1. Open the Next Numeric Number Setup window (Tools >> Setup >> Next Numeric >> Next Numeric Setup).
2. Select the Master Record Type.
3. Enter the Next Master Number. The Master Record Type determines the size of the field. You may enter any alphanumeric sequence that ends with a numeric value.

NEXT NUMERIC COLLECTION
THE ETHOSERIES 108
Using Next Numeric Collection
Next Batch ID – Payables Batches
1. Open the Payables Batch Entry window (Transactions >> Purchasing >> Batches).
2. When the Batch ID field is blank; you may select the New button (if using our alternate Payables Batch Entry window), the hotkey CTRL + N, or Extras >> Additional >> Next Batch ID to enter the next Batch ID.
3. Continue adding a new batch as usual.
Next Batch ID – Receivables Batches
1. Open the Receivables Batch Entry window (Transactions >> Sales >> Receivables Batches).
2. When the Batch ID field is blank; you may select the New button (if using our alternate Receivables Batch Entry window), the hotkey CTRL + N, or Extras >> Additional >> Next Batch ID to enter the next Batch ID.
3. Continue adding a new batch as usual.
Next Batch ID – Sales Batches
1. Open the Sales Batch Entry window (Transactions >> Sales >> Sales Batches).
2. When the Batch ID field is blank; you may select the New button (if using our alternate Sales Batch Entry window), the hotkey CTRL + N, or Extras >> Additional >> Next Batch ID to enter the next Batch ID.
3. Continue adding a new batch as usual.
Next Customer ID
1. Open the Customer Maintenance window (Cards >> Sales >> Customer).
2. When the Customer ID field is blank; you may select the New button (if using our alternate Customer Maintenance window), the hotkey CTRL + N, or Extras >> Additional >> Next Customer ID to enter the next Customer ID.
3. Continue adding a new customer as usual.
4. When a quote for a prospect is transferred to an order, the Prospect to Customer window opens and allows the user to set the Customer ID. Delete the existing Customer ID, tab off the Customer ID field, and then choose the Next Customer ID selection from the Extras menu to enter the next Customer ID.
Next Employee ID
1. Open the Employee Maintenance window (Cards >> Payroll >> Employee).
2. When the Employee ID field is blank; you may select the New button (if using our alternate Employee Maintenance window), the hotkey CTRL + N, or Extras >> Additional >> Next Employee ID to enter the next Employee ID.
3. Continue adding a new employee as usual.
Next Fixed Asset ID
1. Open the Asset General Information window (Cards >> Fixed Assets >> General).
2. When the Asset ID field is blank; you may choose the hotkey CTRL + N or Extras >> Additional >> Next Asset ID to enter the next Asset ID. The Asset Suffix will be set to 1.
3. Continue adding a new asset as usual.
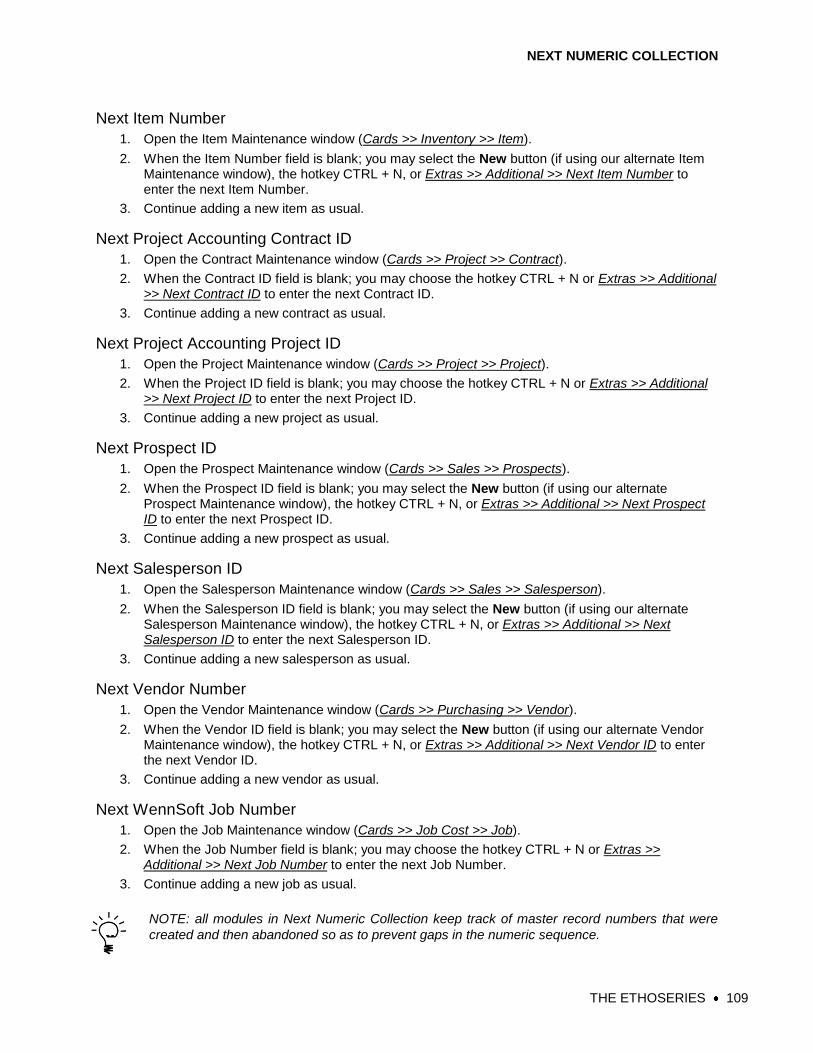
NEXT NUMERIC COLLECTION
THE ETHOSERIES 109
Next Item Number
1. Open the Item Maintenance window (Cards >> Inventory >> Item).
2. When the Item Number field is blank; you may select the New button (if using our alternate Item Maintenance window), the hotkey CTRL + N, or Extras >> Additional >> Next Item Number to enter the next Item Number.
3. Continue adding a new item as usual.
Next Project Accounting Contract ID
1. Open the Contract Maintenance window (Cards >> Project >> Contract).
2. When the Contract ID field is blank; you may choose the hotkey CTRL + N or Extras >> Additional >> Next Contract ID to enter the next Contract ID.
3. Continue adding a new contract as usual.
Next Project Accounting Project ID
1. Open the Project Maintenance window (Cards >> Project >> Project).
2. When the Project ID field is blank; you may choose the hotkey CTRL + N or Extras >> Additional >> Next Project ID to enter the next Project ID.
3. Continue adding a new project as usual.
Next Prospect ID
1. Open the Prospect Maintenance window (Cards >> Sales >> Prospects).
2. When the Prospect ID field is blank; you may select the New button (if using our alternate Prospect Maintenance window), the hotkey CTRL + N, or Extras >> Additional >> Next Prospect ID to enter the next Prospect ID.
3. Continue adding a new prospect as usual.
Next Salesperson ID
1. Open the Salesperson Maintenance window (Cards >> Sales >> Salesperson).
2. When the Salesperson ID field is blank; you may select the New button (if using our alternate Salesperson Maintenance window), the hotkey CTRL + N, or Extras >> Additional >> Next Salesperson ID to enter the next Salesperson ID.
3. Continue adding a new salesperson as usual.
Next Vendor Number
1. Open the Vendor Maintenance window (Cards >> Purchasing >> Vendor).
2. When the Vendor ID field is blank; you may select the New button (if using our alternate Vendor Maintenance window), the hotkey CTRL + N, or Extras >> Additional >> Next Vendor ID to enter the next Vendor ID.
3. Continue adding a new vendor as usual.
Next WennSoft Job Number
1. Open the Job Maintenance window (Cards >> Job Cost >> Job).
2. When the Job Number field is blank; you may choose the hotkey CTRL + N or Extras >> Additional >> Next Job Number to enter the next Job Number.
3. Continue adding a new job as usual.
NOTE: all modules in Next Numeric Collection keep track of master record numbers that were
created and then abandoned so as to prevent gaps in the numeric sequence.

QUICK TRACK
THE ETHOSERIES 110
Quick Track
Quick Track provides the ability to track shipments within Microsoft Dynamics GP. This module allows an unlimited number of packages to be tracked per document. Quick Track provides access to the carrier's World Wide Web site on the Internet for on-line delivery information, all without leaving the accounting system.
Security
This module uses the following windows created by EthoTech: EthoSeries windows and Alternate Dynamics GP windows. EthoSeries windows are automatically assigned to your Microsoft Dynamics GP navigation during installation. Alternate Dynamics GP windows designed by EthoTech need to be granted security access in order to be utilized. Use the Microsoft Dynamics GP Security window to grant – or remove – access to the EthoSeries and Alternate Dynamics GP windows documented below.
EthoSeries Windows
Quick Track Carrier Setup
Quick Track Shipping Method Carrier Setup
Quick Track Inquiry
Quick Track Entry
Refer to Appendix A for details on locating EthoSeries windows in Microsoft Dynamics GP.
Alternate Dynamics GP Windows Series Window Name Required
Sales Sales Transaction Entry Optional
Sales Sales Order Fulfillment Optional
Sales Sales Transaction Inquiry Zoom Optional
Module Setup
NOTE: Carrier and Shipping Method Carrier Setup is only required for the automatic tracking of
packages for carrier‘s with World Wide Web sites. Skip this section if you will not be using this
feature.
Carrier Setup Open the Carrier Setup window (Tools >> Setup >> Quick Track >> Quick Track Carrier Setup). Each carrier will have a unique ID and a description of that carrier. Each carrier can also have a Carrier URL, pointing to a World Wide Web site for tracking packages. The URL will be unique for each carrier. For most carriers the URL will automatically invoke package tracking at their website; for others, the website will be navigated to and you will need to manually enter the tracking information before any package tracking can begin.

QUICK TRACK
THE ETHOSERIES 111
To setup a new carrier:
1. Enter a unique Carrier ID (ex. FEDEX).
2. Enter a description for the carrier (ex. Federal Express).
3. Enter a URL for the carrier’s website.
4. Save the entry.
The following are the URLs to enter for some national carriers.
Quick Track Carrier Setup
DHL
http://track.dhl-usa.com//TrackByNbr.asp?ShipmentNumber=%1
Federal Express
http://www.fedex.com/Tracking?action=track&cntry_code=&initial=x&mps=y&tracknumbers=%1
Purolator
http://shipnow.purolator.com/shiponline/track/PurolatorTrackE.asp?PINNO=%1
Roadway Express
http://www.quiktrak.roadway.com/cgi-bin/quiktrak (manual tracking number entry required)
UPS
http://wwwapps.ups.com/etracking/tracking.cgi?submit=Track&InquiryNumber1=%1&TypeOfInquiryNumber=T
U.S. Postal Service
http://www.usps.gov/cttgate (manual tracking number entry required)
NOTE: If any of these carriers change their website, the URL may need to be updated. Check
the EthoTech website at www.ethotech.com for periodic updates of the carrier URLs.
To set up a World Wide Web link for a carrier not listed above: You will need to know the URL address for the carrier’s tracking web site. Where appropriate in the URL, substitute the following variables for tracking number, country and shipping date. Tracking Number = %1 Country = %2 Shipping date = %3 If the carrier has other input options available for tracking, enter the main tracking page URL. Do not enter any variables within the URL. All tracking information will need to be entered manually by the user.

QUICK TRACK
THE ETHOSERIES 112
Shipping Method Carrier Setup Open the Shipping Method Carrier Setup window (Tools >> Setup >> Quick Track >> Quick Track Shipping Method Carrier Setup). Each Shipping Method defined in the Application will need to be linked to a carrier in order for automatic World Wide Web package tracking.
To setup a Shipping Method Carrier:
1. Select a Shipping Method.
2. Enter a Carrier ID.
3. Save the entry.
NOTE: Entries in this table DO NOT affect your shipping methods defined in the Application.
Using Quick Track
Entering Packages Packages can be entered during Sales Transaction Entry or Sales Order Fulfillment. The Quick Track Entry window can be opened from the Sales Transaction Entry Extras menu, the hotkey CTRL + T, or by zooming on the Freight field (if you are using the alternate Sales Transaction Entry window provided by EthoTech). In Sales Order Fulfillment, open the Quick Track Entry window from the Sales Order Fulfillment Extras menu, the hotkey CTRL + T, or just click the Quick Track button (if you are using the alternate Sales Order Fulfillment window provided by EthoTech). Information regarding the order is displayed at the top of the window. Information regarding each package of the order can be entered into the scrolling window. The tracking number is the only required field for the package. If no date or time is entered then the current user date and time are used.
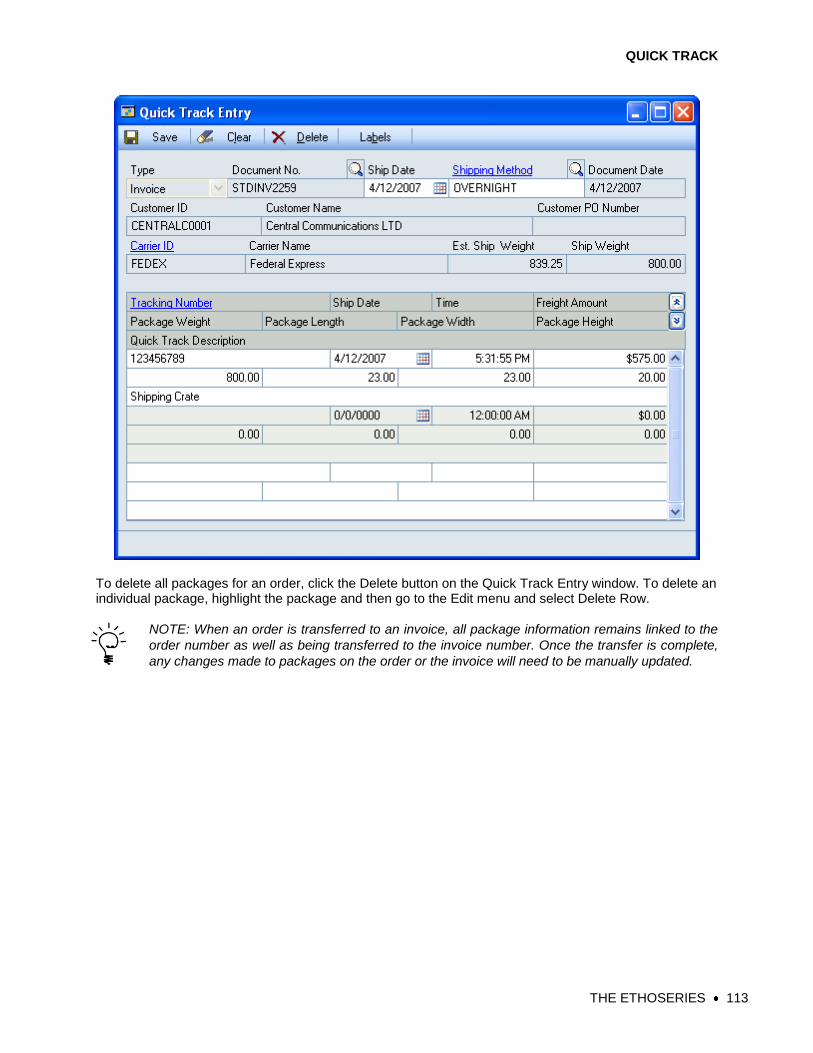
QUICK TRACK
THE ETHOSERIES 113
To delete all packages for an order, click the Delete button on the Quick Track Entry window. To delete an individual package, highlight the package and then go to the Edit menu and select Delete Row.
NOTE: When an order is transferred to an invoice, all package information remains linked to the
order number as well as being transferred to the invoice number. Once the transfer is complete,
any changes made to packages on the order or the invoice will need to be manually updated.

QUICK TRACK
THE ETHOSERIES 114
Package Inquiry Inquiry of packages can be accomplished in two ways.
1. Quick Track Zoom. The Quick Track Zoom window can be opened from the Sales Transaction
Inquiry Zoom Extras menu, the hotkey CTRL + T, or by zooming on the Freight field of the Sales
Transaction Inquiry Zoom window (if you are using the alternate Sales Transaction Inquiry Zoom
window provided by EthoTech). The Quick Track Zoom window displays information regarding the
order and all packages that were entered through Quick Track Entry.

QUICK TRACK
THE ETHOSERIES 115
2. Quick Track Inquiry. Packages can be searched based on the following.
Document ID
Customer ID
Ship Date
Tracking Number
Enter the method by which to search and select All packages or enter a range for the selected search
method. Click the Redisplay button to view the results. Customer Number and Document Number can
be zoomed to see detailed information regarding either.
Tracking Packages through the World Wide Web Packages can be tracked on the World Wide Web for those carriers with a WWW website. Tracking is done through the Quick Track Entry, Quick Track Inquiry and the Quick Track Zoom windows. Simply click on the Tracking Number drill-down field after selecting the row you would like to track. This is available from all of the windows that display tracking numbers within Quick Track.

SALESPERSON BY SHIP TO LOCATION
THE ETHOSERIES 116
Salesperson by Ship To Location
This module provides the ability for every customer address to be assigned to a unique Salesperson ID. If Microsoft Dynamics GP Sales Order Processing is used with this enhancement, then the salesperson for the order will be determined by the Ship To address.
Security
This module uses the following windows created by EthoTech: EthoSeries windows and Alternate Dynamics GP windows. EthoSeries windows are automatically assigned to your Microsoft Dynamics GP navigation during installation. Alternate Dynamics GP windows designed by EthoTech need to be granted security access in order to be utilized. Use the Microsoft Dynamics GP Security window to grant – or remove – access to the EthoSeries and Alternate Dynamics GP windows documented below.
EthoSeries Windows
Salesperson By Ship To Setup
Customer Address Salesperson Utilities Refer to Appendix A for details on locating EthoSeries windows in Microsoft Dynamics GP.
Alternate Dynamics GP Windows Series Window Name Required
Sales Sales Transaction Entry Optional
Module Setup
Salesperson By Ship To Setup Tools >> Setup >> Salesperson By Ship To >>Salesperson By Ship To Setup.
1. Open the Salesperson By Ship To Setup window.
2. Mark the Enable option.
3. Select the drop-down list next to the label: When Updating the Salesperson. You have three choices to use with this module, which involve the Sales Territory that will be assigned to the Sales Order Processing transactions that are created when this module is registered. Select the choice that describes how Salesperson by Ship To Location should work with the Sales Territory field.

SALESPERSON BY SHIP TO LOCATION
THE ETHOSERIES 117
Customer Address Salesperson Utilities Tools >> Utilities >> Salesperson By Ship To >> Customer Address Salesperson Utilities This process will initialize the Salesperson field for all customer address records in the Application:
1. Open the Customer Address Salesperson Utilities window.
2. Select the appropriate processing option in the Set Customer Address Salesperson To drop-down box:
Salesperson in Customer Master, which will assign the salesperson on the customer master to each customer address.
Blank (Clear the Salesperson field), which will remove any salesperson already assigned to a customer address.
3. Select Process to complete the setup.
Using Salesperson by Ship To Location
Customer Address Maintenance Cards >> Sales >> Addresses
1. Open Customer Address Maintenance
2. For each customer, assign a Salesperson ID to each Address ID.
Sales Transaction Entry Transactions >> Sales >> Sales Transaction Entry
1. Use the Sales Transaction Entry window as normal.
2. When a customer is selected, the Salesperson ID assigned to the default ship to address will initially be assigned to the sales document.
3. When you select or change the document’s ship to address, that address’s salesperson will be assigned to the sales document, just as if you had typed it in right after selecting a new ship to address, and the Sales Territory field will be updated based upon your setup choice.
4. When you select or change the document’s ship to address and roll down changes, that address’s salesperson will be assigned to the sales document and appropriate line items, just as if you had typed it in after selecting a new ship to address, and the Sales Territory field(s) will be updated based upon your setup choice.
When you select or change a sales document line item’s ship to address, that address’s salesperson will be assigned to the line item, just as if you had typed it in after selecting a new ship to address, and the line item Sales Territory field will be updated based upon your setup choice.
Dynamics GP commissions are updated when Salesperson By Ship to changes the Salesperson ID(s).

APPENDIX A
THE ETHOSERIES 118
Appendix A
The following table lists the windows added for each EthoSeries product.
Product Series Window Name / Path
Commission Plan Inventory Item Commission Plan Info (Cards >> Commission Plan >> Item Commission Plan Info)
Commission Plan Inventory Item Commission Plan Info Inquiry (Commission Line Trace >> Salesperson From Expansion)
Commission Plan Inventory Item Commission Plan Setup (Tools >> Setup >> Commission Plan >> Item Commission Plan Setup)
Commission Plan Inventory Mass Update Items (Tools >> Utilities >> Commission Plan >> Update Item Commission Plans)
Commission Plan Sales Accrual Run Inquiry (Inquiry >> Commission Plan >> Accrual Run Inquiry)
Commission Plan Sales Accrue Commissions (Tools >> Routines >> Commission Plan >> Accrue Commissions)
Commission Plan Sales Comm Plan Overdue Setup (Tools >> Setup >> Commission Plan >> Commission Plan Setup >> Addit‘l Reductions >> Overdue Setup)
Commission Plan Sales Commission Line Trace (Commission Plan Detail Entry / Detail Inquiry Zoom >> Commission Trace Expansion)
Commission Plan Sales Commission Plan Credit Card Setup (Tools >> Setup >> Commission Plan >> Commission Plan Setup >> Addit‘l Reductions >> Credit Card Setup)
Commission Plan Sales Commission Plan Default Tiers (Tools >> Setup >> Commission Plan >> Commission Plan Default Tiers)
Commission Plan Sales Commission Plan Entry (Transactions >> Commission Plan >> Commission Plan Entry)
Commission Plan Sales Commission Plan Inquiry Zoom (Sales Transaction Inquiry Zoom >> Extras >> Additional >> Commission Plan)
Commission Plan Sales Commission Plan Item Tiers (Cards >> Commission Plan >> Item Commission Plan Info > Item Tiers Expansion)
Commission Plan Sales Commission Plan Matrix Inquiry (Commission Line Trace >> Comm Rate Expansion)
Commission Plan Sales Commission Plan Matrix Setup (Tools >> Setup >> Commission Plan >> Commission Plan Matrix Setup)
Commission Plan Sales Commission Plan Override Date Document Paid (Tools >> Utilities >> Commission Plan >> Commission Plan Utilities >> Utilities List >> Override Date Document Paid)
Commission Plan Sales Commission Plan Payment Terms Setup (Tools >> Setup >> Commission Plan >> Commission Plan Setup >> Addit‘l Reductions >> Payment Terms Setup)
Commission Plan Sales Commission Plan Reduction Inquiry (Commission Line Trace >> Comm Reduction Amt Expansion)
Commission Plan Sales Commission Plan Report (Reports >> Commission Plan >> Commission Plan Report)
Commission Plan Sales Commission Plan Sales Type ID Setup (Tools >> Setup >> Commission Plan >> Commission Plan Setup >> Sales Type ID Setup)
Commission Plan Sales Commission Plan Setup (Tools >> Setup >> Commission Plan >> Commission Plan Setup)
Commission Plan Sales Commission Plan Summary History (Inquiry >> Commission Plan >> Summary History)
Commission Plan Sales Commission Plan Summary Utilities (Tools >> Utilities >> Commission Plan >> Commission Plan Utilities >> Utilities List >> Commission Plan Summary Utilities)
Commission Plan Sales Commission Plan Tiers (Tools >> Setup >> Commission Plan >> Commission Plan Matrix Setup > Tiers Expansion)
Commission Plan Sales Commission Plan Tiers Rate Inquiry (Commission Line Trace >> Comm Rate Expansion)
Commission Plan Sales Commission Plan Utilities (Tools >> Utilities >> Commission Plan >> Commission Plan Utilities)
Commission Plan Sales Commission Plan Utilities Sales Type ID Restrictions (Tools >> Utilities >> Commission Plan >> Commission Plan Utilities >> Sales Type ID – Restricted List)

APPENDIX A
THE ETHOSERIES 119
Commission Plan Sales Commission Run Inquiry (Inquiry >> Commission Plan >> Commission Run Inquiry)
Commission Plan Sales Customer Commission Plan Info (Cards >> Commission Plan >> Customer Commission Plan Info)
Commission Plan Sales Customer Commission Plan Info Inquiry (Commission Line Trace >> Salesperson From Expansion)
Commission Plan Sales Customer Commission Plan Setup (Tools >> Setup >> Commission Plan >> Customer Commission Plan Setup)
Commission Plan Sales Mass Update Customers (Tools >> Utilities >> Commission Plan >> Update Customer Commission Plans)
Commission Plan Sales Mass Update Salespeople (Tools >> Utilities >> Commission Plan >> Update Salesperson Commission Plans)
Commission Plan Sales Process Commissions (Tools >> Routines >> Commission Plan >> Process Commissions)
Commission Plan Sales Salesperson Accrual Run Inquiry (Inquiry >> Commission Plan >> Accrual Run Inquiry - Salesperson)
Commission Plan Sales Salesperson Commission Plan Info (Cards >> Commission Plan >> Salesperson Commission Plan Info)
Commission Plan Sales Salesperson Commission Plan Setup (Tools >> Setup >> Commission Plan >> Salesperson Commission Plan Setup)
Commission Plan Sales Salesperson Commission Run Inquiry (Inquiry >> Commission Plan >> Commission Run Inquiry - Salesperson)
Customer Service Collection
Inventory Expected Receipt Date Utilities (Tools >> Utilities >> Customer Service Collection >> Expected Receipt Date Utilities)
Customer Service Collection
Sales Customer Service Collection Setup (Tools >> Setup >> Customer Service Collection >> Customer Service Collection Setup)
Customer Service Collection
Sales Move Sales Documents (Tools >> Utilities >> Customer Service Collection >> Move Sales Documents)
Customer Service Collection
Sales Unallocated Item Tracking Utilities (Tools >> Utilities >> Customer Service Collection >> Unallocated Item Tracking Utilities)
Enhanced Password Security
System Enhanced Password Security (Tools >> Setup >> System >> Enhanced Password Security)
Enhanced Password Security
System Enhanced Security (Tools >> Setup >> System >> User)
Enhanced Password Security
System Company Security (Tools >> Setup >> System >> Enhanced Password Security >> Security List >> Company Security)
Enhanced Password Security
System Login Restrictions (Tools >> Setup >> System >> Enhanced Password Security >> Security List >> Login Restrictions)
Enhanced Password Security
System Workstation Security (Tools >> Setup >> System >> Enhanced Password Security >> Security List >> Workstation Security)
Historical Serial & Lot Number Tracking
Inventory Serial and Lot Number Tracking (Inquiry >> Hist. Serial - Lot Number Tracking >> Historical Serial and Lot Tracking Inquiry)
Historical Serial & Lot Number Tracking
Inventory Serial Lot Tracking Table Utilities (Tools >> Utilities >> Hist. Serial - Lot Number Tracking >> Historical Serial and Lot Number Tracking Utilities)
Next Numeric Collection
Company Next Numeric Number Setup (Tools >> Setup >> Next Numeric >> Next Numeric Setup)
Quick Track Company Quick Track Carrier Setup (Tools >> Setup >> Quick Track >> Quick Track Carrier Setup)
Quick Track Company Quick Track Shipping Method Carrier Setup (Tools >> Setup >> Quick Track >> Quick Track Shipping Method Carrier Setup)
Quick Track Sales Quick Track Entry (Transactions >> Quick Track >> Quick Track Entry)
Quick Track Sales Quick Track Inquiry (Inquiry >> Quick Track >> Quick Track Inquiry)
Salesperson By Ship To Location
Sales Customer Address Salesperson Utilities (Tools >> Utilities >> Salesperson By Ship To >> Customer Address Salesperson Utilities)
Salesperson By Ship To Location
Sales Salesperson By Ship To Setup (Tools >> Setup >> Salesperson By Ship To >> Salesperson By Ship To Setup)