
D2L Brightspace Student Guide - Kennesaw State University · Java Runtime Environment ... Please...
54
D2L Brightspace Student Guide Learning Technologies, Training, & Audiovisual Outreach University Information Technology Services
Transcript of D2L Brightspace Student Guide - Kennesaw State University · Java Runtime Environment ... Please...
D2L Brightspace Student Guide
University Information Technology Services
Learning Technologies, Training, & Audiovisual Outreach
University Information Technology Services
Copyright © 2016 - KSU Department of University Information Technology Services This document may be downloaded, printed, or copied for educational use without further permission of the University Information Technology Services Division (UITS), provided the content is not modified and this statement is not removed. Any use not stated above requires the written consent of the UITS Division. The distribution of a copy of this document via the Internet or other electronic medium without the written permission of the Kennesaw State University UITS Division is expressly prohibited. Published by Kennesaw State University – UITS 2016 The publisher makes no warranties as to the accuracy of the material contained in this document and therefore is not responsible for any damages or liabilities incurred from its use. D2L Brightspace is a trademark of the D2L Corporation.
University Information Technology Services
D2L Brightspace
Student Guide
Table of Contents Introduction ...................................................................................................................................................... 6
Objectives.......................................................................................................................................................... 6
D2L Brightspace: Student Guide for Mobile Devices ........................................................................................ 6
Accessing D2L Brightspace ................................................................................................................................ 7
The Home Page ................................................................................................................................................. 7
The MiniBar ................................................................................................................................................... 8
Profile ............................................................................................................................................................ 8
Notifications .................................................................................................................................................. 9
Account Settings ......................................................................................................................................... 11
Announcements .......................................................................................................................................... 12
Dismissing Announcement Items ............................................................................................................... 12
Restore Dismissed Announcement Items ................................................................................................... 13
Accessing Your Courses ................................................................................................................................... 13
Important Information about Course Access: ............................................................................................ 14
Calendar .......................................................................................................................................................... 14
Finding the Calendar ................................................................................................................................... 14
Viewing Events on the Calendar ................................................................................................................. 15
Adding Tasks ............................................................................................................................................... 16
Email ................................................................................................................................................................ 18
Opening Email ............................................................................................................................................. 18
Reading Your Email Messages .................................................................................................................... 19
Sending an Email ......................................................................................................................................... 21
Content ........................................................................................................................................................... 24
Accessing and Viewing the Content ............................................................................................................ 24
Accessing the Course Schedule ................................................................................................................... 25
Accessing Content Materials ...................................................................................................................... 26
Navigating within a Topic ............................................................................................................................ 27
The Content Browser .................................................................................................................................. 28
Assignments .................................................................................................................................................... 28
Accessing the Assignments Tool ................................................................................................................. 28
Submitting an Assignment .......................................................................................................................... 29
Submission History ...................................................................................................................................... 32
Instructor Feedback .................................................................................................................................... 32
Discussions ...................................................................................................................................................... 33
Accessing Discussions ................................................................................................................................. 33
Creating a Message ..................................................................................................................................... 34
Reading and Replying to Discussions Posted by Others ............................................................................. 35
Quizzes ............................................................................................................................................................ 37
Taking a Quiz ............................................................................................................................................... 37
Information on Timed Quizzes .................................................................................................................... 40
Reviewing Your Quiz Results ....................................................................................................................... 41
Checking Grades ............................................................................................................................................. 41
Groups ............................................................................................................................................................. 42
Finding your Group ..................................................................................................................................... 42
Enrolling in a Group .................................................................................................................................... 43
Locker .............................................................................................................................................................. 44
Accessing the Locker Tool ........................................................................................................................... 44
Upload Files to the Locker .......................................................................................................................... 45
Create a New File ........................................................................................................................................ 46
Download Files from the Locker ................................................................................................................. 47
Attach a File from the Locker ...................................................................................................................... 47
To Add a File to an Assignments Submission Folder .............................................................................. 47
To Add a File to a Discussion Thread ...................................................................................................... 49
Group Lockers ................................................................................................................................................. 50
Accessing the Group Locker ........................................................................................................................ 50
Logout ............................................................................................................................................................. 51
Additional Help ............................................................................................................................................... 51
Appendix A ...................................................................................................................................................... 52
System & Software Requirements: ............................................................................................................. 52
Internet Connection Speed ..................................................................................................................... 52
Java Runtime Environment (JRE) ............................................................................................................ 52
Desktop Support ..................................................................................................................................... 52
Supported Operating Systems ................................................................................................................ 52
Browser Support ..................................................................................................................................... 53

Tablet Support for Desktop Web ............................................................................................................ 53
Mobile Web Support ............................................................................................................................... 53
Revised: 8/12/2016 Page 6 of 54
Introduction This document has been developed to introduce you to Kennesaw State University’s learning management system, D2L Brightspace©. This document will help you to learn how to use the different features within D2L Brightspace. D2L Brightspace can be used as a small component of a traditional course, such as to submit papers and check grades, or it can be used in a course where everything occurs completely online.
Objectives After reading this document, you will be able to:
Access D2L Brightspace.
Understand the Home Page.
Use the Calendar tool.
Use the Email tool to read and send messages.
Use the Content tool.
Understand the features of the Assignments tool.
Participate in class discussions via the Discussions tool.
Take an online assessment via the Quiz tool.
Check your grades in the Grades tool.
Use the Locker tool to store files.
Log out of D2L Brightspace.
Understand the system requirements of D2L Brightspace.
D2L Brightspace: Student Guide for Mobile Devices D2L Brightspace includes a mobile interface, accessible from an iPad, Android, or other mobile devices. Please see our booklet D2L Brightspace: Student Guide for Mobile Devices for more information about mobile access.

Page 7 of 54
Accessing D2L Brightspace The following instructions explain how to access D2L Brightspace. 1. Go to the following website: http://d2l.kennesaw.edu 2. Click the Log In to KSU D2L Brightspace link. 3. In the Username field enter your NetID, and in the Password field, enter your NetID Password.
Figure 1 - Login
4. Click the Log In button. 5. When you have logged in to D2L Brightspace, the My Home page will appear on your screen.
Figure 2 – My Homepage
The Home Page On the My Home page, you will find the MiniBar and many options such as the Profile, Account Settings, and Notifications.
Figure 3 – Mini Bar
Page 8 of 54
The MiniBar
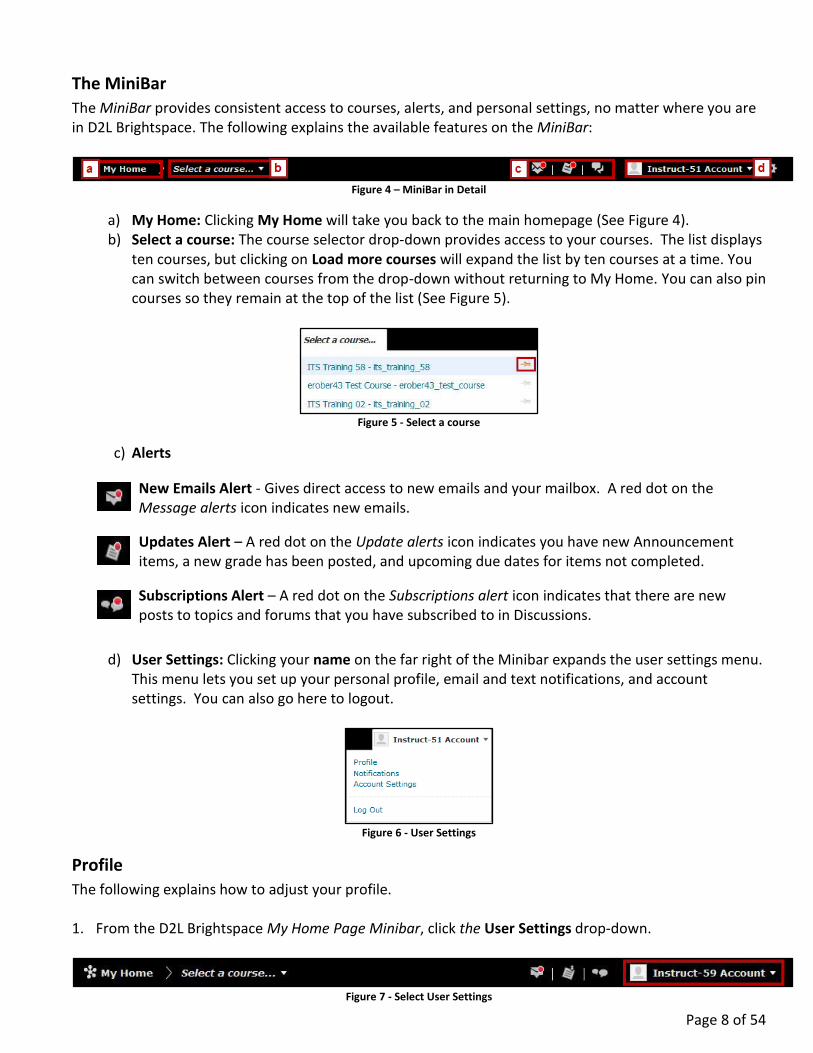
The MiniBar provides consistent access to courses, alerts, and personal settings, no matter where you are in D2L Brightspace. The following explains the available features on the MiniBar:
Figure 4 – MiniBar in Detail
a) My Home: Clicking My Home will take you back to the main homepage (See Figure 4). b) Select a course: The course selector drop-down provides access to your courses. The list displays
ten courses, but clicking on Load more courses will expand the list by ten courses at a time. You can switch between courses from the drop-down without returning to My Home. You can also pin courses so they remain at the top of the list (See Figure 5).
Figure 5 - Select a course
c) Alerts
d) User Settings: Clicking your name on the far right of the Minibar expands the user settings menu.
This menu lets you set up your personal profile, email and text notifications, and account settings. You can also go here to logout.
Figure 6 - User Settings
Profile
The following explains how to adjust your profile. 1. From the D2L Brightspace My Home Page Minibar, click the User Settings drop-down.
Figure 7 - Select User Settings
New Emails Alert - Gives direct access to new emails and your mailbox. A red dot on the Message alerts icon indicates new emails.
Updates Alert – A red dot on the Update alerts icon indicates you have new Announcement items, a new grade has been posted, and upcoming due dates for items not completed.
Subscriptions Alert – A red dot on the Subscriptions alert icon indicates that there are new posts to topics and forums that you have subscribed to in Discussions.
Page 9 of 54
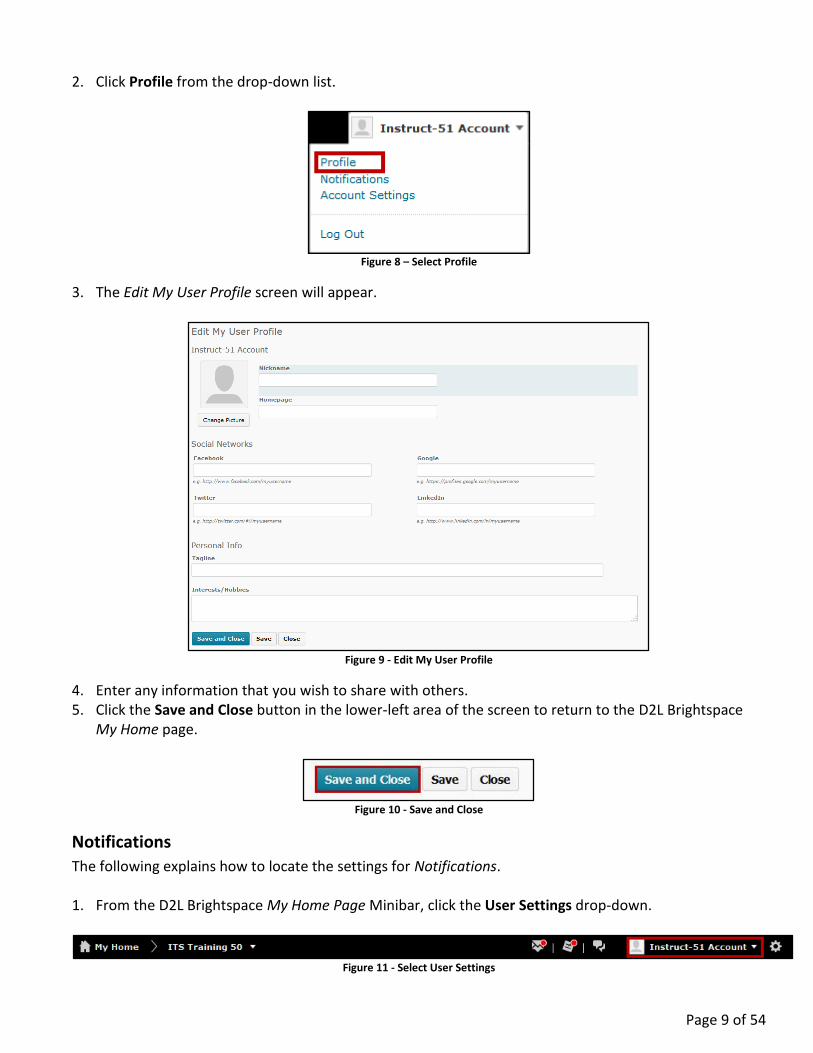
2. Click Profile from the drop-down list.
Figure 8 – Select Profile
3. The Edit My User Profile screen will appear.
Figure 9 - Edit My User Profile
4. Enter any information that you wish to share with others. 5. Click the Save and Close button in the lower-left area of the screen to return to the D2L Brightspace
My Home page.
Figure 10 - Save and Close
Notifications
The following explains how to locate the settings for Notifications. 1. From the D2L Brightspace My Home Page Minibar, click the User Settings drop-down.
Figure 11 - Select User Settings

Page 10 of 54
2. Click Notifications from the drop-down list.
Figure 12 – Select Notifications
3. The Notification Settings screen appears. Here you can do the following.
a. Have notifications sent to your email by clicking Change your email settings (See Figure 13). b. Have notifications sent to your mobile device by clicking Register your mobile (See Figure 13). c. Adjust the settings for notifications in the following three categories located on the screen:
Summary of Activity, Instant Notifications, Customize Notifications, and Exclude Some Courses (See Figure 13).
Figure 13 - New Screenshot
4. Click Save to return to the My Home page.
Figure 14 -- Save
Page 11 of 54
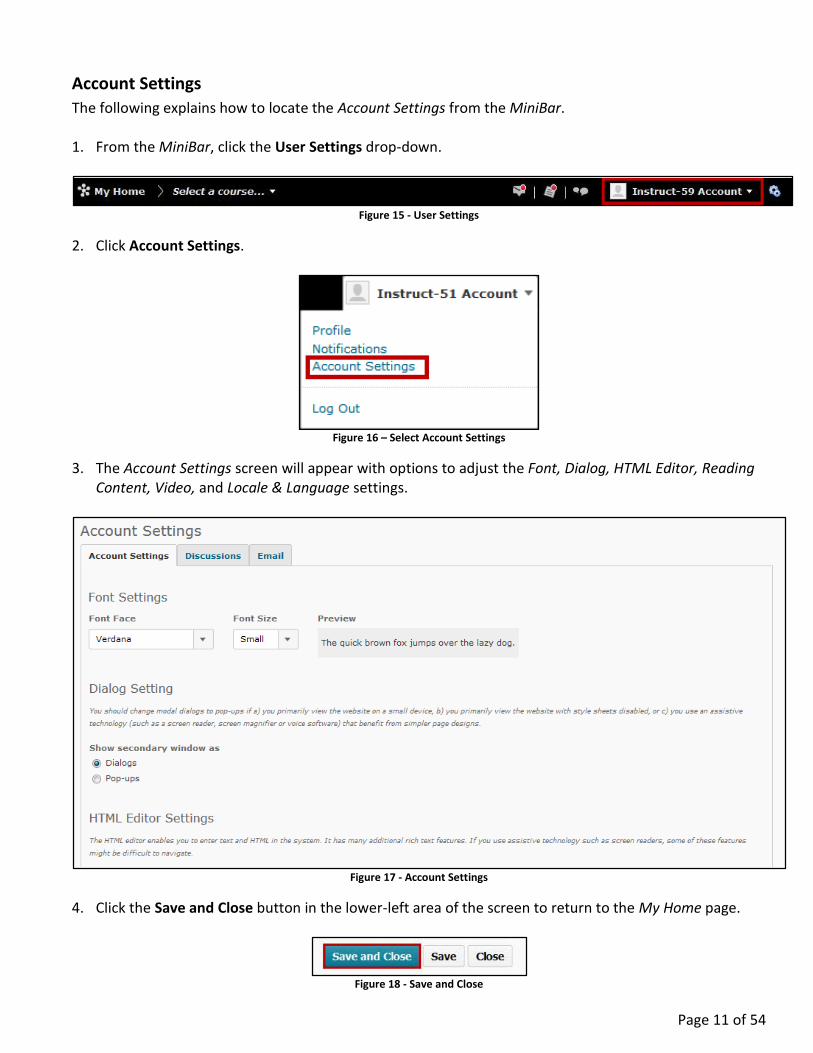
Account Settings
The following explains how to locate the Account Settings from the MiniBar. 1. From the MiniBar, click the User Settings drop-down.
Figure 15 - User Settings
2. Click Account Settings.
Figure 16 – Select Account Settings
3. The Account Settings screen will appear with options to adjust the Font, Dialog, HTML Editor, Reading Content, Video, and Locale & Language settings.
Figure 17 - Account Settings
4. Click the Save and Close button in the lower-left area of the screen to return to the My Home page.
Figure 18 - Save and Close
Page 12 of 54
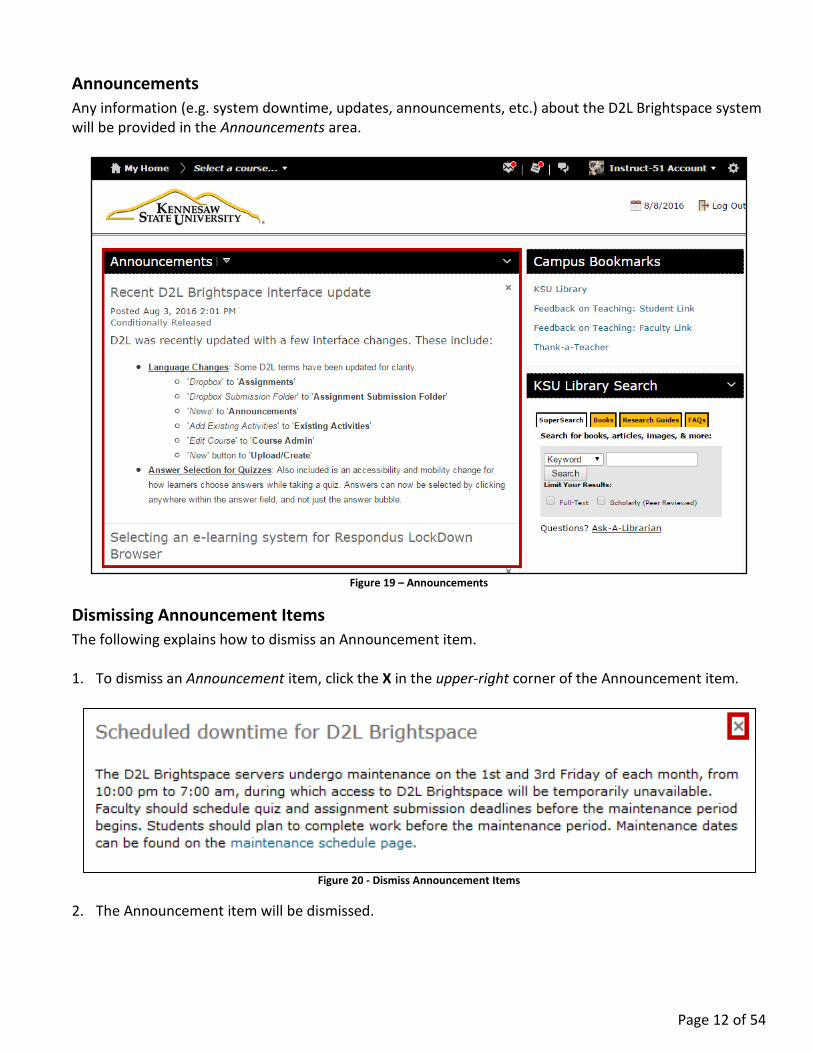
Announcements
Any information (e.g. system downtime, updates, announcements, etc.) about the D2L Brightspace system will be provided in the Announcements area.
Figure 19 – Announcements
Dismissing Announcement Items
The following explains how to dismiss an Announcement item. 1. To dismiss an Announcement item, click the X in the upper-right corner of the Announcement item.
Figure 20 - Dismiss Announcement Items
2. The Announcement item will be dismissed.

Page 13 of 54
Restore Dismissed Announcement Items
The following explains how to restore an Announcement item that has been deleted. 1. Click Announcement to enter the Announcements tool.
Figure 21 - Entering Announcements Tool
2. The Announcements Tool will appear and display all active and dismissed Announcement items. Click the drop-down arrow next to a dismissed Announcement item to access the Restore option.
Figure 22 - Dismissed Announcement Items
3. Click Restore. The Announcement item will be restored and viewable from your My Home page.
Figure 23 - Restore Announcement Item
Note: Announcement items in your Course can be dismissed and/or restored using the same process.
Accessing Your Courses The following explains how to access your courses in D2L Brightspace. 1. From the MiniBar, click the Select a course drop-down.
Figure 24 - MiniBar: Select a Course
2. The course(s) that you are currently enrolled in this semester will appear. Click the course of your choice.
Figure 25 - Select a course
Page 14 of 54
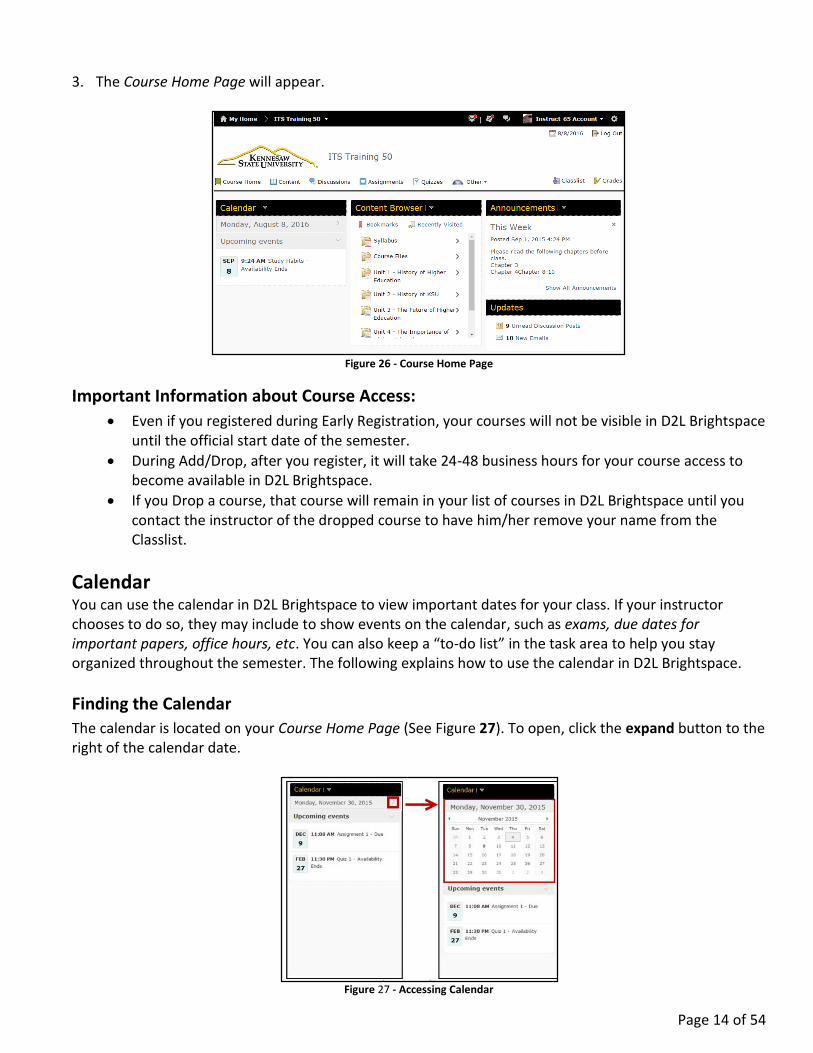
3. The Course Home Page will appear.
Figure 26 - Course Home Page
Important Information about Course Access:
Even if you registered during Early Registration, your courses will not be visible in D2L Brightspace until the official start date of the semester.
During Add/Drop, after you register, it will take 24-48 business hours for your course access to become available in D2L Brightspace.
If you Drop a course, that course will remain in your list of courses in D2L Brightspace until you contact the instructor of the dropped course to have him/her remove your name from the Classlist.
Calendar You can use the calendar in D2L Brightspace to view important dates for your class. If your instructor chooses to do so, they may include to show events on the calendar, such as exams, due dates for important papers, office hours, etc. You can also keep a “to-do list” in the task area to help you stay organized throughout the semester. The following explains how to use the calendar in D2L Brightspace.
Finding the Calendar
The calendar is located on your Course Home Page (See Figure 27). To open, click the expand button to the right of the calendar date.
Figure 27 - Accessing Calendar
Page 15 of 54
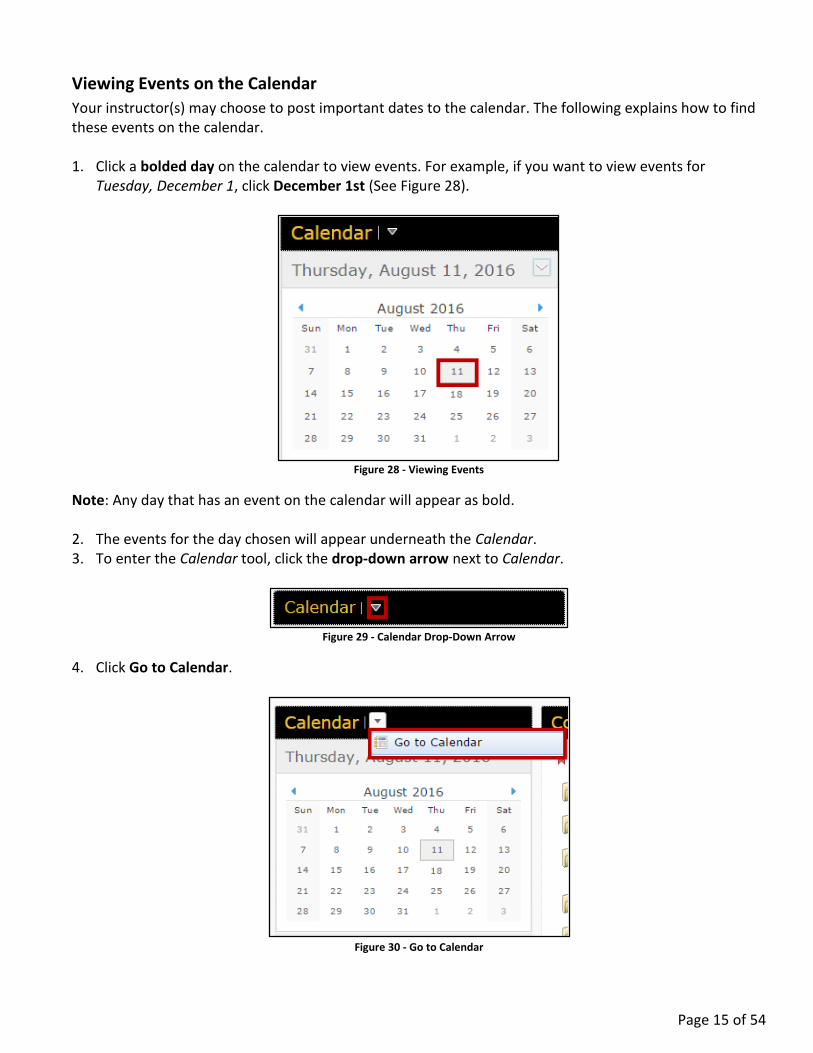
Viewing Events on the Calendar
Your instructor(s) may choose to post important dates to the calendar. The following explains how to find these events on the calendar. 1. Click a bolded day on the calendar to view events. For example, if you want to view events for
Tuesday, December 1, click December 1st (See Figure 28).
Figure 28 - Viewing Events
Note: Any day that has an event on the calendar will appear as bold. 2. The events for the day chosen will appear underneath the Calendar. 3. To enter the Calendar tool, click the drop-down arrow next to Calendar.
Figure 29 - Calendar Drop-Down Arrow
4. Click Go to Calendar.
Figure 30 - Go to Calendar
Page 16 of 54
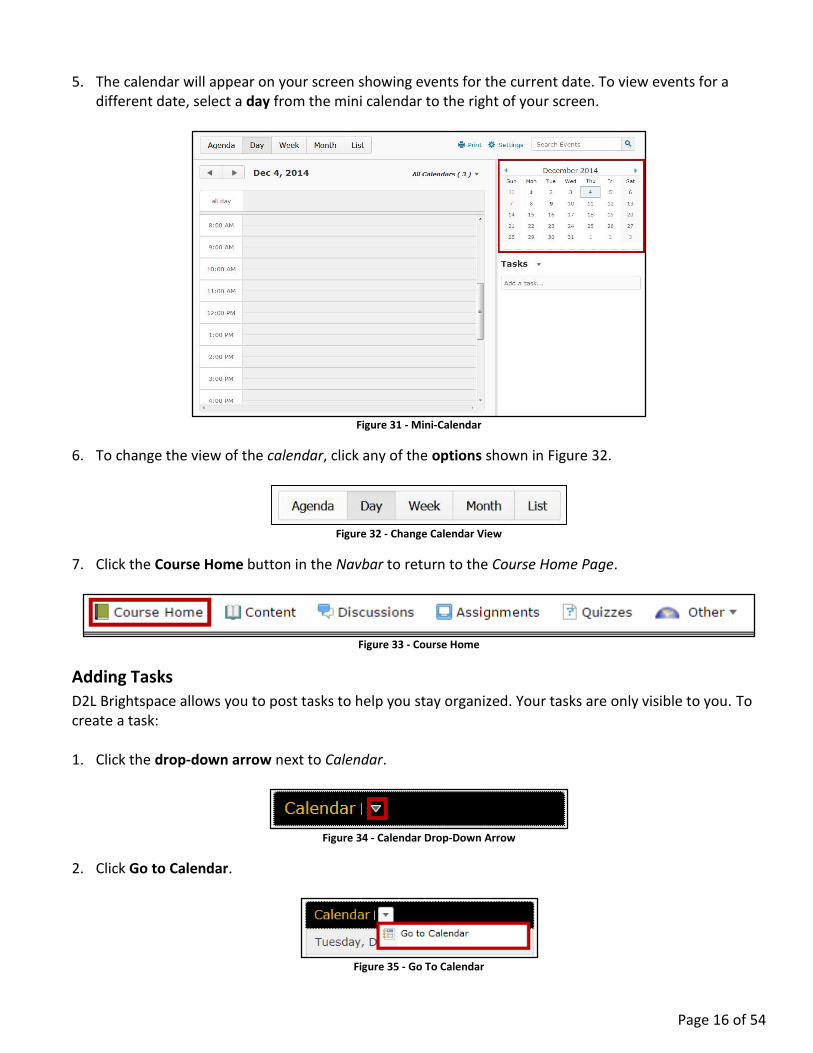
5. The calendar will appear on your screen showing events for the current date. To view events for a different date, select a day from the mini calendar to the right of your screen.
Figure 31 - Mini-Calendar
6. To change the view of the calendar, click any of the options shown in Figure 32.
Figure 32 - Change Calendar View
7. Click the Course Home button in the Navbar to return to the Course Home Page.
Figure 33 - Course Home
Adding Tasks
D2L Brightspace allows you to post tasks to help you stay organized. Your tasks are only visible to you. To create a task: 1. Click the drop-down arrow next to Calendar.
Figure 34 - Calendar Drop-Down Arrow
2. Click Go to Calendar.
Figure 35 - Go To Calendar
Page 17 of 54
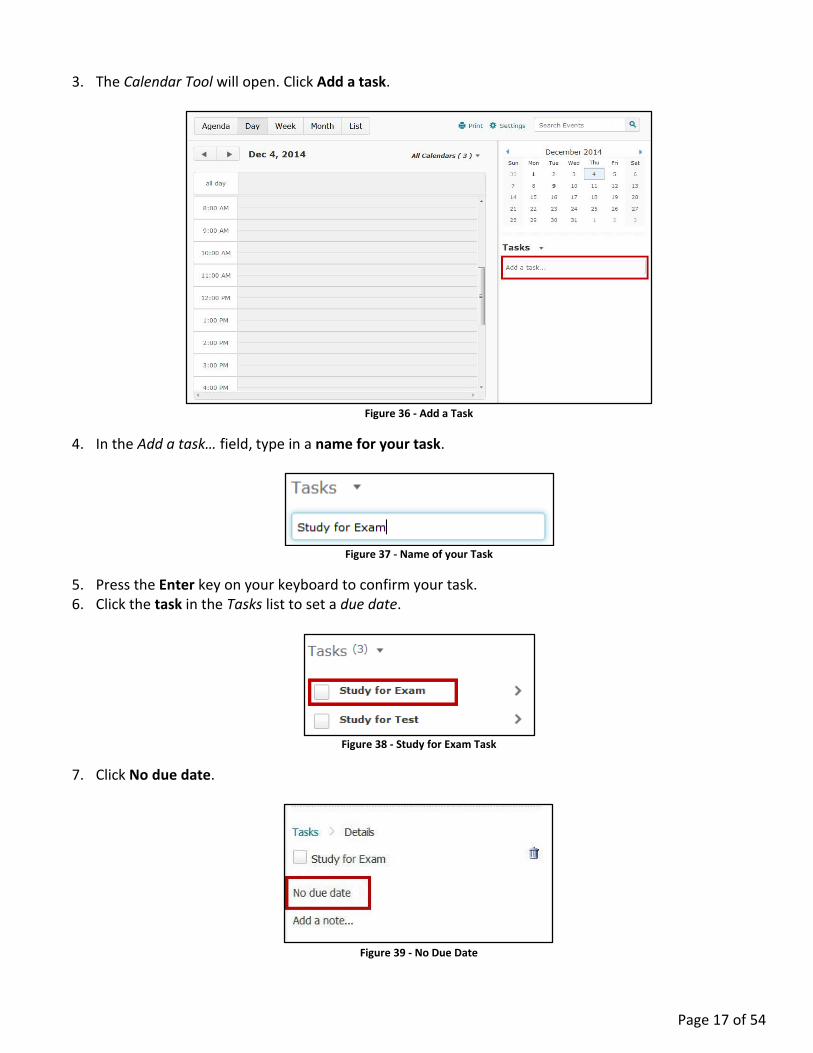
3. The Calendar Tool will open. Click Add a task.
Figure 36 - Add a Task
4. In the Add a task… field, type in a name for your task.
Figure 37 - Name of your Task
5. Press the Enter key on your keyboard to confirm your task. 6. Click the task in the Tasks list to set a due date.
Figure 38 - Study for Exam Task
7. Click No due date.
Figure 39 - No Due Date

Page 18 of 54
8. Enter a date when the task should be complete.
Figure 40 - Enter Due Date
9. Click the Save button.
Figure 41 - Save
10. The task will be added and the due date will be set.
Figure 42 - Task Added
11. Click the Course Home button on the Navbar to return to your Course Home Page.
Figure 43 - Return to Course Home Page
Email The Email tool can be used to send and receive emails within D2L Brightspace. This email tool is separate from your student email account. The following explains more about using the email tool within D2L Brightspace.
Opening Email
The following explains how to open the email tool. 1. From the Minibar, click the Email Alerts icon.
Figure 44 - Email Alerts
Page 19 of 54
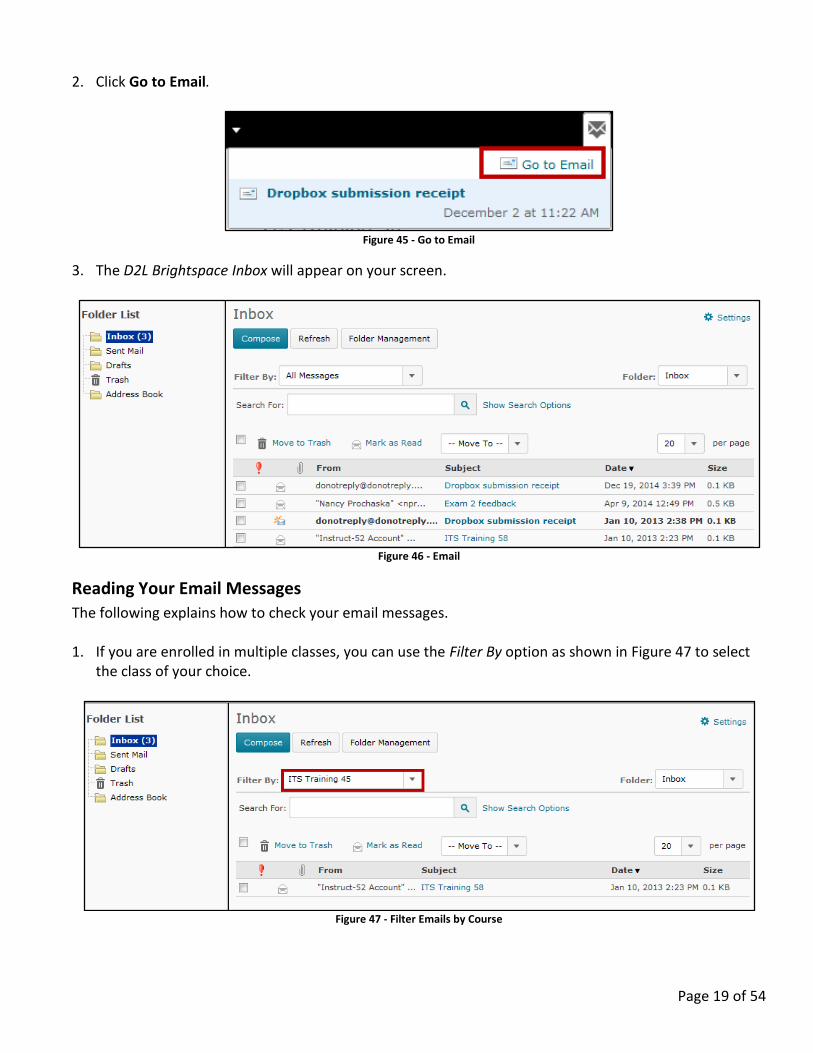
2. Click Go to Email.
Figure 45 - Go to Email
3. The D2L Brightspace Inbox will appear on your screen.
Figure 46 - Email
Reading Your Email Messages
The following explains how to check your email messages. 1. If you are enrolled in multiple classes, you can use the Filter By option as shown in Figure 47 to select
the class of your choice.
Figure 47 - Filter Emails by Course
Page 20 of 54
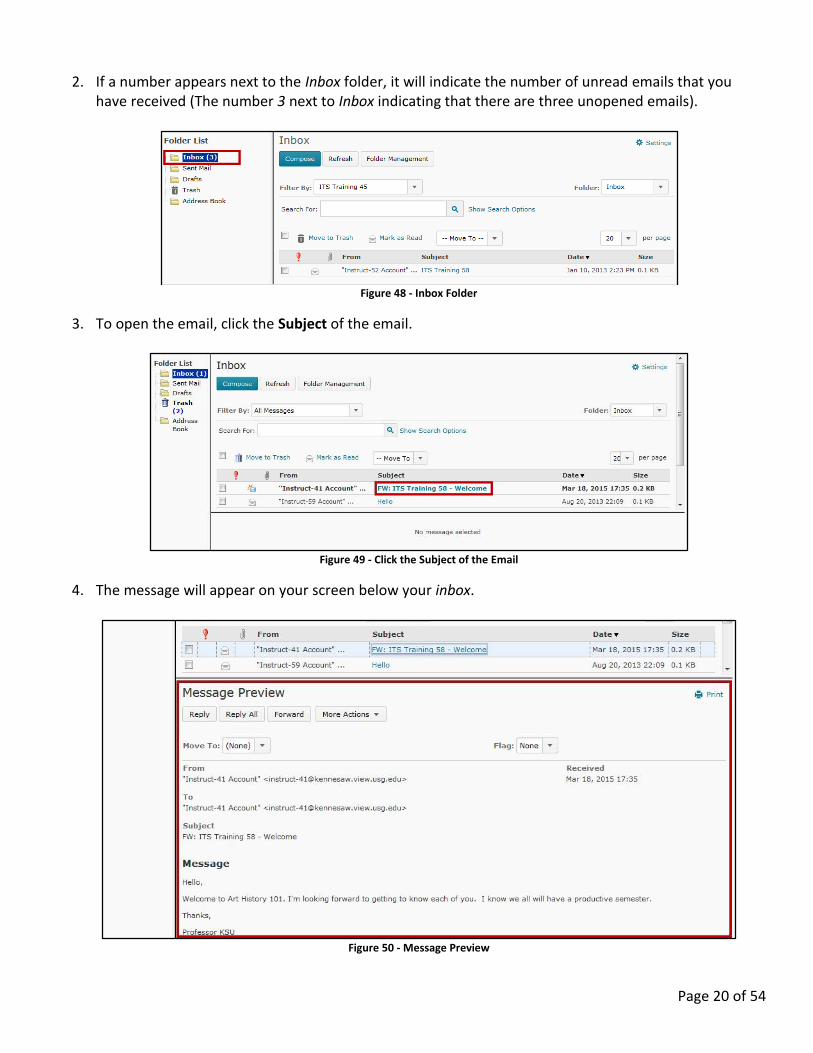
2. If a number appears next to the Inbox folder, it will indicate the number of unread emails that you have received (The number 3 next to Inbox indicating that there are three unopened emails).
Figure 48 - Inbox Folder
3. To open the email, click the Subject of the email.
Figure 49 - Click the Subject of the Email
4. The message will appear on your screen below your inbox.
Figure 50 - Message Preview
Page 21 of 54
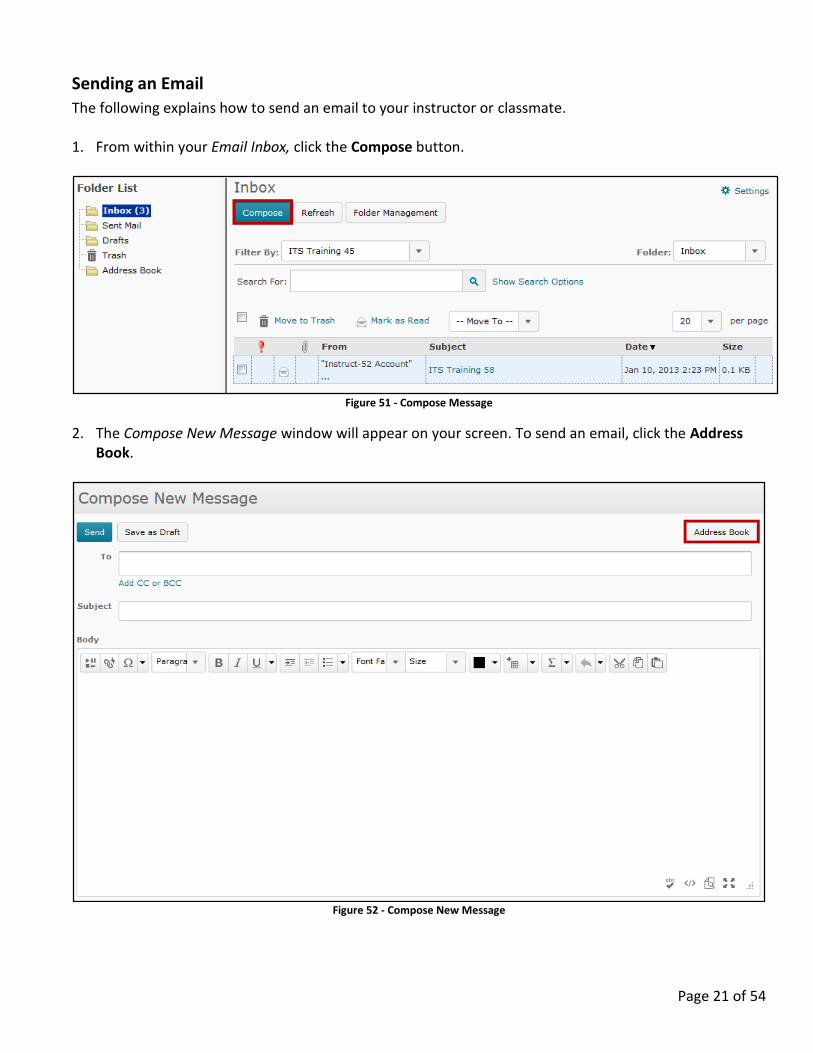
Sending an Email
The following explains how to send an email to your instructor or classmate. 1. From within your Email Inbox, click the Compose button.
Figure 51 - Compose Message
2. The Compose New Message window will appear on your screen. To send an email, click the Address Book.
Figure 52 - Compose New Message

Page 22 of 54
3. The Address Book window will appear on your screen, displaying the names of the people in your class.
Figure 53 - Address Book
4. If you are enrolled in multiple classes, you can use the Filter By option to display user information for your class of choice.
Figure 54 - Filter By
5. Click the checkboxes to select the name(s) of the recipients that you want to send an email to.
Figure 55 - Selecting Recipients
Page 23 of 54
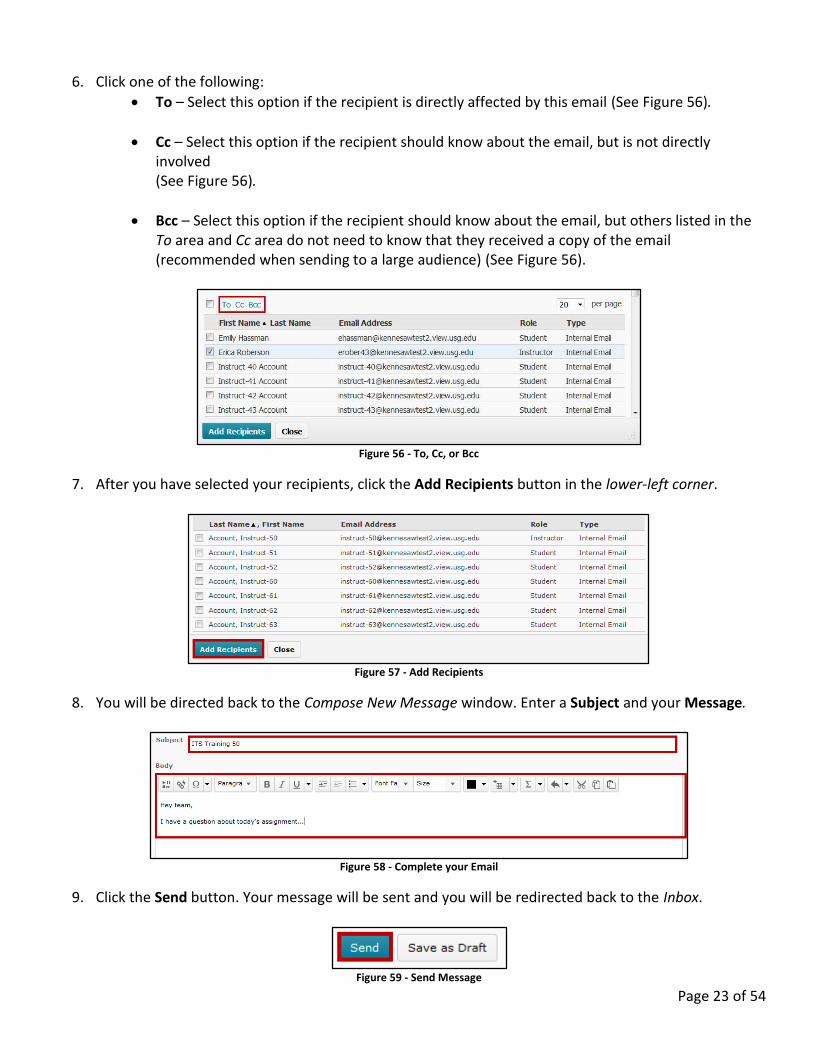
6. Click one of the following:
To – Select this option if the recipient is directly affected by this email (See Figure 56).
Cc – Select this option if the recipient should know about the email, but is not directly involved (See Figure 56).
Bcc – Select this option if the recipient should know about the email, but others listed in the To area and Cc area do not need to know that they received a copy of the email (recommended when sending to a large audience) (See Figure 56).
Figure 56 - To, Cc, or Bcc
7. After you have selected your recipients, click the Add Recipients button in the lower-left corner.
Figure 57 - Add Recipients
8. You will be directed back to the Compose New Message window. Enter a Subject and your Message.
Figure 58 - Complete your Email
9. Click the Send button. Your message will be sent and you will be redirected back to the Inbox.
Figure 59 - Send Message
Page 24 of 54
Content The Content tool is where you will find course materials such as the syllabus, lecture slides, assignments, etc. The following explains how to use the Content area.
Accessing and Viewing the Content
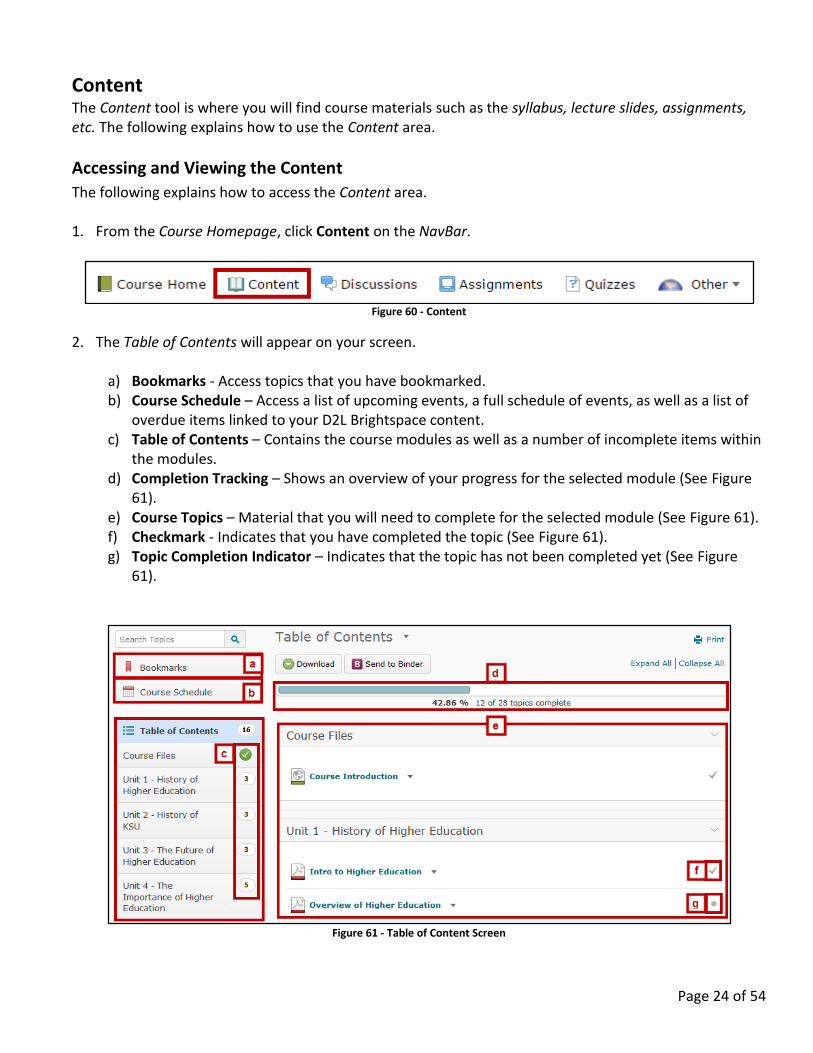
The following explains how to access the Content area. 1. From the Course Homepage, click Content on the NavBar.
Figure 60 - Content
2. The Table of Contents will appear on your screen.
a) Bookmarks - Access topics that you have bookmarked. b) Course Schedule – Access a list of upcoming events, a full schedule of events, as well as a list of
overdue items linked to your D2L Brightspace content. c) Table of Contents – Contains the course modules as well as a number of incomplete items within
the modules. d) Completion Tracking – Shows an overview of your progress for the selected module (See Figure
61). e) Course Topics – Material that you will need to complete for the selected module (See Figure 61). f) Checkmark - Indicates that you have completed the topic (See Figure 61). g) Topic Completion Indicator – Indicates that the topic has not been completed yet (See Figure
61).
Figure 61 - Table of Content Screen
Page 25 of 54
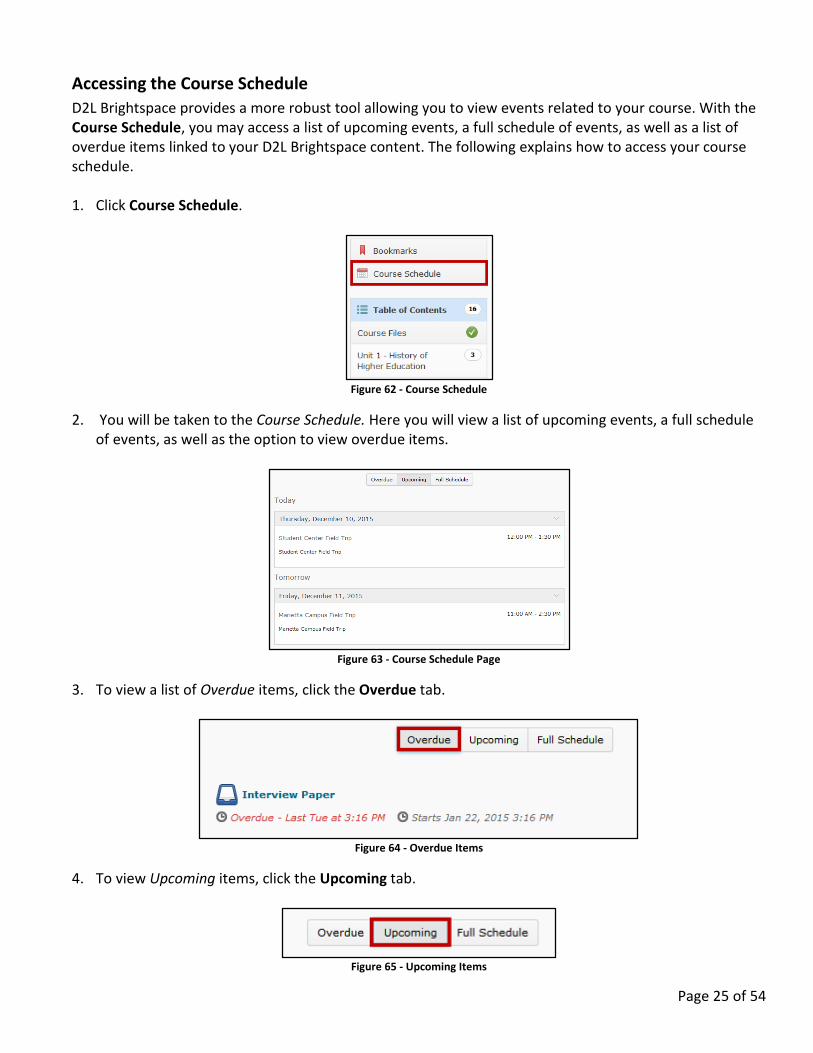
Accessing the Course Schedule
D2L Brightspace provides a more robust tool allowing you to view events related to your course. With the Course Schedule, you may access a list of upcoming events, a full schedule of events, as well as a list of overdue items linked to your D2L Brightspace content. The following explains how to access your course schedule. 1. Click Course Schedule.
Figure 62 - Course Schedule
2. You will be taken to the Course Schedule. Here you will view a list of upcoming events, a full schedule of events, as well as the option to view overdue items.
Figure 63 - Course Schedule Page
3. To view a list of Overdue items, click the Overdue tab.
Figure 64 - Overdue Items
4. To view Upcoming items, click the Upcoming tab.
Figure 65 - Upcoming Items

Page 26 of 54
5. To view a Full Schedule of events, click Full Schedule.
Figure 66 - Full Schedule
Accessing Content Materials
The following explains how to access your content material that has been provided by your instructor. 1. Click a Module heading to view the topics within.
Figure 67 – Accessing Modules
2. Click a topic to view its contents.
Figure 68 - Viewing Topics
3. Once you have completed all topics within a module, a green checkmark will appear next to the module heading within the Table of Contents.
Figure 69 – Green Checkmark

Page 27 of 54
Navigating within a Topic
Once you access a topic, there are several navigation buttons that you will encounter while viewing a topic.
a) Breadcrumb Trail - Move backwards to the Table of Contents (See Figure 70). b) Bookmark – Bookmark the content displayed on the screen (See Figure 70). c) View Content in New Window – Opens the content in a new window (See Figure 70). d) Arrow buttons - Move through topics using the arrow buttons (See Figure 70). e) Slide Out Panel - Select the slide out panel tab for access to the Table of Contents (See Figure 70).
Figure 70 - Navigating within a Topic
Additional navigation options are available within the slide out panel (See Figure 71).
a) Table of Contents - Go to the Table of Contents (See Figure 71). b) Navigation Arrows - Moves backwards/forwards through the modules (See Figure 71). c) Slide Out Panel Tab - Closes the Slide Out Panel (See Figure 71).
Figure 71 - Slide Out Panel Navigation Buttons
Page 28 of 54
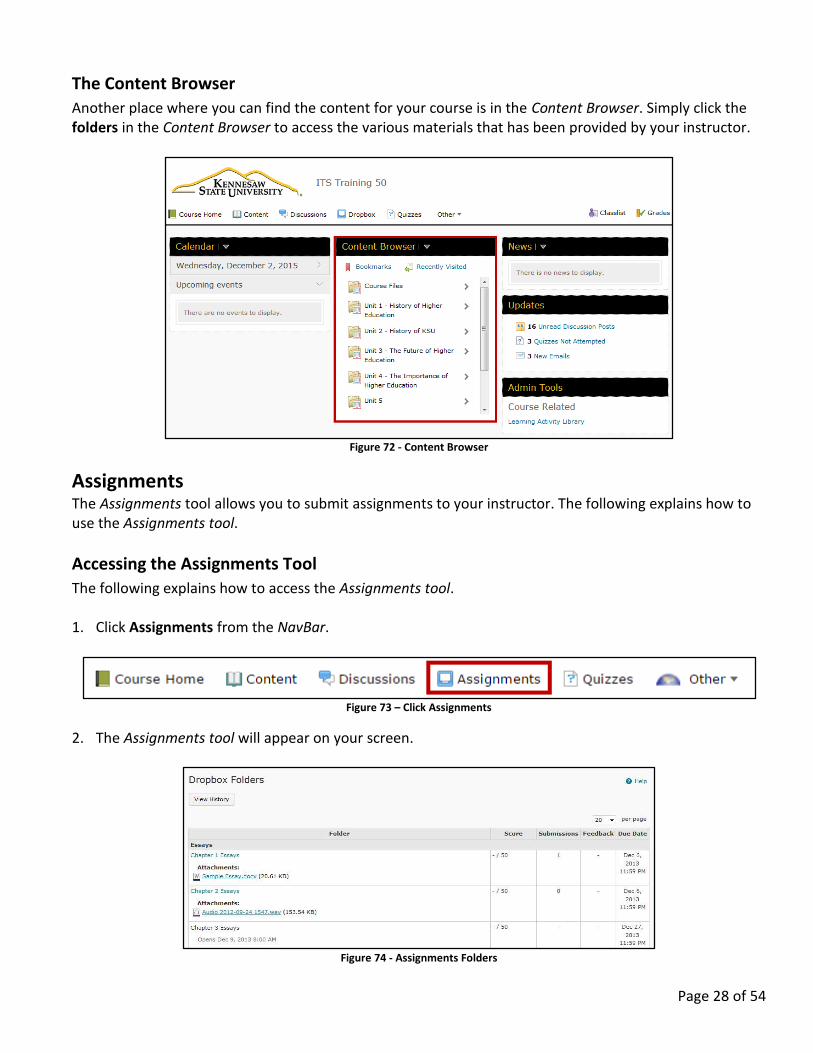
The Content Browser
Another place where you can find the content for your course is in the Content Browser. Simply click the folders in the Content Browser to access the various materials that has been provided by your instructor.
Figure 72 - Content Browser
Assignments The Assignments tool allows you to submit assignments to your instructor. The following explains how to use the Assignments tool.
Accessing the Assignments Tool
The following explains how to access the Assignments tool. 1. Click Assignments from the NavBar.
Figure 73 – Click Assignments
2. The Assignments tool will appear on your screen.
Figure 74 - Assignments Folders
Page 29 of 54
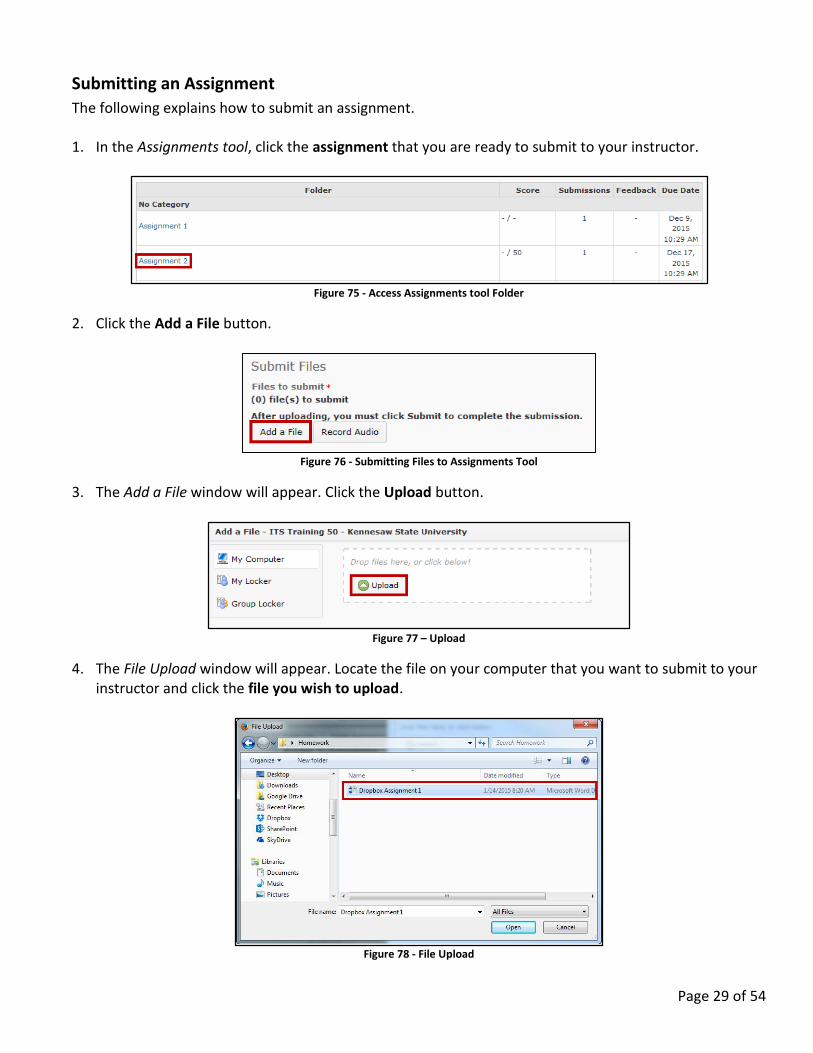
Submitting an Assignment
The following explains how to submit an assignment. 1. In the Assignments tool, click the assignment that you are ready to submit to your instructor.
Figure 75 - Access Assignments tool Folder
2. Click the Add a File button.
Figure 76 - Submitting Files to Assignments Tool
3. The Add a File window will appear. Click the Upload button.
Figure 77 – Upload
4. The File Upload window will appear. Locate the file on your computer that you want to submit to your instructor and click the file you wish to upload.
Figure 78 - File Upload
Page 30 of 54
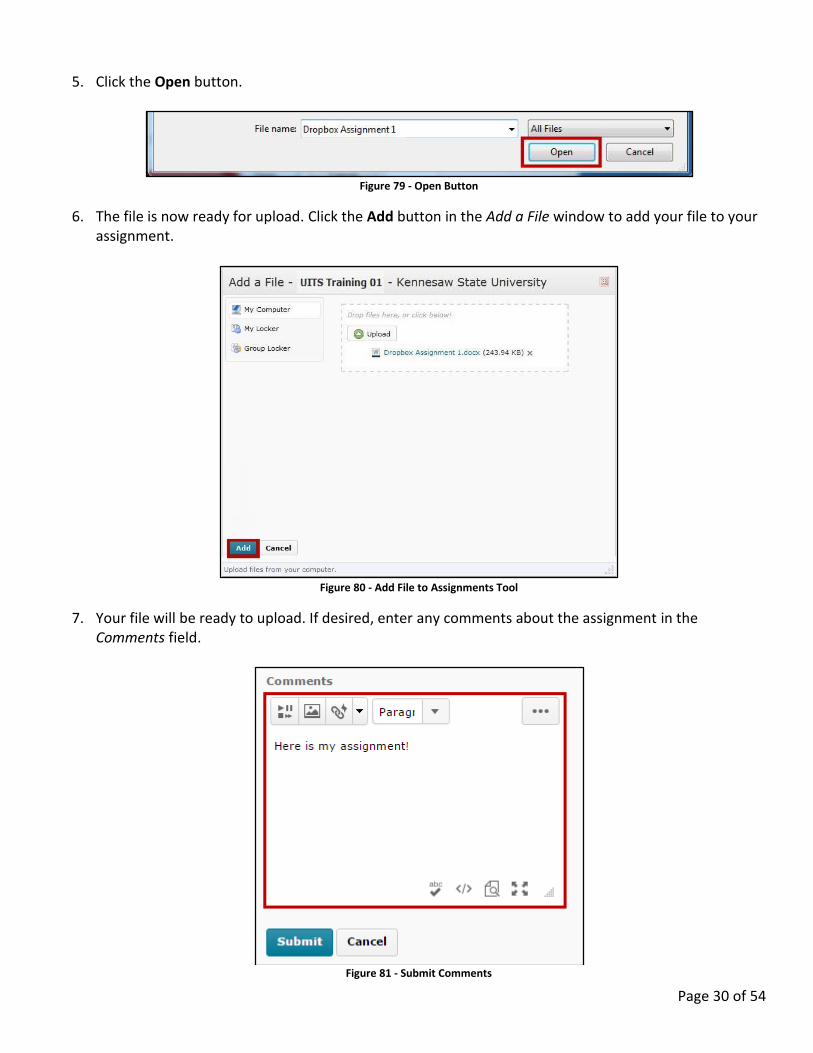
5. Click the Open button.
Figure 79 - Open Button
6. The file is now ready for upload. Click the Add button in the Add a File window to add your file to your assignment.
Figure 80 - Add File to Assignments Tool
7. Your file will be ready to upload. If desired, enter any comments about the assignment in the Comments field.
Figure 81 - Submit Comments
Page 31 of 54
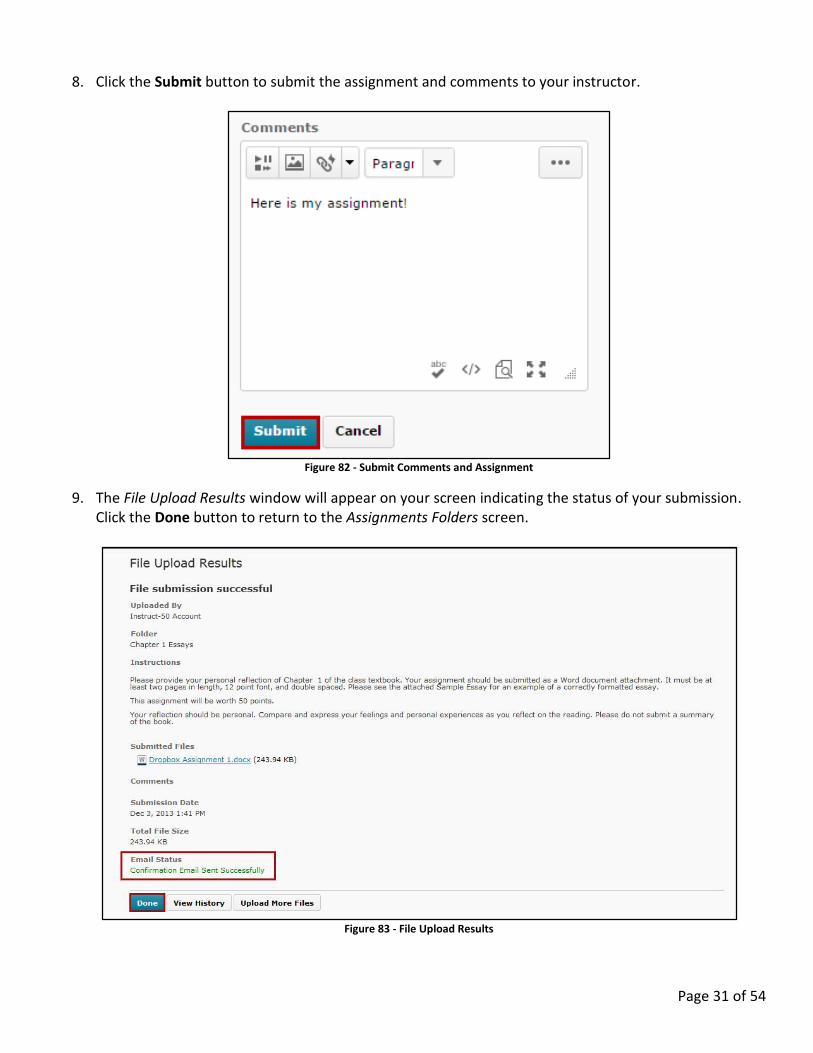
8. Click the Submit button to submit the assignment and comments to your instructor.
Figure 82 - Submit Comments and Assignment
9. The File Upload Results window will appear on your screen indicating the status of your submission. Click the Done button to return to the Assignments Folders screen.
Figure 83 - File Upload Results
Page 32 of 54
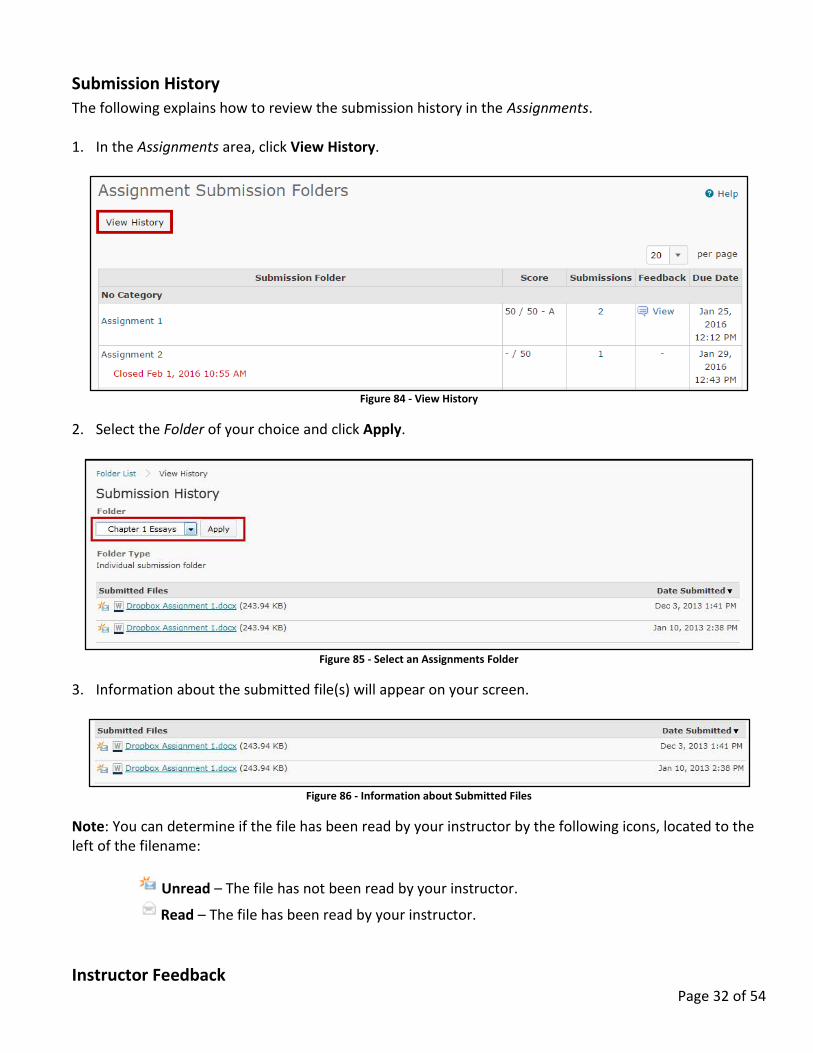
Submission History
The following explains how to review the submission history in the Assignments. 1. In the Assignments area, click View History.
Figure 84 - View History
2. Select the Folder of your choice and click Apply.
Figure 85 - Select an Assignments Folder
3. Information about the submitted file(s) will appear on your screen.
Figure 86 - Information about Submitted Files
Note: You can determine if the file has been read by your instructor by the following icons, located to the left of the filename:
Unread – The file has not been read by your instructor.
Read – The file has been read by your instructor.
Instructor Feedback
Page 33 of 54
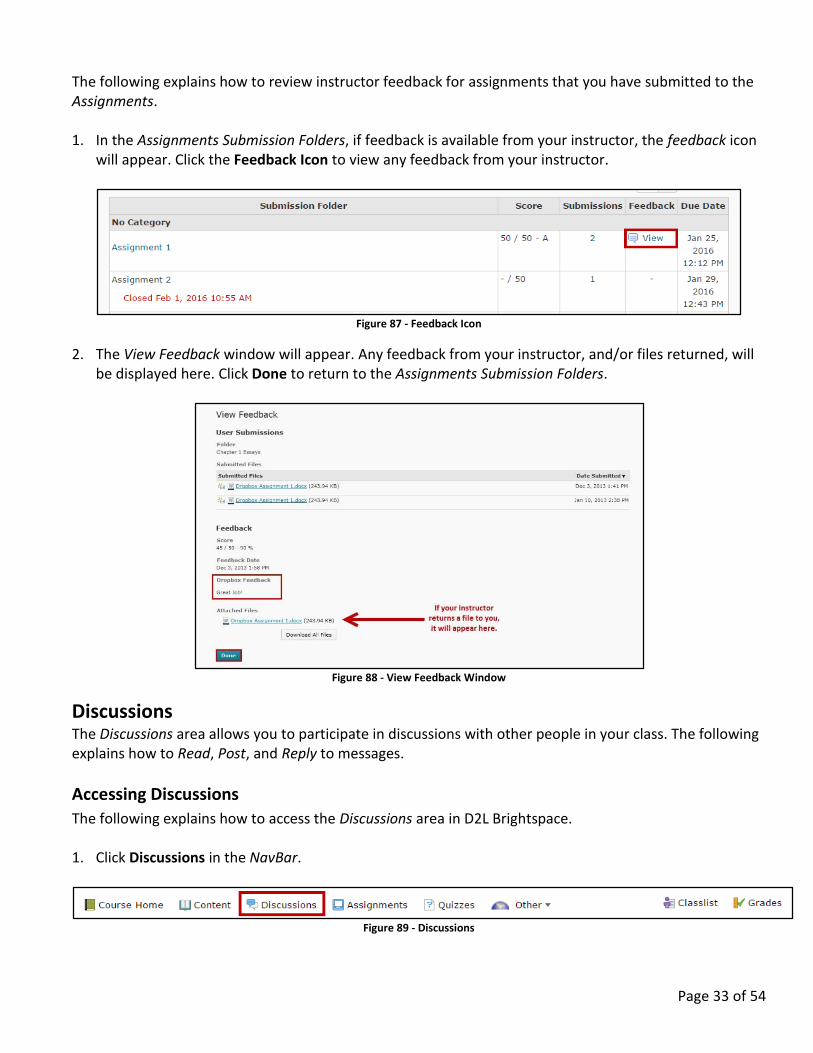
The following explains how to review instructor feedback for assignments that you have submitted to the Assignments. 1. In the Assignments Submission Folders, if feedback is available from your instructor, the feedback icon
will appear. Click the Feedback Icon to view any feedback from your instructor.
Figure 87 - Feedback Icon
2. The View Feedback window will appear. Any feedback from your instructor, and/or files returned, will be displayed here. Click Done to return to the Assignments Submission Folders.
Figure 88 - View Feedback Window
Discussions The Discussions area allows you to participate in discussions with other people in your class. The following explains how to Read, Post, and Reply to messages.
Accessing Discussions
The following explains how to access the Discussions area in D2L Brightspace. 1. Click Discussions in the NavBar.
Figure 89 - Discussions
Page 34 of 54
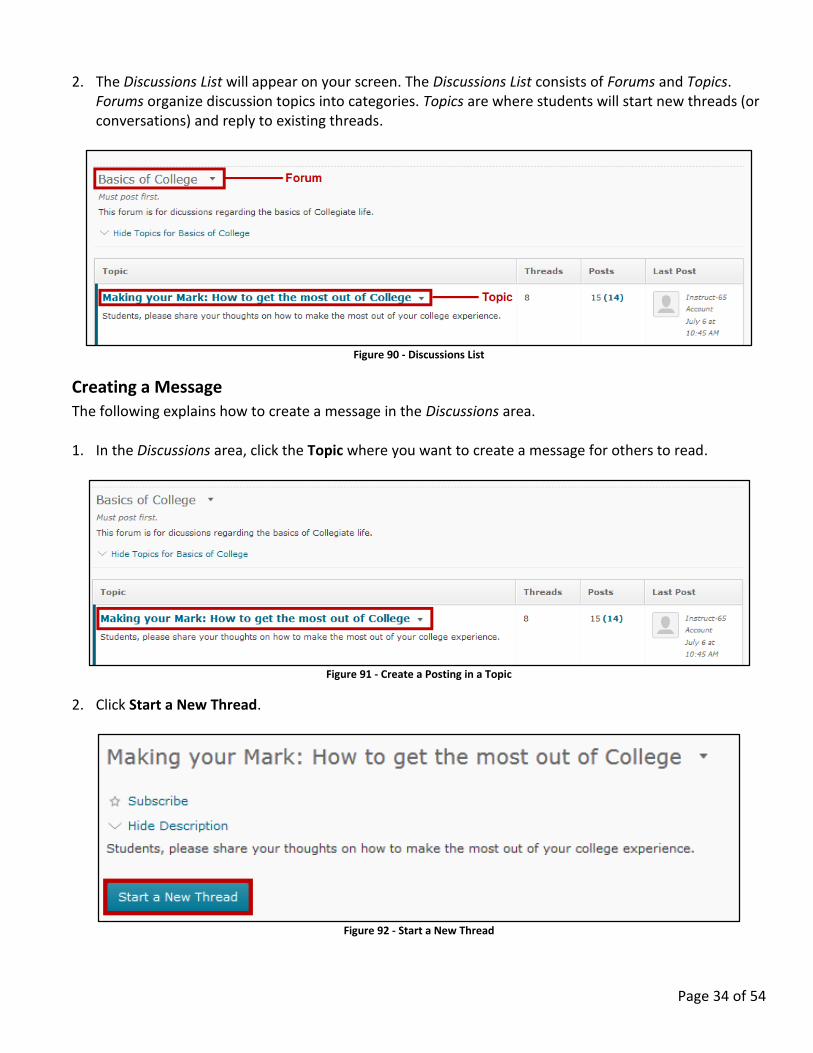
2. The Discussions List will appear on your screen. The Discussions List consists of Forums and Topics. Forums organize discussion topics into categories. Topics are where students will start new threads (or conversations) and reply to existing threads.
Figure 90 - Discussions List
Creating a Message
The following explains how to create a message in the Discussions area. 1. In the Discussions area, click the Topic where you want to create a message for others to read.
Figure 91 - Create a Posting in a Topic
2. Click Start a New Thread.
Figure 92 - Start a New Thread

Page 35 of 54
3. Enter a Subject and Message.
Figure 93 - Type your Subject and Message
4. Click Post in the bottom-left corner.
Figure 94 - Post a Subject and Message
5. The message will appear for other people in your class to read.
Figure 95 - Thread Displayed
Reading and Replying to Discussions Posted by Others
The following explains how to read and reply to messages posted by other people in the class. 1. From the Discussions list, click the topic of your choice.
Figure 96 - Select Topic
Page 36 of 54
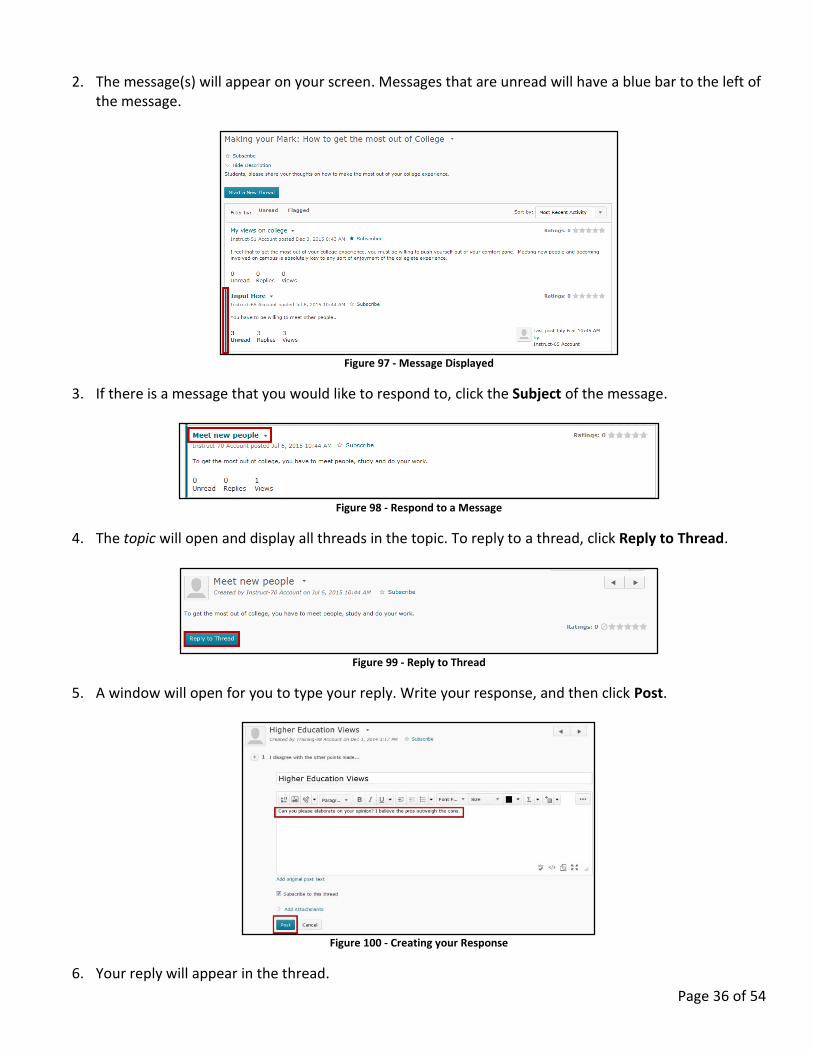
2. The message(s) will appear on your screen. Messages that are unread will have a blue bar to the left of the message.
Figure 97 - Message Displayed
3. If there is a message that you would like to respond to, click the Subject of the message.
Figure 98 - Respond to a Message
4. The topic will open and display all threads in the topic. To reply to a thread, click Reply to Thread.
Figure 99 - Reply to Thread
5. A window will open for you to type your reply. Write your response, and then click Post.
Figure 100 - Creating your Response
6. Your reply will appear in the thread.
Page 37 of 54
Quizzes The following explains how to access quizzes in D2L Brightspace.
Taking a Quiz
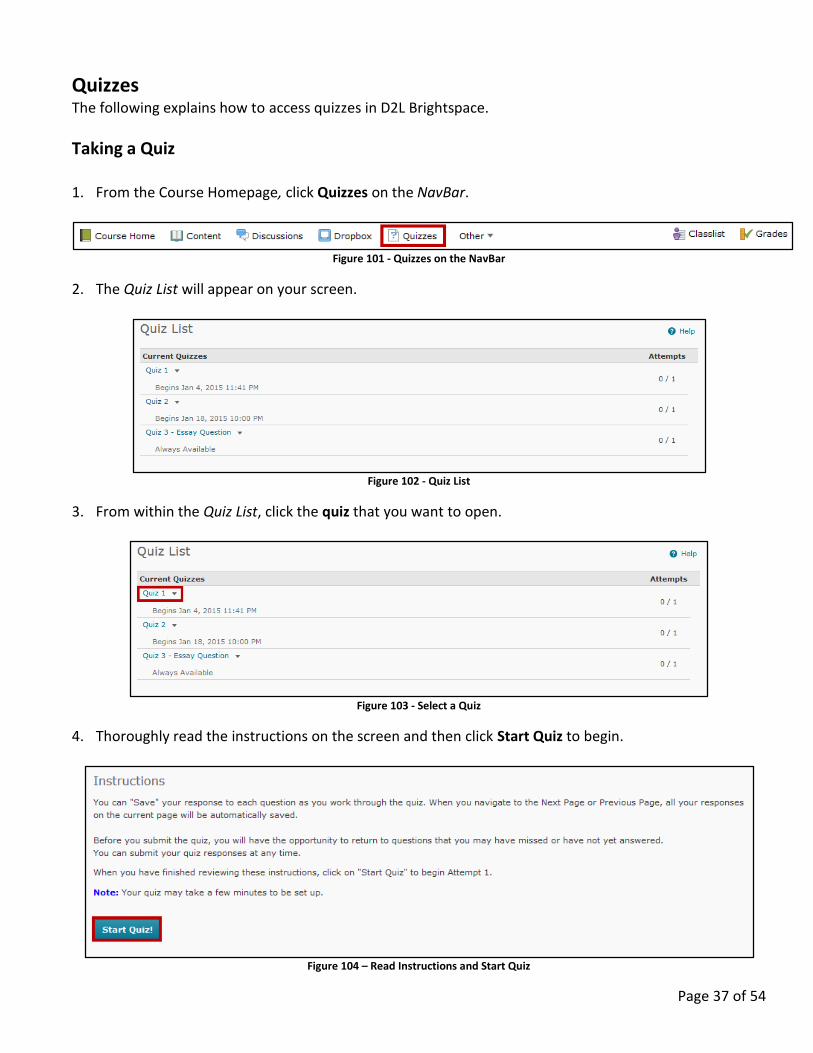
1. From the Course Homepage, click Quizzes on the NavBar.
Figure 101 - Quizzes on the NavBar
2. The Quiz List will appear on your screen.
Figure 102 - Quiz List
3. From within the Quiz List, click the quiz that you want to open.
Figure 103 - Select a Quiz
4. Thoroughly read the instructions on the screen and then click Start Quiz to begin.
Figure 104 – Read Instructions and Start Quiz
Page 38 of 54
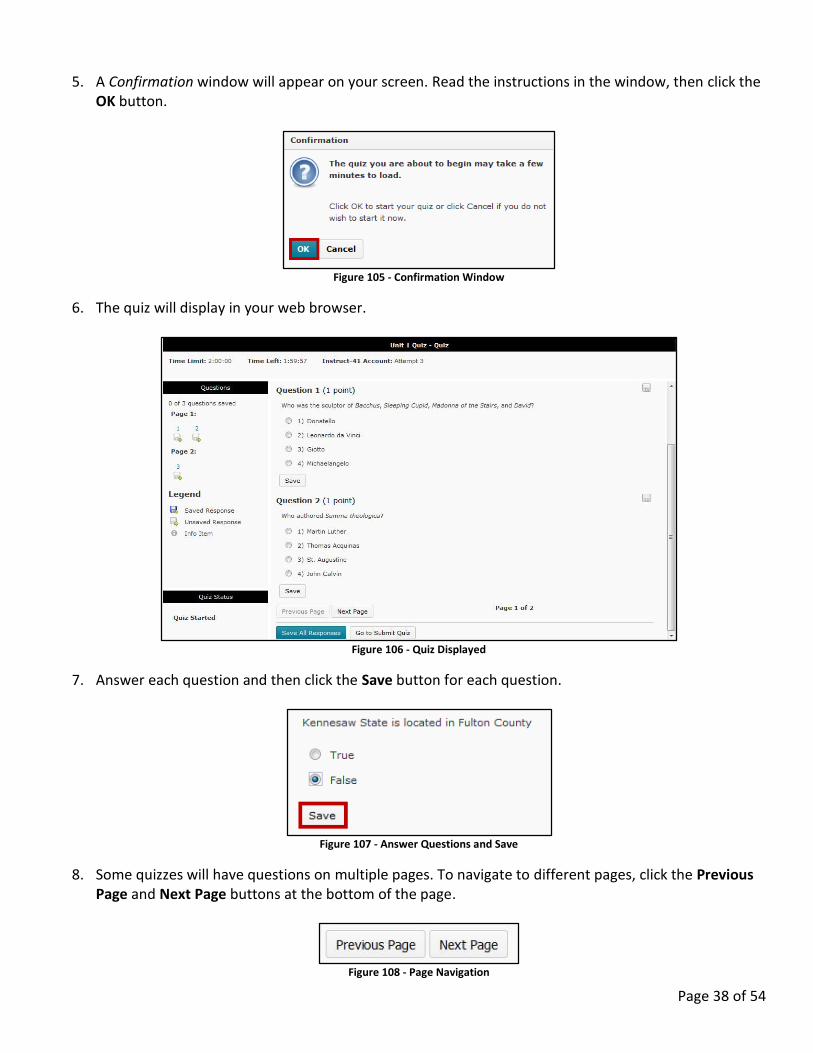
5. A Confirmation window will appear on your screen. Read the instructions in the window, then click the OK button.
Figure 105 - Confirmation Window
6. The quiz will display in your web browser.
Figure 106 - Quiz Displayed
7. Answer each question and then click the Save button for each question.
Figure 107 - Answer Questions and Save
8. Some quizzes will have questions on multiple pages. To navigate to different pages, click the Previous Page and Next Page buttons at the bottom of the page.
Figure 108 - Page Navigation
Page 39 of 54
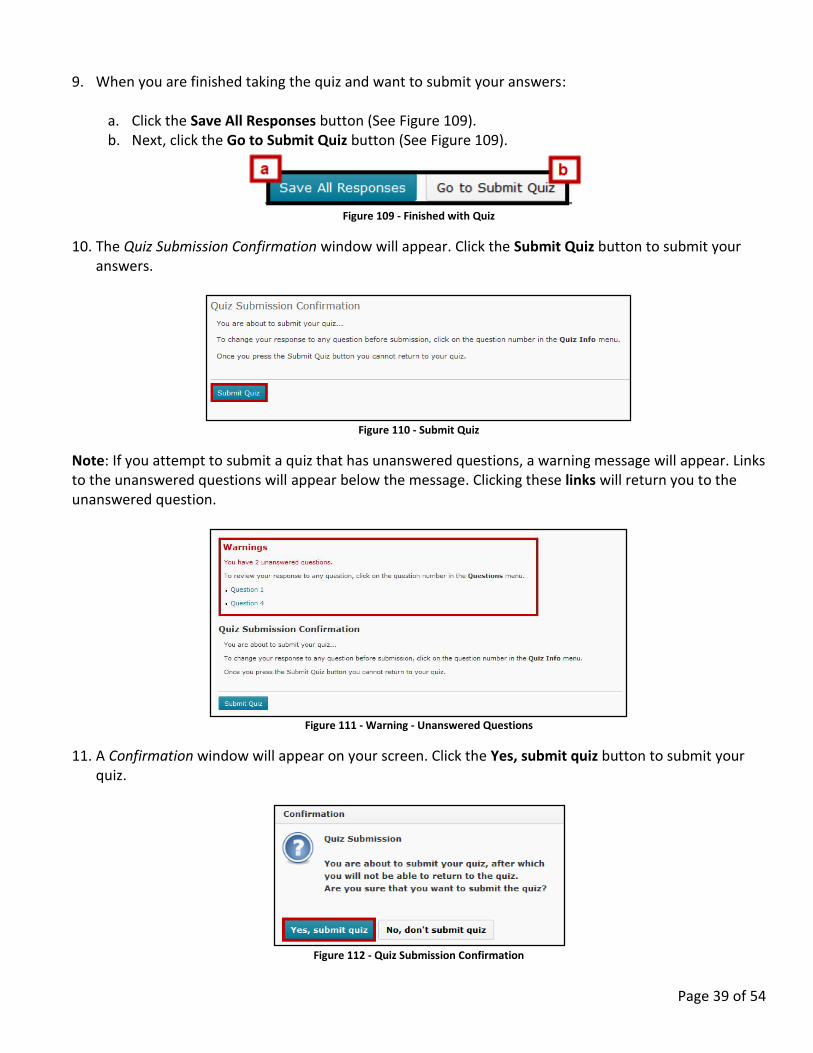
9. When you are finished taking the quiz and want to submit your answers:
a. Click the Save All Responses button (See Figure 109). b. Next, click the Go to Submit Quiz button (See Figure 109).
Figure 109 - Finished with Quiz
10. The Quiz Submission Confirmation window will appear. Click the Submit Quiz button to submit your answers.
Figure 110 - Submit Quiz
Note: If you attempt to submit a quiz that has unanswered questions, a warning message will appear. Links to the unanswered questions will appear below the message. Clicking these links will return you to the unanswered question.
Figure 111 - Warning - Unanswered Questions
11. A Confirmation window will appear on your screen. Click the Yes, submit quiz button to submit your quiz.
Figure 112 - Quiz Submission Confirmation

Page 40 of 54
Information on Timed Quizzes
Most instructors will set a time limit for quizzes. If your quiz has a time limit, it will be displayed at the top of your quiz with the Time Limit, followed by the Time Left. Please be aware of the following:
Figure 113 - Timed Quizzes
Some quizzes that have a time limit have been set up and will result in a score of zero points if the quiz is submitted after the time limit.
Figure 114 - Zero after Time Limit
Some quizzes that have a time limit have been set up to prevent you from continuing your quiz after the time limit. Only the questions that you have saved will be submitted (questions that you have not saved will be not be submitted).
Figure 115 – Prevent Continuation of Quiz
Page 41 of 54
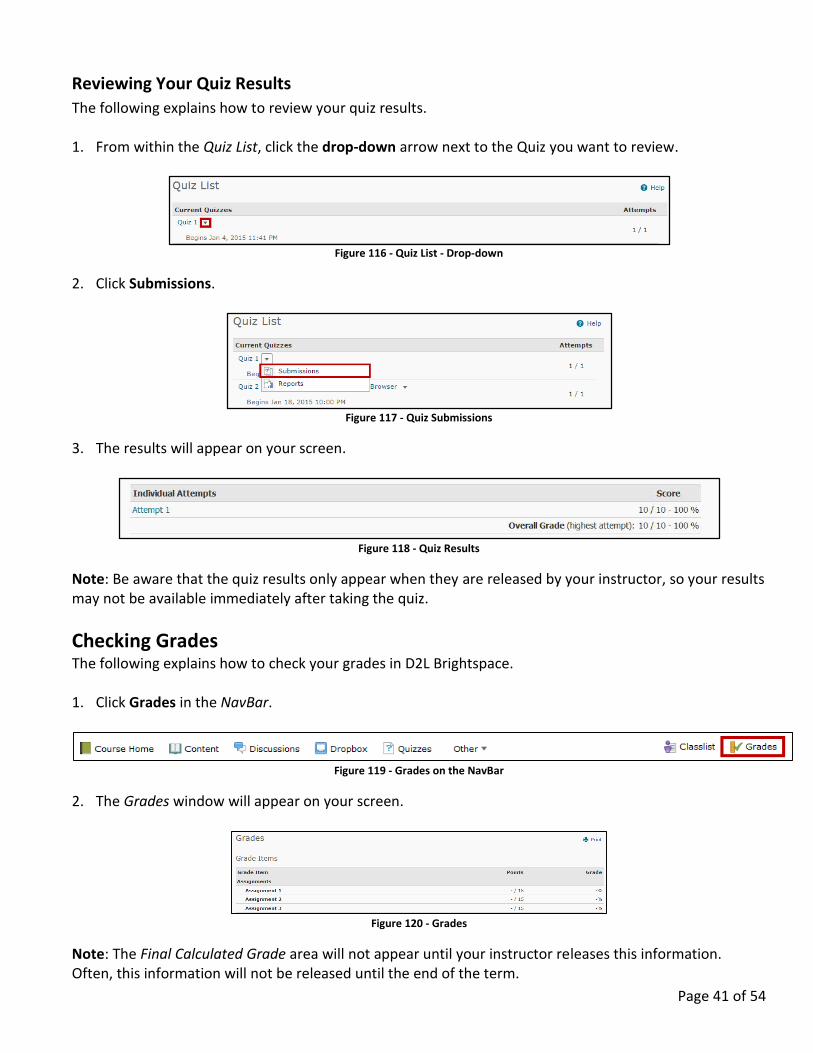
Reviewing Your Quiz Results
The following explains how to review your quiz results. 1. From within the Quiz List, click the drop-down arrow next to the Quiz you want to review.
Figure 116 - Quiz List - Drop-down
2. Click Submissions.
Figure 117 - Quiz Submissions
3. The results will appear on your screen.
Figure 118 - Quiz Results
Note: Be aware that the quiz results only appear when they are released by your instructor, so your results may not be available immediately after taking the quiz.
Checking Grades The following explains how to check your grades in D2L Brightspace. 1. Click Grades in the NavBar.
Figure 119 - Grades on the NavBar
2. The Grades window will appear on your screen.
Figure 120 - Grades
Note: The Final Calculated Grade area will not appear until your instructor releases this information. Often, this information will not be released until the end of the term.
Page 42 of 54
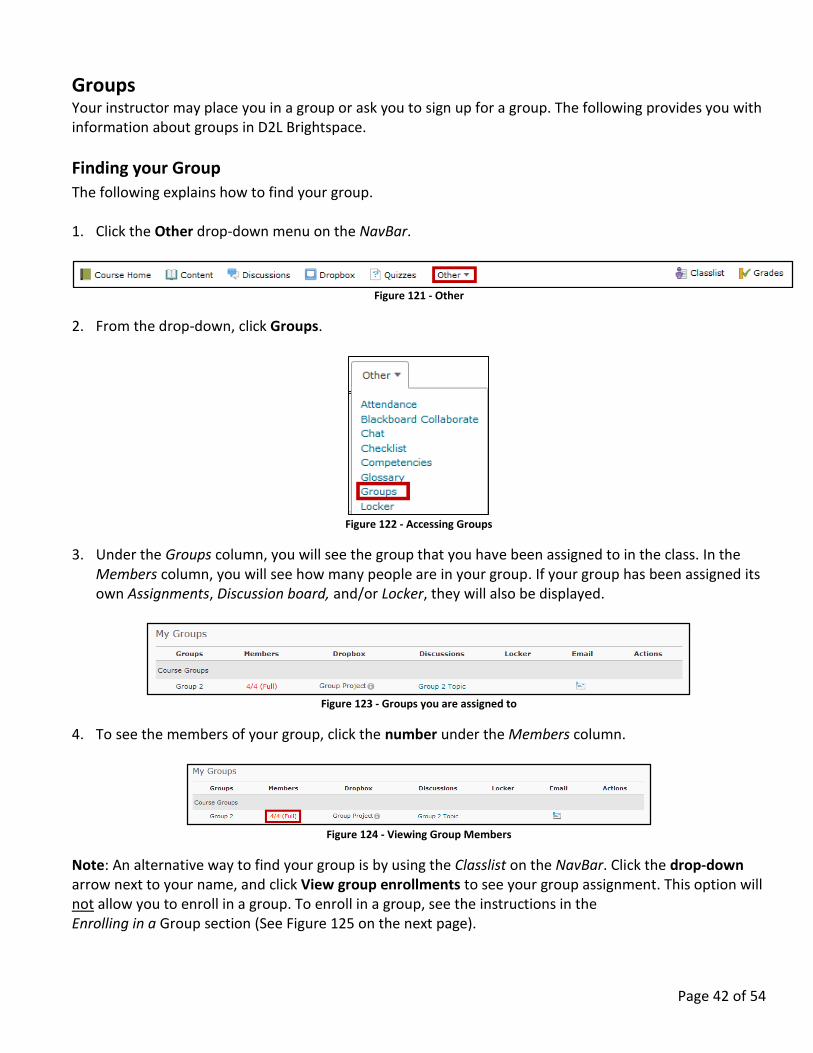
Groups Your instructor may place you in a group or ask you to sign up for a group. The following provides you with information about groups in D2L Brightspace.
Finding your Group
The following explains how to find your group. 1. Click the Other drop-down menu on the NavBar.
Figure 121 - Other
2. From the drop-down, click Groups.
Figure 122 - Accessing Groups
3. Under the Groups column, you will see the group that you have been assigned to in the class. In the Members column, you will see how many people are in your group. If your group has been assigned its own Assignments, Discussion board, and/or Locker, they will also be displayed.
Figure 123 - Groups you are assigned to
4. To see the members of your group, click the number under the Members column.
Figure 124 - Viewing Group Members
Note: An alternative way to find your group is by using the Classlist on the NavBar. Click the drop-down arrow next to your name, and click View group enrollments to see your group assignment. This option will not allow you to enroll in a group. To enroll in a group, see the instructions in the Enrolling in a Group section (See Figure 125 on the next page).

Page 43 of 54
Figure 125 - Viewing Group Enrollments through the Classlist
Enrolling in a Group
The following explains how to enroll into a group in D2L Brightspace:
1. Click the Other drop-down menu on the NavBar.
Figure 126 - Other
2. From the drop-down, click Groups.
Figure 127 - Select Groups from Other
3. The Groups page will appear. Click View Available Groups.
Figure 128 - Choose Group
4. The Choose Group page will appear. A list of available groups will be displayed, along with the number of students currently enrolled in that group. Click Join Group next to a group to enroll in that group.
Figure 129 - Enrolling in a Group
Note: Click a number in the Member column to see a list of the people currently enrolled in the group.
Page 44 of 54
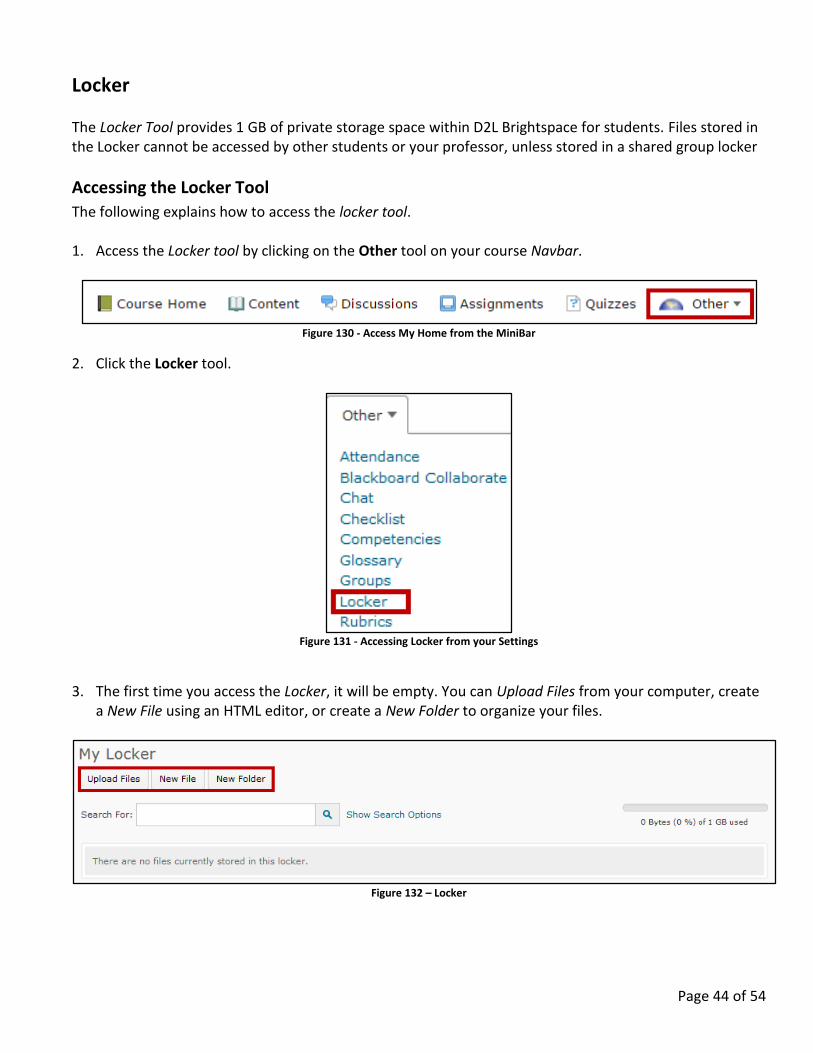
Locker The Locker Tool provides 1 GB of private storage space within D2L Brightspace for students. Files stored in the Locker cannot be accessed by other students or your professor, unless stored in a shared group locker
Accessing the Locker Tool
The following explains how to access the locker tool. 1. Access the Locker tool by clicking on the Other tool on your course Navbar.
Figure 130 - Access My Home from the MiniBar
2. Click the Locker tool.
Figure 131 - Accessing Locker from your Settings
3. The first time you access the Locker, it will be empty. You can Upload Files from your computer, create
a New File using an HTML editor, or create a New Folder to organize your files.
Figure 132 – Locker
Page 45 of 54
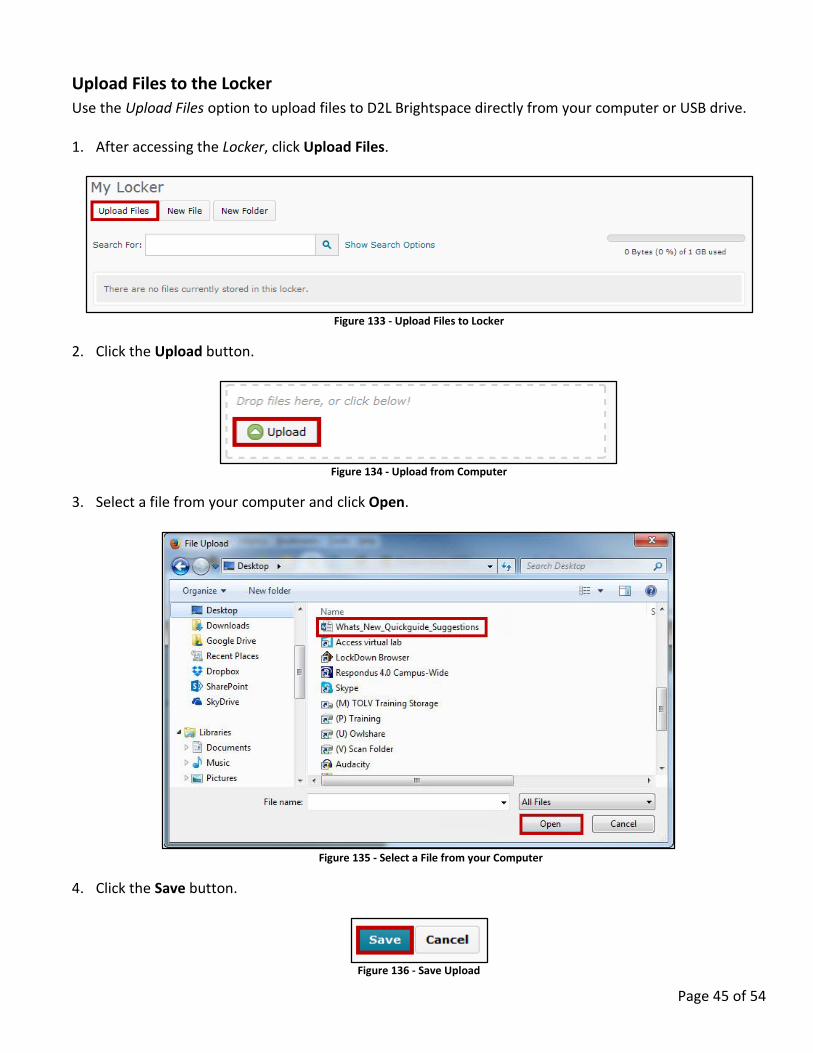
Upload Files to the Locker
Use the Upload Files option to upload files to D2L Brightspace directly from your computer or USB drive. 1. After accessing the Locker, click Upload Files.
Figure 133 - Upload Files to Locker
2. Click the Upload button.
Figure 134 - Upload from Computer
3. Select a file from your computer and click Open.
Figure 135 - Select a File from your Computer
4. Click the Save button.
Figure 136 - Save Upload

Page 46 of 54
Create a New File
Use the New File function to create a new HTML document in your locker. 1. From the Locker tool, click the New File button.
Figure 137 - New File
2. The New HTML File window will appear. In the File Name field, type a name for your file.
Figure 138 - Name for your File
3. Type your text in the Edit Contents box and use the tools to create the content for your HTML file.
Figure 139 - Editing your HTML Document
Page 47 of 54
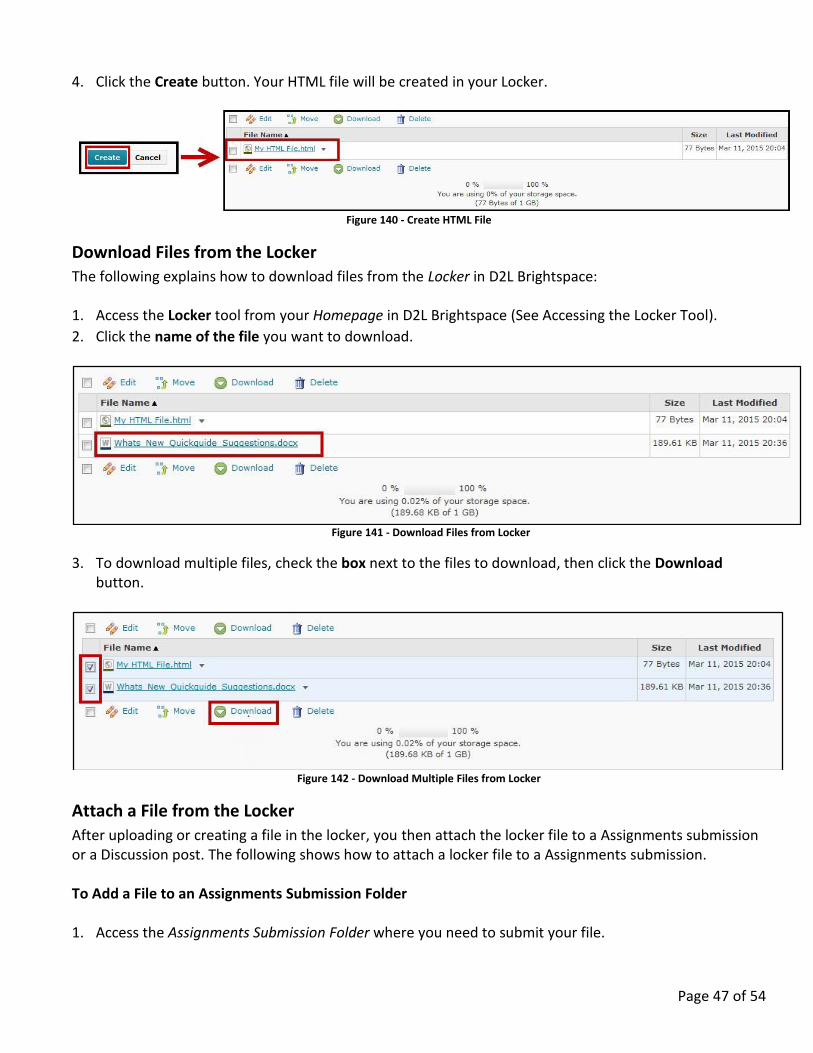
4. Click the Create button. Your HTML file will be created in your Locker.
Figure 140 - Create HTML File
Download Files from the Locker
The following explains how to download files from the Locker in D2L Brightspace: 1. Access the Locker tool from your Homepage in D2L Brightspace (See Accessing the Locker Tool).
2. Click the name of the file you want to download.
Figure 141 - Download Files from Locker
3. To download multiple files, check the box next to the files to download, then click the Download button.
Figure 142 - Download Multiple Files from Locker
Attach a File from the Locker
After uploading or creating a file in the locker, you then attach the locker file to a Assignments submission or a Discussion post. The following shows how to attach a locker file to a Assignments submission. To Add a File to an Assignments Submission Folder 1. Access the Assignments Submission Folder where you need to submit your file.
Page 48 of 54
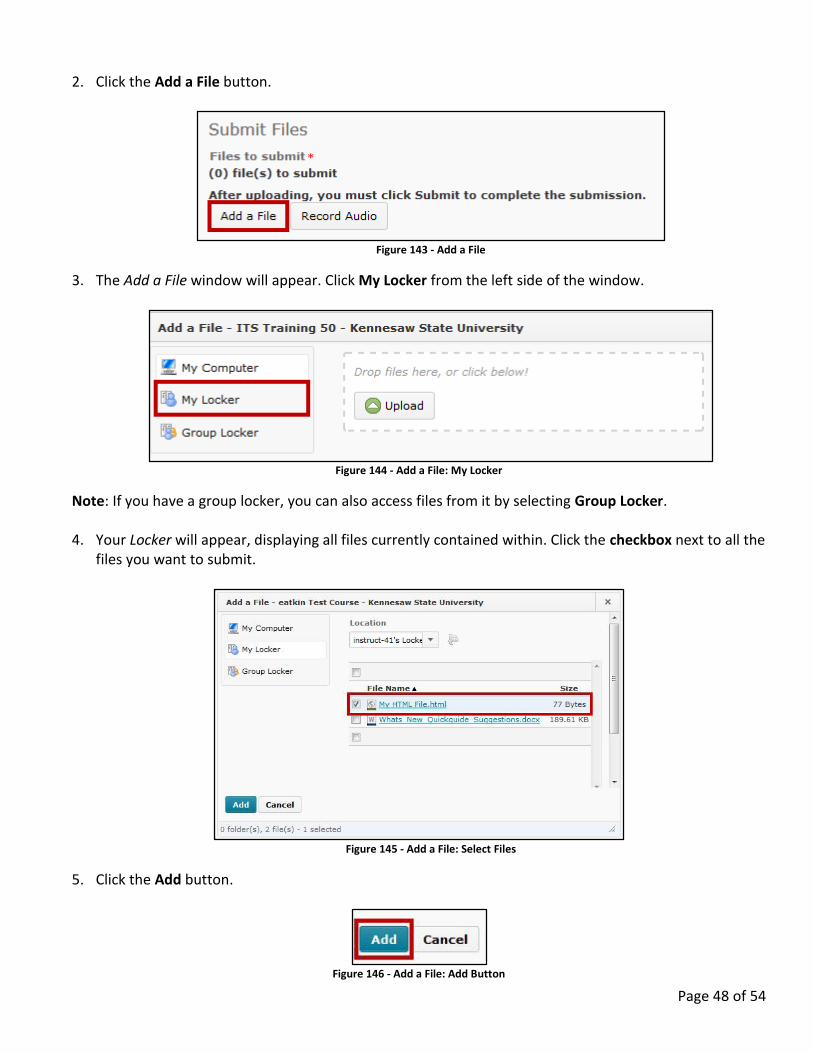
2. Click the Add a File button.
Figure 143 - Add a File
3. The Add a File window will appear. Click My Locker from the left side of the window.
Figure 144 - Add a File: My Locker
Note: If you have a group locker, you can also access files from it by selecting Group Locker. 4. Your Locker will appear, displaying all files currently contained within. Click the checkbox next to all the
files you want to submit.
Figure 145 - Add a File: Select Files
5. Click the Add button.
Figure 146 - Add a File: Add Button
Page 49 of 54
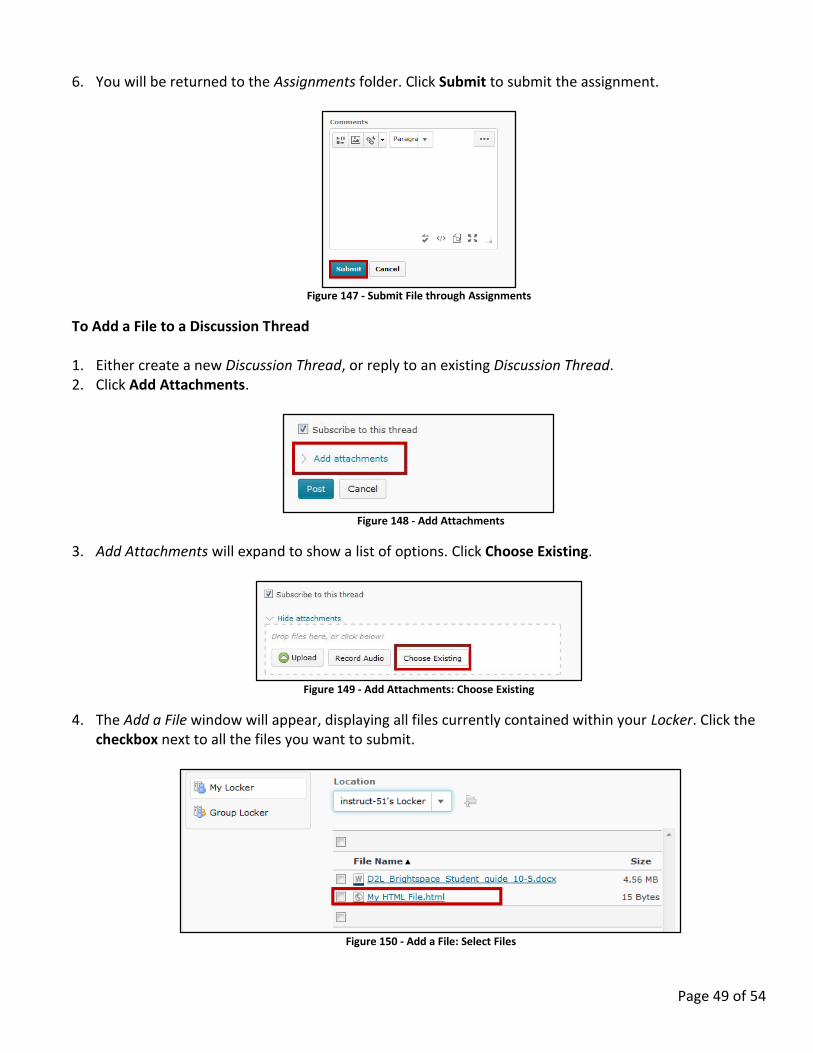
6. You will be returned to the Assignments folder. Click Submit to submit the assignment.
Figure 147 - Submit File through Assignments
To Add a File to a Discussion Thread 1. Either create a new Discussion Thread, or reply to an existing Discussion Thread. 2. Click Add Attachments.
Figure 148 - Add Attachments
3. Add Attachments will expand to show a list of options. Click Choose Existing.
Figure 149 - Add Attachments: Choose Existing
4. The Add a File window will appear, displaying all files currently contained within your Locker. Click the checkbox next to all the files you want to submit.
Figure 150 - Add a File: Select Files
Page 50 of 54
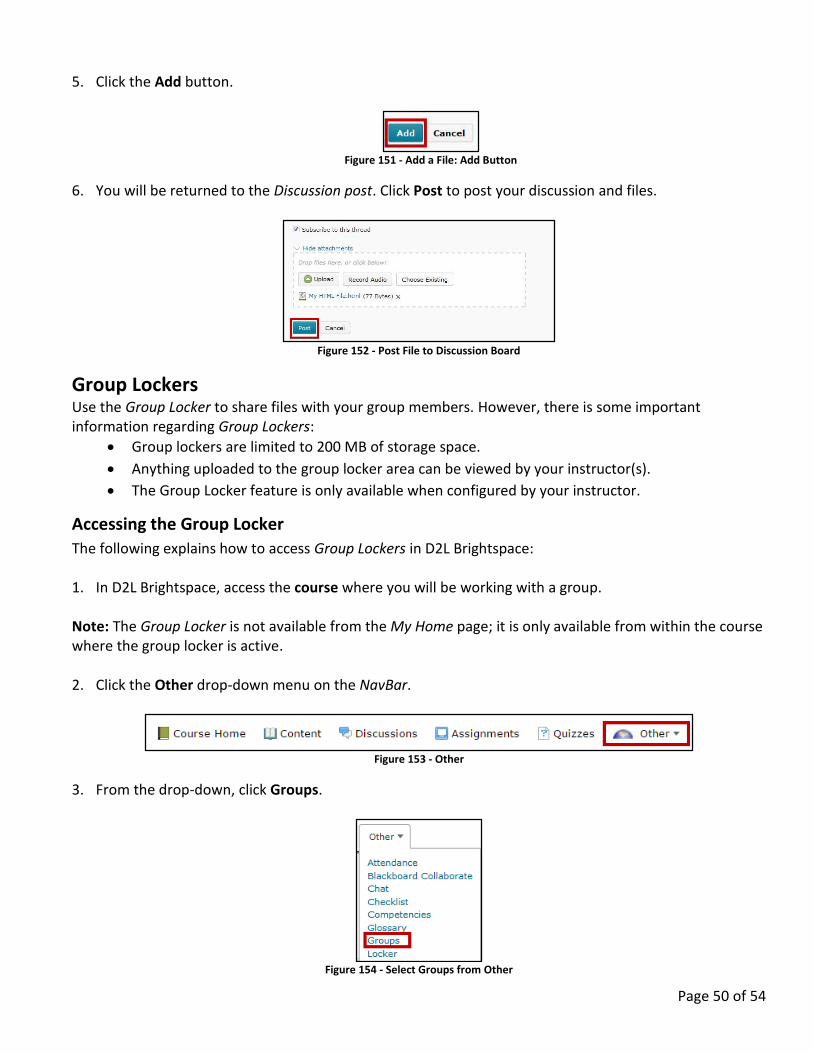
5. Click the Add button.
Figure 151 - Add a File: Add Button
6. You will be returned to the Discussion post. Click Post to post your discussion and files.
Figure 152 - Post File to Discussion Board
Group Lockers Use the Group Locker to share files with your group members. However, there is some important information regarding Group Lockers:
Group lockers are limited to 200 MB of storage space.
Anything uploaded to the group locker area can be viewed by your instructor(s).
The Group Locker feature is only available when configured by your instructor.
Accessing the Group Locker
The following explains how to access Group Lockers in D2L Brightspace: 1. In D2L Brightspace, access the course where you will be working with a group. Note: The Group Locker is not available from the My Home page; it is only available from within the course where the group locker is active. 2. Click the Other drop-down menu on the NavBar.
Figure 153 - Other
3. From the drop-down, click Groups.
Figure 154 - Select Groups from Other
Page 51 of 54
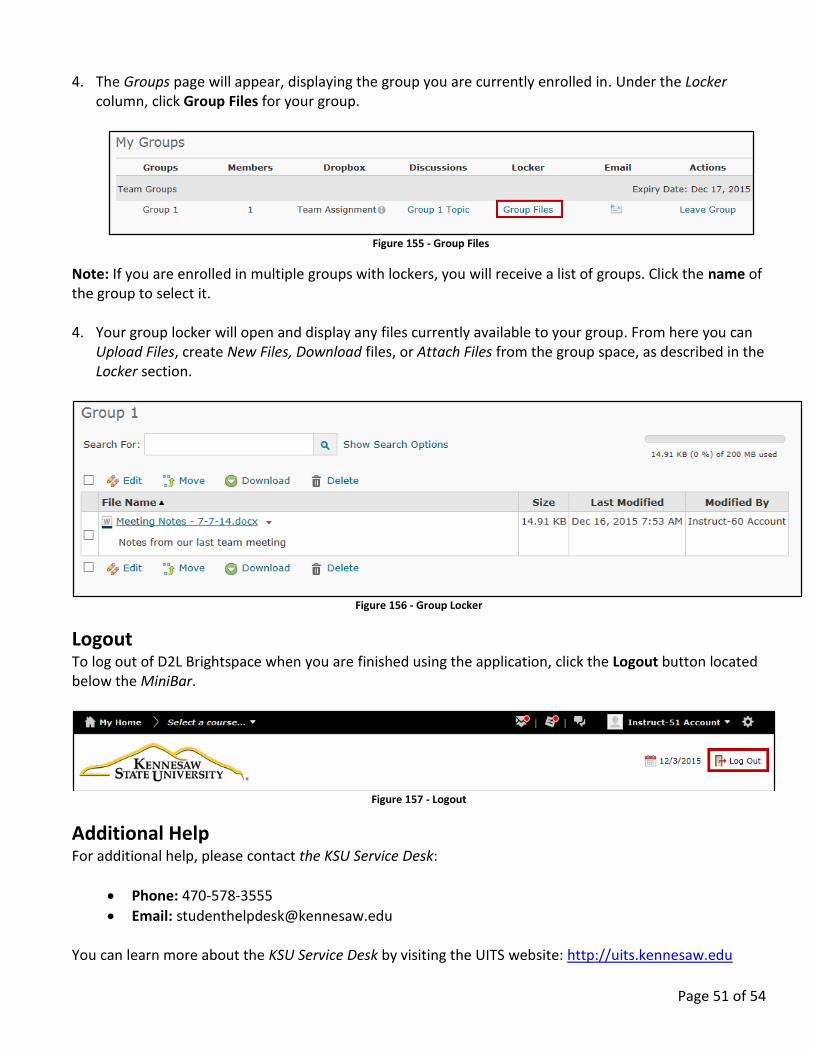
4. The Groups page will appear, displaying the group you are currently enrolled in. Under the Locker column, click Group Files for your group.
Figure 155 - Group Files
Note: If you are enrolled in multiple groups with lockers, you will receive a list of groups. Click the name of the group to select it. 4. Your group locker will open and display any files currently available to your group. From here you can
Upload Files, create New Files, Download files, or Attach Files from the group space, as described in the Locker section.
Figure 156 - Group Locker
Logout To log out of D2L Brightspace when you are finished using the application, click the Logout button located below the MiniBar.
Figure 157 - Logout
Additional Help For additional help, please contact the KSU Service Desk:
Phone: 470-578-3555
Email: [email protected] You can learn more about the KSU Service Desk by visiting the UITS website: http://uits.kennesaw.edu
Page 52 of 54
Appendix A Taken from the University System of Georgia D2L Help Center page at: https://d2lhelp.view.usg.edu/knowledge.do?sysparm_document_key=kb_knowledge,80d6f09a94e3a000e6eb9ad8fcab2105
System & Software Requirements:
D2L Brightspace supports a wide range of popular computer configurations. However, upgrading to any newest browser version is not recommended, since it hasn’t been evaluated for use with D2L Brightspace. If your current software configuration allows you to access D2L Brightspace as expected, you may wish to disable any "automatic updates" until you have completed your D2L Brightspace online coursework at the end of each semester. For advice on any of the requirements below contact the KSU Service Desk, or the DHC Help desk. KSU Service Desk: 470-578-3555 or [email protected] DHC Help desk: Toll Free at 1-855-772-0423 or Toll Free for Hearing Impaired at 1-800-892-4315 Internet Connection Speed
Although D2L Brightspace is useable over a 56K modem, the faster & more reliable your Internet connection speed, the better your experience with D2L Brightspace will be.
A hardwired Cable or DSL connection is recommended, particularly for submitting assignments & quizzes.
Java Runtime Environment (JRE)
JRE 6 update 31 (Required to run the Equation Editor)
JavaScript & cookies must be enabled. Desktop Support
Your system must have Adobe Flash Player 10.+ to use the Record Audio & Record Video features. Ensure that your browser has both JavaScript & Cookies enabled. Popup windows will need to be permitted for D2L Brightspace to function as designed.
Supported Operating Systems
D2L Brightspace is compatible with every version of Windows or Apple operating systems, capable of running any of the supported web browsers listed below.

Page 53 of 54
Browser Support
D2L Brightspace supports many popular web browser versions. However, upgrading to the newest version of any browser is not recommended unless there is a compelling reason to do so, such as correcting some security vulnerability. If your web browser seems to have problems completing certain tasks within D2L Brightspace, either downgrade to an older version of your browser, or download and use another supported browser. The DHC agents can assist you with these tasks.
Browser Status
Internet Explorer 11 Supported
Internet Explorer 10 Supported
Internet Explorer 9 Supported
Internet Explorer 8 Unsupported
Firefox (newest) Supported
Firefox 24.0 Long Term Support
Firefox (older) Unsupported
Chrome (newest) Supported
Safari 7.0 Supported
Safari 6.0 Supported
Safari 5.1 Supported
Safari (older) Unsupported
Tablet Support for Desktop Web
Browser Status
Android Browser (newest) Supported
iOS Safari (newest) Supported
Microsoft Surface Internet Explorer 10 Supported
Playbook Browser (newest) Supported
Mobile Web Support
Operating System/Browser Status
iOS (Newest) Supported
iOS 7 (iPhone 3GS/4/4S/5/5C/5S, iPod Touch 4/5, iPad 2/3/4/mini) Supported
iOS 6 (iPhone 3GS/4/4S/5, iPod Touch 4/5, iPad 2/3/4/mini) Supported
Page 54 of 54
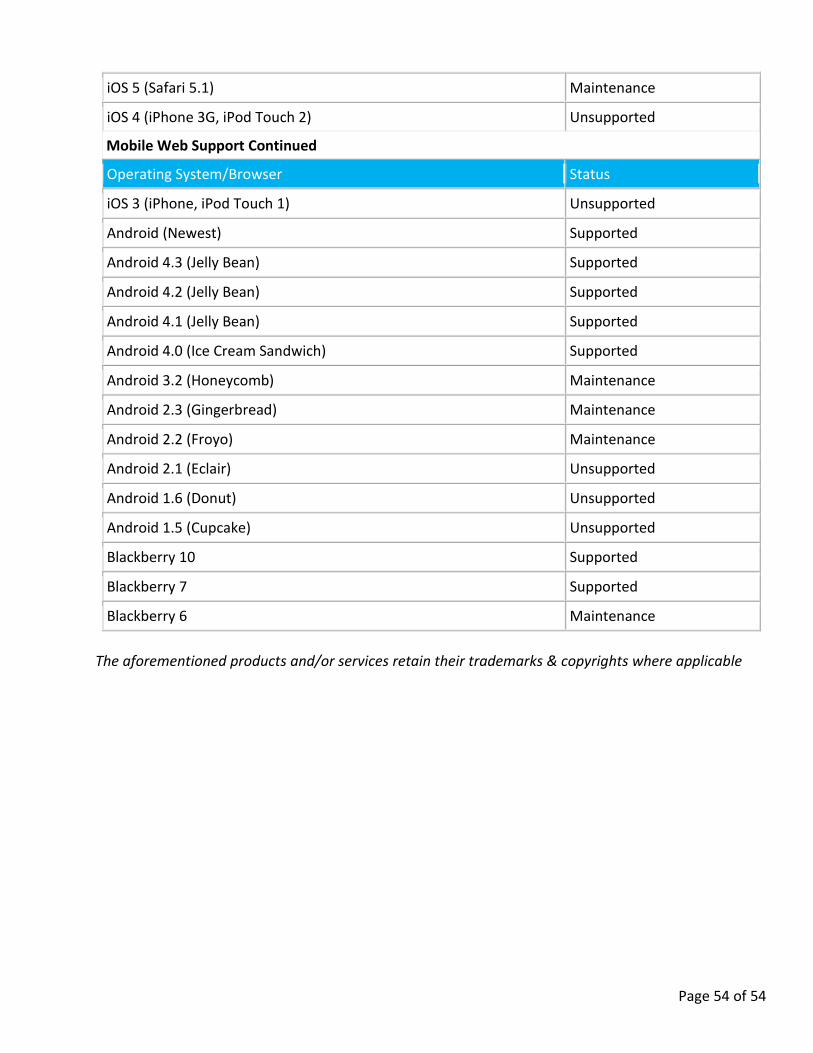
iOS 5 (Safari 5.1) Maintenance
iOS 4 (iPhone 3G, iPod Touch 2) Unsupported
Mobile Web Support Continued
Operating System/Browser Status
iOS 3 (iPhone, iPod Touch 1) Unsupported
Android (Newest) Supported
Android 4.3 (Jelly Bean) Supported
Android 4.2 (Jelly Bean) Supported
Android 4.1 (Jelly Bean) Supported
Android 4.0 (Ice Cream Sandwich) Supported
Android 3.2 (Honeycomb) Maintenance
Android 2.3 (Gingerbread) Maintenance
Android 2.2 (Froyo) Maintenance
Android 2.1 (Eclair) Unsupported
Android 1.6 (Donut) Unsupported
Android 1.5 (Cupcake) Unsupported
Blackberry 10 Supported
Blackberry 7 Supported
Blackberry 6 Maintenance
The aforementioned products and/or services retain their trademarks & copyrights where applicable