Configuration - Informatica...Table of Contents – 3 4.8.1 Changing the default language of the...
261
06/25/2018 English Configuration Informatica MDM - Product 360 Version: 8.1.1
Transcript of Configuration - Informatica...Table of Contents – 3 4.8.1 Changing the default language of the...

06/25/2018 English
ConfigurationInformatica MDM - Product 360
Version: 8.1.1

Table of Contents – 2
1 Table of Contents
1 Table of Contents ................................................................................................................2
2 General Notes for Properties Files....................................................................................12
3 Encrypt secure information ...............................................................................................12
4 Server Configuration..........................................................................................................12
4.1 Server Settings (server.properties) ................................................................................................ 12
4.2 Authentication Setup ......................................................................................................................19
4.2.1 General Requirements Desktop Waffle SSO .................................................................................................19
4.2.2 Supported Authentication Scenarios.............................................................................................................20
4.2.3 LDAP Authentication (LDAPConfig.xml) .......................................................................................................22
4.2.4 SAML Configuration (SamlConfig.xml) .........................................................................................................24
4.3 Control Center Configuration (ClusterixConfig.xml).....................................................................24
4.4 Network Configuration (NetworkConfig.xml) ...............................................................................25
4.4.1 Reverse Proxy Configuration..........................................................................................................................30
4.4.2 Setup a keystore for SSL certificates ............................................................................................................30
4.5 Hazelcast configuration (hazelcast.xml) ...................................................................................... 31
4.6 Command Line Arguments ............................................................................................................31
4.7 Application Preferences (plugin_customization.ini).....................................................................32
4.7.1 Task management ..........................................................................................................................................32Task background jobs ....................................................................................................................................................... 32
Task E-mail notification..................................................................................................................................................... 33
Mail server settings ........................................................................................................................................................... 33
Notification level ................................................................................................................................................................ 33
4.7.2 Product paradigm ...........................................................................................................................................34Standard delivery ............................................................................................................................................................... 34
Setting up 3PPD mode ...................................................................................................................................................... 34
Setting up 1PPD mode ...................................................................................................................................................... 35
4.7.3 Characteristics ................................................................................................................................................35MIME values....................................................................................................................................................................... 35
4.7.4 Database version check .................................................................................................................................35
4.8 Repository configuration (Repository.repository)......................................................................... 35

Table of Contents – 3
4.8.1 Changing the default language of the repository .........................................................................................36
4.8.2 Adding a new language to the Repository.....................................................................................................36
4.8.3 Adding a new language to the database .......................................................................................................36
4.9 Application Modules configuration (application_modules.properties) ......................................37
4.10 Spelling dictionaries .......................................................................................................................37
4.11 Media Asset Management Configuration .....................................................................................38
4.11.1 Media Manager ...............................................................................................................................................38
4.11.2 Classic Provider ..............................................................................................................................................38Preview Generation Parameters ....................................................................................................................................... 38
Running "Classic MediaAssetProvider" with unicode encoded folder names............................................................... 40
4.12 Security logging ..............................................................................................................................42
4.12.1 Setup a keystore for SSL certificates ............................................................................................................42
4.13 Advanced LDAP configuration .......................................................................................................42
4.13.1 uid example .....................................................................................................................................................42
4.13.2 CN example .....................................................................................................................................................43
4.13.3 Do not determine domain from username....................................................................................................44
4.14 EH-Cache Configuration .................................................................................................................45
4.14.1 General Cache configuration..........................................................................................................................45Specific Caches ................................................................................................................................................................. 46
4.15 How to configure Oracle TCPS connection for P360 Server........................................................ 47
4.15.1 Prerequisite .....................................................................................................................................................47
4.15.2 Configure P360 Server....................................................................................................................................47
4.16 SAML Configuration .......................................................................................................................47
4.16.1 Overview ..........................................................................................................................................................47Roles ................................................................................................................................................................................... 47
Single Sign On flow ............................................................................................................................................................ 48
Product 360 SAML support .............................................................................................................................................. 48
4.16.2 Preparation steps............................................................................................................................................49Certificate keystores.......................................................................................................................................................... 49
Enabling HTTPS ................................................................................................................................................................. 50
4.16.3 Configuring SAML for Product 360................................................................................................................51Adding SAML relevant configuration files (SamlConfig.xml and IdP metadata) .......................................................... 51
Service Provider Metadata ................................................................................................................................................ 53
Identity Provider Metadata ................................................................................................................................................ 54
Information Security .......................................................................................................................................................... 54

Table of Contents – 4
Usage of SAML with Product 360 multi-server and load balancer ................................................................................. 57
Automatic User creation on successful authentication .................................................................................................. 58
Internal Users ..................................................................................................................................................................... 59
4.16.4 Logging............................................................................................................................................................59
5 Desktop Client Configuration ............................................................................................59
5.1 OSGI Configuration Area ...............................................................................................................59
5.2 Server Connection Configuration...................................................................................................59
5.3 General Preferences .......................................................................................................................61
5.3.1 Load Balancing ...............................................................................................................................................62Disable Load Balancing ..................................................................................................................................................... 62
Always open Server Selection Dialog ............................................................................................................................... 62
5.3.2 Form settings ..................................................................................................................................................62Number of lines in a multiline text box............................................................................................................................. 62
Number of lines in a multiline rich text box...................................................................................................................... 62
5.3.3 General.............................................................................................................................................................62Always run in background ................................................................................................................................................. 62
5.3.4 Spellcheck .......................................................................................................................................................63Activate spellcheck............................................................................................................................................................ 63
Installed dictionaries ......................................................................................................................................................... 63
5.3.5 Object colors ...................................................................................................................................................63Product ............................................................................................................................................................................... 63
Variant ................................................................................................................................................................................ 63
Item..................................................................................................................................................................................... 63
5.3.6 Query................................................................................................................................................................64Do not show dialog box for editing queries ..................................................................................................................... 64
5.3.7 Structure editor ...............................................................................................................................................64Transfer feature of the parent group when creating structure groups........................................................................... 64
Update subgroups when features have been changed ................................................................................................... 64
Include objects and their attribute assignments when copying structures and structure groups............................... 64
5.3.8 Table settings..................................................................................................................................................65Max. number of rows......................................................................................................................................................... 65
Max. number of grouping nodes per level........................................................................................................................ 65
Group date/time fields by.................................................................................................................................................. 65
Region specific sorting of texts ........................................................................................................................................ 65
Case sensitive sorting ....................................................................................................................................................... 65
Execute "Find and Replace" on server side from ............................................................................................................. 65

Table of Contents – 5
6 Web Configuration .............................................................................................................66
6.1 Activate Product 360 - Web Permissions & Interface Visibility ...................................................66
6.2 Product 360 - Web Specific Configuration ....................................................................................67
6.3 Setup HTTPS/SSL Security ............................................................................................................74
6.3.1 Running Product 360 - Web behind a Reverse Proxy....................................................................................75
6.3.2 Install SSL certificates on Product 360 Application Server directly ............................................................75
6.4 Setup Load Balancing.....................................................................................................................76
6.4.1 Apache Web Server.........................................................................................................................................76
6.4.2 AWS ELB..........................................................................................................................................................76
6.4.3 Troubleshooting Reverse Proxy / LB Setup and Product 360 Push issues ................................................77
6.5 Configure Lists Views, Detail Tabs and Action Menus.................................................................78
6.5.1 Overview ..........................................................................................................................................................78
6.5.2 Declarative Customization Area ....................................................................................................................79
6.5.3 Make Changes to XML Configuration Files...................................................................................................80
6.5.4 Example Definitions........................................................................................................................................82
6.5.5 List of Customization Areas...........................................................................................................................82
6.5.6 Q&A ..................................................................................................................................................................96Debugging .......................................................................................................................................................................... 96
Referencing Fields and Logical Keys................................................................................................................................ 96
Display Media Asset Thumbnail in Table ......................................................................................................................... 96
Display Media Asset Thumbnail in Form.......................................................................................................................... 97
6.5.7 View Definition Examples...............................................................................................................................97List with texts in multiple languages ................................................................................................................................ 97
Variables support for views............................................................................................................................................... 98
List with attribute values and custom caption................................................................................................................. 98
List with different price types............................................................................................................................................ 99
List with Structure Group Name...................................................................................................................................... 100
List of additional price tiers............................................................................................................................................. 100
List of DQ Status per Channel (Transition Fields) ......................................................................................................... 101
List of DQ Rule Status and Message (Transition Fields)............................................................................................... 102
6.5.8 Detail Tab Definition Examples....................................................................................................................102Change Detail Preview Area ............................................................................................................................................ 102
Two column layout with language picker....................................................................................................................... 103
Two column layout with fixed language......................................................................................................................... 104
Variables support for detail tabs .................................................................................................................................... 105

Table of Contents – 6
Detail Tab with specific attributes .................................................................................................................................. 105
Detail Tab and editing multi-value attriubte values ....................................................................................................... 106
Logical Keys exploded..................................................................................................................................................... 108
Logistic Extension Data with multiple Logical Keys ...................................................................................................... 110
Fullqualified Purchase Prices.......................................................................................................................................... 110
Editable Item Preview Panel............................................................................................................................................ 111
Display Structure Group Assignment ............................................................................................................................. 113
Editable List of Sub Entities ............................................................................................................................................ 113
Editable List of Retail Prices for Items ........................................................................................................................... 114
Display Transition Fields in Detail Tab Lists, e.g. Short Description for References................................................... 115
Single Logical Key Selector for Multiple Subentities ..................................................................................................... 117
List of all references to items, but not to other entities (with optional filter) .............................................................. 119
6.5.9 Action menu definition examples ................................................................................................................121Overview ........................................................................................................................................................................... 121
6.6 Task UI and Dashboard configuration.........................................................................................124
6.6.1 Introduction ...................................................................................................................................................124
6.6.2 Layout ............................................................................................................................................................124Grid layout ........................................................................................................................................................................ 125
Grouping components ..................................................................................................................................................... 126
6.6.3 Data Sources .................................................................................................................................................128Report by alias.................................................................................................................................................................. 129
Report by ID ...................................................................................................................................................................... 131
Saved searches................................................................................................................................................................ 132
6.6.4 Components..................................................................................................................................................132
6.6.5 Dashboard components ...............................................................................................................................133Message box component................................................................................................................................................ 133
System message component ......................................................................................................................................... 133
iFrame component........................................................................................................................................................... 134
Barchart component ........................................................................................................................................................ 134
Piechart component ........................................................................................................................................................ 138
Channel status component ............................................................................................................................................. 140
My tasks component ....................................................................................................................................................... 141
Team tasks component................................................................................................................................................... 143
Supplier Portal Timeline component .............................................................................................................................. 144
Workflow KPI component................................................................................................................................................ 145
6.6.6 Flexible task UI components........................................................................................................................149Data provisioning in task UIs........................................................................................................................................... 149
Header strategy................................................................................................................................................................ 151

Table of Contents – 7
Task UI specific syntax summary................................................................................................................................... 152
Form.................................................................................................................................................................................. 152
List .................................................................................................................................................................................... 153
Preview ............................................................................................................................................................................. 154
Structure tree.................................................................................................................................................................... 155
Media Document Details ................................................................................................................................................. 155
Media documents list ...................................................................................................................................................... 156
Media categories tree...................................................................................................................................................... 157
Dynamic Webpage ........................................................................................................................................................... 157
Characteristic values form .............................................................................................................................................. 158
Drag & Drop ...................................................................................................................................................................... 158
7 Media Manager Configuration ........................................................................................158
7.1 Activating PIM - Media Manager, defining volumes & setting up Funcd...................................158
7.1.1 Activating Product 360 - Media Manager....................................................................................................158
7.1.2 Defining Volumes..........................................................................................................................................159
7.1.3 Setting up Funcd ...........................................................................................................................................160
7.2 External preview generation.........................................................................................................160
7.2.1 External preview generation.........................................................................................................................160Example of the file datatypes.xml .................................................................................................................................. 161
Example of a shell script ................................................................................................................................................. 162
7.3 Setting up web front end ..............................................................................................................162
7.3.1 Setting up the Internet module (Internet Administration Console) (Obsolete since Product 360 8.0) ...162
7.3.2 Setting up the Session Manager (Obsolete since Product 360 8.0)..........................................................164
7.4 Connecting the LDAP directory service.......................................................................................164
7.5 Setting up Media Publisher ..........................................................................................................166
7.5.1 Presettings window ......................................................................................................................................166"Standard" tab .................................................................................................................................................................. 166
"Internal" tab ..................................................................................................................................................................... 167
"Orders" tab ...................................................................................................................................................................... 167
"Additional parameters" tab ............................................................................................................................................ 167
7.6 Run Product 360 - Media Manager server modules as a Windows service..............................167
7.6.1 Run the native modules as services ............................................................................................................167
7.6.2 Run Tomcat as a service ..............................................................................................................................168
7.6.3 Run Session Manager as service.................................................................................................................169
7.7 Product 360 Core and PIM - Media Manager Configuration......................................................169

Table of Contents – 8
7.7.1 Product 360 - Server .....................................................................................................................................169Integrating Product 360 - Media Manager ..................................................................................................................... 169
7.7.2 Product 360 - Desktop Client ......................................................................................................................179
7.8 Prevent deletion of assets used in Product 360.........................................................................179
7.8.1 Installing the master asset support web services ......................................................................................179
7.8.2 Media Manager Web.....................................................................................................................................179
7.9 Media Manager Workflows ..........................................................................................................180
7.9.1 Content ..........................................................................................................................................................180
7.9.2 Import ............................................................................................................................................................180
7.9.3 Workflow: MessageQueue Asset created (AssignDocs) ...........................................................................180
7.9.4 Workflow: MessageQueue Asset modified .................................................................................................181
7.9.5 Workflow: MessageQueue Derivative created ............................................................................................182
7.9.6 Workflow: MessageQueue Derivative deleted ............................................................................................182
7.9.7 Workflow: MessageQueue Derivative modified ..........................................................................................183
7.9.8 Workflow: MessageQueue Derivative definition created ...........................................................................184
7.9.9 Workflow: MessageQueue Derivative definition deleted............................................................................184
7.9.10 Workflow: MessageQueue Derivative definition modified .........................................................................185
7.9.11 Workflow: Automatic group assignment.....................................................................................................186
8 Supplier Portal Configuration..........................................................................................187
8.1 Configuration Setup and General Description.............................................................................187
8.1.1 Property Description .....................................................................................................................................187
8.2 Item Editor configuration..............................................................................................................205
8.2.1 Create required Users and Groups within Product 360 - Desktop .............................................................206Create Product 360 Supplier Portal Administrator Users Group .................................................................................. 206
Create Product 360 Supplier Portal System User .......................................................................................................... 207
Add Product 360 Core Users as Product 360 Supplier Portal Administrator .............................................................. 207
8.2.2 Setup Product 360 - Web Users and Permissions for Product 360 Supplier Portal Item Editor/Viewer .207Create Product 360 - Supplier Portal Item Editor User Group....................................................................................... 207
Create Product 360 Supplier Portal Item Viewer User Group ....................................................................................... 210
Create Product 360 Supplier Portal Item Editor System User....................................................................................... 211
Create Product 360 Supplier Portal Item Viewer System User ..................................................................................... 211
8.3 Setup Post Export Step.................................................................................................................211
8.4 Network setup...............................................................................................................................212
8.4.1 Setup HTTPS/SSL Security ..........................................................................................................................212

Table of Contents – 9
8.4.2 Setup a Reverse Proxy..................................................................................................................................212
8.4.3 Configure Support for X-Forward-* headers................................................................................................213
8.4.4 Install SSL certificates on Supplier Portal Server directly ..........................................................................214
8.4.5 Setup Secure Connection between Supplier Portal and Product 360 Server............................................214
8.5 Multiserver Setup..........................................................................................................................215
8.5.1 Property configuration..................................................................................................................................215
8.5.2 Setup Reverse Proxy and Load Balancer.....................................................................................................216
8.6 SAML Configuration .....................................................................................................................217
8.6.1 Overview ........................................................................................................................................................217SAML Roles ...................................................................................................................................................................... 217
Single Sign On flow .......................................................................................................................................................... 217
System architecture......................................................................................................................................................... 218
Security in Product 360 Supplier Portal SAML support ................................................................................................ 218
8.6.2 Preparation steps..........................................................................................................................................219Certificate keystores........................................................................................................................................................ 219
IdP Configuration ............................................................................................................................................................. 221
8.6.3 Configuring SAML for Product 360 Supplier Portal....................................................................................222Activate SAML.................................................................................................................................................................. 222
Configure keystore settings in configuration.properties............................................................................................... 223
Add SAML relevant configuration files........................................................................................................................... 223
Identity Provider metadata .............................................................................................................................................. 227
Information security......................................................................................................................................................... 228
Automatic user and supplier creation on successful authentication........................................................................... 230
8.6.4 Product 360 Supplier Portal Tomcat load balancing..................................................................................233Supplier Portal configuration .......................................................................................................................................... 233
IdP configuration.............................................................................................................................................................. 235
Load balancer configuration ........................................................................................................................................... 235
8.6.5 Session lifetimes...........................................................................................................................................238
8.7 How to configure Oracle TCPS connection for P360 Supplier Portal .......................................238
8.7.1 Prerequisite ...................................................................................................................................................238
8.7.2 Configure P360 Supplier Portal....................................................................................................................239
9 Audit Trail Configuration .................................................................................................239
9.1 Configuration Setup and General Description.............................................................................239
9.2 Audit Trail network config ............................................................................................................239
9.3 Property Description of Product 360 - Audit Trail in Product 360 Core ....................................245
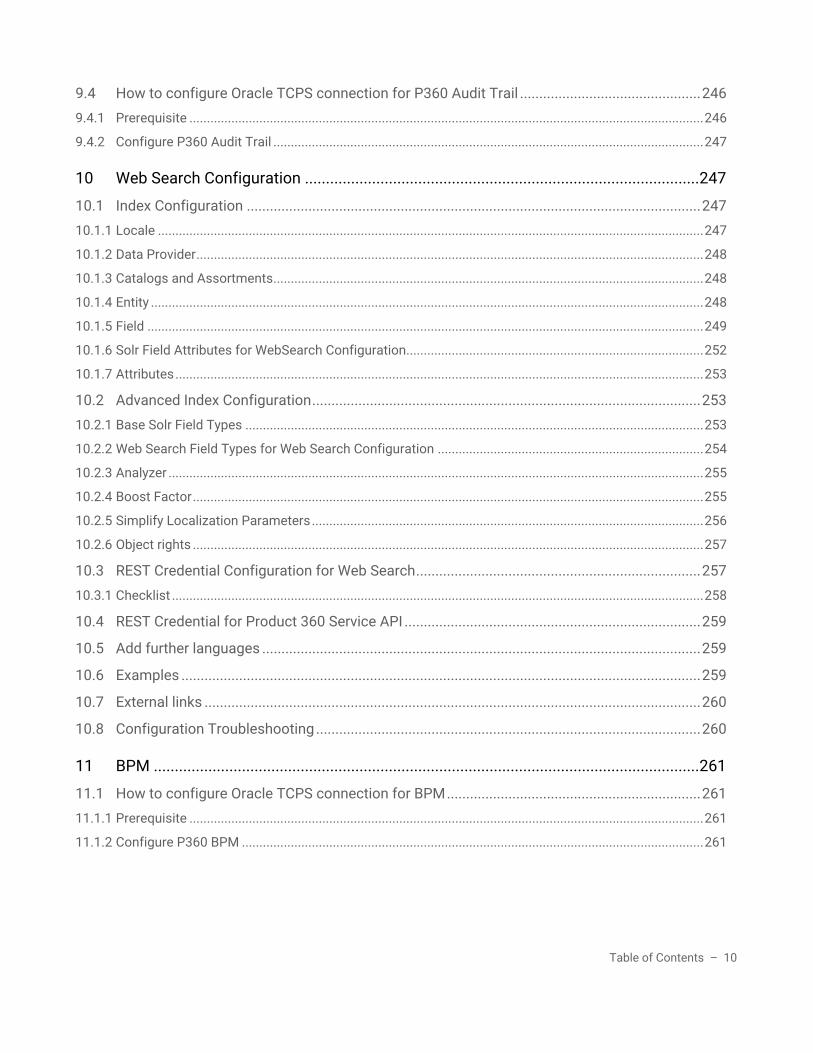
Table of Contents – 10
9.4 How to configure Oracle TCPS connection for P360 Audit Trail ...............................................246
9.4.1 Prerequisite ...................................................................................................................................................246
9.4.2 Configure P360 Audit Trail ...........................................................................................................................247
10 Web Search Configuration ..............................................................................................247
10.1 Index Configuration ......................................................................................................................247
10.1.1 Locale ............................................................................................................................................................247
10.1.2 Data Provider.................................................................................................................................................248
10.1.3 Catalogs and Assortments...........................................................................................................................248
10.1.4 Entity ..............................................................................................................................................................248
10.1.5 Field ...............................................................................................................................................................249
10.1.6 Solr Field Attributes for WebSearch Configuration.....................................................................................252
10.1.7 Attributes.......................................................................................................................................................253
10.2 Advanced Index Configuration.....................................................................................................253
10.2.1 Base Solr Field Types ...................................................................................................................................253
10.2.2 Web Search Field Types for Web Search Configuration ............................................................................254
10.2.3 Analyzer .........................................................................................................................................................255
10.2.4 Boost Factor..................................................................................................................................................255
10.2.5 Simplify Localization Parameters................................................................................................................256
10.2.6 Object rights ..................................................................................................................................................257
10.3 REST Credential Configuration for Web Search..........................................................................257
10.3.1 Checklist ........................................................................................................................................................258
10.4 REST Credential for Product 360 Service API .............................................................................259
10.5 Add further languages ..................................................................................................................259
10.6 Examples .......................................................................................................................................259
10.7 External links .................................................................................................................................260
10.8 Configuration Troubleshooting ....................................................................................................260
11 BPM ..................................................................................................................................261
11.1 How to configure Oracle TCPS connection for BPM..................................................................261
11.1.1 Prerequisite ...................................................................................................................................................261
11.1.2 Configure P360 BPM ....................................................................................................................................261


Informatica MDM - Product 360 Configuration 12
The Configuration Manual provides the full list of all possible preference and configuration options. The installation and operation guides usually describe only the properties and preferences and settings which you are required to adjust in order for the installation. The configuration guide on the other hand describes also the optional configuration possibilities.
2 General Notes for Properties FilesSome configuration files are stored as a java properties file. Some special characters are reserved in property files, like '!' or '#' which both indicate a comment in the file. Additionally to that, the dollar sign '$' indicates a dynamic parameter which is at runtime interpreted as the value of another key in the properties file. Those characters, together with backslashes or spaces should not be used in passwords or other parts of the configuration files. They would need to be escaped and this tends to get very dirty when someone wants to check the passwords and some characters need to be escaped and so on.
3 Encrypt secure informationProduct 360 supports the encryption of secure information like passwords in configuration files. The encryption will be executed only if your secure information in the configuration files is enclosed by the marker [_to_encrypt_].So, if you want to have e.g. the password "MyPassword" encrypted in a configuration file just use the marker before and after the password like this: [_to_encrypt_]MyPassword[_to_encrypt_].
All passwords for which encryption is supported are marked accordingly in the following chapters.
4 Server Configuration
4.1 Server Settings (server.properties)The central configuration properties file of the Product 360 Server is located in <PIM_SERVER_INSTALLATION_ROOT>\server\configuration\HPM\server.properties of the server installation package. The application server needs to be restarted in order to have changes take effect. The configuration file itself contains properties following the standard "key: value" pattern as is encoded as a standard java properties file.
The following tables contain a complete list of all properties available in Product 360 Server, grouped by functionality. Each property is described with further explanation and examples.
Special characters like '!', '#', '\' or '$' should not be used in property files - especially not as part of a password. Additionally to that we recommend to never use paths with spaces in them but that's just a general "best practice".
In case you need to use the special character '\' for paths, like for an instance name of the database, you have to escape those with an additional backslash.
E.g. your instance name for a database is 'myDatabase\myInstance' then you have to define 'myDatabase\\myInstance' in the properties file
This section describes configuration parameters which can be used to adjust the Product 360 Server to the individual needs of the customer. In contrary to the Installation Guide, it contains all available configuration parameters.

Informatica MDM - Product 360 Configuration 13
Property Description
File Transfer SettingsIs is crucial for multi-server deployments that all servers can access the same file storage and the same directories in there. For example, it might be that Server A uploads files to the import area in the file storage, but Server B is executing the import for this. So Server B needs to have the identical file access then Server A.The currently available default implementation for the file storage is SMB which uses the SMB protocol to access the files. Please note that the file transfer from the Desktop Client is done using HTTP only. Clients do not need to have access to the file transfer shares, only the servers!
filestorage.dir.shared
Folder which has to be accessible by each Product 360 server. In case of a single server system, the folder does not have to be a shared one
filestorage.default
Default file storage implementation. Currently only SMB is available. SMB stores the files using the SMB file protocol
filestorage.import File storage implementation for import files, default is also SMB
filestorage.import.path
Path for the import files used by the SMB file storage implementation
filestorage.mime File storage implementation for mime files, default is also SMB. Applies only to the Classic Media Asset Provider.
filestorage.mime.path
Path for the import files used by the SMB file storage implementation. Applies only to the Classic Media Asset Provider.
filestorage.export File storage implementation for export files, default is also SMB
filestorage.export.path
Path for the export files used by the SMB file storage implementation
filestorage.shared File storage implementation for various shared files, default is also SMB
filestorage.shared.path
Path for various shared files used by the SMB file storage implementation
upload.root.local Path for the service api file upload
filestorage.dataquality
File storage implementation for data quality (DQ) files, default is also SMB
filestorage.dataquality.path
Path for the data quality (DQ) files used by the SMB file storage implementation
filestorage.bpm File storage implementation for Informatica BPM (Workflow) files, default is also SMB
filestorage.bpm.path
Path for Informatica BPM (Workflow) files used by the SMB file storage implementation
Informatica BPM Settings (only needed for integration with Informatica BPM)
infa.bpm.base.url The base url to the Informatica BPM instance in the form http://[server]:[port]/active-bpel

Informatica MDM - Product 360 Configuration 14
infa.bpm.workflows.path
The workflows path. Will be used together with the property infa.bpm.base.url to find the endpoints
infa.bpm.user The username for accessing the Informatica BPM instance. Only required if basic authentication on BPM side is configured
infa.bpm.password The password for accessing the Informatica BPM instance. Only required if basic authentication on BPM side is configured
com.heiler.ppm.bpm.server/proxy
Allows to track any call from the server to the Informatica BPM system using a proxy like Fiddler web debugger, example is localhost:8888, this property is disabled by default
infa.bpm.queue.jms.connection.username
The username for accessing the ActiveMQ service
infa.bpm.queue.jms.connection.password
The password for accessing the ActiveMQ service
infa.bpm.queue.jms.queue.suffix
A suffix that will be appended to the default queue name ("infa.bpm"). The suffix can contain characters a-z, 0-9
Inbox/Hot Folder Settings
inbox.hotfolders Local folder in which the incomming files should be placed, shares are not supported.
inbox.processingfolder
inbox.archivefolder
Local folder of the processed inbox files, shares are not supported
inbox.errorfolder Local folder of the failed files, shares are not supported
Customer license key
license.customer.file.local
Local path to the license file. Please contact the Informatica Partner Management to obtain a license file.
If you want to encrypt the password please refer to chapter Encryption of secure information in the Server Installation manual.
If you want to encrypt the password please refer to chapter Encryption of secure information in the Server Installation manual.

Informatica MDM - Product 360 Configuration 15
license.customer.key
Appropriate customer key (in case of multiline keys, use backslash at the end of the line)
Media Asset Server Settings
mime.defaultProvider
Identifier of the media asset provider. Possible values are HLR which corresponds to the Classic Provider or HMM for the Product 360 - Media Manager. Default is HLR
Informatica MDM Settings (only needed for integration with Informatica MDM)
infa.mdm.host
infa.mdm.port
infa.mdm.base.url
infa.mdm.systemName
infa.mdm.user
infa.mdm.password
Repository Settings
repository.default.language
The default language of the repository regarding all language specific aspects like e.g. default logical key language. Possible values: Key synonyms of the corresponding language entries defined in the repository enumeration "Enum.Language", e.g. "de" or "en_US" - default is German, if property does not exist.
Mail Server Settings (Change these properties, if you are using workflows, task notification or other functionality that requires sending e-mails)
mail.host Host name of the e-mail server
mail.port If the mail server uses the standard port for the protocol, this property can be left empty.
mail.protocol E-mail protocol used, currently only SMTP is supported
If you want to encrypt the password please refer to chapter Encryption of secure information in the Server Installation manual.
Note: The repository language MUST NOT be changed as soon as entity data such as items/products/variants or structures/structure groups have been created and exist in the database. In such a situation, the stability of the system can no longer be guaranteed since logical key fields most likely will contain null values.

Informatica MDM - Product 360 Configuration 16
mail.user If the e-mail server requires authentication, then the properties "mail.user" and/or "mail.password" must be set.
mail.password
Various Settings
context.sessioninactiveinterval
http session timeout sec. if not set no timeout is defined
http.client.proxy The base URL of the reverse proxy (e.g. Apache WebServer). Mandatory if web links used in email notifications.
Database settings for Microsoft SQL Server ( We only describe the default settings here. Most of those can be adjusted individually for each database schema as you will see in the server.properties template file. However, splitting the schemas on multiple database hosts/instances is not supported since there are cross schema sql statements which would not work!)
db.default.type This property should never be changed!
db.default.server The host name of the Microsoft SQL Server;Change this in case you have a separate database server
db.default.port Port of the Microsoft SQL Server instance, usually this is 1433
db.default.user User name of the database user
db.default.password
Password of the database user
db.default.dir Base folder for the database schema and database transaction log files (also used by the database setup)Note: This folder needs not to be local to the application server but to the database server!
db.default.dir.data
Folder for the database schema files (*.mdf) Note: This folder needs not to be local to the application server but to the database server!
db.default.dir.log Folder for the transaction log files (*.ldf) Note: This folder needs not to be local to the application server but to the database server.
db.default.data.size
Default size in MB allocated for a database schema; adapt this setting to your needs
If you want to encrypt the password please refer to chapter Encryption of secure information in the Server Installation manual.
If you want to encrypt the password please refer to chapter Encryption of secure information in the Server Installation manual.
Informatica MDM - Product 360 Configuration 17
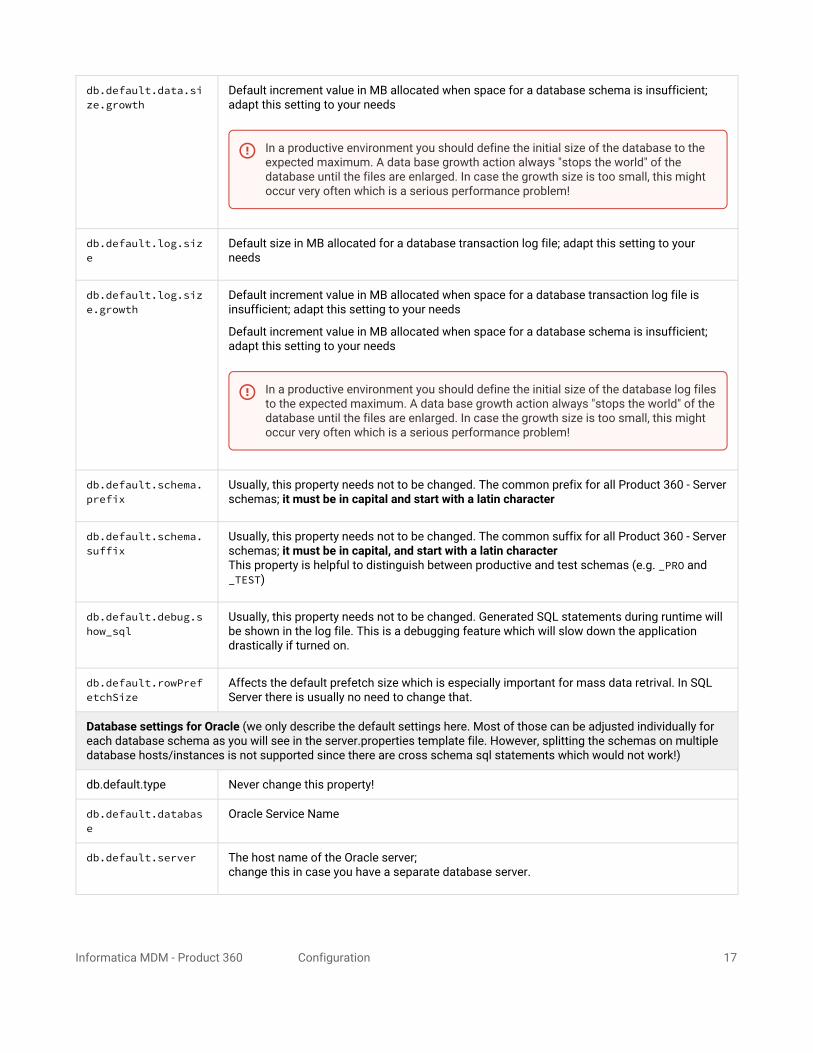
db.default.data.size.growth
Default increment value in MB allocated when space for a database schema is insufficient; adapt this setting to your needs
db.default.log.size
Default size in MB allocated for a database transaction log file; adapt this setting to your needs
db.default.log.size.growth
Default increment value in MB allocated when space for a database transaction log file is insufficient; adapt this setting to your needs
Default increment value in MB allocated when space for a database schema is insufficient; adapt this setting to your needs
db.default.schema.prefix
Usually, this property needs not to be changed. The common prefix for all Product 360 - Server schemas; it must be in capital and start with a latin character
db.default.schema.suffix
Usually, this property needs not to be changed. The common suffix for all Product 360 - Server schemas; it must be in capital, and start with a latin characterThis property is helpful to distinguish between productive and test schemas (e.g. _PRO and _TEST)
db.default.debug.show_sql
Usually, this property needs not to be changed. Generated SQL statements during runtime will be shown in the log file. This is a debugging feature which will slow down the application drastically if turned on.
db.default.rowPrefetchSize
Affects the default prefetch size which is especially important for mass data retrival. In SQL Server there is usually no need to change that.
Database settings for Oracle (we only describe the default settings here. Most of those can be adjusted individually for each database schema as you will see in the server.properties template file. However, splitting the schemas on multiple database hosts/instances is not supported since there are cross schema sql statements which would not work!)
db.default.type Never change this property!
db.default.database
Oracle Service Name
db.default.server The host name of the Oracle server;change this in case you have a separate database server.
In a productive environment you should define the initial size of the database to the expected maximum. A data base growth action always "stops the world" of the database until the files are enlarged. In case the growth size is too small, this might occur very often which is a serious performance problem!
In a productive environment you should define the initial size of the database log files to the expected maximum. A data base growth action always "stops the world" of the database until the files are enlarged. In case the growth size is too small, this might occur very often which is a serious performance problem!

Informatica MDM - Product 360 Configuration 18
db.default.port Port of the Oracle instance, usually this is 1521
db.default.password
Password for the created schema users
db.default.dir Base folder for the database schema and database transaction log files, used by the database setup tooNote: This folder needs not to be local to the application server but to the database server.
db.default.dir.data
Folder for the database schema filesNote: This folder needs not to be local to the application server but to the database server.
db.default.dir.temp
Folder for the database transaction log filesNote: This folder needs not to be local to the application server but to the database server.
db.default.dir.index
Folder for the index tablespacesNote: This folder needs not to be local to the application server but to the database server.
db.default.data.size
Default size in MB allocated for a database schema; adapt this setting to your needs
db.default.data.size.growth
Default increment value in MB allocated when space for a database schema is insufficient; adapt this setting to your needs
db.default.temp.size
Default size in MB allocated for a database transaction log file; adapt this setting to your needs
If you want to connect the P360 Server to an Oracle Database via TCPS, please refer to chapter "How to configure Oracle TCPS connection for P360 Server" in the "Server Configuration" manual.
If you want to encrypt the password please refer to chapter Encryption of secure information in the Server Installation manual.
In a productive environment you should define the initial size of the database log files to the expected maximum. A data base growth action always "stops the world" of the database until the files are enlarged. In case the growth size is too small, this might occur very often which is a serious performance problem!

Informatica MDM - Product 360 Configuration 19
db.default.temp.size.growth
Default increment value in MB allocated when space a transaction log file is insufficient; adapt this setting to your needs
db.default.index.size
Default size in MB allocated for an index tablespace; adapt this setting to your needs
db.default.index.size.growth
Default increment value in MB allocated when space for an index tablespace is insufficient; adapt this setting to your needs
db.default.schema.prefix
The common prefix for all Product 360 - Server schemas; it must be in capital letters!
db.default.schema.suffix
The common suffix for all Product 360 - Server schemas; it must be in capital letters!This property is helpful to distinguish between productive and test schemas (e.g. _PRO and _TEST).
db.default.debug.show_sql
Generated SQL statements during runtime will be shown in the log file. This is a debugging feature which will slow down the application drastically.
db.default.rowPrefetchSize
Affects the default prefetch size which is especially important for mass data retrival.This value might be modified in case you have a lot of memory. The oracle driver is allocating the complete, theoretically needed memory for a single round trip.In case you run into memory problems because of the Oracle database access, you might want to decrease this property. See also the How to enable Java Management Extensions (JMX).
4.2 Authentication Setup
4.2.1 General Requirements Desktop Waffle SSO• Server needs to be on Windows• Client and Server need to run within same domain
In a productive environment you should define the initial size of the database log files to the expected maximum. A data base growth action always "stops the world" of the database until the files are enlarged. In case the growth size is too small, this might occur very often which is a serious performance problem!
In a productive environment you should define the initial size of the database log files to the expected maximum. A data base growth action always "stops the world" of the database until the files are enlarged. In case the growth size is too small, this might occur very often which is a serious performance problem!

Informatica MDM - Product 360 Configuration 20
4.2.2 Supported Authentication Scenarios
Authentication Scenario
Server Configuration / Requirements
User Entities Desktop Client
Web Client
Service API / Supplier Portal / Mobile
Automatic User Sync
PIM Internal Auth only
plugin_customization.ini
com.heiler.ppm.security.server/login.sso.enabled = false
• AuthenticationMode internal
• Domain any value (not considered)
User Name / Password
User Name / Password
User Name / Password
No
PIM Internal Auth with Waffle SSO
Default configuration
• AuthenticationMode internal
• Domain matches Windows domain, e.g. informatica.com
Silent Login
User Name / Password with SHIFT/CTRL
User Name / Password
User Name / Password
No
LDAP LdapConfig.xml configured
plugin_customization.ini
com.heiler.ppm.security.server/login.sso.enabled = false
• AuthenticationMode external
• Domain matches LDAP domain, e.g. informatica.com
Ldap User Name / Password
Ldap User Name / Password
Ldap User Name / Password
User creation on login. Periodic sync job for groups.
LDAP with Waffle SSO
LdapConfig.xml configured
• AuthenticationMode external
• Domain matches LDAP domain, e.g. informatica.com
Silent Login
Ldap User Name / Password with SHIFT/CTRL
Ldap User Name / Password
Ldap User Name / Password
User creation on login. Periodic sync job for groups.

Informatica MDM - Product 360 Configuration 21
Authentication Scenario
Server Configuration / Requirements
User Entities Desktop Client
Web Client
Service API / Supplier Portal / Mobile
Automatic User Sync
SAML SamlConfig.xml configured
plugin_customization.ini
com.heiler.ppm.security.server/login.sso.enabled = false
• AuthenticationMode external
• Domain any value not considered
Not possible SAML SSO only
Not possible User creation on login in Web.
SAML with LDAP
SamlConfig.xml configured
LdapConfig.xml configured
SAML user name must match LDAP user name
plugin_customization.ini
com.heiler.ppm.security.server/login.sso.enabled = false
• AuthenticationMode external
• Domain matches LDAP domain, e.g. informatica.com
Ldap User Name / Password
SAML SSO
Ldap User Name / Password on Login page
Ldap User Name / Password
User creation on login in Web.
User creation on login. Periodic sync job for groups for LDAP login.
SAML with Waffle SSO
SamlConfig.xml configured
SAML user name must match Windows user name
• AuthenticationMode external
• Domain matches Windows domain, e.g. INFORMATICA
Silent Login only
SAML SSO only
Not possible
User creation on login in Web.

Informatica MDM - Product 360 Configuration 22
Authentication Scenario
Server Configuration / Requirements
User Entities Desktop Client
Web Client
Service API / Supplier Portal / Mobile
Automatic User Sync
SAML with Waffle SSO and LDAP
SamlConfig.xml configured
LdapConfig.xml configured
SAML user name must match LDAP user name
SAML user name must match Windows user name
• AuthenticationMode external
• Domain matches LDAP domain, e.g. informatica.com
Silent Login
Ldap User Name / Password with SHIFT/CTRL
SAML SSO
Ldap User Name / Password on Login page
Ldap User Name / Password
User creation on login in Web.
User creation on login. Periodic sync job for groups for LDAP login.
4.2.3 LDAP Authentication (LDAPConfig.xml)The LDAP authentication and synchronisation feature is activated as soon as a valid LDAP configuration is available in the LDAPConfig.xml file which is located in the standard configuration directory. The modification of this file requires a server restart.
An example of this file can be found in the LDAPConfig.xml.template file which can easily be adjusted to your local LDAP environment.
<?xml version="1.0" encoding="UTF-8" standalone="yes"?><ldapConfig> <directory identifier="myLDAP" domain="myDomain.com" url="ldap://myLdap.com"> <principal>[email protected]</principal> <password>myPassword</password> <userConfig objectClass="user" accountNameFilter="(&(sAMAccountName={userName})(objectClass=user))" sidFilter="(&(objectSid={sid})(objectClass=user))"> <name>sAMAccountName</name> <sid>objectSid</sid> <groups>memberOf</groups> </userConfig> <groupConfig objectClass="group" objectFilter="(objectCategory=Group)"> <name>name</name> <description>description</description> <sid>objectSid</sid> <refreshIntervalInMin>10</refreshIntervalInMin> </groupConfig> </directory></ldapConfig>
The LDAP configuration consists of one or more directory configurations which need to be identified by a unique identifier. Each directory has a userConfig and groupConfig element which provides attributes to configure the user and group

Informatica MDM - Product 360 Configuration 23
access in the directory. For your convenience the template file already has a common configuration which is typically found for Active Directories.
Element/Attribute
Description
identifier unique identifier of the directory
domain The domain which is controlled by this LDAP. In case the LDAP directory controls more than one domain, you can specify multiple directory elements for the same LDAP server, but with different domains.
url The URL to the LDAP server. <ldap|ldaps>://<fullyQualifiedHost>:[Port]You can use ldaps in case you want and can connect to your LDAP server using the SSL protocol (LDAP over SSL), otherwise use ldap.The port is optional, if omitted the default port 389 for ldap and 636 for ldaps will be used.
principal Each directory requires a management user which is used for the background synchronization of Product 360 users with LDAP. This user must have read privileges to the directory and is provided with a principal (like [email protected]) and a password.
password
UserConfig
objectClass the class of the object which represent the users in this directory
accountNameFIlter
filter definition to search for the user based on its user name
sidFilter filter definition to find an user based on his unique SID
name the property of the LDAP user class which represents the username
sid the property of the LDAP user class which represents his unique id
groups the property of the LDAP user class which contains his group memberships
UserGroup Config
objectClass the class of the object which represents the user groups in this directory
objectFilter the filter to use to return all relevant groups (default is all groups in the directory). Adjust this attribute to limit the number of groups in the LDAP group selection in Product 360
name the property of the LDAP user group class which represents the groups name
sid the property of the LDAP user group class which represents it's unique id
If you want to encrypt the password please refer to chapter Encryption of secure information in the Server Installation manual.

Informatica MDM - Product 360 Configuration 24
refreshIntervalInMin
To increase the performance of the Organisation perspective in which LDAP groups are mapped to Product 360 user groups, the LDAP groups will be cached. With the default of ten, the users need to wait 10 minutes until a new LDAP user group appears in Product 360.
For advanced LDAP configuration see Advanced LDAP configuration. This page also describes how to use PIM with LDAP without a active principal name.
4.2.4 SAML Configuration (SamlConfig.xml)Please see the SAML Configuration page for details.
4.3 Control Center Configuration (ClusterixConfig.xml)Open the file <PIM ROOT>\clusterix\configuration\clusterix\ClusterixConfig.xml in an editor and adjust the properties as described:
Property Name Description Example
port The HTTP port which should be used for the Control Center Web UI 9000
clusterixHttpsConfiguration
enabled Enables HTTPS for Control Center Web UI. false
httpsPort The HTTPS port which should be used for the Control Center Web UI. 443
keyStoreFile The full path to the keystore file. D:/keystore.jks
keyStorePassword
The password of the keystore file.
clusterixLogin
user The username which must be used for access to the Control Center clusterix
password The password to use for the control center
Please be sure at least one LDAP user group is mapped to a PIM user group for the user to login. Otherwise the login will be rejected and the user will be shown as inactive.
Please contact your local LDAP directory administrator in case it is unclear how to configure these settings.
If you want to encrypt the password please refer to chapter Encryption of secure information in the Server Installation manual.

Informatica MDM - Product 360 Configuration 25
hpmLogin
user The username of the Product 360 user which has Service API access permissions. This user is not needed for the installation process, but later for monitoring Product 360 operations.
rest
password The password of the Product 360 user
Important Notice: When using HTTPS for the Control Center, make sure that your certificate is trusted! To do so follow these steps:
• export your certificate from your wanted keystore file by using this command in your java home path: keytool -export -keystore fullPathToYourKeystoreFile -alias yourChosenAlias -file certificateName.cer
• import your exported certificate into the cacerts file at yourJREHomePath\lib\security by using the following command: keytool -keystore cacerts -importcert -alias yourChosenAlias -file certificateName.cer
• restart your system
=> to simplify this process, you can use an external tool named "portecle".
4.4 Network Configuration (NetworkConfig.xml)Open the file <PIM ROOT>\clusterix\configuration\clusterix\NetworkConfig.xml in an editor and adjust the properties as described:
Element/Attribute
Description Example/Default
network Root element of the network configuration, contains one or more nodes
node Represents a server node in the cluster
identifier Unique identifier of the node within the network. See -Dppm.nodeIdentifier command line argument below!
pim-server1
host The host name / IP address this node runs on. Note: Do not use localhost or similar addresses. The host name or IP address in this attribute must be visible from all nodes in the cluster. In case the server has the CLIENTS_SERVER role, it also must be visible from the desktop clients.
default-role Default role(s) each server node must have at start time. Available roles are CLIENTS_SERVER and JOB_SERVER. Currently the server roles can not be modified during runtime of the server, but this might change in the future.
CLIENTS_SERVER and JOB_SERVER
If you want to encrypt the password please refer to chapter Encryption of secure information in the Server Installation manual.
mandatory attribute

Informatica MDM - Product 360 Configuration 26
node/web Web relevant protocol settings (either HTTP or HTTPS)
useHttps Enables/disables the SSL protocol. Default is false - in case you want to enable it, you need to provide a valid SSL certificate
maxIdleTime Configures the maximum idle time of all Jetty server connectors. Replaces the com.heiler.ppm.http.jetty.multicontext/maxIdleTime setting in plugin_customization.ini.Since 8.0.03.01.
200000
node/web/http HTTP specific settings
port HTTP port to be used for the web server
useNio Use SelectChannelConnector based on non blocking input-output (default is true)
node/web/https
HTTPS specific settings in case SSL protocol should be used
port SSL port
keystore Properties for the SSL certificate
password
keyPassword
needClientAuth
wantClientAuth
protocol
algorithm
keystoreType
If you want to encrypt the password please refer to chapter Encryption of secure information in the Server Installation manual.
If you want to encrypt the password please refer to chapter Encryption of secure information in the Server Installation manual.

Informatica MDM - Product 360 Configuration 27
node/web/session-cookie
Configuration for the handling of the session cookie that is managed by the HTTP service (Jetty). Detailed information: SessionCookieConfig JavaDoc
name Sets the name that will be assigned to any session tracking cookies created on behalf of the application represented by the ServletContext from which this SessionCookieConfig was acquired.
NOTE: Changing the name of session tracking cookies may break other tiers (for example, a load balancing frontend) that assume the cookie name to be equal to the default JSESSIONID, and therefore should only be done cautiously.
domain Sets the domain name that will be assigned to any session tracking cookies created on behalf of the application represented by the ServletContext from which this SessionCookieConfig was acquired.
path Sets the path that will be assigned to any session tracking cookies created on behalf of the application represented by the ServletContext from which this SessionCookieConfig was acquired.
comment Sets the comment that will be assigned to any session tracking cookies created on behalf of the application represented by the ServletContext from which this SessionCookieConfig was acquired.
As a side effect of this call, the session tracking cookies will be marked with a Versionattribute equal to 1.
httpOnly Marks or unmarks the session tracking cookies created on behalf of the application represented by the ServletContext from which this SessionCookieConfig was acquired as HttpOnly.
A cookie is marked as HttpOnly by adding the HttpOnly attribute to it. HttpOnly cookies are not supposed to be exposed to client-side scripting code, and may therefore help mitigate certain kinds of cross-site scripting attacks.
secure Marks or unmarks the session tracking cookies created on behalf of the application represented by the ServletContext from which this SessionCookieConfig was acquired as secure.
One use case for marking a session tracking cookie as secure, even though the request that initiated the session came over HTTP, is to support a topology where the web container is front-ended by an SSL offloading load balancer. In this case, the traffic between the client and the load balancer will be over HTTPS, whereas the traffic between the load balancer and the web container will be over HTTP.
maxAge Sets the lifetime (in seconds) for the session tracking cookies created on behalf of the application represented by the ServletContext from which this SessionCookieConfig was acquired.

Informatica MDM - Product 360 Configuration 28
node/web/threadPool
Thread pool relevant settings for web. Since 8.0.03.01
maxThreads Maximum number of threads in pool that can be created (optional setting). Replaces the http.maxThreads setting in server.properties.
512
maxIdleThreadTime
Maximum idle time in milliseconds for threads in pool (optional setting).Replaces the http.maxIdleThreadTime in server.properties.
60000
node/web/request
Settings for connector requests. Since 8.0.03.01
bufferSize Request buffer size in bytes (optional setting).Replaces the com.heiler.ppm.http.jetty.multicontext/request.bufferSize setting in plugin_customization.ini.
16384
headerSize Request header size in bytes (optional setting).Replaces the com.heiler.ppm.http.jetty.multicontext/request.headerSize setting in plugin_customization.ini.
102400
node/web/response
Settings for connector responses. Since 8.0.03.01
bufferSize Response buffer size in bytes (optional setting).Replaces the com.heiler.ppm.http.jetty.multicontext/response.bufferSize setting in plugin_customization.ini.
32768
headerSize Response header size in bytes (optional setting).Replaces the com.heiler.ppm.http.jetty.multicontext/response.headerSize setting in plugin_customization.ini.
6144
node/data-grid
Settings for the distributed data grid
port Port to be used for the data grid connection.
node/internal Internal communication protocol settings
defaultRequestTimeout
Timeout in milliseconds for requests in communication framework 300000 (5 min.)
node/internal/hlr-tcp
Settings for the internal communication protocol
port Port for incoming / outgoing connections regarding internal communication 1712
useTLS true in case the communication between desktop client and server and in between servers should be encrypted using a certificate. If set to true the keyStore element must also be defined (see below). False or omitted to not use TLS encryption.
false

Informatica MDM - Product 360 Configuration 29
connectTimeout
The timeout in milliseconds when connecting to the host. A value of 0 is interpreted as an infinite timeout. The connection will then block until established or an error occurs.
0
tcpNoDelay Disables (= true!) resp enables (= false) the so-called Nagle's algorithm true
keepAlive Causes a packet (called a "keepalive probe") to be sent to the connected system if a long time (by default, more than 2 hours) passes with no other data being sent or received. This packet is designed to provoke an ACK response from the peer.
true
node/internal/thread-pool
Settings for communication framework's thread pool
maxQueueSize Maximum size of the request/event processing queue. New processing threads will be created only when the queue is full
100
maxCoreThreads
The maximum number of core threads that are processing request/events. Roughly speaking this is a hint for the thread scheduling strategy which denotes expected number of requests/events to be concurrently processed in a 'normal' operation mode. Scheduling strategy will tend to keep this number of threads in a ready-to-run state. Consider maxQueueSize together with this parameter. For more details concerning scheduling algorithm consult Java SDK ThreadPoolExecutor
100
maxThreads The maximum number of threads that are processing request/events. This is a hard limit (in comparison with maxCoreThreads). If this value is reached, server will start rejecting requests
1000
keepAliveTime Time in milliseconds that the thread scheduling strategy will wait, before reducing number of idle threads down to maxCoreThreads. This value protects from the situations when average number of required threads is higher thanmaxCoreThreads and scheduling strategy is constantly recreating threads, because it tries to reduce number of threads down to maxCoreThreads
300000 (5 min.)
doPrestartAllCoreThreads
Flag value which instructs node to start all core threads on initialization. Usually this value should not be changed from its defaults (which is false). The reason to set this value to true could be the situation when all clients connect to the server together during a short period of time.
false
node/service Settings for the Service of the Application Server
identifier Short identifier of the service PIM_8.0
name Name of the service Informatica PIM_8.0
node/jmx Settings for the Java Management Extension (JMX) interface. JMX is needed for monitoring the application server using SNMP, the Control Center Web Interface or any JMX Client
port Port for the JMX communication 55555

Informatica MDM - Product 360 Configuration 30
node/snmp Settings for the SNMP protocol communication
oid Object id of the node in the cluster. Each node must have a unique oid. 1.1 (first node)1.2 (second node)and so on...
node/keyStore Settings for the keystore location
file Path to the keystore file which contains the certificate for the SSL/TLS encrypted communication. The path might be relative to the configuration directory of the server.For example: In case the server application is installed here: C:/Informatica/Product360/server the configuration folder would be C:/Informatica/Product360/server/configuration/HPM. In case you set the file element to certificates\keystore.jks it is expected to be at C:/Informatica/Product360/server/configuration/HPM/certificates/keystore.jks. Alternatively you can define an absolute path.
password The password for the keystore
4.4.1 Reverse Proxy ConfigurationIf a “reverse proxy” is used between Product 360 Desktop and Server, the URL of the proxy server should be configured in the “server.properties” file. The corresponding server-preference is: „http.client.proxy“. The valid value is the base URL of the proxy server (like https://companydomain.com/). This URL will be used in Product 360 Desktop for several components (e.g., RichText-Editor, Multichannel-Preview, Performance installation page) which require a HTTP connection to the Server. If the server-preference „http.client.proxy“ is not configured – the default base URL (defined in “Network Configuration”) will be used instead.
4.4.2 Setup a keystore for SSL certificatesSSL certificates are optionally used for
SAML Single Sign OnProduct 360 Rich Client to server encryptionJetty SSL connector for Product 360 Web for https communication
Product 360 server uses Java keystores for management of certificates. The keystore can be managed by a command line util keytool.exe which is part of the JDK. The procedure for working with certificates is the same as for other Java-based applications, like Apache Tomcat or Jetty. The keystore needs to be specified in NetworkConfig.xml on the server. Example:
<keyStore> <file>C:/Informatica/Product360/SSL/keystore.jks</file> <password>password</password> </keyStore>
As a keystore contains sensitive information it is not recommended to put them on a shared folder. In a multi-server environment make sure that the same keystore file is available on all server instances.
If you want to encrypt the password please refer to chapter Encryption of secure information in the Server Installation manual.

Informatica MDM - Product 360 Configuration 31
For testing purposes, it is usually sufficient to use self-generated certificates. A good description can be found in the Tomcat manuals at http://tomcat.apache.org/tomcat-7.0-doc/ssl-howto.html
For production systems, it is recommended to use certificates of a trusted authority like Verisign, Thawte or GoDaddy. In this case the required steps are:
1. Create a new keystore and generate a private key2. Create a CSR file (certificate signing request) and provide that to the authority so that they can create a certificate for
you. Make sure to use the externally visible host name of your application in the CSR.3. Import the certificate provided from the authority in your keystore. Also, the root and intermediate certificates need to
be imported into the keystore.
Detailed commands for keytool can again be found in the Tomcat manuals at http://tomcat.apache.org/tomcat-7.0-doc/ssl-howto.html.
An alternative approach for importing certificates from a trusted authority into the Java keystore file is described at http://xacmlinfo.org/2014/06/13/how-to-keystore-creating-jks-file-from-existing-private-key-and-certificate/ .Some hints:
When importing the official certificate, make sure to import it into the same keystore where the private key was generated in. Also you must use the same alias, which was used for the private key.You can use "keytool -keystore keyStoreFile -list" to see the content of your keystore. Once all certificates are imported, it should look like this:
root, 16.12.2015, trustedCertEntry,Certificate fingerprint (SHA1): 47:BE:AB:C9:22:EA:E8:0E:78:78:34:62:A7:9F:45:C2:54:FD:E6:8Bserver, 16.12.2015, PrivateKeyEntry,Certificate fingerprint (SHA1): 95:EF:9F:B0:92:F0:D2:41:2F:E7:3B:D3:14:2F:B1:B3:A6:9E:58:10intermed, 16.12.2015, trustedCertEntry,Certificate fingerprint (SHA1): 27:AC:93:69:FA:F2:52:07:BB:26:27:CE:FA:CC:BE:4E:F9:C3:19:B8
You can use OpenSSL to verify your SSL connection. Once installed, use this command to connect to the Product 360 server:
OpenSSL> s_client -connect product360.informatica.com:1712
In case of the error "Failed to establish chain from reply" when importing a certificate back into the keystore, check this Stackoverflow Q&A: http://stackoverflow.com/questions/23611688/keytool-error-java-lang-exception-failed-to-establish-chain-from-reply
4.5 Hazelcast configuration (hazelcast.xml)The hazelcast framework is used as data synchronization mechanism between nodes.Configuring Hazelcast is not mandatory. Usually the pre-delivered default configuration is sufficient.Open the file <PIM ROOT>\clusterix\configuration\HPM\hazelcast in an editor and adjust the properties as described in the official Hazelcast configuration documentation: http://docs.hazelcast.org/docs/3.5/manual/html/hazelcastconfiguration.html
4.6 Command Line ArgumentsAdditionally to the Eclipse command line options, Product 360 - Server defines own command line switches which can be used in special cases.
• -Dppm.configuration=<Configuration directory> (default: ${workspace_loc:com.heiler.ppm.configuration.server/conf})Defines the location of the configuration directory in which the repository and other configuration files are being searched for
Informatica MDM - Product 360 Configuration 32
• -Dppm.properties=<name of server configuration file> (default: server.properties)Defines the name of the property file which specifies the overall server settings like database connections, directories, license file, etc.
• -Dppm.initdialog.ontop=true|false (default: true)Defines if the splash screen should be on-top or not. Default is true.
• -Dhpm.repository=<name of repository file> (default: Repository.repository)Defines the filename of the repository to be loaded, the file has to be located in the configuration directory of the Product 360 - Server.
• -Dppm.keepRunningOnError=true|false (default: false)Prevents the server from stopping in case of any error while startup. Use this switch if you want to use the osgi console to debug startup problems.
• -Dhpm.network.settings.filename=<filename> (default: NetworkSettings.xml)Defines the filename of the NetworkSettings. The file must be located in the configuration directory of the Product 360 - Server (application root/configuration/HPM). (since 5.0)
• -Dhpm.network.atomic-serialization=true|falseA switch which forces the communication framework to serialize each request and event message first, before it's being sent to the destination node.The atomic serialization can help to find (de)serialization issues because the corresponding error message will tell you exactly which parameterof the message failed. Note: activating this switch will decrease the overall system performance especially in multi-user scenarios since the streamingcan't be that effective. (since 5.0)
• -Dppm.excludeInitializers=<id of initializer>,<id of initializer>Defines which initializers should be skipped during startup (since 5.1)
• -Dhpm.show-event-loop-exception=true|falseDefines if in case of an unhandeled event loop exception a dialog should be opened or not.This switch overrides the com.heiler.ppm.main/show-event-loop-exception preference ! (since 5.1)
• -Dhpm.default.deletion-mode=SOFT|HARD (default: SOFT)Overrides the default deletion mode for entities which are capable of both, soft and hard delete.Note: This argument overrides the preference com.heiler.ppm.std.server/default.deletion-mode
• -Dppm.listModelSynchronizer.requeryBoundary=<number of entity items> (default: 3)Defines the number of entity items which must have been created or changed in order to use a list modelbased approach for synchronizing a list model. In case the number of items is less then the requery boundarya detail model access is issued. Modification of this setting might impact the system performance.
4.7 Application Preferences (plugin_customization.ini)Many functionalities of the Server or Clients can be configured by plug-in specific preferences. All available preferences are documented in the file<PIM_SERVER_INSTALLATION_ROOT>\server\configuration\HPM\plugin_customization.ini and can be adjusted there. Changes in this file will override the settings in the individual plugins' preferences.ini files. Some settings need special explanation and are listed here for convenience.
Note: You shouldn't store secure information, e.g. passwords, since password encryption is not supported for this file.
4.7.1 Task management
Task background jobsFor tasks, there are several repeating server jobs, which e.g. check for escalated tasks to reassign them or update the item count of dynamic tasks. The repetition interval for these server jobs are configured in plugin_customization.ini:

Informatica MDM - Product 360 Configuration 33
# ---------------------------------------------------------------------------# Task SERVER Settings# ---------------------------------------------------------------------------## Here you can define the cycle of task jobs.# # Specifies how many days a task should be retained after it has been marked as finished.# The task will be deleted after this interval.# Default is 0 which means that finished tasks will not be deleted automatically# com.heiler.ppm.task.server/task.deleteFinishedAfter = 0 # interval in which the application will check all tasks for escalation.# Default is 3600000 (one hour)# com.heiler.ppm.task.server/task.job.checkEscalation = 3600000 # interval in which all tasks will be updated and checked for expiry# Default is 86400000 (one day)# com.heiler.ppm.task.server/task.job.update = 86400000
Task E-mail notification
Mail server settingsThe mail server to be used for the task E-mail notification is specified in server.properties:
################################################################################### Mail Server Settings # - mail.host: The mail server's host name (mandatory\!)# - mail.protocol: The protocol to be used (mandatory\!)# - mail.port: The port to be used (optional, may be kept empty when using the protocol's standard port)# - mail.user: The user name for authentication (optional, may be kept empty if the server doesn't require authentication)# - mail.password: The password for authentication (optional, may be kept empty if the server doesn't require authentication)
Notification levelThe default notification level for tasks and the default sender address for outgoing mails is configured in plugin_customization.ini:
# ----------------------------# Notification preferences# ---------------------------- # The default notification level (1 - None, 2 - Low, 3 - Regular, 4 - Detail)
If any other notification level than "None" is specified and the mail server cannot be reached, the application server will not start.This is by design and is intended to avoid malfunctions after starting a misconfigured server.
To start the server anyway you need to delete the server's workspace to reset the notification level to "None".

Informatica MDM - Product 360 Configuration 34
# com.heiler.ppm.task.notification.server/default-level = 1 # The default from address for outgoing notifications# com.heiler.ppm.task.notification.server/from-adress = [email protected]
The default notification level is "1 (None)" and the default from adress is "[email protected]".These settings can be changed in the perspective "Task notification" in the client.The user-defined values for the preferences will be stored in the server workspace.
4.7.2 Product paradigmIn PIM 7, the product data model supports two different so-called product paradigms, which specify the possible hierarchy of how the ArticleType based repository entities can be arranged.
• 2 level product paradigm (2PPD): Products have subordinate items• 3 level product paradigm (3PPD): Products have subordinate variants, which in turn have subordinate items
The funtionality supporting the respective product paradigm has been split into different bundles, meaning that in order to set up the desired mode, only the correct plugins have to be added to/removed from the server and client installation. Following bundles are relevant for the product paradigm configuration and thus need to be considered:
• com.heiler.ppm.product2g.level2pp.* - These plugins are only allowed in 2PPD mode and are aggregated into features com.heiler.ppm.feature.level2pp.server and com.heiler.ppm.feature.level2pp.client.
• com.heiler.ppm.variant.* - These plugins are only allowed in 3PPD mode and are aggregated into features com.heiler.ppm.feature.variant.server and com.heiler.ppm.feature.variant.client.
Standard deliveryBy default, the Product Manager is shipped with a 2PPD setup, meaning that the com.heiler.ppm.feature.level2pp.server/client features already reside in the server and client installations.
Setting up 3PPD modePerform the following steps in order to run the Product Manager in 3PPD mode:
1. Add the additional variant features to the server and client installation. The com.heiler.ppm.feature.variant.* features needed for activating the 3PPD are shipped within two separate ZIP files for server and client:
a. PIM_8.0.x_server_variant.zip - Unpack content into server installation folder (e.g. C:\Informatica\PIM\server)b. PIM_8.0.x_client_variant.zip - Unpack content into client installation folder (e.g. C:\Informatica\PIM\client)
2. Remove the com.heiler.ppm.product2g.level2pp.* and com.heiler.ppm.web.product.level2pp* plugins from the server and client installation's plugins folder.
3. Remove the com.heiler.ppm.feature.level2pp* and com.heiler.ppm.feature.web.level2pp* features from the server and client installation's features folder.
The default settings in plugin-customization.ini are only initial values for the task notification.After changing the settings on client level, the new user-specified settings will be used.
To restore the default values from plugin-customization.ini, the server workspace must be deleted.
It is NOT necessary to adapt the Product 360 - Server repository when configuring the product paradigm, this is performed automatically during server startup.
However, it may be necessary to clean up the workspace of the Server folder (except "HPM" folder) with the server restart in order to have everything in sync again.

Informatica MDM - Product 360 Configuration 35
Setting up 1PPD modeThis works out of the box in Desktop Client. To disable products in Web Client, please run the following steps:
1. Open the /plugins directory on the server2. Remove the plug-ins com.heiler.ppm.web.product* and com.heiler.ppm.web.product.level2pp*.
No additional plug-ins are needed. This will hide all options regarding products and will make the master catalog to load items instead of products on activation.
4.7.3 Characteristics
MIME valuesIn order to delete unused files that were used as characteristic values, there is a the system job "Remove obsolete MIME files". You can configure when this job should run in the plugin_customization.ini in the section "Characteristic and characteristic records SERVER Settings" using the preference com.heiler.ppm.article.server/cleanup.job.characteristicMIMEs.repeatPattern. The repeat pattern consists of a cron expression. See Quartz Enterprise Job Scheduler documentation for more details about the syntax. Don't forget to uncomment the line.
By default the job runs every Saturday at 9 PM.
4.7.4 Database version checkEvery release of the Product 360 Server has been tested against a certain number of database versions. During the lifetime of an Product 360 - Server installation it might be that you need to update the database to a not (yet) approved version. This might happen by accident (automatic windows updates) or on purpose due to company orders.For such situations we provide a way to overwrite the database versions which we check against at application server startup.
Open the plugin_configuration.ini file which is located in your <PIM_SERVER>/configuration/HPM directory.You will find a section called Version SERVER Settings which provides you with the properties you can adjust.Please don't forget to uncomment the corresponding line (remove the #).
4.8 Repository configuration (Repository.repository)
In case you can't find the section, you might have a product version in which this setting has not been made public. However, you can just add the corresponding property to the file.com.heiler.ppm.version.server/version.dbms.MSSQL2008 = <YOUR VERSION> (example: 10.0.1600.22)com.heiler.ppm.version.server/version.dbms.MSSQL2005 = <YOUR VERSION> (example: 11.1.0.6.0)com.heiler.ppm.version.server/version.dbms.ORA11g = <YOUR VERSION> (example: 10.2.0.3.0)com.heiler.ppm.version.server/version.dbms.ORA10g = <YOUR VERSION> (example: 11.1.0.6.0)
Please note, we cannot guarantee the full compatibility of the Product 360 Server against every single database version unless they have been tested by our QA department. If you encounter errors which might originate due to the unsupported database version we might not be able to help you in a timely manner.
Modifications of the repository should only be done by System Administrators which have been trained for this.Please see also the repository documentation in the SDK documentation.

Informatica MDM - Product 360 Configuration 36
4.8.1 Changing the default language of the repositorySub entities of the repository are usually pre-qualified by default values directly in the repository. Especially the default language for language dependent fields is subject to be changed for a concrete installation environment, so the users do not have to re-qualify every column all the time. Please note that a modification of the default qualification in the repository affects all clients belonging to the server.
As of PIM7, it is no longer necessary to keep language dependent versions of the repository file for configuring the repository's default language. These language dependent aspects are automatically configured during repository initialization, adjustable by a server property (repository.default.language - possible values: All key synonyms of the corresponding language entries defined in the repository enumeration "Enum.Language", e.g. "de" or "en_US" - default is German). The repository file in <server installation folder>/configuration/HPM/repository.repository no longer contains any hard wired language dependent enum keys, but a placeholder instead, which is replaced during server startup.
Since PIM 7.0.01 the server will check if all attributes of item/product/variant and structure are maintained in the repository default language key. The server won't start if any such entry will be found.The occured error in the server log will look like this:
The database 'HPM_MAIN' contains invalid structure feature entries. '3' entries have been found which aren't maintained in the repository language German.
If you get this message please check out Troubleshooting for this behavior.
4.8.2 Adding a new language to the Repository1. Take a look at the Language tables in the database and find the language you want to add. If you can't find it there, it
might be that the language needs to be added to the database tables. 2. Open the <server installation folder>/configuration/HPM/repository.repository file with the Repository
Editor from your installation package3. Find the enumeration "Enum.Language" in the custom area of the repository.4. Add a new entry to this enumeration, using the ID of the language record of the database as key value.5. Do not forget to add also the locale identifier(s) for your language, especially in case you also want to use this
language as the GUI language of the client (which might require the corresponding language pack licenses too)
4.8.3 Adding a new language to the databaseIn the database there are 3 tables which hold language information. Language, LanguageLang and LanguageISOCodes. All must be filled with the corresponding values in order to make this new language available to the system.
Since the ID's are not just incremented and they need to match for all installations and further updates it is not recommendedto insert the new values by yourself. We strongly recommend to open a ticket with our Global Support so they can provide you an update scriptwhich then will automatically be added to the standard product with the next releases.
For documentation purposes we document here the statements which are necessary to insert a new language in the tables:
Example for language 'Romanian'
INSERT INTO "Language" ( "ID", "Visible", "DisplayOrder", "Alpha3Code", "Locale") VALUES ( 1048, 0, 2147483647, N'ron', N'ro');
Note: The repository language MUST NOT be changed as soon as entity data such as items/products/variants or structures/structure groups have been created and exist in the database. In such a situation, the stability of the system can no longer be guaranteed since logical key fields most likely will contain null values.

Informatica MDM - Product 360 Configuration 37
INSERT INTO "LanguageISOCodes" ( "ID", "LanguageID", "AlphaCode") VALUES ( 800, 1048, N'ron');INSERT INTO "LanguageISOCodes" ( "ID", "LanguageID", "AlphaCode") VALUES ( 801, 1048, N'ro'); INSERT INTO "LanguageLang" ( "ID", "LanguageID", "Name") VALUES ( 1048, 7, N'Rumänisch');INSERT INTO "LanguageLang" ( "ID", "LanguageID", "Name") VALUES ( 1048, 9, N'Romanian');
4.9 Application Modules configuration (application_modules.properties) Application modules include functionality which can be activated/deactivated for the whole application regardless of the user group membership. If a module is deactivated then all views, perspectives but even fields, entities and enumerations are not visible/available in the application. The availability of modules can be configured in the server-side file application_modules.properties which is located in the folder "<PIM_SERVER_INSTALLATION_ROOT>\server\configuration\HPM\".
By default following application modules are activated/deactivated:
# Defines if the GDSN extension is installed (true) or not (false)GDSN = false # Defines if the GDSN pool "IM" is used (true) or not (false) if the GDSN extension is installed.gdsn_pool_im = true # Defines if the GDSN pool "DSE" is used (true) or not (false) if the GDSN extension is installed.gdsn_pool_dse = false # Defines if the GDSN extension is used in "data source" mode (true) or not (false) if installed.gdsn_data_source = true # Defines if the GDSN extension is used in "data recipient" mode (true) or not (false) if installed.gdsn_data_recipient = false # Defines if the food and beverage module is activated (true) or deactivated (false).FoodAndBeverage = false
4.10 Spelling dictionariesHere is a suggestion of sites where you can find spellchecker dictionaries. Please check and respect the particular rights and licences.
http://extensions.services.openoffice.org/dictionary
Language ID and AlphaCode
The required language ID is based on the languages defined by Microsoft called Locale ID (LCID). Use the value from the column "LCID Dec" when adding a language.
To get the corresponding AlphaCodes are based on the ISO 639. For the two letter code use ISO 639-1 and for the three letter code use ISO 639-2/T. A list with available codes can be found on Wikipedia.
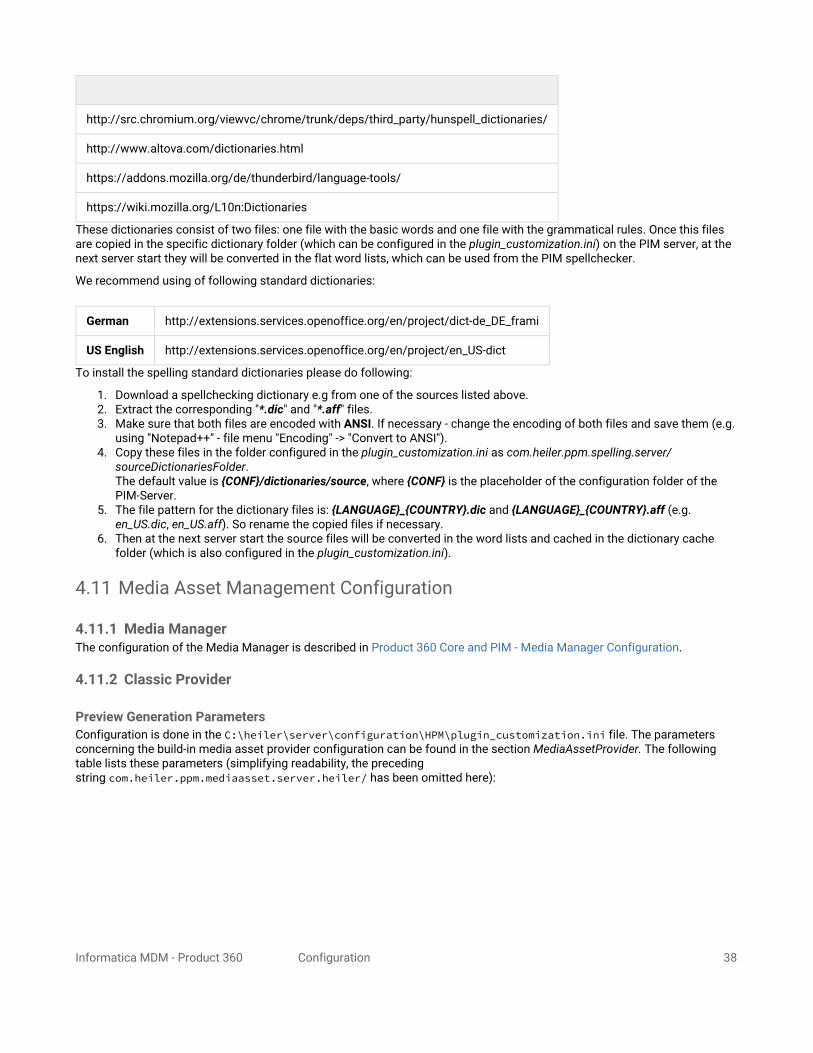
Informatica MDM - Product 360 Configuration 38
http://src.chromium.org/viewvc/chrome/trunk/deps/third_party/hunspell_dictionaries/
http://www.altova.com/dictionaries.html
https://addons.mozilla.org/de/thunderbird/language-tools/
https://wiki.mozilla.org/L10n:Dictionaries
These dictionaries consist of two files: one file with the basic words and one file with the grammatical rules. Once this files are copied in the specific dictionary folder (which can be configured in the plugin_customization.ini) on the PIM server, at the next server start they will be converted in the flat word lists, which can be used from the PIM spellchecker.
We recommend using of following standard dictionaries:
German http://extensions.services.openoffice.org/en/project/dict-de_DE_frami
US English http://extensions.services.openoffice.org/en/project/en_US-dict
To install the spelling standard dictionaries please do following:
1. Download a spellchecking dictionary e.g from one of the sources listed above.2. Extract the corresponding "*.dic" and "*.aff" files.3. Make sure that both files are encoded with ANSI. If necessary - change the encoding of both files and save them (e.g.
using "Notepad++" - file menu "Encoding" -> "Convert to ANSI").4. Copy these files in the folder configured in the plugin_customization.ini as com.heiler.ppm.spelling.server/
sourceDictionariesFolder. The default value is {CONF}/dictionaries/source, where {CONF} is the placeholder of the configuration folder of the PIM-Server.
5. The file pattern for the dictionary files is: {LANGUAGE}_{COUNTRY}.dic and {LANGUAGE}_{COUNTRY}.aff (e.g. en_US.dic, en_US.aff). So rename the copied files if necessary.
6. Then at the next server start the source files will be converted in the word lists and cached in the dictionary cache folder (which is also configured in the plugin_customization.ini).
4.11 Media Asset Management Configuration
4.11.1 Media ManagerThe configuration of the Media Manager is described in Product 360 Core and PIM - Media Manager Configuration.
4.11.2 Classic Provider
Preview Generation ParametersConfiguration is done in the C:\heiler\server\configuration\HPM\plugin_customization.ini file. The parameters concerning the build-in media asset provider configuration can be found in the section MediaAssetProvider. The following table lists these parameters (simplifying readability, the preceding string com.heiler.ppm.mediaasset.server.heiler/ has been omitted here):

Informatica MDM - Product 360 Configuration 39
Parameter
Description Default value
previewSize
Image size of the preview (height x width) in pixel displayed(e.g. in "Image preview" view). The dimensions of the image will be changed only if its width or height exceeds the corresponding geometry specification.
These thumbnails are stored in the folder $(filestorage.mime.path)\hlr-pv
1000
thumbsizeSmall
Image size of small thumbnails (height x width) in pixel displayed in table views. The dimensions of the image will be changed only if its width or height exceeds the corresponding geometry specification.
These thumbnails are stored in the folder $(filestorage.mime.path)\hlr-ts.
32
thumbsizeNormal
Image size of normal sized thumbnails (height x width) in pixel displayed in the "Miniature view (documents)" and "Miniature view. The dimensions of the image will be changed only if its width or height exceeds the corresponding geometry specification.These thumbnails are stored in the folder $(filestorage.mime.path)\hlr-tn.
100
thumbsizeBig
Image size of big thumbnails (height x width) in pixel. The dimensions of the image will be changed only if its width or height exceeds the corresponding geometry specification.
These thumbnails are stored in the folder $(filestorage.mime.path)\hlr-tb.
100
thumbnailFiletype
File type of thumbnails. Possible values are "jpg" and "png". jpg
dpi Resolution of thumbnails. 50
systemDirName
The name of the system diretory which is a folder under $(filestorage.mime.path) with following properties:
1) It can not be deleted by application.
2) It will not be changed by import.
3) It stores all files which are assgined per DND to a article/product/variant/structureGroup in Product 360 desktop.
If unspecified, the system will create the folder hlr-system automatically.
hlr-system
blacklistExtensions
Comma seperated list of file extensions which should not be supported by classic provider. chm,db,doc,docx,eps,exe,htm,html,jar,log,pdf,ps,rar,txt,xls,xlsx,zip
numberOfThread.initValue
Number of threads which are used by initalization of the corresponding thread pools in HeilerClassic Provider, such thread pools schedules the job for execution of GrphicsMagick, or other parallel work. After start of the hpm server, the value of numberOfThread can be also changed by JMX tooling in real time.
10

Informatica MDM - Product 360 Configuration 40
The preview generation process can be customized by means of configuration parameters in the section Heiler MediaAssetProvider of the C:\Heiler\server\configuration\HPM\plugin_customization.ini file.
Parameter Description
com.heiler.graphicsmagick/gm.execute.timeoutMSec
GraphicsMagic execute timeout. Gm.exe is considered as busy or crashed if there is no result after it takes longer than this time. An exception will be throws in this case. Default is 120.000 ms (2 minutes).
Previews for PS, EPF, PDF, HTML and other formats.
Running "Classic MediaAssetProvider" with unicode encoded folder namesGraphicMagic can't handle unicode characters. Without changing the windows settings accordingly, you will get an error message like this
CommunicationWorker-14 ServerImageManager Error while loading file ingraphicsmagickINFO | jvm 1 | 2011/03/03 20:25:20 |org.eclipse.core.runtime.CoreException: An error occurred while running gm.exe.INFO | jvm 1 | 2011/03/03 20:25:20 |C:\Heiler\server\plugins\com.heiler.graphicsmagick.win32_4.5.0\os\win32\x86\gm.exeidentify: Unable to open file (c:\Shared\Test????\123.jpg) Invalid argument.INFO | jvm 1 | 2011/03/03 20:25:20 |INFO | jvm 1 | 2011/03/03 20:25:20 | atcom.heiler.graphicsmagick.internal.ProcessExecutor.postErrorHandling(ProcessExecutor.java:189)INFO | jvm 1 | 2011/03/03 20:25:20 | atcom.heiler.graphicsmagick.internal.ProcessExecutor.runGuarded(ProcessExecutor.java:143)INFO | jvm 1 | 2011/03/03 20:25:20 | atcom.heiler.graphicsmagick.command.InfoCommand.executeAsExternalProcess(InfoCommand.java:238)INFO | jvm 1 | 2011/03/03 20:25:20 | atcom.heiler.graphicsmagick.command.InfoCommand.execute(InfoCommand.java:225)INFO | jvm 1 | 2011/03/03 20:25:20 | atcom.heiler.ppm.mediaasset.server.heiler.ServerImageManager.getProperties(ServerImageManager.java:499)INFO | jvm 1 | 2011/03/03 20:25:20 | atcom.heiler.ppm.mediaasset.server.heiler.HeilerClassic.getMediaAssetFileProperties(HeilerClassic.java:2966)INFO | jvm 1 | 2011/03/03 20:25:20 | atcom.heiler.ppm.mediaasset.server.heiler.HeilerClassic.getMediaAssetFileProperties(HeilerClassic.java:3090)INFO | jvm 1 | 2011/03/03 20:25:20 | atcom.heiler.ppm.mediaasset.server.handler.GetMediaAssetFileProperties.onMessage(GetMediaAssetFileProperties.java:77)INFO | jvm 1 | 2011/03/03 20:25:20 | atcom.heiler.ppm.communication.core.internal.node.AbstractNode.processRequestMessageForOurself(AbstractNode.java:398)INFO | jvm 1 | 2011/03/03 20:25:20 | atcom.heiler.ppm.communication.core.internal.node.AbstractNode.processLowLevelMessageForOurself(AbstractNode.java:295)INFO | jvm 1 | 2011/03/03 20:25:20 | atcom.heiler.ppm.communication.core.internal.node.ServerNodeImpl.processLowLevelMessage(ServerNodeImpl.java:554)INFO | jvm 1 | 2011/03/03 20:25:20 | atcom.heiler.ppm.communication.core.internal.node.AbstractNode$LowLevelMessageRunnable.run(AbstractNode.java:214)INFO | jvm 1 | 2011/03/03 20:25:20 | atjava.util.concurrent.ThreadPoolExecutor$Worker.runTask(ThreadPoolExecutor.java:886)INFO | jvm 1 | 2011/03/03 20:25:20 | at
In the basic configuration GraphicsMagick supports already many file formats, but not for PS, EPS, PDF and HTML files. Use the Informatica Media Manager for advanced capabilities.
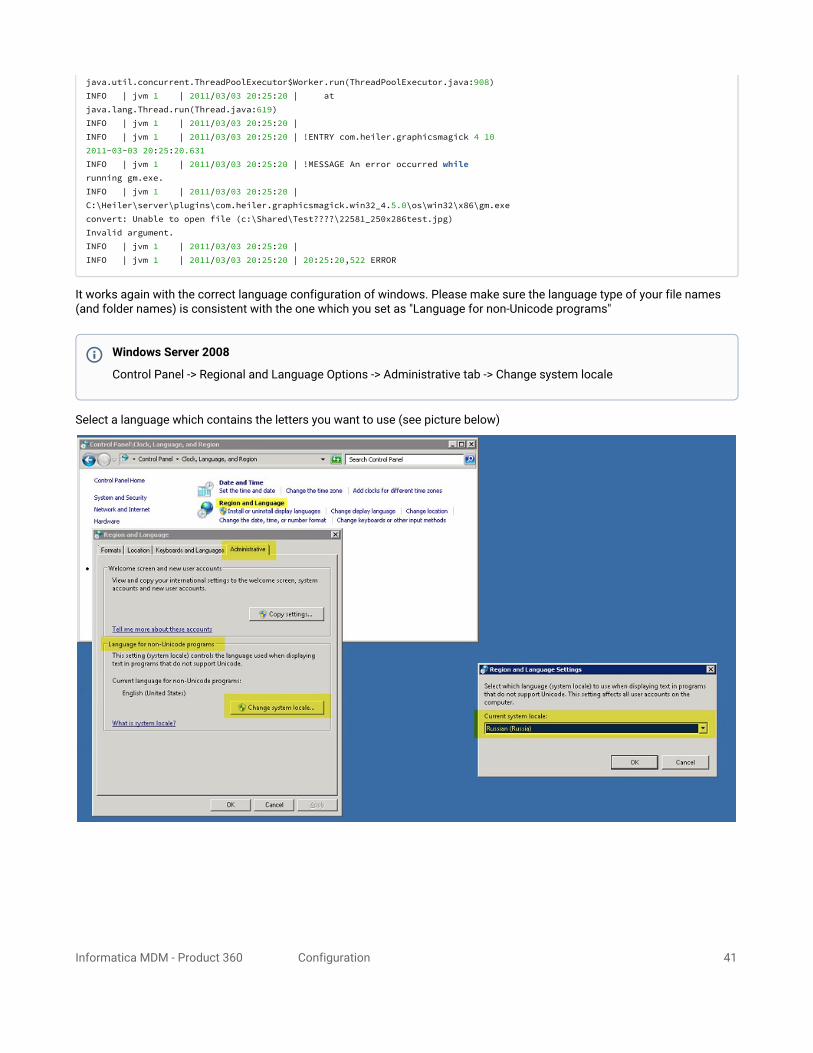
Informatica MDM - Product 360 Configuration 41
java.util.concurrent.ThreadPoolExecutor$Worker.run(ThreadPoolExecutor.java:908)INFO | jvm 1 | 2011/03/03 20:25:20 | atjava.lang.Thread.run(Thread.java:619)INFO | jvm 1 | 2011/03/03 20:25:20 |INFO | jvm 1 | 2011/03/03 20:25:20 | !ENTRY com.heiler.graphicsmagick 4 102011-03-03 20:25:20.631INFO | jvm 1 | 2011/03/03 20:25:20 | !MESSAGE An error occurred whilerunning gm.exe.INFO | jvm 1 | 2011/03/03 20:25:20 |C:\Heiler\server\plugins\com.heiler.graphicsmagick.win32_4.5.0\os\win32\x86\gm.execonvert: Unable to open file (c:\Shared\Test????\22581_250x286test.jpg)Invalid argument.INFO | jvm 1 | 2011/03/03 20:25:20 |INFO | jvm 1 | 2011/03/03 20:25:20 | 20:25:20,522 ERROR
It works again with the correct language configuration of windows. Please make sure the language type of your file names (and folder names) is consistent with the one which you set as "Language for non-Unicode programs"
Select a language which contains the letters you want to use (see picture below)
Windows Server 2008
Control Panel -> Regional and Language Options -> Administrative tab -> Change system locale

Informatica MDM - Product 360 Configuration 42
4.12 Security loggingAll login activities are logged by default in a separate file securityLogin.log as well as persisted in the database. The date, login name and the source will logged. To disable the logging in the database you have to set the field User.LastLoginDate to inactive. If you only want to deactivate the file logging, you can ajdust the log4j.xml and remove SECURITY_LOGIN section.
4.12.1 Setup a keystore for SSL certificates
4.13 Advanced LDAP configuration
With the Elements/Attributes it is possible to adjust PIM to special LDAP environments. Especially if user authentication should not be done by the userPrincipalName (username@domain).
The following values are optional and additional to the parameters mentioned in "Server Configuration" -> "Authentication Setup" -> "LDAP Authentication (LDAPConfig.xml)" chapter.
Element/Attribute Description
serviceBindDN (optional) Used to authenticate the management user. Overwrite <principal>
domainComponentIdentifier
(optional) Used to identify domain tokens. Default is 'DC'
UserConfig
accountBindDN (optional) Used to authenticate user. {userName} will be replaced with entered user name. {domainName} will be replaced with attribute domain value of directory. Default is authentication by principal name.
accountNameFilterBaseDN
(optional) Root node for accountNameFilter to filter user. Default is DC values to build the domain (like DC=domain,DC=com).
Find a view samples below. It is possible to combine the LDAP fields and adjust the filters for the existing LDAP setup.
4.13.1 uid exampleThis sample uses the uid to authenticate and filter the users.
Action LDAP field
Authenticate manager user uid
Authenticate client user uid
Filter client user uid
LDAP configuration Additional comments
DC identifier dc The domain setup looks like 'dc=myDomain,dc=com
The advanced LDAP settings are available since 8.0.03.03, 8.0.5.01

Informatica MDM - Product 360 Configuration 43
LDAP configuration Additional comments
User object class inetOrgPerson
Group object class groupOfNames
<ldapConfig> <directory identifier="myLDAP" domain="myDomain.com" url="ldap://myLdap.com"> <principal>[email protected]</principal> <password>myPassword</password> <serviceBindDN>serviceUserUid</serviceBindDN> <domainComponentIdentifier>dc</domainComponentIdentifier> <userConfig objectClass="inetOrgPerson" accountNameFilter="(&(uid={userName})(objectClass=inetOrgPerson))" sidFilter="(&(objectSid={sid})(objectClass=inetOrgPerson))" accountBindDN="{userName}" accountNameFilterBaseDN="dc=myDomain,dc=com"> <name>cn</name> <sid>objectSid</sid> <groups>groupMembership</groups> </userConfig> <groupConfig objectClass="groupOfNames" objectFilter="(objectCategory=groupOfNames)"> <name>name</name> <description>description</description> <sid>objectSid</sid> <refreshIntervalInMin>10</refreshIntervalInMin> </groupConfig> </directory></ldapConfig>
4.13.2 CN exampleThis sample uses the CN to authenticate and filter the users.
Action LDAP field
Authenticate manager user CN
Authenticate client user CN
Filter client user CN
LDAP configuration Additional comments
DC identifier DC The domain setup looks like 'DC=myDomain,DC=com
User object class user
Group object class group
All your PIM users are below your OU yourOrg
<ldapConfig>

Informatica MDM - Product 360 Configuration 44
<directory identifier="myLDAP" domain="myDomain.com" url="ldap://myLdap.com"> <principal>[email protected]</principal> <password>myPassword</password> <serviceBindDN>CN=serviceUser,OU=yourOrg,DC=myDomain,DC=com</serviceBindDN> <domainComponentIdentifier>DC</domainComponentIdentifier> <userConfig objectClass="user" accountNameFilter="(&(CN={userName},OU=yourOrg,DC=myDomain,DC=com)(objectClass=user))" sidFilter="(&(objectSid={sid})(objectClass=user))" accountBindDN="CN={userName},OU=yourOrg,DC=myDomain,DC=com" accountNameFilterBaseDN="OU=yourOrg,DC=myDomain,DC=com"> <name>sAMAccountName</name> <sid>objectSid</sid> <groups>groupMembership</groups> </userConfig> <groupConfig objectClass="group" objectFilter="(objectCategory=group)"> <name>name</name> <description>description</description> <sid>objectSid</sid> <refreshIntervalInMin>10</refreshIntervalInMin> </groupConfig> </directory></ldapConfig>
4.13.3 Do not determine domain from usernameBy default P360 server tries to determine the user and the domain value from the given typed in user name. This means that given input [email protected] will split into 2 parts. 'user' is used as user name - 'domain.com' is used as domain. The same if you use the pattern domain.com\user.
This default behavior can be changed via the parameter <extractDomainFromUserName>. This parameter is not mandatory and the default value is true. The value is used for all available <directory> entries. If the value is set to true the typed input is used as user name without any changes.
A sample configuration would look like this.
<?xml version="1.0" encoding="UTF-8" standalone="yes"?><ldapConfig> <directory identifier="myLDAP" domain="myDomain.com" url="ldap://myLdap.com"> <principal>[email protected]</principal> <password>myPassword</password> <userConfig objectClass="user" accountNameFilter="(&(sAMAccountName={userName})(objectClass=user))" sidFilter="(&(objectSid={sid})(objectClass=user))"> <name>sAMAccountName</name> <sid>objectSid</sid> <groups>memberOf</groups> </userConfig> <groupConfig objectClass="group" objectFilter="(objectCategory=Group)"> <name>name</name> <description>description</description> <sid>objectSid</sid> <refreshIntervalInMin>10</refreshIntervalInMin> </groupConfig> </directory> <extractDomainFromUserName>false</extractDomainFromUserName></ldapConfig>

Informatica MDM - Product 360 Configuration 45
4.14 EH-Cache ConfigurationCaching is a difficult topic in every application and it's hard to predict which cache is useful and which isn't. Mainly because this is driven by the use cases the user execute on the system, manual ones, or automatic ones.
This page should give some simple overview.
In Product 360 we have multiple various caches which support different use cases. Some of those caches are designed in a ways that their content always needs to be in memory and therefore those caches can not really be adjusted by the user. Others are more transparent in their performance impacts and are provided using the EH-Cache framework.
EH-Cache is an open source caching framework which allows to create cache structures within the application which can then be configured and monitored from outside. The configuration of caches which are implemented using this framework is done in the ehcache.xml file within the configuration/hpm folder of the control center, respectively the application server.
For detail on the general structure of the ehcache.xml file, we kindly ask you to see the official eh-cache documentation. However, for the purpose of this document we will use a small part of it.
4.14.1 General Cache configuration
Mandatory Attributes
Description
name Sets the name of the cache. This is used to identify the cache. It must be unique. This must never be changed as the application uses the name to find the configuration!
maxElementsInMemory
Sets the maximum number of objects that will be created in memory
maxElementsOnDisk
Sets the maximum number of objects that will be maintained in the DiskStore. The default value is zero, meaning unlimited.
eternal Sets whether elements are eternal. If eternal, timeouts are ignored and the element is never expired.
overflowToDisk Sets whether elements can overflow to disk when the memory store has reached the maxInMemory limit.
Optional Attributes
Description
timeToIdleSeconds
Sets the time to idle for an element before it expires. i.e. The maximum amount of time between accesses before an element expiresIs only used if the element is not eternal. Optional attribute. A value of 0 means that an Element can idle for infinity. The default value is 0.
timeToLiveSeconds
Sets the time to live for an element before it expires. i.e. The maximum time between creation time and when an element expires.Is only used if the element is not eternal. Optional attribute. A value of 0 means that and Element can live for infinity. The default value is 0.
diskPersistent Whether the disk store persists between restarts of the Virtual Machine. The default value is false.
diskExpiryThreadIntervalSeconds
The number of seconds between runs of the disk expiry thread. The default value is 120 seconds.

Informatica MDM - Product 360 Configuration 46
diskSpoolBufferSizeMB
This is the size to allocate the DiskStore for a spool buffer. Writes are made to this area and then asynchronously written to disk. The default size is 30MB.Each spool buffer is used only by its cache. If you get OutOfMemory errors consider lowering this value. To improve DiskStore performance consider increasing it. Trace levellogging in the DiskStore will show if put back ups are occurring.
clearOnFlush Whether the MemoryStore should be cleared when flush() is called on the cache. By default, this is true i.e. the MemoryStore is cleared.
memoryStoreEvictionPolicy
Policy would be enforced upon reaching the maxElementsInMemory limit. Default policy is Least Recently Used (specified as LRU). Other policies available -First In First Out (specified as FIFO) and Less Frequently Used (specified as LFU)
Specific Caches
List Model CacheThe List Model Cache is mainly used in the Rest Service API of Product 360 - specifically for the purpose of "paging" in larger list model. In case client application don't want to, or just can't process large list models at once, they have the possibility to use the ListModel cache in order to do that. This way the larger list model is kept on the server until the time to live is expired or the client sends an evict message.
The ehCache.xml file has two cache configurations predefined. One specific for the Item entity (listModel.Article) and one for all other entities (listModel._shared). As described in the ehCache.xml file you can also add a specific configuration for other entities if needed. The application will check if there is an appropriate configuration in the ehCache.xml file, and if not will use the listModel._shared.
An "element" in the context of a list model cache is a "full list model", not single rows of the model.
<!-- shared cache for list models. Comment it to disable shared list mode caching --> <cache name="listModel._shared" maxElementsInMemory="100" eternal="false" timeToIdleSeconds="600" timeToLiveSeconds="3600" overflowToDisk="false" memoryStoreEvictionPolicy="LRU" />
<!-- entity specific cache for list models. use 'listmodel.' prefix to configure cache for a specific entity --> <cache name="listModel.Article" maxElementsInMemory="100" eternal="false" timeToIdleSeconds="600" timeToLiveSeconds="3600" overflowToDisk="false" memoryStoreEvictionPolicy="LRU" />
Informatica MDM - Product 360 Configuration 47
4.15 How to configure Oracle TCPS connection for P360 Server
4.15.1 PrerequisiteIn order to establish a TCPS connection, ensure, that the Oracle server's public key certificate is known by the P360 Server's Java Runtime Environment (JRE). There are different possibilities to achieve this. Please refer to the JSSE Reference Guide (https://docs.oracle.com/javase/8/docs/technotes/guides/security/jsse/JSSERefGuide.html) and here especially the chapters "Creating an X509TrustManager" and "Creating a Keystore to Use with JSSE".
4.15.2 Configure P360 ServerEnsure to do the following configuration changes on all P360 Servers. The easiest and safest way to achieve this, is to change the configuration files and then deploy them to all P360 Servers via P360 Control Center. The P360 application servers need to be restarted in order to have changes take effect.
in server/configuration/HPM/server.properties:specify the Oracle Server's TCPS port as value of the property db.default.port (and naturally also the other database parameters like host, database,...). For details, please refer to the chapter "Server Configuration".
in server/configuration/HPM/database/main.properties.template.ORA11g, master.properties.template.ORA11g and supplier.properties.template.ORA11g
change the protocol to "tcps" in the property hibernate.connection.urlin server/configuration/HPM/quartz/quartz.properties.template.ORA11g
change the protocol to "tcps" in the property org.quartz.dataSource.PPM_MAIN.URLin server/configuration/HPM/database/uda/uda-jdbcpool.xml.template.ORA11g
for all <datasource> tags (PCM_MAIN, PCM_MASTER and PCM_SUPPLIER), change the protocol to "tcps" in the property url
If JBPM is activated for the P360 Server, then also change the following:
in server/plugins/org.jbpm_.../conf/ edit hibernate.cfg.xml.template.ORA10g and hibernate.cfg.xml.template.ORA11g:
change the protocol to "tcps" in property "hibernate.connection.url"
4.16 SAML Configuration
4.16.1 Overview
RolesThe SAML specification defines three roles:
• the Principal (typically a user)• the Identity Provider (IdP) e.g. AD FS, OKTA or Shibboleth• and the Service Provider (SP) in our case Product 360
This section describes all steps necessary to setup Single Sign On via SAML in PIM 360. In general, if you want to know more about what SAML SSO is, documentations can be found on the official SAML
This guide describes the necessary steps to configure Product 360 for usage with SAML Single Sign On (Active Directory Federation Services (AD FS) or Shibboleth). SAML support has been introduced with Product 360 v8.0.02.

Informatica MDM - Product 360 Configuration 48
documentation pages provided by the OASIS consortium.In such documentations the term "Service Provider" can be replaced by "Product 360" and the term "User agent" can be replaced by "Browser" in case of Web based SSO scenarios.
Single Sign On flowProduct 360 supports two ways for Single Sign On. Service Provider initiated and Identity Provider initiated Single Sign On.
Service Provider InitiatedIn this scenario
1. The principal requests a service from the service provider (e.g. access to a web resource within Product 360). 2. To provide this resource to the principal the service provider redirects user authentication (AuthRequest) to the
identity provider.3. In case the user is not yet authenticated at the Identity Provider, the IdP requests credentials from the user, e.g. by
presenting a login form with username and password.4. The IdP sends an identity assertion (SAML Assertion like a security token) for the principal. On basis of this assertion,
the service provider can make a decision to provide the resource to the principal or not.5. The SP ensures that the user is directed to the initially requested resource.
Identity Provider Initiated In this scenario, there is no initial authentication request from the SP. Instead, the IdP provides links to the SP to certain SP resources. IdP initiated Single Sign On is started when clicking on such a link.
1. The user clicks on an IdP provided link to access a resource in the SP.2. In case the user is not yet authenticated at the Identity Provider, the IdP requests credentials from the user, e.g. by
presenting a login form with username and password.3. The SP directly receives an identity assertion for the principal. On basis of this assertion, the service provider can
make a decision to provide the resource to the principal or not.4. The SP ensures that the user is directed to the resource given in the assertion information.
Product 360 SAML support • HTTP communication security is ensured by SSL between the IdP and SP.• Messages can be signed and encrypted to ensure message-level security. This includes:
• signing of AuthRequest message from SP to IdP• signing of SAML Assertions• encryption of SAML Assertions
• While the IdP is signing the assertions, this allows Product 360 to verify against the IdP's public X509 certificate that this assertion's where issued by exactly this IdP.
• Optionally supplying Product 360 with a public X509 certificate and private key allows Product 360, as the SP, to sign outgoing requests to the IdP, as well as decrypt assertions from the IdP.
• To take advantage of these security features, the IdP must be configured to validate signatures and encrypt assertions using the same private key and public X509 certificate that Product 360 uses to sign outgoing requests to the IdP.
• Product 360 signs outgoing messages to the IdP with the SHA1 hashing algorithm. Product 360 supports incoming messages from the IdP signed with the SHA1 or SHA256 hashing algorithms.
• Product 360 can decrypt assertions from IdP, encrypted with AES-128, AES-256, or Triple DES encryption algorithms.• Passwords are never transmitted as part of a SAML authentication request or response. Requests only contains the
username and (optional) any additional metadata (username, domain, etc.) that was configured by the IdP administrator. The optional information can be used for automatic user creation.

Informatica MDM - Product 360 Configuration 49
4.16.2 Preparation steps
Certificate keystores
To setup SAML support in Product 360 we will need to start with creating the keystore's for the different X509 certificates which will be needed for transport and message level security. If there is no SSL connection used within your Product 360 yet, you will need to setup an initial keystore.
Create new certificate and keystoreTo create a new JKS keystore from scratch, containing a single self-signed Certificate, execute the following from a terminal command line:
Create new certificate and keystore
keytool -genkey -alias [your alias] -keyalg RSA -keystore c:\path\to\your\desired\.keystore -keysize 2048
This command will create a new file under the specified (-keystore parameter) location. You will also need to reflect this new location in the Product 360 NetworkConfig.xml file in the <keystore> element.
After executing this command, you will first be prompted for the keystore password. You will also need to specify the custom password in the NetworkConfig.xml file, as described later.
Next, you will be prompted for general information about this Certificate, such as company, contact name, and so on. This information will be displayed to users who attempt to access a secure page in your application, so make sure that the information provided here matches what they will expect.
Finally, you will be prompted for the key password, which is the password specifically for this Certificate (as opposed to any other Certificates stored in the same keystore file). The key password as well as the specified alias (-alias parameter) you need to specify in the appropriate use case (HTTPS, SAML signing, SAML encryption) and there configuration files.
If everything was successful, you now have a keystore file with a Certificate that can be used by your Product 360 server.
Import existing certificate into keystoreIf you already have a Certificate you can import it into your local keystore. First of all you have to import a so called Chain Certificate or Root Certificate into your keystore. After that you can proceed with importing your Certificate
Download a Chain Certificate from the Certificate Authority you obtained the Certificate from.
• For Verisign.com commercial certificates go to: http://www.verisign.com/support/install/intermediate.html• For Verisign.com trial certificates go to: http://www.verisign.com/support/verisign-intermediate-ca/
Trial_Secure_Server_Root/index.html• For Trustcenter.de go to: http://www.trustcenter.de/certservices/cacerts/en/en.htm#server• For Thawte.com go to: http://www.thawte.com/certs/trustmap.html
Import the Chain Certificate into your keystore
For AD FS, it is necessary to have https enabled. Therefore you need a keystore file, which has to be provided for each node.
Product 360 currently operates only on JKS format keystores. The JKS format is Java's standard "Java KeyStore" format, and is the format created by the keytool command-line utility. This tool is included in the JDK.
Each entry in a keystore is identified by an alias string to avoid issues related to the case sensitivity of aliases, it is not recommended to use aliases that differ only in case.
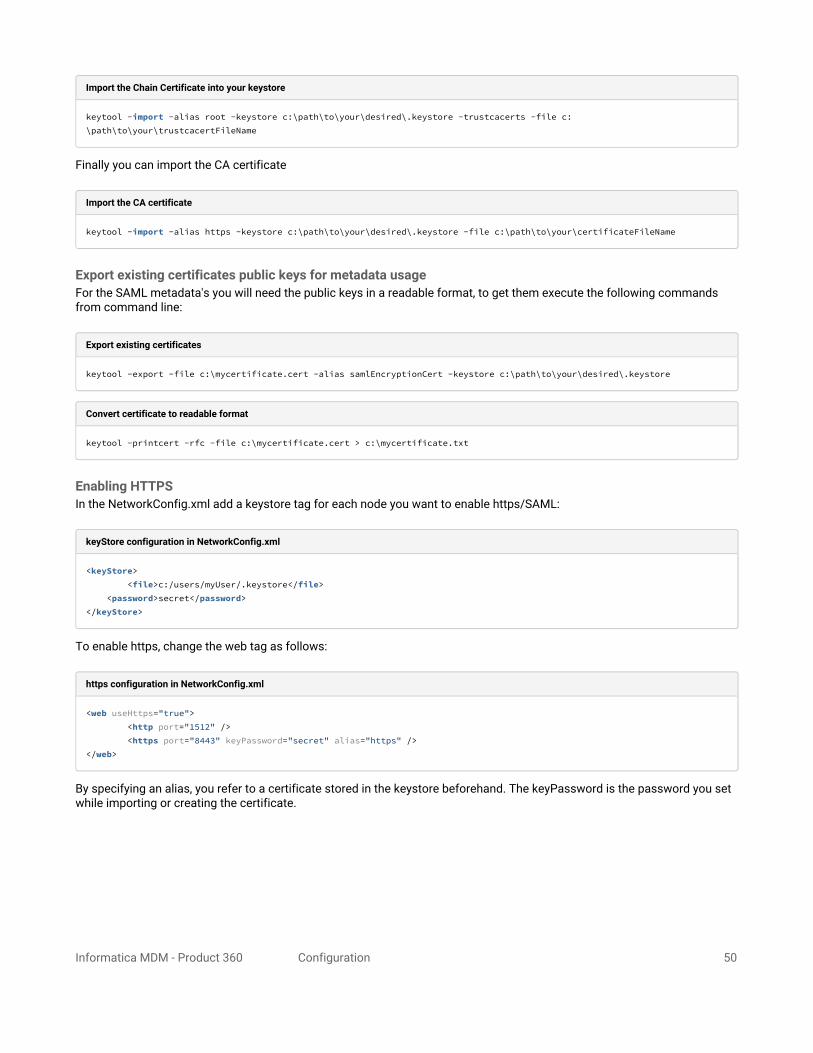
Informatica MDM - Product 360 Configuration 50
Import the Chain Certificate into your keystore
keytool -import -alias root -keystore c:\path\to\your\desired\.keystore -trustcacerts -file c:\path\to\your\trustcacertFileName
Finally you can import the CA certificate
Import the CA certificate
keytool -import -alias https -keystore c:\path\to\your\desired\.keystore -file c:\path\to\your\certificateFileName
Export existing certificates public keys for metadata usageFor the SAML metadata's you will need the public keys in a readable format, to get them execute the following commands from command line:
Export existing certificates
keytool -export -file c:\mycertificate.cert -alias samlEncryptionCert -keystore c:\path\to\your\desired\.keystore
Convert certificate to readable format
keytool -printcert -rfc -file c:\mycertificate.cert > c:\mycertificate.txt
Enabling HTTPSIn the NetworkConfig.xml add a keystore tag for each node you want to enable https/SAML:
keyStore configuration in NetworkConfig.xml
<keyStore> <file>c:/users/myUser/.keystore</file> <password>secret</password></keyStore>
To enable https, change the web tag as follows:
https configuration in NetworkConfig.xml
<web useHttps="true"> <http port="1512" /> <https port="8443" keyPassword="secret" alias="https" /></web>
By specifying an alias, you refer to a certificate stored in the keystore beforehand. The keyPassword is the password you set while importing or creating the certificate.
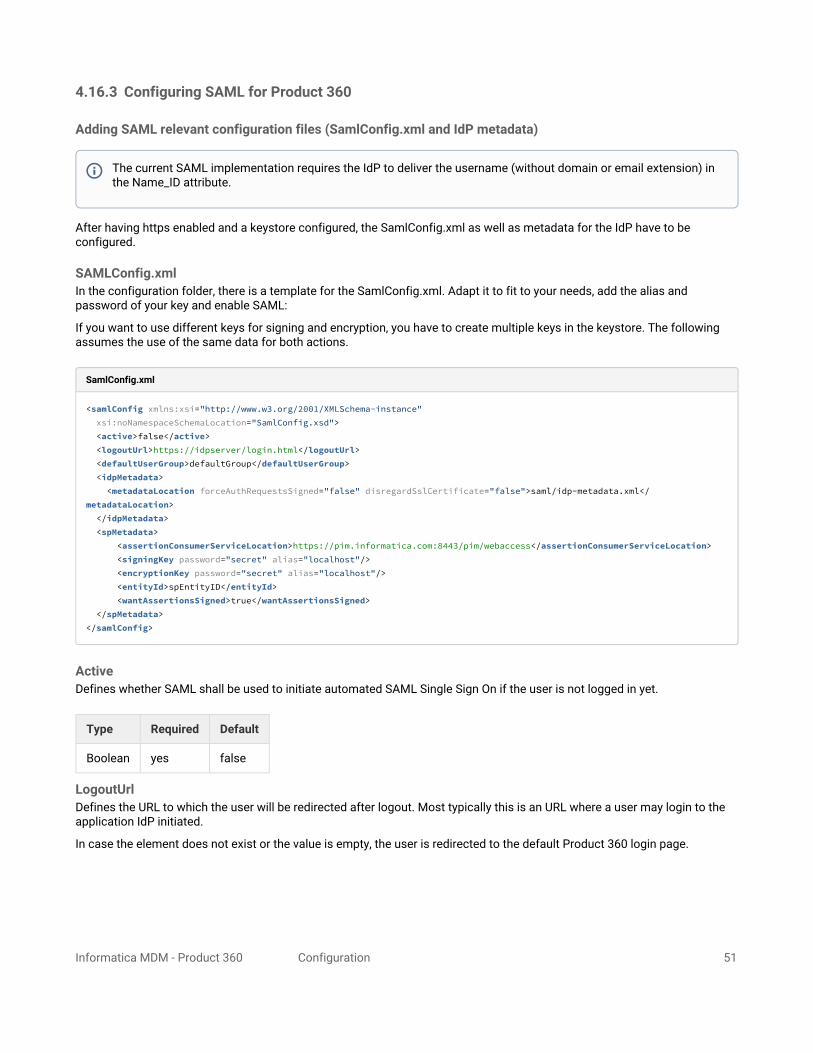
Informatica MDM - Product 360 Configuration 51
4.16.3 Configuring SAML for Product 360
Adding SAML relevant configuration files (SamlConfig.xml and IdP metadata)
After having https enabled and a keystore configured, the SamlConfig.xml as well as metadata for the IdP have to be configured.
SAMLConfig.xmlIn the configuration folder, there is a template for the SamlConfig.xml. Adapt it to fit to your needs, add the alias and password of your key and enable SAML:
If you want to use different keys for signing and encryption, you have to create multiple keys in the keystore. The following assumes the use of the same data for both actions.
SamlConfig.xml
<samlConfig xmlns:xsi="http://www.w3.org/2001/XMLSchema-instance" xsi:noNamespaceSchemaLocation="SamlConfig.xsd"> <active>false</active> <logoutUrl>https://idpserver/login.html</logoutUrl> <defaultUserGroup>defaultGroup</defaultUserGroup> <idpMetadata> <metadataLocation forceAuthRequestsSigned="false" disregardSslCertificate="false">saml/idp-metadata.xml</metadataLocation> </idpMetadata> <spMetadata> <assertionConsumerServiceLocation>https://pim.informatica.com:8443/pim/webaccess</assertionConsumerServiceLocation> <signingKey password="secret" alias="localhost"/> <encryptionKey password="secret" alias="localhost"/> <entityId>spEntityID</entityId> <wantAssertionsSigned>true</wantAssertionsSigned> </spMetadata></samlConfig>
ActiveDefines whether SAML shall be used to initiate automated SAML Single Sign On if the user is not logged in yet.
Type Required Default
Boolean yes false
LogoutUrlDefines the URL to which the user will be redirected after logout. Most typically this is an URL where a user may login to the application IdP initiated.
In case the element does not exist or the value is empty, the user is redirected to the default Product 360 login page.
The current SAML implementation requires the IdP to deliver the username (without domain or email extension) in the Name_ID attribute.

Informatica MDM - Product 360 Configuration 52
Type Required Default
String or URL no Product 360 login page
DefaultUserGroupWhen a user has been authenticated via SAML and there is no matching user with the same name in Product 360 it will be created on the fly and assigned to a default user group which can be provided here.A matching user group with this name must exist in Product 360.
Type Required Default
String no -
SpMetadataRequired element defining all Service Provider relevant settings.
Sub element/Attribute Type
Required
Default
Description
entityId String
yes - An entity ID is a globally unique name for a SAML entity, either an Identity Provider (IdP) or a Service Provider (SP).
The entityId defined will be used for communication between IdP and Sp.
assertionConsumerServiceLocation
URL yes - Describes the endpoint to which SAML responses are to be sent by the IdP.
signingKey - yes - The signing key is used to establish a trusted handshake between SP and IdP (authentication).
alias String
yes - Alias for the key used for signing.
password String
yes - Password for accessing the key defined by the alias.
encryptionKey String
yes - The encryption key is used to decrypt data received by IdP (data was encrypted by the SPs corresponding public key).
alias String
yes - Alias for the key used for signing.
password String
yes - Password for accessing the key defined by the alias.
wantAssertionsSigned
Boolean
yes true If you want the IdP to sign Assertions set this flag to true.
As signing of assertions is the recommended option, the default value is true.
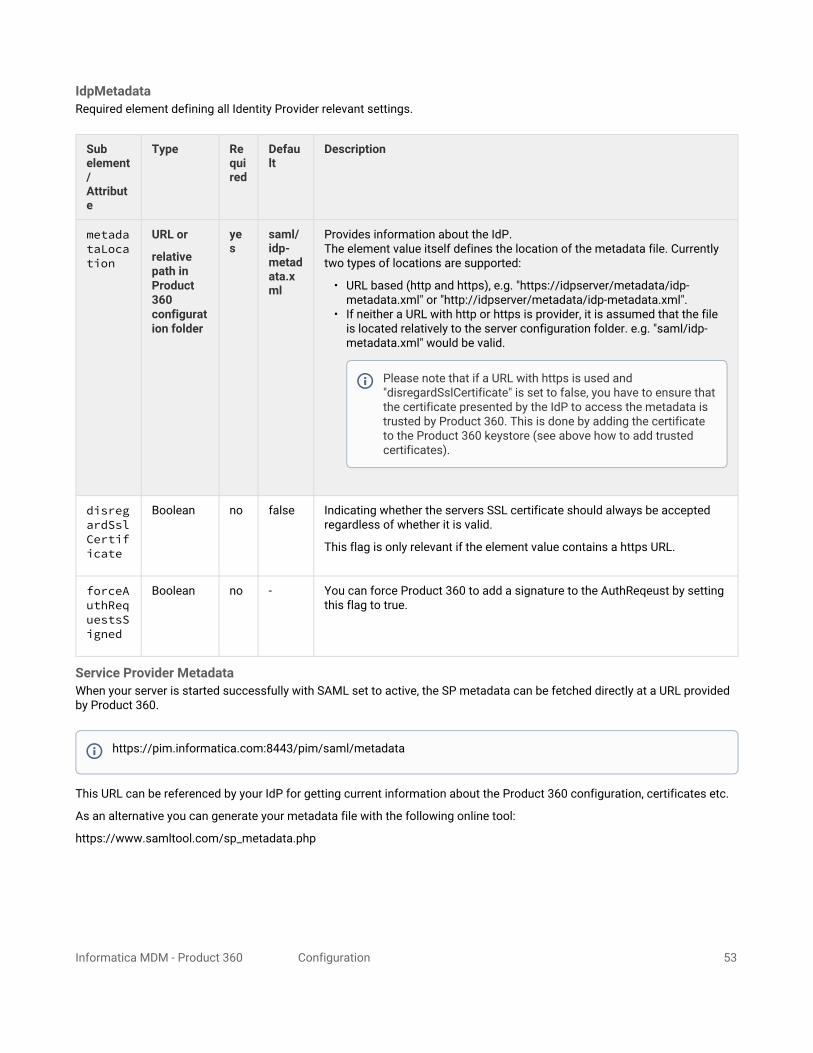
Informatica MDM - Product 360 Configuration 53
IdpMetadataRequired element defining all Identity Provider relevant settings.
Sub element/Attribute
Type Required
Default
Description
metadataLocation
URL or
relative path in Product 360 configuration folder
yes
saml/idp-metadata.xml
Provides information about the IdP.The element value itself defines the location of the metadata file. Currently two types of locations are supported:
• URL based (http and https), e.g. "https://idpserver/metadata/idp-metadata.xml" or "http://idpserver/metadata/idp-metadata.xml".
• If neither a URL with http or https is provider, it is assumed that the file is located relatively to the server configuration folder. e.g. "saml/idp-metadata.xml" would be valid.
disregardSslCertificate
Boolean no false Indicating whether the servers SSL certificate should always be accepted regardless of whether it is valid.
This flag is only relevant if the element value contains a https URL.
forceAuthRequestsSigned
Boolean no - You can force Product 360 to add a signature to the AuthReqeust by setting this flag to true.
Service Provider MetadataWhen your server is started successfully with SAML set to active, the SP metadata can be fetched directly at a URL provided by Product 360.
This URL can be referenced by your IdP for getting current information about the Product 360 configuration, certificates etc.
As an alternative you can generate your metadata file with the following online tool:
https://www.samltool.com/sp_metadata.php
Please note that if a URL with https is used and "disregardSslCertificate" is set to false, you have to ensure that the certificate presented by the IdP to access the metadata is trusted by Product 360. This is done by adding the certificate to the Product 360 keystore (see above how to add trusted certificates).
https://pim.informatica.com:8443/pim/saml/metadata

Informatica MDM - Product 360 Configuration 54
Identity Provider MetadataThe IdP metadata usually can be received over an URL provided by the IdP, which already contains all necessary information you need to know about your IdP. This includes certification information as well as endpoints etc.Of course the IdP metadata can also be retrieved from a configuration folder. A template metadata file "idp-metadata.xml" is contained in the subfolder saml of the Product 360 configuration folder.
The following URL fragments show the metadata URL patterns for the two IdP implementations of Microsoft and Shibboleth:
Microsoft AD FS
https://idpserver/FederationMetadata/2007-06/FederationMetadata.xml
Shibboleth
https://idpserver/idp/shibboleth
OpenAM
http://openamserver/openam/saml2/jsp/exportmetadata.jsp?entityid=entityID
Place your idp-metadata.xml into the subfolder saml of the Product 360 configuration folder or the defined location within your SamlConfig.xml.
In case your IdP does not provide any metadata you need to generate the idp-metadata.xml file from a template located in within the Product 360 configuration folder. The relevant information can alternatively be generated with the help of https://www.samltool.com/idp_metadata.php.
Within the metadata file you need to provide the URL to your IdPs SingleSignOnService location which accepts POST requests. (Example URL schema matches Shibboleth IdP)
Sample idp-metadata.xml
<?xml version="1.0"?><md:EntityDescriptor xmlns:md="urn:oasis:names:tc:SAML:2.0:metadata" entityID="idpEntityID"> <md:IDPSSODescriptor WantAuthnRequestsSigned="false" protocolSupportEnumeration="urn:oasis:names:tc:SAML:2.0:protocol"> <md:SingleSignOnService Binding="urn:oasis:names:tc:SAML:2.0:bindings:HTTP-POST" Location="https://idpserver/idp/profile/SAML2/POST/SSO" /> </md:IDPSSODescriptor></md:EntityDescriptor>
Information Security
Signing of AuthRequest (SP -> IdP)If your IdP requires signed AuthRequest you need to enable this within Product 360. This can be done by setting the WantAuthRequestsSigned parameter within the idp-metadata.xml in the configuration folder to true.

Informatica MDM - Product 360 Configuration 55
Enable signing of SAML request
<md:IDPSSODescriptor WantAuthnRequestsSigned="true" ...>
While the SAML metadata specification does not require the WantAuthRequestSigned parameter within the IDPSSODescriptor some IdP Implementations might not set it explicitly, but nevertheless require a signature.
Force Signed Auth Requests in SamlConfig.xml
<?xml version="1.0" encoding="UTF-8"?><samlConfig xmlns:xsi="http://www.w3.org/2001/XMLSchema-instance" xsi:noNamespaceSchemaLocation="SamlConfig.xsd"> ... <idpMetadata> <metadataLocation forceAuthRequestsSigned="true">https://idpserver/metadata/idp-metadata.xml</metadataLocation> </idpMetadata> ...</samlConfig>
Additionally you need to provide an X509 certificate in your keystore and refer to it over the alias and password attribute in the <signingKey> element within the spMetadata section of your SamlConfig.xml
Signing of SAML Assertions (IdP -> SP)The SAML metadata specification defines an parameter for requesting an IdP to sign the SAML Assertions this might not be enough for all IdPs and you might need to enable the signing of SAML assertions over another way, but to enable Product 360 to require signature validation on assertion level you need to set the WantAssertionsSigned parameter in SamlConfig.xml within you Product 360 configuration folder to true.
Enable signing of SAML response
<samlConfig xmlns:xsi="http://www.w3.org/2001/XMLSchema-instance" xsi:noNamespaceSchemaLocation="SamlConfig.xsd"> ... <spMetadata> ... <wantAssertionsSigned>true</wantAssertionsSigned> ... </spMetadata></samlConfig>
The signature of the assertion will be veryfied by Product 360 against the public key of the X509 certificate within your idp-metadata.xml
Signing public key in idp-metadata.xml
<?xml version="1.0"?><md:EntityDescriptor xmlns:md="urn:oasis:names:tc:SAML:2.0:metadata" entityID="idpEntityID">
If you use the URL based metadata provider for referencing the IdP metadata, you can force your Product 360 to add a signature to the AuthReqeust by adding the forceAuthRequestsSigned flag to true.

Informatica MDM - Product 360 Configuration 56
<md:IDPSSODescriptor WantAuthnRequestsSigned="false" protocolSupportEnumeration="urn:oasis:names:tc:SAML:2.0:protocol"> ... <md:KeyDescriptor use="signing"> <ds:KeyInfo xmlns:ds="http://www.w3.org/2000/09/xmldsig#"> <ds:X509Data> <ds:X509Certificate>MIIDZzCCAk+gAwIBAgIEFuHJDDANBgkqhkiG9w0BAQsFADBkMQswCQYDVQQGEwJE RTEQMA4GA1UECBMHR2VybWFueTENMAsGA1UEBxMEU3RndDERMA8GA1UEChMIV2lu ZG93czcxDTALBgNVBAsTBFBPSU0xEjAQBgNVBAMTCWxvY2FsaG9zdDAeFw0xNTEw MDIxMjA2NDFaFw0xNjA5MjYxMjA2NDFaMGQxCzAJBgNVBAYTAkRFMRAwDgYDVQQI ... </ds:X509Certificate> </ds:X509Data> </ds:KeyInfo> </md:KeyDescriptor> ... </md:IDPSSODescriptor></md:EntityDescriptor>
Encryption of SAML Assertions (IdP -> SP)
If your IdP supports assertion level encryption and the encryption is active, then you must provide your encryption public key X509 certificate within the metadata you provide to your IdP.The IdP will use this public key to encrypt the SAML assertion and only the owner of the corresponding private key can encrypted the assertion. The best way of doing this is to get the metadata provided by Product 360 (see above).This metadata already includes all certificates the IdP needs to know.
If Product 360 receives an encrypted assertion it will try to decrypted the assertion with the configured private key which is referenced by the <encryptionKey> in the SamlConfig.xml.
encryptionKey in SamlConfig.xml
<?xml version="1.0" encoding="UTF-8"?><samlConfig xmlns:xsi="http://www.w3.org/2001/XMLSchema-instance" xsi:noNamespaceSchemaLocation="SamlConfig.xsd"> ... <encryptionKey password="secret" alias="encryption"/> ...</samlConfig>
JCE issues with strong cryptographic algorithms
As already described in the general Server Installation section, due to import control restrictions of some countries, the version of the JCE policy files that are bundled in the Java Runtime Environment, or JRE(TM) 8 environment allow "strong", but limited cryptography is used per default. This means if your IdP uses a strong cryptographic algorithm like AES-256 you will need to change the configuration in file <PIM ROOT>\server\jre\lib\security\java.security.Enable the property 'crypto.policy=unlimited' to activate the unlimited cryptographic algorithms. Otherwise you will run into errors during encryption/decryption in Product 360, saying you're using an illegal key size.Also after update to newest Hotfix the Java JCE 'java.security' file must be replaced in corresponding jre\lib\security folders of all Product 360 components.

Informatica MDM - Product 360 Configuration 57
Usage of SAML with Product 360 multi-server and load balancerFor the usage of SAML in combination with a load balancer on a multi-server setup, there are some additional settings that have to be made on the load balancer and SAML configuration
Configuration of the load balancerAdditionally to the default load balancing scenario (see Web Configuration), the module mod_rewrite has to be enabled.
For the usage of SSL (https) in your load balancer (Apache), stick to the official Apache documentation. The example below defines a virtual host supporting SSL and the additional directives necessary for SAML support.
Example virtual host configuration
Listen 443<VirtualHost *:443> ServerName loadBalancer SSLEngine on SSLCertificateFile "D:/certs/cert.pem" SSLCertificateKeyFile "D:/certs/pk.pem" SSLProxyEngine On SSLProxyVerify none #optional for disabling certificate validation SSLProxyCheckPeerCN off #optional SSLProxyCheckPeerName off #optional ProxyPreserveHost On Header add Set-Cookie "ROUTEID_HPMW=.%{BALANCER_WORKER_ROUTE}e; path=/" env=BALANCER_ROUTE_CHANGED <Proxy balancer://hpmwcluster> BalancerMember https://server1:8443 route=1 BalancerMember https://server2:8443 route=2 ProxySet stickysession=ROUTEID_HPMW </Proxy> ProxyPass /pim balancer://hpmwcluster/pim ProxyPassReverse /pim balancer://hpmwcluster/pim RewriteEngine on RewriteCond %{REMOTE_HOST} =server1 [OR] RewriteCond %{REMOTE_HOST} =server2 RewriteRule "^/pim/(.+)" "https://loadBalancer/pim/$1" # optional [R,L] </VirtualHost>
The most important additional directives to be configured are listed below:
Directive Explanation
SSLProxyEngine On Support SSL proxy
ProxyPreserveHost On Preserve host name on proxy requests (required for successful validation of SAML requests/responses)
RewriteEngine on Rewrite URLs so User always sees the load balancer URL

Informatica MDM - Product 360 Configuration 58
Directive Explanation
RewriteCond %{REMOTE_HOST} =server1 [OR]RewriteCond %{REMOTE_HOST} =server2RewriteRule "^/pim/(.+)" "https://loadBalancer/pim/$1"
Rewrite rules and conditions, a condition for each member of the Product 360 cluster is required
IdP configurationOn IdP side, it is necessary to have the load balancer set as assertion consumer service of your IdP:
If you fetch the SP metadata by the URL provided by Product 360, as recommended, adjust the assertionConsumerServiceLocation in the SamlConfig.xml to point to your load balancer URL on which you want to reach the Product 360 application e.g. https://loadBalancer/pim/webaccess
Automatic User creation on successful authenticationWhen the user authentication is successful, but the authenticated user does not exist yet, a new user will be created with the credential information provided by the SAML response.The user will be created as external user with the unique user name from the assertion subject element "NameID". The created user will be assigned to the user group defined in the xml element defaultUserGroup of the SamlConfig.xml.
The user creation also takes information from the Assertions in the SAML Authentication Response. For uniquely identifying an attribute by its name the conventions in the Identity Selector Interoperability Profile V1.5 specifications are used. The following attributes will be taken from the one assertion containing the information about the NameID of the user:
Value of element attribute "name" in SAML Attribute
Mapped to User data
Mandatory
Comment
http://schemas.xmlsoap.org/ws/2005/05/identity/claims/givenname
Given name No An Attribute may contain a list of values.Because of that all first name values are concatenated with a space as separator. E.g. the first name values {"John", "Karl"} will be mapped to "John Karl".
http://schemas.xmlsoap.org/ws/2005/05/identity/claims/surname
Name No An Attribute may contain a list of values.Because of that all last name values are concatenated with a space as separator. E.g. the last name values {"Earl", "Doe"} will be mapped to "Earl Doe".
http://schemas.xmlsoap.org/ws/2005/05/identity/claims/emailaddress
E-mail No An Attribute may contain a list of values.In case of email values only the first value will be considered.E.g. the email values {"[email protected]", "[email protected]"} are mapped to "[email protected]".

Informatica MDM - Product 360 Configuration 59
Internal UsersIn a SSO scenario it still might be desirable to bypass the automatic authentication flow, e.g. for service users or for troubleshooting issues. A mixed setup with external users authenticated via SAML and internal users is possible. Please run the following steps to authenticate with the credentials of an internal user (User authentication mode must be set to "internal"):
• In the Rich Client, hold the CTRL and SHIFT key during startup to prevent initiation of the SSO flow. A prompt asking for username and password will appear instead.
• For web, enter the url /pim/login to get access to the login page.
4.16.4 LoggingTo identify problems in your SAML configuration you are able to activate an more detailed logging of the security components. To do so add the following log4j categories to the central log4j.xml within your Product 360's configuration folder.
Security Logging within log4j.xml
<category name="com.heiler.ppm.saml"> <priority value="TRACE"/></category> <category name="com.heiler.ppm.web.saml"> <priority value="TRACE"/></category>
5 Desktop Client Configuration
5.1 OSGI Configuration Area The OSGI Configuration area is a directory used by OSGI to store bundle-related files at runtime (f.e. the swt-win32-...dll). Per default for Product 360 Desktop it is configured to the directory "%USERPROFILE%/AppData/Roaming/Informatica PIM Desktop". The current windows user should always have write access to this directory. If in any case the windows user does not have write access to this directory, it should be changed to a writable directory by changing the value of the VM-Argument -Dosgi.configuration.area in the file pim-desktop.cmd and pim-desktop-debug.cmd.
5.2 Server Connection ConfigurationThe ServerConnection.xml file in the client's configuration folder can be used for specifying low-level communication protocol settings as well as the initial server's connection info (host + port). This guarantees that Product 360 Desktop instances are able to connect automatically to the correct server when deployed and started for the first time. After the start of the client, the client remembers all available servers and those will be used to connect if the configured initial server is not available. This list of servers can also be configured manually in the ServerConnection.xml if required. Each time a client connects successfully to a Product 360 server, the connection info of this server is updated in the ServerConnection.xml file, so when manually choosing a different server, next time the new settings are used.
The file looks like the following:
In case there is also a LDAP configuration in place the user will be synchronized with the data stored in the LDAP. This includes group memberships and requires that the user can be found via the same user name in LDAP. Please see the LDAP Configuration for details.

Informatica MDM - Product 360 Configuration 60
ServerConnection.xml Example
<?xml version="1.0" encoding="UTF-8"?><communication connectTimeout="0" tcpNoDelay="true" keepAlive="true" defaultRequestTimeout="300000"> <thread-pool maxCoreThreads="5" /> <initial-server host="localhost" port="1701" /> <servers host="localhost" port="1701" connectTimeout="0" tcpNoDelay="true" keepAlive="true"/> <servers host="localhost" port="1702" connectTimeout="0" tcpNoDelay="true" keepAlive="true"/></communication>
The ServerConnection.xml file can contain the following XML elements and attributes:
Element/Attribute
Description Example/Default
communication
Root element of the server connection.
defaultRequestTimeout
Timeout in milliseconds for requests in communication framework 300000
connectTimeout
The timeout in milliseconds when connecting to the host. A value of 0 is interpreted as an infinite timeout. The connection will then block until established or an error occurs.
0
tcpNoDelay
Disables (= true!) resp enables (= false) the so-called Nagle's algorithm true
keepAlive
Causes a packet (called a "keepalive probe") to be sent to the connected system if a long time (by default, more than 2 hours) passes with no other data being sent or received. This packet is designed to provoke an ACK response from the peer.
true
useTLS true in case the communication between desktop client and server should be encrypted. In case the server uses a self-signed certificate, the trust-store element must be defined!
false
thread-pool
Settings for communication framework's thread pool
maxQueueSize
Maximum size of the request/event processing queue. New processing threads will be created only when the queue is full
maxCoreThreads
The maximum number of core threads that are processing request/events. Roughly speaking this is a hint for the thread scheduling strategy which denotes expected number of requests/events to be concurrently processed in a 'normal' operation mode. Scheduling strategy will tend to keep this number of threads in a ready-to-run state. Consider maxQueueSize together with this parameter. For more details concerning scheduling algorithm consult Java SDK ThreadPoolExecutor
maxThreads
The maximum number of threads that are processing request/events. This is a hard limit (in comparison with maxCoreThreads). If this value is reached, server will start rejecting requests

Informatica MDM - Product 360 Configuration 61
keepAliveTime
Time in milliseconds that the thread scheduling strategy will wait, before reducing number of idle threads down to maxCoreThreads. This value protects from the situations when average number of required threads is higher thanmaxCoreThreads and scheduling strategy is constantly recreating threads, because it tries to reduce number of threads down to maxCoreThreads
doPrestartAllCoreThreads
Flag value which instructs node to start all core threads on initialization. Usually this value should not be changed from its defaults (which is false). The reason to set this value to true could be the situation when all clients connect to the server together during a short period of time.
initial-server
Connection settings to the initial application server
host Hostname of any application server. In case of multi-server deployment this can be just any server of the cluster. The actual server the client connects to will be determined from this server.
port The port of the Product 360 application on the host 1712
trust-store
file Path to the file which contains the certificates for the SSL/TLS encrypted communication. The path might be relative to the configuration directory of the server.For example: In case the server application is installed here: C:/Informatica/Product360/server the configuration folder would beC:/Informatica/Product360/server/configuration/HPM. In case you set the file element to certificates\keystore.jks it is expected to be atC:/Informatica/Product360/server/configuration/HPM/certificates/keystore.jks. Alternatively you can define an absolute path.
Please note that this file is a keystore file, but it is used as trust store. That means, any certificate in this file will be trusted just like any regular, official certificate. This also means that the trust store element is only needed in case self-signed certificates are used for the communication. Certificates from a trust authority are trusted by default.It is always recommended to use trusted certificates and not self-signed ones.
password
The password for the keystore file
5.3 General PreferencesThe Product 360 Desktop preferences dialog contains several settings, which affect the common appearance and layout of the Product 360 Desktop application. The most of this preferences have default values, which can be maintain in the plugin_customization.ini file (on the client). In the following are listed the most important general preferences with the corresponding preference keys which can be used to customize the default values of these preferences.
If you don't know the preference key and the according possible values, you can find your current client settings in <PathToClientWorkspace>client\.metadata\.plugins\org.eclipse.core.runtime\.settings\<plugin_name>.prefs

Informatica MDM - Product 360 Configuration 62
5.3.1 Load Balancing
Disable Load BalancingThe load balancing of the desktop client can be disabled. This might be required in some customer scenarios in which the also the desktop client load balancing should be handled by an external load balancer.
To disable the desktop client load balancing add the following line to the plugin_customization.ini of the client: com.heiler.ppm.communication.ui/clientLoadBalancingEnabled = false
In this case the client will think that there is only the server which is configured in the ServerConnection.xml file of the client.
Always open Server Selection DialogIn case the com.heiler.ppm.communication.ui/alwaysOpenServerSelectionDialog preference in the plugin_customization.ini of the client is set to true, the server selection dialog during startup of the desktop client will always open. In case this preference is missing or set to false, the dialog only opens in case the user presses ctrl or shift during startup.
5.3.2 Form settings
The form settings affects the layout of the form views. On this preference page the user can specify the height of the text boxes.
Number of lines in a multiline text boxSpecifies the height of a multiline text box in a form view (e.g. the "Group name" field of the Article entity).
The preference key for the plugin_customization.ini: com.heiler.ppm.std.ui/form.rows.multiline (the default value is 5)
Number of lines in a multiline rich text boxSpecifies the height of a rich text box in a form view (e.g. the "Long description" field of the Article entity).
The preference key for the plugin_customization.ini: com.heiler.ppm.std.ui/form.rows.multiline.richtext (the default value is 15)
5.3.3 General
Always run in backgroundDetermines if the showing of the progress dialog should be suppressed during a long running operation or an eclipse job is running.
The preference key for the plugin_customization.ini: org.eclipse.ui/RUN_IN_BACKGROUND (the default value is false)

Informatica MDM - Product 360 Configuration 63
5.3.4 Spellcheck
Activate spellcheckDetermines if the spellchecking is enabled
The preference key for the plugin_customization.ini: com.heiler.ppm.spelling.ui/spellingEnabled (the default value is true)
Installed dictionariesIn this list all dictionaries are showing which are currently installed on the server. This is for displaying only and has no function.
5.3.5 Object colors
ProductSpecifies the object color for the entity Product used for the toolbar background for all views which are showing product-specifc data.
The preference key for the plugin_customization.ini (on the server!): com.heiler.ppm.std.ui/header.background.color.Product2G (the default value is 235,251,210)
VariantSpecifies the object color for the entity Variant used for the toolbar background for all views which are showing variant-specifc data.
The preference key for the plugin_customization.ini (on the server!): com.heiler.ppm.std.ui/header.background.color.Variant (the default value is 255,244,229)
ItemSpecifies the object color for the entity Article used for the toolbar background for all views which are showing item-specifc data.
The preference key for the plugin_customization.ini (on the server!): com.heiler.ppm.std.ui/header.background.color.Article (the default value is 215,225,237)

Informatica MDM - Product 360 Configuration 64
5.3.6 Query
Do not show dialog box for editing queriesDetermines if the showing of the "edit query" dialog should be suppressed if the user executes a report query (e.g. using the catalog popup menu)
The preference key for the plugin_customization.ini: com.heiler.ppm.entity.ui/edit.query.dialog.hide (the default value is false)
5.3.7 Structure editor
The structure editor settings specify the general behavior of the structure editor.
Transfer feature of the parent group when creating structure groupsThe preference key for the plugin_customization.ini: com.heiler.ppm.structure.ui/feature_transfer with the options
• feature_transfer_mode_always• feature_transfer_mode_ask • feature_transfer_mode_never (default)
Update subgroups when features have been changedThe preference key for the plugin_customization.ini: com.heiler.ppm.structure.ui/feature_update with the options
• feature_update_mode_always• feature_update_mode_ask • feature_update_mode_never (default)
Include objects and their attribute assignments when copying structures and structure groupsThe preference key for the plugin_customization.ini: com.heiler.ppm.structure.ui/structuregroup_copy_with_mapping with the options 'true' (default) and 'false'.

Informatica MDM - Product 360 Configuration 65
5.3.8 Table settings
The table settings affects the layout of the table views. On this preference page the user can specify several setting for the tables.
Max. number of rowsSpecifies the maximum amount of rows to be displayed in tables. This value is also the threshold to provide so-called "virtual table" with optimized, server-based sorting, filtering etc.
The preference key for the plugin_customization.ini: com.heiler.ppm.std.ui/table.max-rows (the default value is 10,000)
Max. number of grouping nodes per levelSpecifies the maximum amount of table grouping nodes per level.
The preference key for the plugin_customization.ini: com.heiler.ppm.std.ui/table.max-grouping-nodes (the default value is 500)
Group date/time fields bySpecifies the pattern which is used for the grouping of date-/time-fields.
The preference key for the plugin_customization.ini: com.heiler.ppm.std.ui/table.date-fields-group-by (the default value is yyyy-MM-dd HH:mm - grouping by minutes). Other possible values: yyyy-MM-dd HH - grouping by hours, yyyy-MM-dd - grouping by days, yyyy-MM - grouping by months and yyyy - grouping by years.
Region specific sorting of textsSpecifies whether to use locale-sensitive (= "true") resp. locale-insensitive (= "false") string comparison in table sorting.
The preference key for the plugin_customization.ini: com.heiler.ppm.std.ui/table.sort.locale-sensitive (the default value is false)
Case sensitive sortingSpecifies whether to use case-sensitive (= "true") resp. case-insensitive (= "false") string comparison in table sorting.
The preference key for the plugin_customization.ini: com.heiler.ppm.std.ui/table.sort.case-sensitive (the default value is false)
Execute "Find and Replace" on server side fromSpecifies the minimum amount of rows which are needed for performing a server-side job for a "Find&Replace" operation
The preference key for the plugin_customization.ini: com.heiler.ppm.std.ui/findreplace.serversidejob-rows (the default value is 50)

Informatica MDM - Product 360 Configuration 66
6 Web Configuration
6.1 Activate Product 360 - Web Permissions & Interface VisibilityProduct 360 - Web contributes some action rights and interface visibility elements which allow customization of the Web User Interface. To change these permissions, open the Product 360 - Desktop Organization perspective. A couple of web-specific actions rights are shown in the group "Web permissions" in the Action Rights View.
Even more configuration options are available on the Interface Visibility Tab. Please note that all web specific elements are only shown after the Web application was loaded at least once in the Browser.
The shown elements are dynamic and depend on the concrete configuration of the system. Hence new list definition contributions can be assigned to different user groups on the fly.
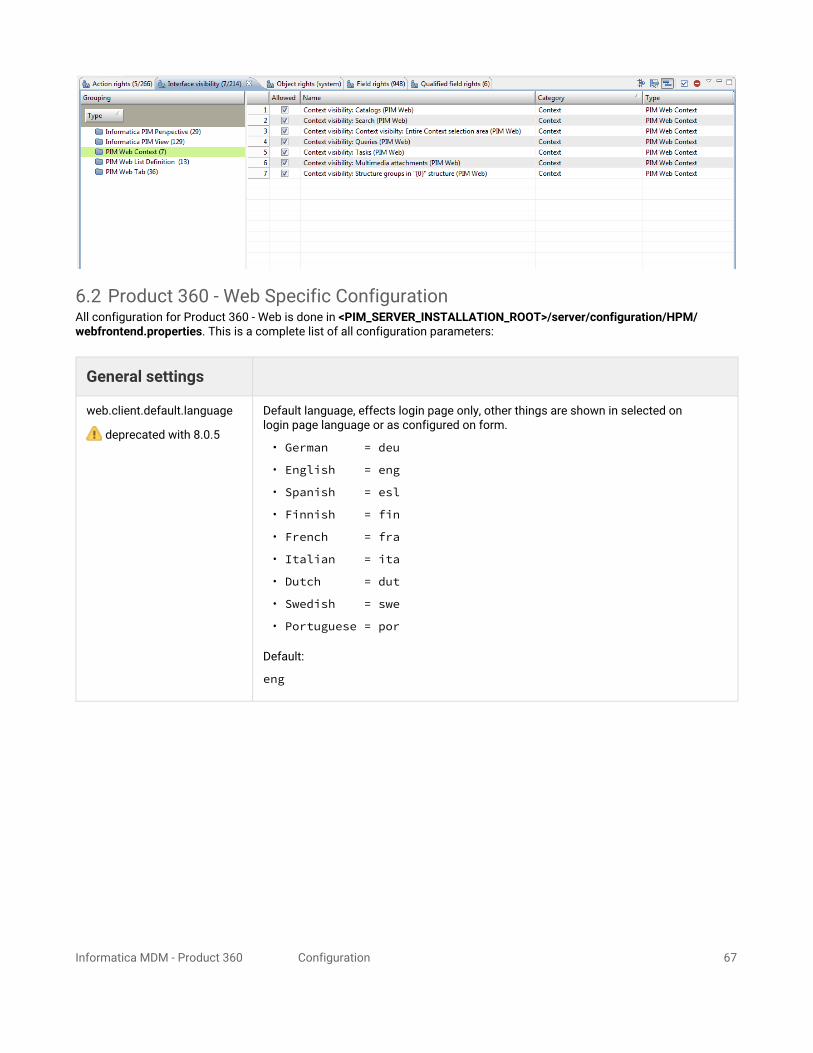
Informatica MDM - Product 360 Configuration 67
6.2 Product 360 - Web Specific ConfigurationAll configuration for Product 360 - Web is done in <PIM_SERVER_INSTALLATION_ROOT>/server/configuration/HPM/webfrontend.properties. This is a complete list of all configuration parameters:
General settings
web.client.default.language
deprecated with 8.0.5
Default language, effects login page only, other things are shown in selected on login page language or as configured on form.
• German = deu
• English = eng
• Spanish = esl
• Finnish = fin
• French = fra
• Italian = ita
• Dutch = dut
• Swedish = swe
• Portuguese = por
Default:
eng

Informatica MDM - Product 360 Configuration 68
web.client.default.locale
since 8.0.03.01
Default locale, effects login page only, other things are shown in selected on login page language or as configured on form.
• German = de_DE
• English (American) = en_US
• Spanish = es_ES
• Finnish = fi_FI
• French = fr_FR
• Italian = it_IT
• Dutch = nl_NL
• Swedish = sv_SE
• Portuguese (Brazilian) = pt_BR
• English (British) = en_GB
Default:
en_US
web.client.available.locales
since 8.0.03.01
List of all available locales for login form. Must be a subset of languageenum values in HPM. Separated by comma.
Default value for this setting is a list of all languages where an official i18n package is available for.
Default:
de_DE,en_US,fr_FR,ru_RU,nl_NL,sv_SE,fi_FI,es_ES,no_NO,pt_BR,ja_JP,zh_CN,ko_KR,it_IT
web.client.theme Theme affects the application appearance.
Default:
symphony
web.client.httpSession.timeout
Session time-out in seconds.
Default (28800 seconds equals 8 hours):
28800
web.client.xframeoptions
since 8.0.03.02
If set, an X-Frame-Options response header will be set in the main page http response to prevent the application being embedded in other sites for security reasons.Please note, that this will break catalog editor functionality in Supplier Portal and Supplier 360.Details: https://tools.ietf.org/html/rfc7034Supported values: DENY, SAMEORIGIN, ALLOW-FROMDefault: <empty>

Informatica MDM - Product 360 Configuration 69
web.client.detailform.inputs.limit
Maximum number of inputs at detail form displayed by default. If inputs count limit will be reached, user will see "More (x)" button.
Default:
30
web.client.filter.minimum.length
Minimum length for text field used for filtering list views. Value has to be >= 0. Note that empty input (length=0) is always allowed as this is used to reset the filter to show all entries.Therefore setting minimum length to 1 does not have any impact.
Default:
1
web.client.text.filter.timeout Timeout for text filters. It set a time for response between entered letter and search results.Recommended value between 200-1000 ms.
Default:
200
web.client.clone.referencetype.Articleweb.client.clone.referencetype.Variantweb.client.clone.referencetype.Product2G
Reference type between cloned element and original. Value is based on repository Enum.ArticleReferenceType keys.WARN:Check your repository for valid keys! Example values from standard repository:sparepart=1,similar=2,followup=3,mandatory=4,select=5,accessories=6,others=7,diff_orderunit=8,consists_of=9,cross_selling=10,up-selling=11;if value is empty or doesn't exist at Enum, reference will not be created.for new custom entities just add new property : prefix 'web.client.clone.referencetype.' + entity identifier
Default:
""
web.definition.dir Relative path to web definitions XML files, starting from configuration directory. By default points to configuration/server/webdefinitionsIt can be also configured with absolute path. If path doesn't start with /, it is considered as absolute.
Default:
/webdefinitions
web.client.default.fetch.size
since 8.0.03.01
Default number of rows that are fetched in master list views. Smaller numbers result in slightly faster loading times, however, multiple db queries might be necessary. Value should be a bit larger than the number of rows that are visible on the screen.
Default:
200

Informatica MDM - Product 360 Configuration 70
Media Asset Configuration
web.client.mediaasset.servlet.path
Media asset bridge servlet (root path)..
Default:
/pim/mediaasset
web.client.mediaasset.prefered.quality
Prefered quality for thumbnails at mediaasset viewer.HLR Available values: web, lowres, highres [,doc,htm,printxml,pdf, ...]Product 360 - Media Manager Available values: 1, originalimage. Please clarify available quality values from Product 360 - Media Manager system administrator
Default
web
web.client.mediaasset.thumbnail.detail.panel.type
Detail form top image type from available mediaasset.Available values: normal, thumbnail, data_sheet, logo, others, unknown [, ...]
Default
normal
web.client.mediaasset.list.thumb.small
Documents list view thumbnails quality mapping for small images.
Default:
small
web.client.mediaasset.list.thumb.normal
Documents list view thumbnails quality mapping for standard images.
Default:
normal
web.client.mediaasset.list.thumb.big
Documents list view thumbnails quality mapping for large images.
Default:
big
web.client.mediaasset.list.page.size
Number of multimeda document that are display on a single page.
Default:
25
Product 360 - Supplier Portal Integration

Informatica MDM - Product 360 Configuration 71
web.client.hsx.supplier.login Login name of Product Manager user that is used for supplier editor. Only needed for Product 360 - Supplier Portal integration.
Default:
supplier
web.client.hsx.supplier.password
Login password of Product Manager user that is used for supplier editor. Only needed for Product 360 - Supplier Portal integration.
Default:
supplier
web.client.hsx.readonly.supplier.login
Login name of Product Manager user that is used for supplier read-only view. Only needed for Product 360 - Supplier Portal integration.
Default:
readonlysupplier
web.client.hsx.readonly.supplier.password
Login password of Product Manager user that is used for supplier read-only view. Only needed for Product 360 - Supplier Portal integration.
Default:
readonlysupplier
Product 360 - Web Search Integration
web.client.hps.max.display.facet
Maximum number of displayed search facets.
Default:
5
Export Configuration
If you want to encrypt the password please refer to chapter Encryption of secure information in the Server Installation manual.
If you want to encrypt the password please refer to chapter Encryption of secure information in the Server Installation manual.

Informatica MDM - Product 360 Configuration 72
web.client.export.max.selection
Maximum number of records that can be exported from the Web UI.Export will be disabled when selection count exceeds this number.Use -1 to disable this limitation.
Default:
200
Various UI settings
web.client.ui.search.and.replace.dialog.default.action
The default action in the Search and Replace dialog.
Available values: SEARCH_AND_REPLACE, SET
Default:
SEARCH_AND_REPLACE
web.client.ui.classification.dialog.default.type
The default classification type in the Classification dialog.
Available values: MOVE, COPY
Default:
MOVE
web.client.ui.show.transition.fields.content
Show content of transition fields in the Field Selection dialog or not.
Available values: TRUE, FALSE
Default:
TRUE
web.client.autoload.catalog
Autoselect Master catalog or catalog stored in cookies after login.
Possible values: true, false
The default is: true
web.client.menu.initial.structure
Specifies external identifier for structure which will be initially selected in context.
If not specified - value from com.heiler.ppm.structure.server/primaryStructureIdentifier will be used.
First available value will be used if none of the properties mentioned above specify explicit value.
web.client.popup.initial.structure
Specifies external identifier for structure which will be initially selected in classification popup.
If not specified - first available value will be used.

Informatica MDM - Product 360 Configuration 73
web.client.enum.sort.locale-sensitive
since 8.1.0.02
Specifies whether to use locale-sensitive (= "true") resp. locale-insensitive (= "false") string comparison
in enum list and lookup value sorting.
Possible values: true, false
The default is: false
web.client.enum.sort.case-sensitive
since 8.1.0.02
Specifies whether to use case-sensitive (= "true") resp. case-insensitive (= "false") string comparison
in enum list and lookup value sorting.
Possible values: true, false
If web.client.enum.sort.locale-sensitive is "true" this property will be ignored
The default is: false
Vaadin Internal Configuration Parameters
web.vaadin.productionMode Enables the application in development mode, must be true in production.
Default:
true
web.vaadin.disable-xsrf-protection Enables the Vaadin XSRF protection. Set to true when running automated web tests. Should be false in production.
Default:
false
web.vaadin.widgetset Vaadin Widgetset which is used in application.
Default:
com.heiler.ppm.web.widgetset.Widgetset
web.vaadin.heartbeatInterval UI Heartbeat interval to track open sessions.https://vaadin.com/book/vaadin7/-/page/application.environment.html#aui_3_2_0_1292
Default value is 300 seconds (5 minutes).
web.vaadin.closeIdleSessions Close http session after user inactivity.# https://vaadin.com/book/vaadin7/-/page/application.environment.html#aui_3_2_0_1309
Default:
true

Informatica MDM - Product 360 Configuration 74
Vaadin Internal Configuration Parameters
web.vaadin.pushMode Mode for server side push. Possible values: AUTOMATIC, MANUAL, DISABLEDWhen disabled, some application might not work correctly. Must be disabled for JMeter load test.
Default:
AUTOMATIC
web.vaadin.pushTransport Transport mode for server side push. Possible values: WEBSOCKET, STREAMING, LONG_POLLING.
Default:
STREAMING
6.3 Setup HTTPS/SSL SecurityWhen configuring Product 360 Web for production usage, setting up https security is mandatory. Otherwise all user credentials will be send as plain text through the internet. There are two scenarios, how security can be ensured:
• Setup a Reverse Proxy that transparently forwards all requests to the Product 360 Application Server. SSL certificates are installed on the Reverse Proxy.
• Install SSL certificates directly on Product 360 Application Server.
A combination of both is possible, too.

Informatica MDM - Product 360 Configuration 75
6.3.1 Running Product 360 - Web behind a Reverse ProxyFor SSL support and security reasons, customers typically run web applications behind a dedicated web server (called reverse proxy) which transparently handles all incoming requests from clients and forwards them to the Product 360 -Web application server.
Product 360 - Web supports this scenario and has been tested with Apache 2.2. If you have installed and configured the Apache, the following lines in httpd.conf are necessary for request forwarding:
# Load the needed mod_proxy modulesLoadModule proxy_module modules/mod_proxy.soLoadModule proxy_connect_module modules/mod_proxy_connect.soLoadModule proxy_http_module modules/mod_proxy_http.so #Reverse ProxyProxyPass /pim http://<hpmserver>:<hpmport>/pimProxyPassReverse /pim http://<hpmserver>:<hpmport>/pim
For setup of SSL, please refer to the corresponding Apache manuals. For a guide how to export a certificate or private key from the Java keystore into an Apache Webserver compatible format, please check this page at http://security.stackexchange.com/questions/3779/how-can-i-export-my-private-key-from-a-java-keytool-keystore .
An example configuration for setting up a Reverse Proxy together with a Virtual Host for https looks like this:
<VirtualHost _default_:443> ProxyPass "/pim" "http://localhost:1512/pim" ProxyPassReverse "/pim" "http://localhost:1512/pim" LoadModule headers_module modules/mod_headers.so# Apache sets X-Forwarded-Host and X-Forwarded-For headers by default, but not X-Forwarded-Proto which is required by Jetty RequestHeader set X-Forwarded-Proto "https" SSLEngine on ServerName localhost:443 SSLCertificateFile "${SRVROOT}/conf/ssl/server.crt" SSLCertificateKeyFile "${SRVROOT}/conf/ssl/server.key"</Virtualhost>
6.3.2 Install SSL certificates on Product 360 Application Server directlyIt is possible to setup SSL security on the Product 360 Application server, too. This is useful, if the connection between the Reverse Proxy and the Product 360 Server should be encrypted and secured, too.
To enable https, open the file <P360_SERVER>\configuration\HPM\NetworkConfig.xml.
<node identifier="pim-server1" host="localhost" > <web useHttps="true"> <http port="1512"/> <https port="8443" keyPassword="password" keystore="C:/Users/sroeck/.keystore" password="password"/> </web> <data-grid port="1801"/> <internal defaultRequestTimeout="300000"> <hlr-tcp port="1701" /> </internal>

Informatica MDM - Product 360 Configuration 76
<default-role>CLIENTS_SERVER</default-role> <default-role>JOB_SERVER</default-role> </node>
Please consult the Product 360 Configuration guide for a full list of all supported parameters.
Add the following lines to the Product 360 Server launch configuration (wrapper.conf) as JVM arguments to let Jetty know where the SSL certificate can be found:
-Djavax.net.ssl.keyStore=C:/Users/sroeck/.keystore-Djavax.net.ssl.keyStorePassword=password
6.4 Setup Load Balancing
6.4.1 Apache Web ServerIf there is a cluster of Product 360 servers then the SSL/TLS-enabled Reverse Proxy described above can be configured as a load balancer with sticky sessions:
LoadModule proxy_module modules/mod_proxy.soLoadModule proxy_balancer_module modules/mod_proxy_balancer.soLoadModule proxy_http_module modules/mod_proxy_http.soLoadModule slotmem_shm_module modules/mod_slotmem_shm.soLoadModule lbmethod_byrequests_module modules/mod_lbmethod_byrequests.so #Apache 2.4 Header add Set-Cookie "ROUTEID_HPMW=.%{BALANCER_WORKER_ROUTE}e; path=/" env=BALANCER_ROUTE_CHANGED<Proxy balancer://hpmwcluster> BalancerMember http://<hpmserver01>:<hpmwport01> route=1 BalancerMember http://<hpmserver02>:<hpmwport02> route=2 BalancerMember http://<hpmserver03>:<hpmwport03> route=3 BalancerMember http://<hpmserver04>:<hpmwport04> route=4 ProxySet stickysession=ROUTEID_HPMW</Proxy>ProxyPass /pim balancer://hpmwcluster/pimProxyPassReverse /pim balancer://hpmwcluster/pim
Host and HTTP port for the nodes are defined in the corresponding elements of the NetworkConfig.xml. Please note that available scheduling algorithms and required modules differ between Apache httpd 2.4 and 2.2. Balancer manager provides some statistics and enables dynamic update of balancer members, please refer to the corresponding paragraph of the httpd documentation for details.
6.4.2 AWS ELBFollowing the instructions on the official AWS ELB documentation pages at http://docs.aws.amazon.com/ElasticLoadBalancing/latest/DeveloperGuide/setting-up-elb.html
If you want to configure health check, make sure the ping is sent to the login page at http://server:1501/pim/login.
Make sure to configure Sticky Sessions and preferably use Application-Controlled Session Stickiness as described on http://docs.aws.amazon.com/ElasticLoadBalancing/latest/DeveloperGuide/elb-sticky-sessions.html.
The application cookie name is JSESSIONID, so the configuration might look like this:
"AppCookieStickinessPolicies": [

Informatica MDM - Product 360 Configuration 77
{ "PolicyName": "my-app-cookie-policy", "CookieName": "JSESSIONID" } ]
6.4.3 Troubleshooting Reverse Proxy / LB Setup and Product 360 Push issuesProduct 360 uses Server-side push functionality implemented by the Vaadin framework. The supported modes can be configured in webfrontend.properties:
# Transport mode for server side push. Possible values: WEBSOCKET, STREAMING, LONG_POLLING. Default is STREAMING.web.vaadin.pushTransport=STREAMING
Please note that WEBSOCKET is not supported.
In case you're experiencing issues after login, e.g. spinning loading indicator, time-outs, unresponsiveness or session time-outs, try one of the following things:
Switch pushTransport mode to STREAMING or LONG_POLLING. Requires a server restart to take changes in effect. LONG_POLLING seem to be more stable behind proxies than STREAMING.Check if the issue can be reproduced in local network, when calling the app on the server directly.Make sure, a proxy doesn't buffer requests.
In Apache, add "KeepAlive Off" in virtual host section.In IIS, set "Response buffer treshold" to 0
Turn http compression off, if enabled.
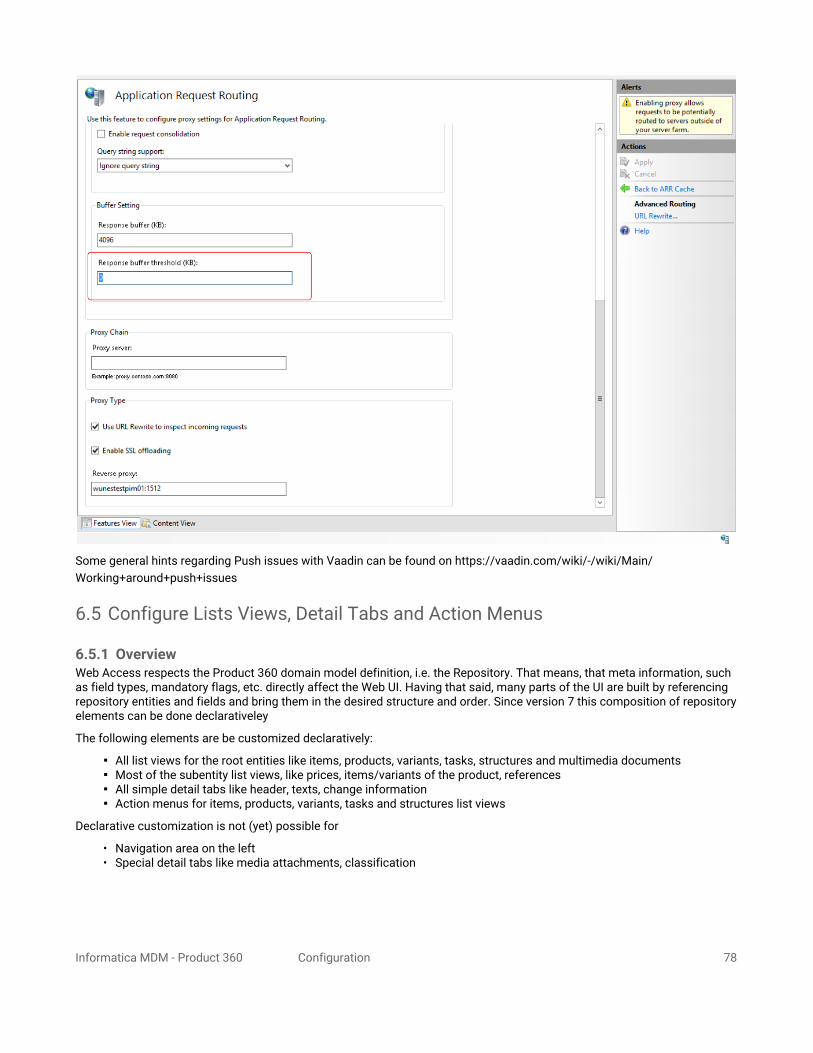
Informatica MDM - Product 360 Configuration 78
Some general hints regarding Push issues with Vaadin can be found on https://vaadin.com/wiki/-/wiki/Main/Working+around+push+issues
6.5 Configure Lists Views, Detail Tabs and Action Menus
6.5.1 OverviewWeb Access respects the Product 360 domain model definition, i.e. the Repository. That means, that meta information, such as field types, mandatory flags, etc. directly affect the Web UI. Having that said, many parts of the UI are built by referencing repository entities and fields and bring them in the desired structure and order. Since version 7 this composition of repository elements can be done declarativeley
The following elements are be customized declaratively:
All list views for the root entities like items, products, variants, tasks, structures and multimedia documentsMost of the subentity list views, like prices, items/variants of the product, referencesAll simple detail tabs like header, texts, change informationAction menus for items, products, variants, tasks and structures list views
Declarative customization is not (yet) possible for
• Navigation area on the left• Special detail tabs like media attachments, classification

Informatica MDM - Product 360 Configuration 79
6.5.2 Declarative Customization AreaDuring Product 360 server bootstrap (more precisely: when starting the very first Web session) the following folder structure is created in the server configuration area:
The directory /webdefinitions is the place where all customized definition files are loaded from. Initially, this folder only contains a readme file and XML schema files. The subdirectory /default contains all definition files. These files are updated on each server start.
To customize a list view or detail tab, copy the corresponding definition file from the /default subdirectory into the /webdefinition root directory. Then apply the desired changes to the copy of the file.
A typical list of default definition files looks like this. (This may vary depending on your system setup, like 2pp/3pp and the repository configuration):
Never change the content of the /default directory as all your changes will be lost after the next server restart.

Informatica MDM - Product 360 Configuration 80
6.5.3 Make Changes to XML Configuration FilesTo customize any of the default configuration files follow these steps:
1. Copy the file to be changed from /default into the upper /webdefinitions directory and open it using your favorite XML editor (XSD Schema support!). Please see table below to find the correct file.
2. Change the file, e.g. add another field, another field definition or change the order of definitions3. Run one of the following actions to apply changes

Informatica MDM - Product 360 Configuration 81
a. Login as Administrator and call "Reset Application" (since version 7.1)
b. When having access to the server console, run OSGi command "hpmwReset"
c. Connect to server via JMX (e.g. with jconsole from the Java-bin directory) and call the MBean hpmwReset in package com.heiler.ppm.web

Informatica MDM - Product 360 Configuration 82
d. Restart the server
After step 3 you'll have to relogin and the changes should be applied. In case of undesired behaviour please check the server log file.
6.5.4 Example DefinitionsPlease refer to the following pages for a comprehensive list of example definitions for list views and detail tabs
• View Definition Examples• Detail Tab Definition Examples• Action menu definition examples
6.5.5 List of Customization Areas
Filename(s) Version Info
Purpose
Products/Items/Variants
article.detailoverview.xml, product.detailoverview.xml, variant.detailoverview.xml

Informatica MDM - Product 360 Configuration 83
Detail preview next to thumbnail in detail form.
article.detailtab.xml, product.detailtab.xml, variant.detailtab.xml
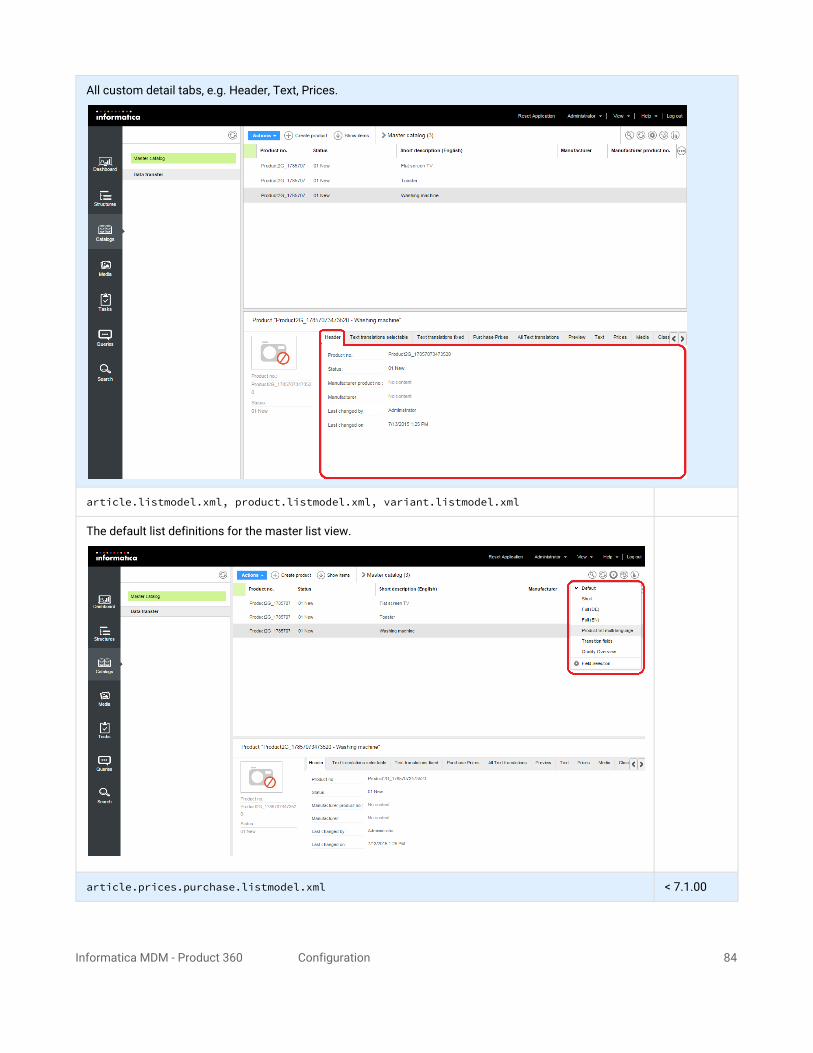
Informatica MDM - Product 360 Configuration 84
All custom detail tabs, e.g. Header, Text, Prices.
article.listmodel.xml, product.listmodel.xml, variant.listmodel.xml
The default list definitions for the master list view.
article.prices.purchase.listmodel.xml < 7.1.00

Informatica MDM - Product 360 Configuration 85
Purchase price list for price tab for items. Replaced with *.detailtab.xml with 7.1.00.
article.prices.selling.listmodel.xml, product.prices.selling.listmodel.xml, variant.prices.selling.listmodel.xml
< 7.1.00
Selling price list for price tab. Replaced with *.detailtab.xml with 7.1.00.
article.reference.form.xml, product.reference.form.xml, variant.reference.form.xml

Informatica MDM - Product 360 Configuration 86
Popup form to create or edit references.
article.references.listmodel.xml, product.references.listmodel.xml, variant.references.listmodel.xml
List definitions to load references for reference tab. All definitions for products, items (and variants) references are merged into a single table.
article.quality.status.listmodel.xml, product.quality.status.listmodel.xml, variant.quality.status.listmodel.xml
> 7.1.00
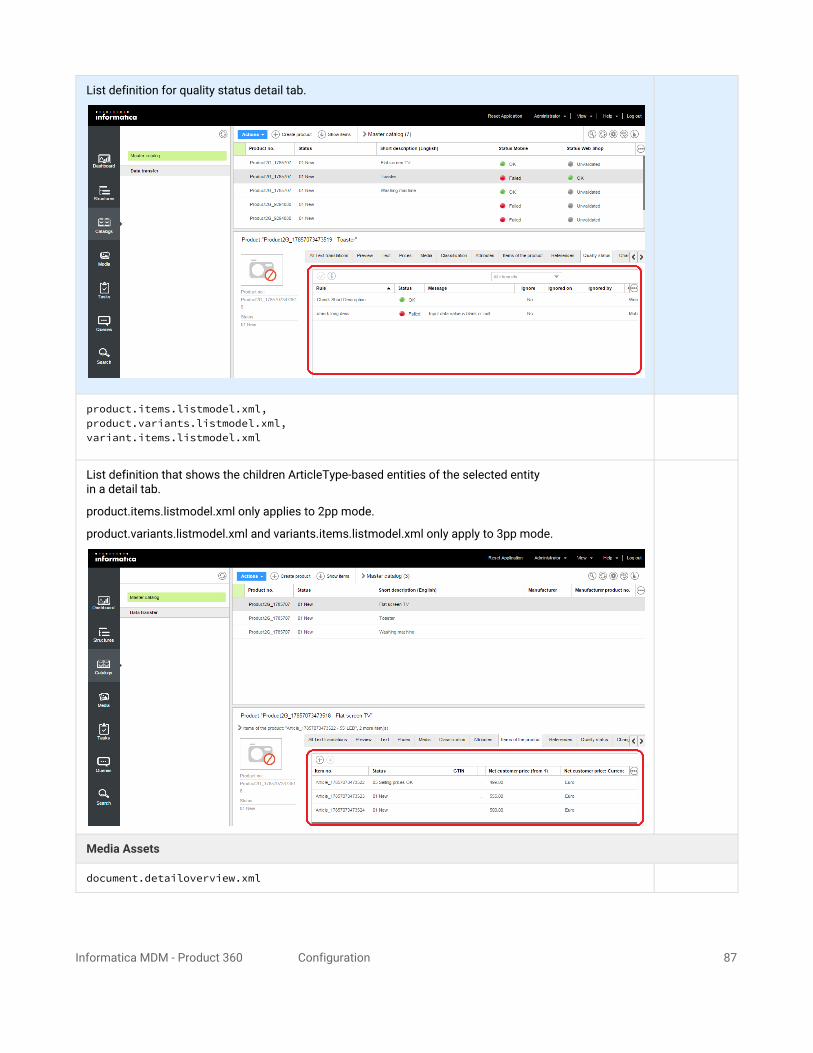
Informatica MDM - Product 360 Configuration 87
List definition for quality status detail tab.
product.items.listmodel.xml, product.variants.listmodel.xml, variant.items.listmodel.xml
List definition that shows the children ArticleType-based entities of the selected entity in a detail tab.
product.items.listmodel.xml only applies to 2pp mode.
product.variants.listmodel.xml and variants.items.listmodel.xml only apply to 3pp mode.
Media Assets
document.detailoverview.xml

Informatica MDM - Product 360 Configuration 88
Detail media asset preview next to thumbnail in detail form.
document.detailtab.xml
All custom detail tabs for media assets e.g. Header, Detail.

Informatica MDM - Product 360 Configuration 89
media.assignment.form.xml
Picker window to assign a media asset to an existing product/variant/item
media.hlr.details.xml
Media asset detail popup for Heiler Classic Provider (HLR)
media.hmm.details.xml
Media asset detail popup for Informatica Media Manager (HMM)
media.reference.form.xml

Informatica MDM - Product 360 Configuration 90
Picker window to assign an item/variant/product to an media asset.
media.variants.xml
Detail area under the media gallery on product/variant/item media tab.

Informatica MDM - Product 360 Configuration 91
Structures
structure.detailoverview.xml
Detail preview next to thumbnail in detail form for structure groups.
structure.detailtab.xml
All custom detail tabs for structures, e.g. Header, Text.
structure.features.listmodel.xml

Informatica MDM - Product 360 Configuration 92
List definition of detail tab showing structure group's features.
structure.products.listmodel.xml
List definition for detail tab showing assigned products or items to a structure group.structure.products.listmodel.xml only applies to 2/3-pp modestructure.items.listmodel.xml only applies to 1pp mode
structure.quality.status.listmodel.xml > 7.1.00
List definition for quality status detail tab for structures.
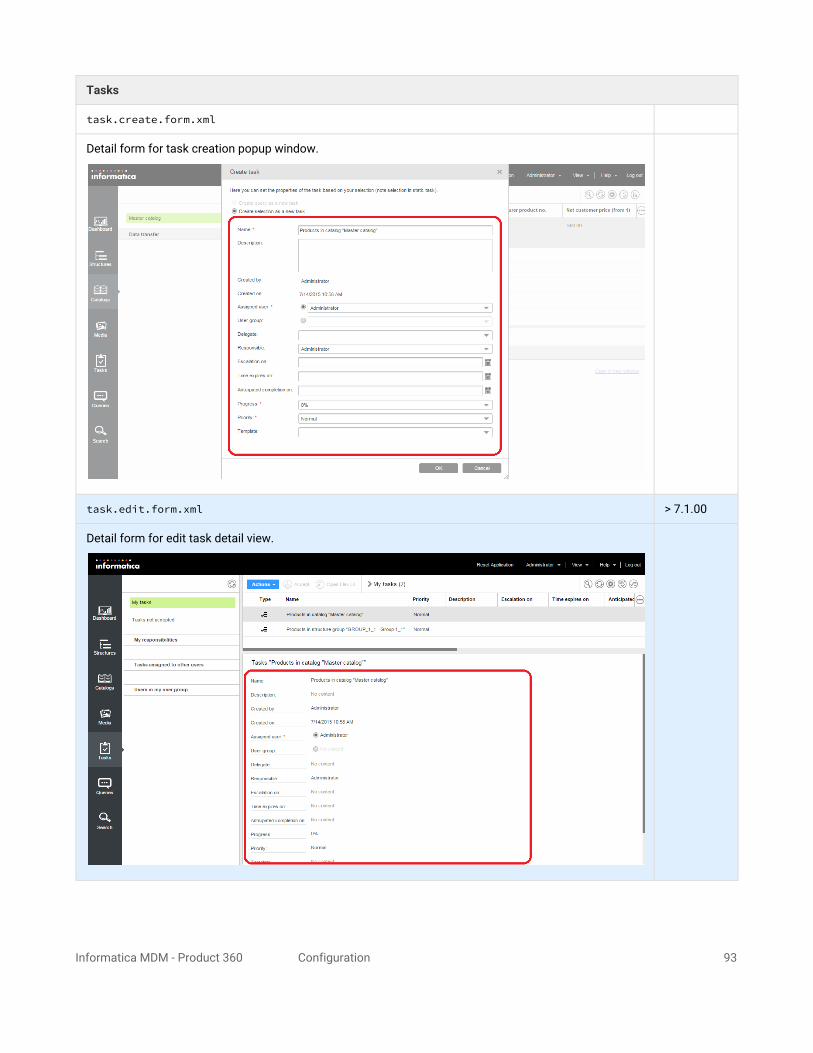
Informatica MDM - Product 360 Configuration 93
Tasks
task.create.form.xml
Detail form for task creation popup window.
task.edit.form.xml > 7.1.00
Detail form for edit task detail view.

Informatica MDM - Product 360 Configuration 94
task.listmodel.xml
List definitions for task main list.
Action menus
menu.actions.list.article.xml, menu.actions.list.product.xml, menu.actions.list.structure.xml, menu.actions.list.task.xml, menu.actions.list.variant.xml
>=8.0
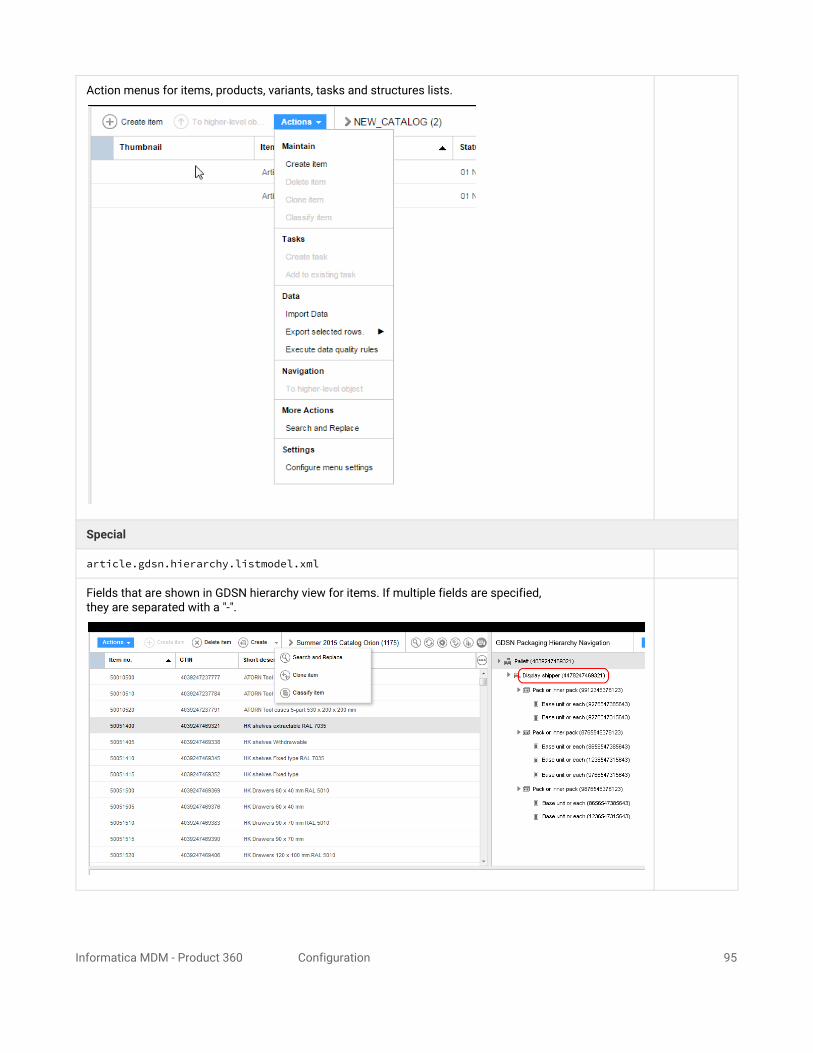
Informatica MDM - Product 360 Configuration 95
Action menus for items, products, variants, tasks and structures lists.
Special
article.gdsn.hierarchy.listmodel.xml
Fields that are shown in GDSN hierarchy view for items. If multiple fields are specified, they are separated with a "-".
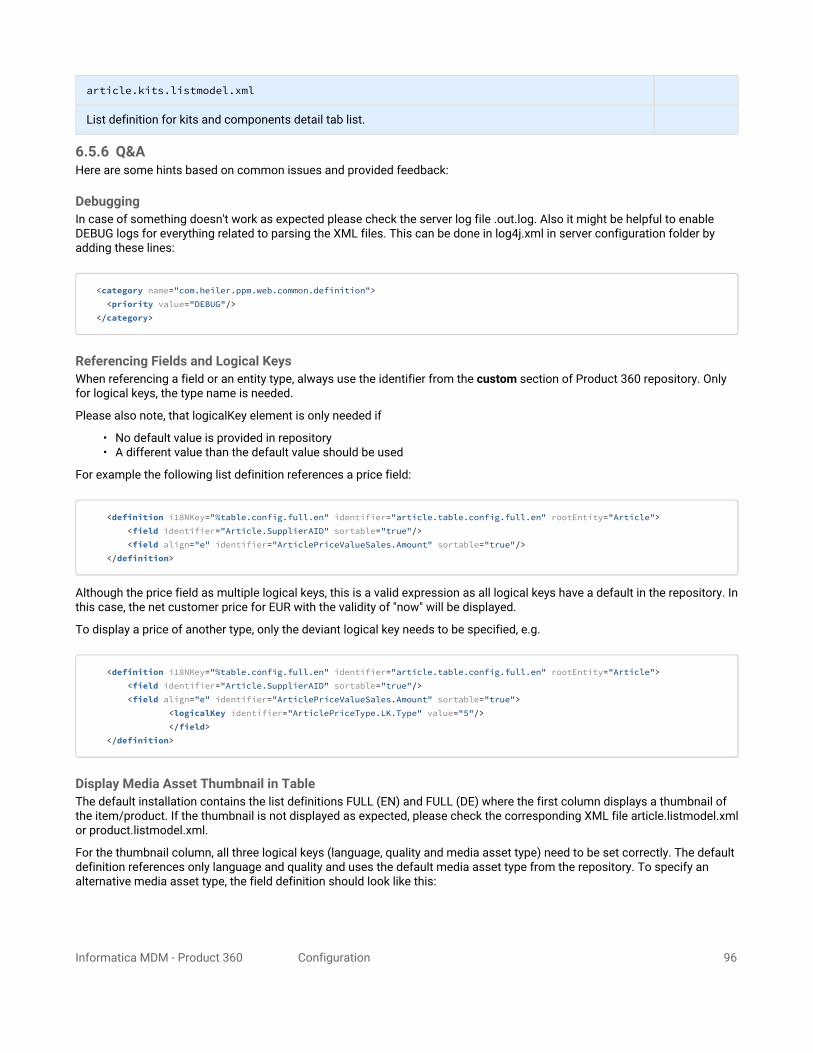
Informatica MDM - Product 360 Configuration 96
article.kits.listmodel.xml
List definition for kits and components detail tab list.
6.5.6 Q&AHere are some hints based on common issues and provided feedback:
DebuggingIn case of something doesn't work as expected please check the server log file .out.log. Also it might be helpful to enable DEBUG logs for everything related to parsing the XML files. This can be done in log4j.xml in server configuration folder by adding these lines:
<category name="com.heiler.ppm.web.common.definition"> <priority value="DEBUG"/> </category>
Referencing Fields and Logical KeysWhen referencing a field or an entity type, always use the identifier from the custom section of Product 360 repository. Only for logical keys, the type name is needed.
Please also note, that logicalKey element is only needed if
• No default value is provided in repository• A different value than the default value should be used
For example the following list definition references a price field:
<definition i18NKey="%table.config.full.en" identifier="article.table.config.full.en" rootEntity="Article"> <field identifier="Article.SupplierAID" sortable="true"/> <field align="e" identifier="ArticlePriceValueSales.Amount" sortable="true"/> </definition>
Although the price field as multiple logical keys, this is a valid expression as all logical keys have a default in the repository. In this case, the net customer price for EUR with the validity of "now" will be displayed.
To display a price of another type, only the deviant logical key needs to be specified, e.g.
<definition i18NKey="%table.config.full.en" identifier="article.table.config.full.en" rootEntity="Article"> <field identifier="Article.SupplierAID" sortable="true"/> <field align="e" identifier="ArticlePriceValueSales.Amount" sortable="true"> <logicalKey identifier="ArticlePriceType.LK.Type" value="5"/> </field> </definition>
Display Media Asset Thumbnail in TableThe default installation contains the list definitions FULL (EN) and FULL (DE) where the first column displays a thumbnail of the item/product. If the thumbnail is not displayed as expected, please check the corresponding XML file article.listmodel.xml or product.listmodel.xml.
For the thumbnail column, all three logical keys (language, quality and media asset type) need to be set correctly. The default definition references only language and quality and uses the default media asset type from the repository. To specify an alternative media asset type, the field definition should look like this:

Informatica MDM - Product 360 Configuration 97
<field caption="%web.client.item.table.thumbnail" identifier="ArticleMediaAssetDocument.ImageIdentifier" sortable="true" width="40"> <logicalKey identifier="ArticleMediaAssetDocumentType.LK.Language" value="English"/> <logicalKey identifier="ArticleMediaAssetDocumentType.LK.Quality" value="Internet image"/> <logicalKey identifier="ArticleMediaAssetMapType.LK.MediaAssetType" value="thumbnail"/> </field>
Display Media Asset Thumbnail in FormEntity thumbnail can be specified like this (possible logical keys same as in table definition):
<fieldGroup displaySectionWidget="true" subEntityId="ArticleMediaAssetDocument"> <mediaField identifier="ArticleMediaAssetDocument.ImageIdentifier" thumbnailType="original"/> <logicalKey identifier="ArticleMediaAssetMapType.LK.MediaAssetType" value="Standard image"/> <logicalKey identifier="ArticleMediaAssetDocumentType.LK.Quality" value="Html document"/> <logicalKey identifier="ArticleMediaAssetDocumentType.LK.Language" value="Language independent"/></fieldGroup>
Possible values for thumbnailType attribute is small, normal, big, preview, original(default value).
6.5.7 View Definition ExamplesThis pages provides example configuration for list view customizings.
List with texts in multiple languagesList format:
Product No.
Status
Short description (German)
Short description (English)
Short description (Spanish)
Short description (Finish)
Short description (French)
Example screen:
Definition (product.listmodel.xml):
<definition defaultDefinition="false" i18NKey="Product list multi language" rootEntity="Product2G">
When referencing Product 360 Core repository fields, make sure to specify the field identifier from the custom areabut not the field identifier from the types area.
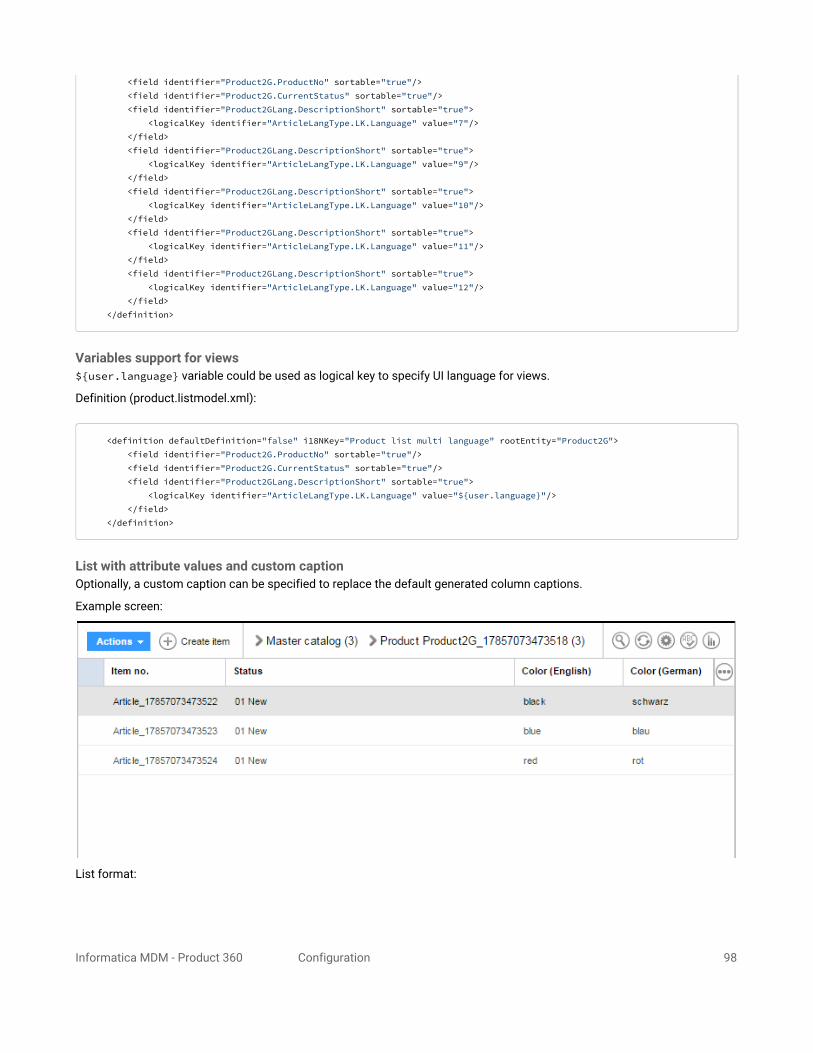
Informatica MDM - Product 360 Configuration 98
<field identifier="Product2G.ProductNo" sortable="true"/> <field identifier="Product2G.CurrentStatus" sortable="true"/> <field identifier="Product2GLang.DescriptionShort" sortable="true"> <logicalKey identifier="ArticleLangType.LK.Language" value="7"/> </field> <field identifier="Product2GLang.DescriptionShort" sortable="true"> <logicalKey identifier="ArticleLangType.LK.Language" value="9"/> </field> <field identifier="Product2GLang.DescriptionShort" sortable="true"> <logicalKey identifier="ArticleLangType.LK.Language" value="10"/> </field> <field identifier="Product2GLang.DescriptionShort" sortable="true"> <logicalKey identifier="ArticleLangType.LK.Language" value="11"/> </field> <field identifier="Product2GLang.DescriptionShort" sortable="true"> <logicalKey identifier="ArticleLangType.LK.Language" value="12"/> </field> </definition>
Variables support for views${user.language} variable could be used as logical key to specify UI language for views.
Definition (product.listmodel.xml):
<definition defaultDefinition="false" i18NKey="Product list multi language" rootEntity="Product2G"> <field identifier="Product2G.ProductNo" sortable="true"/> <field identifier="Product2G.CurrentStatus" sortable="true"/> <field identifier="Product2GLang.DescriptionShort" sortable="true"> <logicalKey identifier="ArticleLangType.LK.Language" value="${user.language}"/> </field> </definition>
List with attribute values and custom captionOptionally, a custom caption can be specified to replace the default generated column captions.
Example screen:
List format:

Informatica MDM - Product 360 Configuration 99
Item no. Status Color (English) Color(German)
Definition (article.listmodel.xml):
<definition defaultDefinition="false" i18NKey="Item list with colors" rootEntity="Article"> <field identifier="Article.SupplierAID" sortable="true"/> <field identifier="Article.CurrentStatus" sortable="true"/> <field identifier="ArticleAttributeValue.Value" sortable="true" caption="Color (English)"> <logicalKey identifier="ArticleAttributeValueType.LK.Language" value="9"/> <logicalKey identifier="ArticleAttributeType.LK.Name" value="Farbe"/> </field> <field identifier="ArticleAttributeValue.Value" sortable="true" caption="Color (German)"> <logicalKey identifier="ArticleAttributeValueType.LK.Language" value="7"/> <logicalKey identifier="ArticleAttributeType.LK.Name" value="Farbe"/> </field> </definition>
List with different price typesExample screen:
List format:
Product No. Net customer price (from 1) Non-binding price recommendation (from 1)
Definition (article.listmodel.xml):
<definition defaultDefinition="false" i18NKey="Product list with prices" rootEntity="Article"> <field identifier="Product2G.ProductNo" sortable="true"/> <field identifier="Product2GPriceValueSales.Amount" sortable="true"> <logicalKey identifier="ArticlePriceValueType.LK.LowerBound" value="1"/> <logicalKey identifier="ArticlePriceType.LK.PartyMS" value="1[|]"/> <logicalKey identifier="ArticlePriceType.LK.Type" value="3"/> <logicalKey identifier="ArticlePriceType.LK.Currency" value="EUR"/> <logicalKey identifier="ArticlePriceType.LK.Territory" value="DE"/> <logicalKey identifier="ArticlePriceType.LK.ValidAt" value="now"/> </field> <field identifier="Product2GPriceValueSales.Amount" sortable="true"> <logicalKey identifier="ArticlePriceValueType.LK.LowerBound" value="1"/> <logicalKey identifier="ArticlePriceType.LK.PartyMS" value="1[|]"/>

Informatica MDM - Product 360 Configuration 100
<logicalKey identifier="ArticlePriceType.LK.Type" value="5"/> <logicalKey identifier="ArticlePriceType.LK.Currency" value="EUR"/> <logicalKey identifier="ArticlePriceType.LK.Territory" value="DE"/> <logicalKey identifier="ArticlePriceType.LK.ValidAt" value="now"/> </field> </definition>
List with Structure Group NameExample screen:
Definition (product.listmodel.xml):
<definition defaultDefinition="false" i18NKey="Transition fields" rootEntity="Product2G"> <field identifier="Product2G.ProductNo" sortable="true" /> <field identifier="Product2G.CurrentStatus" sortable="true" /> <field identifier="Product2GStructureMap.StructureGroup" sortable="true"> <logicalKey identifier="ArticleStructureMapType.LK.StructureId" value="10000" /> </field> </definition>
List of additional price tiers
File: article.detailtab.xml, section detail_purchase_prices

Informatica MDM - Product 360 Configuration 101
<tableDefinition i18NKey="%web.client.article.tab.prices.purchase" identifier="detail_purchase_prices" rootEntity="ArticlePricePurchase"> <field identifier="ArticlePricePurchase.PriceType" sortable="false"/> <field align="e" identifier="ArticlePriceValuePurchase.Amount" sortable="false"> <logicalKey identifier="ArticlePriceValueType.LK.LowerBound" value="1"/> </field> <field align="e" identifier="ArticlePriceValuePurchase.Amount" sortable="false"> <logicalKey identifier="ArticlePriceValueType.LK.LowerBound" value="10"/> </field> <field align="e" identifier="ArticlePriceValuePurchase.Amount" sortable="false"> <logicalKey identifier="ArticlePriceValueType.LK.LowerBound" value="100"/> </field> <field align="e" identifier="ArticlePriceValuePurchase.Amount" sortable="false"> <logicalKey identifier="ArticlePriceValueType.LK.LowerBound" value="1000"/> </field> <field identifier="ArticlePricePurchase.Currency" sortable="true"/> <field identifier="ArticlePricePurchase.Territory" sortable="true"/> <field identifier="ArticlePricePurchase.ValidFrom" sortable="true"/> <field identifier="ArticlePricePurchase.ValidTo" sortable="true"/> <field identifier="ArticlePricePurchase.Supplier" sortable="true"/></tableDefinition>
List of DQ Status per Channel (Transition Fields)
File: product.listmodel.xml
<definition defaultDefinition="true" i18NKey="Quality Overview" identifier="product.table.config.dq" rootEntity="Product2G"> <field identifier="Product2G.ProductNo" sortable="true" width="100"/> <field identifier="Product2G.CurrentStatus" sortable="true" width="180"/> <field identifier="Product2GLang.DescriptionShort" sortable="true"> <logicalKey identifier="ArticleLangType.LK.Language" value="English"/> </field> <field identifier="Product2G.Status" sortable="true" caption="Status Mobile"> <transitionField identifier="QualityStatusSummary.Status"> <logicalKey identifier="StatusSummaryType.LK.Channel" value="Mobile"/> </transitionField> </field> <field identifier="Product2G.Status" sortable="true" caption="Status Web Shop"> <transitionField identifier="QualityStatusSummary.Status"> <logicalKey identifier="StatusSummaryType.LK.Channel" value="Web Shop"/> </transitionField>

Informatica MDM - Product 360 Configuration 102
</field> </definition>
List of DQ Rule Status and Message (Transition Fields)
File: product.listmodel.xml
<definition defaultDefinition="false" i18NKey="Quality Rule Status" identifier="product.table.config.dqrule" rootEntity="Product2G"> <field identifier="Product2G.ProductNo" sortable="true" width="100"/> <field identifier="Product2G.CurrentStatus" sortable="true" width="180"/> <field identifier="Product2GLang.DescriptionShort" sortable="true"> <logicalKey identifier="ArticleLangType.LK.Language" value="English"/> </field> <field identifier="Product2G.Status" sortable="true" caption="Long Descr Status"> <transitionField identifier="QualityStatusEntry.Status"> <logicalKey identifier="StatusEntryType.LK.ProcessIdentifier" value="Check long desc"/> </transitionField> </field> <field identifier="Product2G.Status" sortable="true" caption="Long Descr Message"> <transitionField identifier="QualityStatusEntry.Message"> <logicalKey identifier="StatusEntryType.LK.ProcessIdentifier" value="Check long desc"/> </transitionField> </field> </definition>
6.5.8 Detail Tab Definition ExamplesThis pages provides example configurations for detail tab customizings.
Change Detail Preview AreaThe preview area next to the thumbnail can be changed. This example removes the status field and adds the last change user instead.
When referencing Product 360 Core repository fields, make sure to specify the field identifier from the custom areabut not the field identifier from the types area.
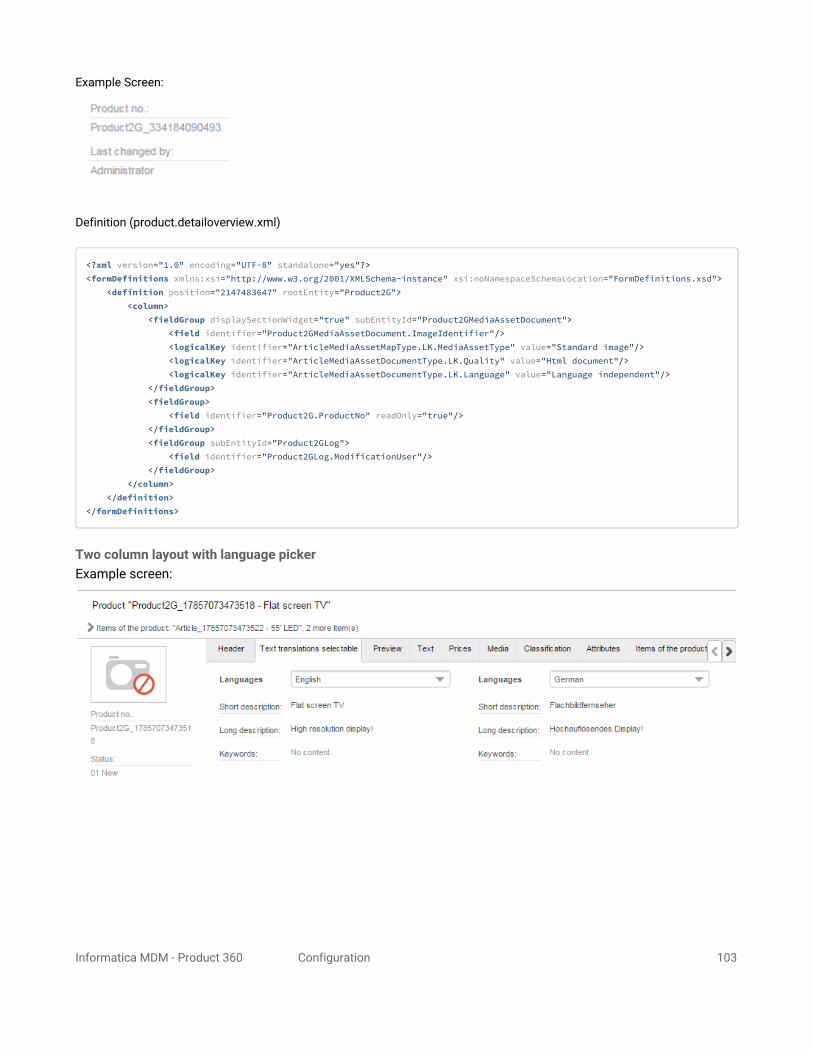
Informatica MDM - Product 360 Configuration 103
Example Screen:
Definition (product.detailoverview.xml)
<?xml version="1.0" encoding="UTF-8" standalone="yes"?><formDefinitions xmlns:xsi="http://www.w3.org/2001/XMLSchema-instance" xsi:noNamespaceSchemaLocation="FormDefinitions.xsd"> <definition position="2147483647" rootEntity="Product2G"> <column> <fieldGroup displaySectionWidget="true" subEntityId="Product2GMediaAssetDocument"> <field identifier="Product2GMediaAssetDocument.ImageIdentifier"/> <logicalKey identifier="ArticleMediaAssetMapType.LK.MediaAssetType" value="Standard image"/> <logicalKey identifier="ArticleMediaAssetDocumentType.LK.Quality" value="Html document"/> <logicalKey identifier="ArticleMediaAssetDocumentType.LK.Language" value="Language independent"/> </fieldGroup> <fieldGroup> <field identifier="Product2G.ProductNo" readOnly="true"/> </fieldGroup> <fieldGroup subEntityId="Product2GLog"> <field identifier="Product2GLog.ModificationUser"/> </fieldGroup> </column> </definition></formDefinitions>
Two column layout with language pickerExample screen:
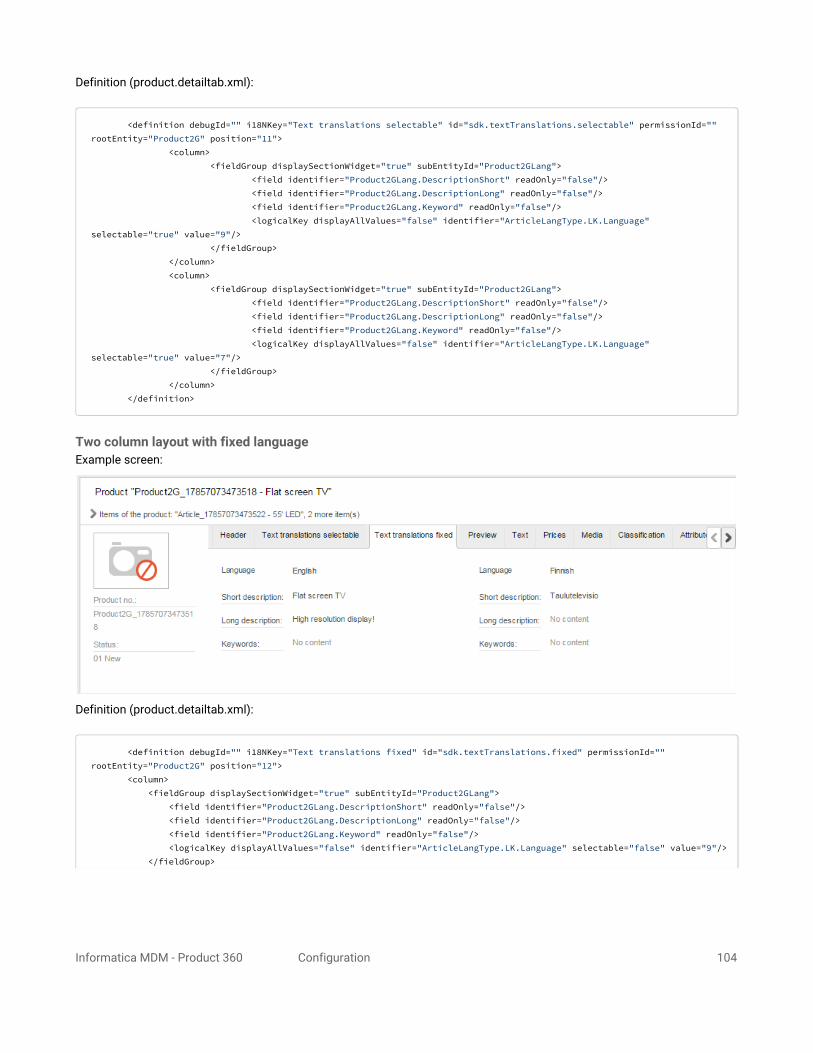
Informatica MDM - Product 360 Configuration 104
Definition (product.detailtab.xml):
<definition debugId="" i18NKey="Text translations selectable" id="sdk.textTranslations.selectable" permissionId="" rootEntity="Product2G" position="11"> <column> <fieldGroup displaySectionWidget="true" subEntityId="Product2GLang"> <field identifier="Product2GLang.DescriptionShort" readOnly="false"/> <field identifier="Product2GLang.DescriptionLong" readOnly="false"/> <field identifier="Product2GLang.Keyword" readOnly="false"/> <logicalKey displayAllValues="false" identifier="ArticleLangType.LK.Language" selectable="true" value="9"/> </fieldGroup> </column> <column> <fieldGroup displaySectionWidget="true" subEntityId="Product2GLang"> <field identifier="Product2GLang.DescriptionShort" readOnly="false"/> <field identifier="Product2GLang.DescriptionLong" readOnly="false"/> <field identifier="Product2GLang.Keyword" readOnly="false"/> <logicalKey displayAllValues="false" identifier="ArticleLangType.LK.Language" selectable="true" value="7"/> </fieldGroup> </column> </definition>
Two column layout with fixed languageExample screen:
Definition (product.detailtab.xml):
<definition debugId="" i18NKey="Text translations fixed" id="sdk.textTranslations.fixed" permissionId="" rootEntity="Product2G" position="12"> <column> <fieldGroup displaySectionWidget="true" subEntityId="Product2GLang"> <field identifier="Product2GLang.DescriptionShort" readOnly="false"/> <field identifier="Product2GLang.DescriptionLong" readOnly="false"/> <field identifier="Product2GLang.Keyword" readOnly="false"/> <logicalKey displayAllValues="false" identifier="ArticleLangType.LK.Language" selectable="false" value="9"/> </fieldGroup>

Informatica MDM - Product 360 Configuration 105
</column> <column> <fieldGroup displaySectionWidget="true" subEntityId="Product2GLang"> <field identifier="Product2GLang.DescriptionShort" readOnly="false"/> <field identifier="Product2GLang.DescriptionLong" readOnly="false"/> <field identifier="Product2GLang.Keyword" readOnly="false"/> <logicalKey displayAllValues="false" identifier="ArticleLangType.LK.Language" selectable="false" value="11"/> </fieldGroup> </column> </definition>
Variables support for detail tabs${user.language} variable could be used as logical key to specify UI language for details tabs.
Definition (product.detailtab.xml):
<definition debugId="" i18NKey="Text translations fixed" id="sdk.textTranslations.fixed" permissionId="" rootEntity="Product2G" position="12"> <column> <fieldGroup displaySectionWidget="true" subEntityId="Product2GLang"> <field identifier="Product2GLang.DescriptionShort" readOnly="false"/> <field identifier="Product2GLang.DescriptionLong" readOnly="false"/> <field identifier="Product2GLang.Keyword" readOnly="false"/> <logicalKey displayAllValues="false" identifier="ArticleLangType.LK.Language" selectable="false" value="${user.language}"/> </fieldGroup> </column> <column> <fieldGroup displaySectionWidget="true" subEntityId="Product2GLang"> <field identifier="Product2GLang.DescriptionShort" readOnly="false"/> <field identifier="Product2GLang.DescriptionLong" readOnly="false"/> <field identifier="Product2GLang.Keyword" readOnly="false"/> <logicalKey displayAllValues="false" identifier="ArticleLangType.LK.Language" selectable="false" value="11"/> </fieldGroup> </column> </definition>
Detail Tab with specific attributesInstead of showing all attributes you can also add a fixed list of attributes to a tab. You can also mix attributes with normal fields by adding them to different field groups. If the attribute doesn't exist for the selected item or product, the widget is not rendered. That means, that users can create or edit attribute values but cannot create new attributes by themselves.
Example that shows the attributes Width and Height (product.detailtab.xml):
<definition debugId="attr" i18NKey="Custom attributes" permissionId="" position="1" rootEntity="Product2G"> <column> <enumGrouping caption="%web.client.login.form.language" enumIdentifier="Enum.Language.WithLanguageIndependent" selectable="true" value="9"/> <fieldGroup subEntityId="Product2GAttributeValue" displaySectionWidget="false"> <field identifier="Product2GAttributeValue.Value"/> <logicalKey identifier="ArticleAttributeValueType.LK.Language" value="9"/>

Informatica MDM - Product 360 Configuration 106
<logicalKey identifier="ArticleAttributeType.LK.Name" value="Width"/> </fieldGroup> <fieldGroup subEntityId="Product2GAttributeValue" displaySectionWidget="false"> <field identifier="Product2GAttributeValue.Value"/> <logicalKey identifier="ArticleAttributeValueType.LK.Language" value="9"/> <logicalKey identifier="ArticleAttributeType.LK.Name" value="Height"/> </fieldGroup> </column> </definition>
Detail Tab and editing multi-value attriubte valuesThere is an an "extra editing mode" for multi attribute values in web, which loads them in an single attribute editor to be able to edit an single value of the list of values identified over an logical key identifier enum. To trigger the new multi attribute in single editor mode, specify an identifier enum with the attributes values identifier logical key, this activates the new mode, if no enum is specified than the standard multi attribute editor in multi mode is used. Don't forget to change the default value of the logical key to an value from the enumeration.
Activating the multi-value attribute editor by specifying an identifier enum in the repository. In the example below the Currency enum was used.

Informatica MDM - Product 360 Configuration 107
Additionally you need to specify a logical key combination to refer to an attribute value in the webs detail tab definition XML, this can be done by using an enum grouping for the identifier enumeration and set the identifier logical key to selectable="true". Another possible option is to specify each logical key combination as an extra field group.
Using an enum grouping to handle all combination of logical keys by an combobox.
<definition debugId="product_attributes_tab" i18NKey="%web.product.detail.tab.attributes" permissionId="web.product.detail.tabs.attributes" position="60" rootEntity="Product2G"> <column> <enumGrouping caption="%web.client.login.form.language" enumIdentifier="Enum.Language.WithLanguageIndependent" selectable="true" value="English"/> <enumGrouping caption="Currency" enumIdentifier="Enum.Currency" selectable="true" value="EUR"/> <fieldGroup displaySectionWidget="true" subEntityId="Product2GAttributeValue"> <field identifier="Product2GAttributeValue.Value"/> <logicalKey identifier="ArticleAttributeValueType.LK.Identifier" selectable="true" value="EUR"/> <logicalKey identifier="ArticleAttributeValueType.LK.Language" selectable="true" value="English"/> <logicalKey displayAllValues="true" hidden="true" identifier="ArticleAttributeType.LK.Name"/> </fieldGroup> </column> </definition>
Alternatively using extra field group for each combination of logical keys.

Informatica MDM - Product 360 Configuration 108
Logical Keys explodedExample screen:

Informatica MDM - Product 360 Configuration 109
Definition (product.detailtab.xml):
<definition debugId="" i18NKey="All Text translations" id="sdk.textTranslations.all" permissionId="" rootEntity="Product2G" position="13"> <column> <fieldGroup displaySectionWidget="true" subEntityId="Product2GLang"> <field identifier="Product2GLang.DescriptionShort" readOnly="false"/> <field identifier="Product2GLang.DescriptionLong" readOnly="false"/> <field identifier="Product2GLang.Keyword" readOnly="false"/> <logicalKey displayAllValues="true" identifier="ArticleLangType.LK.Language" selectable="false"/>

Informatica MDM - Product 360 Configuration 110
</fieldGroup> </column> </definition>
Logistic Extension Data with multiple Logical KeysUse Case:
Logistic Extension Data has 5 logical keys and can be used to store data to a (sub)set of these keys, e.g. language and customer specific.
Example Screen:
Definition (article.detailtab.xml):
<definition debugId="" i18NKey="Logistic Extensions" id="sdk.item.logisticExtensions" permissionId="" rootEntity="Article" position="14"> <column> <fieldGroup displaySectionWidget="true" subEntityId="ArticleLogisticExtension"> <field identifier="ArticleLogisticExtension.Code128" readOnly="false"/> <field identifier="ArticleLogisticExtension.Ean14" readOnly="false"/> <logicalKey displayAllValues="false" identifier="ArticleLogisticExtensionType.LK.Classifier" value="ArticleLogisticExtension" selectable="false"/> <logicalKey displayAllValues="false" identifier="ArticleLogisticExtensionType.LK.Territory" value="WORLD" selectable="false"/> <logicalKey displayAllValues="false" identifier="ArticleLogisticExtensionType.LK.PartyMS" value="3[|]" selectable="true"/> <logicalKey displayAllValues="false" identifier="ArticleLogisticExtensionType.LK.PackagingUnit" value="134[|]" selectable="true"/> <logicalKey displayAllValues="false" identifier="ArticleLogisticExtensionType.LK.Language" value="-1" selectable="false"/> </fieldGroup> </column> </definition>
Fullqualified Purchase PricesUse Case:
Allow viewing and editing of full qualified prices. Note: Listing of all available prices is not possible using XML definitions.

Informatica MDM - Product 360 Configuration 111
Example Screen:
Definition (product.detailtab.xml):
<definition debugId="" i18NKey="Purchase Prices" id="sdk.productprices" permissionId="" position="12" rootEntity="Product2G"> <column> <fieldGroup subEntityId="Product2GPriceValueSales" displaySectionWidget="false"> <field identifier="Product2GPriceValueSales.Amount" caption="Net customer price EUR" /> <logicalKey identifier="ArticlePriceType.LK.Type" value="3" /> <logicalKey identifier="ArticlePriceType.LK.Currency" value="EUR" /> </fieldGroup> <fieldGroup subEntityId="Product2GPriceValueSales" displaySectionWidget="false"> <field identifier="Product2GPriceValueSales.Amount" caption="Non-binding price recom. EUR" /> <logicalKey identifier="ArticlePriceType.LK.Type" value="5" /> <logicalKey identifier="ArticlePriceType.LK.Currency" value="EUR" /> </fieldGroup> </column> <column> <fieldGroup subEntityId="Product2GPriceValueSales" displaySectionWidget="false"> <field identifier="Product2GPriceValueSales.Amount" caption="Net customer price USD" /> <logicalKey identifier="ArticlePriceType.LK.Type" value="3" /> <logicalKey identifier="ArticlePriceType.LK.Currency" value="USD" /> </fieldGroup> <fieldGroup subEntityId="Product2GPriceValueSales" displaySectionWidget="false"> <field identifier="Product2GPriceValueSales.Amount" caption="Non-binding price recom. USD" /> <logicalKey identifier="ArticlePriceType.LK.Type" value="5" /> <logicalKey identifier="ArticlePriceType.LK.Currency" value="USD" /> </fieldGroup> </column></definition>
Editable Item Preview PanelUse Case:
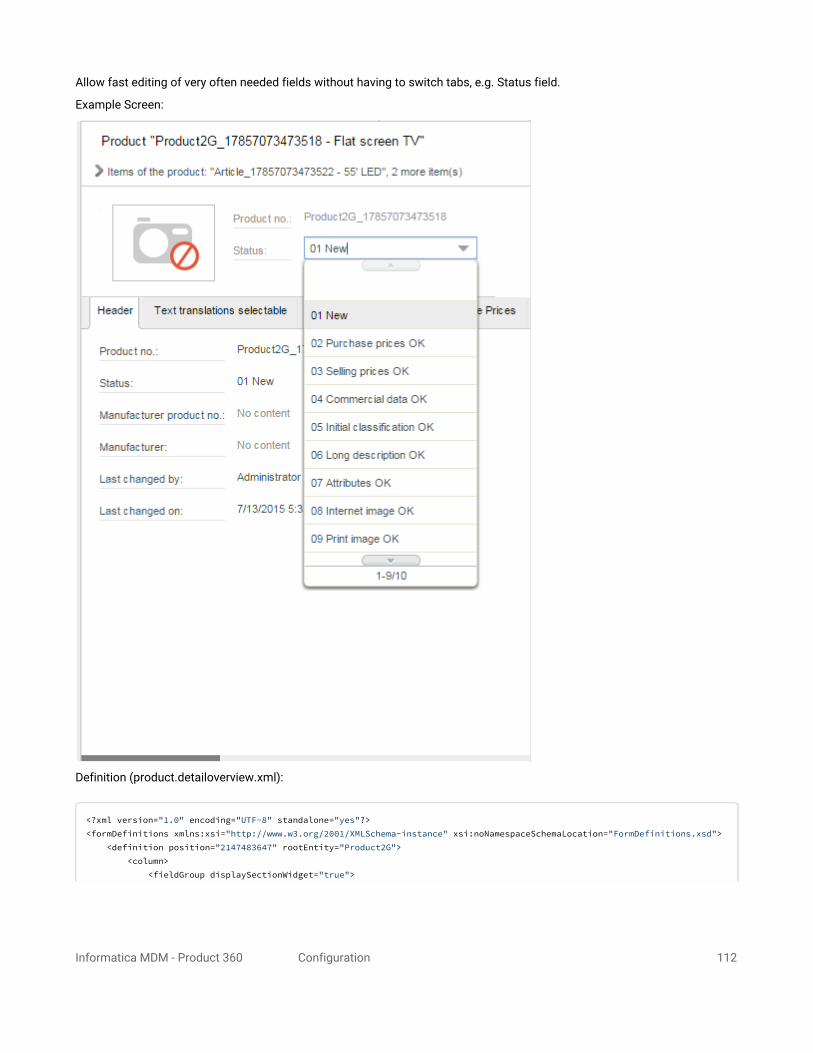
Informatica MDM - Product 360 Configuration 112
Allow fast editing of very often needed fields without having to switch tabs, e.g. Status field.
Example Screen:
Definition (product.detailoverview.xml):
<?xml version="1.0" encoding="UTF-8" standalone="yes"?><formDefinitions xmlns:xsi="http://www.w3.org/2001/XMLSchema-instance" xsi:noNamespaceSchemaLocation="FormDefinitions.xsd"> <definition position="2147483647" rootEntity="Product2G"> <column> <fieldGroup displaySectionWidget="true">

Informatica MDM - Product 360 Configuration 113
<field identifier="Product2G.ProductNo" readOnly="true"/> <field identifier="Product2G.CurrentStatus" readOnly="false"/> </fieldGroup> </column> </definition></formDefinitions>
Display Structure Group AssignmentUse Case: Display the structure group assignment of a given structure system.
Example Screen:
Definition (product.detailtab.xml):
<definition debugId="product_head_tab" i18NKey="Head 2" permissionId="com.heiler.ppm.web.app.view.detail.product.tabs.HeadTab" position="10" rootEntity="Product2G"> <column> <fieldGroup> <field identifier="Product2G.ProductNo"/> <field identifier="Product2G.CurrentStatus"/> <field identifier="Product2G.ManufacturerAID"/> <field identifier="Product2G.ManufacturerName"/> <field identifier="Product2GLog.ModificationUser"/> <field identifier="Product2GLog.ModificationDate"/> </fieldGroup> <fieldGroup subEntityId="Product2GStructureMap" displaySectionWidget="false"> <field identifier="Product2GStructureMap.StructureGroup" readOnly="true"/> <!-- StructureId can be taken from url in Product 360 Web when navigating to structure group. --> <logicalKey identifier="ArticleStructureMapType.LK.StructureId" value="10000" /> </fieldGroup> </column> </definition>
Editable List of Sub EntitiesUse Case: Show a list of all available subentities to an entity (e.g. item) and provide CRUD functionality.
Example Screen:

Informatica MDM - Product 360 Configuration 114
Definition (article.detailtab.xml)
<definition id="sdk.item.list.subentities.editable" rootEntity="Article" i18NKey="Article Logistic Extensions" position="14"> <column> <tableGroup> <actionPanel> <actionButton action="create"/> <actionButton action="delete"/> <actionButton action="edit"/> <fieldFormGroup> <field identifier="ArticleLogisticExtension.Party"/> <field identifier="ArticleLogisticExtension.PackagingUnit"/> <field identifier="ArticleLogisticExtension.Code39"/> <field identifier="ArticleLogisticExtension.Ean14"/> </fieldFormGroup> </actionPanel> <tableDefinition rootEntity="ArticleLogisticExtension"> <field identifier="ArticleLogisticExtension.Party"/> <field identifier="ArticleLogisticExtension.PackagingUnit"/> <field identifier="ArticleLogisticExtension.Code39"/> <field identifier="ArticleLogisticExtension.Ean14"/> </tableDefinition> </tableGroup> </column> </definition>
Editable List of Retail Prices for ItemsPlease note that only basic editing functionality for prices is supported. As of version 7.1, the following restrictions exist:
Price tiers are not handled correctly, ie. price list doesn't automatically show all available price tiers as columns like in Product 360 Desktop. Hence, only a single price tier is supported.Custom fields cannot be edited due to a bug.
Example Screen:

Informatica MDM - Product 360 Configuration 115
Definition (article.detailtab.xml):
<definition id="sdk.salesPricesEditable" rootEntity="Article" i18NKey="Article Retail Prices" position="15"> <column> <tableGroup> <actionPanel> <actionButton action="create"/> <actionButton action="delete"/> <actionButton action="edit"/> <fieldFormGroup subEntityId="ArticlePriceValueSales"> <field identifier="ArticlePriceSales.BuyerId"/> <field identifier="ArticlePriceSales.Currency"/> <field identifier="ArticlePriceSales.PriceType"/> <field identifier="ArticlePriceSales.Territory"/> <field identifier="ArticlePriceValueSales.Amount"/> </fieldFormGroup> </actionPanel> <tableDefinition rootEntity="ArticlePriceSales"> <field identifier="ArticlePriceSales.BuyerId"/> <field identifier="ArticlePriceSales.Currency"/> <field identifier="ArticlePriceSales.PriceType"/> <field identifier="ArticlePriceSales.Territory"/> <field identifier="ArticlePriceValueSales.Amount" caption="Price"/> </tableDefinition> </tableGroup> </column></definition>
Display Transition Fields in Detail Tab Lists, e.g. Short Description for ReferencesLists within detail tabs also support transition fields. This is especially useful for the list of referenced items.
Example:

Informatica MDM - Product 360 Configuration 116
This example requires to create two new transition fields in repository (3 in case of 3-tier product paradigm). Please see the screen for details.
product.references.listmodel.xml

Informatica MDM - Product 360 Configuration 117
<?xml version="1.0" encoding="UTF-8" standalone="yes"?><tableDefinitions xmlns:xsi="http://www.w3.org/2001/XMLSchema-instance" xsi:noNamespaceSchemaLocation="TableDefinitions.xsd"> <definition rootEntity="Product2GReference"> <field identifier="Product2GReference.Type"/> <field identifier="Product2GReference.ReferencedEntityId"/> <field identifier="Product2GReference.ReferencedProductNo"/> <field identifier="Product2GReference.Quantity"/> <field identifier="Product2GReference.DisplayOrder"/> <field identifier="Product2GReference.ReferencedProduct2G" > <transitionField identifier="Product2GLang.DescriptionShort" > <logicalKey identifier="ArticleLangType.LK.Language" value="9"/> </transitionField> </field> </definition> <definition rootEntity="Product2G2ArticleReference"> <field identifier="Product2G2ArticleReference.Type"/> <field identifier="Product2G2ArticleReference.ReferencedEntityId"/> <field identifier="Product2G2ArticleReference.ReferencedProductNo"/> <field identifier="Product2G2ArticleReference.Quantity"/> <field identifier="Product2G2ArticleReference.DisplayOrder"/> <field identifier="Product2G2ArticleReference.ReferencedArticle" > <transitionField identifier="ArticleLang.DescriptionShort" > <logicalKey identifier="ArticleLangType.LK.Language" value="9"/> </transitionField> </field> </definition> </tableDefinitions>
Single Logical Key Selector for Multiple SubentitiesUse Case:
In some cases, multiple fields from different sub entities should be displayed on a single detail tab. If these fields belong to the same entityType, the user wants to select the logical key only once instead of multiple times. This also makes sense, if different subentities share the same logical key, e.g. a qualification by language.
Magic around references
Please note that the handling of the listmodel definitions for references a special. In the Product 360 datamodel, links to each entity (Item, Product, Variant) are represented in a separate sub entity. Thus the file *.references.listmodel.xml contains 2 definitions (3 if variants are used, too). At runtime all these definitions are merged into a single table. That means, that the fields of the definitions must be matching (reference the same field type).
If you want to add another field, this needs to be done in all definitions at the same position. See DescriptionShort field in the above example.

Informatica MDM - Product 360 Configuration 118
Per default, logical key selectors are generated per fieldFormGroup. Fields from different subEntities need to be grouped in seperate fieldFormGroups. Using the syntax "enumGrouping" allows to extract the logical key selector from the fieldFormGroup level to the column level.
Example:
Two price values from ArticlePriceValuePurchase and ArticlePriceValueSales subentity with shared Currency selector:
article.detailtab.xml:

Informatica MDM - Product 360 Configuration 119
<definition debugId="sdk.enumGrouping" i18NKey="Grouped Logical Keys" rootEntity="Article" position="11"> <column> <enumGrouping enumIdentifier="Enum.Currency" selectable="true"/> <fieldGroup subEntityId="ArticlePriceValuePurchase" displaySectionWidget="true"> <field identifier="ArticlePriceValuePurchase.Amount" caption="Net list Purchase Price" /> <logicalKey identifier="ArticlePriceType.LK.PartyMS" hidden="true" value="<Main supplier>"/> <logicalKey identifier="ArticlePriceType.LK.Territory" hidden="true" value="Germany"/> <logicalKey identifier="ArticlePriceType.LK.ValidAt" hidden="true" value="now"/> <logicalKey identifier="ArticlePriceValueType.LK.LowerBound" hidden="true" value="1"/> <logicalKey identifier="ArticlePriceType.LK.Type" value="1" hidden="true"/> <logicalKey identifier="ArticlePriceType.LK.Currency" value="EUR" selectable="true"/> </fieldGroup> <fieldGroup subEntityId="ArticlePriceValueSales" displaySectionWidget="true"> <field identifier="ArticlePriceValueSales.Amount" caption="Net Customer Selling Price" /> <logicalKey identifier="ArticlePriceType.LK.PartyMS" hidden="true" value="<Public>"/> <logicalKey identifier="ArticlePriceType.LK.Territory" hidden="true" value="Germany"/> <logicalKey identifier="ArticlePriceType.LK.ValidAt" hidden="true" value="now"/> <logicalKey identifier="ArticlePriceValueType.LK.LowerBound" hidden="true" value="1"/> <logicalKey identifier="ArticlePriceType.LK.Type" value="3" hidden="true"/> <logicalKey identifier="ArticlePriceType.LK.Currency" value="EUR" selectable="true"/> </fieldGroup> </column> </definition>
List of all references to items, but not to other entities (with optional filter)Shows a list of all references to other items together with GTIN and ShortDescription using transition fields.
Example Screen:
article.detailtab.xml:

Informatica MDM - Product 360 Configuration 120
<definition i18NKey="References to Items" position="11" rootEntity="Article"> <column> <tableGroup> <actionPanel> <actionButton action="create" /> <actionButton action="edit" /> <actionButton action="delete" /> <fieldFormGroup subEntityId="ArticleReference"> <field identifier="ArticleReference.Type"/> <field identifier="ArticleReference.ReferencedSupplierAid" /> <field identifier="ArticleReference.Quantity" /> <field identifier="ArticleReference.DisplayOrder" /> </fieldFormGroup> </actionPanel> <tableDefinition rootEntity="ArticleReference"> <field identifier="ArticleReference.Type"/> <field identifier="ArticleReference.ReferencedSupplierAid" /> <field identifier="ArticleReference.Quantity" /> <field identifier="ArticleReference.DisplayOrder" /> <field identifier="ArticleReference.ReferencedArticle"> <transitionField identifier="Article.EAN" /> </field> <field identifier="ArticleReference.ReferencedArticle"> <transitionField identifier="ArticleLang.DescriptionShort" /> </field> </tableDefinition> </tableGroup> </column> </definition>
List of references to products, that is additionally filtered to show only references of type "accessories":
Example Screen:
product.detailtab.xml:
<definition i18NKey="Accessories of the product" position="13" rootEntity="Article"> <column> <tableGroup> <actionPanel>
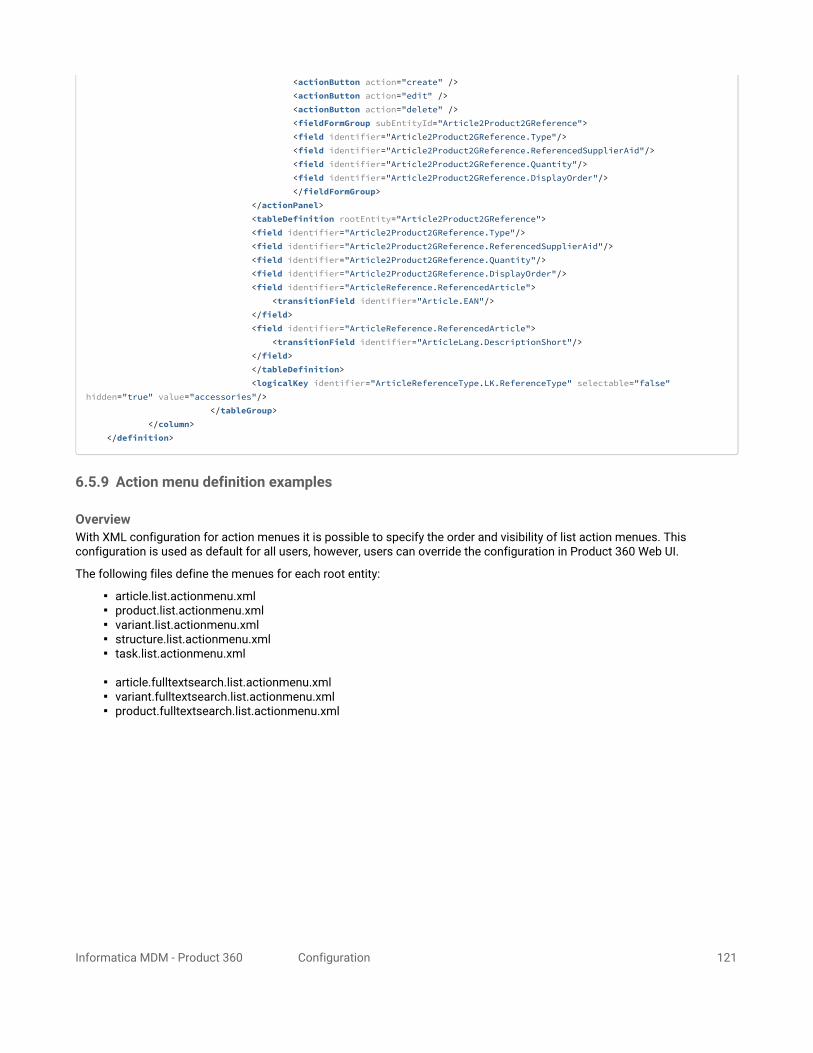
Informatica MDM - Product 360 Configuration 121
<actionButton action="create" /> <actionButton action="edit" /> <actionButton action="delete" /> <fieldFormGroup subEntityId="Article2Product2GReference"> <field identifier="Article2Product2GReference.Type"/> <field identifier="Article2Product2GReference.ReferencedSupplierAid"/> <field identifier="Article2Product2GReference.Quantity"/> <field identifier="Article2Product2GReference.DisplayOrder"/> </fieldFormGroup> </actionPanel> <tableDefinition rootEntity="Article2Product2GReference"> <field identifier="Article2Product2GReference.Type"/> <field identifier="Article2Product2GReference.ReferencedSupplierAid"/> <field identifier="Article2Product2GReference.Quantity"/> <field identifier="Article2Product2GReference.DisplayOrder"/> <field identifier="ArticleReference.ReferencedArticle"> <transitionField identifier="Article.EAN"/> </field> <field identifier="ArticleReference.ReferencedArticle"> <transitionField identifier="ArticleLang.DescriptionShort"/> </field> </tableDefinition> <logicalKey identifier="ArticleReferenceType.LK.ReferenceType" selectable="false" hidden="true" value="accessories"/> </tableGroup> </column> </definition>
6.5.9 Action menu definition examples
OverviewWith XML configuration for action menues it is possible to specify the order and visibility of list action menues. This configuration is used as default for all users, however, users can override the configuration in Product 360 Web UI.
The following files define the menues for each root entity:
article.list.actionmenu.xmlproduct.list.actionmenu.xmlvariant.list.actionmenu.xmlstructure.list.actionmenu.xmltask.list.actionmenu.xml
article.fulltextsearch.list.actionmenu.xmlvariant.fulltextsearch.list.actionmenu.xmlproduct.fulltextsearch.list.actionmenu.xml

Informatica MDM - Product 360 Configuration 122
Possible customizations1. Change groups order2. Change items order inside group3. Move items to other group

Informatica MDM - Product 360 Configuration 123
4. Move item inside other item5. Remove item6. Remove group7. Create new group8. Change default visibility of item9. Change if item in favorite area by default
10. Change captions for groups and items (in resource bundle files or directly in xml by providing explicit value)
LimitationsDo not change menu item identifiers as by them system locates concrete classes. Obviously it's impossible to create new menu item by just adding new line in xml file. However you can contribute new menu items programatically using the SDK.
Example definition
product.list.actionmenu.xml
<?xml version="1.0" encoding="UTF-8" standalone="yes"?><menuDefinition xmlns:xsi="http://www.w3.org/2001/XMLSchema-instance" xsi:noNamespaceSchemaLocation="MenuDefinition.xsd"> <menuGroup identifier="menu.item.group.maintain" i18NKey="%web.common.menu.item.group.maintain"> <menuItem identifier="menu.item.product.action.clone" i18NKey="%web.client.product.clone" favorite="false" visible="true"/> <menuItem identifier="menu.item.product.action.delete" i18NKey="%web.client.product.delete" favorite="false" visible="true"/> <menuItem identifier="menu.item.product.action.create" i18NKey="%web.client.product.create" favorite="true" visible="true"/> <menuItem identifier="menu.item.product.action.classify" i18NKey="%web.product.classification.menu" favorite="false" visible="true"/> </menuGroup> <menuGroup identifier="menu.item.group.task" i18NKey="%web.task.menu.item.group.task"> <menuItem identifier="menu.item.task.action.create" i18NKey="%web.client.task.create" favorite="false" visible="true"/> <menuItem identifier="menu.item.task.action.add" i18NKey="%web.client.task.add" favorite="false" visible="true"/> </menuGroup> <menuGroup identifier="menu.item.group.data" i18NKey="%web.common.menu.item.group.data"> <menuItem identifier="menu.item.product.dataquality.action.execute" i18NKey="%web.quality.menu.execute" favorite="false" visible="true"/> <menuItem identifier="menu.item.product.action.directexport" i18NKey="%export.exportHint" favorite="false" visible="true"/> <menuItem identifier="menu.item.product.action.import" i18NKey="%web.import.list.menu" favorite="false" visible="true"/> </menuGroup> <menuGroup identifier="menu.item.group.navigation" i18NKey="%web.common.menu.item.group.navigation"> <menuItem identifier="menu.item.product.back" i18NKey="%web.client.button.back.parent" favorite="false" visible="true"/> <menuItem identifier="menu.item.product.drilldown" i18NKey="%web.client.product.item.drilldown" favorite="true" visible="true"/> </menuGroup> <menuGroup identifier="menu.item.group.default" i18NKey="%web.common.menu.item.group.default"> <menuItem identifier="menu.item.product.action.findandreplace" i18NKey="%web.client.findandreplace.dialog.title" favorite="false" visible="true"/> </menuGroup> <menuGroup identifier="menu.item.group.actionconfig" i18NKey="%web.client.actionconfig.menu.group"> <menuItem identifier="menu.item.product.action.actionconfig" favorite="false" visible="true"/> </menuGroup></menuDefinition>
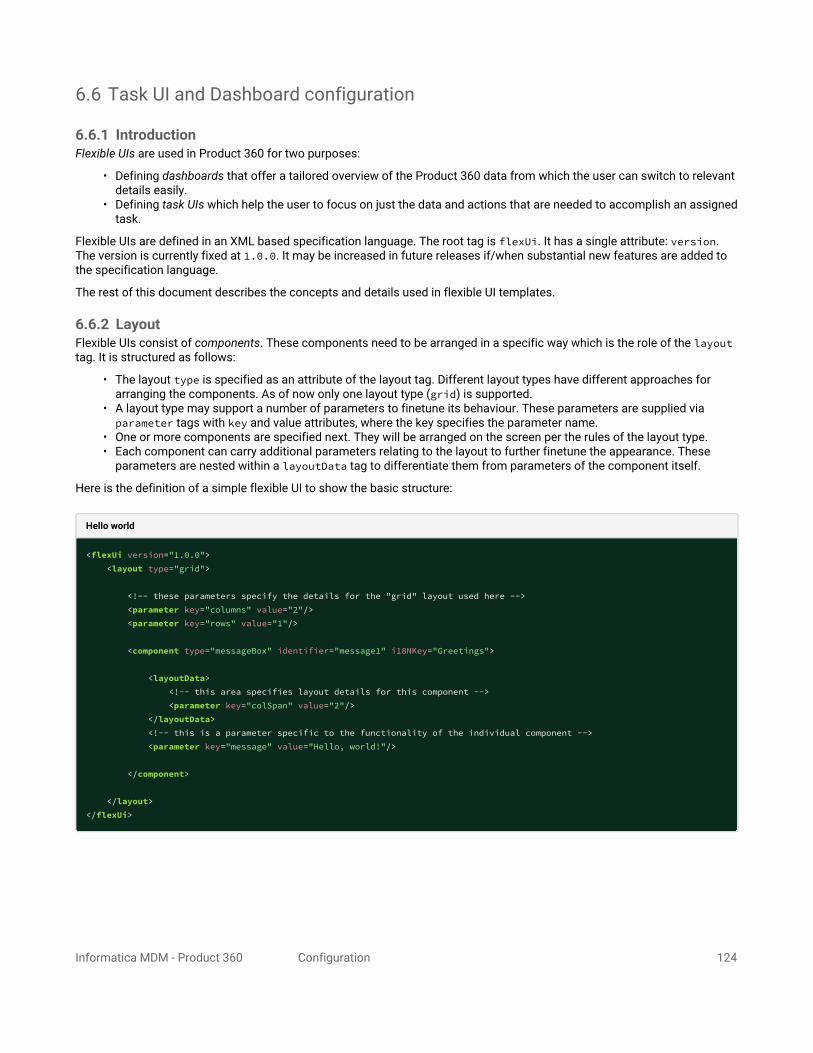
Informatica MDM - Product 360 Configuration 124
6.6 Task UI and Dashboard configuration
6.6.1 IntroductionFlexible UIs are used in Product 360 for two purposes:
• Defining dashboards that offer a tailored overview of the Product 360 data from which the user can switch to relevant details easily.
• Defining task UIs which help the user to focus on just the data and actions that are needed to accomplish an assigned task.
Flexible UIs are defined in an XML based specification language. The root tag is flexUi. It has a single attribute: version. The version is currently fixed at 1.0.0. It may be increased in future releases if/when substantial new features are added to the specification language.
The rest of this document describes the concepts and details used in flexible UI templates.
6.6.2 LayoutFlexible UIs consist of components. These components need to be arranged in a specific way which is the role of the layouttag. It is structured as follows:
• The layout type is specified as an attribute of the layout tag. Different layout types have different approaches for arranging the components. As of now only one layout type (grid) is supported.
• A layout type may support a number of parameters to finetune its behaviour. These parameters are supplied via parameter tags with key and value attributes, where the key specifies the parameter name.
• One or more components are specified next. They will be arranged on the screen per the rules of the layout type.• Each component can carry additional parameters relating to the layout to further finetune the appearance. These
parameters are nested within a layoutData tag to differentiate them from parameters of the component itself.
Here is the definition of a simple flexible UI to show the basic structure:
Hello world
<flexUi version="1.0.0"> <layout type="grid"> <!-- these parameters specify the details for the "grid" layout used here --> <parameter key="columns" value="2"/> <parameter key="rows" value="1"/> <component type="messageBox" identifier="message1" i18NKey="Greetings"> <layoutData> <!-- this area specifies layout details for this component --> <parameter key="colSpan" value="2"/> </layoutData> <!-- this is a parameter specific to the functionality of the individual component --> <parameter key="message" value="Hello, world!"/> </component> </layout></flexUi>

Informatica MDM - Product 360 Configuration 125
Grid layoutIn this type of layout the available space for the UI is divided into cells of a grid. Similar to HTML tables, there are a number of columns and rows which are defined at the layout level. Each component can occupy several adjacent cells in this grid.
Components are added to the grid in the sequence they appear in the XML. For each component the layout algorithm looks for free space of the appropriate size, going from left to right and top to bottom, i.e. the first row is filled as much as possible, skipping to the next row when the next component would not fit any more in the current row. Cells that remain unoccupied may be filled with a subsequent component if it fits, meaning that the layout tries to fill out empty spots as soon as possible.
Collapsing componentsWith collapsible components the user can temporarily minimize information that is not needed and use the additional space to increase the size of other components. In general a component can only be collapsible if it occupies the full width or the full height of the UI. Through this restriction the collapsing behaviour is working in a way that is intuitive for the user: a whole column (or a whole row) is collapsed and all other columns (rows) are proportionally increased in size. If it were possible to minimize a component that only occupies part of the width/height of the UI then the components would have to be rearranged on the fly to fill out the empty space, making it harder for the user to relocate any individual components.
Horizontal collapsing
When a component occupying a whole column is marked as collapsible it gets a button added in the top left of its header. Depending on the state the button displays a minus sign for collapsing or a plus sign for expanding the component.In collapsed mode the width of the component is reduced to the width of the button and the component title is displayed in a banner below the buttom rotated 90 degress to to the left.
Vertical collapsing

Informatica MDM - Product 360 Configuration 126
When a component occupying a whole row is marked as collapsible it gets a button added in the top left of its header. The button displays a triangle pointing right in collapsed state and pointing down in expanded state. When collapsed the component is reduced to its header.
For a finer control of the collapsed state of a subgroup of components see the group component below.
Note that the goal of collapsing is to have more space for other components. Therefore a component can only be collapsed if some other component(s) remain visible. To enforce this, the button for collapsing a component is hidden if it is the only component to be be fully visible currently.
Type: grid
Parameter name
M(andatory)O(ptional)
Layout parameter (LP)Component layout data parameter (CLP)
Example values Description
columns O LP 1 (default) Specifies the number of columns in the grid.
rows O LP 1 (default) Specifies the number of rows in the grid.
columnWidth
O LP css width in pixels (like "300px")
Cell width. By default all available width is equally divided between all cells.
rowHeight O LP css height in pixels (like "300px")
Cell height. By default all available height is equally divided between all cells.
spacingSize
O LP css size in pixels (like "25px")
If columnWidth or rowHeight are defined the desired spacing between cells needs to be specified as well (default 6px).
colSpan O CLP 1 (default) Number of cells occupied by component in horizontal direction.
rowSpan O CLP 1 (default) Number of cells occupied by component in vertical direction.
collapsible O CLP true
false (default)
Specifies whether the component should be collapsible in the UI.
collapsed O CLP true (default)
false
Specifies whether the component should be collapsed initially. Only applies if collapsible is set to true.
Grouping componentsWith the group component it is possible to occupy an area in the layout and then place a number of nested components into this area. In this way it is possible to create layouts that break up the rigid structure of the grid. For example a group can occupy 4 columns and then place 5 components in this area that share this space equally. Using size ratios for the individual

Informatica MDM - Product 360 Configuration 127
components the structure of the UI can deviate from the enclosing layout even more. The second feature of groups is that they manage the collapsible behaviour locally between the nested components.
Use the flexibility of the group component carefully. The overall UI should still present a clear structure to the user.
From the perspective of the enclosing layout the group component acts like a single component and it carries the layout data for the whole group (however groups do not support the collapsible/collapsed parameters, i.e. a group as a whole cannot be collapsed within its layout). The layoutData parameters that can be set for each nested component are defined by the group component - see below.
Tag: group

Informatica MDM - Product 360 Configuration 128
Parameter name
M(andatory)O(ptional)
Group parameter (GP)
Component layout data parameter (CLP)
Example values
Description
direction O GP horizontal (default)
vertical
Direction for placing the child components.
collapsible
O CLP true(default)
false
Specifies whether the component should be collapsible in the UI. The direction of collapsing is defined by the direction of the group.
collapsed O CLP true(default)false
Specifies whether the component should be collapsed initially.
sizeRatio O CLP 1 (default) Defines the relative amount of space (in the direction of the group) the component will be assigned. By default all components have ratio 1 and the space will be distributed equally.
With three components and ratios set to 1, 2, and 1, the middle component will get half the space while the others get a quarter each. If the middle component is collapsed the available space is split equally between the other two as both have the same ratio.
6.6.3 Data SourcesA data source can be used to retrieve a set of entity items (e.g. articles or products). The underlying mechanism used for providing the data set is dependant on the data source type. Each data source is defined using a common XML structure. Data source definitions appear nested in component instance definitions. The respective component type specifies if and how many data sources it supports and what identifiers those data sources should have.
Explicit data sources are mostly used in dashboard components. Within the flexible task UI there is always an implicit data source consisting of the entity items attached to the task.
The most common starting points for specifiying sets of entity items in Product 360 are:
• Catalogs - all the items of either the master catalog or a supplier catalog• Assortments - all the items within an assortment• Structures - items that have been classified in a specific structure system to any structure group or items classified to
a specific structure group
=> these are covered by the entity report based data source types, see examples below
• User defined saved searches with flexible criteria for defining a set of items
=> there is a separate data source type for saved searches, see below

Informatica MDM - Product 360 Configuration 129
• Ad hoc searches using a detailed search expression
=> this is implemented by a special entity report called "bySearch" and is available through the "Report by alias" data source type, see example below. The expression syntax is documented under "REST Search Query Language".
Field / subelement
Description
type This specifies the type of the data source. See the entries below for possible values.
identifier Unique name within the scope of the data source definition. For example a specific component may support multiple data source definitions and the identifier can be used to select the right one.
ref Reference that is used to identify the underlying instance that will provide the data. For example the unique identifier of an entity report if the underlying mechanism is report based.
entity The entity of the items that are provided. This only needs to be specified for some data source types where the "ref" field on its own is not unique.
parameter Key / value pairs providing parameters for the underlying mechanism. For example in case of reports these pairs are matched to parameters defined in the actual report. The following entry specifiies that the parameter "catalog" should be set to "Apparel":
<parameter key="catalog" value="Apparel" />
Additionally a special suffix .editable is recognized in the parameter key. The value is expected to be a boolean (true/false) and it specifies whether the related parameter (same key without the suffix) is made available to the user so he/she can choose the actual value on the fly via a combo box. Here is an example:
<parameter key="catalog" value="Apparel" /> <parameter key="catalog.editable" value="true" />
Note that not all components supporting data sources also support interactive choice of data source parameters. Also, the actual data source must provide an enumeration for the parameter to choose values from. The value provided in the XML ("Apparel") must be from this enumeration and will be preselected in the combo box. If it is not part of the enumeration it will be ignored and the selection will be empty initially.
Finally, if the key/value pair for the parameter is omitted, i.e. only the .editable entry for it is present, then the parameter will be set to a default value provided by the underlying data source implementation (e.g. enitity reports may have defaults for their parameters defined). If no such default value is provided then the selection is left empty initially.
Report by aliasThis type of data source represents an entity report that has been contributed to Product 360 via the extension mechanism and is available via the REST interface of the Product 360 server. The REST interface supports browsing for available reports and parameters. For example the available reports for returning a set of articles can be viewed at http://<pim.server>:1501/rest/V1.0/list/Article/info. Clicking on the report name provides the list of parameters that can be used.
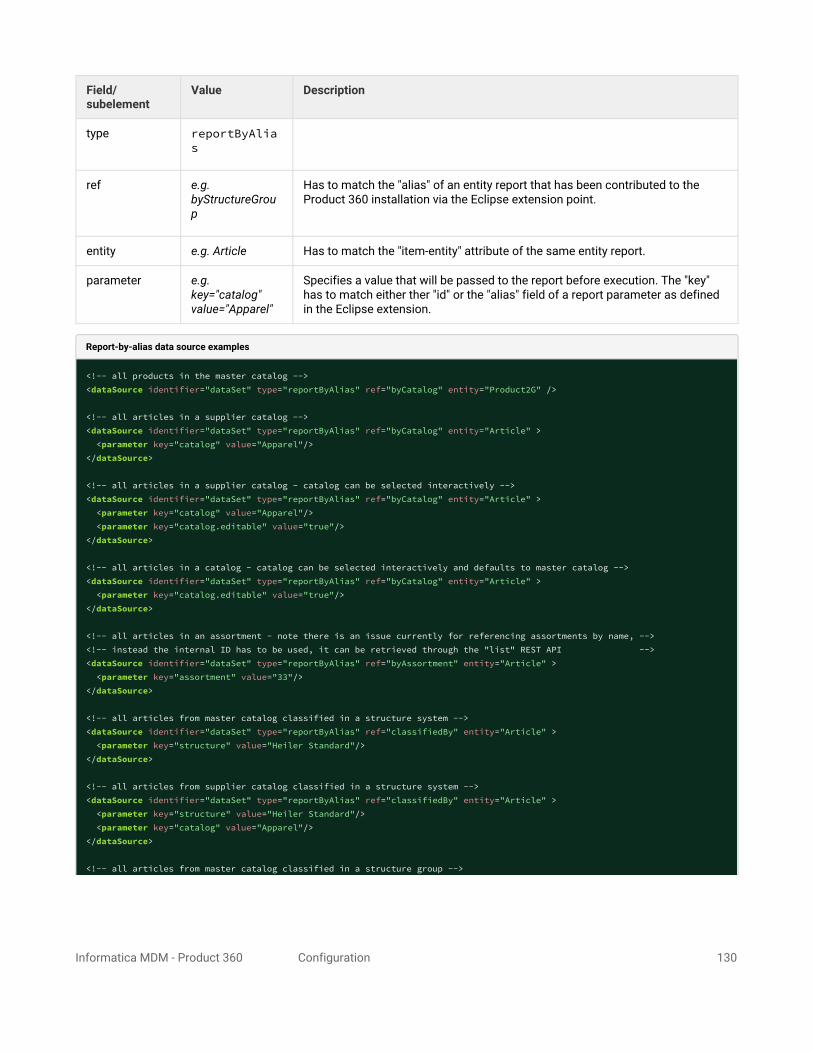
Informatica MDM - Product 360 Configuration 130
Field/subelement
Value Description
type reportByAlias
ref e.g. byStructureGroup
Has to match the "alias" of an entity report that has been contributed to the Product 360 installation via the Eclipse extension point.
entity e.g. Article Has to match the "item-entity" attribute of the same entity report.
parameter e.g. key="catalog" value="Apparel"
Specifies a value that will be passed to the report before execution. The "key" has to match either ther "id" or the "alias" field of a report parameter as defined in the Eclipse extension.
Report-by-alias data source examples
<!-- all products in the master catalog --><dataSource identifier="dataSet" type="reportByAlias" ref="byCatalog" entity="Product2G" /> <!-- all articles in a supplier catalog --><dataSource identifier="dataSet" type="reportByAlias" ref="byCatalog" entity="Article" > <parameter key="catalog" value="Apparel"/></dataSource> <!-- all articles in a supplier catalog - catalog can be selected interactively --><dataSource identifier="dataSet" type="reportByAlias" ref="byCatalog" entity="Article" > <parameter key="catalog" value="Apparel"/> <parameter key="catalog.editable" value="true"/></dataSource> <!-- all articles in a catalog - catalog can be selected interactively and defaults to master catalog --><dataSource identifier="dataSet" type="reportByAlias" ref="byCatalog" entity="Article" > <parameter key="catalog.editable" value="true"/></dataSource> <!-- all articles in an assortment - note there is an issue currently for referencing assortments by name, --> <!-- instead the internal ID has to be used, it can be retrieved through the "list" REST API --><dataSource identifier="dataSet" type="reportByAlias" ref="byAssortment" entity="Article" > <parameter key="assortment" value="33"/></dataSource> <!-- all articles from master catalog classified in a structure system --><dataSource identifier="dataSet" type="reportByAlias" ref="classifiedBy" entity="Article" > <parameter key="structure" value="Heiler Standard"/></dataSource> <!-- all articles from supplier catalog classified in a structure system --><dataSource identifier="dataSet" type="reportByAlias" ref="classifiedBy" entity="Article" > <parameter key="structure" value="Heiler Standard"/> <parameter key="catalog" value="Apparel"/></dataSource> <!-- all articles from master catalog classified in a structure group -->

Informatica MDM - Product 360 Configuration 131
<dataSource identifier="dataSet" type="reportByAlias" ref="byStructureGroup" entity="Article" > <parameter key="structureGroup" value="'GROUP_1'@'HeilerStandard'"/></dataSource> <!-- add hoc search - all articles in a specific segment and with a price in a specific price range, --> <!-- note that the 'less than' sign had to be encoded as it is not allowed in XML attribute values --><!-- Note that most field qualifications use the default from the repository. They could be of course --> <!-- also specified directly here - e.g. looking at the segment in German and comparing against the --><!-- prices in Euro in Germany, etc. --><dataSource identifier="dataSet" type="reportByAlias" ref="bySearch" entity="Article" > <parameter key="query" value="ArticleLang.Segment(${Default}) = Segment01 and ArticlePriceValuePurchase.Amount(${Default},${Default},${Default},${Default},${Default},1.0) > 60 and ArticlePriceValuePurchase.Amount(${Default},${Default},${Default},${Default},${Default},1.0) < 90"/></dataSource>
Report by IDThis type of data source also represents an entity report that has been contributed to Product 360 via the extension mechanism. The only difference is that it can also be used to access reports that have not been made available via the REST interface.
Field/subelement
Value Description
type reportById
ref e.g. com.heiler.ppm.article.core.ArticlesOfStrucureGroup
Has to match the "id" of an entity report that has been contributed to the Product 360 installation via the Eclipse extension point.
parameter e.g. key="catalog" value="Apparel"
Specifies a value that will be passed to the report before execution. The "key" has to match either ther "id" or the "alias" field of a report parameter as defined in the contribution to the Eclipse extension point.
Report-by-ID data source examples
<!-- ***** Simple data source without parameters --><!-- All articles in the master catalog --><dataSource identifier="dataSet" type="reportById" ref="com.heiler.ppm.article.core.ArticlesOfMasterCatalog" /> <!-- ***** Data sources with parameters --> <!-- All articles of a supplier catalog --><dataSource identifier="dataSet" type="reportById" ref="com.heiler.ppm.article.core.ArticlesOfSupplierCatalog"> <parameter key="SupplierCatalog" value="Apparel" /></dataSource> <!-- All articles of an assortment --><dataSource identifier="dataSet" type="reportById" ref="com.heiler.ppm.article.assortment.core.ArticlesOfAssortment"> <parameter key="Assortment" value="MyAssortment" /></dataSource> <!-- All articles from master catalog classified within a structure system --><dataSource identifier="dataSet" type="reportById" ref="com.heiler.ppm.article.core.SupplierArticlesClassifiedTo">

Informatica MDM - Product 360 Configuration 132
<parameter key="Structure" value="HeilerStandard" /></dataSource> <!-- All articles from master catalog classified to a specific structure group --><dataSource identifier="dataSet" type="reportById" ref="com.heiler.ppm.article.core.ArticlesOfStrucureGroup"> <parameter key="StructureGroupID" value="'GROUP_1'@'HeilerStandard'" /></dataSource> <!-- ***** data source with multiple parameters --> <dataSource identifier="dataSet" type="reportById" ref="com.heiler.ppm.article.core.MasterArticlesClassifiedTo"> <parameter key="Catalog" value="1" /> <parameter key="Structure" value="HeilerStandard" /></dataSource> <!-- ***** data source with an editable parameter --> <dataSource identifier="dataSet" type="reportById" ref="com.heiler.ppm.article.core.MasterArticlesClassifiedTo"> <parameter key="Catalog" value="1" /> <parameter key="Catalog.editable" value="true" /> <parameter key="Structure" value="HeilerStandard" /></dataSource>
Saved searchesWithin the rich client users can build search expressions and store them as saved searches for later use in either the rich or the web client. This type of data source enables access to such saved searches in flexible UIs.
Note that neither specifying parameter values nor editing of parameter values is supported. Parameter values for a saved search should be provided in Product 360 Desktop when it is created.
Field/sublement Value Description
type savedSearch
ref e.g. SearchName Has to match the name of the saved search.
entity e.g. Article Has to match the "item-entity" attribute of the saved query.
Saved search data source example
<dataSource identifier="dataSet" type="savedSearch" ref="AllItemsEditedByMe" entity="Article" />
6.6.4 ComponentsA component displays some specific information within a flexible UI and may also offer some actions to work with the displayed data. Most components are defined using the component tag. In general the structure of a component definition is as follows.
Setting Location
Description
type attribute
Defines what type of component this is. The following chapters provide a list of all available component types.

Informatica MDM - Product 360 Configuration 133
Setting Location
Description
identifier
attribute
Defines a unique name for the component in the scope of this flexible UI.
i18NKey
attribute
Provides the title for the component which will be displayed in its header. The title is rendered as provided, localization via properties files is not supported in the initial release.
layoutData
nested tag
Specifies any layout specific parameters for this component - see section on layout at the beginning of this page.
dataSource
nested tags
Specifies any data source parameters that are needed/supported by the component type. See section for specific component for details.
parameter
nested tags
Specifies any parameters that are needed/supported by the component type. See section for specific component for details.
There are a few exceptions to this:
• The group component has its own tag and is not really a component in its own right. As described above it combines multiple components for layout purposes.Groups only have their own tag so no type attribute is needed. There is also no identifier, no header and no nested data sources. Layout data and nested parameters are supported.
• The form component and the list component have specialized content defining in detail which Product 360 data fields are displayed.
Note that all following examples of component definitions omit the layoutData tag. See the section on layouts on how to fine-tune the appearance of each component.
6.6.5 Dashboard componentsDashboards generally do not require any global data source in contrast to flexible task UI components which may rely on the data source implicitly defined by the task that is displayed. All dashboard components may also be used in task UI templates.
Message box componentDisplays a fixed message.
Type: messageBox
Parameter name M(andatory)O(ptional)
Example values Description
message M The quick brown fox jumps over the lazy dog.
Specifies the text that will be displayed.
Message box example
<component type="messageBox" identifier="message1" i18NKey="Greetings"> <parameter key="message" value="Hello, world!"/></component>
System message componentDisplays active system messages. If the user has appropriate permissions it also supports adding new system messages.

Informatica MDM - Product 360 Configuration 134
Type: systemMessage
System message example
<component type="systemMessage" identifier="system1" i18NKey="System messages"></component>
iFrame componentDisplays an external web page on the dashboard within a limited area occupied by the component. Note that no content will be displayed if the publisher of the external page does not allow it to be displayed in a frame.
Type: iframe
Parameter name
M(andatory)O(ptional)
Example values Description
url M https://www.google.com/maps/embed?pb=!1m18!1m12!1m3!1d3164.8565...14244
https://www.youtube.com/embed/UJW0VDJoAas
Specifies the URL for the web page that will be displayed.
iFrame example
<component type="iframe" identifier="googlemaps" i18NKey="Informatica Headquarters"> <parameter key="url" value="https://www.google.com/maps/embed?pb=!1m14!1m8!1m3!1d12659.780154317712!2d-122.19728541031158!3d37.509214421263046!3m2!1i1024!2i768!4f13.1!3m3!1m2!1s0x808fa2f5dfdc5097%3A0xc479e59839708591!2sInformatica+Corporation!5e0!3m2!1sde!2sde!4v1427979234929" /></component>
Barchart componentDisplays a horizontal barchart that shows the distribution of values for a specified field in the specified set of data. The set is specified by an embedded data source. The field is specified using the Service API syntax for Product 360 fields and has to match the type of entity items that are provided by the data source (for instance it makes no sense to group the values of a product specific field when the underlying data is a set of articles).
Throughout the data set the occurrence of each value is counted and displayed as a bar with the bar label being the value and the bar length being in proportion to the number of occurrences of this value. For example if the field that is looked at is the "segment" and there are 255 articles in the data source that have "Consumer Electronics" as the value for the "segment field", then there will be a bar labelled "Consumer Electronics" and the size of the bar will reflect the number 255.
Regarding the bar sizes, the longest bar (i.e. largest occurrence count) will occupy the available space horizontally and the other bars will be drawn in proportion to it.
By clicking on a bar the user can switch to a table view of the items that are represented by that bar.
Type: barchart

Informatica MDM - Product 360 Configuration 135
Data source name M(andatory)O(ptional)
Description
dataSet M Specifies the data set. The barchart component supports combo boxes for editable data source parameters (see above).
Parameter name
M(andatory)O(ptional)
Example values
Description
groupingField
M Article.CurrentStatus
Product2GLang.Segment(de_DE)
Article.Status->QualityStatusSummary.Status(${Default})
Specifies a Product 360 field in Service API syntax. The entity holding this field must match the entities provided by the dataSet data source.
If the path to the subentity holding the field requires qualifications they are provided in a comma separated list at the end of the field name. If any of the qualifications have default definitions in the repository then those can be used by providing the special string "${Default}" instead of an actual value for the qualification.
groupingField.lkn.editable
O true
false(default)
Specifies whether the nth (starting at 0) qualification of the field should be made available as a drop down box in the UI so the user can switch between e.g. the segment field in English or German on the fly. By default no combo boxes for qualifications are displayed.
Note that for this to work the respective Product 360 qualification field has to have an enumeration assigned to it.
numValueBuckets
O 10
5
For some fields it does not make sense to count the appearance of each individual value as there would be too many bars (e.g. item prices). For such fields the values can be split into buckets and all values in a bucket are counted together (e.g. all item prices between 50 and 100).
Currently this behaviour is only available for all fields of type BigDecimal and Long. The buckets are defined by taking into account the minimum and maximum values of the data set. Furthermore the bucket boundaries are also aligned to a well readable raster e.g. 1, 2.5, 5, 7.5, 10, ... The granularity of the chosen raster depends on the distance between min and max and also on the number of buckets to create as specified by this parameter. The actual number of created buckets may be less than specified due to the imposed raster.
The lowest bucket always contains the minimum and the highest always contains the maximum value.

Informatica MDM - Product 360 Configuration 136
Parameter name
M(andatory)O(ptional)
Example values
Description
showBlankEntries
O true(default)
false
Specifies whether there should also be bars of size zero for values that were not present in the data set but within the range of expected values. This of course only works if there is a set of expected values for the field specified as groupingField - which is the case if:
the field type is boolean (true, false)the field type is tri-state booelan (true, false, unknown)the field has an enumeration assigned to it in the Product 360 repositorythe field type is BigDecimal or Long and numValueBuckets has been specifiedthe field includes the BPM workflow as one its qualifiers and it is marked in the Product 360 repository - as a result the possible status values of the respective workflow are then used as expected values
showNullValues
O true(default)
false
Specifies whether the item count for items with missing/null values should be shown as a separate bar labelled "<No input>" or not.Note that pointers to deleted data are also considered to be null values. For instance an article keeps record of the user that created it. If that user has been marked as deleted in the meantime, this field will be treated as missing/null.

Informatica MDM - Product 360 Configuration 137
Parameter name
M(andatory)O(ptional)
Example values
Description
barChartColor
O red, blue, green, black
#000000
(black), #399bf9(blue)
rbg(255, 0, 255)(magenta)
Default color is the theme-based color descriped in dashboard.css in style class:
.hpmw-horizontal-barchart-widget
Specifies the color of the bars. Valid values are either CSS standard color names like red, blue, green, black. The CSS standard colors are defined here: http://www.w3.org/TR/CSS21/syndata.html#value-def-color.
Or CSS-style rgb(x,y,z) values, where x,y,z must be values between 0 .. 255 .
Or hexcoded colors like #000000 for black or #399bf9 for blue can be used.
The longest bar will use this color directly and shorter bars will be drawn with a lighter color - the shorter the bar, the lighter the color.
Barchart examples
<!-- mandatory parameters only --><component type="barchart" identifier="chart1" i18NKey="Product Status in Master Catalog"> <parameter key="groupingField" value="Product2G.CurrentStatus"/> <dataSource identifier="dataSet" type="reportById" ref="com.heiler.ppm.product2g.core.ProductsOfCatalog"/></component> <!-- show bars of size 0 for the status values that are not used in any product --><component type="barchart" identifier="chart1" i18NKey="Product Status in Master Catalog"> <parameter key="groupingField" value="Product2G.CurrentStatus"/> <parameter key="showBlankEntries" value="true"/> <dataSource identifier="dataSet" type="reportById" ref="com.heiler.ppm.product2g.core.ProductsOfCatalog"/></component> <!-- qualified grouping field with editable qualification specifiying the language -->

Informatica MDM - Product 360 Configuration 138
<!-- show a bar with the count of all articles that do not have any short description in the given language --><component type="barchart" identifier="chart2" i18NKey="Article Short Desc in Master Catalog"> <parameter key="groupingField" value="ArticleLang.DescriptionShort(${Default})"/> <parameter key="groupingField.lk0.editable" value="true" /> <parameter key="showNullValues" value="true"/> <dataSource identifier="dataSet" type="reportById" ref="com.heiler.ppm.article.core.ArticlesOfMasterCatalog"/></component> <!-- report with an editable parameter and a different color for the bars --><component type="barchart" identifier="chart3" i18NKey="Articles by Segment in specified catalog (default: Apparel)"> <parameter key="groupingField" value="ArticleLang.Segment(${Default})"/> <parameter key="barChartColor" value="rgb(34,45,78)"/> <dataSource identifier="dataSet" type="reportByAlias" ref="byCatalog" entity="Article" > <parameter key="catalog" value="Apparel"/> <parameter key="catalog.editable" value="true"/> </dataSource></component> <!-- display the distribution of article prices in buckets --><component type="barchart" identifier="chart3" i18NKey="Article Prices in Master Catalog"> <parameter key="groupingField" value="ArticlePriceValuePurchase.Amount(${Default},${Default},${Default},${Default},${Default},1.0)"/> <parameter key="numValueBuckets" value="10"/> <!-- maximum number of buckets is 10 --> <parameter key="showBlankEntries" value="true"/> <!-- show all buckets, even empty ones --> <parameter key="showNullValues" value="true"/> <!-- show a bar with the articles that don't have a price set up --> <dataSource identifier="dataSet" type="reportById" ref="com.heiler.ppm.article.core.ArticlesOfMasterCatalog"/></component>
Piechart componentDisplays a round pie chart that shows the distribution of values for a specified field in the specified set of data. The set is specified by an embedded data source. The semantics are very similar to the Barchart, just the presentation differs. Also, there are some additional options available as described below.
As for the Barchart component, by clicking on a pie section the user can switch to a table view of the items that are represented by that section.
Type: piechart
Data source name M(andatory)O(ptional)
Description
dataSet M Specifies the data set. The barchart component supports combo boxes for editable data source parameters (see above).

Informatica MDM - Product 360 Configuration 139
Parameter name
M(andatory)O(ptional)
Example values
Description
groupingField
M Article.CurrentStatus
Product2GLang.Segment(de_DE)
Article.Status->QualityStatusSummary.Status(${Default})
Specifies a Product 360 field in Service API syntax. The entity holding this field must match the entities provided by the dataSet data source.
If the path to the subentity holding the field requires qualifications they are provided in a comma separated list at the end of the field name. If any of the qualifications have default definitions in the repository then those can be used by providing the special string "${Default}" instead of an actual value for the qualification.
groupingField.lkn.editable
O true
false(default)
Specifies whether the nth (starting at 0) qualification of the field should be made available as a drop down box in the UI so the user can switch between e.g. the segment field in English or German on the fly. By default no combo boxes for qualifications are displayed.
Note that for this to work the respective Product 360 qualification field has to have an enumeration assigned to it.
numValueBuckets
O 10
5
For some fields it does not make sense to count the appearance of each individual value as there would be too many sections (e.g. item prices). For such fields the values can be split into buckets and all values in a bucket are counted together (e.g. all item prices between 50 and 100).
Currently this behaviour is only available for all fields of type BigDecimal and Long. The buckets are defined by taking into account the minimum and maximum values of the data set. Furthermore the bucket boundaries are also aligned to a well readable raster e.g. 1, 2.5, 5, 7.5, 10, ... The granularity of the chosen raster depends on the distance between min and max and also on the number of buckets to create as specified by this parameter. The actual number of created buckets may be less than specified due to the imposed raster.
The lowest bucket always contains the minimum and the highest always contains the maximum value.
maxNumberOfEntries
O 10 (default)
Space is limited and rendering a pie chart with too many sections breaks up the layout. Hence, the maximum number of sections is limited.

Informatica MDM - Product 360 Configuration 140
Parameter name
M(andatory)O(ptional)
Example values
Description
showLegend
O true
false (default)
Toggles the visibility of a legend that lists all captions for each of the values.
showNullValues
O true(default)
false
Specifies whether the item count for items with missing/null values should be shown as a separate bar labelled "<No input>" or not.Note that pointers to deleted data are also considered to be null values. For instance an article keeps record of the user that created it. If that user has been marked as deleted in the meantime, this field will be treated as missing/null.
colors O red, blue, green, black
#000000
(black), #399bf9(blue)
rbg(255, 0, 255)(magenta)
List of colors used for coloring the sections. Colors are separated by semicolon ";".
Valid values are either CSS standard color names like red, blue, green, black. The CSS standard colors are defined here: http://www.w3.org/TR/CSS21/syndata.html#value-def-color.
Or CSS-style rgb(x,y,z) values, where x,y,z must be values between 0 .. 255 .
Or hexcoded colors like #000000 for black or #399bf9 for blue can be used.
Piechart examples
<!-- mandatory parameters only --><component type="piechart" identifier="chart1" i18NKey="Product Status in Master Catalog"> <parameter key="groupingField" value="Product2G.CurrentStatus"/> <dataSource identifier="dataSet" type="reportById" ref="com.heiler.ppm.product2g.core.ProductsOfCatalog"/></component> <!-- pie chart with legend and custom colors --><component i18NKey="Product Status in Master Catalog" identifier="pie1" type="piechart"> <parameter key="groupingField" value="Product2G.CurrentStatus"/> <parameter key="showLegend" value="true"/> <parameter key="colors" value="red;blue;green;pink"/> <dataSource identifier="dataSet" ref="com.heiler.ppm.product2g.core.ProductsOfCatalog" type="reportById"/></component>
Channel status componentDisplays the result of Data Quality checks for the entity items specified by the dataSet data source. On the left hand side a list of channels (defined by the channelIdentifiers parameter) is displayed alongside the aggregated quality status counts
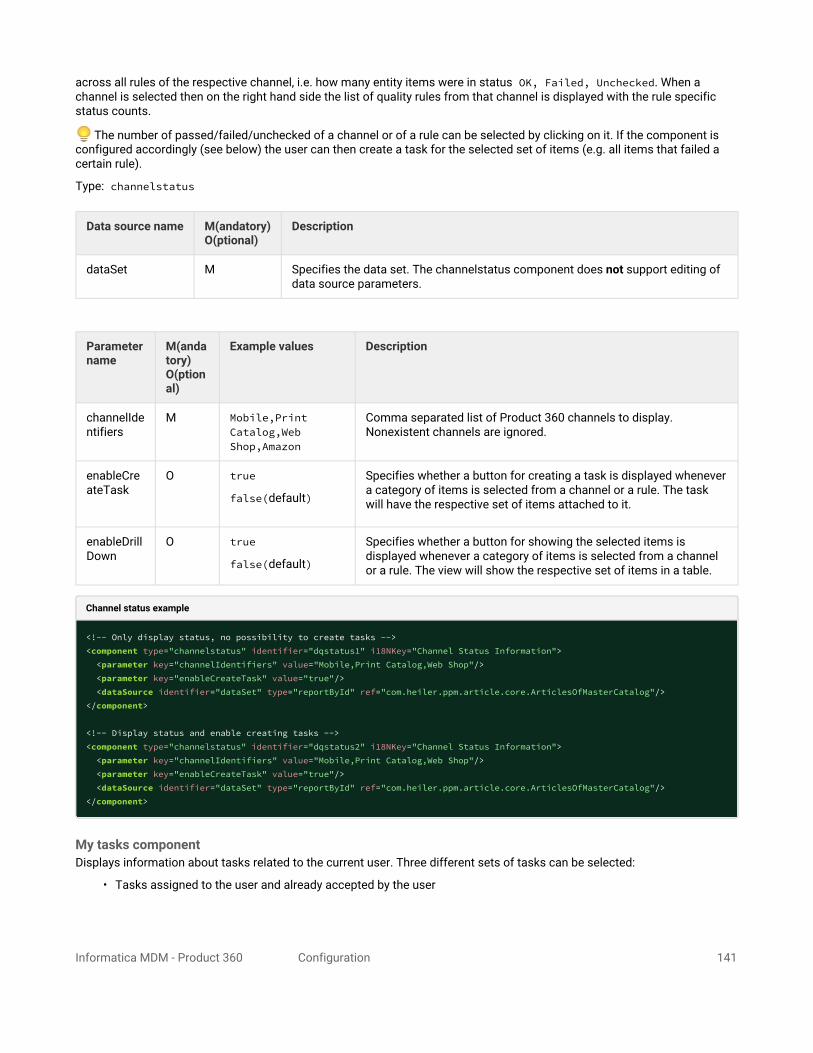
Informatica MDM - Product 360 Configuration 141
across all rules of the respective channel, i.e. how many entity items were in status OK, Failed, Unchecked. When a channel is selected then on the right hand side the list of quality rules from that channel is displayed with the rule specific status counts.
The number of passed/failed/unchecked of a channel or of a rule can be selected by clicking on it. If the component is configured accordingly (see below) the user can then create a task for the selected set of items (e.g. all items that failed a certain rule).
Type: channelstatus
Data source name M(andatory)O(ptional)
Description
dataSet M Specifies the data set. The channelstatus component does not support editing of data source parameters.
Parameter name
M(andatory)O(ptional)
Example values Description
channelIdentifiers
M Mobile,Print Catalog,Web Shop,Amazon
Comma separated list of Product 360 channels to display. Nonexistent channels are ignored.
enableCreateTask
O true
false(default)
Specifies whether a button for creating a task is displayed whenever a category of items is selected from a channel or a rule. The task will have the respective set of items attached to it.
enableDrillDown
O true
false(default)
Specifies whether a button for showing the selected items is displayed whenever a category of items is selected from a channel or a rule. The view will show the respective set of items in a table.
Channel status example
<!-- Only display status, no possibility to create tasks --><component type="channelstatus" identifier="dqstatus1" i18NKey="Channel Status Information"> <parameter key="channelIdentifiers" value="Mobile,Print Catalog,Web Shop"/> <parameter key="enableCreateTask" value="true"/> <dataSource identifier="dataSet" type="reportById" ref="com.heiler.ppm.article.core.ArticlesOfMasterCatalog"/></component> <!-- Display status and enable creating tasks --><component type="channelstatus" identifier="dqstatus2" i18NKey="Channel Status Information"> <parameter key="channelIdentifiers" value="Mobile,Print Catalog,Web Shop"/> <parameter key="enableCreateTask" value="true"/> <dataSource identifier="dataSet" type="reportById" ref="com.heiler.ppm.article.core.ArticlesOfMasterCatalog"/></component>
My tasks componentDisplays information about tasks related to the current user. Three different sets of tasks can be selected:
• Tasks assigned to the user and already accepted by the user

Informatica MDM - Product 360 Configuration 142
• Tasks assigned to the user or one of his/her user groups that have not yet been accepted• Tasks assigned to other users or user groups for which the current user is the "responsible" person.
The user can click on a task title which will either open the task UI of the task (if it is set), present the list of attached items of the task (if there are any) or just display the task details.
When displaying the tasks that the user is responsible for he/she can click on the envelope next to the assignee's name to open the local email client and send an email regarding the task to the assignee The envelope is available if the assignee is a single user (not a group) and Product 360 has been set up with an email address for this user.
Type: mytasks
Parameter name
M(andatory)O(ptional)
Example values Description
initialSet O accepted (default)notAcceptedmyResponsibilities
Specifies which set of tasks is initially displayed in the component. The value is case insensitive. Unknown values are ignored and the default is used instead.
mode O all (default)
workflow
allFixed
workflowFixed
Specifies in which mode the component should operate. There are two modes:
• Displaying both normal and workflow tasks.• Displaying only workflow tasks and offering additional filtering
capabilities
If set to "all" or "workflow" the mode specifies the initial mode and the user still has the possibility to change it in the UI.
If set to "allFixed" or "workflowFixed" the mode is set accordingly and the user cannot change it.
If no BPM server is configured the default mode is allFixed and this will override any setting in the template.
filterByName
O truefalse (default)
If set to true a text field is added in the component header. If the user enters some text in this field the task list is filtered down to those tasks that include the text in their name.
MyTasks examples
<!-- all parameters are optional --><component type="mytasks" identifier="mytasks1" i18NKey="My Tasks" /> <component type="mytasks" identifier="mytasks2" i18NKey="My Tasks"> <parameter key="initialSet" value="notAccepted" /> <parameter key="mode" value="allFixed" /> <parameter key="filterByName" value="true" /></component>

Informatica MDM - Product 360 Configuration 143
Team tasks componentDisplays information about tasks related to members of the user's user groups. If the user has more than one user group assigned a combo box is displayed which can be used to filter the tasks so that only tasks for that group and its members are displayed.
The user can click on a task title which will either open the task UI of the task (if it is set), present the list of attached items of the task (if there are any) or just display the task details.
The user can click on the envelope next to the assignee's name to open the local email client and send an email regarding the task to the assigned. The envelope is available if the assignee is a single user (not a group) and Product 360 has been set up with an email address for this user.
Type: teamtasks
Parameter name
M(andatory)O(ptional)
Example values
Description
mode O all (default)
workflow
allFixed
workflowFixed
Specifies in which mode the component should operate. There are two modes:
• Displaying both normal and workflow tasks.• Displaying only workflow tasks and offering additional filtering capabilities
If set to "all" or "workflow" the mode specifies the initial mode and the user still has the possibility to change it in the UI.
If set to "all_fixed" or "workflow_fixed" the mode is set accordingly and the user cannot change it.
If no BPM server is configured the default mode is allFixed and this will override any setting in the template.
includeGroups
O group1, group2
Comma separated list of user groups that should be considered when adding tasks to the table. By default all user groups of the current user are considered.
The provided list is sanitized against the list of user groups of the current user. Unknown groups and groups that the user does not belong to are ignored.
excludeGroups
O group1, group2
Comma separated list of user groups that should be ignored when adding tasks to the table. By default no user groups are ignored. If the includeGroups option is also present the excludeGroups are applied afterwards, i.e. if a group appears in both lists it will be ignored due to excludeGroups being applied at the end.
The provided list is sanitized against the list of user groups of the current user. Unknown groups and groups that the user does not belong to are ignored.
completedTasksDaysLimit
O 5 (default)
10
-1
Completed tasks are also shown but only if they have been completed in the last couple of days. The actual number of days can be defined with this parameter. The number should be greater or equal to -1 - with -1 meaning "do not display completed tasks".

Informatica MDM - Product 360 Configuration 144
Parameter name
M(andatory)O(ptional)
Example values
Description
filterByName
O truefalse(default)
If set to true a text field is added in the component header. If the user enters some text in this field the task list is filtered down to those tasks that include the text in their name.
userAssignedTasks
O true(default)false
Indicates whether tasks assigned to users of the user groups should also be listed or if only tasks directly assigned to the user groups are taken into consideration.
Team tasks examples
<!-- start in mode "all", show tasks for all user groups of the logged in user, include completed tasks of the last 5 days --><component type="teamtasks" identifier="teamtasks1" i18NKey="Team Tasks"> <!-- restrict mode and only include the groups specified here, do not show user assigned tasks, only user group assigned tasks --><component type="teamtasks" identifier="teamtasks2" i18NKey="Team Tasks"> <parameter key="groups" value="PriceMaintainers, SuperUsers" /> <parameter key="mode" value="allFixed" /> <parameter key="userAssignedTasks" value="false" /></component> <!-- only include all user groups of the logged in user that are not listed here, extend time window for completed tasks and add a filter by name field --><component type="teamtasks" identifier="teamtasks3" i18NKey="Team Tasks"> <parameter key="excludeGroups" value="DashboardAdmins" /> <parameter key="completedTasksDaysLimit" value="10" /> <parameter key="filterByName" value="true" /></component>
Supplier Portal Timeline componentDisplays an the Product 360 Supplier Portal timeline as widget. Can be used for supplier communication and to get an overview on recent supplier activities.
Type: timeline

Informatica MDM - Product 360 Configuration 145
Parameter name
M(andatory)O(ptional)
Example values Description
hsxWebappUrl M http://localhost:9090/hsx
Root url pointing to a running Supplier Portal application. If application runs behind a load balancer/reverse proxy, use externally visible url.
Technically this component uses an iFrame to display the Timeline.
Supplier portal timeline example
<component type="timeline"> <parameter key="hsxWebappUrl" value="http://portalserver:9090/hsx"/></component>
Workflow KPI componentDisplays persisted KPI values that are the result a KPI calculation as described in the Knowledge Base documentation for the Standard KPI 'Average Time Spent In Workflow States'.
In order to show the calculated KPI values in the Web UI, the customer has to add a dashboard component of the type "workflowProcessKPI".The component displays KPI values for certain parameters. The tool tip of the KPI value bar chart shows the corresponding object count.Parameters which are selectable via Combobox are:
• KPI Identifier of the desired Workflow Process KPI• Catalog filter (All or specific catalog)• Time period (see preSelectionCurrentTimePeriod parameter in table below for possible values)• Comparison time period dependent of the previously selected time period (see preSelectionPreviousTimePeriod
parameter for possible values)
The WorkflowProcessCalculationConfig.xml configuration file mentioned in the Knowledge Base documentation for Standard KPI 'Average Time Spent In Workflow States' also has to be configured furthermore to show the KPI values in the Web UI:
• Each kpi element must have a sub element displayName with a particular display name in order to be clearly recognizable in the UI by the customer.
• The state element can have a sub element 'allowedValue' which helps the customer to compare the calculated KPI Values with the corresponding allowed value. This allowed value provides useful information to interpret the calcalated KPI values and to identify possible problems within the workflow.
There are several component parameters to define the preselection value of the combobox parameters.
Parameter name
M(andatory) O(ptional)
Example values
Description
preSelectionKPI
O Specifies the preselected value of Workflow Process KPI combobox. Valid values are the KPI identifier or its displayName which is defined in the above mentioned configuration xml file.

Informatica MDM - Product 360 Configuration 146
Parameter name
M(andatory) O(ptional)
Example values
Description
preSelectionCatalog
O MASTER
MySupplierCatalogIdentifier
Specifies the preselected value of catalog combobox. Valid values are the catalog identifier of a supplier catalog, or "MASTER" for master catalog.
preSelectionCurrentTimePeriod
O CurrentDay
Specifies the preselected value of current time period combobox. Valid values are the following identifiers or its language specified display name:
identifier display name (in english)
CurrentDay Current day
CurrentWeek Current month
CurrentMonth Current week
CurrentYear Current year
The language dependent display name should only be used, if all users login with the same language, since preselection then only works with this specific language. Therefor the identifier is recommended to be used.
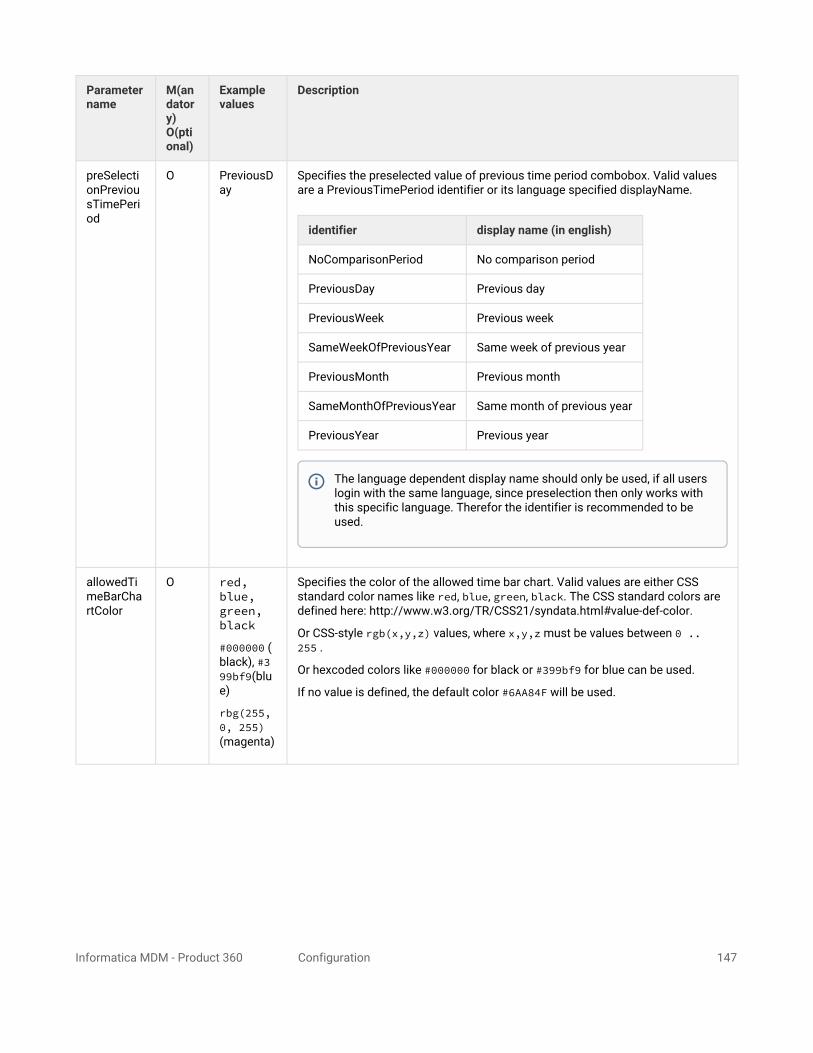
Informatica MDM - Product 360 Configuration 147
Parameter name
M(andatory) O(ptional)
Example values
Description
preSelectionPreviousTimePeriod
O PreviousDay
Specifies the preselected value of previous time period combobox. Valid values are a PreviousTimePeriod identifier or its language specified displayName.
identifier display name (in english)
NoComparisonPeriod No comparison period
PreviousDay Previous day
PreviousWeek Previous week
SameWeekOfPreviousYear Same week of previous year
PreviousMonth Previous month
SameMonthOfPreviousYear Same month of previous year
PreviousYear Previous year
allowedTimeBarChartColor
O red, blue, green, black
#000000 (black), #399bf9(blue)
rbg(255, 0, 255)(magenta)
Specifies the color of the allowed time bar chart. Valid values are either CSS standard color names like red, blue, green, black. The CSS standard colors are defined here: http://www.w3.org/TR/CSS21/syndata.html#value-def-color.
Or CSS-style rgb(x,y,z) values, where x,y,z must be values between 0 .. 255 .
Or hexcoded colors like #000000 for black or #399bf9 for blue can be used.
If no value is defined, the default color #6AA84F will be used.
The language dependent display name should only be used, if all users login with the same language, since preselection then only works with this specific language. Therefor the identifier is recommended to be used.
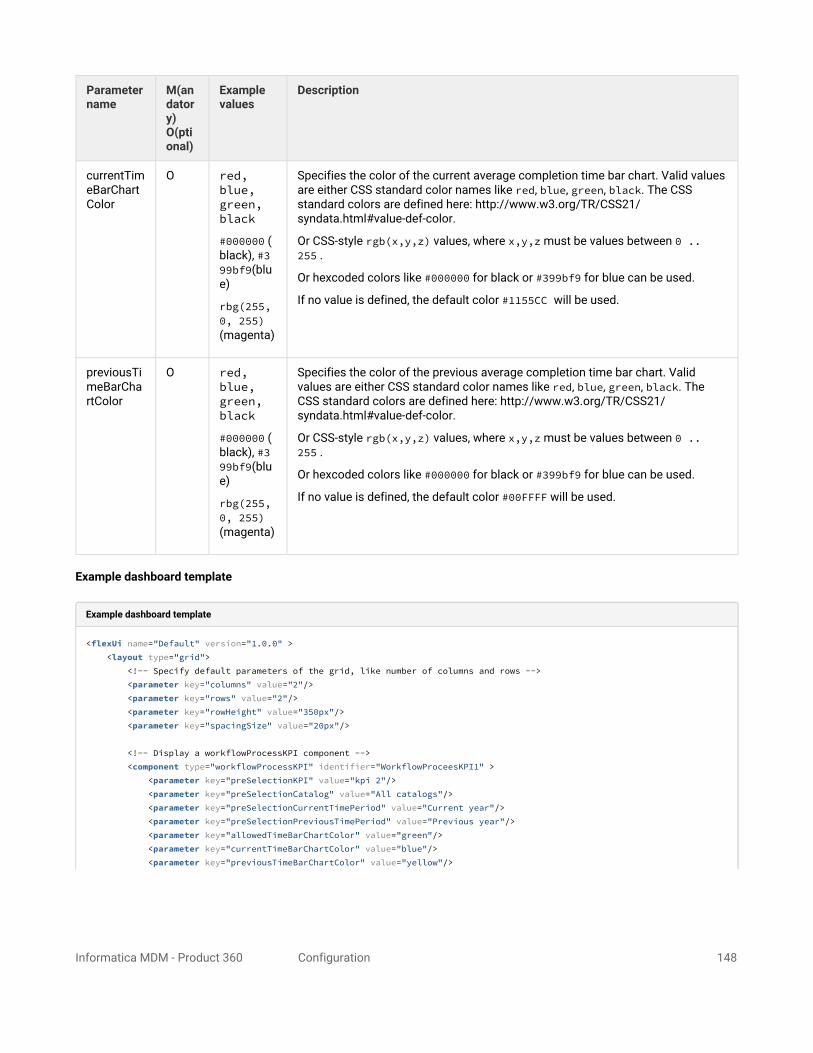
Informatica MDM - Product 360 Configuration 148
Parameter name
M(andatory) O(ptional)
Example values
Description
currentTimeBarChartColor
O red, blue, green, black
#000000 (black), #399bf9(blue)
rbg(255, 0, 255)(magenta)
Specifies the color of the current average completion time bar chart. Valid values are either CSS standard color names like red, blue, green, black. The CSS standard colors are defined here: http://www.w3.org/TR/CSS21/syndata.html#value-def-color.
Or CSS-style rgb(x,y,z) values, where x,y,z must be values between 0 .. 255 .
Or hexcoded colors like #000000 for black or #399bf9 for blue can be used.
If no value is defined, the default color #1155CC will be used.
previousTimeBarChartColor
O red, blue, green, black
#000000 (black), #399bf9(blue)
rbg(255, 0, 255)(magenta)
Specifies the color of the previous average completion time bar chart. Valid values are either CSS standard color names like red, blue, green, black. The CSS standard colors are defined here: http://www.w3.org/TR/CSS21/syndata.html#value-def-color.
Or CSS-style rgb(x,y,z) values, where x,y,z must be values between 0 .. 255 .
Or hexcoded colors like #000000 for black or #399bf9 for blue can be used.
If no value is defined, the default color #00FFFF will be used.
Example dashboard template
Example dashboard template
<flexUi name="Default" version="1.0.0" > <layout type="grid"> <!-- Specify default parameters of the grid, like number of columns and rows --> <parameter key="columns" value="2"/> <parameter key="rows" value="2"/> <parameter key="rowHeight" value="350px"/> <parameter key="spacingSize" value="20px"/> <!-- Display a workflowProcessKPI component --> <component type="workflowProcessKPI" identifier="WorkflowProceesKPI1" > <parameter key="preSelectionKPI" value="kpi 2"/> <parameter key="preSelectionCatalog" value="All catalogs"/> <parameter key="preSelectionCurrentTimePeriod" value="Current year"/> <parameter key="preSelectionPreviousTimePeriod" value="Previous year"/> <parameter key="allowedTimeBarChartColor" value="green"/> <parameter key="currentTimeBarChartColor" value="blue"/> <parameter key="previousTimeBarChartColor" value="yellow"/>

Informatica MDM - Product 360 Configuration 149
</component> </layout></flexUi>
6.6.6Flexible task UI components
Data provisioning in task UIsIn contrast to dashboard components the data provisioning of task UI components is driven by the task to which the task UI template is applied. Three different aspects play a role here:
• Is the component simply displaying data for a "certain item" or is it displaying a table or list of "child items of a certain item" ?
• General components and forms display data for a certain item• List/table components display child items of a certain item
The definition of child items is rather broad in this context:• A task usually has a set of items attached to it - in this context for example some "Article" items can be
the children of a "Task" item.• A product may have variant children or article children (depending on the product paradigm in use)
underneath.• A structure group may have a mixture of product, variant and article children assigned to it which maps
to three distinct sets of child items.
• What entity does the "certain item" need to belong to in order to be suitable as input for a component ?• General components specify the applicable entity via the attribute rootEntity in the component tag. Leaving
this out means the component can handle any entity.• Form components specify the applicable entity through the rootEntity attribute of the nested fieldFormDefinition (see below for details).
• List/table components specify the entity of the child items through the rootEntity attribute of the nested listModelDefinition (see below for details).Whether or not a "certain item" is suitable as input for the component depends on whether it can provide child items matching this entity. For example a task item can be fed into a component displaying an article list only if the task has a set of child items with entity "Article".
• How is the "certain item" specified for a component ?• Statically through a parameter of the component in the XML
(e.g. a component displaying the structure groups of a structure system, with the actual structure system defined in the XML)
• At runtime through the task for which the task UI is displayed (e.g. a form displaying fields of the task)
• Dynamically through selections in other components (e.g. a form with details for an article listening to selection events in an article list)
So how does this all play toghether ?1. Each component gets initialized with its parameters. If this is all that a specific component needs, it's done
(e.g. a structure tree component with structure system as parameter)
2. Next the central task item that is currently displayed is forwarded to all components that indicate that they can handle it.
a. all components with rootEntity = Task

Informatica MDM - Product 360 Configuration 150
b. list based components with a rootEntity for which the task can provide a list of matching child items
3. Whenever a user selects one or more items in a list based component the selected item(s) is/are forwarded to all components that can handle the respective entity
a. all components with rootEntity set to the entity of the selected itemb. list based components with rootEntity for the selected item can provide a list of matching child items
(e.g. a list components displaying variants can be fed with a product item because the product can have variant child items)
Here is an example illustrating the data provisioning within a task UI. Details are omitted and the featured component types are fully documented further below.
Task UI data provisioning
<flexUi version="1.0.0"> <layout type="grid"> ... <!-- This form will receive the currently displayed task as input --> <form identifier="taskForm" i18NKey="Task: "> <fieldFormDefinition rootEntity="Task"> ... </fieldFormDefinition> </form> <!-- List also receives the id of the task as it has listenFor Task inside it --> <!-- and displays the attached items of the task. --> <!-- The rootEntity attribute specifies what kind of items this table can display. --> <!-- User selecting an article in the table will trigger a selection event --> <list i18NKey="Items"> <listenFor source="Task" type="initialEvent" /> <listModelDefinition rootEntity="Article"> ... </listModelDefinition> </list> <!-- This component will be updated with the selection events for Article --> <component identifier="preview1" type="preview" i18NKey="Detail" rootEntity="Article"> ... </component> <!-- This form will also be updated with the selection events for Article --> <form identifier="translationForm" i18NKey="Translate"> <fieldFormDefinition rootEntity="Article"> ... </fieldFormDefinition> </form> ... </layout></flexUi>
FilteringWhile the rules described so far cover most cases, it can be necessary to restrict the selection events that a component listens for. This can be achieved with the listenFor tag. Filtering can be set up regarding the source of events (component identifier) and/or the type of event. For now only one type of event (selectionEvent) is supported.
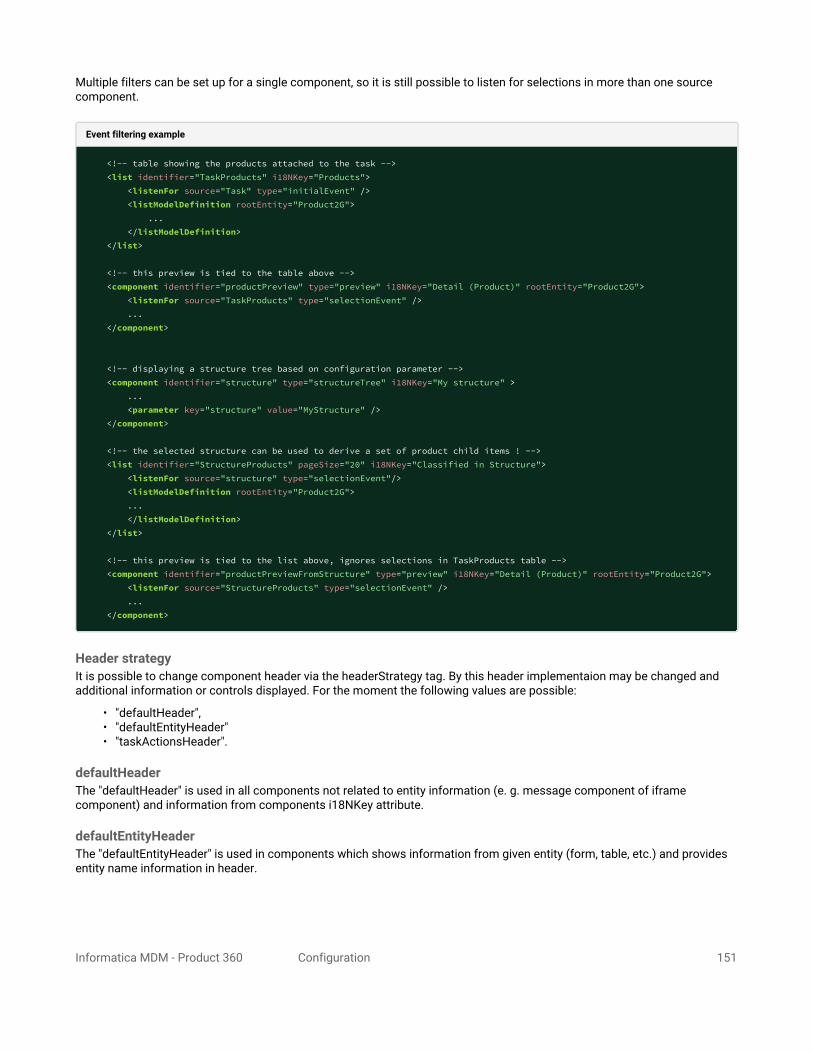
Informatica MDM - Product 360 Configuration 151
Multiple filters can be set up for a single component, so it is still possible to listen for selections in more than one source component.
Event filtering example
<!-- table showing the products attached to the task --> <list identifier="TaskProducts" i18NKey="Products"> <listenFor source="Task" type="initialEvent" /> <listModelDefinition rootEntity="Product2G"> ... </listModelDefinition> </list> <!-- this preview is tied to the table above --> <component identifier="productPreview" type="preview" i18NKey="Detail (Product)" rootEntity="Product2G"> <listenFor source="TaskProducts" type="selectionEvent" /> ... </component> <!-- displaying a structure tree based on configuration parameter --> <component identifier="structure" type="structureTree" i18NKey="My structure" > ... <parameter key="structure" value="MyStructure" /> </component> <!-- the selected structure can be used to derive a set of product child items ! --> <list identifier="StructureProducts" pageSize="20" i18NKey="Classified in Structure"> <listenFor source="structure" type="selectionEvent"/> <listModelDefinition rootEntity="Product2G"> ... </listModelDefinition> </list> <!-- this preview is tied to the list above, ignores selections in TaskProducts table --> <component identifier="productPreviewFromStructure" type="preview" i18NKey="Detail (Product)" rootEntity="Product2G"> <listenFor source="StructureProducts" type="selectionEvent" /> ... </component>
Header strategyIt is possible to change component header via the headerStrategy tag. By this header implementaion may be changed and additional information or controls displayed. For the moment the following values are possible:
• "defaultHeader",• "defaultEntityHeader"• "taskActionsHeader".
defaultHeaderThe "defaultHeader" is used in all components not related to entity information (e. g. message component of iframe component) and information from components i18NKey attribute.
defaultEntityHeaderThe "defaultEntityHeader" is used in components which shows information from given entity (form, table, etc.) and provides entity name information in header.

Informatica MDM - Product 360 Configuration 152
taskActionsHeaderThe "taskActionsHeader" is currently used for:
• Standard tasks (non-workflow tasks):In case of unaccepted standard tasks, the header adds a toggle button for accepting the current task in the form that displays the task details.In case of accepted standard tasks, the header adds a toggle button for marking the current task as completed.
• Workflow tasks:In case of unaccepted workflow tasks, the header adds a toggle button for accepting the selected entities (items, products or variants) in the entity table that displays the attached entities of the workflow task.In case of accepted workflow tasks, the header adds a toggle button for finishing the work on the selected entities in the entity table that displays the attached items of the workflow task.In case of accepted "approval workflow tasks", the header adds toggle buttons for approving and rejecting (with comment) the selected entities in the entity table that displays the attached items of the workflow task.
Task UI specific syntax summaryTask UI components deviate from the standard component syntax as follows:
• Several components have their own tags: form, list, mediaDetail - see the respective section for details.• Specification of the applicable entity via the rootEntity attribute of the component tag or a nested tag in case of form, list .
• Filtering of events via the nested listenFor tag.• Specification of the applicable for initialization entity for list tag via the nested listenFor tag.• Activation of task actions via the nested headerStrategy tag.
FormDisplays a set of fields for a single item in a form. Due to its rather specific content it has its own tag.
Tag: form
Setting Location Description
fieldFormDefinition
Nested tag
For the actual form definition the syntax is the same as for defining detail tabs in the Product 360 web application as described in "Customizing Lists Views, Detail Tabs and Action Menus".
Note that the fieldFormDefinition tag used in this component corresponds to the definition tag used in detail tab XML files.
rootEntity Attribute offieldFormDefinition
Specifies what kind of items this component can display.
Note that in this context the other attributes of the fieldFormDefinition tag are not applicable and should not be used (e.g. permissionId, position, id, i18NKey)
The current "taskActionsHeader" implementation does not add a toggle button for terminating the current workflow for entities of a workflow task. Furthermore, a click on the buttons for accepting, finishing and approving does not open a dialog for entering comments.
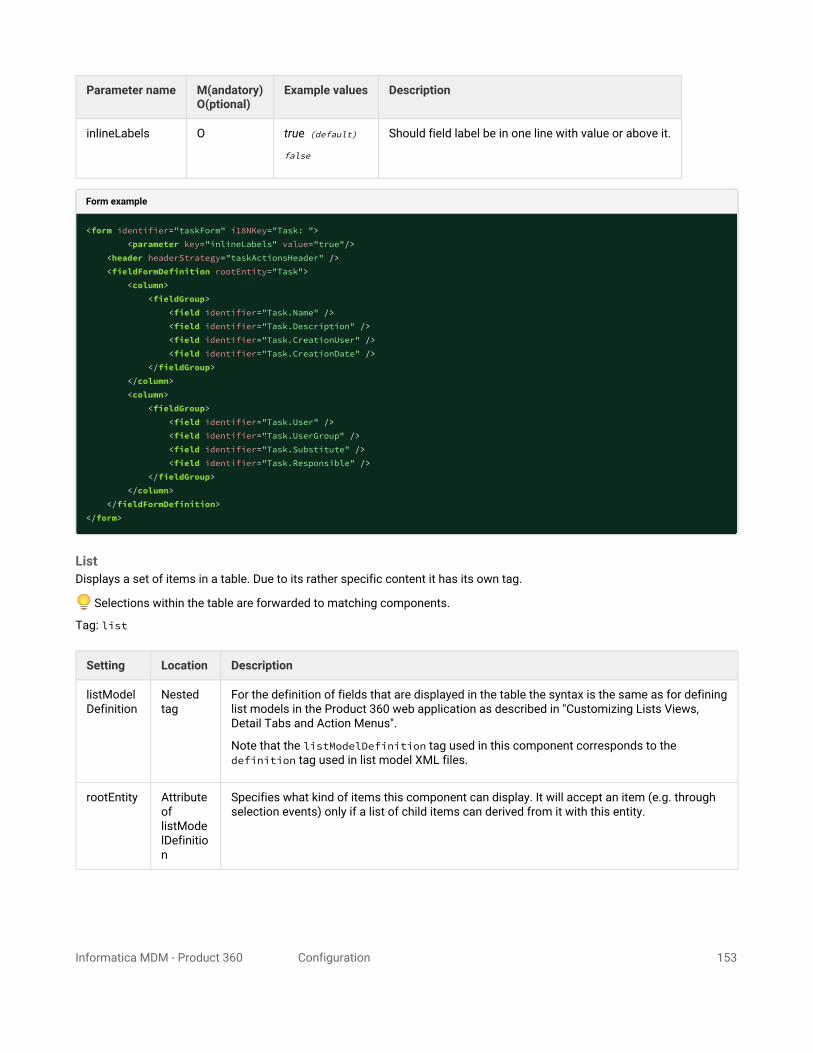
Informatica MDM - Product 360 Configuration 153
Parameter name M(andatory)O(ptional)
Example values Description
inlineLabels O true (default)
false
Should field label be in one line with value or above it.
Form example
<form identifier="taskForm" i18NKey="Task: "> <parameter key="inlineLabels" value="true"/> <header headerStrategy="taskActionsHeader" /> <fieldFormDefinition rootEntity="Task"> <column> <fieldGroup> <field identifier="Task.Name" /> <field identifier="Task.Description" /> <field identifier="Task.CreationUser" /> <field identifier="Task.CreationDate" /> </fieldGroup> </column> <column> <fieldGroup> <field identifier="Task.User" /> <field identifier="Task.UserGroup" /> <field identifier="Task.Substitute" /> <field identifier="Task.Responsible" /> </fieldGroup> </column> </fieldFormDefinition></form>
ListDisplays a set of items in a table. Due to its rather specific content it has its own tag.
Selections within the table are forwarded to matching components.
Tag: list
Setting Location Description
listModelDefinition
Nested tag
For the definition of fields that are displayed in the table the syntax is the same as for defining list models in the Product 360 web application as described in "Customizing Lists Views, Detail Tabs and Action Menus".
Note that the listModelDefinition tag used in this component corresponds to the definition tag used in list model XML files.
rootEntity Attribute oflistModelDefinition
Specifies what kind of items this component can display. It will accept an item (e.g. through selection events) only if a list of child items can derived from it with this entity.

Informatica MDM - Product 360 Configuration 154
Setting Location Description
pageSize Attribute of list tag
Specifies page size of underlying table. It defines amount of rows loaded from server each time during scrolling. Default is 20.
Note that in this context the other attributes of the listModelDefinition tag are not applicable and should not be used (i18NKey)
Parameter name M(andatory)O(ptional)
Example values
Description
forceShowContentFromMaster
O false
(default)
true
For the case when data source for list is structure group, information about catalog can be obtained from task context (default behaviour) or master catalog can be used forcibly.
List example
<list identifier="StructureProducts" pageSize="20" i18NKey="Classified in Structure"> <listModelDefinition rootEntity="Product2G"> <field caption="%web.client.product.table.thumbnail" identifier="Product2GMediaAssetDocument.ImageIdentifier" sortable="true" width="50"> <logicalKey identifier="ArticleMediaAssetDocumentType.LK.Language" value="English" /> <logicalKey identifier="ArticleMediaAssetDocumentType.LK.Quality" value="Internet image" /> </field> <field identifier="Product2G.ProductNo" sortable="true" /> <field identifier="Product2GLang.DescriptionShort" sortable="true"> <logicalKey identifier="ArticleLangType.LK.Language" value="English" /> </field> </listModelDefinition></list>
Note that if list have to be populated by task content instead of listening selection events listenFor tag should be used:
Task content list example
<list identifier="TaskProducts" i18NKey="Products" pageSize="20"> <listenFor source="Task" type="initialEvent" /> <listModelDefinition rootEntity="Product2G"> <field identifier="Product2G.ProductNo" sortable="true" /> <field identifier="Product2G.CurrentStatus" sortable="true" width="180" /> <field identifier="Product2GLang.DescriptionShort" sortable="true"> <logicalKey identifier="ArticleLangType.LK.Language" value="English" /> </field> </listModelDefinition></list>
PreviewDisplays a preview template.
Type: preview
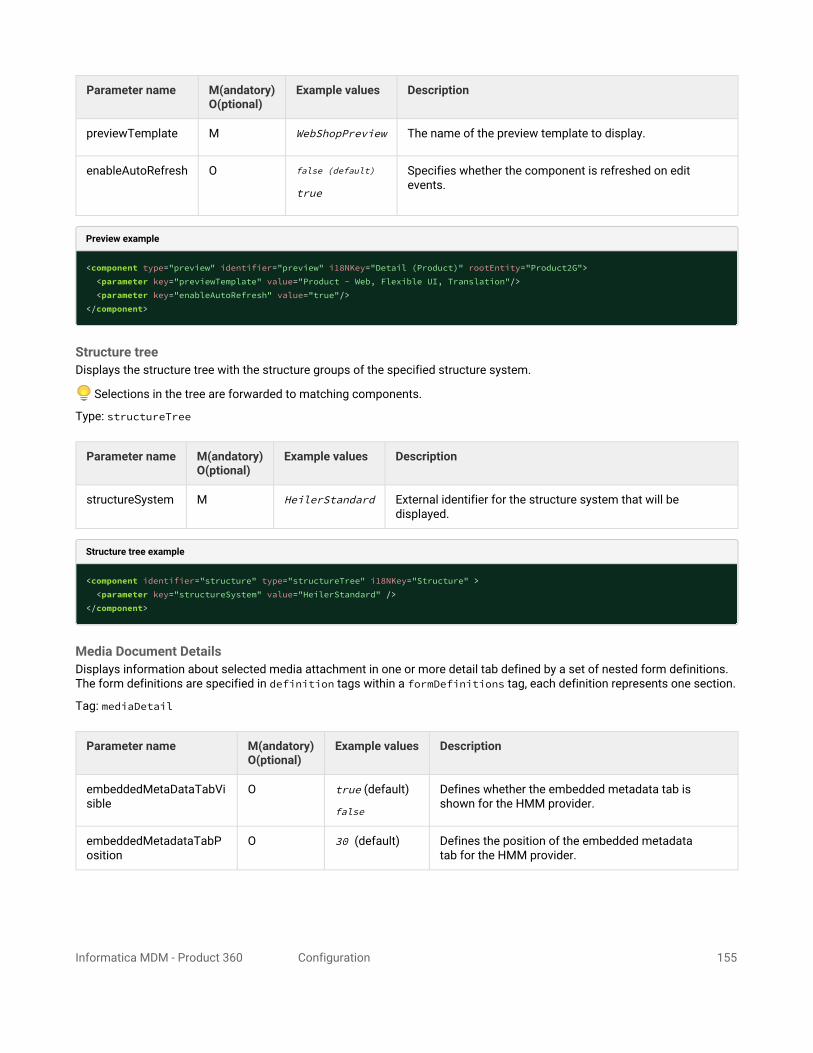
Informatica MDM - Product 360 Configuration 155
Parameter name M(andatory)O(ptional)
Example values Description
previewTemplate M WebShopPreview The name of the preview template to display.
enableAutoRefresh O false (default)
true
Specifies whether the component is refreshed on edit events.
Preview example
<component type="preview" identifier="preview" i18NKey="Detail (Product)" rootEntity="Product2G"> <parameter key="previewTemplate" value="Product - Web, Flexible UI, Translation"/> <parameter key="enableAutoRefresh" value="true"/></component>
Structure treeDisplays the structure tree with the structure groups of the specified structure system.
Selections in the tree are forwarded to matching components.
Type: structureTree
Parameter name M(andatory)O(ptional)
Example values Description
structureSystem M HeilerStandard External identifier for the structure system that will be displayed.
Structure tree example
<component identifier="structure" type="structureTree" i18NKey="Structure" > <parameter key="structureSystem" value="HeilerStandard" /></component>
Media Document DetailsDisplays information about selected media attachment in one or more detail tab defined by a set of nested form definitions. The form definitions are specified in definition tags within a formDefinitions tag, each definition represents one section.
Tag: mediaDetail
Parameter name M(andatory)O(ptional)
Example values Description
embeddedMetaDataTabVisible
O true (default)
false
Defines whether the embedded metadata tab is shown for the HMM provider.
embeddedMetadataTabPosition
O 30 (default) Defines the position of the embedded metadata tab for the HMM provider.

Informatica MDM - Product 360 Configuration 156
Media document details examples
<mediaDetail identifier="mediaDocumentDetailsId" i18NKey="Details"> <parameter key="embeddedMetaDataTabVisible" value="true" /> <parameter key="embeddedMetadataTabPosition" value="30" /> <formDefinitions> <definition i18NKey="%web.multimedia.detail.tab.technical.information" rootEntity="MediaAsset"> <column> <fieldGroup displaySectionWidget="false" subEntityId="MediaAssetDocumentAttributes"> <field identifier="MediaAssetDocumentAttributes.FilenameHMM" readOnly="true"/> <field identifier="MediaAssetDocumentAttributes.TypeHMM" readOnly="true"/> <field identifier="MediaAssetDocumentAttributes.ColorDepthHMM" readOnly="true"/> <field identifier="MediaAssetDocumentAttributes.ColorSpaceHMM" readOnly="true"/> </fieldGroup> </column> </definition> <definition i18NKey="%web.multimedia.detail.tab.general.information" rootEntity="MediaAssetFile"> <column> <fieldGroup displaySectionWidget="true" subEntityId="MediaAssetFileAttributeLang"> <field identifier="MediaAssetFileAttributeLang.Name"/> <field identifier="MediaAssetFileAttributeLang.Memo"/> <logicalKey identifier="MediaAssetFileAttributeLangType.LK.Language" selectable="true" value="English"/> </fieldGroup> <fieldGroup displaySectionWidget="false" subEntityId="MediaAssetFileAttribute"> <field identifier="MediaAssetFileAttribute.Level"/> <field identifier="MediaAssetFileAttribute.State"/> <field identifier="MediaAssetFileAttribute.Status"/> <field identifier="MediaAssetFileAttribute.InProgress"/> </fieldGroup> </column> </definition> </formDefinitions></mediaDetail>
Media documents listDisplays list of media documents in the selected category. Has ability to filter documents.
Type: documentsList
Parameter name M(andatory)O(ptional)
Example values Description
dragEnabled O true (default)
false
Defines whether the drag from list operation enabled.
selectionMode O none, single (default), multiple
Defines if the user can select (one or more) media documents.
Media documents examples
<component identifier="documentsListId" type="documentsList" i18NKey="Images" > <parameter key="selectionMode" value="single" /></component>
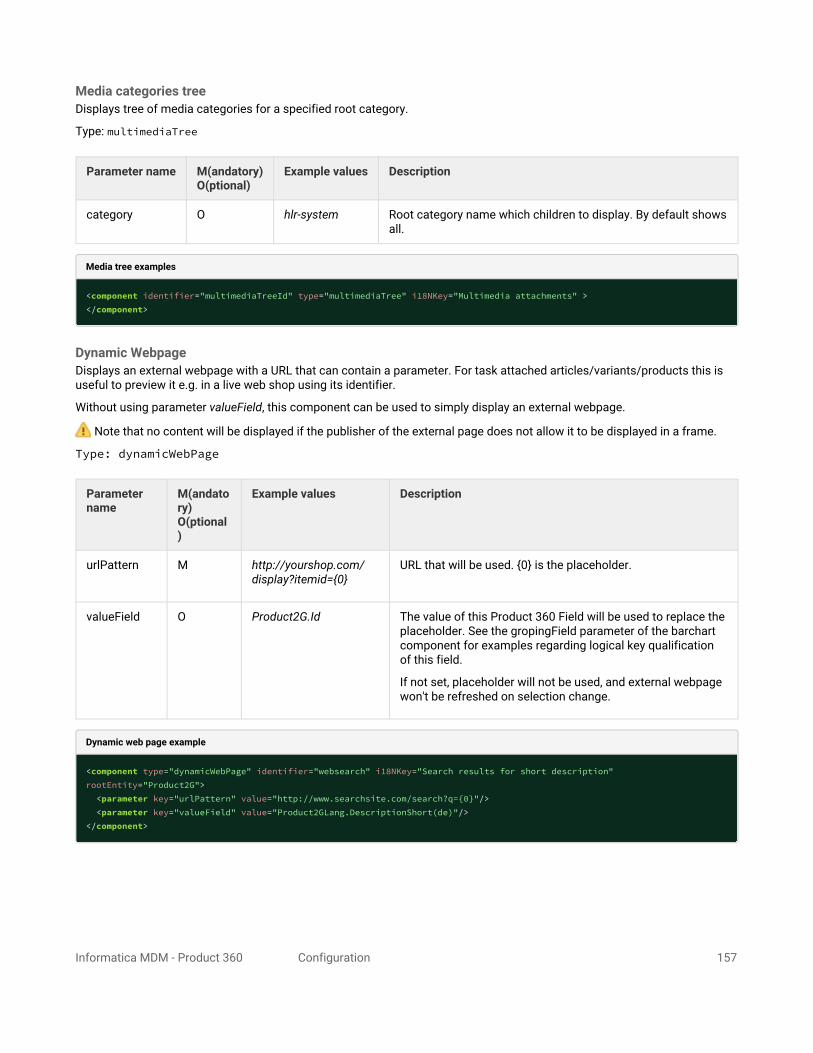
Informatica MDM - Product 360 Configuration 157
Media categories treeDisplays tree of media categories for a specified root category.
Type: multimediaTree
Parameter name M(andatory)O(ptional)
Example values Description
category O hlr-system Root category name which children to display. By default shows all.
Media tree examples
<component identifier="multimediaTreeId" type="multimediaTree" i18NKey="Multimedia attachments" ></component>
Dynamic WebpageDisplays an external webpage with a URL that can contain a parameter. For task attached articles/variants/products this is useful to preview it e.g. in a live web shop using its identifier.
Without using parameter valueField, this component can be used to simply display an external webpage.
Note that no content will be displayed if the publisher of the external page does not allow it to be displayed in a frame.
Type: dynamicWebPage
Parameter name
M(andatory)O(ptional)
Example values Description
urlPattern M http://yourshop.com/display?itemid={0}
URL that will be used. {0} is the placeholder.
valueField O Product2G.Id The value of this Product 360 Field will be used to replace the placeholder. See the gropingField parameter of the barchart component for examples regarding logical key qualification of this field.
If not set, placeholder will not be used, and external webpage won't be refreshed on selection change.
Dynamic web page example
<component type="dynamicWebPage" identifier="websearch" i18NKey="Search results for short description" rootEntity="Product2G"> <parameter key="urlPattern" value="http://www.searchsite.com/search?q={0}"/> <parameter key="valueField" value="Product2GLang.DescriptionShort(de)"/></component>
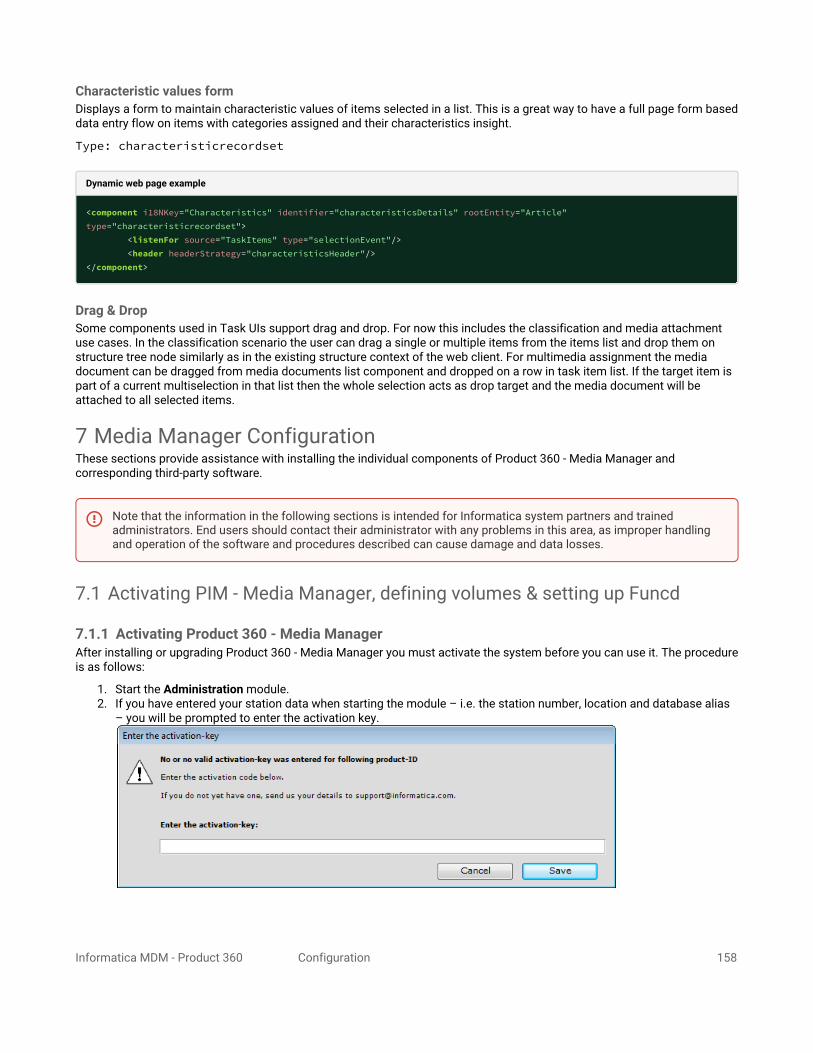
Informatica MDM - Product 360 Configuration 158
Characteristic values formDisplays a form to maintain characteristic values of items selected in a list. This is a great way to have a full page form based data entry flow on items with categories assigned and their characteristics insight.
Type: characteristicrecordset
Dynamic web page example
<component i18NKey="Characteristics" identifier="characteristicsDetails" rootEntity="Article" type="characteristicrecordset"> <listenFor source="TaskItems" type="selectionEvent"/> <header headerStrategy="characteristicsHeader"/></component>
Drag & DropSome components used in Task UIs support drag and drop. For now this includes the classification and media attachment use cases. In the classification scenario the user can drag a single or multiple items from the items list and drop them on structure tree node similarly as in the existing structure context of the web client. For multimedia assignment the media document can be dragged from media documents list component and dropped on a row in task item list. If the target item is part of a current multiselection in that list then the whole selection acts as drop target and the media document will be attached to all selected items.
7 Media Manager ConfigurationThese sections provide assistance with installing the individual components of Product 360 - Media Manager and corresponding third-party software.
7.1 Activating PIM - Media Manager, defining volumes & setting up Funcd
7.1.1 Activating Product 360 - Media ManagerAfter installing or upgrading Product 360 - Media Manager you must activate the system before you can use it. The procedure is as follows:
1. Start the Administration module.2. If you have entered your station data when starting the module – i.e. the station number, location and database alias
– you will be prompted to enter the activation key.
Note that the information in the following sections is intended for Informatica system partners and trained administrators. End users should contact their administrator with any problems in this area, as improper handling and operation of the software and procedures described can cause damage and data losses.

Informatica MDM - Product 360 Configuration 159
3. Contact Informatica Support to receive an activation key.4. Enter the activation key in the Enter activation key: field and click on Save.5. Restart the Administration module so that your changes will take effect.
7.1.2 Defining VolumesOn each workstation you have to define the available Product 360 - Media Manager volumes. To do so the desired volumes have to be mounted on the respective volumes on the machine and the logged on user must have read and write permission on them. After mounting the volumes they are defined in Product 360 - Media Manager as follows:
1. Start the Administration module.2. Select System > Volumes of Product 360 - Media Manager to open the Overview of Product 360 - Media Manager
volumes window.
3. Double-click an existing volume to modify it or click on the New button to create a new one.4. The settings in the Global Volume data area are system wide. You have to define them only once.
5. Now tell the Product 360 - Media Manager workstation where it can find the current volume. You can do this in the Local assignment area.
6. Repeat the steps 3 to 5 for each volume.7. Repeat the steps 1 to 6 for each Product 360 - Media Manager workstation.
Keep in mind to use the right path separators for the respective machines, e.g. like the file server or the database server.
UNC paths
We recommend using UNC paths instead of locally mapped network shares.

Informatica MDM - Product 360 Configuration 160
7.1.3 Setting up FuncdIn the Administration module, select System > System parameters to open the Modify system data window. Go to the Network tab and enter the values for the Funcd IP addresses and ports for your Product 360 - Media Manager system.
7.2 External preview generation
7.2.1 External preview generationExternal preview generation enables you to create the previews of your media objects using a separate application or with adapted options and not using ImageMagick, as is normally the case in Product 360 - Media Manager.
External preview generation can be used to manage the creation of preview images for any file format for specific customers or all customers.
The formats to be delegated to external preview generation and for which customer(s) are defined in the datatypes.xml file in the directory [Volume0]/opasdata/conf. This directory also includes the file example_datatypes.xml, which contains some sample definitions.
In the file datatypes.xml, you specify which Funcd is to be used to call up an external command for a customer and data format. The value 1 indicates that the Funcd on the file server is used. The file server can be running under Unix or Windows. The value 2 indicates that the Funcd on the second pipeline computer is used. The 2nd pipeline computer runs under Windows.
This function should only be used and configured by administrators. A very thorough knowledge of the system is required to perform the steps described below. We strongly recommend that you do not use external preview generation if you do not possess the requisite technical knowledge.

Informatica MDM - Product 360 Configuration 161
The external command itself must be specified as a file path from the calling Funcd. This path must not contain any blank spaces or special characters. The command receives three command line parameters from the Funcd.
• The first parameter is the path from Funcd to the original file. The previews are to be generated from this file. The command called must generate three JPG files from the original file. The first file may be a maximum of 25 x 25 pixels. The second file may be a maximum of 100 x 100 pixels. The third file should be larger than the second file by the factor defined in the Medias settings in the Administration module.
• The second parameter is the basic name of the files generated.• The third path is the absolute path from the Funcd to the directory in which the generated files are stored. The third
parameter is specified without a separator at the end.
The Funcd then executes the command, for example: /export/db-main/opastool/TransScript01.sh '/export/buffer/buffer/s79/test.eps' 041109123456 '/export/buffer/buffer/s80'
The shell script TranScript01.sh must generate the files:
1. /export/buffer/buffer/s80/041109123456_1.jpg with a maximum size of 25x25 pixels2. /export/buffer/buffer/s80/041109123456_2.jpg with a maximum size of 100x100 pixels3. /export/buffer/buffer/s80/041109123456_3.jpg with a size corresponding to the factor set in the Medias settings in
the Administration module
Of course, instead of using a shell script you can also call up a special program or delegate the parameters within a shell script to other programs.
If Product 360 - Media Manager cannot find one of the three expected files, the corresponding internal preview generation function is used.
Example of the file datatypes.xmlHere is an example of a possible configuration and structure of the file datatypes.xml in the directory [Volume0]/opasdata/conf.
datatypes.xml
<DEFINITION> <ENTRY> <CUSTOMER>D049999</CUSTOMER> <DATATYPE>.eps</DATATYPE> <FUNCD>1</FUNCD> <PROGRAM>/export/opas/buffer_volume/TransScript01.sh</PROGRAM> </ENTRY> <ENTRY> <CUSTOMER>D049999</CUSTOMER> <DATATYPE>epsf</DATATYPE> <FUNCD>1</FUNCD> <PROGRAM>/export/opas/buffer_volume/TranScript01.sh</PROGRAM> </ENTRY> <ENTRY> <CUSTOMER>D049999</CUSTOMER> <DATATYPE>.tif</DATATYPE> <FUNCD>2</FUNCD>
The file paths for the original file and the generated files are case-sensitive.
The file datatypes.xml may not contain any comments because the parser used cannot process them.

Informatica MDM - Product 360 Configuration 162
<PROGRAM>X:\opas\buffer_volume\TranScript02.bat</PROGRAM> </ENTRY> <ENTRY> <CUSTOMER>D049999</CUSTOMER> <DATATYPE>tiff</DATATYPE> <FUNCD>2</FUNCD> <PROGRAM>X:\opas\buffer_volume\TranScript02.bat</PROGRAM> </ENTRY></DEFINITION>
Example of a shell scriptHere is an example of a shell script for external preview generation. This shell script is also located in the file TranScript01.sh in the directory [Volume0]/opasdata/conf.
TranScript01.sh
#!/bin/bash# Enter the absolute path to the ImageMagick convert command here.CONV_PATH=/export/opas/volume0/db-main/opastool/funcd/tools/convert# You can use this value to control the preview quality.# The default value is 72.# Lower values generate lower quality previews.# Higher values generate better quality previews.CONV_DENS=200# You can set the width x height size of the small preview in pixels here.# You should only modify this value slightly, if at all.SMALL_SIZE=25x25You can set the width x height size of the medium preview in pixels here.# You should only modify this value slightly, if at all.MEDIUM_SIZE=100x100You can set the width x height size of the large preview in pixels here.# You should adjust this value to match your settings. Refer to the file example_datatypes.xml.BIG_SIZE=400x400# From this point onwards, you do not need to change anything.SRC=$1TMP=$3/$2_4.tifDST1=$3/$2_1.jpgDST2=$3/$2_2.jpgDST3=$3/$2_3.jpg$CONV_PATH -density $CONV_DENS "$SRC" "$TMP[0]"$CONV_PATH -geometry $SMALL_SIZE "$TMP" "$DST1"$CONV_PATH -geometry $MEDIUM_SIZE "$TMP" "$DST2"$CONV_PATH -geometry $BIG_SIZE "$TMP" "$DST3"rm -f "$TMP"
7.3 Setting up web front end
7.3.1 Setting up the Internet module (Internet Administration Console) (Obsolete since Product 360 8.0)This chapter is obsolete since Product 360 8.0. For reasons of compatibilty to Product 360 versions < 8.0 this chapter is still remaining in Product 360 version 8.0 documentation.
The procedure for setting up the Internet module is as follows:
1. Start the Tomcat server if it is not already running.
Informatica MDM - Product 360 Configuration 163
2. Start the Internet module using the OPAS_xob.exe program from the oxobjsrv directory in your local Product 360 - Media Manager installation.
3. Navigate to Presettings > Presettings and, in the subsequent window, go to the Master 1 tab. Make the following settings on this tab:
• Should a log be kept?• Time contingent for user in minutes controls the timeout for users who are logged into the Internet module.
• Max. number of displayed records per search defines the number of hits a search will return.
• Max. data quantity in MB that may be transmitted via the module defines how many Megabytes of data can be downloaded using the Internet module. Downloading of larger volumes of data terminates with an error message.
• Should the e-mails be sent with the Pipeline module?: If you activate this setting, e-mails are sent using the Pipeline module rather than the Internet module.
• URL of dindex page for workflow e-mail processing: In some e-mails, paths to the dindex page are specified in order to enable direct access to the web application.
• Should previews of job components be generated via the pipeline?
• Should MEDIAS previews be cached?: If you activate this option, previews of MEDIAS objects are buffered, which means that they do not have to be retrieved from the content and media database each time they are called up.
5. Go to the Master 2 tab:• Under Station number of this computer, enter the local Product 360 - Media Manager workstation number.• It is recommended that you enable communication with the Session Manager.• Enter the IP address of this computer.• Under Port of this computer, define a port range, e.g. 85-94.• Specify a port to communicate with the Session Manager (default 81).• Path to the working directories of this computer: Click on the relevant button to select the directory. It is
recommended to use UNC paths.
A value of 30 minutes is recommended.
A value of 500 is recommended.
A value of 100 is recommended.
This setting should only be made after the Tomcat server has been configured. There you can copy the path to the page from the web browser and enter the prefix d before index.
To relieve the load on Internet module you can use the Pipeline module to generate previews.
This speeds up the page layout process in the web application.

Informatica MDM - Product 360 Configuration 164
• Max. time limit for a TCP/IP packet (in seconds) is set to 5 seconds by default.• Sleep time between the individual requests (in ms) is set to 10 milliseconds by default.• Integrate watermark starting from which pixel dimension is set to 150 by default.
6. Click on Save to save your entries.7. You have to restart the Product 360 - Media Manager Internet module.
You can call up the Product 360 - Media Manager web front end using http://<IP address of Tomcat computer>:8080/opas/index.jsp.
7.3.2 Setting up the Session Manager (Obsolete since Product 360 8.0)This chapter is obsolete since Product 360 8.0. For reasons of compatibilty to Product 360 versions < 8.0 this chapter is still remaining in Product 360 version 8.0 documentation.
1. In the file server.xml in the directory [XOBSessionManager]\conf, adapt the following values:
1. <ServerPort value="81"/>: Depending on the free port or the port to be used.2. <WebPort value="8089"/>3. <LogLevel value="7"/>4. <server IP="192.168.25.170" Port="82" Prio="5" Active="Y"/>5. <server IP="192.168.25.215" Port="86" Prio="2" Active="N"/>
• Save all your entries.• Start the Session Manager using startup.bat.
You can also start the Session Manager as a Windows service; refer to Run Product 360 - Media Manager server modules as a Windows service.
You can query the status of the Session Manager under http://localhost:[Port for info page]/ in your browser.
7.4 Connecting the LDAP directory serviceThe LDAP option provides an interface between the Product 360 - Media Manager system and an ADS server, to reduce the amount of administration work for users in the two systems and eliminate redundancy.
The directory is part of the Web application (Windows: C:\OpasGWebServer\workdir). If necessary, enable this directory in the network.
This setting determines the image size in pixels above which a watermark will be integrated.
The Session Manager is part of the Web application and, after installation, is located in the directory e.g. C:\OpasGWebServer\XOBSessionManager.
The priority Prio allows more powerful computers to be utilized more intensively. 1 is the highest priority, 20the lowest.The Internet module can be activated and deactivated using Active.Under IP enter the IP address of the computer on which you want to install the Internet module.
Adapt the file Base.cfg so that the Web application submits your queries via the Session Manager.

Informatica MDM - Product 360 Configuration 165
It is implemented in every module, which forwards login requests from Product 360 - Media Manager to a directory service, synchronizes the data in this service with the Product 360 - Media Manager system and ensures that access to and rights in Product 360 - Media Manager are in line with your requirements.
LDAP stands for Lightweight Directory Access Protocol and represents a method of mapping structured directories, e.g. for employees or customers. ADS from Microsoft stands for Active Directory Service and is an implementation of LDAP, which is very similar to LDAP but differs from it on certain points. ADS is mostly used in Windows networks with domains.
1. Start the Administration module.2. Select the menu System > System parameters and enable Activation of LDAP Login (If this optio was disables a
restart is needed)3. Select the menu ADS/LDAP > LDAP server settings to open the overview list of ADS/LDAP servers.4. Click on to create a new ADS/LDAP server.
5. Adapt the following settings on the Master tab:
• Under Designation you enter the designation of your choice for your server. The designation has no influence on the operation of the module or the directory service server.
• Under Domain name you need to enter the name of your domain (e.g. mycompany.com).• Under Server addressame you need to enter the name (or the IP address) at which your directory service server can
be contacted.• Under Server port you need to enter the port at which your directory service server can be contacted (default: 389).• Attribute of group assignments, default is memberOf
• When you have finished entering your settings, click on Save.
ADS and LDAP provide extremely versatile configuration options. As a result, it is not possible to make a general statement about what extensions are necessary for the interface to the LDAP module. Further information can be found in the license conditions.

Informatica MDM - Product 360 Configuration 166
Now you have to create the mapping between the Product 360 - Media Manager user groups and the ADS user groups:
1. Select the menu ADS/LDAP > LDAP group settings.to open the overview list for group assignments.2. Create new group assignments, e.g. LDAP group:
CN=companyname,OU=groups,OU=mycity,DC=mycompany,DC=com3. Select the corresponding Product 360 - Media Manager user group.4. Click on Save.
7.5 Setting up Media Publisher
7.5.1 Presettings window
1. Open the Media Publisher module. The module is pre-configured in such a way that it does not automatically start in automatic mode.
2. Close the message about missing default settings by clicking on OK.3. Select Publisher > Default settings to open the "Modify default settings" window.
"Standard" tab1. The options in the General operational settingssection apply to all projects and tasks processed on the local
workstation by the Media Publisher module.• Timeout in seconds for server-supported transactions defines how many seconds the Media Publisher
module waits for responses from Funcd or Scripting Servers.• How many days should the entries in the action basket be held? defines how long logs of executed actions
remain in the action basket.• Number of retries following error controls how often an action is repeated in case of an error before the
module cancels processing of the action.2. In the Regulate tasks of this station in automatic modesection, you can specify how you want the Media Publisher
module to process everything on this workstation.• Process tasks from all stations and Process tasks from this station only defines whether jobs in the action
basket will only be processed if they were created locally or also if they come from other workstations. If you want the Media Publisher module to run in automatic mode on this workstation and to execute corresponding actions for all users, set Process tasks from all stations here.
To edit the default settings for the Media Publisher module, you need to log in as a user with "Media Publisher administration" rights. You will find more information about user rights in the documentation for the Administration module.

Informatica MDM - Product 360 Configuration 167
• You can also specify which project types will be processed.Grayed out fields cannot be selected as the corresponding scripting engines are not licensed.It can be useful to restrict the project types, for example if you are running different scripting engines on different workstations and you want to improve the communication speed between the relevant module of Media Publisher and the associated local scripting engine. This can also reduce network traffic.
"Internal" tab1. You can Activate automatic mode for processing action basket.2. You can specify whether you want it to be processed at a fixed time or at a defined interval. Depending on your
selection, enter the appropriate values in the relevant fields.3. Required data can also be restored automatically if it is archived.
"Orders" tab1. You can Activate automatic mode for processing action basket.2. You can specify whether you want it to be processed at a fixed time or at a defined interval. Depending on your
selection, enter the appropriate values in the relevant fields.3. Required data can also be restored automatically if it is archived.
"Additional parameters" tabHere, you can specify additional parameters for the Media Publisher module.
7.6 Run Product 360 - Media Manager server modules as a Windows service
7.6.1 Run the native modules as services1. Open the Process Watcher module.
These settings affect all Media Publisher modules in your Product 360 - Media Manager system.
All non-local paths must be UNC paths on the workstation where the services are running. The user account for the service must have read and write permissions on these UNC paths:
• Administration module: locale volume assignments• Internet module: path to the working directories of this computer• Funcd working directories
When logging on to a machine where Product 360 - Media Manager programs run as service avoid using the account under which the services are executed. When you log off a machine all running services of the currently used account are stopped.

Informatica MDM - Product 360 Configuration 168
2. Select Processwatcher > Processwatcher default settings.
3. Activate the Processwatcher is being started as service option.4. Activate the modules to be monitored.5. Click on Save.6. Start the automatic mode for the Process Watcher module to check the settings.7. Stop the automatic mode of Process Watcher.8. Quit the application.9. Quit all monitored modules.
10. Navigate to the directory where the Process Watcher module is installed, e.g. C:\Program Files (x86)\Informatica Media Manager\opwatcher.
11. Double-click on MakeService.bat.12. Open the Microsoft service administration.13. Open the properties of the Infomatica Media Manager Process Watcher service.14. On the General tab set the startup type to Automatic (delayed).15. Switch to the Log On tab.16. Activate This account.17. Enter the user name and password.18. Click on OK.19. Start the service.
The settings of these automatic modules can be controlled in the Administration module with the control center.
7.6.2 Run Tomcat as a service1. Change installService.bat in folder [YourWebServerInstallation] with your used paths, e.g. set
OpasGWebServerPath=C:\OpasGWebServer.2. Open the command line (for Windows 7 or 2008 R2 server open in administrative mode).3. Call installService.bat e.g. in the directory C:\OpasGWebServer.4. Open the Microsoft service administration.5. Open the properties of the Informatica Media Manager Apache Tomcat service.6. On the General tab set the startup type to Automatic (delayed).7. Switch to the Log On tab.8. Activate This account.9. Enter the user name and password.
10. Click on OK.
With RemoveService.bat the service can be deleted.

Informatica MDM - Product 360 Configuration 169
11. Start the service.
7.6.3 Run Session Manager as service1. Open the command line (for Windows 7 or 2008 R2 server open in administrative mode).2. Call InstallApp-NT.bat in directory [YourWebServerInstallation]\XOBSessionManager\bin, e.g. C:
\OpasGWebServer\XOBSessionManager\bin.3. Open the Microsoft service administration.4. Open the properties of the Informatica Media Manager Session Manager service.5. On the General tab set the startup type to Automatic (delayed).6. Switch to the Log On tab.7. Activate This account.8. Enter the user name and password.9. Click on OK.
10. Start the service.
7.7 Product 360 Core and PIM - Media Manager Configuration
7.7.1 Product 360 - Server
Integrating Product 360 - Media ManagerThe usage of Product 360 - Media Manager as media asset provider for Product 360 - Server presumes that Product 360 - Media Manager version 8.0.5 has been installed. Please refer to the Product 360 - Media Manager installation manual for such an installation.
Product 360 - Media Manager is integrated into the Product 360 - Server by means of a plug-in. This plug-in is default installed and must be configured afterwards. The following chapters will explain this in detail.
Switching default media asset provider to Product 360 - Media ManagerIn order that Product 360 - Server uses Product 360 - Media Manager as media asset provider, you have to switch the default media asset provider to Product 360 - Media Manager. This is performed in the C:\Informatica\server\configuration\HPM\server.properties file by setting the "mime.defaultProvider" parameter in the "Media Asset Server (MAS) Settings" section to "HMM":
################################################################################ ### Media Asset Server (MAS) Settings# Defines the default provider for media assets which defines the source where to obtain the multimedia documents from(e.g. HLR, HMM).# MediaAssets are administered by a provider. A implement of provider is already included by standard HPM(Identifier=HLR).# The identifier of provider is defined in its plugin.xml, see the Extension point com.heiler.ppm.mediaasset.server.mediaAssetProvider.# If no provider is explicit specified, then the here defined default provider will be used.mime.defaultProvider = HMM
With removeService.bat the service can be deleted.
With UninstallApp-NT.bat the service can be deleted.

Informatica MDM - Product 360 Configuration 170
Configuring Product 360 - Media ManagerAfter the integration of the Product 360 - Media Manager plug-in, you have to configure the plug-in to your needs. The configuration should be performed in the C:\Informatica\server\configuration\HPM\hmm.properties file.
The parameters concerning the Product 360 - Media Manager configuration can be found in the "connection settings for the application server" section.
The following sections describe the configuration parameters.
Connection dataIn order that Product 360 server can connect to Product 360 Media Manager, you have to specify the corresponding settings for Product 360 - Media Manager and it's database.
The following table lists the connection parameters:
Property Description
hmm.login.supervisor.userName
Login name of the supervisor user at Media Manager who has all rights and will be mapped to the Product 360 administrator.
hmm.login.supervisor.password
Password of the supervisor user at Media Manager who has all rights .
hmm.login.customer Customer ID for the authentication at Product 360 - Media Manager.
hmm.db.url Url of the Media Manager database which can be reached by Product 360.
Special characters
If a value contains unicode characters store them using escape sequences, e.g. \u00C4 for the German umlaut Ä.
MSSQL - Integrated security
If your security guidelines do not allow passwords in configuration files you can use integrated authentication on Windows operating systems. (MSSQL only)
If you want to encrypt the password please refer to chapter Encryption of secure information in the Server Installation manual.
It is possible to use an encrypted connection to the Media Manager database (MSSQL only). Append ';ssl=request' to your url.
The url would look like
jdbc:jtds:sqlserver://localhost:1433/opasdb;ssl=request

Informatica MDM - Product 360 Configuration 171
Property Description
hmm.db.user Login name at the Media Manager database which can be reached by Product 360.
Might be empty if integrated authentication with MSSQL is used.
hmm.db.password Password for the above mentioned user at the Media Manager database which can be reached by Product 360.
Might be empty if integrated authentication with MSSQL is used.
hmm.db.type Supported Product 360 - Media Manager database type. It must be one integer of the following values:1: ORACLE 11g R2 and above; 2: MSSQL SERVER 2008 R2; 3: MSSQL SERVER 2012 and above
hmm.connection.poolsize
Size of connections pool per Product 360 user to Media Manager, default value is 10.
hmm.connection.timeoutSEC
Time out setting(in seconds) for each connection to Media Manager. The connection will be deteled after this period. Default value is 1800.
SharesProduct 360 - Server uses one share within the Product 360 - Media Manager system for accessing exported media assets. In order that Product 360 - Server can access this share, its path must be declared.
Property Description
hmm.share.export Path to the share containing the temporary exported zip file for images. This share must provide read-write access to application server.
Notification queueIf Product 360 - Server should use the master asset functionaltity of Product 360 - Media Manager, Product 360 - Server must keep itself informed about asset changes in Product 360 - Media Manager by listening to corresponding notification queues.
In order that this mechanism works, the following parameters have to be configured:
Removed since Product 360_8.0.03
Please note that the local directories of the shares might not (yet) exist. Usually the Product 360 - Server creates these directories on the first start, but for this configuration step you would need to do this manually to be able to create the share on them.

Informatica MDM - Product 360 Configuration 172
Property Description
hmm.jms.connection.url
Connection URL to Media Manager JMS server which replaces the old settings for notification queue.
An error message for unreachable JMS server is only ensured with the transport options "initialReconnectDelay" and "maxReconnectAttempts".
hmm.jms.connection.username
Optional property as the name for the authentication user during connection to the Media Manager JMS server. They are only necessary if the user should be authorized to connect to the Media Manager JMS server.
hmm.jms.connection.password
Optional property as the password for the authentication user during connection to the Media Manager JMS server. They are only necessary if the user should be authorized to connect to the Media Manager JMS server.
Write accessIf Product 360 - Server should be supported with the wirte access of Product 360 - Media Manager, the following parameters have to be configured:
Property Description
hmm.supportsWrite
Set this to false, If the write access of media manager Provider should not be supported.
Please note, that there is not granular destinction. Either the Provider supports FULL write support (Upload, Removing files and categories...) or doesn't support write at all.
Example
hmm.jms.connection.url = failover:(tcp://JMSServer:61616?wireFormat.maxInactivityDuration=0)?initialReconnectDelay=2000&maxReconnectAttempts=2
This property is introduced only for the cloud solution, therefore it is currently not available since the media manager still connects to JMS server without authorization mechanism.
This property is introduced only for the cloud solution, therefore it is currently not available since the media manager still connects to JMS server without authorization mechanism.
Default value
true

Informatica MDM - Product 360 Configuration 173
Property Description
hmm.defaultCategoryId
The identifier of default category(usually names "Unassigned") which stores all images that are not assinged to other categories.
Additional language packagesIf you have installed additional language packages (refer to appendix "i18n language packages" for more information), you will have to add respective mappings into the hmm.properties file. This is due to the fact that Product 360 -Server works with locales and Product 360 - Media Manager with language numbers.
The mapping entries must look like this:
# Mapping from Locales to Media Manager language numbershmm.locale.en_US=0
MiscellaneousThe following table lists all other parameters for the configuration of the Product 360 - Media Manager plug-in:
Property Description Default value
hmm.maxCountOfIdsInOneThread
Maximum count of ids which are sent as parameter to corresponding connector API call that can be run with multi-threading. This value can be adjusted in real time for a better performance.
For more detailed information please visit the section "Media Asset Parallel Management" of chapter "Tuning advisory" in [OpertationManual].
1000
hmm.numberOfThread.initValue
This setting defines the initial vlaue for the number of threads which are used for calling media asset parallel operations. Default value is 1, therefore this initial value should be adjusted according to the corresponding hardware and media manager configuration(e.g. number of hmm port). After start of the Product 360 - Server, the value of numberOfThread can be also changed by JMX tooling in real time.
1
The default category id can be fetched by calling the following sql statement from the Media Manager database:
select IHIE_ID from F_IMGHIER where IHIE_NAME = 'Unassigned'
• A setting with false value can cause fatal error by fetching asset information form Media Manager!• locale must be an enum entry defined in the enumeration "Enum.Language".
Tip: The language numbers are defined in the "Informatica Product 360 Media Manager Administration". You can retrieve a list of the language numbers from by selecting "System" -> "Manage languages" in the native application "Informatica Product 360 Media Manager Administration"

Informatica MDM - Product 360 Configuration 174
Property Description Default value
hmm.maxNumberOfDisplayableObjects
Maximum number of the from Product 360 - Media Manager loadable media objects pro search, no matter what default value in the Product 360 - Media Manager system parameters.
10000
defaultquality The default image quality. This parameter is only needed when using the master asset functionality of Product 360 - Media Manager.
originalimage
hmm.exportMediaAsset.defaultWithLoggedInUser
Specifies whether the logged in user will be used as default while exporting media asset information from the Media Manager.
If it is set as true, then only the media assets will be exported, which can be accessed by the logged in user who runs the export job. Otherweise the media assets will be exported, which can be accessed by the defined system user(system user has the access level of the Media Manager user defined with the "hmm.login.supervisor.userName").
true
hmm.exportMediaAsset.uncpath.separator
Specifies which separator should be used in the unc path returned from the corresponding methods of Media Manager provider for export. Default is the backslash("\\"), if you want to use the unc path directly under Unix system, please set it with the slash("/")
\\
Auto AssignmentAll settings for Auto Assignment and Auto path resolution please visit the page: Configurations for Auto Assignment
Configuration example of Product 360 - Media Manager
Example for hmm.properties(without auto assignment configurations)
################################################################################### connection settings for the application server### --------------------### Connection data## supervisor user in media manager with all rights
available since 8.0.01.04, 8.0.03.00
available since 8.0.03.01(Version 8.0 Update 3 Hotfix 01)

Informatica MDM - Product 360 Configuration 175
# hmm.login.supervisor.userName=<ENTER SUPERVISOR USERNAME HERE># hmm.login.supervisor.password=<ENTER SUPERVISOR PASSWORD HERE>hmm.login.supervisor.userName=totohmm.login.supervisor.password=toto## Identical customer ID which is defined in Media manager for all media manager users who will be mapped to corresponding Product 360 user. # hmm.login.customer=<ENTER MEDIA MANAGER CUSTOMER NUMBER HERE, e. g. D120001>hmm.login.customer=D080001## hmm.db.url=<ENTER MEDIA PORTAL DATABASE CONNECTION URL HERE, e. g. jdbc:jtds:<server_type>://<server>[:<port>][/<database>]># hmm.db.user=<ENTER MEDIA PORTAL DATABASE USERNAME HERE># hmm.db.password=<ENTER MEDIA PORTAL DATABASE PASSWORD HERE># supported database type: 1 = ORACLE 11g R2 and above# 2 = MSSQL SERVER 2008 R2# 3 = MSSQL SERVER 2012 and above# hmm.db.type=<ENTER MEDIA PORTAL DATABASE TYPE HERE, e. g. 2>hmm.db.url=jdbc:jtds:sqlserver://10.10.11.198:1433/opasdbhmm.db.user=totoUserhmm.db.password=totoPasswordhmm.db.type=2## size of connections pool per HPM user to Media Portalhmm.connection.poolsize=10# time out setting(in seconds) for each connection, the connection will be deteled after this periodhmm.connection.timeoutSEC=1800 #### --------------------### Notification queue## Connection URL to Media Manager JMS server # Default protocol prefix is 'failover:' to ensure a robust connection, and the default transport Options are initialReconnectDelay=2000&maxReconnectAttempts=2,# so that after 2 attempts at connecting an exception will be shown to user who decides reconnection again or restart the Product 360 server after correcting this url. # The further default connection option is '?wireFormat.maxInactivityDuration=0' to increase robustness# Example for JMS server '10.10.11.198' and port '61616': # hmm.jms.connection.url=failover:(tcp://10.10.11.198:61616?wireFormat.maxInactivityDuration=0)?initialReconnectDelay=2000&maxReconnectAttempts=2hmm.jms.connection.url=failover:(tcp://10.10.11.198:61616?wireFormat.maxInactivityDuration=0)?initialReconnectDelay=2000&maxReconnectAttempts=2#### --------------------### Write access## Set this to false, If the write access of HMM Provider should not be supported, default value is true. # Please note, that there is not granular destinction.# Either the Provider supports FULL write support (Upload, Removing files and categories...) or doesn't support write at all. hmm.supportsWrite = true## hmm.defaultCategoryId indicates the identifier of default category(usually names "Without Category") which stores all images that are not assinged to other categories. hmm.defaultCategoryId = 006800000000000000000000000000000000000000000000000000000000000000000000000000000000000000000000000000000000000000000000#### --------------------

Informatica MDM - Product 360 Configuration 176
### Additional language packages## Mapping from Locales to HMM language numbers# Caution: a setting with false value can cause fatal error by fetching asset information form HMM!# Tip: The language numbers are not fix, but are set by the "Product 360 - Media Manager Administration". # You can retrieve a list of the language numbers from by selecting System > Manage languages in the native application "Product 360 - Media Manager Administration"hmm.locale.en_US=0#### --------------------### Miscellaneous## maximum count of ids which are send as parameter to corresponding XOB Call that can be run with multi-threadinghmm.maxCountOfIdsInOneThread = 1000## Initial value for the number of threads which are used for all media asset parallel operations.# Default is 1, therefore this initial value should be adjusted according to the corresponding hardware and media portal configuration(e.g. number of hmm port).# After start of the hpm server, the value of numberOfThread can be also changed by JMX tooling in real time.hmm.numberOfThread.initValue =1## This properties defines the maximum number of the from HMM server loadable media objects pro search, no matter what default value in the HMM system parameters.hmm.maxNumberOfDisplayableObjects = 10000## The default quality(master asset) of the providerdefaultquality=originalimage## Specifies whether the logged in user will be used as default while exporting media asset information from the Media Manager.# false - the media assets will be exported, which can be accessed by the defined system user(system user has the access level of the Media Manager user defined with the "hmm.login.supervisor.userName").# true - default / only the media assets will be exported, which can be accessed by the logged in user who runs the export job.hmm.exportMediaAsset.defaultWithLoggedInUser=true## Specifies which separator should be used in the unc path returned from the corresponding methods of Media Manager provider for export.# Default is the backslash("\\"), if you want to use the unc path directly under Unix system, please set it with the slash("/")hmm.exportMediaasset.uncpath.separator =\\
Using Product 360 - Media Manager with master assets and derivatesProduct 360 supports the master asset business logic provided by Product 360 - Media Manager.
This implies that Product 360 - Server must be informed about new derivate shemas or changes in existing derivative shemas performed in the integrated Product 360 - Media Manager. Product 360 - Media Manager keeps Product 360 - Server informed about such changes by putting respective notifications into its notification queues.
Product 360 - Server can obtain these notifications by means of a listener listening to this notification queue. In order that this mechanism works, the notification queue parameters as well as the defaultquality parameter must be correctly set in the hmm.properties file.
After Product 360 - Server has collected or successfully consumed a notification, the notification is removed from the notification queue.

Informatica MDM - Product 360 Configuration 177
There are several notifications which can currently be processed by the Product 360 - Server. It is necessary that you check that the following notification queue events are configured in the workflow manager of Product 360 - Media Manager:
• Notifications from the queue "heiler.hmm.backend.event"• Changed derivative schema (name) The listener listens to the notification queue on the topic
"ModifyDerivativeSchema" for a "F_DERIVATE.DEV_ID" which has to be a number (the number of the changed derivative schema id). The listener triggers only a change of the derivative schema name in the "MediaAssetQualityEnumeration".
• New derivative schema The listener listens to the notification queue on the topic "NewDerivativeSchema" for a "F_DERIVATE.DEV_ID" which has to be a number (the number of the new created derivative schema id). The listener triggers a creation of new media asset documents on a media asset if this media asset has a mapped master asset and the derivative of this asset is just calculated by the pipeline. Furthermore, the listener triggers an update of the "MediaAssetQualityEnumeration".
• Delete derivative The listener listens to the notification queue on the topic "DeleteDerivative" for a "F_DERIVATE.DEV_ID" which has to be a number (the number of a derivative schema id) and for the "F_IMGKOMP.PKOM_PNR" (the master asset identifier). The listener triggers a deletion of all to Product 360 object assigned media asset document for the corresponding master asset identifier and quality(derivative schema id). Typically this notification is sent if the pipeline has deleted a derivative.
• Notifications from the queue "heiler.hmm.backend.event.assignment"• Assign document The server job "AssignDocumentJob" picks the next message up from the notification
queue, if it has the topic "AssignDocument" with a property "F_IMGKOMP.PKOM_PNR" which has to be a string(the identifier of the media asset), a "F_IMGKOMP.PIMG_SOURCE_FILENAME" which has to be a string(the name of the media asset), and a "F_IMGKOMP.PIMG_CATALOG_ID" which has to be a string(the identifier of the catalog), the the server job triggers an assignment of corresponding media asset document to a Product 360 catalog object.
• New derivative of a media asset The server job "AssignDocumentJob" picks the next message up from the notification queue, if it has the topic "NewDerivative" with a property "F_DERIVATE.DEV_ID" which has to be a number (the number of a derivative schema id) and a "F_IMGKOMP.PKOM_PNR" which has to be a string(the master asset identifier). The server job triggers a creation of a new media asset document on the media assets which contain the master asset identifier in a media asset document which has the master asset quality (e.g. originalimage). Typically this notification is sent if the pipeline has rendered a derivative quality.
• Notifications from the queue "heiler.hmm.backend.event.assetModified"• Asset modified The server job "UpdateModifiedAssetJob" picks the next message up from the notification
queue, if it has the topic "AssetModified" with a property "F_IMGKOMP.PKOM_PNR" which has to be a string(the identifier of the changed media asset), the server job triggers the update of the "modificationTimestamp" for the corresponding media asset documents, meida assets and assinged objects(item, product and structure group).
There are example workflows existing which can be imported into the Product 360 - Media Manager workflow manager.
How to work with workflows and how to change and modify workflows inside the workflow manager is described in the Product 360 - Media Manager manual and is only supported by the Product 360 - Media Manager consulting and support teams.
The corresponding example workflows contains also another useful workflows which should be adjusted and imported into the Product 360 - Media Manager workflow manager. Especially the workflow "Automatic group assignment" should be actived to automatically assign all unassigned images( images which are not assigned to any other category) to the default category. For more details information please visit the page Media Manager Workflows.
To enable the message queue on the Product 360 - Media Manager side you have to start the activemq script on the Product 360 - Media Manager server by executing the startup.bat.

Informatica MDM - Product 360 Configuration 178
Adding new media asset attribute(property field) to the repositoryThe Product 360 - Server has read/write access to the media asset attributes of Product 360 - Media Manager.
Since the configuration of the Product 360 - Server repository is adjusted to the current state of supported media asset attributes, it might be necessary to add some (user defined) attributes.
This chapter describes how you can do this. It is assumed that you have installed the repository editor from the setup archive
PIM_<Version>_Rev-<Revision>_repoEdit_<OS>.zip, e.g. PIM_8.0.00.00_Rev-12345_repoEdit_win32.zip
To add new media asset attributes to the Product 360 - Server repository, perform the following steps:
Add new media asset attribute(property field) for media asset filePlease visit the following page for detailed information: Bring Media Manager property field in media asset file views of PIM desktop.
Add new media asset attribute(property field) for media asset document1. Open the C:\Informatica\server\configuration\HPM\Repository.repository file in the repository editor.2. In the "types" area, add an new field type under the entity type "MediaAssetDocumentAttributesType".
3. In the "custom" area, add an new field of the defined field type under the entity "MediaAssetDocumentAttributes".
Only the property field(meta data definition) of Product 360 - Media Manager can be added in Product 360 core in this way!
Note: The value of "Persistence XPath" is the identifier of corresponding Product 360 - Media Manager field, e.g. "F_IMGITEM.IMI_ITEM1" is the identifier for the first meta data value of asset, and so on.
Currently only read access is supported for the fields under the entity "MediaAssetDocumentAttributes", therefore the corresponding "Editable" property has to be set with "false".
Note: Add a field parameter under the field which has as key "mediaAssetProvider" and as value: "HMM" (this is necessary for the automatic detection of the necessary fields by the Product 360 - Server)

Informatica MDM - Product 360 Configuration 179
4. Add the respective field identifier with the language dependent name for each added field to the C:\Informatica\server\configuration\HPM\Repository.properties_[language key] (e.g. C:\Informatica\server\configuration\HPM\Repository.properties_en) files.
7.7.2 Product 360 - Desktop ClientThe respective plug-in on the client side which integrates the Media Manager web view in Product 360 Desktop, is not supported in standard Product 360 solution any more. If any reqular customer has always such request, please contact your administrator or our support.
7.8 Prevent deletion of assets used in Product 360
7.8.1 Installing the master asset support web servicesProduct 360 - Server provides two web services used by Product 360 - Media Manager, "isDerivationDefinitionInUse" and "isMediaAssetInUse".
To ensure that these are activated in Product 360, you have to check that the plugin com.heiler.ppm.mediaasset.ws.server.opasg is located in the C:\Informatica\server\plugins folder.
To check if the web services are available after the Product 360 - Server starts, enter the corresponding URL in your browser:
http://{host}:{port}/services/MediaAsset?wsdl
The value of the {host} and {port} are defined in NetworkConfig.xml. E.g. if the server node has a "host" attribute with "localhost" and the "http port" is set as 1512, then the URL will be http://localhost:1512/services/MediaAsset?wsdl
And the result should be:
7.8.2 Media Manager WebEnable the connection between the Media Manager Web application and Product 360 Server in the config fileOpasGWebServer\Tomcat\webapps\opas\conf\HPMConfig.xml
Setup
Note: Since Product 360 version 7.0.03 the media asset attribute with type "multiple selection list" can be also shown in Product 360 - Desktop client, for that the "Upper Bound" of the corresponding field type in repository must be set as "-1".
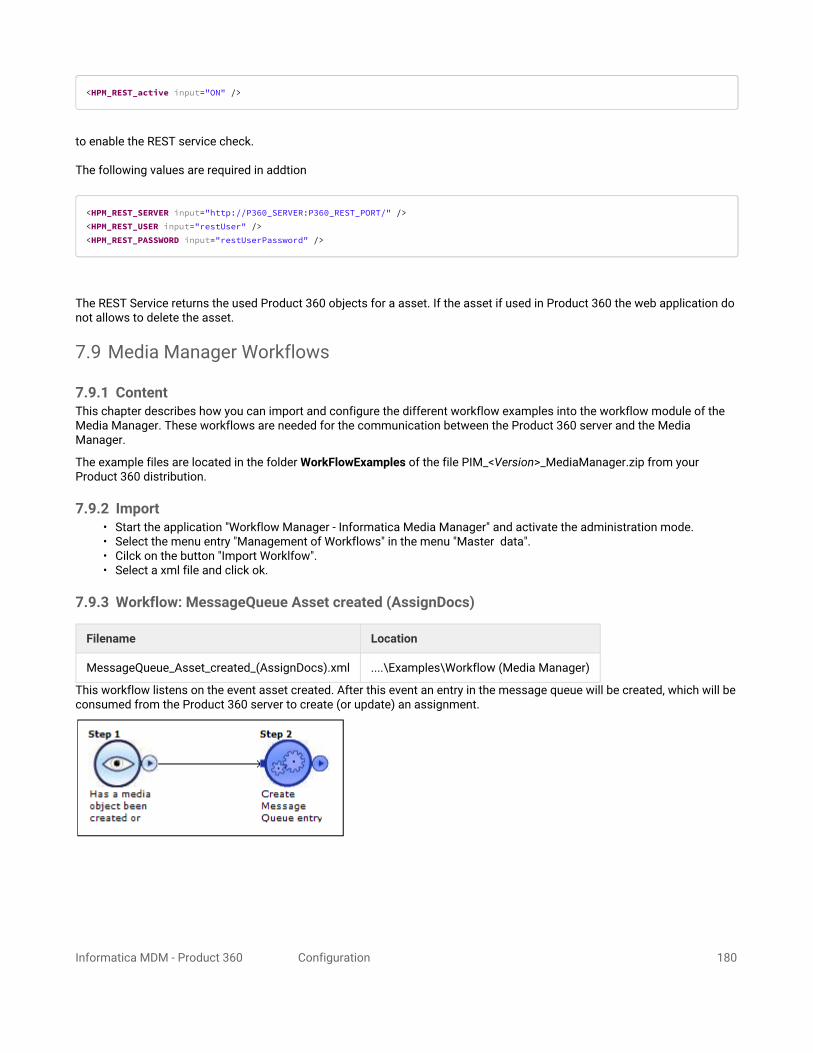
Informatica MDM - Product 360 Configuration 180
<HPM_REST_active input="ON" />
to enable the REST service check.
The following values are required in addtion
<HPM_REST_SERVER input="http://P360_SERVER:P360_REST_PORT/" /><HPM_REST_USER input="restUser" /><HPM_REST_PASSWORD input="restUserPassword" />
The REST Service returns the used Product 360 objects for a asset. If the asset if used in Product 360 the web application do not allows to delete the asset.
7.9 Media Manager Workflows
7.9.1 ContentThis chapter describes how you can import and configure the different workflow examples into the workflow module of the Media Manager. These workflows are needed for the communication between the Product 360 server and the Media Manager.
The example files are located in the folder WorkFlowExamples of the file PIM_<Version>_MediaManager.zip from your Product 360 distribution.
7.9.2 Import• Start the application "Workflow Manager - Informatica Media Manager" and activate the administration mode.• Select the menu entry "Management of Workflows" in the menu "Master data".• Cilck on the button "Import Worklfow".• Select a xml file and click ok.
7.9.3 Workflow: MessageQueue Asset created (AssignDocs)
Filename Location
MessageQueue_Asset_created_(AssignDocs).xml ....\Examples\Workflow (Media Manager)
This workflow listens on the event asset created. After this event an entry in the message queue will be created, which will be consumed from the Product 360 server to create (or update) an assignment.

Informatica MDM - Product 360 Configuration 181
Step Value(s) Change Value(s)
Comment
Definition
<WRFD_STATION>1</WRFD_STATION>
YES ID of the Media Manager Application Server where the Workflow Module is running in the automatic mode.
Step 1 D120001 YES Select the correct client, which stores the Product 360 assets.
Step 2 tcp://localhost:61616
heiler.hmm.backend.event
AssignDocument
F_IMGKOMP.PKOM_PNR
YES
NO
NO
NO
Replace the computer name localhost with the name of the computer where the MessageQueue is running.
7.9.4 Workflow: MessageQueue Asset modified
Filename Location
MessageQueue_Asset_modified.xml ....\Examples\Workflow (Media Manager)
This workflow listens on the event asset modified or created. After one of those events an entry in the message queue will be created, which will be consumed from the Product 360 server to update the assigned asset informations.
Step Value(s) Change Value(s)
Comment
Definition
<WRFD_STATION>1</WRFD_STATION>
YES ID of the Media Manager Application Server where the Workflow Module is running in the automatic mode.
Step 1 D120001 YES Select the correct client, which stores the Product 360 assets.
Step 2 tcp://localhost:61616
heiler.hmm.backend.event
AssetModified
F_IMGKOMP.PKOM_PNR
YES
NO
NO
NO
Replace the computer name localhost with the name of the computer where the MessageQueue is running.
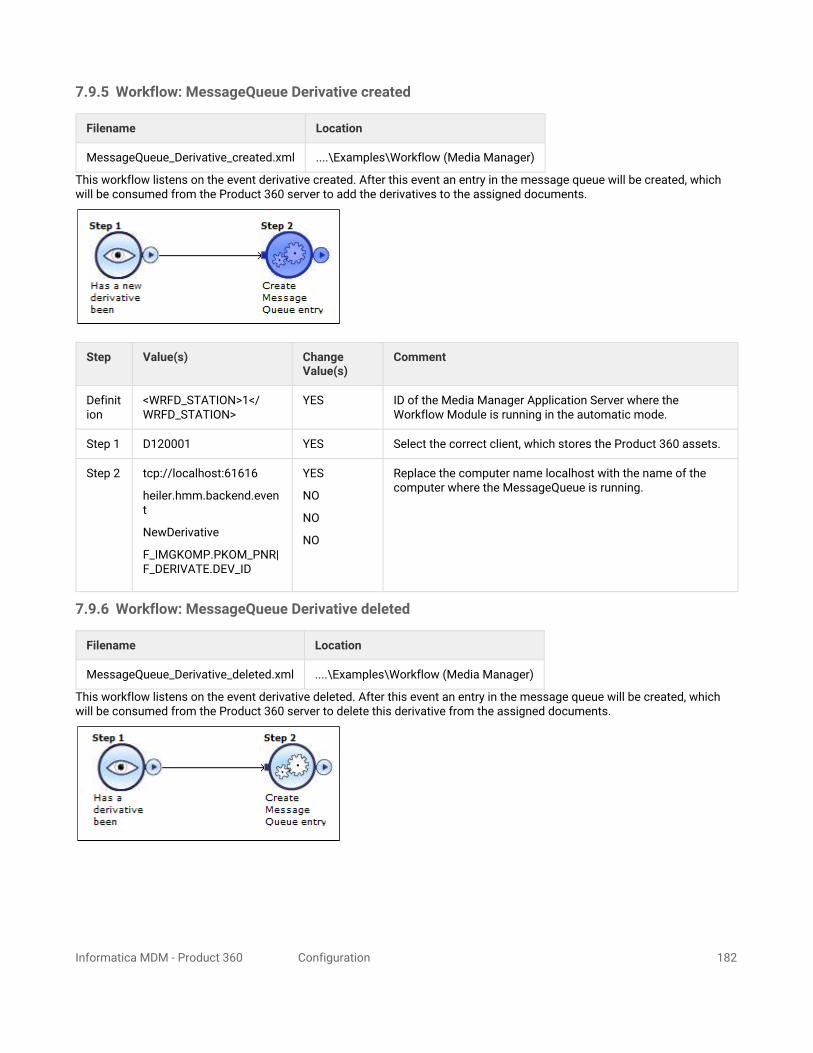
Informatica MDM - Product 360 Configuration 182
7.9.5 Workflow: MessageQueue Derivative created
Filename Location
MessageQueue_Derivative_created.xml ....\Examples\Workflow (Media Manager)
This workflow listens on the event derivative created. After this event an entry in the message queue will be created, which will be consumed from the Product 360 server to add the derivatives to the assigned documents.
Step Value(s) Change Value(s)
Comment
Definition
<WRFD_STATION>1</WRFD_STATION>
YES ID of the Media Manager Application Server where the Workflow Module is running in the automatic mode.
Step 1 D120001 YES Select the correct client, which stores the Product 360 assets.
Step 2 tcp://localhost:61616
heiler.hmm.backend.event
NewDerivative
F_IMGKOMP.PKOM_PNR|F_DERIVATE.DEV_ID
YES
NO
NO
NO
Replace the computer name localhost with the name of the computer where the MessageQueue is running.
7.9.6 Workflow: MessageQueue Derivative deleted
Filename Location
MessageQueue_Derivative_deleted.xml ....\Examples\Workflow (Media Manager)
This workflow listens on the event derivative deleted. After this event an entry in the message queue will be created, which will be consumed from the Product 360 server to delete this derivative from the assigned documents.

Informatica MDM - Product 360 Configuration 183
Step Value(s) Change Value(s)
Comment
Definition
<WRFD_STATION>1</WRFD_STATION>
YES ID of the Media Manager Application Server where the Workflow Module is running in the automatic mode.
Step 1 D120001 YES Select the correct client, which stores the Product 360 assets.
Step 2 tcp://localhost:61616
heiler.hmm.backend.event
DeleteDerivative
F_IMGKOMP.PKOM_PNR|F_DERIVATE.DEV_ID
YES
NO
NO
NO
Replace the computer name localhost with the name of the computer where the MessageQueue is running.
7.9.7 Workflow: MessageQueue Derivative modified
Filename Location
MessageQueue Derivative modified ....\Examples\Workflow (Media Manager)
This workflow listens on the event derivative modified. After this event an entry in the message queue will be created, which will be consumed from the Product 360 server to modify this derivative at the assigned documents.
Step Value(s) Change Value(s)
Comment
Definition
<WRFD_STATION>1</WRFD_STATION>
YES ID of the Media Manager Application Server where the Workflow Module is running in the automatic mode.
Step 1 D120001 YES Select the correct client, which stores the Product 360 assets.
Step 2 tcp://localhost:61616
heiler.hmm.backend.event
NewDerivative
F_IMGKOMP.PKOM_PNR|F_DERIVATE.DEV_ID
YES
NO
NO
NO
Replace the computer name localhost with the name of the computer where the MessageQueue is running.

Informatica MDM - Product 360 Configuration 184
7.9.8 Workflow: MessageQueue Derivative definition created
Filename Location
MessageQueue_Derivative_definition_created.xml ....\Examples\Workflow (Media Manager)
This workflow listens on the event derivative definition created. After this event an entry in the message queue will be created, which will be consumed from the Product 360 server to register this new definition..
Step Value(s) Change Value(s)
Comment
Definition
<WRFD_STATION>1</WRFD_STATION>
YES ID of the Media Manager Application Server where the Workflow Module is running in the automatic mode.
Step 1 D120001 YES Select the correct client, which stores the Product 360 assets.
Step 2 tcp://localhost:61616
heiler.hmm.backend.event
NewDerivativeSchema
F_DERIVATE.DEV_ID
YES
NO
NO
NO
Replace the computer name localhost with the name of the computer where the MessageQueue is running.
7.9.9 Workflow: MessageQueue Derivative definition deleted
Filename Location
MessageQueue_Derivative_definition_deleted.xml ....\Examples\Workflow (Media Manager)
This workflow listens on the event derivative definition deleted. After this event an entry in the message queue will be created, which will be consumed from the Product 360 server to unregister this definition..
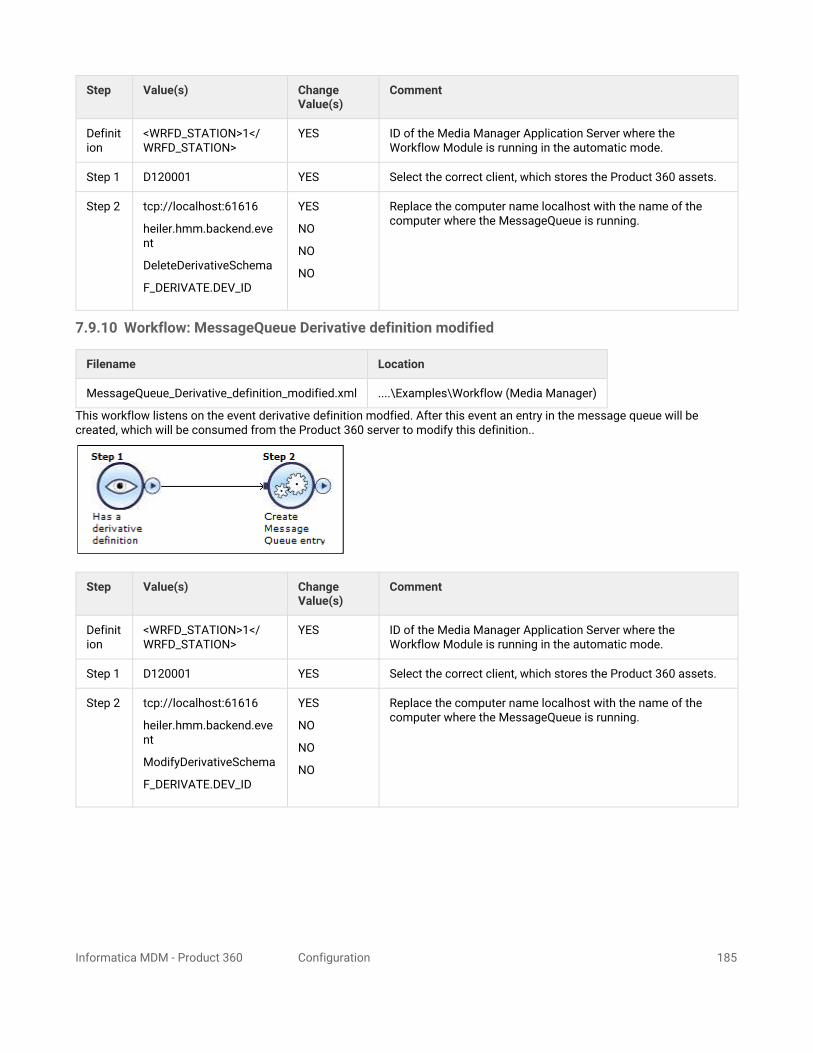
Informatica MDM - Product 360 Configuration 185
Step Value(s) Change Value(s)
Comment
Definition
<WRFD_STATION>1</WRFD_STATION>
YES ID of the Media Manager Application Server where the Workflow Module is running in the automatic mode.
Step 1 D120001 YES Select the correct client, which stores the Product 360 assets.
Step 2 tcp://localhost:61616
heiler.hmm.backend.event
DeleteDerivativeSchema
F_DERIVATE.DEV_ID
YES
NO
NO
NO
Replace the computer name localhost with the name of the computer where the MessageQueue is running.
7.9.10 Workflow: MessageQueue Derivative definition modified
Filename Location
MessageQueue_Derivative_definition_modified.xml ....\Examples\Workflow (Media Manager)
This workflow listens on the event derivative definition modfied. After this event an entry in the message queue will be created, which will be consumed from the Product 360 server to modify this definition..
Step Value(s) Change Value(s)
Comment
Definition
<WRFD_STATION>1</WRFD_STATION>
YES ID of the Media Manager Application Server where the Workflow Module is running in the automatic mode.
Step 1 D120001 YES Select the correct client, which stores the Product 360 assets.
Step 2 tcp://localhost:61616
heiler.hmm.backend.event
ModifyDerivativeSchema
F_DERIVATE.DEV_ID
YES
NO
NO
NO
Replace the computer name localhost with the name of the computer where the MessageQueue is running.

Informatica MDM - Product 360 Configuration 186
7.9.11 Workflow: Automatic group assignment
Filename Location
Automatic_group_assignment.xml ....\Examples\Workflow (Media Manager)
This workflow listens on the event asset modfied or created. Atfer that event it will be checked wether it is assigned to any group.If not it is added to the group "Unassigned" otherwise it is removed from the group "Unassigned".
Step Value(s) Change Value(s)
Comment
Definition
<WRFD_STATION>1</WRFD_STATION>
YES ID of the Media Manager Application Server where the Workflow Module is running in the automatic mode.
Step 1
D120001 YES Select the correct client, which stores the Product 360 assets.
Step 2
'1'
1
F_IMGKOMP, F_IMGKOHI
F_IMGKOHI.IMHI_PNR = F_IMGKOMP.PKOM_PNR
NO
NO
NO
NO
Sql statement to check if there is any group assignment for this asset.
Step 3
'1'
1
F_IMGKOMP, F_IMGKOHI
F_IMGKOHI.IMHI_PNR = F_IMGKOMP.PKOM_PNR and not(F_IMGKOHI.IMHI_IHIE_ID like '006400000000%')
NO
NO
NO
YES
Sql statement to check if there is a group assignment for this asset, but not group with the id; 00640000000.........The string 006400000000 has to be adapted to your system group id,

Informatica MDM - Product 360 Configuration 187
Step Value(s) Change Value(s)
Comment
Step 4
00640000000........ YES Remove assignment from the unassigned group, This group id has to be changed.
Step 5
00640000000........ YES Assignment the asset to the unassigned group, This group id has to be changed.
8 Supplier Portal ConfigurationIn this manual, configuration settings for Product 360 - Supplier Portal are described.
8.1 Configuration Setup and General DescriptionAll configuration properties can be defined in a single property file - the path of the configuration file is defined in the settings of your application server and is passed as argument to the Product 360 - Supplier Portal war file. The default is <P360_SUPPLIER_PORTAL_INSTALLATION_ROOT>/configuration directory in the Product 360 - Supplier Portal installation package.
The application has to be restarted on the application server in order to have changes take effect. It is recommended to always restart the Tomcat instead of restarting the webapp only. This is to avoid PermGen Out of Memory errors.
The configuration file itself contains properties following the standard "key: value" pattern.
If a configuration property is not set in the configuration properties file, the default value from the war file is taken.
8.1.1 Property DescriptionThe following tables contain a complete list of all properties available in Product 360 - Supplier Portal, grouped by functionality. Each property is described with further explanation and examples.
If a property uses cron expressions, you can have a look at http://www.quartz-scheduler.org/documentation/quartz-1.x/tutorials/crontrigger for further information.
Database settings
database.type
Database type, see http://activiti.org/userguide/#supporteddatabasesMainly used for Activiti and Database creation:
oracle
mssql
h2
Default: mssql
Please keep in mind, that every 'properties' file (ending with *.properties) will be read and all contained properties will be imported (e.g. if you have a copy of the configuration.properties file which also ends with *.properties and its properties are changed, this could lead to unpredictable property values of the Product 360 - Supplier Portal system). Therefore it is highly recommended to have only one properties file in the configuration folder.

Informatica MDM - Product 360 Configuration 188
database.name
MSSQL: Name of the created database
e.g. database.name=hsx_1.4
Oracle: SID or ServiceName of the Oracle DB
e.g. database.name=XE
Default: database.name=hsx_1.4
database.server
Hostname of the database server
Default: database.server=localhost
database.port
Port number of the database server
Default: MSSQL defaul is database.port=1433
database.username
User name for the database connectionCAUTION: Oracle needs the username in uppercase letters.
database.password
Password for the database connection
database.systemUser
Only for ORACLE Database Installation.
User which has the permission to create other users/tablespaces, is needed only to run the database creation script, feel free to remove this property after successfull script execution.
e.g. database.systemUser=SYSTEM
database.systemUser
Only for ORACLE Database Installation.
password for the above specified database system user
database.data.dir
Specifies the operating-system path to the database data file.
If you want to connect P360 Supplier Portal to an Oracle Database via TCPS, please refer to chapter "How to configure Oracle TCPS connection for P360 Supplier Portal" in the "Supplier Portal Configuration" manual.

Informatica MDM - Product 360 Configuration 189
database.data.size
Oracle:
Specify the size of the database data tablespace file in bytes. Use K, M, G, or T to specify the size in kilobytes, megabytes, gigabytes, or terabytes. Specify a whole number; do not include a decimal.
MSSQL:
Is the initial size of the database data file. The kilobyte (KB), megabyte (MB), gigabyte (GB), or terabyte (TB) suffixes can be used. The default is MB. Specify a whole number; do not include a decimal. The minimum value for size is 512 KB.
Default:
database.data.size=128MB
database.data.size.growth
Oracle:
specify the size in bytes of the next increment of disk space to be allocated automatically when more extents are required. Use K, M, G, or T to specify the size in kilobytes, megabytes, gigabytes, or terabytes.Specify a whole number; do not include a decimal.
MSSQL:
Specifies the growth increment of the databases data file. It is the amount of space added to the database data file each time new space is needed. Specify a whole number; do not include a decimal. A value of 0 indicates no growth. The value can be specified in MB, KB, GB, TB, or percent (%). If a number is specified without an MB, KB, or % suffix, the default is MB. When % is specified, the growth increment size is the specified percentage of the size of the database data file at the time the increment occurs.
Default:
database.data.size.growth=64MB
database.log.dir
Only for MSSQL Database Installation.
Specifies the operating-system path to the database log file.
database.log.size
Only for MSSQL Database Installation.
Is the initial size of the database log file. The kilobyte (KB), megabyte (MB), gigabyte (GB), or terabyte (TB) suffixes can be used. The default is MB. Specify a whole number; do not include a decimal. The minimum value for size is 512 KB.
Default:
database.log.size=128MB

Informatica MDM - Product 360 Configuration 190
database.log.size.growth
Only for MSSQL Database Installation.
Specifies the growth increment of the databases log file. It is the amount of space added to the database log file each time new space is needed. Specify a whole number; do not include a decimal. A value of 0 indicates no growth. The value can be specified in MB, KB, GB, TB, or percent (%). If a number is specified without an MB, KB, or % suffix, the default is MB. When % is specified, the growth increment size is the specified percentage of the size of the database log file at the time the increment occurs.
Default:
database.log.size.growth=64MB
database.temp.dir
Only for ORACLE Database Installation.
Specifies the operating-system path to the database temporary tablespace file.
database.temp.size
Only for ORACLE Database Installation.
Specify the size of the database temporary tablespace file in bytes. Use K, M, G, or T to specify the size in kilobytes, megabytes, gigabytes, or terabytes. Specify a whole number; do not include a decimal.
Default:
database.temp.size=128MB
database.temp.size.growth
Only for ORACLE Database Installation.
specify the size in bytes of the next increment of disk space to be allocated automatically when more extents are required. Use K, M, G, or T to specify the size in kilobytes, megabytes, gigabytes, or terabytes.Specify a whole number; do not include a decimal.
Default:
database.temp.size.growth=64MB
database.index.dir
Only for ORACLE Database Installation.
Specifies the operating-system path to the database index tablespace data file.
database.index.size
Only for ORACLE Database Installation.
Specify the size of the database index tablespace data file in bytes. Use K, M, G, or T to specify the size in kilobytes, megabytes, gigabytes, or terabytes. Specify a whole number; do not include a decimal.
Default:
database.data.size=128MB

Informatica MDM - Product 360 Configuration 191
database.index.size.growth
Only for ORACLE Database Installation.
specify the size in bytes of the next increment of disk space to be allocated automatically when more extents are required. Use K, M, G, or T to specify the size in kilobytes, megabytes, gigabytes, or terabytes.Specify a whole number; do not include a decimal.
Default:
database.data.size.growth=64MB
database.url JDBC database URL connection string. Generally starts with "jdbc:". Examples:
jdbc:oracle:thin:@databaseServer:1521:sid
jdbc:jtds:sqlserver://databaseServer:1433;DatabaseName=HENRI
jdbc:h2:~/.hsp/database/dev;FILE_LOCK=NO´
Default:
automatically set though database.type declaration.
${database.url.${database.type}}
database.driverClassName
Java class name of the JDBC driver to use. See the JDBC driver manual for details. Supported values are:
oracle.jdbc.driver.OracleDriver
net.sourceforge.jtds.jdbc.Driver
org.h2.Driver
Default: automatically set though database.type declaration.
database.driverClassName=${database.driverClassName.${database.type}}
persistence.xmlLocation
Location pointing to the Hibernate XML configuration file.This is a SPRING resource path, more information: http://static.springsource.org/spring/docs/current/spring-framework-reference/html/resources.html
Example:
file:///C:/Informatica/SupplierPortal/configuration/persistence-mssql.xml
Default:
persistence.xmlLocation=file:///${hsx.configurationArea}/persistence-${database.type}.xml
where ${hsx.configurationArea} and ${database.type} are variables which get replaced on runtime.
persistence.unitName
Name of the Hibernate persistence unit. Same as defined in persistence.xml. Example
default
Default: default

Informatica MDM - Product 360 Configuration 192
Database connection pool settings (since 8.0.6.02)
Settings for the database connection pool. Typically, Supplier Portal doesn't execute expensive and long lasting operations on database level (import jobs are handled in Product 360 server).However, for high load scenarios with many concurrent users, the defaults should be updated.Detailed explanation of the ObjectPool parameters: https://commons.apache.org/proper/commons-pool/api-1.6/org/apache/commons/pool/impl/GenericObjectPool.html
# Maximum number of active connections that can be allocated at the same time database.pool.maxActive=8# Maximum number of connections that can remain idledatabase.pool.maxIdle=8# Minimum number of idle connections in the pooldatabase.pool.minIdle=0# Maximum amount of time (in milliseconds) the borrowObject method should block before throwing an exception when the pool is exhausted. Use -1 to make the pool wait indefinitely.database.pool.maxWait=-1# Whether or not the pool will validate objects before they are borrowed from the pooldatabase.pool.testOnBorrow=true# Whether or not the pool will validate objects before they are returned to the pooldatabase.pool.testOnReturn=false
# The SQL query that will be used to validate connections from this pool before returning them to the caller. # MSSQL Server database.pool.validationQuery=select 1 # H2 #database.pool.validationQuery=select 1# Oracle #database.pool.validationQuery=select 1 from dual
Import settings
import.autoImportDefault Configures the default auto import policy. New suppliers (invited or registered) get this value as default. It can be changed in the UI by the portal administrator.Options are
• MANUAL_IMPORT• AUTO_IMPORT_NO_ERRORS• AUTO_IMPORT_NO_WARNINGS
Default:
MANUAL_IMPORT
import.automaticImportExecutionDelay
Can be configured at supplier level to trigger an import after a successful test run. The execution is delayed by the given number of milliseconds.
restartUploadWizardWhenFinished
Configures what happens to suppliers once they finished uploading their data.If set to false, user will be brought to the timeline after clicking through the upload wizard.if set to true, the wizard will start from the beginning with the same catalog context.
HPM settings

Informatica MDM - Product 360 Configuration 193
hpm.restUri REST base URL to Product 360 - Server. For host name and web server port see your Product 360 - Server configuration. Example:
http://hpmServer:1501/rest
hpm.systemUserName
Internal HPM user name that is used to trigger Product 360 - Server communication (e.g. start a test run) for supplier users.For all communication triggered by portal admins the corresponding Product 360 - Server credentials are being used.
hpm.systemUserPassword
Internal Product 360 - Server user password
hpm.requestChunkSizeInBytes
Chunk size in bytes for HTTP file transfer to Product 360 - Server.
Example value: 1048576
Default:
1048576
hpm.webClientUri Base URL of the Product 360 - Web. Only used if permission.itemeditor is true. Example:
http://hpmserver:1501/pim/webaccess
hpm.embedded.itemeditor
Global switch to enable/disable embedded item editor view.Options are TRUE and FALSE:- TRUE: item editor for supplier users appears embedded within Supplier Portal- FALSE: items editor for supplier users appears in a separate browser tab
HMM settings
hmm.restUri REST base URL to Product 360 - Media Manager.For host name and web server port see your Product 360 - Media Manager configuration. Example: http://hmmServer:8080/rest/rest
hmm.requestChunkSizeInBytes
Chunk size in bytes for HTTP file transfer to Product 360 - Media Manager.
Example value: 1048576
Default: 1048576
Mail settings
mail.enabled Global switch to enable/disable mail functionality (boolean value).If true, the following parameters need to be used for mail server configuration.(It does not make much sense to use Product 360 - Supplier Portal without a mail server.)
Default: false

Informatica MDM - Product 360 Configuration 194
mail.protocol Mail protocol as passed to javax.mail.
Example value: smtp
Default: smtp
mail.serverHost Mail server host.
Example value:
smtp.company.com
mail.serverPort Mail server port. Example:
25
Default: 25
mail.senderAddressDefault
The default sender address for mails. Will be used and displayed as mail sender. Has to follow a valid email pattern.Example value:
mail.username User name if the mail server demands authentication. Can be empty otherwise.
mail.password User password for mail server authentication.
mail.templateFolderPath
Directory which contains mail templates that overwrite the default templates provided within the war file. You can also download the default templates using this link.
Default: file:///${hsx.configurationArea}/mailTemplates/
Filestorage settings
fileStorageService.rootDirectory Folder pointing to the root directory for all binary files.Make sure that the folder exists and that there is enough space available.In production environments this directory should point to a fail-safe volume (e.g. RAID).
Default: C:/Informatica/PIM/SupplierPortal/filestorage
FileShareAdapter settings
These settings are only needed if no Product 360 - Media Manager is available. Instead, a file based file share adapter can be configuredthat puts all uploaded media files in a single directory. If Product 360 - Media Manager is used, no values need to be configured.

Informatica MDM - Product 360 Configuration 195
fileshare.adapter.home.dir
Path to the Digital Asset Management System (DAM) home folder where the media assets from Product 360 - Supplier Portal shall be sent to.The user running the Tomcat server for Product 360 - Supplier Portal needs to have read/write access to that folder.Existing files will be overwritten. Examples:
C:/Informatica/PIM/SupplierPortal/DAM//ServerName/ShareFolder
Default: C:/Informatica/PIM/SupplierPortal/DAM
fileshare.adapter.supplier.subfolder
Create a supplier sub-folder. If true, a sub-folder for the specific supplier (if not already existing) will be created in the DAM home folder. The name of the folder is the supplier identifier. If false, the DAM home folder root is used.
Default: true
fileshare.adapter.catalog.subfolder
Create a catalog sub-folder. If true, a sub-folder of the supplier folder (if not already existing) will be created. The name of the folder is the catalog identifier. If supplier sub-folder is false and catalog sub-folder is true, it will be implicitly assumed that supplier sub-folder is true.
Default: true
fileshare.adapter.unzip.images
If true, the media archive will be unzipped before it is uploaded to the specific folder. Otherwise the zipped file is placed at the specific folder.
Default: false
fileshare.adapter.post.copy.step
If defined, a batch script is called after the previous upload steps are completed. This property defines the batch script (including path) or is empty if no post copy step is needed. Examples:
C:/Informatica/PIM/SupplierPortal/bin/MyBatchScript.bat//ServerName/ShareFolder/BIN/MyBatchScript.bat
Media Asset settings (MAM)
These settings apply to both Product 360 - Supplier Portal and FileShareAdapter.
mam.mapping.available Allows to hide the special MAM mapping to upload images. If false, this mapping will not be shown,e.g. Product 360 - Supplier Portal can be used without any MAM system as back-end.
Default: true
mam.mapping.name The name of the MAM mapping. This is displayed to the supplier user in the first step of the upload process. As mappings from Product 360 - Server cannot be shown in more than one language, the name of the MAM mapping is unique too.
Default: Media Assets

Informatica MDM - Product 360 Configuration 196
mam.mapping.text A longer description text for the MAM mapping.
Default: Use this mapping to provide your media files.
mam.mapping.datasource.name
The name of the first and only mapping datasource.
Default: Zipped media files
mam.mapping.datasource.text
A longer description text for the mapping datasource.
Default: A zip archive containing all media assets.
Internationalization / UI language settings
i18n.defaultUiLocale Default locale of the system in JAVA syntax. This value is used as default for new users.
Example value: en_US
Default: en_US
i18n.availableUiLocales Property is not used in Product 360 7.0.04
List of all available locales in JAVA syntax, separated by comma.
Example value: de_DE,en_US
Default: de_DE,en_US
i18n.defaultDataLocale The default language (locale) that is used for language specific data, f.e. catalog names.
The format is ISO 3166-1 alpha-2.
Default: en_US
i18n.availableDataLocales The languages (locales) that are used for language specific data, f.e. all languages for which catalog names are maintained.
The format is ISO 3166-1 alpha-2.
Default: de_DE,en_US,fr_FR,ru_RU,nl_NL,sv_SE,fi_FI,es_ES,no_NO
Dataload job settings

Informatica MDM - Product 360 Configuration 197
synchronizePendingImportRunJob.trigger.cronExpression
Timer settings for the Product 360 - Server sync job following the cron expression pattern. This job polls Product 360 - Server for updates of running test runs / import runs. If such a run is finished, the Product 360 - Supplier Portal workflowmail continues.Example value to run every 10 seconds:
0,10,20,30,40,50 * * * * ?
Default:
# Run every 10 seconds
0,10,20,30,40,50 * * * * ?
synchronizePendingImportRunJob.lockAtMost (since 8.1.1)
Defines how long (in ms) the job lock should be kept in case the machine which obtained the lock died before releasing it.This is just a fallback, under normal circumstances the lock is released as soon the tasks finishes. Negative value means default (1 hour)
Default: 9000 (ms) = 9s
removeOldImportFiles.trigger.cronExpression
Timer settings for the old import files cleanup job following the cron expression pattern. This job removes product data and media data import files which overpass a specific amount of days.Example value to run every 10 seconds:
0,10,20,30,40,50 * * * * ?
Default:
# run every night at 01:00 a.m.
0 0 1 * * ?
removeOldImportFiles.lockAtMost (since 8.1.1)
Defines how long (in ms) the job lock should be kept in case the machine which obtained the lock died before releasing it.This is just a fallback, under normal circumstances the lock is released as soon the tasks finishes. Negative value means default (1 hour)
Default: 3600000 (ms) = 1h
removeOldImportFiles.productFiles.olderThan
Configuration of the import files cleanup jobRemove all product data import files older than x days
Default: 365
removeOldImportFiles.mediaFiles.olderThan
Configuration of the import files cleanup jobRemove all media data import files older than x days
Default: 365
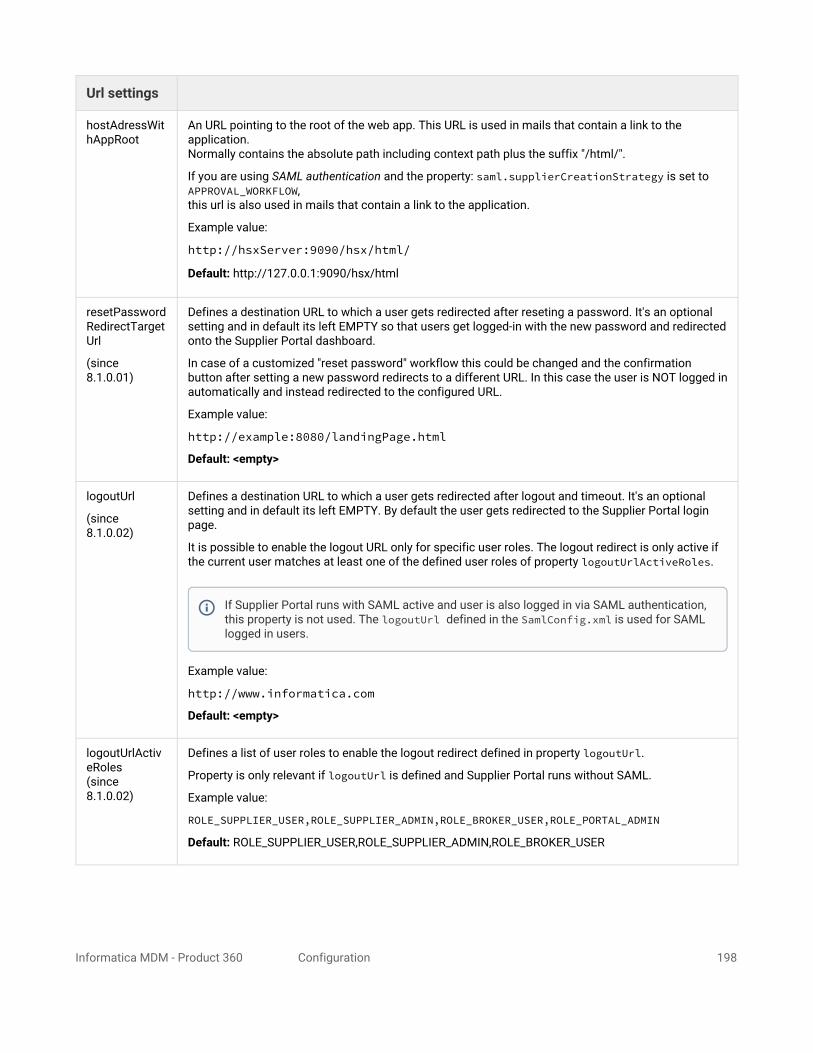
Informatica MDM - Product 360 Configuration 198
Url settings
hostAdressWithAppRoot
An URL pointing to the root of the web app. This URL is used in mails that contain a link to the application.Normally contains the absolute path including context path plus the suffix "/html/".
If you are using SAML authentication and the property: saml.supplierCreationStrategy is set to APPROVAL_WORKFLOW, this url is also used in mails that contain a link to the application.
Example value:
http://hsxServer:9090/hsx/html/
Default: http://127.0.0.1:9090/hsx/html
resetPasswordRedirectTargetUrl
(since 8.1.0.01)
Defines a destination URL to which a user gets redirected after reseting a password. It's an optional setting and in default its left EMPTY so that users get logged-in with the new password and redirected onto the Supplier Portal dashboard.
In case of a customized "reset password" workflow this could be changed and the confirmation button after setting a new password redirects to a different URL. In this case the user is NOT logged in automatically and instead redirected to the configured URL.
Example value:
http://example:8080/landingPage.html
Default: <empty>
logoutUrl
(since 8.1.0.02)
Defines a destination URL to which a user gets redirected after logout and timeout. It's an optional setting and in default its left EMPTY. By default the user gets redirected to the Supplier Portal login page.
It is possible to enable the logout URL only for specific user roles. The logout redirect is only active if the current user matches at least one of the defined user roles of property logoutUrlActiveRoles.
Example value:
http://www.informatica.com
Default: <empty>
logoutUrlActiveRoles(since 8.1.0.02)
Defines a list of user roles to enable the logout redirect defined in property logoutUrl.
Property is only relevant if logoutUrl is defined and Supplier Portal runs without SAML.
Example value:
ROLE_SUPPLIER_USER,ROLE_SUPPLIER_ADMIN,ROLE_BROKER_USER,ROLE_PORTAL_ADMIN
Default: ROLE_SUPPLIER_USER,ROLE_SUPPLIER_ADMIN,ROLE_BROKER_USER
If Supplier Portal runs with SAML active and user is also logged in via SAML authentication, this property is not used. The logoutUrl defined in the SamlConfig.xml is used for SAML logged in users.

Informatica MDM - Product 360 Configuration 199
File upload content filter settings
content.filter.enabled Global switch to enable/disable content filtering of all uploaded files.
If enabled, the parameter content.filter.accepted.mime.types provides a white list of all accepted file types.
Default: true
content.filter.accepted.mime.type List of accepted mime types for content filtering of uploaded files. All other files will be rejected during upload.A list of valid mime types can be found here: http://www.iana.org/assignments/media-types/media-types.xhtml
Default:
application/xml,text/csv,application/vnd.ms-excel,application/vnd.openxmlformats-officedocument.spreadsheetml.sheet,application/vnd.ms-excel.sheet.macroenabled.12,image/png,image/jpeg,image/gif,application/pdf,application/gzip,application/zip
Image resizing settings
image.resize The width uploaded user avatar images will be resized to.
Default: 256
image.resize.height The height uploaded user avatar images will be resized to.
Default: 256
Timeline / notification settings
Default values for mail notifications of new feed messages(can be individually changed per user in personal settings)
Supplier:
feednotification.supplier.USER_REQUEST Notify if new user message has been committed to the timeline that is visible for that supplier (boolean value).
feednotification.supplier.USER_REGISTRATION
Notify if a new user has registered for that supplier (boolean value).
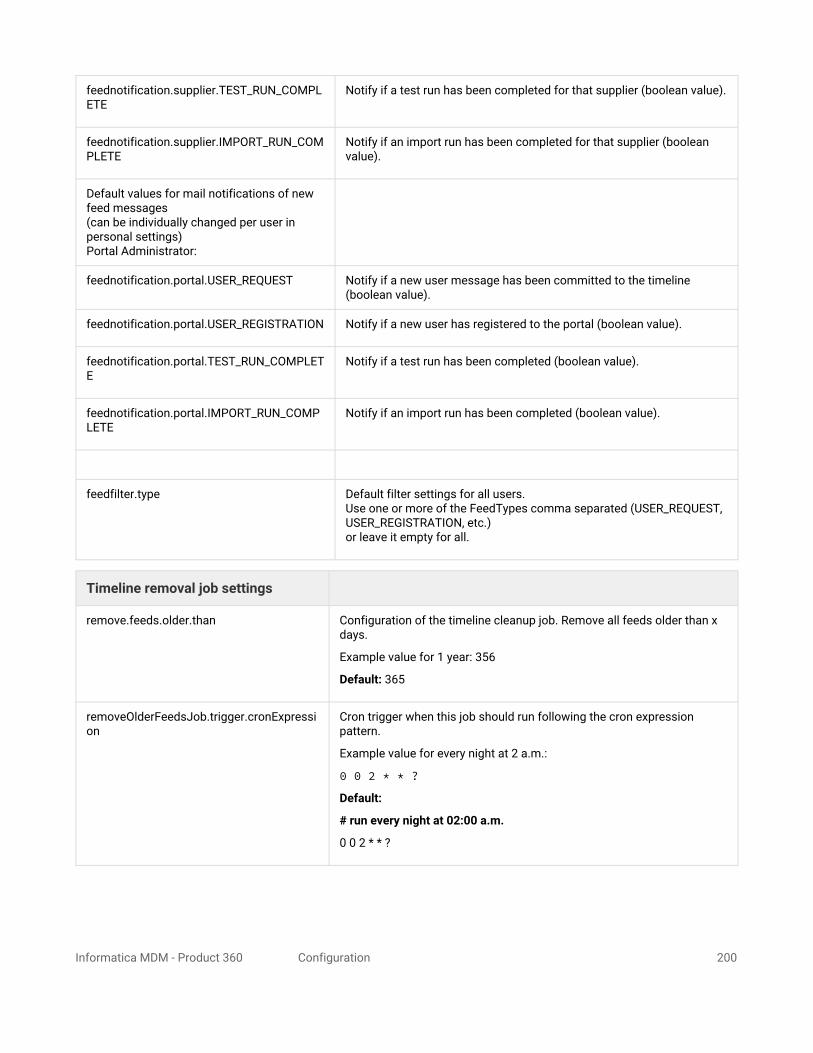
Informatica MDM - Product 360 Configuration 200
feednotification.supplier.TEST_RUN_COMPLETE
Notify if a test run has been completed for that supplier (boolean value).
feednotification.supplier.IMPORT_RUN_COMPLETE
Notify if an import run has been completed for that supplier (boolean value).
Default values for mail notifications of new feed messages (can be individually changed per user in personal settings)Portal Administrator:
feednotification.portal.USER_REQUEST Notify if a new user message has been committed to the timeline (boolean value).
feednotification.portal.USER_REGISTRATION Notify if a new user has registered to the portal (boolean value).
feednotification.portal.TEST_RUN_COMPLETE
Notify if a test run has been completed (boolean value).
feednotification.portal.IMPORT_RUN_COMPLETE
Notify if an import run has been completed (boolean value).
feedfilter.type Default filter settings for all users. Use one or more of the FeedTypes comma separated (USER_REQUEST, USER_REGISTRATION, etc.)or leave it empty for all.
Timeline removal job settings
remove.feeds.older.than Configuration of the timeline cleanup job. Remove all feeds older than x days.
Example value for 1 year: 356
Default: 365
removeOlderFeedsJob.trigger.cronExpression
Cron trigger when this job should run following the cron expression pattern.
Example value for every night at 2 a.m.:
0 0 2 * * ?
Default:
# run every night at 02:00 a.m.
0 0 2 * * ?
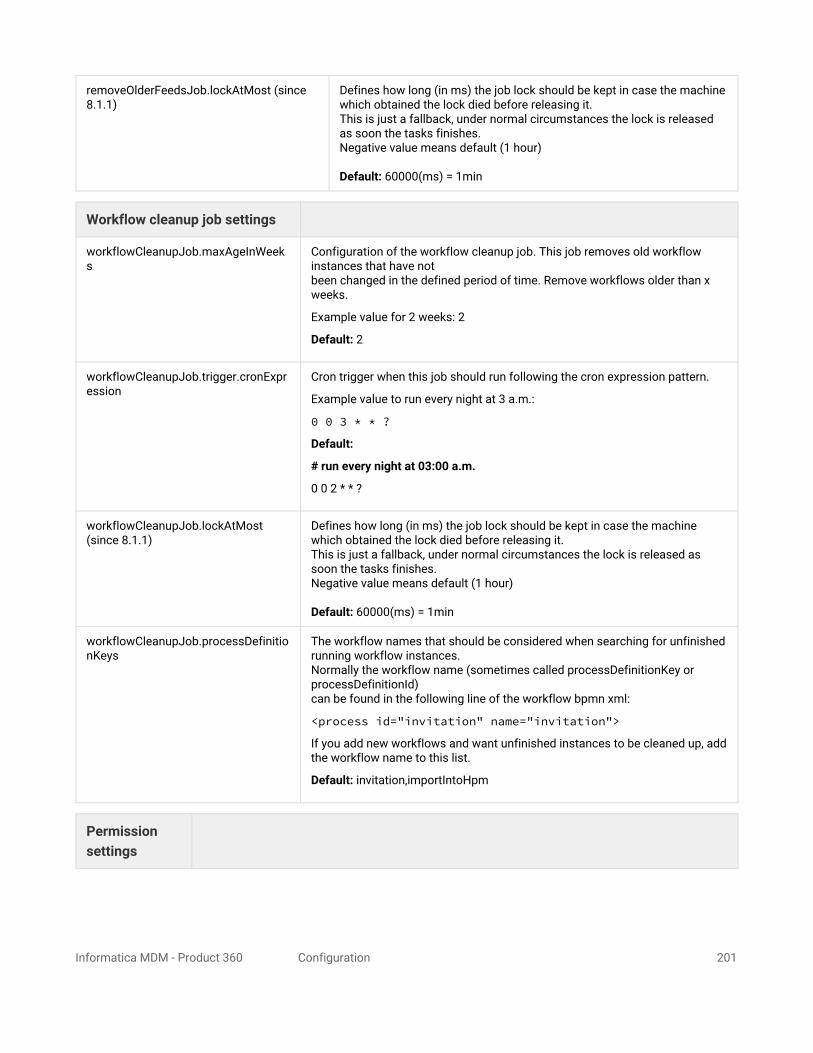
Informatica MDM - Product 360 Configuration 201
removeOlderFeedsJob.lockAtMost (since 8.1.1)
Defines how long (in ms) the job lock should be kept in case the machine which obtained the lock died before releasing it.This is just a fallback, under normal circumstances the lock is released as soon the tasks finishes. Negative value means default (1 hour)
Default: 60000(ms) = 1min
Workflow cleanup job settings
workflowCleanupJob.maxAgeInWeeks
Configuration of the workflow cleanup job. This job removes old workflow instances that have not been changed in the defined period of time. Remove workflows older than x weeks.
Example value for 2 weeks: 2
Default: 2
workflowCleanupJob.trigger.cronExpression
Cron trigger when this job should run following the cron expression pattern.
Example value to run every night at 3 a.m.:
0 0 3 * * ?
Default:
# run every night at 03:00 a.m.
0 0 2 * * ?
workflowCleanupJob.lockAtMost (since 8.1.1)
Defines how long (in ms) the job lock should be kept in case the machine which obtained the lock died before releasing it.This is just a fallback, under normal circumstances the lock is released as soon the tasks finishes. Negative value means default (1 hour)
Default: 60000(ms) = 1min
workflowCleanupJob.processDefinitionKeys
The workflow names that should be considered when searching for unfinished running workflow instances. Normally the workflow name (sometimes called processDefinitionKey or processDefinitionId) can be found in the following line of the workflow bpmn xml:
<process id="invitation" name="invitation">
If you add new workflows and want unfinished instances to be cleaned up, add the workflow name to this list.
Default: invitation,importIntoHpm
Permission settings

Informatica MDM - Product 360 Configuration 202
global.permission.itemeditor
Global switch to enable/disable item editor functionality. New suppliers (invited or registered) get this value as default. It can be changed in the UI for each supplier separately by the portal administrator.Please check for communication settings Supplier Portal => Product 360 ServerPossible values:
• EDIT: items can be edited via item editor• READ: items can be viewed read only via item editor• RESTRICTED: items cannot be viewed and edited. Only portal admin can do any permission
changes for a supplier.• DISABLED: items cannot be seen. An item editor does not exist at all.
Default: RESTRICTED
global.permission.suppliertasks
Global switch to enable/disable the access to tasks assigned to Supplier Organization from Supplier Portal. Possible values:
• ENABLED: access to supplier tasks is enabled for the whole Supplier portal.• DISABLED: access to supplier tasks is disabled for the whole Supplier portal.
Default: DISABLED
permissions.portalAdmin
Defines a comma separated list of permissions which will be assigned to the portal admin role on startup. Possible values are:
• INVITE_SUPPLIER • VIEW_IMPORT_MANAGER • MANAGE_SUPPLIER_USER• MANAGE_SUPPLIER• START_DRY_RUN• MANAGE_BROKER_USER
Default:
INVITE_SUPPLIER,VIEW_IMPORT_MANAGER,MANAGE_SUPPLIER_USER,MANAGE_SUPPLIER,START_DRY_RUN,MANAGE_BROKER_USER
To get more detailed information on how to handle role permissions see the Customize User Interface.
permissions.supplierAdmin
Defines a comma seperated list of permissions which will be assigned to the portal admin role on startup. Possible values are:
• START_DRY_RUN• MANAGE_SUPPLIER_USER
Default:
START_DRY_RUN,MANAGE_SUPPLIER_USER
To get more detailed information on how to handle role permissions see the Customize User Interface.

Informatica MDM - Product 360 Configuration 203
permissions.broker
Defines a list of permissions which will be assigned to the broker role on startup. Possible values are:
• START_DRY_RUN
Default:
START_DRY_RUN
urlToken.maxAge
For url token authentication. Defines the time slot after that an issued token expires.Expired tokens cannot be used for authentication anymore. Value is in seconds.
Default: 60
License control settings
license.maximumActiveUsers The number of total active supplier users allowed. If more users are created (e.g. during invitation or registration),a warning will be displayed in the UI and written in the log file.
Default: 50
Customization settings
uiCustomizaton.file Defines the location ui customization file that allows to contribute new ui elements. An example and further details can be found in the Accelerators package under "Customize_User_Interface.html".
Default: file:///${hsx.configurationArea}/uiCustomization.json
dataModelCustomization.file Defines the location of the custom fields file that allows to contribute additional data model fields. An example and further details can be found in the Accelerators package under "Customized_Data_Model_for_Supplier_Data.html".
Default: file:///${hsx.configurationArea}/dataModelCustomization.json
registrationCustomization.defaultCatalogName
Defines the name of the default catalog which is created while activating a supplier over Supplier Hub. The pattern {SupplierName} is going to be replaced by the supplier's name on runtime.
Default: {SupplierName} - default Catalog
workflows.customizationFolderPath
Location of the folder containing customized workflows.
Default: file:///${hsx.configurationArea}/workflows/
Other Security Related Settings
keystore.location Defines the file location of the keystore to use

Informatica MDM - Product 360 Configuration 204
keystore.password Defines the password of the keystore defined via ${keystore.location} property
Load Balancer Settings for SAML setup
loadbalancer.schema Defines the file http transport protocol schema, either http or https
loadbalancer.contextPath The supplier portal context path must be set and start with a forward slash
Default: /hsx
loadbalancer.serverName The load balancer server name
loadbalancer.port The load balancer server port
saml.supplierCreationStrategy Define the strategy how to create suppliers, if SAML authentication is used.
Possible values are:
• AUTOMATIC: Supplier and supplier users will be created automatically.
• APPROVAL_WORKFLOW: Supplier and supplier users will be created with the registration workflow.
Default value is AUTOMATIC
Misc Settings
global.permission.ECCnetAccess
(since 8.0.6.01)
Global switch to enable/disable the ECCnet access from Supplier Portal.Possible values:
• ENABLED: ECCnet access is enabled. Means that by default ECCnet access is enabled for newly created suppliers. However, the portal administrator can revoke ECCnet access from the supplier.
• RESTRICTED: ECCnet access is available, but by default ECCnet access is disabled for newly created suppliers. However, the portal administrator can give ECCnet access to the supplier.
• DISABLED: ECCnet access is disabled for the whole Supplier portal.
Default: DISABLED
atmosphere.enabled
Can be used to turn push notifications off. Turn it off in case of issues in the network infrastructure, like proxies which are not deal with long running requests correctly.If set to false, users will not get notifications about new timeline messages unless refreshing the page explicitly or during navigation. Default value: true

Informatica MDM - Product 360 Configuration 205
atmosphere.defaultTransport
Default transport mode for server-side push notifications. Only applies, if atmosphere.enabled is true.Details: https://github.com/Atmosphere/atmosphere/wiki/atmosphere.js-APIPossible values: long-polling, streaming, jsonp, sse, websocketDefault value: streaming
atmosphere.fallbackTransport
Fallback transport mode for server-side push notifications. Only applies, if atmosphere.enabled is true.Fallback is used where there's an issue when estabilishing a connection to the server using the default mode.Details: https://github.com/Atmosphere/atmosphere/wiki/atmosphere.js-APIPossible values: long-polling, streaming, jsonp, sse, websocketDefault value: long-polling
Job Framework Settings (since 8.1.1)
job.threadPoolSize Set the Job Frameworks thread pool size.
Default: 10
job.threadNamePrefix Set the job frameworks thread name prefix.
Default: JobThread
job.defaultLockAtMostFor Scheduled (like import job synchronization,etc) jobs get locked to be sure to execute them only once at the same time. By setting defaultLockAtMostFor you make sure that the lock is released even if the node dies and make sure it's not executed more than once in the configured time duration (in minutes).Please note that if the job takes longer than the configured time duration, it will be executed again.
Default: 15
8.2 Item Editor configurationTo use the Product 360 Web Item Editor functionality as Product 360 Supplier Portal Item Editor you need to setup special Product 360 Core users which handle the item editor scenario. Follow the next subsections to create these users and appropriate user groups which include the minimal set of action rights that are needed for the Product 360 Supplier Portal Item Editor use case.
There are 3 different kinds of Product 360 Core Users for different Product 360 - Supplier Portal use cases:
• Product 360 Supplier Portal System User• This system user is used to authenticate REST requests at Product 360 - Server which are triggered by
suppliers (or Product 360 - Supplier Portal background jobs).
• Product 360 Supplier Portal Administrator Users• For all actions in Product 360 - Supplier Portal triggered by a portal administrator, the corresponding
credentials of the named user are used at the REST interface.

Informatica MDM - Product 360 Configuration 206
8.2.1 Create required Users and Groups within Product 360 - Desktop
Create Product 360 Supplier Portal Administrator Users Group• The Product 360 Supplier Portal Users Group needs at least the following action rights:
Rights group Permission Note
Catalog Supplier catalogs, general access
General Service Login
Company Management Company Management, general access
Item Items, general access
Item Create Item
Item Create Prices
Item Create Prices (in the past)
Item Delete items
Item Delete prices
Item Delete prices (in the past)
Item Edit items
Item Edit prices
Item Edit prices (in the past)
Item View prices
Suppliers Supplier Management, general access
Suppliers Edit suppliers
Structures Structures, general access Needed since version 7.1.02, while supplier is able to classify in structure tree.
In order to have an easily maintainable system, it is recommended to create a user group (with the minimal set of common rights) and to assign it to the Product 360 Supplier Portal System User and Product 360 Supplier PortalAdministrator Users.
If object rights are used for an object, please keep in mind that all other users implicitly don't have any rights for it. Thus if an object like a supplier, catalog or mapping shall be used in Product 360 - Supplier Portal context (e.g. for the supplier list, to perform uploads, etc.) the corresponding user group for Product 360 - Supplier Portal MUST have full object rights on that object as well.

Informatica MDM - Product 360 Configuration 207
Rights group Permission Note
Structure groups Structure groups, general access Needed since version 7.1.02, while supplier is able to classify in structure tree.
Users Users, general access
Create Product 360 Supplier Portal System User1. Fill in the user details, keep attention to the follwoing details:
• the Active checkbox must be checked.• Authentication mode has to be set to "Internal"
2. Add User to the created Product 360 Supplier Portal Administrators User Group
Add Product 360 Core Users as Product 360 Supplier Portal Administrator1. Create a new Product 360 Core user or choose an existing Product 360 Core user to add to the Product 360 Supplier
Portal Administrator User Group2. Fill in the user details, keep attention to the following details:
• the Active check-box must be checked.• Add User to the created Product 360 Supplier Portal Administrators User Group.
8.2.2 Setup Product 360 - Web Users and Permissions for Product 360 Supplier Portal Item Editor/ViewerThe item management within Product 360 - Supplier Portal uses the Product 360 - Web functionality. There a two different use cases within Product 360 - Supplier Portal to take into account.
Product 360 Supplier Portal Item Editor:
which means, suppliers are able to edit items within the Product 360 - Supplier Portal.
Product 360 Supplier Portal Item Viewer:
which means, suppliers don't have the ability to edit item data within the Product 360 - Supplier Portal.
Create Product 360 - Supplier Portal Item Editor User Group1. If not already exists, create a new Product 360 Core User Group, which manages the Product 360 Supplier Portal Item
Editor permission within Product 360 Core.2. The Product 360 Supplier Portal Item Editor Users Group need at least the following action rights:
Rights group Permission Note
Web Permissions
Log in (Product 360 - Web)
All other Action rights not mentioned above, as well as all field rights have to be defined individuality depending on the scenario and requirements of the project and the individual use case scenarios
Both users need to be referenced by the webfrontend.properties file of the Product 360 server in order to be used by the system as default system users for Item Editor access through the Supplier Portal.
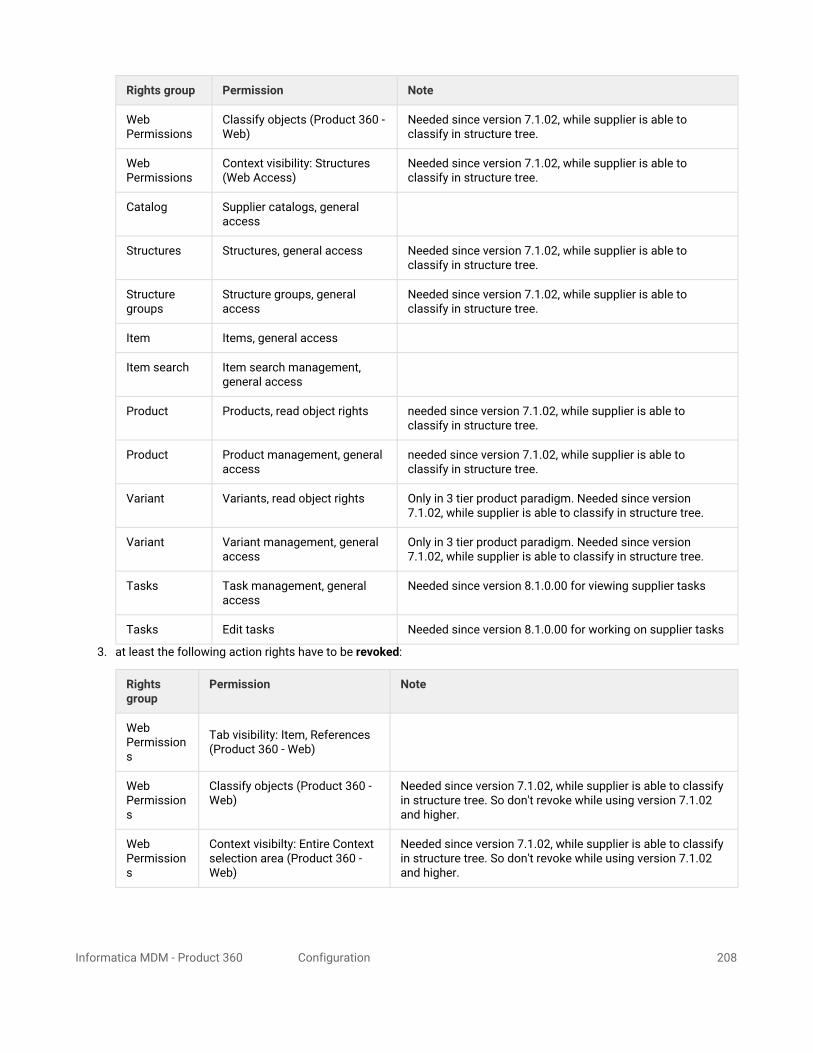
Informatica MDM - Product 360 Configuration 208
Rights group Permission Note
Web Permissions
Classify objects (Product 360 - Web)
Needed since version 7.1.02, while supplier is able to classify in structure tree.
Web Permissions
Context visibility: Structures (Web Access)
Needed since version 7.1.02, while supplier is able to classify in structure tree.
Catalog Supplier catalogs, general access
Structures Structures, general access Needed since version 7.1.02, while supplier is able to classify in structure tree.
Structure groups
Structure groups, general access
Needed since version 7.1.02, while supplier is able to classify in structure tree.
Item Items, general access
Item search Item search management, general access
Product Products, read object rights needed since version 7.1.02, while supplier is able to classify in structure tree.
Product Product management, general access
needed since version 7.1.02, while supplier is able to classify in structure tree.
Variant Variants, read object rights Only in 3 tier product paradigm. Needed since version 7.1.02, while supplier is able to classify in structure tree.
Variant Variant management, general access
Only in 3 tier product paradigm. Needed since version 7.1.02, while supplier is able to classify in structure tree.
Tasks Task management, general access
Needed since version 8.1.0.00 for viewing supplier tasks
Tasks Edit tasks Needed since version 8.1.0.00 for working on supplier tasks
3. at least the following action rights have to be revoked:
Rights group
Permission Note
Web Permissions
Tab visibility: Item, References (Product 360 - Web)
Web Permissions
Classify objects (Product 360 - Web)
Needed since version 7.1.02, while supplier is able to classify in structure tree. So don't revoke while using version 7.1.02 and higher.
Web Permissions
Context visibilty: Entire Context selection area (Product 360 - Web)
Needed since version 7.1.02, while supplier is able to classify in structure tree. So don't revoke while using version 7.1.02 and higher.

Informatica MDM - Product 360 Configuration 209
Rights group
Permission Note
Web Permissions
Help (Product 360 - Web)
Web Permissions
Change Password
Tasks Create tasks
Multimedia attachments
Add multimedia attachments
Import revoke all permissions Especially revoking 'Perform import' is important. Otherwise the Supplier Portal upload process would be compromised.
Merge Merge, general access Needed since version 8.1, since it allows to perform a catalog merge from within the Web UI now.
Merge Perform Merge Needed since version 8.1, since it allows to perform a catalog merge from within the Web UI now.
Flexible UI Access Flexible UI Needed since version 8.1 which introduces the new permission to avoid access to tasks of other suppliers and to objects from catalogs of other suppliers and master catalog using Flexible UI.
Since Product 360 8.1 it is possible to allow the assignment of Supplier Organizations to tasks setup in the system. The Supplier Organizations that are configured to work with tasks can access them similarly as their general catalog data by the item editor integration. For this setup at least the following field right setup should be considered:
Data range
Permission Note
Tasks Revoke all field rights except the following:
Start date
Estimated start date
Anticipated completion on
Progress
Completed on
These adjustments are needed since version 8.1 which enables the assignment of Supplier Organizations to tasks. Revoking the field rights will guarantee that a supplier user cannot change the general definitions of a task setup by you.

Informatica MDM - Product 360 Configuration 210
Create Product 360 Supplier Portal Item Viewer User Group1. If not already exists, create a new Product 360 Core User Group, which manages the Product 360 Supplier Portal Item
Viewer permission within Product 360 Core.2. The Product 360 Supplier Portal Item Viewer Users Group need at least the following action rights:
Rights group Permission Note
Web Permissions
Log in (Product 360 - Web)
Catalog Supplier catalogs, general access
Structures Structures, general access Needed since version 7.1.02, while supplier is able to classify in structure tree.
Structure groups Structure groups, general access
Needed since version 7.1.02, while supplier is able to classify in structure tree.
Item Items, general access
Item search Item search management, general access
Product Products, read object rights needed since version 7.1.02, while supplier is able to classify in structure tree.
Variant Variants, read object rights Only in 3 tier product paradigm. Needed since version 7.1.02, while supplier is able to classify in structure tree.
3. at least the following action rights have to be revoked:
Rights group Permission Note
Web Permissions Tab visibility: Item, References (Product 360 - Web)
Web Permissions Classify objects (Product 360 - Web)
Web Permissions Context visibilty: Entire Context selection area (Product 360 - Web)
Web Permissions Help (Product 360 - Web)
Web Permissions Change Password
Tasks Create tasks
Multimedia attachments Add multimedia attachments
All other Action rights not mentioned above, as well as all field rights have to be defined individuality depending on the scenario and requirements of the project and the individual use case scenarios

Informatica MDM - Product 360 Configuration 211
Rights group Permission Note
Item revoke all permission to edit, insert, delete or change items
(Variants) only for 3 tier product paradigm installations
revoke all permission to edit, insert, delete or change variants
Products revoke all permission to edit, insert, delete or change products
Import revoke all permissions Especially revoking 'Perform import' is important. Otherwise the Supplier Portal upload process would be compromised.
Create Product 360 Supplier Portal Item Editor System User1. Fill in the user details, keep attention to the follwoing details:
• the Active checkbox must be checked.• Authentication mode has to be set to "Internal"
• Add User to the created Product 360 Supplier Portal Item Editor User Group.
Create Product 360 Supplier Portal Item Viewer System User1. Fill in the user details, keep attention to the follwoing details:
• the Active checkbox must be checked.• Authentication mode has to be set to "Internal"
• Add User to the created Product 360 Supplier Portal Item Viewer User Group
8.3 Setup Post Export Step
The Product 360 Supplier Portal Post Export Step introduces the possibility for Product 360 Core users to send selected catalog data to a specific supplier within Product 360 Supplier Portal. For more information about the Product 360 Supplier Portal Post Export Step see this page.
To configure the communication from Product 360 - Server to Product 360 Supplier Portal just make sure you set the following properties in the
<P360_SERVER_INSTALLATION_ROOT>\server\configuration\HPM\hsx.properties
All other Action rights not mentioned above, as well as all field rights have to be defined individuality depending on the scenario and requirements of the project and the individual use case scenarios

Informatica MDM - Product 360 Configuration 212
Database Settings
hsx.enabled Enable the Product 360 - Server-> Product 360 - Supplier Portal communication
hsx.enabled=true
hsx.server The Product 360 - Supplier Portal tomcat application server host name.
e.g. hsx.server=localhost
hsx.port Port of the Product 360 - Supplier Portal application.
e.g. hsx.port=9090
hsx.login.name e.g. hsx.login.name=hsx
hsx.login.password Password of the above portal administrator.
e.g. hsx.login.password=pass
hsx.rest.uri e.g. hsx.rest.uri=http://localhost:9090/hsx/rest/
8.4 Network setup
8.4.1 Setup HTTPS/SSL SecurityWhen configuring Product 360 Supplier Portal for production usage, setting up https security is mandatory. Otherwise all user credentials will be send as plain text through the internet. There are two scenarios, how security can be ensured:
• Setup a Reverse Proxy that transparently forwards all requests to the Supplier Portal server. SSL certificates are installed on the Reverse Proxy.
• Install SSL certificates directly on Supplier Portal Server.
A combination of both is possible, too.
8.4.2 Setup a Reverse ProxyA proxy may optionally be used to handle incoming requests from outside and redirect them into the internal network. Please note, that the Product 360 server needs to be configured at the same proxy to enable the catalog editor functionality (suppliers that can view/edit their catalog data directly). The catalog editor is a stripped down Product 360 web interface that is loaded within an iFrame at the supplier users Browser. The property hpm.webClientUri needs to be adjusted to point to the externally visible Product 360 Web UI endpoint.
When using a proxy don't forget to configure the externally visible URLs in the configuration file. This URL is used in emails that are sent by the application.
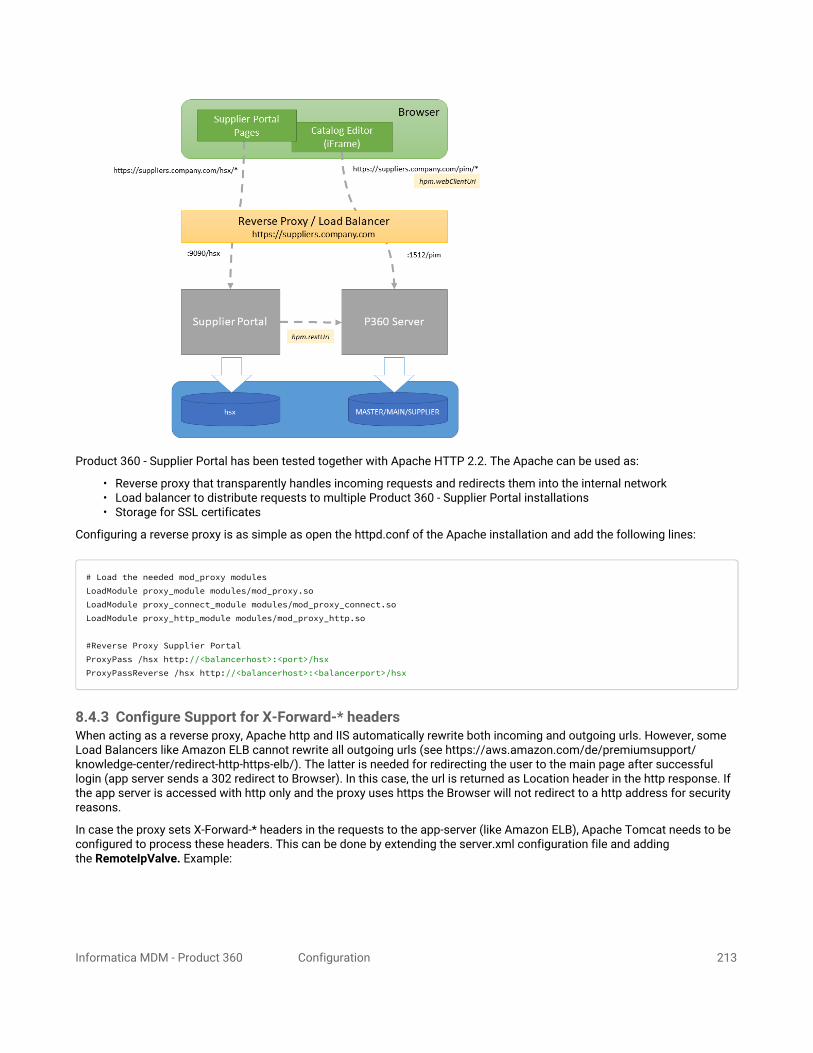
Informatica MDM - Product 360 Configuration 213
Product 360 - Supplier Portal has been tested together with Apache HTTP 2.2. The Apache can be used as:
• Reverse proxy that transparently handles incoming requests and redirects them into the internal network• Load balancer to distribute requests to multiple Product 360 - Supplier Portal installations• Storage for SSL certificates
Configuring a reverse proxy is as simple as open the httpd.conf of the Apache installation and add the following lines:
# Load the needed mod_proxy modulesLoadModule proxy_module modules/mod_proxy.soLoadModule proxy_connect_module modules/mod_proxy_connect.soLoadModule proxy_http_module modules/mod_proxy_http.so #Reverse Proxy Supplier PortalProxyPass /hsx http://<balancerhost>:<port>/hsxProxyPassReverse /hsx http://<balancerhost>:<balancerport>/hsx
8.4.3 Configure Support for X-Forward-* headersWhen acting as a reverse proxy, Apache http and IIS automatically rewrite both incoming and outgoing urls. However, some Load Balancers like Amazon ELB cannot rewrite all outgoing urls (see https://aws.amazon.com/de/premiumsupport/knowledge-center/redirect-http-https-elb/). The latter is needed for redirecting the user to the main page after successful login (app server sends a 302 redirect to Browser). In this case, the url is returned as Location header in the http response. If the app server is accessed with http only and the proxy uses https the Browser will not redirect to a http address for security reasons.
In case the proxy sets X-Forward-* headers in the requests to the app-server (like Amazon ELB), Apache Tomcat needs to be configured to process these headers. This can be done by extending the server.xml configuration file and adding the RemoteIpValve. Example:

Informatica MDM - Product 360 Configuration 214
<Valve className="org.apache.catalina.valves.RemoteIpValve" internalProxies="192\.168\.1\.\d{1,3}" remoteIpHeader="x-forwarded-for" remoteIpProxiesHeader="x-forwarded-by" protocolHeader="x-forwarded-proto" />
Note: internalProxies is the IP address of the Load Balancer as seen by the Tomcat. The value should be in the form of a regular expression (in the syntax supported by java.util.regex)
More information: http://stackoverflow.com/questions/5741210/handling-x-forwarded-proto-in-java-apache-tomcat and https://tomcat.apache.org/tomcat-9.0-doc/api/org/apache/catalina/valves/RemoteIpValve.html .
8.4.4 Install SSL certificates on Supplier Portal Server directlyIt is possible to setup SSL security on the Supplier Portal server, too. This is useful, if the connection between the Reverse Proxy and the Supplier Portal should be encrypted and secured, too. However, when using a Load Balancer, SSL certificates need to be installed and maintained on all machines.
To enable https, open the file <HSX_Install>\tomcat\conf\server.xml. Please find or extend a block similar to this one:
<Connector port="9443" protocol="org.apache.coyote.http11.Http11NioProtocol" SSLEnabled="true" maxThreads="150" scheme="https" secure="true" clientAuth="false" sslProtocol="TLS" URIEncoding="UTF-8" keystoreFile="C:/Users/sroeck/.keystore" keystorePass="password" />
The specified port is the one that needs to be configured within the Reverse Proxy/Load Balancer. KeystoreFile is pointing to the location of the SSL certificate.
Please refer to the Tomcat documentation for more information about available options.
8.4.5 Setup Secure Connection between Supplier Portal and Product 360 ServerCustomers sometimes require to not only encrypt http traffic between Browser and Application Server but also all internal http messages, e.g. between Supplier Portal and Product 360 Server. To implement this:
1. Configure https on the Product 360 Server as described here2. Specify the configured https url within Supplier Portal, e.g.
hpm.restUri=https://localhost:8443/rest
Some notes on testing with self-created SSL certificates:
• SSL handshake checks the server's identity. If the identity cannot be matched, you'll receive the following exception: java.security.cert.CertificateException: No name matching. To fix this, make sure the certificate's CN

Informatica MDM - Product 360 Configuration 215
matches the host name of the destination server, e.g. "localhost" (more info).
• Self-Created certificates are not trusted by default. To make your local keystore trusted, start Supplier Portal with the following JVM arguments (more info):
-Djavax.net.ssl.trustStore=C:/Users/sroeck/.keystore // path to keystore-Djavax.net.ssl.trustStorePassword=password // keystore password
8.5 Multiserver SetupSupplier Portal may be setup as a multiserver system including load balancing. There a some things to consider concerning configuration of the servers and the loadbalancers.
8.5.1 Property configuration
It has to be ensured that all quartz job triggers are configured as such that only one server executes them.

Informatica MDM - Product 360 Configuration 216
There are several properties that define a trigger pattern (see property descriptions above). Define the patterns except for the dedicated quartz job server like in the following example so that the triggers never fire:
synchronizePendingImportRunJob.trigger.cronExpression=* * * * * ? 2099
Also for all properties that define access to files make sure that the same folder is used across all servers. This is generally done by using shared folders and UNC path as in this example:
fileStorageService.rootDirectory=//ServerName/ShareFolder
If there is a load balancer setup for several Product 360 servers, the url for the service api requests and the web client have to be set to the loadbalancer as well:
hpm.restUri=http://pimLoadbalancer/resthpm.webClientUri=http://pimLoadbalancer/pim/webaccess
8.5.2 Setup Reverse Proxy and Load BalancerWhen using Apache HTTP 2.2 as reverse proxy and load balancer for multiserver scenarios, the httpd.conf file must be additonally modified for load balancing purposes:
# Load the needed mod_proxy modulesLoadModule proxy_module modules/mod_proxy.soLoadModule proxy_connect_module modules/mod_proxy_connect.soLoadModule proxy_http_module modules/mod_proxy_http.so <IfModule log_config_module>...LogFormat "%h %l %u %t %{ms}T \"%r\" %>s %b \"%{JSESSIONID}e\"" combined...</IfModule>#Reverse Proxy Supplier PortalProxyPass /hsx http://<balancerhost>:<port>/hsx stickysession=JSESSIONID|jsessionidProxyPassReverse /hsx http://<balancerhost>:<balancerport>/hsx stickysession=JSESSIONID|jsessionid#Use sticky sessions, identify servers via route parameter<Proxy balancer://<balancerhost>> BalancerMember http://<supplierserver1>:<server1port> route=server1 stickysession=JSESSIONID|jsessionid BalancerMember http://<supplierserver2>:<server2port> route=server2 stickysession=JSESSIONID|jsessionid ProxySet stickysession=JSESSIONID|jsessionid</Proxy>
So in this case high availably cannot be guaranteed, because it's a requirement to only have one background job for import job synchronization running, to not corrupt the job status within the supplier portal.
This does not mean that any import data will get lost on a down time of the supplier portal server running the synchronization job, it only means that the displayed import status within the supplier portal import views going to stuck for the time this server is down.

Informatica MDM - Product 360 Configuration 217
The route parameter also requires to setup the tomcat servers accordingly. That means using the same route id in the engine parameter in the server.xml of the respective Tomcat configuration.This would be an example configuration for the server <supplierserver1>:
<Engine name="Catalina" defaultHost="localhost" jvmRoute="server1">
For further information consider the Apache web server documentation.
<Valve className="org.apache.catalina.valves.RemoteIpValve" internalProxies="192.168.1.XXX"
remoteIpHeader="x-forwarded-for" remoteIpProxiesHeader="x-forwarded-by" protocolHeader="x-
forwarded-proto" />
8.6 SAML ConfigurationThis guide describes the necessary steps to configure Product 360 Supplier Portal for usage with SAML Single Sign On.
8.6.1 Overview
SAML RolesThe SAML specification defines three roles:
• the Principal (typically a user)• the Identity Provider (IdP) e.g. Active Directory Federation Services (AD FS), OKTA or Shibboleth• and the Service Provider (SP), in our case the Product 360 Supplier Portal
This section describes all steps necessary to setup Single Sign On (in short SSO) via SAML for the Product 360 Supplier Portal. If you want to know more about what SAML is, documentation can be found on the official SAML documentation pages provided by the OASIS consortium.In general, the term "Service Provider" can be replaced with "Product 360 Supplier Portal" and the term "User agent" can be replaced with "Browser" in case of web based SSO scenarios.
Single Sign On flowProduct 360 Supplier Portal supports two general ways for Single Sign On: Service Provider initiated and Identity Provider initiated Single Sign On.In addition to that, Supplier Portal also supports Single Sign On for all user roles: Supplier users or Broker users maintained only in Supplier Portal and Portal administrators that are maintained in the Product 360 Server.
Single Sign On Initiation
Service Provider initiatedIn this scenario
1. the principal requests a service from the service provider (e.g. access to a web resource within the Product 360 Supplier Portal).
2. Before providing this resource to the principal the service provider redirects user authentication (AuthRequest) to the identity provider.
3. In case the user is not yet authenticated at the Identity Provider, the IdP requests credentials from the user, e.g. by presenting a login form for the username and password.
4. Once the authentication has been finished, the IdP provides an identity assertion (SAML assertion) for the principal. 5. On basis of this assertion, the service provider can make a decision to provide the resource to the principal or not, i.e.
checking authorization of the principal for the resource. 6. If the authorization check passes, the SP then provides the initially requested resource.

Informatica MDM - Product 360 Configuration 218
Identity Provider initiated In this scenario, there is no initial authentication request from the SP. Instead, the IdP provides links to certain SP resources. IdP initiated Single Sign On is started when the user clicks on such a link.
1. The user has already accessed the IdP's web user interface and is authenticated. 2. In that interface the user clicks on a link to access a resource of the SP.3. The SP directly receives an identity assertion for the principal and information about the requested resource. 4. On basis of this assertion, the service provider can make a decision to provide the resource to the principal or not, i.e.
checking authorization of the principal for the resource. 5. If the authorization check passes, the SP then provides the initially requested resource.
Role specific processIn Product 360 Supplier Portal it is possible to activate Single Sign On only for Supplier/Broker users or only for Portal administrators or for all roles. This may require specific configuration preparations for user or supplier creation. For details about this see section 'Automatic user and supplier creation on successful authentication' below.
System architecture
Product 360 Supplier Portal acts as two relying parties (service providers): A Supplier User SSO relying party (for Supplier/Broker users) and a Portal Administrator SSO relying party (respectively service provider and entityID).
In the case of Portal Administrator SSO also Product 360 Server acts as a relying party resp. service provider (for more information on SAML configuration for Product 360 Server see chapter "Server Configuration" of the Installation and Configuration guide and there "SAML Configuration"). In this scenario the authenticated portal administrator not only has to be logged into the Product 360 Supplier Portal, but also into the Product 360 Server, in order to be able to authenticate when executing REST calls (e.g. for syncing catalog/supplier information from Product 360 Server). Therefor Product 360 Supplier Portal sends the SAML Response (initially created by the IdP for Portal Administrator SSO) to the Product 360 Server and receives an access token for authentication against Product 360 Server in further REST calls.
The relying party for Suplier Portal Supplier User SSO can either be configured on the same IdP as the relying party for Supplier Portal Portal Administrator SSO, or on a different IdP.
Product 360 Supplier Portal has two different login and consumer urls, one for Supplier User SSO and one for Portal Administrator SSO. Also the SAML configuration for these two cases are located in different XML files (SamlConfig.xml and SamlConfigPortalAdmin.xml) .
Security in Product 360 Supplier Portal SAML support • HTTP communication security is ensured by using SSL for the communication between the IdP and SP (Tomcat https
support)• Messages can be signed and encrypted to ensure message-level security. This includes:
• signing of AuthRequest message by the SP
Gliffy Macro Error
You do not have permission to view this diagram.
For Portal Administrator SSO it is mandatory, that the relying party for Product 360 Supplier Portal Portal Administrator SSO and the relying party for Product 360 Server are configured on the same IdP. Also the same certificates and keys have to be used for these two relying parties, so that Product 360 Server is also able to validate the SAML Response, which was initially created for the relying party of Product 360 Supplier Portal Portal Administrator SSO.
This also means that Saml must be set tot active and keystore properly defined on the Product360 Server.
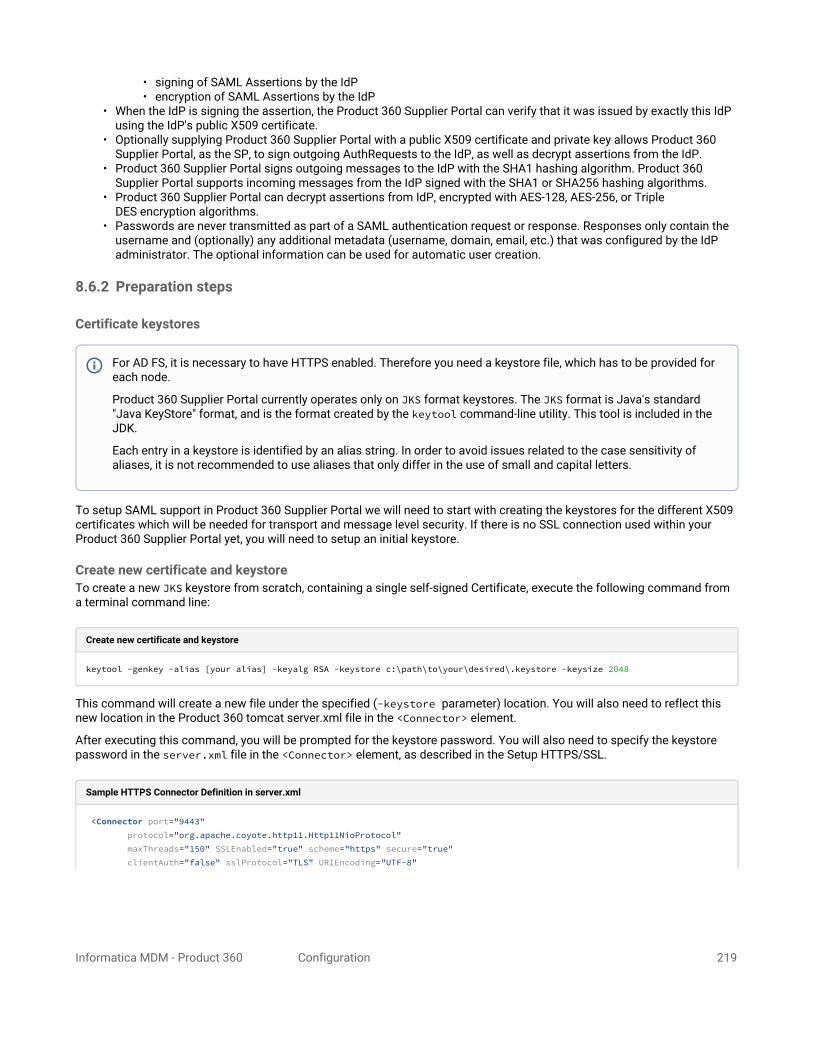
Informatica MDM - Product 360 Configuration 219
• signing of SAML Assertions by the IdP• encryption of SAML Assertions by the IdP
• When the IdP is signing the assertion, the Product 360 Supplier Portal can verify that it was issued by exactly this IdP using the IdP's public X509 certificate.
• Optionally supplying Product 360 Supplier Portal with a public X509 certificate and private key allows Product 360 Supplier Portal, as the SP, to sign outgoing AuthRequests to the IdP, as well as decrypt assertions from the IdP.
• Product 360 Supplier Portal signs outgoing messages to the IdP with the SHA1 hashing algorithm. Product 360 Supplier Portal supports incoming messages from the IdP signed with the SHA1 or SHA256 hashing algorithms.
• Product 360 Supplier Portal can decrypt assertions from IdP, encrypted with AES-128, AES-256, or Triple DES encryption algorithms.
• Passwords are never transmitted as part of a SAML authentication request or response. Responses only contain the username and (optionally) any additional metadata (username, domain, email, etc.) that was configured by the IdP administrator. The optional information can be used for automatic user creation.
8.6.2 Preparation steps
Certificate keystores
To setup SAML support in Product 360 Supplier Portal we will need to start with creating the keystores for the different X509 certificates which will be needed for transport and message level security. If there is no SSL connection used within your Product 360 Supplier Portal yet, you will need to setup an initial keystore.
Create new certificate and keystoreTo create a new JKS keystore from scratch, containing a single self-signed Certificate, execute the following command from a terminal command line:
Create new certificate and keystore
keytool -genkey -alias [your alias] -keyalg RSA -keystore c:\path\to\your\desired\.keystore -keysize 2048
This command will create a new file under the specified (-keystore parameter) location. You will also need to reflect this new location in the Product 360 tomcat server.xml file in the <Connector> element.
After executing this command, you will be prompted for the keystore password. You will also need to specify the keystore password in the server.xml file in the <Connector> element, as described in the Setup HTTPS/SSL.
Sample HTTPS Connector Definition in server.xml
<Connector port="9443" protocol="org.apache.coyote.http11.Http11NioProtocol" maxThreads="150" SSLEnabled="true" scheme="https" secure="true" clientAuth="false" sslProtocol="TLS" URIEncoding="UTF-8"
For AD FS, it is necessary to have HTTPS enabled. Therefore you need a keystore file, which has to be provided for each node.
Product 360 Supplier Portal currently operates only on JKS format keystores. The JKS format is Java's standard "Java KeyStore" format, and is the format created by the keytool command-line utility. This tool is included in the JDK.
Each entry in a keystore is identified by an alias string. In order to avoid issues related to the case sensitivity of aliases, it is not recommended to use aliases that only differ in the use of small and capital letters.

Informatica MDM - Product 360 Configuration 220
keyAlias="tomcat" keypass="secret" keystoreFile="C:\PIM\SP\configuration\.keystore" keystorePass="heiler" />
Next, you will be prompted for general information about this certificate, such as company, contact name, and so on. This information will be displayed to users who attempt to access a secure page in your application, so make sure that the information provided here matches with what they will expect.
Finally, you will be prompted for the key password, which is the specific password for this certificate (as opposed to any other certificates stored in the same keystore file). You need to specify the key password as well as the specified alias (-alias parameter) in the appropriate use case (HTTPS, SAML signing, SAML encryption) and their configuration files (e.g. server.xml, see above).
If everything was successful, you now have a keystore file with a certificate that can be used by your Product 360 Supplier Portal.
Import existing certificate into keystoreIf you already have a CA certificate (=certificate obtained by a Certificate Authority), you can import it into your local keystore. First of all you have to import a so called Chain Certificate or Root Certificate into your keystore. After that you can proceed with importing your CA certificate.
Download a Chain Certificate from the Certificate Authority you obtained the certificate from.
• For Verisign.com commercial certificates go to: http://www.verisign.com/support/install/intermediate.html• For Verisign.com trial certificates go to: http://www.verisign.com/support/verisign-intermediate-ca/
Trial_Secure_Server_Root/index.html• For Trustcenter.de go to: http://www.trustcenter.de/certservices/cacerts/en/en.htm#server• For Thawte.com go to: http://www.thawte.com/certs/trustmap.html
Import the Chain Certificate into your keystore:
Import the Chain Certificate into your keystore
keytool -import -alias root -keystore c:\path\to\your\desired\.keystore -trustcacerts -file c:\path\to\your\trustcacertFileName
Finally you can import the CA certificate:
Import the CA certificate
keytool -import -alias https -keystore c:\path\to\your\desired\.keystore -file c:\path\to\your\certificateFileName
Export existing certificate's public keys for metadata usageFor the SAML metadatas you will need the public keys in a readable format. In order to get them execute the following commands from command line:
Export existing certificates
keytool -export -file c:\mycertificate.cert -alias samlEncryptionCert -keystore c:\path\to\your\desired\.keystore

Informatica MDM - Product 360 Configuration 221
Convert certificate to readable format
keytool -printcert -rfc -file c:\mycertificate.cert > c:\mycertificate.txt
Import of Single Sign On relevant keystore entries from Product 360 Server
IdP ConfigurationThe concrete configuration steps for the IdP highly depend on the IdP implementation (like AD FS, OpenAM or Shibboleth). But in general the following points have to be considered here:
Create relying party(s) representing Product 360 Supplier Portal. For Supplier User SSO and Portal administrator SSO seperate relying parties are needed.Define unique entityID(s), for Supplier User SSO and Portal adminstrator SSO, which you then use in the Product 360 Supplier Portal Configuration files (see chapter "Add SAML relevant configuration files")The assertion consumer server location in the IdP corresponds to the assertionConsumerServiceLocation defined in SamlConfig.xml resp. SamlConfigPortalAdmin.xml plus /<applicationRoot>/saml/supplierSSO (for Supplier user SSO) resp. /<applicationRoot>/saml/supplierSSO/alias/portalAdmin (for Portal Administrator SSO),
e.g. for Supplier User SSO: https://pim.informatica.com/hsx/saml/supplierSSOe.g. for Portal administrator SSO: https://pim.informatica.com/hsx/saml/supplierSSO/alias/portalAdminplease keep in mind that the assertionConsumerServiceLocation in both config files SamlConfig.xml resp. SamlConfigPortalAdmin.xml is still only the base app url, e.g. https://pim.informatica.com/hsx.
Use or create public certificates and private keys appropriate to them used in the Product 360 Supplier Portal keystore.
If possible, use the URL-provided SP metadata of Product 360 Supplier Portal, in order to retrieve SAML metadata information of Product 360 Supplier Portal (configuration, certificates etc...):
e.g. forSupplier User SSO: https://pim.informatica.com/hsx/saml/metadata e.g. for Portal administrator SSO: https://pim.informatica.com/hsx/saml/metadata/alias/portalAdminAs an alternative you can generate your metadata file with the following online tool: https://www.samltool.com/sp_metadata.php
When activating Single Sign on for Portal administrators, please keep in mind that Product 360 Supplier Portal also authenticates against the same IdP which is used for Single Sign On. Since Product 360 Supplier Portal does not have access to the keystore of Product 360 Server it is required to reuse those keystore entries from Product 360 Server in the keystore used for Product 360 Supplier Portal.
For Portal Administrator SSO it is mandatory to use the same certificates for the Portal Administrator relying party of Product 360 Supplier Portal as used for the relying party of Product 360 Server (see chapter "Server Configuration" of the Installation and Configuration guide and there "SAML Configuration").
If you use Active Directory Federation Services (AD FS), you might have to explicitely enable the usage of one certificate for multiple relying parties. Here you can find more information about this:https://support.microsoft.com/en-us/help/2877424/update-enables-you-to-use-one-certificate-for-multiple-relying-party-trusts-in-an-ad-fs-2.1-farm

Informatica MDM - Product 360 Configuration 222
Ensure that SAML assertions contain the mandatory SAML attributes defined in the chapter "SAML attributes". Optionally map also the not-mandatory SAML attributes.
8.6.3 Configuring SAML for Product 360 Supplier Portal
Activate SAMLActivate SAML for Product 360 Supplier Portal by adding the samlSSO spring profile to the JVM arguments list.
Windows1. Call the configure script:
<SUPPLIER PORTAL INSTALLATION ROOT>/configure.bat
2. Add samlSSO spring profile to the spring.profiles.active argument:
-Dspring.profiles.active=samlSSO
Linux1. Edit your tomcat.sh shell script:
<SUPPLIER PORTAL INSTALLATION ROOT>/tomcat/bin/tomcat.sh
2. Add the spring.profiles.active argument with the samlSSO profile included (see line 11 below as an example):

Informatica MDM - Product 360 Configuration 223
....export CATALINA_OPTS="-Dcatalina.home=$CATALINA_HOME-Dcatalina.base=$CATALINA_HOME-Djava.endorsed.dirs=$CATALINA_HOME/endorsed-Djava.io.tmpdir=$CATALINA_HOME/temp-Djava.util.logging.manager=org.apache.juli.ClassLoaderLogManager-Djava.util.logging.config.file=$CATALINA_HOME/conf/logging.properties-Dhsx.configurationArea=$HSX_CONFIG_AREA-Dlogback.configurationFile=$HSX_CONFIG_AREA/logback.xml -Dspring.profiles.active=samlSSO -XX:MaxPermSize=512m".....
Configure keystore settings in configuration.propertiesEdit your configuration.properties to conform to your created Keystore Settings:
################################################################################### Keystore settings # Defines the file location of the keystore to usekeystore.location = file:c:/temp/.keystore# Defines the password of the keystore defined via ${keystore.location} propertykeystore.password = heiler
Add SAML relevant configuration files
After having https enabled and a keystore configured, the SamlConfig.xml resp. the SamlConfigPortalAdmin.xml have to be configured.Both xml files have the same schema, but their values differ to reflect the different SSO scenarios for the different user roles.
• If Single Sign On for Supplier users is desired, configuring the SamlConfig.xml in Supplier Portal file is mandatory.• If Single Sign On for Portal administrators is desired, configuring the SamlConfigPortalAdmin.xml file in Supplier
Portal is mandatory. Here it is also mandatory to activate SSO in Product 360 Server and adjust the SamlConfig.xmlfile in Product 360 Server. See chapter "Server Configuration" of the Installation and Configuration guide and there "SAML Configuration".
SamlConfig.xml and SamlConfigPortalAdmin.xmlCreate a new SamlConfig.xml respectively SamlConfigPortalAdmin.xml file in your configuration folder. Adapt it to fit to your needs, add the alias and password of your key and enable SAML.
If you want to use different keys for signing and encryption, you have to create multiple keys in the keystore. The following example assumes the use of the same keys for signing and encryption.
The current SAML implementation requires the IdP to deliver the username (without domain or email extension) in the NameID attribute.

Informatica MDM - Product 360 Configuration 224
Sample SamlConfig.xml
<samlConfig xmlns:xsi="http://www.w3.org/2001/XMLSchema-instance" xsi:noNamespaceSchemaLocation="SamlConfig.xsd"> <logoutUrl>https://idpserver/login.html</logoutUrl> <active>true</active> <idpMetadata> <metadataLocation forceAuthRequestsSigned="false" disregardSslCertificate="false">idp-metadata.xml</metadataLocation> </idpMetadata> <spMetadata> <assertionConsumerServiceLocation>https://supplierPortal.informatica.com</assertionConsumerServiceLocation> <signingKey password="secret" alias="localhost"/> <encryptionKey password="secret" alias="localhost"/> <entityId>spEntityID</entityId> <wantAssertionsSigned>true</wantAssertionsSigned> </spMetadata></samlConfig>
ActiveDefines whether SAML shall be used to initiate automated SAML Single Sign On if the user is not logged in yet.
Type Required Default
Boolean yes false
LogoutUrlDefines the URL which the user will be redirected to after logout. Most typically this is an URL where a user may login to the application IdP initiated.
In case the element does not exist or the value is empty, the user is redirected to the default Product 360 Supplier Portal login page.
Type Required Default
String or URL no Product 360 Supplier Portal login page
DefaultUserGroupThis element is only meaningful for portal admin user SSO.
When a portal admin user has been authenticated via SAML and there is no matching user with the same name in Product 360 Server the user will be created on the fly. In this case it is mandatory to provide a default user group here, which the newly created portal admin user will be assigned to in Product 360 Server. A matching user group with this name has to exist in Product 360 Server.
A guideline which user rights requirements the user group for Portal Admin Users has to fulfill can be found in the chapter "Item Editor Configuration" in the general documentation "Supplier Portal Configuration".
Type Required Default
String not required as per schema definition, but required in SamlConfigPortalAdmin.xml, in case Portal administrator SSO is active
-

Informatica MDM - Product 360 Configuration 225
SpMetadataRequired element defining all Service Provider relevant settings.
Sub element/Attribute
Type
Required
Default
Description
entityId String
yes - An entity ID is a globally unique name for a SAML entity, in this case a Service Provider (SP), in concrete the Supplier Portal.The entityId defined will be used for communication between IdP and SP.
assertionConsumerServiceLocation
URL
yes - Describes the endpoint to which SAML responses are sent by the IdP.
signingKey
- yes - The signing key is used to establish a trusted handshake between SP and IdP (authentication).
alias String
yes - Alias for the key used for signing.
password String
yes - Password for accessing the key defined by the alias.
In case the SamlConfigPortalAdmin.xml is configured for Portal administrator SSO, then the entityId must differ from the entityId in the SamlConfig.xml of Product 360 Server and also from the entityId in the SamlConfig.xml of Product 360 Supplier Portal.
Add only your Supplier Portal URL for example: https://localhost:9443/hsx . SAML relevant url path extensions are added by internal framework.
In case the SamlConfigPortalAdmin.xml is configured for Portal administrator SSO, the same signing key as defined in the SamlConfig.xml in Product 360 Server must be used.

Informatica MDM - Product 360 Configuration 226
encryptionKey
String
yes - The encryption key is used to decrypt data received by IdP (data was encrypted by the SPs corresponding public key).
alias String
yes - Alias for the key used for signing.
password String
yes - Password for accessing the key defined by the alias.
wantAssertionsSigned
Boolean
yes true
Flag indicating (to the IdP) whether Product 360 Supplier Portal requires signed assertions.
As signing of assertions is the recommended option, the default value is true.
IdpMetadataRequired element defining all Identity Provider relevant settings.
Sub element/Attribute
Type Required
Default
Description
metadataLocation
URL or
relative path in configuration folder
yes idp-metadata.xml
Provides information about the IdP.The element value itself defines the location of the metadata file. Currently two types of locations are supported:
• URL based (http and https), e.g. "https://idpserver/metadata/idp-metadata.xml" or "http://idpserver/metadata/idp-metadata.xml". (this is the recommended way)
• If neither a URL with http or https is provided, it is assumed that the file is located relatively to the Product 360 Supplier Portal configuration folder. E.g. "idp-metadata.xml" would be valid.
In case the SamlConfigPortalAdmin.xml is configured for Portal administrator SSO, the same encyrption key as defined in the SamlConfig.xml in Product 360 Server must be used.
Please note that if an URL with https is used and "disregardSslCertificate" is set to false, you have to ensure that the certificate presented by the IdP to access the metadata is trusted by Product 360 Supplier Portal. This is done by adding the certificate to the Product 360 Supplier Portal keystore (see above how to add trusted certificates).

Informatica MDM - Product 360 Configuration 227
disregardSslCertificate
Booleannofalse
Indicating whether the servers SSL certificate should always be accepted regardless of whether it is valid.
This flag is only relevant if the element value contains a https URL.
forceAuthRequestsSigned
Booleanno-
You can force your Product 360 Supplier Portal to add a signature to the AuthRequest by adding the forceAuthRequestsSigned flag to true.
Identity Provider metadataThe IdP metadata usually can be received over an URL provided by the IdP, which already contains all necessary information you need to know about your IdP. This includes certification information as well as endpoints etc.
The following URL fragments show the metadata URL patterns for the most common IdP implementations:
Microsoft AD FS
https://idpserver/FederationMetadata/2007-06/FederationMetadata.xml
Shibboleth
https://idpserver/idp/shibboleth
OpenAM
http://openamserver/openam/saml2/jsp/exportmetadata.jsp?entityid=entityID
Place your idp-metadata.xml into the the Product 360 Supplier Portal configuration folder or the defined location within your SamlConfig.xml.
In case your IdP does not provide any metadata you need to generate the idp-metadata.xml file, the relevant information can be generated with the help of https://www.samltool.com/idp_metadata.php.
Within the metadata file you need to provide the URL to your IdPs SingleSignOnService location which accepts POST requests. (The example URL schema matches Shibboleth IdP.)
In case the SamlConfigPortalAdmin.xml is configured for Portal administrator SSO, the same metadata location as defined in the SamlConfig.xml in Product 360 Server must be used.
In case the SamlConfigPortalAdmin.xml is configured for Portal administrator SSO, the same setting as defined in the SamlConfig.xml in Product 360 Server must be used.

Informatica MDM - Product 360 Configuration 228
Sample idp-metadata.xml
<?xml version="1.0"?><md:EntityDescriptor xmlns:md="urn:oasis:names:tc:SAML:2.0:metadata" entityID="idpEntityID"> <md:IDPSSODescriptor WantAuthnRequestsSigned="false" protocolSupportEnumeration="urn:oasis:names:tc:SAML:2.0:protocol"> <md:SingleSignOnService Binding="urn:oasis:names:tc:SAML:2.0:bindings:HTTP-POST" Location="https://idpserver/idp/profile/SAML2/POST/SSO" /> </md:IDPSSODescriptor></md:EntityDescriptor>
Information security
Signing of AuthRequest (SP -> IdP)If your IdP requires signed AuthRequest you need to enable this within Product 360 Supplier Portal. Therefor you have different options.
If your idp-metadata.xml is located in the local configuration folder of Supplier Portal, the WantAuthRequestsSigned parameter can be set to true:
Enable signing of SAML request
<md:IDPSSODescriptor WantAuthnRequestsSigned="true" ...>
If you use the URL based metadata provider for referencing the IdP metadata, you can force your Product 360 Supplier Portal to add a signature to the AuthRequest by adding the forceAuthRequestsSigned flag to true:
Force Signed Auth Requests in SamlConfig.xml
<?xml version="1.0" encoding="UTF-8"?><samlConfig xmlns:xsi="http://www.w3.org/2001/XMLSchema-instance" xsi:noNamespaceSchemaLocation="SamlConfig.xsd"> ... <idpMetadata> <metadataLocation forceAuthRequestsSigned="true">https://idpserver/metadata/idp-metadata.xml</metadataLocation> </idpMetadata> ...</samlConfig>
Additionally you need to provide an X509 certificate in your keystore and refer to it over the alias and password attribute in the <signingKey> element within the spMetadata section of your SamlConfig.xml.
While the SAML metadata specification does not require the WantAuthRequestSigned parameter within the IDPSSODescriptor, some IdP Implementations might not set it explicitly, but nevertheless require a signature.

Informatica MDM - Product 360 Configuration 229
Signing of SAML Assertions (IdP -> SP)The SAML metadata specification defines a parameter for requesting an IdP to sign the SAML Assertions. To enable Product 360 Supplier Portal to require signature validation on assertion level, you need to set the WantAssertionsSigned parameter in SamlConfig.xml (resp. SamlConfigPortalAdmin.xml) to true.
Enable signing of SAML response
<samlConfig xmlns:xsi="http://www.w3.org/2001/XMLSchema-instance" xsi:noNamespaceSchemaLocation="SamlConfig.xsd"> ... <spMetadata> ... <wantAssertionsSigned>true</wantAssertionsSigned> ... </spMetadata></samlConfig>
The signature of the assertion will be verified by Product 360 Supplier Portal against the public key of the X509 certificate within your idp-metadata.xml.
Signing public key in idp-metadata.xml
<?xml version="1.0"?><md:EntityDescriptor xmlns:md="urn:oasis:names:tc:SAML:2.0:metadata" entityID="idpEntityID"> <md:IDPSSODescriptor WantAuthnRequestsSigned="false" protocolSupportEnumeration="urn:oasis:names:tc:SAML:2.0:protocol"> ... <md:KeyDescriptor use="signing"> <ds:KeyInfo xmlns:ds="http://www.w3.org/2000/09/xmldsig#"> <ds:X509Data> <ds:X509Certificate>MIIDZzCCAk+gAwIBAgIEFuHJDDANBgkqhkiG9w0BAQsFADBkMQswCQYDVQQGEwJE RTEQMA4GA1UECBMHR2VybWFueTENMAsGA1UEBxMEU3RndDERMA8GA1UEChMIV2lu ZG93czcxDTALBgNVBAsTBFBPSU0xEjAQBgNVBAMTCWxvY2FsaG9zdDAeFw0xNTEw MDIxMjA2NDFaFw0xNjA5MjYxMjA2NDFaMGQxCzAJBgNVBAYTAkRFMRAwDgYDVQQI ... </ds:X509Certificate> </ds:X509Data> </ds:KeyInfo> </md:KeyDescriptor> ... </md:IDPSSODescriptor></md:EntityDescriptor>
Encryption of SAML Assertions (IdP -> SP)
JCE issues with strong cryptographic algorithms
Due to import control restrictions of some countries, the version of the JCE policy files that are bundled in the Java Runtime Environment, or JRE(TM), 8 environment allow "strong" but limited cryptography to be used. This means, if

Informatica MDM - Product 360 Configuration 230
If your IdP supports assertion level encryption and the encryption is active, you must provide your encryption public key X509 certificate within the metadata, that is provided to the IdP. The IdP will use this public key to encrypt the SAML assertion and only the owner of the corresponding private key can encrypt the assertion.
If Product 360 Supplier Portal receives an encrypted assertion, it will try to decrypt the assertion with the configured private key which is referenced by the <encryptionKey> in the SamlConfig.xml resp. SamlConfigPortalAdmin.xml.
encryptionKey in SamlConfig.xml
<?xml version="1.0" encoding="UTF-8"?><samlConfig xmlns:xsi="http://www.w3.org/2001/XMLSchema-instance" xsi:noNamespaceSchemaLocation="SamlConfig.xsd"> ... <encryptionKey password="secret" alias="encryption"/> ...</samlConfig>
Automatic user and supplier creation on successful authenticationWhen the user authentication is successful, but the authenticated user and/or supplier does not exist yet in Product 360 Supplier Portal and/or Product 360 Server, a new user and/or supplier must be created with the credential information provided by the SAML response.
Automatic user/supplier creation differs for the particular user roles in Product 360 Supplier Portal.
Portal administratorOn successful authentication, a Portal administrator will be automatically created in Product 360 Supplier Portal and Product 360 Server if not yet existent. Therefor the unique user name from the SAML assertion subject element "NameID" is used. In Product 360 Server the user will be created as external user and will be assigned to the user group in Product 360 Server, which is defined by the element defaultUserGroup in the Supplier Portal's SamlConfigPortalAdmin.xml file.
The user creation also takes additional optional attributes from the Assertions in the SAML Authentication Response (see chapter "SAML attributes" for more details). The synchronization of the attributes will be done only for the creation process and they will not be updated in case if the user already exists.
BrokerBroker users are also able to logon via SAML. Precondition is an existing broker user in the Supplier Portal. New brokers have to be created manually by a Portal administrator.
Supplier userThere are two supplier creation modes "Automatic" and "Manual" creation.In both cases the email address is mandatory. The user will be identified and created with the attribute value from the attribute "NameID", which must be a unique value to identify the user.
Automatic supplier creationTo activate the "Automatic" supplier creation you need to set the saml.supplierCreationStrategy to AUTOMATIC in your configuration.properties file.
your IdP uses a strong cryptographic algorithm like AES-256, you will need to replace your Java Runtime's JCE policy files. Otherwise you will run into errors in SAML message decryption, saying you are using an illegal key size.
See http://www.oracle.com/technetwork/java/javase/downloads/jce8-download-2133166.html for details.
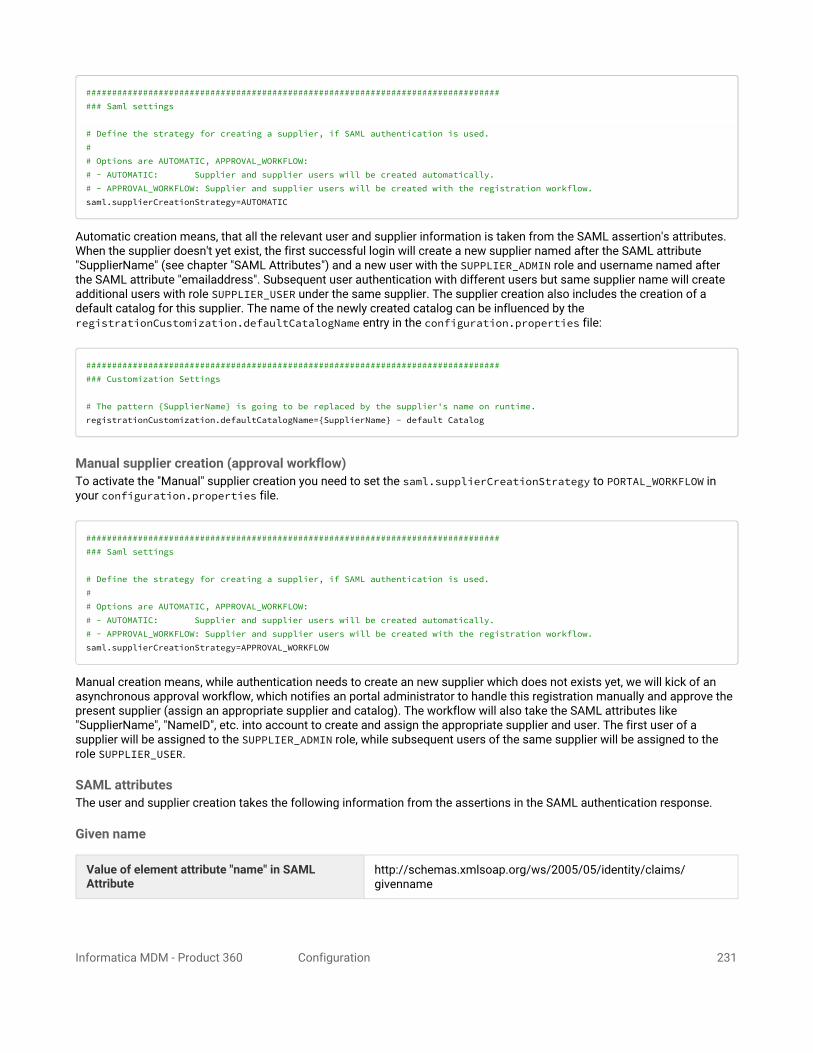
Informatica MDM - Product 360 Configuration 231
################################################################################### Saml settings # Define the strategy for creating a supplier, if SAML authentication is used.## Options are AUTOMATIC, APPROVAL_WORKFLOW:# - AUTOMATIC: Supplier and supplier users will be created automatically.# - APPROVAL_WORKFLOW: Supplier and supplier users will be created with the registration workflow.saml.supplierCreationStrategy=AUTOMATIC
Automatic creation means, that all the relevant user and supplier information is taken from the SAML assertion's attributes. When the supplier doesn't yet exist, the first successful login will create a new supplier named after the SAML attribute "SupplierName" (see chapter "SAML Attributes") and a new user with the SUPPLIER_ADMIN role and username named after the SAML attribute "emailaddress". Subsequent user authentication with different users but same supplier name will create additional users with role SUPPLIER_USER under the same supplier. The supplier creation also includes the creation of a default catalog for this supplier. The name of the newly created catalog can be influenced by the registrationCustomization.defaultCatalogName entry in the configuration.properties file:
################################################################################### Customization Settings # The pattern {SupplierName} is going to be replaced by the supplier's name on runtime.registrationCustomization.defaultCatalogName={SupplierName} - default Catalog
Manual supplier creation (approval workflow)To activate the "Manual" supplier creation you need to set the saml.supplierCreationStrategy to PORTAL_WORKFLOW in your configuration.properties file.
################################################################################### Saml settings # Define the strategy for creating a supplier, if SAML authentication is used.## Options are AUTOMATIC, APPROVAL_WORKFLOW:# - AUTOMATIC: Supplier and supplier users will be created automatically.# - APPROVAL_WORKFLOW: Supplier and supplier users will be created with the registration workflow.saml.supplierCreationStrategy=APPROVAL_WORKFLOW
Manual creation means, while authentication needs to create an new supplier which does not exists yet, we will kick of an asynchronous approval workflow, which notifies an portal administrator to handle this registration manually and approve the present supplier (assign an appropriate supplier and catalog). The workflow will also take the SAML attributes like "SupplierName", "NameID", etc. into account to create and assign the appropriate supplier and user. The first user of a supplier will be assigned to the SUPPLIER_ADMIN role, while subsequent users of the same supplier will be assigned to the role SUPPLIER_USER.
SAML attributesThe user and supplier creation takes the following information from the assertions in the SAML authentication response.
Given name
Value of element attribute "name" in SAML Attribute
http://schemas.xmlsoap.org/ws/2005/05/identity/claims/givenname

Informatica MDM - Product 360 Configuration 232
Mapped to User data First name
Mandatory No
Comment An attribute may contain a list of values.All first name values are concatenated with a space as separator. E.g. the first name values {"John", "Karl"} will be mapped to "John Karl".
Last name
Value of element attribute "name" in SAML attribute
http://schemas.xmlsoap.org/ws/2005/05/identity/claims/surname
Mapped to user data Last name
Mandatory No
Comment An attribute may contain a list of values.All last name values are concatenated with a space as separator. E.g. the last name values {"Earl", "Doe"} will be mapped to "Earl Doe".
Value of element attribute "name" in SAML attribute
http://schemas.xmlsoap.org/ws/2005/05/identity/claims/emailaddress
Mapped to user data E-mail
Mandatory No for Portal Admin Users
Yes for Supplier Users
Comment An attribute may contain a list of values.Only the first value will be considered.E.g. the e-mail values {"[email protected]", "[email protected]"} are mapped to "[email protected]".
Note that the value must be conform to the format of a valid e-mail address. If not, the synchronisation of the user fails and the single sign on process fails as well.
Supplier name
Value of element attribute "name" in SAML attribute
http://informatica.com/custom/claims/supplierName
Mapped to user data Supplier name

Informatica MDM - Product 360 Configuration 233
Mandatory No for Portal Admin Users
Yes for Supplier Users, if the user
• is unknown to the system and has to be created or• has been found and is not a broker user
Comment An attribute may contain a list of values.Only the first value will be considered.
In case the supplier is newly created, then the supplier name will also be used as supplier identifier. On successive SSO login processes, in case the supplier user from the SAML response is found and the supplier name is different than that user's supplier name,then the name of the supplier will be updated with the new value. That supplier's identifier will remain unchanged and will still contain the initial name from supplier creation.
8.6.4 Product 360 Supplier Portal Tomcat load balancingFor the usage of SAML in combination with a load balancer in a multi-server setup, there are some additional settings that have to be made on the load balancer and SAML configuration.
Supplier Portal configuration
All your Supplier Portal cluster instances need to act as one host for the IdP, so they all need to return the same assertionConsumerServiceLocation which redirects to the load balancer.
Modify all your Supplier Portal cluster instances SAMLConfig.xml resp. SamlConfigPortalAdmin.xml, when using an HTTP-based metadata provider:
• Redirect to the load balancer:
<assertionConsumerServiceLocation>https://loadbalancerhost/hsx</assertionConsumerServiceLocation>
• Use the same entityID and same signing and encryption keys:
<signingKey password="heiler" alias="signing" /><encryptionKey password="heiler" alias="encryption" /><entityId>supplierPortalEntityID</entityId>
Use the same keystore (signing, encryption keys) for all your Supplier Portal cluster instances.
Enable the additional spring profile named "loadBalancer", which tells the Supplier Portal to rewrite request url form IdP with the load balancer URL.
Windows
In the load balancing scenario you need to use the same Encryption and Signing certificates for all your cluster instances, as well as the same entityId in each SamlConfig.xml resp. SamlConfigPortalAdmin.xml.
Your IdP will only see the load balancer as a communication peer - the Supplier Portal cluster instances behind it are hidden from the IdP.

Informatica MDM - Product 360 Configuration 234
1. Call the configure script:
<SUPPLIER PORTAL INSTALLATION ROOT>/configure.bat
2. Add additionally to the samlSSO the loadBalancer profile to spring.profiles.active argument:
-Dspring.profiles.active=samlSSO,loadBalancer
Linux1. Edit your tomcat.sh shell script:
<SUPPLIER PORTAL INSTALLATION ROOT>/tomcat/bin/tomcat.sh
2. Add additionally to the samlSSO the loadbalancer profile to spring.profiles.active argument (see line 11 below as an example):
....export CATALINA_OPTS="-Dcatalina.home=$CATALINA_HOME-Dcatalina.base=$CATALINA_HOME-Djava.endorsed.dirs=$CATALINA_HOME/endorsed-Djava.io.tmpdir=$CATALINA_HOME/temp-Djava.util.logging.manager=org.apache.juli.ClassLoaderLogManager-Djava.util.logging.config.file=$CATALINA_HOME/conf/logging.properties-Dhsx.configurationArea=$HSX_CONFIG_AREA-Dlogback.configurationFile=$HSX_CONFIG_AREA/logback.xml -Dspring.profiles.active=samlSSO,loadBalancer -XX:MaxPermSize=512m".....
Edit your configuration.properties to modify your load balancer settings within in the Loadbalancer settings section.
################################################################################### Loadbalancer settings# Overrides request attributes with values of the load-balancer or reverse-proxy in front of the local application# The settings help to provide correct redirect URls and verify destination URLs during SAML processing. To activate the SAML loadbalancer # scenario you additionally need to add the 'loadBalancer' profile to the active spring profiles as an JVM argument. # override the request schema to http or httpsloadbalancer.schema = https# Context path must be set and start with a forward slashloadbalancer.contextPath = /hsx# override your server name loadbalancer.serverName = localhost# override the server portloadbalancer.port = 443

Informatica MDM - Product 360 Configuration 235
IdP configurationOn IdP side, it is necessary to have the load balancer set as assertion consumer service for the Supplier Portal relying party. The assertion consumer service location URL is then the same as already adjusted in the assertionConsumerServiceLocation in the SamlConfig.xml. (see above).
When you are not using the URL-based metadata fetching mechanism on IdP side, you need to manually modify the assertion consumer service location to point to the load balancer location.
Load balancer configurationThe following steps need to be done either for Apache or IIS to handle load-balancing for the Supplier Portal.
Apache and Tomcat load balancingAdditionally to the default load balancing scenario for the Supplier Portal
• Apache and Tomcat load balancing without SAML (see Supplier Portal Load Balancer Setup )
you need to do the following steps to handle SAML Authentication over your Apache load balancer (Tested with Apache httpd 2.4.18):
1. Edit the Apache configuration file httpd.conf: Activate the SSL module additionally to the other modules. (For the usage of SSL (https) in your load balancer (Apache), stick to the official Apache documentation)
LoadModule ssl_module modules/mod_ssl.so LoadModule proxy_connect_module modules/mod_proxy_connect.soLoadModule proxy_http_module modules/mod_proxy_http.soLoadModule proxy_module modules/mod_proxy.soLoadModule slotmem_shm_module modules/mod_slotmem_shm.soLoadModule lbmethod_byrequests_module modules/mod_lbmethod_byrequests.so LoadModule proxy_balancer_module modules/mod_proxy_balancer.so...<IfModule ssl_module> Include conf/extra/httpd-ssl.conf SSLRandomSeed startup builtin SSLRandomSeed connect builtin</IfModule>...
2. Check that the Listen statement listens to the appropriate SSL port (default 443):
Listen 443
3. There needs to be a virtual host matching your load balancer and the SSL port, the example below defines a virtual host supporting SSL and the additional directives necessary for SAML support:
Example virtual host configuration
<VirtualHost *:443> ServerName loadBalancer SSLEngine on SSLCertificateFile "D:/certs/cert.pem" SSLCertificateKeyFile "D:/certs/pk.pem" SSLProxyEngine On

Informatica MDM - Product 360 Configuration 236
ProxyPreserveHost On #optional for disabling certificate validation for testing purpose #SSLProxyVerify off #SSLProxyCheckPeerCN off #SSLProxyCheckPeerName off <Proxy balancer://supplierclusterSSL> BalancerMember https://supplierPortalCluster1:9443 route=server1 BalancerMember https://supplierPortalCluster2:9443 route=server2 ProxySet stickysession=JSESSIONID|jsessionid </Proxy> ProxyPass /hsx balancer://supplierclusterSSL/hsx stickysession=JSESSIONID|jsessionid ProxyPassReverse /hsx balancer://supplierclusterSSL/hsx stickysession=JSESSIONID|jsessionid </VirtualHost>
The most important additional directives to be configured are listed below:
Directive Explanation
SSLProxyEngine On Support SSL proxy
ProxyPreserveHost On Preserve host name on proxy requests (required for successful validation of SAML requests/responses)
SSLCertificate... Either SSL Certifcate or SSLCACertificates which where defined here, need to be trusted by the IDP to successfull handle an SAML authentication.
Microsoft IIS and Tomcat load balancingYou need to do the following steps to handle SAML Authentication over your IIS load balancer (tested with IIS and ARR on windows 2012 R2 server).
Additionally to the default IIS load balancing settings you need to take care of the following settings for the Supplier Portal:
1. Install Application Request Routing and URL Rewriting on your IIS server.2. Create server farm with the appropriate Supplier Portal server instances (especially with their appropriate port
settings, which are configured in your supplier portal configuration.properties file). Add HTTP and HTTPS ports
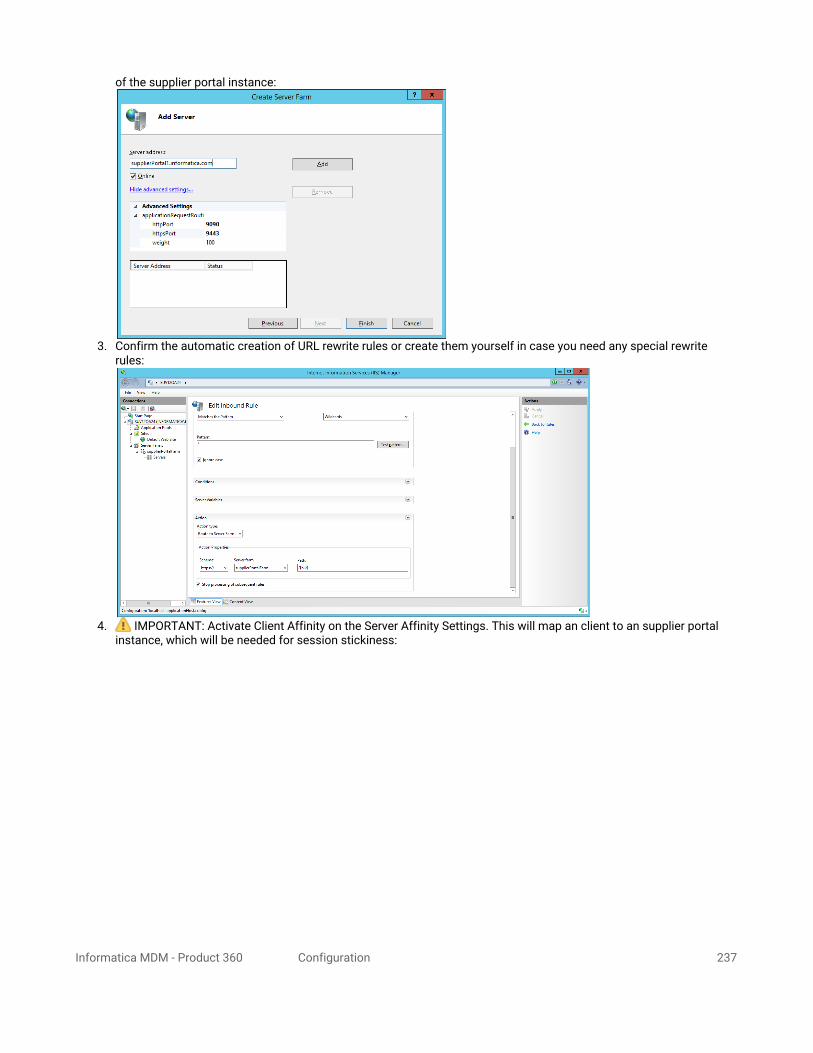
Informatica MDM - Product 360 Configuration 237
of the supplier portal instance:
3. Confirm the automatic creation of URL rewrite rules or create them yourself in case you need any special rewrite rules:
4. IMPORTANT: Activate Client Affinity on the Server Affinity Settings. This will map an client to an supplier portal instance, which will be needed for session stickiness:

Informatica MDM - Product 360 Configuration 238
8.6.5 Session lifetimesThere are a several token or session lifetimes that have to be considered when setting up SSO for Supplier Portal. There is no specific recommendation for the IdP side session lifetimes, but for the Product 360 applications the following requirements must be met:
PIM Server Access Token Lifetime > PIM Server Session Lifetime > PIM Supplier Portal Session Lifetime
A preconfigured Product 360 installation package already has the required default values, so typically nothing has to be done. But keep this requirement in mind in case it is desired to change any of the lifetimes.
Token name Default value
Configurable Description
PIM Server Access Token
One day (86400 seconds)
via preference in plugin_customization.ini:
com.heiler.ppm.webservice.server/accessTokenExpirationTime.SAML
Access Token created to make Service API calls on behalf of the Portal Admin user.
PIM Server Session 3 hours No Used when issuing a Rest Service API call with certain credentials.
PIM Supplier Portal Session
120 minutes
in web.xml:<session-config><session-timeout>120</session-timeout>...</session-config>
Login token for the Supplier Portal application.
8.7 How to configure Oracle TCPS connection for P360 Supplier Portal
8.7.1 PrerequisiteIn order to establish a TCPS connection, ensure, that the Oracle server's public key certificate is known by the P360 Supplier Portal's Java Runtime Environment (JRE). There are different possibilities to achieve this. Please refer to the JSSE Reference

Informatica MDM - Product 360 Configuration 239
Guide (https://docs.oracle.com/javase/8/docs/technotes/guides/security/jsse/JSSERefGuide.html) and here especially the chapters "Creating an X509TrustManager" and "Creating a Keystore to Use with JSSE".
8.7.2 Configure P360 Supplier PortalEnsure to do the following configuration changes on all P360 Supplier Portal servers. The P360 Supplier Portal needs to be restarted in order to have changes take effect.
• in <INSTALLATION ROOT>/configuration/configuration.properties:• specify the Oracle Server's TCPS port as value of the property database.port (and naturally also the other
database parameters like host, database,...). For details, please refer to the chapter "Supplier Portal Configuration".
• change the protocol to "tcps" in the property database.url.oracle so the value is like follows: jdbc:oracle:thin:@(DESCRIPTION=(ADDRESS=(PROTOCOL=tcps)(HOST=${database.server})(PORT=${database.port}))(CONNECT_DATA=(SERVICE_NAME=${database.name})))
9 Audit Trail ConfigurationIn this manual configuration settings for Product 360 - Audit Trail are described.
9.1 Configuration Setup and General DescriptionConfiguration properties which belongs to the Product 360 - Audit Trail can be found in the Product 360 - Audit Trail Server, Product 360 Core or in the MessageQueue.
The according application has to be restarted in order to have changes take effect.
The configuration file itself contains properties following the standard "key: value" pattern.
9.2 Audit Trail network configThe AuditTrailNetworkConfig.xml file holds all the information of the audit trail network.
Only the first node is used to connect to that specific Audit Trail server.Typically the host of the node is the loadbalancer used for Audit Trail in a setup with multiple Audit Trail servers.
<network> <node host="audittrail-loadbalancer" port="2801" username="Administrator" password="Administrator" /> </network>
If you want to encrypt the passwords used in the configuration files please refer to chapter Encryption of secure information in the Server Installation manual.

Informatica MDM - Product 360 Configuration 240
Element/Attribute
Description Required Default
network Root element of the network configuration yes
network/node
Represents an Audit Trail server node in the cluster. Only the first node is used to connect to that specific Audit Trail server.Typically the host of the node is the loadbalancer used for Audit Trail in a setup with multiple Audit Trail servers.
yes
host The host name / IP address this node runs on. Note: Do not use localhost or similar addresses. The host name or IP address in this attribute must be visible from all nodes in the cluster. In case the server has the CLIENTS_SERVER role, it also must be visible from the desktop clients.
yes
port The port that is used for the http connection to the server. In case https is desired the port of the https element is used (see below).
yes in case http is used
no in case https is used
username Username used for Basic Authentication. yes
password Password used for Basic Authentication. yes
network/node/https
Defines whether https should be used for connection. Https is automatically used if element exists.
No. Only required if https is the desired protocol.
port The port that is used for https connection. yes
protocol Https protocol to be used for secure connection.
Possible values are "SSL", "SSLv2", "SSLv3", "TLS", "TLSv1", "TLSv1.1" or "TLSv1.2".
no TLSv1.2
Property Description of Product 360 - Audit Trail storage serverThe following tables contain a complete list of all properties available in Product 360 - Audit Trail server, grouped by functionality. Each property is described with further explanation and examples.
Note that if https is used, a keystore is needed. The definition for the keystore is taken from the node of the current P360 server. See keystore element definition in Server Configuration - Network Configuration (NetworkConfig.xml) section.
If you want to connect P360 Audit Trail to an Oracle Database via TCPS, please refer to chapter "How to configure Oracle TCPS connection for P360 Audit Trail".

Informatica MDM - Product 360 Configuration 241
General settings
dest.host Hostname on which Product 360 - Audit Trail Server is running
Database settings
db.integrated.security
If your security guidelines do not allow passwords in configuration files this preference allows you to use integrated authentication on Windows operating systems."Integrated Security" is a security functionality of Microsoft SQL Server. If other password protection mechanism is used, then keep this setting in the configuration file and set to false.
db.default.type
ORA11g or MSSQL2008
db.audittrail.schema
Schema name of the database. It must be in capital letters.Default: HPM_AUDITTRAIL
db.audittrail.schema.backup
Backup name of the database
db.audittrail.server
The host name of the Oracle/Microsoft SQL Server;Change this in case of a separate database server
db.audittrail.port
Port number of the database server.Default for MSSQL: 1433Default for Oracle: 1521
db.audittrail.user
Name of the database user. For Oracle use the defined schema name.If Microsoft SQL Server "Integrated Security" is in use, set to empty
db.audittrail.password
Password for the database userIf Microsoft SQL Server "Integrated Security" is in use, set to empty
db.audittrail.dir.local
Base folder for the database schema and database transaction log files, used by the database setup too.
db.audittrail.dir.data
Folder for the database schema files.
db.audittrail.dir.log
Folder for the transaction log files.
db.audittrail.dir.temp
Folder for the database transaction log files.
This folder needs not to be local to the application server but to the database server.

Informatica MDM - Product 360 Configuration 242
General settings
db.audittrail.data.size
Default size in MB allocated for a database transaction log file; adapt this setting to your needs.Default: 256
db.audittrail.data.size.growth
Default increment value in MB allocated when space a transaction log file is insufficient; adapt this setting to your needs.Default: 128
db.audittrail.log.size
Default size in MB allocated for a database transaction log file; adapt this setting to your needs.
db.audittrail.log.size.growth
Default increment value in MB allocated when space for a database transaction log file is insufficient; adapt this setting to your needs.
db.audittrail.debug.show_sql
Usually, this property needs not to be changed. Generated SQL statements during runtime will be shown in the log file. This is a debugging feature which will slow down the application drastically if turned on.
Database settings (Oracle only)
db.sys.password
Password for SYS user which will be used to connect to Oracle Server as SYSDBARequired to create/drop target schema only.
db.audittrail.tns
The TNS name used by Oracle. Please verify that TNS is enabled at Oracle Database.
db.audittrail.index.size
Default size in MB allocated for an index tablespace; adapt this setting to your needs.
db.audittrail.index.size.growth
Default increment value in MB allocated when space for an index tablespace is insufficient; adapt this setting to your needs.
db.audittrail.temp.size
Default size in MB allocated for a database transaction log file; adapt this setting to your needs.
In a productive environment you should define the initial size of the database log files to the expected maximum. A data base growth action always "stops the world" of the database until the files are enlarged. In case the growth size is too small, this might occur very often which is a serious performance problem!
In a productive environment you should define the initial size of the database log files to the expected maximum. A data base growth action always "stops the world" of the database until the files are enlarged. In case the growth size is too small, this might occur very often which is a serious performance problem!

Informatica MDM - Product 360 Configuration 243
General settings
db.audittrail.temp.size.growth
Default increment value in MB allocated when space a transaction log file is insufficient; adapt this setting to your needs.
Persistence layer settings
hibernate.dialect
Default for MSSQL: org.hibernate.dialect.SQLServer2008DialectDefault for Oracle: org.hibernate.dialect.Oracle10gDialect
hibernate.connection.driver_class
Default for MSSQL: com.microsoft.sqlserver.jdbc.SQLServerDriverDefault for Oracle: oracle.jdbc.driver.OracleDriver
hibernate.connection.url
Default for MSSQL: dbc:sqlserver://${db.audittrail.server}:${db.audittrail.port};databaseName=${db.audittrail.schema}Default for Oracle: jdbc:oracle:thin:@${db.audittrail.server}:${db.audittrail.port}/${db.audittrail.tns}
hibernate.connection.username
Default: ${db.audittrail.user}
hibernate.connection.password
Default: ${db.audittrail.password}
hibernate.entitychange.id.allocate
Default: 2000
hibernate.tomcatjdbc.pool.validationQuery
Default for MSSQL: SELECT 1Default for Oracle: SELECT 1 FROM DUAL
hibernate.tomcatjdbc.pool.jdbcInterceptors
Default for MSSQL: StatementCache(prepared=true,max=100)Default for Oracle: StatementFinalizer
Communication settings
In a productive environment you should define the initial size of the database log files to the expected maximum. A data base growth action always "stops the world" of the database until the files are enlarged. In case the growth size is too small, this might occur very often which is a serious performance problem!

Informatica MDM - Product 360 Configuration 244
General settings
server.authentification.enabled
Turn authentification on/offDefault: true
JMS consumer settings
jms.connection.url
Connection URL of the JMS server tcp://<host>:<port>.Default: tcp://localhost:61616
jms.connection.username
In case MessageQueue security is activated this is the defined user name. Default: atcsreader
jms.connection.password
In case MessageQueue security is activated, this is the defined password for the user.Default: arpass
jms.queue.name
JMS subscription queue name. The consumer is using VirtualTopic Queue, so queue name should match Consumer.*.VirtualTopic.* pattern.Default: Consumer.ATCS.VirtualTopic.ATCS.ALL
jms.consumer.count
JMS consumers count. Notice that every consumer work in separate session and receives messages asynchronously.Default: 20
jms.consumer.validator.errors.limit
Errors count, which should be reached, to suspend JMS consumption and wait for a while before reconnect again (see delay property)Default: 20
The URL have to match the MessageQueue configuration and JMS configuration in audittrail.properties of Product 360 Core.
It has to match the MessageQueue activemq.xml authenticationUser.
It has to match the MessageQueue activemq.xml authenticationUser.
The corresponding topic configuration in the server.properties of Audit Trail server have to be named "VirtualTopic.<restof the topic name>"

Informatica MDM - Product 360 Configuration 245
General settings
jms.consumer.validator.trigger.seconds
Delay between JMS error validations in seconds.Default: 10
jms.consumer.validator.restart.delay.seconds
Delay between JMS service restart.Default: 60
jms.consumer.autostart
JMS consumer service auto start option. If multiple Audit Trail servers are running and you want to use one server for answering requests and the other for working the message queue, you have to set this value to false for the server which should handle only requests.Default: true
jms.consumer.jmxregistration
JMS management bean registration optionDefault: true
9.3 Property Description of Product 360 - Audit Trail in Product 360 CoreThe following tables contain a complete list of all Product 360 - Audit Trail properties available in Product 360 Core, grouped by functionality. Each property is described with further explanation and examples.
General settings
audittrail.enabled Enable/Disable Product 360 - Audit Trail functionality. If Product 360 - Audit Trail is disabled there will be no performance overhead. Default = false
audittrail.fetch.data.before.delete
Should be true if hard deletes should be logged with identifiers and labels.Disabling this feature will improve performance but only entity type will be logged for hard delete operations.Default = true
audittrail.atcsbuilder.local
Locale for object labels and entity names (Product 360 - Audit Trail saves object labels only in one language). If not defined then Product 360 Server locale is used.Default: en_US
JMS settings
audittrail.jmsconsumer.jms.topic
JMS topic where Audit Trail Change Sets will be sent to. The topic name should start with "VirtualTopic" prefix because ActiveMQ maps such topics to queues internally by a convention.Default: VirtualTopic.ATCS.ALL
Corresponding queues have to be named "Consumer.*.VirtualTopic.<rest of the topic name>"

Informatica MDM - Product 360 Configuration 246
General settings
audittrail.jmsconsumer.jms.connection.url
JMS connection URL tcp://<host>:<port>. Default: tcp://localhost:61616
audittrail.jmsconsumer.storage.type
When JMS is not accessible messages are persisted, storage types:
• file - each message is serialized to file - recomended• discard - messages discarded• jdbm - storage based on JDBM• memory - stores messages in memory
Saved messages are sent to JMS as soon as JMS server become accessibleDefault: file
audittrail.jmsconsumer.storage.warn
Works only if storage type is discard. If true each discarded message will add warning in log.Default: false
audittrail.jmsconsumer.storage.size
Works only if storage type is memory. Defines max number of messages in the storage.Default: 100000
audittrail.jmsconsumer.jms.sessions
Number of JMS sessions used to send ATCSsDefault: 10
audittrail.jmsconsumer.jms.persisted
If messages are not persisted then they will be lost if JMS server crashes or is restarted but JMS server can become a perfomance bottle neck if messages are persisted (SSD or raid can help)Default: false
ATCS Builder thread poll configuration
ATCSs are constructed asynchronously. This section of config allows to tune thread pool running ATCS builder threads.
audittrail.processor.async.threadpoolsize
ATCS builder thread pool's size.Default: 30
audittrail.processor.async.keepalivetimesecs
ATCS builder thread pool's keep alive which is the amount of time that threads in excess of the core pool size may remain idle before being terminated.Default: 600
9.4 How to configure Oracle TCPS connection for P360 Audit Trail
9.4.1 PrerequisiteIn order to establish a TCPS connection, ensure, that the Oracle server's public key certificate is known by the P360 Audit Trail's Java Runtime Environment (JRE). There are different possibilities to achieve this. Please refer to the JSSE Reference Guide (https://docs.oracle.com/javase/8/docs/technotes/guides/security/jsse/JSSERefGuide.html) and here especially the chapters "Creating an X509TrustManager" and "Creating a Keystore to Use with JSSE".
The URL have to fit the MessageQueue configuration and has to match JMS configuration in server.properties of Product 360 - Audit Trail server.

Informatica MDM - Product 360 Configuration 247
9.4.2 Configure P360 Audit TrailEnsure to do the following configuration changes on all P360 Audit Trail servers. The P360 Audit Trails servers need to be restarted in order to have changes take effect.
in <INSTALLATION_ROOT>/atserver/configuration/audittrailserver/server.properties:specify the Oracle Server's TCPS port as value of the property db.audittrail.port (and naturally also the other database parameters like host name, schema,...). For details, please refer to the chapter "Audit Trail Configuration".change the protocol to "tcps" in the property "hibernate.connection.url" so it is equalsjdbc:oracle:thin:@(DESCRIPTION=(ADDRESS=(PROTOCOL=tcps)(HOST=${db.audittrail.server})(PORT=${db.audittrail.port}))(CONNECT_DATA=(SERVICE_NAME=${db.audittrail.tns})))
10 Web Search ConfigurationEach Web Search is based on an index, which has to be built previously. The content of the search index can be configured in the index configuration which is located in <P360_WEBSEARCH_INSTALLATION_ROOT>\store\index.xml.
You can also use the web-based,rudimental Configuration Administration Tool which is located on: http://server:port/hps-config-admin (please consider to replace your own server and port settings, e.g. http://localhost:18090/hps-config-admin/).
• Configuration Troubleshooting• Web-based Index Config Administration Tool
All index configurations can be read by REST as well: http://server:port/hps-web/rest2/index/<Name of index>/Configuration/Online (e.g. http://localhost:18090/hps-web/rest2/index/Master/Configuration/Online , where 'Master' is the index name).
The data source of the indices is the Product 360 Service API. Therefore the Web Search depends on what the Product 360 Service API provides.
10.1 Index Configuration
10.1.1 LocaleLocale defines the locale and language specific setting of this index. This is also important to use language specific stop words and stemmers for the index build.
An Oracle TCPS connection is only supported for the Audit Trail server itself. The Audit Trail Database installation and update (described in the chapter "Audit Trail Database" in the "Database Installation" manual) is NOT possible via TCPS for Oracle.
Tip
If you have any further question, how to configure Web Search, have a look to the HowTo page: Web Search Configuration How to
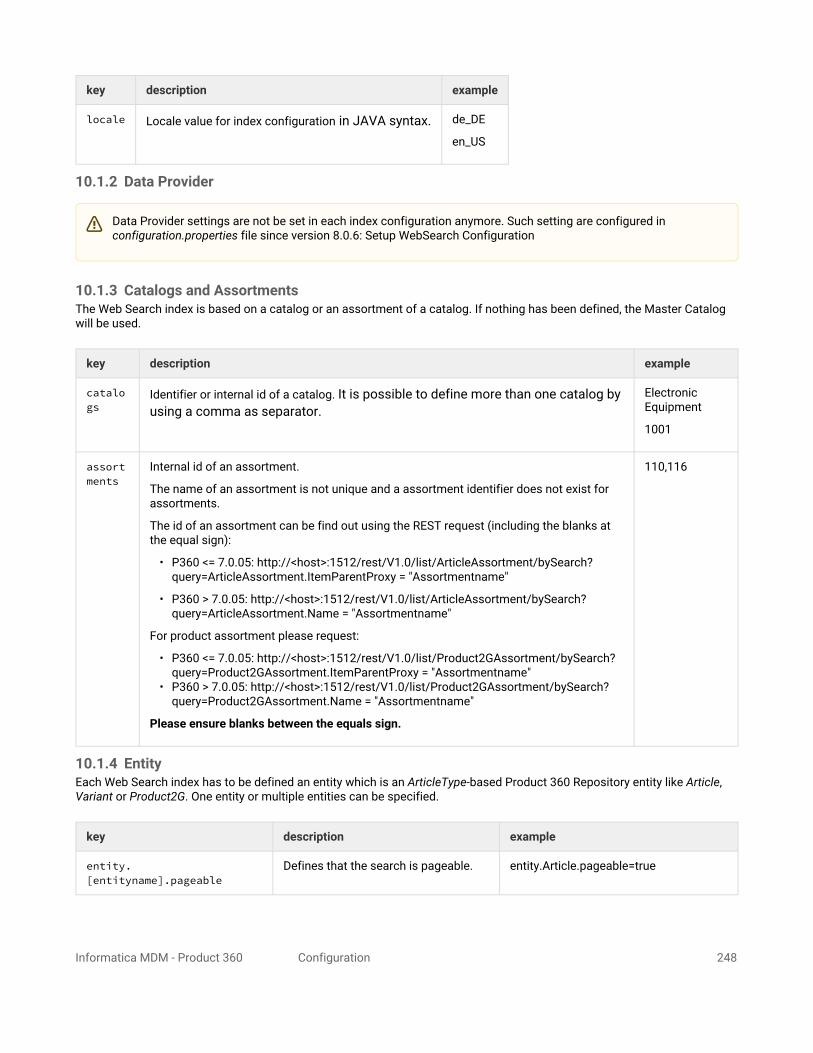
Informatica MDM - Product 360 Configuration 248
key description example
locale Locale value for index configuration in JAVA syntax. de_DE
en_US
10.1.2 Data Provider
10.1.3 Catalogs and AssortmentsThe Web Search index is based on a catalog or an assortment of a catalog. If nothing has been defined, the Master Catalog will be used.
key description example
catalogs
Identifier or internal id of a catalog. It is possible to define more than one catalog by using a comma as separator.
Electronic Equipment
1001
assortments
Internal id of an assortment.
The name of an assortment is not unique and a assortment identifier does not exist for assortments.
The id of an assortment can be find out using the REST request (including the blanks at the equal sign):
• P360 <= 7.0.05: http://<host>:1512/rest/V1.0/list/ArticleAssortment/bySearch?query=ArticleAssortment.ItemParentProxy = "Assortmentname"
• P360 > 7.0.05: http://<host>:1512/rest/V1.0/list/ArticleAssortment/bySearch?query=ArticleAssortment.Name = "Assortmentname"
For product assortment please request:
• P360 <= 7.0.05: http://<host>:1512/rest/V1.0/list/Product2GAssortment/bySearch?query=Product2GAssortment.ItemParentProxy = "Assortmentname"
• P360 > 7.0.05: http://<host>:1512/rest/V1.0/list/Product2GAssortment/bySearch?query=Product2GAssortment.Name = "Assortmentname"
Please ensure blanks between the equals sign.
110,116
10.1.4 EntityEach Web Search index has to be defined an entity which is an ArticleType-based Product 360 Repository entity like Article, Variant or Product2G. One entity or multiple entities can be specified.
key description example
entity.[entityname].pageable
Defines that the search is pageable. entity.Article.pageable=true
Data Provider settings are not be set in each index configuration anymore. Such setting are configured in configuration.properties file since version 8.0.6: Setup WebSearch Configuration
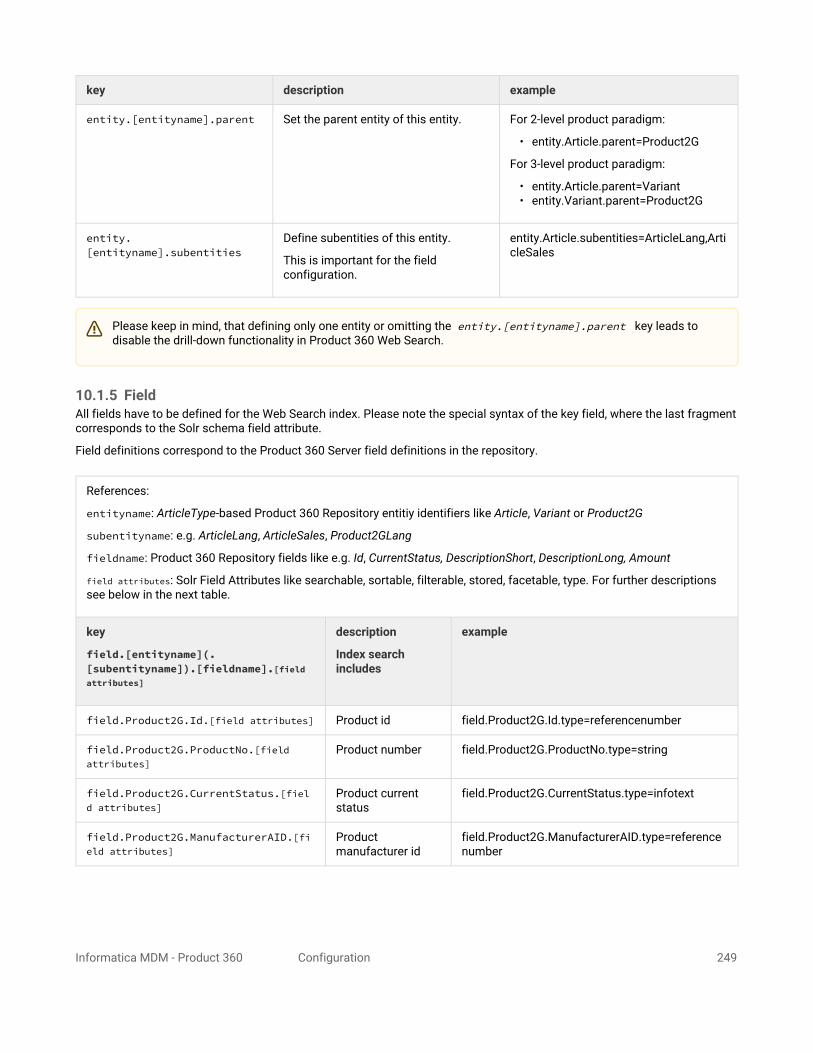
Informatica MDM - Product 360 Configuration 249
key description example
entity.[entityname].parent Set the parent entity of this entity. For 2-level product paradigm:
• entity.Article.parent=Product2G
For 3-level product paradigm:
• entity.Article.parent=Variant• entity.Variant.parent=Product2G
entity.[entityname].subentities
Define subentities of this entity.
This is important for the field configuration.
entity.Article.subentities=ArticleLang,ArticleSales
10.1.5 FieldAll fields have to be defined for the Web Search index. Please note the special syntax of the key field, where the last fragment corresponds to the Solr schema field attribute.
Field definitions correspond to the Product 360 Server field definitions in the repository.
References:
entityname: ArticleType-based Product 360 Repository entitiy identifiers like Article, Variant or Product2G
subentityname: e.g. ArticleLang, ArticleSales, Product2GLang
fieldname: Product 360 Repository fields like e.g. Id, CurrentStatus, DescriptionShort, DescriptionLong, Amount
field attributes: Solr Field Attributes like searchable, sortable, filterable, stored, facetable, type. For further descriptions see below in the next table.
key
field.[entityname](.[subentityname]).[fieldname].[field attributes]
description
Index search includes
example
field.Product2G.Id.[field attributes] Product id field.Product2G.Id.type=referencenumber
field.Product2G.ProductNo.[field attributes]
Product number field.Product2G.ProductNo.type=string
field.Product2G.CurrentStatus.[field attributes]
Product current status
field.Product2G.CurrentStatus.type=infotext
field.Product2G.ManufacturerAID.[field attributes]
Product manufacturer id
field.Product2G.ManufacturerAID.type=referencenumber
Please keep in mind, that defining only one entity or omitting the entity.[entityname].parent key leads to disable the drill-down functionality in Product 360 Web Search.
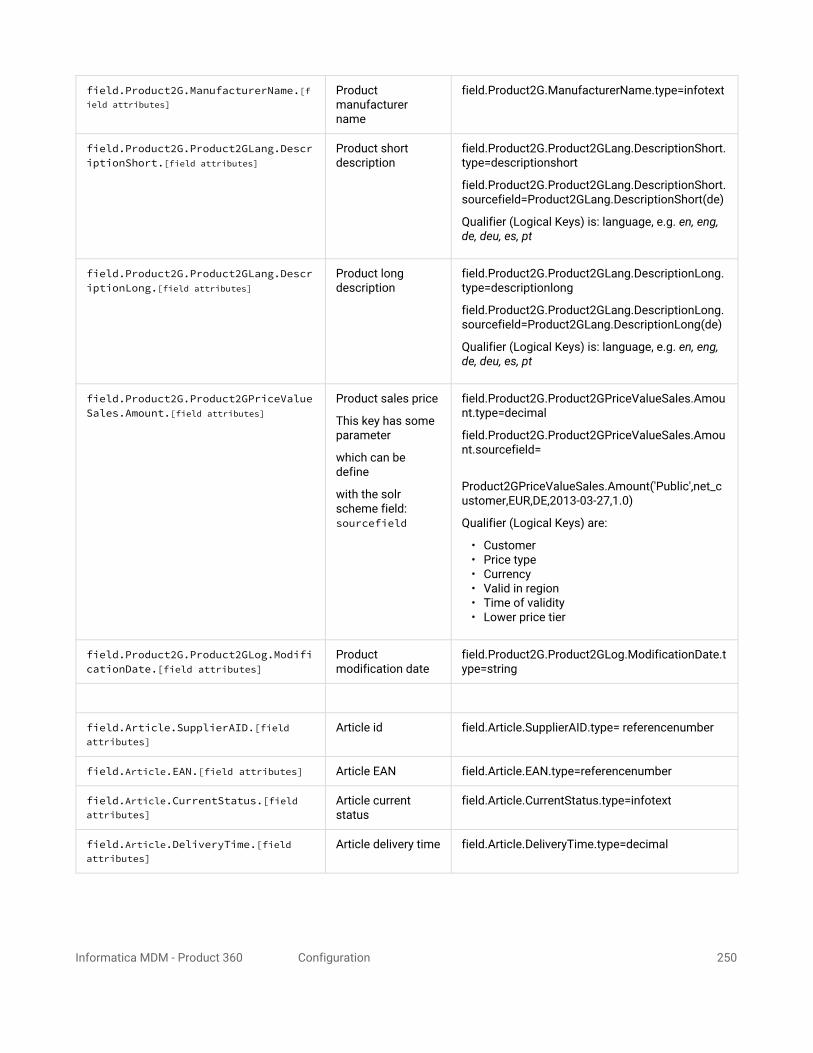
Informatica MDM - Product 360 Configuration 250
field.Product2G.ManufacturerName.[field attributes]
Product manufacturer name
field.Product2G.ManufacturerName.type=infotext
field.Product2G.Product2GLang.DescriptionShort.[field attributes]
Product short description
field.Product2G.Product2GLang.DescriptionShort.type=descriptionshort
field.Product2G.Product2GLang.DescriptionShort.sourcefield=Product2GLang.DescriptionShort(de)
Qualifier (Logical Keys) is: language, e.g. en, eng, de, deu, es, pt
field.Product2G.Product2GLang.DescriptionLong.[field attributes]
Product long description
field.Product2G.Product2GLang.DescriptionLong.type=descriptionlong
field.Product2G.Product2GLang.DescriptionLong.sourcefield=Product2GLang.DescriptionLong(de)
Qualifier (Logical Keys) is: language, e.g. en, eng, de, deu, es, pt
field.Product2G.Product2GPriceValueSales.Amount.[field attributes]
Product sales price
This key has some parameter
which can be define
with the solr scheme field: sourcefield
field.Product2G.Product2GPriceValueSales.Amount.type=decimal
field.Product2G.Product2GPriceValueSales.Amount.sourcefield=
Product2GPriceValueSales.Amount('Public',net_customer,EUR,DE,2013-03-27,1.0)
Qualifier (Logical Keys) are:
• Customer• Price type• Currency• Valid in region• Time of validity• Lower price tier
field.Product2G.Product2GLog.ModificationDate.[field attributes]
Product modification date
field.Product2G.Product2GLog.ModificationDate.type=string
field.Article.SupplierAID.[field attributes]
Article id field.Article.SupplierAID.type= referencenumber
field.Article.EAN.[field attributes] Article EAN field.Article.EAN.type=referencenumber
field.Article.CurrentStatus.[field attributes]
Article current status
field.Article.CurrentStatus.type=infotext
field.Article.DeliveryTime.[field attributes]
Article delivery time field.Article.DeliveryTime.type=decimal
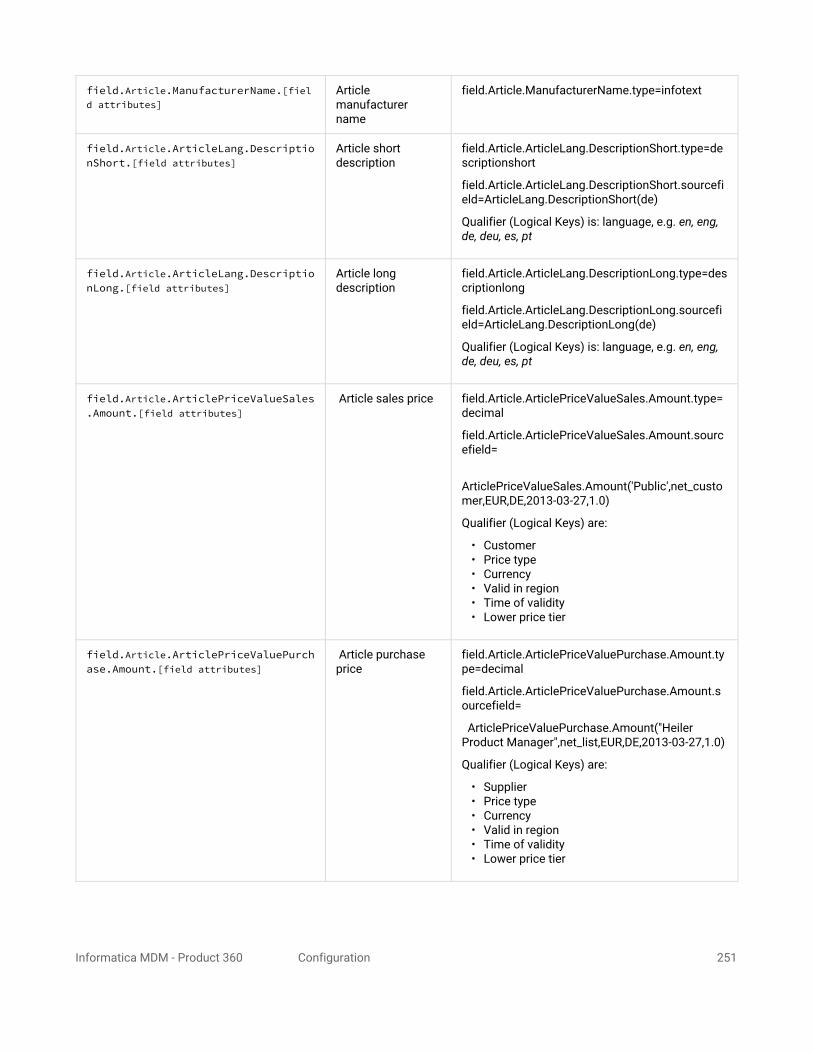
Informatica MDM - Product 360 Configuration 251
field.Article.ManufacturerName.[field attributes]
Article manufacturer name
field.Article.ManufacturerName.type=infotext
field.Article.ArticleLang.DescriptionShort.[field attributes]
Article short description
field.Article.ArticleLang.DescriptionShort.type=descriptionshort
field.Article.ArticleLang.DescriptionShort.sourcefield=ArticleLang.DescriptionShort(de)
Qualifier (Logical Keys) is: language, e.g. en, eng, de, deu, es, pt
field.Article.ArticleLang.DescriptionLong.[field attributes]
Article long description
field.Article.ArticleLang.DescriptionLong.type=descriptionlong
field.Article.ArticleLang.DescriptionLong.sourcefield=ArticleLang.DescriptionLong(de)
Qualifier (Logical Keys) is: language, e.g. en, eng, de, deu, es, pt
field.Article.ArticlePriceValueSales.Amount.[field attributes]
Article sales price field.Article.ArticlePriceValueSales.Amount.type=decimal
field.Article.ArticlePriceValueSales.Amount.sourcefield=
ArticlePriceValueSales.Amount('Public',net_customer,EUR,DE,2013-03-27,1.0)
Qualifier (Logical Keys) are:
• Customer• Price type• Currency• Valid in region• Time of validity• Lower price tier
field.Article.ArticlePriceValuePurchase.Amount.[field attributes]
Article purchase price
field.Article.ArticlePriceValuePurchase.Amount.type=decimal
field.Article.ArticlePriceValuePurchase.Amount.sourcefield=
ArticlePriceValuePurchase.Amount("Heiler Product Manager",net_list,EUR,DE,2013-03-27,1.0)
Qualifier (Logical Keys) are:
• Supplier• Price type• Currency• Valid in region• Time of validity• Lower price tier

Informatica MDM - Product 360 Configuration 252
10.1.6 Solr Field Attributes for WebSearch Configuration
field attributesof Solr scheme
description values
type Type of field which also set default values to the other scheme fields.
referencenumber, infotext, string, descriptionshort, descriptionlong, decimal (see in tableWeb Search Field Types below)
searchable If true, this field will be searchable. true/false
sortable If true, this field will be sortable. true/false
filterable If true, this field will be filterable. true/false
stored If true, this field will be stored. This is also necessary, if the field is sortable and searchable.
true/false
facetable If true, this field will be facetable. The facets will be displayed on Product 360 - Web after running a search query.
true/false
facetordervalue A number that is used for sorting facets. number
autocompletable If true, this field will be autocompletable (is not used in Web Search).
true/false
sourcefield Describes the original source of the field. This has to be defined, if the field contains parameter like the locale or language.
e.g.
ArticleLang.DescriptionShort(de)
ArticlePriceValuePurchase.Amount("Heiler Product Manager",net_list,EUR,DE,2013-03-27,1.0)
ArticleLog.ModificationDate(HPM)
returnfield Describes the originial field name which are returned. This is useful, if you like to add the same field with different parameter like the language in your index.
e.g.
ArticleLang.DescriptionShort(de)
ArticlePriceValuePurchase.Amount("Heiler Product Manager",net_list,EUR,DE,2013-03-27,1.0)
ArticleLog.ModificationDate(HPM)
ismodificationdatesource
If true, this field will be the source of the modification date of each row.
true/false

Informatica MDM - Product 360 Configuration 253
10.1.7 AttributesProduct 360 Core Attributes can be defined for the use as facets in Web Search index.
key description example
attributeprovider.[entityname].[entityname]Attribute.namesourcefields
Product 360 attributes namesource like
attribute name and attribute unit.
attributeprovider.Product2G.Product2GAttribute.namesourcefields= Product2GAttributeLang.Name(en),Product2GAttribute.Unit(eng)
attributeprovider.Article.ArticleAttribute.namesourcefields= ArticleAttributeLang.Name(en),ArticleAttribute.Unit(eng)
Qualifier (Logical Keys) is: language, e.g. en, eng, de, deu, es, pt
attributeprovider.[entityname].[entityname]Attribute.valuesourcefields
Product 360 attribute valuesource like attribute value.
attributeprovider.Product2G.Product2GAttribute.valuesourcefields= Product2GAttributeValue.Value
attributeprovider.Article.ArticleAttribute.valuesourcefields= ArticleAttributeValue.Value
attributeprovider.search.ignoreAttributesWithValues
Attribute values that are ignored in the search.
That means that the specified terms are not considered
as a match for attributes values.
However, if the term is contained in any other field, the
row matches.
attributeprovider.search.ignoreAttributesWithValues=no,false,0
10.2 Advanced Index Configuration
10.2.1 Base Solr Field Types
Solr field attributes
type example value stored
string some text true

Informatica MDM - Product 360 Configuration 254
boolean true true
decimal 1.234 true
integer 45 true
10.2.2 Web Search Field Types for Web Search ConfigurationWeb Search Field Types are definded in the schema.xml file located in solr/configuration/{locale}/conf, with locale = en_USor de_DE. Further information can be found on the solr wiki: http://wiki.apache.org/solr/SchemaXml
Solr field attributes
type example native fields
example value
purpose
stored
search-
able
facets
sortable
filterable
auto-
complete
boost factor
related
analyzers
descriptionshort
• descriptionshort
black shoes
searchable,
filter,
sortable
string field
true
true true
true true medium,
5.0
simpleexactshortshinglephoneticngramedgengramfront edgengrambacksnowball
descriptionlong
• descriptionlong
black shoes
searchable,
filter,
sortable
string field
true
true true normal,
1.0
simpleexactshortshinglephoneticngramedgengramfront edgengrambacksnowball

Informatica MDM - Product 360 Configuration 255
infotext
• catalogname
• manufacturername
• suppliername
some text
searchable,
filter,
sortable,
facetable
string field
true
true true
true true true normal,
2.0
simpleexact
infonumber
• lead time/delivery time
• price
1.234 filterable,
sortable,
facetable
number field
using decimals
true
true
true true
keyword
• keyword black shoes shoe
true
true low,
0.001
simpleexact
referencenumber
• supplierarticleid
• manufacturerarticleid
• ean
1234-456/234
searchable,
filterable,
sortable
string field
true
true true
true true high,
10.0
simpleexactshinglereferencenumberfrontreferencenumberback
10.2.3 AnalyzerSolr Analyzer contains information how to pre-process input text at index time and/or at search time. This can be done with Tokenizers and Token Filters. Please refer to http://wiki.apache.org/solr/AnalyzersTokenizersTokenFilters for further information.
10.2.4 Boost FactorBoost factor can improve the score value of a result item and gives a higher ranking of in the search result. There exist a few default values for boost factor for Web Search Field Types (see also table above) and Attributes:

Informatica MDM - Product 360 Configuration 256
type / attribute boost factor
descriptionshort 5.0
descriptionlong 1.0
infotext 2.0
keyword 0.001
referencenumber 10.0
attribute 1.0
In addition to the default boost values by fieldType, it is also possible to configure an boost value on field level. In such a case, both values will be applied together on each match. The for boosting fields is like this:
boost.field.Article.SupplierAID = 20
In this example, the item number field is boosted by factor 20 (default is 1.0).
10.2.5 Simplify Localization ParametersFor localization handling, the parameter locale is mandatory in each index configuration. Based on the value of that parameter, other parameters are automatically derived by the system as shown in the following table. This simplification only works for all locales.
Placeholder
locale=de_DE
locale=en_US
Example
${languageISO3}
deu eng field.Article.ArticleLang.DescriptionLong.sourcefield=ArticleLang.DescriptionLong(${languageISO3})
attributeprovider.Article.ArticleAttribute.namesourcefields=ArticleAttributeLang.Name(${languageISO3}),ArticleAttribute.Unit(${languageISO3})
${language}
de en field.Article.ArticleLang.DescriptionLong.sourcefield=ArticleLang.DescriptionLong(${language})
attributeprovider.Article.ArticleAttribute.namesourcefields=ArticleAttributeLang.Name(${language}),ArticleAttribute.Unit(${languageISO3})
${locale} de_DE en_US field.Article.ArticleLang.DescriptionShort.sourcefield=ArticleLang.DescriptionShort(${locale})
attributeprovider.Article.ArticleAttribute.namesourcefields=ArticleAttributeLang.Name(${locale}),ArticleAttribute.Unit
Since version 7.1.0 :
${country}
DE US field.Article.ArticlePriceValueSales.Amount.returnfield=ArticlePriceValueSales.Amount('Public',net_customer,USD,${country},2013-03-27,1.0)
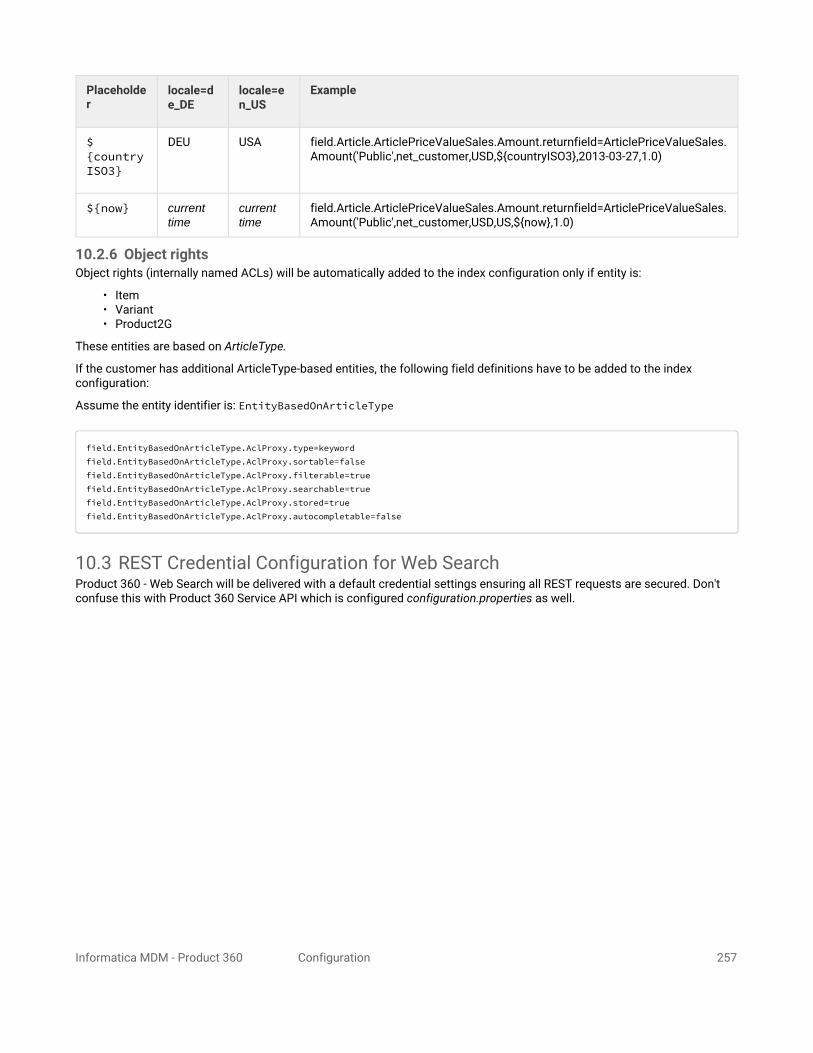
Informatica MDM - Product 360 Configuration 257
Placeholder
locale=de_DE
locale=en_US
Example
${countryISO3}
DEU USA field.Article.ArticlePriceValueSales.Amount.returnfield=ArticlePriceValueSales.Amount('Public',net_customer,USD,${countryISO3},2013-03-27,1.0)
${now} current time
current time
field.Article.ArticlePriceValueSales.Amount.returnfield=ArticlePriceValueSales.Amount('Public',net_customer,USD,US,${now},1.0)
10.2.6 Object rightsObject rights (internally named ACLs) will be automatically added to the index configuration only if entity is:
• Item• Variant• Product2G
These entities are based on ArticleType.
If the customer has additional ArticleType-based entities, the following field definitions have to be added to the index configuration:
Assume the entity identifier is: EntityBasedOnArticleType
field.EntityBasedOnArticleType.AclProxy.type=keywordfield.EntityBasedOnArticleType.AclProxy.sortable=falsefield.EntityBasedOnArticleType.AclProxy.filterable=truefield.EntityBasedOnArticleType.AclProxy.searchable=truefield.EntityBasedOnArticleType.AclProxy.stored=truefield.EntityBasedOnArticleType.AclProxy.autocompletable=false
10.3 REST Credential Configuration for Web SearchProduct 360 - Web Search will be delivered with a default credential settings ensuring all REST requests are secured. Don't confuse this with Product 360 Service API which is configured configuration.properties as well.

Informatica MDM - Product 360 Configuration 258
The REST credential can be configure before the installation in: <P360_WEBSEARCH_INSTALLATION_ROOT>\configuration.properties as descriped in .PIM - Web Search Configuration v8.1.
After the installation the REST credentials can be changed in: <P360_WEBSEARCH_INSTALLATION_ROOT>\apache-tomcat-7.0.xx\webapps\hps-web\WEB-INF\classes\META-INF\spring\fulltextsearch.properties.
Don't forget to change the Product 360 Desktop and Product 360 - Web settings as well. See Setup Configuration for Product 360 - Core and Product 360 - Web for further instructions.
10.3.1 Checklist
No.
Task location
Product 360 Web Search REST Service:
1 Change fulltextsearch.propertiesfile
<P360_WEBSEARCH_INSTALLATION_ROOT>\apache-tomcat-7.0.xx\webapps\hps-web\WEB-INF\classes\META-INF\spring
2 Change credential in Configuration Administration Tool
http://localhost:18090/hps-config-admin
Product 360 Rest Service (Product 360 Service API):
3 Change credential in fulltextsearch.properties file
<P360_SERVER_INSTALLATION_ROOT>\server\configuration\HPM
5 Restart Web Search server Window Service: Informatica Product 360 Search

Informatica MDM - Product 360 Configuration 259
10.4 REST Credential for Product 360 Service APIThe REST credential can be configure before the installation in: <P360_WEBSEARCH_INSTALLATION_ROOT>\configuration.properties as descriped in .PIM - Web Search Configuration v8.1.
After the installation the REST credentials can be changed in: <P360_WEBSEARCH_INSTALLATION_ROOT>\apache-tomcat-7.0.xx\webapps\hps-web\WEB-INF\classes\META-INF\spring\hpm.properties.
10.5 Add further languagesProduct 360 Web Search contains two language German and US English out of the box for the index configuration.
However indices and their related searches are language dependent while considering language specific grammar-, stop-words- and phonetic-settings.
Following several steps desribes how to add new language for an index configuration. Examples uses france as a new language:
• Edit file solr.xml in folder solr\configuration : add a line for the new language with the core tag. Example: <core name="fr_FR" instanceDir="fr_FR" />
• Add a new subfolder of solr\configuration, e.g. fr_FR/conf and copy for the first the three file: schema.xml, solrconfig.xml and stopwords.txt from folder en_US/conf into the new folder.
• File solrconfig.xml can be left as it is.• File schema.xml has to be edited:
• Change language and country settings in JAVA syntax of CollationKeyFilterFactory. Example: <filter class="solr.CollationKeyFilterFactory" language="fr" country="FR" strength="primary" />
• Change encoder for PhoneticFilterFactory. Example: <filter class="solr.PhoneticFilterFactory" encoder="DoubleMetaphone" inject="false"/> . For further infos see API of class PhoneticFilterFactory: http://lucene.apache.org/solr/3_6_0/org/apache/solr/analysis/PhoneticFilterFactory.html
• Change language of SnowballPorterFilterFactory. Example: <filter class="solr.SnowballPorterFilterFactory" language="French"/>. Further infos can be found in: http://lucene.apache.org/solr/3_6_0/org/apache/solr/analysis/package-summary.html and http://lucene.apache.org/solr/3_6_0/org/apache/solr/analysis/SnowballPorterFilterFactory.html
• Change StemFilterFactory in edgengramfront and edgengramback fieldType definition. Replace <filter class="solr.EnglishMinimalStemFilterFactory"/> with for example <filter class="solr.FrenchMinimalStemFilterFactory"/>. Please have a look to: http://lucene.apache.org/solr/3_6_0/org/apache/solr/analysis/BaseTokenFilterFactory.html where all available StemFilterFactory class are listed.
• File stopwords.txt has to replace by languagespecific stopword list. This can be found in package org.apache.lucene.analysis and languagespecific subpackage. For example the stopword of French can be found in package org.apache.lucene.analysis.snowball or in package org.apache.lucene.analysis.fr in file: french_stop.txt .
The french example is available here: fr_FR.zip. But it has not been testet.
10.6 ExamplesExamples for index configuration which can be used to get started can be found after installing Product 360 Web Search in folder indexExamples of your installation location.
These examples include the listed files below:
• item only: index item-only.txt
Tip
Please check your credential using the REST Url in your browser: http://localhost:18090/hps-web/rest2/index/Master/Configuration/Online

Informatica MDM - Product 360 Configuration 260
• product only: index product-only.txt• variant only: index variant-only.txt• 2-level product paradigm (with product and item): index 2pp (product,item).txt• 3-level product paradigm (with product,variant and item): index 3pp (product,variant,item).txt• Items of assortments: index with assortments.txt• Items of catalogs: index with catalogs.txt
Further index configuration with some customizations:
• item assortment with two different logical key per field.txt• items with channel logical key.txt
10.7 External linksFurther information to Solr can be found here:
• http://wiki.apache.org/solr• http://wiki.apache.org/solr/AnalyzersTokenizersTokenFilters• http://wiki.apache.org/solr/SchemaXml• http://www.solrtutorial.com/solrconfig-xml.html• http://www.solrtutorial.com/schema-xml.html• http://www.installationpage.com/solr/solr-configuration-tutorial-schema-solrconfig-xml/• http://www.solrtutorial.com/boost-documents-by-age.html• https://cwiki.apache.org/confluence/display/solr/
Major+Changes+from+Solr+3+to+Solr+4#MajorChangesfromSolr3toSolr4-Changestosolrconfig.xml
10.8 Configuration TroubleshootingIn case the application doesn't work, you might try the following:
No search results Please check:
• Index build was successful.• Product 360 Server and Product 360 Web Server is available• Product 360 - Web Search server is available• Use for the first time an asterix '*' as a search string• Check all index configuration settings in:
• <PIM_WEBSEARCH_INSTALLATION_ROOT>/configuration.properties• <PIM_INSTALLATION_ROOT>/webfrontend.properties• <PIM_INSTALLATION_ROOT>/fulltextsearch.properties
• May be the Product 360 data has not anything which matches the search string
Drill-Down functionality does not work
Please check in the index configuration:
Define more than one entity:
entity.Article.pageable= trueentity.Variant.pageable= trueor entity.Product.pageable= trueDefine parent key:
entity.Article.parent=Variant or entity.Article.parent=Product

Informatica MDM - Product 360 Configuration 261
Object rights will not be considered
Object rights of Item-, Variant- and Product2G entities will be automatically added to the index configuration
If the customer has additional ArticleType-based entities, add following field definitions to the index configuration: (e.g. entity identifier = EntityBasedOnArticleType)
field.EntityBasedOnArticleType.AclProxy.type=keywordfield.EntityBasedOnArticleType.AclProxy.sortable=falsefield.EntityBasedOnArticleType.AclProxy.filterable=truefield.EntityBasedOnArticleType.AclProxy.searchable=truefield.EntityBasedOnArticleType.AclProxy.stored=truefield.EntityBasedOnArticleType.AclProxy.autocompletable=false
11 BPM11.1 How to configure Oracle TCPS connection for BPM
11.1.1 PrerequisiteIn order to establish a TCPS connection, ensure, that the Oracle server's public key certificate is known by the P360 Audit Trail's Java Runtime Environment (JRE). There are different possibilities to achieve this. Please refer to the JSSE Reference Guide (https://docs.oracle.com/javase/8/docs/technotes/guides/security/jsse/JSSERefGuide.html) and here especially the chapters "Creating an X509TrustManager" and "Creating a Keystore to Use with JSSE".
11.1.2 Configure P360 BPMEnsure to do the following configuration changes on all P360 BPM servers. The P360 BPM servers need to be restarted in order to have changes take effect.
• in <INSTALLATION_ROOT>/server/server-enterprise/tomcat_config/bin/install.properties:• change the jdbc.database.url property to the following: jdbc\:oracle\:thin\://
@(DESCRIPTION\=(ADDRESS\=(PROTOCOL\=tcps)(HOST\=<YOUR_DATABASE_HOST>)(PORT\=<DB_SSL_PORT>))(CONNECT_DATA\=(SERVICE_NAME\=<DATABASE_NAME>)))
• run the config_deploy.sh file in the same directory as follows: sudo ./config_deploy.sh console• restart the BPM service