CA Workload Automation Agent for Informatica Workload Automation System Agent... · (Optional)...
45
Implementation Guide r11.3.1 CA Workload Automation Agent for Informatica
-
Upload
nguyendieu -
Category
Documents
-
view
247 -
download
0
Transcript of CA Workload Automation Agent for Informatica Workload Automation System Agent... · (Optional)...
Implementation Guide r11.3.1
CA Workload Automation Agent for Informatica

This Documentation, which includes embedded help systems and electronically distributed materials, (hereinafter referred to as the “Documentation”) is for your informational purposes only and is subject to change or withdrawal by CA at any time. This Documentation is proprietary information of CA and may not be copied, transferred, reproduced, disclosed, modified or duplicated, in whole or in part, without the prior written consent of CA.
If you are a licensed user of the software product(s) addressed in the Documentation, you may print or otherwise make available a reasonable number of copies of the Documentation for internal use by you and your employees in connection with that software, provided that all CA copyright notices and legends are affixed to each reproduced copy.
The right to print or otherwise make available copies of the Documentation is limited to the period during which the applicable license for such software remains in full force and effect. Should the license terminate for any reason, it is your responsibility to certify in writing to CA that all copies and partial copies of the Documentation have been returned to CA or destroyed.
TO THE EXTENT PERMITTED BY APPLICABLE LAW, CA PROVIDES THIS DOCUMENTATION “AS IS” WITHOUT WARRANTY OF ANY KIND, INCLUDING WITHOUT LIMITATION, ANY IMPLIED WARRANTIES OF MERCHANTABILITY, FITNESS FOR A PARTICULAR PURPOSE, OR NONINFRINGEMENT. IN NO EVENT WILL CA BE LIABLE TO YOU OR ANY THIRD PARTY FOR ANY LOSS OR DAMAGE, DIRECT OR INDIRECT, FROM THE USE OF THIS DOCUMENTATION, INCLUDING WITHOUT LIMITATION, LOST PROFITS, LOST INVESTMENT, BUSINESS INTERRUPTION, GOODWILL, OR LOST DATA, EVEN IF CA IS EXPRESSLY ADVISED IN ADVANCE OF THE POSSIBILITY OF SUCH LOSS OR DAMAGE.
The use of any software product referenced in the Documentation is governed by the applicable license agreement and such license agreement is not modified in any way by the terms of this notice.
The manufacturer of this Documentation is CA.
Provided with “Restricted Rights.” Use, duplication or disclosure by the United States Government is subject to the restrictions set forth in FAR Sections 12.212, 52.227-14, and 52.227-19(c)(1) - (2) and DFARS Section 252.227-7014(b)(3), as applicable, or their successors.
Copyright © 2013 CA. All rights reserved. All trademarks, trade names, service marks, and logos referenced herein belong to their respective companies.

CA Technologies Product References
This document references the following CA Technologies products:
■ CA Process Automation
■ CA Workload Automation AE
■ CA Workload Automation Agent for Application Services (CA WA Agent for Application Services)
■ CA Workload Automation Agent for Databases (CA WA Agent for Databases)
■ CA Workload Automation Agent for i5/OS (CA WA Agent for i5/OS)
■ CA Workload Automation Agent for Informatica (CA WA Agent for Informatica)
■ CA Workload Automation Agent for Linux (CA WA Agent for Linux)
■ CA Workload Automation Agent for Micro Focus (CA WA Agent for Micro Focus)
■ CA Workload Automation Agent for Microsoft SQL Server (CA WA Agent for Microsoft SQL Server)
■ CA Workload Automation Agent for Oracle E-Business Suite (CA WA Agent for Oracle E-Business Suite)
■ CA Workload Automation Agent for PeopleSoft (CA WA Agent for PeopleSoft)
■ CA Workload Automation Agent for Remote Execution (CA WA Agent for Remote Execution)
■ CA Workload Automation Agent for SAP (CA WA Agent for SAP)
■ CA Workload Automation Agent for UNIX (CA WA Agent for UNIX)
■ CA Workload Automation Agent for Web Services (CA WA Agent for Web Services)
■ CA Workload Automation Agent for Windows (CA WA Agent for Windows)
■ CA Workload Automation CA 7 Edition
■ CA Workload Automation DE
■ CA Workload Automation Desktop Client (CA WA Desktop Client)
■ CA Workload Automation ESP Edition
■ CA Workload Control Center
Contact CA Technologies
Contact CA Support
For your convenience, CA Technologies provides one site where you can access the information that you need for your Home Office, Small Business, and Enterprise CA Technologies products. At http://ca.com/support, you can access the following resources:
■ Online and telephone contact information for technical assistance and customer services
■ Information about user communities and forums
■ Product and documentation downloads
■ CA Support policies and guidelines
■ Other helpful resources appropriate for your product
Providing Feedback About Product Documentation
If you have comments or questions about CA Technologies product documentation, you can send a message to [email protected].
To provide feedback about CA Technologies product documentation, complete our short customer survey which is available on the CA Support website at http://ca.com/docs.
Contents 5
Contents
Chapter 1: Introduction 7
Intended Audience ....................................................................................................................................................... 7
Agents and Agent Plug-ins ........................................................................................................................................... 7
CA WA Agent for Informatica ....................................................................................................................................... 8
Supported Number of Informatica PowerCenter Instances ......................................................................................... 9
Chapter 2: Installing the Agent Plug-in 11
How to Install CA WA Agent for Informatica .............................................................................................................. 12
Properties Files .................................................................................................................................................... 13
Collect your Informatica Information ................................................................................................................. 14
Deciding Whether to Create an Alias .................................................................................................................. 15
Apply the Latest Agent Patch on the Platform .................................................................................................... 16
Install the Microsoft Visual C++ 2008 Redistributable Package .......................................................................... 16
Review the CA WA Agent for Informatica Installation Options .......................................................................... 17
Install CA WA Agent for Informatica ................................................................................................................... 19
Set the INFA_DOMAINS_FILE Environment Variable .......................................................................................... 21
Download the jTDS JDBC Driver .......................................................................................................................... 22
Create Additional Database Repository Properties Files for an Informatica Target ........................................... 23
How to Connect to an Additional Informatica Target Server .............................................................................. 25
How to Remove the Agent Plug-in ............................................................................................................................. 29
Disable CA WA Agent for Informatica ................................................................................................................. 29
Remove the Agent Plug-in from the Scheduling Manager .................................................................................. 30
Chapter 3: Your Scheduling Manager and the Agent Plug-in 31
Configuring the Scheduling Manager to Work with the Agent Plug-in ...................................................................... 31
Running a Verification Test ........................................................................................................................................ 32
Chapter 4: Configuring the Agent Plug-in 33
How to Configure Agent Parameters ......................................................................................................................... 33
Configure Agent Parameters on the Agent ......................................................................................................... 33
Configure Agent Parameters on the Scheduling Manager .................................................................................. 34
CA WA Agent for Informatica Parameters in the agentparm.txt File ......................................................................... 34
How to Set Up an Alias for the Agent Plug-in ............................................................................................................. 37
Create an Alias for the Agent Plug-in .................................................................................................................. 38
Configuring an Alias on the Scheduling Manager ............................................................................................... 38

6 Implementation Guide
Chapter 5: Troubleshooting the Agent Plug-in 39
Unable to Establish Connection with Informatica Server .......................................................................................... 39
Chapter 6: Related Documentation 41
CA Workload Automation AE Documentation ........................................................................................................... 41
CA Workload Automation CA 7 Edition Documentation ............................................................................................ 42
CA Workload Automation DE Documentation ........................................................................................................... 42
CA Workload Automation ESP Edition Documentation ............................................................................................. 43
Index 45

Chapter 1: Introduction 7
Chapter 1: Introduction
This section contains the following topics:
Intended Audience (see page 7) Agents and Agent Plug-ins (see page 7) CA WA Agent for Informatica (see page 8) Supported Number of Informatica PowerCenter Instances (see page 9)
Intended Audience
This document is for system administrators who are responsible for upgrading, installing, and configuring agents.
You require knowledge of the operating system where the agent is installed and any third-party products or software technology that the agent uses.
Notes:
■ The term Windows refers to any Microsoft Windows operating system supported by the agent.
■ The Linux instructions in this document also apply to UNIX systems unless otherwise noted.
Agents and Agent Plug-ins
Agents are the key integration components of CA Technologies workload automation products. Agents let you automate, monitor, and manage workload on all major platforms, applications, and databases. To run workload on a particular system, you install an agent on that system. If your workload must run on a UNIX computer, for example, you can install and configure the CA WA Agent for UNIX. The agent lets you run UNIX scripts, execute UNIX commands, transfer files using FTP, monitor file activity on the agent computer, and perform many other tasks.
You can extend the functionality of the agent by installing one or more agent plug-ins in the agent installation directory. If you have a relational database such as Oracle, for example, you can install a database agent plug-in to query and monitor the database. Other agent plug-ins are also available. For more information about agent plug-ins, see the Implementation Guide for the appropriate agent plug-in.
Note: The agent plug-ins are only available for UNIX, Linux, and Windows operating environments.
CA WA Agent for Informatica
8 Implementation Guide
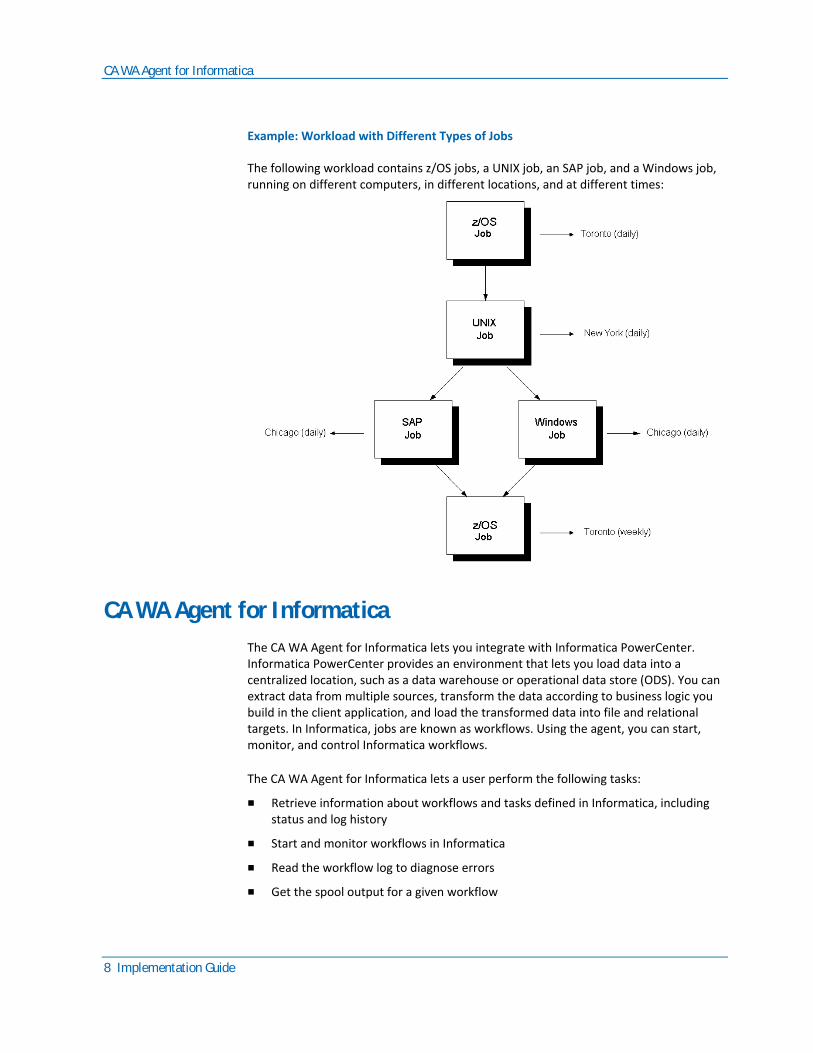
Example: Workload with Different Types of Jobs
The following workload contains z/OS jobs, a UNIX job, an SAP job, and a Windows job, running on different computers, in different locations, and at different times:
CA WA Agent for Informatica
The CA WA Agent for Informatica lets you integrate with Informatica PowerCenter. Informatica PowerCenter provides an environment that lets you load data into a centralized location, such as a data warehouse or operational data store (ODS). You can extract data from multiple sources, transform the data according to business logic you build in the client application, and load the transformed data into file and relational targets. In Informatica, jobs are known as workflows. Using the agent, you can start, monitor, and control Informatica workflows.
The CA WA Agent for Informatica lets a user perform the following tasks:
■ Retrieve information about workflows and tasks defined in Informatica, including status and log history
■ Start and monitor workflows in Informatica
■ Read the workflow log to diagnose errors
■ Get the spool output for a given workflow

Supported Number of Informatica PowerCenter Instances
Chapter 1: Introduction 9
The following diagram shows the functional relationship between the scheduling managers, the CA WA Agent for Informatica plug-in, the additional Informatica servers, and the multiple database repositories:
Supported Number of Informatica PowerCenter Instances
The agent supports simultaneous connections to multiple Informatica PowerCenter instances, so you can run jobs on multiple instances using a single agent.
Note: CA WA Agent for Informatica supports up to three Informatica PowerCenter instances per agent.


Chapter 2: Installing the Agent Plug-in 11
Chapter 2: Installing the Agent Plug-in
This section contains the following topics:
How to Install CA WA Agent for Informatica (see page 12) How to Remove the Agent Plug-in (see page 29)

How to Install CA WA Agent for Informatica
12 Implementation Guide
How to Install CA WA Agent for Informatica
As an administrator, you are responsible for installing CA WA Agent for Informatica. CA WA Agent for Informatica is an agent plug-in that installs into the CA WA Agent for UNIX, Linux, or Windows installation directory.
Note: Before you install the agent plug-in, install and configure the agent on one of the supported platforms. Review the CA Workload Automation Agent for Informatica Release Notes for the list of supported platforms and system requirements.
This scenario walks you through the process of installing CA WA Agent for Informatica.

How to Install CA WA Agent for Informatica
Chapter 2: Installing the Agent Plug-in 13
To install the agent plug-in, follow these steps:
1. Collect your Informatica information (see page 14).
2. Decide whether to create an alias (see page 15).
3. Apply the latest agent patch on the platform (see page 16).
4. (Windows only) Install the Microsoft Visual C++ 2008 Redistributable Package (see page 16).
5. Review the agent plug-in installation options (see page 17).
6. Install the agent plug-in (see page 19).
7. Set the INFA_DOMAINS_FILE environment variable (see page 21).
8. (Microsoft SQL Server only) Download the jTDS JDBC driver (see page 22).
9. (Optional) Create additional database repository properties files for an Informatica target (see page 23).
10. (Optional) Connect to an additional Informatica target server (see page 25).
Properties Files
The agent plug-in uses properties files to connect to an Informatica target server and a database repository that is configured to work with Informatica PowerCenter.
The connection information for each Informatica target is stored in the following directory.
■ On Linux:
install_dir/config/informatica/infaTarget
■ On Windows:
install_dir\config\informatica\infaTarget
install_dir
Specifies the agent installation directory.
infaTarget
Specifies the name of the Informatica target. This directory contains the properties for connecting to the Informatica server and one or more database repositories.

How to Install CA WA Agent for Informatica
14 Implementation Guide
Each infaTarget directory contains the following files:
■ An Informatica properties file (informatica.properties) that specifies the connection properties for a specified Informatica target.
■ A default database repository properties file (repositoryName.properties) that specifies the connection properties for the default database repository for a specified Informatica target.
■ (Optional) Additional database repository properties files (repositoryName.properties) for connecting to additional database repositories.
During installation, the installer creates an Informatica properties file and a default database repository properties file based on the information you provide. After installation, you can create additional properties files, as necessary, so that jobs can connect to additional Informatica targets or database repositories.
Collect your Informatica Information
During the agent plug-in installation, you are prompted for Informatica information. Speak to your Informatica administrator and collect the following information:
Information Your Value
Informatica server domain name
Informatica integration service name
Informatica repository name
User ID and password of a user who has access to Informatica. This user will be used as a default user in the job definition.
Address of the computer where your database is installed
Type of database you are using (Oracle or Microsoft SQL Server) for Informatica repository
Database listener port
System identifier (SID) for an Oracle database or database name for a Microsoft SQL Server database

How to Install CA WA Agent for Informatica
Chapter 2: Installing the Agent Plug-in 15
Information Your Value
User ID and password of a user who has access to the database and Informatica tables. The database and Informatica tables are as follows:
■ Opb_subject
■ Opb_task
■ opb_wf_runinfo
■ rep_workflow_dep
■ rep_task_inst
■ rep_workflows
■ V_ELMNT_TASKINST
■ OPB_wflow_RUN
■ Job_Tree
■ OPB_TASK_INST_RUN
■ REP_ALL_TASKS
Deciding Whether to Create an Alias
You install an agent plug-in into the agent installation directory to extend the core functionality of the agent. By default, the agent plug-in operates under the same agent name that is assigned to the agent. An alias lets you create a unique agent name for an agent plug-in, which is useful for controlling agent security or for setting up clustered environments. The installation program generates the alias by adding a suffix to the agent name.
Note: If you are installing the agent plug-in to work with CA Workload Automation DE, you must set up an alias. Setting up an alias for use with other scheduling managers is optional.
Suppose you have installed an agent named AGT10 on a Linux computer. Users who have access to that agent through their security permissions specify AGT10 as the agent name in their job definitions. Now suppose that you install an agent plug-in into the installation directory for AGT10. You can create an alias for the agent plug-in, for example, AGT10_INFA. You can then restrict access to that alias to only those users that run Informatica workload. Those specific users then must specify AGT10_INFA as the agent name in their job definitions.

How to Install CA WA Agent for Informatica
16 Implementation Guide
Each agent plug-in has a default alias that you can enable during installation. For example, the agent plug-in for CA WA Agent for Informatica has the default alias agentname_INFA. You can enable or change the default alias name after installation. To work, you must also configure the alias on the scheduling manager.
Note: To configure agent aliasing for clustered environments, see the CA Workload Automation Agent for UNIX, Linux, or Windows Implementation Guide.
Apply the Latest Agent Patch on the Platform
If patches are available, you can apply the latest agent patch on the platform where you are installing the agent plug-in.
For example, if you are installing on Windows, install the latest patch for CA Workload Automation Agent for Windows.
Install the Microsoft Visual C++ 2008 Redistributable Package
Before you install CA WA Agent for Informatica, you must install Microsoft Visual C++ 2008 Redistributable Package.
Note: This procedure applies only to Windows.
Follow these steps:
1. Open your browser and go to the following web page:
http://www.microsoft.com/en-us/download/details.aspx?id=11895
The web page opens.
2. Download the vcredist_x64.exe setup file.
3. Run the setup file and follow the installation instructions.
The Microsoft Visual C++ 2008 Redistributable Package is installed.

How to Install CA WA Agent for Informatica
Chapter 2: Installing the Agent Plug-in 17
Review the CA WA Agent for Informatica Installation Options
The CA WA Agent for Informatica interactive installation program prompts you for the following information, which you should review before proceeding with the installation:
Do you want to set up the alias?
Indicates whether the default alias is enabled for the agent plug-in.
■ Y—Enables the default alias. The default alias for CA WA Agent for Informatica is agentname_INFA.
■ N—Disables the default alias.
Default: Y
Note: The alias is required for CA Workload Automation DE.
Do you want to configure the CA WA Agent for Informatica plug-in?
Indicates whether you want to configure the agent plug-in.
■ Y—Configures the agent plug-in. Choose this option for a new installation.
■ N—Does not configure the agent plug-in. Choose this option for an upgrade.
Default: Y
Informatica target name
Specifies the name of the Informatica target (infaTarget). The install_dir/config/informatica/infaTarget directory contains the properties for connecting to the Informatica server and one or more database repositories.
Limits: Up to 128 characters; cannot contain delimiters (such as spaces) and special characters
Informatica domain name
Specifies the name of the Informatica server domain. An Informatica PowerCenter environment uses a domain to centralize the administration. A domain can contain multiple nodes. Each node is identified by a host and port. The domain name can be obtained from the domains.infa file.
Notes:
■ For the agent to connect to Informatica, the domains.infa file must be stored on the agent computer. Copy the domains.infa file from the Power Center client installation to the agent computer.
■ After the installation, you will set the INFA_DOMAINS_FILE environment variable to the location of the domains.infa file on the agent.
Informatica service name
Specifies the name of the Informatica integration service. The integration service name can be obtained from the Informatica Workflow Designer.

How to Install CA WA Agent for Informatica
18 Implementation Guide
Informatica repository name
Specifies the name of the repository (repositoryName) created on the Informatica server. The repository can be obtained from the Informatica Administrative console. The repositoryName.properties file for a specified Informatica target (infaTarget) contains the database connection properties.
Limits: Up to 128 characters; cannot contain delimiters (such as spaces) and special characters
Informatica default user name
Specifies the Informatica server user name.
Limits: Up to 128 characters; cannot contain a tab, a newline character, or the following special characters: comma (,), plus sign (+), double-quotations ("), backslash (\), less than (<), greater than (>), semi-colon (;), forward slash (/), asterisk (*), percent (%), question mark (?), ampersand symbol (&)
Informatica password
Specifies the password for the Informatica server user name. The agent encrypts the password in the Informatica.properties file.
Limits: Up to 80 characters
Database type
Specifies the type of database. CA WA Agent for Informatica supports the following databases:
■ Oracle
■ Microsoft_SQL_Server
Database host name
Specifies the address of the computer where your Informatica database is installed.
Note: The agent constructs the JDBC URL based on the database connection information you provide. After the installation, you can configure the repositoryName.properties file to use a custom JDBC URL.
Database port
Specifies the database listener port.
Database service name
Specifies the system identifier (SID) of the Oracle instance for an Oracle database and the name of the database for a Microsoft SQL Server database.
How to Install CA WA Agent for Informatica
Chapter 2: Installing the Agent Plug-in 19
Database user ID
Specifies the user who has access to the database.
Limits: Up to 30 characters; can include alphanumeric characters and the following special characters: pound (#), dollar symbol ($), and underscore (_)
Note: If you are using Microsoft SQL Server, the user can be a Windows domain user for Windows domain authentication. The format for Windows domain authentication is domain_name\user_name.
Database password
Specifies the password that corresponds to the default database user ID. The agent encrypts the password in the repositoryName.properties file.
Note: If you are using Microsoft SQL Server, you can use a Windows password for Windows authentication.
Install CA WA Agent for Informatica
You can install CA WA Agent for Informatica using an interactive program that prompts you for the required information.
Follow these steps:
1. Copy the informatica.pak file into the agent installation directory. You can copy this file from the product DVD or download a zip file that contains the file from the CA Support Online website, found at http://ca.com/support.
2. Change to the agent installation directory. For example, type the following command:
■ On Linux:
cd opt/CA/WA_Agent_R11_3
■ On Windows:
cd C:\Program Files\CA\WA Agent R11.3
3. Type the following command to stop the agent:
■ On Linux:
./cybAgent -s
■ On Windows:
cybAgent -s
The agent stops.

How to Install CA WA Agent for Informatica
20 Implementation Guide
4. Type the following command to start the installation program:
■ On Linux:
./PluginInstaller informatica.pak install_dir
■ On Windows:
PluginInstaller.exe informatica.pak install_dir
install_dir
Specifies the agent installation directory.
The CA WA Agent for Informatica installation program opens.
5. Enter the information the installation program prompts you for (see page 17).
The installation program displays a message and closes automatically upon a successful installation.
6. Type the following command to start the agent:
■ On Linux:
./cybAgent &
■ On Windows:
cybAgent -a
The agent starts.
Note: If you are using Microsoft SQL Server, start the agent only after downloading the jTDS JDBC driver (see page 22).
Note: The installation program backs up all modified and replaced files. The backup files are compressed into a file named backup_timestamp.zip, located in the backups subdirectory of the agent installation directory. You can use WinZip® or other similar utilities to open the backup file. A backup copy of the agentparm.txt file is stored in the ZIP file.

How to Install CA WA Agent for Informatica
Chapter 2: Installing the Agent Plug-in 21
Set the INFA_DOMAINS_FILE Environment Variable
Before the agent can connect to Informatica, you must set the INFA_DOMAINS_FILE environment variable to the location of the domains.infa file on the agent computer.
Note: If the domains.infa file does not exist on the agent computer, copy the domains.infa file from the Power Center client installation.
To set the INFA_DOMAINS_FILE environment file on Linux, run the following command:
setenv INFA_DOMAINS_FILE path/domains.infa
To set the INFA_DOMAINS_FILE environment file on Windows, follow these steps:
1. Right-click the Computer icon on your Desktop, and select Properties.
2. Click Advanced system settings.
3. Click Environment Variables.
4. Click New to add a variable name and value.
The New User Variable dialog opens.
5. Enter INFA_DOMAINS_FILE in the Variable name field.
6. Specify the full path and name of the domains.infa file in the Variable value field, and click OK.
7. Click OK to save the changes.
Note: Alternatively, you can set the INFA_DOMAINS_FILE environment file on the agent using agent-wide variables. For more information about setting up environment variables on the agent, see the CA Workload Automation Agent for UNIX, Linux, or Windows Implementation Guide.
Example: Sample domains.infa File
The following partial domains.infa file maps the Domain_LODMA0012 domain to the lodma0012 host and 6005 port:
<vector xsi:type="domainservice:Portals" objVersion="1.0.0">
<domainName>Domain_LODMA0012</domainName>
<address xsi:type="metadata:NodeRef" objVersion="1.0.0">
<host>lodma0012</host>
<port>6005</port>
</address>
</vector>

How to Install CA WA Agent for Informatica
22 Implementation Guide
Download the jTDS JDBC Driver
Due to a license restriction, you must manually download the jTDS JDBC driver and copy it into the agent installation directory before you can complete the installation.
Note: This procedure applies only to Microsoft SQL Server databases.
Follow these steps:
1. Open your browser and go to the following web page:
http://sourceforge.net/projects/jtds/files/jtds/1.2.6/jtds-1.2.6-dist.zip/dow
nload
The web page opens.
2. Download and unzip the jtds-1.2.6-dist.zip file to the agent computer.
3. Copy the jtds-1.2.6.jar file into the following location:
install_dir\jars\ext
install_dir
Specifies the agent installation directory.
4. Type the following command to start the agent:
cybAgent -a
The agent starts.
How to Install CA WA Agent for Informatica
Chapter 2: Installing the Agent Plug-in 23
Create Additional Database Repository Properties Files for an Informatica Target
During the installation, the installer creates a default database repository properties file for an Informatica target based on the information you provided. You can create additional database repository properties files for an Informatica target, as necessary, so that jobs can connect to other database repositories.
Follow these steps:
1. Change to the following directory:
■ On Linux:
install_dir/config/informatica/infaTarget
■ On Windows:
install_dir\config\informatica\infaTarget
install_dir
Specifies the agent installation directory.
infaTarget
Specifies the name of the Informatica target (infaTarget). The install_dir/config/informatica/infaTarget directory contains the properties for connecting to the Informatica server and one or more database repositories.
2. Create a new properties file using a text editor. Name the file repositoryName.properties, where repositoryName corresponds to the repository name.
3. Add the following properties to the file:
informatica.db.type
Specifies the type of database. CA WA Agent for Informatica supports the following databases:
■ Oracle
■ Microsoft_SQL_Server
informatica.db.user
Specifies the user who has access to the database.
Limits: Up to 30 characters; can include alphanumeric characters and the following special characters: pound (#), dollar symbol ($), and underscore (_)
Note: If you are using Microsoft SQL Server, the user can be a Windows domain user for Windows domain authentication. The format for Windows domain authentication is domain_name\user_name.

How to Install CA WA Agent for Informatica
24 Implementation Guide
informatica.db.password
Specifies the password that corresponds to the default database user ID.
Notes:
■ The password must be encrypted. To encrypt a password, use the Password utility that is provided with the agent. For more information about the Password utility, see the CA Workload Automation Agent for UNIX, Linux, or Windows Implementation Guide.
■ If you are using Microsoft SQL Server, the default database user can use a Windows password for Windows authentication.
informatica.db.url
Specifies the JDBC URL.
Examples:
■ jdbc:oracle:thin:@abcd:1521:orcl
■ jdbc:jtds:sqlserver://lodma0012:1433/test
Note: The agent constructs the JDBC URL based on the database connection information you provided during installation. You can modify this property to use a custom JDBC URL.
4. Save the repositoryName.properties file.
The database repository properties file is created.
5. (Optional) Repeat the previous steps to create additional database repository properties files.
Example: Database Repository Properties File
This example shows the database repository properties in the Infa_Rep_Srv.properties file:
informatica.db.type=Oracle
informatica.db.user =INFA_REP
informatica.db.password=43621DB580AC7251
informatica.db.url=jdbc:oracle:thin:@abcd:1521:orcl
More information:
Properties Files (see page 13)

How to Install CA WA Agent for Informatica
Chapter 2: Installing the Agent Plug-in 25
How to Connect to an Additional Informatica Target Server
During the installation, the installer creates an Informatica properties file and a default database repository properties file based on the information you provided. You can create additional properties files, as necessary, so that jobs can connect to multiple Informatica targets.
To connect to an additional Informatica target server, follow these steps:
1. Create the Informatica properties file (see page 25).
2. Create the default database repository file (see page 27).
3. (Optional) Create additional database repository properties files (see page 23).
Create the Informatica Properties File
To connect to an additional Informatica target server, you first create an Informatica properties file.
Follow these steps:
1. Create the following directory:
■ On Linux:
install_dir/config/informatica/infaTarget
■ On Windows:
install_dir\config\informatica\infaTarget
install_dir
Specifies the agent installation directory.
infaTarget
Specifies the name of the Informatica target (infaTarget). The install_dir/config/informatica/infaTarget directory contains the properties for connecting to the Informatica server and one or more database repositories.
2. Create a new properties file named informatica.properties in the directory you created using a text editor.
3. Add the following properties to the file:
informatica.domain.name
Specifies the name of the Informatica server domain. An Informatica PowerCenter environment uses a domain to centralize the administration. A domain can contain multiple nodes. Each node is identified by a host and port. The domain name can be obtained from the domains.infa file.

How to Install CA WA Agent for Informatica
26 Implementation Guide
informatica.service name
Specifies the name of the Informatica integration service. The integration service name can be obtained from the Informatica Workflow Designer.
informatica.repository.name.default
Specifies the name of the default database repository created on the Informatica server. The repository can be obtained from the Informatica Administrative console. The repositoryName.properties file for a specified Informatica target contains the database connection properties.
informatica.user.id.default
Specifies the Informatica server user name.
informatica.password.default
Specifies the password for the Informatica server user name.
Note: The password must be encrypted. To encrypt a password, use the Password utility that is provided with the agent. For more information about the Password utility, see the CA Workload Automation Agent for UNIX, Linux, or Windows Implementation Guide.
4. Save the informatica.properties file.
The Informatica properties file is created.
Example: Informatica Properties File
This example shows the Informatica properties in the informatica.properties file for a target server named ABCD. The informatica.properties file was created in the install_dir/config/informatica/ABCD directory.
informatica.domain.name=LODMA0012
informatica.service.name=Infa_Int_Srv_T2
informatica.repository.name.default=Infa_Rep_Srv
informatica.user.id.default=U_JAPI
informatica.password.default=2415AC61385DB210
Note: The properties for the default database repository will be stored in the Infa_Rep_Srv.properties file in the same directory.
More information:
Properties Files (see page 13)

How to Install CA WA Agent for Informatica
Chapter 2: Installing the Agent Plug-in 27
Create the Default Database Repository File
After you create the informatica.properties file, you create the default database repository file in the same directory.
Follow these steps:
1. Change to the following directory:
■ On Linux:
install_dir/config/informatica/infaTarget
■ On Windows:
install_dir\config\informatica\infaTarget
install_dir
Specifies the agent installation directory.
infaTarget
Specifies the name of the Informatica target (infaTarget). The install_dir/config/informatica/infaTarget directory contains the properties for connecting to the Informatica server and one or more database repositories.
2. Create a new properties file using a text editor. Name the file repositoryName.properties, where repositoryName corresponds to the value you specified in the informatica.repository.name.default property in the informatica.properties file.
3. Add the following properties to the file:
informatica.db.type
Specifies the type of database. CA WA Agent for Informatica supports the following databases:
■ Oracle
■ Microsoft_SQL_Server
informatica.db.user
Specifies the user who has access to the database.
Limits: Up to 30 characters; can include alphanumeric characters and the following special characters: pound (#), dollar symbol ($), and underscore (_)
Note: If you are using Microsoft SQL Server, the user can be a Windows domain user for Windows domain authentication. The format for Windows domain authentication is domain_name\user_name.

How to Install CA WA Agent for Informatica
28 Implementation Guide
informatica.db.password
Specifies the password that corresponds to the default database user ID.
Notes:
■ The password must be encrypted. To encrypt a password, use the Password utility that is provided with the agent. For more information about the Password utility, see the CA Workload Automation Agent for UNIX, Linux, or Windows Implementation Guide.
■ If you are using Microsoft SQL Server, the default database user can use a Windows password for Windows authentication.
informatica.db.url
Specifies the JDBC URL.
Examples:
■ jdbc:oracle:thin:@abcd:1521:orcl
■ jdbc:jtds:sqlserver://lodma0012:1433/test
Note: The agent constructs the JDBC URL based on the database connection information you provided during installation. You can modify this property to use a custom JDBC URL.
4. Save the repositoryName.properties file.
The default database repository file is created.
Example: Default Database Repository File
This example shows the default database repository in the Infa_Rep_Srv.properties file:
informatica.db.type=Oracle
informatica.db.user =INFA_REP
informatica.db.password=43621DB580AC7251
informatica.db.url=jdbc:oracle:thin:@abcd:1521:orcl
You have successfully installed CA WA Agent for Informatica. Before the scheduler can submit workload to the agent, configure the scheduling manager to work with the agent plug-in and optionally run a verification test.
More information:
Properties Files (see page 13)

How to Remove the Agent Plug-in
Chapter 2: Installing the Agent Plug-in 29
How to Remove the Agent Plug-in
You can remove an agent plug-in when you no longer require it.
To remove the agent plug-in, follow these steps:
1. Disable the agent plug-in (see page 29).
2. (Optional) Remove the agent plug-in from the scheduling manager (see page 30).
Disable CA WA Agent for Informatica
Use this procedure when you want to remove CA WA Agent for Informatica from your system.
Follow these steps:
1. Verify that all workload is complete.
2. Stop the agent.
3. Open the agentparm.txt file located in the agent installation directory.
4. Comment out the plugins.start_internal_n parameter, and renumber any subsequent plugins.start_internal_n parameters.
Note: Renumber all other agent plug-ins that are assigned a greater number than the agent plug-in you are uninstalling.
5. Comment out the communication.alias parameter if you created an alias during the agent plug-in installation.
6. Renumber any subsequent communication.alias_n parameters.
7. Save and close the agentparm.txt file.
8. Remove the informatica.jar files from the jars subdirectory of the agent installation directory.
9. Start the agent.
How to Remove the Agent Plug-in
30 Implementation Guide
Example: Renumber the plugins.start_internal_n Parameter
Suppose that you have the following agent plug-ins set in the agentparm.txt file:
plugins.start_internal_1=runner
plugins.start_internal_2=informatica
plugins.start_internal_3=ftp
plugins.start_internal_4=microfocus
To disable the agent plug-in for CA WA Agent for Informatica, you would modify the agentparm.txt file as follows:
plugins.start_internal_1=runner
#plugins.start_internal_2=informatica
plugins.start_internal_2=ftp
plugins.start_internal_3=microfocus
Example: Renumber the communication.alias_n Parameter
Suppose that you have two alias agent plug-ins. The agentparm.txt file has the following parameters:
communication.alias_1=agentname_INFA
communication.alias_2=agentname_MF
To disable the agent plug-in for CA WA Agent for Informatica, modify the agentparm.txt file as follows:
#communication.alias_1=agentname_INFA
communication.alias_1=agentname_MF
Remove the Agent Plug-in from the Scheduling Manager
In addition to disabling the agent plug-in, you can remove it from the configuration on the scheduling manager.
Note: For detailed instructions to remove the agent from the scheduling manager, see the documentation for your scheduling manager.

Chapter 3: Your Scheduling Manager and the Agent Plug-in 31
Chapter 3: Your Scheduling Manager and the Agent Plug-in
This section contains the following topics:
Configuring the Scheduling Manager to Work with the Agent Plug-in (see page 31) Running a Verification Test (see page 32)
Configuring the Scheduling Manager to Work with the Agent Plug-in
If you have defined the following items for the agent plug-in, you must configure the items on the scheduling manager:
■ An alias
■ A user
For detailed configuration instructions, see the documentation for your scheduling manager.

Running a Verification Test
32 Implementation Guide
Running a Verification Test
For your verification test, you define and start an Informatica workflow. To define the job, you require the following information:
Agent
Specifies the name of your agent or the alias for the agent plug-in if you created an alias.
Command
(CLI only) Specifies the command that you want to run. To start an Informatica workflow using the CLI, specify startWorkflow.
Folder name
Specifies the Informatica PowerCenter repository folder name where the specified workflow resides. You can obtain this value from the Informatica server.
Workflow name
Specifies the name of the PowerCenter workflow to be started. You can get the list of available workflows using the listAllWorkflows command.
Note: For more information about starting a workflow, see the documentation for your scheduling manager or the CLI User Guide.

Chapter 4: Configuring the Agent Plug-in 33
Chapter 4: Configuring the Agent Plug-in
This section contains the following topics:
How to Configure Agent Parameters (see page 33) CA WA Agent for Informatica Parameters in the agentparm.txt File (see page 34) How to Set Up an Alias for the Agent Plug-in (see page 37)
How to Configure Agent Parameters
You configure agent parameters by editing the agentparm.txt file, located in the agent installation directory. When you install the agent, the installation program adds frequently-configured agent parameters to the file. Other agent parameters exist, which you must manually add to the agentparm.txt file to configure the agent. For any configuration changes to take effect, always stop and restart the agent. For some agent parameters, such as the agent name and communication parameters, also configure the parameters on the scheduling manager.
To configure agent parameters, do the following:
1. Configure agent parameters on the agent.
2. Configure agent parameters on the scheduling manager (see page 34).
Configure Agent Parameters on the Agent
Use the following procedure to configure agent parameters on CA WA Agent for UNIX, Linux, or Windows.
Follow these steps:
1. Change to the agent installation directory.
2. Stop the agent. At the command prompt, enter the following command:
■ On Linux:
./cybAgent -s
■ On Windows:
cybAgent -s
The agent stops.

CA WA Agent for Informatica Parameters in the agentparm.txt File
34 Implementation Guide
3. Open the agentparm.txt file located in the agent installation directory.
4. Edit the parameters to make the required changes.
5. Save and close the agentparm.txt file.
6. Start the agent. At the command prompt, enter the following command:
■ On Linux:
./cybAgent &
■ On Windows:
cybAgent -a
The agent starts and the parameters are configured.
Configure Agent Parameters on the Scheduling Manager
When you change an agent parameter in the agentparm.txt file that is also defined on the scheduling manager, such as the agent name, configure the agent parameter on the scheduling manager.
Note: For detailed instructions to configure agent parameters on the scheduling manager, see the documentation for your scheduling manager.
CA WA Agent for Informatica Parameters in the agentparm.txt File
The agent plug-in installation program adds the parameters listed below to the agentparm.txt file. The file is located in the agent installation directory. You can open the agentparm.txt file in any standard text editor.
Note: You must save the file after making edits to persist the changes.
communication.alias_n
Defines the alias name for the agent. The n suffix increments sequentially for each alias agent.
Note: To enable an alias on the agent, verify that the comment character (#) is removed from the parameter line.
Default: agentname_INFA
CA WA Agent for Informatica Parameters in the agentparm.txt File
Chapter 4: Configuring the Agent Plug-in 35
informatica.appendRunLog
Specifies whether the workflow or the task logs of the current execution is captured and stored in the spool file for the startWorkflow, restartWorkflow, and monitorWorkflow CLI operations. The following values are available:
ALWAYS
Indicates that the workflow or the task log is always stored in the spool file.
FAILURE
Indicates that the workflow or the task log is stored in the spool file only when the job fails.
NONE
Indicates that no logs are stored in the spool file for a workflow run.
Default: FAILURE
Note: The logs of a failed task are only added if the failed task is of the SESSION type.
informatica.concurrentinstances.enabled
Indicates whether to enable the execution of concurrent workflows with the same instance name.
true
Enables the execution of concurrent workflows with the same instance name.
Note: Due to a known issue in Informatica, this option is not supported so you cannot run workflow instances in parallel.
false
Disables the execution of concurrent workflows with the same instance name.
Default: false
informatica.connection.pool.size
Specifies the maximum number of simultaneously open connections in a database pool.
Default: 20

CA WA Agent for Informatica Parameters in the agentparm.txt File
36 Implementation Guide
informatica.controltask.enabled
Indicates whether to retrieve the run details of CONTROL tasks within a workflow using the Informatica API or a database query.
true
Retrieves the run details of CONTROL tasks within a workflow using the Informatica API.
Note: Due to a known issue in Informatica, this option is not supported.
false
Retrieves the run details of CONTROL tasks within a workflow using a database query.
Default: false
informatica.monitor.workflow.sleep.time.seconds
Specifies the job monitor polling interval for outstanding jobs in seconds.
Default: 20
informatica.passonsuccessonly.default
Indicates whether the status of the workflow is retrieved directly from Informatica or inferred depending on the successful execution of all the tasks.
true
Returns the workflow status based on the status of tasks in the Informatica workflow. If all tasks in the workflow complete successfully, the agent reports the status of the workflow as successful. If any task in the workflow fails, the agent reports the status of the workflow as failed.
false
Returns the workflow status as reported by Informatica. In Informatica, a workflow can succeed even if one or more tasks in the workflow fail.
Default: false
Note: You can override the value in the job definition.
informatica.server.target.default
Specifies the name of the Informatica target (infaTarget). The install_dir/config/informatica/infaTarget directory contains the properties for connecting to the Informatica server and one or more database repositories.
Note: You can identify the Informatica target server in a job definition to override the default value.

How to Set Up an Alias for the Agent Plug-in
Chapter 4: Configuring the Agent Plug-in 37
informatica.thread.pool.size
Specifies the maximum number of threads in a database pool that is used for connecting to Informatica.
Default: 20
java.security.egd
Sets the source for random number generation. The agent sets this parameter to file:///dev/urandom to overcome a known issue on Linux with random number generation that can cause applications to be blocked.
jdbc.drivers
Specifies the driver class name for the JDBC driver. Separate multiple drivers with a colon (:).
Example: oracle.jdbc.driver.OracleDriver:com.microsoft.sqlserver.jdbc.SQLServerDriver
plugins.start_internal_n
Specifies the agent plug-in to start by the core Java agent.
n
Denotes an integer assigned to the agent plug-in, starting at 1. The n suffix must increase sequentially for each agent plug-in.
How to Set Up an Alias for the Agent Plug-in
When you install the agent plug-in, you are prompted to create a default alias, which you can change after installation. If you enable an alias on the agent plug-in, you must also configure the alias on the scheduling manager.
To set up an alias for the agent plug-in, follow these steps:
1. Create an alias for the agent plug-in (see page 38).
2. Configure the alias on the scheduling manager (see page 38).
How to Set Up an Alias for the Agent Plug-in
38 Implementation Guide
Create an Alias for the Agent Plug-in
An alias lets you create a unique agent name for an agent plug-in. Each agent plug-in has a default alias, which you can enable or change.
To create an alias for the agent, configure the following agent parameter on the agent:
communication.alias_n
Defines the alias name for the agent. The n suffix increments sequentially for each alias agent.
Note: To enable an alias on the agent, verify that the comment character (#) is removed from the parameter line.
Configuring an Alias on the Scheduling Manager
When you create an alias for an agent plug-in, you must also configure the alias on the scheduling manager. You must define the alias on the scheduling manager with the same address, port number, and encryption key as the agent where the agent plug-in is installed.
Note: For detailed instructions to configure an alias on the scheduling manager, see the documentation for your scheduling manager.

Chapter 5: Troubleshooting the Agent Plug-in 39
Chapter 5: Troubleshooting the Agent Plug-in
This section contains the following topics:
Unable to Establish Connection with Informatica Server (see page 39)
Unable to Establish Connection with Informatica Server
Symptom:
When I enter the machine name instead of the IP address of the machine the Informatica server runs on in the Information host details CLI, I get the following error message:
Error Code: -109 Error Message: Unable to establish connection with Informatica Server Message Context: IJLMDriver::getConnection (01hw310783, 6014, 360).
Note: In the error message, the machine name is 01hw310783, the Informatica listener port for a client is 6014, and the timeout parameter required for the Informatica APIs is 360.
Solution:
The machine name 01hw310783 is unknown to UNIX or Linux and must be added in the hosts file with a mapping IP address.
To correct this problem
1. Enter the following command at the operating system prompt to edit the hosts file:
vi/etc/hosts
The hosts file opens.
2. Add the new host name, for example:
172.26.193.114 01hw310783
A new host is added in the hosts file.
3. Save the hosts file and exit from the terminal.


Chapter 6: Related Documentation 41
Chapter 6: Related Documentation
Documentation for the agent and scheduling managers is available in PDF format at http://ca.com/support.
Note: To view PDF files, you must download and install the Adobe Reader from the Adobe website if it is not already installed on your computer.
This section contains the following topics:
CA Workload Automation AE Documentation (see page 41) CA Workload Automation CA 7 Edition Documentation (see page 42) CA Workload Automation DE Documentation (see page 42) CA Workload Automation ESP Edition Documentation (see page 43)
CA Workload Automation AE Documentation
To work with the agent and CA Workload Automation AE, see the following documentation:
Task Documentation
Configure the scheduling manager to work with the agent
CA Workload Automation AE UNIX Implementation Guide
CA Workload Automation AE Windows Implementation Guide
Define, monitor, and control jobs
CA Workload Automation AE Reference Guide
CA Workload Automation AE User Guide
CA Workload Control Center Workload Scheduling Guide

CA Workload Automation CA 7 Edition Documentation
42 Implementation Guide
CA Workload Automation CA 7 Edition Documentation
To work with the agent and CA Workload Automation CA 7 Edition, see the following documentation:
Task Documentation
Configure the scheduling manager to work with the agent
CA Integrated Agent Services Implementation Guide
CA Workload Automation CA 7 Edition Interface Reference Guide
CA Workload Automation CA 7 Edition Systems Programming Guide
Define, monitor, and control jobs
CA Integrated Agent Services User Guide
CA Workload Automation CA 7 Edition Interface Reference Guide
CA Workload Automation CA 7 Edition Database Maintenance Guide
CA Workload Automation CA 7 Edition Command Reference Guide
CA Workload Automation DE Documentation
To work with the agent and CA Workload Automation DE, see the following documentation:
Task Documentation
Configure the scheduling manager to work with the agent
CA Workload Automation DE Admin Perspective Help
Define jobs
CA Workload Automation DE Define Perspective Help
Monitor and control jobs CA Workload Automation DE Monitor Perspective Help
Note: The online help is available in HTML and PDF formats.

CA Workload Automation ESP Edition Documentation
Chapter 6: Related Documentation 43
CA Workload Automation ESP Edition Documentation
To work with the agent and CA Workload Automation ESP Edition, see the following documentation:
Task Documentation
Configure the agent to work with the scheduling manager
CA Workload Automation ESP Edition Installation and Configuration Guide
Define jobs CA Workload Automation ESP Edition Command Reference Guide
Monitor and control jobs CA Workload Automation ESP Edition Operator's Guide

Index 45
Index
A
agent plug-in description • 7 uninstall process • 29
alias setup process • 37
C
configuration process, agent plug-in • 33
D
documentation, scheduling manager • 41
I
installation removing the plug-in • 29
S
scheduling manager configuration for the agent plug-in • 31 configuring agent parameters • 34 configuring an alias • 38 documentation • 41
T
troubleshooting, agent plug-in • 39
W
workload example, different jobs • 7