A Receiving Array for 160 m Through 2200 mrudys.typepad.com/files/sept-oct-2016-qex-article.pdf22...
8
22 QEX September/October 2016 Rudy Severns, N6LF PO Box 589, Cottage Grove, OR 97424; [email protected] A Receiving Array for 160 m Through 2200 m N6LF presents study of an antenna with low back lobes and the ability to switch the pattern direction and shape from the shack in a simple structure with no phasing networks. For the past ten years I’ve participated in the ARRL 600 m experimental license group, WD2XSH, and tried a variety of receiving antennas from phased verticals (E-probes) to BOG’s (Beverage on the ground) to terminated loops. I’ve also used regular Beverages on 160 m but at 475 kHz a 1.5 l Beverage would be ≈ 3000 ft long and at 137 kHz over 10,000 ft, not very practical for most of us. With the imminent authorization of the 2200 m and 630 m bands I needed an LF-MF receiving antenna with good performance from 100 kHz through 2 MHz. What I wanted was an antenna with low side lobes off the back (azimuths 90° through 270°) and the ability to switch the pattern direction and shape from the shack. All this of course is in a simple structure with no phasing networks. Comments on Terminated Loops Resistively terminated loops have many names: flags, pennants, EWEs, and so on. These antennas are usually electrically small — loop perimeters smaller than 0.1 l — where l is a wavelength at the operating frequency. Given the long wavelengths this will be the case for any practical antenna at 630 m or 2200 m. Because of the small size the current amplitude will be almost the same along the wire. The small variation in current magnitude translates into an insensitivity to the shape of the loop. Round, square or triangular makes little difference. This encourages us to use shapes that fit the available space and supports. Changing the size (area) of the loops has little effect on the pattern, it mostly affects the amplitude of the received signal. The greater the area of the loop, the greater the signal voltage V amplitude at a given frequency. It’s just Faraday’s law, d V n dt f = where f is the total flux and n is the number of turns. As we go down in frequency, for the same physical size, the signal decreases. An essential feature of terminated loops is the use of a resistive termination somewhere in the loop. The value of the terminating resistor is typically in the range of 200 – 1200 W , which is much greater than the self-impedance of a small loop without the termination. The result is a feed-point impedance dominated by the fixed termination resistance. The feed-point impedance changes little as the frequency and/or loop size are changed. Another effect QX1609-Severns01 A B C D Control RG-6 RG-6 RG-6 RG-6 Rx Figure 1 — EZNEC model for the receiving antenna.
Transcript of A Receiving Array for 160 m Through 2200 mrudys.typepad.com/files/sept-oct-2016-qex-article.pdf22...
22 QEX September/October 2016
Rudy Severns, N6LF
PO Box 589, Cottage Grove, OR 97424; [email protected]
A Receiving Array for 160 m Through 2200 m
N6LF presents study of an antenna with low back lobes and the ability to switch the pattern direction and shape from the
shack in a simple structure with no phasing networks.
For the past ten years I’ve participated in the ARRL 600 m experimental license group, WD2XSH, and tried a variety of receiving antennas from phased verticals (E-probes) to BOG’s (Beverage on the ground) to terminated loops. I’ve also used regular Beverages on 160 m but at 475 kHz a 1.5 l Beverage would be ≈ 3000 ft long and at 137 kHz over 10,000 ft, not very practical for most of us.
With the imminent authorization of the 2200 m and 630 m bands I needed an LF-MF receiving antenna with good performance from 100 kHz through 2 MHz. What I wanted was an antenna with low side lobes off the back (azimuths 90° through 270°) and the ability to switch the pattern direction and shape from the shack. All this of course is in a simple structure with no phasing networks.
Comments on Terminated Loops Resistively terminated loops have many
names: flags, pennants, EWEs, and so on. These antennas are usually electrically small — loop perimeters smaller than 0.1 l — where l is a wavelength at the operating frequency. Given the long wavelengths this will be the case for any practical antenna at 630 m or 2200 m. Because of the small size the current amplitude will be almost the same along the wire. The small variation in current magnitude translates into an insensitivity to the shape of the loop. Round, square or triangular makes little difference. This encourages us to use shapes that fit the available space and supports. Changing the size (area) of the loops has little effect on
the pattern, it mostly affects the amplitude of the received signal. The greater the area of the loop, the greater the signal voltage V amplitude at a given frequency. It’s just Faraday’s law,
dV ndtf
=
where f is the total flux and n is the number of turns. As we go down in frequency, for the same physical size, the signal decreases.
An essential feature of terminated loops is the use of a resistive termination somewhere in the loop. The value of the terminating resistor is typically in the range of 200 – 1200 W , which is much greater than the self-impedance of a small loop without the termination. The result is a feed-point impedance dominated by the fixed termination resistance. The feed-point impedance changes little as the frequency and/or loop size are changed. Another effect
QX1609-Severns01
A B C D
ControlRG-6
RG-6 RG-6
RG-6
Rx
Figure 1 — EZNEC model for the receiving antenna.

QEX September/October 2016 23
of using a termination is to swamp out the mutual impedance due to coupling between loops. Changing the phase differences or the spacing between the loops has little effect on the feed-point impedances, which simplifies feed network design. This reduction in mutual coupling is exactly the same effect seen in phased arrays using short vertical elements (E-probes).
The properties of terminated loops lead me to think about combining them in an array. About that time the March 2015 issue of QST arrived with an article by Chris Kunze, DK6ED, on a his version of a double loop antenna.1 This antenna is basically two triangular terminated loops in a line, fed 180° out of phase. What attracted my attention was the good pattern off the back of the antenna, sharp broadside nulls and the simplicity of the phasing scheme, which might allow the antenna work from 100 kHz to 2 MHz if it could be made large enough to have sufficient received signal on 2200 m but
still be small enough to behave like a “small” loop on 160 m.
A bit of modeling with EZNEC was very encouraging so I built and tested an antenna.2 This note describes that antenna in some detail. However, the reader should keep in mind this is just one example that happens to fit my particular location.
These antennas can be scaled up or down in size to suit a particular situation. The primary effect of scaling is to change the received signal strength. The directive patterns change very little.
The Antenna The antenna is shown in Figure 1. I have
two ≈80 ft poles, spaced 150 ft in my pasture from which I could suspend the antenna.
Each loop is an equilateral triangle 73 ft on a side. The bottom wires are 8 ft above ground and the corners at the mid-point are 2 ft apart. At each end of each of the bottom wires (points A, B, C and D) there is a 1 kW to 75 W impedance transformer with a common-mode choke for isolation (Figure 2). Each choke is connected to a length of 75 W RG-6 leading back to the control box in the shack. The control box determines how the feed points are driven — which are terminated, which are driven and what the phase relationship will be between the two loops. The cables back to the control box can be of any length but all four cables must be the same electrical length! It’s best if all four cables are cut to the same physical length from the same roll of cable.
The 100 kW resistor in Figure 2 is for
QX1609-Severns02
37t
10 t
100 k2 W 35 t
F
RG-6GroundStake
QX1609-Severns03
A B C D
FFFF
S3
S1
S275 Ω 75 Ω
180° 0°
20t 20t
24t
BNC
Table 1Source and termination locations.Configuration Left source Right source Left termination Right termination Relative phasing1 B D A C 02 A C B D 03 B D A C 180°4 A C B D 180°5 A D B C 06 B C A D 07 A D B C 180°8 B C A D 180°
Figure 2 — Impedance transformer and common mode choke. RG-6 with F-connectors runs to the control box.
Figure 3 — Control unit schematic. F-connectors are used at A, B, C and D in the 75 W portion of the system, and a BNC connector is used at the 50 W connector to the receiver.

24 QEX September/October 2016
static discharge, these are large wire antennas that could accumulate a charge under some weather conditions. Construction details for the transformer-chokes and the control box are in the last section of this article. The control box contains only three switches and a phase-inversion transformer as shown in Figure 3.
The terminations are 75 W resistors placed in the control box. The 75 W is transformed to 1 kW at the antenna with the transformers at A, B, C and D. Whether a cable is acting as a source or as a termination is determined in the control box. If A and C are terminated and B and D are sources, the radiation maximum is to the right, from the terminations towards the sources. The transformer provides 180°
phase inversion and, with the turns ratios shown, also transforms the 75 W impedances to 50 W at the receiver output.
There are eight different combinations of sources, terminations and relative phasing (0° or 180°). These combinations are summarized in Table 1.
Each combination has a specific pattern although configurations 5 and 6 have the same pattern as do 7 and 8. The result is four different patterns, two of which are reversible, that can be selected from the control box in the shack.
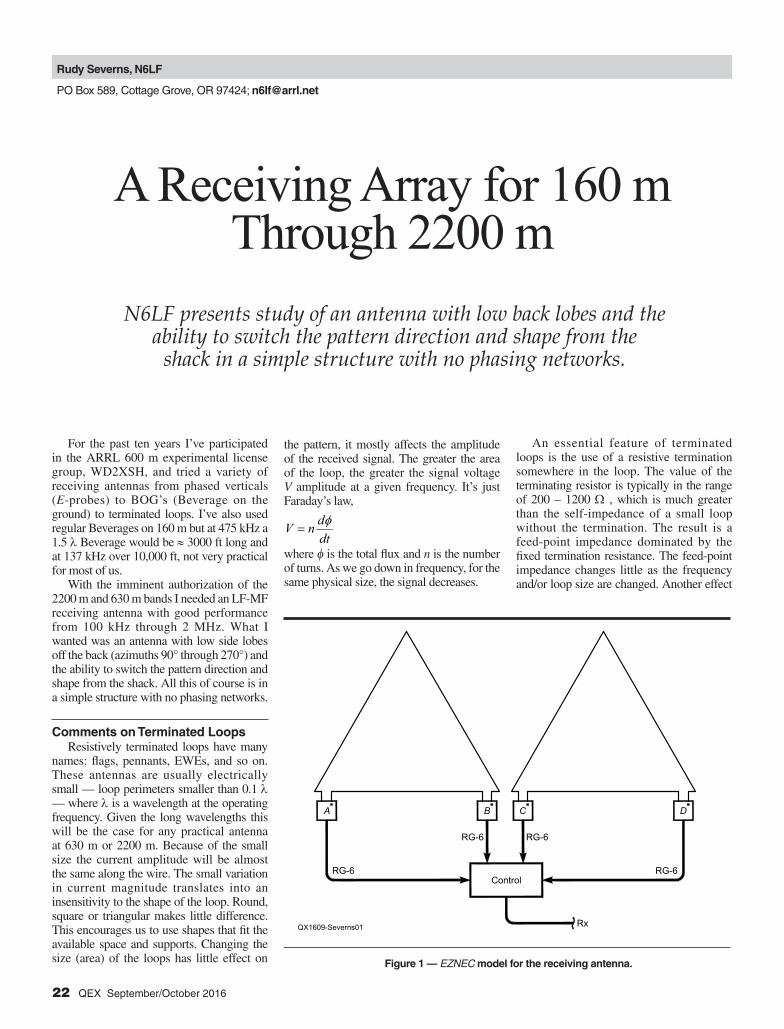
Figures 4 through 7 are for 475 kHz but the patterns at 1.83 MHz and 137 kHz are very similar except for differences in peak gain. This is illustrated in Figures 8 through
11, which compare the directivity patterns for 160 m and 630 m. The outer (higher gain) patterns are configuration 1, the loops are driven in-phase. The inner patterns are for configuration 3, loops driven 180° out of phase.
At 160 m, Figures 8 and 9 illustrate significantly improved directivity going from the loops in-phase to 180° out of phase, it also shows the significant reduction in peak gain (≈ -5 dBi). Figures 10 and 11 are for 630 m and again we see a significant improvement in directivity with 180° phasing, but an even larger reduction in peak gain (≈ -16 dBi). The patterns for 2200 m are very similar to 630 m except that there is another 20 dB of
Figure 5 — Pattern for configurations 3 and 4.
Figure 4 — Pattern for configurations 1 and 2. Figure 6 — Pattern for configurations 5 and 6.
Figure 7 — Pattern for configurations 7 and 8.

QEX September/October 2016 25
gain reduction. The signal levels on 160 m and 630 m are not alarming low and on-the-air testing has shown that an amplifier is not needed. However, on 2200 m a preamp would be helpful — between 20 to 40 dB would be adequate — although I have been using my antenna successfully on 137 kHz for WSPR signals without additional receiver gain.
The predicted performance on 160 m, 630 m and 2200 m for different configurations is summarized in Table 2.
Near-field PatternsAll of the directivity patterns shown to
this point have been for the far-field — many wavelengths from the antenna. At 475 kHz l is ≈ 2,000 ft and at 137 kHz l is ≈ 7,200 ft. The directivity pattern for any noise source — like a utility line or neighbors TV — within that distance will be the near-field pattern, which can be very different from the far-field pattern. Figures 12 and 13 show
a comparison between near and far-field patterns with the noise source at a distance of 400 ft at 475 kHz for the near-field pattern.
The solid lines represent the far-field patterns and the dashed lines the near-field patterns. Note the scale is in mV/m not dB. When the loops are both driven in phase (configuration 1) there is some degradation in the near-field pattern compared to the far-field but it’s not too severe. However, the difference between the near and far-field patterns with 180° phase difference (configurations 3 and 4) is very great. This is a very important observation for locations in congested urban environments. Although the far-field pattern with 180° phase difference is much more directive, the local noise rejection is grossly inferior. Configurations with 180° phase difference may not be usable in these situations.
Sensitivity to ShapeThe configurations listed in Table 2
assume two symmetric triangles. To illustrate how insensitive to loop shape the antenna is, I modeled the variation shown in Figure 14, and show a performance comparison in Table 3. The first entry is Figure 1 and the second Figure 14.
The differences are very small. This implies that the primary driver for loop shape will be the available supports.
An Extended VersionI happen to have another 80 ft pole in
line with the first two, again spaced 150 ft. I’ve considered duplicating the present antenna and extending it to four loops as shown in Figure 15. Figures 16 – 18 show patterns associated with Figure 15. Receive directional factor (RDF) is 13.6 dBi at 475 kHz with an antenna that is only 300 ft long! A comparable Beverage would be almost a mile long. However, the Beverage would have a lot more signal coming out of it.
Table 2Performance summary.
Band Configuration F/B [dB],10° elev. F/R [dB],10° elev. RDF Max gain [dBi] at Az° at El°160 m 1 & 2 18.39 3.91 7.13 ‑12.48 0 38160 m 3 & 4 18.07 15.07 11.22 ‑20.12 0 22160 m 5 & 6 0.00 0.00 6.33 ‑15.81 0 90160 m 7 & 8 0.00 0.00 5.01 ‑17.40 0 26630 m 1 & 2 23.49 5.22 7.71 ‑34.44 0 26630 m 3 & 4 24.43 16.73 11.52 ‑53.55 0 18630 m 5 & 6 0.00 0.00 5.47 ‑39.92 0 90630 m 7 & 8 0.00 0.00 4.77 ‑40.12 0 202200 m 1 & 2 23.63 5.33 7.71 ‑55.46 0 202200 m 3 & 4 14.63 14.63 11.08 ‑85.18 0 142200 m 5 & 6 0.00 0.00 5.22 ‑61.38 0 902200 m 7 & 8 0.00 0.00 4.71 ‑61.08 0 16
Figure 8 — 1.83 MHz azimuth plot at 20°. Figure 9 — 1.83 MHz elevation plot.
26 QEX September/October 2016
Figure 12 — Comparison between near and far-field patterns for zero phase difference.
Figure 10 — 475 kHz azimuth plot.
Figure 11 — 475 kHz elevation plot.
Figure 13 — Comparison between near and far-field patterns for 180° phase difference.
Figure 14 — An alternate loop shape.
Figure 15 — Four loop version.
Figure 16 — Four loop azimuth pattern.

QEX September/October 2016 27
VerificationModeling is a great tool, providing
reliable predictions, but in the end it’s necessary to verify the predictions and that the antenna is correctly assembled. Does this contraption actually work? After a careful visual check that all the electrical connections are correct, and that all of the transformer/chokes are correctly connected to provide proper phasing. Figures 1 and 2 have prominent phasing dots to indicate the proper connections. Even with careful assembly it is possible to switch one or more of the connections. There are a couple of ways to quickly check the polarity of the transformers. First, set the control to 0° phasing (configuration 1), then switch the direction (configuration 2). There should be no significant change in signal level for the background noise. If there is a large change then at least one of the transformers is reversed. Next change the phasing to 180° (configuration 3). There should be a substantial drop in signal level but the new level should not change much when the pattern is reversed (configuration 4). Finally, select a strong signal with a known direction, more or less in line with the main lobe, then reverse the pattern. This should show the F/B of the array and confirm the directions are correct. If all these are as expected then you probably have the phasing correct.
You can also make some impedance measurements. The feed system is designed for 75 W up to the control box, and the impedances within the feed system should be close to this over the entire frequency range. Using a VNA2180 vector network analyzer I measured the impedances at several points from 100 kHz to 2 MHz as I switched the control box through the various configurations. The first point was the output port to the receiver. The impedance was close to 50 W as designed. Tthe phase inversion transformer converts the 75 W impedance of the feed system to 50 W for the receiver. I next measured the impedances at the control box end of the feed cables one at a time while switching between configurations. Each of these measurements was a sweep over the frequency range. All of the graph plots were very similar with an SWR < 1.5:1, indicating there were no major errors. The antenna impedances agreed with predictions.
That was the easy part! The next step was to verify that the antenna had the predicted directivity patterns associated with each configuration. The ideal procedure would be to place a signal source well beyond the Fresnel zone, that is, more than 10 l distant at various azimuths and measure signal strengths as the pattern was switched. At 137 kHz or even 475 kHz the distances to the sources would have to be many miles
although at 1.8 MHz the distances are not so great. My location is in a small valley surrounded in most directions by hills so this approach did not seem practical except perhaps for checking the depth of a null in a particular direction on 160 m. I needed to be a bit more crafty! Because the patterns are basically the same from 100 kHz to 2 MHz, I realized I could use signals anywhere in that range. There are a large number of well defined signals in this range, most prominently AM broadcast stations. There are also aeronautical and coastal navigation beacons and the WSPR transmissions by Amateur Radio experimental stations. From long experience with Yagis and other arrays we know that the null depth and location is much more sensitive than the details of the main lobe. In general if the nulls are where they should be and the null depth anywhere near what it should be, then we can have confidence that the pattern is close to its predicted form. Locating and measuring
Table 3Performance comparison.
Band Configuration F/B [dB]at 10° elev. F/R [dB] at10° elev. RDF Max gain [dBi] at Az° at El°630 m 1 & 2 23.49 5.22 7.71 ‑34.44 0 26630 m 1 & 2 21.92 5.10 7.68 ‑34.36 0 26
Figure 17 — Four loop elevation pattern.
Figure 18 — 3-D pattern for four loops.
Figure 19 — Secondary winding on the impedance transformer.
28 QEX September/October 2016
pattern nulls can take us a long way towards verifying the actual pattern.
To identify and measure signals I have an old HP3585A spectrum analyzer. This allowed me to see the station signals and measure their amplitudes. The instrument displays the amplitude to 0.01 dB but that’s deceiving. Even strong local BC signals have several dB of variation (noise) even with very narrow scans, which makes resolution of the main lobe impractical but it’s still possible to get a good estimate of null depths and locations by observing the signal while switching the pattern direction. Switching the pattern doesn’t help however, with the nulls to the side (±90°, see Figure 5). I was able to find BC stations lying along the axis of the array which showed the predicted F/B ratios reasonably well. The preliminary measurements with BC and 630 m WSPR stations indicate the patterns are close to the NEC predictions, at least the nulls.
Transformers and Control Unit Details
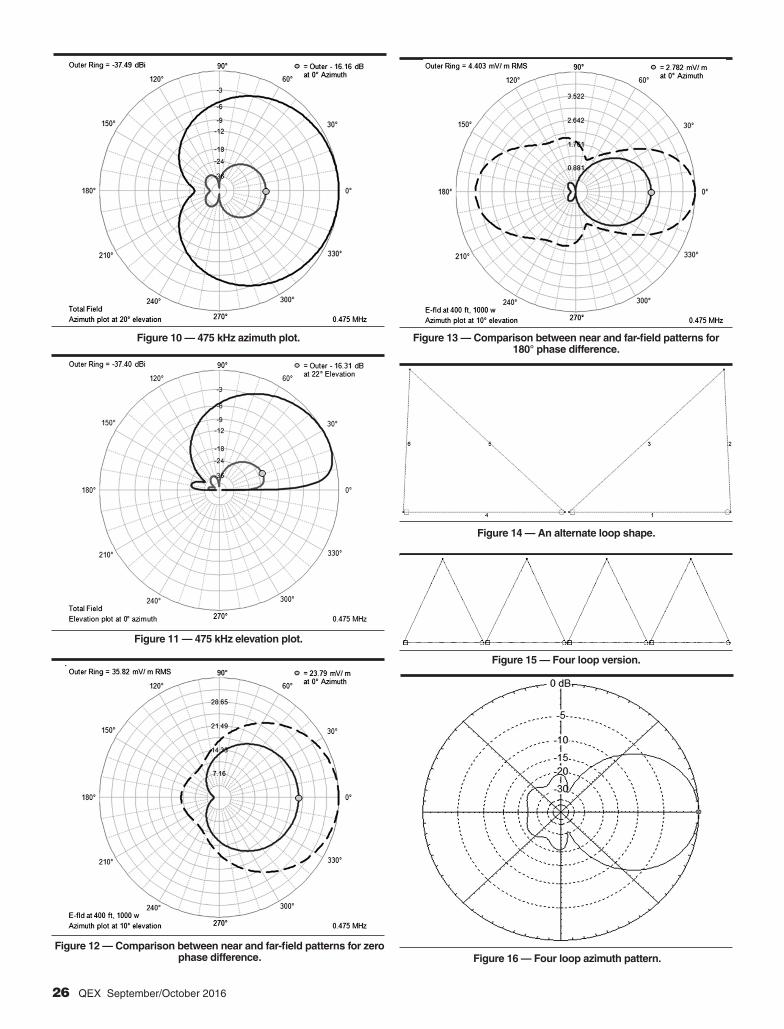
As indicated in Figure 1, the loops are fed or terminated at the lower corners. At each point (A, B, C and D) there is an isolated impedance transformer, 1000 W to 75 W like the one shown in Figure 2. To further isolate the transmission lines from the antenna, on the primary of the impedance transformer there is a common mode choke. Note the use of winding polarity dots in the transformer-choke schematic of Figure 2. Keeping track of the phasing is critical! When toroidal cores are used, two windings are in phase — the same dot — when both wires come out of the core in the same direction.
The impedance transformers, the common mode chokes, and the phase inversion transformer are all wound on the same toroidal ferrite core, Fair-Rite #5977002721. Nine cores are needed for this project. I obtained them from Mouser Electronics for about $3.75 US each.3 These cores are type 77 ferrite, recommended for use in low flux applications below 3 MHz. All of the windings used #26 AWG insulated wire. Neither the wire size nor the insulation type is critical. I simply used what I had on hand. You have to use wire small enough for the windings to fit on the cores. The magnetic components must to work from 137 kHz through 1.9 MHz. The feed-point transformers are used to isolate the antenna from the feed system and to transform the to 75 W resistance on the primary to1000 W on the secondary to properly terminate the loops. The transformer shunt impedance has be significantly greater than1000 W to maintain proper termination. This has to be the case over the entire range of 137 kHz to 2 MHz. At the low frequency the issue
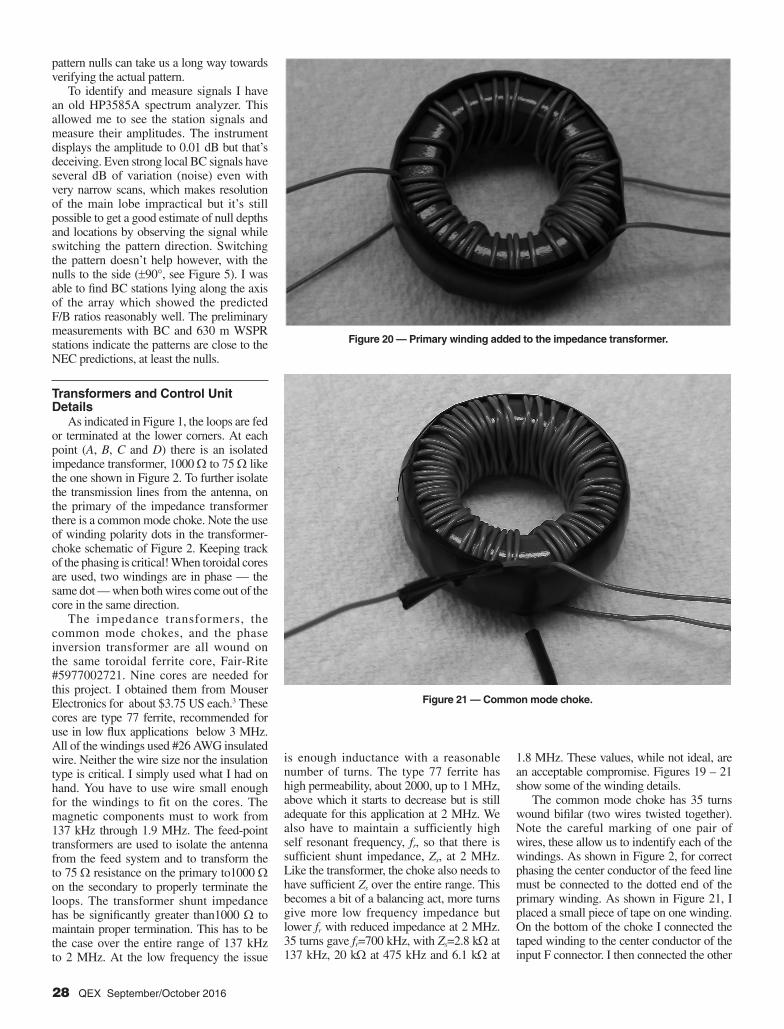
is enough inductance with a reasonable number of turns. The type 77 ferrite has high permeability, about 2000, up to 1 MHz, above which it starts to decrease but is still adequate for this application at 2 MHz. We also have to maintain a sufficiently high self resonant frequency, fr, so that there is sufficient shunt impedance, Zs, at 2 MHz. Like the transformer, the choke also needs to have sufficient Zs over the entire range. This becomes a bit of a balancing act, more turns give more low frequency impedance but lower fr with reduced impedance at 2 MHz. 35 turns gave fr=700 kHz, with Zs=2.8 kW at 137 kHz, 20 kW at 475 kHz and 6.1 kW at
Figure 20 — Primary winding added to the impedance transformer.
Figure 21 — Common mode choke.
1.8 MHz. These values, while not ideal, are an acceptable compromise. Figures 19 – 21 show some of the winding details.
The common mode choke has 35 turns wound bifilar (two wires twisted together). Note the careful marking of one pair of wires, these allow us to indentify each of the windings. As shown in Figure 2, for correct phasing the center conductor of the feed line must be connected to the dotted end of the primary winding. As shown in Figure 21, I placed a small piece of tape on one winding. On the bottom of the choke I connected the taped winding to the center conductor of the input F connector. I then connected the other

QEX September/October 2016 29
end of the taped winding to the dotted end of the transformer.
Note also that the ends of two windings come out on the same side of the toroid, the windings from the same side have the same polarity — they share the same “dot”. This convention applies also to the impedance transformer.
The transformer-chokes were installed in insulated junction boxes (Figure 22) available at most hardware stores. The left box is for point A in Figure 1. Points B and C are combined in a common box (middle) and point D is in the box on the right. The cores are secured with some silicone caulk/adhesive. The terminals to which the antenna wire is attached were simple SS machine screws in holes through the sides of the boxes. The holes were tight and caulked with silicone.
The installation at point B – C at the center of the antenna is shown in Figure 23. Notice the careful markings on the box and the cables to keep track of proper phasing and cable connections. For the antenna to work as expected it is vital that all the connections are correct. To this end every cable was marked at both ends, A, B, C, etc. Every RF connector on the feed point boxes and the control unit was also carefully marked to avoid confusion during assembly. The antenna was made from #17 AWG aluminum electric fence wire.
SummaryThe final version of my antenna is
basically the same as DK6ED’s, just scaled up and with some added switching to give additional patterns. There are four modes of
Figure 22 — Feed point boxes with transformer-chokes installed.
Figure 23 — Transformer box at the center of the array.
operation, two of which are reversible. On several occasions while using the antenna I’ve found the pattern associated with 180° phase shift to be too narrow for general listening. The deep side nulls cut out stations north and south of me. In fact most of the time I leave the loops in-phase, switching to 180° phasing only when it seems to help. I have been using the antenna on 160 m, 630 m and 2200 m without an amplifier. This has worked very well, however, if the antenna were scaled down in size, an amplifier might be needed especially on 2200 m.
I spent a great deal of time trying to optimize this antenna, varying the shape, relative phasing, termination resistances and even exploring reactive terminations. I found all this made very little difference. The antenna seemed to work about the same no matter what I did to it. Even changing the soil characteristics under the antenna has only modest effect. The received signal amplitude is a function of the size of the loops. Bigger loop mean more signal, but that’s about all that changes as the loop size is varied.
Rudy Severns, N6LF, was first licensed as WN7AWG in 1954. He is a retired electrical engineer, an IEEE Fellow and ARRL Life Member.
Notes1Chris Kunze, DK6ED, “The DK6ED Double
Loop”, QST Mar 2015, pp. 34‑37.2Several versions of EZNEC antenna model‑
ing software are available from developer Roy Lewallen, W7EL, at www.eznec.com.
3www.mouser.com.