


Languages
Pages
Legal


KJA; Reviewed;
SPOC 7/6/2012
Solution & Interoperability Test Lab Application Notes
©2012 Avaya Inc. All Rights Reserved.
1 of 72
ACMP11xCM62SM62
Avaya Solution & Interoperability Test Lab
Application Notes for AudioCodes MediaPack 11x with
Avaya Aura® Communication Manager and Avaya Aura®
Session Manager – Issue 1.0
Abstract
This Application Notes document contains interoperability instructions for configuring
AudioCodes MediaPack 11x with Avaya Aura® Communication Manager and Avaya Aura®
Session Manager. Compliance testing was conducted to verify the interoperability.
Information in these Application Notes has been obtained through DevConnect compliance
testing and additional technical discussions. Testing was conducted via the DevConnect
Program at the Avaya Solution and Interoperability Test Lab.
NOTE: This Application Note is applicable with Avaya Aura® 6.2 which is currently in
Controlled Introduction. Avaya Aura® 6.2 will be Generally Available in Summer 2012.
KJA; Reviewed;
SPOC 7/6/2012
Solution & Interoperability Test Lab Application Notes
©2012 Avaya Inc. All Rights Reserved.
2 of 72
ACMP11xCM62SM62
Table of Contents
Table of Contents .................................................................................................................................. 2
1. Introduction................................................................................................................................... 4 2. General Test Approach and Test Results .................................................................................... 4
2.1. Interoperability Compliance Testing .................................................................................... 4
2.2. Test Results ............................................................................................................................ 5 2.3. Support.................................................................................................................................... 5
3. Reference Configuration .............................................................................................................. 6
4. Equipment and Software Validated............................................................................................. 7 5. Configure Avaya Aura® Communication Manager .................................................................. 8
5.1. Verify Avaya Aura® Communication Manager License .................................................... 8
5.2. Administer IP Network Region ............................................................................................. 9 5.2.1. IP Network Region for Voice and Fax Calls .............................................................. 9 5.2.2. IP Network Region for Modem Calls ....................................................................... 10
5.3. Administer IP Codec Set ..................................................................................................... 11 5.3.1. IP Codec set for Voice and Fax Calls ....................................................................... 11 5.3.2. IP Codec Set for Modem Calls .................................................................................. 12
5.4. Administer IP Node Names ................................................................................................. 13 5.5. Administer SIP Signaling Group ........................................................................................ 13
5.5.1. Signaling Group for Voice and Fax Calls ................................................................ 14
5.5.2. Signaling Group for Modem Calls ............................................................................ 15 5.6. Administer SIP Trunk Group .............................................................................................. 16
5.6.1. Trunk Group for Voice and Fax Calls ...................................................................... 16
5.6.2. Trunk Group for Modem Calls.................................................................................. 17 5.7. Administer Route Pattern .................................................................................................... 18
5.7.1. Route Pattern for Voice and Fax Calls ..................................................................... 18
5.7.2. Route Pattern for Modem Calls ................................................................................. 18 5.8. Administer Private Numbering ........................................................................................... 19 5.9. Administer AAR Analysis................................................................................................... 19
5.10. Administer ARS Analysis .............................................................................................. 20 5.11. Administer Stations ......................................................................................................... 21
6. Configure Avaya Aura® Session Manager .............................................................................. 22
6.1. Add SIP Domain .................................................................................................................. 24 6.2. Add Location ........................................................................................................................ 24 6.3. Add SIP Entity ..................................................................................................................... 26
6.4. Add Entity Link.................................................................................................................... 27 6.5. Add Time Ranges ................................................................................................................ 28 6.6. Add Routing Policy ............................................................................................................. 29
6.7. Add Dial Patterns ................................................................................................................. 31 6.8. Add User ............................................................................................................................... 33
7. Configure AudioCodes MediaPack 11x ................................................................................... 36
7.1. Verify/Upgrade Firmware Version ..................................................................................... 36
KJA; Reviewed;
SPOC 7/6/2012
Solution & Interoperability Test Lab Application Notes
©2012 Avaya Inc. All Rights Reserved.
3 of 72
ACMP11xCM62SM62
7.2. Administer Application Settings ......................................................................................... 41 7.3. Administer Syslog Settings ................................................................................................. 42
7.4. Administer Certificates ........................................................................................................ 43 7.5. Administer DNS Setting ...................................................................................................... 44 7.6. Administer Media Security ................................................................................................. 45
7.7. Administer General Parameters .......................................................................................... 46 7.8. Administer Advanced Parameter ........................................................................................ 47 7.9. Administer Proxy and Registration..................................................................................... 47
7.10. Administer Coders .......................................................................................................... 50 7.11. Administer Coders Group Settings ................................................................................ 50 7.12. Administer Tel Profile Settings ...................................................................................... 52
7.13. Administer IP Profile Settings........................................................................................ 53 7.14. Administer EndPoint Phone Number ............................................................................ 54 7.15. Administer Hunt Group Settings .................................................................................... 55
7.16. Administering Manipulations ......................................................................................... 56 7.17. Administer IP to Trunk Group Routing ......................................................................... 57 7.18. Administer Other Parameters ......................................................................................... 58
7.19. Administer DTMF and Dialing ...................................................................................... 60 7.20. Administer Supplementary Services .............................................................................. 61 7.21. Administer FXO .............................................................................................................. 62
8. Verification Steps ....................................................................................................................... 63 8.1. Avaya Aura® Communication Manager and Avaya Aura® Session Manager............... 63
9. Conclusion .................................................................................................................................. 65
10. Additional References ......................................................................................................... 65 A. Appendix ..................................................................................................................................... 66
KJA; Reviewed;
SPOC 7/6/2012
Solution & Interoperability Test Lab Application Notes
©2012 Avaya Inc. All Rights Reserved.
4 of 72
ACMP11xCM62SM62
1. Introduction AudioCodes MediaPack (MP) 11x Analog VoIP gateways provide voice technology to connect
analog phones, fax machines and modems (FXS) or landlines (FXO) to IP based PBX systems.
During compliance testing, AudioCodes MP-112 and AudioCodes MP-114 VoIP gateways were
used. Inherently, this also covers AudioCodes MP-118. Both AudioCodes MPs were configured
to communicate with Avaya Aura® Session Manager using SIP (Session Initiation Protocol).
2. General Test Approach and Test Results Interoperability compliance testing focused on verifying various inbound and outbound call
flows between AudioCodes MP-11x, Avaya Aura® Communication Manager and Avaya Aura®
Session Manager.
DevConnect Compliance Testing is conducted jointly by Avaya and DevConnect members. The
jointly-defined test plan focuses on exercising APIs and/or standards-based interfaces pertinent
to the interoperability of the tested products and their functionalities. DevConnect Compliance
Testing is not intended to substitute full product performance or feature testing performed by
DevConnect members, nor is it to be construed as an endorsement by Avaya of the suitability or
completeness of a DevConnect member’s solution.
2.1. Interoperability Compliance Testing
Analog lines on AudioCodes MP-11x were configured as users on Avaya Aura® Session
Manager. Each configured analog line user, registered with Session Manager. SIP TLS and
SRTP were utilized during this test effort. Following features and functionalities were covered
during compliance testing:
Incoming calls to AudioCodes MP-11x
Outgoing calls from AudioCodes MP-11x
Voice codecs G.711u, G.711A and G.729 using SRTP
Incoming and outgoing faxes using T.38
Incoming and outgoing modem calls
DTMF tone transmission with RFC2833
Calls using various Analog, H.323 and SIP endpoints supported by Avaya IP telephony
solution
Note: Configuration instructions in this document are primarily geared towards FXS lines on
AudioCodes MP-11x. Configuration for FXO lines is clearly noted, and is only necessary if
configuring FXO lines on AudioCodes MP-11x.
KJA; Reviewed;
SPOC 7/6/2012
Solution & Interoperability Test Lab Application Notes
©2012 Avaya Inc. All Rights Reserved.
5 of 72
ACMP11xCM62SM62
2.2. Test Results
All test cases were executed and passed with the following exception/observations:
1. MWI feature: MWI for lamp wasn’t tested. However, the MWI stutter tone was tested
successfully.
2. RTCP configuration: At present, Avaya Aura® Communication Manager only supports
unencrypted RTCP. In order to disable RTCP decryption on AudioCodes MP-11x, a parameter
named RTCPEncryptionDisableRx with value of 1, needs to be configured via AdminPage.
Please note that, even though this parameter is applied, it will not be displayed in the ini file.
2.3. Support
Technical support for AudioCodes MP-11x can be obtained through the following:
Phone:
Americas: +1-732-652-1085 or 1-800-735-4588
Rest of the World: 800-44422444 or 972-3-9764343
Web:crm.audiocodes.com
E-Mail: [email protected]
KJA; Reviewed;
SPOC 7/6/2012
Solution & Interoperability Test Lab Application Notes
©2012 Avaya Inc. All Rights Reserved.
6 of 72
ACMP11xCM62SM62
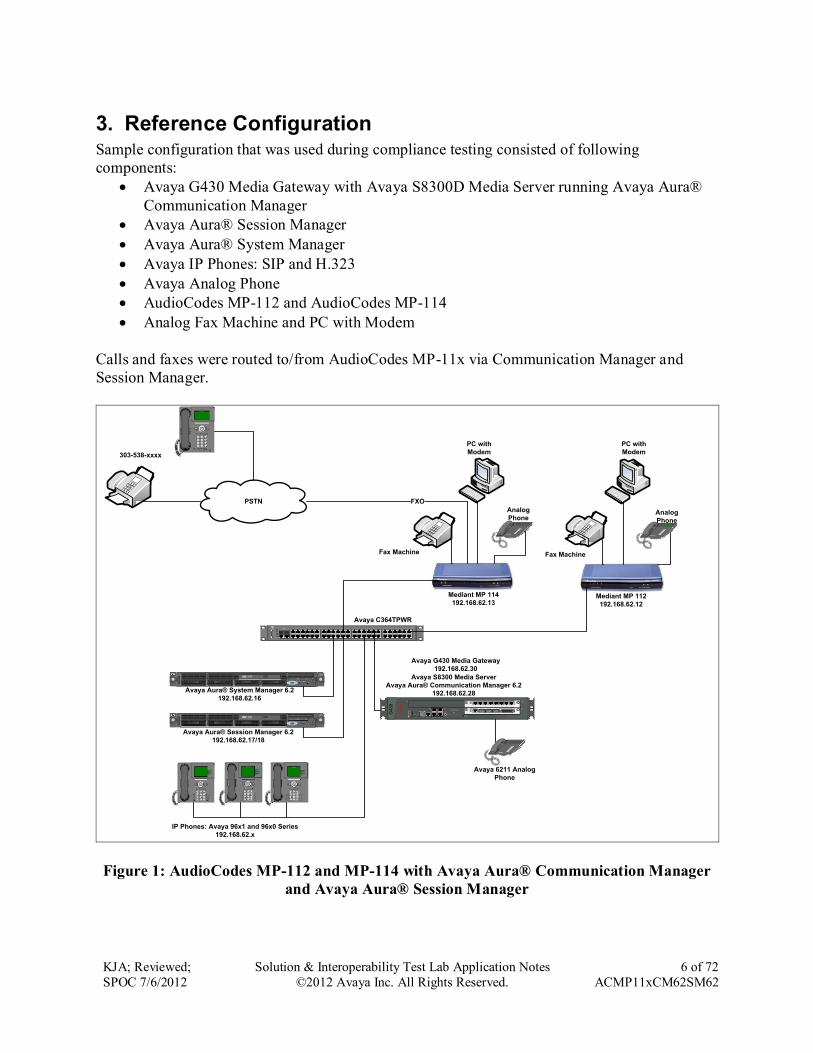
3. Reference Configuration Sample configuration that was used during compliance testing consisted of following
components:
Avaya G430 Media Gateway with Avaya S8300D Media Server running Avaya Aura®
Communication Manager
Avaya Aura® Session Manager
Avaya Aura® System Manager
Avaya IP Phones: SIP and H.323
Avaya Analog Phone
AudioCodes MP-112 and AudioCodes MP-114
Analog Fax Machine and PC with Modem
Calls and faxes were routed to/from AudioCodes MP-11x via Communication Manager and
Session Manager.
IP Phones: Avaya 96x1 and 96x0 Series
192.168.62.x
303-538-xxxx
Avaya C364TPWR
Avaya S8300 Media Server
Avaya Aura® Communication Manager 6.2
192.168.62.28
Avaya G430 Media Gateway
192.168.62.30
PSTN
OK
PHONEMESSAGE
CONTACTS MENU CALL LOG
SPEAKER MUTE VOLUME HEADSET
ABC DEF
JKL MNOGHI
1 2 3
4 5 6
TUV WXYZPQRS
7 8 9
*
[
0 #
.,@
Avaya one-X
OK
PHONEMESSAGE
CONTACTS MENU CALL LOG
VOLUME
ABC DEF
JKL MNOGHI
1 2 3
4 5 6
TUV WXYZPQRS
7 8 9
*
[
0 #
.,@
MUTESPEAKER
HEADSET
FORWARD
Avaya one-X
OK
PHONEMESSAGE
CONTACTS MENU CALL LOG
VOLUME
ABC DEF
JKL MNOGHI
1 2 3
4 5 6
TUV WXYZPQRS
7 8 9
*
[
0 #
.,@
MUTESPEAKER
HEADSET
FORWARD
Avaya one-X
OK
PHONEMESSAGE
CONTACTS MENU CALL LOG
VOLUME
ABC DEF
JKL MNOGHI
1 2 3
4 5 6
TUV WXYZPQRS
7 8 9
*
[
0 #
.,@
MUTESPEAKER
HEADSET
FORWARD
5049
25 27 29 31 33 35
32 34 3626 28 30
37 39 41 43 45 47
44 46 4838 40 42
Down/51
Base
Status
1 3 5 7 9 11 13 15 17 19 21 23
8 10 122 4 6 20 22 2414 16 18
Up/52
PWR
SpeedLink/Act
2550T
7 8 9
* 0 #
PQRS WXYZTUV
Volume
1 2 3
4 5 6
ABC DEF
MNOJKLGHI
Speaker Mute Ho ld
Redial Transfer Ring
Menu Ex it Prev Next
6408
Avaya 6211 Analog
Phone
8
1 2UID41
5
32
SID
HPProLiant
DL360 G7
8
1 2UID41
5
32
SID
HPProLiant
DL360 G7
Avaya Aura® Session Manager 6.2
192.168.62.17/18
Avaya Aura® System Manager 6.2
192.168.62.16
7 8 9
* 0 #
PQRS WXYZTUV
Volume
1 2 3
4 5 6
ABC DEF
MNOJKLGHI
Speaker Mute Ho ld
Redial Transfer Ring
Menu Ex it Prev Next
6408
7 8 9
* 0 #
PQRS WXYZTUV
Volume
1 2 3
4 5 6
ABC DEF
MNOJKLGHI
Speaker Mute Ho ld
Redial Transfer Ring
Menu Ex it Prev Next
6408
Mediant MP 112
192.168.62.12
Mediant MP 114
192.168.62.13
Fax Machine
Analog
PhoneAnalog
Phone
Fax Machine
PC with
Modem
PC with
Modem
W A N
1 LAN 10/3SERVICESCCA 10/12
USB
10/2LAN10/4
MDM
A LM
CPU
P W R
RST A SB
V1
SY
ST
EM
COMPACT FLASH
CARDIN US E
V2
V3
A UDIO
G430
ALM
TST
ACT
AVAYA
E1 /T1
MODULESIG
SO EI SM EM SI EO
ALM
TST
ACT
1 2 3 4 5 6 7 8
AVAYAMM 712
DCP
VH3
FXO
Figure 1: AudioCodes MP-112 and MP-114 with Avaya Aura® Communication Manager
and Avaya Aura® Session Manager
KJA; Reviewed;
SPOC 7/6/2012
Solution & Interoperability Test Lab Application Notes
©2012 Avaya Inc. All Rights Reserved.
7 of 72
ACMP11xCM62SM62
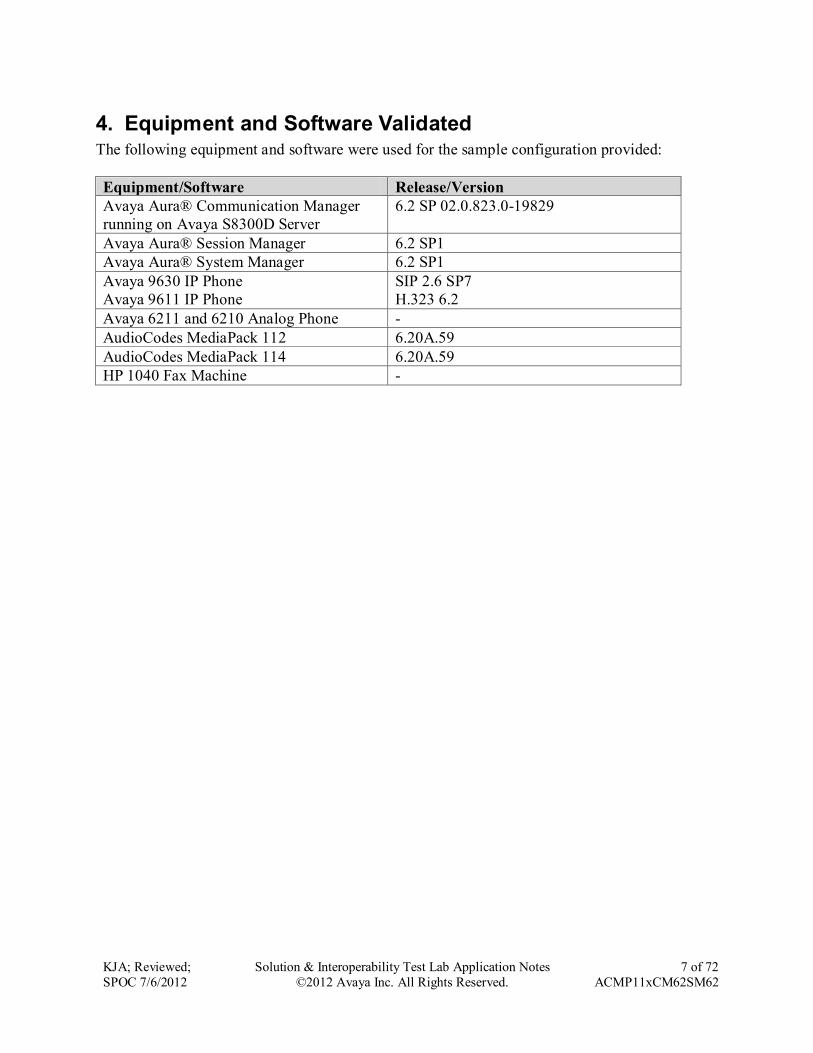
4. Equipment and Software Validated The following equipment and software were used for the sample configuration provided:
Equipment/Software Release/Version
Avaya Aura® Communication Manager
running on Avaya S8300D Server
6.2 SP 02.0.823.0-19829
Avaya Aura® Session Manager 6.2 SP1
Avaya Aura® System Manager 6.2 SP1
Avaya 9630 IP Phone
Avaya 9611 IP Phone
SIP 2.6 SP7
H.323 6.2
Avaya 6211 and 6210 Analog Phone -
AudioCodes MediaPack 112 6.20A.59
AudioCodes MediaPack 114 6.20A.59
HP 1040 Fax Machine -
KJA; Reviewed;
SPOC 7/6/2012
Solution & Interoperability Test Lab Application Notes
©2012 Avaya Inc. All Rights Reserved.
8 of 72
ACMP11xCM62SM62
5. Configure Avaya Aura® Communication Manager This section provides steps for configuring Communication Manager. All configuration for
Communication Manager is done through System Access Terminal (SAT).
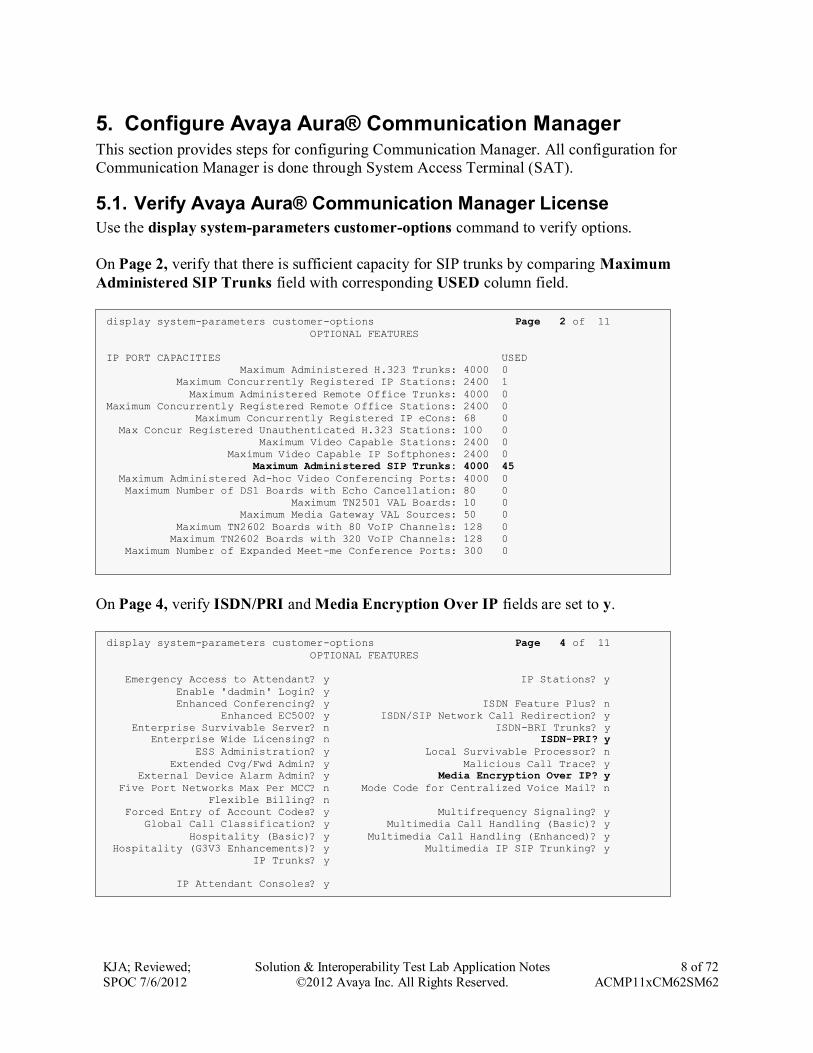
5.1. Verify Avaya Aura® Communication Manager License
Use the display system-parameters customer-options command to verify options.
On Page 2, verify that there is sufficient capacity for SIP trunks by comparing Maximum
Administered SIP Trunks field with corresponding USED column field.
On Page 4, verify ISDN/PRI and Media Encryption Over IP fields are set to y.
display system-parameters customer-options Page 4 of 11
OPTIONAL FEATURES
Emergency Access to Attendant? y IP Stations? y
Enable 'dadmin' Login? y
Enhanced Conferencing? y ISDN Feature Plus? n
Enhanced EC500? y ISDN/SIP Network Call Redirection? y
Enterprise Survivable Server? n ISDN-BRI Trunks? y
Enterprise Wide Licensing? n ISDN-PRI? y
ESS Administration? y Local Survivable Processor? n
Extended Cvg/Fwd Admin? y Malicious Call Trace? y
External Device Alarm Admin? y Media Encryption Over IP? y
Five Port Networks Max Per MCC? n Mode Code for Centralized Voice Mail? n
Flexible Billing? n
Forced Entry of Account Codes? y Multifrequency Signaling? y
Global Call Classification? y Multimedia Call Handling (Basic)? y
Hospitality (Basic)? y Multimedia Call Handling (Enhanced)? y
Hospitality (G3V3 Enhancements)? y Multimedia IP SIP Trunking? y
IP Trunks? y
IP Attendant Consoles? y
display system-parameters customer-options Page 2 of 11
OPTIONAL FEATURES
IP PORT CAPACITIES USED
Maximum Administered H.323 Trunks: 4000 0
Maximum Concurrently Registered IP Stations: 2400 1
Maximum Administered Remote Office Trunks: 4000 0
Maximum Concurrently Registered Remote Office Stations: 2400 0
Maximum Concurrently Registered IP eCons: 68 0
Max Concur Registered Unauthenticated H.323 Stations: 100 0
Maximum Video Capable Stations: 2400 0
Maximum Video Capable IP Softphones: 2400 0
Maximum Administered SIP Trunks: 4000 45
Maximum Administered Ad-hoc Video Conferencing Ports: 4000 0
Maximum Number of DS1 Boards with Echo Cancellation: 80 0
Maximum TN2501 VAL Boards: 10 0
Maximum Media Gateway VAL Sources: 50 0
Maximum TN2602 Boards with 80 VoIP Channels: 128 0
Maximum TN2602 Boards with 320 VoIP Channels: 128 0
Maximum Number of Expanded Meet-me Conference Ports: 300 0
KJA; Reviewed;
SPOC 7/6/2012
Solution & Interoperability Test Lab Application Notes
©2012 Avaya Inc. All Rights Reserved.
9 of 72
ACMP11xCM62SM62
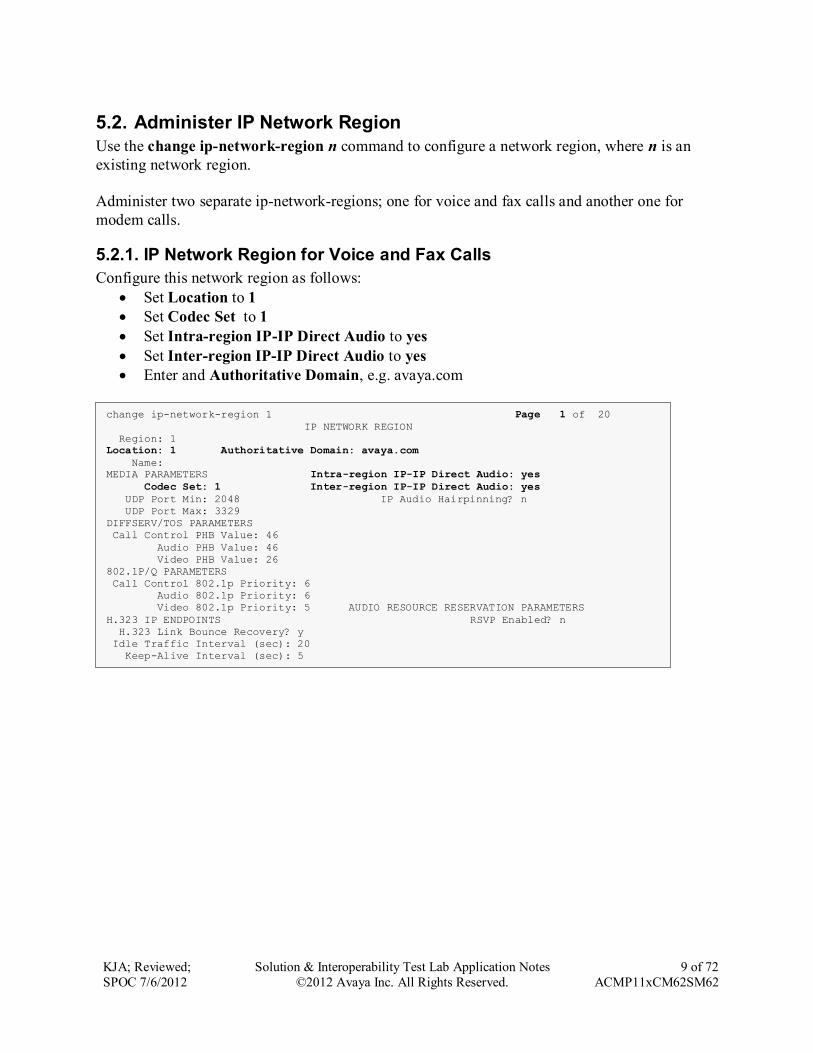
5.2. Administer IP Network Region
Use the change ip-network-region n command to configure a network region, where n is an
existing network region.
Administer two separate ip-network-regions; one for voice and fax calls and another one for
modem calls.
5.2.1. IP Network Region for Voice and Fax Calls
Configure this network region as follows:
Set Location to 1
Set Codec Set to 1
Set Intra-region IP-IP Direct Audio to yes
Set Inter-region IP-IP Direct Audio to yes
Enter and Authoritative Domain, e.g. avaya.com
change ip-network-region 1 Page 1 of 20
IP NETWORK REGION
Region: 1
Location: 1 Authoritative Domain: avaya.com
Name:
MEDIA PARAMETERS Intra-region IP-IP Direct Audio: yes
Codec Set: 1 Inter-region IP-IP Direct Audio: yes
UDP Port Min: 2048 IP Audio Hairpinning? n
UDP Port Max: 3329
DIFFSERV/TOS PARAMETERS
Call Control PHB Value: 46
Audio PHB Value: 46
Video PHB Value: 26
802.1P/Q PARAMETERS
Call Control 802.1p Priority: 6
Audio 802.1p Priority: 6
Video 802.1p Priority: 5 AUDIO RESOURCE RESERVATION PARAMETERS
H.323 IP ENDPOINTS RSVP Enabled? n
H.323 Link Bounce Recovery? y
Idle Traffic Interval (sec): 20
Keep-Alive Interval (sec): 5
Keep-Alive Count: 5
KJA; Reviewed;
SPOC 7/6/2012
Solution & Interoperability Test Lab Application Notes
©2012 Avaya Inc. All Rights Reserved.
10 of 72
ACMP11xCM62SM62
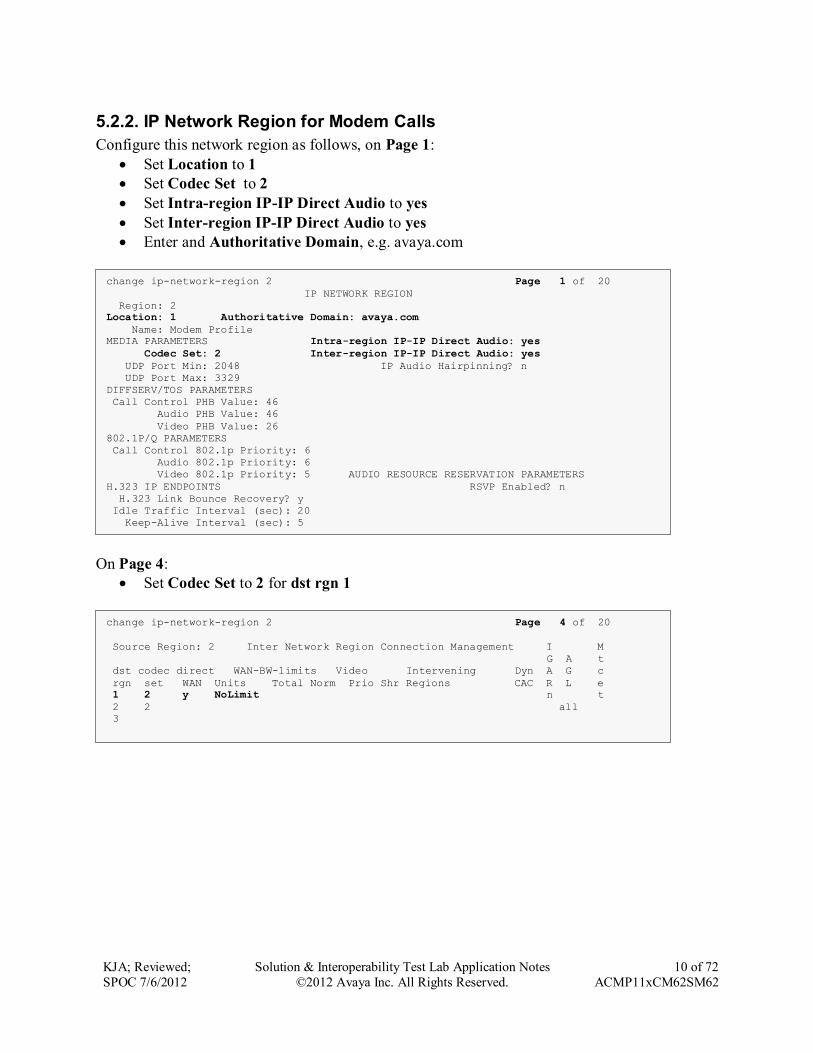
5.2.2. IP Network Region for Modem Calls
Configure this network region as follows, on Page 1:
Set Location to 1
Set Codec Set to 2
Set Intra-region IP-IP Direct Audio to yes
Set Inter-region IP-IP Direct Audio to yes
Enter and Authoritative Domain, e.g. avaya.com
On Page 4:
Set Codec Set to 2 for dst rgn 1
change ip-network-region 2 Page 4 of 20
Source Region: 2 Inter Network Region Connection Management I M
G A t
dst codec direct WAN-BW-limits Video Intervening Dyn A G c
rgn set WAN Units Total Norm Prio Shr Regions CAC R L e
1 2 y NoLimit n t
2 2 all
3
change ip-network-region 2 Page 1 of 20
IP NETWORK REGION
Region: 2
Location: 1 Authoritative Domain: avaya.com
Name: Modem Profile
MEDIA PARAMETERS Intra-region IP-IP Direct Audio: yes
Codec Set: 2 Inter-region IP-IP Direct Audio: yes
UDP Port Min: 2048 IP Audio Hairpinning? n
UDP Port Max: 3329
DIFFSERV/TOS PARAMETERS
Call Control PHB Value: 46
Audio PHB Value: 46
Video PHB Value: 26
802.1P/Q PARAMETERS
Call Control 802.1p Priority: 6
Audio 802.1p Priority: 6
Video 802.1p Priority: 5 AUDIO RESOURCE RESERVATION PARAMETERS
H.323 IP ENDPOINTS RSVP Enabled? n
H.323 Link Bounce Recovery? y
Idle Traffic Interval (sec): 20
Keep-Alive Interval (sec): 5
Keep-Alive Count: 5
KJA; Reviewed;
SPOC 7/6/2012
Solution & Interoperability Test Lab Application Notes
©2012 Avaya Inc. All Rights Reserved.
11 of 72
ACMP11xCM62SM62
5.3. Administer IP Codec Set
Use the change ip-codec-set n command to configure IP codec set, where n is an existing codec
set number.
Administer two ip-codec-set; one for voice and fax calls and another one for modem calls
corresponding to ip-network-region configured in Section 5.2.1 and Section 5.2.2.
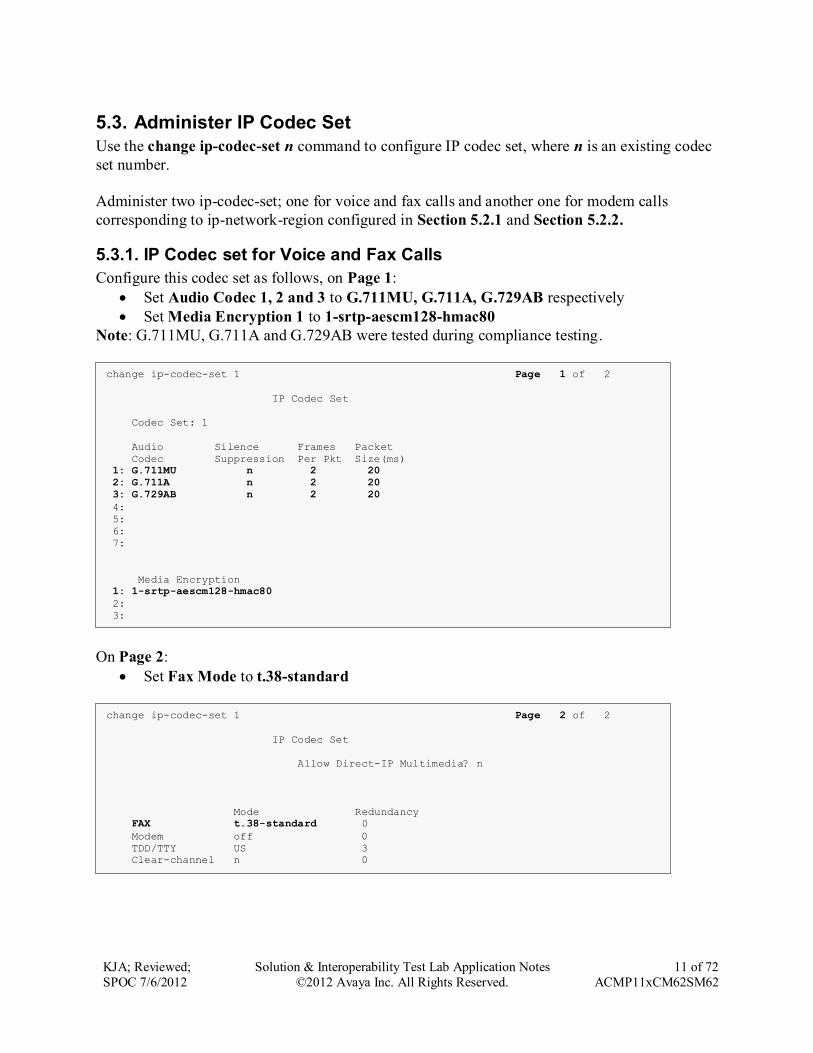
5.3.1. IP Codec set for Voice and Fax Calls
Configure this codec set as follows, on Page 1:
Set Audio Codec 1, 2 and 3 to G.711MU, G.711A, G.729AB respectively
Set Media Encryption 1 to 1-srtp-aescm128-hmac80
Note: G.711MU, G.711A and G.729AB were tested during compliance testing.
On Page 2:
Set Fax Mode to t.38-standard
change ip-codec-set 1 Page 2 of 2
IP Codec Set
Allow Direct-IP Multimedia? n
Mode Redundancy
FAX t.38-standard 0
Modem off 0
TDD/TTY US 3
Clear-channel n 0
change ip-codec-set 1 Page 1 of 2
IP Codec Set
Codec Set: 1
Audio Silence Frames Packet
Codec Suppression Per Pkt Size(ms)
1: G.711MU n 2 20
2: G.711A n 2 20
3: G.729AB n 2 20
4:
5:
6:
7:
Media Encryption
1: 1-srtp-aescm128-hmac80
2:
3:
KJA; Reviewed;
SPOC 7/6/2012
Solution & Interoperability Test Lab Application Notes
©2012 Avaya Inc. All Rights Reserved.
12 of 72
ACMP11xCM62SM62
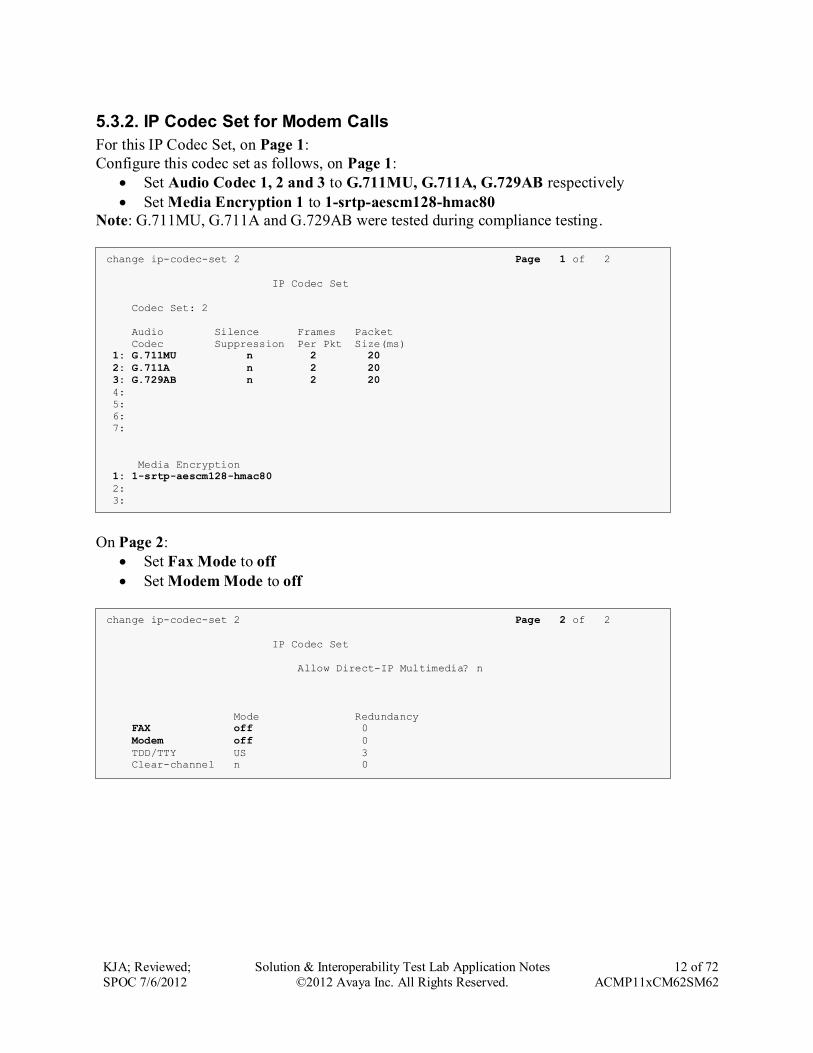
5.3.2. IP Codec Set for Modem Calls
For this IP Codec Set, on Page 1:
Configure this codec set as follows, on Page 1:
Set Audio Codec 1, 2 and 3 to G.711MU, G.711A, G.729AB respectively
Set Media Encryption 1 to 1-srtp-aescm128-hmac80
Note: G.711MU, G.711A and G.729AB were tested during compliance testing.
On Page 2:
Set Fax Mode to off
Set Modem Mode to off
change ip-codec-set 2 Page 2 of 2
IP Codec Set
Allow Direct-IP Multimedia? n
Mode Redundancy
FAX off 0
Modem off 0
TDD/TTY US 3
Clear-channel n 0
change ip-codec-set 2 Page 1 of 2
IP Codec Set
Codec Set: 2
Audio Silence Frames Packet
Codec Suppression Per Pkt Size(ms)
1: G.711MU n 2 20
2: G.711A n 2 20
3: G.729AB n 2 20
4:
5:
6:
7:
Media Encryption
1: 1-srtp-aescm128-hmac80
2:
3:
KJA; Reviewed;
SPOC 7/6/2012
Solution & Interoperability Test Lab Application Notes
©2012 Avaya Inc. All Rights Reserved.
13 of 72
ACMP11xCM62SM62
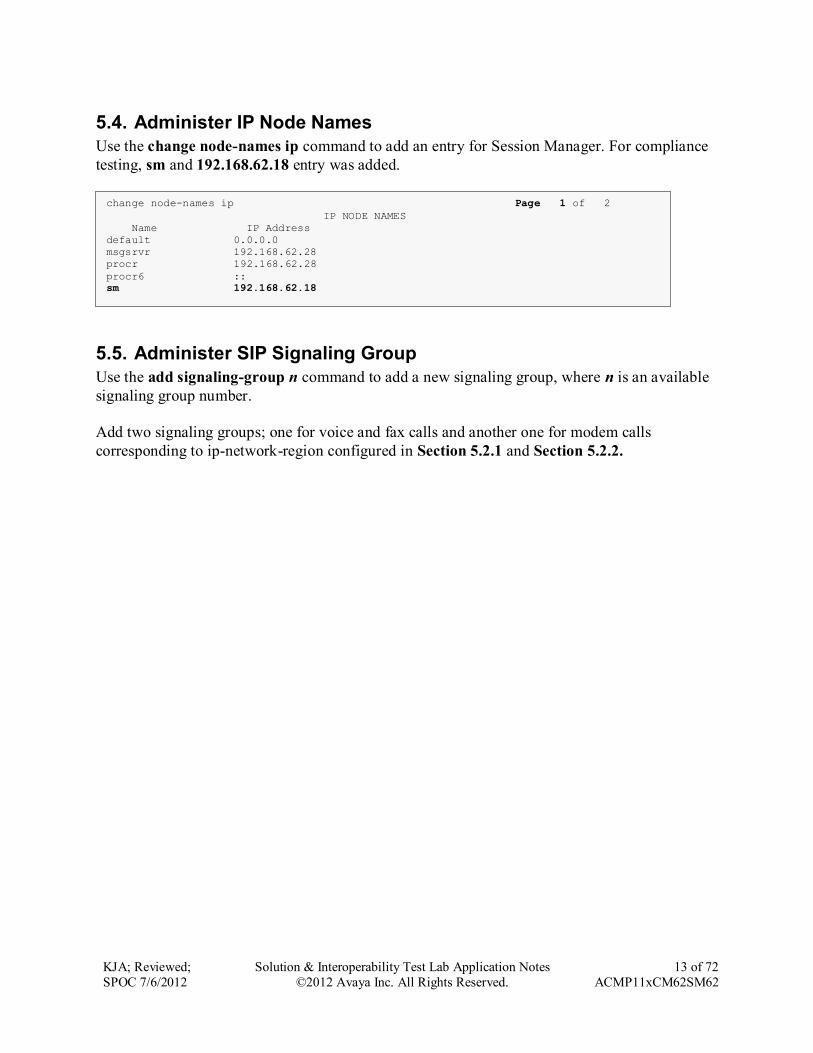
5.4. Administer IP Node Names
Use the change node-names ip command to add an entry for Session Manager. For compliance
testing, sm and 192.168.62.18 entry was added.
5.5. Administer SIP Signaling Group
Use the add signaling-group n command to add a new signaling group, where n is an available
signaling group number.
Add two signaling groups; one for voice and fax calls and another one for modem calls
corresponding to ip-network-region configured in Section 5.2.1 and Section 5.2.2.
change node-names ip Page 1 of 2
IP NODE NAMES
Name IP Address
default 0.0.0.0
msgsrvr 192.168.62.28
procr 192.168.62.28
procr6 ::
sm 192.168.62.18
KJA; Reviewed;
SPOC 7/6/2012
Solution & Interoperability Test Lab Application Notes
©2012 Avaya Inc. All Rights Reserved.
14 of 72
ACMP11xCM62SM62
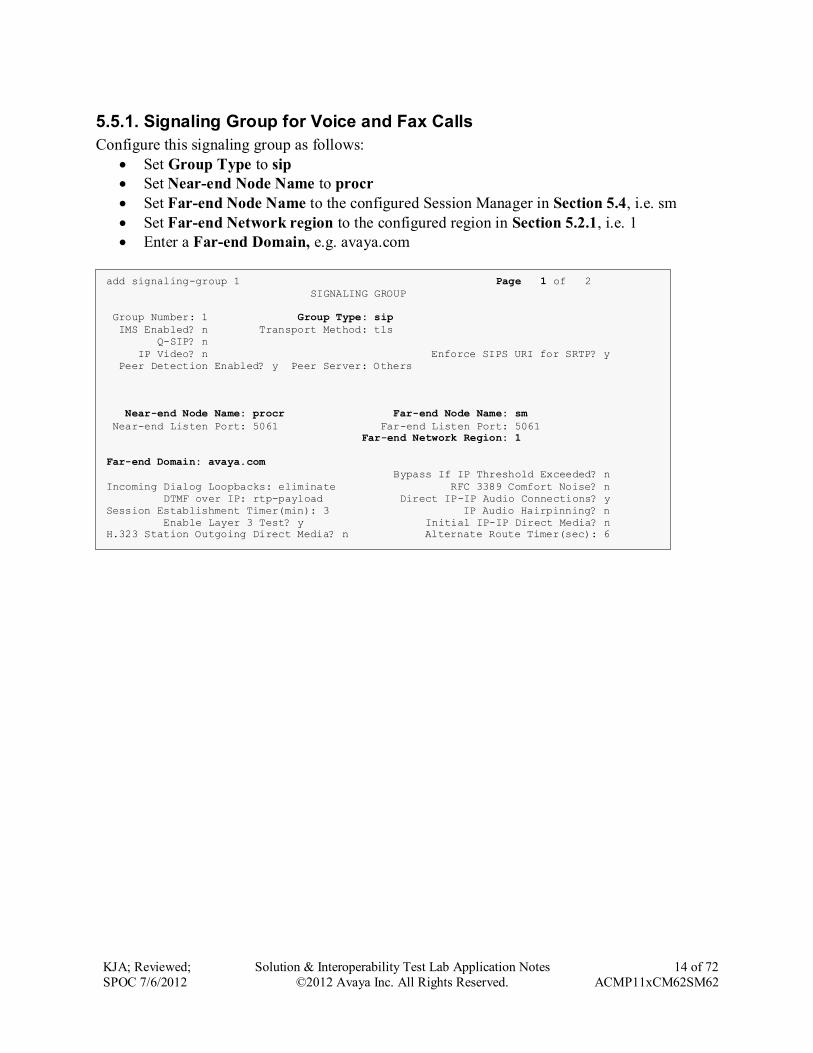
5.5.1. Signaling Group for Voice and Fax Calls
Configure this signaling group as follows:
Set Group Type to sip
Set Near-end Node Name to procr
Set Far-end Node Name to the configured Session Manager in Section 5.4, i.e. sm
Set Far-end Network region to the configured region in Section 5.2.1, i.e. 1
Enter a Far-end Domain, e.g. avaya.com
add signaling-group 1 Page 1 of 2
SIGNALING GROUP
Group Number: 1 Group Type: sip
IMS Enabled? n Transport Method: tls
Q-SIP? n
IP Video? n Enforce SIPS URI for SRTP? y
Peer Detection Enabled? y Peer Server: Others
Near-end Node Name: procr Far-end Node Name: sm
Near-end Listen Port: 5061 Far-end Listen Port: 5061
Far-end Network Region: 1
Far-end Domain: avaya.com
Bypass If IP Threshold Exceeded? n
Incoming Dialog Loopbacks: eliminate RFC 3389 Comfort Noise? n
DTMF over IP: rtp-payload Direct IP-IP Audio Connections? y
Session Establishment Timer(min): 3 IP Audio Hairpinning? n
Enable Layer 3 Test? y Initial IP-IP Direct Media? n
H.323 Station Outgoing Direct Media? n Alternate Route Timer(sec): 6
KJA; Reviewed;
SPOC 7/6/2012
Solution & Interoperability Test Lab Application Notes
©2012 Avaya Inc. All Rights Reserved.
15 of 72
ACMP11xCM62SM62
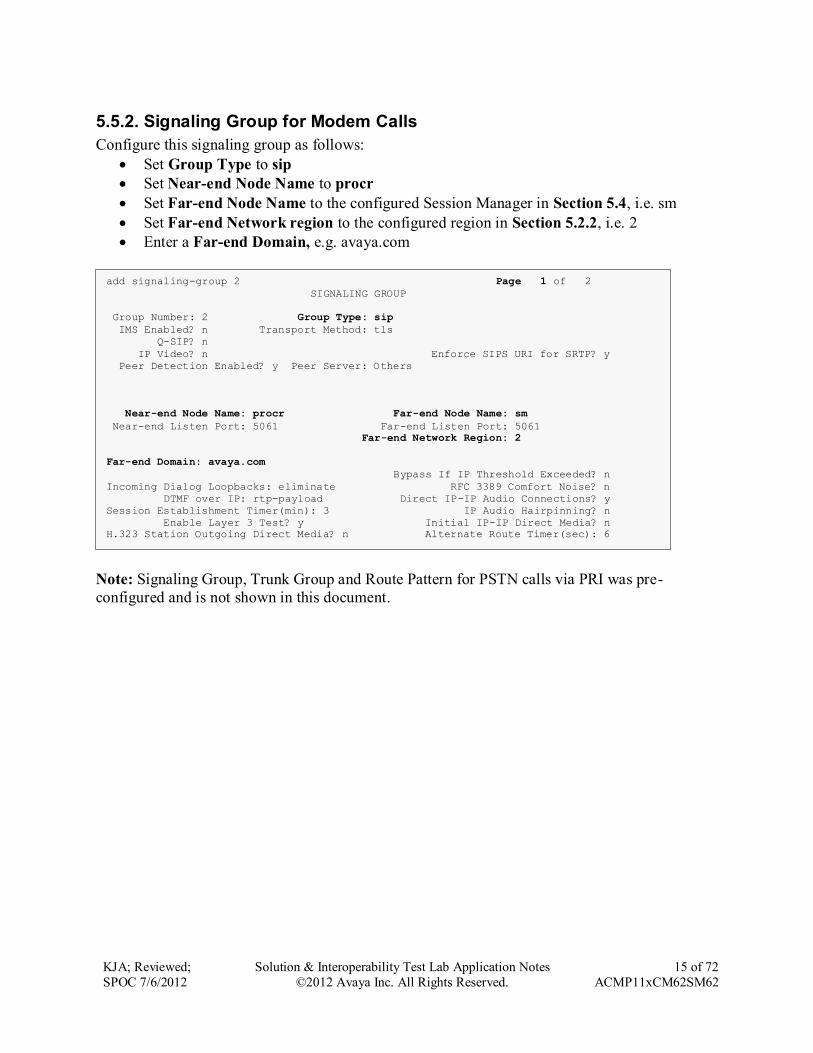
5.5.2. Signaling Group for Modem Calls
Configure this signaling group as follows:
Set Group Type to sip
Set Near-end Node Name to procr
Set Far-end Node Name to the configured Session Manager in Section 5.4, i.e. sm
Set Far-end Network region to the configured region in Section 5.2.2, i.e. 2
Enter a Far-end Domain, e.g. avaya.com
Note: Signaling Group, Trunk Group and Route Pattern for PSTN calls via PRI was pre-
configured and is not shown in this document.
add signaling-group 2 Page 1 of 2
SIGNALING GROUP
Group Number: 2 Group Type: sip
IMS Enabled? n Transport Method: tls
Q-SIP? n
IP Video? n Enforce SIPS URI for SRTP? y
Peer Detection Enabled? y Peer Server: Others
Near-end Node Name: procr Far-end Node Name: sm
Near-end Listen Port: 5061 Far-end Listen Port: 5061
Far-end Network Region: 2
Far-end Domain: avaya.com
Bypass If IP Threshold Exceeded? n
Incoming Dialog Loopbacks: eliminate RFC 3389 Comfort Noise? n
DTMF over IP: rtp-payload Direct IP-IP Audio Connections? y
Session Establishment Timer(min): 3 IP Audio Hairpinning? n
Enable Layer 3 Test? y Initial IP-IP Direct Media? n
H.323 Station Outgoing Direct Media? n Alternate Route Timer(sec): 6
KJA; Reviewed;
SPOC 7/6/2012
Solution & Interoperability Test Lab Application Notes
©2012 Avaya Inc. All Rights Reserved.
16 of 72
ACMP11xCM62SM62
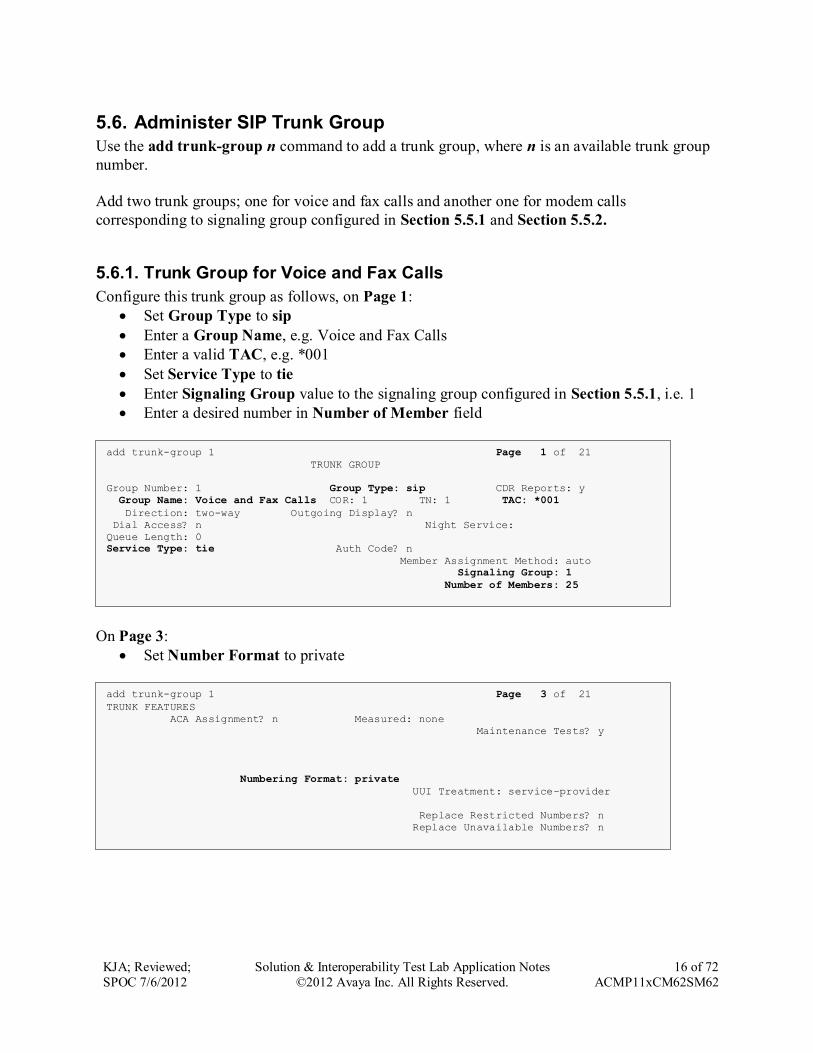
5.6. Administer SIP Trunk Group
Use the add trunk-group n command to add a trunk group, where n is an available trunk group
number.
Add two trunk groups; one for voice and fax calls and another one for modem calls
corresponding to signaling group configured in Section 5.5.1 and Section 5.5.2.
5.6.1. Trunk Group for Voice and Fax Calls
Configure this trunk group as follows, on Page 1:
Set Group Type to sip
Enter a Group Name, e.g. Voice and Fax Calls
Enter a valid TAC, e.g. *001
Set Service Type to tie
Enter Signaling Group value to the signaling group configured in Section 5.5.1, i.e. 1
Enter a desired number in Number of Member field
On Page 3:
Set Number Format to private
add trunk-group 1 Page 3 of 21
TRUNK FEATURES
ACA Assignment? n Measured: none
Maintenance Tests? y
Numbering Format: private
UUI Treatment: service-provider
Replace Restricted Numbers? n
Replace Unavailable Numbers? n
add trunk-group 1 Page 1 of 21
TRUNK GROUP
Group Number: 1 Group Type: sip CDR Reports: y
Group Name: Voice and Fax Calls COR: 1 TN: 1 TAC: *001
Direction: two-way Outgoing Display? n
Dial Access? n Night Service:
Queue Length: 0
Service Type: tie Auth Code? n
Member Assignment Method: auto
Signaling Group: 1
Number of Members: 25

KJA; Reviewed;
SPOC 7/6/2012
Solution & Interoperability Test Lab Application Notes
©2012 Avaya Inc. All Rights Reserved.
17 of 72
ACMP11xCM62SM62
5.6.2. Trunk Group for Modem Calls
Configure this trunk group as follows, on Page 1:
Set Group Type to sip
Enter a Group Name, e.g. Modem Calls
Enter a valid TAC, e.g. *002
Set Service Type to tie
Enter Signaling Group value to the signaling group configured in Section 5.5.2, i.e. 2
Enter a desired number in Number of Member field
On Page 3:
Set Number Format to private
add trunk-group 2 Page 3 of 21
TRUNK FEATURES
ACA Assignment? n Measured: none
Maintenance Tests? y
Numbering Format: private
UUI Treatment: service-provider
Replace Restricted Numbers? n
Replace Unavailable Numbers? n
add trunk-group 2 Page 1 of 21
TRUNK GROUP
Group Number: 2 Group Type: sip CDR Reports: y
Group Name: Modem Calls COR: 1 TN: 1 TAC: *001
Direction: two-way Outgoing Display? n
Dial Access? n Night Service:
Queue Length: 0
Service Type: tie Auth Code? n
Member Assignment Method: auto
Signaling Group: 2
Number of Members: 25
KJA; Reviewed;
SPOC 7/6/2012
Solution & Interoperability Test Lab Application Notes
©2012 Avaya Inc. All Rights Reserved.
18 of 72
ACMP11xCM62SM62
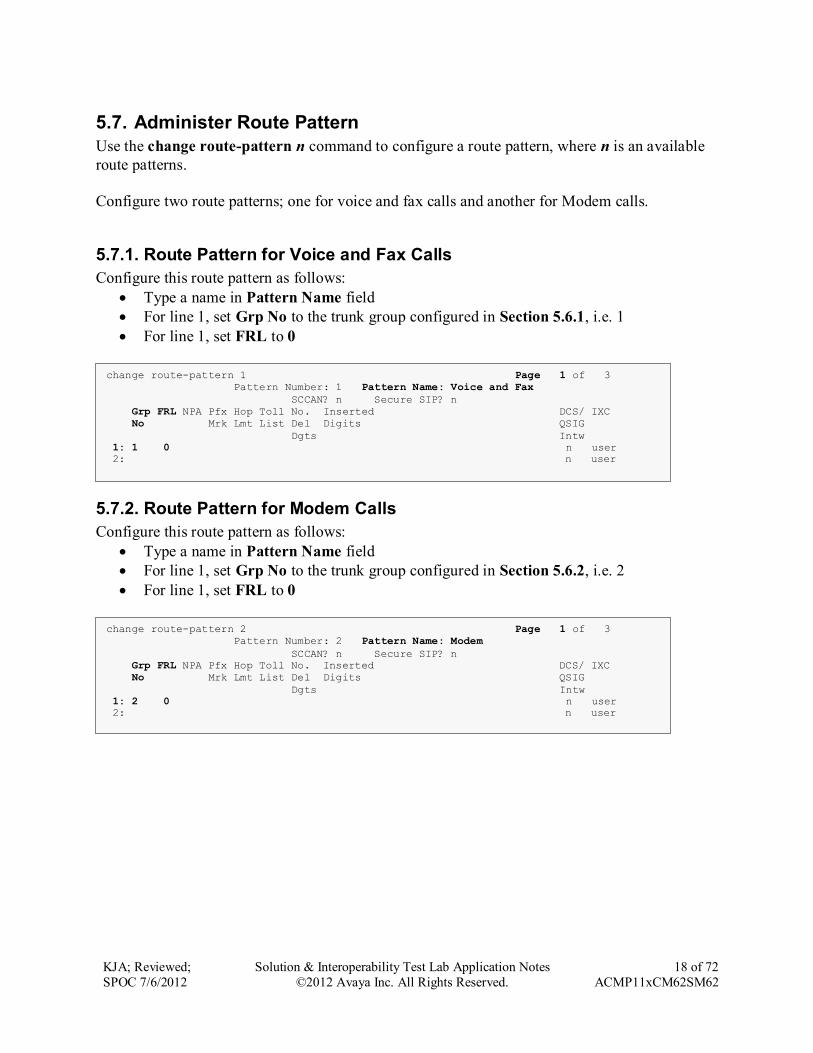
5.7. Administer Route Pattern
Use the change route-pattern n command to configure a route pattern, where n is an available
route patterns.
Configure two route patterns; one for voice and fax calls and another for Modem calls.
5.7.1. Route Pattern for Voice and Fax Calls
Configure this route pattern as follows:
Type a name in Pattern Name field
For line 1, set Grp No to the trunk group configured in Section 5.6.1, i.e. 1
For line 1, set FRL to 0
5.7.2. Route Pattern for Modem Calls
Configure this route pattern as follows:
Type a name in Pattern Name field
For line 1, set Grp No to the trunk group configured in Section 5.6.2, i.e. 2
For line 1, set FRL to 0
change route-pattern 2 Page 1 of 3
Pattern Number: 2 Pattern Name: Modem
SCCAN? n Secure SIP? n
Grp FRL NPA Pfx Hop Toll No. Inserted DCS/ IXC
No Mrk Lmt List Del Digits QSIG
Dgts Intw
1: 2 0 n user
2: n user
change route-pattern 1 Page 1 of 3
Pattern Number: 1 Pattern Name: Voice and Fax
SCCAN? n Secure SIP? n
Grp FRL NPA Pfx Hop Toll No. Inserted DCS/ IXC
No Mrk Lmt List Del Digits QSIG
Dgts Intw
1: 1 0 n user
2: n user
KJA; Reviewed;
SPOC 7/6/2012
Solution & Interoperability Test Lab Application Notes
©2012 Avaya Inc. All Rights Reserved.
19 of 72
ACMP11xCM62SM62
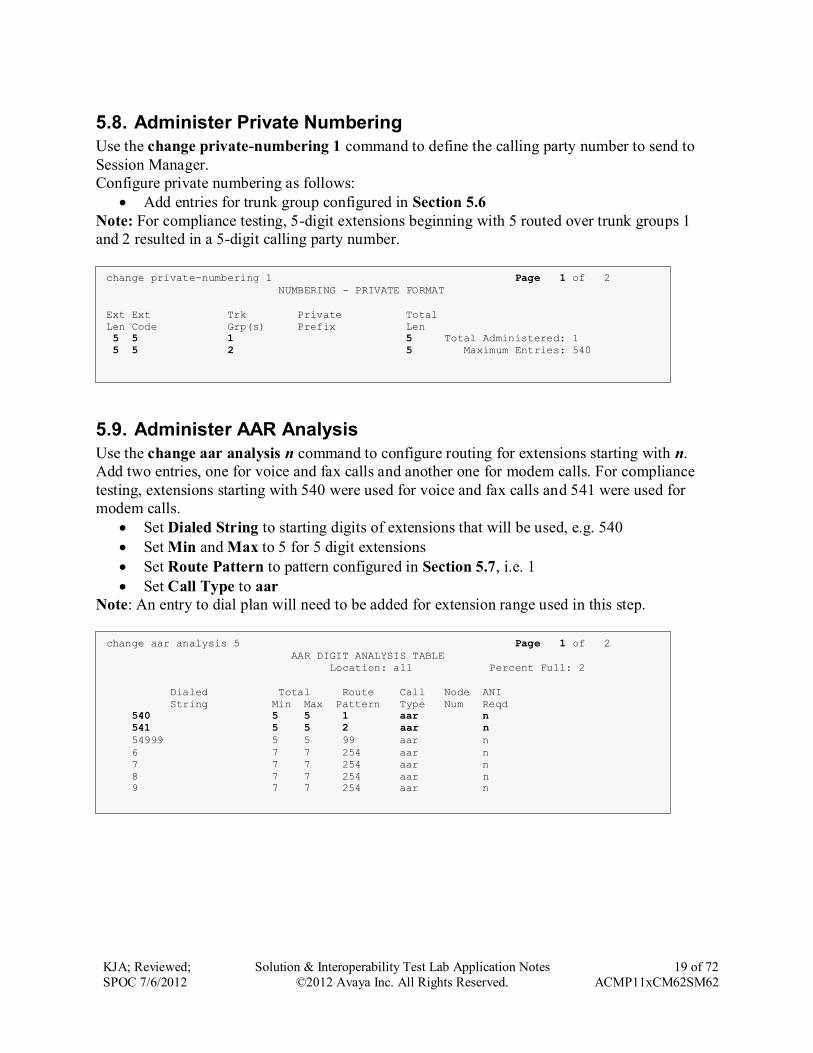
5.8. Administer Private Numbering
Use the change private-numbering 1 command to define the calling party number to send to
Session Manager.
Configure private numbering as follows:
Add entries for trunk group configured in Section 5.6
Note: For compliance testing, 5-digit extensions beginning with 5 routed over trunk groups 1
and 2 resulted in a 5-digit calling party number.
5.9. Administer AAR Analysis
Use the change aar analysis n command to configure routing for extensions starting with n.
Add two entries, one for voice and fax calls and another one for modem calls. For compliance
testing, extensions starting with 540 were used for voice and fax calls and 541 were used for
modem calls.
Set Dialed String to starting digits of extensions that will be used, e.g. 540
Set Min and Max to 5 for 5 digit extensions
Set Route Pattern to pattern configured in Section 5.7, i.e. 1
Set Call Type to aar
Note: An entry to dial plan will need to be added for extension range used in this step.
change aar analysis 5 Page 1 of 2
AAR DIGIT ANALYSIS TABLE
Location: all Percent Full: 2
Dialed Total Route Call Node ANI
String Min Max Pattern Type Num Reqd
540 5 5 1 aar n
541 5 5 2 aar n
54999 5 5 99 aar n
6 7 7 254 aar n
7 7 7 254 aar n
8 7 7 254 aar n
9 7 7 254 aar n
change private-numbering 1 Page 1 of 2
NUMBERING - PRIVATE FORMAT
Ext Ext Trk Private Total
Len Code Grp(s) Prefix Len
5 5 1 5 Total Administered: 1
5 5 2 5 Maximum Entries: 540
KJA; Reviewed;
SPOC 7/6/2012
Solution & Interoperability Test Lab Application Notes
©2012 Avaya Inc. All Rights Reserved.
20 of 72
ACMP11xCM62SM62
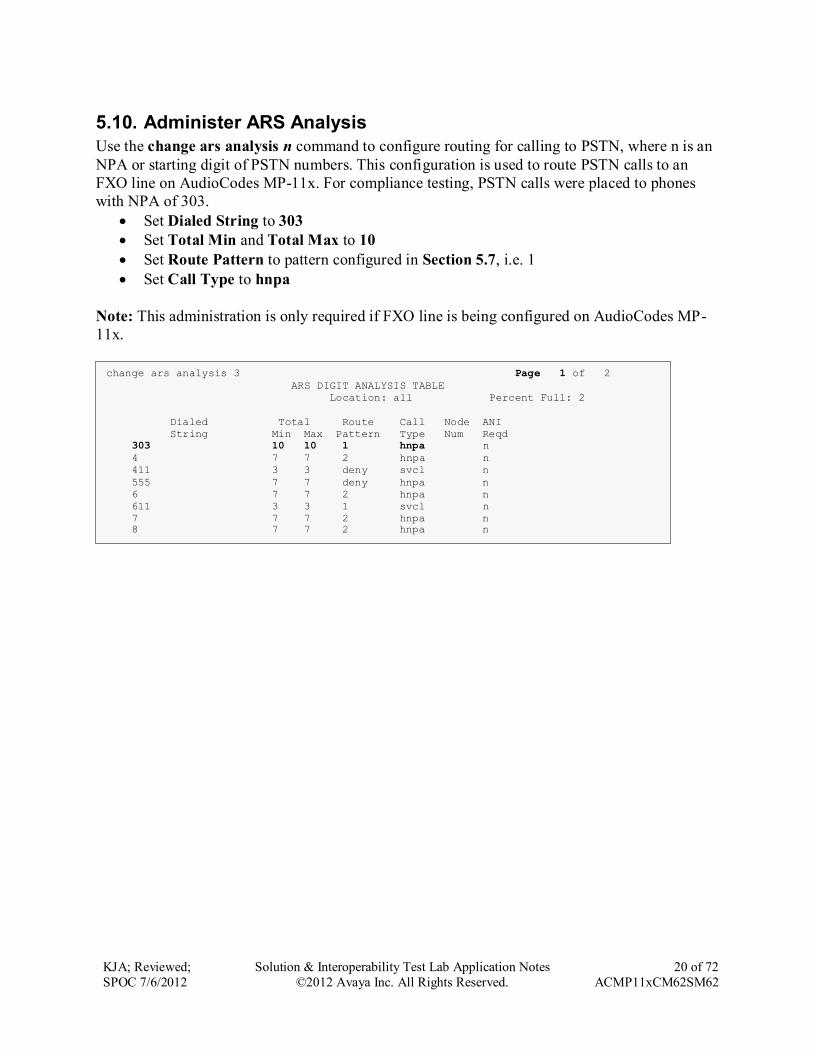
5.10. Administer ARS Analysis
Use the change ars analysis n command to configure routing for calling to PSTN, where n is an
NPA or starting digit of PSTN numbers. This configuration is used to route PSTN calls to an
FXO line on AudioCodes MP-11x. For compliance testing, PSTN calls were placed to phones
with NPA of 303.
Set Dialed String to 303
Set Total Min and Total Max to 10
Set Route Pattern to pattern configured in Section 5.7, i.e. 1
Set Call Type to hnpa
Note: This administration is only required if FXO line is being configured on AudioCodes MP-
11x.
change ars analysis 3 Page 1 of 2
ARS DIGIT ANALYSIS TABLE
Location: all Percent Full: 2
Dialed Total Route Call Node ANI
String Min Max Pattern Type Num Reqd
303 10 10 1 hnpa n
4 7 7 2 hnpa n
411 3 3 deny svcl n
555 7 7 deny hnpa n
6 7 7 2 hnpa n
611 3 3 1 svcl n
7 7 7 2 hnpa n
8 7 7 2 hnpa n
KJA; Reviewed;
SPOC 7/6/2012
Solution & Interoperability Test Lab Application Notes
©2012 Avaya Inc. All Rights Reserved.
21 of 72
ACMP11xCM62SM62
5.11. Administer Stations
Administration of Avaya Stations/Extensions in Communication Manager and Session Manager
is not shown in this document. Please refer to document [1] and/or [2] in reference section of this
document.
Note: Please ensure that SRTP encryption is turned on for SIP stations connected to Session
Manager. SRTP encryption can be turned on by modifying 46xxsettings.txt file; change
MEDIAENCRYTION parameter to 1,9; 1 is encryption of aescm128-hmac80 and 9 is none.
KJA; Reviewed;
SPOC 7/6/2012
Solution & Interoperability Test Lab Application Notes
©2012 Avaya Inc. All Rights Reserved.
22 of 72
ACMP11xCM62SM62
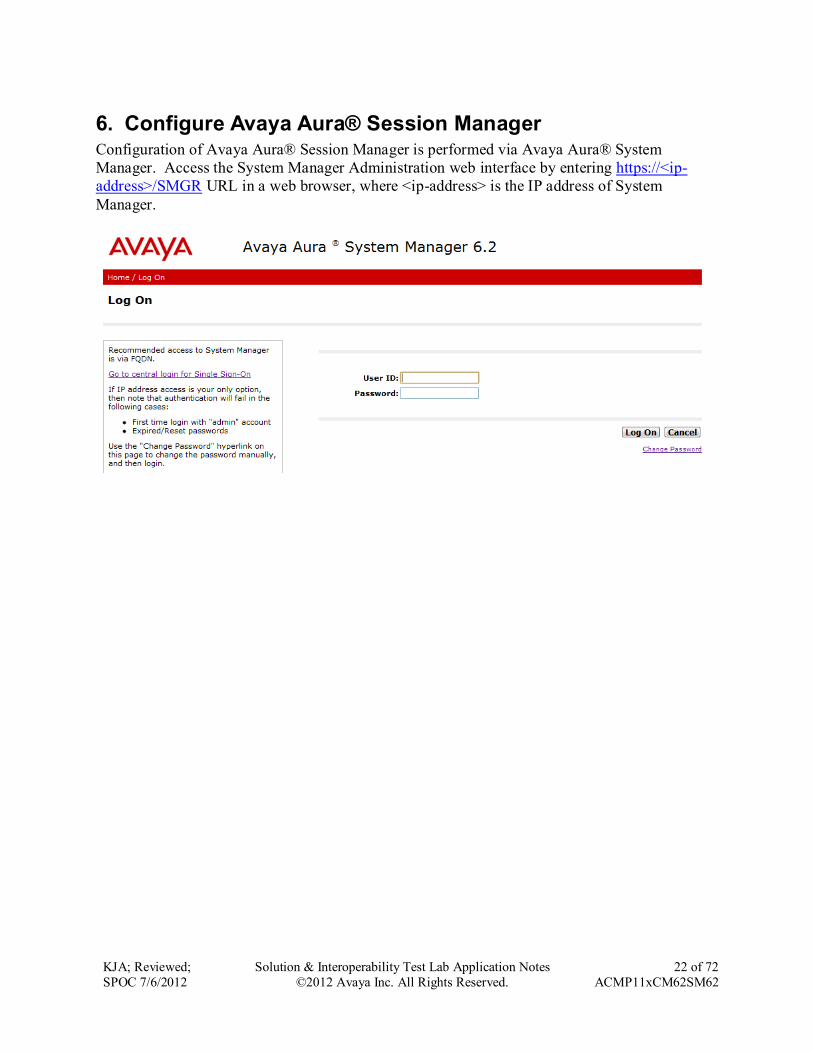
6. Configure Avaya Aura® Session Manager Configuration of Avaya Aura® Session Manager is performed via Avaya Aura® System
Manager. Access the System Manager Administration web interface by entering https://<ip-
address>/SMGR URL in a web browser, where <ip-address> is the IP address of System
Manager.
KJA; Reviewed;
SPOC 7/6/2012
Solution & Interoperability Test Lab Application Notes
©2012 Avaya Inc. All Rights Reserved.
23 of 72
ACMP11xCM62SM62
Log in using appropriate credentials.
KJA; Reviewed;
SPOC 7/6/2012
Solution & Interoperability Test Lab Application Notes
©2012 Avaya Inc. All Rights Reserved.
24 of 72
ACMP11xCM62SM62
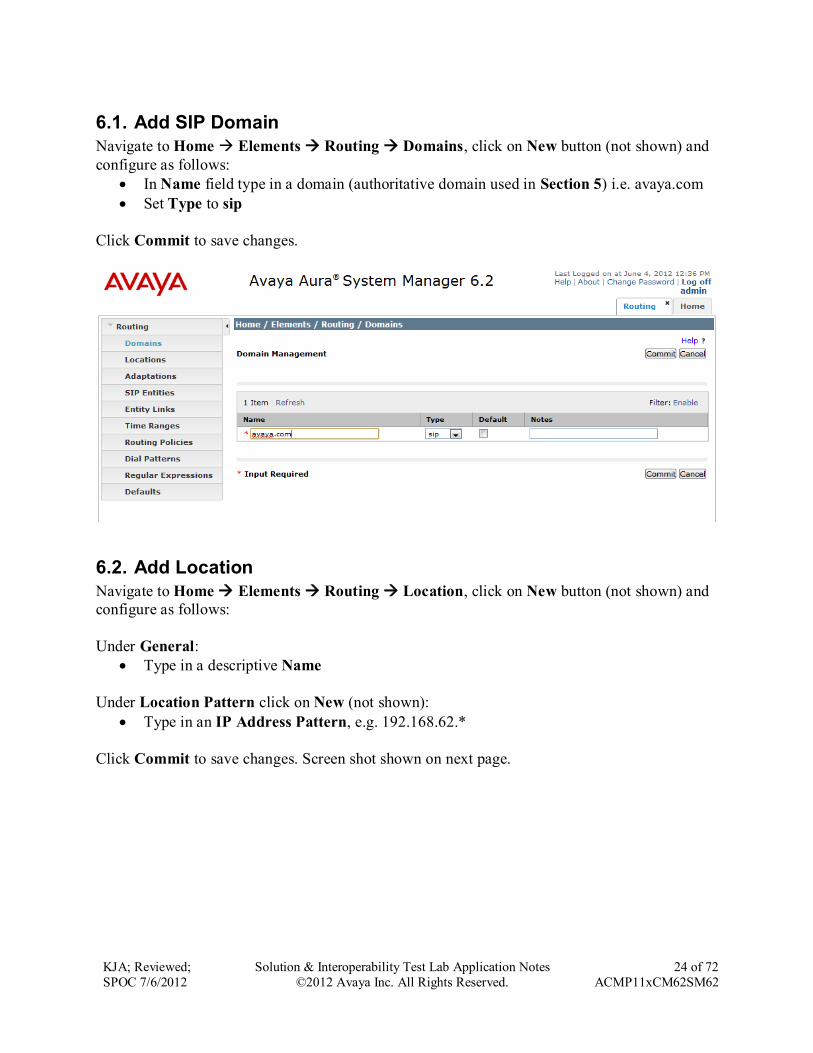
6.1. Add SIP Domain
Navigate to Home Elements Routing Domains, click on New button (not shown) and
configure as follows:
In Name field type in a domain (authoritative domain used in Section 5) i.e. avaya.com
Set Type to sip
Click Commit to save changes.
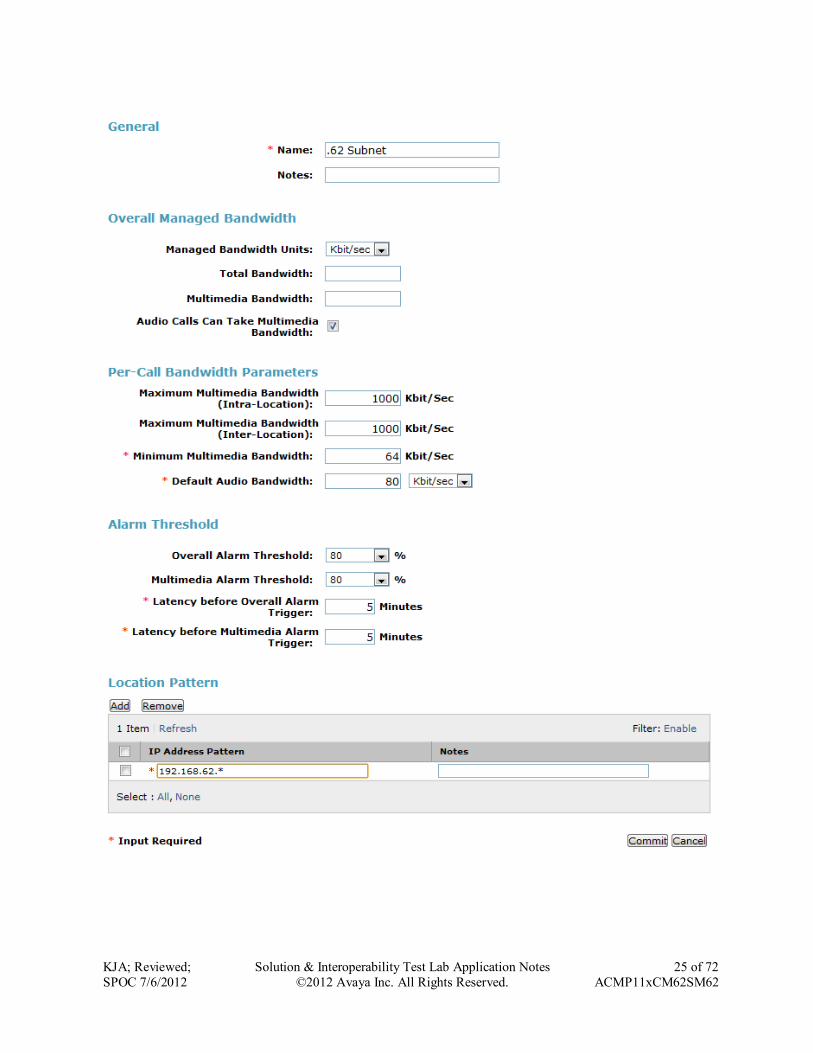
6.2. Add Location
Navigate to Home Elements Routing Location, click on New button (not shown) and
configure as follows:
Under General:
Type in a descriptive Name
Under Location Pattern click on New (not shown):
Type in an IP Address Pattern, e.g. 192.168.62.*
Click Commit to save changes. Screen shot shown on next page.
KJA; Reviewed;
SPOC 7/6/2012
Solution & Interoperability Test Lab Application Notes
©2012 Avaya Inc. All Rights Reserved.
25 of 72
ACMP11xCM62SM62
KJA; Reviewed;
SPOC 7/6/2012
Solution & Interoperability Test Lab Application Notes
©2012 Avaya Inc. All Rights Reserved.
26 of 72
ACMP11xCM62SM62
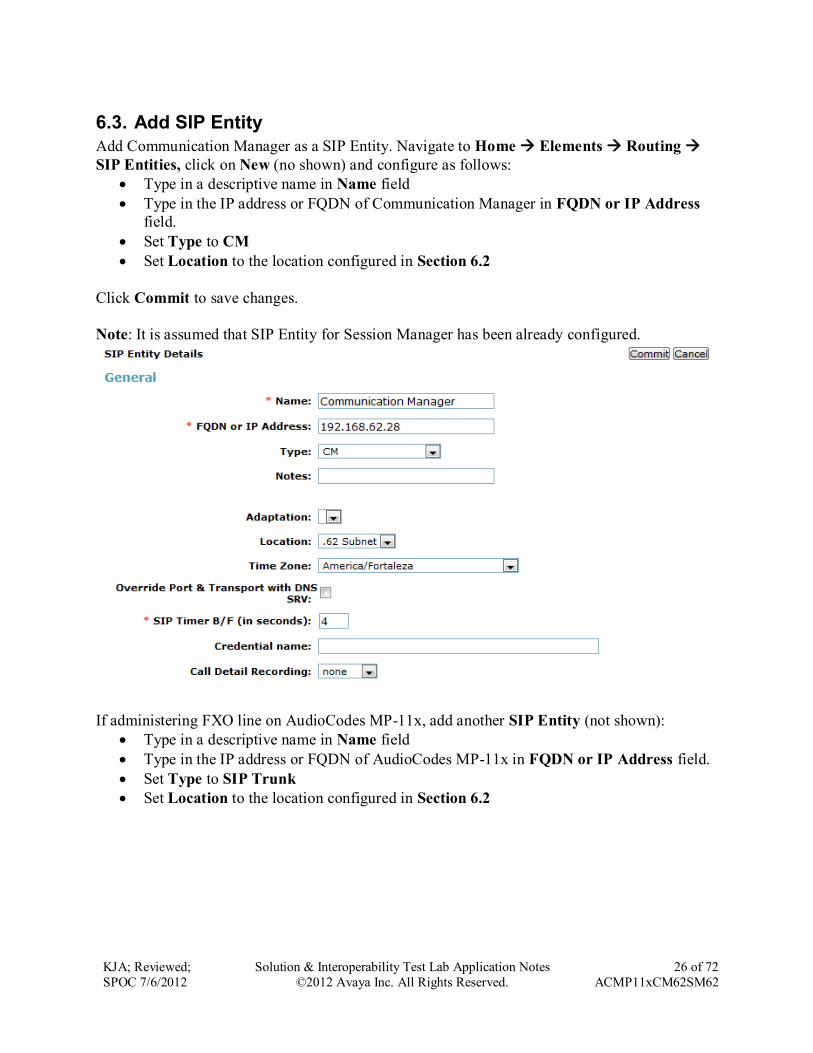
6.3. Add SIP Entity
Add Communication Manager as a SIP Entity. Navigate to Home Elements Routing
SIP Entities, click on New (no shown) and configure as follows:
Type in a descriptive name in Name field
Type in the IP address or FQDN of Communication Manager in FQDN or IP Address
field.
Set Type to CM
Set Location to the location configured in Section 6.2
Click Commit to save changes.
Note: It is assumed that SIP Entity for Session Manager has been already configured.
If administering FXO line on AudioCodes MP-11x, add another SIP Entity (not shown):
Type in a descriptive name in Name field
Type in the IP address or FQDN of AudioCodes MP-11x in FQDN or IP Address field.
Set Type to SIP Trunk
Set Location to the location configured in Section 6.2
KJA; Reviewed;
SPOC 7/6/2012
Solution & Interoperability Test Lab Application Notes
©2012 Avaya Inc. All Rights Reserved.
27 of 72
ACMP11xCM62SM62
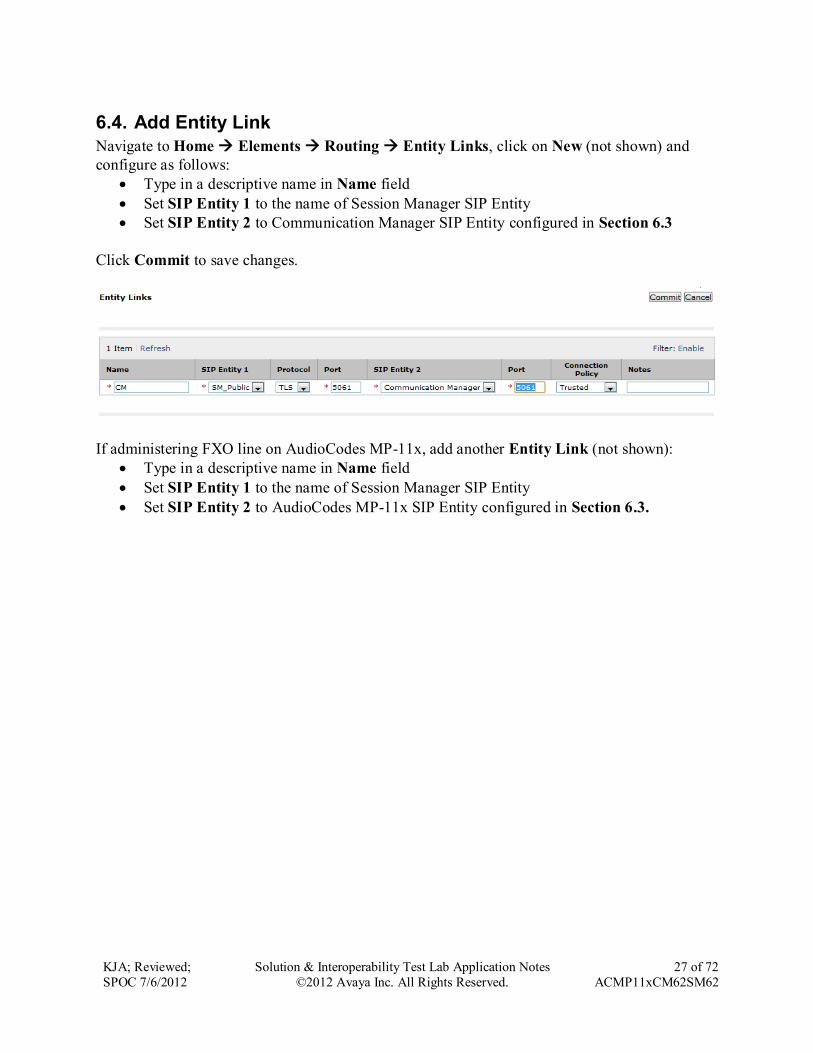
6.4. Add Entity Link
Navigate to Home Elements Routing Entity Links, click on New (not shown) and
configure as follows:
Type in a descriptive name in Name field
Set SIP Entity 1 to the name of Session Manager SIP Entity
Set SIP Entity 2 to Communication Manager SIP Entity configured in Section 6.3
Click Commit to save changes.
If administering FXO line on AudioCodes MP-11x, add another Entity Link (not shown):
Type in a descriptive name in Name field
Set SIP Entity 1 to the name of Session Manager SIP Entity
Set SIP Entity 2 to AudioCodes MP-11x SIP Entity configured in Section 6.3.
KJA; Reviewed;
SPOC 7/6/2012
Solution & Interoperability Test Lab Application Notes
©2012 Avaya Inc. All Rights Reserved.
28 of 72
ACMP11xCM62SM62
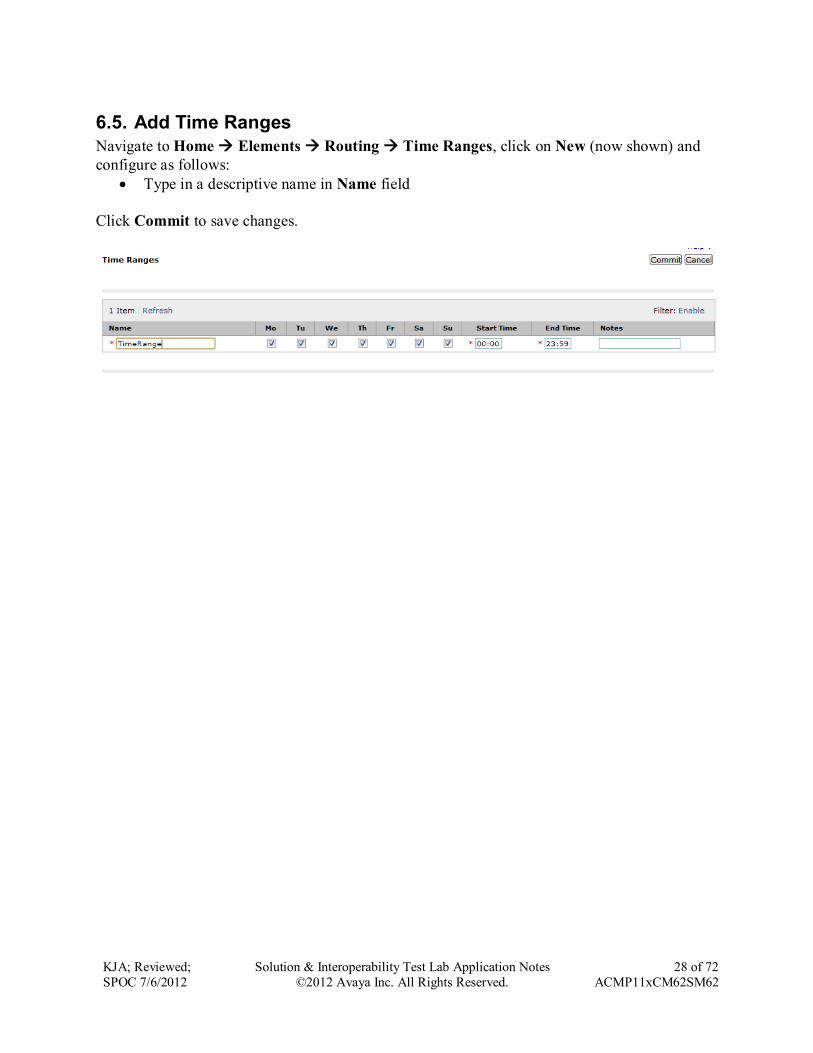
6.5. Add Time Ranges
Navigate to Home Elements Routing Time Ranges, click on New (now shown) and
configure as follows:
Type in a descriptive name in Name field
Click Commit to save changes.
KJA; Reviewed;
SPOC 7/6/2012
Solution & Interoperability Test Lab Application Notes
©2012 Avaya Inc. All Rights Reserved.
29 of 72
ACMP11xCM62SM62
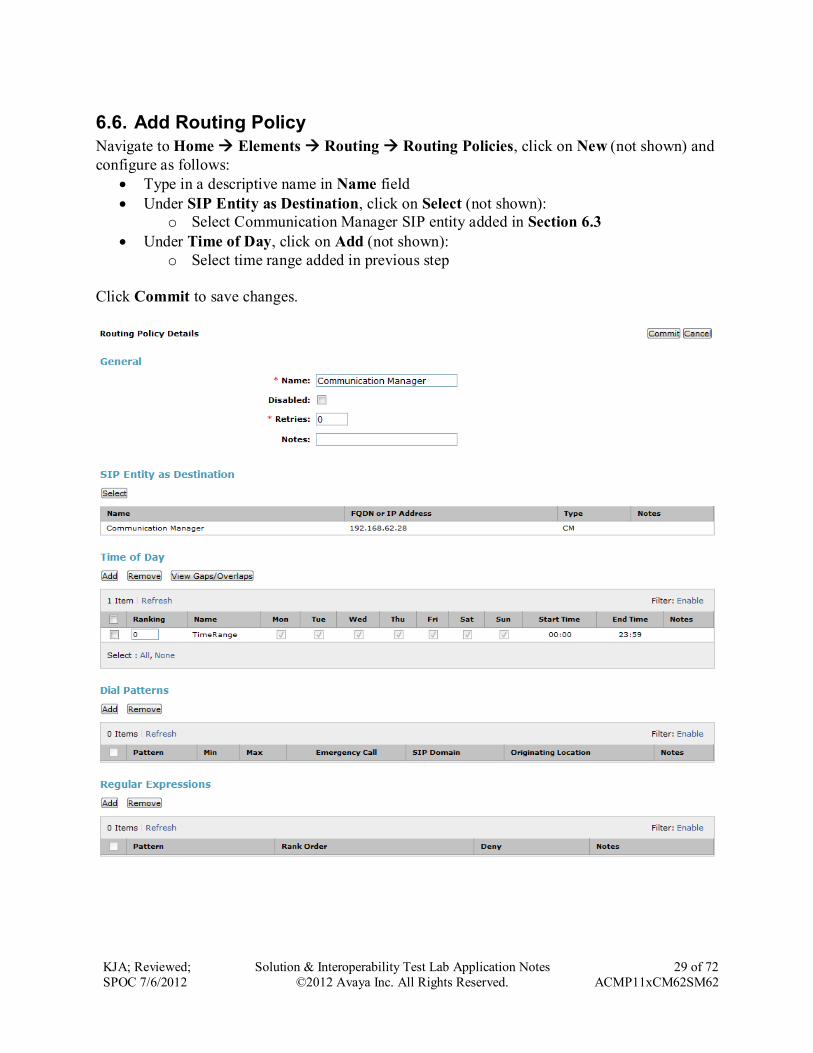
6.6. Add Routing Policy
Navigate to Home Elements Routing Routing Policies, click on New (not shown) and
configure as follows:
Type in a descriptive name in Name field
Under SIP Entity as Destination, click on Select (not shown):
o Select Communication Manager SIP entity added in Section 6.3
Under Time of Day, click on Add (not shown):
o Select time range added in previous step
Click Commit to save changes.

KJA; Reviewed;
SPOC 7/6/2012
Solution & Interoperability Test Lab Application Notes
©2012 Avaya Inc. All Rights Reserved.
30 of 72
ACMP11xCM62SM62
If administering FXO line on AudioCodes MP-11x, add another Routing Policy (not shown):
Type in a descriptive name in Name field
Under SIP Entity as Destination, click on Select (not shown):
o Select AudioCodes MP-11x SIP entity added in Section 6.3
Under Time of Day, click on Add (not shown):
o Select time range added in previous step
KJA; Reviewed;
SPOC 7/6/2012
Solution & Interoperability Test Lab Application Notes
©2012 Avaya Inc. All Rights Reserved.
31 of 72
ACMP11xCM62SM62
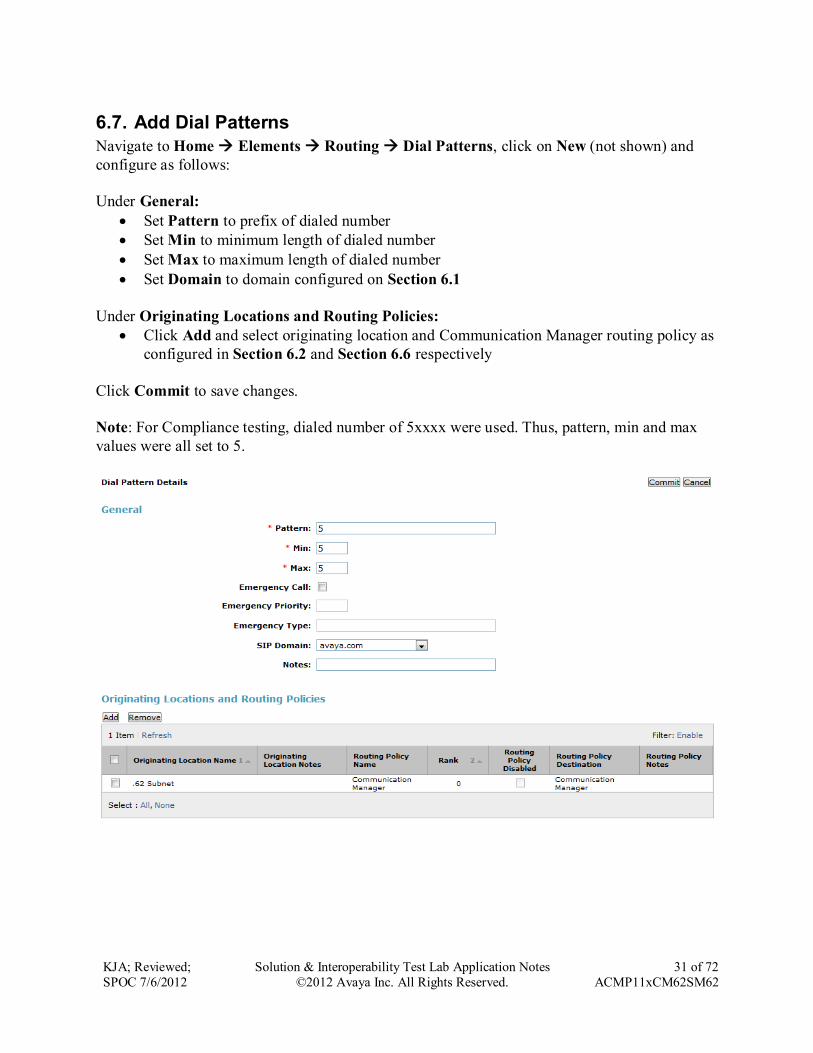
6.7. Add Dial Patterns
Navigate to Home Elements Routing Dial Patterns, click on New (not shown) and
configure as follows:
Under General:
Set Pattern to prefix of dialed number
Set Min to minimum length of dialed number
Set Max to maximum length of dialed number
Set Domain to domain configured on Section 6.1
Under Originating Locations and Routing Policies:
Click Add and select originating location and Communication Manager routing policy as
configured in Section 6.2 and Section 6.6 respectively
Click Commit to save changes.
Note: For Compliance testing, dialed number of 5xxxx were used. Thus, pattern, min and max
values were all set to 5.
KJA; Reviewed;
SPOC 7/6/2012
Solution & Interoperability Test Lab Application Notes
©2012 Avaya Inc. All Rights Reserved.
32 of 72
ACMP11xCM62SM62
If administering FXO line on AudioCodes MP-11x, add another Dial Pattern (not shown):
Under General:
Set Pattern to prefix of dialed number
Set Min to minimum length of dialed number
Set Max to maximum length of dialed number
Set Domain to domain configured on Section 6.1
Under Originating Locations and Routing Policies:
Click Add and select originating location and AudioCodes MP-11x routing policy as
configured in Section 6.2 and Section 6.6 respectively

KJA; Reviewed;
SPOC 7/6/2012
Solution & Interoperability Test Lab Application Notes
©2012 Avaya Inc. All Rights Reserved.
33 of 72
ACMP11xCM62SM62
6.8. Add User
For each analog line on AudioCodes MP-11x, a user needs to be added on Session Manager.
Information in this section will be used by AudioCodes MP-11x for registering to Session
Manager.
Navigate to Home Users User Management Manage User, click on New (not shown)
and configure as follows:
Under Identity tab:
Type in Last Name and First Name
In Login Name field type in <extension>@<domain>. <Extension> is an extension
which will be configured on AudioCodes MP-11x to receive and make calls. <domain>
is as configured in Section 6.1
Type in a desired Password and Confirm Password
KJA; Reviewed;
SPOC 7/6/2012
Solution & Interoperability Test Lab Application Notes
©2012 Avaya Inc. All Rights Reserved.
34 of 72
ACMP11xCM62SM62
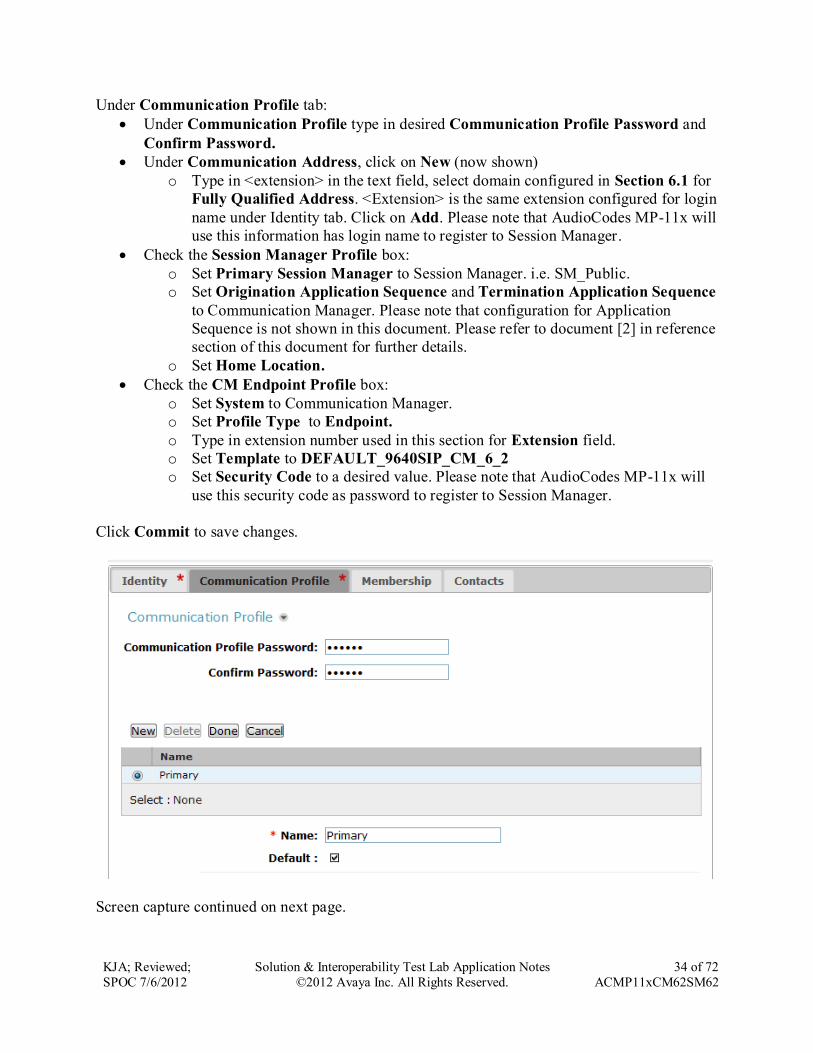
Under Communication Profile tab:
Under Communication Profile type in desired Communication Profile Password and
Confirm Password.
Under Communication Address, click on New (now shown)
o Type in <extension> in the text field, select domain configured in Section 6.1 for
Fully Qualified Address. <Extension> is the same extension configured for login
name under Identity tab. Click on Add. Please note that AudioCodes MP-11x will
use this information has login name to register to Session Manager.
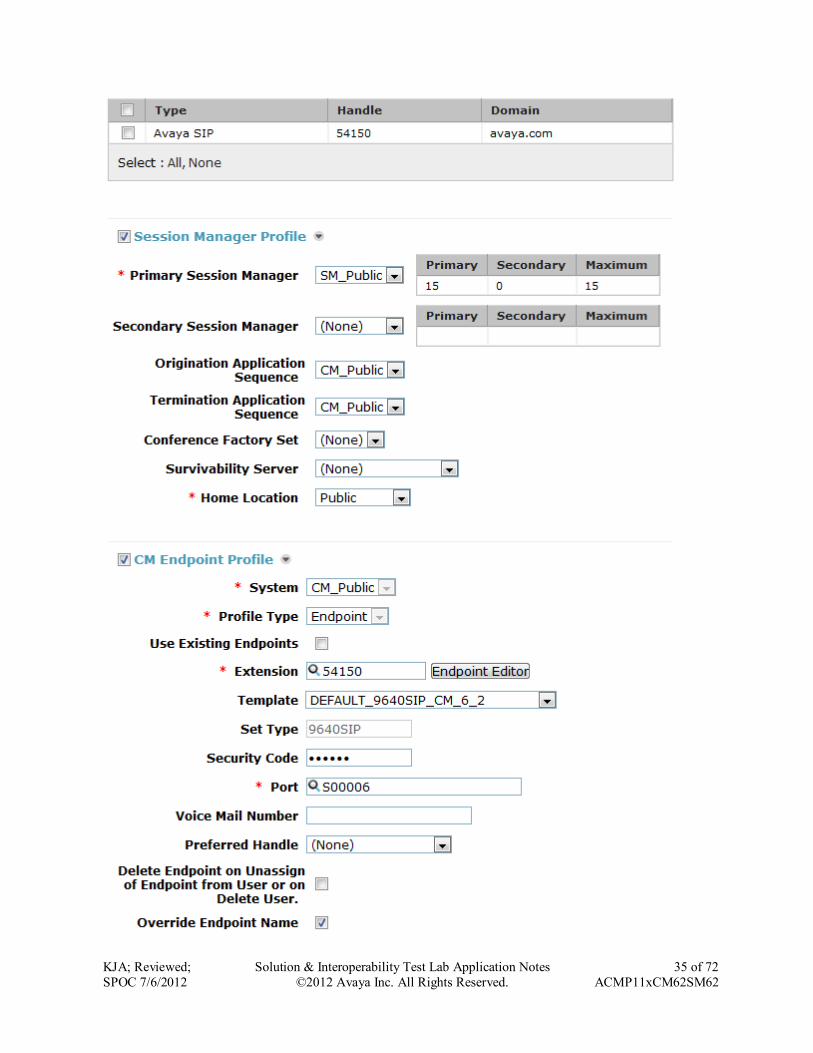
Check the Session Manager Profile box:
o Set Primary Session Manager to Session Manager. i.e. SM_Public.
o Set Origination Application Sequence and Termination Application Sequence
to Communication Manager. Please note that configuration for Application
Sequence is not shown in this document. Please refer to document [2] in reference
section of this document for further details.
o Set Home Location.
Check the CM Endpoint Profile box:
o Set System to Communication Manager.
o Set Profile Type to Endpoint.
o Type in extension number used in this section for Extension field.
o Set Template to DEFAULT_9640SIP_CM_6_2
o Set Security Code to a desired value. Please note that AudioCodes MP-11x will
use this security code as password to register to Session Manager.
Click Commit to save changes.
Screen capture continued on next page.
KJA; Reviewed;
SPOC 7/6/2012
Solution & Interoperability Test Lab Application Notes
©2012 Avaya Inc. All Rights Reserved.
35 of 72
ACMP11xCM62SM62
KJA; Reviewed;
SPOC 7/6/2012
Solution & Interoperability Test Lab Application Notes
©2012 Avaya Inc. All Rights Reserved.
36 of 72
ACMP11xCM62SM62
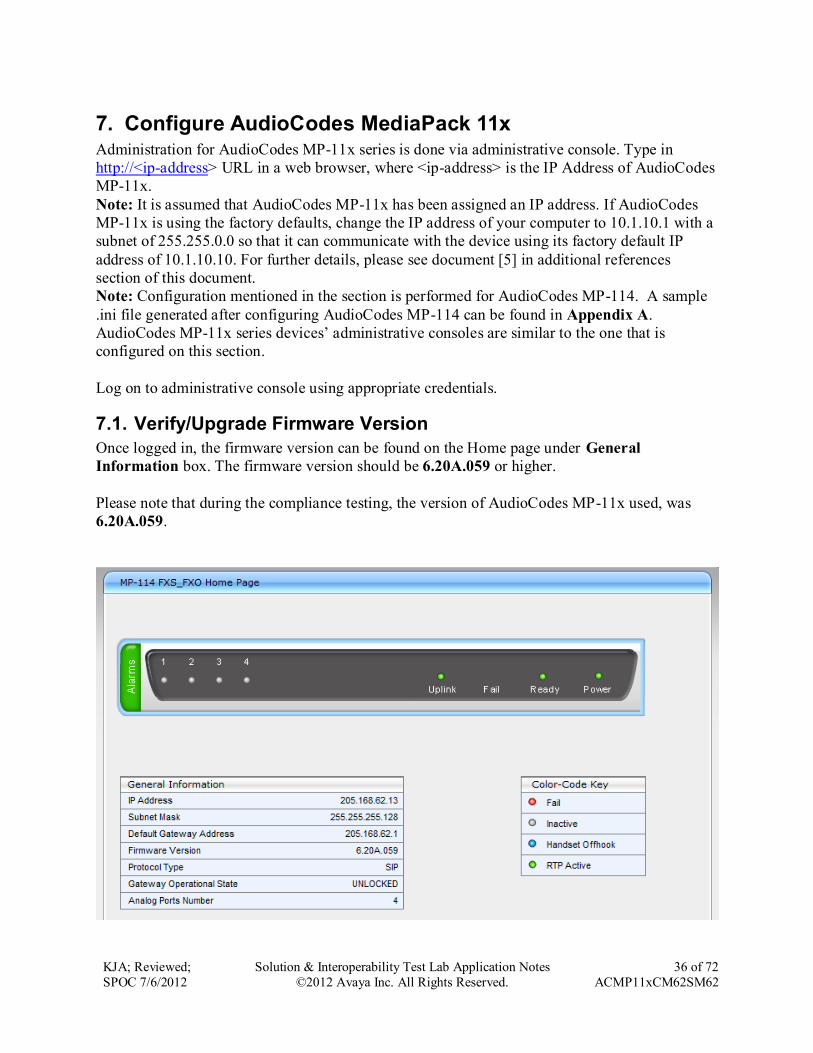
7. Configure AudioCodes MediaPack 11x Administration for AudioCodes MP-11x series is done via administrative console. Type in
http://<ip-address> URL in a web browser, where <ip-address> is the IP Address of AudioCodes
MP-11x.
Note: It is assumed that AudioCodes MP-11x has been assigned an IP address. If AudioCodes
MP-11x is using the factory defaults, change the IP address of your computer to 10.1.10.1 with a
subnet of 255.255.0.0 so that it can communicate with the device using its factory default IP
address of 10.1.10.10. For further details, please see document [5] in additional references
section of this document.
Note: Configuration mentioned in the section is performed for AudioCodes MP-114. A sample
.ini file generated after configuring AudioCodes MP-114 can be found in Appendix A.
AudioCodes MP-11x series devices’ administrative consoles are similar to the one that is
configured on this section.
Log on to administrative console using appropriate credentials.
7.1. Verify/Upgrade Firmware Version
Once logged in, the firmware version can be found on the Home page under General
Information box. The firmware version should be 6.20A.059 or higher.
Please note that during the compliance testing, the version of AudioCodes MP-11x used, was
6.20A.059.
KJA; Reviewed;
SPOC 7/6/2012
Solution & Interoperability Test Lab Application Notes
©2012 Avaya Inc. All Rights Reserved.
37 of 72
ACMP11xCM62SM62
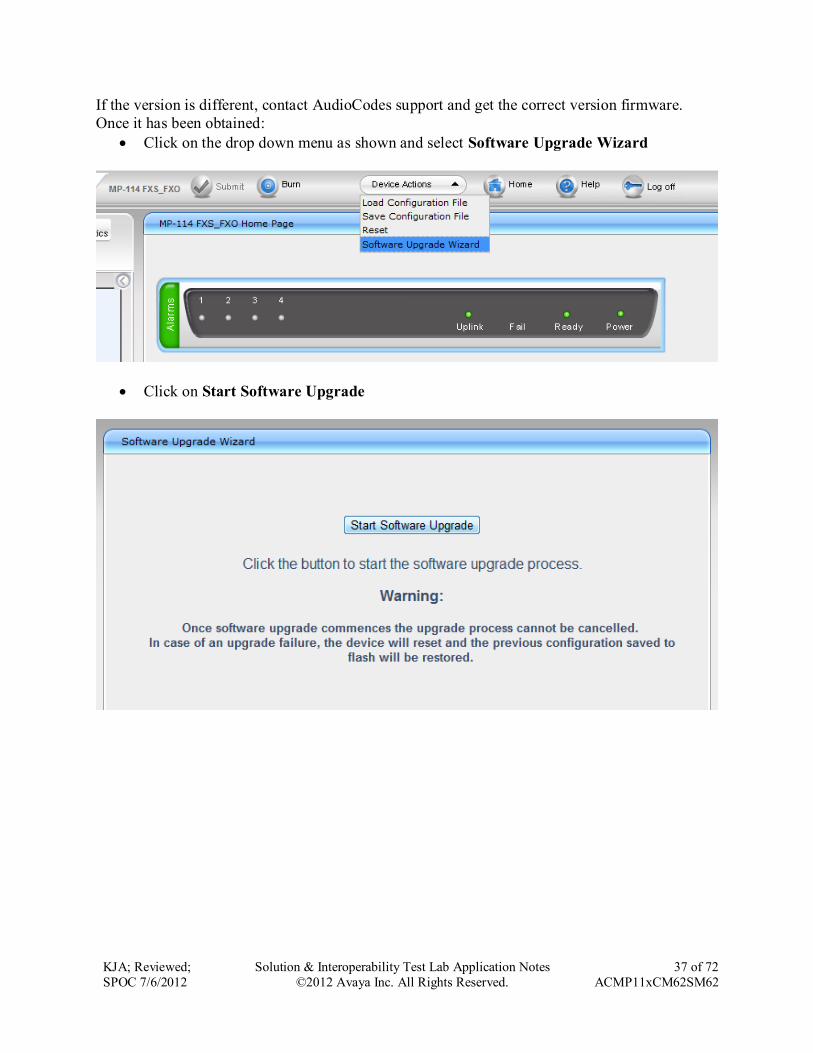
If the version is different, contact AudioCodes support and get the correct version firmware.
Once it has been obtained:
Click on the drop down menu as shown and select Software Upgrade Wizard
Click on Start Software Upgrade
KJA; Reviewed;
SPOC 7/6/2012
Solution & Interoperability Test Lab Application Notes
©2012 Avaya Inc. All Rights Reserved.
38 of 72
ACMP11xCM62SM62
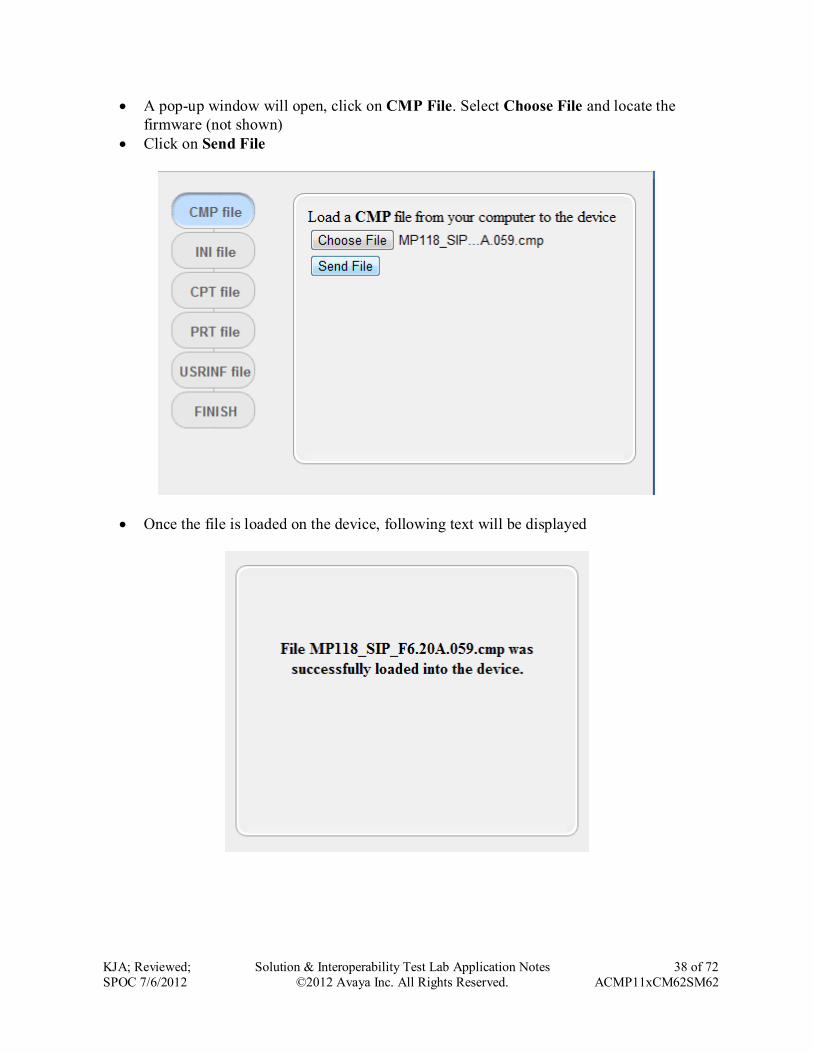
A pop-up window will open, click on CMP File. Select Choose File and locate the
firmware (not shown)
Click on Send File
Once the file is loaded on the device, following text will be displayed
KJA; Reviewed;
SPOC 7/6/2012
Solution & Interoperability Test Lab Application Notes
©2012 Avaya Inc. All Rights Reserved.
39 of 72
ACMP11xCM62SM62
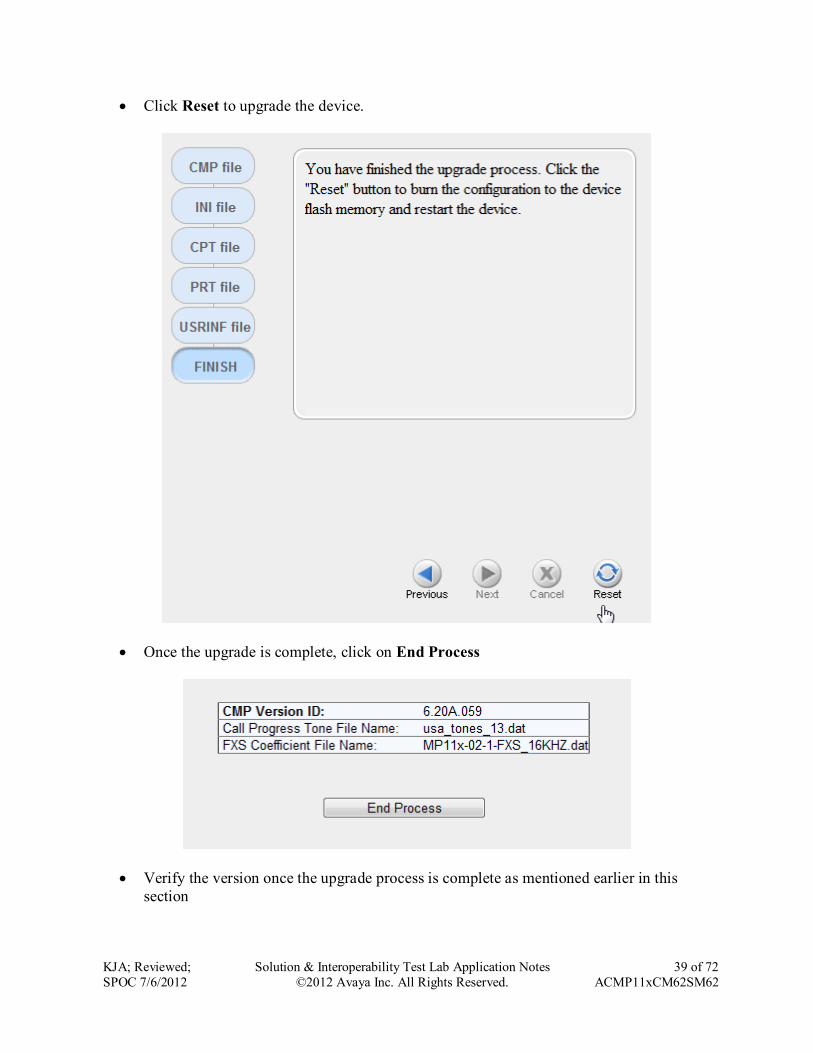
Click Reset to upgrade the device.
Once the upgrade is complete, click on End Process
Verify the version once the upgrade process is complete as mentioned earlier in this
section
KJA; Reviewed;
SPOC 7/6/2012
Solution & Interoperability Test Lab Application Notes
©2012 Avaya Inc. All Rights Reserved.
40 of 72
ACMP11xCM62SM62
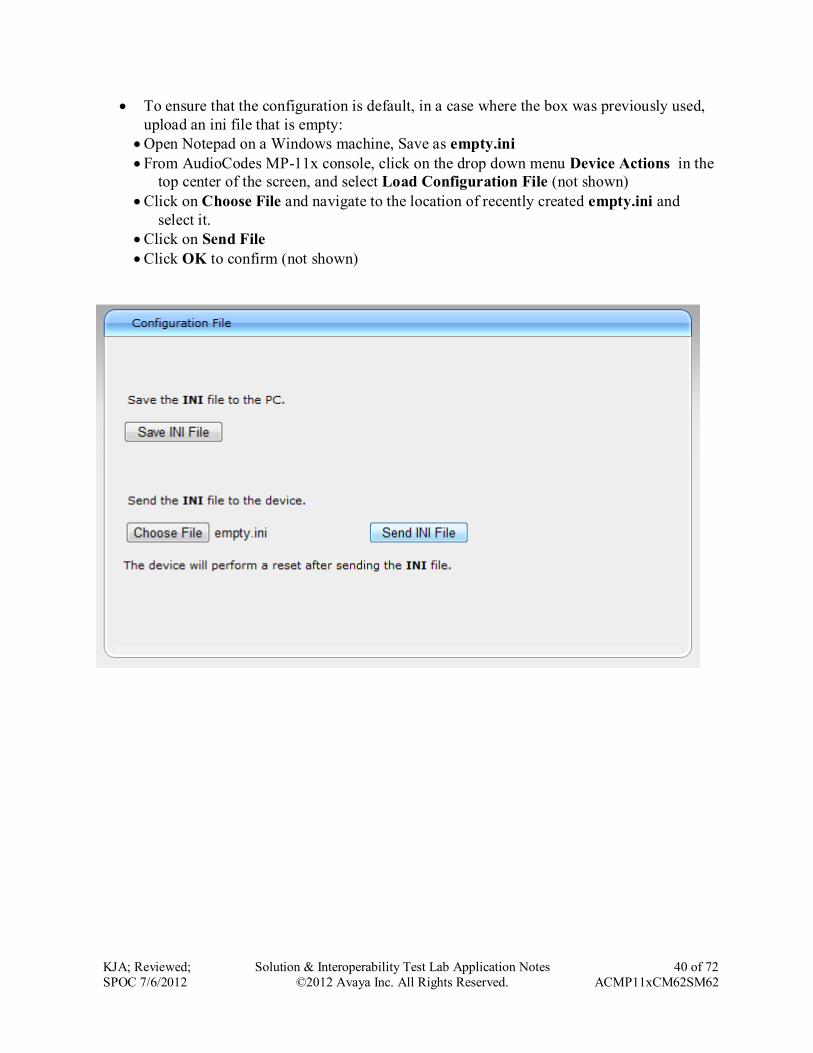
To ensure that the configuration is default, in a case where the box was previously used,
upload an ini file that is empty:
Open Notepad on a Windows machine, Save as empty.ini
From AudioCodes MP-11x console, click on the drop down menu Device Actions in the
top center of the screen, and select Load Configuration File (not shown)
Click on Choose File and navigate to the location of recently created empty.ini and
select it.
Click on Send File
Click OK to confirm (not shown)
KJA; Reviewed;
SPOC 7/6/2012
Solution & Interoperability Test Lab Application Notes
©2012 Avaya Inc. All Rights Reserved.
41 of 72
ACMP11xCM62SM62
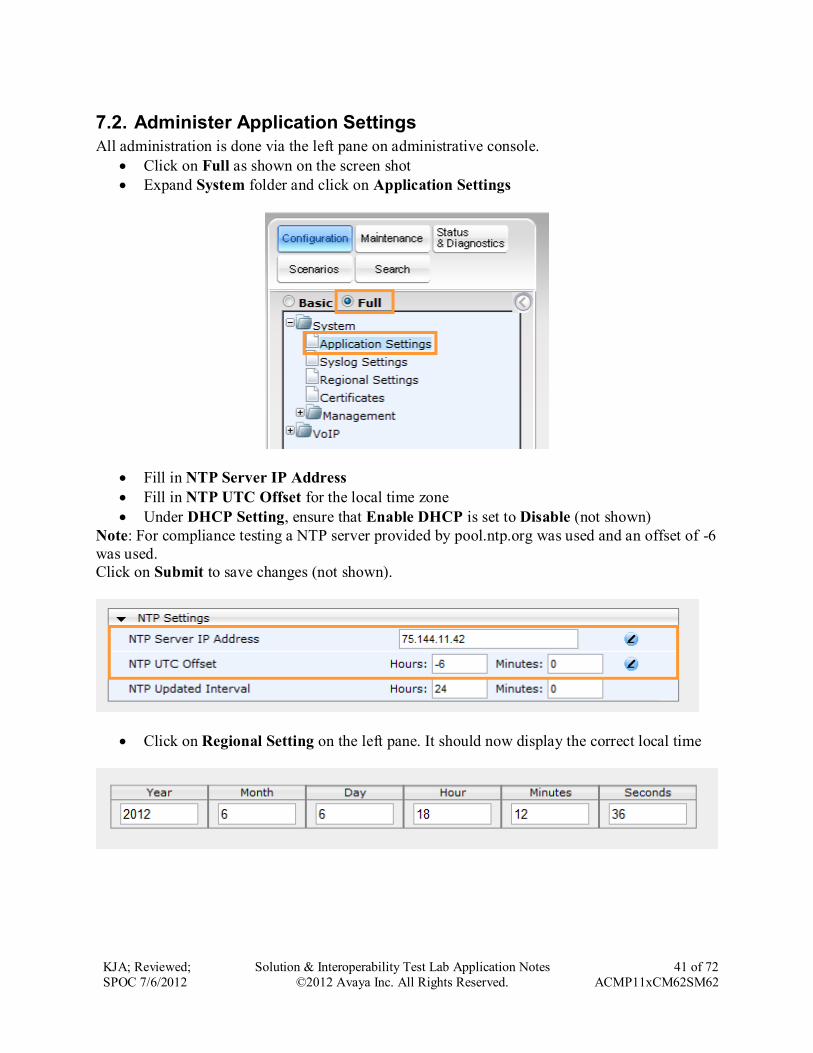
7.2. Administer Application Settings
All administration is done via the left pane on administrative console.
Click on Full as shown on the screen shot
Expand System folder and click on Application Settings
Fill in NTP Server IP Address
Fill in NTP UTC Offset for the local time zone
Under DHCP Setting, ensure that Enable DHCP is set to Disable (not shown)
Note: For compliance testing a NTP server provided by pool.ntp.org was used and an offset of -6
was used.
Click on Submit to save changes (not shown).
Click on Regional Setting on the left pane. It should now display the correct local time

KJA; Reviewed;
SPOC 7/6/2012
Solution & Interoperability Test Lab Application Notes
©2012 Avaya Inc. All Rights Reserved.
42 of 72
ACMP11xCM62SM62
7.3. Administer Syslog Settings
Navigate to System Syslog Settings
Set Enable Syslog to Enable
For Syslog Server IP Address, type in the IP address of a workstation that is running a
syslog application, e.g. ACSyslog
Set Debug Level to 5
Under Activity Types to Report via ‘Activity Log’ Messages, check all boxes
Please note that, Syslog does not need to be enabled to successfully interoperate Session
Manager with AudioCodes MP-11x. However, AudioCodes recommends to it to be turned on for
troubleshooting purposes. Turning Syslog on does not impact performance of AudioCodes MP-
11x.
Click Submit to save changes (not shown).
Reset the device to save changes to flash memory of AudioCodes MP-11x.
KJA; Reviewed;
SPOC 7/6/2012
Solution & Interoperability Test Lab Application Notes
©2012 Avaya Inc. All Rights Reserved.
43 of 72
ACMP11xCM62SM62
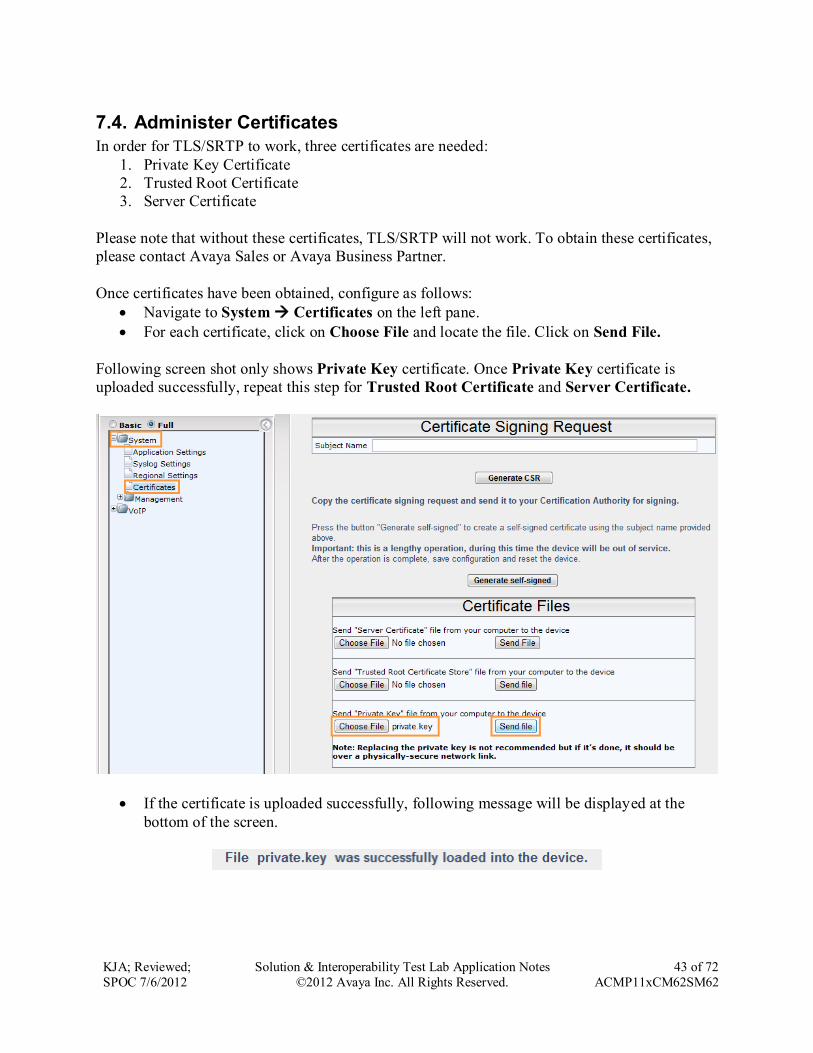
7.4. Administer Certificates
In order for TLS/SRTP to work, three certificates are needed:
1. Private Key Certificate
2. Trusted Root Certificate
3. Server Certificate
Please note that without these certificates, TLS/SRTP will not work. To obtain these certificates,
please contact Avaya Sales or Avaya Business Partner.
Once certificates have been obtained, configure as follows:
Navigate to System Certificates on the left pane.
For each certificate, click on Choose File and locate the file. Click on Send File.
Following screen shot only shows Private Key certificate. Once Private Key certificate is
uploaded successfully, repeat this step for Trusted Root Certificate and Server Certificate.
If the certificate is uploaded successfully, following message will be displayed at the
bottom of the screen.
KJA; Reviewed;
SPOC 7/6/2012
Solution & Interoperability Test Lab Application Notes
©2012 Avaya Inc. All Rights Reserved.
44 of 72
ACMP11xCM62SM62
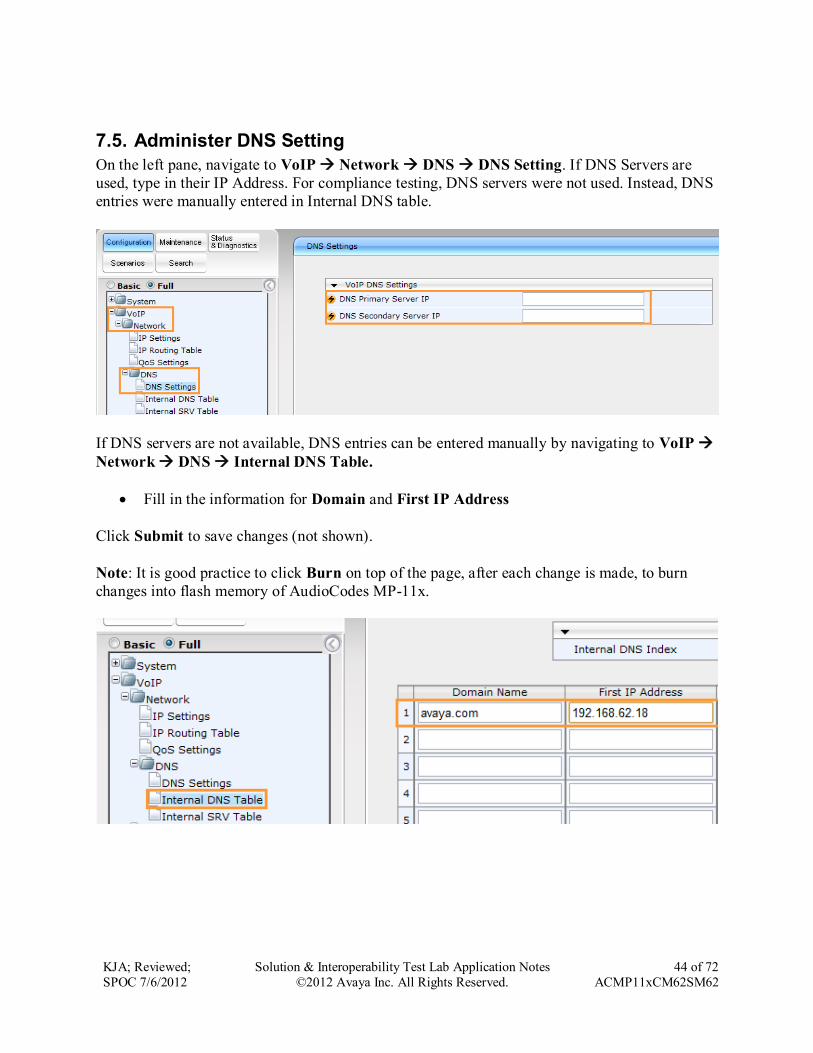
7.5. Administer DNS Setting
On the left pane, navigate to VoIP Network DNS DNS Setting. If DNS Servers are
used, type in their IP Address. For compliance testing, DNS servers were not used. Instead, DNS
entries were manually entered in Internal DNS table.
If DNS servers are not available, DNS entries can be entered manually by navigating to VoIP
Network DNS Internal DNS Table.
Fill in the information for Domain and First IP Address
Click Submit to save changes (not shown).
Note: It is good practice to click Burn on top of the page, after each change is made, to burn
changes into flash memory of AudioCodes MP-11x.
KJA; Reviewed;
SPOC 7/6/2012
Solution & Interoperability Test Lab Application Notes
©2012 Avaya Inc. All Rights Reserved.
45 of 72
ACMP11xCM62SM62
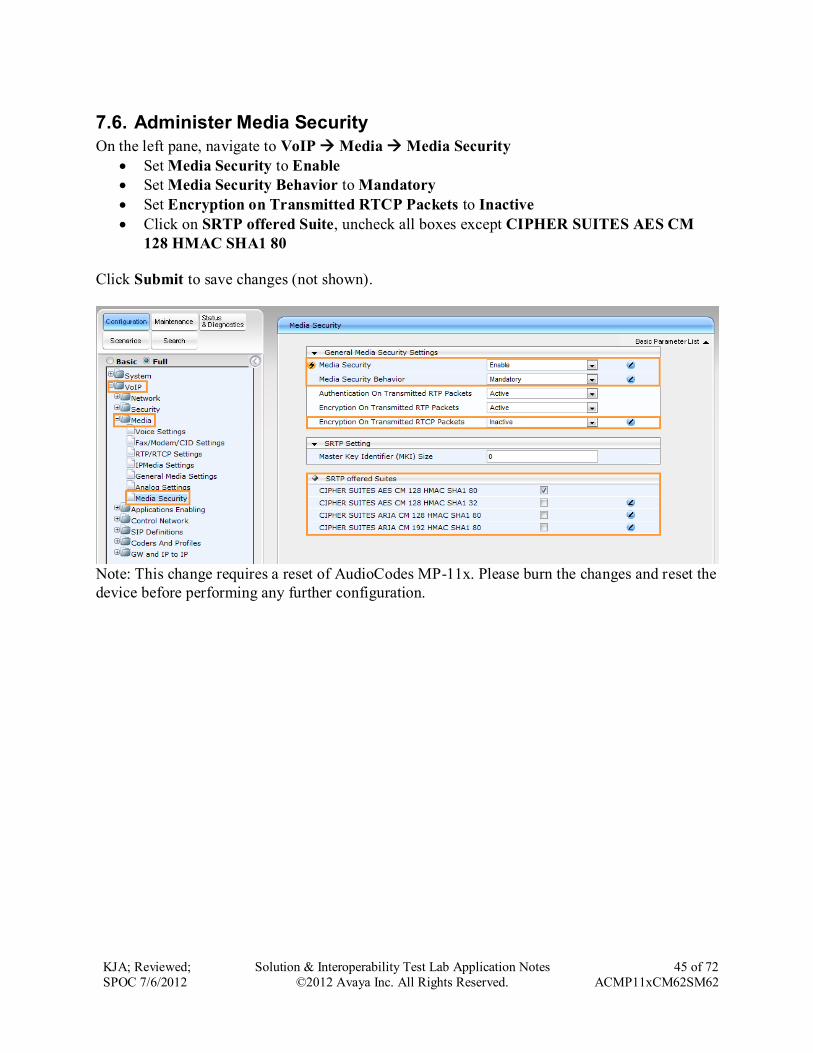
7.6. Administer Media Security
On the left pane, navigate to VoIP Media Media Security
Set Media Security to Enable
Set Media Security Behavior to Mandatory
Set Encryption on Transmitted RTCP Packets to Inactive
Click on SRTP offered Suite, uncheck all boxes except CIPHER SUITES AES CM
128 HMAC SHA1 80
Click Submit to save changes (not shown).
Note: This change requires a reset of AudioCodes MP-11x. Please burn the changes and reset the
device before performing any further configuration.
KJA; Reviewed;
SPOC 7/6/2012
Solution & Interoperability Test Lab Application Notes
©2012 Avaya Inc. All Rights Reserved.
46 of 72
ACMP11xCM62SM62
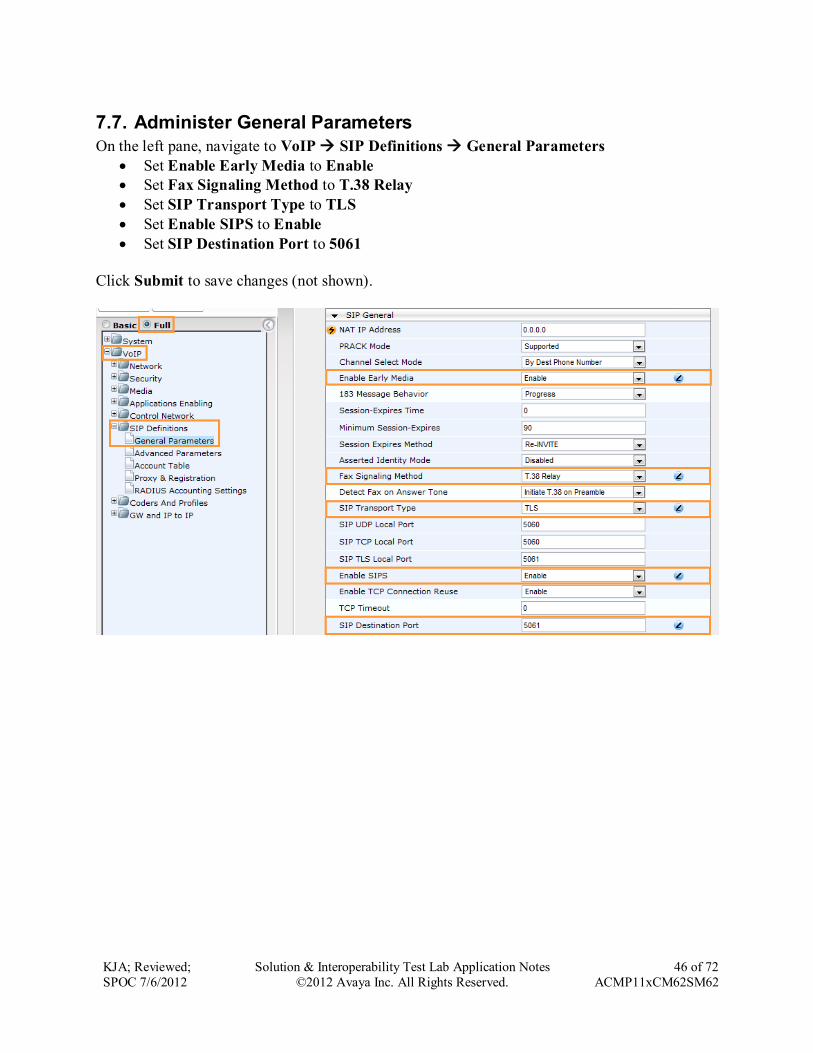
7.7. Administer General Parameters
On the left pane, navigate to VoIP SIP Definitions General Parameters
Set Enable Early Media to Enable
Set Fax Signaling Method to T.38 Relay
Set SIP Transport Type to TLS
Set Enable SIPS to Enable
Set SIP Destination Port to 5061
Click Submit to save changes (not shown).
KJA; Reviewed;
SPOC 7/6/2012
Solution & Interoperability Test Lab Application Notes
©2012 Avaya Inc. All Rights Reserved.
47 of 72
ACMP11xCM62SM62
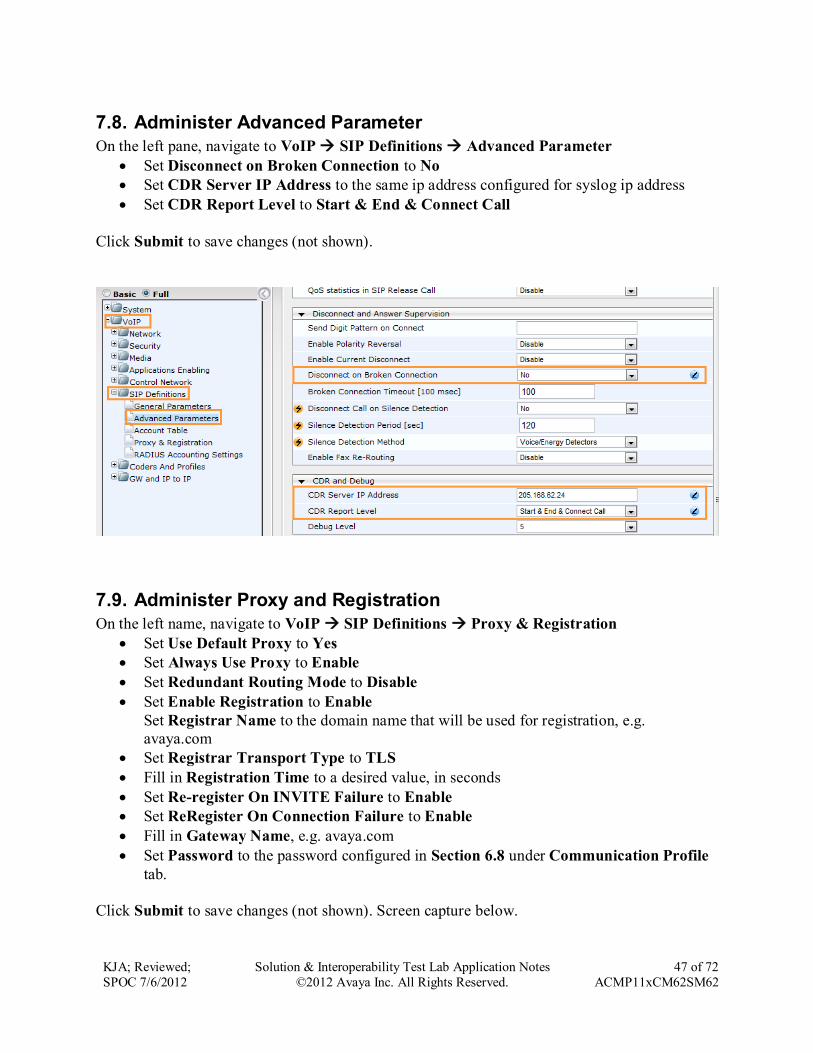
7.8. Administer Advanced Parameter
On the left pane, navigate to VoIP SIP Definitions Advanced Parameter
Set Disconnect on Broken Connection to No
Set CDR Server IP Address to the same ip address configured for syslog ip address
Set CDR Report Level to Start & End & Connect Call
Click Submit to save changes (not shown).
7.9. Administer Proxy and Registration
On the left name, navigate to VoIP SIP Definitions Proxy & Registration
Set Use Default Proxy to Yes
Set Always Use Proxy to Enable
Set Redundant Routing Mode to Disable
Set Enable Registration to Enable
Set Registrar Name to the domain name that will be used for registration, e.g.
avaya.com
Set Registrar Transport Type to TLS
Fill in Registration Time to a desired value, in seconds
Set Re-register On INVITE Failure to Enable
Set ReRegister On Connection Failure to Enable
Fill in Gateway Name, e.g. avaya.com
Set Password to the password configured in Section 6.8 under Communication Profile
tab.
Click Submit to save changes (not shown). Screen capture below.

KJA; Reviewed;
SPOC 7/6/2012
Solution & Interoperability Test Lab Application Notes
©2012 Avaya Inc. All Rights Reserved.
48 of 72
ACMP11xCM62SM62

KJA; Reviewed;
SPOC 7/6/2012
Solution & Interoperability Test Lab Application Notes
©2012 Avaya Inc. All Rights Reserved.
49 of 72
ACMP11xCM62SM62
On the same page, click on the Arrow icon, , next to Proxy Set Table (not shown)
Type in the Proxy Address, e.g. avaya.com:5061
Set Transport Type to TLS
Set Enable Proxy Keep Alive to Using Options
Set Proxy Keep Alive Time to a desired value, in seconds.
Click Submit to save changes.
KJA; Reviewed;
SPOC 7/6/2012
Solution & Interoperability Test Lab Application Notes
©2012 Avaya Inc. All Rights Reserved.
50 of 72
ACMP11xCM62SM62
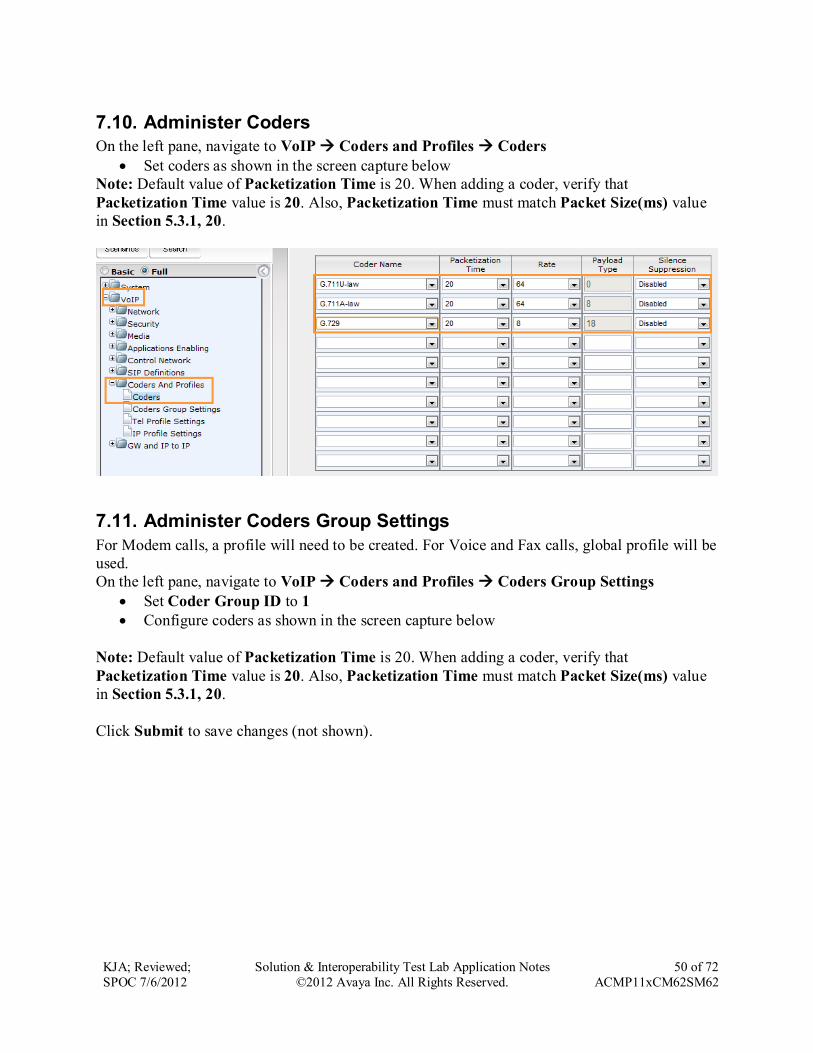
7.10. Administer Coders
On the left pane, navigate to VoIP Coders and Profiles Coders
Set coders as shown in the screen capture below
Note: Default value of Packetization Time is 20. When adding a coder, verify that
Packetization Time value is 20. Also, Packetization Time must match Packet Size(ms) value
in Section 5.3.1, 20.
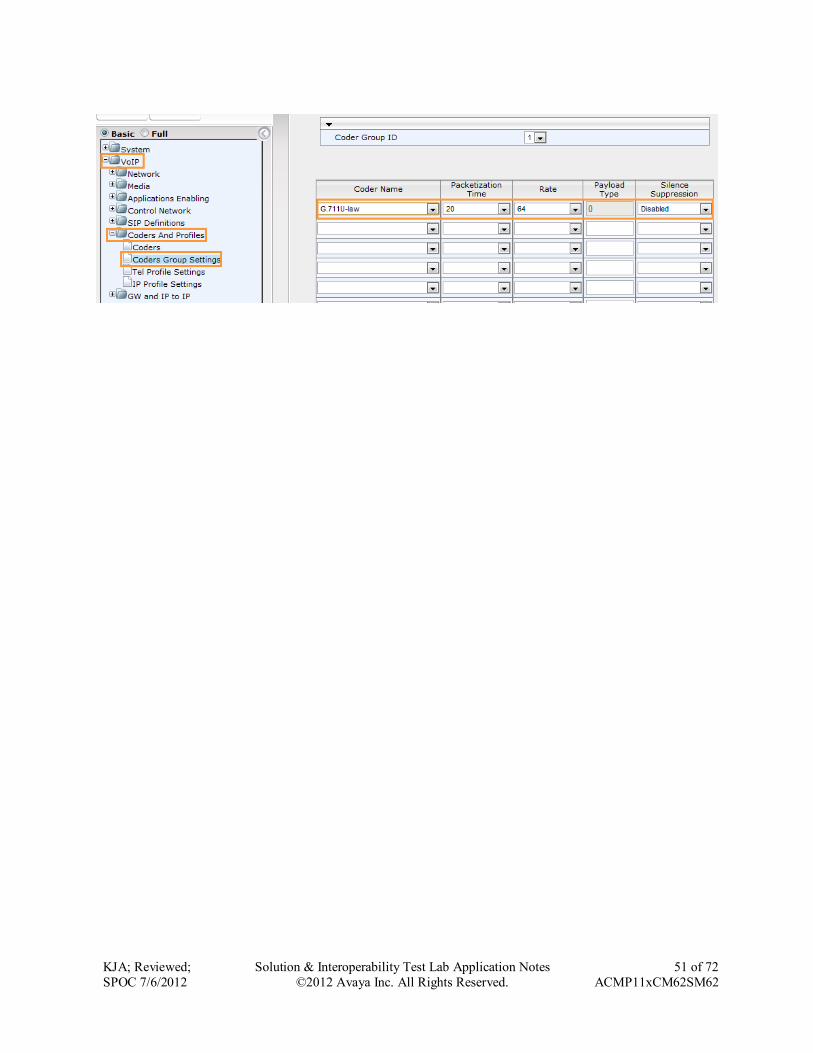
7.11. Administer Coders Group Settings
For Modem calls, a profile will need to be created. For Voice and Fax calls, global profile will be
used.
On the left pane, navigate to VoIP Coders and Profiles Coders Group Settings
Set Coder Group ID to 1
Configure coders as shown in the screen capture below
Note: Default value of Packetization Time is 20. When adding a coder, verify that
Packetization Time value is 20. Also, Packetization Time must match Packet Size(ms) value
in Section 5.3.1, 20.
Click Submit to save changes (not shown).
KJA; Reviewed;
SPOC 7/6/2012
Solution & Interoperability Test Lab Application Notes
©2012 Avaya Inc. All Rights Reserved.
51 of 72
ACMP11xCM62SM62
KJA; Reviewed;
SPOC 7/6/2012
Solution & Interoperability Test Lab Application Notes
©2012 Avaya Inc. All Rights Reserved.
52 of 72
ACMP11xCM62SM62
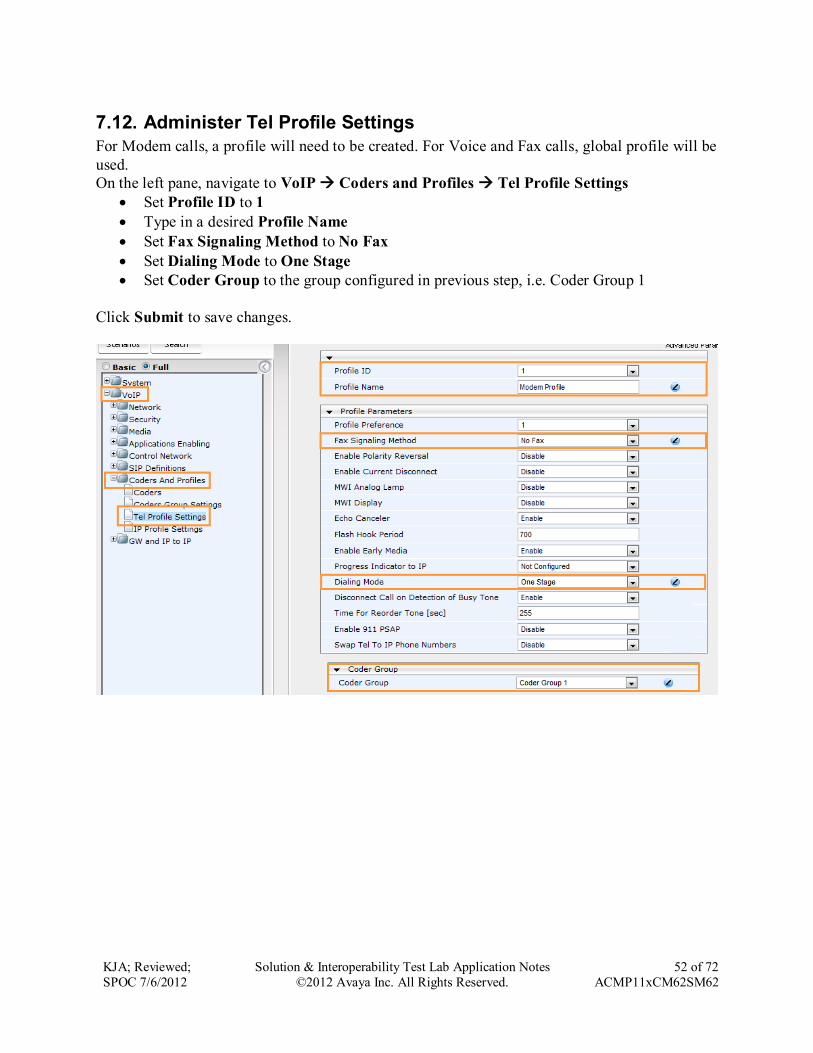
7.12. Administer Tel Profile Settings
For Modem calls, a profile will need to be created. For Voice and Fax calls, global profile will be
used.
On the left pane, navigate to VoIP Coders and Profiles Tel Profile Settings
Set Profile ID to 1
Type in a desired Profile Name
Set Fax Signaling Method to No Fax
Set Dialing Mode to One Stage
Set Coder Group to the group configured in previous step, i.e. Coder Group 1
Click Submit to save changes.
KJA; Reviewed;
SPOC 7/6/2012
Solution & Interoperability Test Lab Application Notes
©2012 Avaya Inc. All Rights Reserved.
53 of 72
ACMP11xCM62SM62
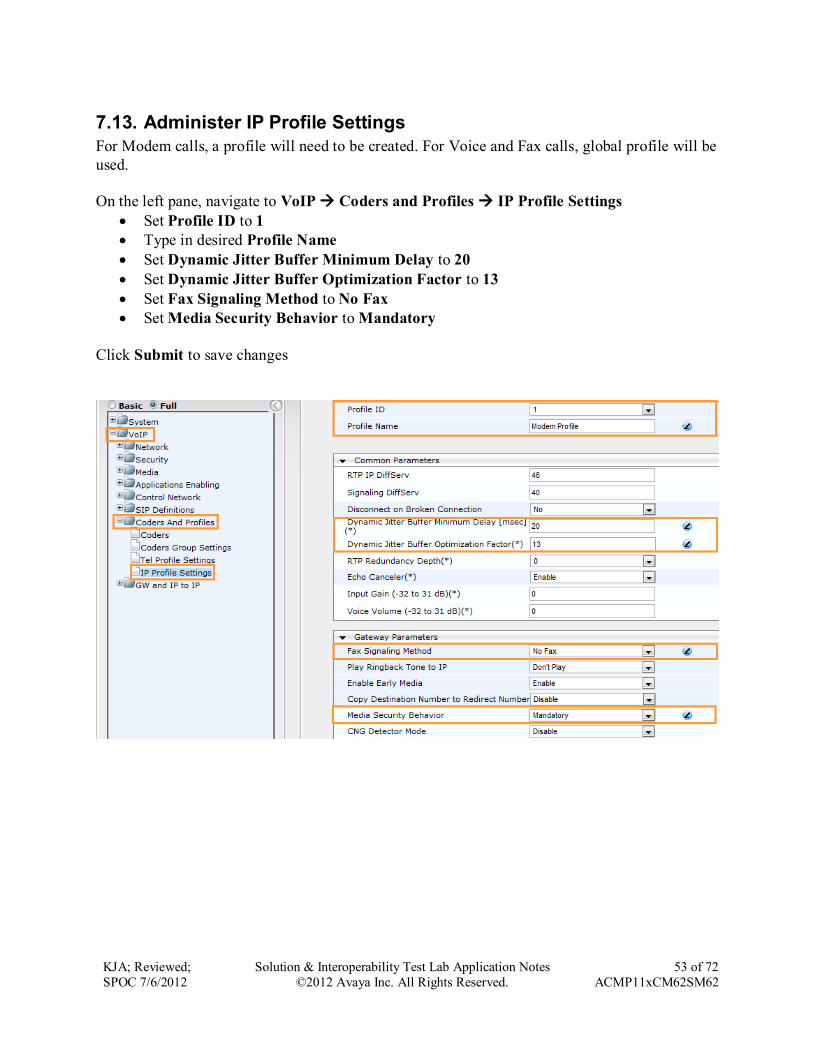
7.13. Administer IP Profile Settings
For Modem calls, a profile will need to be created. For Voice and Fax calls, global profile will be
used.
On the left pane, navigate to VoIP Coders and Profiles IP Profile Settings
Set Profile ID to 1
Type in desired Profile Name
Set Dynamic Jitter Buffer Minimum Delay to 20
Set Dynamic Jitter Buffer Optimization Factor to 13
Set Fax Signaling Method to No Fax
Set Media Security Behavior to Mandatory
Click Submit to save changes
KJA; Reviewed;
SPOC 7/6/2012
Solution & Interoperability Test Lab Application Notes
©2012 Avaya Inc. All Rights Reserved.
54 of 72
ACMP11xCM62SM62
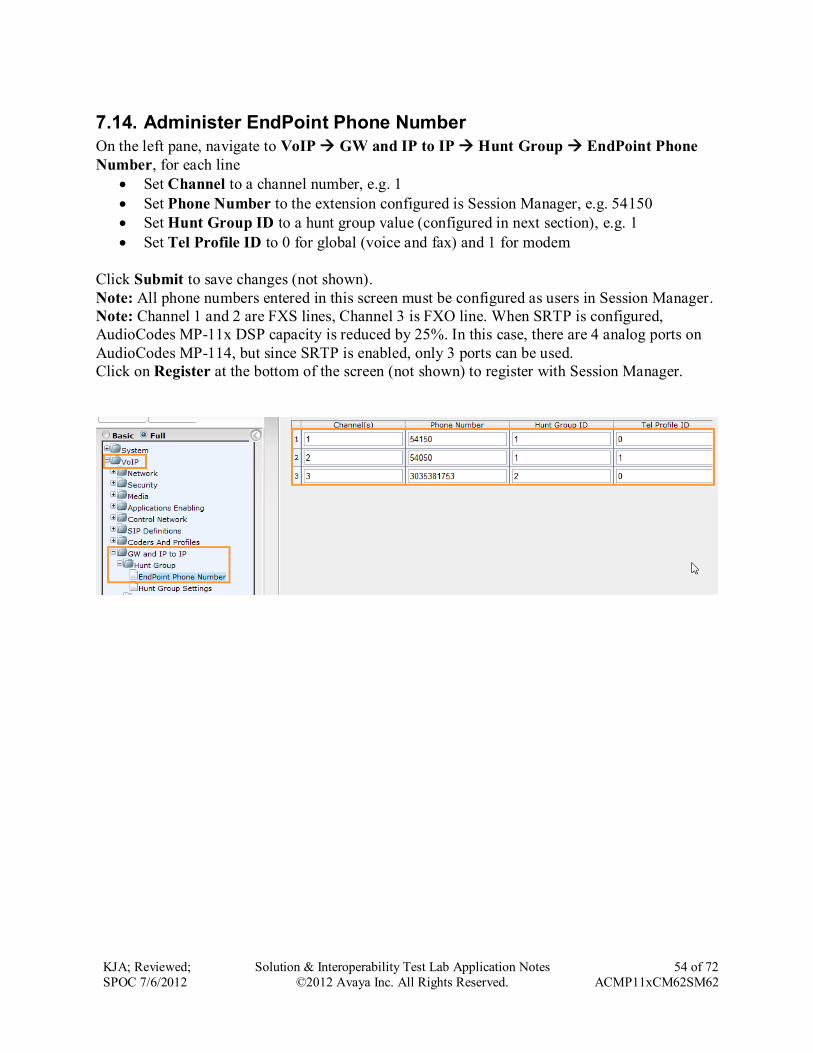
7.14. Administer EndPoint Phone Number
On the left pane, navigate to VoIP GW and IP to IP Hunt Group EndPoint Phone
Number, for each line
Set Channel to a channel number, e.g. 1
Set Phone Number to the extension configured is Session Manager, e.g. 54150
Set Hunt Group ID to a hunt group value (configured in next section), e.g. 1
Set Tel Profile ID to 0 for global (voice and fax) and 1 for modem
Click Submit to save changes (not shown).
Note: All phone numbers entered in this screen must be configured as users in Session Manager.
Note: Channel 1 and 2 are FXS lines, Channel 3 is FXO line. When SRTP is configured,
AudioCodes MP-11x DSP capacity is reduced by 25%. In this case, there are 4 analog ports on
AudioCodes MP-114, but since SRTP is enabled, only 3 ports can be used.
Click on Register at the bottom of the screen (not shown) to register with Session Manager.
KJA; Reviewed;
SPOC 7/6/2012
Solution & Interoperability Test Lab Application Notes
©2012 Avaya Inc. All Rights Reserved.
55 of 72
ACMP11xCM62SM62
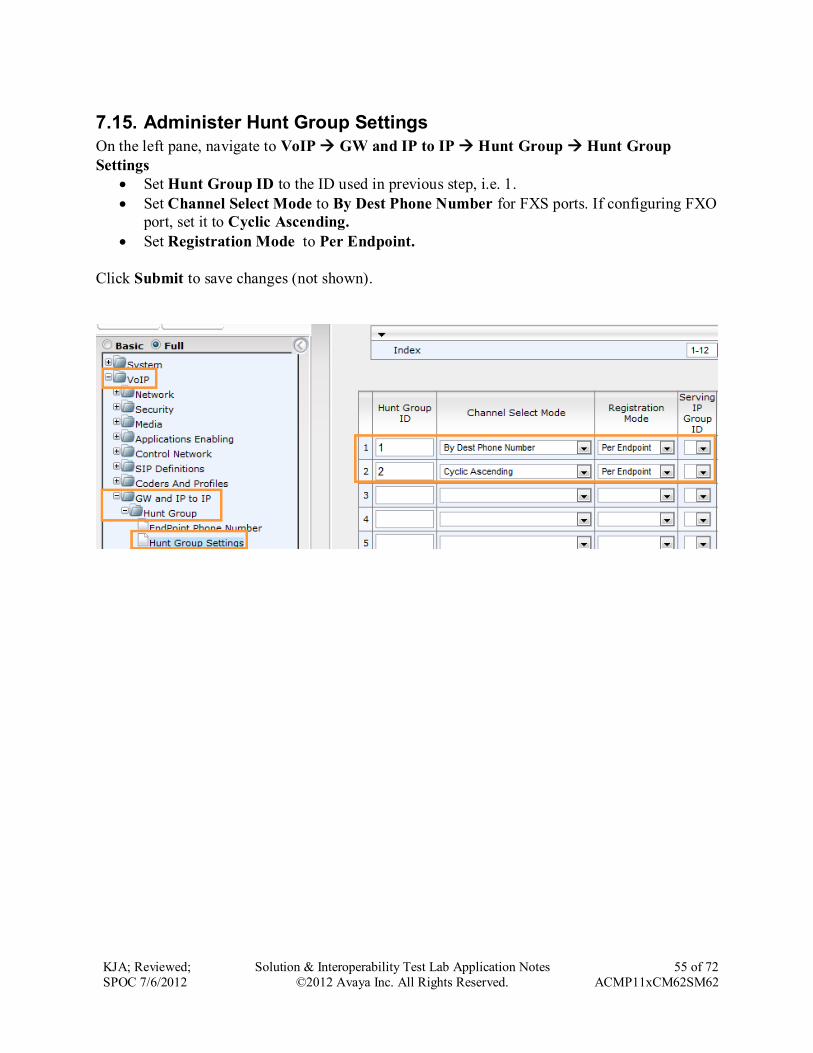
7.15. Administer Hunt Group Settings
On the left pane, navigate to VoIP GW and IP to IP Hunt Group Hunt Group
Settings
Set Hunt Group ID to the ID used in previous step, i.e. 1.
Set Channel Select Mode to By Dest Phone Number for FXS ports. If configuring FXO
port, set it to Cyclic Ascending.
Set Registration Mode to Per Endpoint.
Click Submit to save changes (not shown).
KJA; Reviewed;
SPOC 7/6/2012
Solution & Interoperability Test Lab Application Notes
©2012 Avaya Inc. All Rights Reserved.
56 of 72
ACMP11xCM62SM62
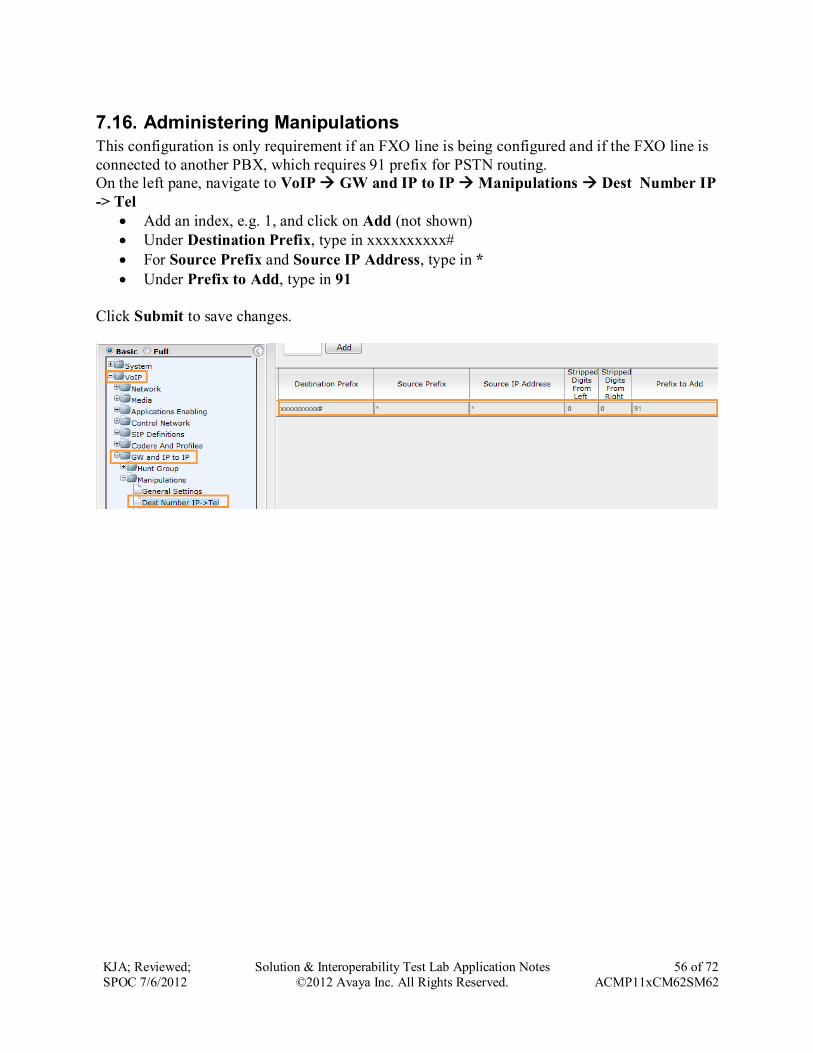
7.16. Administering Manipulations
This configuration is only requirement if an FXO line is being configured and if the FXO line is
connected to another PBX, which requires 91 prefix for PSTN routing.
On the left pane, navigate to VoIP GW and IP to IP Manipulations Dest Number IP
-> Tel
Add an index, e.g. 1, and click on Add (not shown)
Under Destination Prefix, type in xxxxxxxxxx#
For Source Prefix and Source IP Address, type in *
Under Prefix to Add, type in 91
Click Submit to save changes.
KJA; Reviewed;
SPOC 7/6/2012
Solution & Interoperability Test Lab Application Notes
©2012 Avaya Inc. All Rights Reserved.
57 of 72
ACMP11xCM62SM62
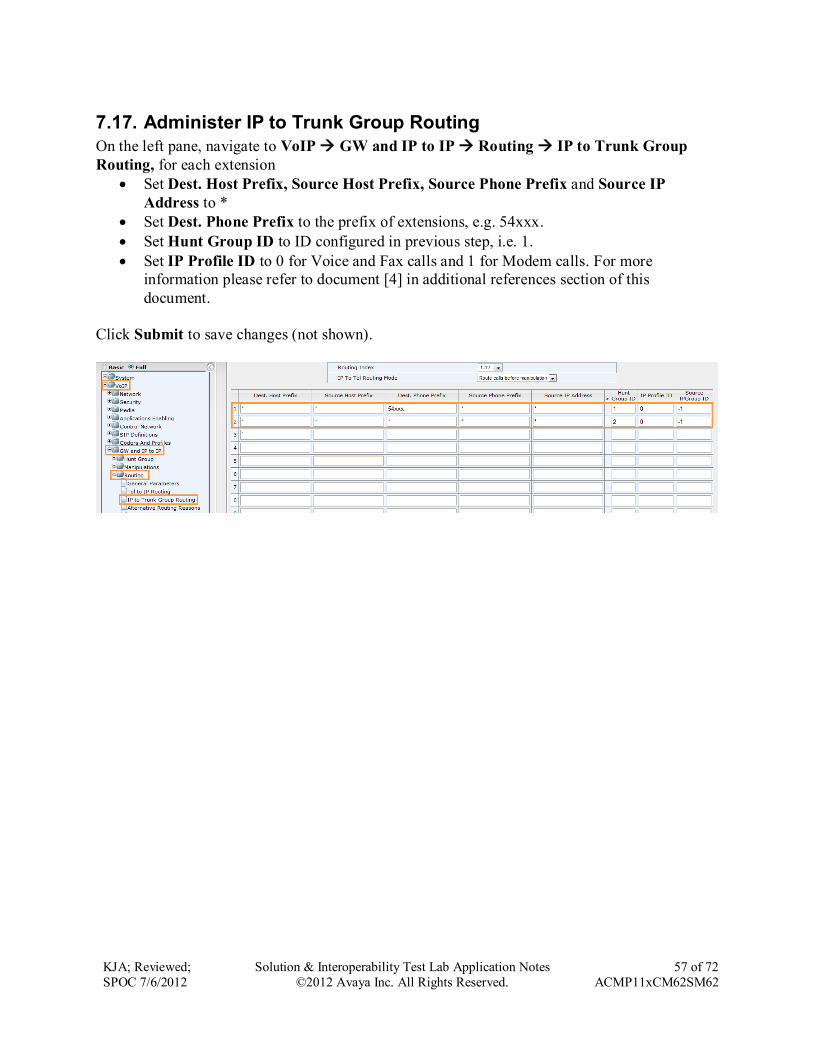
7.17. Administer IP to Trunk Group Routing
On the left pane, navigate to VoIP GW and IP to IP Routing IP to Trunk Group
Routing, for each extension
Set Dest. Host Prefix, Source Host Prefix, Source Phone Prefix and Source IP
Address to *
Set Dest. Phone Prefix to the prefix of extensions, e.g. 54xxx.
Set Hunt Group ID to ID configured in previous step, i.e. 1.
Set IP Profile ID to 0 for Voice and Fax calls and 1 for Modem calls. For more
information please refer to document [4] in additional references section of this
document.
Click Submit to save changes (not shown).
KJA; Reviewed;
SPOC 7/6/2012
Solution & Interoperability Test Lab Application Notes
©2012 Avaya Inc. All Rights Reserved.
58 of 72
ACMP11xCM62SM62
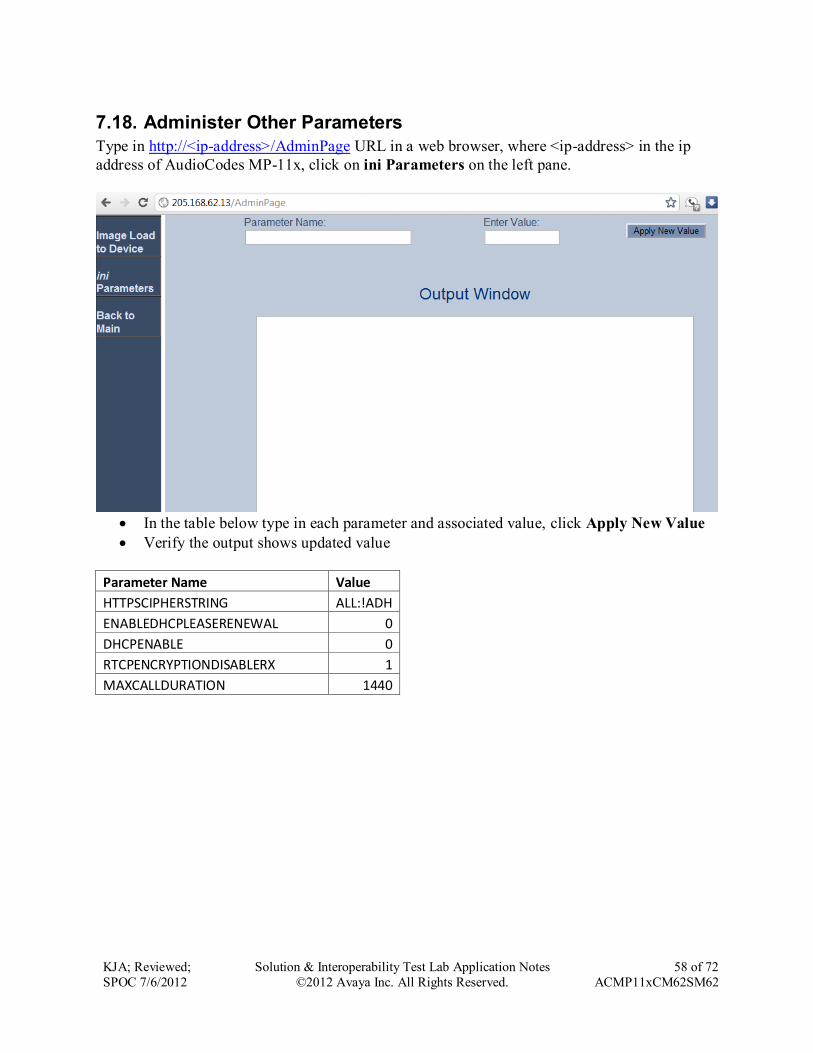
7.18. Administer Other Parameters
Type in http://<ip-address>/AdminPage URL in a web browser, where <ip-address> in the ip
address of AudioCodes MP-11x, click on ini Parameters on the left pane.
In the table below type in each parameter and associated value, click Apply New Value
Verify the output shows updated value
Parameter Name Value
HTTPSCIPHERSTRING ALL:!ADH
ENABLEDHCPLEASERENEWAL 0
DHCPENABLE 0
RTCPENCRYPTIONDISABLERX 1
MAXCALLDURATION 1440
KJA; Reviewed;
SPOC 7/6/2012
Solution & Interoperability Test Lab Application Notes
©2012 Avaya Inc. All Rights Reserved.
59 of 72
ACMP11xCM62SM62
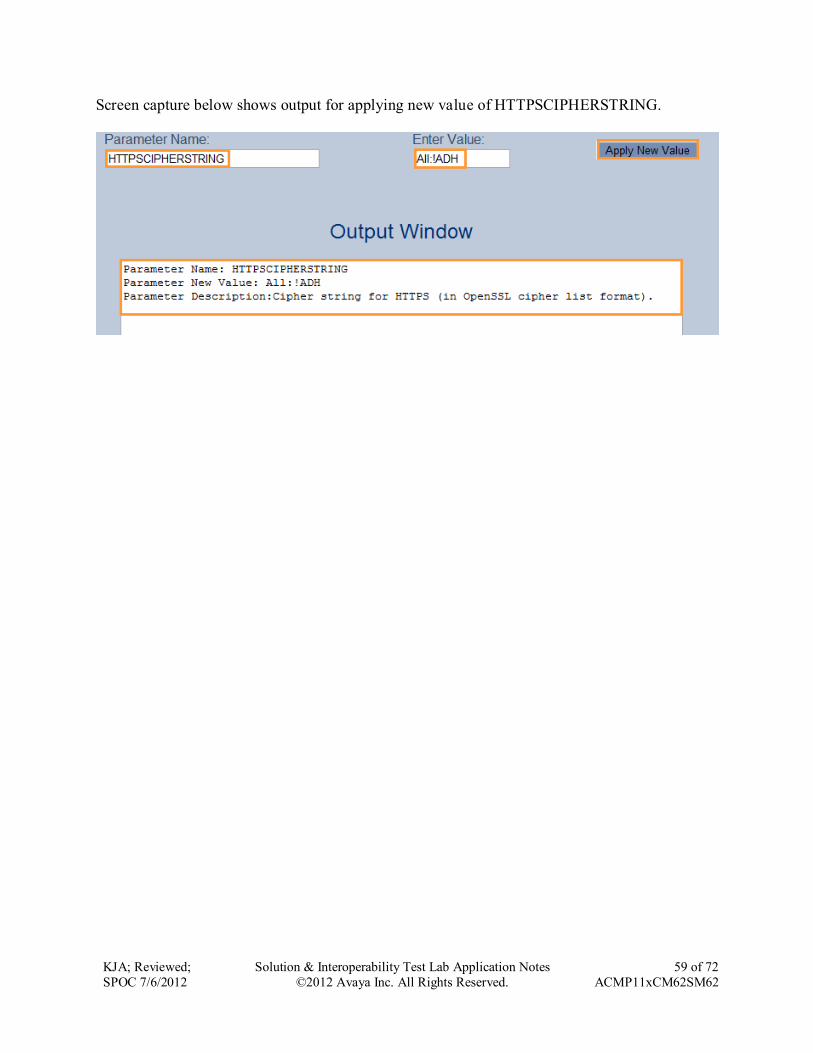
Screen capture below shows output for applying new value of HTTPSCIPHERSTRING.
KJA; Reviewed;
SPOC 7/6/2012
Solution & Interoperability Test Lab Application Notes
©2012 Avaya Inc. All Rights Reserved.
60 of 72
ACMP11xCM62SM62
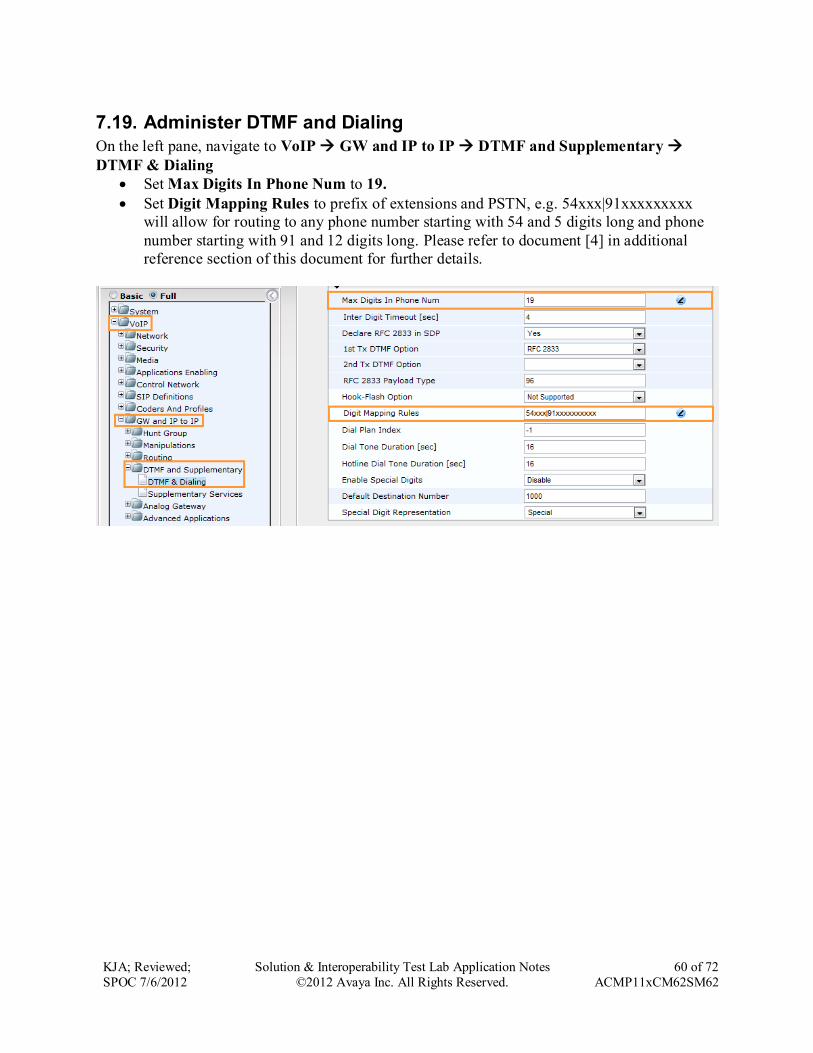
7.19. Administer DTMF and Dialing
On the left pane, navigate to VoIP GW and IP to IP DTMF and Supplementary
DTMF & Dialing
Set Max Digits In Phone Num to 19.
Set Digit Mapping Rules to prefix of extensions and PSTN, e.g. 54xxx|91xxxxxxxxx
will allow for routing to any phone number starting with 54 and 5 digits long and phone
number starting with 91 and 12 digits long. Please refer to document [4] in additional
reference section of this document for further details.
KJA; Reviewed;
SPOC 7/6/2012
Solution & Interoperability Test Lab Application Notes
©2012 Avaya Inc. All Rights Reserved.
61 of 72
ACMP11xCM62SM62
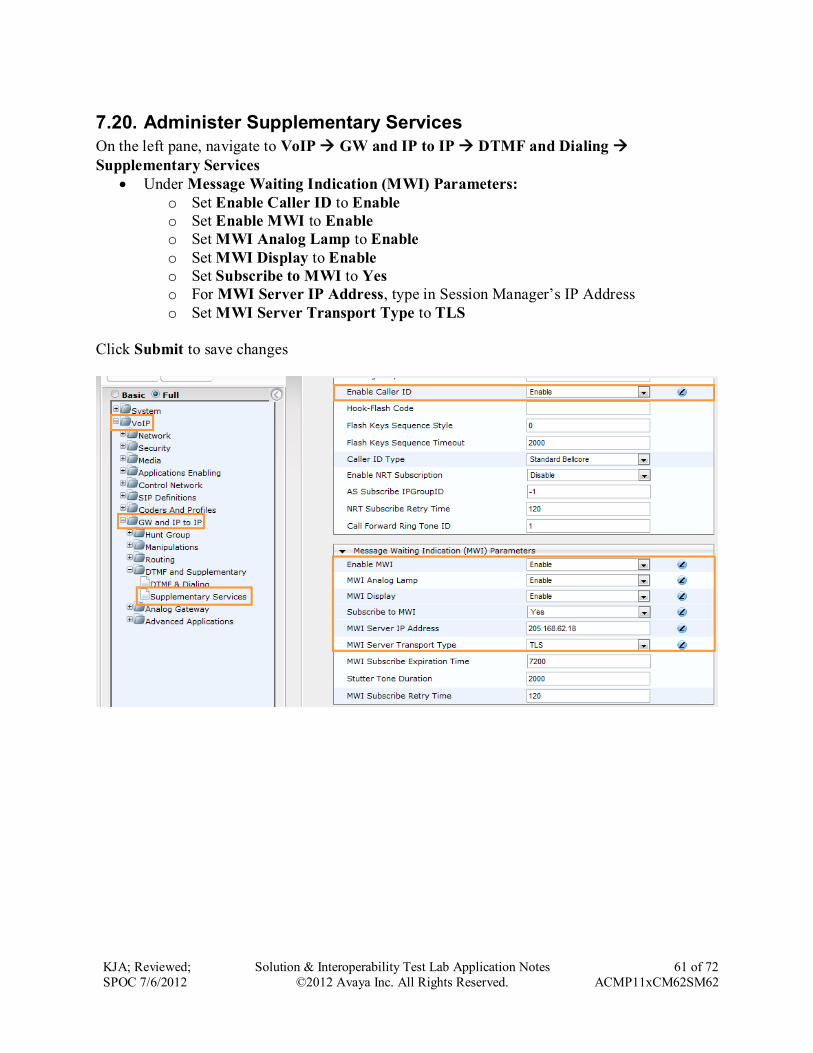
7.20. Administer Supplementary Services
On the left pane, navigate to VoIP GW and IP to IP DTMF and Dialing
Supplementary Services
Under Message Waiting Indication (MWI) Parameters:
o Set Enable Caller ID to Enable
o Set Enable MWI to Enable
o Set MWI Analog Lamp to Enable
o Set MWI Display to Enable
o Set Subscribe to MWI to Yes
o For MWI Server IP Address, type in Session Manager’s IP Address
o Set MWI Server Transport Type to TLS
Click Submit to save changes
KJA; Reviewed;
SPOC 7/6/2012
Solution & Interoperability Test Lab Application Notes
©2012 Avaya Inc. All Rights Reserved.
62 of 72
ACMP11xCM62SM62
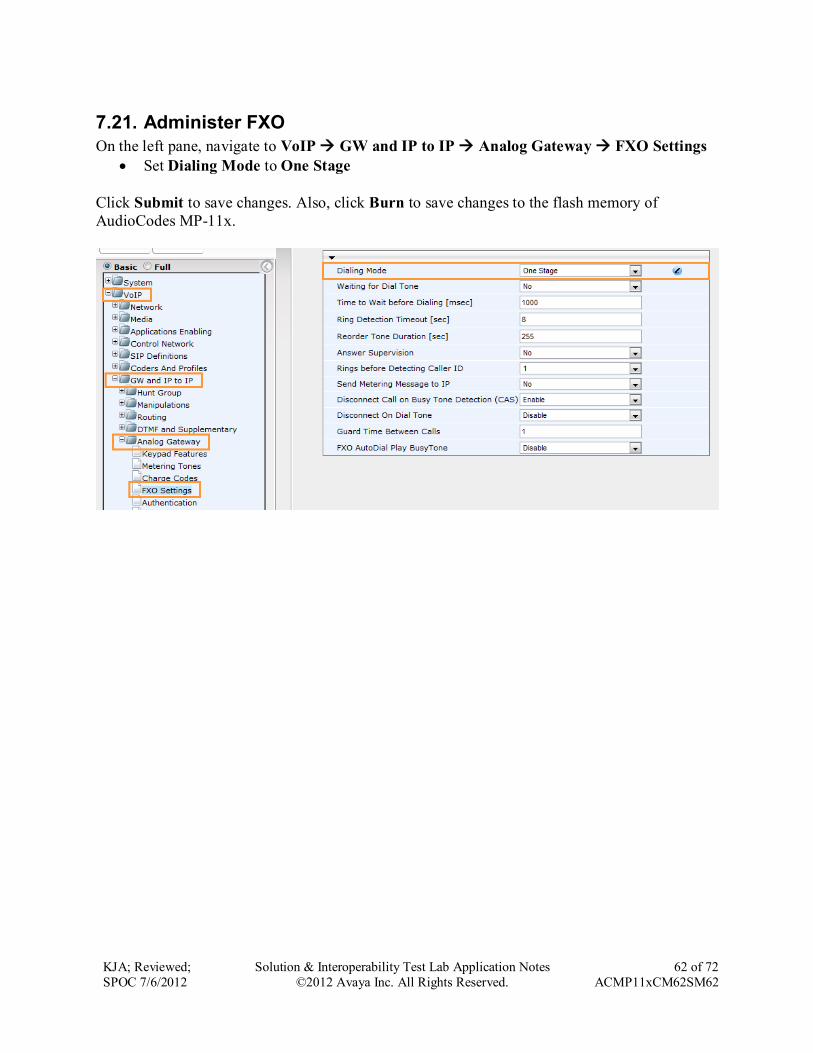
7.21. Administer FXO
On the left pane, navigate to VoIP GW and IP to IP Analog Gateway FXO Settings
Set Dialing Mode to One Stage
Click Submit to save changes. Also, click Burn to save changes to the flash memory of
AudioCodes MP-11x.
KJA; Reviewed;
SPOC 7/6/2012
Solution & Interoperability Test Lab Application Notes
©2012 Avaya Inc. All Rights Reserved.
63 of 72
ACMP11xCM62SM62
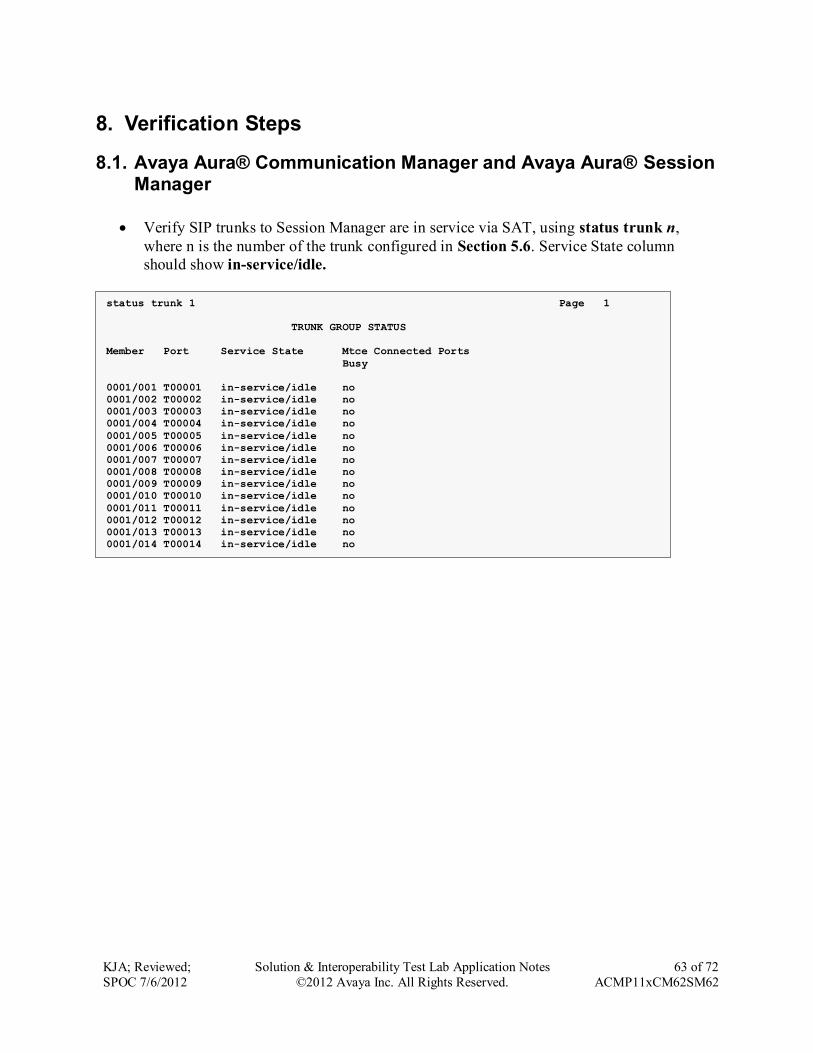
8. Verification Steps
8.1. Avaya Aura® Communication Manager and Avaya Aura® Session Manager
Verify SIP trunks to Session Manager are in service via SAT, using status trunk n,
where n is the number of the trunk configured in Section 5.6. Service State column
should show in-service/idle.
status trunk 1 Page 1
TRUNK GROUP STATUS
Member Port Service State Mtce Connected Ports
Busy
0001/001 T00001 in-service/idle no
0001/002 T00002 in-service/idle no
0001/003 T00003 in-service/idle no
0001/004 T00004 in-service/idle no
0001/005 T00005 in-service/idle no
0001/006 T00006 in-service/idle no
0001/007 T00007 in-service/idle no
0001/008 T00008 in-service/idle no
0001/009 T00009 in-service/idle no
0001/010 T00010 in-service/idle no
0001/011 T00011 in-service/idle no
0001/012 T00012 in-service/idle no
0001/013 T00013 in-service/idle no
0001/014 T00014 in-service/idle no
KJA; Reviewed;
SPOC 7/6/2012
Solution & Interoperability Test Lab Application Notes
©2012 Avaya Inc. All Rights Reserved.
64 of 72
ACMP11xCM62SM62
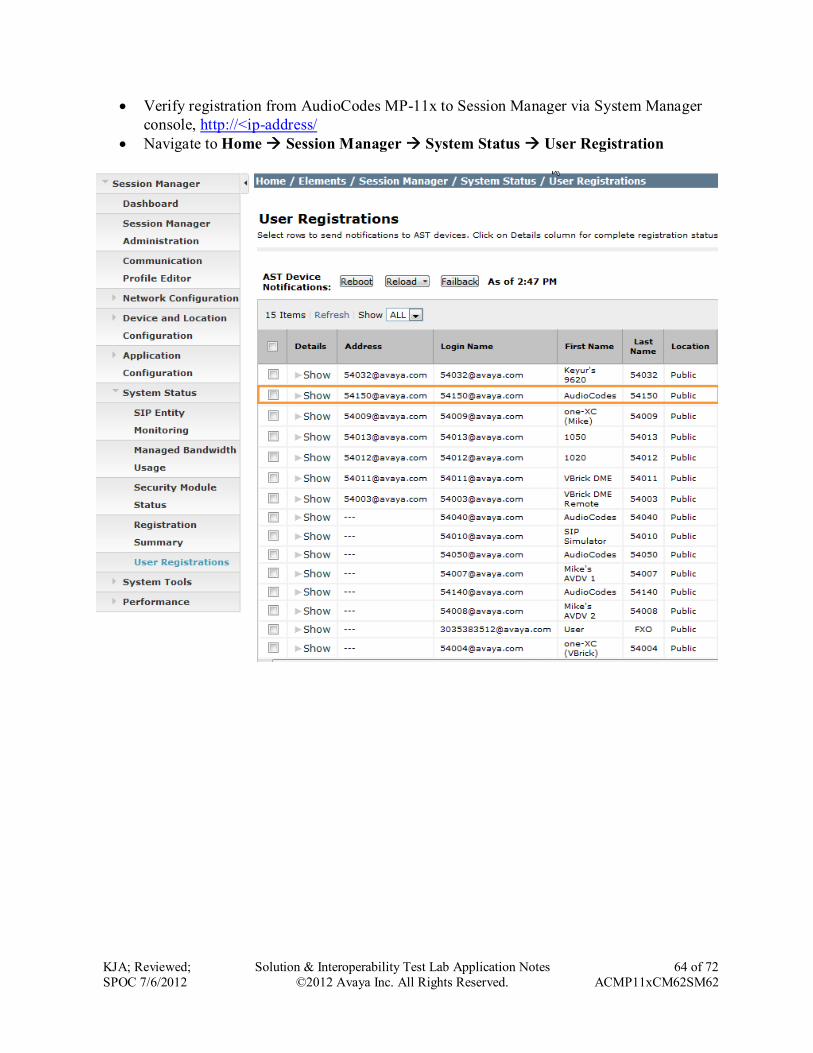
Verify registration from AudioCodes MP-11x to Session Manager via System Manager
console, http://<ip-address/
Navigate to Home Session Manager System Status User Registration
KJA; Reviewed;
SPOC 7/6/2012
Solution & Interoperability Test Lab Application Notes
©2012 Avaya Inc. All Rights Reserved.
65 of 72
ACMP11xCM62SM62
9. Conclusion These Application Notes describe the configuration steps required for AudioCodes MP-11x to
successfully interoperate with Avaya Aura® Communication Manager and Avaya Aura®
Session Manager. All feature and serviceability test cases completed and pass with
observations/exceptions noted in Section 2.2
10. Additional References This section references the product documentation relevant for these Application Notes.
[1] Administering Avaya Aura® Communication Manager, Document 03-300509, Release
6.2, Issue 7.0, February 2012
[2] Administering Avaya Aura® Session Manager, Document 03-603324, Release 6.2,
February 2012
[3] AudioCodes Transport Layer Security Note, Document LTRT-31600, January 2012
[4] MP-11x and MP-124 SIP User’s Manual, Version 6.2, Document LTRT-65414,
November 2010
[5] MP-11x and MP-124 SIP Installation Manual, Version 6.2, Document LTRT-59812,
September 2010
[6] SIP CPE Release Notes, Version 6.2, Document LTRT-26903
[7] Configuring Syslog Technical Note, Version 6.2, Document LTRT-28600
[8] Errata-Addendum for SIP CPE Documentation, Version 6.2, Document LTRT-29101
[9] Restoring Factory Defaults Technical Note, Version 6.2, Document LTRT-30300
[10] BootP Technical Note, Version 6.2, Document LTRT-30500
[11] Customer Case Reporting Procedures, Document LTRT-36502
[12] SIP CPE Product Reference Manual, Version 6.2, LTRT-52307
[13] CPE SIP Troubleshooting Guide, Document LTRT-57601

KJA; Reviewed;
SPOC 7/6/2012
Solution & Interoperability Test Lab Application Notes
©2012 Avaya Inc. All Rights Reserved.
66 of 72
ACMP11xCM62SM62
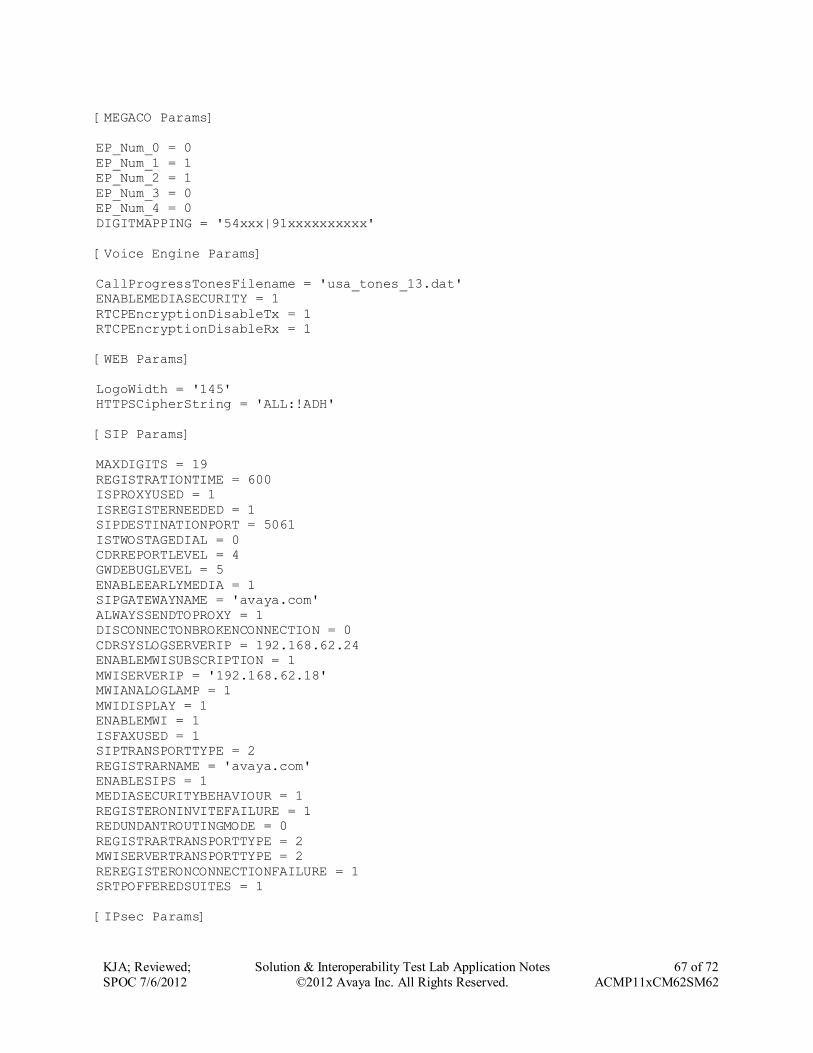
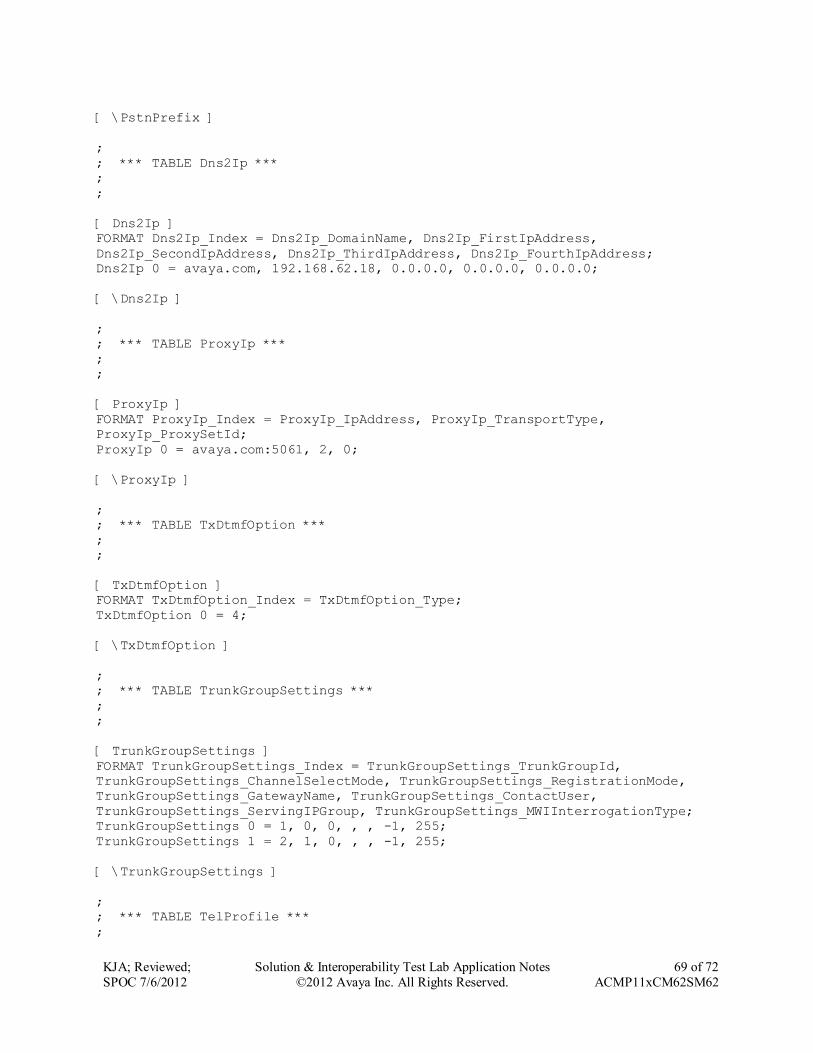
A. Appendix AudioCodes MP-114 .ini file generated after following the instruction is as follows: Please use it
only for reference purposes.
Note: Please note that password for registration will need to be changed if this ini file is loaded
on an AudioCodes MP-11x device.
;**************
;** Ini File **
;**************
;Board: MP-114 FXS_FXO
;Serial Number: 2478413
;Slot Number: 1
;Software Version: 6.20A.059
;DSP Software Version: 204IM => 620.10
;Board IP Address: 192.168.62.13
;Board Subnet Mask: 255.255.255.128
;Board Default Gateway: 192.168.62.1
;Ram size: 32M Flash size: 8M
`;Num of DSP Cores: 1 Num DSP Channels: 3
;Profile: NONE
;License Key limits aren't active full features capabilities are available !;
;----------------------------------------------
[SYSTEM Params]
SyslogServerIP = 192.168.62.24
EnableSyslog = 1
NTPServerIP = 75.144.11.42
NTPServerUTCOffset = -21600
ENABLEPARAMETERSMONITORING = 1
ActivityListToLog = 'pvc', 'afl', 'dr', 'fb', 'swu', 'ard', 'naa', 'spc',
'll'
[BSP Params]
PCMLawSelect = 3
RoutingTableHopsCountColumn = 0, 0, 0, 0, 0, 0, 0, 0, 0, 0, 0, 0, 0, 0, 0, 0,
0, 0, 0, 0, 0, 0, 0, 0, 0
[Analog Params]
FXSLoopCharacteristicsFilename = 'MP11x-02-1-FXS_16KHZ.dat'
[ControlProtocols Params]
AdminStateLockControl = 0
[MGCP Params]
KJA; Reviewed;
SPOC 7/6/2012
Solution & Interoperability Test Lab Application Notes
©2012 Avaya Inc. All Rights Reserved.
67 of 72
ACMP11xCM62SM62
[MEGACO Params]
EP_Num_0 = 0
EP_Num_1 = 1
EP_Num_2 = 1
EP_Num_3 = 0
EP_Num_4 = 0
DIGITMAPPING = '54xxx|91xxxxxxxxxx'
[Voice Engine Params]
CallProgressTonesFilename = 'usa_tones_13.dat'
ENABLEMEDIASECURITY = 1
RTCPEncryptionDisableTx = 1
RTCPEncryptionDisableRx = 1
[WEB Params]
LogoWidth = '145'
HTTPSCipherString = 'ALL:!ADH'
[SIP Params]
MAXDIGITS = 19
REGISTRATIONTIME = 600
ISPROXYUSED = 1
ISREGISTERNEEDED = 1
SIPDESTINATIONPORT = 5061
ISTWOSTAGEDIAL = 0
CDRREPORTLEVEL = 4
GWDEBUGLEVEL = 5
ENABLEEARLYMEDIA = 1
SIPGATEWAYNAME = 'avaya.com'
ALWAYSSENDTOPROXY = 1
DISCONNECTONBROKENCONNECTION = 0
CDRSYSLOGSERVERIP = 192.168.62.24
ENABLEMWISUBSCRIPTION = 1
MWISERVERIP = '192.168.62.18'
MWIANALOGLAMP = 1
MWIDISPLAY = 1
ENABLEMWI = 1
ISFAXUSED = 1
SIPTRANSPORTTYPE = 2
REGISTRARNAME = 'avaya.com'
ENABLESIPS = 1
MEDIASECURITYBEHAVIOUR = 1
REGISTERONINVITEFAILURE = 1
REDUNDANTROUTINGMODE = 0
REGISTRARTRANSPORTTYPE = 2
MWISERVERTRANSPORTTYPE = 2
REREGISTERONCONNECTIONFAILURE = 1
SRTPOFFEREDSUITES = 1
[IPsec Params]

KJA; Reviewed;
SPOC 7/6/2012
Solution & Interoperability Test Lab Application Notes
©2012 Avaya Inc. All Rights Reserved.
68 of 72
ACMP11xCM62SM62
[SNMP Params]
;
; *** TABLE DspTemplates ***
; This table contains hidden elements and will not be exposed.
; This table exists on board and will be saved during restarts
;
;
; *** TABLE TrunkGroup ***
;
;
[ TrunkGroup ]
FORMAT TrunkGroup_Index = TrunkGroup_TrunkGroupNum, TrunkGroup_FirstTrunkId,
TrunkGroup_FirstBChannel, TrunkGroup_LastBChannel,
TrunkGroup_FirstPhoneNumber, TrunkGroup_ProfileId, TrunkGroup_LastTrunkId,
TrunkGroup_Module;
TrunkGroup 0 = 1, 255, 1, 1, 54150, 0, 255, 255;
TrunkGroup 1 = 1, 255, 2, 2, 54050, 1, 255, 255;
TrunkGroup 2 = 2, 255, 3, 3, 3035383512, 0, 255, 255;
[ \TrunkGroup ]
;
; *** TABLE NumberMapIp2Tel ***
;
;
[ NumberMapIp2Tel ]
FORMAT NumberMapIp2Tel_Index = NumberMapIp2Tel_DestinationPrefix,
NumberMapIp2Tel_SourcePrefix, NumberMapIp2Tel_SourceAddress,
NumberMapIp2Tel_NumberType, NumberMapIp2Tel_NumberPlan,
NumberMapIp2Tel_RemoveFromLeft, NumberMapIp2Tel_RemoveFromRight,
NumberMapIp2Tel_LeaveFromRight, NumberMapIp2Tel_Prefix2Add,
NumberMapIp2Tel_Suffix2Add, NumberMapIp2Tel_IsPresentationRestricted,
NumberMapIp2Tel_SrcTrunkGroupID, NumberMapIp2Tel_SrcIPGroupID;
NumberMapIp2Tel 1 = xxxxxxxxxx#, *, *, 255, 255, 0, 0, 255, 91, , 255, -1, -
1;
[ \NumberMapIp2Tel ]
;
; *** TABLE PstnPrefix ***
;
;
[ PstnPrefix ]
FORMAT PstnPrefix_Index = PstnPrefix_DestPrefix, PstnPrefix_TrunkGroupId,
PstnPrefix_SourcePrefix, PstnPrefix_SourceAddress, PstnPrefix_ProfileId,
PstnPrefix_SrcIPGroupID, PstnPrefix_DestHostPrefix, PstnPrefix_SrcHostPrefix,
PstnPrefix_TrunkId;
PstnPrefix 0 = 54xxx, 1, *, *, 0, -1, *, *, -1;
PstnPrefix 1 = *, 2, *, *, 0, -1, *, *, -1;
KJA; Reviewed;
SPOC 7/6/2012
Solution & Interoperability Test Lab Application Notes
©2012 Avaya Inc. All Rights Reserved.
69 of 72
ACMP11xCM62SM62
[ \PstnPrefix ]
;
; *** TABLE Dns2Ip ***
;
;
[ Dns2Ip ]
FORMAT Dns2Ip_Index = Dns2Ip_DomainName, Dns2Ip_FirstIpAddress,
Dns2Ip_SecondIpAddress, Dns2Ip_ThirdIpAddress, Dns2Ip_FourthIpAddress;
Dns2Ip 0 = avaya.com, 192.168.62.18, 0.0.0.0, 0.0.0.0, 0.0.0.0;
[ \Dns2Ip ]
;
; *** TABLE ProxyIp ***
;
;
[ ProxyIp ]
FORMAT ProxyIp_Index = ProxyIp_IpAddress, ProxyIp_TransportType,
ProxyIp_ProxySetId;
ProxyIp 0 = avaya.com:5061, 2, 0;
[ \ProxyIp ]
;
; *** TABLE TxDtmfOption ***
;
;
[ TxDtmfOption ]
FORMAT TxDtmfOption_Index = TxDtmfOption_Type;
TxDtmfOption 0 = 4;
[ \TxDtmfOption ]
;
; *** TABLE TrunkGroupSettings ***
;
;
[ TrunkGroupSettings ]
FORMAT TrunkGroupSettings_Index = TrunkGroupSettings_TrunkGroupId,
TrunkGroupSettings_ChannelSelectMode, TrunkGroupSettings_RegistrationMode,
TrunkGroupSettings_GatewayName, TrunkGroupSettings_ContactUser,
TrunkGroupSettings_ServingIPGroup, TrunkGroupSettings_MWIInterrogationType;
TrunkGroupSettings 0 = 1, 0, 0, , , -1, 255;
TrunkGroupSettings 1 = 2, 1, 0, , , -1, 255;
[ \TrunkGroupSettings ]
;
; *** TABLE TelProfile ***
;
KJA; Reviewed;
SPOC 7/6/2012
Solution & Interoperability Test Lab Application Notes
©2012 Avaya Inc. All Rights Reserved.
70 of 72
ACMP11xCM62SM62
;
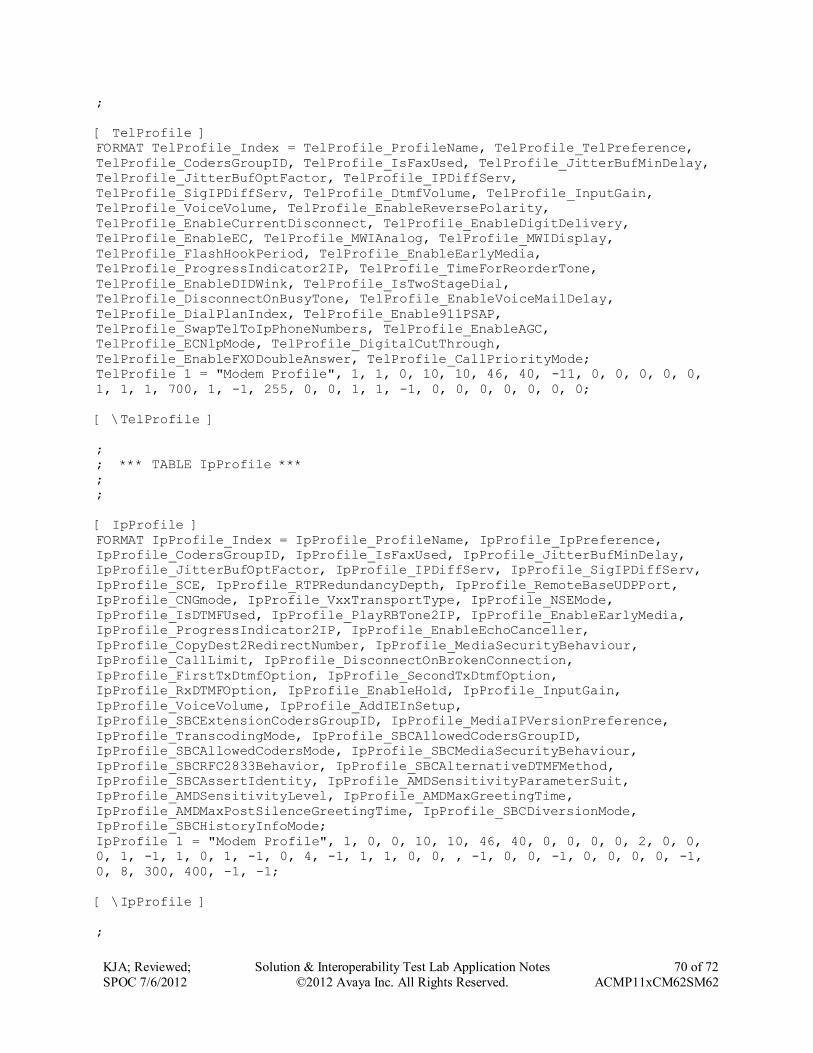
[ TelProfile ]
FORMAT TelProfile_Index = TelProfile_ProfileName, TelProfile_TelPreference,
TelProfile_CodersGroupID, TelProfile_IsFaxUsed, TelProfile_JitterBufMinDelay,
TelProfile_JitterBufOptFactor, TelProfile_IPDiffServ,
TelProfile_SigIPDiffServ, TelProfile_DtmfVolume, TelProfile_InputGain,
TelProfile_VoiceVolume, TelProfile_EnableReversePolarity,
TelProfile_EnableCurrentDisconnect, TelProfile_EnableDigitDelivery,
TelProfile_EnableEC, TelProfile_MWIAnalog, TelProfile_MWIDisplay,
TelProfile_FlashHookPeriod, TelProfile_EnableEarlyMedia,
TelProfile_ProgressIndicator2IP, TelProfile_TimeForReorderTone,
TelProfile_EnableDIDWink, TelProfile_IsTwoStageDial,
TelProfile_DisconnectOnBusyTone, TelProfile_EnableVoiceMailDelay,
TelProfile_DialPlanIndex, TelProfile_Enable911PSAP,
TelProfile_SwapTelToIpPhoneNumbers, TelProfile_EnableAGC,
TelProfile_ECNlpMode, TelProfile_DigitalCutThrough,
TelProfile_EnableFXODoubleAnswer, TelProfile_CallPriorityMode;
TelProfile 1 = "Modem Profile", 1, 1, 0, 10, 10, 46, 40, -11, 0, 0, 0, 0, 0,
1, 1, 1, 700, 1, -1, 255, 0, 0, 1, 1, -1, 0, 0, 0, 0, 0, 0, 0;
[ \TelProfile ]
;
; *** TABLE IpProfile ***
;
;
[ IpProfile ]
FORMAT IpProfile_Index = IpProfile_ProfileName, IpProfile_IpPreference,
IpProfile_CodersGroupID, IpProfile_IsFaxUsed, IpProfile_JitterBufMinDelay,
IpProfile_JitterBufOptFactor, IpProfile_IPDiffServ, IpProfile_SigIPDiffServ,
IpProfile_SCE, IpProfile_RTPRedundancyDepth, IpProfile_RemoteBaseUDPPort,
IpProfile_CNGmode, IpProfile_VxxTransportType, IpProfile_NSEMode,
IpProfile_IsDTMFUsed, IpProfile_PlayRBTone2IP, IpProfile_EnableEarlyMedia,
IpProfile_ProgressIndicator2IP, IpProfile_EnableEchoCanceller,
IpProfile_CopyDest2RedirectNumber, IpProfile_MediaSecurityBehaviour,
IpProfile_CallLimit, IpProfile_DisconnectOnBrokenConnection,
IpProfile_FirstTxDtmfOption, IpProfile_SecondTxDtmfOption,
IpProfile_RxDTMFOption, IpProfile_EnableHold, IpProfile_InputGain,
IpProfile_VoiceVolume, IpProfile_AddIEInSetup,
IpProfile_SBCExtensionCodersGroupID, IpProfile_MediaIPVersionPreference,
IpProfile_TranscodingMode, IpProfile_SBCAllowedCodersGroupID,
IpProfile_SBCAllowedCodersMode, IpProfile_SBCMediaSecurityBehaviour,
IpProfile_SBCRFC2833Behavior, IpProfile_SBCAlternativeDTMFMethod,
IpProfile_SBCAssertIdentity, IpProfile_AMDSensitivityParameterSuit,
IpProfile_AMDSensitivityLevel, IpProfile_AMDMaxGreetingTime,
IpProfile_AMDMaxPostSilenceGreetingTime, IpProfile_SBCDiversionMode,
IpProfile_SBCHistoryInfoMode;
IpProfile 1 = "Modem Profile", 1, 0, 0, 10, 10, 46, 40, 0, 0, 0, 0, 2, 0, 0,
0, 1, -1, 1, 0, 1, -1, 0, 4, -1, 1, 1, 0, 0, , -1, 0, 0, -1, 0, 0, 0, 0, -1,
0, 8, 300, 400, -1, -1;
[ \IpProfile ]
;
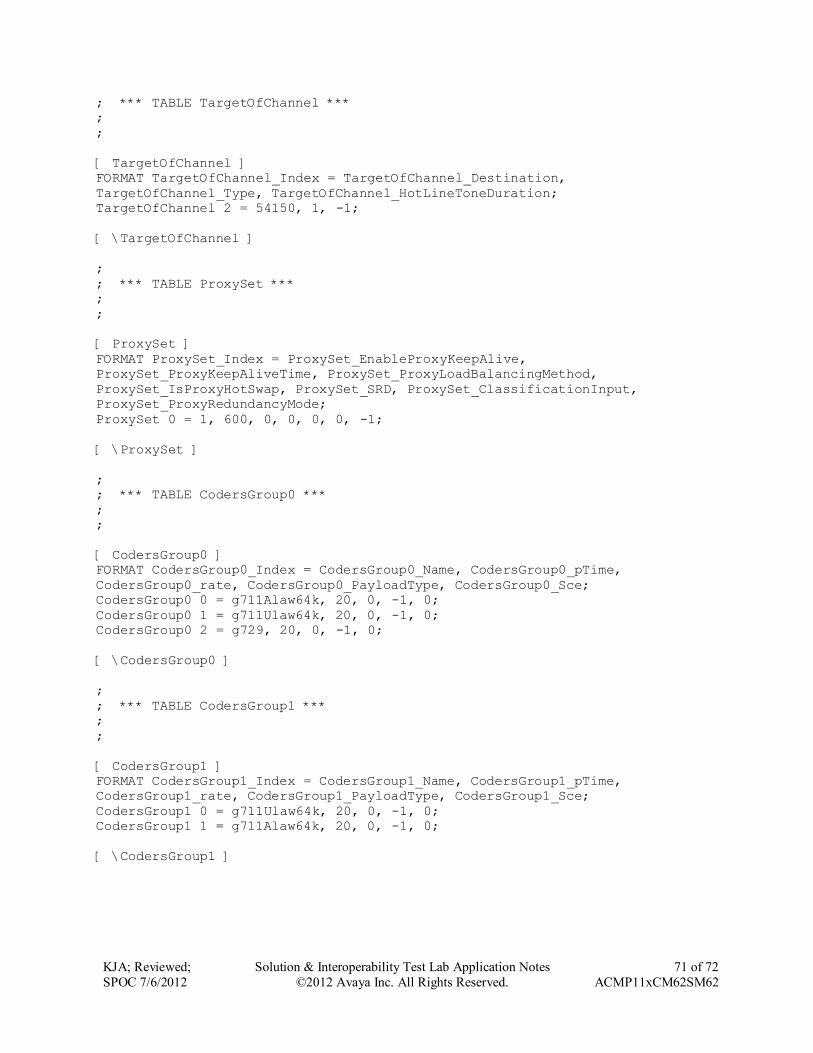
KJA; Reviewed;
SPOC 7/6/2012
Solution & Interoperability Test Lab Application Notes
©2012 Avaya Inc. All Rights Reserved.
71 of 72
ACMP11xCM62SM62
; *** TABLE TargetOfChannel ***
;
;
[ TargetOfChannel ]
FORMAT TargetOfChannel_Index = TargetOfChannel_Destination,
TargetOfChannel_Type, TargetOfChannel_HotLineToneDuration;
TargetOfChannel 2 = 54150, 1, -1;
[ \TargetOfChannel ]
;
; *** TABLE ProxySet ***
;
;
[ ProxySet ]
FORMAT ProxySet_Index = ProxySet_EnableProxyKeepAlive,
ProxySet_ProxyKeepAliveTime, ProxySet_ProxyLoadBalancingMethod,
ProxySet_IsProxyHotSwap, ProxySet_SRD, ProxySet_ClassificationInput,
ProxySet_ProxyRedundancyMode;
ProxySet 0 = 1, 600, 0, 0, 0, 0, -1;
[ \ProxySet ]
;
; *** TABLE CodersGroup0 ***
;
;
[ CodersGroup0 ]
FORMAT CodersGroup0_Index = CodersGroup0_Name, CodersGroup0_pTime,
CodersGroup0_rate, CodersGroup0_PayloadType, CodersGroup0_Sce;
CodersGroup0 0 = g711Alaw64k, 20, 0, -1, 0;
CodersGroup0 1 = g711Ulaw64k, 20, 0, -1, 0;
CodersGroup0 2 = g729, 20, 0, -1, 0;
[ \CodersGroup0 ]
;
; *** TABLE CodersGroup1 ***
;
;
[ CodersGroup1 ]
FORMAT CodersGroup1_Index = CodersGroup1_Name, CodersGroup1_pTime,
CodersGroup1_rate, CodersGroup1_PayloadType, CodersGroup1_Sce;
CodersGroup1 0 = g711Ulaw64k, 20, 0, -1, 0;
CodersGroup1 1 = g711Alaw64k, 20, 0, -1, 0;
[ \CodersGroup1 ]
KJA; Reviewed;
SPOC 7/6/2012
Solution & Interoperability Test Lab Application Notes
©2012 Avaya Inc. All Rights Reserved.
72 of 72
ACMP11xCM62SM62
©2012 Avaya Inc. All Rights Reserved.
Avaya and the Avaya Logo are trademarks of Avaya Inc. All trademarks identified by ® and
™ are registered trademarks or trademarks, respectively, of Avaya Inc. All other trademarks
are the property of their respective owners. The information provided in these Application
Notes is subject to change without notice. The configurations, technical data, and
recommendations provided in these Application Notes are believed to be accurate and
dependable, but are presented without express or implied warranty. Users are responsible for
their application of any products specified in these Application Notes.
Please e-mail any questions or comments pertaining to these Application Notes along with the
full title name and filename, located in the lower right corner, directly to the Avaya
DevConnect Program at [email protected].
Top Related