xStream App Director User Guide - Virtustream · 2. xStream App Director Features ... VMs Stopped...
75
xStream App Director Service Module User Guide How to Navigate and Use the Features of xStream App Director, R3.0 Beta Document Revision: ADUG-01 Revision Date: 7/1/2016
Transcript of xStream App Director User Guide - Virtustream · 2. xStream App Director Features ... VMs Stopped...
xStream App Director Service Module User Guide
How to Navigate and Use the Features of xStream App Director, R3.0 Beta Document Revision: ADUG-01 Revision Date: 7/1/2016
xStream App Director User Guide ii
Virtustream, Inc. www.virtustream.com
North America Offices
Headquarters 4800 Montgomery Lane, Suite 1100 Bethesda, MD 20814 Tel: +1.240.252.1007 Fax: +1.301.718.7880 455 Market Street, Suite 1250 San Francisco, CA 94105 T +1.415.856.2501 F +1.415.856.2504 6 Concourse Parkway, Suite 1930 Atlanta, GA 30328 T +1.678.533.2440 F +1.678.395.6998
Europe Office
3rd Floor, 78-79 Leadenhall Street London, EC3A 3DH T +44 (0) 870.345.3525 F +44 (0) 870.738.6345
Copyright © 2016 by Virtustream, Inc. All rights reserved worldwide. Confidential and Proprietary to Virtustream, Inc., and Its Customers

xStream App Director User Guide iii
Contents
1. Overview of xStream App Director ................................................................................................. 2
Launchpad Components ................................................................................................................................................. 2
Toolbar ............................................................................................................................................................... 3
Cockpits .............................................................................................................................................................. 4
Cockpit Links ...................................................................................................................................................... 4
Tiles .................................................................................................................................................................... 6
Customization Tools ........................................................................................................................................................ 6
Navigating xStream App Director .................................................................................................................................... 6
Infrastructure Searches and Navigation ............................................................................................................. 7
Landscape Searches and Navigation .............................................................................................................. 11
TAM Ticket Searches and Navigation .............................................................................................................. 13
2. xStream App Director Features .................................................................................................... 15
Budgeting and Reporting Tiles ...................................................................................................................................... 15
µVM, Storage, and Network Consumption ....................................................................................................... 15
VMs Stopped .................................................................................................................................................... 17
VMs Running .................................................................................................................................................... 19
µVM Consumption of Clusters ......................................................................................................................... 21
µVM, CPU, RAM, and Disk Utilization by VM .................................................................................................. 23
VMs Exceeding Average µVM Utilization ......................................................................................................... 24
VMs Using an App Director License ................................................................................................................ 25
Technical Account Management (TAM) Reporting ....................................................................................................... 26
TAM Reports .................................................................................................................................................... 26
Service Tickets ................................................................................................................................................. 27
Change Tickets ................................................................................................................................................ 28
Incident Tickets ................................................................................................................................................ 29
Operations and Administration ...................................................................................................................................... 30
Accelerators & Automators............................................................................................................................... 30
Scheduled Jobs ................................................................................................................................................ 31
VM Backup Status ............................................................................................................................................ 32
Validation Checklists ........................................................................................................................................ 32
Running Processes of SAP Components ........................................................................................................ 33
SAP Profile Parameter Changes ...................................................................................................................... 34
VM Changes ..................................................................................................................................................... 35
Patch SAP Kernel ............................................................................................................................................. 35
Reset SAP Passwords ..................................................................................................................................... 36
SAP Kernel Information .................................................................................................................................... 37

xStream App Director User Guide iv
Critical VMs ...................................................................................................................................................... 37
Isolate SAP Systems ........................................................................................................................................ 38
Compare Configuration of Landscape Components ........................................................................................ 41
Stop and Start SAP Systems ........................................................................................................................... 41
Copy SAP System ............................................................................................................................................ 42
Compliance and Security .............................................................................................................................................. 43
VM Audit Event Details ..................................................................................................................................... 43
SAP Server and Database Licenses ................................................................................................................ 45
Hypervisor Startup and Shutdown Logs ........................................................................................................... 46
SAP Startup and Shutdown Logs ..................................................................................................................... 46
VM Snapshot Logs ........................................................................................................................................... 47
Migration & Provisioning Management ......................................................................................................................... 47
3. App Director Customization .......................................................................................................... 48
Enabling and Disabling Customization .......................................................................................................................... 48
Adding a New Tile ......................................................................................................................................................... 48
Creating Groups of Tiles ............................................................................................................................................... 48
Example 1: Landscape Operations ................................................................................................................. 49
Example 2: Systems Operations ..................................................................................................................... 51
Example 3: Control Instance Operations (ECU on ASE Development) .......................................................... 53
Example 4: Data Layer and Application Layer Operations ............................................................................. 60
Example 5: Control Instance Operations (ECI on HANA Development) ........................................................ 61
Example 6: Infrastructure Operations ............................................................................................................. 68
Example 7: Host Operations ........................................................................................................................... 69
4. Glossary ....................................................................................................................................... 71
My Home ....................................................................................................................................................................... 72

xStream App Director User Guide 2
1. Overview of xStream App Director
The xStream App Director (App Director) Service Module is a software application within the xStream Suite that
automates the creation and in-life management of complex, enterprise applications, whether in-house or in a service
provider’s data center. This powerful new software simplifies the complexities of running, managing, maintaining, and
continually optimizing mission-critical applications within the customer environment using a highly developed monitoring
and reporting system of Virtual Machines (VMs), built from the ground up, which also accommodates resource providers
such as SAP, HANA, Oracle, etc.
App Director provides the following services:
* Cloud Operations and Administration — tools for daily operation, scheduling, planning, and automation of
tasks for support, preventive maintenance, and other customizable project needs for applications and VMs
* Budgeting, Forecasting, and Reporting — pricing and invoicing reporting based on VM monitoring and
consumption reporting through the patented Virtustream micro-VM (µVM), a cloud resource management
technology that measures actual vs. peak VM consumption
* Technical Account Management Reporting — service level agreement (SLA) compliance, operations
monitoring and reporting, and ticket tracking
* Security, Governance, and Compliance — tools for security, auditing, and compliance reporting, plus risk
analysis and vulnerability scanning
* Migration and Provisioning Management — orchestration, deployment, and acceleration tasks for application
migrations, upgrades, and patching activities
* Infrastructure Optimization and Monitoring — reporting and alerting of infrastructure operations in dashboard
displays
These services are provided within a seamless dashboard display navigated within feature-rich cockpits. In addition to
the built-in monitoring and reporting processes, users (self-service customers, managed services staff, and channel
partners) can create both simple and complex customized processes using available ingredients and recipes.
This document provides descriptions of each service, the features (tiles) included, instructions for navigating and
customizing features, and examples of use cases, as well as a glossary of terms.
Launchpad Components
The Launchpad (opening screen) presents a toolbar across the top, cockpit links, and cockpit tiles (feature categories).

xStream App Director User Guide 3
Toolbar
After clicking a cockpit category and tile, a Home button displays on the toolbar in the upper left corner of the screen
to enable return to the selected category. To the right, this toolbar also displays a Search tool to enable finding a
specific item. To the right of the Search tool, a Help (?) button provides user assistance in the form of topic-sensitive
step-by-step instructions. To the right of the Help button, an Options menu provides access to additional
tools and information. These menus vary according to the selected tile.
Note: Toolbar items are described in detail in section 5. App Director Navigation.

xStream App Director User Guide 4
Cockpits
Cockpits are groups, or categories, of related reporting or actionable features. Features (tiles) are of three types:
infrastructure (VMs in the Cloud), Application Landscapes (SAP landscapes), and Technical Account Management (TAM)
(support monitoring and reporting). Examples of these feature types are:
* VM Utilization by Cloud – (infrastructure) displays VM ID, location, host name, IP address, average µVM
consumption, current CPU and RAM consumption, plus health status of all of the VMs owned by the customer or
all VMs in a data center, as filtered by the requester’s search. Specific VMs can be selected to display further
details and charts based on real-time monitoring.
* SAP Server and Database Licenses – (SAP landscape) displays all of the SAP server names, licenses, and
service statuses. Specific servers can be selected for a view of details.
* Service Requests – (Technical Account Management) displays ticket ID, status, subject, priority, submitted
date/time, submitter group, requester, assignee, close date/time, and closer).
Each feature includes search functions pertinent to the tile type to facilitate finding a target quickly.
Note: Detailed descriptions of each feature are found in section 6. App Director Feature Details.
Cockpit Links
Cockpit links provide quick navigation to the feature categories: Budgeting and Reporting, Technical Account
Management (TAM) Reporting, Operations and Administration, and Compliance and Security. You can click a Cockpit
link or scroll down the seamless (fixed block) screen to reach a destination.
Budgeting and Reporting
The Budgeting and Reporting cockpit includes tiles that have a financial impact, such as consumption of billable elements
and configuration changes.

xStream App Director User Guide 5
Technical Account Management
The tiles in the Technical Account Management (TAM) cockpit provide a manager report, plus incident, service request,
and change request reporting. Most TAM tiles include ticket ID, status, subject, priority, submitted date/time, submitter
group, requester, assignee, close date/time, and closer name or ID.
Operations and Administration
The Operations and Administration cockpit provides reports and tools regarding general administration, operations, and
monitoring of SAP landscapes and VM processes to assist in support activities and maintenance. For example, you can
choose a view of all currently running SAP applications, databases (DB), operating systems (OS), or VM processes.
Specific views of currently shut down or suspended systems or all VMs in a critical state are also available. Many
features enable actions from the cockpit to start or stop SAP systems, change passwords, execute post-processing steps,
etc.
Compliance and Security
This cockpit provides logs related to application and infrastructure startup and shutdown logs, as well as licensing
information.

xStream App Director User Guide 6
Tiles
Cockpit categories display tiles (features) that provide real-time reporting and/or enable actions by the user. Each tile
represents an App Director feature. By default, the tile displays all resources within its category (VMs, applications, or
service request). Tiles can be customized to display a subset of resources - for example, only those applications used in
a QA or production environment.
Note: Tiles are described in detail in section 6. App Director Feature Details.
Customization Tools
The following features provide the ability to customize your xStream App Director experience:
* Enable/disable customization
* Create Group
* Add tile
Note: Additional instructions for customizations are in section 7. App Director Customization.
Navigating xStream App Director
There are three navigation or search patterns within the App Director features. The most frequent pattern is used in the
infrastructure tiles such as VMs in the Cloud. The second pattern occurs in the application tiles, or SAP Landscapes. A
third pattern is provided in the TAM tiles for ticketing and support management.
The user access type (customer, service provider, channel partner) and level (read only, administer some or all features,
etc.) will determine the information that is displayed and the actions that are permitted. Customers will always see only
their own VMs, Applications, and TAM reports. Service Providers will be able see all of the VMs, Applications, and TAM
reports in the data center(s) they manage.
xStream App Director User Guide 7
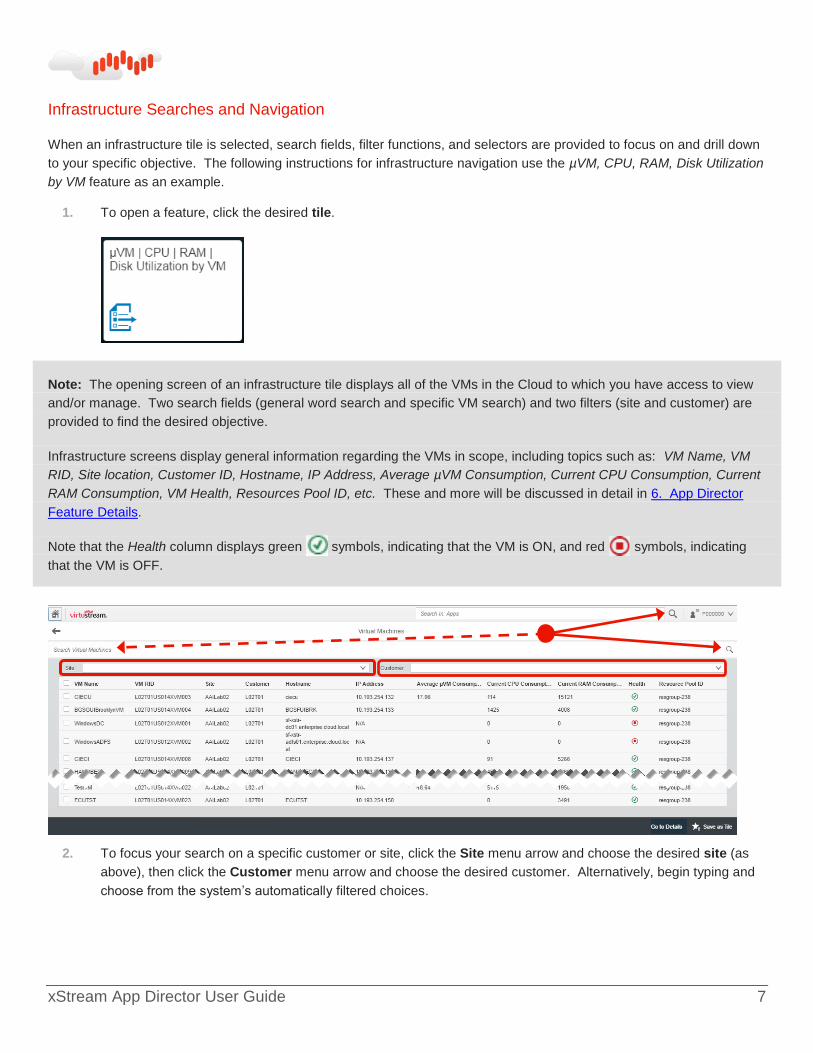
Infrastructure Searches and Navigation
When an infrastructure tile is selected, search fields, filter functions, and selectors are provided to focus on and drill down
to your specific objective. The following instructions for infrastructure navigation use the µVM, CPU, RAM, Disk Utilization
by VM feature as an example.
1. To open a feature, click the desired tile.
Note: The opening screen of an infrastructure tile displays all of the VMs in the Cloud to which you have access to view
and/or manage. Two search fields (general word search and specific VM search) and two filters (site and customer) are
provided to find the desired objective.
Infrastructure screens display general information regarding the VMs in scope, including topics such as: VM Name, VM
RID, Site location, Customer ID, Hostname, IP Address, Average µVM Consumption, Current CPU Consumption, Current
RAM Consumption, VM Health, Resources Pool ID, etc. These and more will be discussed in detail in 6. App Director
Feature Details.
Note that the Health column displays green symbols, indicating that the VM is ON, and red symbols, indicating
that the VM is OFF.
2. To focus your search on a specific customer or site, click the Site menu arrow and choose the desired site (as
above), then click the Customer menu arrow and choose the desired customer. Alternatively, begin typing and
choose from the system’s automatically filtered choices.

xStream App Director User Guide 8
3. To focus your search on the details of a specific VM, in the Search Virtual Machines field, begin typing the
desired VM name. The system will display every VM that contains the letter(s) typed. The list will decrease in
number as additional letters are typed.
a When the desired VM or VMs display in the list, click the adjacent checkbox(es), or click the Select All
checkbox to the left of the first column name.
b At the lower right corner of the screen, click Go to Details.
Note: If you select Go to Details without selecting any checkboxes, the details screen will display the first VM and the
other VMs will be available from the Navigation bars icon that is under the Home button.
4. To change the view on the Details screen, at mid-right, click from the following icons (default view is column chart
format):

xStream App Director User Guide 9
* Column Chart – display information in graphic format
* Table View – display information in table format
* Display Legend – show description of each member of the chart
* Zoom In – view a specific area in greater detail
* Zoom Out – view a larger area with less detail
* Full Screen – view only the chart on the screen or return to normal view (on/off button)
a To perform a desired action, at lower right, select from the following for which you have permission (if you
do not have permission, the buttons will be greyed out):

xStream App Director User Guide 10
* Power Off – to shut down the selected VM
* Power On – to start the selected VM
* Console – to connect to the VM using a console connection
* Support Request – to create a support ticket
* Configure – change the CPU and/or RAM configuration of the VM
* Email – where to send a copy of the chart
b To view CPU, Memory, or Storage utilization, at mid-left on the screen, select CPU, Memory, or Storage.
The following figure depicts CPU utilization in table format.
c To display another VM when more than one VM was selected, click the Navigation Bars at upper left
to open the navigation panel, then select the desired VM. The VM on display is highlighted with a blue
background. To return to the opening VM display, click the Return Arrow on the navigation panel.
Do NOT use the back button on the computer to move to a previous screen.
d To hide the navigation panel, click anywhere on the display window.
xStream App Director User Guide 11
Landscape Searches and Navigation
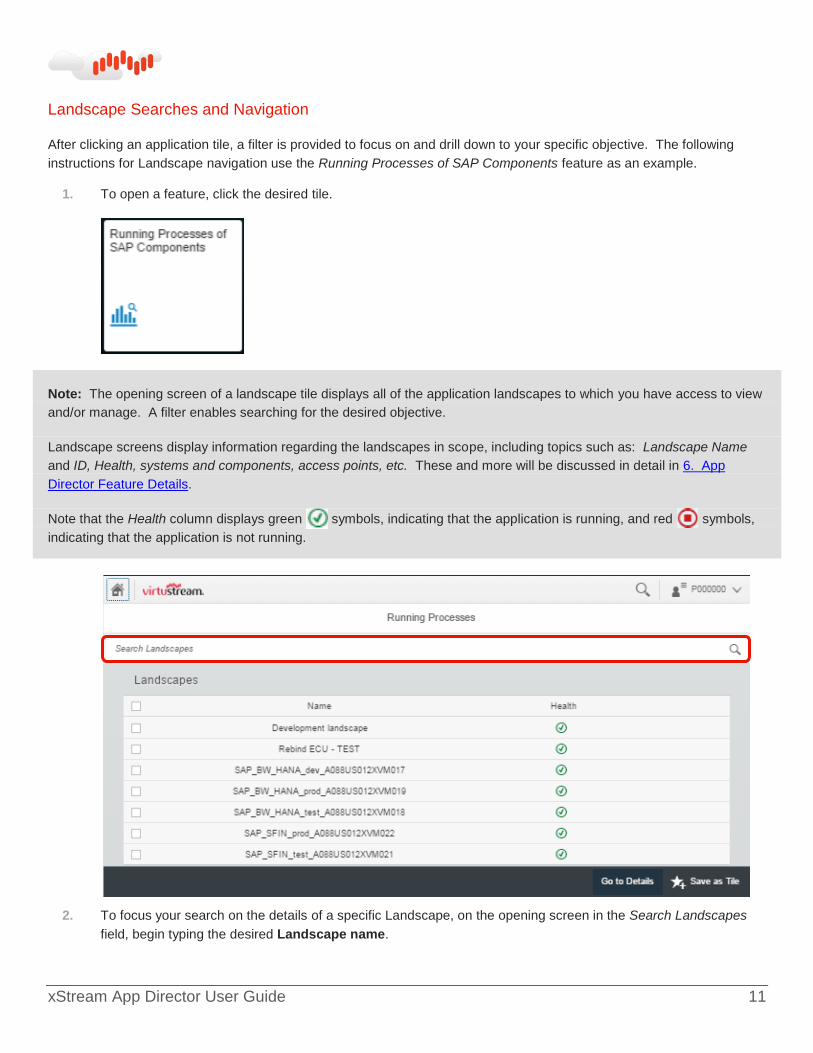
After clicking an application tile, a filter is provided to focus on and drill down to your specific objective. The following
instructions for Landscape navigation use the Running Processes of SAP Components feature as an example.
1. To open a feature, click the desired tile.
Note: The opening screen of a landscape tile displays all of the application landscapes to which you have access to view
and/or manage. A filter enables searching for the desired objective.
Landscape screens display information regarding the landscapes in scope, including topics such as: Landscape Name
and ID, Health, systems and components, access points, etc. These and more will be discussed in detail in 6. App
Director Feature Details.
Note that the Health column displays green symbols, indicating that the application is running, and red symbols,
indicating that the application is not running.
2. To focus your search on the details of a specific Landscape, on the opening screen in the Search Landscapes
field, begin typing the desired Landscape name.

xStream App Director User Guide 12
Note: The system will display every Landscape that contains the letter(s) typed. The list will decrease in number as
additional letters are typed.
a When the desired Landscape or Landscapes display in the list, click the adjacent checkbox(es), or click on
the Select All icon to the left of the first column label.
b At the lower right corner of the screen, click Go to Details.
3. To enlarge the display window, on the Details screen, grab the lower border of the window and pull down.
a Use the scrollbar on the right to view the entire contents of the window.
b To hide the information tip, click Information .

xStream App Director User Guide 13
4. To view details of an item, expand each node as required and click the text within the row to select the item.
Note: Tooltips offer suggestions for node expansion/compression when the mouse is hovered over an item or icon.
Items preceded by a
Right Arrow can be expanded. Items preceded by a Down Arrow cannot be expanded further.
5. To display another Landscape when more than one Landscape item was selected, click the Navigation Bars
at upper left to open the navigation panel, then select the desired item. (The item on display is highlighted
with a blue background.). To return to the opening Landscape display, click the Return Arrow on the
navigation panel.
Do NOT use the back button on the computer to move to a previous screen.
6. To hide the navigation panel, click anywhere on the display window.
TAM Ticket Searches and Navigation
Technical Account Management tiles are of two types: a one-month report (changeable as desired) that includes support
metrics for tickets, disk space, VM performance, backup retention, and usage trending by customer; and three individual

xStream App Director User Guide 14
ticket reports for service requests, change requests, and incidents. The three ticket features provide filters for Status,
Priority and Submit Date, plus a search function to enable quick retrieval of specific items as required. The following
instructions for ticket navigation use the Service Tickets feature as an example.
1. To open a feature, click the desired tile.
Note: The opening screen of a ticket tile displays three filter options and a search field.
Ticket screens display information including topics such as: Ticket ID, Status, Subject, Priority, Submit Date, Submitter
and Requester, Assignee, and Close Date and Closer Name. These and more will be discussed in detail in 6. App
Director Feature Details.
2. On the opening screen, click the Navigation Bars at upper left to open the customer list navigation panel.
a In the navigation panel, search for or scroll and select the desired client.
b Click anywhere on the report screen to hide the navigation panel.
3. On the Report screen, to hide the information tip, click Information .

xStream App Director User Guide 15
a Click the Status and Priority menu arrows and choose the desired Status and Priority level for the
report view.
b Click the Submitted On menu arrow and choose the length of time for the report to cover.
2. xStream App Director Features
Features of xStream App Director are displayed as Tiles that contain monitoring reports of VMs in the Cloud, application
Landscapes, and TAM report and requests. When opened, they provide overall views, details, and charts, many of which
provide additional details per item.
Views of feature presentations are limited to the type (customer, service provider, or channel partner) and level of access
granted to the user. For example, a customer will have access only to reports on items in the customer’s environment. A
service provider will have access to reports on all of the items in the managed data center.
Some features provide search functions to filter for specific items or time; others allow drilling down to details of items; still
others enable interaction by the user, such as Power Off, Connect, or Change Password.
Features are described below in their respective categories, with a detailed description of each, and brief, step-by-step
instructions for use and/or performance of tasks. For detailed navigation and search instructions, refer to section 5. App
Director Navigation. For customization of feature tiles, refer to section 7. App Director Customization.
Budgeting and Reporting Tiles
µVM, Storage, and Network Consumption
This feature displays a consolidated view of the total consumption of all cloud resources in average hourly compute,
average hourly storage, and network metrics, per customer. You can use the information from this tile to review and
quickly identify costly resources, because it allows you to identify opportunities for optimization by scaling down a system,
optimizing managed services (where applicable), or using a cloud scheduler.
1. From the Budgeting and Reporting Tiles cockpit, click the µVM | Storage | Network Consumption tile. The
Consumption Details screen opens and displays the compute consumption information. The Compute

xStream App Director User Guide 16
consumption component is selected by default showing the Compute Report, which displays the Average hourly
compute per day, for the last hour, and the trend.
* At upper left, you can search for items in the list.
* You can view the average hourly compute per day consumption details about Compute for the last hour,
current month total, and trend, in chart or table format.
2. On the Navigation Panel, click Storage to view the Storage Report, which provides average hourly storage per
day consumption details about Storage for the last hour, current month total, and trend, in chart or table format.
3. On the Navigation Panel, click Network to view the average hourly network summary details about the Network
for the last hour and current month total.
xStream App Director User Guide 17
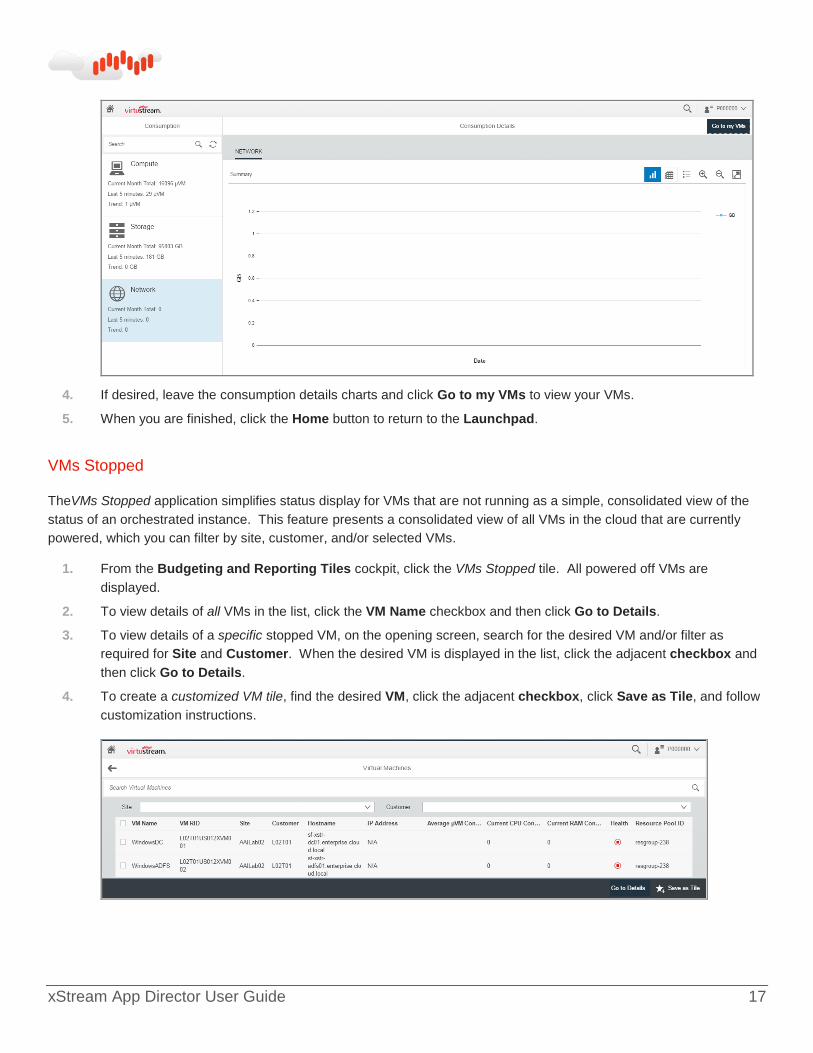
4. If desired, leave the consumption details charts and click Go to my VMs to view your VMs.
5. When you are finished, click the Home button to return to the Launchpad.
VMs Stopped
TheVMs Stopped application simplifies status display for VMs that are not running as a simple, consolidated view of the
status of an orchestrated instance. This feature presents a consolidated view of all VMs in the cloud that are currently
powered, which you can filter by site, customer, and/or selected VMs.
1. From the Budgeting and Reporting Tiles cockpit, click the VMs Stopped tile. All powered off VMs are
displayed.
2. To view details of all VMs in the list, click the VM Name checkbox and then click Go to Details.
3. To view details of a specific stopped VM, on the opening screen, search for the desired VM and/or filter as
required for Site and Customer. When the desired VM is displayed in the list, click the adjacent checkbox and
then click Go to Details.
4. To create a customized VM tile, find the desired VM, click the adjacent checkbox, click Save as Tile, and follow
customization instructions.

xStream App Director User Guide 18
5. On the selected VM Details screen, view the µVM usage in chart or table format; or click CPU, Memory, or
Storage and view their usage in chart or table format. (CPU and Memory provide a search function to aid in
finding the desired VM.)
6. On each screen, as desired:
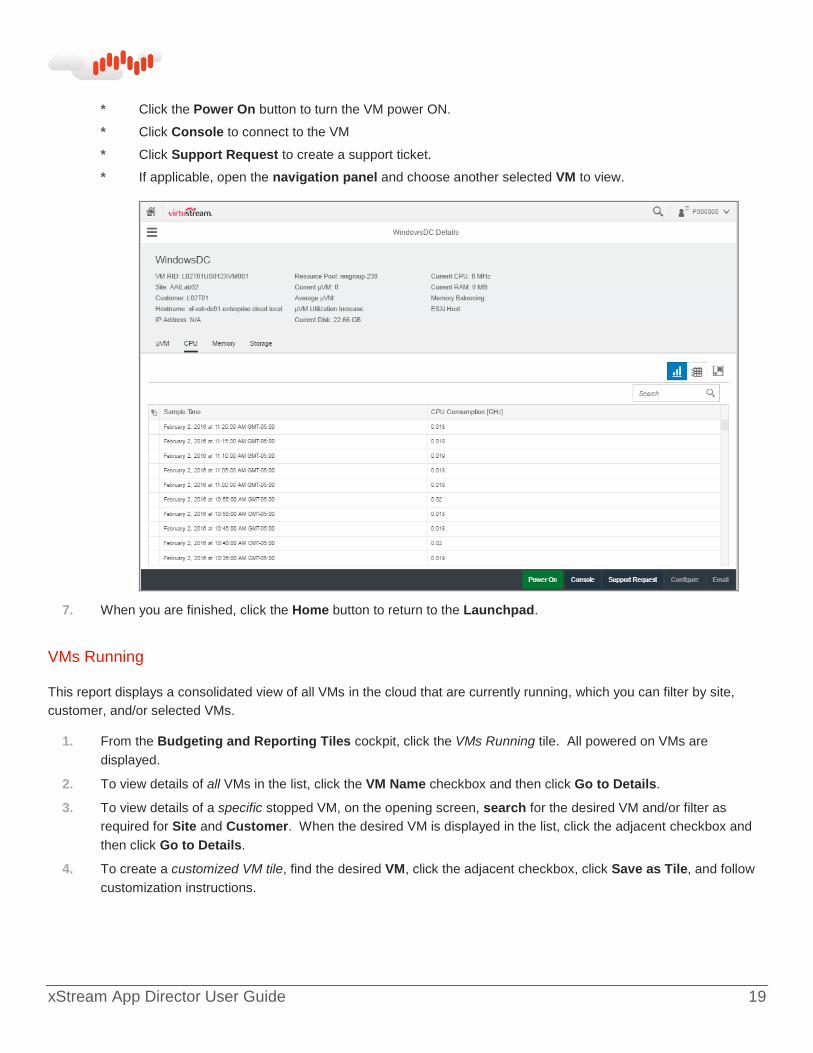
xStream App Director User Guide 19
* Click the Power On button to turn the VM power ON.
* Click Console to connect to the VM
* Click Support Request to create a support ticket.
* If applicable, open the navigation panel and choose another selected VM to view.
7. When you are finished, click the Home button to return to the Launchpad.
VMs Running
This report displays a consolidated view of all VMs in the cloud that are currently running, which you can filter by site,
customer, and/or selected VMs.
1. From the Budgeting and Reporting Tiles cockpit, click the VMs Running tile. All powered on VMs are
displayed.
2. To view details of all VMs in the list, click the VM Name checkbox and then click Go to Details.
3. To view details of a specific stopped VM, on the opening screen, search for the desired VM and/or filter as
required for Site and Customer. When the desired VM is displayed in the list, click the adjacent checkbox and
then click Go to Details.
4. To create a customized VM tile, find the desired VM, click the adjacent checkbox, click Save as Tile, and follow
customization instructions.

xStream App Director User Guide 20
5. On the selected VM Details screen, view the µVM usage in chart or table format; or click CPU, Memory, or
Storage and view their usage in chart or table format. (CPU and Memory provide a search function to aid in
finding the desired VM.)
6. On each screen, as desired:

xStream App Director User Guide 21
* Click Power Off to turn the VM power OFF.
* Click Console to connect to the VM
* Click Support Request to create a support ticket.
* If applicable, open the navigation panel and choose another selected VM to view.
7. When you are finished, click the Home button to return to the Launchpad.
µVM Consumption of Clusters
The µVM Consumption of Clusters application Cluster consumption automates reporting to help identify potential
backend bottlenecks, hotspots, or resource contention that can potentially result in client performance degradation and/or
system outages. This feature displays a consolidated view of µVM consumption of VM clusters in the cloud, which you
can filter by site, customer, and/or selected VMs, and enables you to create customized tiles as cluster subsets.
1. From the Budgeting and Reporting Tiles cockpit, click the µVM Consumption of Clusters tile and, to view a
specific cluster, on the opening screen, search for the cluster and/or filter as necessary for Location, Zone,
and/or Customer.
2. To create a customized tile, find the desired cluster, click its adjacent checkbox, click Save as Tile, and follow
customization instructions.

xStream App Director User Guide 22
3. To add or remove columns in the view, click Change View .
* Scroll the list or search for a title, then click the checkbox(es) adjacent to the column title to add or remove,
as applicable.
xStream App Director User Guide 23
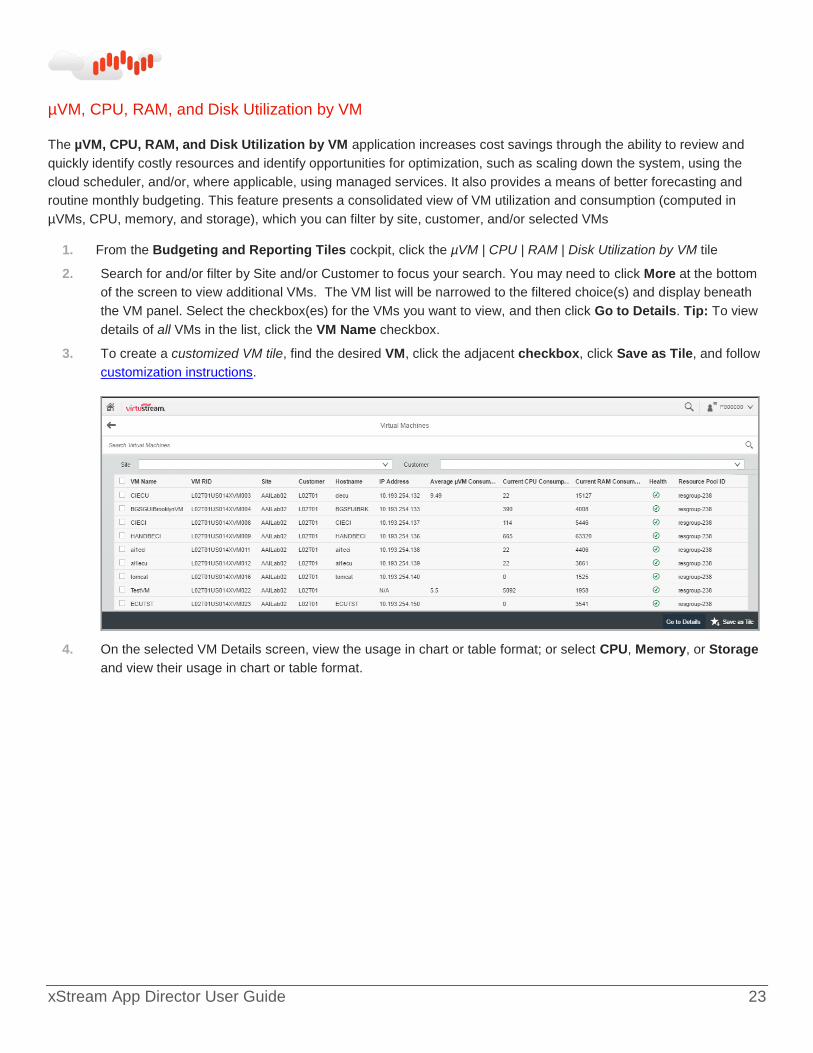
µVM, CPU, RAM, and Disk Utilization by VM
The µVM, CPU, RAM, and Disk Utilization by VM application increases cost savings through the ability to review and
quickly identify costly resources and identify opportunities for optimization, such as scaling down the system, using the
cloud scheduler, and/or, where applicable, using managed services. It also provides a means of better forecasting and
routine monthly budgeting. This feature presents a consolidated view of VM utilization and consumption (computed in
µVMs, CPU, memory, and storage), which you can filter by site, customer, and/or selected VMs
1. From the Budgeting and Reporting Tiles cockpit, click the µVM | CPU | RAM | Disk Utilization by VM tile
2. Search for and/or filter by Site and/or Customer to focus your search. You may need to click More at the bottom
of the screen to view additional VMs. The VM list will be narrowed to the filtered choice(s) and display beneath
the VM panel. Select the checkbox(es) for the VMs you want to view, and then click Go to Details. Tip: To view
details of all VMs in the list, click the VM Name checkbox.
3. To create a customized VM tile, find the desired VM, click the adjacent checkbox, click Save as Tile, and follow
customization instructions.
4. On the selected VM Details screen, view the usage in chart or table format; or select CPU, Memory, or Storage
and view their usage in chart or table format.

xStream App Director User Guide 24
5. On each screen, as desired:
* Click Power Off to shut down the VM.
* Click Console to connect to the VM.
* Click Support Request to create a support ticket.
* If applicable, open the navigation panel and choose another selected VM to view.
VMs Exceeding Average µVM Utilization
Gaining visibility into VM overutilization increases cost savings through the ability to review and quickly identify costly
resources, as well as opportunities for optimization by scaling down the system, using the cloud scheduler, and/or, where
applicable, using managed services. Additionally, this knowledge provides a means of better forecasting and routine
monthly budgeting. The VMs Exceeding Average µVM Utilization application creates a report that yields a consolidated
view of all VMs in the cloud whose µVM utilization is exceeding their weekly or monthly average by an adjustable
percentage, and you can optionally filter by site, customer, and/or selected VMs.
1. From the Budgeting and Reporting Tiles cockpit, click the VMs Exceeding Average Utilization tile. The Virtual
Machines list displays with all of the VMs that are exceeding their average µVM utilization by 10%.
2. To view details of all VMs in the list, click the checkbox for the VM Name column, and then click Go to Details.
3. To view details of a specific stopped VM, search for the desired VM and/or filter as required for Site and
Customer. When the desired VM is displayed in the list, click the adjacent checkbox and then click Go to
Details.
4. To modify the length of time the chart covers, click the Compare with menu arrow and choose the desired
number of days.

xStream App Director User Guide 25
5. To change the percentage of utilization exceeded over average, grab the percentage indicator and move it left
or right, as required. (The indicator will display the percent as it is moved.)
6. To create a customized VM tile, find the desired VM, click the adjacent checkbox, click Save as Tile, and follow
customization instructions.
VMs Using an App Director License
This tile displays information only from the Launchpad tile, as a count of virtual machines presently using a license for
xStream App Director. Based on the number of xStream App Director licenses that the customer has, the percentage of
licenses used is color-coded as follows:
Color Percentage of Licenses Used
Green Less than 90%
Orange 90-100%
Red 100% or above

xStream App Director User Guide 26
Technical Account Management (TAM) Reporting
TAM Reports
The TAM Reports application provides:
* On-demand reporting tailored to the client’s personal landscape
* Critical data for optimizing system costs, accurate forecasting, landscape planning and consolidation, and SLA
reviews
The TAM Reports feature provides technical account managers an automated view of automates the creation of Technical
Account Manager reports that include support metrics for tickets, disk space, VM performance, backup retention, and
usage trending by customer.
1. From the Technical Account Management (TAM) Reporting cockpit, click the TAM Report tile and, on the
opening screen, click the Navigation Bars at upper left to open the customer list navigation panel.

xStream App Director User Guide 27
a In the navigation panel, search for or scroll and select the desired client.
b Click anywhere on the report screen to hide the navigation panel.
2. If desired, click the Start and End Date calendars to change the dates for report results, then click Show.
3. When you are finished, click the Home button.
Service Tickets
The Service Tickets application automates service request reporting, which provides on-demand, expedited reporting by
displaying response and resolution statistics and details of customer service request tickets, which you can filter by age of
request.
1. From the Technical Account Management (TAM) Reporting cockpit, click the Service Requests tile and, on
the opening screen, click the Navigation Bars at upper left to open the customer list navigation panel.

xStream App Director User Guide 28
a In the navigation panel, search for or scroll and select the desired client.
b Click anywhere on the report screen to hide the navigation panel.
2. On the Report screen, to hide the information tip, click Information .
a Click the Status and Priority menu arrows and choose the desired Status and Priority level for the
report view.
b Click the Submitted On menu arrow and choose the length of time for the report to cover.
Change Tickets
The Change Tickets application automates change request reporting, which provides on-demand, expedited reporting by
displaying response and resolution statistics and details of customer change requests, which you can filter by age of
request.
1. From the Technical Account Management (TAM) Reporting cockpit, click the Change Requests tile and, on
the opening screen, click the Navigation Bars at upper left to open the customer list navigation panel.
a In the navigation panel, search for or scroll and select the desired client.
b Click anywhere on the report screen to hide the navigation panel.

xStream App Director User Guide 29
2. On the Report screen, to hide the information tip, click Information .
a Click the Status and Priority menu arrows and choose the desired Status and Priority level for the
report view.
b Click the Submitted On menu arrow and choose the length of time for the report to cover.
Incident Tickets
The Incident Tickets application automates service request reporting, which provides on-demand, expedited reporting by
displaying Incident response and resolution statistics and details of customer incident requests, which you can filter by
age of request, are provided in this report.
1. From the Technical Account Management (TAM) Reporting cockpit, click the Incident Requests tile and, on
the opening screen, click the Navigation Bars at upper left to open the customer search field.
a In the navigation panel, search for or scroll and select the desired client.
b Click anywhere on the report screen to hide the navigation panel.
2. On the Report screen, to hide the information tip, click Information .
a Click the Status and Priority menu arrows and choose the desired Status and Priority level for the
report view.
b Click the Submitted On menu arrow and choose the length of time for the report to cover.

xStream App Director User Guide 30
Operations and Administration
Accelerators & Automators
1. From the Operations and Administration cockpit, click the Accelerators & Automators tile and, in the navigation
panel, search for or select the desired Landscape objective.
2. On the Landscape Details window in the Systems and Components panel, to expand the selected landscape,
click the desired node arrows.
a To enlarge the viewing area, grab the lower border of the window and pull down.
Note: The following figure displays a Landscape fully expanded. For ease in viewing task steps, close the window to its
original size, as step-by-step instructions will display beneath the expanded topics.
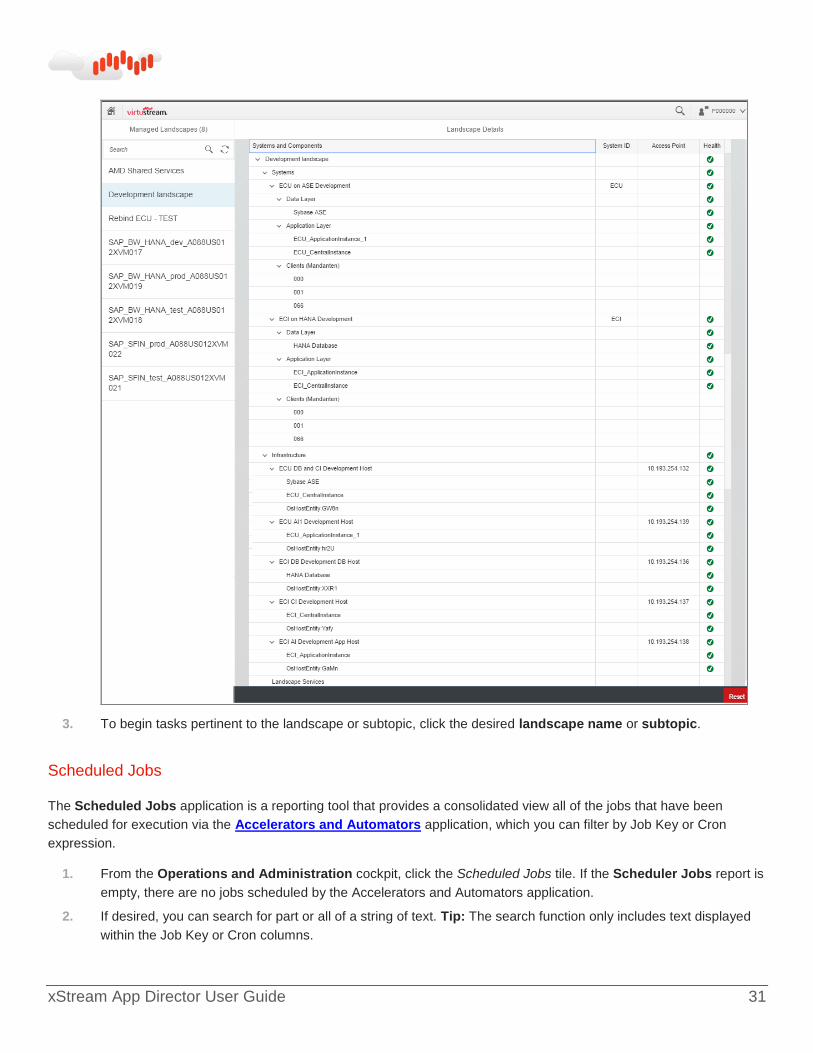
xStream App Director User Guide 31
3. To begin tasks pertinent to the landscape or subtopic, click the desired landscape name or subtopic.
Scheduled Jobs
The Scheduled Jobs application is a reporting tool that provides a consolidated view all of the jobs that have been
scheduled for execution via the Accelerators and Automators application, which you can filter by Job Key or Cron
expression.
1. From the Operations and Administration cockpit, click the Scheduled Jobs tile. If the Scheduler Jobs report is
empty, there are no jobs scheduled by the Accelerators and Automators application.
2. If desired, you can search for part or all of a string of text. Tip: The search function only includes text displayed
within the Job Key or Cron columns.

xStream App Director User Guide 32
Note: System and Recipe Action show no values by default.
3. When you are finished, click Home to return to the Launchpad.
VM Backup Status
The VM Backup Status application assists in providing data protection, backup compliance, and general backup auditing.
This report presents a consolidated view of VM backup details of those backups that are currently running, along with their
status, which you can filter by site, customer, and/or selected VMs.
1. From the Operations and Administration cockpit, click the VM Backup Status tile.
2. Select the customer checkbox(es) desired for viewing, and then click Go to Details. Tip: Select the Customer
RID checkbox at top left to select all Customers. The information for the first customer is displayed by default. If
there is no backup information for the Customer, a No Data message is displayed.
3. If you selected more than one customer, click Select Customers in the upper left of the screen, click on a
customer, and then click in the screen to close the Navigation panel. The information for the newly selected
customer is displayed on the screen.
4. If you want to go back to the first screen to change your selection, click Select Customers, and then click on the
arrow to the left of the selected customers. The Customers screen is displayed with your previously selected
customers. You can update the selection and continue with the process as described.
5. When you are finished, click the Home button to return to the Launchpad.
Validation Checklists
This tile expedites and accelerates accurate and consistent turnover of systems to client by presenting a consolidated
view and, where possible, automates the various checklists used by Onboarding to validate systems before transferring
ownership to Cloud Cover Services for continued management and administration.
1. From the Operations and Administration cockpit, click the Validation Checklists tile. The Landscape selection
screen displays.
2. Search for and/or select the desired SAP Landscape checkbox(es) and then click Go to Details. The Landscape
panel displays in the top of the screen.
Note: The Landscape is selected by default; you do not need to select a component within the Landscape.
3. Click Run the checklists for all systems inside the selected managed Landscape to start the process. On the
popup message, click OK or Cancel, as desired.

xStream App Director User Guide 33
Note: Tasks that are Automatic can be completely validated by the App Director system. Tasks that are Semi-Automatic
can be partially validated by the system, which means you may need to complete some components of the validation.
Tasks that are Manual must be validated by a user. Once validated, you must update the Status." "A system message will
display indicating that checklists are being validated, and several hours may be required. Closing browser will not stop
the process. When finished, you will receive an email.
4. The validation checklist for each component in the Landscape will be displayed in its own tab in the bottom of the
screen.
5. To update Manual tasks, click the Status checkbox. Your username and the date will be auto-populated in the
checklist. You can then add comments as described below.
6. Following validation, you can add a comment to a task. To add a comment, click on the Comments link, enter the
comment, and click on Save Comment. Click on the screen to close the Comments popup. To view the
comment, click on the Comments link and then click on the screen to close the Comments popup. Comment
is added or displayed in a popup.
7. Following validation, you can view details relevant to a specific task. Click on the View Details link to open the
popup. Choose OK to close the popup. The details are displayed in a popup screen.
8. Following validation, you can Rerun the test for a specific task. Click the Rerun icon in the Rerun column. The
test will be rerun for the task.
9. Following validation, you can rerun all of the tasks for a single component in the landscape. Select the
appropriate checklist in the bottom panel and click Selected Single System Checklist. A system message will
display indicating that the checklist is being validated, and several hours may be required. Closing the browser
will not stop the process. When the process is finished, you will receive an email.
10. If more than one Landscape was selected, click the Navigation Bars , choose another Landscape, and
repeat the process. The Navigation panel opens.
11. Click anywhere on the screen to close the Navigation panel. The Navigation panel closes and the new
Landscape is displayed in the top of the screen.
12. Follow the steps above to perform the action on the new Landscape.
13. When you are finished, click the Home button to return to the Launchpad.
Running Processes of SAP Components
This feature displays a consolidated view of the processes running across multiple OS, Hypervisor, SAP, and DB
components that can be leveraged to accelerate maintenance and root cause analysis activities, which provides
enhanced operational continuity by:
* Simplifying root cause analysis
* Providing a monitoring tool to assist in the quick resolution and avoidance of system performance degradation
that can directly impact business or µVM consumption costs
* Providing a mechanism for analysis for general maintenance planning and scheduling

xStream App Director User Guide 34
1. From the Operations and Administration cockpit, click the Running Processes of SAP Components tile. The
Landscape selection screen displays.
2. Search for and/or select the desired SAP Landscape checkbox(es) and then click Go to Details. The Landscape
panel displays in the top of the screen.
3. If necessary, expand the SAP Landscape and Systems and select the desired System. The selected SAP
System instances information will display beneath the Landscape panel for review.
4. Select an Infrastructure Component in the landscape panel. The selected SAP System Host information will
display beneath the Landscape panel for review.
5. If more than one Landscape was selected, click the Navigation Bars , choose another Landscape, and
repeat the process. The Navigation panel opens.
6. Click anywhere on the screen to close the Navigation panel. The Navigation panel closes and the new
Landscape is displayed in the top of the screen.
7. Follow the steps above to perform the action on the new Landscape.
8. When you are finished, click the Home button to return to the Launchpad.
SAP Profile Parameter Changes
The SAP Profile Parameter Changes application provides simplified assistance with troubleshooting, security
compliance (PCI Compliance) , general auditing, and cross-system or individual system reporting of parameter and value
consistency maintenance. This tile displays a consolidated, comparative view of various SAP parameter changes,
including user(s) responsible for the changes, for the purpose of security auditing, root cause analysis, etc.
1. From the Operations and Administration cockpit, click the VM Changes tile. The landscape selection screen
displays.
2. Search for and/or select the desired SAP Landscape checkbox(es), and then click Go to Details. The
Landscape panel displays in the top of the screen.
3. If necessary, expand the SAP Landscape and Systems and select the System. The selected SAP System log
information will display beneath the Landscape panel for review.
4. Select an Infrastructure component. The selected Infrastructure log information will display beneath the
Landscape panel for review.
5. If more than one Landscape was selected, click the Navigation Bars , choose another Landscape, and
repeat the process. The Navigation panel opens.
6. Click anywhere on the screen to close the Navigation panel. The Navigation panel closes and the new
Landscape is displayed in the top of the screen.
7. Follow the steps above to perform the action on the new Landscape.
8. When you are finished, click the Home button to return to the Launchpad.

xStream App Director User Guide 35
VM Changes
VM Changes presents a consolidated view of VM configuration changes, which you can filter by site, customer, and/or
selected VMs. This application assists in troubleshooting, security compliance (PCI Compliance), general auditing, and/or
change management reporting.
1. From the Operations and Administration cockpit, click the VM Changes tile. The Virtual Machines list displays.
2. Search for and/or filter by Site and/or Customer to focus your search. You may need to click More at the bottom
of the screen to view additional VMs. The VM list will be narrowed to the filtered choice(s) and display beneath
the VM panel.
3. Select the VM checkbox(es) desired for viewing and then click Go to Details. Tip: Select the VM Name
checkbox at top left to select all VMs. The information for the first VM out of the selection is displayed by default.
If any changes have been made, a Changes panel will display the Action Type beneath the VM panel; if not,
a No change configuration events found message will display.
4. If you selected more than one VM, click Select VMs in the upper left of the screen, click on a VM, and then click
in the screen to close the Navigation panel. The information for the newly selected VM is displayed on the
screen.
5. If you want to go back to the first screen to change your selection, click Select VMs again, and then click on the
arrow to the left of Selected Virtual Machines. The Virtual Machines screen is displayed with your previously
selected VMs. You can update the selection and continue with the process as described.
6. When you are finished, click the Home button to return to the Launchpad.
Patch SAP Kernel
The Patch SAP Kernel application orchestrates, simplifies, and accelerates the installation of updates to the SAP Kernel
and reduces the downtime and risk of keeping a systems Kernel patched and up to date. This Operations and
Administration feature orchestrates the entire kernel change process from backup through update and post-validation
health check.
1. From the Operations and Administration cockpit, click the Patch SAP Kernel tile. The Landscape selection
screen displays.
2. Search for and/or select the checkbox for the SAP Landscape(s) desired and then click Go to Details. The
Landscape panel displays in the top of the screen.
3. If necessary, expand the Landscape and Systems, and then select the desired System. Entry fields display
beneath Landscape panel.
4. On the Entry Panel that displays, enter information as follows:
Entry Field Description
Username for the fileshare Username required to connect to fileshare where kernel patch SAR and
SAPCAR files are located.
Password for the fileshare Password required to connect to fileshare where kernel patch SAR and
SAPCAR files are located.

xStream App Director User Guide 36
Location of fileshare File share location where path SAR and SAPCAR are located
(e.g.,//10.193.253.131/download).
Mount point Name of the directory that will be mounted on the VM (e.g.,/install).
Path to kernel path SAR files in
fileshare
Path in “Location of fileshare” where the kernel patch files SAR files
are located (e.g.,/install/ SAP_Kernel_742_Unicode_linux_300).
Path the SAPCAR in fileshare Path in “Location of fileshare” where SAPCAR is located
(e.g.,/install/SAPCAR_DUMP).
5. Click the desired Run Time option: Run Now or Schedule for Later (select Date and Time).
6. Click Patch SAP Kernel to begin the process. You will receive an email with confirmation on the completion of
the process.
7. If more than one Landscape was selected, click the Navigation Bars at the upper left. The Navigation panel
will display on the left.
8. Select a different Landscape. Applicable Details information panel displays.
9. Click on the screen anywhere to close the Navigation panel. Navigation panel collapses.
10. Follow the steps above to perform the action on the new Landscape.
11. Click the Home button to return to the Launchpad. Opens the Launchpad.
Reset SAP Passwords
This Operations and Administration tile enhances security and compliance capabilities and improves adherence to
security best practices through ease of use by providing Services Managers and other administrators the ability to reset
SAP user passwords.
1. From the Operations and Administration cockpit, click the Reset SAP Passwords tile. The Landscape
selection screen displays.
2. Search for and/or select the checkbox for the SAP Landscape(s) desired and then click Go to Details. The
Landscape panel displays in the top of the screen.
3. If necessary, expand the Landscape and Systems and select the desired System. The Reset SAP Password
entry fields display beneath the SAP Landscape panel.
4. In the entry fields:
a Select the Client.
b Enter the User account name.
c Enter the new Password.
d Click Reset Now, or click Reset Later and enter Date and Time desired for reset to occur.
5. When you are satisfied with the field contents, click Reset SAP Password. A success message opens indicating
that the password for applicable user(s) is reset.
6. If desired, you can select another System and repeat the process.
7. If more than one Landscape was selected, click the Navigation Bars , and choose another Landscape.

xStream App Director User Guide 37
8. Click anywhere on the screen to close the Navigation panel.
9. Follow the steps above to perform the action on the new Landscape.
10. Click the Home button to return to the Launchpad.
SAP Kernel Information
This Operations and Administration feature provides a clear and concise view of system kernel status of all systems in a
SAP landscape, for consistency and proper upkeep.
1. From the Operations and Administration cockpit, click the SAP Server and Kernel Information tile. The
Landscape selection screen displays.
2. Search for and/or select the checkbox for the SAP Landscape(s) desired and click Go to Details. The
Landscape panel displays in the top of the screen.
3. If necessary, expand the Landscape and select the System. The Kernel information panel displays beneath the
Landscape panel with information on the System selected.
4. If desired, select a different System in the Landscape. The Kernel information panel displays beneath the
Landscape panel with information on the last System selected.
5. If you selected more than one Landscape, click the Navigation Bars , and choose a different Landscape
from the navigation panel.
6. Click anywhere on the screen to close the Navigation panel. The Navigation panel closes and the new
Landscape displays in the top of the screen.
7. Follow the steps above to perform the action on the new Landscape.
8. When you are finished, click the Home button to return to the Launchpad.
Critical VMs
The Critical VMs application assists in reviewing potential backend bottlenecks, hotspots, or resource contention
potentially resulting in client performance degradation, system outages. This feature displays a consolidated view of all
systems in a predefined severity level of “critical,” based on various metrics (CPU, memory, etc.).
1. From the Operations and Administration cockpit, click the Critical VMs tile. The Virtual Machines list displays
with all of the VMs that are in a critical state based on their CPU or Memory utilization.
2. Search for and/or filter by Site and/or Customer to focus your search. You may need to click More at the bottom
of the screen to view additional VMs. The VM list will be narrowed to the filtered choice(s) and display beneath
the VM panel.
3. When you have selected the checkbox(es) for the VMs you want to view, click Go to Details. The properties of
the first VM are displayed in the top of the screen and the CPU chart is displayed in the bottom of the screen. If
desired:
a Click the µVM, Memory, or Storage tab at the bottom of the screen to view a chart of the corresponding
metric. The appropriate chart is displayed.
b Click Power On to change the VM's power state. The VM starts up.

xStream App Director User Guide 38
c Click Console to connect to the VM. Connects to the VM through a Console session.
d Click Support Request to create a support ticket. Launches support screen.
4. If you selected more than one VM, click Select VMs in the upper left of the screen, click on a VM, and then click
in the screen to close the Navigation panel. The information for the newly selected VM is displayed on the
screen.
5. If you want to go back to the first screen to change your selection, click Select VMs again, and then click on the
arrow to the left of Selected Virtual Machines. The Virtual Machines screen is displayed with your previously
selected VMs. You can update the selection and continue with the process as described.
6. When you are finished, click Home to return to the Launchpad.
Isolate SAP Systems
The Isolate SAP Systems application provides full E2E ability to gracefully and consistently prepare a full shutdown with
minimal risk of error (potentially in mass) for maintenance of any type of infrastructure, OS, DB, or Application. Doing so
reduces overall downtime, especially when working across multiple landscapes at one time. Additionally, this feature
increases end-user maintenance transparency. Isolate SAP Systems accelerates maintenance of SAP Systems by
creating a system message, temporarily suspending SAP jobs, locking the system against login (optionally forcing active
users to log off), and notifying the administrator via email.
1. From the Operations and Administration cockpit, click the Isolate SAP System tile. The Landscape selection
screen displays on the Isolate SAP Systems opening screen.
2. If necessary, search for the desired SAP Landscape. Click the checkbox(es) adjacent to the name(s) of the
desired landscape(s), and then click Go to Details.

xStream App Director User Guide 39
3. The Landscape panel displays in the top of the screen. Click the chevrons > as needed to drill down, and then
select the row for the system that you want to isolate.
4. On the Entry panel that displays, enter the required information in the applicable fields as follows:
Entry Field Description
Force logoff users Select this checkbox to force all of users of the system
to be immediately logged off.
Administrator users who are not to be locked and force
logged off during system isolation
Type a comma-separated list of the usernames for
administrators who are to be allowed to remain logged
in during system isolation. For example, DDIC, SOP
*First line of System Message This is the only mandatory field.
Second line of System Message
Third line of System Message
Name of the server where System Message is to be
created
Type the name of server to which System Message
applies. If this field is blank, all users on all servers will
be shown the system message.
Client where System Message is to be created
Client to which System Message applies. If this system
message is only for a specific client, select the client
from the drop list. You can CTRL+Click to select
multiple clients. If left blank, the message will apply to
all clients.
Language code for System Message Type the 2-character language code to be used for the
message; for example, type EN for English.
Expiration date for System Message Type an expiration date for the system message in
YYYY/MM/DD format.

xStream App Director User Guide 40
Entry Field Description
Expiration time for System Message Type an expiration time for the system message in 24-
hour format as HH:MM:SS.
Delete on date for System Message Type a date for the system message to be deleted in
YYYY/MM/DD format.
Delete on time for System Message Type a time for the system message to be deleted in
24-hour format as HH:MM:SS.
5. As applicable:
* To initiate the process immediately, click the Run Now radio button.
* To schedule the process later, click the Schedule for Later radio button and enter a Date and Time.
6. Click Isolate SAP System to begin the process. You will receive an email with confirmation that process has
completed.
7. A success message displays. Click OK to close it.
8. Click the Home button to return to the Launchpad.

xStream App Director User Guide 41
Compare Configuration of Landscape Components
The Compare Configuration of Landscape Components application creates a comparison analysis that simplifies
viewing of status and consistency across a landscape(s), helping to avoid wasted project time, consulting costs, improper
testing on dissimilar environments, and potential production disruption issues due to the promotion of two inconsistent
environments. This report presents a consolidated, comparative view of various configuration parameters (NetWeaver SP
level, kernel versions, additional user-selected parameters) across a Landscape, enabling identification of inadvertent
deviations.
1. From the Operations and Administration cockpit, click the Compare Configuration of Landscape Components
tile. The Landscape selection screen displays.
2. Search for and/or select the checkbox for the SAP Landscape(s) desired and then click Go to Details. The
Landscape panel displays in the top of the screen, and the configuration information is displayed in the bottom of
the screen.
3. The Landscape is selected by default; you do not need to select any component within the Landscape. The
configuration information for all systems within the landscape are displayed in the bottom of the screen.
4. If more than one Landscape was selected, click the Navigation Bars , choose another Landscape, and
repeat the process. The Navigation panel opens.
5. Click anywhere on the screen to close the Navigation panel. The Navigation panel closes and the new
Landscape is displayed in the top of the screen.
6. Follow the steps above to perform the action on the new Landscape.
7. When you are finished, click the Home button to return to the Launchpad.
Stop and Start SAP Systems
The Start | Stop SAP Systems application provides SAP Basis Administrators with the ability to operate an SAP
NetWeaver Systems and databases via a HCP-based user interface. This feature allows you to choose one or more SAP
systems to start or stop, either now or at a scheduled time or at a recurring instance (daily, monthly, yearly). For instance,
regularly stopping the systems during known non-working hours such as weekends can greatly decrease operating costs.
1. From the Operations and Administration cockpit, click the Stop | Start SAP Systems tile.
2. Select desired landscape(s), and then click Go to Details.
3. In the resulting list of Systems and Components, select the SAP ABAP system instance, and then click either
Start or Stop
4. If desired, select the checkbox to include SAP System Database (not selected by default), and then choose
when to execute this task:
a
5. Click Execute.
6. Use Selected Landscapes to act similarly on other chosen Landscapes.
7. When you are finished, click the Home button to return to the Launchpad.

xStream App Director User Guide 42
Copy SAP System
The Copy SAP System application provides:
* Cost savings by accelerating the typical complexities of activities required for projects, upgrades, and testing
* Enhanced ability to perform consistent upkeep of security and application updates on a mass scale with minimal
disruption to business continuity
* Provides client with a simplified and less disruptive means of adhering to both the application and security
compliance and best practice recommendations
This feature automates the copy of a SAP ABAP system by restoring a backup of the source system to a new, unattended
installation of a NetWeaver target system, followed by a SID change and ABAP post processing.
1. From the Operations and Administration cockpit, click the Copy SAP Systems tile.
2. Search for and/or select the desired SAP System checkbox, and then click Go to Details. The Landscape panel
displays in the top of the screen.
3. If necessary, expand the selected Landscape and Systems, select the desired System, and then click Go to
Details. SAP System copy entry fields display beneath the Systems and Components panel.
4. In the information panel:
a Choose the Target Landscape from the dropdown menu.
b Choose the Target VM from the dropdown menu.
5. Enter the following information:
Entry Field Description
Directory where the database backup of
source system is placed
The path where the backup files are to be stored in the file
share.
Database schema password
NFS share for backup IP address of the NFS share
File System device file Name of the swap device
Name of the swap file
Size (MB) of swap file
FQDN
Master Password for the target system
Path to software share
Address of the fileshare
Username for the fileshare
Password for the fileshare

xStream App Director User Guide 43
SID of the target SAP system
Database hostname of the target system
Central instance hostname of the target
system
Path to SAP inst in software share
Logical system name of the target
system
(e.g., ECYCLNT000)
6. When all information is entered, click Copy SAP System. System is copied as directed, and a message is
displayed that states that you will receive an email notification when each of the 5 steps completes.
7. Once a step is completed, you can return to the screen, and View the details of the step. A dialog box is
displayed with the information specific to the step.
8. You can Cancel System Copy at any time. The process is aborted.
9. If desired, select a different System in the Landscape and follow the process above to copy it.
10. If more than one Landscape was selected, click the Navigation Bars , choose another Landscape, and
repeat the process. The Navigation panel opens.
11. Click anywhere on the screen to close the Navigation panel. The Navigation panel closes and the new
Landscape is displayed in the top of the screen.
12. Follow the steps above to perform the action on the new Landscape.
13. When you are finished, click the Home button to return to the Launchpad.
Compliance and Security
VM Audit Event Details
The VM Audit Event Details application provides visibility into all actions taken on the VMs for purposes of traceability and
troubleshooting.
1. From the Compliance and Security cockpit, click the VM Audit Event Details tile. The Virtual Machines selection
screen displays.

xStream App Director User Guide 44
2. You can filter by Customer using the list at the top right, or begin typing part of the name of desired VMs in the
Search field, select the checkbox(es) adjacent to the VMs for which you want to view events, and then click Go
to Details. Tip: To create a customized VM tile, find the desired VM, click the adjacent checkbox, click Save as
Tile, and follow customization instructions.
3. The resulting list of Audit Event Details for a selected VM lists events like migrations of the VM, changes in
CPU/memory usage, changes in resource allocation, etc. You can type in the Search field to filter the events.

xStream App Director User Guide 45
a Click Power On to change the VM's power state. The VM starts up.
b Click Console to connect to the VM. Connects to the VM through a Console session.
c Click Support Request to create a support ticket. Launches support screen.
SAP Server and Database Licenses
The SAP Server and Database Licenses application is for monitoring the licenses in use to avoid issues by:
* Providing a clear and concise view of system or trial license status
* Avoiding potential system or project disruption
* Providing information that assists in budgeting, forecasting, and auditing
This feature monitors licensing of all components of a SAP System (SAP, DB, OS) and notifies of near-term license
expiration.
1. From the Compliance and Security cockpit, click the SAP Server & Database Licenses tile. The Landscape
selection screen displays.
2. Search for and/or select the desired SAP Landscape checkbox(es) and then click Go to Details. The SAP server
license information displays beneath the Landscape panel in the SAP Application Server tab.
3. After reviewing the Server information, select the Databases tab under the Landscape panel. The database
license information displays beneath the Landscape panel in the Databases tab.
4. If more than one Landscape was selected, click the Navigation Bars , choose another Landscape, and
repeat the process. The Navigation panel opens.
5. Click anywhere on the screen to close the Navigation panel. The Navigation panel closes and the new
Landscape is displayed in the top of the screen.
6. Follow the steps above to perform the action on the new Landscape.

xStream App Director User Guide 46
7. Click the Home button to return to the Launchpad.
Hypervisor Startup and Shutdown Logs
The Hypervisor Startup and Shutdown Logs application provides a log to assist with trouble shooting, security
compliance (PCI Compliance) , general auditing, or SLA uptime accountability and reporting. This log file presents a
consolidated view of various details of Hypervisor start/stop events for VMs, which you can filter by data center, tenant, or
business unit.
1. From the Compliance and Security cockpit, click the Hypervisor Startup | Shutdown Logs tile. The Virtual
Machines list displays.
2. Search for and/or filter by Site and/or Customer to focus your search. You may need to select More at the bottom
of the screen to view additional VMs. The VM list will be narrowed to the filtered choice(s) and display beneath
the VM panel.
3. Select the VM checkbox(es) desired for viewing and then click Go to Details. Tip: Select the VM Name
checkbox at top left to select all VMs. The information for the first VM out of the selection is displayed by default.
If there is no information available for the VM, a message will display indicating that no logs are currently
available .
4. If you selected more than one VM, click the Select VMs option in the upper left of the screen, click on a VM, and
then click in the screen to close the Navigation panel. The information for the newly selected VM is displayed on
the screen.
5. If you want to go back to the first screen to change your selection, click Select VMs, and then click on the arrow
to the left of Selected Virtual Machines. The Virtual Machines screen is displayed with your previously selected
VMs. You can update the selection and continue with the process as described.
6. When you are finished, click the Home button to return to the Launchpad.
SAP Startup and Shutdown Logs
The SAP Startup and Shutdown Logs tile provides a Total Landscape component overview to assist in troubleshooting,
security compliance (PCI Compliance), general auditing, and/or SLA uptime accountability and reporting. These logs
display the date and time a component was started or shut down, and the user(s) who performed these actions, which you
can filter by timeframe.
1. From the Compliance and Security cockpit, click the SAP Startup | Shutdown Logs tile. The Landscape
selection screen displays.
2. Search for and/or select the desired SAP Landscape checkbox(es), and then click Go to Details. The
Landscape panel displays in the top of the screen.
3. If necessary, expand the SAP Landscape and Systems and select the System. The selected SAP System log
information will display beneath the Landscape panel for review.
4. Select an Infrastructure component. The selected Infrastructure log information will display beneath the
Landscape panel for review.
5. If more than one Landscape was selected, click the Navigation Bars , choose another Landscape, and
repeat the process. The Navigation panel opens.

xStream App Director User Guide 47
6. Click anywhere on the screen to close the Navigation panel. The Navigation panel closes and the new
Landscape is displayed in the top of the screen.
7. Follow the steps above to perform the action on the new Landscape.
8. When you are finished, click the Home button to return to the Launchpad.
VM Snapshot Logs
VM Snapshot Logs provides an integrated view of VM management events can assist in preventing datastore overfill that
can corrupt a VM. This application displays VM snapshot events in a consolidated view, including VM name, date,
description, and log, which you can filter by site, customer, and/or selected VMs.
1. From the Compliance and Security cockpit, click the VM Snapshot Logs tile. The Virtual Machines list displays.
2. Search for and/or filter by Site and/or Customer to focus your search. You may need to click More at the bottom
of the screen to view additional VMs. The VM list will be narrowed to the filtered choice(s) and display beneath
the VM panel.
3. Select the VM checkbox(es) desired for viewing and then click Go to Details. Tip: Select the VM Name
checkbox at top left to select all VMs. The information for the first VM out of the selection is displayed by default.
The Snapshot Name, Date and Description will be displayed if available for the VM.
4. If you selected more than one VM, click Select VMs in the upper left of the screen, click on a VM, and then click
in the screen to close the Navigation panel. The information for the newly selected VM is displayed on the
screen.
5. If you want to go back to the first screen to change your selection, click Select VMs, and then click on the arrow
to the left of Selected Virtual Machines. The Virtual Machines screen is displayed with your previously selected
VMs. You can update the selection and continue with the process as described.
6. Click the Home button to return to the Launchpad. Opens the Launchpad.
Migration & Provisioning Management
These features are used by the Implementation/Onboarding Team to bring in a new customer. To begin, a few machines
are brought on board during Quality Analysis (QA). Following a successful launch, development VMs are added.
* Onboarding Checklists – consolidates and, where possible, automates various checklists used by the
Onboarding Team to validate systems prior to transferring ownership to Cloud Cover Services for continued
management and administration

xStream App Director User Guide 48
3. App Director Customization
Enabling and Disabling Customization
On the fixed-block screen at bottom right is a floating button that enables customization of the tiles and/or groups. When
clicked, this button turns blue and a popup message displays, indicating that the system is ready for personalization of
tiles and/or groups. This button is an ON/OFF button that ends customization when clicked a second time.
Adding a New Tile
Tiles that display an X ( ) on the upper right corner can be removed as desired. A grey tile in each category marked
with a plus ( ) enables creation and customization of a new feature report or action. New tiles are chosen from a
catalog.
Creating Groups of Tiles
A new group of tiles can be added by clicking +Add Group, which displays with customization below each feature
category. When clicked, an button displays to enable entry of the name of the new group and addition
of tiles.
Creating Custom Functions
You can customize xStream App Director to perform applications on targets of interest. This section provides several
examples.
> >

xStream App Director User Guide 49
Example 1: Landscape Operations
1. Select the opening Landscape name.
2. Beneath the Landscape Details window, in the Operations panel Step 1. Select Operations, search for and/or
select from the operation list the operation(s) to be performed, then click Step 2.
* destroy
* get Factual Blueprint
* restart
* start
* suspend
Note: At any time, you may click the Reset button to delete the currently selected operations. Clicking the Name
checkbox will select all items in the list, from which you may deselect the unwanted operations.
3. In the Operations panel Step 2. Enter Argument Values, enter the Values in the entry field and click Step 3.

xStream App Director User Guide 50
4. In the Operations panel Step 3. Define Sequence, if more than one operation has been selected, click the Step
Number menu arrow and choose the order in which the operations are to be performed, then click Step 4.
5. In the Operations panel Step 4. Define Scheduling, to specify the time(s) for the operation(s) to be performed,
click the applicable radio button:
* Run Now – initiate operation(s) immediately.
* Run Once – initiate operation(s) on the date specified:
* Recurrence – initiate operation(s) as specified:
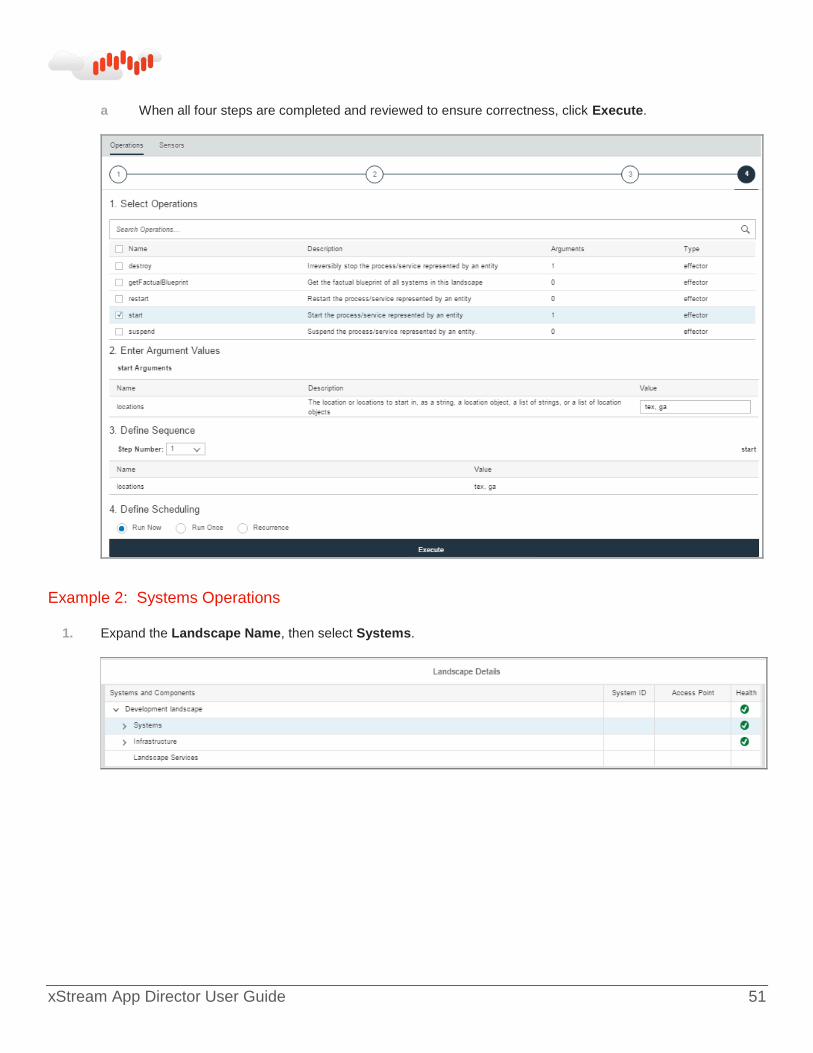
xStream App Director User Guide 51
a When all four steps are completed and reviewed to ensure correctness, click Execute.
Example 2: Systems Operations
1. Expand the Landscape Name, then select Systems.

xStream App Director User Guide 52
2. Beneath the Landscape Details window, in the Operations panel Step 1. Select Operations, search for and/or
select from the operation list the operation(s) to be performed, then click Step 2.
* destroy
* start
* suspend
3. Repeat Example 1 Steps 3 – 5.a.

xStream App Director User Guide 53
Example 3: Control Instance Operations (ECU on ASE Development)
1. Expand the Landscape Name, expand Systems, then select the Control Instance.
2. In the Operations panel Step 1. Select Operations, search for and/or select from the operation list the
operation(s) to be performed. (See table in Step 3 below for Operations and their Values.)
a If scrolling the list, click the More button at bottom to display additional operations.
b When finished with selections, click Step 2.
3. In the Operations panel Step 2. Enter Argument Values, enter the values for the specified operation(s), then click
Step 3. Values for each operation are as follows:

xStream App Director User Guide 54
Analyze Logs
Start Time
End Time
Severity
Max Eentries
Query Spool Requests
Spool Number
Client
User
Title
Recepient
Department
Authorization
Creation Date
Output Device
Log Level
Update Dynamic Profile Parameter
Profile Name
Parameter Name
Parameter Value
Log Level
Configure Transport Domain
Domain Name
Domain Text
System Test
Log Level
Read Client
Client
Log Level
Update Transaction Codes
Transaction Codes
Lock
Unlock
Log Level
Convert Logical System Names
Job Name
Start Date
Start Time
Initiator User Name
Old Logical System Name
New Logical System Name
Test Run
Check Existence Of New Names In Tables
Log Level
Read Kernel Info
Output Format
Update Transport Organizer
Source System SID
Log Level
Create Logon Group
Instance
Logon Group Name
Log Level
Read License Info
License Key
Product
Hardware Key
Log Level
Upload System Change Options
Upload Directory For Namespace
Upload Directory For Components
Namespace File Name
Components File Name
Log Level
Create Multiple Profile Parameters
Profile Parameters
Path
File Name
Log Level
Read Logon Groups
Name
Instance
Logon Group Name
Log Level
Isolate System
Force LogOff
Message

xStream App Director User Guide 55
Create Profile Parameter
Profile Name
Parameter Name
Parameter Value
Parameter Value 2
Parameter Value 3
Parameter Value 4
Log Level
Read Profile Parameter
Profile Name
Version Number
Parameter Name
Log Level
Isolate System
Force LogOff
Admin Users
Message
Create System Message
Message
Message 2
Message 3
Server Name
Client
Language Code
Expiration Date
Expiration Time
Delete On Date
Delete On Time
Log Level
Read STMS State
Log Level
Isolate System
Force LogOff
Admin Users
Message
Message 2
Delete All Licenses
Log Level
Read SAP License Keys
Output Format
Isolate System
Force LogOff
Admin Users
Message
Message 2
Message 3
Delete Logon Group
Instance
Logon Group Name
Log Level
Read System Data
Log Level
Isolate System
Force LogOff
Admin Users
Message
Message 2
Message 3
Server Name

xStream App Director User Guide 56
Delete Multiple Profile Parameters
Profile Parameters
Path
File Name
Log Level
Read System Metrics
No Data
Isolate System
Force LogOff
Admin Users
Message
Message 2
Message 3
Server Name
Client
Delete Profile Parameter
Profile Name
Parameter Name
Log Level
Restart
No Data
Isolate System
Force LogOff
Admin Users
Message
Message 2
Message 3
Server Name
Client
Language Code
Delete System Messages
Message ID
Get Archived
Log Level
Retrieve Global Work Processes
Get All Processes
Get Active Processes Only
Log Level
Isolate System
Force LogOff
Admin Users
Message
Message 2
Message 3
Server Name
Client
Language Code
Expiration Date
Destroy
Really do this
Retrieve System Messages
Get Archived
Log Level
Isolate System
Force LogOff
Admin Users
Message
Message 2
Message 3
Server Name
Client
Language Code
Expiration Date
Expiration Time

xStream App Director User Guide 57
Display Locked Transaction Codes
Show Locked Transaction Codes
Show Unlocked Transaction Codes
Log Level
Schedule Standard Jobs
Schedule
Log Level
Isolate System
Force LogOff
Admin Users
Message
Message 2
Message 3
Server Name
Client
Language Code
Expiration Date
Expiration Time
Delete On Date
Download System Change Options
Download Directory For Namespace
Download Directory For Components
Namespace File Name
Components File Name
Log Level
Show Logged On Users
Server Name
Log Level
Isolate System
Force LogOff
Admin Users
Message
Message 2
Message 3
Server Name
Client
Language Code
Expiration Date
Expiration Time
Delete On Date
Delete On Time
Generate ABAP Loads
Components
Path
File
Log Level
Start
Locations
Retrieve SAP System Instance
Profile Parameter Changes
No Data
Get Factual Blueprint
No Data
Start Database
No Data
Retrieve SAP System Instance
Profile Parameter Changes
Profile Parameter
Import Profiles
Log Level
Start SAP All Instances
Priority Level
Run Level
Soft Timeout
Retrieve SAP System Instance
Profile Parameter Changes
Profile Parameter
Instance Profiles

xStream App Director User Guide 58
Install License
Path
File Name
Log Level
Stop Database
No Data
SAP Kernel Patch
SID
Fileshare User
Fileshare Password
Share
Mount Point
Patch Sourcepath
Path To SAP Car
Log Off Multiple Users
Exclude Users
Log Level
Stop SAP All Instances
Priority Level
Soft Timeout
System Copy
FS Device
Swap File Name
Swap File Size
SID
SID Target
DB SID
FQDN
Master Password
DB Host
DB Target
CI Host
Host Target
Path To SW Share
Path To SAP Inst
Share
Share User
Share Password
DB Data Size
DB Schema User Password
Path To Backup
Old Logical System Name
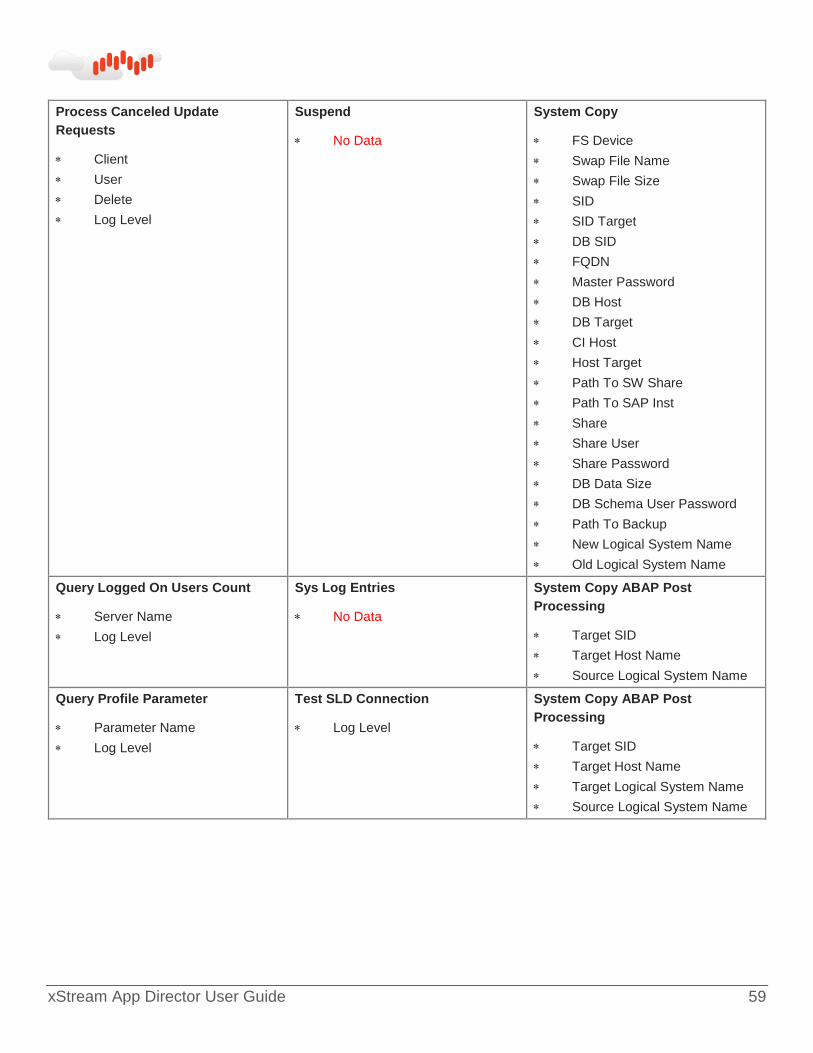
xStream App Director User Guide 59
Process Canceled Update
Requests
Client
User
Delete
Log Level
Suspend
No Data
System Copy
FS Device
Swap File Name
Swap File Size
SID
SID Target
DB SID
FQDN
Master Password
DB Host
DB Target
CI Host
Host Target
Path To SW Share
Path To SAP Inst
Share
Share User
Share Password
DB Data Size
DB Schema User Password
Path To Backup
New Logical System Name
Old Logical System Name
Query Logged On Users Count
Server Name
Log Level
Sys Log Entries
No Data
System Copy ABAP Post
Processing
Target SID
Target Host Name
Source Logical System Name
Query Profile Parameter
Parameter Name
Log Level
Test SLD Connection
Log Level
System Copy ABAP Post
Processing
Target SID
Target Host Name
Target Logical System Name
Source Logical System Name

xStream App Director User Guide 60
Update And Persist Profile
Parameter
Profile Name
Parameter Name
Parameter Value
Parameter Value 2
Parameter Value 3
Parameter Value 4
Log Level
System Copy Prep And Export
Path To Backup
DB Schema User Password
NFS Share
4. In the Operations panel Step 3. Define Sequence, if more than one operation has been selected, click the Step
Number menu arrow and choose the order in which the operations are to be performed, then click Step 4.
5. In the Operations panel Step 4. Define Scheduling, to specify the time(s) for the operation(s) to be performed,
click the applicable radio button. Refer to Example 1 Step 5 for details.
a When all four steps are completed and reviewed to ensure correctness, click Execute.
Example 4: Data Layer and Application Layer Operations
1. Expand the Landscape Name, Systems, and the Control Instance, then select Data Layer.
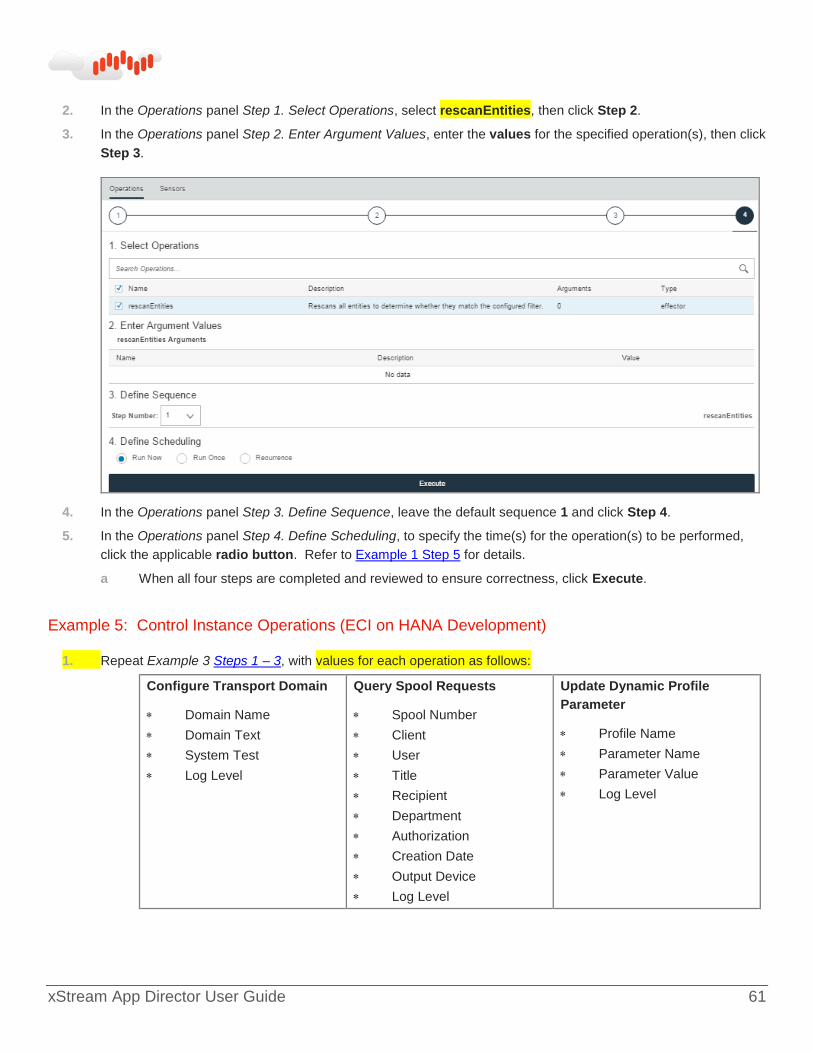
xStream App Director User Guide 61
2. In the Operations panel Step 1. Select Operations, select rescanEntities, then click Step 2.
3. In the Operations panel Step 2. Enter Argument Values, enter the values for the specified operation(s), then click
Step 3.
4. In the Operations panel Step 3. Define Sequence, leave the default sequence 1 and click Step 4.
5. In the Operations panel Step 4. Define Scheduling, to specify the time(s) for the operation(s) to be performed,
click the applicable radio button. Refer to Example 1 Step 5 for details.
a When all four steps are completed and reviewed to ensure correctness, click Execute.
Example 5: Control Instance Operations (ECI on HANA Development)
1. Repeat Example 3 Steps 1 – 3, with values for each operation as follows:
Configure Transport Domain
Domain Name
Domain Text
System Test
Log Level
Query Spool Requests
Spool Number
Client
User
Title
Recipient
Department
Authorization
Creation Date
Output Device
Log Level
Update Dynamic Profile
Parameter
Profile Name
Parameter Name
Parameter Value
Log Level

xStream App Director User Guide 62
Convert Logical System
Names
Job Name
Start Date
Start Time
Initiator User Name
Old Logical System Name
New Logical System Name
Test Run
Check Existence Of New Names In Tables
Log Level
Read Client
Client
Log Level
Update Transaction Codes
Transaction Codes
Lock
Unlock
Log Level
Create Logon Group
Instance
Logon Group Name
Log Level
Read License Info
License Key
Product
Hardware Key
Log Level
Update Transport Organizer
Source System SID
Log Level
Create Multiple Profile
Parameters
Profile Parameters
Path
File Name
Log Level
Read Logon Groups
Name
Instance
Logon Group Name
Log Level
Upload System Change
Options
Upload Directory For Namespace
Upload Directory For Components
Namespace File Name
Components File Name
Log Level
Create Profile Parameter
Profile Name
Parameter Name
Parameter Value
Parameter Value 2
Parameter Value 3
Parameter Value 4
Log Level
Read Profile Parameter
Profile Name
Version Number
Parameter Name
Log Level
Isolate System
Force LogOff
Message

xStream App Director User Guide 63
Create System Message
Message
Message 2
Message 3
Server Name
Client
Language Code
Expiration Date
Expiration Time
Delete On Date
Delete On Time
Log Level
Read STMS State
Log Level
Isolate System
Force LogOff
Admin Users
Message
Delete All Licenses
Log Level
Read SAP License Keys
Output Format
Isolate System
Force LogOff
Admin Users
Message
Message 2
Delete Logon Group
Instance
Logon Group Name
Log Level
Read System Data
Log Level
Isolate System
Force LogOff
Admin Users
Message
Message 2
Message 3
Delete Multiple Profile
Parameters
Profile Parameters
Path
File Name
Log Level
Read System Metrics
No Data
Isolate System
Force LogOff
Admin Users
Message
Message 2
Message 3
Server Name
Delete Profile Parameter
Profile Name
Parameter Name
Log Level
Restart
No Data
Isolate System
Force LogOff
Admin Users
Message
Message 2
Message 3
Server Name
Client

xStream App Director User Guide 64
Delete System Messages
Message ID
Get Archived
Log Level
Restart SAP HANA
Priority Level
Run Level
Soft Time Out
Isolate System
Force LogOff
Admin Users
Message
Message 2
Message 3
Server Name
Client
Language Code
Destroy
Really do this
Retrieve Global Work
Processes
Get All Processes
Get Active Processes Only
Log Level
Isolate System
Force LogOff
Admin Users
Message
Message 2
Message 3
Server Name
Client
Language Code
Expiration Date
Display Locked Transaction
Codes
Show Locked Transaction Codes
Show Unlocked Transaction Codes
Log Level
Retrieve System Messages
Get Archived
Log Level
Isolate System
Force LogOff
Admin Users
Message
Message 2
Message 3
Server Name
Client
Language Code
Expiration Date
Expiration Time

xStream App Director User Guide 65
Download System Change
Options
Download Directory For Namespace
Download Directory For Components
Namespace File Name
Components File Name
Log Level
Schedule Standard Jobs
Schedule
Log Level
Isolate System
Force LogOff
Admin Users
Message
Message 2
Message 3
Server Name
Client
Language Code
Expiration Date
Expiration Time
Delete On Date
Generate ABAP Loads
Components
Path
File
Log Level
Show Logged On Users
Server Name
Log Level
Isolate System
Force LogOff
Admin Users
Message
Message 2
Message 3
Server Name
Client
Language Code
Expiration Date
Expiration Time
Delete On Date
Delete On Time
Get Factual Blueprint
No Data
Start
Locations
Retrieve SAP System Instance
Profile Parameter Changes
No Data
HANA Query
Query Name
Start SAP All Instances
Priority Level
Run Level
Soft Timeout
Retrieve SAP System Instance
Profile Parameter Changes
Profile Parameter
Import Profiles
Log Level
Start SAP HANA
Priority Level
Run Level
Soft Time Out
Retrieve SAP System Instance
Profile Parameter Changes
Profile Parameter
Instance Profiles

xStream App Director User Guide 66
Install License
Path
File Name
Log Level
Stop SAP All Instances
Priority Level
Soft Time Out
SAP Kernel Patch
SID
Fileshare User
Fileshare Password
Share
Mount Point
Patch Sourcepath
Path To SAP Car
Log Off Multiple Users
Exclude Users
Log Level
Stop SAP HANA
Priority Level
Soft Timeout
System Copy
FS Device
Swap File Name
Swap File Size
SID
SID Target
DB SID
FQDN
Master Password
DB Host
DB Target
CI Host
Host Target
Path To SW Share
Path To SAP Inst
Share
Share User
Share Password
DB Data Size
DB Schema User Password
Path To Backup
Old Logical System Name

xStream App Director User Guide 67
Process Canceled Update
Requests
Client
User
Delete
Log Level
Suspend
No Data
System Copy
FS Device
Swap File Name
Swap File Size
SID
SID Target
DB SID
FQDN
Master Password
DB Host
DB Target
CI Host
Host Target
Path To SW Share
Path To SAP Inst
Share
Share User
Share Password
DB Data Size
DB Schema User Password
Path To Backup
New Logical System Name
Old Logical System Name
Query Logged On Users
Count
Server Name
Log Level
Test SLD Connection
Log Level
System Copy ABAP Post
Processing
Target SID
Target Host Name
Source Logical System Name
Query Profile Parameter
Parameter Name
Log Level
Update And Persist Profile
Parameter
Profile Name
Parameter Name
Parameter Value
Parameter Value 2
Parameter Value 3
Parameter Value 4
Log Level
System Copy ABAP Post
Processing
Target SID
Target Host Name
Target Logical System Name
Source Logical System Name
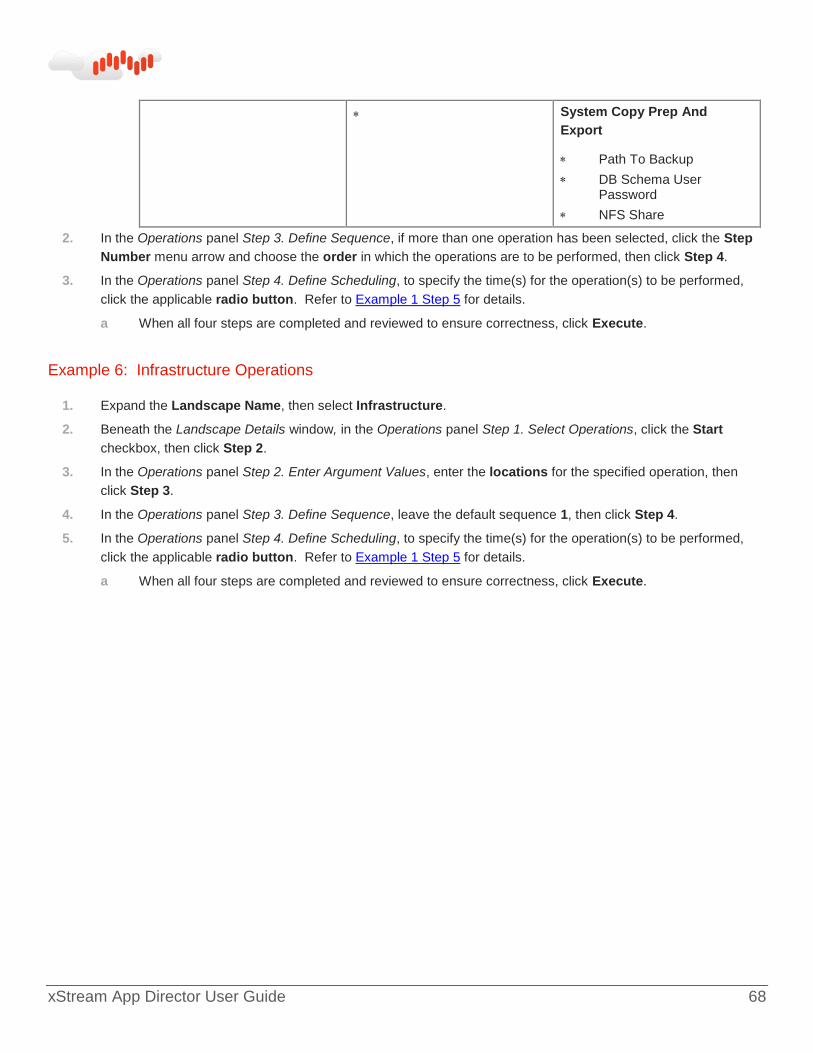
xStream App Director User Guide 68
System Copy Prep And
Export
Path To Backup
DB Schema User Password
NFS Share
2. In the Operations panel Step 3. Define Sequence, if more than one operation has been selected, click the Step
Number menu arrow and choose the order in which the operations are to be performed, then click Step 4.
3. In the Operations panel Step 4. Define Scheduling, to specify the time(s) for the operation(s) to be performed,
click the applicable radio button. Refer to Example 1 Step 5 for details.
a When all four steps are completed and reviewed to ensure correctness, click Execute.
Example 6: Infrastructure Operations
1. Expand the Landscape Name, then select Infrastructure.
2. Beneath the Landscape Details window, in the Operations panel Step 1. Select Operations, click the Start
checkbox, then click Step 2.
3. In the Operations panel Step 2. Enter Argument Values, enter the locations for the specified operation, then
click Step 3.
4. In the Operations panel Step 3. Define Sequence, leave the default sequence 1, then click Step 4.
5. In the Operations panel Step 4. Define Scheduling, to specify the time(s) for the operation(s) to be performed,
click the applicable radio button. Refer to Example 1 Step 5 for details.
a When all four steps are completed and reviewed to ensure correctness, click Execute.

xStream App Director User Guide 69
Example 7: Host Operations
1. Expand the Landscape Name and Infrastructure, then select the desired Host.
2. Beneath the Landscape Details window, in the Operations panel Step 1. Select Operations, search for and/or
select from the operation list the operation(s) to be performed, then click Step 2.
3. In the Operations panel Step 2. Enter Argument Values, enter the locations for the specified operation, then
click Step 3.
4. In the Operations panel Step 3. Define Sequence, leave the default sequence 1, then click Step 4.
5. In the Operations panel Step 4. Define Scheduling, to specify the time(s) for the operation(s) to be performed,
click the applicable radio button. Refer to Example 1 Step 5 for details.
a When all four steps are completed and reviewed to ensure correctness, click Execute.
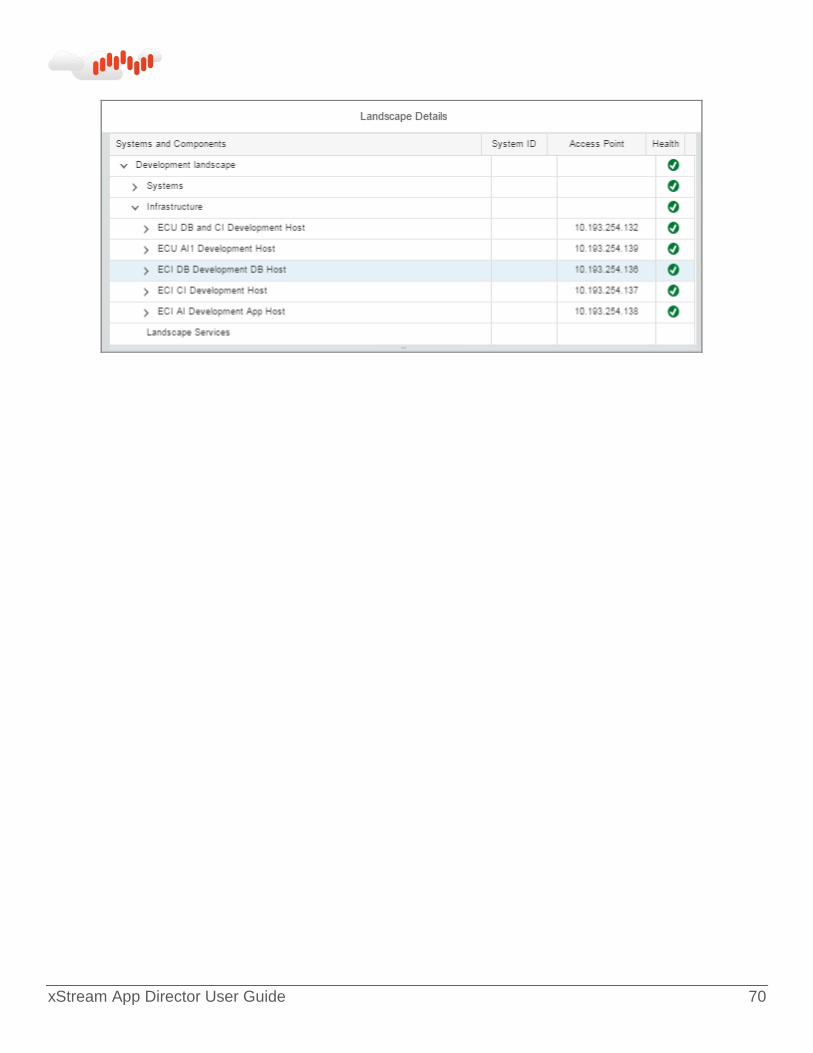
xStream App Director User Guide 70

xStream App Director User Guide 71
6. On the Save as Tile dialog box, enter information as required and select OK to add the tile, or Cancel to abort
the procedure.
* Title
* Subtitle
* Info
* Group
a Click the menu arrow and choose the group into which to add the tile.
4. Glossary
* VM Utilization by Cloud – (infrastructure) displays VM ID, location, host name, IP address, average µVM
consumption, current CPU and RAM consumption, plus health status of all of the VMs owned by the customer or
all VMs in a data center, as filtered by the requester’s search. Specific VMs can be selected to display further
details and charts based on real-time monitoring.
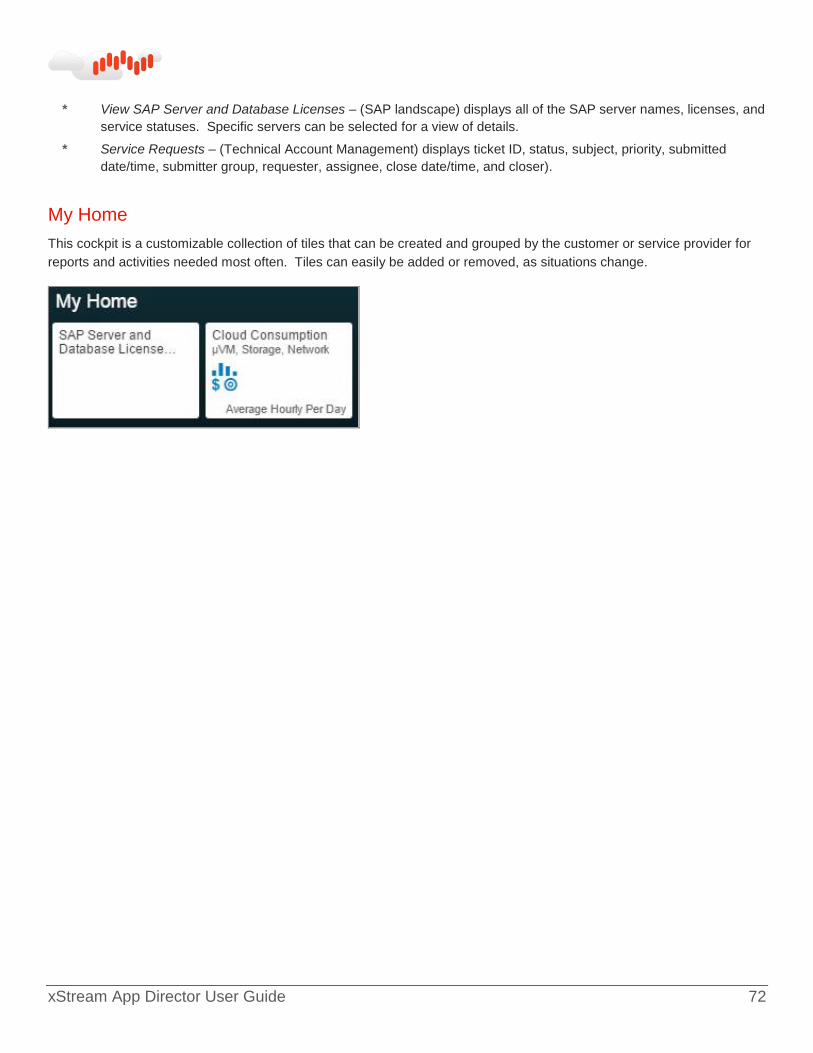
xStream App Director User Guide 72
* View SAP Server and Database Licenses – (SAP landscape) displays all of the SAP server names, licenses, and
service statuses. Specific servers can be selected for a view of details.
* Service Requests – (Technical Account Management) displays ticket ID, status, subject, priority, submitted
date/time, submitter group, requester, assignee, close date/time, and closer).
My Home
This cockpit is a customizable collection of tiles that can be created and grouped by the customer or service provider for
reports and activities needed most often. Tiles can easily be added or removed, as situations change.