Working with Office Documents COPYRIGHTED...
26
Chapter 1 3 GET THE SCOOP ON... Quick ways to create new documents ■ Get easy access to professionally designed document templates ■ Customize Office to make saving documents easier and faster ■ Publish documents on the Web or use the universal PDF or XPS formats Working with Office Documents W orking with Office documents seems like a fairly straightforward affair: You create a new docu- ment, edit it, save it, close it when you no longer need it, and then open it later when you need it once again. In the official Office world, that is indeed all there is to document management. However, in the unofficial world that you will be inhabiting throughout this book, many powerful and useful document management tech- niques exist that you can take advantage of to work faster and more efficiently. In Word, for example, the standard method for work- ing with a new document is to create a blank document based on the Normal template and then add your text, for- matting, and images. However, did you know that Microsoft offers well over 1,000 templates at the Office Online site? These templates cover everything from letters, memos, and fax cover sheets to brochures, flyers, and newsletters, and their professional design not only saves you time, but makes you look professional, as well. This chapter introduces you to templates and to many other techniques for managing your Office documents, from creating them to saving them to publishing them on the Web. COPYRIGHTED MATERIAL
Transcript of Working with Office Documents COPYRIGHTED...

Chapter 1
3
G E T T H E S C O O P O N . . .Quick ways to create new documents ■ Get easy access
to professionally designed document templates ■
Customize Office to make saving documents easier andfaster ■ Publish documents on the Web or use the
universal PDF or XPS formats
Working with OfficeDocuments
Working with Office documents seems like a fairlystraightforward affair: You create a new docu-ment, edit it, save it, close it when you no longer
need it, and then open it later when you need it onceagain. In the official Office world, that is indeed all there isto document management. However, in the unofficialworld that you will be inhabiting throughout this book,many powerful and useful document management tech-niques exist that you can take advantage of to work fasterand more efficiently.
In Word, for example, the standard method for work-ing with a new document is to create a blank documentbased on the Normal template and then add your text, for-matting, and images. However, did you know thatMicrosoft offers well over 1,000 templates at the OfficeOnline site? These templates cover everything from letters,memos, and fax cover sheets to brochures, flyers, andnewsletters, and their professional design not only savesyou time, but makes you look professional, as well.
This chapter introduces you to templates and to manyother techniques for managing your Office documents,from creating them to saving them to publishing them onthe Web.
05_045876 ch01.qxp 9/15/06 10:17 PM Page 3
COPYRIG
HTED M
ATERIAL

4 PART I ■ LEARNING COMMON OFFICE TASKS
Creating a new documentIn most of the Office programs, a new document is created for you auto-matically when you launch the program. However, you can also generatea new document at any time by using either of the following techniques:
■ Choose OfficeNew, and then click Blank type, where type dependson the program. For example, in Word you click Blank Document,in Excel you click Blank Workbook, and in PowerPoint you clickBlank Presentation.
■ Press Ctrl+N.
Creating a new document outside of the programYou can also create a new document even if the associated program isn’topen. Instead, you use the Windows shell to create the document. Thistechnique is useful if you are working in Windows Explorer and realizethat you want to create a new document within the current folder. Hereis how you do so:
1. Choose OfficeNew. (Alternatively, right-click an empty part of thefolder and then click New.)
2. In the list of file types that appears, click one of the following:
■ Microsoft Office Access Database. Creates a blank Access data-base.
■ Microsoft Office Word Document. Creates a blank Word 2007document.
■ Microsoft Office PowerPoint Presentation. Creates a blankPowerPoint presentation.
■ Microsoft Office Publisher Document. Creates a blank Publisherdocument.
■ Microsoft Excel Worksheet. Creates a blank Excel workbook.
Inside ScoopThe new interfaces for Word, Excel, and PowerPoint do not have a traditionalmenu system. In particular, Microsoft has replaced the old File menu item withthe Office button in the top left corner of each program. So in this book when
I tell you something like “Choose Office New,” I mean that you should click the Officebutton and then click New.
InsideScoop
05_045876 ch01.qxp 9/15/06 10:17 PM Page 4

5CHAPTER 1 ■ WORKING WITH OFFICE DOCUMENTS
3. Type a new name for the document (be sure not to delete the fileextension).
4. Press Enter. Double-click the new document to open it in its associ-ated application.
Creating a custom shell presentationWhen you create a new PowerPoint presentation using the Windowsshell, as you learned in the previous section, Windows creates the newdocument using a blank PowerPoint file named PWRPNT12.PPTX,which is located in ShellNew, a subfolder of the main Windows folder(usually C:\Windows). The PWRPNT12.PPTX file just creates a blankpresentation. However, you can create a customized version ofPWRPNT12.PPTX that uses a particular theme or includes one or moreslides that you always include in your presentations, which can save youlots of time when you start presentations. Follow these steps:
1. Use Windows Explorer to open the C:\Windows\ShellNew folder.
2. Right-click PWRPNT12.PPTX and then click Open. Windowslaunches PowerPoint and loads the template.
3. Customize the presentation file as required.
4. Save the template file.
Now when you choose OfficeNew and click Microsoft OfficePowerPoint Presentation, the new file includes the changes you made tothe PWRPNT12.PPTX template.
Note that you can also apply this technique to new Excel andPublisher documents:
■ For Excel, open the ShellNew folder and customize theEXCEL12.XLSX file.
■ For Publisher, open the ShellNew folder and customize theMSPUB.PUB file.
Creating a new document based on an existing documentWhen you work in Microsoft Office, one of the best ways to save time andincrease your efficiency is to, as the saying goes, avoid reinventing thewheel. This means, in this case, that if you need to create a document
05_045876 ch01.qxp 9/15/06 10:17 PM Page 5

6 PART I ■ LEARNING COMMON OFFICE TASKS
that is very similar to an existing document, do not build the new docu-ment from scratch. Instead, use the existing document as a starting pointand modify it as needed for the new file.
Of course this method is only useful if you preserve the original doc-ument. Here are four methods you can use to base a new document onan existing document while also preserving the original:
■ Open the original document and then choose Office Save As. Inthe Save As dialog box that appears, type a new filename. You canalso optionally click a different location and click a different filetype. When you are done, click Save.
■ In the application, choose OfficeNew to display the NewDocument dialog box. Click New from existing to open the Newfrom Existing Document dialog box. Click the original file you wantto use and then click Create New.
■ In the application, choose OfficeOpen to display the Open dia-log box. Click the original file you want to use and then pull downthe Open button’s list and click Open as Copy.
■ Use Windows Explorer to open the folder that contains the originaldocument. Click the document and then choose EditCopy (orpress Ctrl+C). Open the folder in which you want to store the newdocument (this is optional) and then choose EditPaste (or pressCtrl+V).
Taking advantage of templatesAnother secret to success in the business world is to let the experts dowhatever it is they are good at. Let the salespeople sell, the copywriterswrite, and the designers design. If you try to do these things yourself,chances are that it will take you longer and the results will not be as good.
You can apply the same idea to the Office world, as well. Why spendendless hours tweaking the design and layout of, say, a brochure when awide variety of professionally designed brochures is just a few mouseclicks away? I am talking here about using templates, special documentsthat come with predefined layouts, color schemes, graphics, and text.Microsoft Office Online has well over 1,000 templates that you can use,
05_045876 ch01.qxp 9/15/06 10:17 PM Page 6

7CHAPTER 1 ■ WORKING WITH OFFICE DOCUMENTS
divided into more than 20 different categories such as Brochures,Business Cards, Flyers, Letters and Letterhead, Memos and Fax Covers,and Newsletters. And that’s just for Word. Hundreds of other templatesare also available for Excel, PowerPoint, Publisher, and other Office pro-grams. All of them were created by professional designers and most arequite striking. Of course, once you have created a document based onone of these templates, you are free to tweak the layout, design, and textto suit your needs.
In previous versions of Office, the Office Online templates were notfeatured in any way and you had to jump through quite a few hoops touse them. You had to click a link or a button to open the Office Onlinesite in your Web browser, find the template you want, download it, andthen start a new document based on the downloaded file. Just creatingthe document from scratch almost seemed easier.
That has all changed in Office 2007 because Word, Excel, andPowerPoint now make it extremely easy to find and use the OfficeOnline templates. Once you are connected to the Internet, follow thesesteps:
1. Choose OfficeNew to display the New Document dialog box.
2. Click the template category you want to use.
3. Click the template subcategory you want to use (if one exists).
4. Click the template. The right side of the New Document windowshows a larger version of the template, the download size and time,and the template rating (generated by visitors to the Office Onlinesite), as shown in Figure 1.1.
5. Click Download. The program downloads the template and thencreates a new document based on the template.
6. If you see a Security Alert, click Enable Content, click Trust all docu-ments from this publisher, and then click OK.
Inside ScoopAfter you download a template, you can reuse it easily by choosing OfficeNew, clicking the template in the Recently Used Templates list, and then click-ing Create.
InsideScoop
05_045876 ch01.qxp 9/15/06 10:17 PM Page 7

8 PART I ■ LEARNING COMMON OFFICE TASKS
Figure 1.1. Click an Office Online template to see a larger version and its rating.
Saving a documentExperienced computer users know that saving your work too often is justnot possible. A power failure, lightning strike, program hang, orWindows crash can occur at any time, and the result is often the inadver-tent and sudden shutdown of the program and whatever document ordocuments you were working on. If you have not saved your work for awhile, you will lose some or all of those changes.
To minimize the amount of work lost if your document shuts downwithout warning (and therefore minimize the amount of time you haveto spend redoing that work), you can do two things:
■ Get into the habit of saving frequently, at least every few minutes.Some people save every time they pause in their work. To make thistask easier, take advantage of the Save button in the Quick Accesstoolbar or use the Save command’s shortcut key combination:Ctrl+S. With practice you can easily press these keys using just twofingers on your left hand (such as the pinky and middle finger).
05_045876 ch01.qxp 9/15/06 10:17 PM Page 8

9CHAPTER 1 ■ WORKING WITH OFFICE DOCUMENTS
Alternatively, you can automate the saving of a document using aVBA macro, as explained in Appendix B.
■ Use the AutoRecover feature available in most Office 2007 pro-grams. AutoRecover tracks changes made to a document, and in theevent of a program crash enables you to recover files that hadunsaved changes.
Rules for naming Office documentsWhen you save a new document for the first time, the Save As dialog boxincludes a File name text box that you can use to type a name for the doc-ument. In general, you should supply each document with a name that islong enough to accurately describe the document, but not so long thatthe name gets truncated when you view it in Windows Explorer or in theOpen dialog box.
Besides this general file-naming guideline, here are a few more rulesthat you must follow when naming your documents:
■ The complete pathname for any document must not exceed 255characters. The pathname includes not only the filename, but alsothe location of the document, including the drive letter, colon,folder name (or names), and backslashes.
■ The filename can include any alphanumeric character, one or morespaces, and any of the following characters: ~ ` @ # $ % ^ & ( ) _ - += { } [ ] ; , . ‘
■ The filename can also include non-keyboard characters such as anem dash ( — ) and the trademark symbol (™). To type such sym-bols, hold down Alt and then use your keyboard’s numeric keypadto type 0 followed by the symbol’s three-digit ANSI code. Table 1.1lists a few common symbols and the key combinations that you pressto generate them.
■ The filename must not include any of the following characters: * | \ :“ < > ?
■ Do not delete the file extension, such as .doc or .docx for Word doc-uments, and .xls or .xlsx for Excel workbooks. Windows uses the fileextension to associate a document with its application, so deletingan extension breaks that association.
05_045876 ch01.qxp 9/15/06 10:17 PM Page 9

10 PART I ■ LEARNING COMMON OFFICE TASKS
Table 1.1. Key combinations for some common symbolsSymbol Description Key Combination
€ Euro Alt+0128
™ Trademark Alt+0153
¢ Cents Alt+0162
£ Pound Alt+0163
¥ Yen Alt+0165
© Copyright Alt+0169
® Registered trademark Alt+0174
ƒ 1⁄4 One quarter Alt+0188
ƒ 1⁄2 One half Alt+0189
ƒ 3⁄4 Three quarters Alt+0190
Shortening the AutoRecover intervalAutoRecover is one of those great tools that you hope you never have touse. If AutoRecover has a downside, it is that the default interval for sav-ing the recovery data is every 10 minutes. That might sound quite short,but when you are on a roll you can get quite a bit of work done in 10 min-utes. To help AutoRecover recover even more of your work, follow thesesteps to shorten the interval:
1. Choose OfficeApplication Options, where Application is the nameof the program you are using. The Options dialog box appears. (InOffice applications that have a menu bar, choose ToolsOptions,instead.)
2. Click Save. (In some applications you click the Save tab instead.)
3. Make sure the Save AutoRecover info every X minutes check box isactivated, and reduce the number of minutes to the value you wantto use.
4. Click OK.
05_045876 ch01.qxp 9/15/06 10:17 PM Page 10

11CHAPTER 1 ■ WORKING WITH OFFICE DOCUMENTS
Specifying a default save locationWhen you save a new document for the first time, or when you click theSave As command, the Save As dialog box appears. You use this dialogbox to provide a name for the new file and to select a location in whichto store it. Most of the document-based Office applications (includingWord, Excel, PowerPoint, Access, Visio, Project, and OneNote) have adefault folder that appears when you first display the Save As dialog box(or the Open dialog box). This default folder is usually either the MyDocuments folder defined in your Windows user profile, or a subfolderof My Documents — such as My Shapes, for Visio. (In Windows Vista, thedefault folder is usually the Documents folder within your user profile.)
Although not having your documents scattered all over your harddisk is good file management practice, putting every document in a singlefolder is just as bad. Ideally, you should create subfolders in MyDocuments (or Documents, in Windows Vista) for different file types(workbooks, presentations, databases, and so on), different projects, dif-ferent departments, and so on.
After you set up this organizing system, however, you will probablyfind that saving (and opening) documents takes you a little extra timebecause you have to navigate from the program’s default folder to thesubfolder you prefer. Instead or performing these extra steps every time,you can make saving and opening more efficient by changing the pro-gram’s default folder. Here are the steps to follow:
1. Choose OfficeApplication Options, where Application is the nameof the program you are using. The Options dialog box appears. (InOffice applications that have a menu bar, choose ToolsOptionsinstead.)
2. Click Save. (In some applications you click the Save tab instead.)
3. Type the new folder path in the Default file location text box.
4. Click OK.
Watch Out!For small documents, the shorter the AutoRecover interval the better.However, for large documents, saving the AutoRecover data can take the pro-gram a noticeable amount of time, so a very short interval can slow you
down. Try a 4- or 5-minute interval as a compromise.
05_045876 ch01.qxp 9/15/06 10:17 PM Page 11

12 PART I ■ LEARNING COMMON OFFICE TASKS
Customizing the Places bar for quick folder accessThe left side of the Save As and Open dialog boxes includes icons for sev-eral common locations: My Recent Documents, Desktop, MyDocuments, My Computer, and My Network Places. The area that con-tains these icons is called the Places bar.
If you have two or more folders that you use regularly (for example,you might have several folders for various projects that you have on thego), switching between them can be a hassle. To make this chore easier,you can customize the Places bar to include icons for each of these fold-ers. That way, no matter which location you have displayed in the Save Asor Open dialog box, you can switch to one of these regular folders with asingle click of the mouse.
Follow these steps to add a folder to the Places bar:
1. Display the Save As or Open dialog box.
2. Navigate to the folder you want to add to the Places bar.
3. Right-click an empty section of the Places bar.
4. Click Add ‘Folder’, where Folder is the name of the current folder.Office adds the folder to the Places bar.
Figure 1.2 shows the Conference Files folder added to the Places bar.
Figure 1.2. You can get one-click access to any folder by adding that folder to the Places bar.
05_045876 ch01.qxp 9/15/06 10:17 PM Page 12

13CHAPTER 1 ■ WORKING WITH OFFICE DOCUMENTS
To manage a folder icon you have added to the Places bar, right-clickthe folder icon and then click one of the following commands:
■ Move Up. Choose this command to move the folder icon higher inthe Places bar.
■ Move Down. Choose this command to move the folder icon lower inthe Places bar.
■ Rename. Choose this command to rename the folder icon.
■ Remove. Choose this command to delete the folder icon from thePlaces bar.
Saving an Excel workspaceIf you are a regular Excel user, you may find that you have several work-books that open in Excel all or most of the time. Having them open givesyou easy access to the data you need, but opening all those files each timeyou start Excel can be a hassle. To make this task easier, you can define aworkspace that includes those files. A workspace is a special file that acts asa pointer to a collection of workbooks. When you open the workspacefile, Excel automatically opens all the files contained in the workspace.
Before you can create a workspace, you need to customize Excel’sQuick Access toolbar to include the Save Workspace command. You findout the details for customizing the Quick Access toolbar in Chapter 23.For now, follow these steps to add the Save Workspace command toExcel’s Quick Access toolbar:
1. In Excel, choose OfficeExcel Options to display the ExcelOptions dialog box.
2. Click Customization.
3. In the Choose commands from drop-down list, click All Commands.
4. In the Choose commands from list, click Save Workspace.
5. Click Add.
6. Click OK.
05_045876 ch01.qxp 9/15/06 10:17 PM Page 13

14 PART I ■ LEARNING COMMON OFFICE TASKS
Now follow these steps to create a workspace:
1. Open all the workbooks that you want to include in the workspace.(Also, be sure to close any workbooks that you do not want in theworkspace.)
2. In the Quick Access toolbar, click the Save Workspace button. TheSave Workspace dialog box appears.
3. Click a location for the workspace file.
4. Type a name for the workspace file (the default name isresume.xlw).
5. Click Save.
With that done, the next time you launch Excel, you can open all theworkbooks you defined in the workspace by opening the workspace file.
Microsoft Word does not have a Save Workspace command, but it cer-tainly could use one. However, using a VBA macro to save a collection ofWord files as a workspace is possible. See Appendix B for the details.
Embedding TrueType fonts while savingIf you use some unusual TrueType fonts in a Word document orPowerPoint presentation that you plan on sharing with other people (asdescribed in Chapter 22), your formatting efforts will be wasted if theother users do not have those fonts installed. To solve this problem, saveyour work with the TrueType fonts embedded in the document, whichensures that the other users will see your document exactly as youdesigned it. Here are the steps to follow:
1. Choose OfficeApplication Options, where Application is the nameof the program you are using. The Options dialog box appears.
2. Click Save.
3. In the Preserve fidelity when sharing this document/presentationlist, click the document in which you want to embed the fonts.
Bright IdeaYou do not need to restrict yourself to a single workspace file. For example,you could create a separate workspace file for each project you are currentlyworking on. This enables you to quickly switch from one set of workbooks toanother. See Appendix B for a macro that closes all open files.
05_045876 ch01.qxp 9/15/06 10:17 PM Page 14
15CHAPTER 1 ■ WORKING WITH OFFICE DOCUMENTS
4. Click the Embed fonts in the file check box. The application nowactivates check boxes:
■ Embed only the characters used in the document. Activate thischeck box to embed on the characters that actually appear in thedocument, which reduces the file size. If file size is not an issue,or if you think the other user might need to add new charactersin the font, leave this check box deactivated to embed all charac-ters in the font.
■ Do not embed common system fonts. This check box is activatedby default, which makes sense since the other user’s computershould have the same system fonts. If you know that is not thecase, for some reason, deactivate this check box to embed the sys-tem fonts as well.
5. Click OK.
Publishing a Document to the WebWhat do you do if you have existing documents, worksheets, and presen-tations that you want to mount on the Web? Internet Explorer can workin conjunction with Office to display these files, but all your readersmight not have that capability. To make sure anyone who surfs to yoursite can access your data, you need to convert your files into the Web’slingua franca: HTML. Fortunately, the Office applications make this taskeasy by including features that convert documents from their native for-mat to HTML. The next few sections explain the techniques that you usein Word, Excel, PowerPoint, and Outlook.
Saving a Word document as a Web pageWord does an excellent job of converting existing documents intoHTML format. Character formatting (that is, those formats that are com-patible with HTML) is carried out flawlessly. Bullets, numbers, and tablesremain intact; graphics are preserved; and hyperlinks make the journeywithout a hitch. You need to watch out for your headings, but as long asyou’ve used Word’s default heading styles (Heading 1, Heading 2, and soon), they transfer correctly to HTML heading tags.
Of course, there are still a few Word knickknacks that don’t survivethe trip: text boxes, unusual symbols, columns, and table formulas, to
05_045876 ch01.qxp 9/15/06 10:17 PM Page 15

16 PART I ■ LEARNING COMMON OFFICE TASKS
name a few. The best part is that the conversion is about as painless asthese things get. Here are the steps to follow:
1. Make sure you’ve saved your document in Word format.
2. Choose Office Save As. Word displays the Save As dialog box.
3. In the Save as type list, click one of the following types:
■ Single File Web Page. This is the MIME Encapsulation ofAggregate HTML Documents (MHTML) format. It combines theHTML and references to external files such as images into a sin-gle file that uses the .mht extension. Note that only InternetExplorer supports this file type.
■ Web Page. This is a regular HTML Web page that uses the .htmfile extension. Word also creates a folder named Filename_files(where Filename is the text in the File name text box) thatincludes any supporting files, such as images required by the Webpage.
■ Web Page, Filtered. This is also a regular HTML Web page thatuses the .htm extension. The difference is that this format alsostrips out any Office-specific tags that Word uses in the Web Pageformat to facilitate the conversion of the file back into Word for-mat. If you don’t care about converting the document back toWord, choose this format for a smaller size (less than half theWeb Page format). Note, too, that this format also creates afolder to hold the page’s supporting files.
4. If you want to change the page title (the text that appears in thebrowser’s title bar), click Change Title, type the new title in the SetPage Title text box, and click OK.
5. Select a location for the new file.
HackIf you do not want Word to create the folder for the supporting file, chooseOffice Word Options, click Advanced, and then click Web Options. In the Filestab, click Organize supporting files in a folder to deactivate it.
05_045876 ch01.qxp 9/15/06 10:17 PM Page 16

17CHAPTER 1 ■ WORKING WITH OFFICE DOCUMENTS
6. Use the File name box to type a new name for the file if necessary. Ifyou don’t, Word just changes the document’s extension to .mht or.htm (depending on the file type you chose).
7. Click Save.
Saving an Excel range, sheet, or workbook as a Web pageExcel’s row-and-column format mirrors the layout of an HTML table, soit is natural that you should be able to convert a range into the appropri-ate HTML table tags. Of course, you can also publish entire workbooks asWeb pages.
Here are the steps to follow to publish a range or workbook to theWeb:
1. Decide what you want to publish:
■ To publish an entire workbook, open the workbook.
■ To publish a worksheet, select the entire worksheet.
■ To publish a range, select the range.
■ To publish a chart, select the chart.
2. Choose Office Save As. Excel displays the Save As dialog box.
3. In the Save as type list, click one of the following types:
■ Single File Web Page. This is the MIME Encapsulation ofAggregate HTML Documents (MHTML) format. It combines theHTML and references to external files such as images into a sin-gle file that uses the .mht extension. Note that only InternetExplorer supports this file type.
■ Web Page. This is a regular HTML Web page that uses the .htmfile extension. Excel also creates a folder named Filename_files(where Filename is the text in the File name text box) thatincludes any supporting files, such as images required by the Webpage.
4. If you want to change the page title (the text that appears in thebrowser’s title bar), click Change Title, type the new title in the SetPage Title text box, and click OK.
5. Click a location for the new file.
05_045876 ch01.qxp 9/15/06 10:17 PM Page 17
18 PART I ■ LEARNING COMMON OFFICE TASKS
6. Use the File name box to type a new name for the file if necessary. Ifyou don’t, Excel just changes the document’s extension to .mht or.htm (depending on the file type you chose).
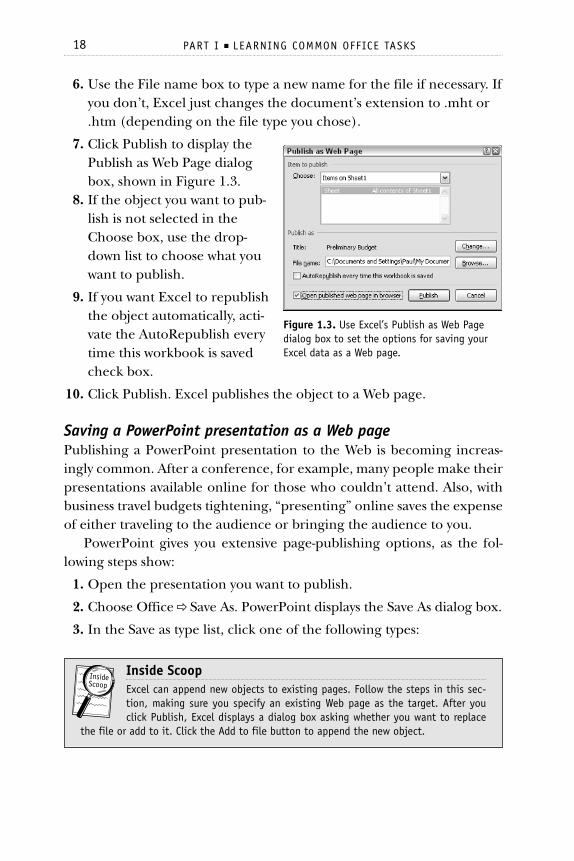
7. Click Publish to display thePublish as Web Page dialogbox, shown in Figure 1.3.
8. If the object you want to pub-lish is not selected in theChoose box, use the drop-down list to choose what youwant to publish.
9. If you want Excel to republishthe object automatically, acti-vate the AutoRepublish everytime this workbook is savedcheck box.
10. Click Publish. Excel publishes the object to a Web page.
Saving a PowerPoint presentation as a Web pagePublishing a PowerPoint presentation to the Web is becoming increas-ingly common. After a conference, for example, many people make theirpresentations available online for those who couldn’t attend. Also, withbusiness travel budgets tightening, “presenting” online saves the expenseof either traveling to the audience or bringing the audience to you.
PowerPoint gives you extensive page-publishing options, as the fol-lowing steps show:
1. Open the presentation you want to publish.
2. Choose OfficeSave As. PowerPoint displays the Save As dialog box.
3. In the Save as type list, click one of the following types:
Inside ScoopExcel can append new objects to existing pages. Follow the steps in this sec-tion, making sure you specify an existing Web page as the target. After youclick Publish, Excel displays a dialog box asking whether you want to replace
the file or add to it. Click the Add to file button to append the new object.
InsideScoop
Figure 1.3. Use Excel’s Publish as Web Pagedialog box to set the options for saving yourExcel data as a Web page.
05_045876 ch01.qxp 9/15/06 10:17 PM Page 18

19CHAPTER 1 ■ WORKING WITH OFFICE DOCUMENTS
■ Single File Web Page. This is the MIME Encapsulation ofAggregate HTML Documents (MHTML) format. It combines theHTML and references to external files such as images into a sin-gle file that uses the .mht extension. Note that only InternetExplorer supports this file type.
■ Web Page. This is a regular HTML Web page that uses the .htm fileextension. PowerPoint also creates a folder named Filename_files(where Filename is the text in the File name text box) that includesany supporting files, such as images required by the Web page.
4. If you want to change the page title (the text that appears in thebrowser’s title bar), click Change Title, type the new title in the SetPage Title text box, and click OK.
5. Click a location for the new file.
6. Use the File name box to type a new name for the file if necessary. Ifyou don’t, PowerPoint just changes the document’s extension to.mht or .htm (depending onthe file type you chose).
7. Click Publish to display thePublish as Web Page dialogbox, shown in Figure 1.4.
8. To determine how much ofthe presentation you publish,PowerPoint gives you threeoptions:
■ Complete Presentation.Click this option to publish every slide in the presentation.
■ Slide Number X Through Y. Click this option to publish only therange of slides you specify using the two spin boxes.
■ Custom Show. Click this option to publish the custom slide showyou select in the associated list. (PowerPoint disables this optionif the presentation has no custom slide shows. To create a customslide show, choose Slide ShowCustom Slide ShowCustomShows.)
Figure 1.4. Use PowerPoint’s Publish as WebPage dialog box to set the options for savingyour presentation as a Web page.
05_045876 ch01.qxp 9/15/06 10:17 PM Page 19

20 PART I ■ LEARNING COMMON OFFICE TASKS
9. If you also want to include your speaker notes, leave the Displayspeaker notes check box activated.
10. Use the options in the Browser Support group to set the targetbrowser for your users.
11. Click Publish. PowerPoint publishes the presentation to a Web page.
Saving an Outlook calendar as a Web pageIf you don’t have access to an Exchange Server, or if you don’t want topublish your Free/Busy information on the Web, you can still publishyour Outlook Calendar as a Web page. Here are the steps to follow:
1. Click the Calendar.
2. Choose File Save as Web Page. Outlook displays the Save as WebPage dialog box.
3. Type the Start date and End date for the time frame that you wantto publish.
4. Type a Calendar title.
5. Type a File name and location for the HTML file.
6. Click Save.
Saving a document as an XPS fileThe global nature of our connected world means that you often need to share information with people who do not use the same technologythat you do. They may not use Microsoft Office, they may run a different version of Windows, or they may be using an entirely different operatingsystem. How do you share the information contained in a document onyour system in such circumstances? Currently you have three mainoptions:
■ Convert the document to plain text, a format supported by all systems.This enables you to share the raw data, but you lose all of your docu-ment’s fonts, formatting, and graphics, which may dilute or distortyour information.
■ Put the document on the Web, enabling the other person to view it using any Web browser. The Office programs do a good job of
05_045876 ch01.qxp 9/15/06 10:17 PM Page 20

21CHAPTER 1 ■ WORKING WITH OFFICE DOCUMENTS
converting documents to Web pages (see the previous few sections),but you do not get any rights management. The other user can eas-ily copy the information and republish it.
■ Publish the document as a PDF (Portable Document Format) file.Almost all systems have (or can get) PDF viewers, so PDF is a near-universal format. Also, the PDF document looks identical to theoriginal, and you can apply digital rights to the PDF file to controlits use. Microsoft has said that it will make available a download thatenables you to save documents in the PDF format, but details werenot available as this book went to press. Check out the Downloadssection of office.microsoft.com.
One problem with PDF is that it is a proprietary standard (it is owned byAdobe Systems) and you may prefer to use a format based on open stan-dards. That is the idea behind Microsoft’s new document format calledthe XML Paper Specification, or XPS. XPS uses XML (eXtendableMarkup Language) for the document syntax and ZIP for the documentcontainer file, so it’s based on open and available technologies.
Microsoft is also licensing XPS royalty-free, so developers can incor-porate XPS viewing and publishing features into their products withoutcost. Also, support for XPS is built into Windows Vista, so all Vista userscan view XPS documents.
Follow these steps to save a document as an XPS file:
1. Open the document you want to convert.
2. Choose Office Save AsXPS. The Publish as XPS dialog boxappears.
3. Type a name for the XPS document in the File name text box.
4. Click an optimization option:
■ Standard. Choose this option if you intend to distribute the PDFdocument online or want to print the PDF document.
■ Minimum size. Choose this option if you only want to distributethe PDF document online.
5. Click Publish.
05_045876 ch01.qxp 9/15/06 10:17 PM Page 21

22 PART I ■ LEARNING COMMON OFFICE TASKS
Opening a documentTo read or work with an existing document, you must open the docu-ment within its associated application. The four main ways you can dothis are as follows:
■ Choose OfficeOpen to dis-play the Open dialog box,locate and click the docu-ment, and then click Open.
■ If you used the documentrecently, click File. If you seethe document listed in theFile menu’s Recent Files list(see Figure 1.5), click thedocument.
■ If you used the documentrecently, choose StartMyRecent Documents (or, inWindows Vista, choose StartRecent Items). If you seethe document listed in thesubmenu, click the docu-ment.
■ Use Windows Explorer to find the document and then double-clickthe file.
Removing a document from Word’s recent files listIf you have recently worked with a Word document that contains sensi-tive data, such as payroll details or proprietary information, you probablydo not want unauthorized users viewing that data. You find out about
Bright IdeaFor convenience, you may want to set up a document as a permanent part ofthe recent files list. To do this, click the pushpin beside the document (thepin pushes “in” to the menu).
Figure 1.5. The File menu maintains a list ofyour recently used documents. If you see thedocument you want to open, click it.
05_045876 ch01.qxp 9/15/06 10:17 PM Page 22

23CHAPTER 1 ■ WORKING WITH OFFICE DOCUMENTS
Office security in detail in Chapter 23. For now, one quick method youcan use to increase security is to remove the document from the recentfiles list that appears in Word’s File menu. Here are the steps to follow:
1. Press Ctrl+Alt+-. The mouse pointer changes to a horizontal bar.
2. Click Office to drop down the Office menu.
3. Click the document you want to remove. Word removes the docu-ment from the list.
If you think you will be removing documents from the recent files listregularly, see Appendix B for a VBA macro that automatically removes alldocuments from the Recent Files list.
Previewing a document before opening itIf you have a large number of documents in a folder, rememberingwhich file contains the information you are looking for can be difficult.Giving documents descriptive filenames can help, but you still may havetimes when you are not sure what is in a file.
You could simply open the document to see what it contains, but youcould easily end up wasting quite a bit of time trying to find the docu-ment you want. To avoid this problem, you can instead display a previewof a selected document in the Open dialog box. Follow these steps:
1. Choose OfficeOpen to display the Open dialog box.
2. Open the folder you want to work with.
3. Click the Views button and then click Preview. The Open dialog boxdisplays a preview pane on the right side.
4. Click a document. The document text appears in the preview pane,as shown in Figure 1.6.
5. Repeat step 4 for any other documents you want to preview.
HackYou can control the number of documents in the Recent Files list. Choose Office Word Options, click Advanced, and then click the value you want in Number ofdocuments on Recent Documents list. You can also use this feature in Excel,PowerPoint, and Access.
05_045876 ch01.qxp 9/15/06 10:17 PM Page 23

24 PART I ■ LEARNING COMMON OFFICE TASKS
Figure 1.6. Click the Views button and then Preview to add the preview pane to the Open dialog box.
Repairing a documentIf a program hangs or Windows crashes while you are working on a doc-ument, you may subsequently have trouble opening the document or, ifyou can open the file, you may find that it contains garbage characters.In either case, the likely cause is that the crash corrupted the document.Fortunately, you may still be able to fix the document or, at least, extractthe document’s text. Follow these steps:
Views
Bright IdeaThe size of the Open dialog box is not fixed. You can click and drag the bor-ders to change the dialog box to the size you prefer. The program will remem-ber the new size the next time you display the dialog box. This trick alsoworks for the Save As dialog box.
05_045876 ch01.qxp 9/15/06 10:17 PM Page 24

25CHAPTER 1 ■ WORKING WITH OFFICE DOCUMENTS
1. In the application, choose OfficeOpen to display the Open dia-log box.
2. Click the file you want to use.
3. Pull down the Open button’s list and click Open and Repair.
Working with document propertiesOffice maintains a collection of properties for each document, and theseproperties represent metadata — data about the document itself. Thedefault properties include the document’s title, subject, author, and,depending on the program, statistics such as the number of words andparagraphs. Each program generates the values of many of these proper-ties automatically. For example, Word calculates all the statistics based onthe document content, and the default values for the Author andCompany properties are the values you entered when you installedWord. The other properties you fill in by hand.
Editing document propertiesTo add or edit the properties for a document, first open the document inits associated application. Choose Office FinishProperties. The stan-dard properties appear in the Properties pane, shown in Figure 1.7.
Figure 1.7. Choose Office Finish Properties to display the current document’s standard properties.
05_045876 ch01.qxp 9/15/06 10:17 PM Page 25

26 PART I ■ LEARNING COMMON OFFICE TASKS
For a more detailed look at the document’s properties, click Standardand then click Advanced to display the document’s Properties dialogbox, shown in Figure 1.8, which has five tabs:
■ General. This tab shows properties such as the filename, file type,location, size, and the dates the document was created and lastmodified.
■ Summary. This tab shows the standard properties plus a couple ofextra properties (such as Manager).
■ Statistics. This tab shows the document’s creation date, the dates itwas last modified, accessed, and printed, who last saved it, the num-ber of times it has been saved (the revision number), and the totalediting time. Word andPowerPoint documents alsoshow statistics such as thenumber of pages, paragraphs,words, and characters.
■ Contents. This tab shows ahierarchical view of the docu-ment’s parts. For example,Excel shows the name of eachsheet, whereas PowerPointshows the names of the fontsused, the design template,the slide titles, and more.
■ Custom. This tab shows thecustom properties associatedwith the document. See thenext section for more on cus-tom properties.
Bright IdeaTo change the default Author property, choose Office Application Options,where Application is the name of the program. Click Personalize and then editthe value in the User name text box.
Figure 1.8. Click Advanced to display all the properties associated with the document.
05_045876 ch01.qxp 9/15/06 10:17 PM Page 26

27CHAPTER 1 ■ WORKING WITH OFFICE DOCUMENTS
Creating a custom document propertyYou can also create your own custom properties, and you can set these upto be filled in either automatically or manually. For example, if you arepassing a document among a number of people, you may want to keeptrack of who last read the document. To do that, you could create a “LastRead By” property and have each user fill in his or her initials. Here arejust a few other custom property ideas:
■ The name of the person who edited or proofread the document
■ The date the document was completed
■ The department the document belongs to
■ The project that the document is part of
■ The current status of the document
■ A telephone number to call for more information about the document
You create a custom property by following these steps:
1. Click the document and then choose Office FinishPropertiesto display the document’s Properties dialog box.
2. Pull down the Standard list and click Advanced to display theDocument Properties dialog box, and then click the Custom tab.
3. Type a name for the property in the Name text box.
4. Use the Type list to click a data type for the property: Text, Date,Number, or Yes or No.
5. Type the property value in the Value text box.
6. If you want the property value generated automatically by a book-mark (in Word) or a named cell (in Excel), click the Link to con-tent check box.
HackYou can get Word, Excel, and PowerPoint to remind you to enter document prop-erties. See Appendix B for a macro that enables you to set this up.
05_045876 ch01.qxp 9/15/06 10:17 PM Page 27

28 PART I ■ LEARNING COMMON OFFICE TASKS
7. Specify the value of the prop-erty as follows:
■ If you activated Link tocontent, use the Value listto click the name of thebookmark or range nameyou want to associate withthe property.
■ Otherwise, type the prop-erty value in the Value textbox.
8. Click Add. Windows adds theproperty to the Propertieslist. Figure 1.9 shows anexample.
9. Repeat Steps 3 through 8 toadd other custom properties.
10. Click OK.
Just the facts■ To create a new Office document in Windows Explorer, choose
OfficeNew and then click the file type you want to create.
■ A filename can include any alphanumeric character, one or morespaces, and any of the following characters: ~ ` @ # $ % ^ & ( ) _ - += { } [ ] ; , . ‘. Do not use any of the following characters in your file-names: * | \ : “ < > ?
■ To save a document as a Web page, choose Office Save As, use theSave as type box to click the Web page format you want, and thenclick either Save or Publish.
■ To preview a document before opening it, choose OfficeOpen,click the Views button, and then click Preview.
■ To display and edit a document’s standard properties, choose View FinishProperties.
Figure 1.9. Use the Custom tab to add yourown properties to the document.
05_045876 ch01.qxp 9/15/06 10:17 PM Page 28