Welcome to the CSS (Claimant Self Service)...
48
Welcome to the CSS (Claimant Self Service) System Welcome to the Claimant Self Service tutorial. This tutorial was developed to show you what to expect and how to navigate the screens you will see if you decide to file an Unemployment claim.
Transcript of Welcome to the CSS (Claimant Self Service)...

Welcome to the CSS
(Claimant Self Service) System
Welcome to the Claimant Self Service tutorial. This tutorial was developed to show you
what to expect and how to navigate the screens you will see if you decide to file an
Unemployment claim.

2
If you are a first time user of Uplink, you must create a new account, even if you already
have an account in CS3. To do this, click on the New User button.
If for any reason your Uplink account would need to be reset, you’ll be instructed to click
on the New User button to recreate your account.

3
You should complete all fields, but those fields with an asterisk just to the right are
mandatory.
You will want to double check your Social Security Number to be sure you entered it
correctly. The last time your Social Security Number will appear in Uplink will be on this
screen.
Your Date of Birth must be entered in the format shown in the parenthesis to the right of
that field. You may also click the calendar icon to the right of the date field.

4
By doing so, a calendar will pop up, which you can use to select the year, month, and
then the day. This will place the date chosen in the field. All date fields in Uplink have
this option.
To create a new account, your Date of Birth must match the date you used when you
filed your claim in the past.
5
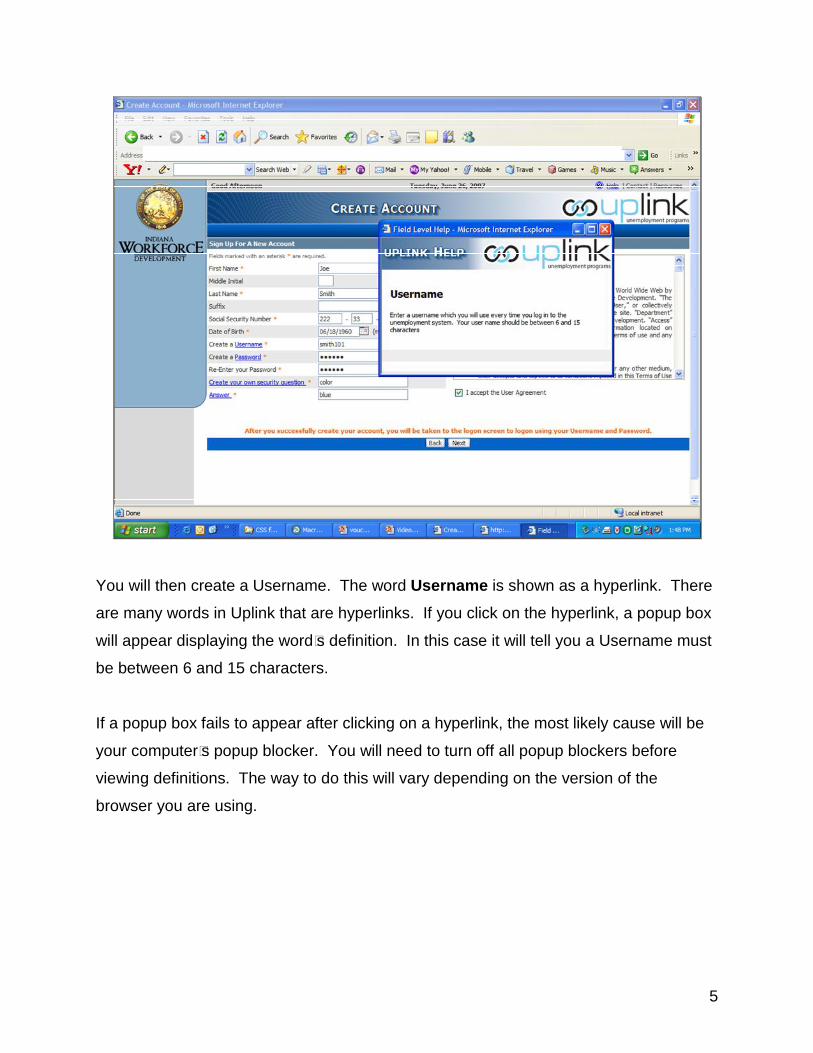
You will then create a Username. The word Username is shown as a hyperlink. There
are many words in Uplink that are hyperlinks. If you click on the hyperlink, a popup box
will appear displaying the word’s definition. In this case it will tell you a Username must
be between 6 and 15 characters.
If a popup box fails to appear after clicking on a hyperlink, the most likely cause will be
your computer’s popup blocker. You will need to turn off all popup blockers before
viewing definitions. The way to do this will vary depending on the version of the
browser you are using.
6
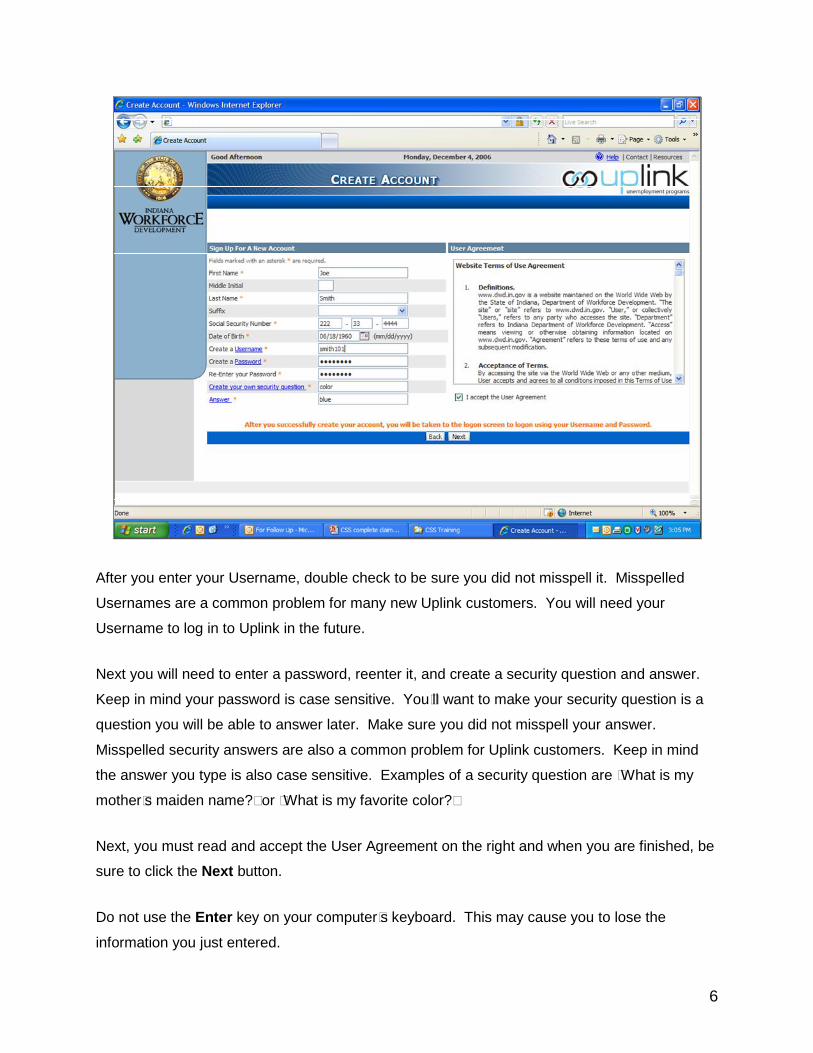
After you enter your Username, double check to be sure you did not misspell it. Misspelled
Usernames are a common problem for many new Uplink customers. You will need your
Username to log in to Uplink in the future.
Next you will need to enter a password, reenter it, and create a security question and answer.
Keep in mind your password is case sensitive. You’ll want to make your security question is a
question you will be able to answer later. Make sure you did not misspell your answer.
Misspelled security answers are also a common problem for Uplink customers. Keep in mind
the answer you type is also case sensitive. Examples of a security question are “What is my
mother’s maiden name?” or “What is my favorite color?”
Next, you must read and accept the User Agreement on the right and when you are finished, be
sure to click the Next button.
Do not use the Enter key on your computer’s keyboard. This may cause you to lose the
information you just entered.

7
After you verify your Social Security Number and Date of Birth, click the Next button.

8
Now that you have an account established, you will be asked to logon. This is done by
entering your newly created user name and password, and clicking the Logon button.
If you forget your username or password, you can click on the appropriate button. You
will then be asked for your Social Security number and date of birth, and be required to
answer your security question. Once this information is successfully entered, your
password will be reset. You must then create and reenter a new password.
If you clicked on the Forgot Username button, pay close attention to the Username that
will be displayed for you after you enter your security answer. This is how you will need
to spell your Username when you log back in.

9
Now you will begin the registration process. You will be asked for your personal
information. If you have already had a claim, this information will already be listed. You
may edit any information that has changed.
Be sure to double check your Date of Birth while you are on this screen. This will be the
only time you’ll be permitted to correct it.

10
You will enter your address on this screen.

11
Contact information is not mandatory, but recommended. This will help us contact you
quickly due to any problems with your claim. The correct format must be entered.

12
You are then asked for demographic information. You must select your Education
Level, Race and Ethnicity, (these two for statistical purposes) and answer Yes or No for
if you are Disabled, a Veteran, and/or a Citizen. If you are not a Citizen, an Alien
Registration number must be entered.

13
You are now registered in Uplink. The next series of questions are to be answered for
filing a claim. The need for further information or direction is determined by the answers
to the questions on this screen. The answers also determine what type of claim you are
filing.

14
Answers to these questions determine the need for further fact finding as well.
Be sure to read each question carefully before answering. An answer to some of these
questions could require further fact finding, and answering incorrectly could create a
delay on your claim. For example, you must still be able and available for full-time work
even if you are job-attached and excused from looking for work.
If you are unsure how to answer any of these questions you may contact Indiana
Department of Workforce Development’s Uplink Customer Service Center by calling 1-
800-891-6499 for assistance.
15
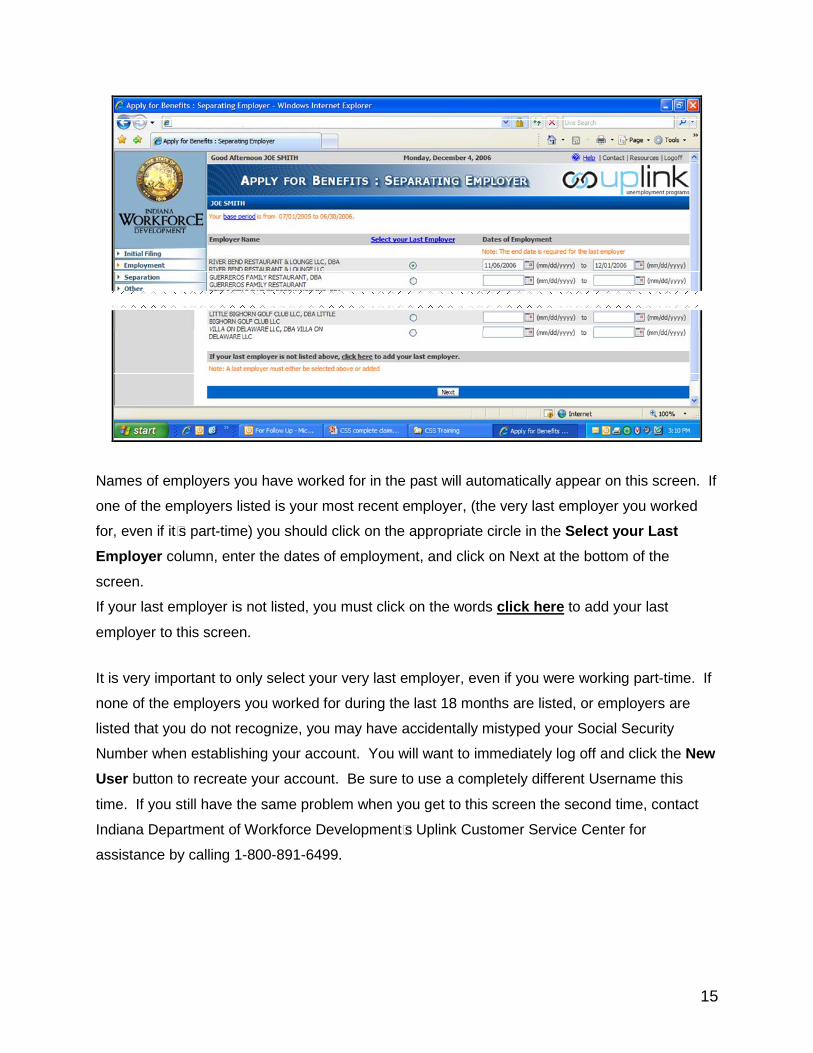
Names of employers you have worked for in the past will automatically appear on this screen. If
one of the employers listed is your most recent employer, (the very last employer you worked
for, even if it’s part-time) you should click on the appropriate circle in the Select your Last
Employer column, enter the dates of employment, and click on Next at the bottom of the
screen.
If your last employer is not listed, you must click on the words click here to add your last
employer to this screen.
It is very important to only select your very last employer, even if you were working part-time. If
none of the employers you worked for during the last 18 months are listed, or employers are
listed that you do not recognize, you may have accidentally mistyped your Social Security
Number when establishing your account. You will want to immediately log off and click the New
User button to recreate your account. Be sure to use a completely different Username this
time. If you still have the same problem when you get to this screen the second time, contact
Indiana Department of Workforce Development’s Uplink Customer Service Center for
assistance by calling 1-800-891-6499.

16
You may search for your last employer by typing your employer’s name and clicking the
Search button under Option 1, or you may click on the Manual Entry button under
Option 2 to enter your employer information manually.

17
If you select Option 1, a list of employer’s names will appear, each name containing the
string of characters you typed to use for searching on the previous screen. If your last
employer appears in this list, you may select it by clicking in the circle to the left of your
employer’s name, enter the dates of your employment and click on the Add Employer
button. This will place your employer’s name in the list of your employers on the
previous screen.
If you are unsuccessful in searching for your last employer by name, you may click on
Click here and add your employer information manually.

18
Regardless of the Option you chose, once your last employer appears in the list, you
may click on the Finished adding employers. Continue to next screen button.

19
You will then select your last employer, enter your dates of employment, and click on
Next.

20
If only one employer is listed, this screen will not appear. If this screen does appear,
click on the Additional Information Needed link to answer more questions about your
employment with this last employer.
If you see this screen but do not see this link, you will need to scroll to the right. If you
are trying to click on the Additional Information Needed link and fact finding questions
fail to appear, the most likely cause will be your popup blocker. You must turn off all
popup blockers to continue. The way to do this will vary depending on the browser you
are using.

21
Here, you will select the reason your employment ended along with other information
regarding your separation.
The last date for which wages will be paid is the last day you were actually paid for, not
the day you received your last paycheck. In other words, if you last worked on a
Wednesday the 8th and were paid for 2 additional days of vacation through Friday the
10th, the last date for which wages will be paid to you would be that Friday the 10th, even
if you don’t get your check until the 17th.
22
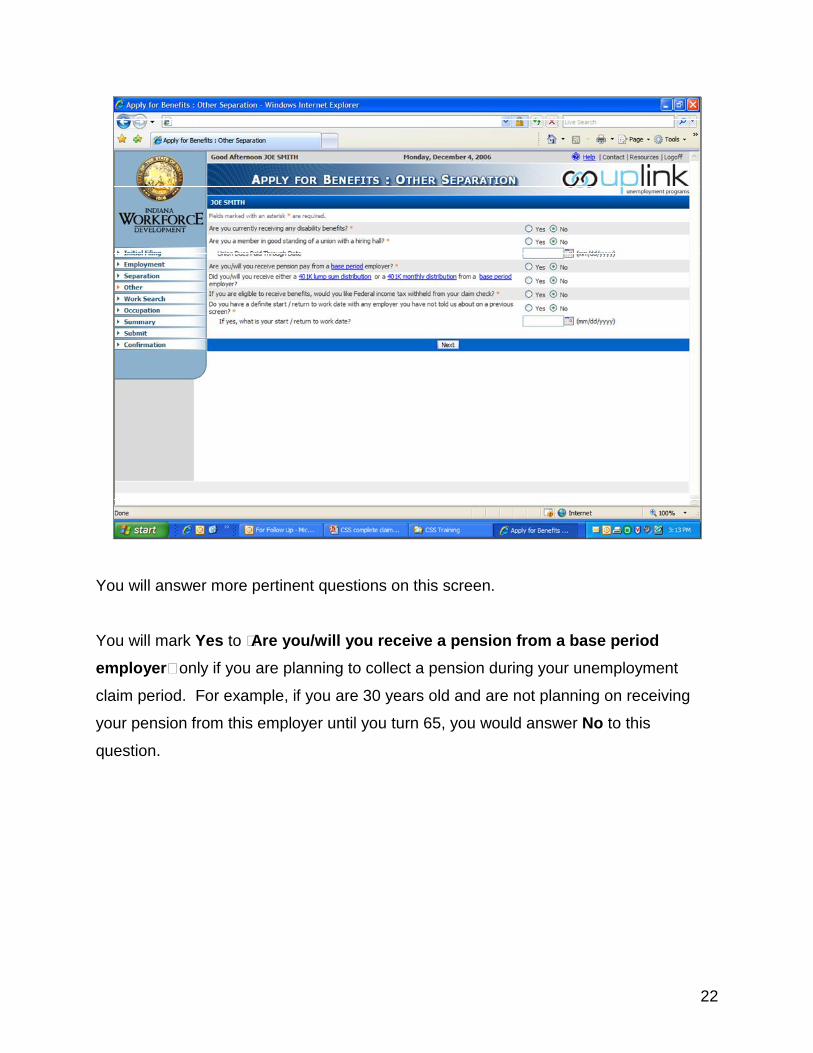
You will answer more pertinent questions on this screen.
You will mark Yes to “Are you/will you receive a pension from a base period
employer” only if you are planning to collect a pension during your unemployment
claim period. For example, if you are 30 years old and are not planning on receiving
your pension from this employer until you turn 65, you would answer No to this
question.
23
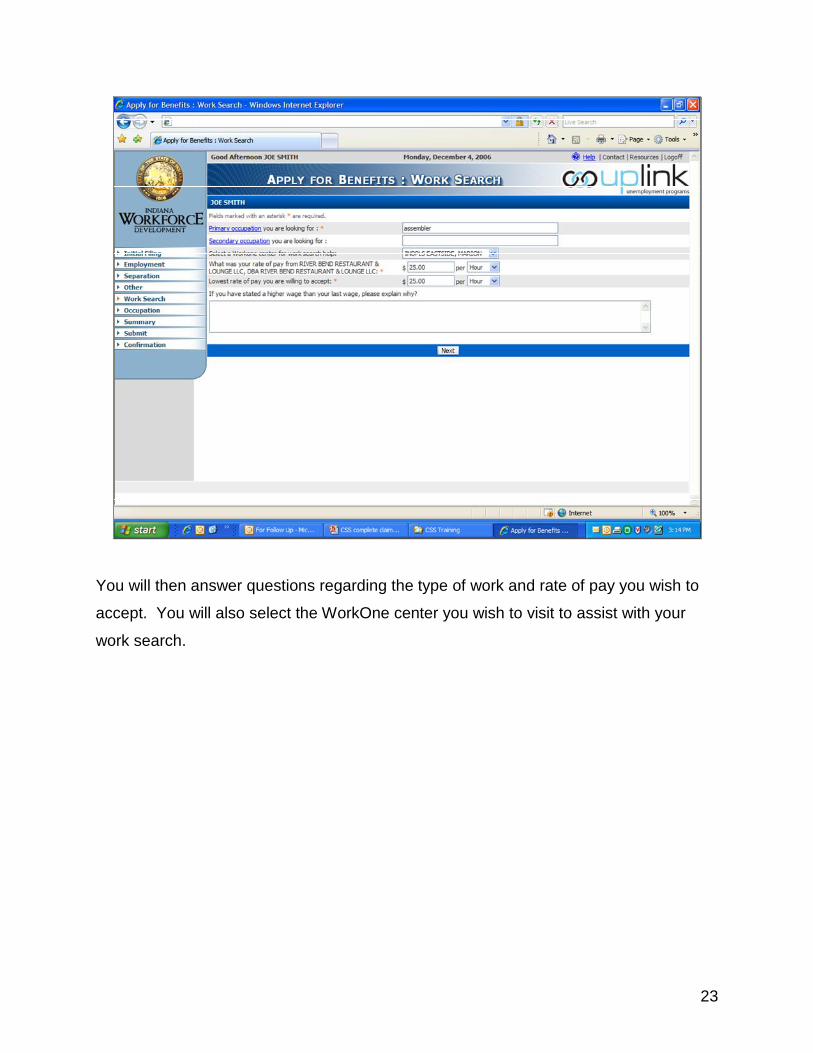
You will then answer questions regarding the type of work and rate of pay you wish to
accept. You will also select the WorkOne center you wish to visit to assist with your
work search.

24
You must then select the job title that best describes your occupation. You may do so
by clicking on the letter your occupation begins with or by typing your occupation in the
search box and clicking on Search. You may need to scroll to the right to see the
Search link.
By performing either of these methods of searching, a list of occupations to choose from
will be displayed. You may continue searching until you find the occupation that best
matches your own.

25
The summary page will then be displayed. You should review the entries you made
while scrolling to the bottom of the page. Clicking on the Edit button below any of the
sections will take you to the applicable screen to make any corrections/additions
needed.

26
Once you are satisfied with all answers given, you may click the Print button to print this
page if desired. Then click on the Next button.

27
You will then be given information regarding Penalties for Falsification (you must use
the scroll bar to the right of this section to read all of this very important information),
Benefits Rights and Information, and Terms and Policies.
Then you may choose to agree to the information and file your claim, or you may
choose not to agree. If you choose not to agree, you will be given information stating
your entries will be kept on file for seven days in case you change your mind and decide
to file your claim.

28
If your answer to any question creates an issue that will require adjudication, you will be
asked to provide additional fact-finding information regarding the issue. Clicking on the
Provide Additional Information link will start the fact finding process.
Again, to be able to click on these links to answer your fact finding questions, all popup
blockers will need to be turned off.

29
You will need to answer all questions that apply to your situation.

30
Continue answering all applicable questions.
31
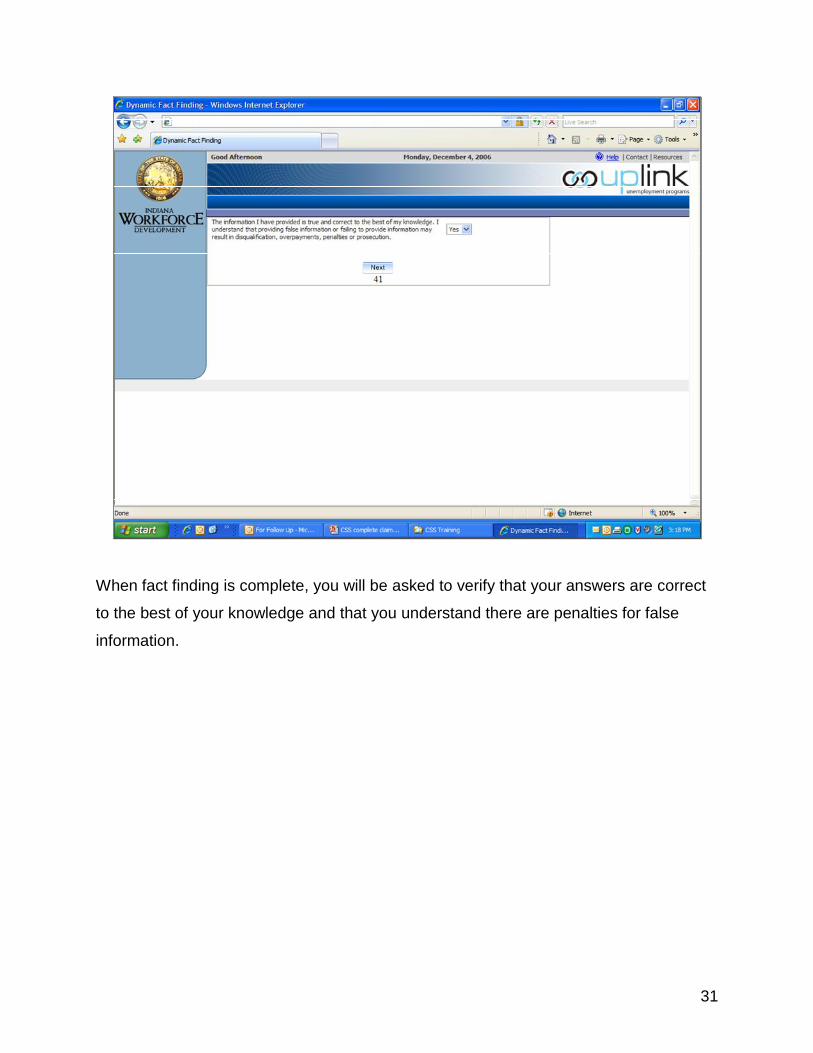
When fact finding is complete, you will be asked to verify that your answers are correct
to the best of your knowledge and that you understand there are penalties for false
information.

32
Next is your fact finding summary screen. You may scroll through to read all of your
answers.

33
You may click the Print button to print this summary, or just click Continue to continue
with your claim filing.

34
If there is more than one issue that requires fact finding, you will need to click the
Provide Additional Information link each time you return here to answer the specific
fact finding questions for each issue.

35
When all fact finding questions are complete, click the Next button. Leaving any fact
finding incomplete could result in a delay on your claim.
36
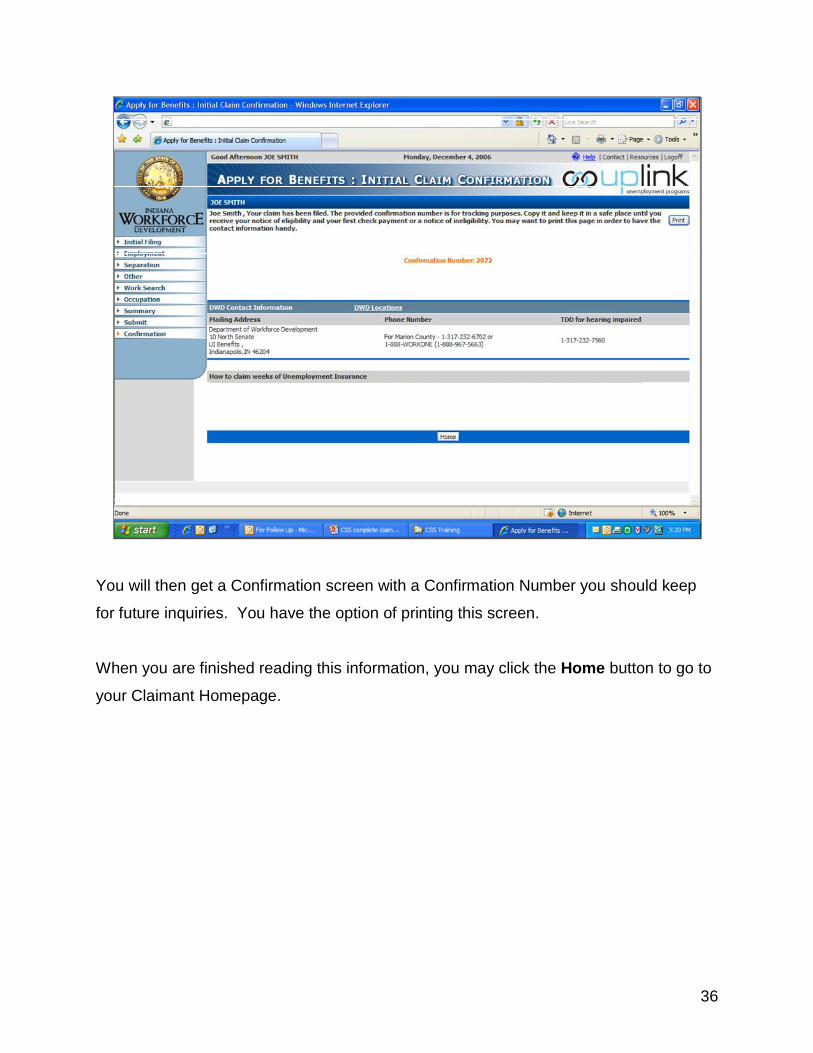
You will then get a Confirmation screen with a Confirmation Number you should keep
for future inquiries. You have the option of printing this screen.
When you are finished reading this information, you may click the Home button to go to
your Claimant Homepage.

37
This Homepage will contain information about your claim. You will want to return to this
page when your claim has been established to view more detailed information about
your claim.

38
When your claim has been established, you will be able to return to this screen to view
information such as weekly and maximum amount, when your claim expires, and
weekly voucher status, (when and how much you are paid each week).
There is also an Issues Delaying Payment section that shows if you have an issue on
your claim delaying your payment. If one of the issues is underlined you may click on it.
This will allow you to answer further fact finding questions that will help resolve this
issue.
If you click on the Week End Date hyperlink of your current claim, you will be taken to
the Claim Homepage.

39
Unlike the Claimant Homepage, the Claim Homepage will give you more detailed
information about weeks claimed on a specific claim.
To view information about a week in which something was deducted, (why and how
much) you can click on the Y hyperlink in the Deductions column.

40
This will bring you to the Adjustments screen. This screen will give you the reason and
the amount of each deduction for a particular week claimed.
To return to the Claim Homepage, click on the Back button.

41
John Smith
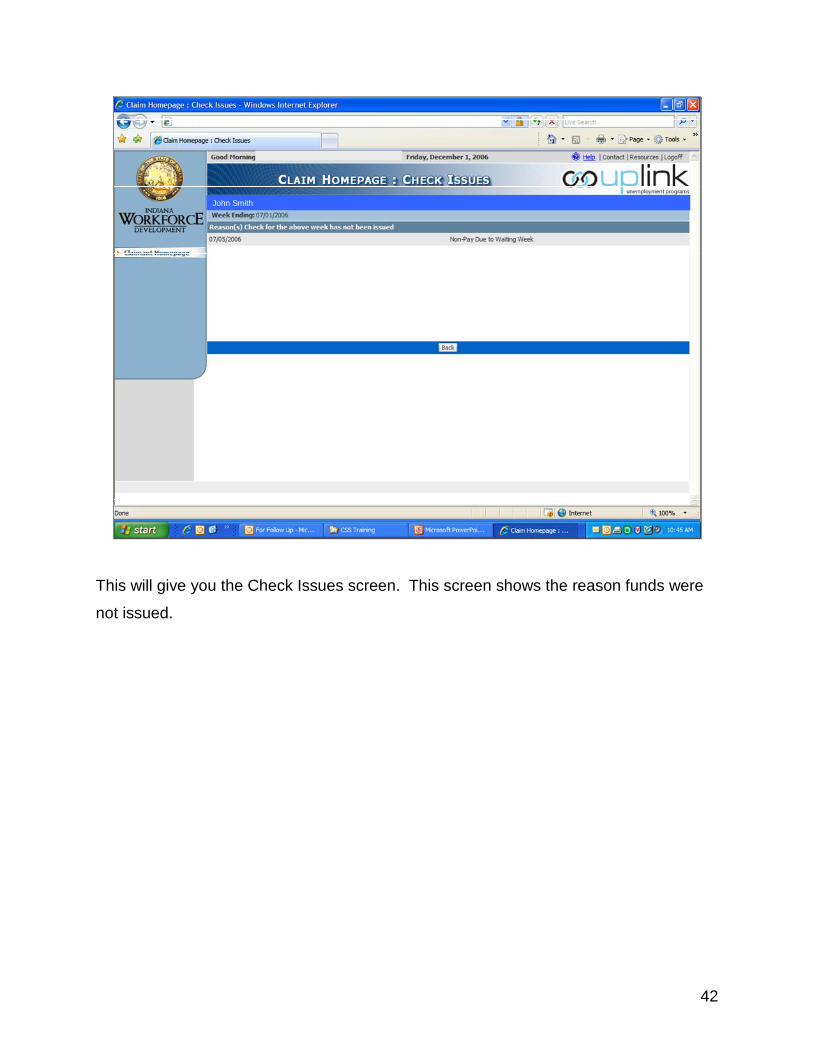
If no money was received for a particular week claimed, you can click on the N hyperlink
in the Issued column to view the reason for nonpayment.
42
John Smith
This will give you the Check Issues screen. This screen shows the reason funds were
not issued.

43
John Smith
Once a claim has been established, you may file your weekly claim voucher online.
This is a voucher. You will click on the scroll down arrow to select answers to the
questions.
You may click on each question itself to get a more detailed explanation of the question.

44
John Smith
Be careful when answering these questions, as the drop down box covers the next
question’s answer.
Once you select your answer, look at it again to be sure it is the answer you meant to
choose. You’ll also want to be careful when using the scroll wheel on your mouse.
Using this wheel can cause you to unintentionally change your answers.
Once you have answered all questions on the voucher, click the Next button.

45
John Smith
Pay close attention to any comments in the box at the bottom of this screen. If you
need to correct any of your answers, click the I need to correct my Answers button
and you will be taken back to your weekly claim to correct them.
When your answers are correct, click the My answers are correct button.

46
John Smith
Once all questions have been answered, certification of the week is required. You will
need to read the information and click the Yes, I agree – File my Claim button to
submit the voucher for payment.
If further fact finding is required, including you job contacts if you looked for work, the
fact finding process will begin after you submit your weekly claim.
If you click the No, I do not agree button, your voucher will not be submitted, and you
will be given information stating that your entries will be kept on file for three days in
case you change your mind and decide to file your weekly claim.

47
John Smith
Once submitted, you will receive confirmation. You may wish to keep this confirmation
number in case of future inquiries.
You may print this screen by clicking on the Print button.
This screen also explains you must register for work, and you may do this online, or at a
WorkOne center.
You may click the Claimant Home button to return to your homepage.

48
Thank you for using the CSS
(Claimant Self Service) Tutorial
Thank you for using this tutorial. We hope this information has helped you become
more familiar with the Claimant Self Service system.
THE END
![CSS & eCSStender [CSS Summit 2011]](https://static.fdocuments.in/doc/165x107/54c70c6e4a79593f288b4656/css-ecsstender-css-summit-2011.jpg)