WARNING - JustAnswer€¦ · 15/11/2011 · test or inspection within the microwave ... monitor,...
12
Tech Sheet Do not discard 8206217 / 4619-651-98872 FOR SERVICE TECHNICIAN’S USE ONLY PRECAUTIONS TO BE OBSERVED BEFORE AND DURING SERVICING TO AVOID POSSIBLE EXPOSURE TO EXCESSIVE MICROWAVE ENERGY a. Do not operate or allow the oven to be operated with the door open. b. Make the following safety checks on all ovens to be serviced before activating the magnetron or other microwave source, and make repairs as necessary: 1. Interlock Operation 2. Proper Door Closing 3. Seal and Sealing Surfaces (Arcing, Wear and Other Damage) 4. Damage to or Loosening of Hinges and Latches 5. Evidence of Dropping or Abuse c. Before turning on microwave power for any service test or inspection within the microwave generating compartments, check the magnetron, waveguide or transmission line, and cavity for proper alignment, integrity and connections. d. Any defective or misadjusted components in the interlock, monitor, door seal, and microwave generation and transmission systems shall be repaired, replaced, or adjusted by procedures described in service manual before the oven is released to the owner. e. A microwave leakage check to verify compliance with the Federal Performance Standard should be performed on each oven prior to release to the owner. f. Do not attempt to operate the oven if the door glass is broken. WARNING Electrical Shock Hazard Disconnect power before servicing. Replace all parts and panels before operating. Failure to do so can result in death or electrical shock.
Transcript of WARNING - JustAnswer€¦ · 15/11/2011 · test or inspection within the microwave ... monitor,...

Tech Sheet Do not discard
8206217 / 4619-651-98872 FOR SERVICE TECHNICIAN’S USE ONLY
PRECAUTIONS TO BE OBSERVED BEFORE AND DURING SERVICING TO AVOID POSSIBLE EXPOSURE TO EXCESSIVE
MICROWAVE ENERGYa. Do not operate or allow the oven to be operated with
the door open.b. Make the following safety checks on all ovens to be
serviced before activating the magnetron or other microwave source, and make repairs as necessary:1. Interlock Operation2. Proper Door Closing3. Seal and Sealing Surfaces (Arcing, Wear and Other
Damage)4. Damage to or Loosening of Hinges and Latches5. Evidence of Dropping or Abuse
c. Before turning on microwave power for any service test or inspection within the microwave generating compartments, check the magnetron, waveguide or transmission line, and cavity for proper alignment, integrity and connections.
d. Any defective or misadjusted components in the interlock, monitor, door seal, and microwave generation and transmission systems shall be repaired, replaced, or adjusted by procedures described in service manual before the oven is released to the owner.
e. A microwave leakage check to verify compliance with the Federal Performance Standard should be performed on each oven prior to release to the owner.
f. Do not attempt to operate the oven if the door glass is broken.
WARNING
Electrical Shock Hazard
Disconnect power before servicing.
Replace all parts and panels before operating.
Failure to do so can result in death or electrical shock.

2
WIRING DIAGRAMSSchematic Diagram
Sym
bol N
otes
BK
: Bla
ckB
U: B
lue
R: R
ed
W: W
hite
G: G
reen
Y: Y
ello
w
1 B
RW
ire C
olor
- B
row
nW
ire N
o. -
1
Con
ditio
n: D
oor
Ope
n.
Mag
netr
on
Fus
e
5 W
4 B
R
27 BU
26B
U
Sec
onda
ryIn
terlo
ckS
witc
h
Relay Board
Prim
ary
Inte
rlock
Sw
itch
CF
TT
Cav
ity L
amp
Coo
ling
Fan
Mot
or
Turn
tabl
e M
otor
Hoo
d E
xhau
stFa
n M
otor
P21
/P31
/P32
/P33
/P34
/P35
/P51
/P52
/P53
/P54
/P55
/P56
/P57
/P58
/P61
/P62
/P63
/P64
/P65
/P66
/P67
/P68
/P71
/P72
/P73
/P
74/C
N70
1/C
N70
2/C
N70
3: W
ire to
PC
B C
onne
ctor
s
Hoo
d La
mp
(Coo
ktop
Lam
p)H
LCL
46 R
47 R
BR
: Bro
wn
OR
: Ora
nge
TR
: Tra
nspa
rent
CN
702
CN
701
1 B
R
20 A
mp
P85
/P86
/P87
/P88
/P89
/P90
: Wire
to R
elay
Con
nect
ors
45 Y/G
GY
: Gra
y
1
CN
703
E70
1
Inve
rter
Mon
itor
Inte
rlock
Sw
itch
25R
L N
G W120V
/125
V,6
0Hz
W /
3C
Rib
bon
Cab
le A
wg
/ 3 C
ore
12
12
12
Start Quartz Tube
Halogen Grill Element
Quartz Grill Heater
The
rmos
tat
24 G
7 B
R
MW
Rel
ay49
03H
eate
rR
elay
4904
Gril
lR
elay
4914
Sta
rtR
elay
4924
12
TT
TTR
elay
4906
1P
53
CF
Rel
ay49
01
FCFA
Rel
ay49
07
P52
NF
CH
Rel
ay49
05
CF
FC
55 W
5P81
50 W
6P81
FC Ring Heater
GN
D
R
HF
WBK
Mot
orC
apac
itor
Hoo
d E
xhau
stFa
n M
otor
FC
TH
FC
TH
FC
(F
orce
d C
onve
ctio
n)T
herm
oact
uato
r
FC
FC
(F
orce
d C
onve
ctio
n)Fa
n M
otor
R
HF
BK
CF
FCFA
500m
AF
use
L
P74
1
FCThermistor
2 B
R
39 BU
35 BR
56 W
36 R
42 GY
8 R
41 R
40 GY
15 BU
37 R
33 BK
49 B
K
12
1
Mag
netr
on T
herm
isto
r
HF
Tria
c71
90
Y
TR
TR
1P81
Y
1
HL
HL
32W
31W
2P81
P58
51 W
52 W
W
FC
1P84
2P84
1
6 R
The
rmos
tat
Gril
l
12 BK
1P8234 BU
4P81
2P82
10uF
4121
3P82
3P81
20 BU
21 BK
11 B
U
16 R
10 W
9 R
14 BK
17 B
K
13 W
P51
P57 P56
P67
P66
1 BKRW
P68
Relay Control Board
Hum
idity
Sen
sor
1P
73
Hoo
d/Li
ght
Sw
itch
P65
P61
1CN701
Inve
rter
1P
54
103
1 P55
3
P71
P21
CL
1
P63
The
rmos
tat
Bas
e
38 R
1
P62
Doo
rN
FS
Inve
rter
500m
A
Fus
e
4170
Relay 4924-1
19 W
53 BK
P62
-2/N
FS
2P83
1P83
22 GY
43 B
U
54 BK
3 BR
L1 N1
P34
P31
Coi
lR
Cy
Cy
Cx
P32
P33
AC
Lin
e F
ilter
Cx
VD
RV
DR
P35
BK
MWRelayfeedback
P85
P90
1 2
P87
P88
P89
TT
2P91
1P91
P86
P81
/P82
/P83
/P84
: Wire
to W
ire C
onne
ctor
s
23 O
R
28 B
U
18 B
U
Cav
ityTh
erm
osta
t
P64
UIB
GY
/5C
P2
P3
LCD
W /
3 C
BK
/ R
/ 10
C
Y /
3C
Wav
egui
deTh
erm
osta
t
8P81
58 R
29 BU
VDR
57 W
7P81
DW
G N
O.
MU
-082
UIB Thermistor
W R BK
BK
W
R/W
R R

3
Parts Layout(not to scale)
A. Halogen grill element B. Start quartz tube C. Quartz grill heaterD. Grill thermostat—opens at 293ºF
(145ºC), closes at 158ºF (70ºC) E. Waveguide thermostat—opens at 257ºF
(125ºC), closes at -63.4ºF (-53ºC) F. AC line filter G. Relay board H. Magnetron thermistor I. Magnetron J. Secondary interlock switch K. FC thermoactuator L. Ferrite ring
M. Inverter
N. Cooling fan motor O. Motor capacitor P. Monitor interlock switch Q. Primary interlock switch R. Relay control board S. Line fuse (20 amp) T. Fuse holder U. Hood (cooktop) lamps V. Hood exhaust fan motor
W. Base thermostat—closes at 140ºF (60ºC), opens at 104ºF (40ºC)
X. Turntable motor Y. Touch panel (back and front views)Z. Cavity lamp
AA. Hood/light switch BB. FC motor CC. FC thermostat—opens at 329ºF
(165ºC), closes at 257ºF (125ºC) DD. FC ring heater EE. FC thermistor FF. Humidity sensor
GG. Cavity thermostat—opens at 329ºF (165ºC), closes at -22ºF (-30ºC)
HH. Door control assembly (back view) (includes the touch panel only)
II. UIB (user interface board)JJ. LCD module
Primary, Secondary, and Monitor Interlock Switch Checkout Procedure
Switch Check By Door Open Door Closed
Primary Interlock
1. Unplug microwave oven or disconnect power.2. Disconnect the wires at the Primary Interlock Switch.3. Check from the common terminal (brown wires) to the normally
open terminal (brown/white wires).
- +
1. Unplug microwave oven or disconnect power.2. Disconnect the wires at the Primary Interlock Switch.3. Check from the common terminal (brown wires) to the normally
closed terminal (orange wire).
+ -
Secondary Interlock
1. Unplug microwave oven or disconnect power.2. Disconnect the wires at the Secondary Interlock Switch.3. Check from the common terminal (blue wire) to the normally open
terminal (white/blue wires).
- +
Monitor Interlock
1. Unplug microwave oven or disconnect power.2. Disconnect the wires at the Monitor Interlock Switch.3. Check from the common terminal (blue wire) to the normally
closed terminal (white/red wires).
+ -
(+) Continuity (-) No Continuity
AB
CD
EF
GHIJK
L
M
NO
PQRST
UVWXY
AA
BB
CC
DDEE
ZU
FFGG
HH
II JJ
Y

4
NOTE: These diagrams are not intended to show a complete circuit; they represent the position of switches during “DOOR OPEN” or “DOOR CLOSED” (continuity checks only).
Door Closed Door Open
TROUBLESHOOTINGDo not continue with the diagnostics of appliance if the household fuse is blown, a circuit breaker is tripped or if there is less than 120-volt power supply at the wall outlet.Complete the following steps before checking microwave oven circuitry:1. Unplug microwave oven or disconnect power.2. Check for loose wiring or incorrect wiring within
microwave oven.
3. Disconnect white wire from power transformer and discharge high-voltage capacitor.
4. All testing must be done with an ohmmeter having a sensitivity of 20,000 ohms per volt DC or greater, and powered by at least a 9-volt battery.
5. All operational checks using microwave energy must be done with the microwave oven loaded with a minimum of 8 oz (250 mL) of water in a microwave-safe container.
Inverter and Magnetron Circuit
Halogen Grill Heater Circuit
Quartz Grill Heater Circuit
MonitorInterlockSwitch
PrimaryInterlockSwitch
SecondaryInterlockSwitch
(NC) (NO) (NC)(NO) (NC) (NO)
L N
MonitorInterlockSwitch
PrimaryInterlockSwitch
SecondaryInterlockSwitch
(NC) (NO) (NC)(NO) (NC) (NO)L N
Filter2
49031
BU
CavityThermostatPrimary
InterlockSwitch
MW RelayBUBR
P56
P66CN702
P65
CN
701
CN
703Inverter
Magnetron
12
3
32
1
R
R Relay Control Board
Relay Board
BR
10
SecondaryInterlockSwitch
BK BU
RibbonCable
L
BK BRN
WFilter
RibbonCable
Fuse20 Amp
WaveguideThermostat
BU
BU
CavityThermostat
Primary InterlockSwitch
BUBR
Fuse20 Amp
W
Secondary Interlock
Switch
Halogen GrillElement
Grill Relay4914
2 1W WR W
Grill ThermostatL
BK BRN
WFilterFilter
Relay Board
BU
WaveguideThermostat
LBK Filter BR
Fuse20 Amp
Primary InterlockSwitch
GrillThermostat
W R W BUQuartz Grill Element
Heater Relay4904
Relay Board
2 1BU BU W
Secondary InterlockSwitch
BU BU
CavityThermostat
Filter WN
BU
WaveguideThermostat
BR
5
Start Quartz Tube Circuit
Forced Convection Circuit
Hood Exhaust Fan On (Variable Speed)
Cooling Fan Motor Circuit
BU
CavityThermostat
BU
Secondary InterlockSwitch
2 1
W
L NWFilterHalogen Grill Element
BU
BK
BK Filter BR
Fuse20 Amp
Primary InterlockSwitch
GrillThermostat
Start Quartz Tube
BR W R W
BK
BK
Relay Board
Start Relay4924
BU
WaveguideThermostat
Relay Board G
R3P53
BR BR
P52
WFC Ring Heater
P51
2 1FCH Relay
4905
RRR Cavity
Thermostat
4P53
F CFCFA Relay
4907FCTH
PrimaryInterlock
Switch
BR R
BR
R GY
GY
BU BU
FCThermostat
NW
L
BKFilter Filter
Fuse20 Amp
WaveThermostat
4P545P81
Fuse
500mA
Inverter
4170BR
HF
2P82
3P82
1P821P54
3P81
HF Triac
7190
BKBK
MotorCapacitor
W
RR
BK
W
P52P51 BR
W
Fuse20 Amp
BR BR
GRelay Board
R BUN
WL
BK
Filter
Filter CavityThermostat
R
R8P81
7P81
BU
WaveguideThermostat
CF2P53
1P83
CF Relay4901
Relay Board
BU
BU
GBR BRP52P51
CavityThermostat
BR BU BUN
WL
BKFilterFilter
Fuse20 Amp
WaveguideThermostat
4P54BR
R
2P835P81

6
Turntable Motor Circuit
Door Open—Oven Cavity Light is On
Cooktop Light On (Variable Light)
Hood Exhaust Fan On Auto
4P54W
TT
1P53
Relay Board
BR
W
5P81
R
GBR BRP52P51
CavityThermostat
BR BU BUN
WL
BKFilterFilter
6P81
Fuse20 Amp
TT Relay4906
WaveguideThermostat
R
LN
Fuse20 Amp BR
WBK BR B RP51 P52
2P55
Fuse500mA
Inverter
4170
4121
Fuse500mA
3P55
P611 2 3
BU BUG
Relay ControlBoard
Relay Board
P63
OR
1P62
12
FilterFilter
PrimaryInterlock
Switch
CavityThermostat
CavityLamp
1P55
R
WaveguideThermostat
RR
L NFuse
20 AmpWBK BR BU BUG
P582
1 W
W
W
TR
Y
W
TR
Y
HL HL
1P84
2P84
2P81
1P81
Filter Filter
CavityThermostat
R
WaveguideThermostatBR
P51 P52
2P55
Fuse500mA
Inverter
4170
4121
Fuse500mA
3P55
P611 2 3
Relay ControlBoard
Relay Board
P63
OR
1P62
12
PrimaryInterlock
Switch
CavityLamp
1P55
BR
R
R
L
N
Fuse20 Amp
BR
W
BK BR BRP51
P52
BU BUG
Relay Board
4 P54
HF2P82
3P82
W
RBR W W
BKBKBKBU
1P82
5P81
4P81
Filter
BaseThermostat
MotorCapacitor
Filter
CavityThermostat
7P81 8P81
R
WaveguideThermostat
R
R
R

7
Touch Panel
Touch Panel and Relay Control Board Tests
To access the test mode:1. Unplug microwave oven or disconnect power.2. Open the microwave oven door.3. Press and hold OFF/CANCEL.
4. Plug in microwave oven or reconnect power.5. Release OFF/CANCEL and close microwave oven door.NOTE: If the OFF/CANCEL key is pressed during this diagnostic routine, you will exit the test mode.
Test Mode Table
Troubleshooting Circuit Test Chart
Cooking Mode Magnetron
Convection Element
Grill Elements Cooling Fan
Convection Fan
Hood Exhaust Fan
Microwave only
On On
Convection On On On On
Grill On On On
Microwave and Grill Combination
On On On On
Microwave and Convection Combination
On* On* On On On
*Magnetron and convection elements turn on alternately, not simultaneously.NOTE: After convection or grill elements are on, the cooling fan and hood exhaust fan may be on for up to 10 minutes for cooling.
Screen Display Display Explanation
UIB SW ver Version number of UIB (user interface board) software
PB SW Ver Flash Version number of power board (relay control board) software
FC thermistor (ºC) The temperature (ºC) measured by FC (forced convection) thermistor—maximum 250ºC
UIB thermistor (ºC) The temperature (ºC) measured by UIB (user interface board) thermistor—ranges about 5ºC above room temperature, if oven has not been used recently
Magnetron thermistor (ºC) The temperature (ºC) measured by magnetron thermistor—maximum 125ºC
HUM PWM Humidity level inside unit—ranges between 8,000 and 9,500, depending on humidity level in oven cavity
Screen Display Display Explanation
Hood Key Hood key number
Touch panel Touch panel error
EEPROM Version number of PB (relay control board) EEPROM (Electrically Erasable Programmable Read-Only Memory)
MW reply error MW relay error
Smps FB error Smps feedback error
Hum sensor error Humidity sensor error
Cavity thermistor error Cavity thermistor error
Magnetron thermistor error Magnetron thermistor error
EEPROM error Power board (relay control board) error

8
Microwave Oven Power Output Test1. Place 8 oz (250 mL) of lukewarm water in the center of the
microwave oven.2. Operate on HIGH power level for 2 minutes. Water
should be hot.
NOTE: If the water takes longer than 2 minutes to heat, this may indicate either the operating voltage is lower than 110 volts or there is a problem with the microwave oven.
NOTE: Many of the problems listed in the chart below may be solved by power cycling: unplug microwave oven or disconnect power. After one minute, plug in microwave oven or reconnect power.
Failure Codes Indications
Display Likely Failure Condition Recommended Repair Procedure
F1.E1 Relay control board defective
1. Unplug microwave oven or disconnect power.2. Replace the relay control board.3. Plug in microwave oven or reconnect power.
F2.H1 Hood keys stuck 1. Unplug microwave oven or disconnect power.2. Replace hood/light switch. 3. Plug in microwave oven or reconnect power.
F2.H2 Hood/light switch defective
1. Unplug microwave oven or disconnect power.2. Replace hood/light switch.3. Plug in microwave oven or reconnect power.
F2.Q1 Not reading keypad inputs
1. Unplug microwave oven or disconnect power.2. Replace the user interface board (UIB).3. Replace the door control assembly.4. Plug in microwave oven or reconnect power.
F3.H1 Humidity sensor 1. Unplug microwave oven or disconnect power.2. Check connection to relay control board.3. Replace humidity sensor.4. Plug in microwave oven or reconnect power.5. If problem persists, unplug microwave oven or disconnect power.6. Replace relay control board.7. Plug in microwave oven or reconnect power.
F3.T1 UIB (user interface board) thermistor
1. Unplug microwave oven or disconnect power.2. Check the connections from the UIB to the relay control board.3. Plug in microwave oven or reconnect power.4. If problem persists, unplug microwave oven or disconnect power.5. Replace relay control board.6. Plug in microwave oven or reconnect power.7. If problem persists, unplug microwave oven or disconnect power.8. Replace the UIB.9. Plug in microwave oven or reconnect power.
F3.T2 FC thermistor 1. Unplug microwave oven or disconnect power.2. Check FC thermistor connection.3. Replace the FC thermistor.4. Plug in microwave oven or reconnect power.5. If problem persists, unplug microwave oven or disconnect power.6. Replace relay control board.7. Plug in microwave oven or reconnect power.
F3.T4 Magnetron thermistor 1. Unplug microwave oven or disconnect power.2. Check magnetron thermistor connection.3. Replace the magnetron thermistor.4. Plug in microwave oven or reconnect power.5. If problem persists, unplug microwave oven or disconnect power.6. Replace relay control board.7. Plug in microwave oven or reconnect power.
9
Component Tests
F6 MW relay 1. Unplug microwave oven or disconnect power.2. Check the cable from P85 to inverter.3. Check to see if the relay (4903 on relay board) contact has welded closed.4. Plug in microwave oven or reconnect power.5. If problem persists, unplug microwave oven or disconnect power.6. Replace relay board.7. Plug in microwave oven or reconnect power.8. If problem persists, unplug microwave oven or disconnect power.9. Replace relay control board.10. Plug in microwave oven or reconnect power.
F7 Power to magnetron interrupted
1. Unplug microwave oven or disconnect power.2. After 40 seconds, check to see whether this solves the problem. 3. Unplug microwave oven or disconnect power.4. Check cooling fan operation5. Check the magnetron.6. Check P65 connection on the relay control board.7. Check the P56/P66 connection between relay board and relay control
board.8. Check wiring to the 1100W inverter and control system. See “Checking
Inverters.”9. Check operation of all interlock switches. 10. Plug in microwave oven or reconnect power.11. Check voltage at 4903-1 on relay board. If it is 120, unplug microwave
oven or disconnect power.12. Replace inverter. 13. Plug in microwave oven or reconnect power.14. If problem persists, unplug microwave oven or disconnect power.15. Replace relay control board.16. Plug in microwave oven or reconnect power.
F9 Relay control board communications error
1. Unplug microwave oven or disconnect power.2. Check the communications cable from P66 to P56 between relay control
board and relay board.3. Plug in microwave oven or reconnect power.4. If problem persists, unplug microwave oven or disconnect power.5. Replace the relay board and relay control board.6. Plug in microwave oven or reconnect power.
F9.Q Touch communication 1. Unplug microwave oven or disconnect power.2. Check the communications cable from UIB to the touch panel.3. Plug in microwave oven or reconnect power.4. If problem persists, unplug microwave oven or disconnect power.5. Replace the door control assembly.6. Plug in microwave oven or reconnect power.
IMPORTANT:
■ Unplug microwave oven or disconnect power.■ Remove the lead wires from the related component
before conducting any of the following tests.■ Discharge the high-voltage capacitor and remove the
lead wires from the primary winding of the high-voltage transformer before conducting any of the following tests.
■ All operational checks using microwave energy must be done with the microwave oven loaded with a minimum of 8 oz (250 mL) of water in a microwave safe container.
■ Conduct a microwave energy test after performing any tests or repairs to the microwave oven.
■ Check that all wire leads are in the correct position before operating the microwave oven.
■ Grasp wire connectors when removing the wire leads from microwave oven parts.
■ All testing must be done with an ohmmeter having a sensitivity of 20,000 ohms per volt DC or greater, and powered by at least a 9-volt battery.
Failure Codes Indications
Display Likely Failure Condition Recommended Repair Procedure
10
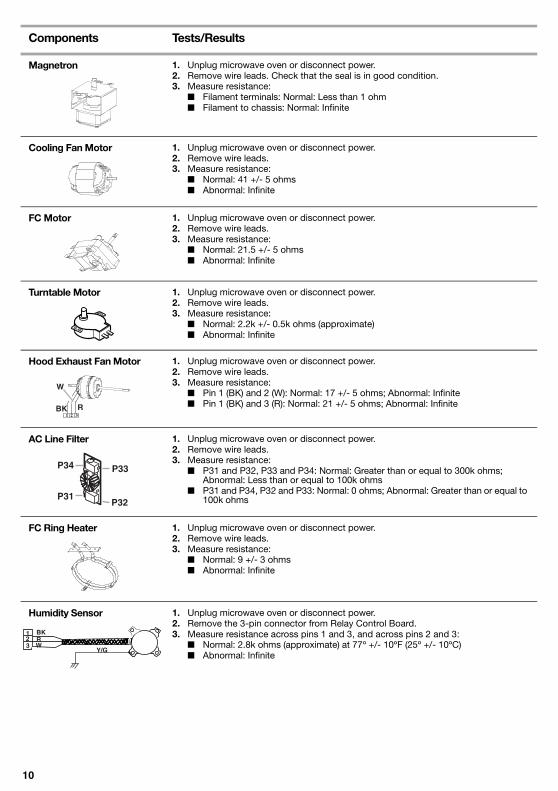
Components Tests/Results
Magnetron 1. Unplug microwave oven or disconnect power.2. Remove wire leads. Check that the seal is in good condition.3. Measure resistance:
■ Filament terminals: Normal: Less than 1 ohm■ Filament to chassis: Normal: Infinite
Cooling Fan Motor 1. Unplug microwave oven or disconnect power.2. Remove wire leads.3. Measure resistance:
■ Normal: 41 +/- 5 ohms■ Abnormal: Infinite
FC Motor 1. Unplug microwave oven or disconnect power.2. Remove wire leads.3. Measure resistance:
■ Normal: 21.5 +/- 5 ohms■ Abnormal: Infinite
Turntable Motor 1. Unplug microwave oven or disconnect power.2. Remove wire leads.3. Measure resistance:
■ Normal: 2.2k +/- 0.5k ohms (approximate)■ Abnormal: Infinite
Hood Exhaust Fan Motor 1. Unplug microwave oven or disconnect power.2. Remove wire leads.3. Measure resistance:
■ Pin 1 (BK) and 2 (W): Normal: 17 +/- 5 ohms; Abnormal: Infinite■ Pin 1 (BK) and 3 (R): Normal: 21 +/- 5 ohms; Abnormal: Infinite
AC Line Filter 1. Unplug microwave oven or disconnect power.2. Remove wire leads.3. Measure resistance:
■ P31 and P32, P33 and P34: Normal: Greater than or equal to 300k ohms; Abnormal: Less than or equal to 100k ohms
■ P31 and P34, P32 and P33: Normal: 0 ohms; Abnormal: Greater than or equal to 100k ohms
FC Ring Heater 1. Unplug microwave oven or disconnect power.2. Remove wire leads.3. Measure resistance:
■ Normal: 9 +/- 3 ohms■ Abnormal: Infinite
Humidity Sensor 1. Unplug microwave oven or disconnect power.2. Remove the 3-pin connector from Relay Control Board.3. Measure resistance across pins 1 and 3, and across pins 2 and 3:
■ Normal: 2.8k ohms (approximate) at 77º +/- 10ºF (25º +/- 10ºC)■ Abnormal: Infinite
1 2 3BK
W
R
P34
P31
P33
P32
123
Y/G
BKRW

11
Thermostats NOTE: Refer to “Parts Layout” for opening and closing temperatures.1. Unplug microwave oven or disconnect power.2. Remove wire leads.3. Measure continuity:
■ FC, Grill, Cavity and Waveguide Thermostats: Normal: Continuity; Abnormal: Infinite
■ Base Thermostat: Normal: Infinite; Abnormal: Continuity
Halogen Grill Element1000W, 120V (inside cavity)
1. Unplug microwave oven or disconnect power.2. Remove wire leads.3. Measure continuity (ohmmeter scale: Rx1):
■ Normal: 2 +/- 1 ohms ■ Abnormal: Infinite
Start Quartz Tube600W, 60V (not visible to user)
1. Unplug microwave oven or disconnect power.2. Remove wire leads.3. Measure resistance (ohmmeter scale: Rx1):
■ Normal: 6 +/- 3 ohms ■ Abnormal: Infinite
Quartz Grill Heater 1. Unplug microwave oven or disconnect power.2. Remove wire leads.3. Measure resistance:
■ Normal: 29 +/- 5 ohms ■ Abnormal: Infinite
FC Thermistor 1. Unplug microwave oven or disconnect power.2. Remove wire leads.3. Measure resistance:
■ Normal: 230k +/- 20% ohm at 77ºF (25ºC)■ Abnormal: Infinite
Magnetron Thermistor 1. Unplug microwave oven or disconnect power.2. Remove wire leads.3. Measure resistance:
■ Normal: 10k +/- 5% ohms at 77ºF (25ºC)■ Abnormal: Infinite
Motor Capacitor 1. Unplug microwave oven or disconnect power.2. Remove wire leads.3. Measure resistance:
■ Normal: Momentarily 0 ohms, then goes to infinite■ Abnormal: Infinite
FC Thermoactuator 1. Unplug microwave oven or disconnect power.2. Remove wire leads.3. Measure resistance:
■ Normal: 1.2k +/- 0.5k ohms■ Abnormal: Infinite
Cavity / Hood Lamp 1. Unplug microwave oven or disconnect power.2. Remove wire leads.3. Measure resistance:
■ Normal: 1.5 +/- 0.5 ohms■ Abnormal: Infinite
Components Tests/Results
FC / Grill / Cavity /Waveguide Thermostat
BaseThermostat

Checking Inverters
Measure Oven Input Current
Connect an ammeter (Valhalla Scientific 2101 or equivalent recommended) to measure the input current of microwave oven when the power level is set to Level 10 at the touch panel.
If more than 0.5A:The 1100W inverter is probably OK. Check the magnetron. See Magnetron test in “Component Tests.”
If less than 0.5A:There is no input to the 1100W inverter. Check the following:1. Unplug microwave oven or disconnect power.2. No AC voltage supply. Check relay control board and
wiring.3. No control signal. Check relay control board and wiring.
Check the 1100W Inverter
NOTE: Do not try to repair the inverter board, nor try to make any adjustments to the board.
Check wiring to 1100W inverter:1. Unplug microwave oven or disconnect power.2. Visually inspect 4 connectors on the 1100W inverter
board, CN701, CN702, CN703, E701, to see whether there are signs of overheating or any signs of failure due to loose wires, bad crimping, etc.
Relay Control Board NOTE: Do not try to repair or make adjustments to the relay control board.1. Unplug microwave oven or disconnect power.2. Check wiring to relay control board.3. Visually inspect P61, P62, P63, P64, P65, P66, P67, P68, P71, P73 and P74 to see
whether there are signs of overheating or any signs of failure due to loose wires, bad crimping, etc.
Hood / Light Switch NOTE: Do not try to repair or make adjustments to the hood/light switch.1. Unplug microwave oven or disconnect power.2. Check wiring to hood/light switch.3. Visually inspect P21 to see whether there are signs of overheating or any signs of
failure due to loose wires, bad crimping, etc.
Relay Board NOTE: Do not try to repair or make adjustments to the relay board.1. Unplug microwave oven or disconnect power.2. Check wiring to relay board.3. Visually inspect P51, P52, P53, P54, P55, P56 and P57 to see whether there are
signs of overheating or any signs of failure due to loose wires, bad crimping, etc.
Components Tests/Results3
12
1
1P
62
1P
61
61
52
P6
31
P6
6
P6
41
P6
8
70
01
46
25
P6
51
P6
71
P7
11
P7
31
P7
41
P21
P224501
45024503
49
14
49
04
49
24
49
05
P52
P51
31
1049
06
49
01
49
07
1P53
3191
49314932
1P54
4903
4121
P54
1
P56
P57
1
4170
P581
5174
5170
15A
Amps
A. CN702B. Heat sinkC. E701D. High-voltage output
to magnetron
E. CN703F. Control signal in/outG. CN701H. 120V AC
B
G
A
C
D
EF
H
8206217 / 4619-651-988721/06
FOR SERVICE TECHNICIAN’S USE ONLY