User Instructions - Main Light Industries · User Instructions Elation Professional R. Table of...
16
4295 Charter Street Los Angeles CA. 90058 www.elationlighting.com User Instructions Elation Professional R
Transcript of User Instructions - Main Light Industries · User Instructions Elation Professional R. Table of...

4295 Charter StreetLos Angeles CA. 90058www.elationlighting.com
User Instructions
Elation Professional R

Table of Contents
General Instruction..........................................................................2
Warnings.........................................................................................2
Cautions......................................................................................... 2
Welcome ..........................................................................................1
Control and Functions.................................................................... 3
Front View...................................................................................3
Rear View................................................................................... 4
Operation Guide.............................................................................. 5
Scene operation............................................................................. 5
Chase operation............................................................................. 7
Bank copy & Fixture copy............................................................... 9
PAN/TILT Setting.......................................................................... 10
Fade Time..................................................................................... 11
MIDI Control.................................................................................. 11
Data Sending............................................................................... 12
Data Receiving............................................................................. 12
Memory Stick................................................................................12
Technical Specifications ..............................................................13

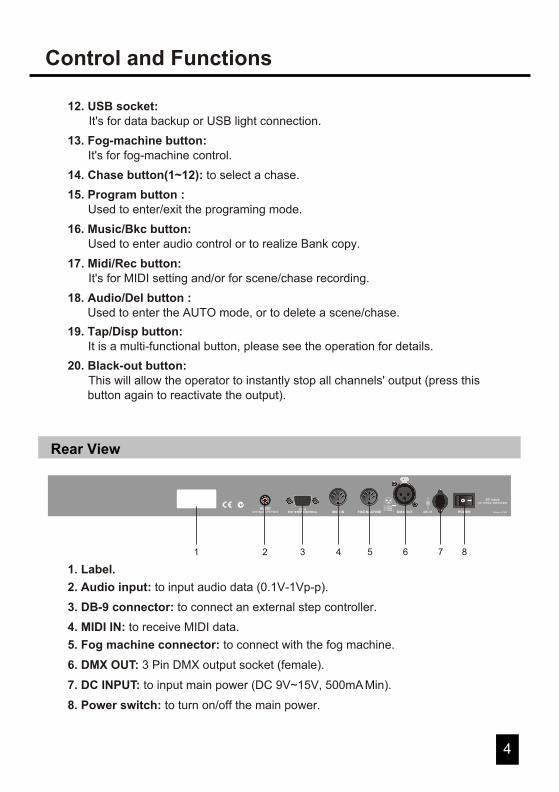
General Instruction
2
This is a professional lighting controller with a total of 192 DMX output channels.
30 banks of programmable scenes (one bank contains 8 scenes) and 12 chases
with up to 240 steps each are provided for your application. Speed, Fade Time &
Pan/Tilt adjustment are also provided by this unit. USB connector can be used to
realize data backup and DJ work light.
Specifications and improvements in the design of this product and this
manual are subject to change without any prior notice.
Notice:
To optimize performance of this product, please read the instructions carefully
to familiarize yourself with the basic operations.
Warnings
Cautions
When unpacking, please check the unit is not damaged. Should something
wrong happen to this product, contact the local dealer immediately.
All rights reserved. No part of the manual included with this product may be
reproduced, transmitted, transcribed or translated into any language in any
form, by any means, without authorized permission.
This unit is intended for indoor use only.
Do not make any inflammable liquids, water or metal objects enter the unit.
No user serviceable parts inside, do not dismantle the unit by yourself.
Please do not allow children to play and tamper with this product.
To reduce the risk of fire or electric shock, do not expose the unit to rain or
high levels of moisture.
Repairs must be done by qualified personnel.
Welcome
Main features as below:
1
Every effort has been made to design dependability, reliability and comfort
into each unit. New products are being designed constantly to meet the needs
of both entertainment and the lighting industry. We welcome your comments
about our product and services.
It is both a privilege and a pleasure serving you.
- 8 dimming faders & total 192 DMX channels
- Speed fader & Fade Time fader
- 30 banks x 8 programmable scenes
- 12 programmable chases, each chase can record up to 240 steps
- Fade time setting & Pan/Tilt setting
- Manual control gets first priority
- Built-in microphone or line input for audio triggering
- MIDI control upon banks, chases and blackout
- External step Control & Fog machine control
- 7-segment LED display
- USB connector for both DJ work light and data backup
- Scan Master II with joystick module or with jog wheel module available
as your desire
Joystick module Jog wheel module

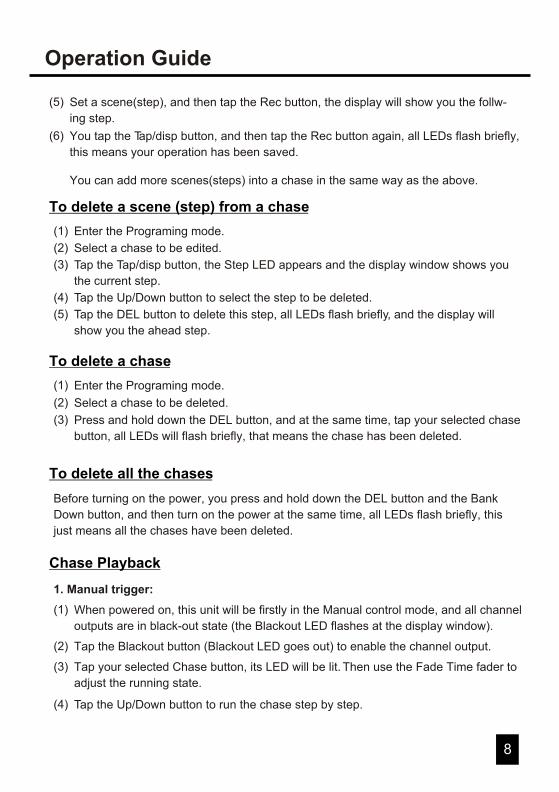
Control and Functions
4
Rear View
4. MIDI IN: to receive MIDI data.
6. DMX OUT: 3 Pin DMX output socket (female).
2. Audio input: to input audio data (0.1V-1Vp-p).
7. DC INPUT: to input main power (DC 9V~15V, 500mA Min).
3. DB-9 connector: to connect an external step controller.
Made in PRC
DC input: 9V-12VDC, 500mA Min
1 = Ground2 = Data -3 = Data +
POWERMIDI IN DMX OUT DC INFOG MACHINEDB-9
EXT STEP CONTROLAUDIO
Line Input 0.1V-1Vp-p
1 2 543 6 87
1. Label.
8. Power switch: to turn on/off the main power.
5. Fog machine connector: to connect with the fog machine.
Control and Functions
3
Front View
1
2 3 4 5 6
9 10 11 12
14
7 8
13
15~20
4. Speed fader: To adjust the speed level (0.1 second ~10 minutes).
1. Fixture buttons(1~12): Used to select relevant fixture.
5. Fade Time fader: To adjust the fade time (0~30seconds).
3. Channel Bank button: To switch between Ch1~8 and Ch9~16.
2. Channel faders(1~8): Used to control the dimming output of each corresponding channel.
6. FINE button: In the "FINE" mode, you can adjust the Pan/Tilt finely.
7. MODE button: This is a multi-functional button, please see the operation for details.
8. Pan/Tilt joystick: Used to adjust the Pan/Tilt level.
9. Scene buttons (1~8): to select a scene.
10. LED-display: This LED-display shows you relevant information depending on your operation. 11. Bank Up/Down button: To select a bank or step (see operation guide for details).
20. Black-out button: This will allow the operator to instantly stop all channels' output (press this button again to reactivate the output).
16. Music/Bkc button: Used to enter audio control or to realize Bank copy. 17. Midi/Rec button: It's for MIDI setting and/or for scene/chase recording.
15. Program button : Used to enter/exit the programing mode.
19. Tap/Disp button: It is a multi-functional button, please see the operation for details.
18. Audio/Del button : Used to enter the AUTO mode, or to delete a scene/chase.
12. USB socket: It's for data backup or USB light connection. 13. Fog-machine button: It's for fog-machine control. 14. Chase button(1~12): to select a chase. FIXTURES
1
2
3
4
5
6
7
8
9
10
11
12
Chase Scene Bank
Auto Trigger
BlackoutStep
PROG
Step/time
Audio Trigger
0
30S
Fade TimeSpeed
10Min
0.1S
ChannelBank
Channel 1/8
Channel 9/16
0
2
4
6
8
10 1
9
0
2
4
6
8
10 2
10
0
2
4
6
8
10 3
11
0
2
4
6
8
10 4
12
0
2
4
6
8
10 5
13
0
2
4
6
8
10 6
14
0
2
4
6
8
10 7
15
0
2
4
6
8
10 8
16
1 2 3 4 5 6 7 8
SCENES
Program
OPERATOR 192
Assign
Reverse
USBPORT
Heating
Ready
FOG MACHINE
Music/Bkc Midi/Rec Auto/Del Tap/Disp Blackout
PAN TILT
MODE
FINE
BANK
1
7
2
8
3
9
4
10
5
11
6
12
CH
AS
E
Control and Functions
4
Rear View
4. MIDI IN: to receive MIDI data.
6. DMX OUT: 3 Pin DMX output socket (female).
2. Audio input: to input audio data (0.1V-1Vp-p).
7. DC INPUT: to input main power (DC 9V~15V, 500mA Min).
3. DB-9 connector: to connect an external step controller.
Made in PRC
DC input: 9V-12VDC, 500mA Min
1 = Ground2 = Data -3 = Data +
POWERMIDI IN DMX OUT DC INFOG MACHINEDB-9
EXT STEP CONTROLAUDIO
Line Input 0.1V-1Vp-p
1 2 543 6 87
1. Label.
8. Power switch: to turn on/off the main power.
5. Fog machine connector: to connect with the fog machine.
Control and Functions
3
Front View
1
2 3 4 5 6
9 10 11 12
14
7 8
13
15~20
4. Speed fader: To adjust the speed level (0.1 second ~10 minutes).
1. Fixture buttons(1~12): Used to select relevant fixture.
5. Fade Time fader: To adjust the fade time (0~30seconds).
3. Channel Bank button: To switch between Ch1~8 and Ch9~16.
2. Channel faders(1~8): Used to control the dimming output of each corresponding channel.
6. FINE button: In the "FINE" mode, you can adjust the Pan/Tilt finely.
7. MODE button: This is a multi-functional button, please see the operation for details.
8. Pan/Tilt joystick: Used to adjust the Pan/Tilt level.
9. Scene buttons (1~8): to select a scene.
10. LED-display: This LED-display shows you relevant information depending on your operation. 11. Bank Up/Down button: To select a bank or step (see operation guide for details).
20. Black-out button: This will allow the operator to instantly stop all channels' output (press this button again to reactivate the output).
16. Music/Bkc button: Used to enter audio control or to realize Bank copy. 17. Midi/Rec button: It's for MIDI setting and/or for scene/chase recording.
15. Program button : Used to enter/exit the programing mode.
19. Tap/Disp button: It is a multi-functional button, please see the operation for details.
18. Audio/Del button : Used to enter the AUTO mode, or to delete a scene/chase.
12. USB socket: It's for data backup or USB light connection. 13. Fog-machine button: It's for fog-machine control. 14. Chase button(1~12): to select a chase. FIXTURES
1
2
3
4
5
6
7
8
9
10
11
12
Chase Scene Bank
Auto Trigger
BlackoutStep
PROG
Step/time
Audio Trigger
0
30S
Fade TimeSpeed
10Min
0.1S
ChannelBank
Channel 1/8
Channel 9/16
0
2
4
6
8
10 1
9
0
2
4
6
8
10 2
10
0
2
4
6
8
10 3
11
0
2
4
6
8
10 4
12
0
2
4
6
8
10 5
13
0
2
4
6
8
10 6
14
0
2
4
6
8
10 7
15
0
2
4
6
8
10 8
16
1 2 3 4 5 6 7 8
SCENES
Program
OPERATOR 192
Assign
Reverse
USBPORT
Heating
Ready
FOG MACHINE
Music/Bkc Midi/Rec Auto/Del Tap/Disp Blackout
PAN TILT
MODE
FINE
BANK
1
7
2
8
3
9
4
10
5
11
6
12
CH
AS
E

Operation Guide
6
To copy a scene
Enter the Programing mode.(1)
Select your desired being copied scene in a bank.
(2)
Press Midi/Rec button.
(3)
Press your selected Scene button in the relevant bank, all LEDs flash briefly, that
means your copy operating has been saved.
(4)
To delete a scene
Enter the Programing mode.(1)
Select a scene to be deleted. (2)
Press and hold down the DEL button, and at the same time, tap your selected
Scene button, all LEDs will flash briefly, that means the scene has been deleted.
(3)
To delete all the scenes
Before turning on the power, you press and hold down the Program button and the Bank
Down button, and then turn on the power at the same time, all LEDs flash briefly, this just
means all the scenes have already been deleted.
Scene Playback
When powered on, this unit will be firstly in the Manual control mode, and all channel
outputs are in black-out state (the Blackout LED flashes at the display window).
(1)
Tap the Blackout button (Blackout LED goes out) to enable the channel output.
(2)
Tap the AUTO button, the Auto Trigger LED will light up at the display window, this
indicates you that you are now in the Auto trigger mode.
(1)
Tap Bank Up/Down button to select desired bank (0~30).(2)
You can use the Speed fader (or Tap/disp button) and the Fade Time fader to adjust
the running state.
(3)
1. Manual trigger:
Select your desired scene to be replayed, tap this scene button to enable the scene
(Tap this scene button again to disable the scene).
(3)
2. Auto trigger:
Tap the Auto button again(Auto Trigger LED goes out) to exit from the Auto mode.(4)
Note: You can tap the Tap/Disp button twice to create an interval running rate.
Operation Guide
5
When powered on, this unit will be firstly in the Manual control mode, and all channel
outputs are in black-out state (the Blackout LED flashes at the display window). You
can also press the Blackout button to enable the channel output.
To record a scene
Enter the Programing mode as the above told you.
(1)
Press a Fixture button, its LED will be lit.
(2)
Press and hold down the Program button for about 2 seconds till the PROG LED flashes,
this means you have entered the programing mode. Press and hold down the Program
button for about 2 seconds again (till the PROG LED goes out) to exit from the Program-
ing mode.
Use the channel faders to set a scene (You can use the Channel Bank button to
select between Ch1~8 and Ch9~16 as your desire).
(3)
Then press the REC button to record the scene that you have set.
(4)
Select a bank (01~30).(5)
Select a Scene button (1~8) in this bank and press it, all LEDs flash briefly, this
means you setting has been saved.
(6)
Set the other scene(s) in the same way as your desire.(7)
After finishing your settings, you can p
ress and hold down the Program button for
about 2 seconds (till the PROG LED goes out) to exit from the Programing mode.
(8)
Note: The recorded scene can be reedited; if you reedit a scene and save it, the old
scene will be replaced by the new one.
Scene Operation
To edit a scene
Enter the Programing mode.(1)
Select your desired being edited scene in a bank.
(2)
Press a Fixture button (its LED lights up), and then set a new scene.
(3)
Press Midi/Rec button, and then press the selected scene button (all LEDs flash
briefly, that means your setting has been saved).
(4)

Operation Guide
6
To copy a scene
Enter the Programing mode.(1)
Select your desired being copied scene in a bank.
(2)
Press Midi/Rec button.
(3)
Press your selected Scene button in the relevant bank, all LEDs flash briefly, that
means your copy operating has been saved.
(4)
To delete a scene
Enter the Programing mode.(1)
Select a scene to be deleted. (2)
Press and hold down the DEL button, and at the same time, tap your selected
Scene button, all LEDs will flash briefly, that means the scene has been deleted.
(3)
To delete all the scenes
Before turning on the power, you press and hold down the Program button and the Bank
Down button, and then turn on the power at the same time, all LEDs flash briefly, this just
means all the scenes have already been deleted.
Scene Playback
When powered on, this unit will be firstly in the Manual control mode, and all channel
outputs are in black-out state (the Blackout LED flashes at the display window).
(1)
Tap the Blackout button (Blackout LED goes out) to enable the channel output.
(2)
Tap the AUTO button, the Auto Trigger LED will light up at the display window, this
indicates you that you are now in the Auto trigger mode.
(1)
Tap Bank Up/Down button to select desired bank (0~30).(2)
You can use the Speed fader (or Tap/disp button) and the Fade Time fader to adjust
the running state.
(3)
1. Manual trigger:
Select your desired scene to be replayed, tap this scene button to enable the scene
(Tap this scene button again to disable the scene).
(3)
2. Auto trigger:
Tap the Auto button again(Auto Trigger LED goes out) to exit from the Auto mode.(4)
Note: You can tap the Tap/Disp button twice to create an interval running rate.
Operation Guide
5
When powered on, this unit will be firstly in the Manual control mode, and all channel
outputs are in black-out state (the Blackout LED flashes at the display window). You
can also press the Blackout button to enable the channel output.
To record a scene
Enter the Programing mode as the above told you.
(1)
Press a Fixture button, its LED will be lit.
(2)
Press and hold down the Program button for about 2 seconds till the PROG LED flashes,
this means you have entered the programing mode. Press and hold down the Program
button for about 2 seconds again (till the PROG LED goes out) to exit from the Program-
ing mode.
Use the channel faders to set a scene (You can use the Channel Bank button to
select between Ch1~8 and Ch9~16 as your desire).
(3)
Then press the REC button to record the scene that you have set.
(4)
Select a bank (01~30).(5)
Select a Scene button (1~8) in this bank and press it, all LEDs flash briefly, this
means you setting has been saved.
(6)
Set the other scene(s) in the same way as your desire.(7)
After finishing your settings, you can p
ress and hold down the Program button for
about 2 seconds (till the PROG LED goes out) to exit from the Programing mode.
(8)
Note: The recorded scene can be reedited; if you reedit a scene and save it, the old
scene will be replaced by the new one.
Scene Operation
To edit a scene
Enter the Programing mode.(1)
Select your desired being edited scene in a bank.
(2)
Press a Fixture button (its LED lights up), and then set a new scene.
(3)
Press Midi/Rec button, and then press the selected scene button (all LEDs flash
briefly, that means your setting has been saved).
(4)

To delete a chase
Enter the Programing mode.(1)
Select a chase to be deleted. (2)
Press and hold down the DEL button, and at the same time, tap your selected chase
button, all LEDs will flash briefly, that means the chase has been deleted.
(3)
To delete all the chases
Before turning on the power, you press and hold down the DEL button and the Bank
Down button, and then turn on the power at the same time, all LEDs flash briefly, this
just means all the chases have been deleted.
Operation Guide
8
Set a scene(step), and then tap the Rec button, the display will show you the follw-
ing step.
(5)
You tap the Tap/disp button, and then tap the Rec button again, all LEDs flash briefly,
this means your operation has been saved.
(6)
You can add more scenes(steps) into a chase in the same way as the above.
To delete a scene (step) from a chase
Enter the Programing mode.(1)
Select a chase to be edited.(2)
Tap the Tap/disp button, the Step LED appears and the display window shows you
the current step.
(3)
Tap the Up/Down button to select the step to be deleted.(4)
Tap the DEL button to delete this step, all LEDs flash briefly, and the display will
show you the ahead step.
(5)
Chase Playback
When powered on, this unit will be firstly in the Manual control mode, and all channel
outputs are in black-out state (the Blackout LED flashes at the display window).
(1)
Tap the Blackout button (Blackout LED goes out) to enable the channel output.
(2)
1. Manual trigger:
Tap your selected Chase button, its LED will be lit. Then use the Fade Time fader to
adjust the running state.
(3)
Tap the Up/Down button to run the chase step by step.
(4)
Operation Guide
7
Tap the Music/Bkc button, the Audio Trigger LED will light up at the display window,
this indicates you that you are now in the Audio trigger mode.
(1)
Tap Bank Up/Down button to select desired bank (the scenes in the bank will run
sensitively by the Audio signal through the built-in microphone).
(2)
3. Audio trigger:
Tap the Audio button again(Audio Trigger LED goes out) to exit from the Audio mode.(3)
Chase Operation
This product has 12 programmable chases, each chase can record up to 240 scenes/
steps. Please see the below instructions for Chase setting.
To record a chase
Enter the Programing mode.
(1)
Press a Chase button, its LED will be lit.
(2)
Select a scene which you want to record into the chase as the first step.
(3)
Press the REC button, all LEDs will flash briefly, that means your operation has
been saved.
(4)
Record more scenes into the chase as your desire till finish your settings. Up to
240 scenes (steps) can be recorded in a chase.
(5)
To record a bank of scenes into a chase
Enter the Programing mode.
(1)
Select a Chase to be edited.(2)
Select a bank which you want to record into the chase.
(3)
Tap the Music/Bkc button, and then tap the Midi/Rec button, all LEDs will flash briefly,
that means the selected bank has been recorded into this chase.
(4)
To add a step into a chase
Enter the Programing mode.
(1)
Select a Chase to be edited.(2)
Tap the Tap/disp button, the Step LED appears and the display window shows you the
current step.
(3)
Tap the Up/Down button to select the step behind which you want to add a step. (4)

PAN/TILT Setting
"Assign"
1. Enter the Programming mode.
2. Press and hold down the MODE button, and then tap the FINE button at the same
time, the "Assign" LED will be lit.
3. Tap the Up/Down button to select PAN or TILT.
4. Tap your selected Fixture button.
6. You can press and hold down the MODE button, and then tap relevant scene button
to set the Pan/Tilt channel (all LEDs will flash briefly).
"Reverse"
1. Enter the Programming mode.
2. When the "Assign" LED is lit, you press and hold down the MODE button, and then tap
the FINE button at the same time, the "Reverse" LED will be lit.
3. Set the Pan/Tilt channel in the same way as above. After your settings, press and hold
down the MODE button, and then tap the FINE button at the same time to exit.
Delete all Pan/Tilt channels
Before turning on the power, you press and hold down the DEL button and the MODE
button, and then turn on the power at the same time, all LEDs flash briefly, this means
means all Pan/Tilt channels have been deleted.
10
Operation Guide
Delete Pan/Tilt channel
1. When in "Assign" or "Reverse" operating mode, press the related Fixture button.
2. Press and hold down the MODE button, and then tap the DEL button to delete the
Pan/Tilt channel.
Tap the Music/Bkc button, the Audio Trigger LED will light up at the display window,
this indicates you that you are now in the Audio trigger mode.
(1)
Select your desired chase and press related chase button, its LED will flash. The chase
will run sensitively by the audio signal through the built-in microphone.
(2)
3. Audio trigger:
Tap the Audio button again(Audio Trigger LED goes out) to exit from the Audio mode.(3)
Tap the AUTO button, the Auto Trigger LED will light up at the display window, this
indicates you that you are now in the Auto trigger mode.
(1)
Select your desired chase and press related chase button, its LED will flash.(2)
You can then use the Speed fader (or Tap/disp button) and the Fade Time fader to
adjust the running state.
(3)
2. Auto trigger:
Tap the Auto button again (Auto Trigger LED goes out) to exit from the Auto mode.(4)
Note: You can simultaneously run more scenes as your desire, and the enabled scenes
will run by your operating sequence.
9
Operation Guide
Bank copy & Fixture copy
Bank copy
1. Enter the Programming mode.
2. Use the Bank Up/Down buttons to select the bank to be copied.
3. Tap the Midi/Rec button, and then select the bank into which you want to copy.
4. Tap the Music/Bkc button, all LEDs flash briefly, this means your operation has been
saved. (You can copy the other bank in the same way.)
Fixture copy
1. Enter the Programming mode.
2. Press your selected Fixture button, its LED will be lit.
5. You can see the related information through the connected DMX receiver.
3. Set your desired channel output.
4. Press and hold down your selected Fixture button, and then tap the Fixture button into
which you want to copy to finish your Fixture copy.

Fade Time
1. Press and hold down MODE button, and then tap the Tap/disp button, the display
may show you "only"; Repeat this operation when "only" appears, the display will
show you "All".
2. The "only" or "ALL" display will go out automatically within almost 3 seconds.
"ALL" means that All channels run by the fade time.
"Only" means that only the preset PAN/TILT channels run by the fade time.
MIDI Control
1. Press and hold down the Midi button for about 2 seconds, the display may show you
like "In:01", this means the current Midi channel is "01". You can use Up/Down button
to set the Midi channel from 01 to 16 as your desire.
2. Then, press and hold down the Midi button for about 2 seconds to save your setting,
all the LEDs flash briefly indicating your operation has been saved.
Set MIDI channel
3. Press Blackout button to exit.
MIDI Control :
This unit can receive MIDI data to realize MIDI control upon Bank1~15,Chase1~6
and the Blackout function.
Control
Bank 1
Bank 2
Bank 15
Chase 1
Chase 2
Chase 3
Chase 4
Chase 5
Chase 6
Blackout
... ...
MIDI Note
00~07
08~15
112~119
120
121
122
123
124
125
126
... ...
Function
Turn on/off Bank 1
Turn on/off Bank 2
Turn on/off Bank 15
Turn on/off Chase 1
Turn on/off Chase 2
Turn on/off Chase 3
Turn on/off Chase 4
Turn on/off Chase 5
Turn on/off Chase 6
Enable/disable Blackout
... ...
Operation Guide
12
Operation Guide
11
Before turning on the power, press and hold down the Fixture2 button, the Fixture3
button and the Scene1 button; Then turn on the power, the display will flickeringly
show you "Read" (ready). This means the unit is ready to send data.
1.
Data Sending
After the above operation, you press and hold down the Scene7 button and Scene8
button to send the data, the LED-display will show you "OUT" till the data sending is
finished (You can also tap the Scene1 button during data sending to come back and
resend the data).
2.
Before data sending, make sure the connections between this unit and the connected
DMX receiver are well done.
Before turning on the power, press and hold down the Fixture2 button, the Fixture3
button and the Scene2 button; Then turn on the power, the display will flickeringly
show you "Read" (ready). This means the unit is ready to receive data.
1.
Data Receiving
The LED-display shows you "Rece" (receive) during data receiving.
(You can also tap
the Scene1 button during data sending to come back and resend the data).
2.
Before data receiving, make sure the connections between this unit and the connected
DMX receiver are well done.
Memory stick
You can also use a compact memory stick (sold separately) for convenient data backup
and transfer.
Memory stick (sold separately)
24-004-1685 Rev 1.1 All Rights Reserved!
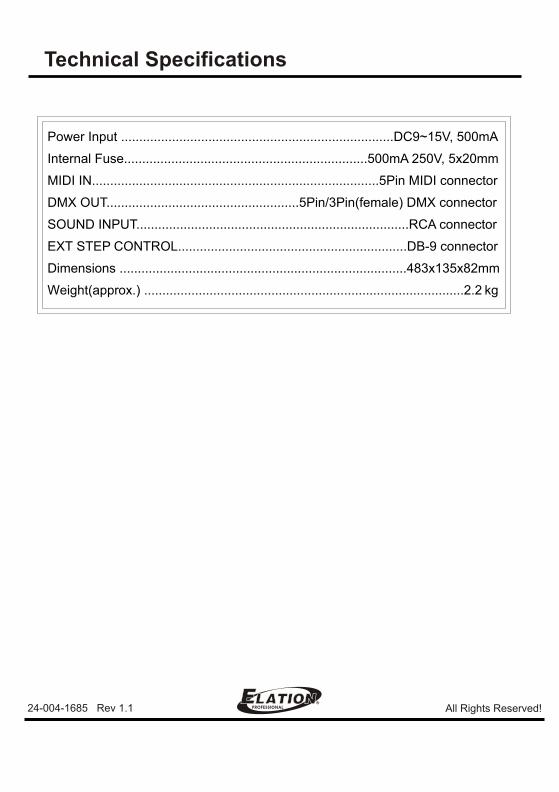
Technical Specifications
Power Input ...........................................................................DC9~15V, 500mA
Internal Fuse...................................................................500mA 250V, 5x20mm
MIDI IN...............................................................................5Pin MIDI connector
DMX OUT.....................................................5Pin/3Pin(female) DMX connector
SOUND INPUT...........................................................................RCA connector
EXT STEP CONTROL...............................................................DB-9 connector
Dimensions ...............................................................................483x135x82mm
Weight(approx.) ........................................................................................2.2 kg