
Turning Chuck Parts of a Lathe Headstock Toolpost ...
39
Turning Parts of a Lathe Headstock Chuck Toolpost Tailstock Saddle Treadle Stop Feedshaft Leadscrew Lathe Bed
Transcript of Turning Chuck Parts of a Lathe Headstock Toolpost ...

Turning
Parts of a LatheHeadstock
Chuck
Toolpost
Tailstock
Saddle
Treadle StopFeedshaftLeadscrew
LatheBed

Turning
Parts of a LatheCross-slide Handwheel
Compound-slide Handwheel
Feed Reverse
Feed Direction
Saddle Handwheel
SpindleStart/Stop
Feed Start/StopEngage
Screwcutting
Spindle speed gear selection levers
High/LowGear Ratio
Selector
EmergencyStop
Button
Feedrate & Screwcutting Gear Selection Levers
SADDLE
HEADSTOCKFeedshaft/Leadscrew
Reverse

TurningLathe Tools
Side and Face cutter Knife Tool Roughing Tool
Forming Tool Parting Tool Screwcutting Chamfering Tool

TurningLathe Tool AnglesRake angle
Clearance angle
The tool must be set to centre height when clamped into the lathe tool-post otherwise the angles will change

TurningLathe Tool Angles
Tool correctly set on centre height
If the tool is set too high then ...
If the tool is set too low then ...
…..the rake gets bigger andthe clearance gets smaller
…..the rake gets smaller andthe clearance gets bigger
rake
clearance
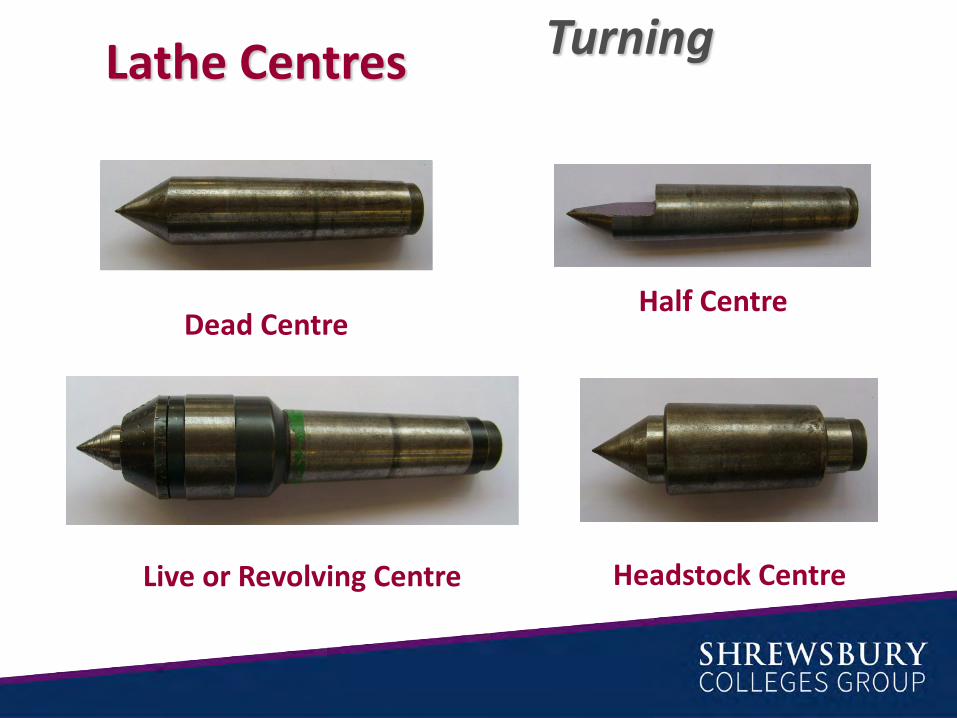
TurningLathe Centres
Dead CentreHalf Centre
Live or Revolving Centre Headstock Centre

TurningTools used on a Lathe
Centre Drill Twist Drills
Thread Chasers
parallel shank
Taps and Dies
Machine Reamer
Knurling Tool
Morse taper shank

TurningWork HoldingThree Jaw Chuck
With 2 sets of jaws –
for holding different diameters of work

TurningWork HoldingCollet Chuck Has interchangeable collets for
different diameters
Will not distort thin walled jobs
Often used for production work

TurningWork HoldingFaceplate
Used for mounting jobs that cannot be held in a
chuck
Must be balanced before using

TurningWork HoldingFour Jaw Chuck
Jaws are reversible and independent
for centreing eccentric work

TurningSteadies
Long workpieces will deflect and spring if not supported.
To avoid this we use steadies – there are two types…
Bolted to the saddle so it travels along the work directly
behind the cutter and so prevents deflection due to the
cutting forces
Travelling Steady

TurningSteadies
Fixed to the bed to provide support when turning the end of long
workpieces.
Fixed Steady

TurningTaper Turning…
1) offsetting the tailstock…
…to produce slow tapers when turning between centres

TurningTaper Turning…
2) offsetting the compound slide…
…used for steeper angles

TurningTaper Turning…
…the cross-slide spindle is disengaged so that the taper turning attachment controls its movement
3) using a taper turning attachment…

TurningTaper Turning…
4) using a taper form tool…

Centre Lathe Use Name 6 main parts of a Centre Lathe.
A Lathe Tool has 2 main angles that form the cutting edge, Name them.
Name 6 tools that can be used on a Centre Lathe.
Name 3 kinds of tool holding used on a Centre Lathe.
Why is it important that a Lathe tool is set on centre height.

Turning a taper on a Centre Lathe can be achieved in four ways, What are They?

Reading a micrometer

A micrometer is used for making accuratemeasurements
Reading a micrometer
It can easily measure the thickness of a human hair…
…which is about four hundredths of a millimetre
0.04mm

Reading a micrometer
So how does it work?
It uses a screw thread
Each thread has its own pitch…
… this is the distance that the screw will move when turned through one revolution

Before going any further we need to know what the basic parts of a micrometer are called…..
Reading a micrometer

Reading a micrometer
The micrometer spindle has a thread
The pitch of this thread is 0.5mm
How far will the spindle move if it is turned through one revolution?
0.5mm

Reading a micrometer
When a micrometer is in the closed position…
…the scales are set so that they read zero.

Reading a micrometer
The top barrel scale is graduated in 0.5mmdivisions to record the number of full turns of the thimble
The bottom barrel scale is graduated in 1 mmdivisions
(2 full revolutions of the thimble)

Reading a micrometerIf the thimble is given one full turn from closed it will have moved how far?
This is shown as one small division on the barrel
0.5mm

Reading a micrometer
This is shown as one large division on the barrel
1 mm
If the thimble is given two full turns from closed it will have moved how far?
2 full turns of the thimble

Reading a micrometer
So 2 full turns (1mm) moves through 100 thimble divisions
The thimble scale is divided into 50
This means that each thimble division is one hundredth of a millimetre - 0.01 mm

Reading a micrometer
Reading the micrometer now is easy – simply add
the whole mm’s…
any half mm’s…
and the hundredths of a mm
10.00
0.50
0.06
10.56 mm


WELDINGBASIC INTRODUCTION TO WELDING

LEARNING AIM 1:TO DEVELOP A BASIC UNDERSTANDING OF 4 WELDING PROCESS
LEARNING AIM 2:UNDERSTAND SOME OF THE SAFETY REQUIREMENTS FOR WELDING
LEARNING OUTCOMES:
TO ACHIEVE A BASIC UNDERSTANDING OF WELDING PROCESSES AND SAFE WORKING PROCEDURES, THAT WILL SUPPORT YOUR START IN:
CITY AND GUILDS LEVEL 2 FABRICATION AND WELDING(UNIT 213 MMA, UNIT 214 MIG AND UNIT 215 TIG)
BTEC LEVEL 3 (UNIT 23 WELDING TECHNOLOGY)

ALL OF THE FOUR WELDING PROCESSES HAVE BENEFITS AND LIMITATIONS DEPENDING ON THE ENVIRONMENT OF WORK AND SKILL LEVEL OF THE PERSON WELDING.
THERE WILL BE A CHOICE OF PROCESS FOR PARTICULAR JOBS IN INDUSTRY. SOME PROCESSES ARE CAPABLE OF THE SAME WORK BUT MIGHT NOT BE AS PRODUCTIVE, OR USED MAINLY FOR WORK WITH SOME MATERIALS IN CERTAIN INDUSTRIES.
YOU WILL SEE THAT THERE IS QUITE A DIFFERENCE IN THE EQUIPMENT NEEDED AND CONSIDERATIONS FOR SAFETY WITH THE HAZARDS OF ELECTRICAL ARC WELDING.

CLICK ON THE LINK TO OPEN A VIDEO PRODUCED BY THE TWI (THE WELDING INSTITUTE) AS IT CONTAINS MOST OF THE DETAIL THAT YOU WILL NEED TO BE ABLE TO COMPLETE THE TASKS.
YOU WILL ALSO NEED TO USE RESEARCH ON BOTH HSE.GOV.UK AND TWI.COM TO ASSIST YOU WITH THE SAFETY QUESTIONS.
HTTPS://WWW.YOUTUBE.COM/WATCH?V=AQ-RIPIY-Y0

PLEASE DOWNLOAD THE YEAR 11 WELDING QUESTIONS DOCUMENT.
YOU CAN COMPLETE THIS DOCUMENT, WHICH YOU WILL NEED TO PRINT OUT AND BRING WITH YOU IN SEPTEMBER.
ALL TASK QUESTIONS ARE APPROPRIATE TO THE WELDING UNITS THAT WILL START IN SEPTEMBER SO USE THE GUIDANCE GIVEN AND FEEL FREE TO RESEARCH FROM OTHER SOURCES.
NOTE:WE ARE IN THE UK AND SOME RESOURCES MAY NOT BE ACCURATE FOR UK REGULATIONS AND LEGISLATION

Qualification Unit number and title
Preparation for:
City and Guilds Fabrication and Welding Level 2
Units: 213 MMA, 214 MIG and 215 TIG
Learner name Assessor name
W Hughes
Date issued Hand in deadline Submitted on
27th March 2020 4th September 2020
Please complete the following questions, based on the video in the presentation and
using research from the websites listed below.
You could add more detail to your answers if you research from other sources such as
TWI (The Welding Institute) and HSE.gov.uk (for welding fume guidance and COSHH
regulations).
This is ideal preparation for your upcoming units for both:
BTEC level 3 Unit 23 Welding Technology
City and Guilds Level 2 Fabrication and Welding
1. Which process requires less protection from ultraviolet light for anyone working in
the working area, and why?
2. What is the simplest process requiring less machinery and why does it not need a
separate shielding gas?

3. Which process is best suited to high production welding in all welding positions
and why?
4. Using research from hse.gov.uk and twi.com, how does welding fume need to be
controlled under COSHH regulations?
5. Why is submerged arc welding less suitable for multi-positional welding (not in
the flat (PA) or horizontal vertical (PB) positions?

Please add your name and submission date to the top of this document in the
appropriate box.


![Sliding Headstock Type CNC Automatie Lathe · 2019. 5. 28. · Cincom L20, Type XII [Example tooling] Stable, powerful, and highly productive with versatility of modular design. With](https://static.fdocuments.in/doc/165x107/612a084f8e119b143850cf00/sliding-headstock-type-cnc-automatie-lathe-2019-5-28-cincom-l20-type-xii-example.jpg)
