TryItNow! ANSYS AIM · 1 © 2015 ANSYS, Inc. August 26, 2016 ANSYS Confidential TryItNow! ANSYS AIM...
23
1 © 2015 ANSYS, Inc. August 26, 2016 ANSYS Confidential TryItNow! ANSYS AIM Step by Step Walkthrough: Polymer Processing L-Channel Extrusion
Transcript of TryItNow! ANSYS AIM · 1 © 2015 ANSYS, Inc. August 26, 2016 ANSYS Confidential TryItNow! ANSYS AIM...
1 © 2015 ANSYS, Inc. August 26, 2016 ANSYS Confidential
TryItNow! ANSYS AIMStep by Step Walkthrough:
Polymer Processing
L-Channel Extrusion

2 © 2015 ANSYS, Inc. August 26, 2016 ANSYS Confidential
ANSYS designed this TryItNow! experience to give you quick access to ANSYS AIM simulations on the cloud.
This AIM demonstration shows an polymer extrusion simulation of an L-channel. The simulation demonstrates the ease of setting up and solving an extrusion simulation for inverse die design.
Default settings are used to highlight ease-of-use and to demonstrate how AIM automates many of the steps required for the polymer extrusion.
Step by Step Walkthrough:L-Channel Extrusion

3 © 2015 ANSYS, Inc. August 26, 2016 ANSYS Confidential
Select Polymer Extrusion Template
Select the “Polymer Extrusion” template.

4 © 2015 ANSYS, Inc. August 26, 2016 ANSYS Confidential
Modify Template Settings
2. Select “Create Simulation Process” and select “L-Channel Extrusion.scdoc” as the geometry.
1. Select Determine die lip shape as the Simulation goal.

5 © 2015 ANSYS, Inc. August 26, 2016 ANSYS Confidential
Setup Mesh
1. Click on Mesh task.
2. Select the Edge Selection filter.
3. Add an Edge Sizing.
4. Select the 5 edges shown in blue.
5. Specify 20 Edge divisions.
6. Change the Bias type to Left.
6. Change the Behavior to Hard.

6 © 2015 ANSYS, Inc. August 26, 2016 ANSYS Confidential
Setup Mesh
1. Create another Edge Sizing.
2. Select the 4 edges shown.
3. Specify 12 Edge divisions.
4. Change the Behavior to Hard.
5. Change the Bias type to Left.

7 © 2015 ANSYS, Inc. August 26, 2016 ANSYS Confidential
Setup Mesh
1. Create a new Edge Sizing.
3. Specify 12 Edge divisions.
4. Change the Behavior to Hard.
2. Select the 2 edges shown.
5. Change the Bias type to Right.

8 © 2015 ANSYS, Inc. August 26, 2016 ANSYS Confidential
Setup Mesh
1. Create a new Edge Sizing.
3. Specify 20 Edge divisions.
4. Change the Behavior to Hard.
2. Select the edge shown.
5. Change the Bias type to Right.

9 © 2015 ANSYS, Inc. August 26, 2016 ANSYS Confidential
Setup Mesh
2. Select the face shown in blue.
1. Create a Face Sizing.
4. Change the Element size to be 0.002 m.
5. Specify the Behavior to Hard.
3. Use the filter and Ctrl-click to select 3 additional faces behind the first.
6. Generate the Mesh.

10 © 2015 ANSYS, Inc. August 26, 2016 ANSYS Confidential
Specify Material
2. Open Material Assignments.
1. Select Extrusion task.
3. Change the Material model to Generalized Newtonian Fluid.
4. Open settings for Generic Polymer.
6. Add a Viscosity –Bird-Carreau law with the specified properties.

11 © 2015 ANSYS, Inc. August 26, 2016 ANSYS Confidential
Specify Extrusion Settings
1. Under Extrusion Settings, open Fluid Flow Conditions, and Extrudate Deformation 1.
2. Change the Location to the body shown in blue.
3. Change the Deformation method to Streamwise.
4. Change the Integration method to Line kinematic condition.

12 © 2015 ANSYS, Inc. August 26, 2016 ANSYS Confidential
Specify Extrusion Settings
1. Open Free Surface 1.
2. Select the 6 faces shown in blue.
3. Specify the Pressure to be 0 Pa.

13 © 2015 ANSYS, Inc. August 26, 2016 ANSYS Confidential
Specify Extrusion Settings
1. Open Die Deformation 1.
2. Select the volume shown in blue as the Location.
3. Specify the Deformation type to be Variable.
14 © 2015 ANSYS, Inc. August 26, 2016 ANSYS Confidential
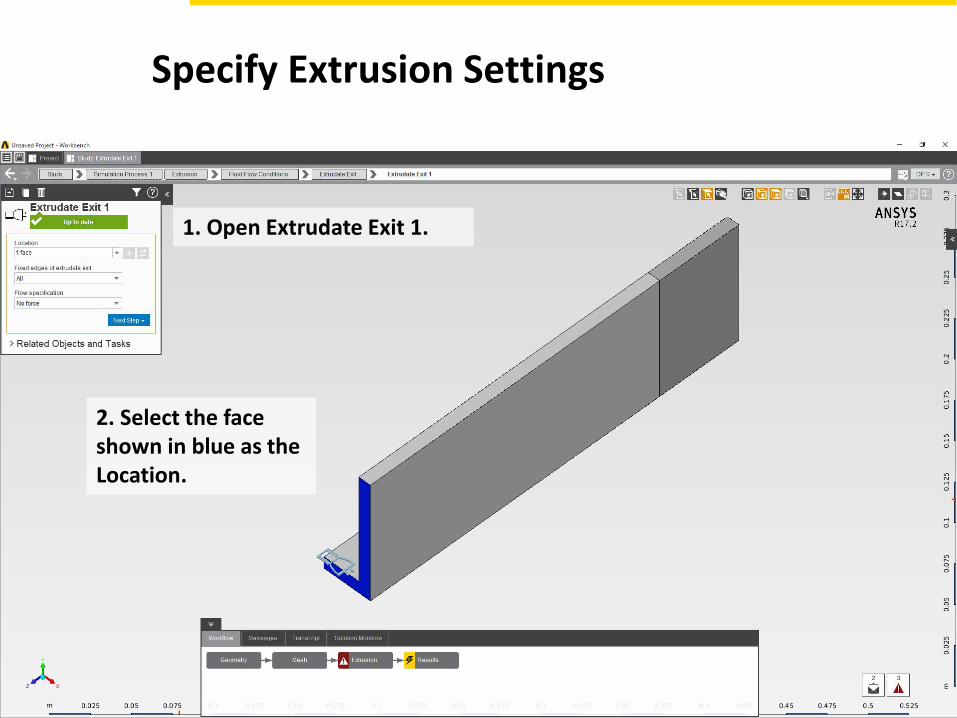
Specify Extrusion Settings
1. Open Extrudate Exit 1.
2. Select the face shown in blue as the Location.

15 © 2015 ANSYS, Inc. August 26, 2016 ANSYS Confidential
Specify Extrusion Settings
1. Open Inlet 1.
2. Select the face shown in blue as the Location.
3. Specify 4.2e-5 m^3 / s to be the Volume flow rate.
16 © 2015 ANSYS, Inc. August 26, 2016 ANSYS Confidential
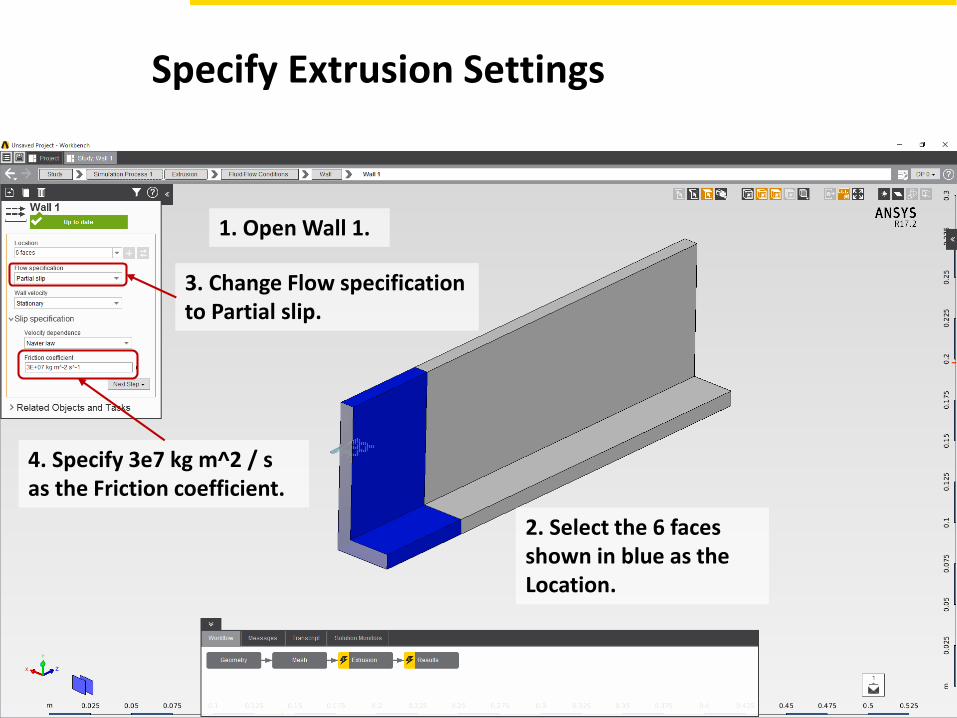
Specify Extrusion Settings
1. Open Wall 1.
3. Change Flow specification to Partial slip.
4. Specify 3e7 kg m^2 / s as the Friction coefficient.
2. Select the 6 faces shown in blue as the Location.

17 © 2015 ANSYS, Inc. August 26, 2016 ANSYS Confidential
Solve Physics
1. Solve Physics.

18 © 2015 ANSYS, Inc. August 26, 2016 ANSYS Confidential
Results
1. Select Results task.
2. Right-click and select Evaluate Results.
19 © 2015 ANSYS, Inc. August 26, 2016 ANSYS Confidential
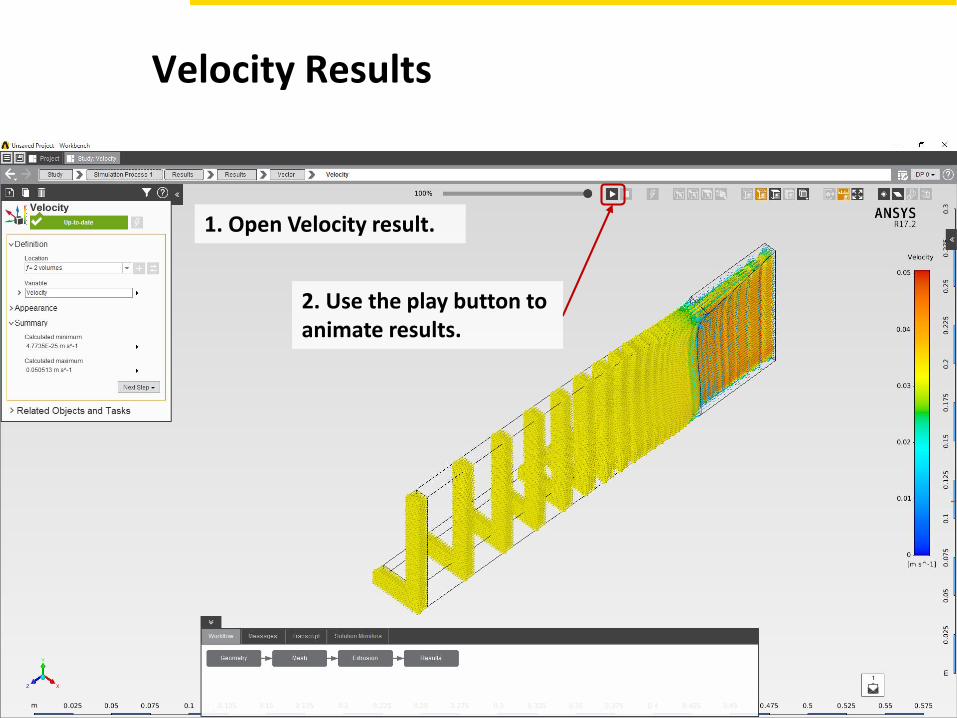
Velocity Results
1. Open Velocity result.
2. Use the play button to animate results.
20 © 2015 ANSYS, Inc. August 26, 2016 ANSYS Confidential
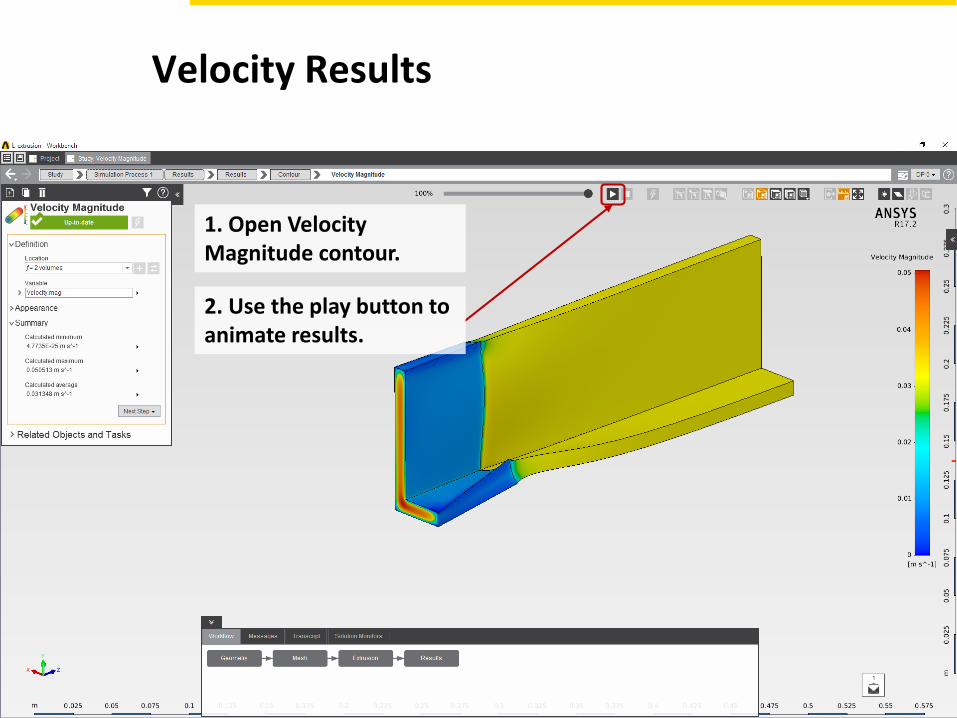
Velocity Results
1. Open Velocity Magnitude contour.
2. Use the play button to animate results.

21 © 2015 ANSYS, Inc. August 26, 2016 ANSYS Confidential
Pressure Results
1. Open Pressure contour.
2. Use the play button to animate results.
22 © 2015 ANSYS, Inc. August 26, 2016 ANSYS Confidential
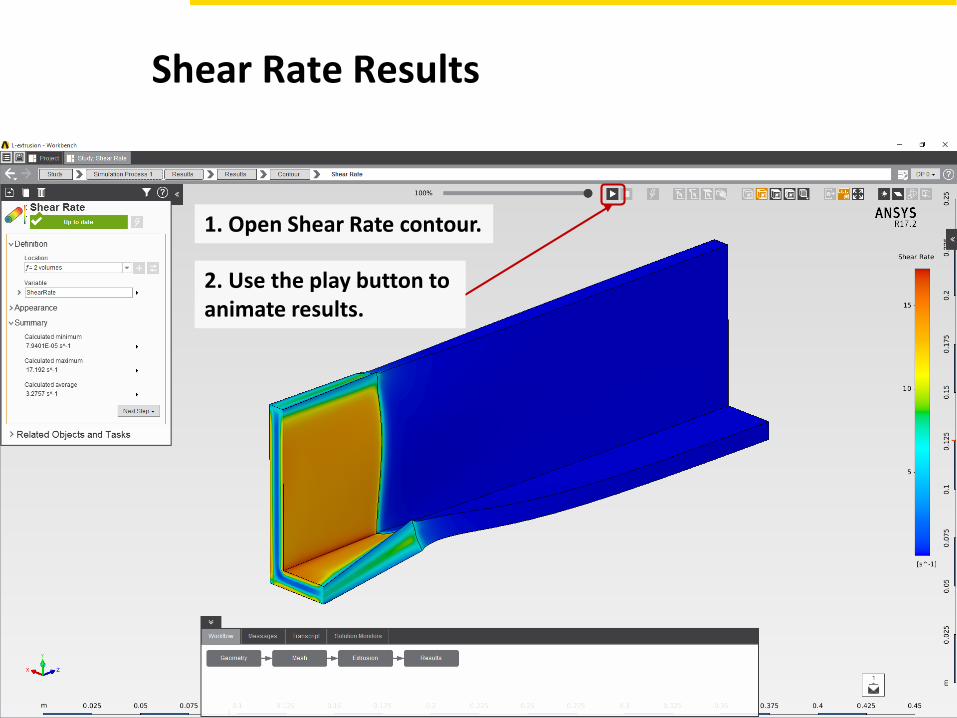
Shear Rate Results
1. Open Shear Rate contour.
2. Use the play button to animate results.

23 © 2015 ANSYS, Inc. August 26, 2016 ANSYS Confidential
Ready to learn more about ANSYS AIM?
CONTACT US
ANSYS, Inc.
Southpointe
275 Technology Drive
Canonsburg, PA 15317
U.S.A.