
Supervision and Administration Manual - Avanzada 7 · Supervision and Administration Manual Eduardo...
74
pg. 1 Supervision and Administration Manual Eduardo Sellanes Product Manager April 2014
Transcript of Supervision and Administration Manual - Avanzada 7 · Supervision and Administration Manual Eduardo...

pg. 1
Supervision and Administration Manual
Eduardo Sellanes
Product Manager
April 2014

pg. 2
Content
User Interface --------------------------------------------------------------------------------------------- 3
Configuring the system --------------------------------------------------------------------------------- 4
Management of Supervisor users ---------------------------------------------------------------------- 16
Managing Teams ------------------------------------------------------------------------------------------ 22
ECCP User Administration ------------------------------------------------------------------------------ 25
Administration Breaks ----------------------------------------------------------------------------------- 27
Agents Management --------------------------------------------------------------------------------------- 30
Dynamic Configuration and Standard Configuration --------------------------------------------- 34
CallBack Extensions Management --------------------------------------------------------------------- 35
Assigning Agents to Queues------------------------------------------------------------------------------ 38
Forms Administration ------------------------------------------------------------------------------------ 40
Campaign Management ---------------------------------------------------------------------------------- 51
Recycling Campaign --------------------------------------------------------------------------------------- 59
Reports-------------------------------------------------------------------------------------------------------- 61
Monitoring --------------------------------------------------------------------------------------------------- 73

pg. 3
User Interface CallCenter module consists of two main blocks: Administration and Management
Administration
This section made all management tasks, and generic configuration CallCenter Pro
For example, administration of Supervisors and Agents, Database configuration and parameters of AMD.
Management
Meanwhile, in the other section, the CallCenter management tasks are performed.
For example, campaign creation, monitoring and reporting

pg. 4
Configuring the System
Module: Generic Configuration
Location
Tab "CCPRO Admin" Submenu "Configuration" Side Menu: "General Settings"
pg. 5
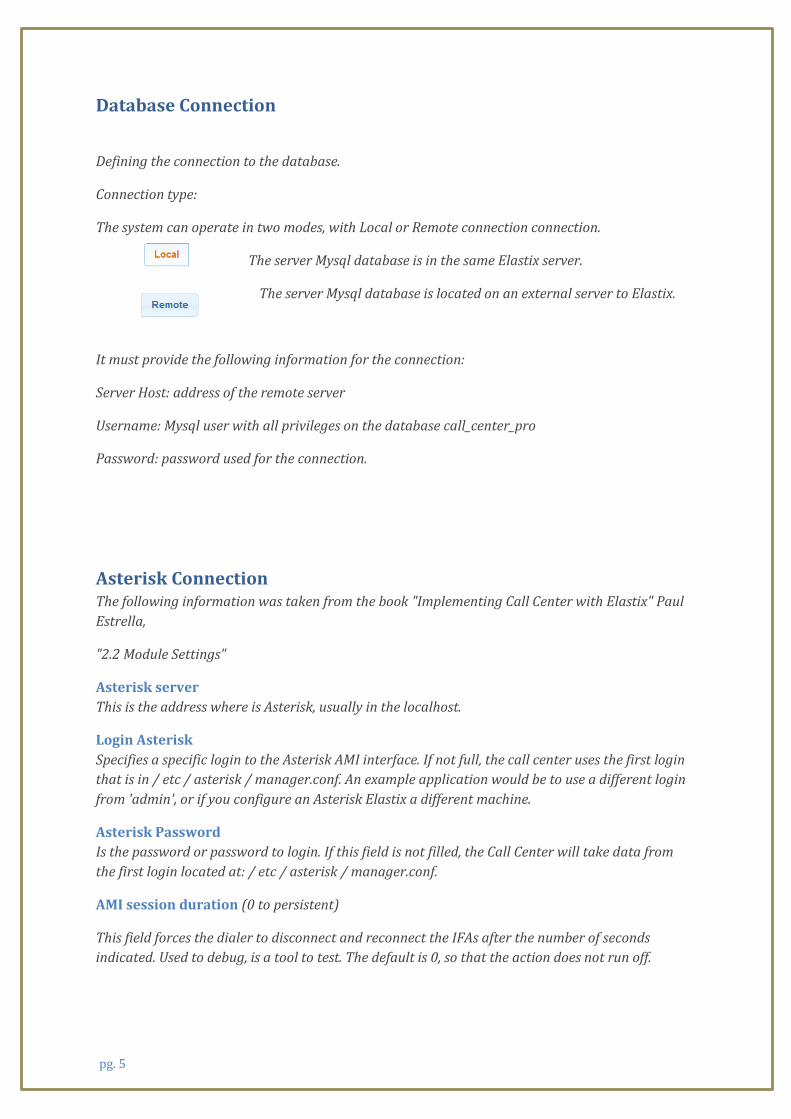
Database Connection
Defining the connection to the database.
Connection type:
The system can operate in two modes, with Local or Remote connection connection.
The server Mysql database is in the same Elastix server.
The server Mysql database is located on an external server to Elastix.
It must provide the following information for the connection:
Server Host: address of the remote server
Username: Mysql user with all privileges on the database call_center_pro
Password: password used for the connection.
Asterisk Connection The following information was taken from the book "Implementing Call Center with Elastix" Paul
Estrella,
"2.2 Module Settings"
Asterisk server
This is the address where is Asterisk, usually in the localhost.
Login Asterisk
Specifies a specific login to the Asterisk AMI interface. If not full, the call center uses the first login
that is in / etc / asterisk / manager.conf. An example application would be to use a different login
from 'admin', or if you configure an Asterisk Elastix a different machine.
Asterisk Password
Is the password or password to login. If this field is not filled, the Call Center will take data from
the first login located at: / etc / asterisk / manager.conf.
AMI session duration (0 to persistent)
This field forces the dialer to disconnect and reconnect the IFAs after the number of seconds
indicated. Used to debug, is a tool to test. The default is 0, so that the action does not run off.
pg. 6
Dialer Parameters
Short Call Threshold Often it happens That the outgoing call is connected and passed to the agent, but is disconnected
for some reason there is not That dialogue. So from the point of view of Asterisk the call was
successful "but it was for the campaign.
THEREFORE, This value specifies the minimum length of a valid call. If a call is connected for less
seconds than indicated, is Considered as failed. The default value is 10 and is Measured in seconds.
Answering Delay Is the initial value of the estimate of what it will take from a call is placed (or assigned to an agent)
until he has news of what happens to the call, or if connected, or failed. During the course of the
outbound campaign, this value is replaced with the actual statistics of how much on average is
taking the call to be answered. This statistical value used to replace is in memory but not written
to the database.
On this field we will deepen. The dialer examines how long an agent has been busy with a call. Then
estimate the probability that after "X" seconds, the agent taking the call ends and becomes free.
If the probability is higher than the percentage of service, the new call is placed as if the agent had
been free. The value of "X" is what is entered in "Delay to reply," but only as an initial estimate.
If the percentage is less than a certain number of calls, "Delay to answer" if you exceed a certain
number of calls already made, the average real answer is used is used.
Service Percentage The percentage is a parameter predicting calls.
Risk exists that the prediction is incorrect when the prediction that the agent will be released soon
occupied is performed. Then call placed from that prediction will stay waiting in line after
connecting until another agent is released unintentionally.
The percentage regulates so that a prediction xxx% certainty that actually the agent will be
released and will take the call is taken.
Per-call dial timeout It is a parameter placement. If the call is not answered beyond the time indicated, is closed and
marked as failed. This is in addition to the module in version 2.1.99-4, does not affect any other
parameter. The value of 0 is equivalent to an Asterisk default value equivalent to 30 seconds.
Retries are not affected by this parameter.

pg. 7
Enable dailer debug Activate the DEBUG and make records in the log of the dialer.
The default path of the log of the marker is the file: / opt / elastix / dialer / dialerd.log
Dump all events received Asterisk It is a debugging tool. The dialer works by listening and interpreting emitting Asterisk AMI events.
Only some events are of interest to the current code. However it may happen that a bug or a new
feature that can be implemented taking information from an additional AMI event arises. Enabling
this flag to see if there is some event renders the information required, but is currently not taking
action on it. You need to activate first DEBUG does not work regardless if active.
Enable overcommit of outgoing calls The dialer places a certain amount of calls based on the number of free agents, and the prediction
of the number of agents that will be released soon. This is the default behavior.
From all calls placed by iteration, only a fraction is actually connected. The fraction known as
Seizure Average Rate (ASR). If the flag is set, then the dialer ASR statistics used to place a greater
number of outgoing calls to cancel the ASR form and all agents remain busy.
For example, if 10 calls on average just 5 connect, the ASR is 50%. So try to place the dialer twice
calls than you would if the flag is cleared.
Enable Predictive dialer behavior If this option is disabled, the predictive dialer does not do and only place calls to the number of free
agents. In this case the parameters: short call threshold, delay and percentage answering service
until no longer needed and its value is not taken into account.
The predictive dialer has the following functions:
• Begin each call using the Asterisk Originate command.
Review • constantly calls that have been placed by it and have not had a OriginateResponse event.
• If the marker receives a response OriginateResponse type (example: join or link) Read the
information in the call database.
• Regularly interrogates the queue status to see how many agents are registered and free.
• The number of free agents regulates how many calls are initiated simultaneously.
• The net estimate the average length of call, to try to predict whether the current calls are ending
and proactively place new calls.
Dialer Status Report a service status and allows to start or stop the service dialer.

pg. 8
Module: Setup AMD CallCenter system attempts to detect answering machines at the beginning of outgoing calls. Activating the answering machines detection is performed in the configuration of the outgoing
campaign. In the "AMD Config" parameters module for adjusting the shape detection. Location Tab "CCPRO Admin" Submenu "Configuration" Side Menu: "AMD Config"
Initial Silence
It is the maximum silence duration before greeting. If it exceeds then answering machine is detected.
Greeting
It is the maximum length of a greeting. If it exceeds then answering machine is detected.
After Greeting Silence
It is the silence after detecting a greeting. If it is detected then exceeds Human. Total Analysis Time The maximum time allowed for the algorithm to decide on a human or answering machine.
Minimum Word Length
It is the minimum duration of Voice to considered as a word.
Between Words Silence
It is the minimum duration of silence after a word to consider the audio that follows as a new word.
Maximum Number Of Words
This is the maximum number of words in greeting. If it exceeds then answering machine is detected.
Silence Threshold
It is the silence threshold.

pg. 9
Module: External URLs Some of the following information was taken from the book "Implementing Call Center with Elastix" Paul Estrella,
Chapter "4.7.5 External URLs" Location Tab "CCPRO Admin" Submenu "Configuration" Side Menu: "External URLs"
Listing information
Displays information on all registered External URLs in CallCenter.
Active: External URL (Yes - No)
Yes - Enables selectable campaigns
No - Not Active, it can not be used from the campaigns
Open in: default place where open external url
URL Tempate: Info link developed for the implementation of the external application
Description: short name to use to identify the url in the other modules.
Options: Actions to be taken on the registry settings of the extension.

pg. 10
Action Bar
New URL: Register a new external url.
Page Control: Change page in the list, when there are many elements, the system displays information using
pages to make viewing more efficient.
Register a new external URL In the "External URL" module take action "New URL"
The following screen appears:
Information to complete:
URL Template: This field displays the link we have developed for the implementation of the external
application is placed. For example:
http://interno.crm.org/integracion_call_center.php?agent = {__AGENT_NUMBER__}&phone={__PHONE__}
URL Description: This field contains a description of the URL. It may be a short description, as this
information is the reference shown in the "External URL" field when creating an outbound or inbound
campaign.
Open URL in: Select where the application should open with the following options: New window, embedded
Marco and JSONP.
The JSONP option lets you run JavaScript directly into the agent console. The URL then provides to run
JavaScript.
Fields indicated with * are mandatory
At the end select "Save" to save the data or "Cancel" to cancel it.

pg. 11
Edit an external URL
In the "External URL" module to click on [Edit], corresponding to the Options column of the list.
The following screen appears:
The system allows you to change all log data. The field "Enable use of this template" to enable or disable the use of this form of external urls in campaigns. Fields indicated with * are mandatory After editing use "Apply Changes" to update the data or "Cancel" to cancel. Templates from an external URL The template URL can contain identifiers with names in braces, such as {HomeAddress} which will be replaced with actual values for each connected call escapees. Identifiers available are the names of the attributes of the call (with distinction capitalization) plus the following default attributes of the call: {_AGENT_NUMBER_} Agent channel identifier, for example: Agent/9000 _CALL_TYPE_} {One of the values 'incoming', 'outgoing' _CAMPAIGN_ID_ {} Internal ID of the current year _CALL_ID_ {} Internal ID of the current year _PHONE_} {Dialed Number or Caller-ID of the connected call {ID} _REMOTE_CHANNEL_ channel connected call An example application of this feature might be the link to open the window of a CRM, and in the process send the customer's phone number and ask the CRM screen that displays customer information to make match that number. The URL that opens this application is: https://IP_Address/index.php?id_cliente={id_cliente}&id_planilla={id_planilla}&id_calls={__CALL_ID__}&id_campaign={__CAMPAIGN_ID__} The first two parameters are columns of csv (callfile) and the other two are default attributes.

pg. 12
Module: Queues This module selected from all queues that are defined in Elastix PBX which is used in the system CallCenter Pro Location Tab "CCPRO Admin" Submenu "Configuration" Side Menu: "Queues"
Listing information
Displays information for all queues that have been registered to the CallCenter system.
Queue Name: The number is related to the defined queue in PBX Elastix
Status: Queue Status (Active - Inactive)
Active - Active , is selectable campaigns
Inactive - Turns off, can not be used for campaigns
Options: Actions to be taken on the registed settings of the Queue.

pg. 13
Action Bar
Select Queue: Register a queue in the CallCenter system.
Change Status: Changes the state of the queue, On - Off.
Page Control: Change page in the list, when there are many elements, the system displays information using
pages to make viewing more efficient.
Show Filter: There are fields to filter the information to present.
To perform a custom search, complete the appropriate fields, and click "Search"
In gray the selected search filters is presented.

pg. 14
Register a new queue In the "Queues" module take action "Select Queue"
The following screen appears:
Information to complete:
Queue: queue Elastix PBX used in the CallCenter. If a queue was already recorded, will not be available for
selection.
This selection should be performed for all queue you want to use, either for an incoming to an outgoing
campaign.
Script: Script default that will tell the agent on your console when you answer a call from this queue. This
script can be written about when generating a campaign.
Fields marked with * are required
At the end select "Save" to save the data or "Cancel" to cancel it.

pg. 15
Editing a Record in Queue In the "Queues" module to click on [Edit], corresponding to the Options column of the list.
The following screen appears:
The system allows you to change all log data.
Fields indicated with * are mandatory
After editing use "Apply Changes" to update the data or "Cancel" to cancel.

pg. 16
Management of Supervisor users
Supervisors are users who have the power to administer and manage the CallCenter module.
The supervisor users are divided into two categories, "General Supervisors" and "Supervisors Teams"
The "general supervisors" manage the overall CallCenter configuration, while "team supervisors" are
responsible for managing the agents and campaigns for their teams.
Here the list of tasks you can perform each type of supervisor is detailed.
Comparison chart types of supervisors:
Task General Supervisor Teams Supervisor
Configuration parameters Yes NO
AMD Parameters Yes NO
External URL Parameters Yes NO
Define PBX Queues utilization Yes NO
Adminster Supervisors Yes NO
Administer Teams Yes NO
Assign Supervisors / Teams Yes NO
Create Agents Yes NO
Create ECCP Users Yes NO
Administer Callback Extensions Yes NO
Add Agents to Queues Yes Yes
Administer Breaks Yes NO
Create Static Forms Yes Yes
Create Dynamic Forms Yes Yes
Ingoing Campaigns Yes Yes
Outgoing Campaigns Yes Yes
Do not Call list Yes Yes
Campaign Recycle NO Yes
Reports Yes Yes
Monitoring Yes Yes
pg. 17
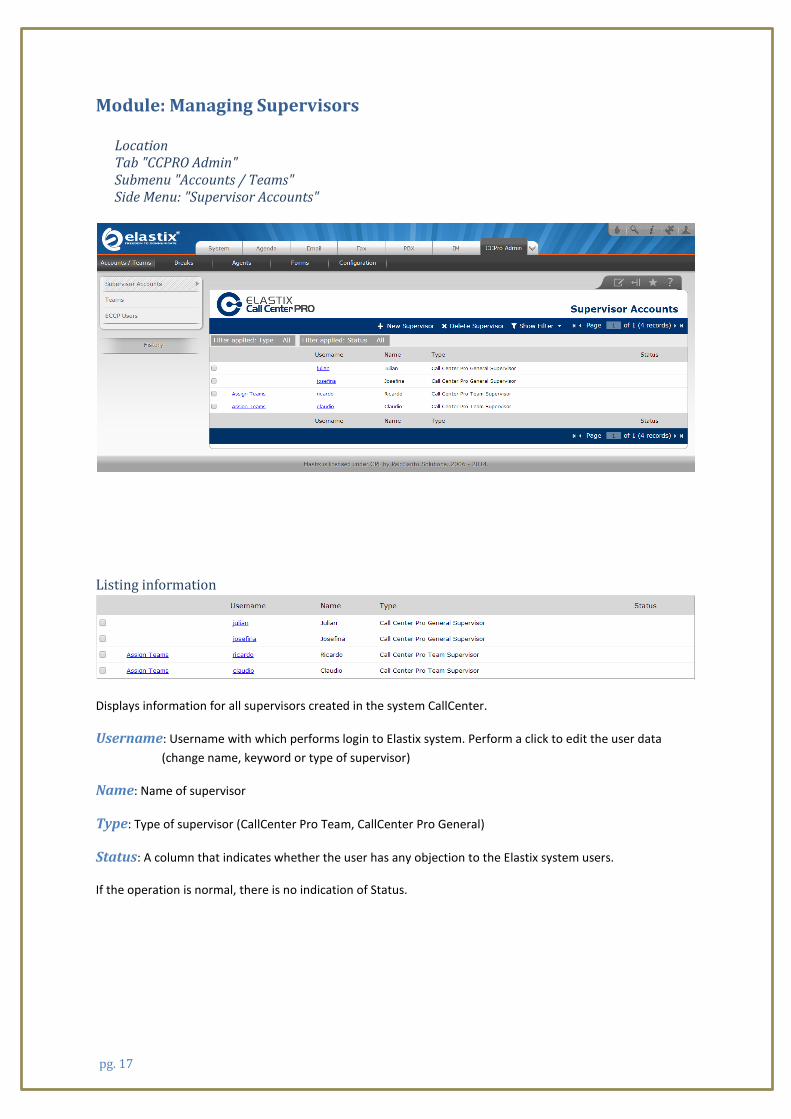
Module: Managing Supervisors Location Tab "CCPRO Admin" Submenu "Accounts / Teams" Side Menu: "Supervisor Accounts"
Listing information
Displays information for all supervisors created in the system CallCenter.
Username: Username with which performs login to Elastix system. Perform a click to edit the user data
(change name, keyword or type of supervisor)
Name: Name of supervisor
Type: Type of supervisor (CallCenter Pro Team, CallCenter Pro General)
Status: A column that indicates whether the user has any objection to the Elastix system users.
If the operation is normal, there is no indication of Status.
pg. 18
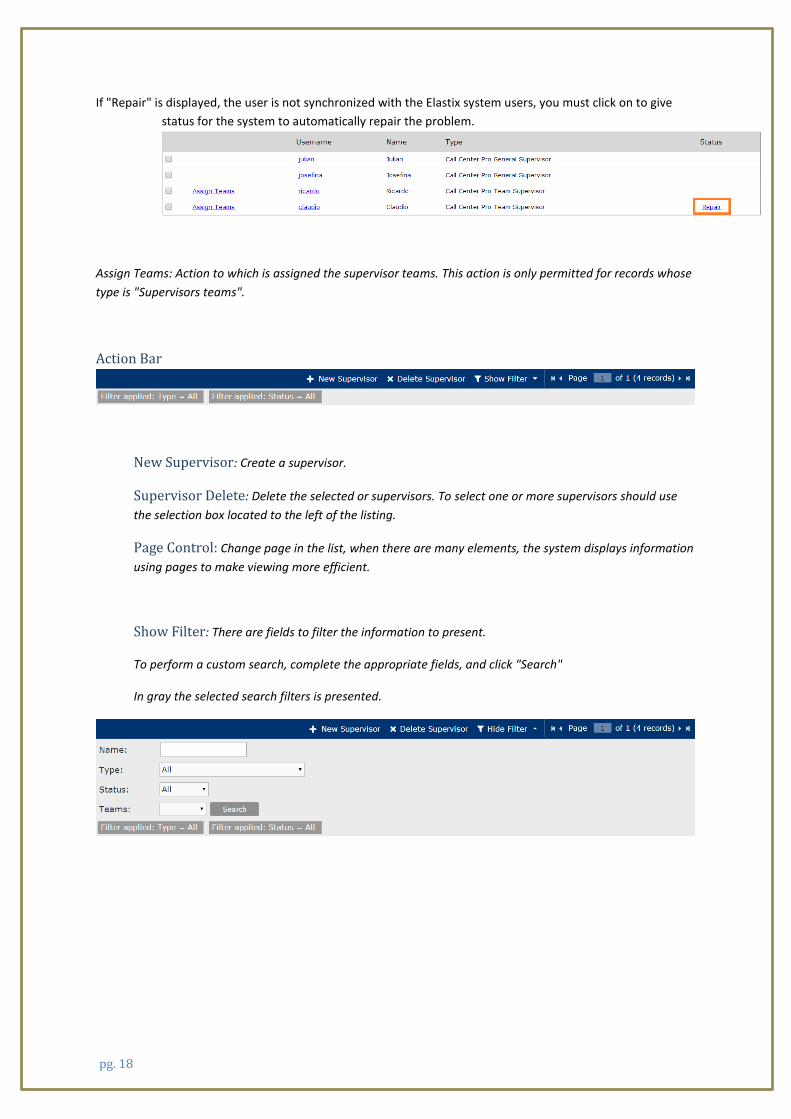
If "Repair" is displayed, the user is not synchronized with the Elastix system users, you must click on to give
status for the system to automatically repair the problem.
Assign Teams: Action to which is assigned the supervisor teams. This action is only permitted for records whose
type is "Supervisors teams".
Action Bar
New Supervisor: Create a supervisor.
Supervisor Delete: Delete the selected or supervisors. To select one or more supervisors should use
the selection box located to the left of the listing.
Page Control: Change page in the list, when there are many elements, the system displays information
using pages to make viewing more efficient.
Show Filter: There are fields to filter the information to present.
To perform a custom search, complete the appropriate fields, and click "Search"
In gray the selected search filters is presented.

pg. 19
Create Supervisor user In the "Supervisor Accounts" module take action "New Supervisor"
The following screen appears:
Information to complete:
Username: Username with which performs login to Elastix system.
Name: Name of supervisor
Password: Password with which the supervisor performs login to Elastix system
Supervisor Type: Type of supervisor (CallCenter Pro Team, CallCenter Pro General)
Fields indicated with * are mandatory
At the end select "Save" to save the data or "Cancel" to cancel it.
Edit User Supervisor In the "Accounts Supervisor" block user to click on to edit

pg. 20
The following screen appears:
The system allows you to change all data except the user name.
After editing use "Apply Changes" to update the data or "Cancel" to cancel.
Create first user Supervisor General
The admin user of Elastix or Administrators users are those who have the power to administer the general
managers in the CallCenter Pro
To create the first general supervisor, you must follow the following tasks:
1) log on with admin user Elastix
2) Log on tab "CCPro Admin"
3) Secondary menu "Accounts / Teams"
4) Side Menu "Supervisor Accounts"
5) Action "New Supervisor"
6) Continue with the actions described above (create user Supervisor)

pg. 21
Assign teams to a Supervisor
In the registered supervisor which will be assigned the teams, give click on "Assign Teams".
The following screen appears:
To assign teams to a supervisor, must be created previously from the "Teams" module (see chapter Teams)
Two sets of selection is presented: "Available Teams" and "Assigned Teams"
Available Teams: All teams available is displayed in the system.
Assigned Teams: All teams assigned to the corresponding Supervisor are displayed.
The task allocation is done via Drag & Drop action.
The item is taken from the "Available Teams" group and drag it to the "Assigned Teams" group
To unassign a team perform the same task but inreverse.
The item is taken from the "Assigned Teams" group and drag it to the "Available Teams" group
After the assignment use "Apply Changes" to update the data or "Cancel" to cancel.

pg. 22
Management Teams
The teams are an entity that unifies management CallCenter. Each team can contain campaigns, forms, and
varied information.
The teams are supervised by the "Supervisors Teams". A supervisor may be in charge of several Teams, and
teams can be managed by several monitors simultaneously.
Thus several supervisors can monitor the activity of the team.
Module: Managing Teams
Location Tab "CCPRO Admin" Submenu "Accounts / Teams" Side Menu: "Teams"

pg. 23
Listing information
Displays information for all teams created in the system CallCenter.
Name: Name of the team, reference to be used in the other modules of the CallCenter
Description: Short description of the Team
Status: Status of the team in the system (Active, Inactive)
Active: The team is active and can be used from all the CallCenter.
Inactive: Team remains in the CallCenter, but can not be used from other modules.
Campaigns: Indicates the number of campaigns that have assigned that team.
Action Bar
New Team: Create a team.
Team Delete: Delete the selected or teams. To select one or more teams must use the selection box
located to the left of the listing.
Change Status: Changes the state of one or more teams, to select one or more teams must use the
selection box located to the left of the listing.
Page Control: Change page in the list, when there are many elements, the system displays
information using pages to make viewing more efficient.
Show Filter: There are fields to filter the information to present.
To perform a custom search, complete the appropriate fields, and click "Search"
In gray the selected search filters is presented.
pg. 24
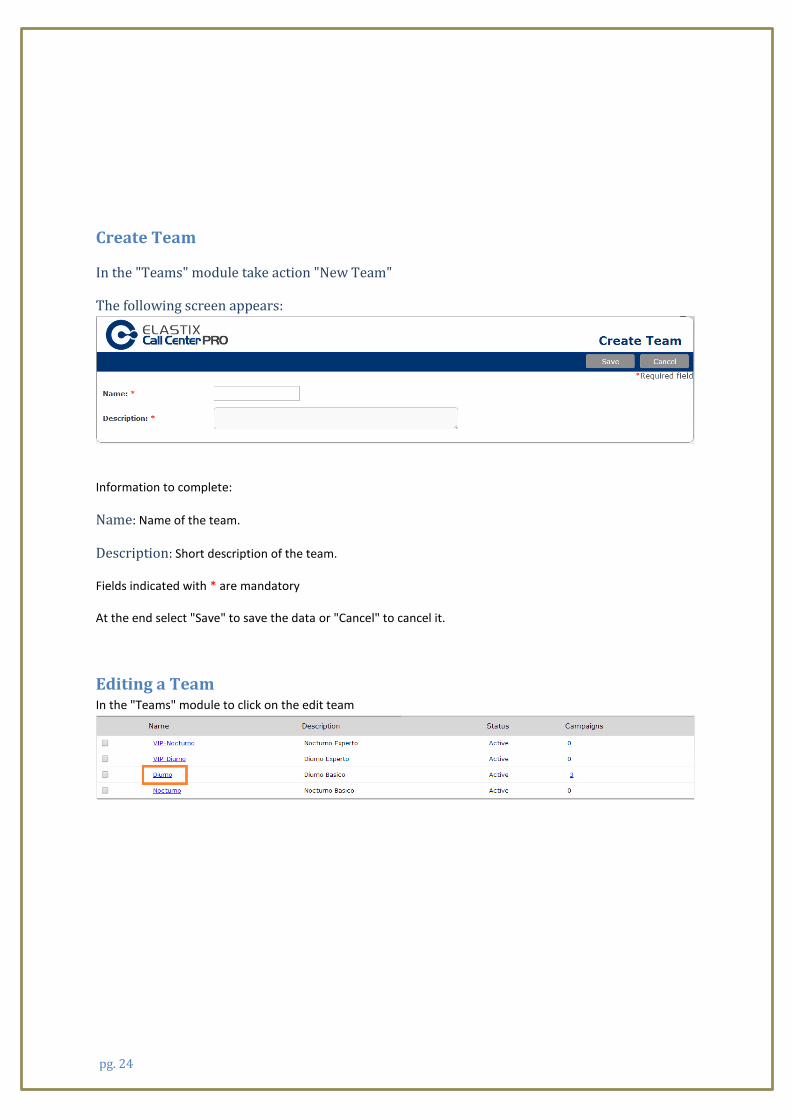
Create Team
In the "Teams" module take action "New Team"
The following screen appears:
Information to complete:
Name: Name of the team.
Description: Short description of the team.
Fields indicated with * are mandatory
At the end select "Save" to save the data or "Cancel" to cancel it.
Editing a Team In the "Teams" module to click on the edit team
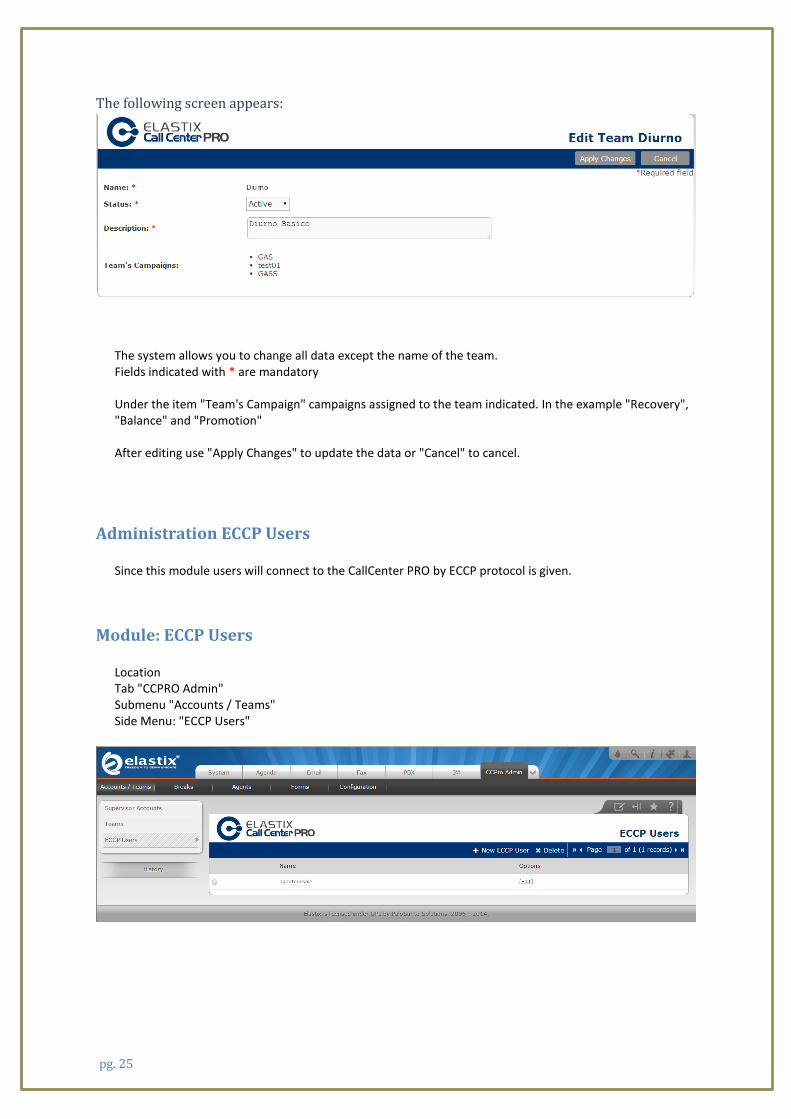
pg. 25
The following screen appears:
The system allows you to change all data except the name of the team. Fields indicated with * are mandatory Under the item "Team's Campaign" campaigns assigned to the team indicated. In the example "Recovery", "Balance" and "Promotion" After editing use "Apply Changes" to update the data or "Cancel" to cancel.
Administration ECCP Users Since this module users will connect to the CallCenter PRO by ECCP protocol is given.
Module: ECCP Users Location Tab "CCPRO Admin" Submenu "Accounts / Teams" Side Menu: "ECCP Users"
pg. 26
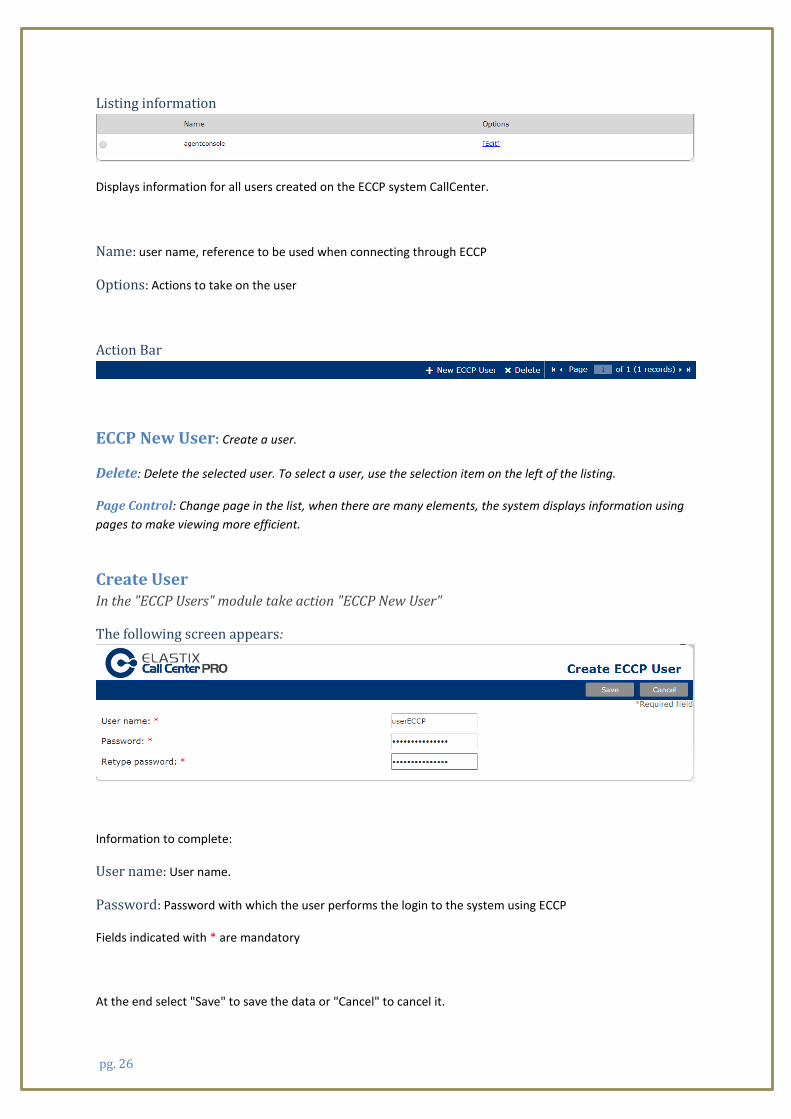
Listing information
Displays information for all users created on the ECCP system CallCenter.
Name: user name, reference to be used when connecting through ECCP
Options: Actions to take on the user
Action Bar
ECCP New User: Create a user.
Delete: Delete the selected user. To select a user, use the selection item on the left of the listing.
Page Control: Change page in the list, when there are many elements, the system displays information using
pages to make viewing more efficient.
Create User In the "ECCP Users" module take action "ECCP New User"
The following screen appears:
Information to complete:
User name: User name.
Password: Password with which the user performs the login to the system using ECCP
Fields indicated with * are mandatory
At the end select "Save" to save the data or "Cancel" to cancel it.
pg. 27
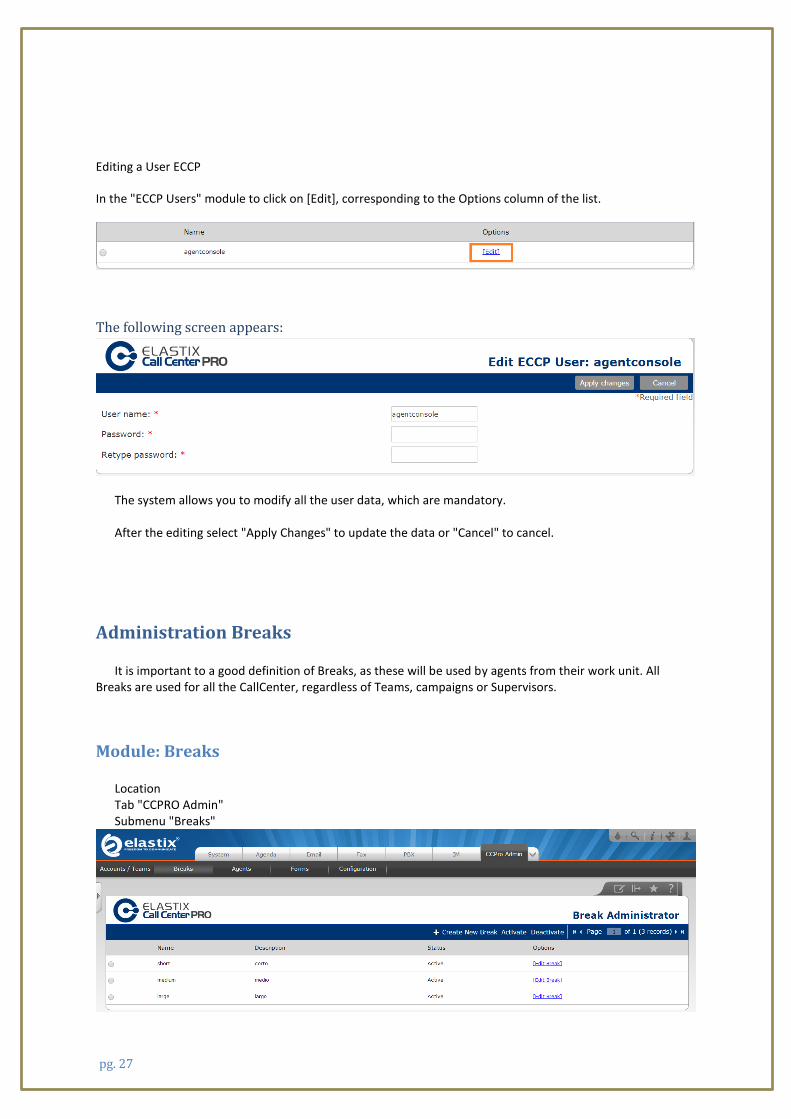
Editing a User ECCP
In the "ECCP Users" module to click on [Edit], corresponding to the Options column of the list.
The following screen appears:
The system allows you to modify all the user data, which are mandatory. After the editing select "Apply Changes" to update the data or "Cancel" to cancel.
Administration Breaks It is important to a good definition of Breaks, as these will be used by agents from their work unit. All
Breaks are used for all the CallCenter, regardless of Teams, campaigns or Supervisors.
Module: Breaks Location Tab "CCPRO Admin" Submenu "Breaks"

pg. 28
Listing information
Displays information for all created Breaks CallCenter system.
Name: Reference to be used by agents from the console.
Description: Brief Description.
Status: Status of the break in the system (Active, Inactive)
Active: The Break is active and can be used from the console agent.
Inactive: The Break remains in the CallCenter, but can not be used from the console agent
Options: Action to Take on Break.
Action Bar
Create New Break: Creating a break.
Activate / Deactivate: Changes the state of a Break, Active to Inactive and vice versa.
Page Control: Change page in the list, when there are many elements, the system displays information using
pages to make viewing more efficient.

pg. 29
Create a Break
In the "Breaks" module take action "Create New Break"
The following screen appears:
Information to complete:
Name: Name of the break.
Description: Brief Description.
Fields indicated with * are mandatory
At the end select "Save" to save the data or "Cancel" to cancel it.
Editing a Break
In the module "Breaks" to click on [Edit], corresponding to the Options column of the list.
The following screen appears:
The system allows you to modify all the user data, which are mandatory.
After the editing select "Apply Changes" to update the data or "Cancel" to cancel.
pg. 30
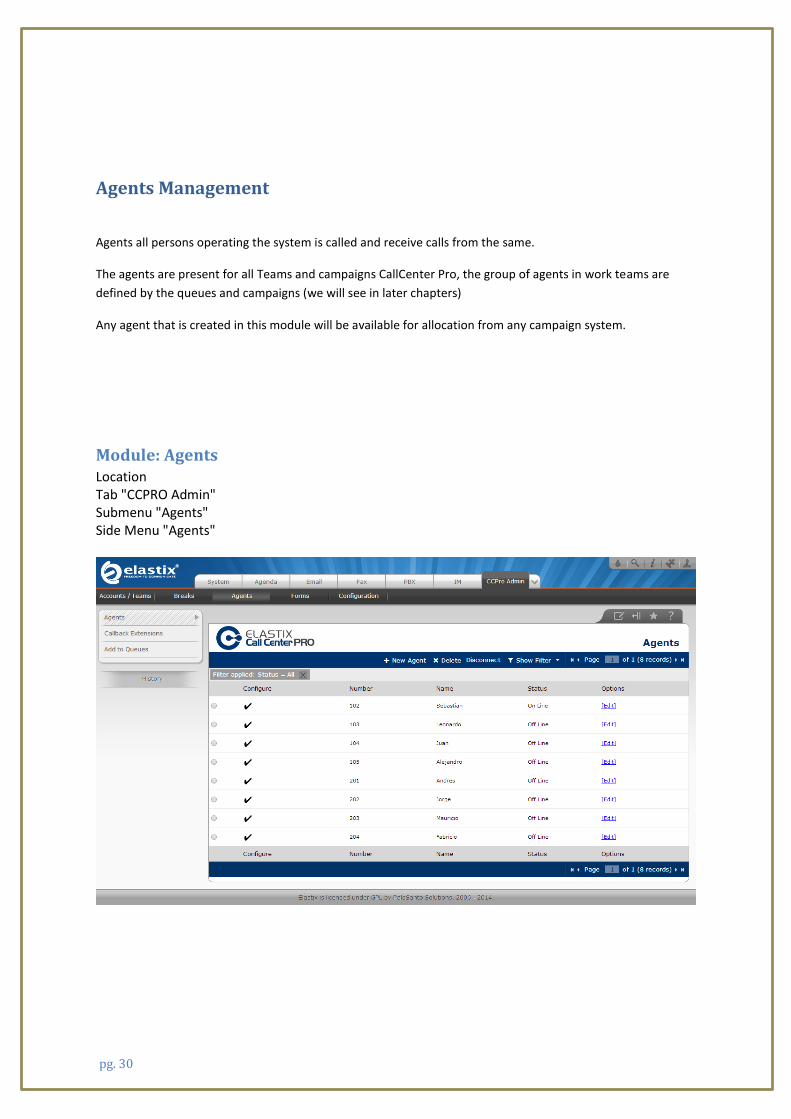
Agents Management
Agents all persons operating the system is called and receive calls from the same.
The agents are present for all Teams and campaigns CallCenter Pro, the group of agents in work teams are
defined by the queues and campaigns (we will see in later chapters)
Any agent that is created in this module will be available for allocation from any campaign system.
Module: Agents Location Tab "CCPRO Admin" Submenu "Agents" Side Menu "Agents"

pg. 31
Listing information
Displays information for all agents in the system created CallCenter.
Configure: Configuration Status agent
The agent configuration is synchronized with Asterisk.
There is a configuration problem, if we click on "By repair" will attempt to repair the configuration. The
solution to the problem may be to remove the selected agent.
Number: Number of agent
Name: Name of the agent.
Status: Status of the agent in the system (On Line - Off Line)
On Line: The agent is logged in the system.
Off Line: The agent is not connected to the system
Options: Actions to be taken on the agent configuration.
Action Bar
New Agent: Create an agent.
Delete: Deletes an agent.
Disconnect: Disconnecting the agent from the system.

pg. 32
Page Control: Change page in the list, when there are many elements, the system displays
information using pages to make viewing more efficient.
Show Filter: There are fields to filter the information to present.
To perform a custom search, complete the appropriate fields, and click "Search"
In gray the selected search filters is presented.
Create an agent In the "Agents" module take action "New Agent"
The following screen appears:
Information to complete:
Agent Number: Number of the agent (this is not the number of the telephone extension is the agent
identifier)
Name: Name of agent
Password: Password that the agent used to log in on the console agent.
ECCP Password: If the agent can connect directly from the ECCP protocol, this will be the key to log (this
field is not mandatory, for safety reasons, if the field is not completed, the system will automatically generate
a complex password) .
Fields indicated with * are mandatory
At the end select "Save" to save the data or "Cancel" to cancel it.

pg. 33
Edit an Agent
In the "Agent" module to click on [Edit], corresponding to the Options column of the list.
The following screen appears:
The system allows you to modify all the user data except for the number of agent Fields indicated with * are mandatory After the editing select "Apply Changes" to update the data or "Cancel" to cancel.
pg. 34
Dynamic Configuration and Standard Configuration The following information was taken from the book "Implementing Call Center with Elastix" Paul Star Under the normal configuration of the Call Center, the agent enters the Elastix server and logs in on him, this requires an extension and an IP phone or softphone. When you receive a call log extension, agent sets the password and enters the Call Center, which remains "free" state until it is transferred or assigned a call. During this operation, the extension remains in the calling mode, permanently until you exit the module. Between calls the agent hears "music on hold" method to differentiate the "free" state "busy" or "on call". This operation process we will call standard configuration. The introduction of "Callback Login", allows a different the operating mode in the sense that the agent does not have to be in the login call all the time, but receives a call when allocated by the Call Center. In this configuration, the agent enters the Elastix server, select an available extension for "Callback Login", sets the password and enters the Call Center. In this process your extension does not receive a call to confirm the entry and instead shows the agent console interface, which remains "free" state until it is assigned a call. During this operation, extention remains on hook, ring when receiving a call, when answered their status will switch to "busy" while the call lasts. When hangup your status will return to "free." This process does not require that the agent is permanently on call, but waiting to ring your extension. We will call this operation as dynamic configuration. Registration of extensions that will be available when the agent logs into the system is defined in the "CallBack Extensions" module Operation of the module under standard configuration requires that the agent keeps a permanent extension call and allow the CallCenter to assign or transfer calls from a campaign, incoming or outgoing. During this operation the agent will hear any of the music files we have available in our directories of music on hold, if not assigned with a call from a campaign. Under some scenarios, keep in constant listening to music on call waiting can be annoying. In an outbound campaign opportunities are waiting to be reduced, because the campaign is controlled and seeks to call as many numbers as possible during the working day, so that the waiting time is less per agent. Under this scenario the agent is likely to pass 95% of the time talking with customers of the campaign. The case is different in an incoming campaign, in which calls are product of some marketing campaign that aims to capture a spontaneous interest in the client and the need to call the call center, or that the agent belongs to a support department that takes calls Frequently at a moderate level. If the waiting time of the agent is greater than 20 or 30 percent, is sure to hear music on hold constantly present to him a nuisance. This situation motivated the functionality, called "Callback Login" is included, which allows an agent / call center operator, is operating without having to remain on call constantly. This functionality is implemented using AMI QueueAdd to run on the agent's extension and queue of the campaign. This means that when the agent logs in to the module agent is added to the queue with the extension hung. When you Logout, QueueRemove shows the agent queue. The static agent (which is in a standard configuration) always belongs to the queue, although it may be "not available". The dynamic agent appears and disappears according QueueAdd and QueueRemove.
pg. 35
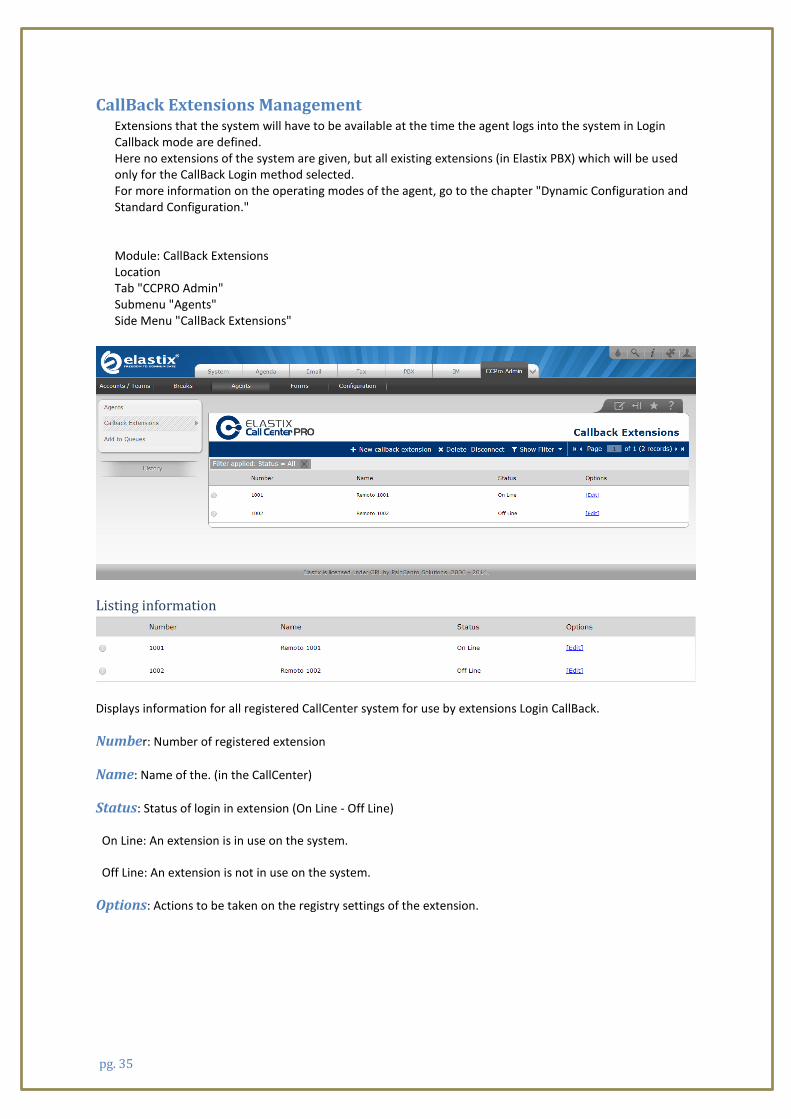
CallBack Extensions Management Extensions that the system will have to be available at the time the agent logs into the system in Login Callback mode are defined. Here no extensions of the system are given, but all existing extensions (in Elastix PBX) which will be used only for the CallBack Login method selected. For more information on the operating modes of the agent, go to the chapter "Dynamic Configuration and Standard Configuration." Module: CallBack Extensions Location Tab "CCPRO Admin" Submenu "Agents" Side Menu "CallBack Extensions"
Listing information
Displays information for all registered CallCenter system for use by extensions Login CallBack.
Number: Number of registered extension
Name: Name of the. (in the CallCenter)
Status: Status of login in extension (On Line - Off Line)
On Line: An extension is in use on the system.
Off Line: An extension is not in use on the system.
Options: Actions to be taken on the registry settings of the extension.
pg. 36
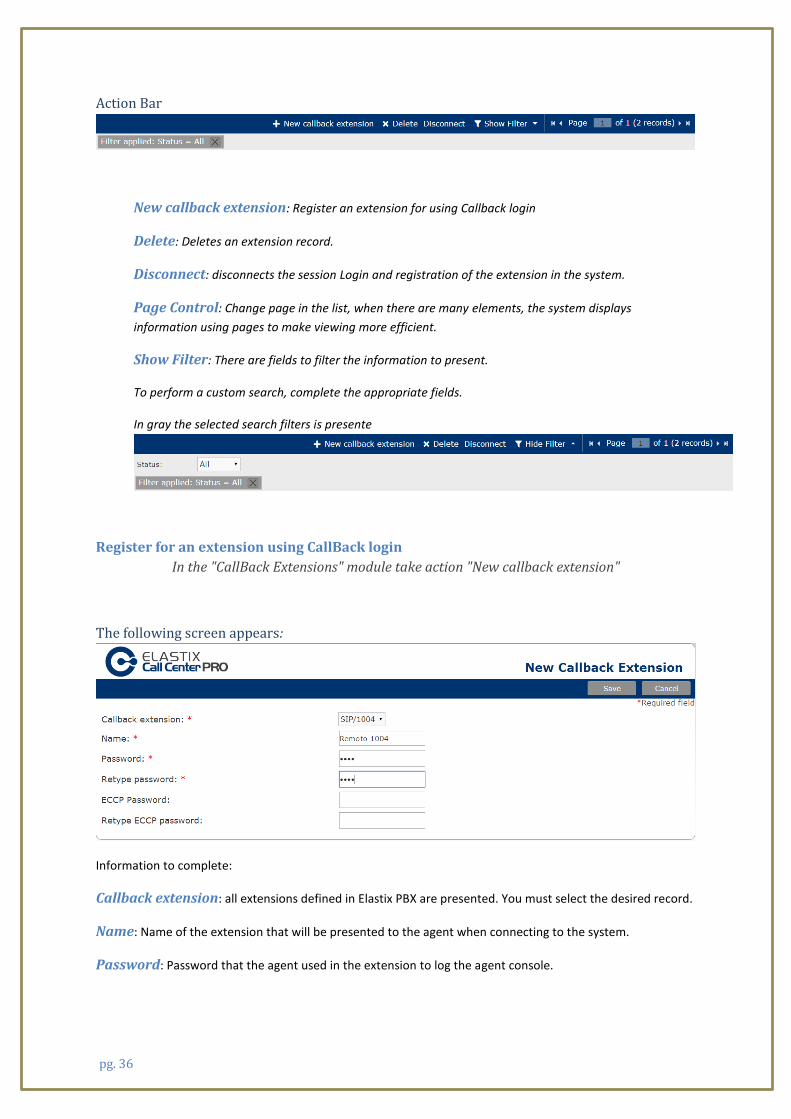
Action Bar
New callback extension: Register an extension for using Callback login
Delete: Deletes an extension record.
Disconnect: disconnects the session Login and registration of the extension in the system.
Page Control: Change page in the list, when there are many elements, the system displays
information using pages to make viewing more efficient.
Show Filter: There are fields to filter the information to present.
To perform a custom search, complete the appropriate fields.
In gray the selected search filters is presente
Register for an extension using CallBack login
In the "CallBack Extensions" module take action "New callback extension"
The following screen appears:
Information to complete:
Callback extension: all extensions defined in Elastix PBX are presented. You must select the desired record.
Name: Name of the extension that will be presented to the agent when connecting to the system.
Password: Password that the agent used in the extension to log the agent console.

pg. 37
ECCP Password: If the agent can connect directly from the ECCP protocol, this will be the key to log in on
the ECCP (this field is not mandatory, for safety reasons, if the field is not completed, the system will generate
a key complex automatically).
Fields indicated with * are mandatory
At the end select "Save" to save the data or "Cancel" to cancel it.
Edit a record extension to use Callback
In the "CallBack Extensions" module to click on [Edit], corresponding to the Options column of the list.
The following screen appears:
The system allows you to change all data except the registration number of the extension of CallBack. Fields indicated with * are mandatory After the editing select "Apply Changes" to update the data or "Cancel" to cancel.

pg. 38
Assigning Agents to Queues The supervisor assigns or removes agents from queues.
Module: Add to Queues Location Tab "CCPRO Admin" Submenu "Agents" Sidebar "Add to Queues"
Listing information
Displays information for all registered members of the queues in the system CallCenter. List of dynamic and
static agents.
Dynamic agents are those that are configured using CallBack Extensions.
Queue: queue number
Static Agents: Number of static agents assigned to the queue
Dynamic Agents: Number of dynamic agents assigned to the queue

pg. 39
Action Bar
Page Control: Change page in the list, when there are many elements, the system displays
information using pages to make viewing more efficient.
Show Filter: There are fields to filter the information to present.
To perform a custom search, complete the appropriate fields.
In gray the selected search filters is presented.
Assign agents to queues To assign static agents must give Static Agents click on the column, while dynamic agents to
allocate to click Dynamic Agents column.
The following screen appears:
To assign agents to a queue must be created previously from the "Agents" module (see chapter Creating Agents) Two sets of selection is presented: "Available Agents" and "Assigned Agents"
Agents Available: all available agents is deployed in the system.
Assigned Agents: all agents assigned to the appropriate queue is displayed. The task allocation is done via Drag & Drop action. The item is taken from the "Available Agents" group and drag it to the "Assigned Agents" group To unassign an agent performs the same task but in reverse. The item is taken from the "Assigned Agents" group and drag it to the "Available Agents" group After the assignment select "Apply Changes" to update the data or "Cancel" to cancel.

pg. 40
Forms Administration Some of the following information was taken from the book "Implementing Call Center with Elastix" Paul Estrella, Chapter "4.4 Forms" Forms are an important part of the operation of campaigns and calls in a contact center. In them the agent / operator records information are consulted each client or caller or the called. This implies that it is vital for both inbound outbound campaigns to campaigns. Note: It is recommended to design all forms well in advance, if possible make a preliminary list in other media and polish before going to the module to create them.
Module: Static Forms Location Tab "CCPRO Admin" Submenu "Forms" Side Menu "Static Forms"
Listing information
Displays information for all registered forms CallCenter system.
Name: Name of the form.
Description: Brief review of the same
Status: Status (Active - Inactive)
Active: The form can be assigned to a campaign.
Inactive: The form is inactive for the system, can not be assigned to a campaign.
Options: Actions to be taken on the configuration form.
pg. 41
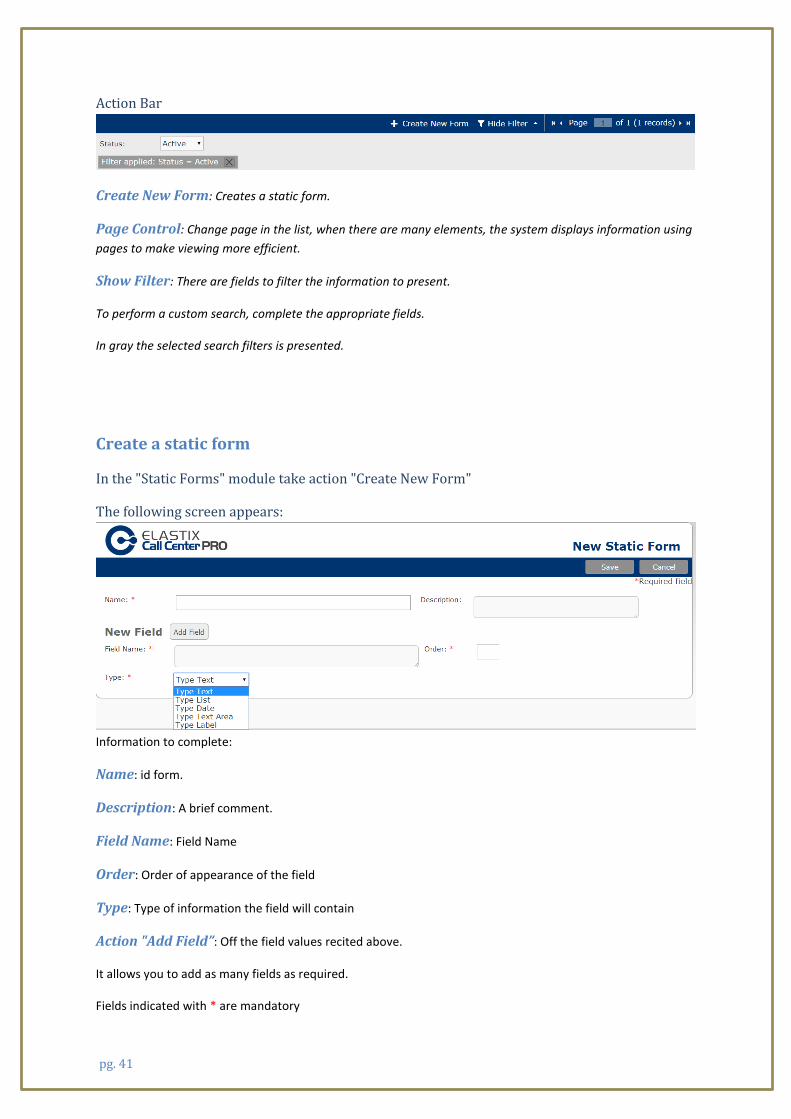
Action Bar
Create New Form: Creates a static form.
Page Control: Change page in the list, when there are many elements, the system displays information using
pages to make viewing more efficient.
Show Filter: There are fields to filter the information to present.
To perform a custom search, complete the appropriate fields.
In gray the selected search filters is presented.
Create a static form
In the "Static Forms" module take action "Create New Form"
The following screen appears:
Information to complete:
Name: id form.
Description: A brief comment.
Field Name: Field Name
Order: Order of appearance of the field
Type: Type of information the field will contain
Action "Add Field”: Off the field values recited above.
It allows you to add as many fields as required.
Fields indicated with * are mandatory
pg. 42
The field types that can be added in the "New Field" section, are:
• Text Field
• Field Selection List
• Date Field
• Text area field
• Field type label
At the end select "Save" to save the data or "Cancel" to cancel it.
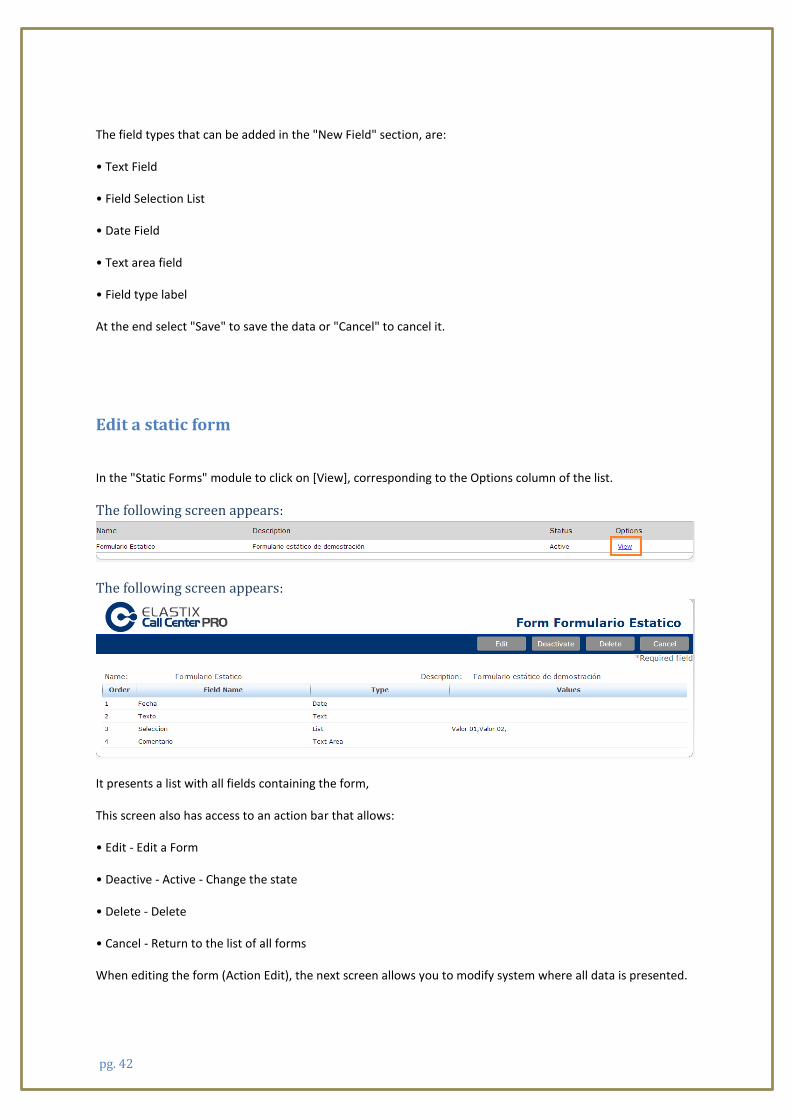
Edit a static form
In the "Static Forms" module to click on [View], corresponding to the Options column of the list.
The following screen appears:
The following screen appears:
It presents a list with all fields containing the form,
This screen also has access to an action bar that allows:
• Edit - Edit a Form
• Deactive - Active - Change the state
• Delete - Delete
• Cancel - Return to the list of all forms
When editing the form (Action Edit), the next screen allows you to modify system where all data is presented.

pg. 43
If you need to change the attributes to a field, and then clicking on the Edit action (Options column) of the
entry field.
Fields indicated with * are mandatory
After the editing select "Apply Changes" to update the data or "Cancel" to cancel.

pg. 44
Preview a static form Location Tab "CCPRO Admin" Submenu "Forms" Side Menu "Static Forms"
Listing information
Displays information for all registered forms CallCenter system.
To preview a form, you must to click on "View" ("Options" column) to display registry.
Previewing static form

pg. 45
Module: Dynamic Forms
Dynamic Forms is where agents recorded information exchanged with customers. Advancing the form changes
according to the client's responses.
Are composed of nodes, each node consists of several fields where the information is recorded.
The nodes are concatenated by specific type fields Route

pg. 46
Location Tab "CCPRO Admin" Submenu "Forms" Side Menu "Dynamic Forms"
Listing information
Displays information for all registered with the dynamic forms CallCenter system.
Name: Name of the form.
Number of nodes: Number of nodes that contains the form
Created by: User who created the form
Creation date: Date of creation
Type: Visibility (Public - Private)
Public - The form is accessible to all supervisors
Private - It is accessible only to supervisors Team
Team - Team to which the form belongs, see Property Type
Status: Status (Active - Inactive)
Active: The form can be assigned to a campaign.
Inactive: The form is inactive for the system, can not be assigned to a campaign.
Actions: Actions to be taken on the registry settings of the extension.
pg. 47
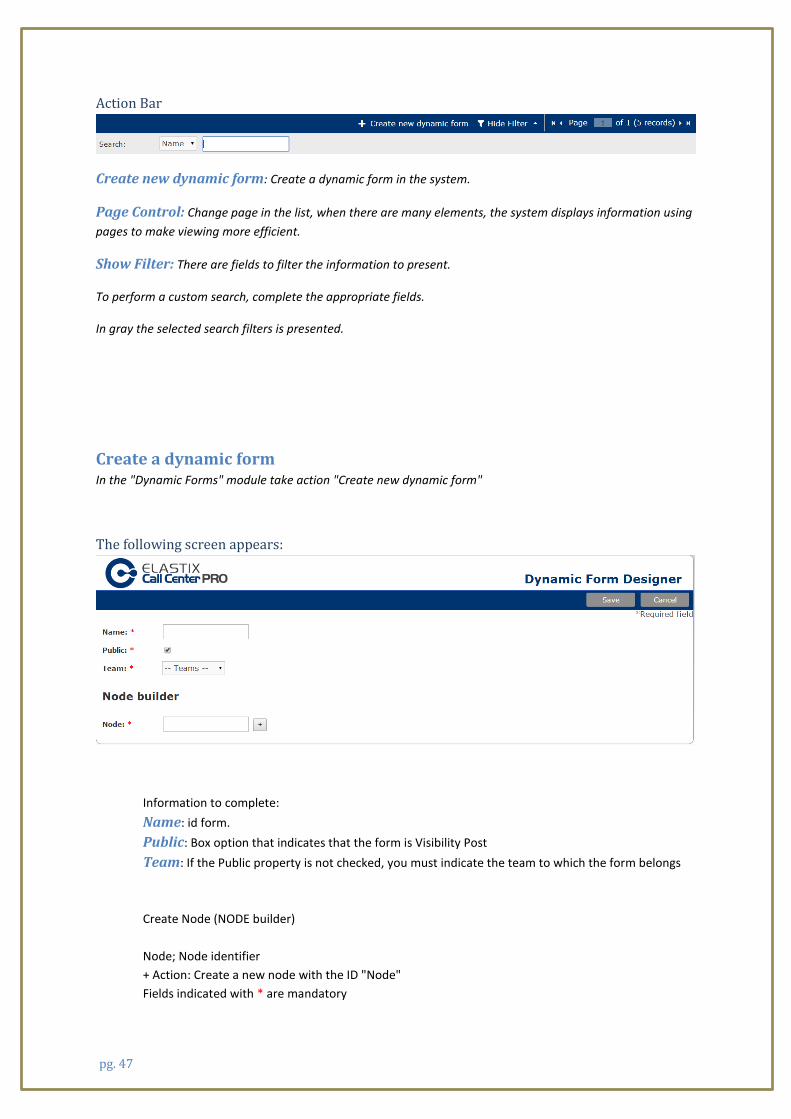
Action Bar
Create new dynamic form: Create a dynamic form in the system.
Page Control: Change page in the list, when there are many elements, the system displays information using
pages to make viewing more efficient.
Show Filter: There are fields to filter the information to present.
To perform a custom search, complete the appropriate fields.
In gray the selected search filters is presented.
Create a dynamic form In the "Dynamic Forms" module take action "Create new dynamic form"
The following screen appears:
Information to complete:
Name: id form.
Public: Box option that indicates that the form is Visibility Post
Team: If the Public property is not checked, you must indicate the team to which the form belongs
Create Node (NODE builder)
Node; Node identifier
+ Action: Create a new node with the ID "Node"
Fields indicated with * are mandatory

pg. 48
To create nodes, just the ID is entered and click on +
It allows you to add as many nodes as required.
Fields create nodes
Nodes are composed of a number of fields to enter these fields should be to click on the "Edit" action log
nodes (list Options column Nodes)

pg. 49
When editing the node, the following display:
Here all the fields that belong to that node are entered.
The process is very similar to the static forms unless there is a new data type:
Type: Route - This type of field is Set to form the next node to execute.
A list of options is created and for each of these, you should indicate the node to "jump"
In the following example, the options are:
YES - node to run segment Take Data
NO - node to run segment: Farewell
Therefore, if the client answers yes to the question "want to participate in a survey?" Redirects to the node
form takes data to continue the survey.
If the client answers NO, the form continues its execution in the Farewell node.
If we are editing a node, click on the "Back" to return to editing the form.
In the form edit screen to click on "Save" to save the entire form to the system.

pg. 50
Use Fields in Recycling Campaigns
One of the properties that have fields dynamic forms is to participate in recycling campaigns.
Fields with are recyclable Property type: Route and List
For this part of the recycling field, you must mark the "Recyclable" box when creating it.

pg. 51
Campaign Management
Module: ingoing Campaigns Some of the following information was taken from the book "Implementing Call Center with Elastix" Paul Estrella, Chapter "4.2 Inbound Campaigns" A campaign receives incoming calls from customers or subscribers spontaneously. No need to have a list of numbers or customers call and prediction does not work in this mode. As in outbound campaigns, you must define a queue, in which the agents that work in this campaign are included. Should be organized subscribers who call the system are directed to the queue configured for the campaign, this is related to the creation of an IVR to direct the client to the tail, or the direct assignment of a number (which does not is optimum from a commercial point of view). As in outbound campaigns, the system records in a database agent that was assigned to the call. This information will serve several purposes of consultation. Although there is no need to generate a list of calls, you can feed the system with information about specific numbers for the agent to have customer information available in the console. Location Tab "CCPRO Manage" Submenu "ingoing calls" Side Menu: "ingoing Campaigns"
Listing information
Displays all incoming information campaigns created in the system CallCenter.
Name: Reference Campaign
Team: Team you belong
Range Date, per Day Schedule: Days and Hours campaign execution.
pg. 52
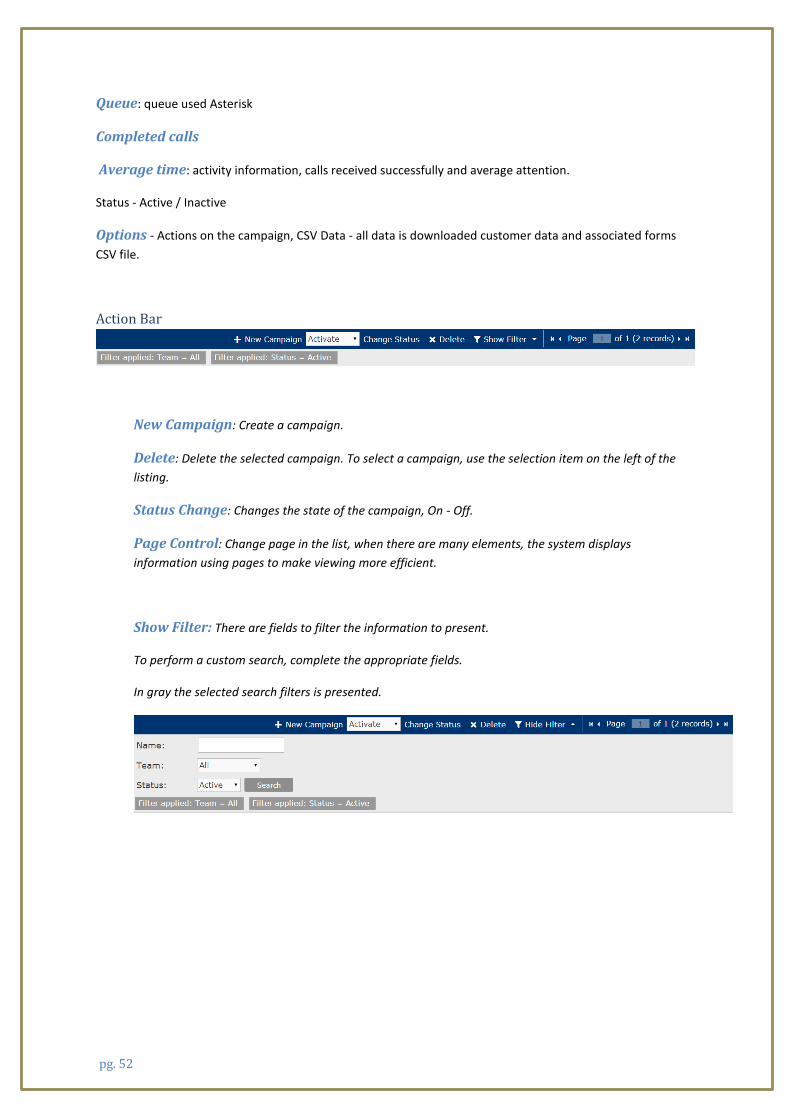
Queue: queue used Asterisk
Completed calls
Average time: activity information, calls received successfully and average attention.
Status - Active / Inactive
Options - Actions on the campaign, CSV Data - all data is downloaded customer data and associated forms
CSV file.
Action Bar
New Campaign: Create a campaign.
Delete: Delete the selected campaign. To select a campaign, use the selection item on the left of the
listing.
Status Change: Changes the state of the campaign, On - Off.
Page Control: Change page in the list, when there are many elements, the system displays
information using pages to make viewing more efficient.
Show Filter: There are fields to filter the information to present.
To perform a custom search, complete the appropriate fields.
In gray the selected search filters is presented.

pg. 53
Create a campaign In the "ingoing Campaigns" module take action "New Campaign"
The following screen appears:
Information to complete:
Name: Identifier of the campaign.
Team Name: Team to which it belongs.
Range Date: Range of days during which the campaign is active.
Schedule per Day: Range of hours in which the campaign is active.
Form: static form that will be presented to the agent on your console.
Dynamic Form: Dynamic Forms to use when contacting the agent with the customer.
External URLs: External URL that invokes the moment you contact the customer.
Queue: Queue associated with telephone campaign
Script: Script specific to the campaign (script overwrites the default queue)
Fields indicated with * are mandatory
At the end select "Save" to save the data or "Cancel" to cancel it.

pg. 54
Editing an Inbound Campaign In the "ingoing Campaigns" module to click on the name of the campaign, corresponding to the "Name"
column of the list.
The system allows you to modify all the data of the campaign, After the editing select "Apply Changes" to update the data or "Cancel" to cancel.

pg. 55
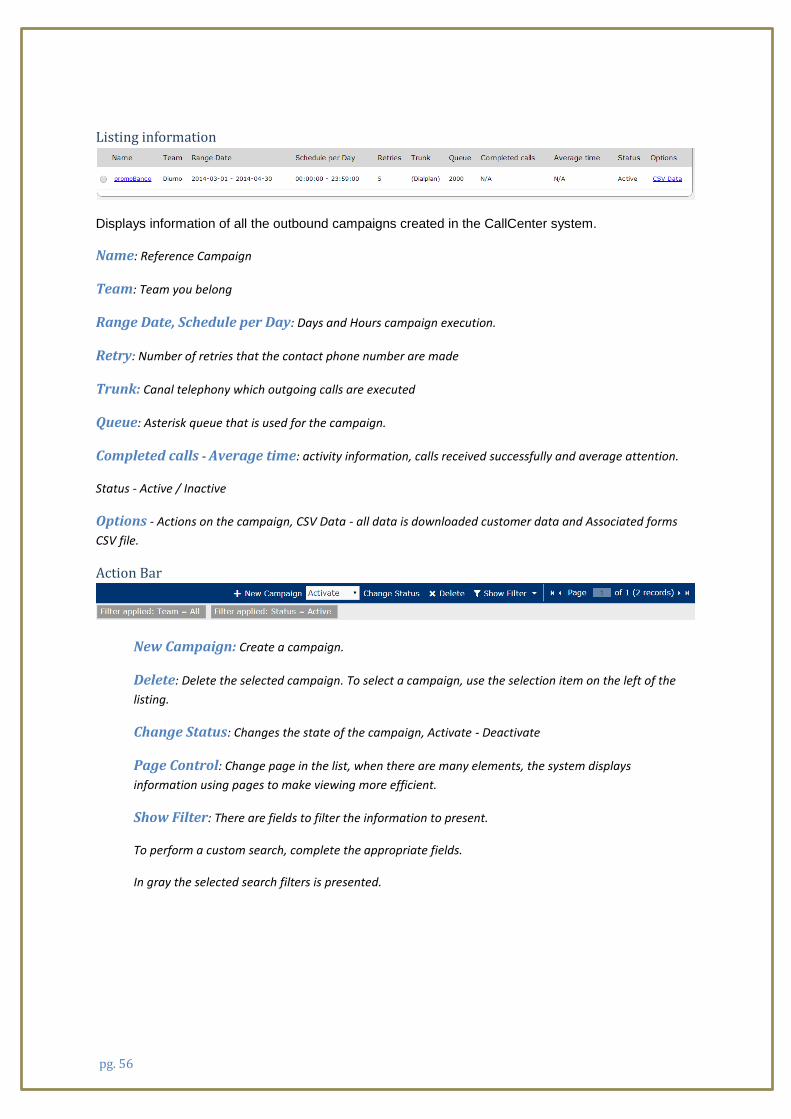
Module: Outgoing Campaigns Some of the following information was taken from the book "Implementing Call Center with Elastix" Paul Estrella, Chapter "4.1 Outgoing Campaigns" An outbound campaign, is a set of calls that the Elastix server to a list of numbers of customers or subscribers and that are assigned to an agent / operator who is logged on. The dialer for Elastix is probably the most important part of such campaigns as it is who participates in the generation and assignment of calls to agents. It is understood that for an outbound campaign is needed to be performed in advance with a list of telephone numbers of subscribers. We must feed the system with a file containing the telephone numbers dialed. When the campaign is activated, the system dials the phone numbers from the list, checking the number of agents / free registered traders who are in the queue. "So many concurrent calls as free agents." In this method the subscriber's number, not with a specific agent, so if the call is successful, enters the queue and is assigned to the next available agent. The allocation depends on the policy assigned to the queue (linear, random ... ect). The system records in a database agent that was assigned to the call. This information will serve several purposes of consultation. After the call, the agent goes into idle state / standby, and is again available to receive a call. This process continues through the whole list of numbers. You can set the number of attempts, so that the module call the numbers that failed to be contacted. Location Tab "CCPRO Manage" Submenu "Outgoing Calls" Side Menu: "Campaigns"
pg. 56
Listing information
Displays information of all the outbound campaigns created in the CallCenter system.
Name: Reference Campaign
Team: Team you belong
Range Date, Schedule per Day: Days and Hours campaign execution.
Retry: Number of retries that the contact phone number are made
Trunk: Canal telephony which outgoing calls are executed
Queue: Asterisk queue that is used for the campaign.
Completed calls - Average time: activity information, calls received successfully and average attention.
Status - Active / Inactive
Options - Actions on the campaign, CSV Data - all data is downloaded customer data and Associated forms
CSV file.
Action Bar
New Campaign: Create a campaign.
Delete: Delete the selected campaign. To select a campaign, use the selection item on the left of the
listing.
Change Status: Changes the state of the campaign, Activate - Deactivate
Page Control: Change page in the list, when there are many elements, the system displays
information using pages to make viewing more efficient.
Show Filter: There are fields to filter the information to present.
To perform a custom search, complete the appropriate fields.
In gray the selected search filters is presented.

pg. 57
Create a campaign In the "Outgoing Campaigns" module take action "New Campaign"
The following screen appears:

pg. 58
Information to complete:
Name: Identifier of the campaign.
Team Name: Team to which it belongs.
Range Date: Range of days during which the campaign is active.
Schedule per Day: Range of hours in which the campaign is active.
Form: static form that will be presented to the agent on your console.
Dynamic Form: Dynamic Forms to use when contacting the agent with the customer.
External URLs: External URL that invokes the moment you contact the customer.
Trunk: Telephony channel which outgoing calls are executed. Default Options - (By Dialplan) The dialer dials using the default dialplan Elastix.
Max. channels used: Maximum number of channels to be used, is limit simultaneous calls.
Enable AMD: Turn on the answering machine detection for the campaign
Context: The context will use the campaign. If you do not have a specific context for our Call center management, always place them "from-internal".
Queue: Queue associated with telephone campaign
Retries Number of retries to customers, if the value 0 is placed only called 1 time.
Call File: CSV file with customer information
Script: Script specific to the campaign (script overwrites the default queue) Fields indicated with * are mandatory At the end select "Save" to save the data or "Cancel" to cancel it.
CSV File Format
The CSV file for inserting numbers to call should keep the following format: "Text CSV (. Csv)". The field delimiter must be a comma (,) and the text delimiter quotes ("). In the file encoding is recommended to choose "UTF-8". Must have at least one column phone: "Phone" 099123456 098123456 097123456 You can incorporate additional information phone number, the name of the field as an extra column is added to the file: "Phone", "new_field1", "new_field2", ...., "new_fieldX" For Example
"phone","name","surname",” identification card” 099123456,"Eduardo","SurnameEduardo",”11111111”
098123456,"Pedro","SurnamedePedro",”22222222”
097123456,"Juan","SurnamedeJuan",”33333333”
Working with multiple numbers per customer The CSV file remains the same, only the phone field is modified, rather than a single number, her
column consists of all numbers that can be contacted customer separated by hyphen "-" Phone1-Phone2-... phoneX In this example: "Phone" 099123456-099123123-099321321 098111111-098444444

pg. 59
097222222 If the record has only 1 number is placed unscripted. For the case with extra information: "phone", "name", "name", "identification card" 099123456-099123123-099321321, "Eduardo", "SurnameEduardo", "11111111" 098111111-098444444, "Peter", "SurnamedePedro", "22222222" 097222222, "John", "SurnamedeJuan", "33333333"
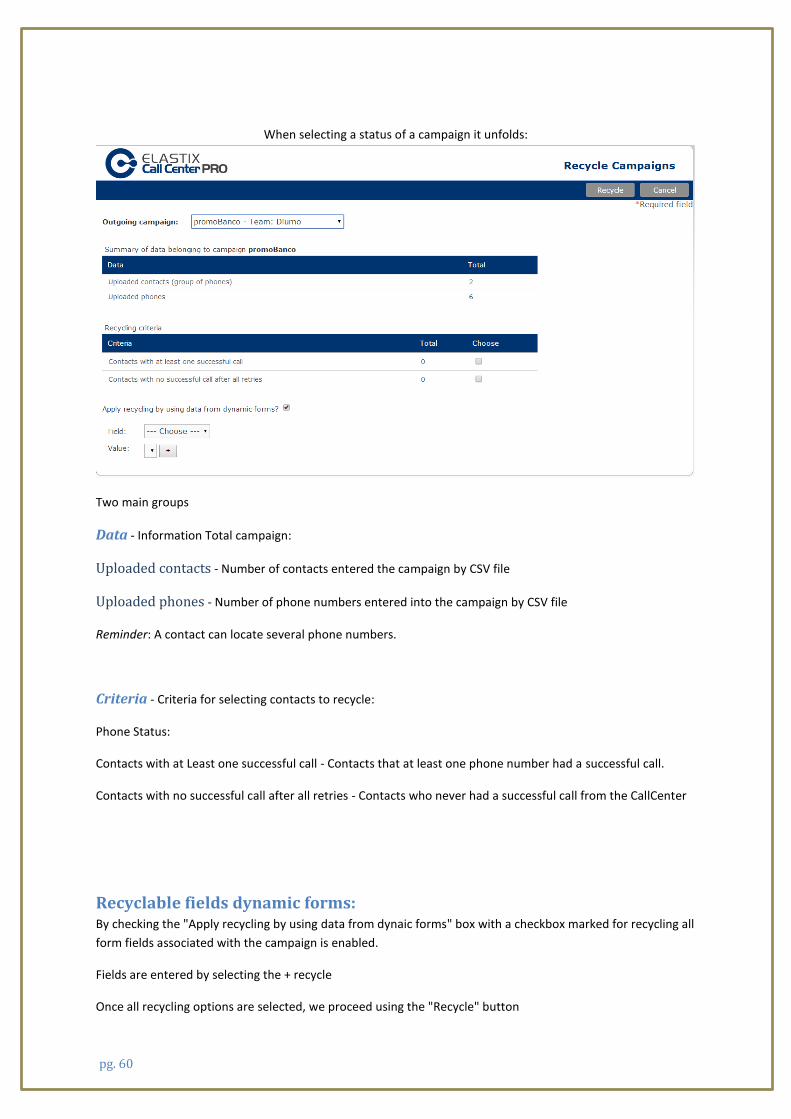
Recycling Campaign The recycling campaign is the provision of outbound campaigns, your main task is to reactivate the customer call data. This revitalization is done by different methods and choices. It depends on the status of telephony, for example you can recycle a campaign Whose clients did not answer. Or Depending on fields in the dynamic form of the campaign. (see dynamic forms, net fields) Module: Recycle Campaign Location Tab "CCPRO Manage" Submenu "Outgoing Calls" Side Menu "Campaign Recycle"
Listing information
Displays the name and the team they belong campaigns, which is responsible for the supervisor who is
currently logged on.
pg. 60
When selecting a status of a campaign it unfolds:
Two main groups
Data - Information Total campaign:
Uploaded contacts - Number of contacts entered the campaign by CSV file
Uploaded phones - Number of phone numbers entered into the campaign by CSV file
Reminder: A contact can locate several phone numbers.
Criteria - Criteria for selecting contacts to recycle:
Phone Status:
Contacts with at Least one successful call - Contacts that at least one phone number had a successful call.
Contacts with no successful call after all retries - Contacts who never had a successful call from the CallCenter
Recyclable fields dynamic forms: By checking the "Apply recycling by using data from dynaic forms" box with a checkbox marked for recycling all
form fields associated with the campaign is enabled.
Fields are entered by selecting the + recycle
Once all recycling options are selected, we proceed using the "Recycle" button

pg. 61
Reports Some of the following information was taken from the book "Implementing Call Center with Elastix" Paul
Estrella,
Chapter "11.2 Reports included in the addon for Elastix Call Centers"
The reports included in the Call Center module are designed exclusively for an operation of this type.
The module has a total of 10 statistical reports:
• Reports Break
• Calls Detail
• Calls per hour
• Calls per Agent
• Hold Time
• Login Logout
• Success ingoing calls
• Graphic Calls per hour
• Agent Information
• Trunks used per hour

pg. 62
Module: Reports Location Tab "CCPRO Manage" Submenu "Reports" Reports Break
It is the first available report, and contains many columns as we have set breaks. Filter this report allows querying for a date range.
The report allows us to see a listing of the number and name of the agent against various existing breaks.
Each contains a sum total rest per agent, and the report contains two general summations:
• The sum of all the breaks of each agent, as shown in the column "Total"
• The sum of total rest periods of each agent type of rest. This is shown in row "Total".
This report can be downloaded as a CSV file, spreadsheet or PDF.
An additional fact that we can get to download a spreadsheet, is the average of each type of rest.
pg. 63
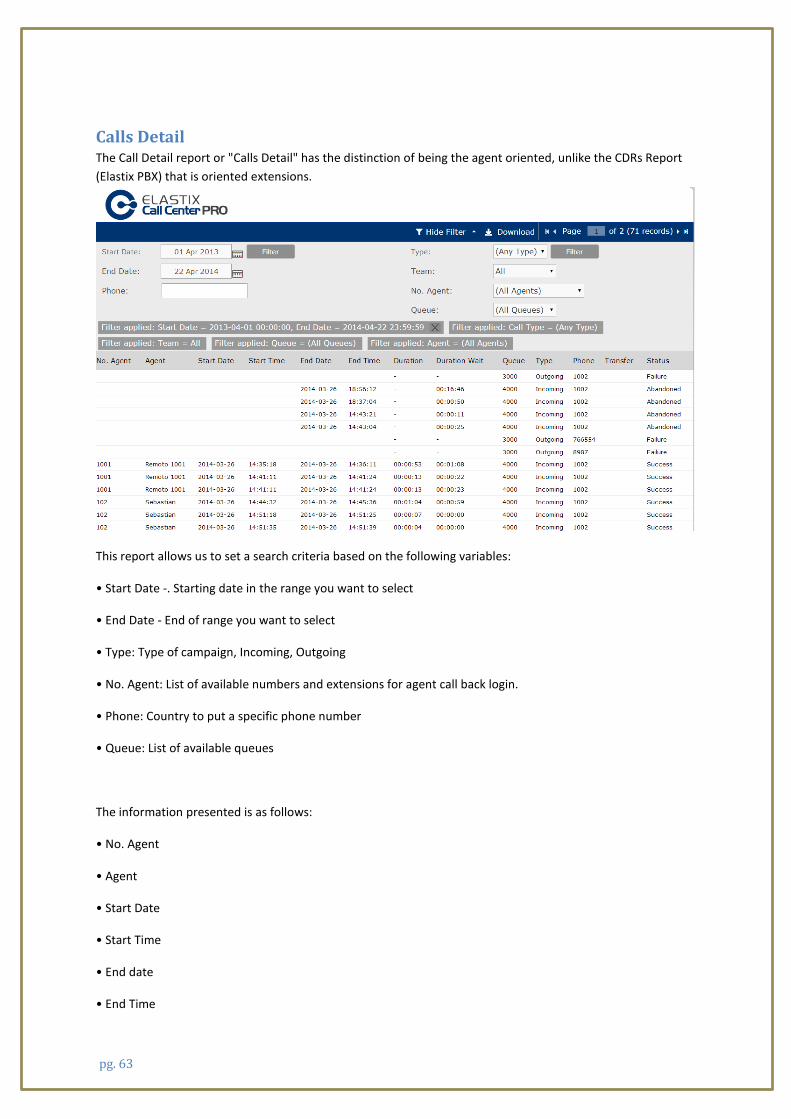
Calls Detail The Call Detail report or "Calls Detail" has the distinction of being the agent oriented, unlike the CDRs Report
(Elastix PBX) that is oriented extensions.
This report allows us to set a search criteria based on the following variables:
• Start Date -. Starting date in the range you want to select
• End Date - End of range you want to select
• Type: Type of campaign, Incoming, Outgoing
• No. Agent: List of available numbers and extensions for agent call back login.
• Phone: Country to put a specific phone number
• Queue: List of available queues
The information presented is as follows:
• No. Agent
• Agent
• Start Date
• Start Time
• End date
• End Time
pg. 64
• Duration
• Wait Time
• Queue
• Type
• Telephone
• Transfer
• Status
This report can be downloaded as a CSV file, spreadsheet or PDF.
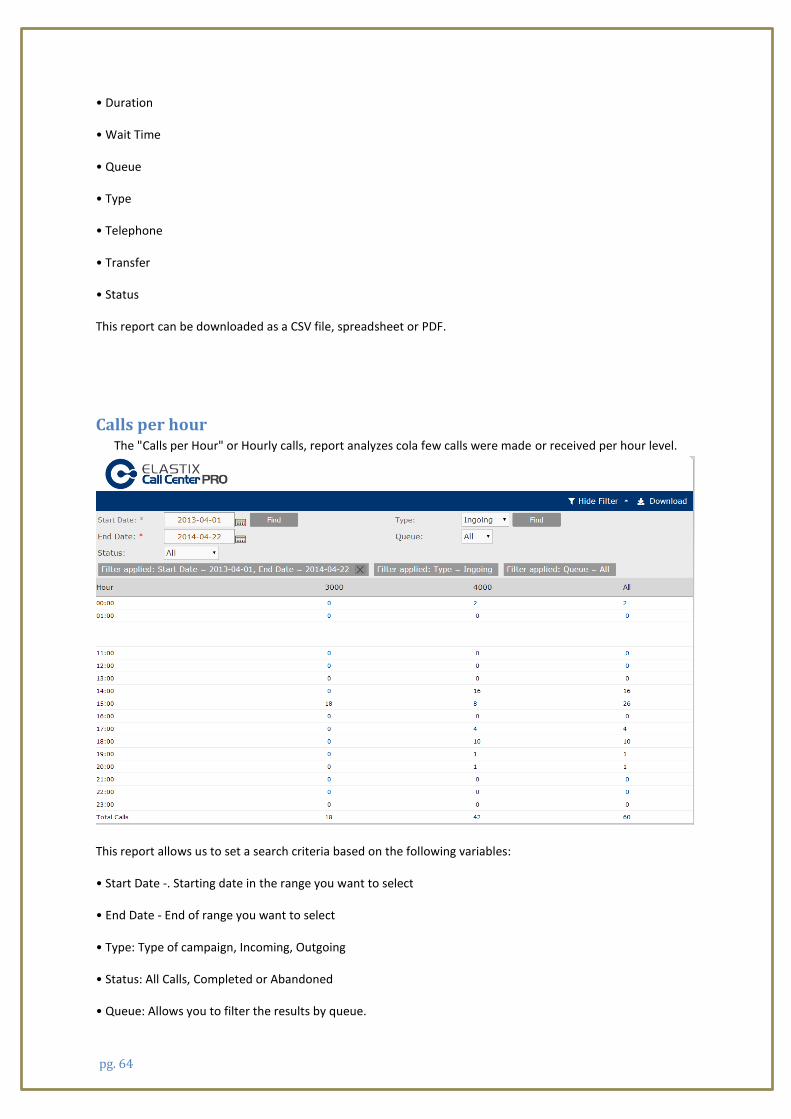
Calls per hour The "Calls per Hour" or Hourly calls, report analyzes cola few calls were made or received per hour level.
This report allows us to set a search criteria based on the following variables:
• Start Date -. Starting date in the range you want to select
• End Date - End of range you want to select
• Type: Type of campaign, Incoming, Outgoing
• Status: All Calls, Completed or Abandoned
• Queue: Allows you to filter the results by queue.
pg. 65
The number of calls made in each hour over a range of 24 hours, displaying result for each of the queues and a
summation of calls every hour that shows the total operation of the Call Center is detailed.
The number of calls per hour is the sum of calls according to the date range set, ie if we take a range of 3 days,
the number of calls in each hour will be the sum of calls at that hour during those days.
This overall result may not be effective for a statistical analysis over a short range query, so it is advisable to
test the values per day and establish more accurate information weekly.
This report can be downloaded as a CSV file, spreadsheet or PDF.
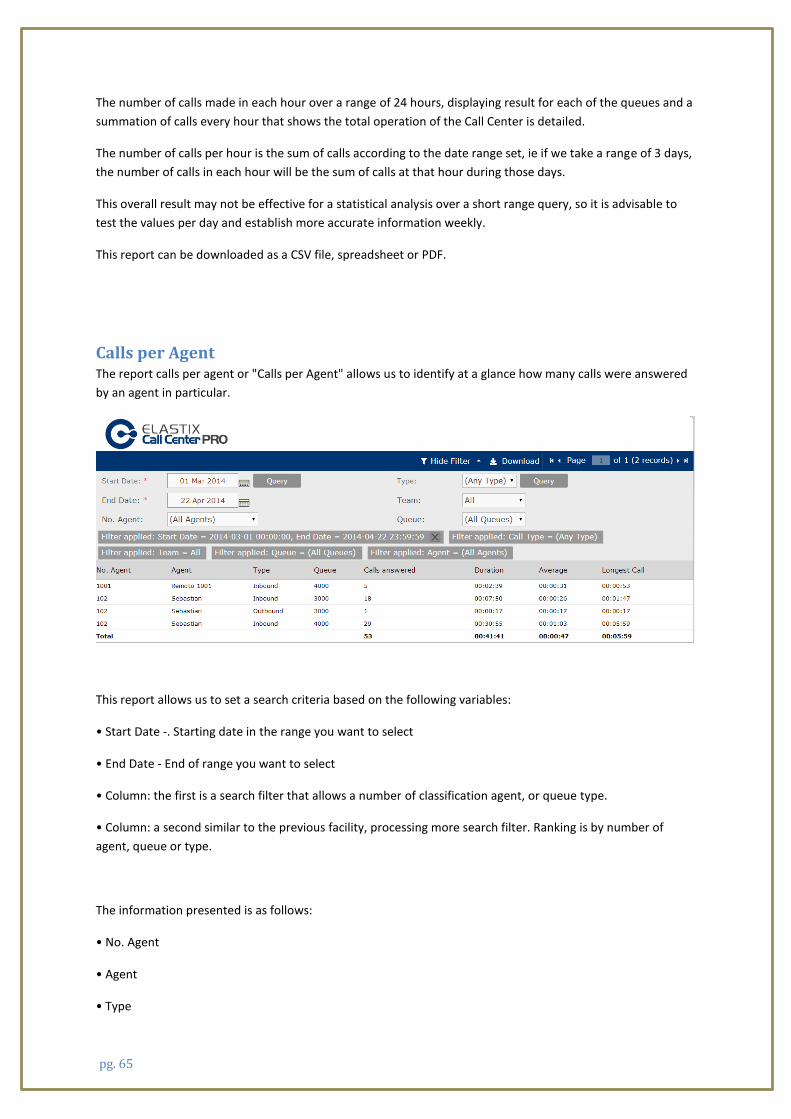
Calls per Agent The report calls per agent or "Calls per Agent" allows us to identify at a glance how many calls were answered
by an agent in particular.
This report allows us to set a search criteria based on the following variables:
• Start Date -. Starting date in the range you want to select
• End Date - End of range you want to select
• Column: the first is a search filter that allows a number of classification agent, or queue type.
• Column: a second similar to the previous facility, processing more search filter. Ranking is by number of
agent, queue or type.
The information presented is as follows:
• No. Agent
• Agent
• Type

pg. 66
• Queue
• Answered Calls
• Duration
• Average
• Longest Call
These results do not allow to analyze two key factors, abuse of breaks by the agents and on the other hand, if
the ring strategy we have chosen is efficient in a queue for our call volume.
The average obtained is also useful if you have an estimated time it will take a call, this allows us to review first
hand if the agent is having problems with the implementation of the campaign.
In some cases, especially if we use predictive dialing function, calls that enter the queue may experience some
wait time to be connected with an agent. For this reason it is important to review these results together with
the report of Hold Time.
This report can be downloaded as a CSV file, spreadsheet or PDF.
Hold Time The report Timeout or "Hold Time" allows us to easily identify the time a person had to wait to call be
answered by an agent.
The analysis and the results displayed are oriented tail.
This report allows us to set a search criteria based on the following variables:
• Start Date -. Starting date in the range you want to select
• End Date - End of range you want to select
• Type -. Allows us to classify search on incoming calls or outgoing calls.
• Status -. Lets us show all available results, successful calls or abandoned calls.
This report can be downloaded as a CSV file, spreadsheet or PDF.

pg. 67
Login Logout This report allows us to check the dates and times at which the agents entered and left the agent console.
Login-Logout allows us also to obtain the total connection time of an agent, the time spent on calls and the
percentage of service, ie, the time spent in calls about the time that was available in the agent console.
This report allows us to set a search criteria based on the following variables:
• Start Date -. Starting date in the range you want to select
• End Date - End of range you want to select
• Queue -. Outcome is classified by queues
• Type -. Shows the result of a detailed or general.
The information presented is as follows: • Agent • Date Start • Date End • Total Login • Incoming Calls • Outgoing Calls • Time of Call • Service (%) • Status With respect to classification search "type", selecting the "Detail" option, can see each of the inputs and
outputs that had agents in the selected time range.
The "General" option instead takes a sum of the values of time are presented.
The way we relate this information to a campaign is selecting the assigned queue.
This report can be downloaded as a CSV file, spreadsheet or PDF.

pg. 68
Ingoing Calls Success The report successful incoming calls or "ingoing calls Success" shows in detail the result (s) year (s) entree (s)
for each of the available queues.
This report allows us to set a search criteria based on the following variables:
• Start Date -. Starting date in the range you want to select
• End Date - End of range you want to select
The information presented is as follows:
• Queue
• Success
• Abandoned
• Timeout
• Total Calls
Each line shows the total calls, successful calls, abandoned and waiting time. Like the report calls per hour, is
more effective for revising daily time range, or the range period of the campaign.
Although not classified as a real-time report, information is updated as completed calls in the system with
which we can see results globally campaign effectiveness by comparing successful calls with abandoned calls.
This report can be downloaded as a CSV file, spreadsheet or PDF.

pg. 69
Graphic Calls per hour Graph of calls per hour or "Graphic calls per hour", gives us a graphical representation of the calls for a certain
period of time, for a range of 24 hours.
This report is particularly useful for inbound campaigns, as we show in a practical way the number of
abandoned calls. Also very useful for outgoing calls, as we will see the number of completed in relation to calls
dialed and calls this way we can make adjustments to optimize performance dialer.
This report allows us to set a search criteria based on the following variables:
• Start Date -. Starting date in the range you want to select
• End Date - End of range you want to select
• Type -. Allows us to select the type of operation between incoming or outgoing calls.
pg. 70
• Status - It allows us to classify the status of the call as: All, Completed or Abandoned.
• Cola -. Allows us to classify the result queue
Like the report calls per hour, is more effective for revising daily time range, or the range period of the
campaign.
This can be an effective reporting to visually analyze the peak hours in an incoming campaign.
This report can be downloaded as a CSV file, spreadsheet or PDF.
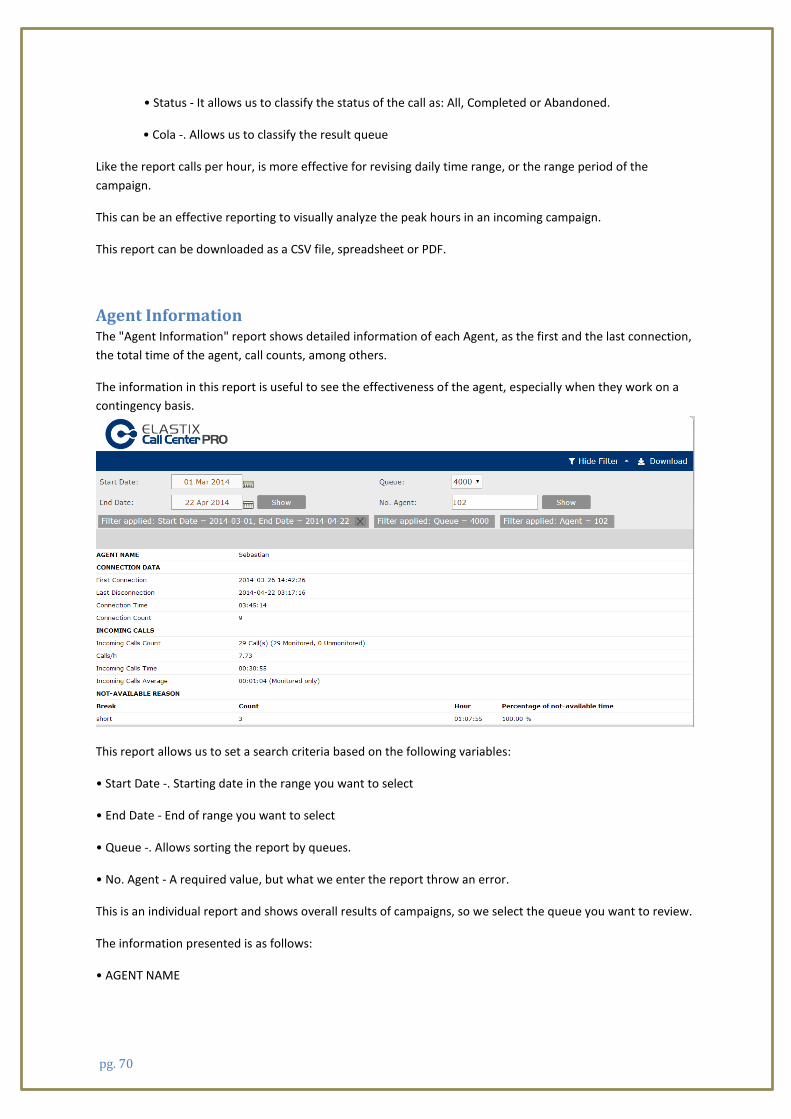
Agent Information The "Agent Information" report shows detailed information of each Agent, as the first and the last connection,
the total time of the agent, call counts, among others.
The information in this report is useful to see the effectiveness of the agent, especially when they work on a
contingency basis.
This report allows us to set a search criteria based on the following variables:
• Start Date -. Starting date in the range you want to select
• End Date - End of range you want to select
• Queue -. Allows sorting the report by queues.
• No. Agent - A required value, but what we enter the report throw an error.
This is an individual report and shows overall results of campaigns, so we select the queue you want to review.
The information presented is as follows:
• AGENT NAME
pg. 71
• DATA CONNECTION
First Connection
Last Disconnect
Connect time
Count Connections
• INCOMING
Count incoming calls
Calls / h (Calls per hour average)
Incoming Call Time (total talk time)
Incoming Calls Average (average per call talk time)
• NOT – AVAILABLE REASON
Break
Count
Time
Percentage of non-availability
We could say that this report is the resume of the agent.
This report can be downloaded as a CSV file, spreadsheet or PDF.

pg. 72
Trunks used per hour The "Trunks used per hour" report allows us to review the use of each trunk per hour for a specified date
range.
Another important information is the amount of inbound, answered and abandon calls. Although some of the
information collected will lead summations, allows real-time data review of calls that are queued or have been
abandoned.
This report allows us to set a search criteria based on the following variables:
• Start Date -. Starting date in the range you want to select
• End Date - End of range you want to select
• Trunk -. Allows sorting the report by Trunk
The information presented is as follows:
• Time Period (in hours)
• Entered
• Answered
• Abandoned
• In Queue
• Without monitoring
It can be downloaded as a CSV file, spreadsheet or PDF.
pg. 73
Monitoring Some of the following information was taken from the book "Implementing Call Center with Elastix" Paul
Estrella,
Chapter "11.2 Reports included in the addon for Elastix Call Centers"
Module: Reports Location Tab "CCPRO Manage" Submenu "Monitoring"
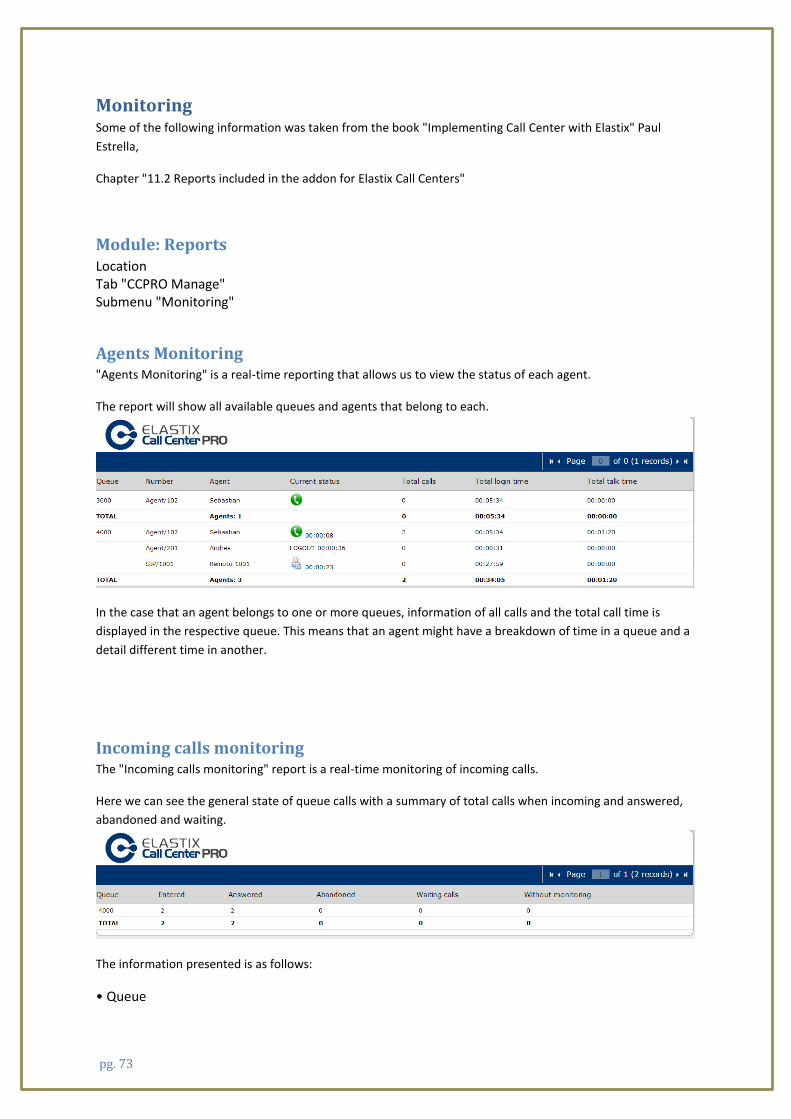
Agents Monitoring "Agents Monitoring" is a real-time reporting that allows us to view the status of each agent.
The report will show all available queues and agents that belong to each.
In the case that an agent belongs to one or more queues, information of all calls and the total call time is
displayed in the respective queue. This means that an agent might have a breakdown of time in a queue and a
detail different time in another.
Incoming calls monitoring The "Incoming calls monitoring" report is a real-time monitoring of incoming calls.
Here we can see the general state of queue calls with a summary of total calls when incoming and answered,
abandoned and waiting.
The information presented is as follows:
• Queue
pg. 74
• Entered • Answered • Abandoned • Calls Waiting • No monitoring
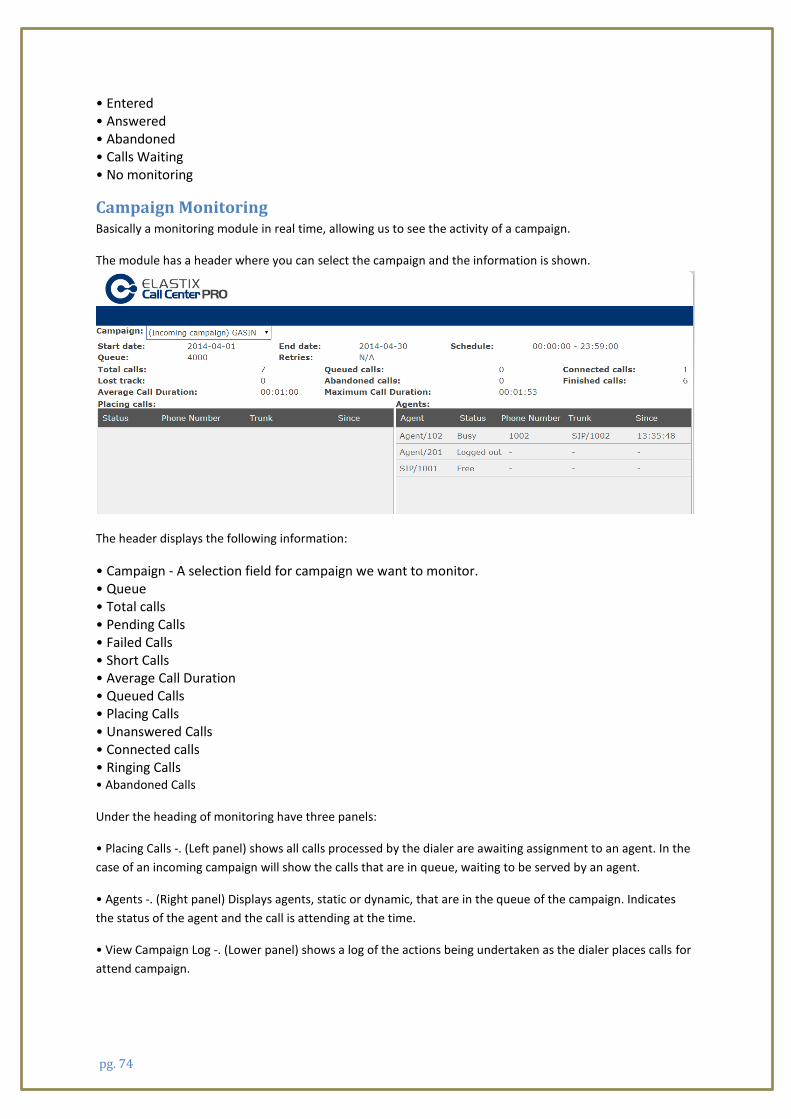
Campaign Monitoring Basically a monitoring module in real time, allowing us to see the activity of a campaign.
The module has a header where you can select the campaign and the information is shown.
The header displays the following information:
• Campaign - A selection field for campaign we want to monitor. • Queue • Total calls • Pending Calls • Failed Calls • Short Calls • Average Call Duration • Queued Calls • Placing Calls • Unanswered Calls • Connected calls • Ringing Calls • Abandoned Calls
Under the heading of monitoring have three panels:
• Placing Calls -. (Left panel) shows all calls processed by the dialer are awaiting assignment to an agent. In the
case of an incoming campaign will show the calls that are in queue, waiting to be served by an agent.
• Agents -. (Right panel) Displays agents, static or dynamic, that are in the queue of the campaign. Indicates
the status of the agent and the call is attending at the time.
• View Campaign Log -. (Lower panel) shows a log of the actions being undertaken as the dialer places calls for
attend campaign.