
Student service user guide - Pearson qualifications · Student service user guide Version 1.0, July...
28
1 Student service user guide Version 1.0, July 2013 This guide is designed to help Exams Officers and teachers understand what students see when they log into the new enhanced version of ResultsPlus Direct, helping them to answer any queries they may have. 1. About the new enhanced ResultsPlus Direct 2.0 service 2 2. Account activation for each registration method 3-9 2.1 Note re students registered via PIN slips 3 2.2 Account activation for students registered via either Option A (CSV upload option) or via the PIN slips 4-5 2.3 Account activation for students registered via Option B (CSV download option) 6-9 3. Logging in (resetting passwords, locked accounts) 9-10 4. Managing student accounts (changing email addresses, unlocking accounts) 11-14 4.1 Searching for registered students 11 4.2 Registered accounts that are ‘Not activated’ 12 4.3 Failed activation 13 4.4 Forgotten passwords 14 4.5 Locked accounts 14 5. Home (My results, My mock results, My account, More from Pearson) 15 6. My results 15-24 6.1 Grade and unit results 15 6.2 Sort and refine 16 6.2 Exam paper overview 17 6.3 Highlights 18-20 6.4 Question analysis 21-22 6.5 Skills maps 23 7. My mock results 24 7.1 Entering mock marks 24 7.2 Mock analysis reports 25-27 8. My account (Editing your account details, security questions and email) 28 9. More from Pearson 28 10. Technical requirements 28
Transcript of Student service user guide - Pearson qualifications · Student service user guide Version 1.0, July...
1
Student service user guide Version 1.0, July 2013
This guide is designed to help Exams Officers and teachers understand what students see when they log into the new enhanced version of ResultsPlus Direct, helping them to answer any queries they may have.
1. About the new enhanced ResultsPlus Direct 2.0 service 2
2. Account activation for each registration method 3-9
2.1 Note re students registered via PIN slips 3
2.2 Account activation for students registered via either Option A
(CSV upload option) or via the PIN slips 4-5
2.3 Account activation for students registered via Option B
(CSV download option) 6-9
3. Logging in (resetting passwords, locked accounts) 9-10
4. Managing student accounts (changing email addresses, unlocking accounts) 11-14
4.1 Searching for registered students 11
4.2 Registered accounts that are ‘Not activated’ 12
4.3 Failed activation 13
4.4 Forgotten passwords 14
4.5 Locked accounts 14
5. Home (My results, My mock results, My account, More from Pearson) 15
6. My results 15-24
6.1 Grade and unit results 15
6.2 Sort and refine 16
6.2 Exam paper overview 17
6.3 Highlights 18-20
6.4 Question analysis 21-22
6.5 Skills maps 23
7. My mock results 24
7.1 Entering mock marks 24
7.2 Mock analysis reports 25-27
8. My account (Editing your account details, security questions and email) 28
9. More from Pearson 28
10. Technical requirements 28

2
1. About the new enhanced ResultsPlus Direct 2.0 service
Launching Summer 2013, our new ResultsPlus Direct 2.0 service offers four big
enhancements, all recommended by teachers and students:
Greater detail, with question-by-question
analysis, highlight reports and skills maps for each students
Being able to view their own performance reports may
help students understand how they performed on each
question in their exam and mock papers. These reports
can help them analyse their knowledge of the subject
and identify the most suitable pathways for their future.
Should they choose to do so, students will also be able
to share their reports with their parents.
Mock exam reporting to support past paper mock exams marked by teachers,
plus the facility for students to enter the marks themselves
For past Edexcel exam papers sat as mocks, this
analysis will be available as soon as the marks from the
paper have been uploaded to ResultsPlus. These reports
may help teachers work with their students to support
their learning. In addition, ResultsPlus Direct 2.0 will
also allow the students themselves to upload the marks
from these mock papers, as well as teachers.
Access through smart devices like iPhone
or Android devices, tablets and PCs
To meet the needs of today's technology-savvy
students, the new service will be accessible anywhere.
A lifetime account that allows their results data to travel across institutions
Any students moving to a new school or college will
have the option to share their own reports with new
institution to help improve transition.

3
2. Account activation for each registration method
Before 2013, ResultsPlus Direct student accounts were only available when they were issued with PINs
through their examination officer. This PIN process is being replaced after Summer 2013. This year,
two new options were piloted, allowing exam officers to create enhanced student accounts:
Registration Option A (the CSV upload option)
Registration Option B (the CSV download option)
The diagram below demonstrates the student registration and subsequent account activation processes
for each of the three options currently available (PIN slip, option A and option B). Please note,
however, that the PIN slip option will not be available after Summer 2013. For more details on the new
registration options that will be made available from Autumn 2013, please visit our pilot website.
2.1 Note re students registered via PIN slips
Students who received PIN slips from their institution in Summer 2013 need to follow the instructions
on the slip to register their account. After registering the account, they will receive a confirmation
email explaining that they will receive a welcome email with their activation details before Results Day.
At the start of August all students registering via PIN slips will receive their welcome email containing
details on how to activate their accounts. Students are advised to register their PIN slip accounts at the
earliest opportunity, since it may take up to 48 hours for the activation welcome email to be sent to
them.
See section 1.2 for further details on welcome emails and how students activate their account.

4
2.2 Account activation for students registered via either Option A (the CSV
upload option) or via PIN slips
Registration Option A involves the examination officer uploading student details including their email
address. Students registered via Option A or via PIN slips will automatically receive a welcome email
(below) at the start of August asking them to activate their account by clicking on the activation link.
Trouble Shooting
What if… The student
hasn’t received their
welcome email?
If, for any reason, the
student cannot see their
welcome email in their
inbox, please ask them
to check their
spam/junk folders. It is
possible that students’
home firewalls may in
some instances prevent
welcome emails from
being received. If this is
happens, Exams Officers
can resend the welcome
email to the same or a
different email address
via the ResultsPlus
Direct administration
area in their ResultsPlus
account.

5
When students click on the link in their welcome email they will be taken to the activation screen:
To activate the account, each student must provide their date of birth and set a security question and
password.
After completing these fields and accepting terms of service, students will have access to their
ResultsPlus account.
Next Step - section 3: Logging in

6
2.3 Account activation for students registered via Option B (the CSV download
option)
This section applies to students who have been given verification codes by their Exams Officer. These
codes are generated if a centre uses registration option B (the digital export of student account
verification details).
Each student must first go to the webpage
https://www.resultsplusdirect.co.uk/students/login.html#emailActivate and then paste or type in the
verification code supplied by their Exams Officer into the field called “Enter your token” (see screen
below).
Please note that it is essential that each student is given the correct code and not that of
another student.
After submitting their token successfully, students will see the following screen:
Students will need to enter their email address and confirm it by typing it in a second time. Please
advise your students to choose an email address that is active and to take extra care to enter the
email address correctly.
Please note that if the name at the top of this screen is not that of the student, the wrong verification
code has been supplied to this student. You will need to redistribute the correct code to this student
and we recommend that you check all the codes that have been distributed to check if other students
have been given the wrong code.
Please see our pilot webpage for tips on distribution of verification codes.
7
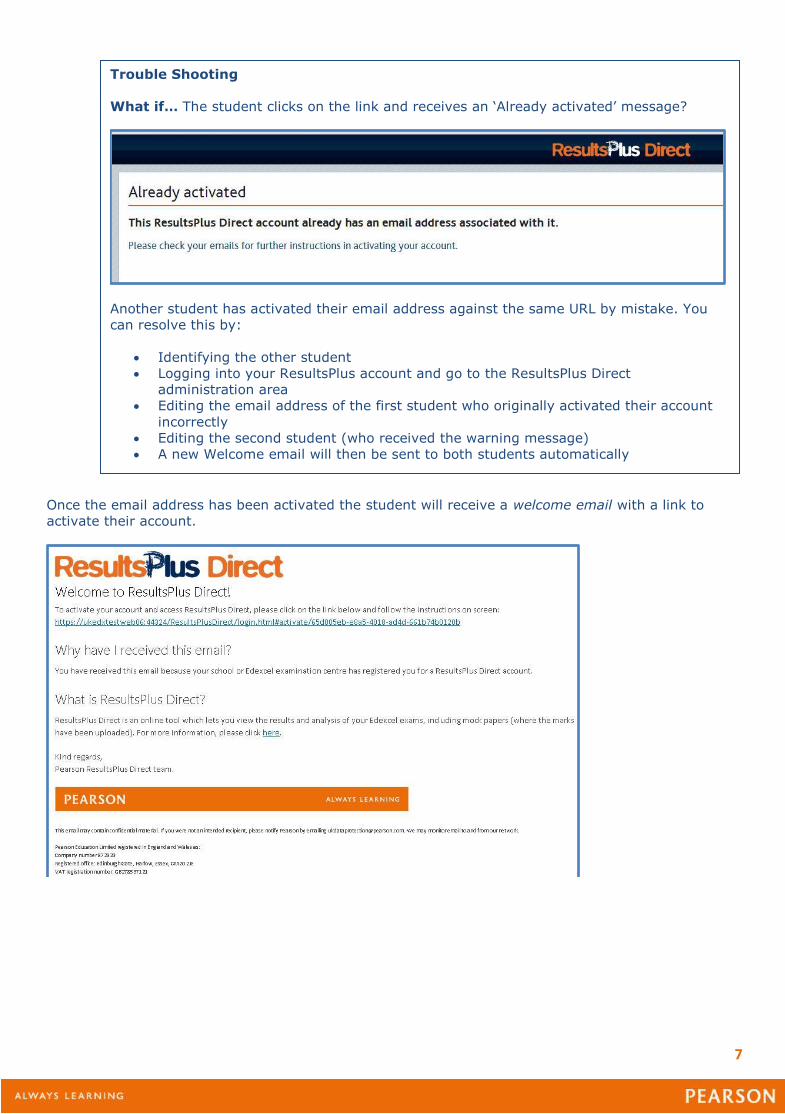
Once the email address has been activated the student will receive a welcome email with a link to
activate their account.
Trouble Shooting
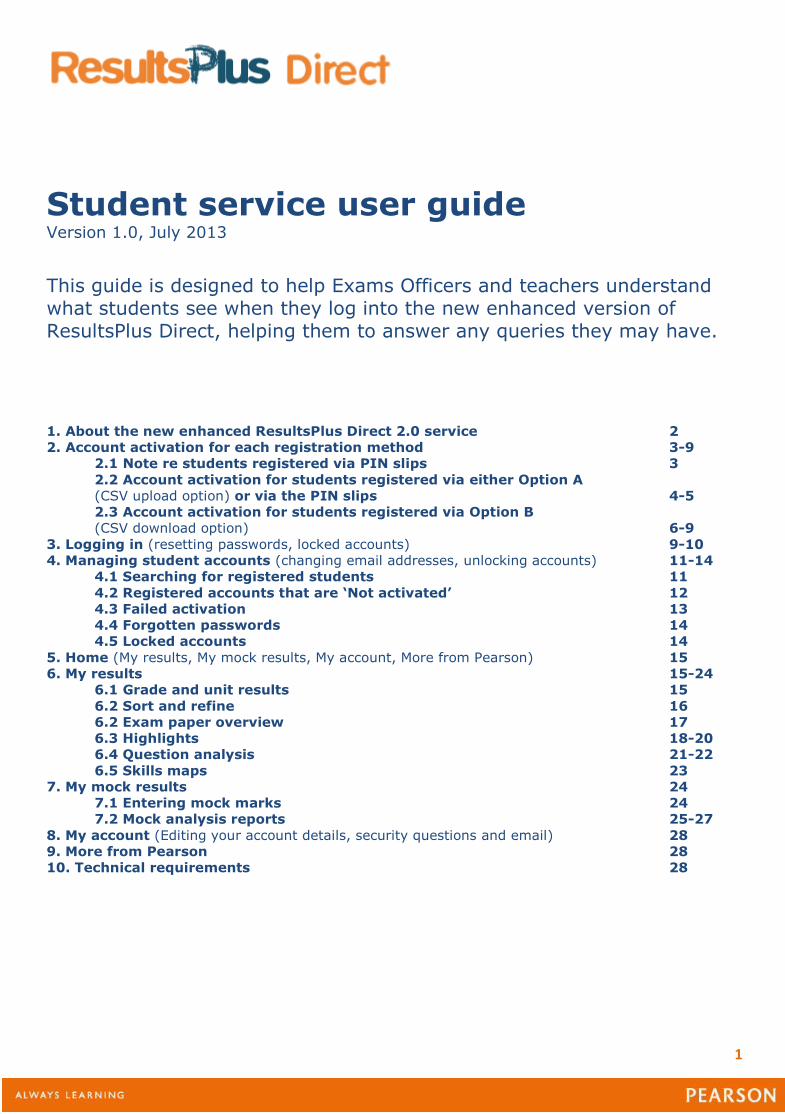
What if… The student clicks on the link and receives an ‘Already activated’ message?
Another student has activated their email address against the same URL by mistake. You
can resolve this by:
Identifying the other student
Logging into your ResultsPlus account and go to the ResultsPlus Direct
administration area
Editing the email address of the first student who originally activated their account
incorrectly
Editing the second student (who received the warning message)
A new Welcome email will then be sent to both students automatically

8
When students click on the link in their welcome email they will be taken to the activation screen:
Trouble Shooting
What if… The student
hasn’t received their
welcome email?
If, for any reason, the
student cannot see their
welcome email in their
inbox, please ask them
to check their
spam/junk folders. It is
possible that students’
home firewalls may in
some instances prevent
welcome emails from
being received. If this is
happens, Exams Officers
can resend the welcome
email to the same or a
different email address
via the ResultsPlus
Direct administration
area in their ResultsPlus
account.
9
To activate the account, each student must provide their date of birth and set a security question and
password.
After completing these fields and accepting terms of service, students will have access to their
ResultsPlus account.
Next Step - section 3: Logging in
3. Logging in
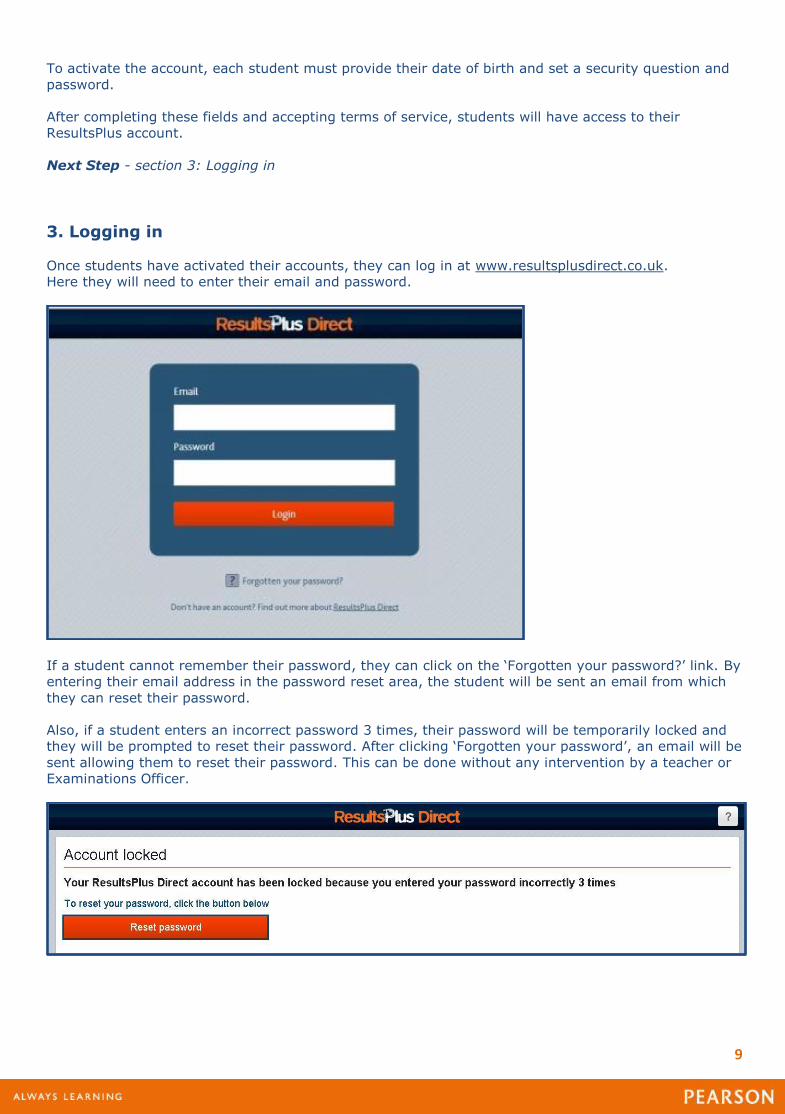
Once students have activated their accounts, they can log in at www.resultsplusdirect.co.uk.
Here they will need to enter their email and password.
If a student cannot remember their password, they can click on the ‘Forgotten your password?’ link. By
entering their email address in the password reset area, the student will be sent an email from which
they can reset their password.
Also, if a student enters an incorrect password 3 times, their password will be temporarily locked and
they will be prompted to reset their password. After clicking ‘Forgotten your password’, an email will be
sent allowing them to reset their password. This can be done without any intervention by a teacher or
Examinations Officer.
10
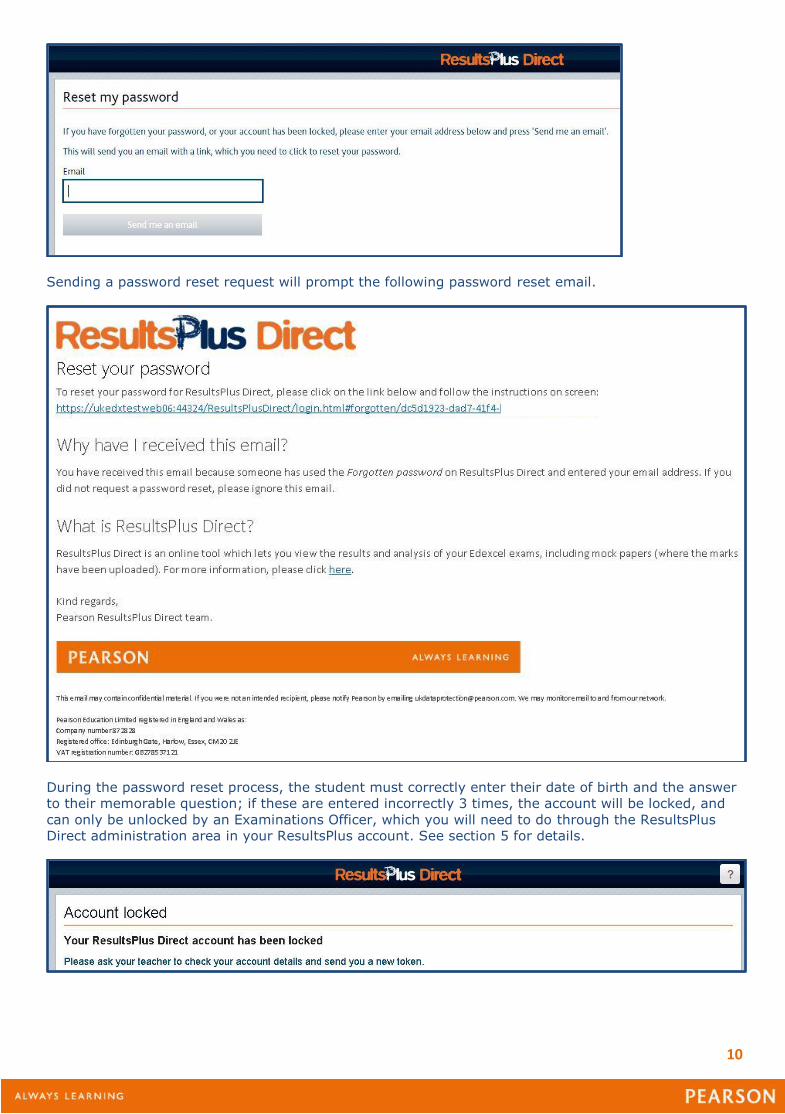
Sending a password reset request will prompt the following password reset email.
During the password reset process, the student must correctly enter their date of birth and the answer
to their memorable question; if these are entered incorrectly 3 times, the account will be locked, and
can only be unlocked by an Examinations Officer, which you will need to do through the ResultsPlus
Direct administration area in your ResultsPlus account. See section 5 for details.

11
4. Managing student accounts
The ResultsPlus Direct Administration area enables Exams Officers to manage student accounts, as well
as register them for the service.
4.1 Searching for registered students
You can search for students using any of the search fields available – including accounts that are
locked, not yet activated, or where students have forgotten their passwords.
You can bring up the details of a
student’s account by selecting the
‘View’ option next to the search results
summary for that student.
12
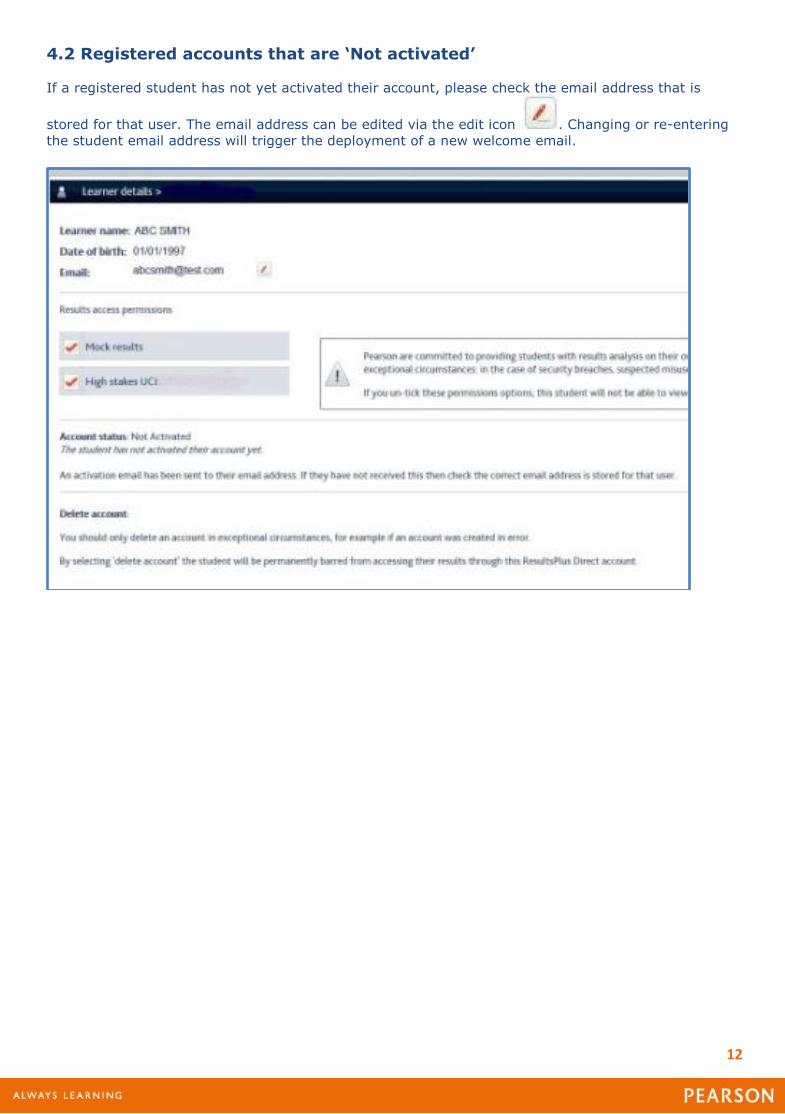
4.2 Registered accounts that are ‘Not activated’
If a registered student has not yet activated their account, please check the email address that is
stored for that user. The email address can be edited via the edit icon . Changing or re-entering
the student email address will trigger the deployment of a new welcome email.
13
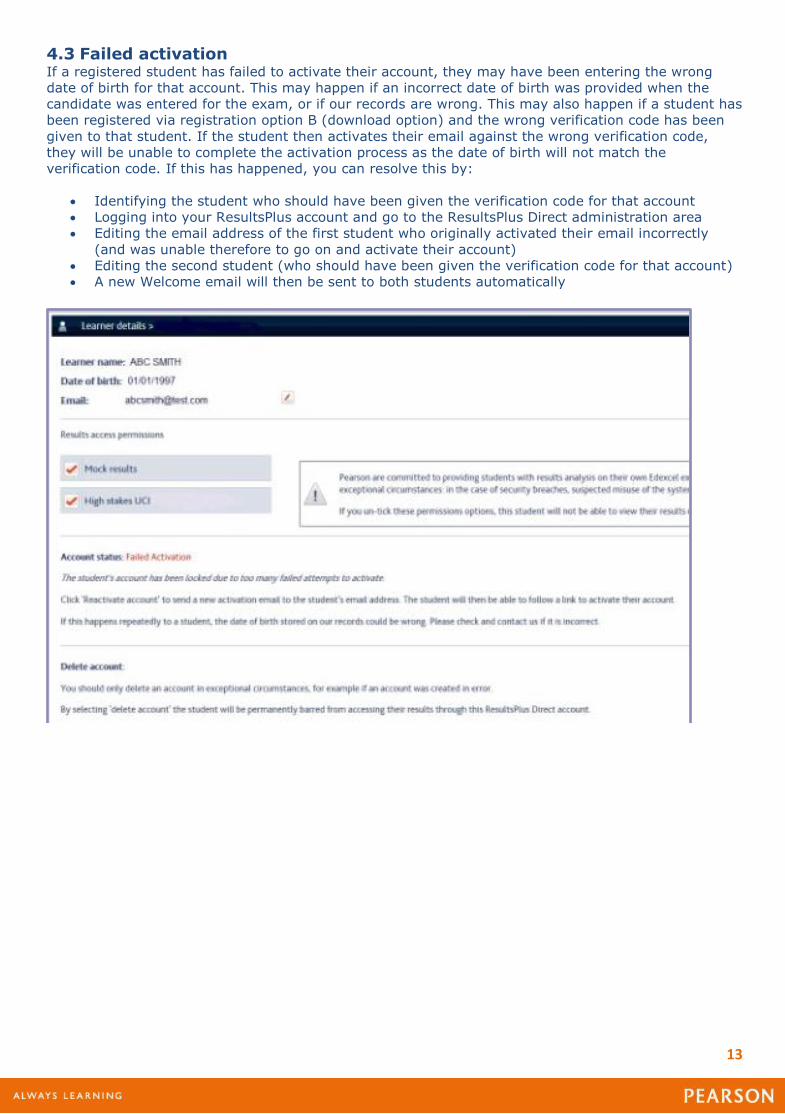
4.3 Failed activation
If a registered student has failed to activate their account, they may have been entering the wrong
date of birth for that account. This may happen if an incorrect date of birth was provided when the
candidate was entered for the exam, or if our records are wrong. This may also happen if a student has
been registered via registration option B (download option) and the wrong verification code has been
given to that student. If the student then activates their email against the wrong verification code,
they will be unable to complete the activation process as the date of birth will not match the
verification code. If this has happened, you can resolve this by:
Identifying the student who should have been given the verification code for that account
Logging into your ResultsPlus account and go to the ResultsPlus Direct administration area
Editing the email address of the first student who originally activated their email incorrectly
(and was unable therefore to go on and activate their account)
Editing the second student (who should have been given the verification code for that account)
A new Welcome email will then be sent to both students automatically
14
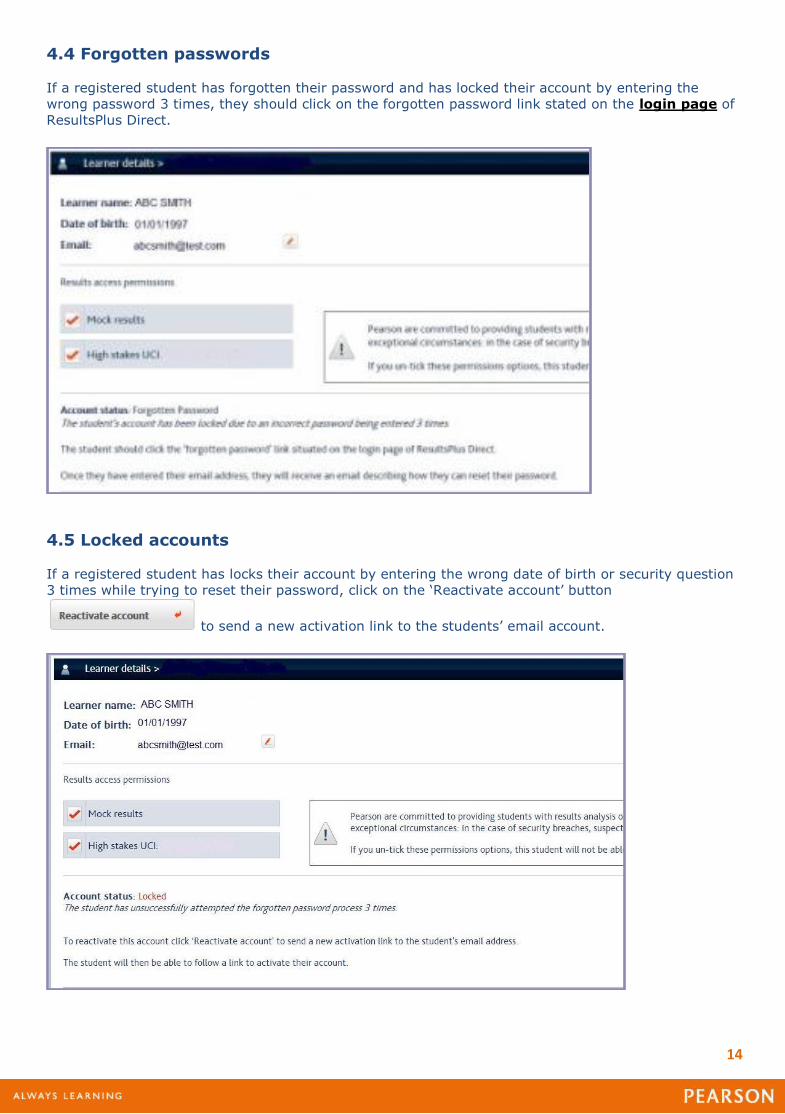
4.4 Forgotten passwords
If a registered student has forgotten their password and has locked their account by entering the
wrong password 3 times, they should click on the forgotten password link stated on the login page of
ResultsPlus Direct.
4.5 Locked accounts
If a registered student has locks their account by entering the wrong date of birth or security question
3 times while trying to reset their password, click on the ‘Reactivate account’ button
to send a new activation link to the students’ email account.

15
5. Home
Once a student has logged in, they will be presented with 4 options:
‘My results’ lets them view their grades and their analysis.
‘My account’ allows them to edit their email address, password or memorable question and/or
answer.
‘My mock results’ is where students can upload scores from teacher-marked mock papers and
also view the analysis reports for mock papers whose marks have been uploaded.
‘More from Pearson’ will link to student support pages offering advice about their Edexcel
qualifications.
6. My results
6.1 Grade and unit results
The ‘My results’ area enables students to see at-a-glance what result they achieved on each Edexcel
exam paper and how close they were to the next grade (via the gradeometer – click the info icon for
more detail). From this screen, clicking any award allows them to view unit detail, paper scores and
question analysis reports. Exam papers displaying ‘No result’ simply indicate the listing of a
qualification before the result is available.

16
6.2 Sort and refine
Using the sort button, students can sort their results by date, score, grade, title, or qualification type.
Using the ‘refine’ button, students can filtered results by exam session or qualification type.

17
6.3 Exam paper overview
Clicking on one of the ‘i’ icons for a specific exam paper in the ‘My results’ area will enable the student
to view the overview information for that exam paper.
The paper overview shows the UMS for each Unit, as well as the overall grade and gradeometer.

18
This paper overview can be sorted by date, UMS score and Unit title
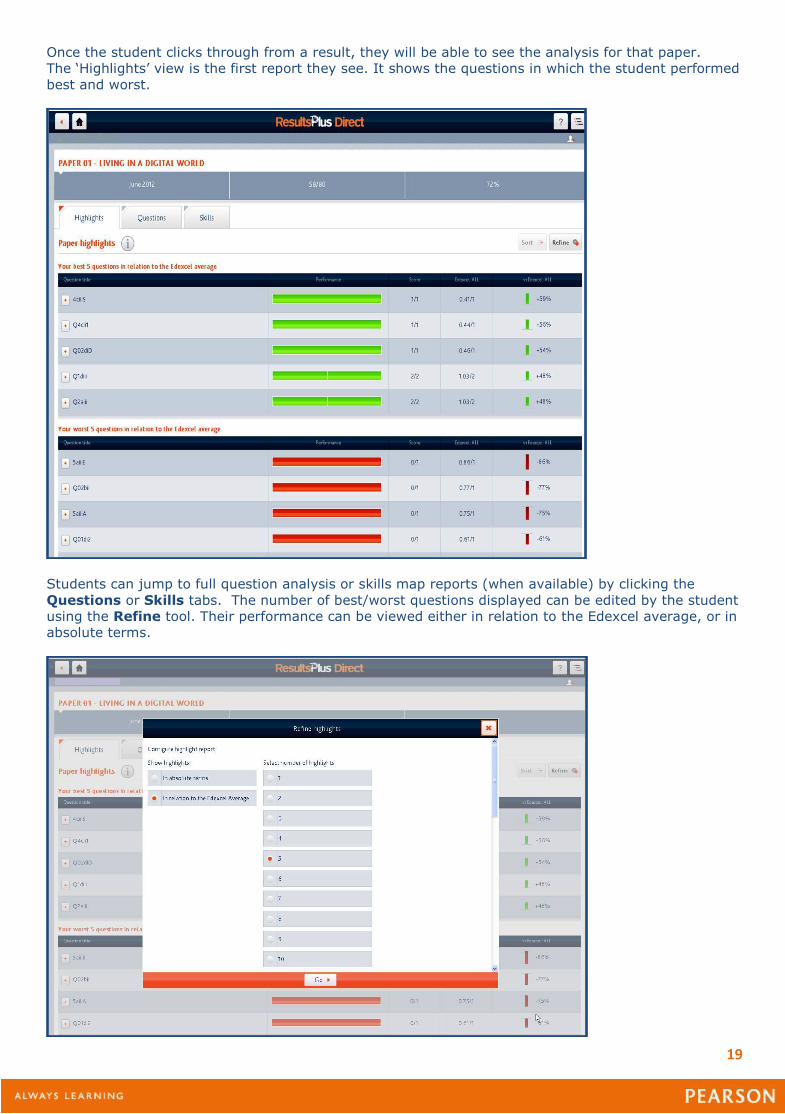
6.4 Highlights
The analysis reports are accessed via the ‘My results’ area by clicking on the arrow next to the grade
(or, on most devices, anywhere along the bar featuring the award name).
19
Once the student clicks through from a result, they will be able to see the analysis for that paper.
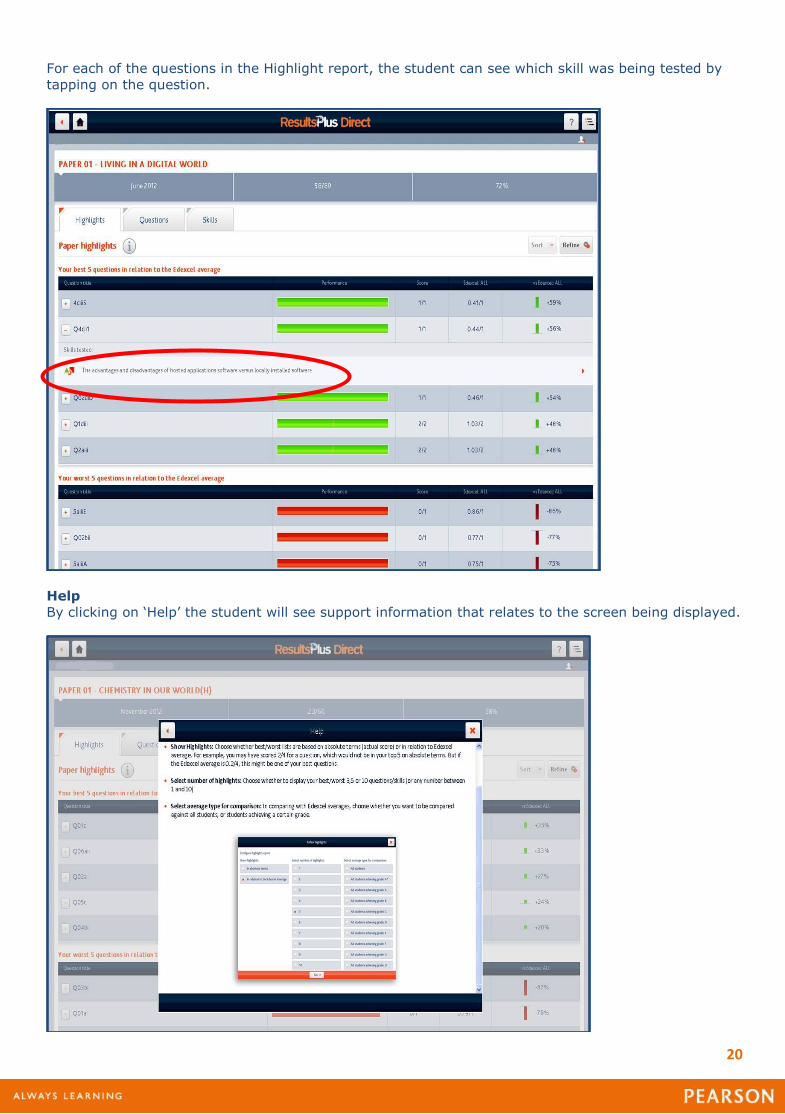
The ‘Highlights’ view is the first report they see. It shows the questions in which the student performed
best and worst.
Students can jump to full question analysis or skills map reports (when available) by clicking the
Questions or Skills tabs. The number of best/worst questions displayed can be edited by the student
using the Refine tool. Their performance can be viewed either in relation to the Edexcel average, or in
absolute terms.
20
For each of the questions in the Highlight report, the student can see which skill was being tested by
tapping on the question.
Help
By clicking on ‘Help’ the student will see support information that relates to the screen being displayed.
21
6.5 Question analysis
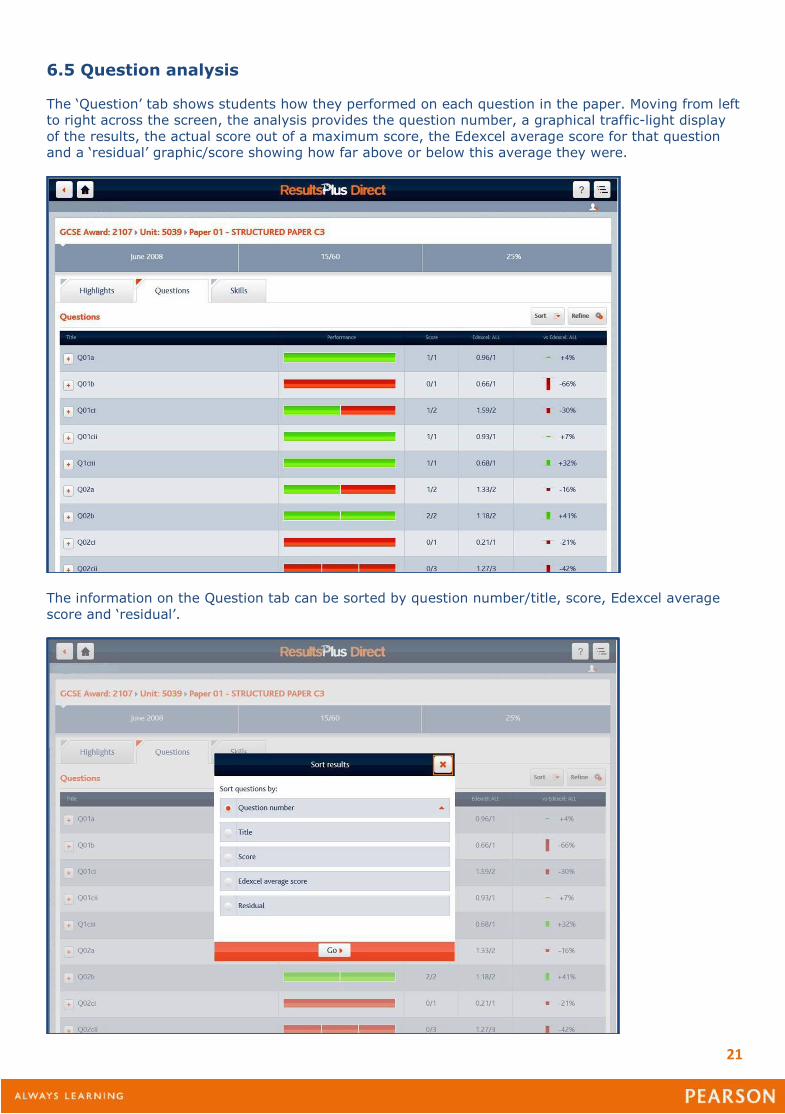
The ‘Question’ tab shows students how they performed on each question in the paper. Moving from left
to right across the screen, the analysis provides the question number, a graphical traffic-light display
of the results, the actual score out of a maximum score, the Edexcel average score for that question
and a ‘residual’ graphic/score showing how far above or below this average they were.
The information on the Question tab can be sorted by question number/title, score, Edexcel average
score and ‘residual’.

22
The information on the Question tab can also be filtered to show comparison with the performance of
students who achieved a particular grade.
By clicking on a question, the student can see which skill was being tested. They can also click on the
arrow next to that skill to view the skills map analysis for the question.
23
6.6 Skills maps
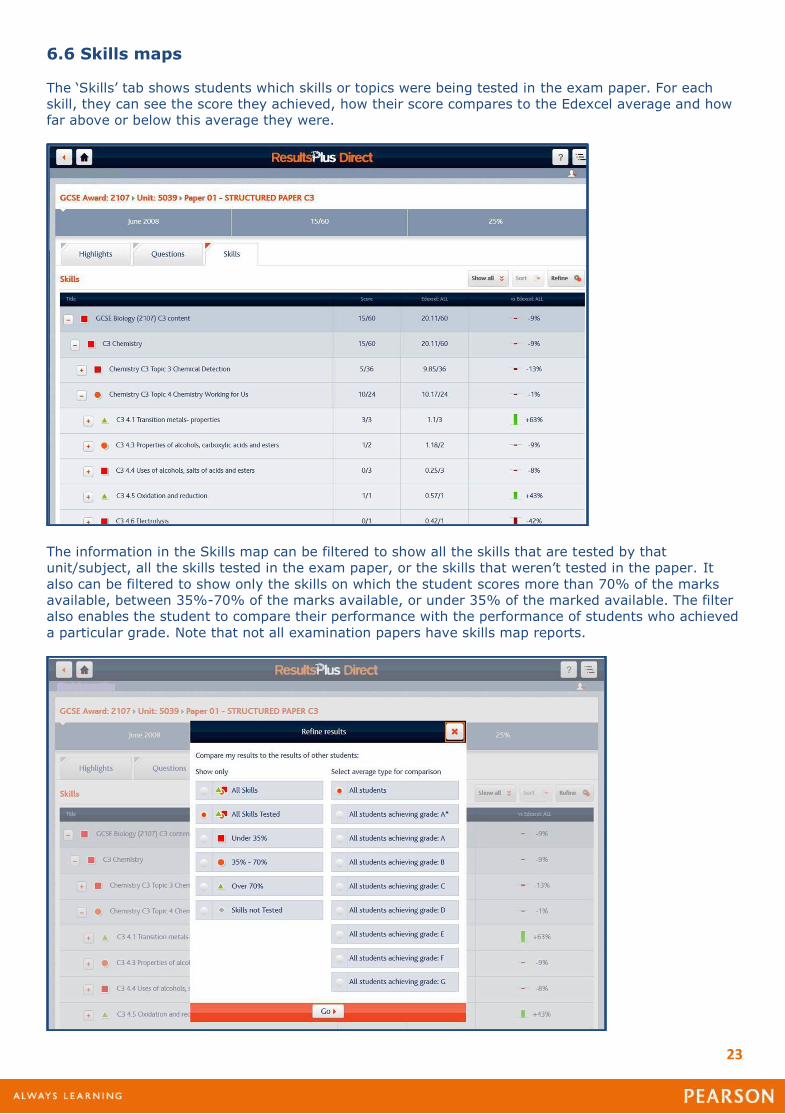
The ‘Skills’ tab shows students which skills or topics were being tested in the exam paper. For each
skill, they can see the score they achieved, how their score compares to the Edexcel average and how
far above or below this average they were.
The information in the Skills map can be filtered to show all the skills that are tested by that
unit/subject, all the skills tested in the exam paper, or the skills that weren’t tested in the paper. It
also can be filtered to show only the skills on which the student scores more than 70% of the marks
available, between 35%-70% of the marks available, or under 35% of the marked available. The filter
also enables the student to compare their performance with the performance of students who achieved
a particular grade. Note that not all examination papers have skills map reports.

24
7. My mock results
This section shows you how students can enter their own marks for mock papers and the analysis this
generates. These screens can be accessed via the ‘My mock results’ option on the students’ home
screen.
7.1 Entering mock marks
Before students can enter marks for a mock paper, their teacher needs to have assigned them that
paper (see Teacher User Guide for more details on assigning a mock paper) and provided them with
their marked mock exam script.
On selecting My mock results, a student sees an overview of the analysis available and papers for
which they can enter marks.

25
After selecting a mock paper, the student can start inputting their marks by selecting the ‘Question’ tab
and entering the mark awarded for each question (usually by the teacher) into the fields provided.
7.2 Mock analysis reports
Once the student (or teacher) has entered the marks for the mock paper, the student will be able view
the same type of analysis as they can for the high stakes exams (Highlight report, Question analysis
and Skills map analysis).

26
The mock Highlights information can be sorted and filtered in the same way as it can for the high
stakes exam papers.
The mock Question analysis information is displayed in the same way as for the high stakes exam
papers.
27
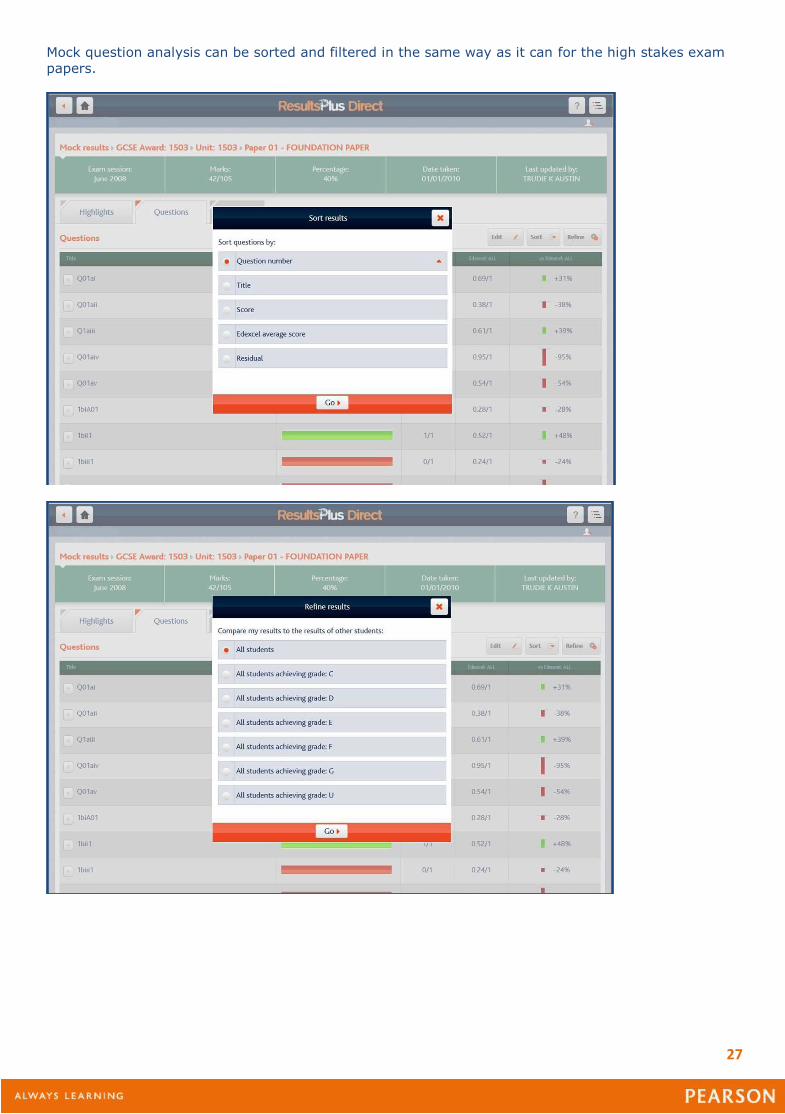
Mock question analysis can be sorted and filtered in the same way as it can for the high stakes exam
papers.
28
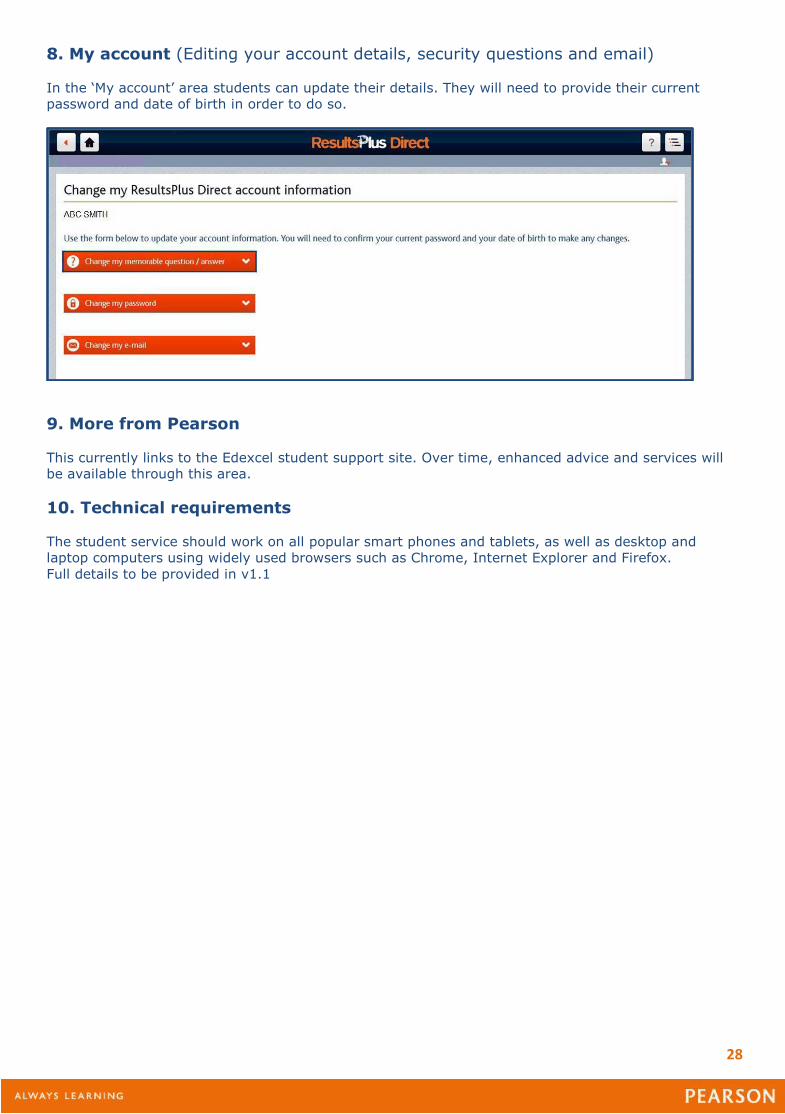
8. My account (Editing your account details, security questions and email)
In the ‘My account’ area students can update their details. They will need to provide their current
password and date of birth in order to do so.
9. More from Pearson
This currently links to the Edexcel student support site. Over time, enhanced advice and services will
be available through this area.
10. Technical requirements
The student service should work on all popular smart phones and tablets, as well as desktop and
laptop computers using widely used browsers such as Chrome, Internet Explorer and Firefox.
Full details to be provided in v1.1