
Store User Guide - Forecasting - HotSchedules · From the Menu tab, select ‘Reports’ from the...
16
Store User Guide - Forecasting Jimmy John’s All rights reserved. This publication contains proprietary information of HotSchedules. No part of this publication may be reproduced, stored in a retrieval system, or transmitted in any form by any means, electronic, mechanical, photocopying, recording or otherwise without the prior written permission of HotSchedules. All registered trademarks, trademarks and service marks are the property of their respective holders. This document is provided “as-is.” Information in this document may change without notice.
Transcript of Store User Guide - Forecasting - HotSchedules · From the Menu tab, select ‘Reports’ from the...

Store User Guide - Forecasting
Jimmy John’s
All rights reserved. This publication contains proprietary information of HotSchedules. No part of this publication may be reproduced, stored in a retrieval system, or transmitted in any form by any means, electronic, mechanical, photocopying, recording or otherwise without the prior written permission of HotSchedules. All registered trademarks, trademarks and service marks are the property of their respective holders.
This document is provided “as-is.” Information in this document may change without notice.
Store User Guide – Jimmy John’s Page | 2
Table of Contents Table of Contents ....................................................................................................................................... 2
Forecasting ................................................................................................................................................. 3
Why is understanding and adjusting your forecast a key process? ........................................................... 3
What is the ‘best practice’ process for forecasting? .................................................................................. 3
Add Event Profile – Manual Adjustments ................................................................................................ 12
New Forecast Event Profile – Past Occurrences .................................................................................... 13
Multiple Special Events per Calendar Day .............................................................................................. 14
Edit an Event Profile................................................................................................................................ 15
Scheduling an Event ............................................................................................................................... 15
Store User Guide – Jimmy John’s Page | 3
Forecasting
Why is understanding and adjusting your forecast a key process?
A clear picture of the stores forecast provides Franchisees and Managers the assurance that their inventory ordering and scheduling are properly aligned with expected sales goals.
What is the ‘best practice’ process for forecasting?
✓ The forecast would be viewed for the week ahead so a clear picture of the expected sales trends can be understood.
✓ Flagging special events in the forecast for any given day or time period will provide the user with a more accurate ‘big picture’ of the forecast and will assist with improved future forecast accuracy.
All adjustments are time stamped and can be tracked and reviewed.
How to View the Forecast
There are two ways to view the Forecast
✓ Forecast – (Daily) – By Sales, Transactions. Sales Items
✓ Forecast Evaluatior – (Weekly)
Forecast (Daily) – The Daily forecast page is where any adjustments are made.
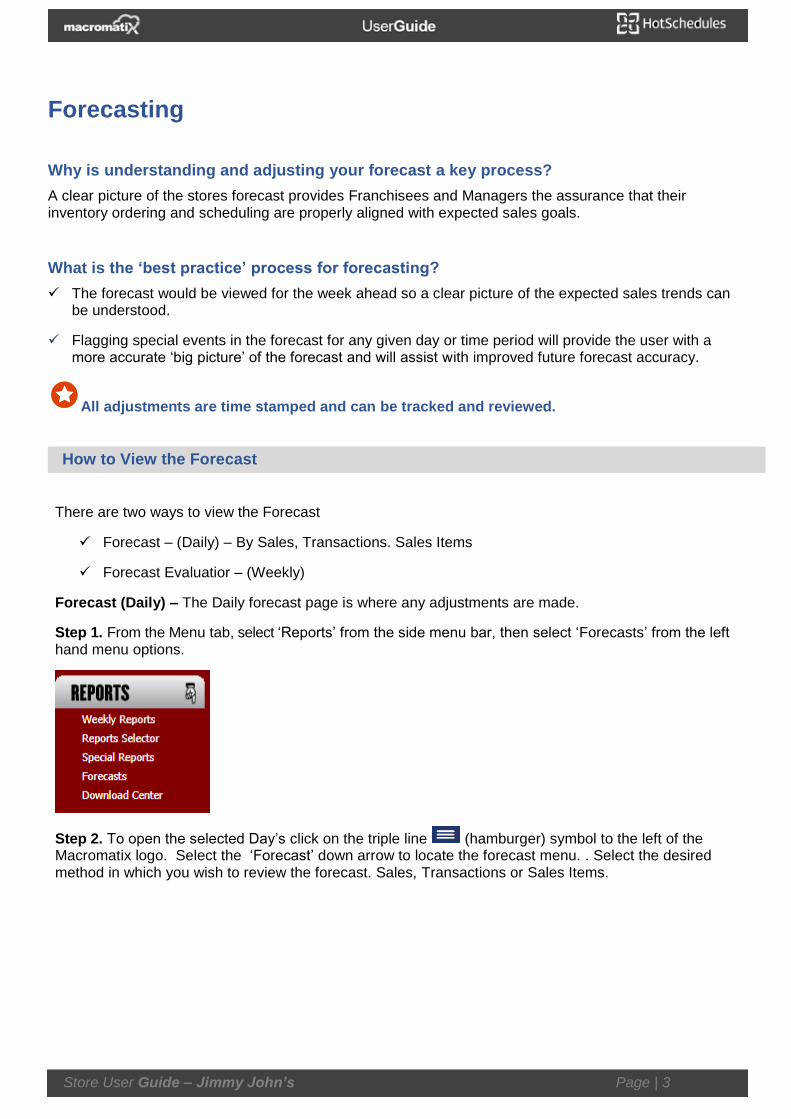
Step 1. From the Menu tab, select ‘Reports’ from the side menu bar, then select ‘Forecasts’ from the left hand menu options.
Step 2. To open the selected Day’s click on the triple line (hamburger) symbol to the left of the Macromatix logo. Select the ‘Forecast’ down arrow to locate the forecast menu. . Select the desired method in which you wish to review the forecast. Sales, Transactions or Sales Items.
Store User Guide – Jimmy John’s Page | 4
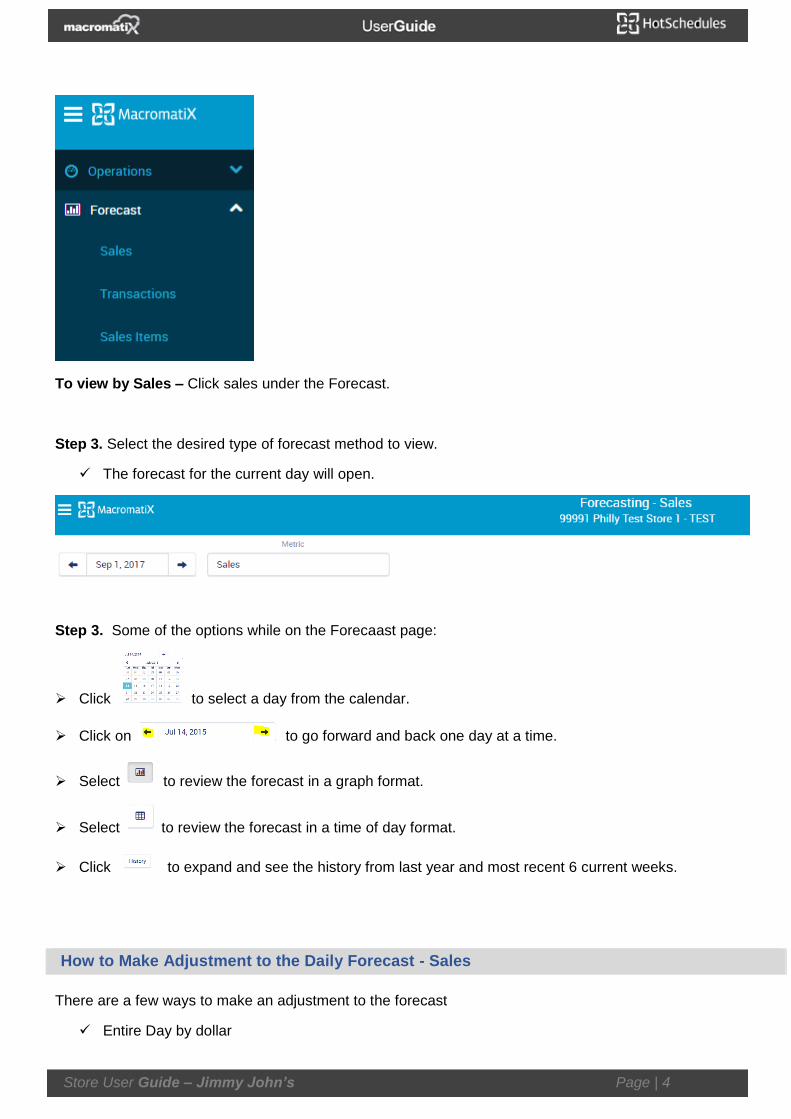
To view by Sales – Click sales under the Forecast.
Step 3. Select the desired type of forecast method to view.
✓ The forecast for the current day will open.
Step 3. Some of the options while on the Forecaast page:
➢ Click to select a day from the calendar.
➢ Click on to go forward and back one day at a time.
➢ Select to review the forecast in a graph format.
➢ Select to review the forecast in a time of day format.
➢ Click to expand and see the history from last year and most recent 6 current weeks.
How to Make Adjustment to the Daily Forecast - Sales
There are a few ways to make an adjustment to the forecast
✓ Entire Day by dollar
Store User Guide – Jimmy John’s Page | 5
✓ Entire Day by percentage
✓ Hourly adjustment by dollar
✓ Hourly adjustment by percentage.
Entire Day
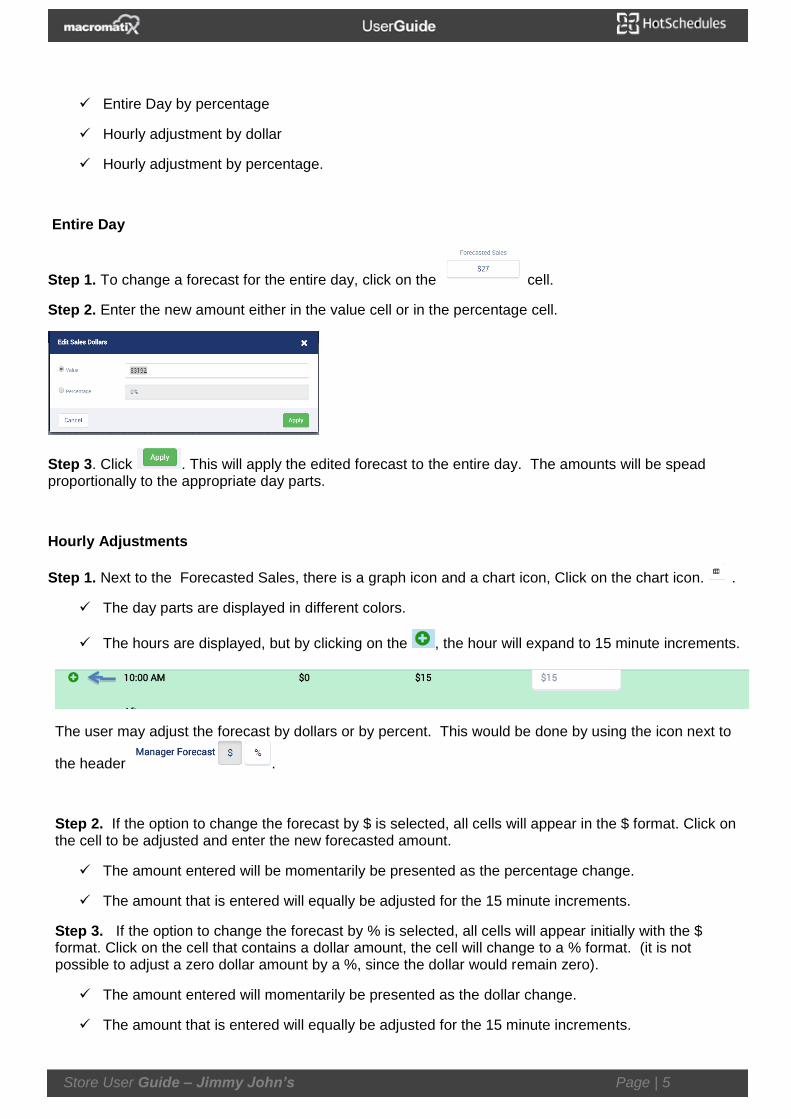
Step 1. To change a forecast for the entire day, click on the cell.
Step 2. Enter the new amount either in the value cell or in the percentage cell.
Step 3. Click . This will apply the edited forecast to the entire day. The amounts will be spead proportionally to the appropriate day parts.
Hourly Adjustments
Step 1. Next to the Forecasted Sales, there is a graph icon and a chart icon, Click on the chart icon. .
✓ The day parts are displayed in different colors.
✓ The hours are displayed, but by clicking on the , the hour will expand to 15 minute increments.
The user may adjust the forecast by dollars or by percent. This would be done by using the icon next to
the header .
Step 2. If the option to change the forecast by $ is selected, all cells will appear in the $ format. Click on the cell to be adjusted and enter the new forecasted amount.
✓ The amount entered will be momentarily be presented as the percentage change.
✓ The amount that is entered will equally be adjusted for the 15 minute increments.
Step 3. If the option to change the forecast by % is selected, all cells will appear initially with the $ format. Click on the cell that contains a dollar amount, the cell will change to a % format. (it is not possible to adjust a zero dollar amount by a %, since the dollar would remain zero).
✓ The amount entered will momentarily be presented as the dollar change.
✓ The amount that is entered will equally be adjusted for the 15 minute increments.
Store User Guide – Jimmy John’s Page | 6
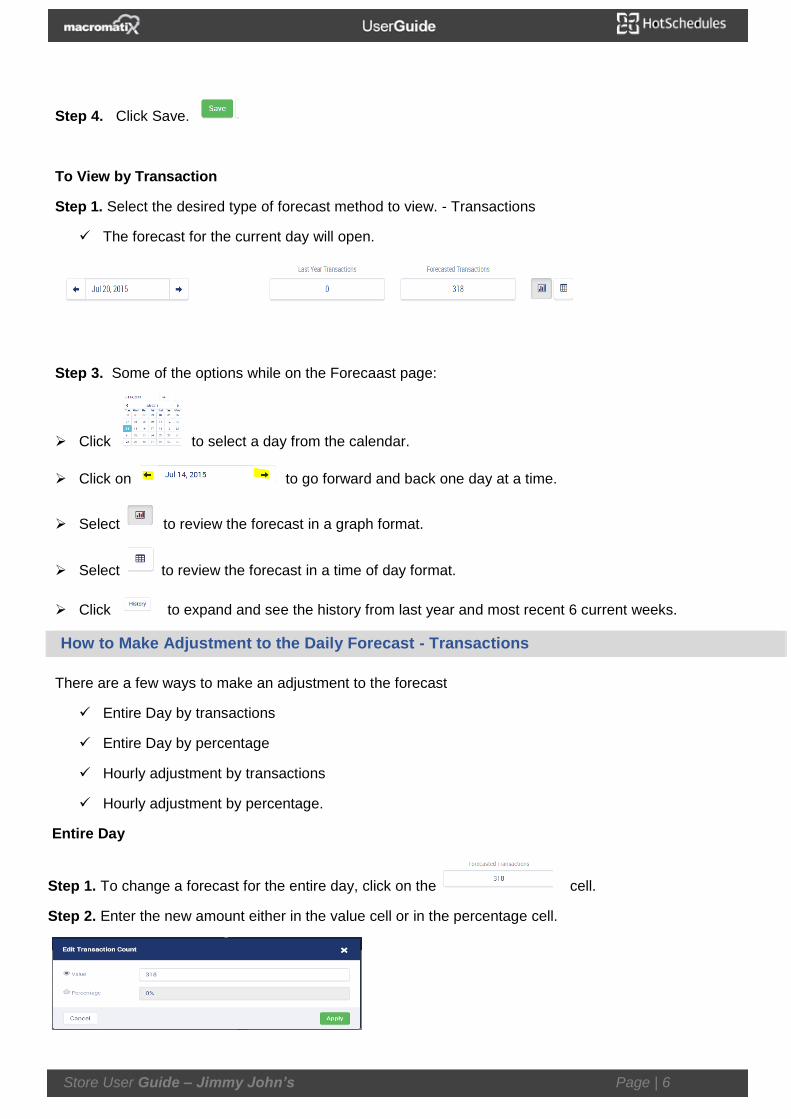
Step 4. Click Save.
To View by Transaction
Step 1. Select the desired type of forecast method to view. - Transactions
✓ The forecast for the current day will open.
Step 3. Some of the options while on the Forecaast page:
➢ Click to select a day from the calendar.
➢ Click on to go forward and back one day at a time.
➢ Select to review the forecast in a graph format.
➢ Select to review the forecast in a time of day format.
➢ Click to expand and see the history from last year and most recent 6 current weeks.
How to Make Adjustment to the Daily Forecast - Transactions
There are a few ways to make an adjustment to the forecast
✓ Entire Day by transactions
✓ Entire Day by percentage
✓ Hourly adjustment by transactions
✓ Hourly adjustment by percentage.
Entire Day
Step 1. To change a forecast for the entire day, click on the cell.
Step 2. Enter the new amount either in the value cell or in the percentage cell.

Store User Guide – Jimmy John’s Page | 7
Step 3. Click . This will apply the edited forecast to the entire day. The amounts will be spead proportionally to the appropriate day parts.
Hourly Adjustments
Step 1. Next to the Forecasted Transactions, there is a graph icon and a chart icon, Click on the chart
icon. .
✓ The day parts are displayed in different colors.
✓ The hours are displayed, but by clicking on the , the hour will expand to 15 minute increments.
The user may adjust the forecast by # or by %. This would be done by using the icon next to the header
.
Step 2. If the option to change the forecast by # is selected, all cells will appear in the # format. Click on the cell to be adjusted and enter the new forecasted amount.
✓ The amount that is entered will equally be adjusted for the 15 minute increments.
Step 3. If the option to change the forecast by % is selected, all cells will appear initially the # format. Click on the cell that contains a number amount, the cell will change to a % format. (it is not possible to adjust a zero dollar amount by a %, since the dollar would remain zero).
✓ The amount entered will momentarily be presented as the transaction change.
✓ The amount that is entered will equally be adjusted for the 15 minute increments.
Step 4. Click Save.
To View by Sales Item
Step 1. Select the desired type of forecast method desired to view. – Sales Item
✓ The forecast for the current day will open.
Step 2. Some of the options while on the Forecaast page:
➢ Click to select a day from the calendar.
➢ Click on to go forward and back one day at a time.
Store User Guide – Jimmy John’s Page | 8
➢ Select to review the forecast in a graph format.
➢ Select to review the forecast in a time of day format.
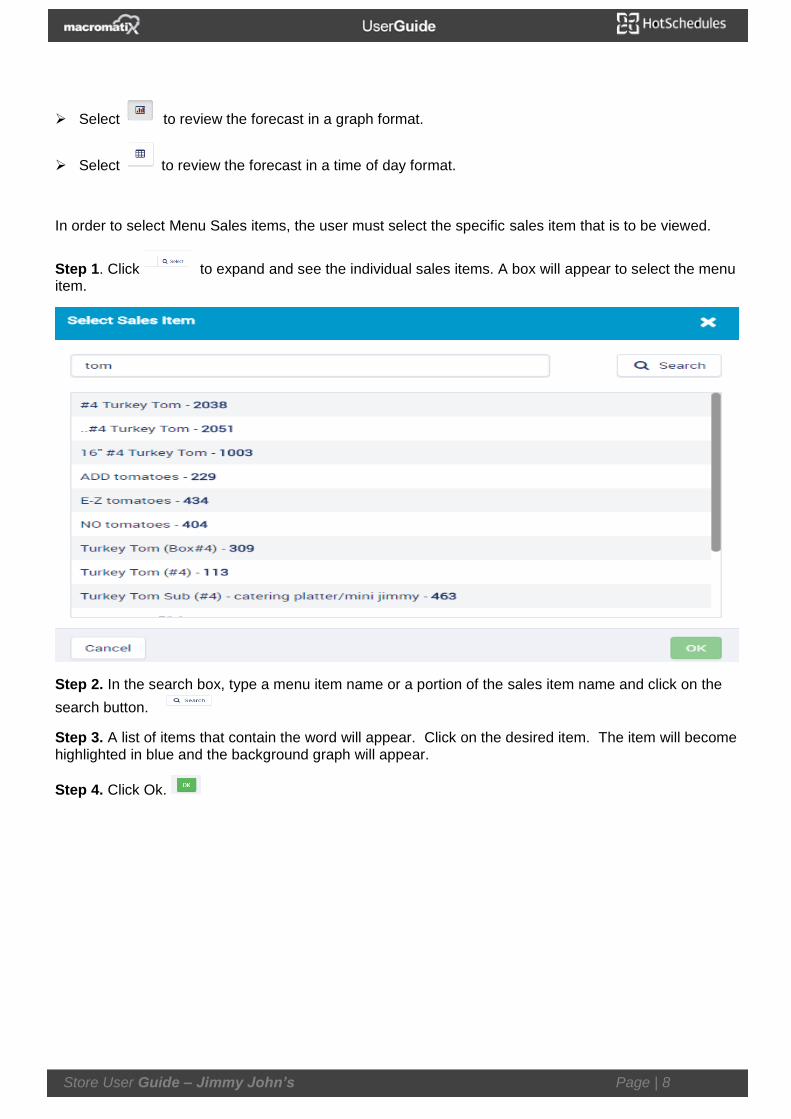
In order to select Menu Sales items, the user must select the specific sales item that is to be viewed.
Step 1. Click to expand and see the individual sales items. A box will appear to select the menu item.
Step 2. In the search box, type a menu item name or a portion of the sales item name and click on the
search button.
Step 3. A list of items that contain the word will appear. Click on the desired item. The item will become highlighted in blue and the background graph will appear.
Step 4. Click Ok.
Store User Guide – Jimmy John’s Page | 9
How to Make Adjustment to the Daily Forecast – Sales Item
There are a few ways to make an adjustment to the forecast
✓ Entire Day by sales item
✓ Entire Day by percentage
✓ Hourly adjustment by sales item
✓ Hourly adjustment by percentage.
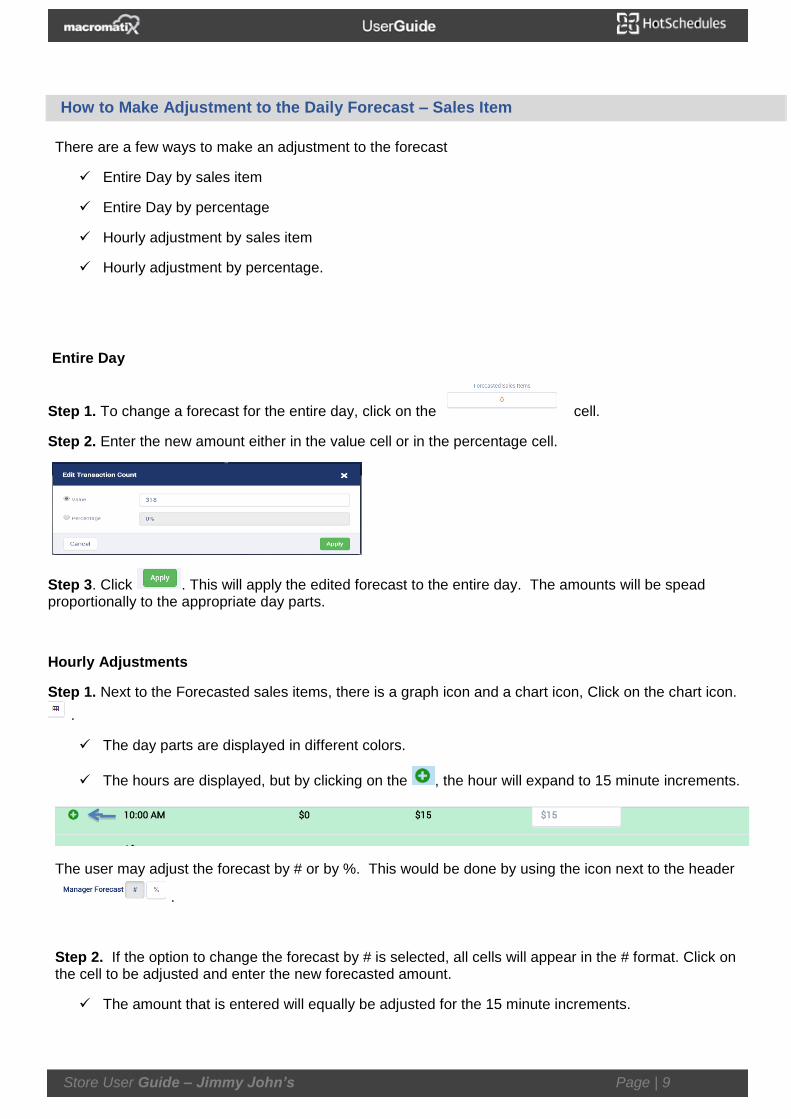
Entire Day
Step 1. To change a forecast for the entire day, click on the cell.
Step 2. Enter the new amount either in the value cell or in the percentage cell.
Step 3. Click . This will apply the edited forecast to the entire day. The amounts will be spead proportionally to the appropriate day parts.
Hourly Adjustments
Step 1. Next to the Forecasted sales items, there is a graph icon and a chart icon, Click on the chart icon.
.
✓ The day parts are displayed in different colors.
✓ The hours are displayed, but by clicking on the , the hour will expand to 15 minute increments.
The user may adjust the forecast by # or by %. This would be done by using the icon next to the header
.
Step 2. If the option to change the forecast by # is selected, all cells will appear in the # format. Click on the cell to be adjusted and enter the new forecasted amount.
✓ The amount that is entered will equally be adjusted for the 15 minute increments.
Store User Guide – Jimmy John’s Page | 10
Step 3. If the option to change the forecast by % is selected, all cells will appear initially the # format. Click on the cell that contains a number amount, the cell will change to a % format. (it is not possible to adjust a zero dollar amount by a %, since the dollar would remain zero).
✓ The amount entered will momentarily be presented as the sales item change.
✓ The amount that is entered will equally be adjusted for the 15 minute increments.
Step 4. Click Save.
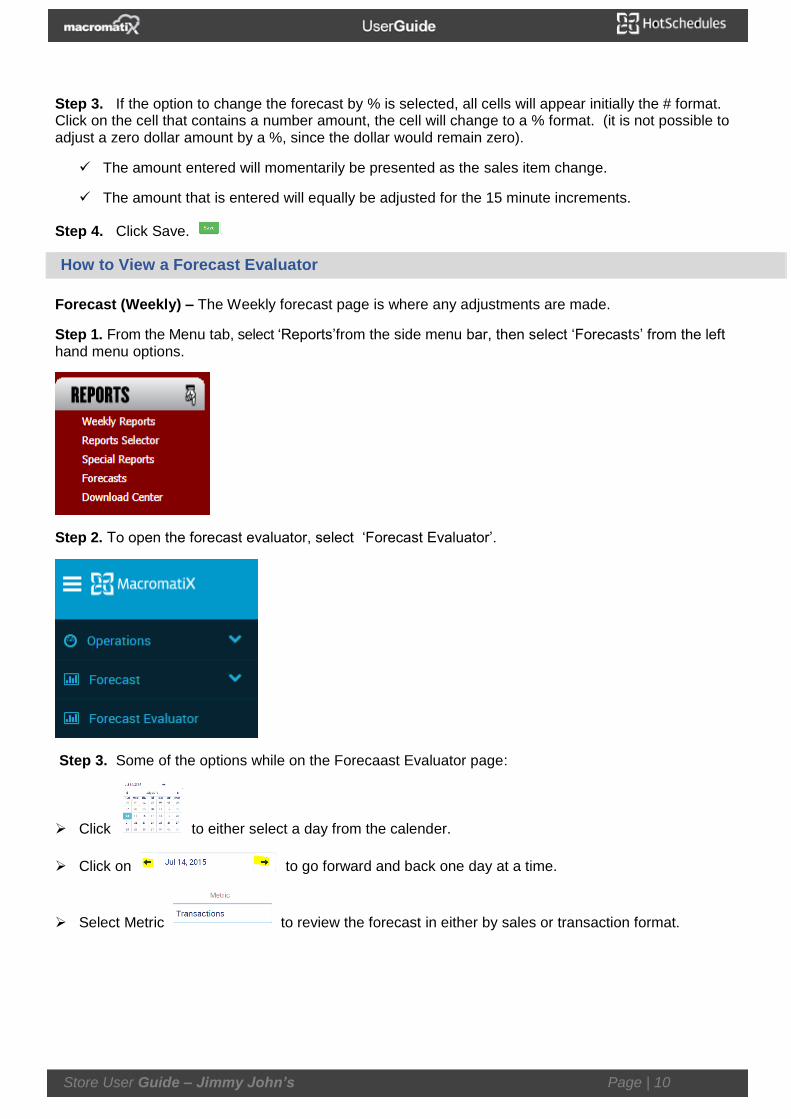
How to View a Forecast Evaluator
Forecast (Weekly) – The Weekly forecast page is where any adjustments are made.
Step 1. From the Menu tab, select ‘Reports’from the side menu bar, then select ‘Forecasts’ from the left hand menu options.
Step 2. To open the forecast evaluator, select ‘Forecast Evaluator’.
Step 3. Some of the options while on the Forecaast Evaluator page:
➢ Click to either select a day from the calender.
➢ Click on to go forward and back one day at a time.
➢ Select Metric to review the forecast in either by sales or transaction format.

Store User Guide – Jimmy John’s Page | 11
How to Create an Event(s)
The Forecasting events feature allows users to:
✓ Set-up new Events in advance of the Event date and specify what the expected impact of that Event
✓ Select previous Events to be the basis of the forecast for the future occurrence of that Event.
Forecast (Weekly) – The Event calendar presents in one week increments.
Step 1. From the Menu tab, select ‘Reports’ from the side menu bar, then select ‘Forecasts’ from the left hand menu options.
Step 2. To open the option to create an event, select ‘Events’.
The event calandar will allow the user to set up events that have already occurred and events that will happen in the future.

Store User Guide – Jimmy John’s Page | 12
Options while on the events page:
➢ Click to either select a day from the calendar.
➢ Click on to go forward and back one day at a time.
➢ Actions to schedule an event, add an event profile or edit and event profile.
Add Event Profile – Manual Adjustments
Select this option to:
• Forecast Adjustments from Past Occurance
• Creat Adjustments Manually.
To create a manual forecast adjustment:
Step 1. Click on the pull down.
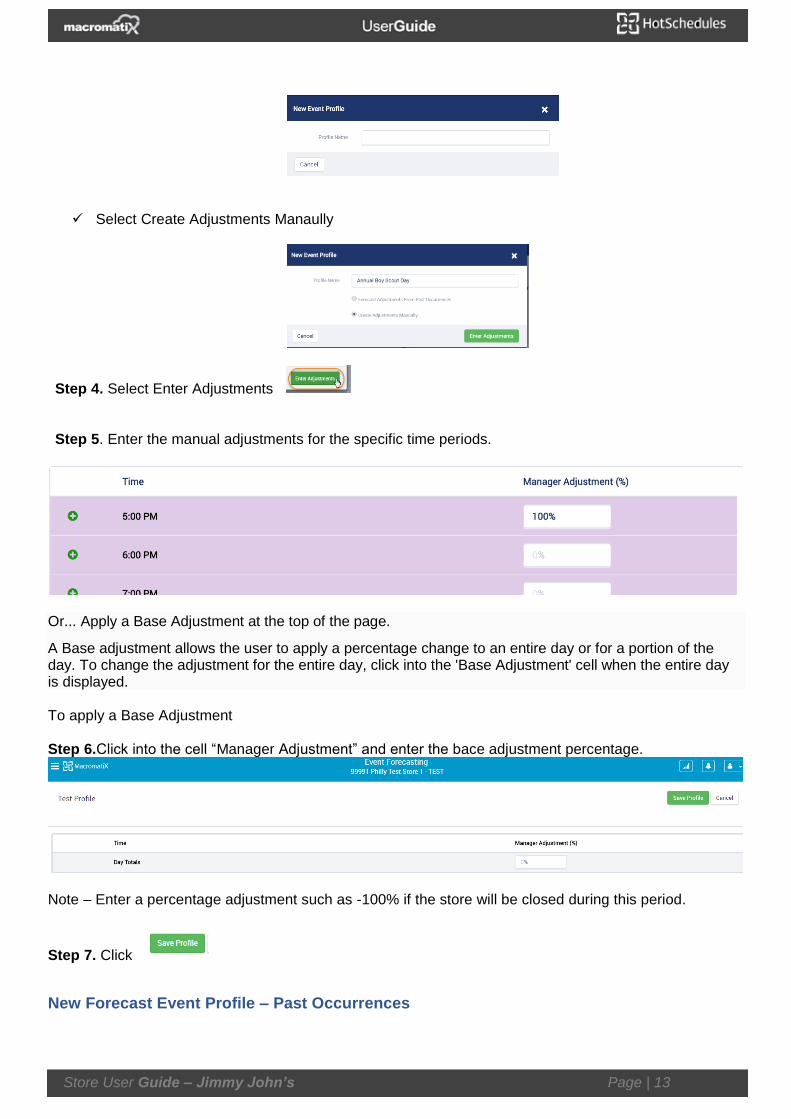
Step 2. Click the “Add Event Profile” The “New Event Profile” will pop up. Step 3. Enter a Profile Name.
Store User Guide – Jimmy John’s Page | 13
✓ Select Create Adjustments Manaully
Step 4. Select Enter Adjustments Step 5. Enter the manual adjustments for the specific time periods.
Or... Apply a Base Adjustment at the top of the page.
A Base adjustment allows the user to apply a percentage change to an entire day or for a portion of the day. To change the adjustment for the entire day, click into the 'Base Adjustment' cell when the entire day is displayed. To apply a Base Adjustment Step 6.Click into the cell “Manager Adjustment” and enter the bace adjustment percentage.
Note – Enter a percentage adjustment such as -100% if the store will be closed during this period.
Step 7. Click
New Forecast Event Profile – Past Occurrences
Store User Guide – Jimmy John’s Page | 14
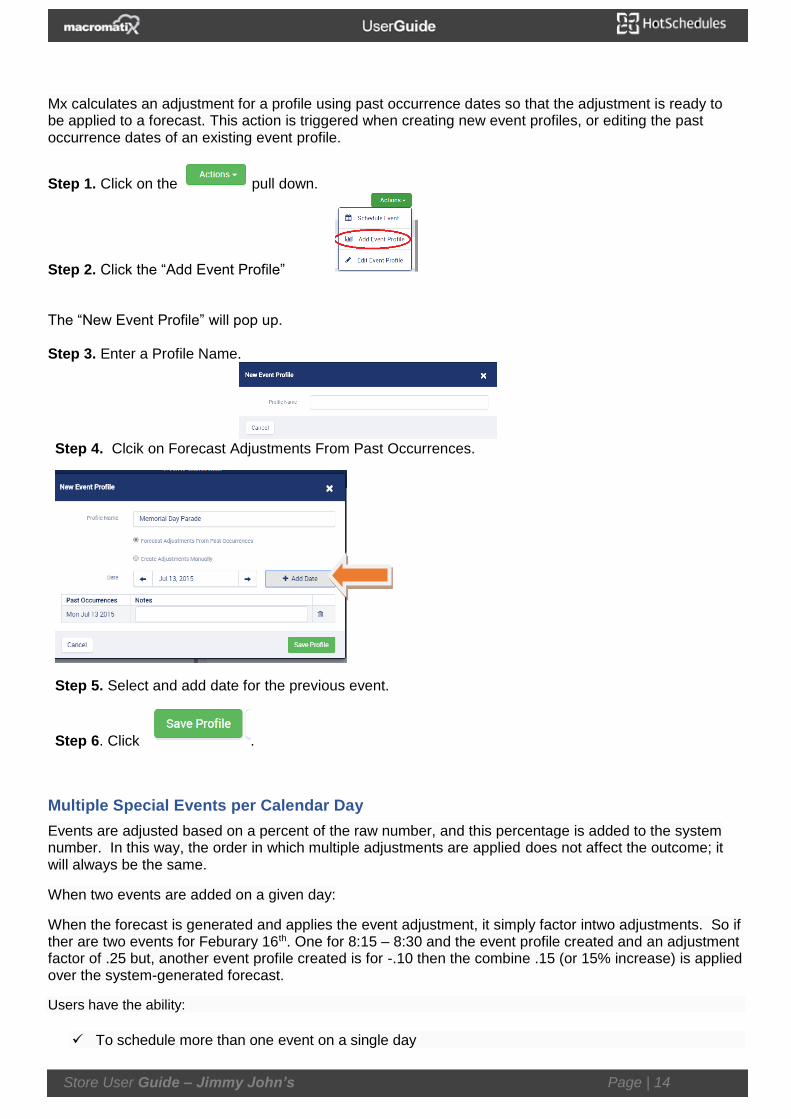
Mx calculates an adjustment for a profile using past occurrence dates so that the adjustment is ready to be applied to a forecast. This action is triggered when creating new event profiles, or editing the past occurrence dates of an existing event profile.
Step 1. Click on the pull down.
Step 2. Click the “Add Event Profile” The “New Event Profile” will pop up. Step 3. Enter a Profile Name.
Step 4. Clcik on Forecast Adjustments From Past Occurrences.
Step 5. Select and add date for the previous event.
Step 6. Click .
Multiple Special Events per Calendar Day
Events are adjusted based on a percent of the raw number, and this percentage is added to the system number. In this way, the order in which multiple adjustments are applied does not affect the outcome; it will always be the same.
When two events are added on a given day:
When the forecast is generated and applies the event adjustment, it simply factor intwo adjustments. So if ther are two events for Feburary 16th. One for 8:15 – 8:30 and the event profile created and an adjustment factor of .25 but, another event profile created is for -.10 then the combine .15 (or 15% increase) is applied over the system-generated forecast.
Users have the ability:
✓ To schedule more than one event on a single day
Store User Guide – Jimmy John’s Page | 15
✓ List scheduled events for a given day one underneath the other for the selected day ✓ If an event is added on a day where there is already a forecast generated, regenerate the forecast ✓ To select a single event within a calendar day ✓ To scheduled multiple events on a single day using different event profiles
Edit an Event Profile
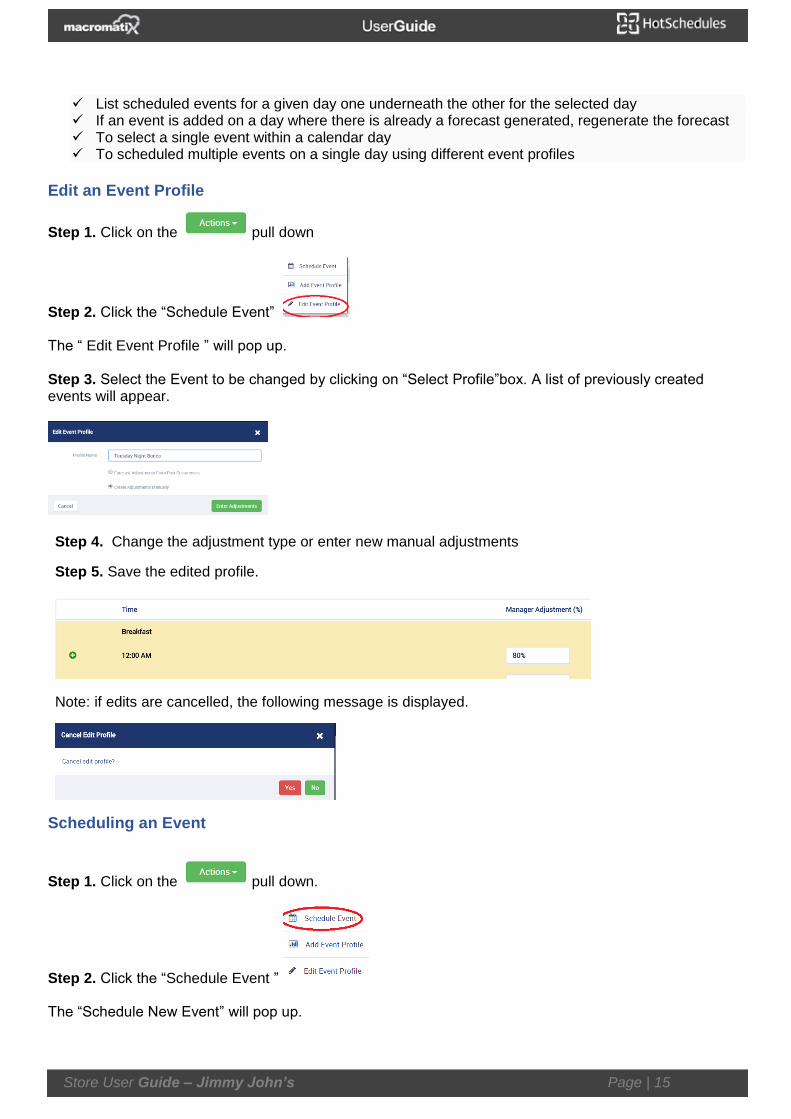
Step 1. Click on the pull down
Step 2. Click the “Schedule Event” The “ Edit Event Profile ” will pop up. Step 3. Select the Event to be changed by clicking on “Select Profile”box. A list of previously created events will appear.
Step 4. Change the adjustment type or enter new manual adjustments
Step 5. Save the edited profile.
Note: if edits are cancelled, the following message is displayed.
Scheduling an Event
Step 1. Click on the pull down.
Step 2. Click the “Schedule Event ” The “Schedule New Event” will pop up.
Store User Guide – Jimmy John’s Page | 16
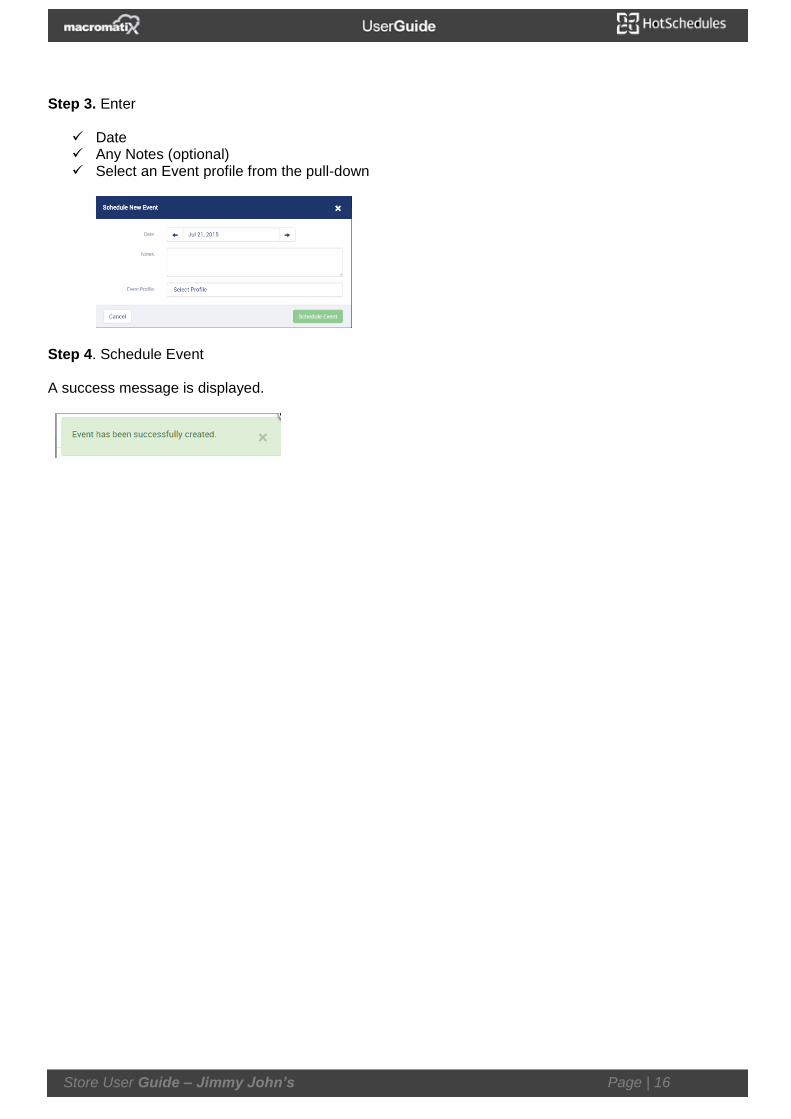
Step 3. Enter
✓ Date ✓ Any Notes (optional) ✓ Select an Event profile from the pull-down
Step 4. Schedule Event A success message is displayed.


![SELECT [ [,...]] FROM [ ] [WHERE [ ]] Example: SELECT { [Measures].[Unit Sales], [Measures].[Store Sales] } ON COLUMNS, { [Time].[1997], [Time].[1998]](https://static.fdocuments.in/doc/165x107/5a4d1b057f8b9ab05998807a/select-from-where-example-select-measuresunit-sales.jpg)