Special Ledger Configure
47
Global Template Project CD FI10.1 Special Purpose Ledger Configuration Definition Version Date Author Comments 1.0 07 July 2004 Evan Mullally Draft version 1.1 16 Aug 2006 Sanjeev Talwar Final Version 1.2 29 Jan 2008 K. Sawicka Updated 45382339.doc Page 1 of 47
-
Upload
chaluvarajgowda -
Category
Documents
-
view
116 -
download
9
Transcript of Special Ledger Configure
Global Template Project
CD FI10.1
Special Purpose Ledger
Configuration Definition
Version Date Author Comments1.0 07 July 2004 Evan Mullally Draft version1.1 16 Aug 2006 Sanjeev Talwar Final Version1.2 29 Jan 2008 K. Sawicka Updated
45382339.doc Page 1 of 47
Global Template Project
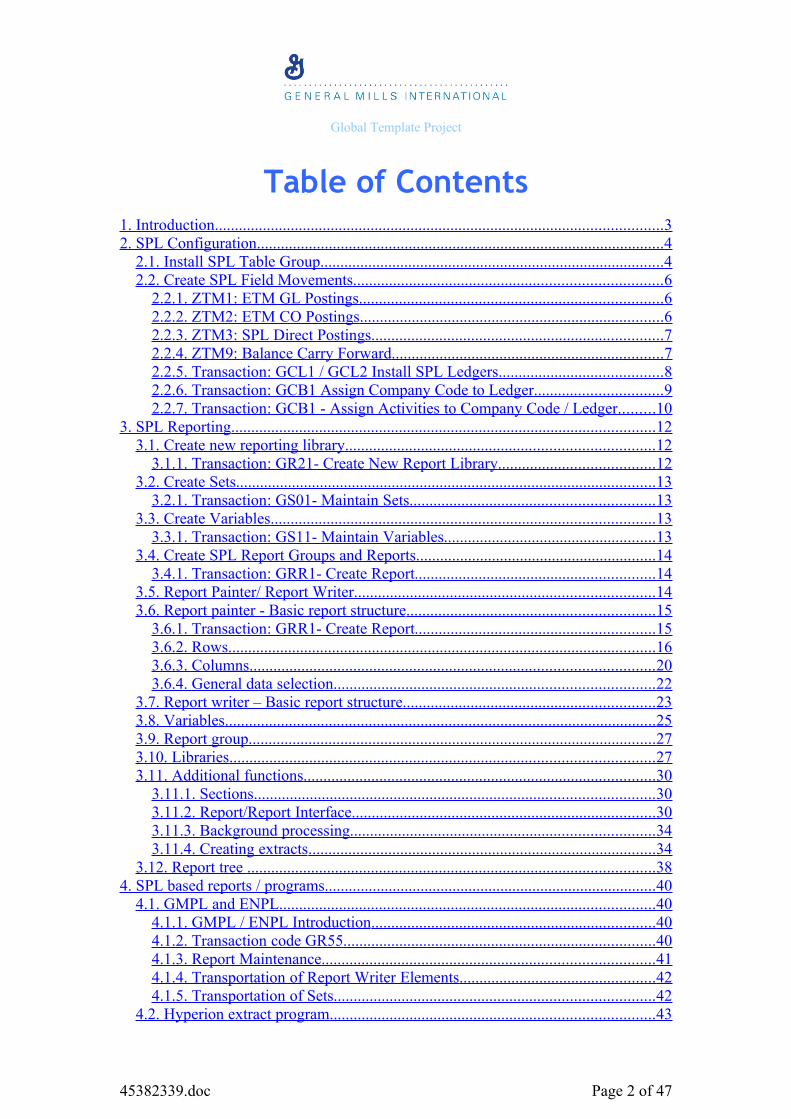
Table of Contents1. Introduction ................................................................................................................ 3 2. SPL Configuration ...................................................................................................... 4
2.1. Install SPL Table Group ...................................................................................... 4 2.2. Create SPL Field Movements ............................................................................. 6
2.2.1. ZTM1: ETM GL Postings ............................................................................ 6 2.2.2. ZTM2: ETM CO Postings ............................................................................ 6 2.2.3. ZTM3: SPL Direct Postings ......................................................................... 7 2.2.4. ZTM9: Balance Carry Forward .................................................................... 7 2.2.5. Transaction: GCL1 / GCL2 Install SPL Ledgers ......................................... 8 2.2.6. Transaction: GCB1 Assign Company Code to Ledger ................................ 9 2.2.7. Transaction: GCB1 - Assign Activities to Company Code / Ledger ......... 10
3. SPL Reporting .......................................................................................................... 12 3.1. Create new reporting library ............................................................................. 12
3.1.1. Transaction: GR21- Create New Report Library ....................................... 12 3.2. Create Sets ......................................................................................................... 13
3.2.1. Transaction: GS01- Maintain Sets ............................................................. 13 3.3. Create Variables ................................................................................................ 13
3.3.1. Transaction: GS11- Maintain Variables ..................................................... 13 3.4. Create SPL Report Groups and Reports ............................................................ 14
3.4.1. Transaction: GRR1- Create Report ............................................................ 14 3.5. Report Painter/ Report Writer ........................................................................... 14 3.6. Report painter - Basic report structure .............................................................. 15
3.6.1. Transaction: GRR1- Create Report ............................................................ 15 3.6.2. Rows ........................................................................................................... 16 3.6.3. Columns ..................................................................................................... 20 3.6.4. General data selection ................................................................................ 22
3.7. Report writer – Basic report structure ............................................................... 23 3.8. Variables ............................................................................................................ 25 3.9. Report group ...................................................................................................... 27 3.10. Libraries .......................................................................................................... 27 3.11. Additional functions ........................................................................................ 30
3.11.1. Sections .................................................................................................... 30 3.11.2. Report/Report Interface ............................................................................ 30 3.11.3. Background processing ............................................................................ 34 3.11.4. Creating extracts ....................................................................................... 34
3.12. Report tree ...................................................................................................... 38 4. SPL based reports / programs ................................................................................... 40
4.1. GMPL and ENPL .............................................................................................. 40 4.1.1. GMPL / ENPL Introduction ....................................................................... 40 4.1.2. Transaction code GR55 .............................................................................. 40 4.1.3. Report Maintenance ................................................................................... 41 4.1.4. Transportation of Report Writer Elements ................................................. 42 4.1.5. Transportation of Sets ................................................................................ 42
4.2. Hyperion extract program ................................................................................. 43
45382339.doc Page 2 of 47
Global Template Project
4.2.1. Hyperion extract program build ................................................................. 43 4.2.2. Hyperion extract program functions .......................................................... 43 4.2.3. Variants for the program ............................................................................ 44 4.2.4. Execute Hyperion extract program ............................................................. 45 4.2.5. Scheduled jobs ............................................................................................ 46 4.2.6. Trouble Shooting ........................................................................................ 47
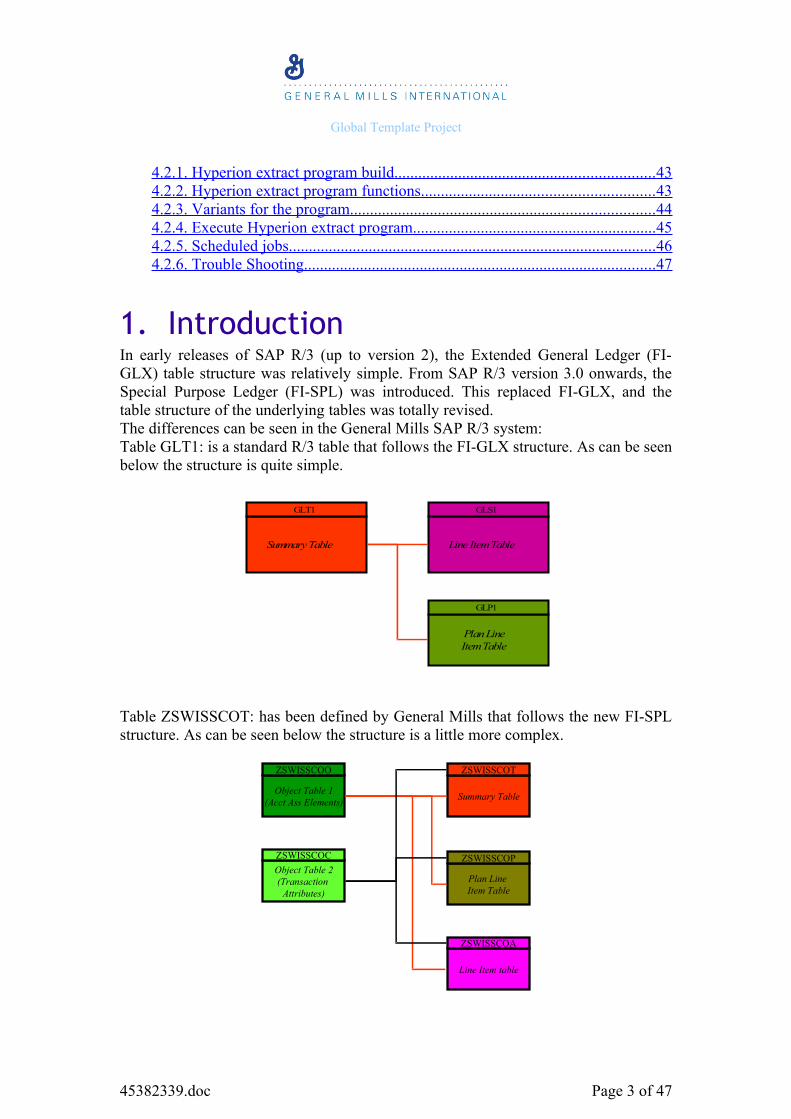
1. IntroductionIn early releases of SAP R/3 (up to version 2), the Extended General Ledger (FI-GLX) table structure was relatively simple. From SAP R/3 version 3.0 onwards, the Special Purpose Ledger (FI-SPL) was introduced. This replaced FI-GLX, and the table structure of the underlying tables was totally revised.The differences can be seen in the General Mills SAP R/3 system:Table GLT1: is a standard R/3 table that follows the FI-GLX structure. As can be seen below the structure is quite simple.
Summary Table
GLT1
Line Item Table
GLS1
Plan LineItem Table
GLP1
Table ZSWISSCOT: has been defined by General Mills that follows the new FI-SPL structure. As can be seen below the structure is a little more complex.
Object Table 1(Acct Ass Elements)
ZSWISSCOO
Object Table 2(Transaction
Attributes)
ZSWISSCOC
Summary Table
ZSWISSCOT
Plan Line Item Table
ZSWISSCOP
Line Item table
ZSWISSCOA
45382339.doc Page 3 of 47

Global Template Project
In the legacy SAP system, Company Codes CCH1, CCH2 and CLB1 have been assigned to ledgers in table ZSWISSCOT whereas other company codes have been assigned to ledgers in table GLT1. As a result the GMPL report (created in table GLT1) does not work for all company codes.In order to make the system consistent and to enable GMPL reporting, it was decided to re-install the Special Purpose Ledger from scratch. This document details the configuration that has been done in the ETM SAP system to allow Gross Margin reporting. It does not explain the SPL configuration already in the system for Greek statutory reporting using the Alternate Chart of Accounts.
2. SPL ConfigurationThe steps in the configuration process are:
1. Install new SPL Table Group2. Create SPL Field Movements3. Install new SPL Ledgers4. Assign Company Code to Ledgers
2.1. Install SPL Table GroupTransaction:IMG Menu Path: Financial Accounting > Special Purpose Ledger > Tables >
Definition > Define Table GroupAs this task creates client independent configuration, John Callis carried out this task. Table Group ZETM was installed, which created five separate SPL tables.
- ZETMT Summary table- ZETMA Line Item table- ZETMP Plan Line Item table- ZETMO Object table 1- ZETMC Object Table 2
In addition to the standard fields, several user specific fields were included in the table set up. The key fields in these tables are:
Field Description Key Field
RCLNT Client Y
RLDNR Ledger Y
RRCTY Record Type Y
RVERS Version Y
RYEAR Fiscal year Y
ROBJNR Object number for objects (account assignment elements)
Y
COBJNR Object number for transaction attributes Y
45382339.doc Page 4 of 47
Global Template Project
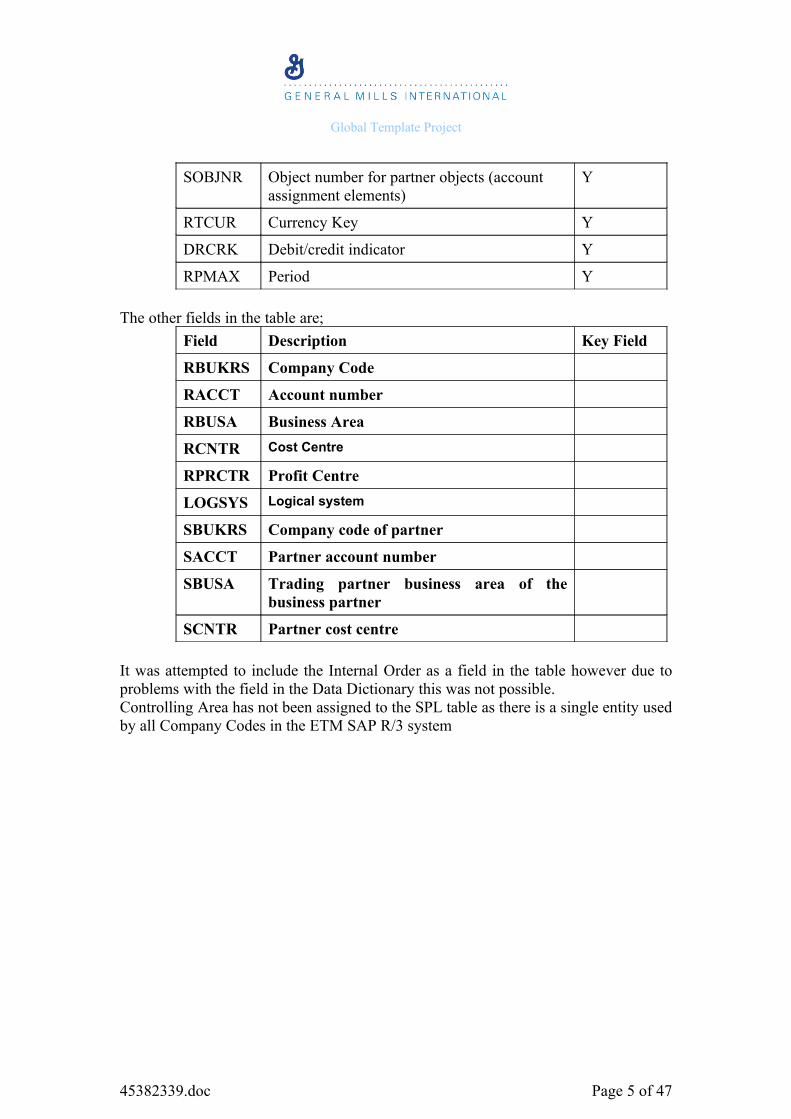
SOBJNR Object number for partner objects (account assignment elements)
Y
RTCUR Currency Key Y
DRCRK Debit/credit indicator Y
RPMAX Period Y
The other fields in the table are;
Field Description Key Field
RBUKRS Company Code
RACCT Account number
RBUSA Business Area
RCNTR Cost Centre
RPRCTR Profit Centre
LOGSYS Logical system
SBUKRS Company code of partner
SACCT Partner account number
SBUSA Trading partner business area of the business partner
SCNTR Partner cost centre
It was attempted to include the Internal Order as a field in the table however due to problems with the field in the Data Dictionary this was not possible.Controlling Area has not been assigned to the SPL table as there is a single entity used by all Company Codes in the ETM SAP R/3 system
45382339.doc Page 5 of 47
Global Template Project
2.2. Create SPL Field Movements
Transaction: GCF1 – Create, GCF2 - ChangeIMG Menu Path: Financial Accounting > Special Purpose Ledger > Basic
Settings > Master Data > Maintain Field MovementThe field movement controls how data is to be transferred and summarized in the database table. The field movements contain sender fields and receiver fields.Four field movements have been created Field Movement
Description Receiver table
Sender Table
ZTM1 ETM GL Postings ZETMT ACCHD ZTM2 ETM CO Postings ZETMT COBK ZTM3 SPL Direct Postings to table ZETM ZETMT GLU1 ZTM9 ETM SPL Balance cfd GLU1 GLU1
All the field movements are similar in the sender and receiver fields. Four have been created to accommodate the different sender fields.
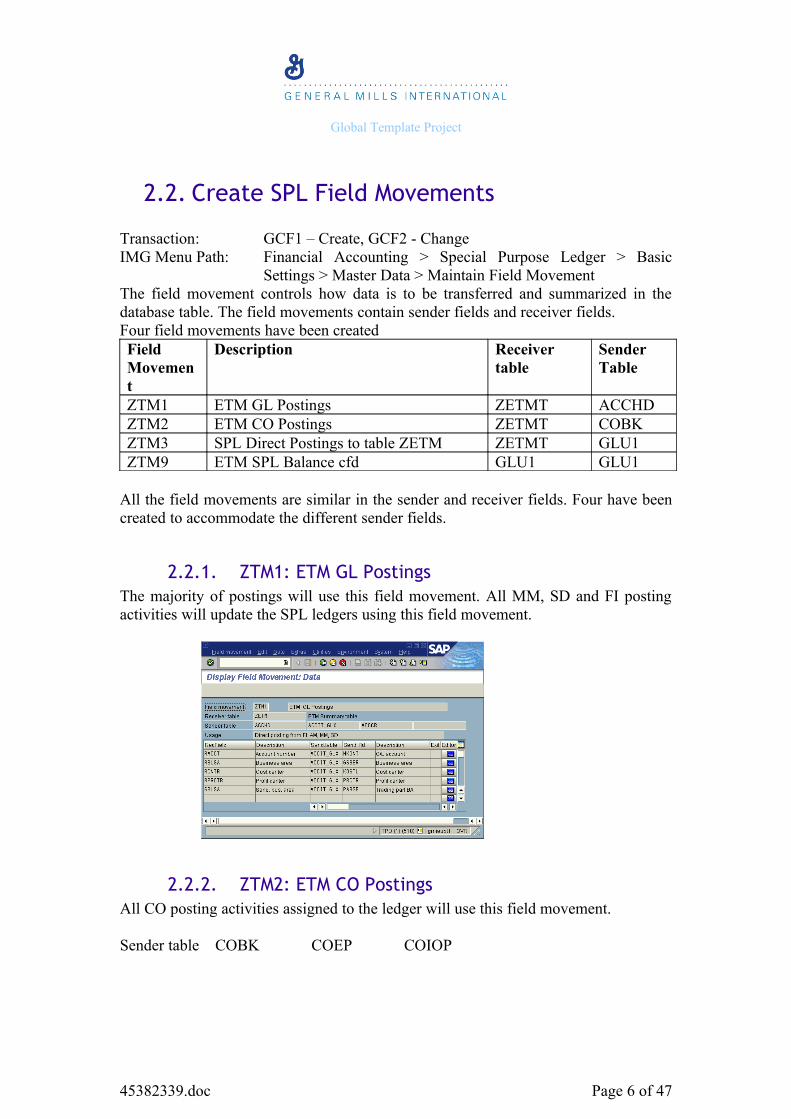
2.2.1. ZTM1: ETM GL PostingsThe majority of postings will use this field movement. All MM, SD and FI posting activities will update the SPL ledgers using this field movement.
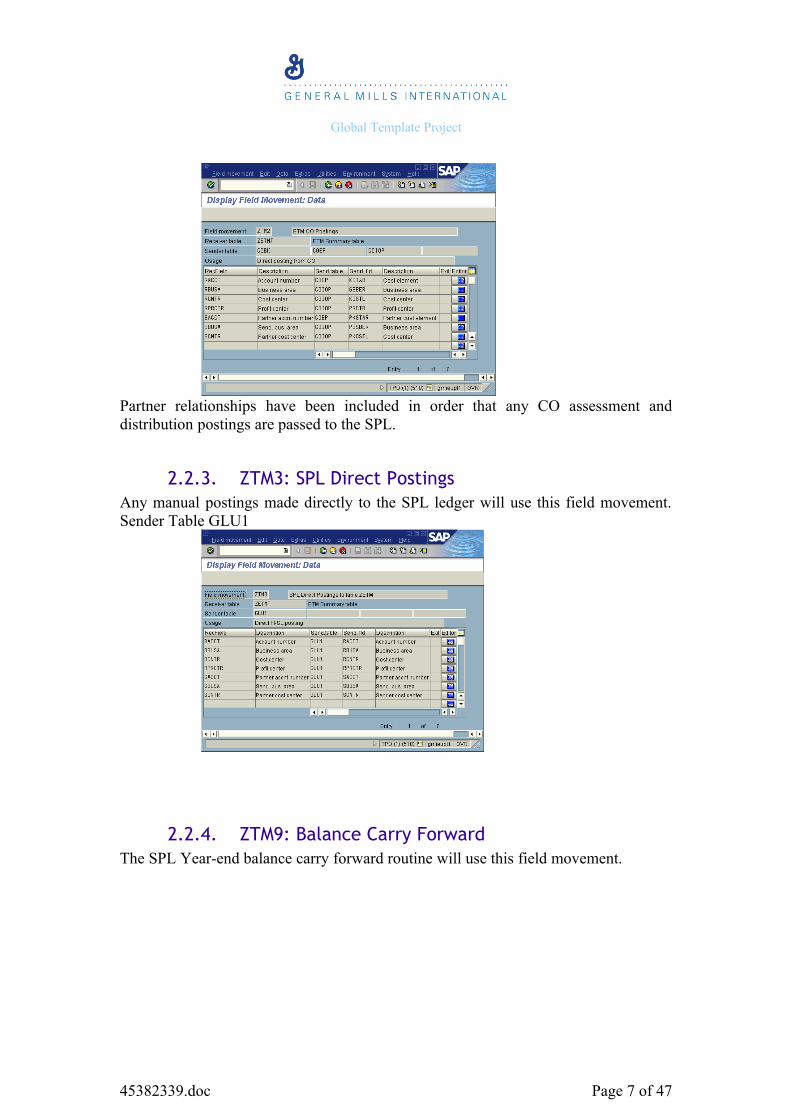
2.2.2. ZTM2: ETM CO PostingsAll CO posting activities assigned to the ledger will use this field movement.
Sender table COBK COEP COIOP
45382339.doc Page 6 of 47
Global Template Project
Partner relationships have been included in order that any CO assessment and distribution postings are passed to the SPL.
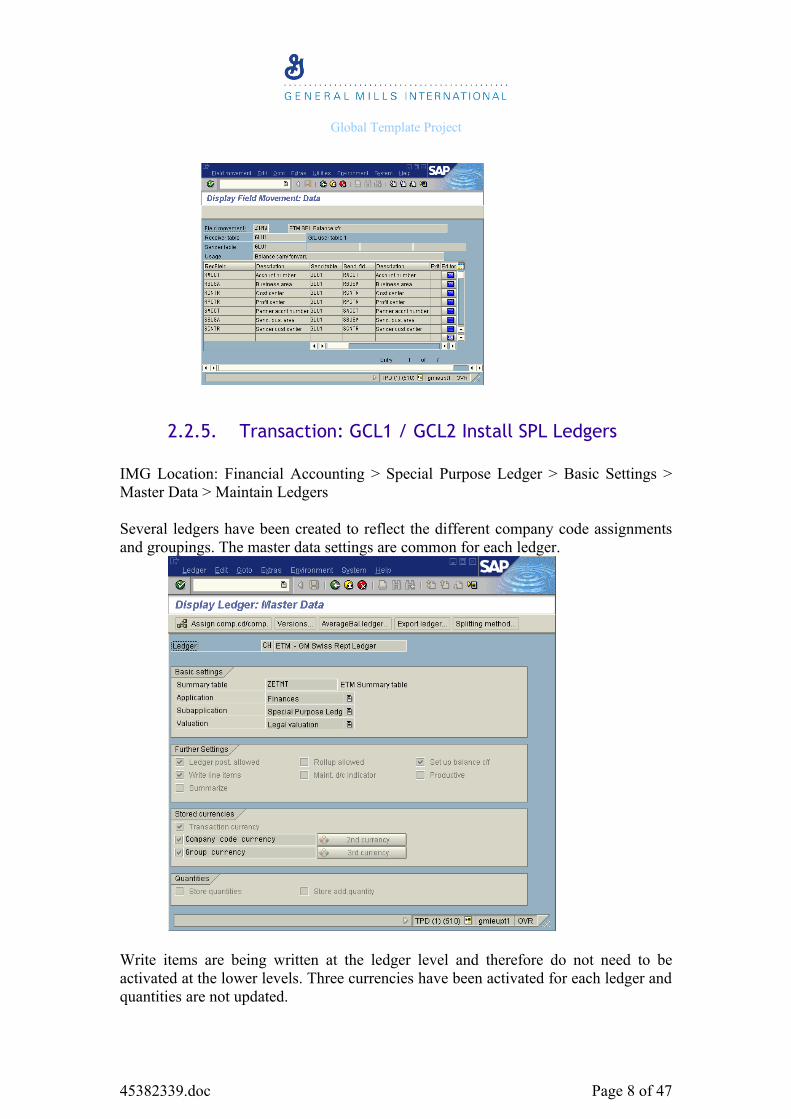
2.2.3. ZTM3: SPL Direct PostingsAny manual postings made directly to the SPL ledger will use this field movement. Sender Table GLU1
2.2.4. ZTM9: Balance Carry ForwardThe SPL Year-end balance carry forward routine will use this field movement.
45382339.doc Page 7 of 47
Global Template Project
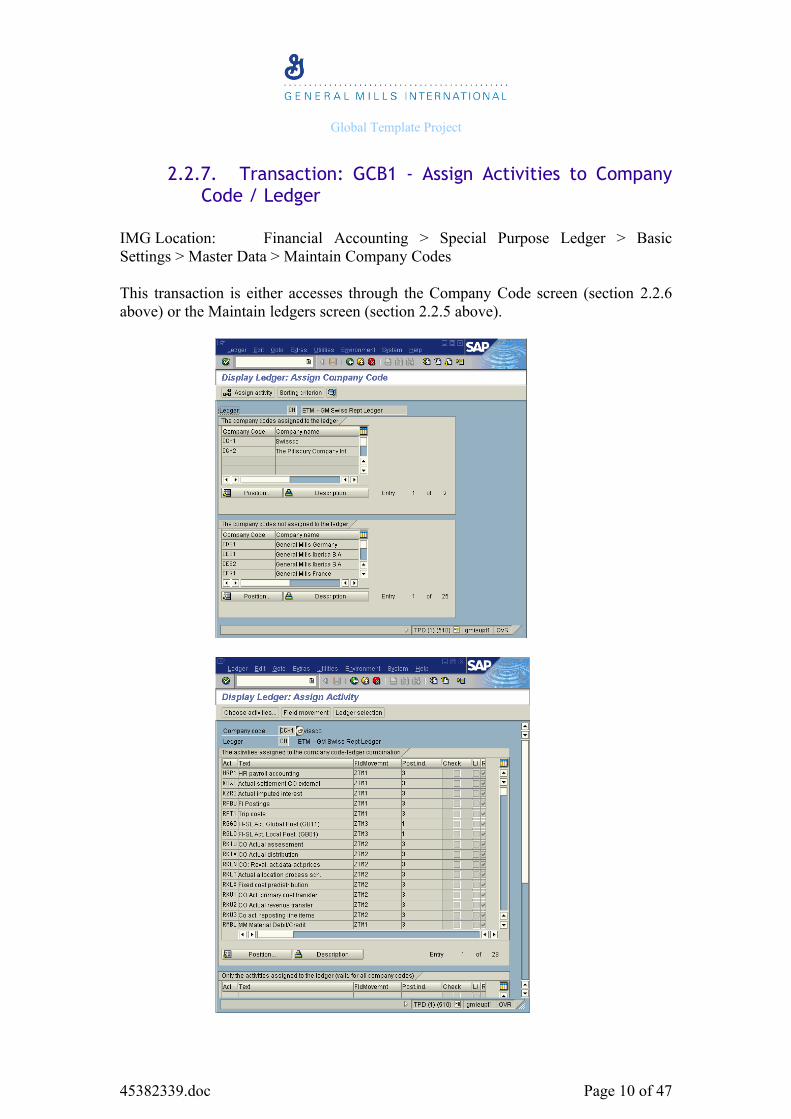
2.2.5. Transaction: GCL1 / GCL2 Install SPL Ledgers
IMG Location: Financial Accounting > Special Purpose Ledger > Basic Settings > Master Data > Maintain Ledgers
Several ledgers have been created to reflect the different company code assignments and groupings. The master data settings are common for each ledger.
Write items are being written at the ledger level and therefore do not need to be activated at the lower levels. Three currencies have been activated for each ledger and quantities are not updated.
45382339.doc Page 8 of 47

Global Template Project
From the menu path: Extras > Balance Carried forward field movement, the field movement for balance carry forward is assigned to each ledger.
2.2.6. Transaction: GCB1 Assign Company Code to Ledger
IMG Location: Financial Accounting > Special Purpose Ledger > Basic Settings > Master Data > Maintain Company Codes
Irrespective of ledger each Company Code has the same settings.In GMI we use only one SPL Ledger which is: EU and all company codes have been assigned to it.
45382339.doc Page 9 of 47
Global Template Project
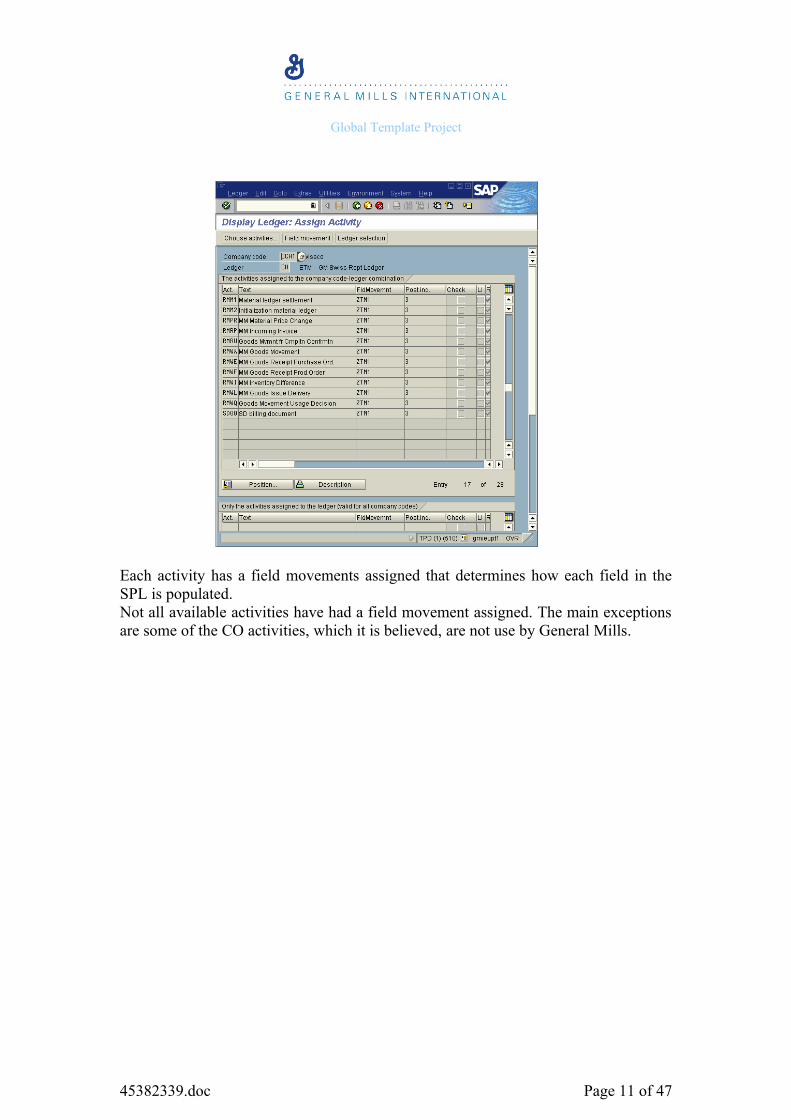
2.2.7. Transaction: GCB1 - Assign Activities to Company Code / Ledger
IMG Location: Financial Accounting > Special Purpose Ledger > Basic Settings > Master Data > Maintain Company Codes
This transaction is either accesses through the Company Code screen (section 2.2.6 above) or the Maintain ledgers screen (section 2.2.5 above).
45382339.doc Page 10 of 47
Global Template Project
Each activity has a field movements assigned that determines how each field in the SPL is populated.Not all available activities have had a field movement assigned. The main exceptions are some of the CO activities, which it is believed, are not use by General Mills.
45382339.doc Page 11 of 47
Global Template Project
3. SPL ReportingIn addition to the configuration, new reports and related entities have also had to be created.
1. Create new reporting library2. Create new reporting sets & variables3. Create new SPL Report Groups & Reports
3.1. Create new reporting library
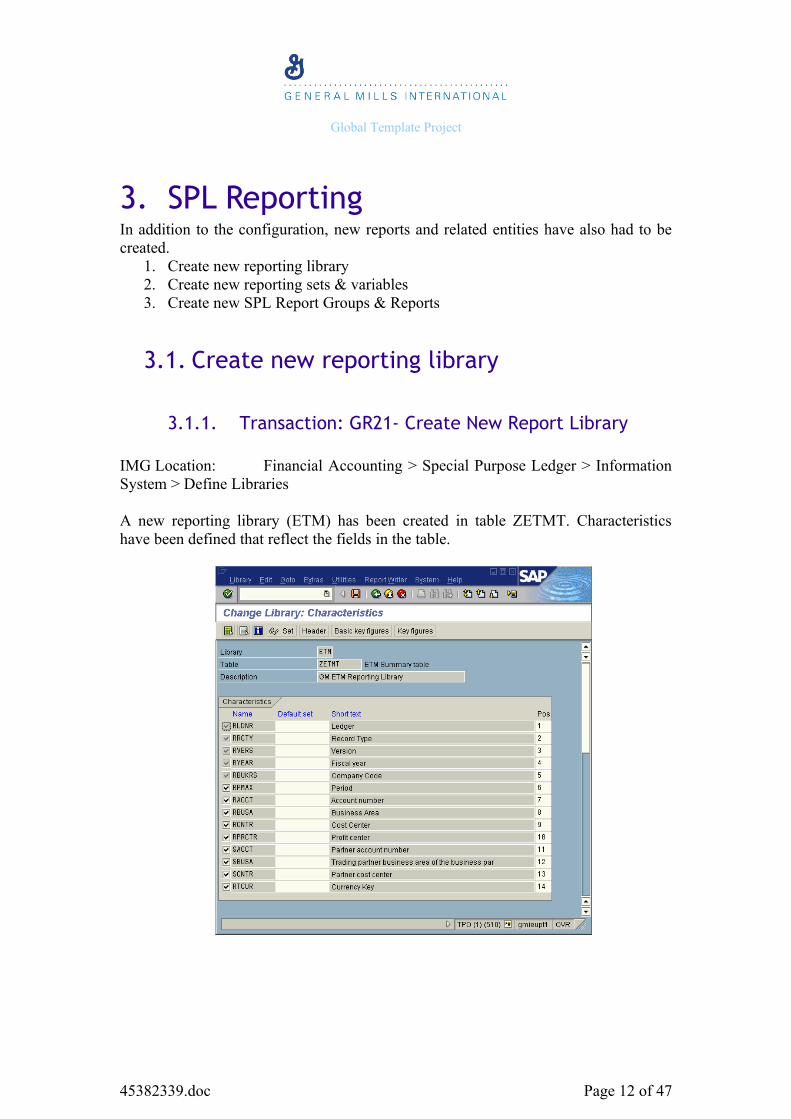
3.1.1. Transaction: GR21- Create New Report Library
IMG Location: Financial Accounting > Special Purpose Ledger > Information System > Define Libraries
A new reporting library (ETM) has been created in table ZETMT. Characteristics have been defined that reflect the fields in the table.
45382339.doc Page 12 of 47
Global Template Project
3.2. Create Sets
3.2.1. Transaction: GS01- Maintain Sets
IMG Location: Financial Accounting > Special Purpose Ledger > Tools > Set Maintenance > Maintain Sets
In addition to the standard sets created when the data table is created, many, many other sets have been created in table ZETMT to meet the current reporting requirements. These have been created using the following naming convention:
ZX_YYYYY_nnnnWhere;X represents the set type. This can be either; B for a basic set, M for a multi
set, D for a data set or S for a single set.YYYYY – represents the SPL field name e.g. RACCT for GL account,
RPRCTR for profit centre etc.nnnn – represents a sequential number.
3.3. Create Variables
3.3.1. Transaction: GS11- Maintain VariablesIMG Location: Financial Accounting > Special Purpose Ledger > Tools > Set Maintenance > Maintain Variables
Several variables have been created for use in ETM reports. At present these are all set variables and are as follows.
Variable Description Type Table FieldZ_BUSAR Business area Set ZETMT RBUSAZ_CCODE Company code Set ZETMT RBUKRSZ_FYEAR Fiscal year Formula ZETMT RYEARZ_LEDNR Ledger Set ZETMT RLDNRZ_PERFM Period from Value ZETMT RPMAXZ_PERTO Period to Value ZETMT RPMAXZ_PRCTR Profit Center Set ZETMT RPRCTR
45382339.doc Page 13 of 47
Global Template Project
3.4. Create SPL Report Groups and Reports
3.4.1. Transaction: GRR1- Create Report
IMG Location: Accounting > Financial Accounting > Special Purpose Ledger > Tools > Report Painter > Report > Create / Change
In the initial configuration, four report groups containing five reports have been created in the new SPL table. These have been created in both Report painter and Report Writer.Library Report
GroupReport Description Painter /
Writer
ETM GMPL ETMPL01 General Mills P&L USD Painter
ETMPL02 General Mills P&L Local Currency Painter
GMPC ETMPL03 GM Profit Centre Rep Painter
HDGL ETMHD-GL HD GL Painter
PEP1 ETM-PEP1 Hyperion Profit & Loss Report Writer
The names of the Report Groups are unchanged from those that exist in the current live system. However the original Groups were deleted and re-created in the new Library with new reports. The legacy reports are unchanged but are no longer assigned to a Report Group. They are retained for reference.
3.5. Report Painter/ Report Writer
Definition & objectives
• Report painter: performs a similar task to that of the report writer but it is easier to use; the basic principle is WISIWYG (What You See Is What You Get).
• Used as a reporting tool in Overhead Management, Controlling, Special purpose ledger, Logistics, and other application areas.
• Allows the flexible organization of reports according to the business requirements
45382339.doc Page 14 of 47

Global Template Project
3.6. Report painter - Basic report structure
To define a report, you must determine the row and the column structure and the general data selection criteria.
3.6.1. Transaction: GRR1- Create Report
IMG Location: Accounting > Financial Accounting > Special Purpose Ledger > Tools > Report Painter > Report > Create / Change
Go to TC GRR1
Press Enter
Fill in the library, the report identification and the report description.
Click
45382339.doc Page 15 of 47

Global Template Project
3.6.2. Rows
You can begin by defining the rows. Double-click the field that says Row 1. The screen with the Element Definition: Row 1appears. Select characteristic Account number from the Available characteristic menu and transfer it to the Characteristic Values screen by pressing .
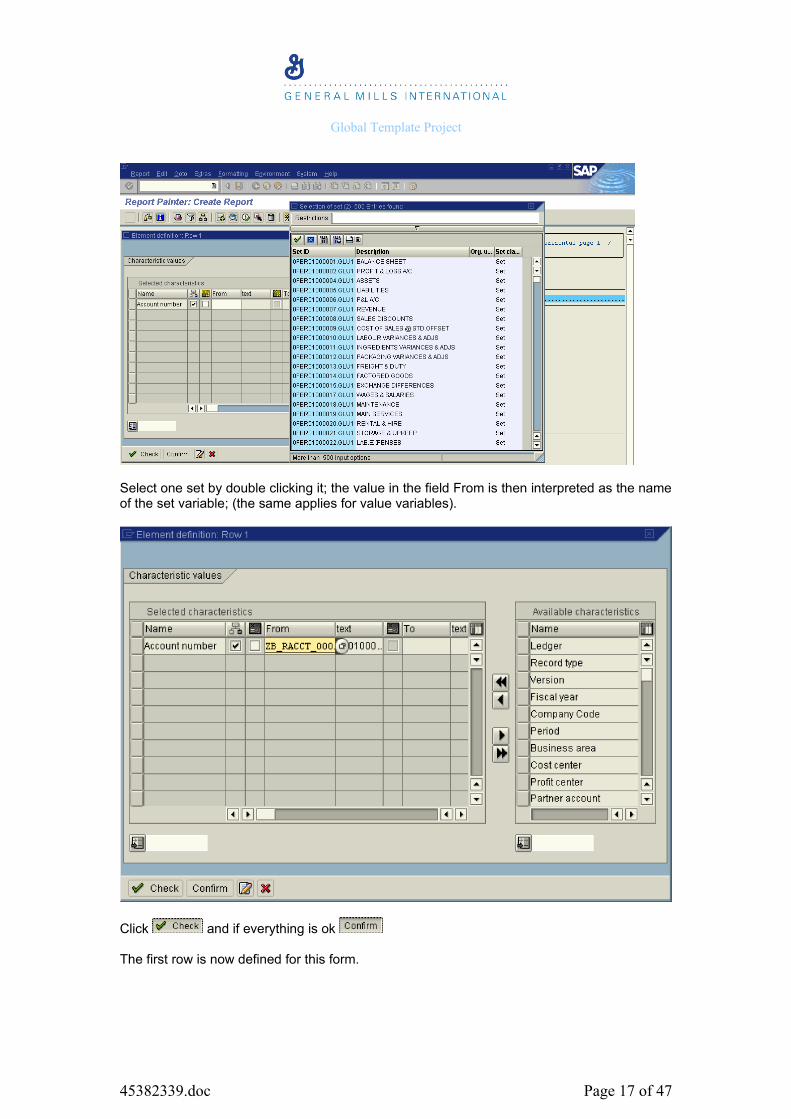
You can select for this characteristic a single value or a range; or you can select a variable: set, value or formula variable. Select a set variable: flag set or hierarchy node ON/OFF and pres F4 to get the list of the available sets.
45382339.doc Page 16 of 47
Global Template Project
Select one set by double clicking it; the value in the field From is then interpreted as the name of the set variable; (the same applies for value variables).
Click and if everything is ok
The first row is now defined for this form.
45382339.doc Page 17 of 47

Global Template Project
Let’s now define a second row using the explode functions. When using groups of several single values to define rows (cost centres and cost elements for instance), you can define whether only a total row is to be displayed, or if the complete group hierarchy with subtotals is to be exploded, or if every single value in a row is to be displayed.
Also, you can choose the hierarchical sequence in which the characteristics are displayed.
Double click row 2 and select characteristics Account number and Profit centre. Select a set for each.
45382339.doc Page 18 of 47

Global Template Project
Click and if everything is ok
You will be taken again to the Create form screen. By the way, you can change the text of the line that was just created; just insert a relevant text in the cell.
Click the right button of the mouse and press Explode.
This pop-up box will appear:
Make the relevant selections: expand the account number and select single values for profit centre.
Validate by pressing Enter or .
45382339.doc Page 19 of 47

Global Template Project
3.6.3. Columns Let’s define now the column structure; double-click the column 1 field. The Select Element type pop-up screen appears; here you can choose between key figure with characteristics and predefined key figures. Choose key figures with characteristics.
Validate by pressing Enter or .
The pop-up screen bellow appears; select one basic key figure and if relevant, characteristics. These characteristics will only apply to this key figure.
Click and if everything is ok .
The column is now defined and you are taken back to the Create Form screen.
45382339.doc Page 20 of 47
Global Template Project
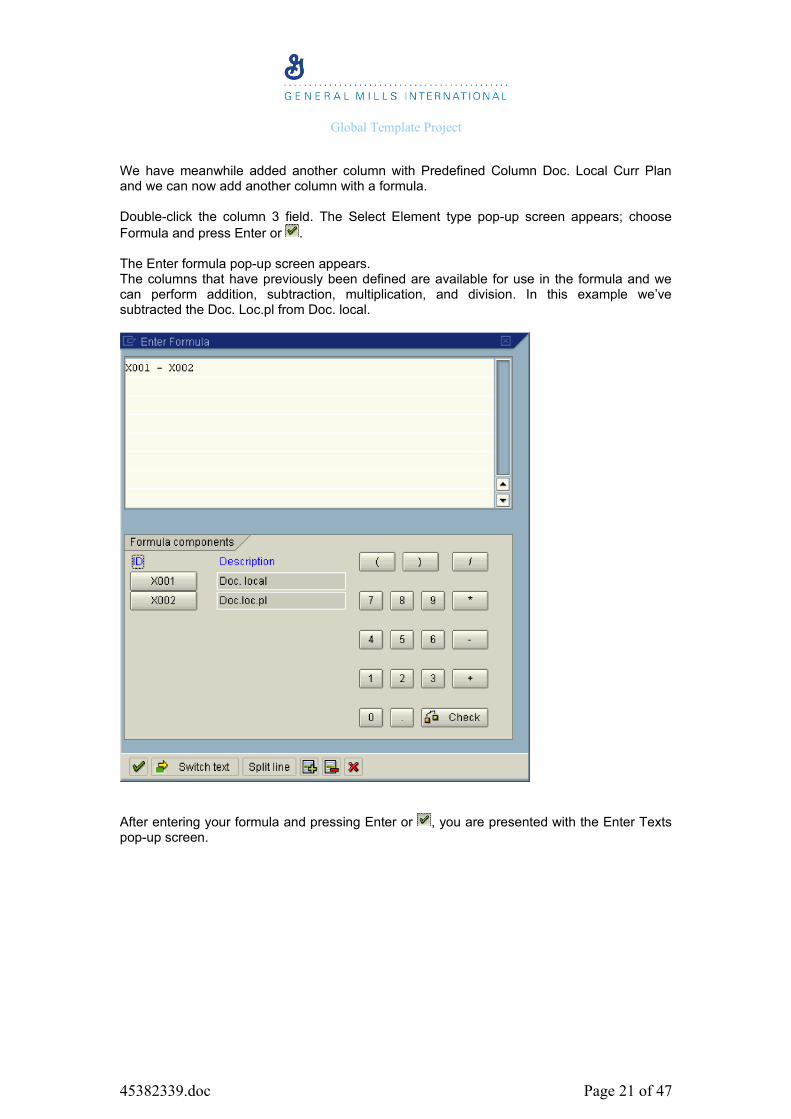
We have meanwhile added another column with Predefined Column Doc. Local Curr Plan and we can now add another column with a formula.
Double-click the column 3 field. The Select Element type pop-up screen appears; choose Formula and press Enter or .
The Enter formula pop-up screen appears.The columns that have previously been defined are available for use in the formula and we can perform addition, subtraction, multiplication, and division. In this example we’ve subtracted the Doc. Loc.pl from Doc. local.
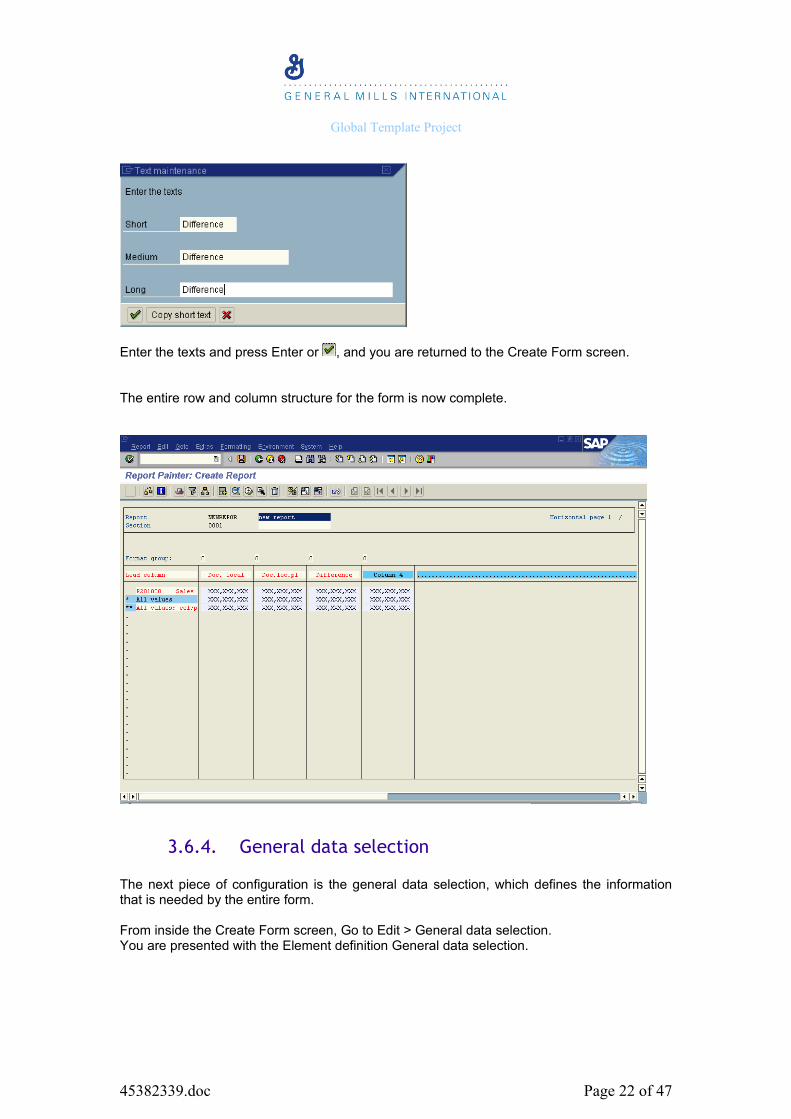
After entering your formula and pressing Enter or , you are presented with the Enter Texts pop-up screen.
45382339.doc Page 21 of 47
Global Template Project
Enter the texts and press Enter or , and you are returned to the Create Form screen.
The entire row and column structure for the form is now complete.
3.6.4. General data selection
The next piece of configuration is the general data selection, which defines the information that is needed by the entire form.
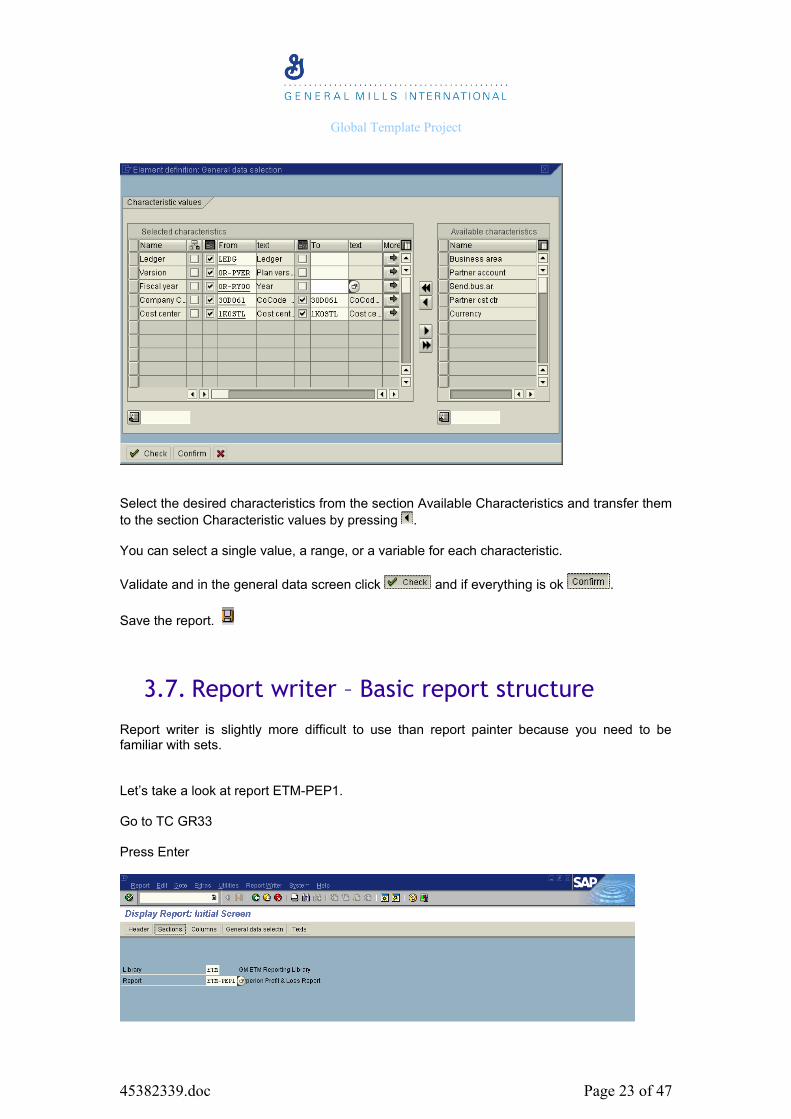
From inside the Create Form screen, Go to Edit > General data selection.You are presented with the Element definition General data selection.
45382339.doc Page 22 of 47
Global Template Project
Select the desired characteristics from the section Available Characteristics and transfer them to the section Characteristic values by pressing .
You can select a single value, a range, or a variable for each characteristic.
Validate and in the general data screen click and if everything is ok .
Save the report.
3.7. Report writer – Basic report structure
Report writer is slightly more difficult to use than report painter because you need to be familiar with sets.
Let’s take a look at report ETM-PEP1.
Go to TC GR33
Press Enter
45382339.doc Page 23 of 47
Global Template Project
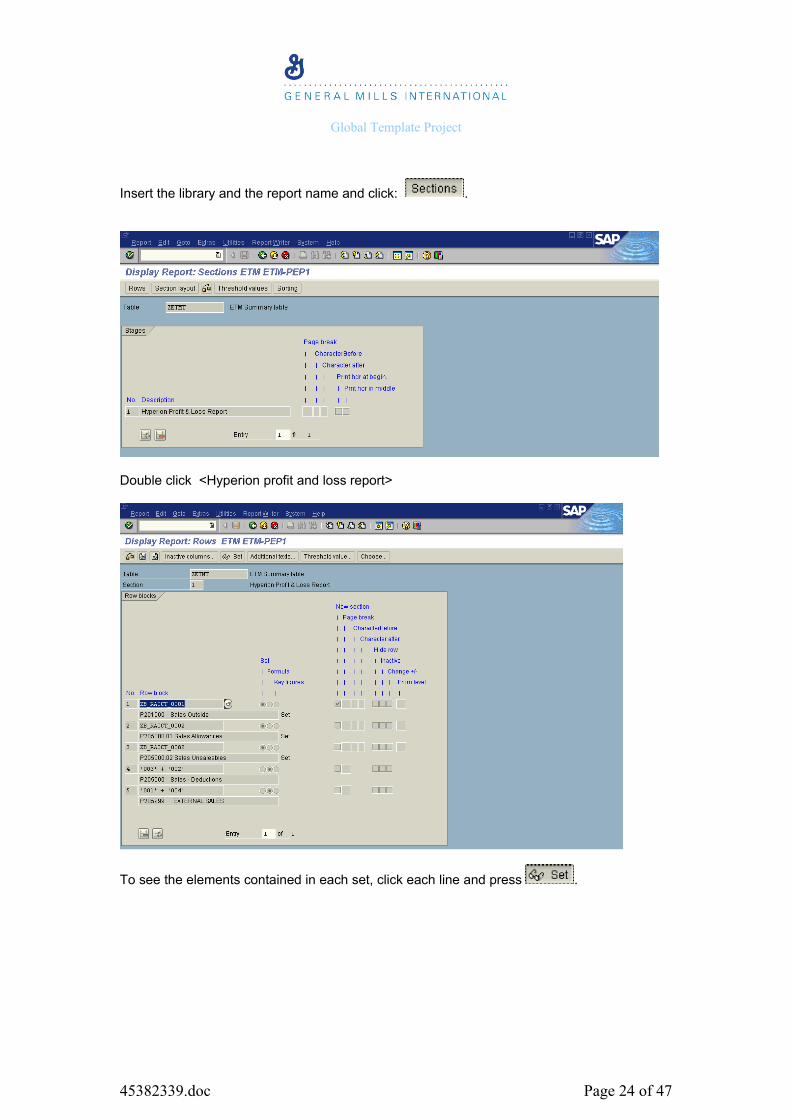
Insert the library and the report name and click: .
Double click <Hyperion profit and loss report>
To see the elements contained in each set, click each line and press .
45382339.doc Page 24 of 47
Global Template Project
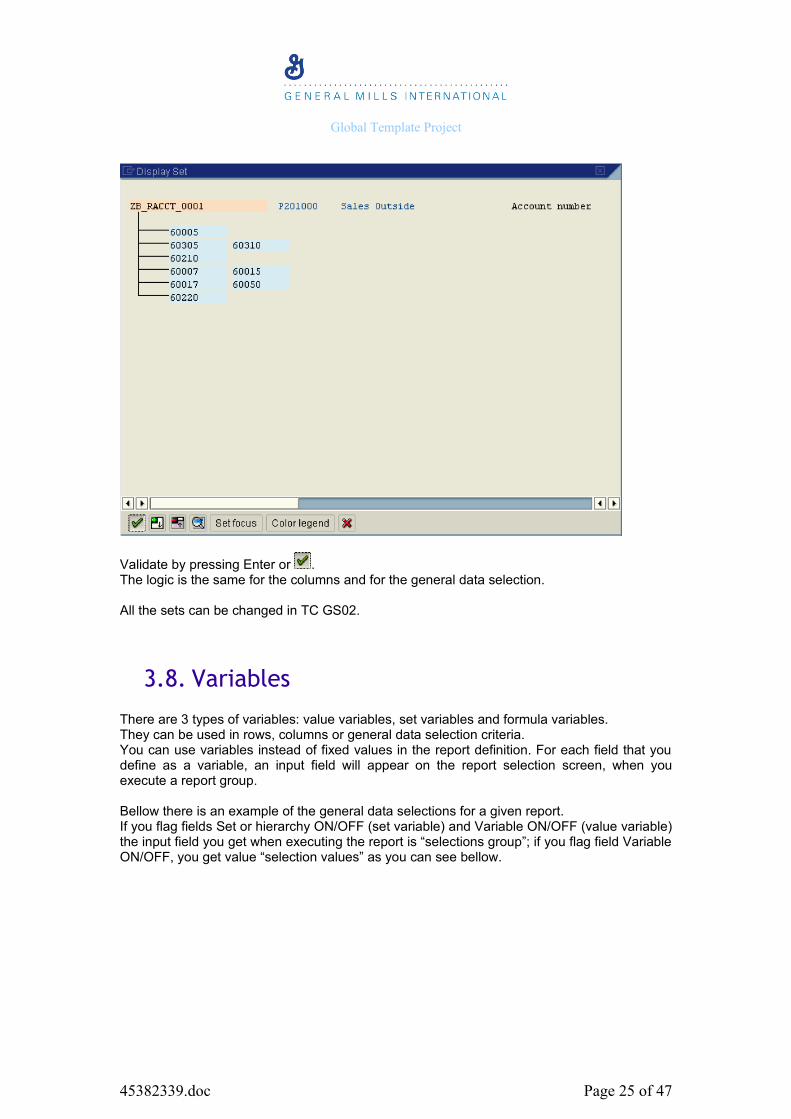
Validate by pressing Enter or .The logic is the same for the columns and for the general data selection.
All the sets can be changed in TC GS02.
3.8. Variables
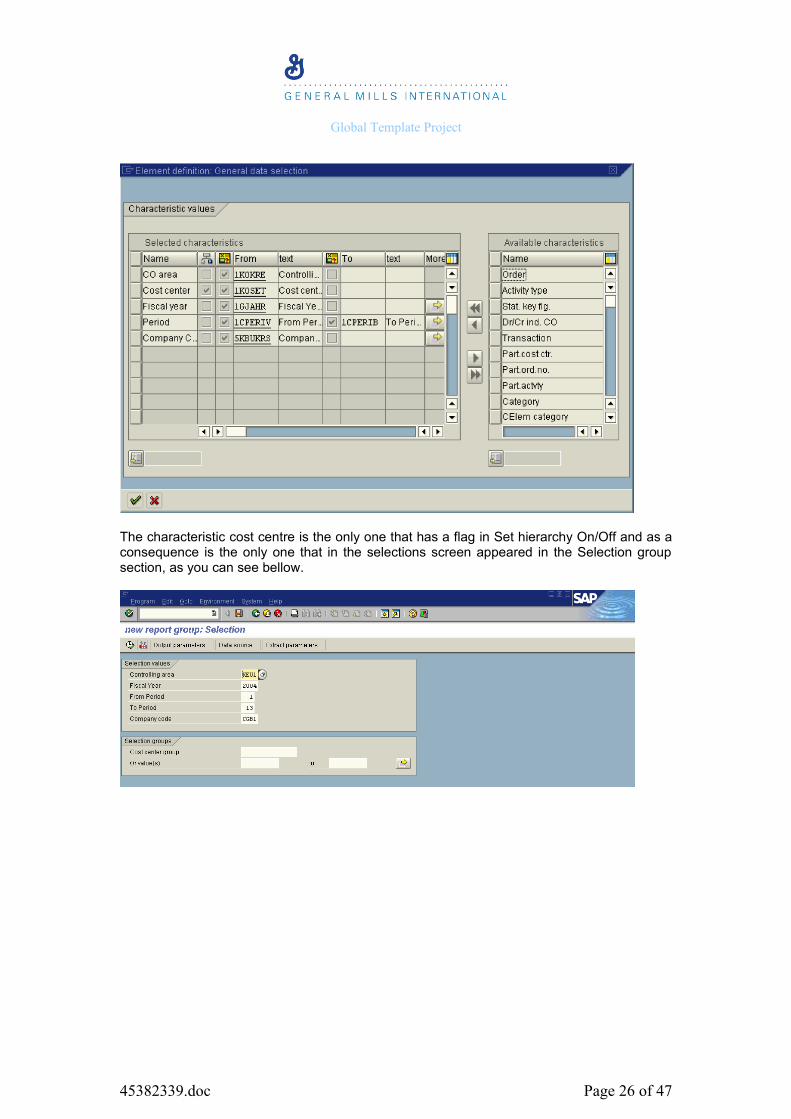
There are 3 types of variables: value variables, set variables and formula variables. They can be used in rows, columns or general data selection criteria.You can use variables instead of fixed values in the report definition. For each field that you define as a variable, an input field will appear on the report selection screen, when you execute a report group.
Bellow there is an example of the general data selections for a given report. If you flag fields Set or hierarchy ON/OFF (set variable) and Variable ON/OFF (value variable) the input field you get when executing the report is “selections group”; if you flag field Variable ON/OFF, you get value “selection values” as you can see bellow.
45382339.doc Page 25 of 47
Global Template Project
The characteristic cost centre is the only one that has a flag in Set hierarchy On/Off and as a consequence is the only one that in the selections screen appeared in the Selection group section, as you can see bellow.
45382339.doc Page 26 of 47
Global Template Project
3.9. Report group
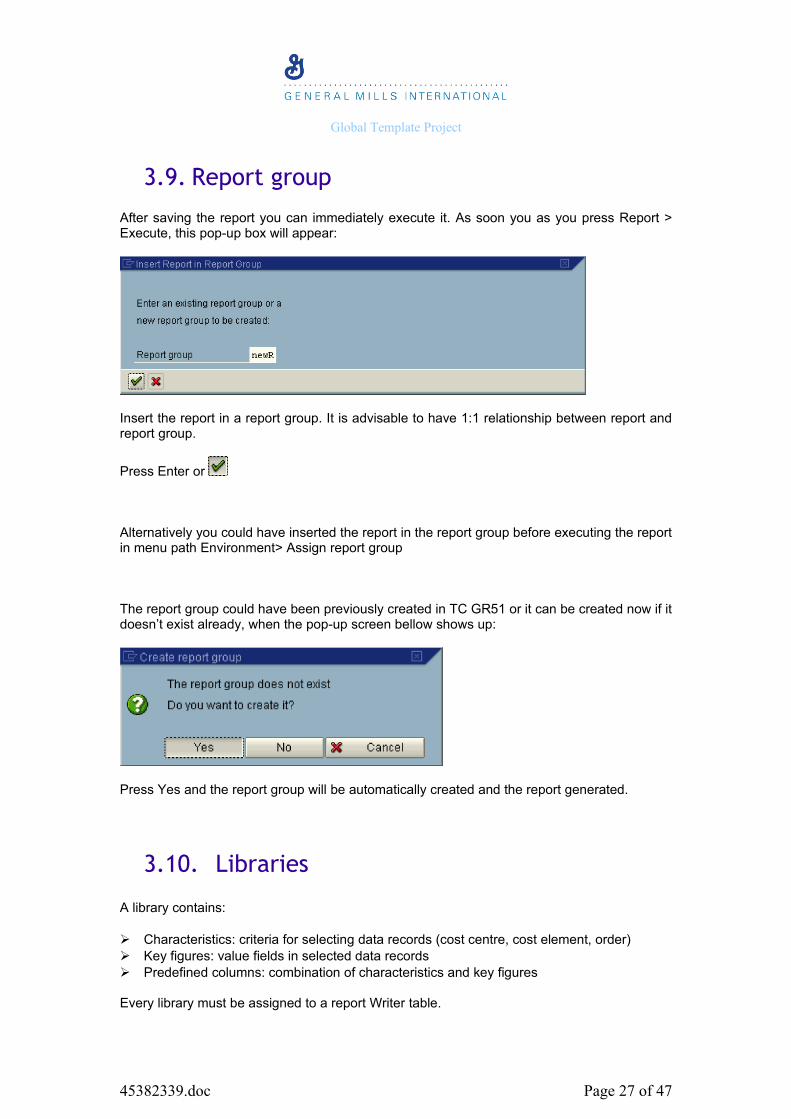
After saving the report you can immediately execute it. As soon you as you press Report > Execute, this pop-up box will appear:
Insert the report in a report group. It is advisable to have 1:1 relationship between report and report group.
Press Enter or
Alternatively you could have inserted the report in the report group before executing the report in menu path Environment> Assign report group
The report group could have been previously created in TC GR51 or it can be created now if it doesn’t exist already, when the pop-up screen bellow shows up:
Press Yes and the report group will be automatically created and the report generated.
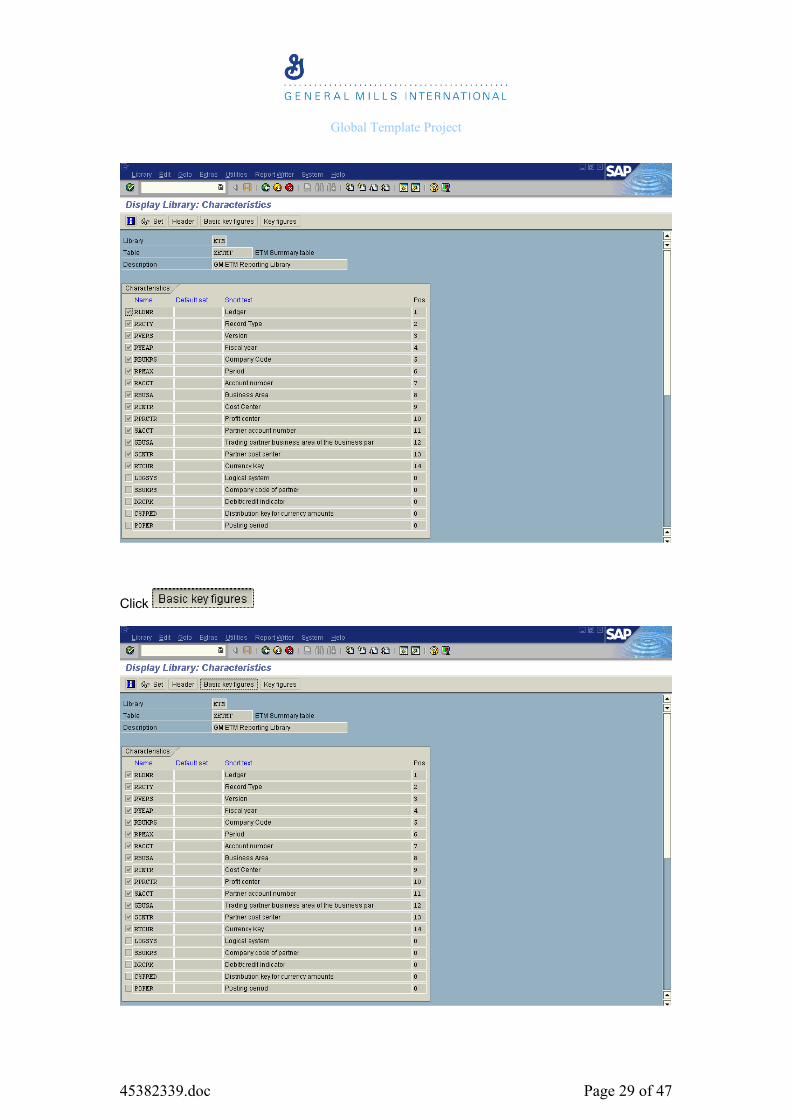
3.10. Libraries
A library contains:
Characteristics: criteria for selecting data records (cost centre, cost element, order) Key figures: value fields in selected data records Predefined columns: combination of characteristics and key figures
Every library must be assigned to a report Writer table.
45382339.doc Page 27 of 47
Global Template Project
By selecting a characteristic, key figure or a predefined column in the library, you are indicating that these objects can be used in the reports.
You can determine the order in which the entries are displayed in the corresponding selection lists of the Report Painter. For example, you can place an entry that you report on regularly in the first position.
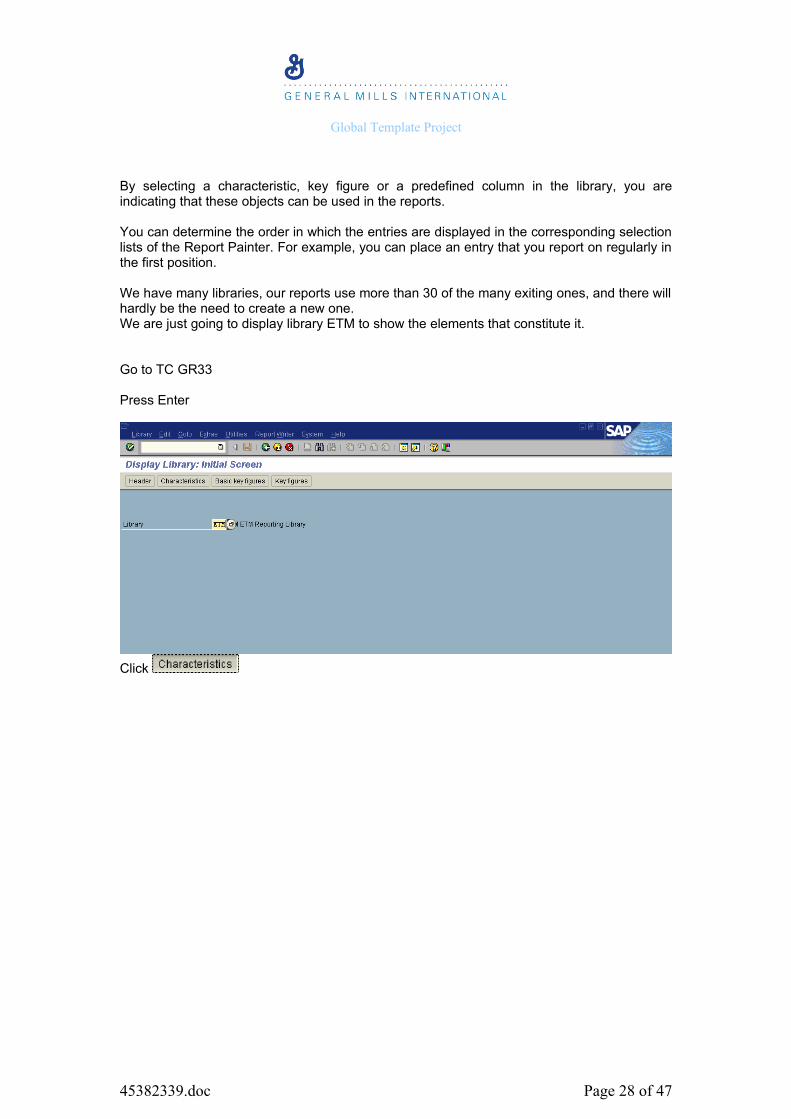
We have many libraries, our reports use more than 30 of the many exiting ones, and there will hardly be the need to create a new one. We are just going to display library ETM to show the elements that constitute it.
Go to TC GR33
Press Enter
Click
45382339.doc Page 28 of 47
Global Template Project
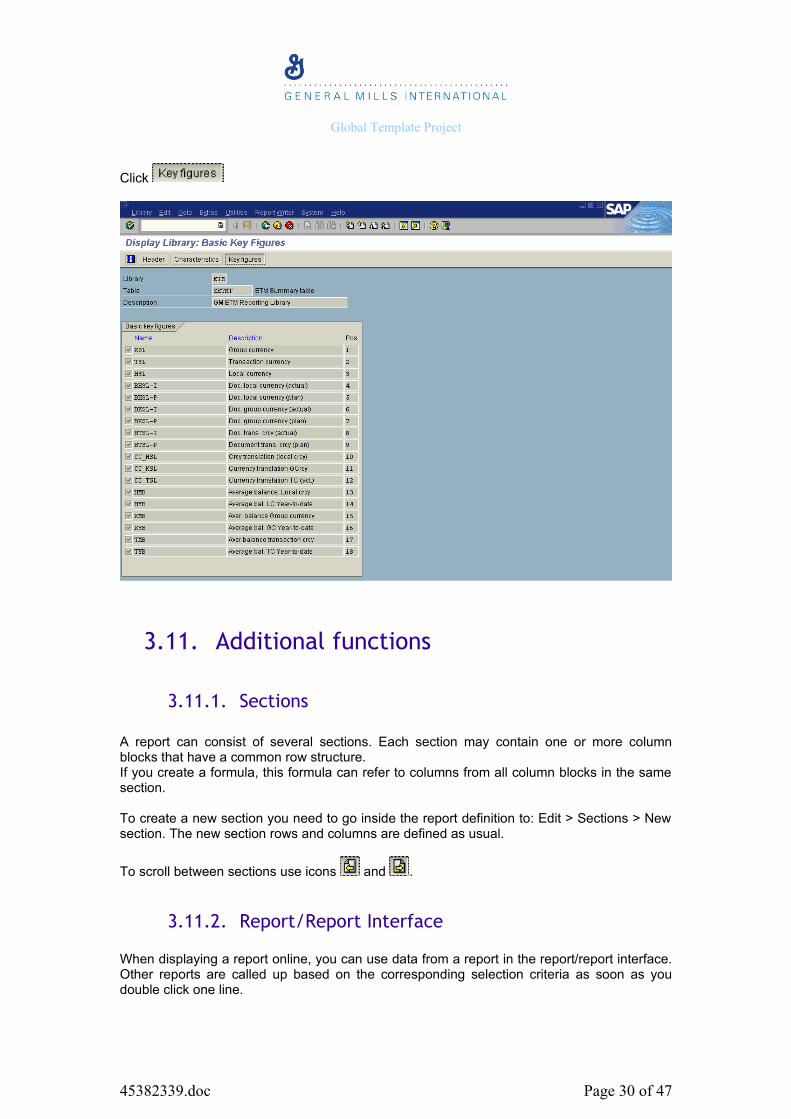
Click
45382339.doc Page 29 of 47
Global Template Project
Click
3.11. Additional functions
3.11.1. Sections
A report can consist of several sections. Each section may contain one or more column blocks that have a common row structure. If you create a formula, this formula can refer to columns from all column blocks in the same section.
To create a new section you need to go inside the report definition to: Edit > Sections > New section. The new section rows and columns are defined as usual.
To scroll between sections use icons and .
3.11.2. Report/Report Interface
When displaying a report online, you can use data from a report in the report/report interface. Other reports are called up based on the corresponding selection criteria as soon as you double click one line.
45382339.doc Page 30 of 47
Global Template Project
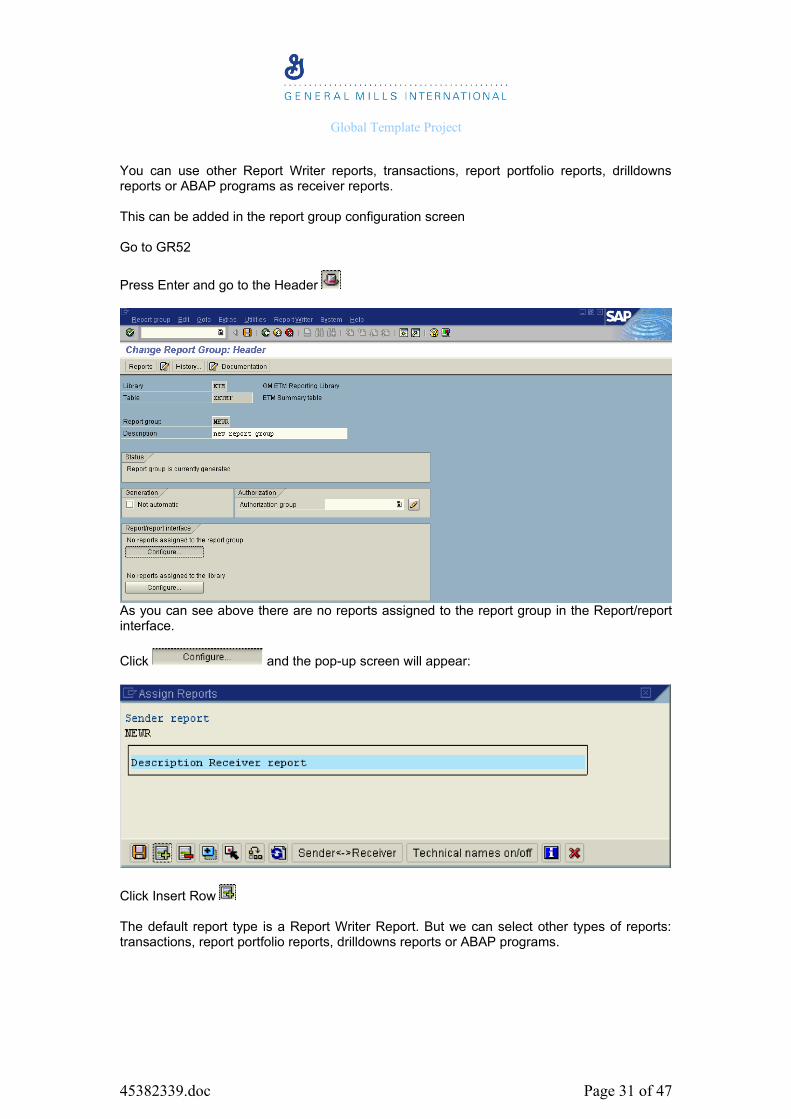
You can use other Report Writer reports, transactions, report portfolio reports, drilldowns reports or ABAP programs as receiver reports.
This can be added in the report group configuration screen
Go to GR52
Press Enter and go to the Header
As you can see above there are no reports assigned to the report group in the Report/report interface.
Click and the pop-up screen will appear:
Click Insert Row
The default report type is a Report Writer Report. But we can select other types of reports: transactions, report portfolio reports, drilldowns reports or ABAP programs.
45382339.doc Page 31 of 47
Global Template Project
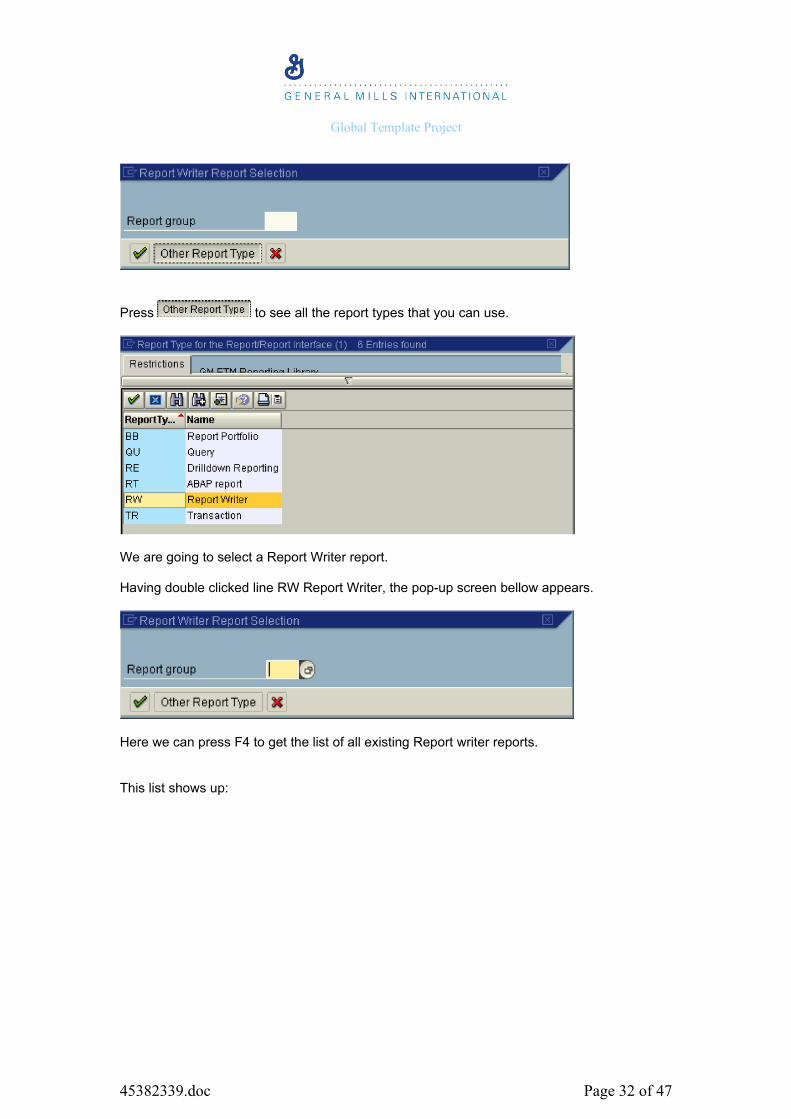
Press to see all the report types that you can use.
We are going to select a Report Writer report.
Having double clicked line RW Report Writer, the pop-up screen bellow appears.
Here we can press F4 to get the list of all existing Report writer reports.
This list shows up:
45382339.doc Page 32 of 47

Global Template Project
From this list select one report by double clicking it.
Validate by pressing Enter or
Save
45382339.doc Page 33 of 47
Global Template Project
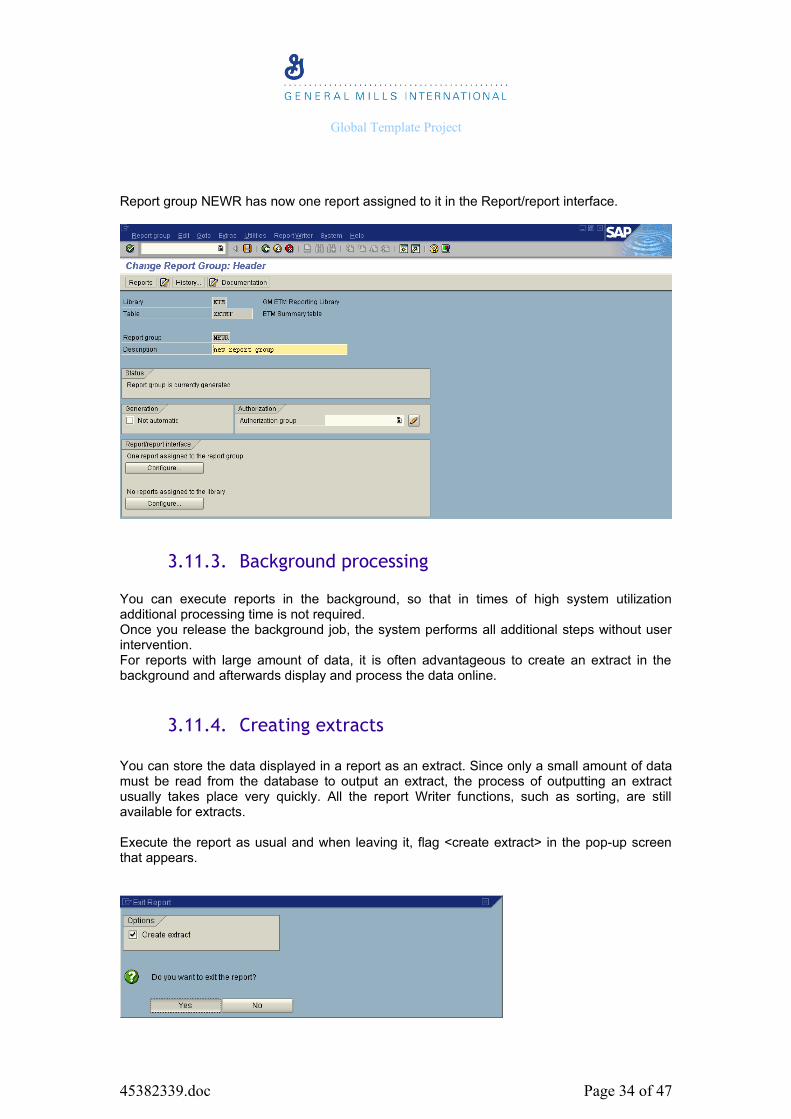
Report group NEWR has now one report assigned to it in the Report/report interface.
3.11.3. Background processing
You can execute reports in the background, so that in times of high system utilization additional processing time is not required. Once you release the background job, the system performs all additional steps without user intervention.For reports with large amount of data, it is often advantageous to create an extract in the background and afterwards display and process the data online.
3.11.4. Creating extracts
You can store the data displayed in a report as an extract. Since only a small amount of data must be read from the database to output an extract, the process of outputting an extract usually takes place very quickly. All the report Writer functions, such as sorting, are still available for extracts.
Execute the report as usual and when leaving it, flag <create extract> in the pop-up screen that appears.
45382339.doc Page 34 of 47
Global Template Project
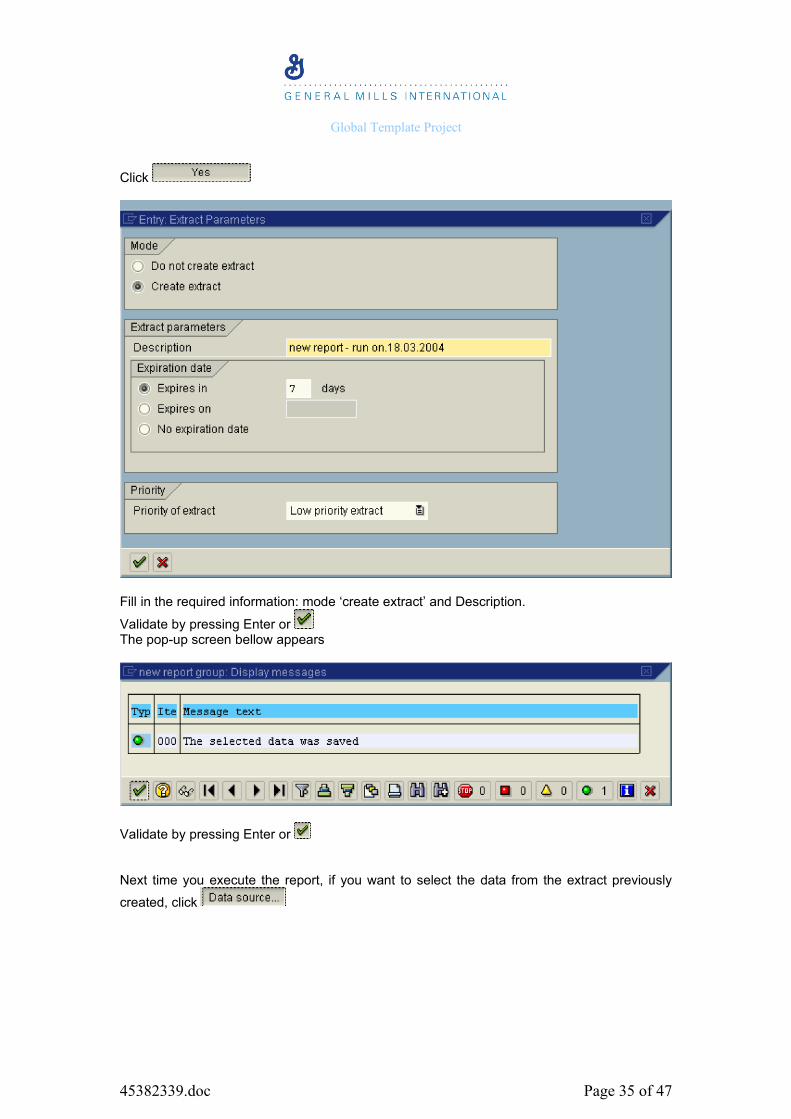
Click
Fill in the required information: mode ‘create extract’ and Description.
Validate by pressing Enter or The pop-up screen bellow appears
Validate by pressing Enter or
Next time you execute the report, if you want to select the data from the extract previously
created, click
45382339.doc Page 35 of 47

Global Template Project
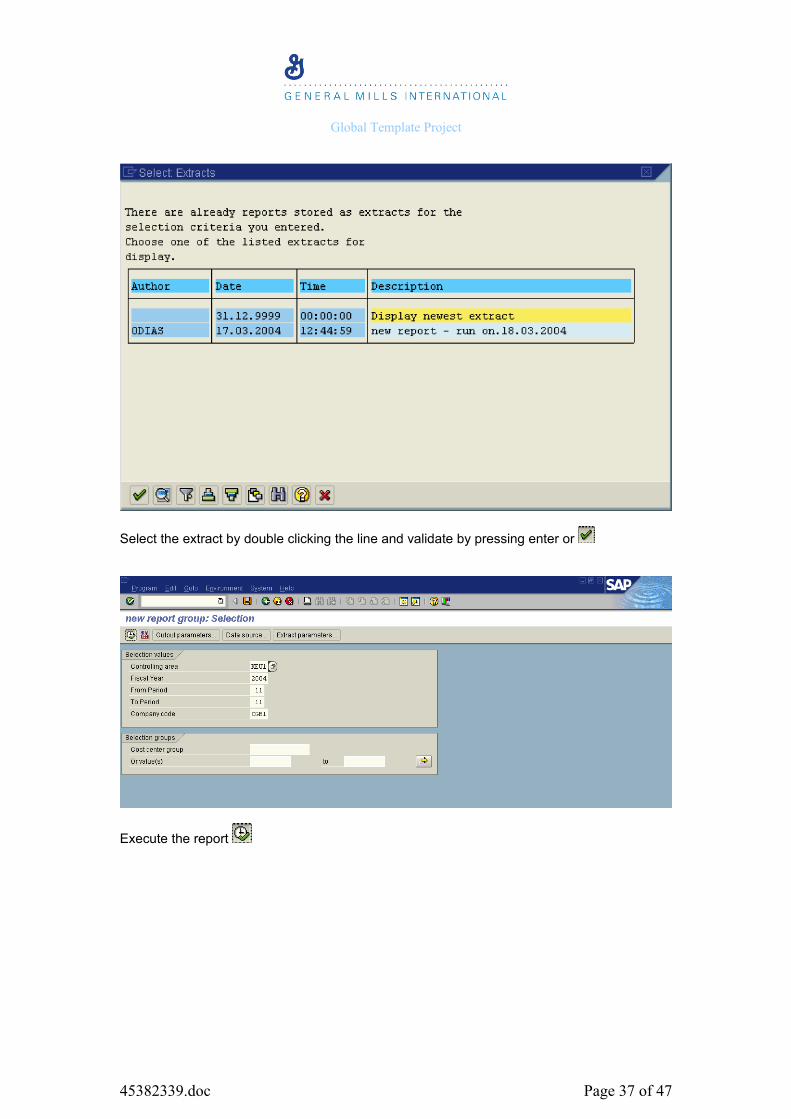
In the pop-up screen select Display Extract
Validate by pressing Enter or
The pop-up screen bellow appears
45382339.doc Page 36 of 47
Global Template Project
Select the extract by double clicking the line and validate by pressing enter or
Execute the report
45382339.doc Page 37 of 47
Global Template Project
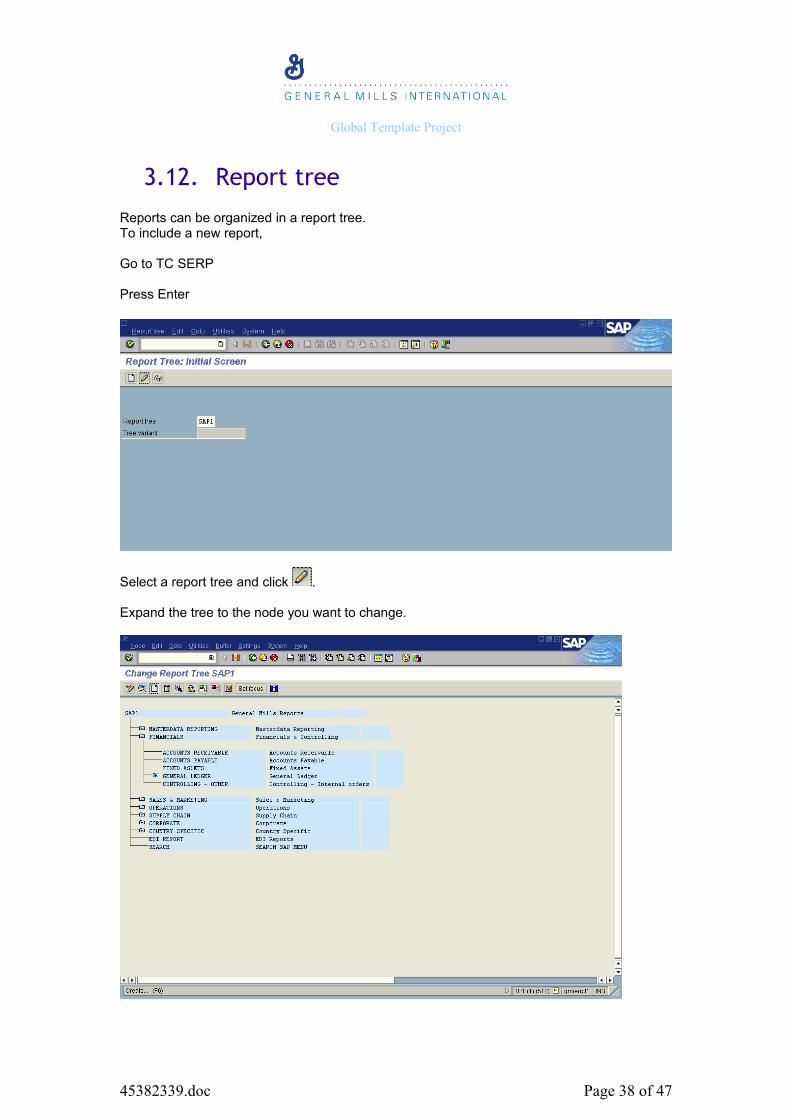
3.12. Report tree
Reports can be organized in a report tree.To include a new report,
Go to TC SERP
Press Enter
Select a report tree and click .
Expand the tree to the node you want to change.
45382339.doc Page 38 of 47
Global Template Project
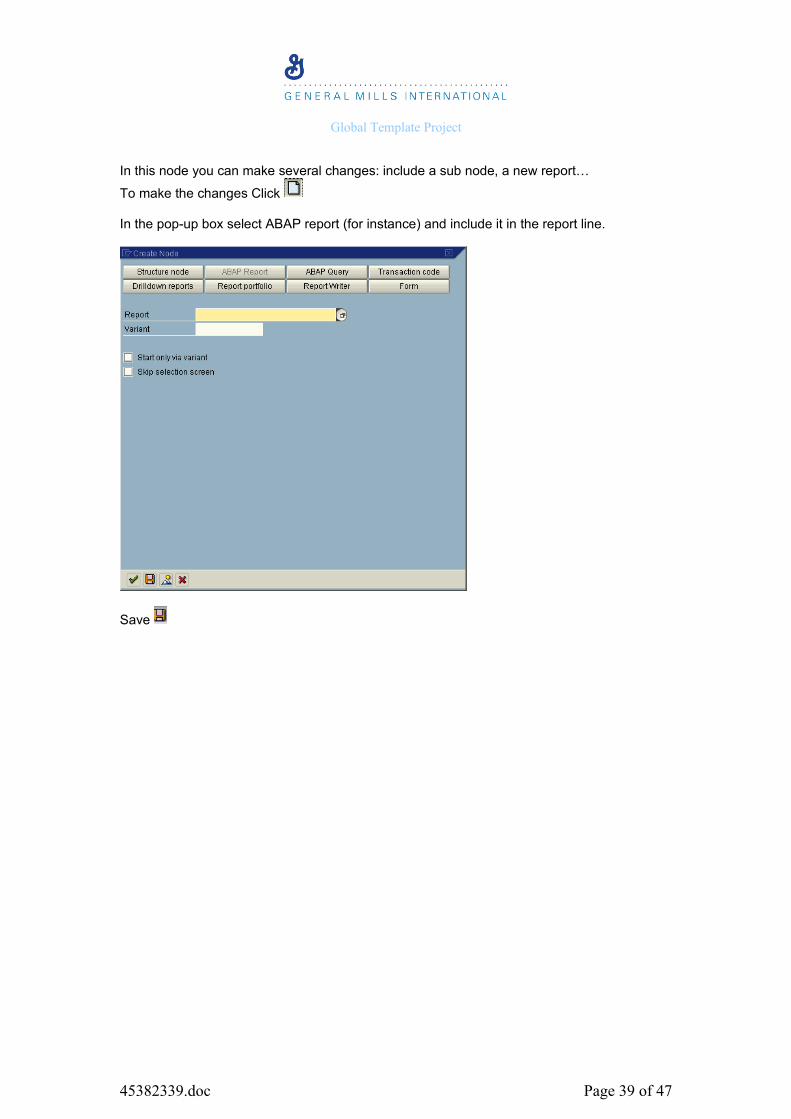
In this node you can make several changes: include a sub node, a new report…
To make the changes Click
In the pop-up box select ABAP report (for instance) and include it in the report line.
Save
45382339.doc Page 39 of 47
Global Template Project
4. SPL based reports / programs
4.1. GMPL and ENPL
4.1.1. GMPL / ENPL Introduction
For ETM, the GMPL and later ENPL (General Mills Profit & Loss Statement) reports were created. The business requirement was to be able to analyse cross company code P&L reporting at a business area level.
For GMPL Report Structure – please refer to excel document on the Share Point directory: I n t e r n a t i o n a l > D o c u m e n t C e n te r > E x t r a n e t > I n te r n a t i o n a l > I n te r n a t i o n a l S A P > F i n a n c i a l s _ C o n t r o l l i n g > G M P L D o c u m e n t a t i o n
For ENPL Report Structure – please refer to excel document on the Share Point directory:
I n t e r n a t i o n a l > D o c u m e n t C e n te r > E x t r a n e t > I n te r n a t i o n a l > I n te r n a t i o n a l S A P > F i n a n c i a l s _ C o n t r o l l i n g > E N P L D o c u m e n t a t i o n
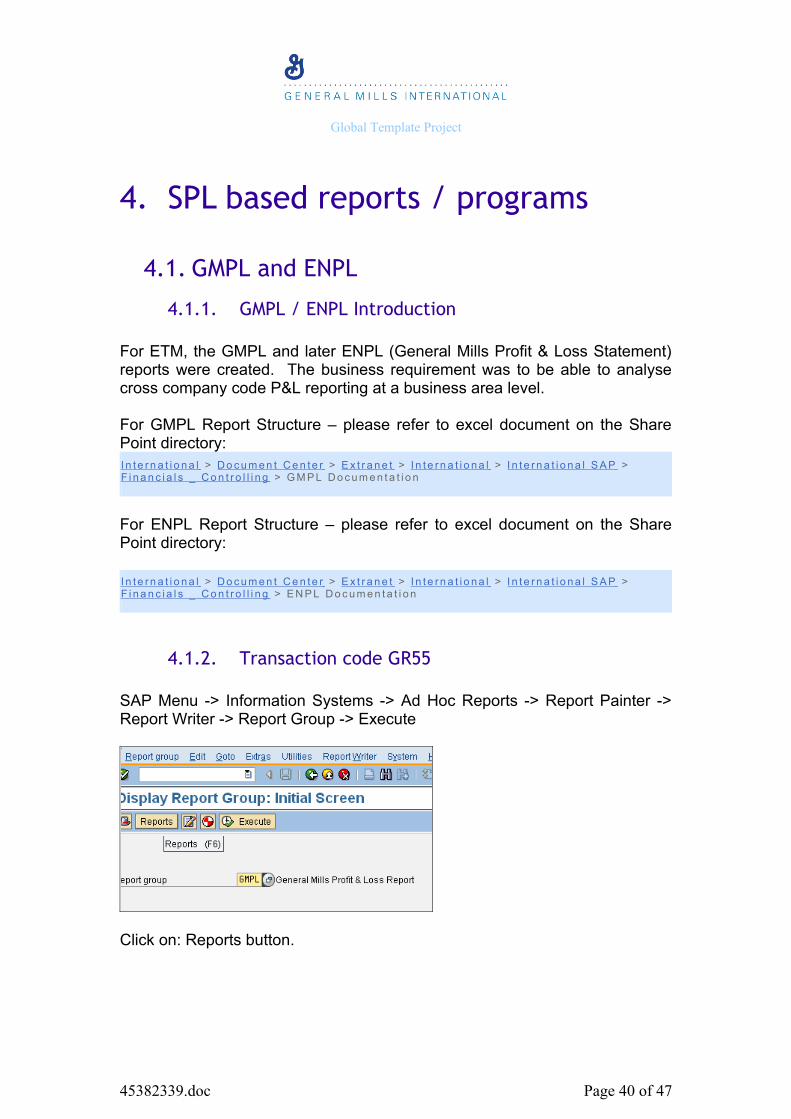
4.1.2. Transaction code GR55
SAP Menu -> Information Systems -> Ad Hoc Reports -> Report Painter -> Report Writer -> Report Group -> Execute
Click on: Reports button.
45382339.doc Page 40 of 47
Global Template Project
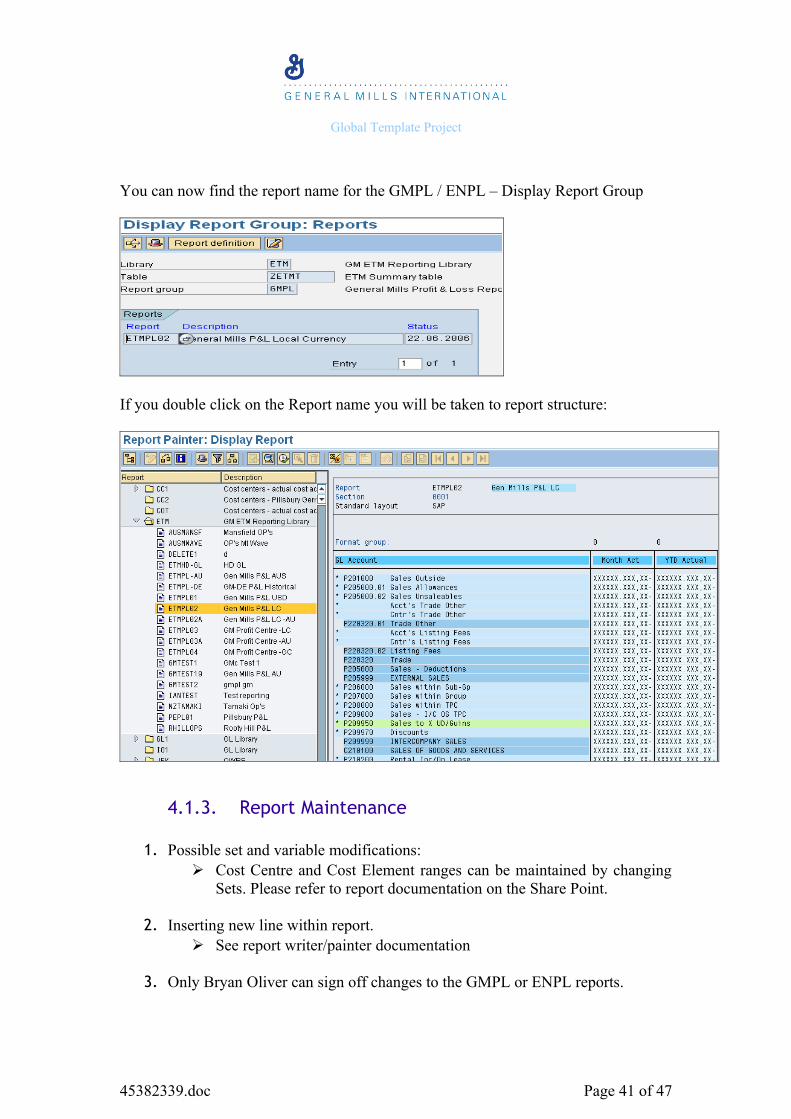
You can now find the report name for the GMPL / ENPL – Display Report Group
If you double click on the Report name you will be taken to report structure:
4.1.3. Report Maintenance
1. Possible set and variable modifications: Cost Centre and Cost Element ranges can be maintained by changing
Sets. Please refer to report documentation on the Share Point.
2. Inserting new line within report. See report writer/painter documentation
3. Only Bryan Oliver can sign off changes to the GMPL or ENPL reports.
45382339.doc Page 41 of 47
Global Template Project
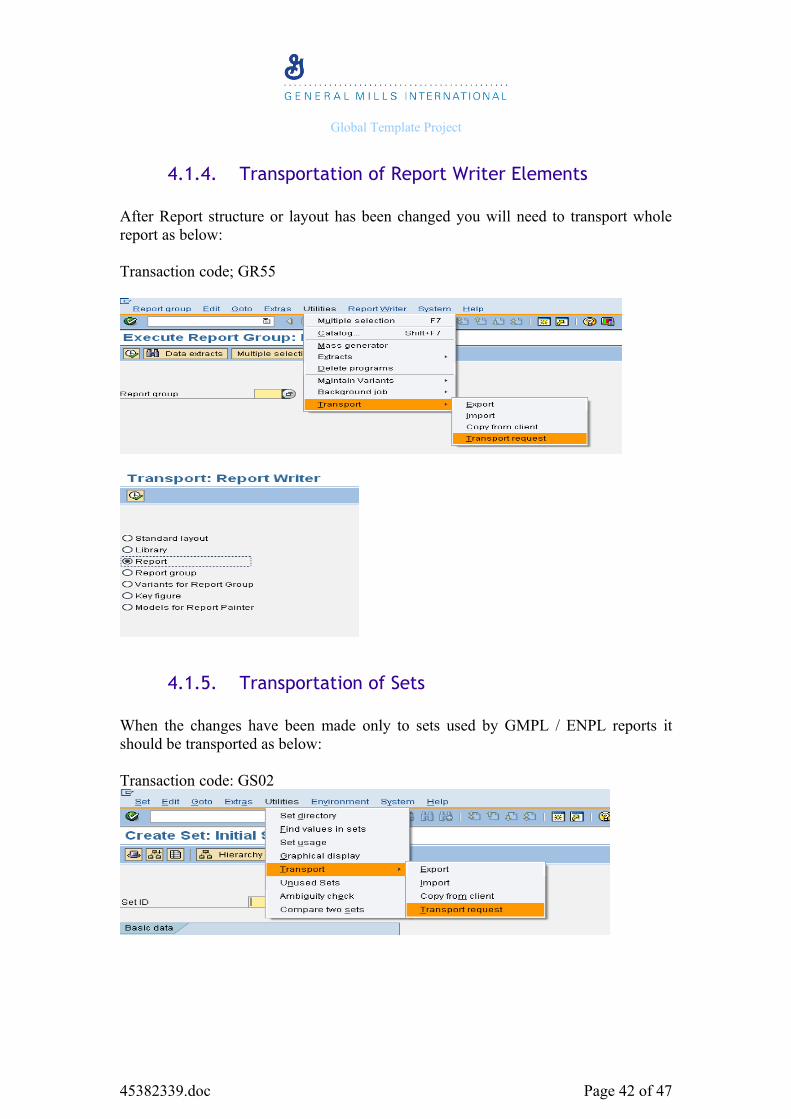
4.1.4. Transportation of Report Writer Elements
After Report structure or layout has been changed you will need to transport whole report as below:
Transaction code; GR55
4.1.5. Transportation of Sets
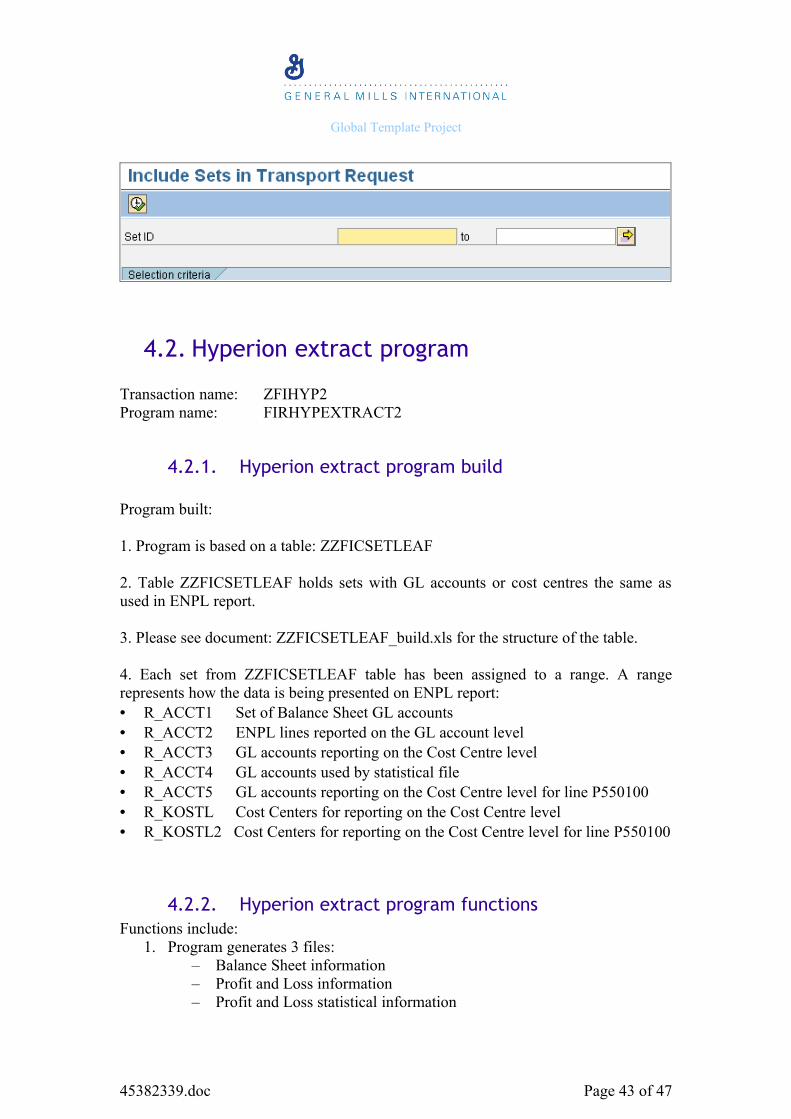
When the changes have been made only to sets used by GMPL / ENPL reports it should be transported as below:
Transaction code: GS02
45382339.doc Page 42 of 47
Global Template Project
4.2. Hyperion extract program
Transaction name: ZFIHYP2Program name: FIRHYPEXTRACT2
4.2.1. Hyperion extract program build
Program built:
1. Program is based on a table: ZZFICSETLEAF
2. Table ZZFICSETLEAF holds sets with GL accounts or cost centres the same as used in ENPL report.
3. Please see document: ZZFICSETLEAF_build.xls for the structure of the table.
4. Each set from ZZFICSETLEAF table has been assigned to a range. A range represents how the data is being presented on ENPL report:• R_ACCT1 Set of Balance Sheet GL accounts• R_ACCT2 ENPL lines reported on the GL account level• R_ACCT3 GL accounts reporting on the Cost Centre level• R_ACCT4 GL accounts used by statistical file• R_ACCT5 GL accounts reporting on the Cost Centre level for line P550100• R_KOSTL Cost Centers for reporting on the Cost Centre level• R_KOSTL2 Cost Centers for reporting on the Cost Centre level for line P550100
4.2.2. Hyperion extract program functionsFunctions include:
1. Program generates 3 files: – Balance Sheet information– Profit and Loss information– Profit and Loss statistical information
45382339.doc Page 43 of 47
Global Template Project
2. Balance sheet file produce list of balance sheet accounts with values. The file suppresses zero balances.
3. Profit and Loss file generates complete P&L values in the structure of ENPL report.
4. Profit and Loss statistical file produce list of selected P&L accounts with values.
5. Auto populate of a period range & fiscal year has been added on selection screen.- If current period is 01, populate period 01 to 12 and PRIOR fiscal year- Else populate period 01 to current period -1 of CURRENT fiscal year.
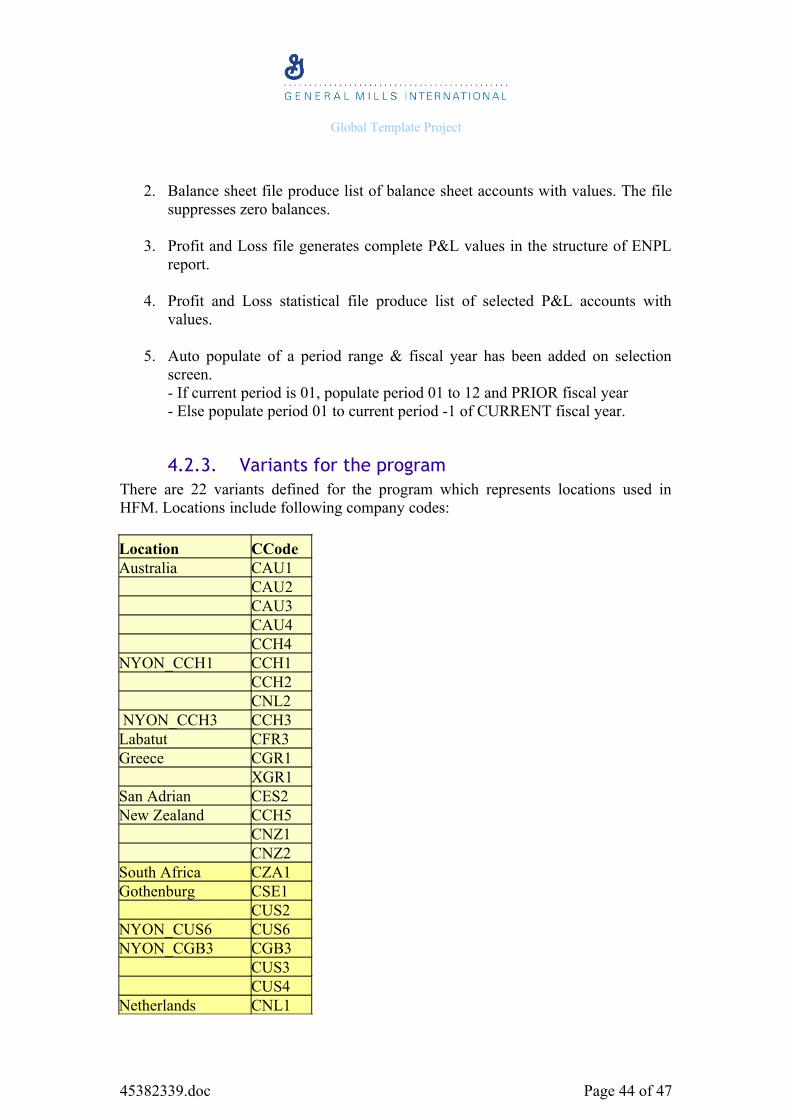
4.2.3. Variants for the programThere are 22 variants defined for the program which represents locations used in HFM. Locations include following company codes:
Location CCodeAustralia CAU1 CAU2 CAU3 CAU4 CCH4NYON_CCH1 CCH1 CCH2 CNL2 NYON_CCH3 CCH3Labatut CFR3Greece CGR1 XGR1San Adrian CES2New Zealand CCH5 CNZ1 CNZ2South Africa CZA1Gothenburg CSE1 CUS2NYON_CUS6 CUS6NYON_CGB3 CGB3 CUS3 CUS4Netherlands CNL1
45382339.doc Page 44 of 47

Global Template Project
Israel CIL1Athens CCH8 CCH8MENA CGB5 CLB1Paris_EDM CUS1 CGB4Berwick CGB2Uxbridge CGB1 XGB8 XGB9Arras CFR2Paris CFR1 CFR5 CFR6 CNL3 CBE1Madrid CES1Hamburg CDE1 CDE2
4.2.4. Execute Hyperion extract program
1. Please use transaction ZFIHYP2.2. Please select one of the available variants or create your own selection:
3. Please check and select appropriate Periods and Company codes.
45382339.doc Page 45 of 47
Global Template Project
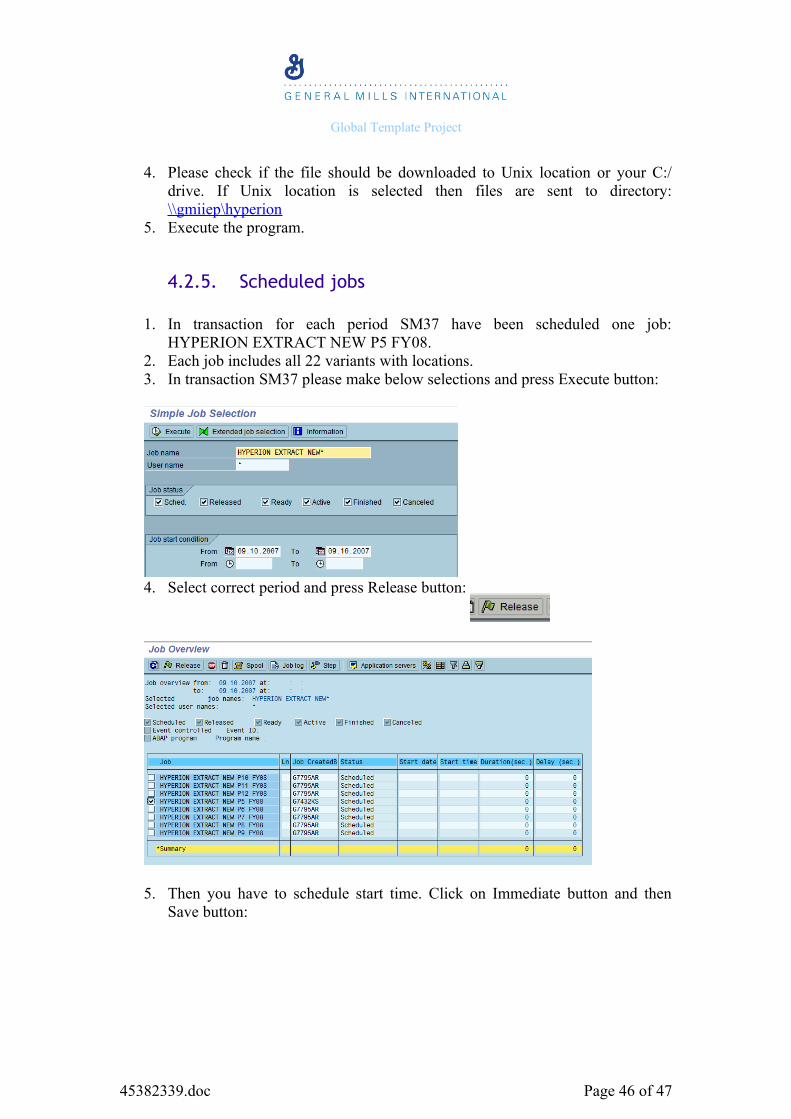
4. Please check if the file should be downloaded to Unix location or your C:/ drive. If Unix location is selected then files are sent to directory: \\gmiiep\hyperion
5. Execute the program.
4.2.5. Scheduled jobs
1. In transaction for each period SM37 have been scheduled one job: HYPERION EXTRACT NEW P5 FY08.
2. Each job includes all 22 variants with locations.3. In transaction SM37 please make below selections and press Execute button:
4. Select correct period and press Release button:
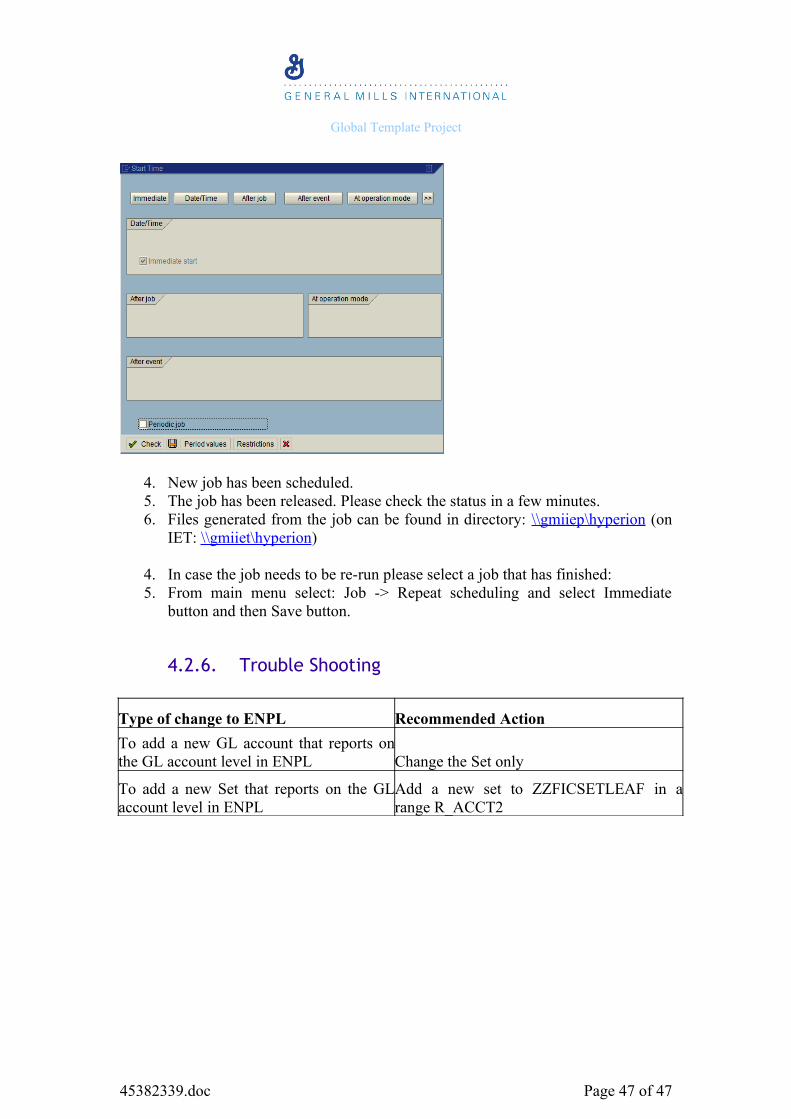
5. Then you have to schedule start time. Click on Immediate button and then Save button:
45382339.doc Page 46 of 47
Global Template Project
4. New job has been scheduled. 5. The job has been released. Please check the status in a few minutes.6. Files generated from the job can be found in directory: \\gmiiep\hyperion (on
IET: \\gmiiet\hyperion)
4. In case the job needs to be re-run please select a job that has finished:5. From main menu select: Job -> Repeat scheduling and select Immediate
button and then Save button.
4.2.6. Trouble Shooting
Type of change to ENPL Recommended Action
To add a new GL account that reports on the GL account level in ENPL Change the Set only
To add a new Set that reports on the GL account level in ENPL
Add a new set to ZZFICSETLEAF in a range R_ACCT2
45382339.doc Page 47 of 47