SINGER FUTURATM – Leaf Napkin Ring - singerco.com® FUTURATM – Leaf Napkin Ring Dress your...
9
SINGER ® FUTURA TM – Leaf Napkin Ring Dress your holiday table in style with this glitzy maple leaf napkin ring. You create the design from start to finish including the image artwork itself! ¼ yard silk dupioni ⅛ yard fusible interfacing Cut-away stabilizer Metallic embroidery threads – gold & copper All purpose thread Hand sewing needle Small gold seed beads (optional) Shopping List:
Transcript of SINGER FUTURATM – Leaf Napkin Ring - singerco.com® FUTURATM – Leaf Napkin Ring Dress your...

SINGER® FUTURATM – Leaf Napkin Ring
Dress your holiday table in style with this glitzy maple leaf napkin ring. You create the design from start to finish including the image artwork itself!
¼ yard silk dupioni
⅛ yard fusible interfacing
Cut-away stabilizer
Metallic embroidery threads – gold & copper
All purpose thread
Hand sewing needle
Small gold seed beads (optional)
Shopping List:

2
1. Silk fabric Cut two - 8” x 9” (leaf) Cut one - 3” x 6½” (band)
Cut-away stabilizer Cut one - 8” x 9”
Fusible interfacing Cut one - 3” x 6½”
2. Because the leaf will be three dimensional when finished, make a “fabric sandwich” so the stabilizer will not show on the finished piece. Place the cut-away stabilizer in between the two 8” x 9” pieces. Place the fabric sandwich in the small hoop.
3. Download the Maple Leaf Outline image from
www.singerco.com.
4. Open the software for the SINGER® FUTURA™ sewing & embroidery machine.
5. Select Small Hoop: • Select the Tools from the main tool bar. • Select Hoop. • Select Small.
6. Open Draw Package:
• Select Create from the main tool bar. • Select Draw Package. • When prompted, select Open an existing image. • Click OK. • Locate and select the Maple Leaf image from
where you saved it on your computer.
Fabric Preparation:
At the Computer:
3
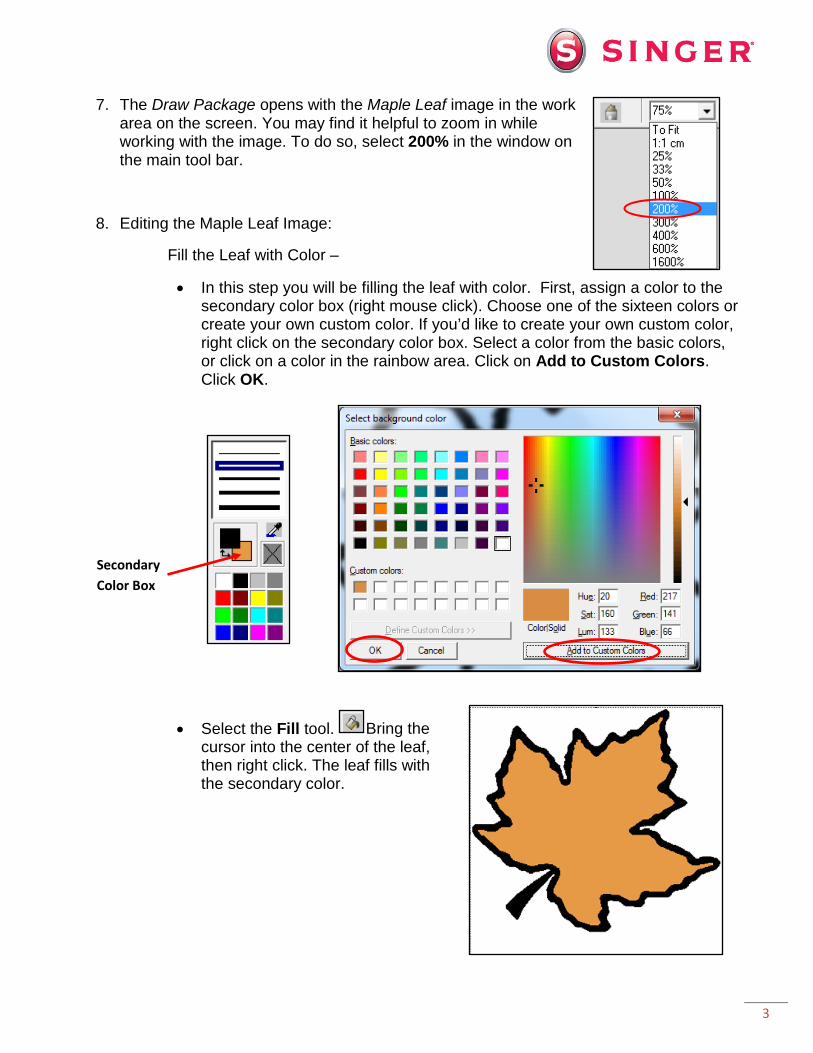
7. The Draw Package opens with the Maple Leaf image in the work area on the screen. You may find it helpful to zoom in while working with the image. To do so, select 200% in the window on the main tool bar.
8. Editing the Maple Leaf Image:
Fill the Leaf with Color –
• In this step you will be filling the leaf with color. First, assign a color to the secondary color box (right mouse click). Choose one of the sixteen colors or create your own custom color. If you’d like to create your own custom color, right click on the secondary color box. Select a color from the basic colors, or click on a color in the rainbow area. Click on Add to Custom Colors. Click OK.
• Select the Fill tool. Bring the cursor into the center of the leaf, then right click. The leaf fills with the secondary color.
Secondary Color Box

4
Add Veins to the Leaf -
• Select either the Pen tool or the Polyline tool to draw veins in the leaf. Select the second line thickness. For this design, you will be dividing the leave down the center in order to create two halves of the leaf. Later, you will edit the stitches so that the stitches in each half run opposite of each other. For this to happen, draw a line from the stem to the tip of the leaf, do not leave a gap in between the line and the outline.
• Next, draw vein lines like shown below. This time, leave a space in between the outline and the lines.
• Exit the Draw Package. Click on the Close Image Editor icon. Create a new name for the leaf and save your image.
Do not leave a gap in between the line and the outline.
Do not leave a gap in between the line and the outline.
5
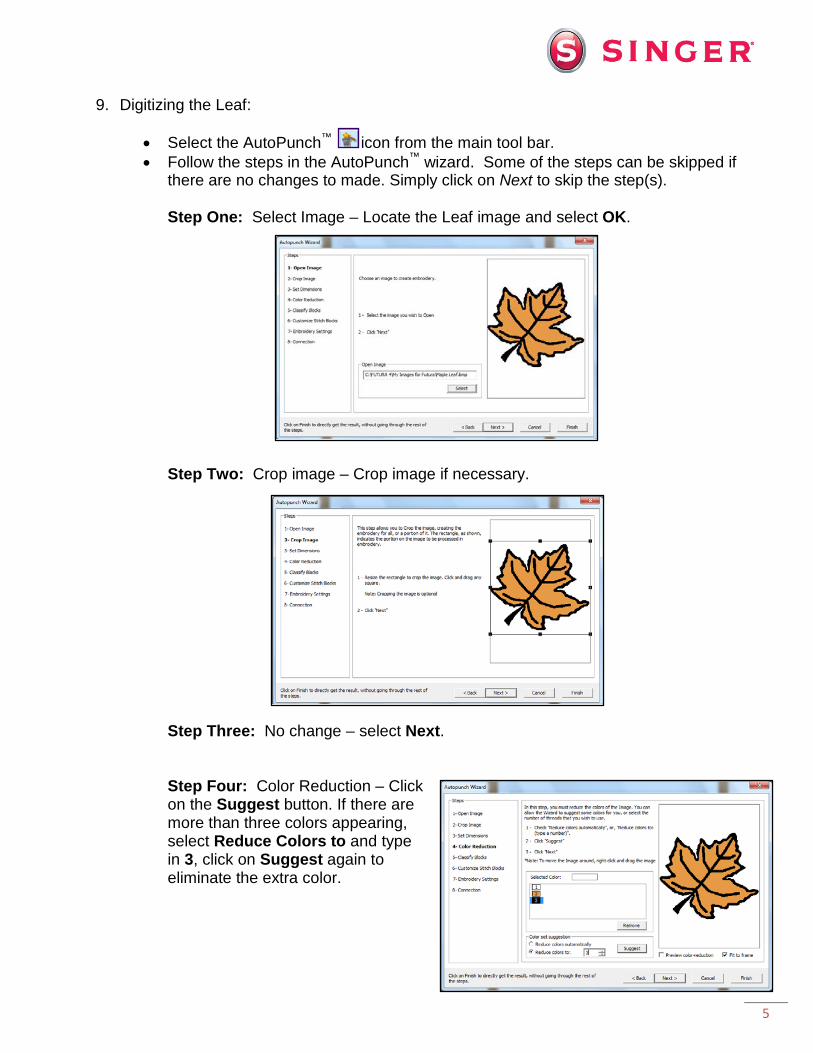
9. Digitizing the Leaf:
• Select the AutoPunch™ icon from the main tool bar. • Follow the steps in the AutoPunch™ wizard. Some of the steps can be skipped if
there are no changes to made. Simply click on Next to skip the step(s). Step One: Select Image – Locate the Leaf image and select OK. Step Two: Crop image – Crop image if necessary. Step Three: No change – select Next. Step Four: Color Reduction – Click on the Suggest button. If there are more than three colors appearing, select Reduce Colors to and type in 3, click on Suggest again to eliminate the extra color.

6
Step Five: Classify Blocks – Reduce the width to 6.0mm. Step Six: Customize Stitch Blocks – In most cases, the design will be broken down into three blocks: two halves of the leaf and the outline. If you have more than three blocks, you may want to check the order of the blocks, to make sure that they will stitch in the best order. If changes are necessary, click the block to be moved and use the Move Up or Move Down buttons. When the changes are complete, select Finish. The design will appear fully digitized in the hoop. You may view the design realistically by selecting View from the main tool bar, then selecting Realistic View.
7
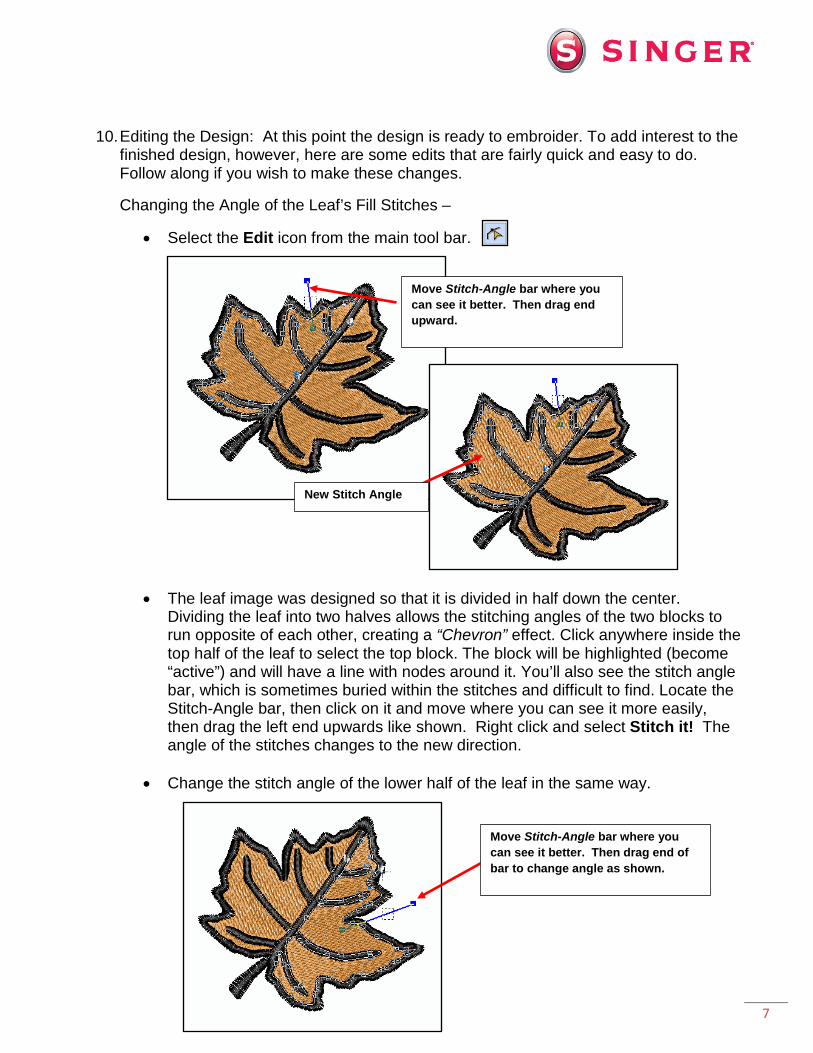
10. Editing the Design: At this point the design is ready to embroider. To add interest to the finished design, however, here are some edits that are fairly quick and easy to do. Follow along if you wish to make these changes.
Changing the Angle of the Leaf’s Fill Stitches –
• Select the Edit icon from the main tool bar.
• The leaf image was designed so that it is divided in half down the center. Dividing the leaf into two halves allows the stitching angles of the two blocks to run opposite of each other, creating a “Chevron” effect. Click anywhere inside the top half of the leaf to select the top block. The block will be highlighted (become “active”) and will have a line with nodes around it. You’ll also see the stitch angle bar, which is sometimes buried within the stitches and difficult to find. Locate the Stitch-Angle bar, then click on it and move where you can see it more easily, then drag the left end upwards like shown. Right click and select Stitch it! The angle of the stitches changes to the new direction.
• Change the stitch angle of the lower half of the leaf in the same way.
Move Stitch-Angle bar where you can see it better. Then drag end of bar to change angle as shown.
Move Stitch-Angle bar where you can see it better. Then drag end upward.
New Stitch Angle

8
Change the Stitch Type –
• While still in the editing mode, once again click on the top half of the leaf.
• Right click, and select Embroidery Settings. • Select the Stitch Type tab. • Scroll down the list and select Random Step. • Select Apply.
• Repeat this with the lower half of the leaf. • Click on the Edit icon to exit the editing mode.
11. Transmit Design to the Machine:
The design is ready to stitch out.
• Select the Transmit to Machine icon from the main tool bar.
• Select Send Design. Use the metallic thread on the top of the machine and an all purpose thread that will match the fabric in the bobbin. When finished, remove the fabric from the hoop. Trim away excess fabric from around the leaf being very careful to not cut any of the outline stitches.

9
• Sew beads to create additional veins if desired.
12. Prepare the machine for regular sewing. Thread the machine with the all-purpose thread. Apply the interfacing to the wrong side of the 3” x 6½” napkin ring band according to the manufacturer’s instructions. With right sides together, fold the piece in half lengthwise. Stitch the side edges together using a ½” seam. Turn to the right side out.
13. Fold in ½” on one end. Tuck the other end inside of the folded under end, forming a circle. Slipstitch in place. Hand sew the leaf to the napkin ring band.
Sewing Directions:
Singer, the Cameo “S” Design, Futura and Singer is Sewing Made Easy are exclusive trademarks of The Singer Company Limited S.à r.l. or its Affiliates. © 2014 The Singer Company Limited S.à r.l. or its Affiliates. All rights reserved.
SINGER is sewing made easy™
Fold
Hand-sew beads to create additional veins if desired.