ShelbyNext | Financials: Handle Mistakes
33
©2017 Shelby Systems, Inc. Other brand and product names are trademarks or registered trademarks of the respective holders. ShelbyNext | Financials: Handle Mistakes (Course N37) Presented by: Ben Lane Shelby Senior Staff Trainer
Transcript of ShelbyNext | Financials: Handle Mistakes

©2017 Shelby Systems, Inc. Other brand and product names are trademarks or registered trademarks of the respective holders.
ShelbyNext | Financials: Handle Mistakes
(Course N37)
Presented by: Ben Lane Shelby Senior Staff Trainer

2
Objective
This session explains how to fix financial mistakes using good practices and Shelby tools. You
review common data entry mistakes and correction techniques as well as how to use various
Shelby tools in the process.
This session presents the following topics:
Pay attention to your CURRENT FINANCIAL SETTINGS
How to avoid common mistakes when posting transactions
Why dates and post‐to periods are so critical
What to do if you used the wrong bank account
Posting entries to the General Ledger – who approves and do you post directly from the applications or not?
How to track missing transactions – watch the filters
What to do if you used the wrong year
Reverse/Copy a journal entry – when and why
Why your reports may be out of balance
3
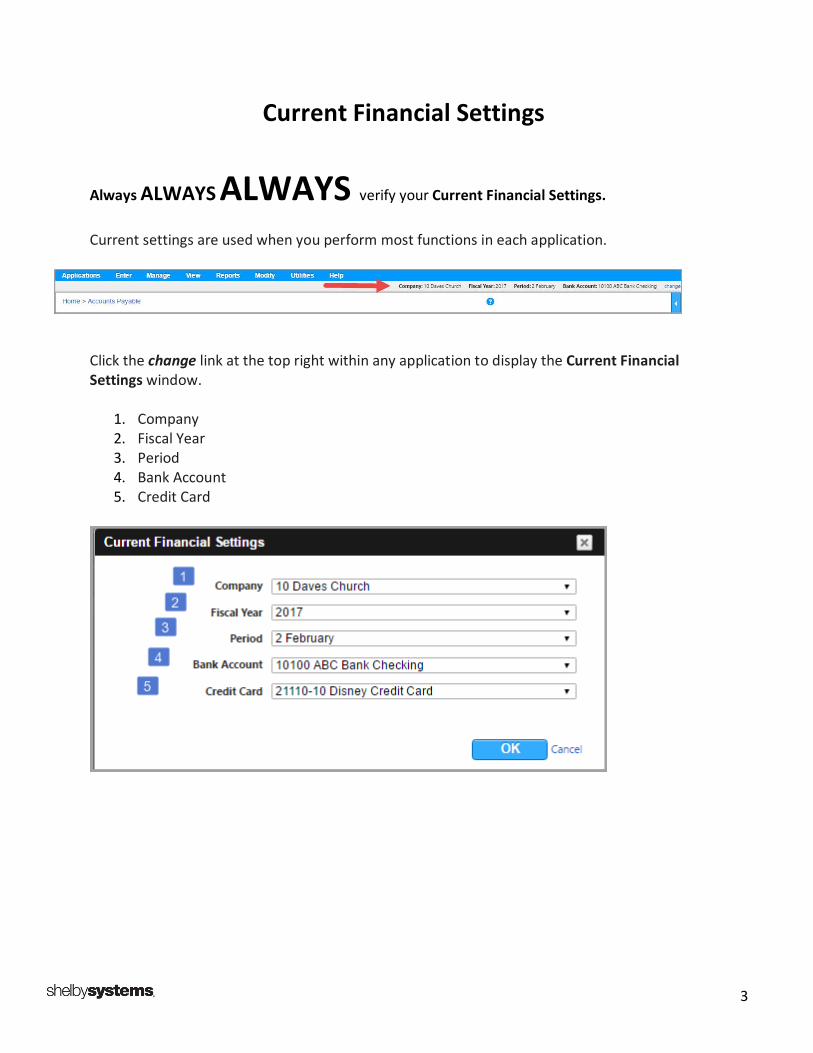
Current Financial Settings
Always ALWAYS ALWAYS verify your Current Financial Settings. Current settings are used when you perform most functions in each application.
Click the change link at the top right within any application to display the Current Financial Settings window.
1. Company 2. Fiscal Year 3. Period 4. Bank Account 5. Credit Card

4
Accounts Payable
Invoices entered to the wrong bank account, or “OOPS I forgot to check my Current Financial Settings.” This is easily corrected. Select the transactions you want to assign to a different bank account and click the Change Bank Account button to display the Change Bank Account window.
Choose the correct bank account for your selected transactions and then click the Continue button. Click the Close link to return to the Transactions page without changing the assigned bank account.

5
Invoices posted incorrectly
You may need to change or delete an invoice that is finalized already to the unpaid invoice file.
NOTE: You cannot change or delete a paid invoice.
The process described below is to undo an invoice, which removes the unpaid status. Removing the unpaid status allows you to access the invoice via the Manage Unposted Transactions page. The invoice is then changed as required or even deleted if the invoice is no longer needed.
From the Accounts Payable menu, select View ‐> Transaction Inquiry. You are now on the Transaction Inquiry screen.
1. Select the Company where the invoice was originally posted. 2. Select the Bank Account where the invoice was originally posted. 3. Check the Invoices check box. 4. Click the Unpaid radio button. 5. Select the Vendor. 6. Click the Search button.

6
From the Transaction Inquiry page select the invoice to undo. Click the View Details icon or double‐click on the invoice. The Undo Invoice button is now available to click.
Check your Current Financial Settings first, and then click the Undo Invoice button to undo the invoice. (This option only appears for unpaid invoices.)

7
The General Ledger Input Audit report appears. This report displays all the detail for the invoice.
1. First and most important, check your Current Financial Settings.
2. After verifying that the Current Financial Settings are correct, click the Print icon to print the report.
3. Click Undo Transaction button to finalize the undo procedure and put the invoice back on the Manage Unposted Transactions page.
NOTE: You are not prompted to enter the Post Entries to General Ledger information. A journal entry is created based on your Current Financial Settings using the current date. You may need to edit the undone journal entry and enter the correct date.
The invoice is moved back to the invoice work file. It is ready to be changed or deleted. If you wish to post the invoice again, make any desired changes and then click the Update button to return to the Unposted Transactions page. You can then save the invoice. To delete the invoice, click the Delete icon. You are then prompted to remove the invoice.
REMEMBER — Any invoices that are paid cannot be changed or deleted. However, the check can be voided.

8
Adjustments Adjustments are entered when an invoice is finalized but not paid and needs to be adjusted due to either an error or a credit issued. You can make multiple adjustments to an existing invoice. This procedure does not change the original invoice but adjusts the amount to be paid to the vendor.
Update 1099 or Project Information after posting an invoice You can only update the 1099 status and Project field on the Transaction Inquiry page. Select the vendor and invoice that needs to be corrected. Click the View Details icon or double‐click a detail line to edit the transaction.

9
You can now add or delete Project or 1099 Status information.
If you change the Project or 1099 status, click the OK button, and then click the Update button to save your changes or the Cancel link to return to the Details screen without saving changes. You can change the Project on a posted invoice. If you do this, you are prompted that the project does not match the corresponding journal entry that was made when the invoice was processed. If you change the project on a posted invoice in Accounts Payable, it is recommended that you also change the project in the corresponding journal entry in the General Ledger.

10
Voiding a check correctly
1. Select the Vendor. 2. Enter the check # for the check to void or click the search icon to select it from a list. 3. Check whether you wish to Keep Detail Lines as unpaid. (LET US TALK ABOUT THIS!) 4. Click the Add to Grid button to add the selected check to the grid.
You can click the Delete icon by any check to be prompted to delete that check from the grid.
HINT FROM BEN – If bank reconciliations have already been finalized for prior periods, then void the check in the current period.
11
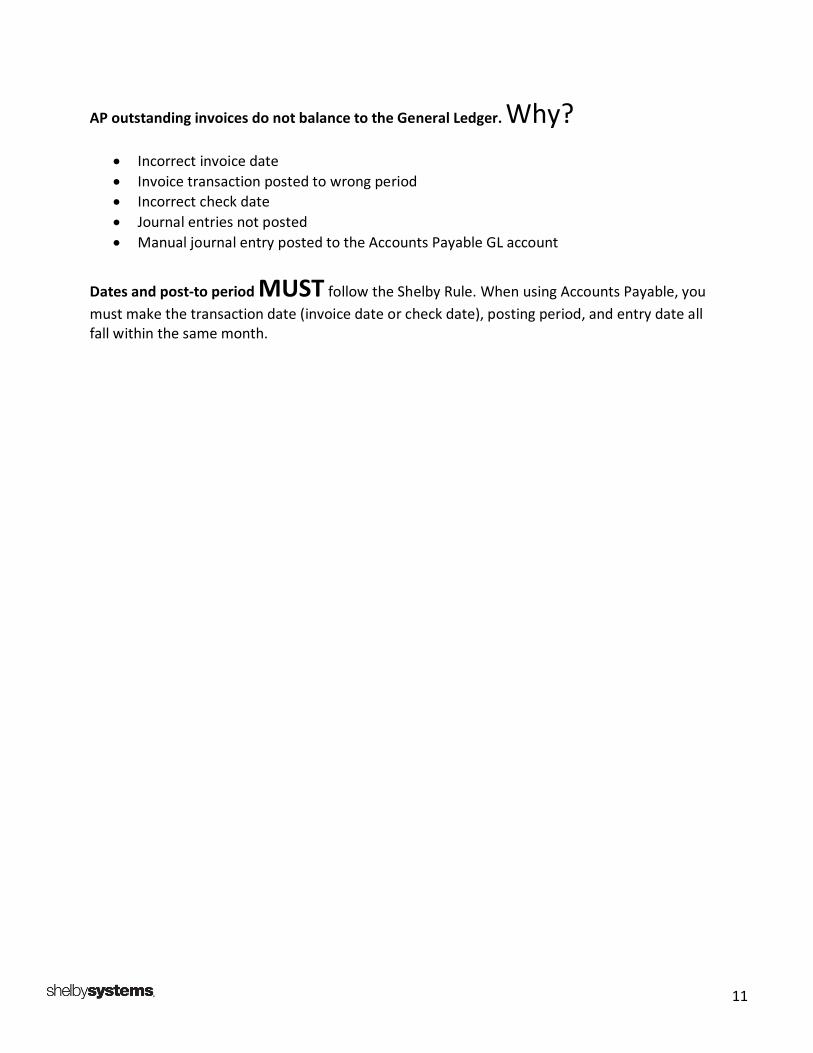
AP outstanding invoices do not balance to the General Ledger. Why?
Incorrect invoice date
Invoice transaction posted to wrong period
Incorrect check date
Journal entries not posted
Manual journal entry posted to the Accounts Payable GL account
Dates and post‐to period MUST follow the Shelby Rule. When using Accounts Payable, you
must make the transaction date (invoice date or check date), posting period, and entry date all fall within the same month.

12
Payroll
Make sure your General Ledger links are correct. There are various steps required in order to begin using Payroll. Company and Account information is set up in General Ledger first. Then, check your General Ledger links under Employer information.
Compensation and Deduction information
ALL the major Compensation and Deduction categories have been set up for you.
It is recommended (PLEASE) that you use these existing categories and only add new ones if absolutely needed (last resort). Certain information on some of the existing compensations/deduction categories cannot be accessed or changed. The most common Compensation Category is “Salary/Hourly” (regular wages). Use the predefined “Salary/Hourly Regular Wage” compensation type for all employees, including ministers. You do not have to create a special compensation type for ministers. Do not confuse “Subject to” with actually withholding taxes. Ministers are subject to Federal and State taxes even though you may not be withholding them. Do not worry about the “Subject to Social Security and Medicare” option for a minister. By checking the box “Check here if Minister” when setting up the minister’s record, you override the withholding of Social Security and Medicare taxes.

13
Sample Compensation Information
Sample Deduction – 403(b)

14
Misclassifying Pastors Make sure the “Check here if Minister” box is checked on the Employee Information screen if the employee is a minister. Checking this box causes an override of the compensation being subject to Social Security and Medicare taxes. No Social Security or Medicare taxes are withheld on a minister. It exempts ministers from federal withholding (minister can opt to have voluntary federal/state withholding). It also allows the use of compensation categories that pertain to ministers only, such as a housing allowance.
State or Local Taxes missing (including Pastors)
Make sure that ALL employees have State/Local Taxes included on the Tax tab if required. This
puts the amount of compensation that is subject to State Tax in box 16 and the amount of state withholding in box 17.

15
Correcting hours entered prior to running checks
After you complete the process of entering hours for hourly employees, the Payroll Processing screen displays. Here you can verify and make changes to employees, if needed. To view the paycheck details or make changes to an employee’s pay, double‐click on the employee to change.
This opens the Payroll Processing ‐> Update screen. Here you can update, add, or delete compensation, deductions, and non‐cash distributions.

16
Voiding a check correctly
There are two methods for voiding a previously written check: Void Check or negative Manual Check.
The method you choose depends on whether the tax deposit has been made or not.
If the tax deposit HAS NOT BEEN made, then use the Void Check option under Utilities.
If the tax deposit HAS BEEN made, use the Manual Check option to enter a negative check
using the same check number as the original and use the date of your next upcoming payroll for the date. This results in your Federal Tax deposit being properly calculated. When finished, the net amount of the manual check should be the same as the original check.

17
Other uses of MANUAL CHECKS
Employee Non‐Cash Gift Card
Employer portion of HSA contribution
Misclassification of Minister Housing Allowance
Over Withheld as result of incorrect Health Insurance Deductions
Missing State/County/Local Taxes
TIPS!
Use only existing compensation and deduction categories. Only add a new one if absolutely needed (LAST RESORT).
What drives payroll reports?
Watch your quarterly reconcile for 941 and State reports.
Make sure the totals for your quarterly reports equal the totals of your W2s before you print your W2s.
Dates and post‐to period must follow the Shelby Rule. When using Payroll, you should make the check date the date you want all records and reports to use. The check date should also be used when choosing the posting period and entry date.

18
Accounts Receivable
Revenue Centers and Item information Make sure links to General Ledger are correct. Revenue Center GL Interface
Item Information GL Interface
19
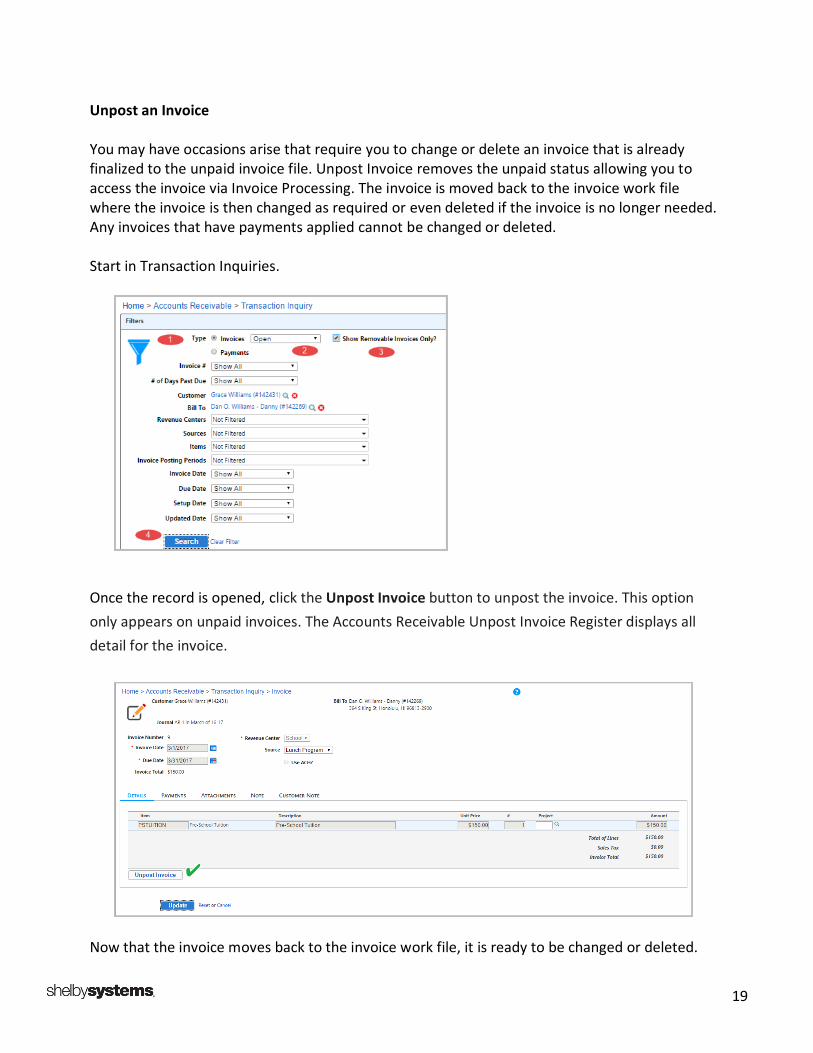
Unpost an Invoice You may have occasions arise that require you to change or delete an invoice that is already finalized to the unpaid invoice file. Unpost Invoice removes the unpaid status allowing you to access the invoice via Invoice Processing. The invoice is moved back to the invoice work file where the invoice is then changed as required or even deleted if the invoice is no longer needed. Any invoices that have payments applied cannot be changed or deleted. Start in Transaction Inquiries.
Once the record is opened, click the Unpost Invoice button to unpost the invoice. This option
only appears on unpaid invoices. The Accounts Receivable Unpost Invoice Register displays all
detail for the invoice.
Now that the invoice moves back to the invoice work file, it is ready to be changed or deleted.

20
Void a Payment The Void Payments Utility allows you to void payments within Accounts Receivable. You can void any payments that are entered and finalized within the Accounts Receivable application (returned checks). This makes the necessary adjustments in Accounts Receivable, Bank Reconciliation, and the General Ledger. If you have several payments to void, the program creates a journal entry for each one individually. If the payment you are voiding has multiple lines of distribution, the void reverses each line.
Void Payment Final Register – Rows in bold are the payments with the payment detail on subsequent rows.
Reasons that outstanding AR invoices do not balance to the General Ledger:
Incorrect invoice date
Invoice posted to wrong period
Check date incorrect
Journal entries not posted
A manual journal entry posted to the Accounts Receivable account Dates and post‐to period must follow the Shelby Rule. When using Accounts Receivable, you must make the transaction date (invoice date or check date), posting period, and entry date all fall within the same month.

21
Bank Account Management
Get the opening balance and beginning outstanding items correct When you set up an existing bank account in Bank Account Management for the first time, you need to set the beginning balance for this account using the ending balance from your last reconciled bank statement as your opening balance. (NOTE: You only need to do this once.) If you have multiple funds and separate accounts at the bank for each fund, then define each bank account within Bank Account Management. In this case you reconcile each account separately. If you have multiple funds and reconcile to one account at the bank, then only define the main bank account in the main general fund. For this to work, each bank account number in each fund must be the same in your chart of accounts in General Ledger (e.g., Fund 000 = Bank Account 10100, Fund 001 = Bank Account 10100). In this case you reconcile only one bank account in Bank Account Management. Entries made to the General Ledger still post to the correct fund bank account. TRUST THE SYSTEM. If you have multiple accounts at the bank in one fund, then define each bank account (e.g., Bank Account 10100, Bank Account 10200, and so forth). Bank Account Information – Update If you are setting up an existing bank account for the first time, enter the ending balance from your last reconciled bank statement.

22
In your GL, make sure you use the same account number across funds.
Next, key in the items that are outstanding from your previous system or manual records. Key checks/withdrawals/deposits under All Items. This process gets these items into the system to be reconciled.
Make sure you have keyed in all outstanding items as of your last Bank Reconciliation.

23
Manage Unposted Transactions allows you to create, edit, and save Bank Account Management transactions. Miscellaneous Deposits – Interest or deposits that do not originate from another financial application. Miscellaneous Withdrawals – Bank charges, credit card fees, auto withdrawals, or transfers between bank accounts. Enter Transactions allows you to enter Bank Account Management transactions. The Deposit and Charge fields denote the action being recorded against the bank account selected in Current Financial Settings. For instance, an amount of $100 under Deposit debits the bank account and credits the account entered in the detail line of the transaction.

24
Modify Company Information – Send Entry to Bank Account Management Once this option is turned on, each time you post a manual journal entry that affects an account that is set up within Bank Account Management, the system creates an outstanding item(s) entry for each related manual journal detail line. If a checking account is listed three times in one manual journal entry, the system creates three corresponding items in Bank Account Management.

25
TIP
Bank Account Management creates a better audit trail than a Manual Journal Entry. Try to avoid a Manual Journal Entry that affects an account that is already set up in Bank Account Management.
Manage Bank Statements allows you to create and edit bank account statement periods for the purpose of reconciling your bank statements. The Reconcile to Bank Statement area at the bottom left of the screen keeps track of your progress as you reconcile. When you are finished reconciling, the Out of Balance By field should
show ZERO. The Statement Starting Balance and Calculated Ending Balance fields should
match the amounts shown on your current bank account statement. (Question: What is the correct date you should use for the Statement Date?) The Reconcile to General Ledger area contains the following fields:
Statement Period: Select the General Ledger year and period from which to reconcile.
General Ledger Balance: This is the current balance of the currently selected bank account as of the selected Statement Period, including unposted journals.
Outstanding Items: This is the amount total of all outstanding items posted to the selected Statement Period or before. This also includes any items manually added in Bank Account Management. Marking an item as cleared removes it from this total.
General Ledger Calculated Ending Balance: This is the General Ledger balance adjusted by the total of the Outstanding Items field.
General Ledger Out of Balance By: This is the Statement Ending Balance minus the General Ledger Calculated Ending Balance. When you are finished reconciling, this
field should show ZERO.
Reconciled Items from after the Statement Period: This is the total of all items marked as cleared that are posted to a future General Ledger period.
26
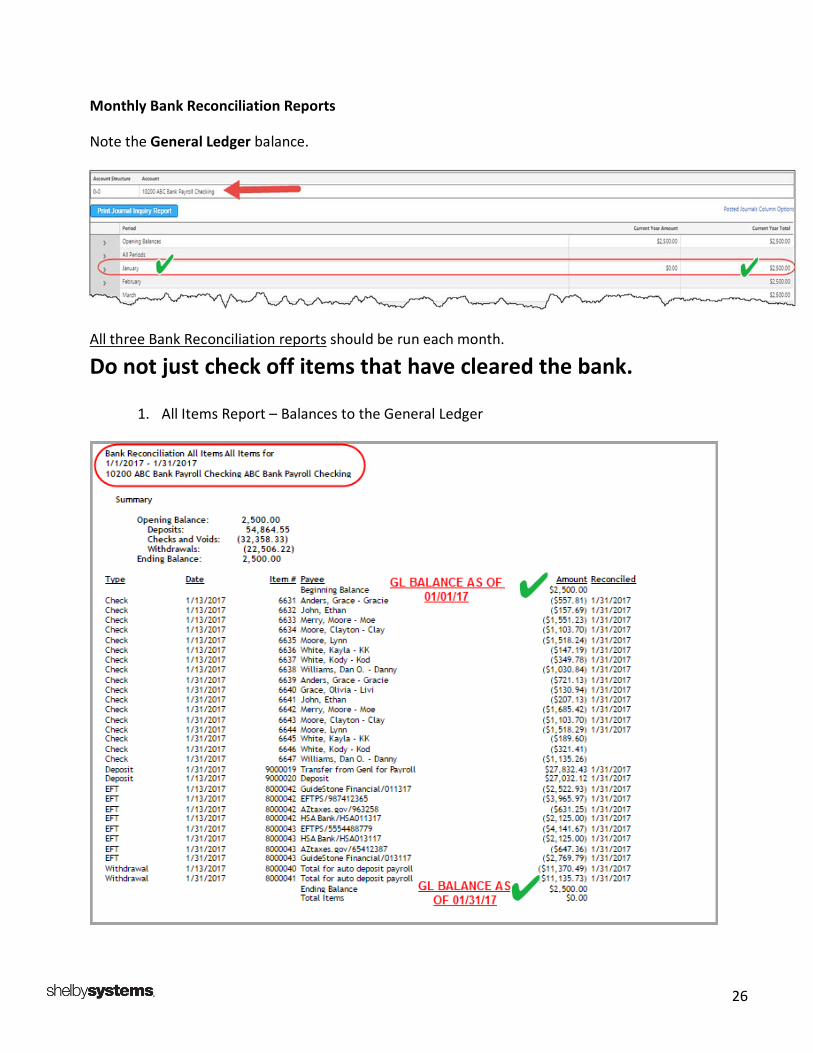
Monthly Bank Reconciliation Reports
Note the General Ledger balance.
All three Bank Reconciliation reports should be run each month.
Do not just check off items that have cleared the bank.
1. All Items Report – Balances to the General Ledger

27
2. Canceled Items Report – Copy of Bank Statement

28
3. Outstanding Items Report – Ending Bank Statement balance reconciled to General Ledger Balance
For Bank Reconciliation reports to balance to the General Ledger, the General Ledger posting period and the check/withdrawal/deposit date MUST MATCH. General Ledger account balances update only when a journal entry posts. Make sure you use the correct Bank Statement date and correct Bank Statement ending
balance when reconciling.
Check for consistent dates.
CHECK FOR CONSISTENT DATES!
CHECK FOR CONSISTENT DATES!!
Make sure ALL items on your bank statement are included in both your
General Ledger and as outstanding items in Bank Account Management!
Watch online/merchant deposits!
Watch for Misc. charges/chargebacks!
If you use funds, let the system do the work for you!
Look for unposted journal entries!
Your General Ledger is NOT in balance until you have balanced your bank accounts!!!!!

29
General Ledger
Check your Company Information – choose the Require the Posting Date and the Period to match on Sub Ledger Journals check box. This requires your Posting Date to always match the currently selected period when finalizing to the General Ledger in other applications.
Avoid manual journal entries when possible. Allow other financial applications to feed
transactions to your General Ledger (AP, AR, BAM, PR, FA). TRUST THE SYSTEM. Manage Unposted Journals allows you to create, edit, and save journal entries. Journals are sent to this area from other applications and can be created manually as well. Who performs the Unposted Journals update and when are they updated? Daily? Weekly?
Clear filters before updating.
Make sure that Unposted Journals are posted to the correct period.

30
Before you post journals, LOOK THEM OVER.
Make sure the Date falls within the Period.
You cannot delete journals that originated in other financial applications.
If you need to change the year on any journals, select it and click the Change Year button. Select the Year from the drop‐down list and click the OK button to save the change or the Cancel link to return to the Unposted Journals page without changing the year for selected journals.
Reverse/Copy a journal entry: Why, when, and what period.
Reverse Only: Creates an exact opposite (debits and credits) of the selected journal in Unposted Journals.
Copy Only: Creates an exact copy of the selected journal in Unposted Journals.
Reverse & Copy: Creates both an exact opposite and an exact copy of the selected journal on the Unposted Journals page.
Journals created through the Reverse or Copy procedure are associated with the period the original journal posts to, but the copy can be changed in the Unposted Journals page before posting.

31
In this example a 09/30/16 deposit is posted to October. Reverse from the wrong period and copy to the correct period using the same date of 09/30/16.
Why financial reports are out of balance:
1. Missing Closing Account 2. GL Account Groupings are not set up correctly 3. Opening Balances are out of balance (have been locked down)
RUN GENERAL LEDGER – DETAIL LEDGER MONTHLY
RUN GENERAL LEDGER – DETAIL LEDGER MONTHLY
RUN GENERAL LEDGER – DETAIL LEDGER MONTHLY

32
Q&A
Class Discussion

Ben Lane Shelby Senior Staff Trainer
Before joining Shelby as a certified staff trainer, Ben served as a youth minister and a minister of education at various churches. His desire is to help churches maximize their ministry through effective use of Shelby software. Currently he is a Shelby Senior Staff Trainer and trains on all Shelby products.