13315 INSTALLATION INSTRUCTIONS Safety glasses should be ...

PERIODICALLY CHECK THIS RECEIVER HITCH TO ENSURE ALL FASTENERS ARE TIGHT AND ALL STRUCTURAL COMPONENTS ARE SOUNDCURT Manufacturing Inc. warrants this product to be free of defects in material and/or workmanship at the time of retail purchase by the original purchaser. If the product is found to be defective, Curt Manufacturing Inc. may repair or replacethe product at their option, when the product is returned, prepaid, with proof of purchase. Alteration to, misuse of, or improper installation of this product voids the warranty. Curt Manufacturing Inc.'s liability is limited to repair or replacementof products found to be defective, and specifically excludes liability for incidental or consequential loss or damage.For more information log onto www.curtmfg.com, & for helpful towing tips log onto www.hitchinfo.com
MAKE: STYLE:
MIN.45/90
WARNING: NEVER EXCEED YOUR VEHICLE MANUFACTURER'S RECOMMENDED TOWING CAPACITY
WEIGHT CARRYING:
INSTALLATION TIPS: INSTALLATION TIME:
INSTALLATION REQUIRES:
VEHICLE PHOTO:
HITCH ILLUSTRATION:
REPRESENTATIVE PHOTO
MAKE SURE YOUR HITCH MATCHES
LEVEL OF DIFFICULTY: MODERATE
EASY MODERATE HARD
THE INSTALL TIME LISTED IS FOR PROFESSIONAL/NOVICE INSTALLERS. IF YOU ARE HESITANT TO UNDERTAKE THIS TASK ON YOUR OWN, CONTACT AN AUTHORIZED CURT INSTALLER FOR ADDITIONAL ASSISTANCE.
1. BEFORE YOU BEGIN INSTALLATION, READ ALL INSTRUCTIONS THOROUGHLY. 2. TO EASE INSTALLATION, 2 PEOPLE MAY BE REQUIRED. 3. USING PROPER TOOLS WILL GREATLY IMPROVE THE QUALITY OF THE INSTALL AND REDUCE THE TIME REQUIRED. 4. NEED HELP OR HAVE SOME QUESTIONS? CALL TECHNICAL SUPPORT AT 800.798.0813
Safety glasses should be worn at all times whileinstalling this product.
YEARS: 2013 MERCEDES BENZ MODEL: GLK250 BLUETEC SUV
3,500525
TRAILER WEIGHT:TONGUE WEIGHT:
13155 INSTALLATION INSTRUCTIONS
LBS.LBS.
1/22/2014
WARNING: WE RECOMMEND THE USE OF 18050 STABILIZING STRAPS FOR ALL NON-TRAILER (WHEEL-LESS) LOADS. PLEASE SEE THE CURT CATALOG OR VISIT US ONLINE AT WWW.CURTMFG.COM FOR FURTHER INFORMATION.
- WELDNUT CLEANING
- LOWER EXHAUST
POWERDRILL1/2"
DRILL BIT
DIE GRINDER
SOCKET
3/4"11/16"
RATCHET
SOCKETEXTENSION
6"
TORQUEWRENCH
SAFETYGLASSES
SCREWDRIVER
TORXBITSOCKETT40
WIRE PIPEBRUSH
- ENLARGE HOLES

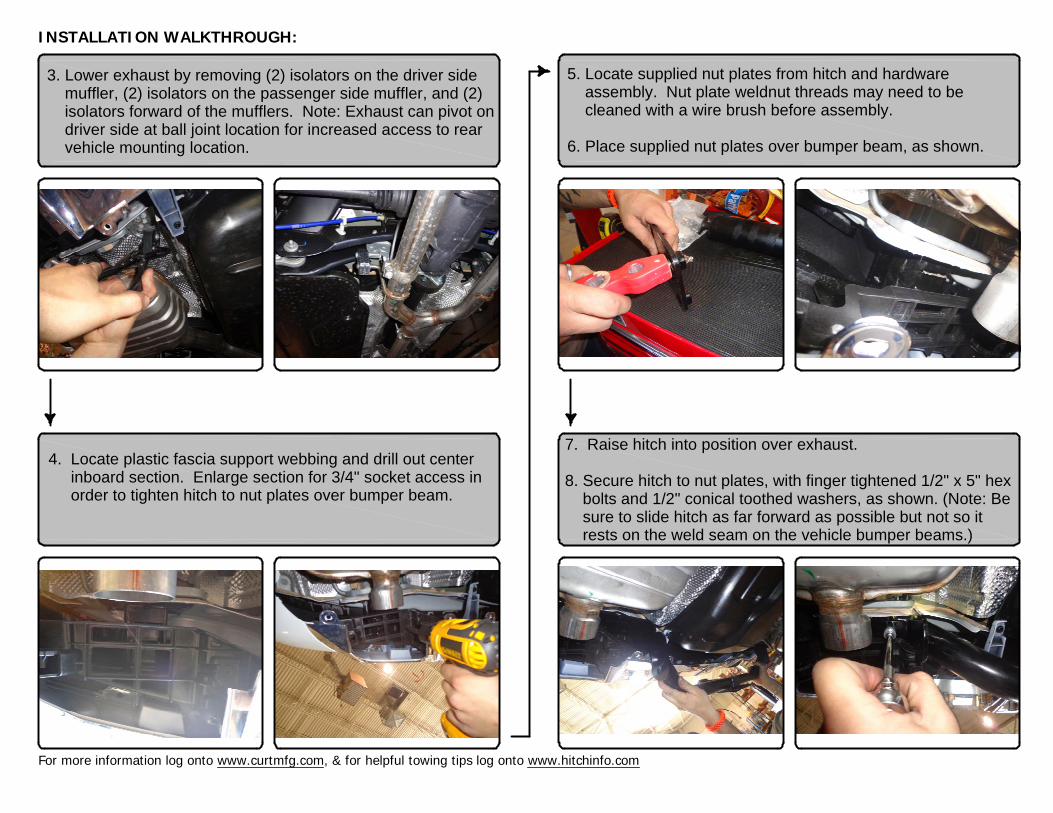
INSTALLATION WALKTHROUGH:
For more information log onto www.curtmfg.com, & for helpful towing tips log onto www.hitchinfo.com
Parts ListDESCRIPTIONPART NUMBERQTYITEM
NUT PLATE WELDMENTCM-NP1W31
HEX BOLT1_2 - 13 x 5 HEX 82
HEX FLANGE NUT7/16-1423
HEX BOLT1/2 - 13 x 2 3/444
CONICAL TOOTHED WASHER1/2"125
CARRIAGE BOLT7/16-14 x 126
2
3
4
56
1. Remove 3 fascia clips from each side of the vehicle with a flat head screwdriver. This will allow for the fascia to flex slightly for socket access during installation.
2. Remove exhaust tips by removing T40 torx screws from 3 locations on each side of the vehicle with a short torx bit and ratchet extension. Tips will be reinstalled when hitch installation is complete.
1
INSTALLATION WALKTHROUGH:
For more information log onto www.curtmfg.com, & for helpful towing tips log onto www.hitchinfo.com
3. Lower exhaust by removing (2) isolators on the driver side muffler, (2) isolators on the passenger side muffler, and (2) isolators forward of the mufflers. Note: Exhaust can pivot on driver side at ball joint location for increased access to rear vehicle mounting location.
4. Locate plastic fascia support webbing and drill out center inboard section. Enlarge section for 3/4" socket access in order to tighten hitch to nut plates over bumper beam.
5. Locate supplied nut plates from hitch and hardware assembly. Nut plate weldnut threads may need to be cleaned with a wire brush before assembly. 6. Place supplied nut plates over bumper beam, as shown.
7. Raise hitch into position over exhaust. 8. Secure hitch to nut plates, with finger tightened 1/2" x 5" hex bolts and 1/2" conical toothed washers, as shown. (Note: Be sure to slide hitch as far forward as possible but not so it rests on the weld seam on the vehicle bumper beams.)

INSTALLATION WALKTHROUGH:
For more information log onto www.curtmfg.com, & for helpful towing tips log onto www.hitchinfo.com
9. Raise mounting strap behind vehicle crossmember, as shown. 10. Secure mounting strap to hitch with finger tightened 7/16" hex flange nuts.
11. Raise nut plate in front of vehicle cross member. 12. Secure nut plate to mounting strap with finger tightened 1/2" x 2 3/4" hex bolts and 1/2" conical toothed washers.
13. Torque all 1/2-13 x 5" hex bolts to 75 lb-ft. Torque all remaining 1/2" hardware to 110 lb-ft and all 7/16" hardware to 70 lb-ft. 14. Raise exhaust back into position.
15. Reattach exhaust tip (3 mounting locations each side.) 16. Reattach fascia clips (3 locations each side of vehicle.) Installation is complete.

GROSS LOAD CAPACITY WHEN USED AS A WEIGHT CARRYING HITCH: LBS. TRAILER WEIGHT & LBS. TONGUE WEIGHT.
***DO NOT EXCEED VEHICLE MANUFACTURER'S RECOMMENDED TOWING CAPACITY.***WARNING: ALL NON-TRAILER LOADS APPLIED TO THIS PRODUCT MUST BE SUPPORTED BY AUXILIARY STABILIZING STRAPS.
** FAILURE TO PROPERLY SUPPORT NON-TRAILER LOADS WILL VOID PRODUCT WARRANTY**HAVING INSTALLATION QUESTIONS? CALL TECHNICAL SUPPORT AT 1-800-798-0813
HITCH WEIGHT: LBS.
INSTALL TIME
PROFESSIONAL: MINUTES
NOVICE (DIY): MINUTES
INSTALL NOTES:
PERIODICALLY CHECK THIS RECEIVER HITCH TO ENSURE THAT ALL FASTENERSARE TIGHT AND THAT ALL STRUCTURAL COMPONENTS ARE SOUND.
Curt Manufacturing Inc., warrants this product to be free of defects in material and/or workmanship at the time of retail purchase by the original purchaser. If the product is found to be defective,Curt Manufacturing Inc., may repair or replace the product, at their option, when the product is returned, prepaid, with proof of purchase. Alteration to, misuse of, or improper installation ofthis product voids the warranty. Curt Manufacturing Inc.'s liability is limited to repair or replacement of products found to be defective, and specifically excludes liability for incidental orconsequential loss or damage.
3,500 525
33
45
MERCEDES BENZ GLK250 BLUETEC1/22/2014
13155
90
Parts ListDESCRIPTIONPART NUMBERQTYITEM
CONICAL TOOTHED WASHER1/2"121HEX FLANGE NUT7/16-1422HEX BOLT1_2 - 13 x 5 HEX 83CARRIAGE BOLT7/16-14 x 124HEX BOLT1/2 - 13 x 2 3/445NUT PLATE WELDMENTCM-NP1W36
- LOWER EXHAUST- FISHWIRE HARDWARE
2
5
1
3
4
DRIVER SIDE BUMPER BEAM
PASSENGER SIDE BUMPER BEAM
MOUNTING STRAP
VEHICLE CROSSMEMBER
PAGE 1 OF 2
POSITION UNDER CROSS MEMBER
POSITION THROUGHCROSS MEMBER
6
6
TOOLS REQUIREDFLAT HEAD SCREWDRIVER
DRILL, 1/2" DRILL BITDIE GRINDER
RATCHETT40 SHORT TORX BIT11/16", 3/4" SOCKET
WIRE BRUSH6" SOCKET EXTENSION
TORQUE WRENCH

GROSS LOAD CAPACITY WHEN USED AS A WEIGHT CARRYING HITCH: LBS. TRAILER WEIGHT & LBS. TONGUE WEIGHT.
***DO NOT EXCEED VEHICLE MANUFACTURER'S RECOMMENDED TOWING CAPACITY.***WARNING: ALL NON-TRAILER LOADS APPLIED TO THIS PRODUCT MUST BE SUPPORTED BY AUXILIARY STABILIZING STRAPS.
** FAILURE TO PROPERLY SUPPORT NON-TRAILER LOADS WILL VOID PRODUCT WARRANTY**HAVING INSTALLATION QUESTIONS? CALL TECHNICAL SUPPORT AT 1-800-798-0813
INSTALLATION STEPS
PERIODICALLY CHECK THIS RECEIVER HITCH TO ENSURE THAT ALL FASTENERSARE TIGHT AND THAT ALL STRUCTURAL COMPONENTS ARE SOUND.
Curt Manufacturing Inc., warrants this product to be free of defects in material and/or workmanship at the time of retail purchase by the original purchaser. If the product is found to be defective,Curt Manufacturing Inc., may repair or replace the product, at their option, when the product is returned, prepaid, with proof of purchase. Alteration to, misuse of, or improper installation ofthis product voids the warranty. Curt Manufacturing Inc.'s liability is limited to repair or replacement of products found to be defective, and specifically excludes liability for incidental orconsequential loss or damage.
3,500 525
MERCEDES BENZ GLK250 BLUETEC1/22/2014
13155
1. Remove 3 fascia clips from each side of the vehicle with a flat head screwdriver. This will allow the fascia to flex slightly for socket access during installation. 2. Remove exhaust tips by removing T40 torx screws from 3 locations on each side of the vehicle with a short torx bit and ratchet extension. Tips will be reinstalled when hitch installation is complete. 3. Lower exhaust by removing (2) isolators on the driver side muffler, (2) isolators on the passenger side muffler, and (2) isolators forward of the mufflers. (See RUBBER ISOLATOR REMOVAL DIAGRAM.) Note: Exhaust can pivot on driver side at ball joint location for increased access to rear vehicle mounting location. 4. Locate plastic fascia support webbing and drill out center inboard section. Enlarge section for 3/4" socket access in order to tighten hitch to nut plates over bumper beam. 5. Locate supplied nut plates from hitch and hardware assembly. Nut plate weldnut threads may need to be cleaned with a wire brush before assembly. (See WELDNUT CLEANING DIAGRAM.) 6. Place supplied nut plates over bumper beam, as shown. 7. Raise hitch into position over exhaust. 8. Secure hitch to nut plates, with finger tightened 1/2" x 5" hex bolts and 1/2" conical toothed washers, as shown. (Note: Be sure to slide hitch as far forward as possible but not so it rests on the weld seam on the vehicle bumper beams.) 9. Raise mounting strap behind vehicle crossmember, as shown. 10. Secure mounting strap to hitch with finger tightened 7/16" hex flange nuts, as shown. 11. Raise nut plate in front of vehicle crossmember. 12. Secure nut plate to mounting strap with finger tightened 1/2" x 2 3/4" hex bolts and 1/2" conical toothed washers, as shown. 13. Torque all 1/2-13 x 5" hex bolts to 75 lb-ft. Torque all remaining 1/2" hardware to 110 lb-ft and all 7/16" hardware to 70 lb-ft. 14. Raise exhaust back into position. 15. Reattach fascia screws (3 locations each side of vehicle.) 16. Reattach exhaust tips (3 mounting locations each side of vehicle.)
PAGE 2 OF 2